
My name is Junliang Zhang. I come from Shanghai, China. I am a 3D Environment Artist currently working at 3BLACKDOT in Los Angeles, USA.
My passion for the game industry comes from my childhood. I still remembered how much I was setting in front of computer playing the most of classical PC games back to 90’s, such as, Starcraft, Commend & Conquer series, and Age of Empires II.
When I usually playing these games I always wondered how they were made arts and gameplay or how I could make something cool mods. Therefore, My true interest is game art.
In order to achieve this goal, I started self-learning 3D modeling, texturing, and game engines since 2010. At the same time, I went to Shanghai Art & Design Academy to study Game and Interactive Media Design Associate’s Degree major.
I studied a lot of 2D and 3D game arts, such as concept art, 2D/3D character design and environment modeling, and game design courses.
On Sept 2014, I went to New York Film Academy(NYFA) to study BFA in Game Design. Since then, I have been very familiar with newest game industry art workflow. In the meanwhile, I have learned a lot from many professional artists who created many awesome tutorials as well.
From now on, I have gained a lot of great experience in 3D environment art and lighting after graduated from NYFA. After graduation, I joined 3BLACKDOT and participated in the production of Dead Realm (2017), No Way Out - A Dead Realm Tale (2018) and some unannounced projects.
Now, I am working as a Full-Time 3D Environment Artist and constantly creating personal projects for my ArtStation portfolios. At the same time, I am going to study Entertainment Arts & Engineering Program at the University of Utah in the Technical Arts track in the end of this year.
Ideas and Pre-Production
I started working on CyberNeon project from Oct. 21, 2017 to March 15, 2019. As I work full time at 3BLACKDOT, I only worked on the project after works and on weekends. I was inspired CyberRunner project created by Hard-Surface 3D Artist: Josh Van Zuylen.
He spent two years making it in his spare time. His works make me feel very shocked and admired at that time! So I was inspired and decided to make an unique Chinese Cyberpunk world, which was called CyberNeon!
I set three main goals at that time. First, all scenes designed from zero to complete independent production. Second, showing the Chinese style of Cyberpunk world. Third, a larger scale than CyberRunner.

Production of the CyberNeon City and Layouts
Awesome references or concept arts are always a great way to get started when you want to create something in the visual world. When I start making a project like this, I usually will sit down and think about the background story of the scene. This is a great habit for working on anythings.
It will help you get a lot of inspiration and ideas while designing and texturing. I spent a lot of time that collected as many as I could with Google images and Pinterest. Eventually, I made several mood boards for the CyberNeon project.
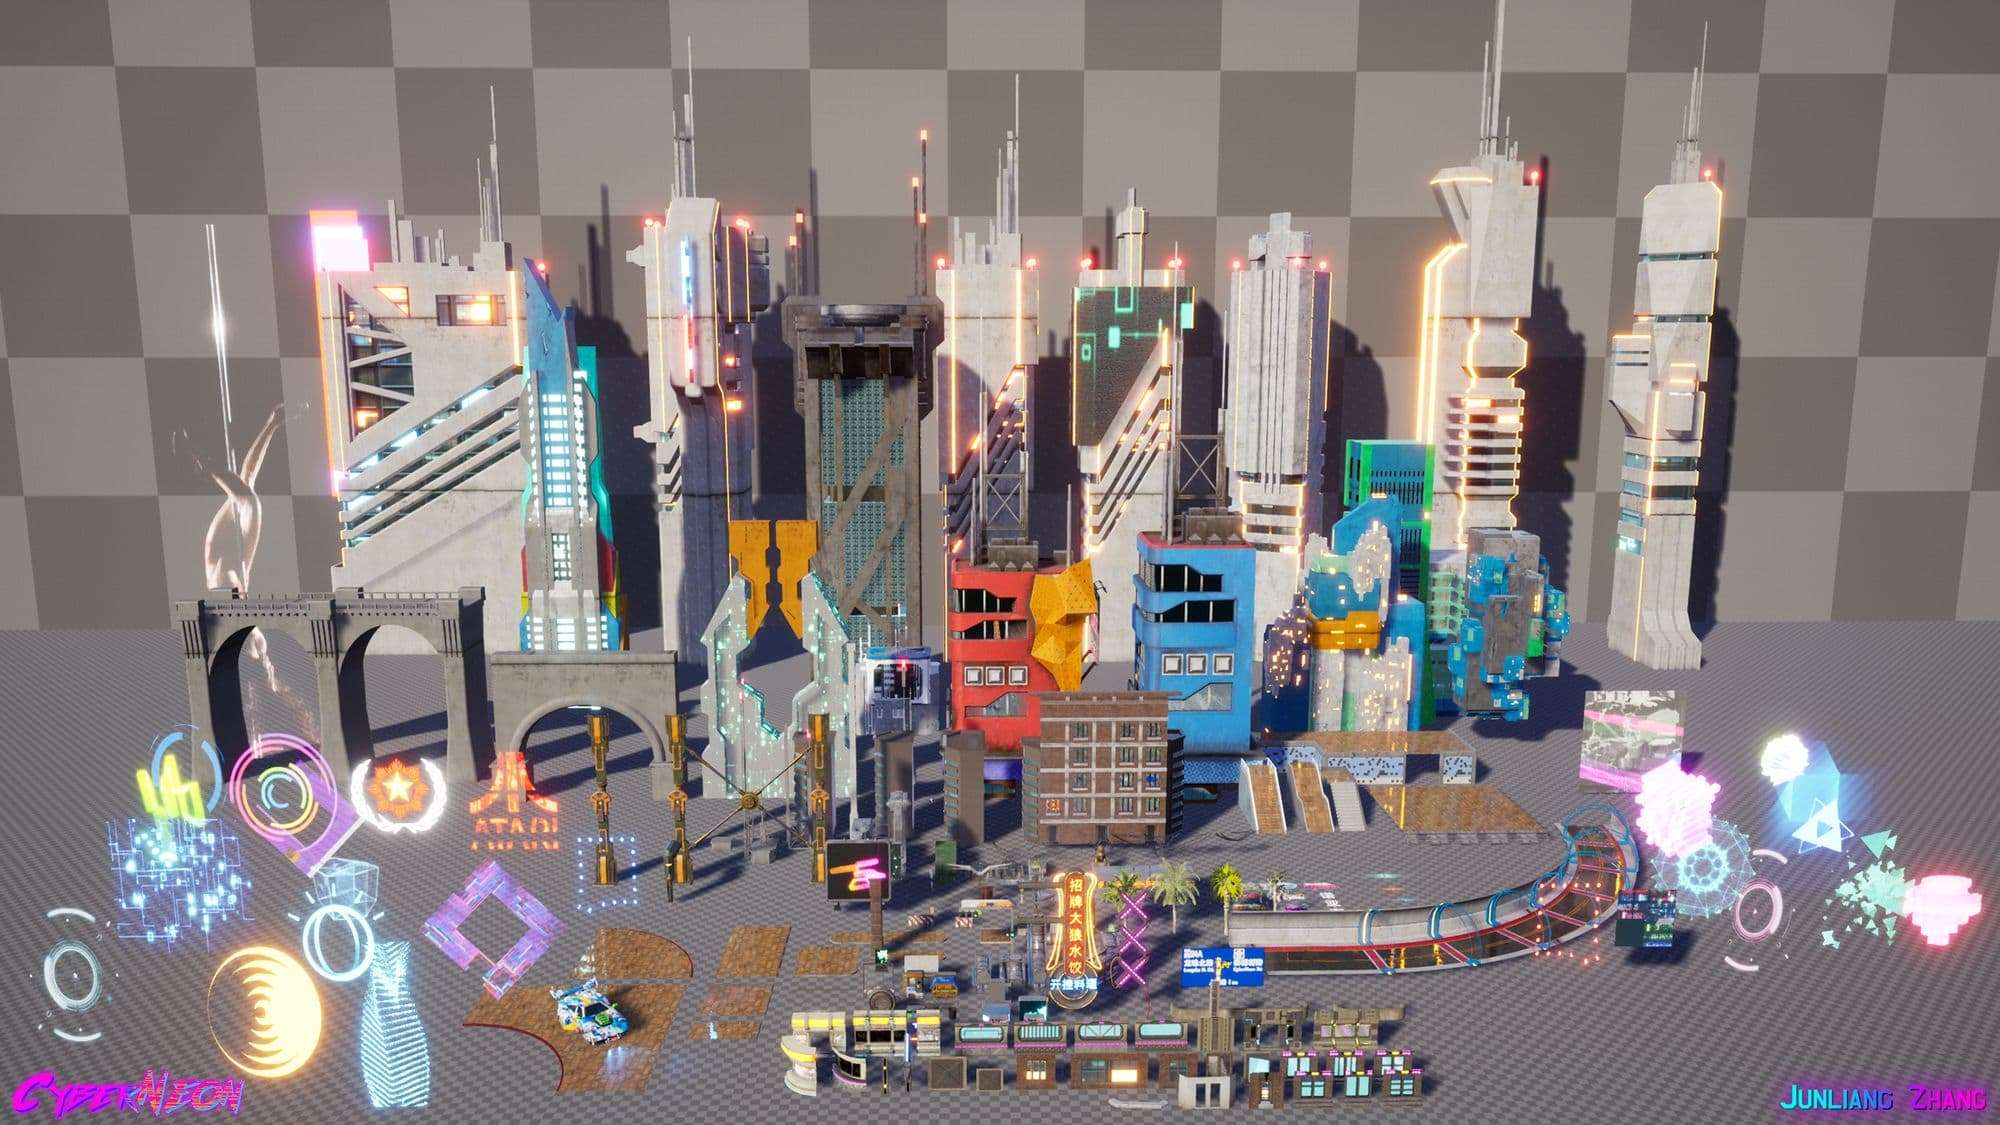
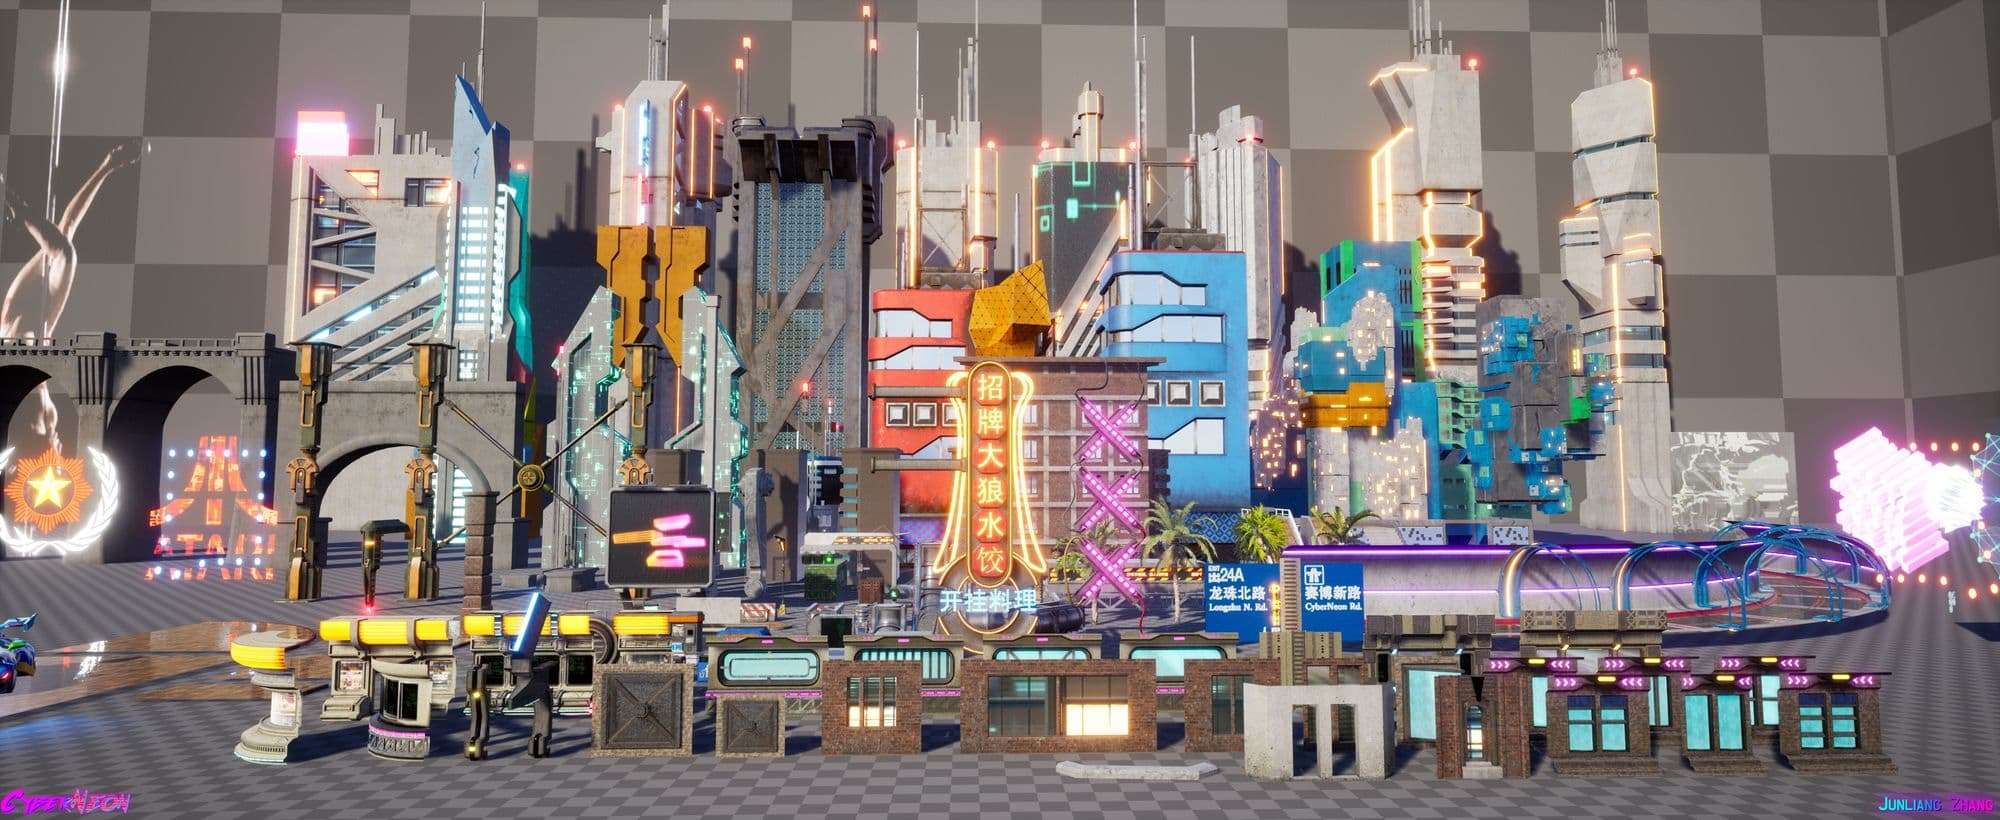
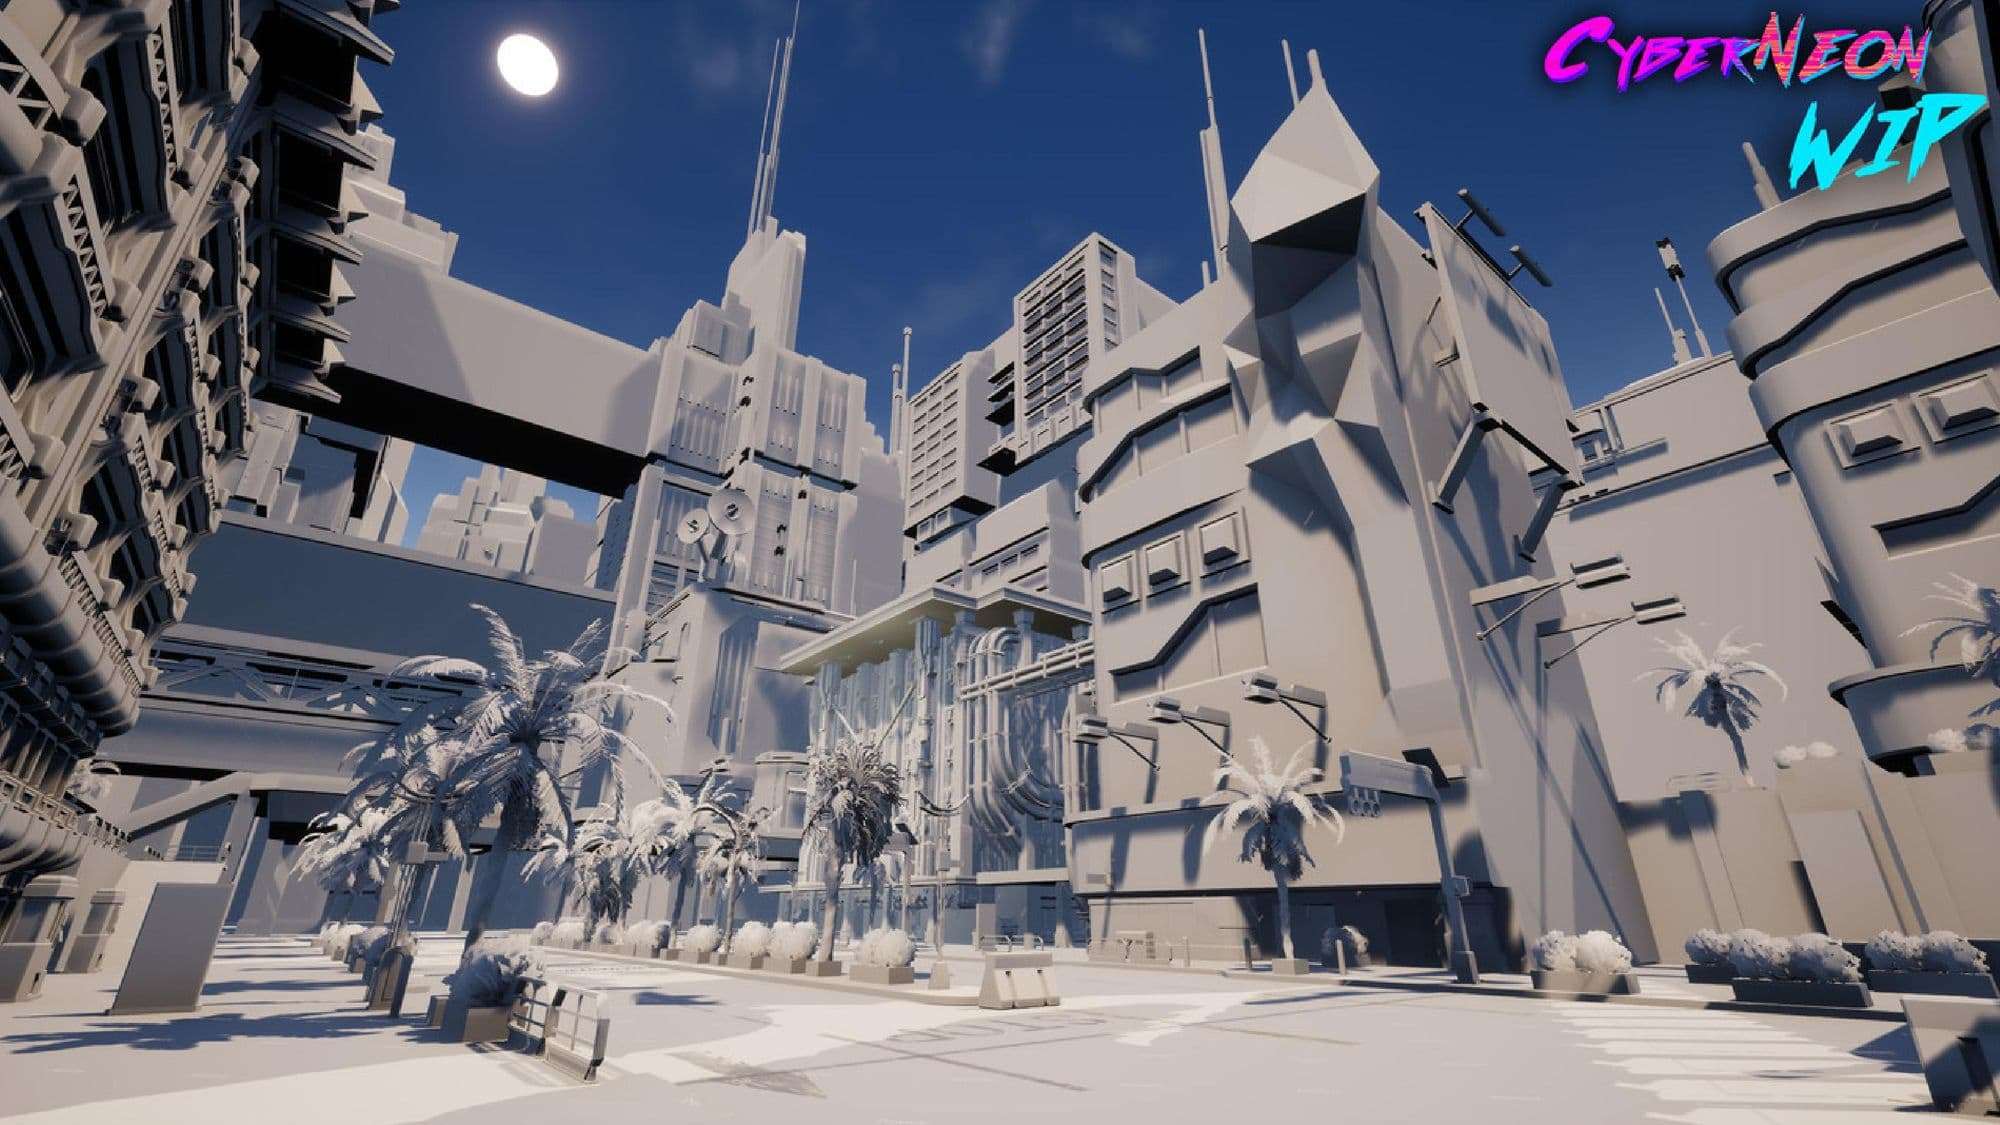
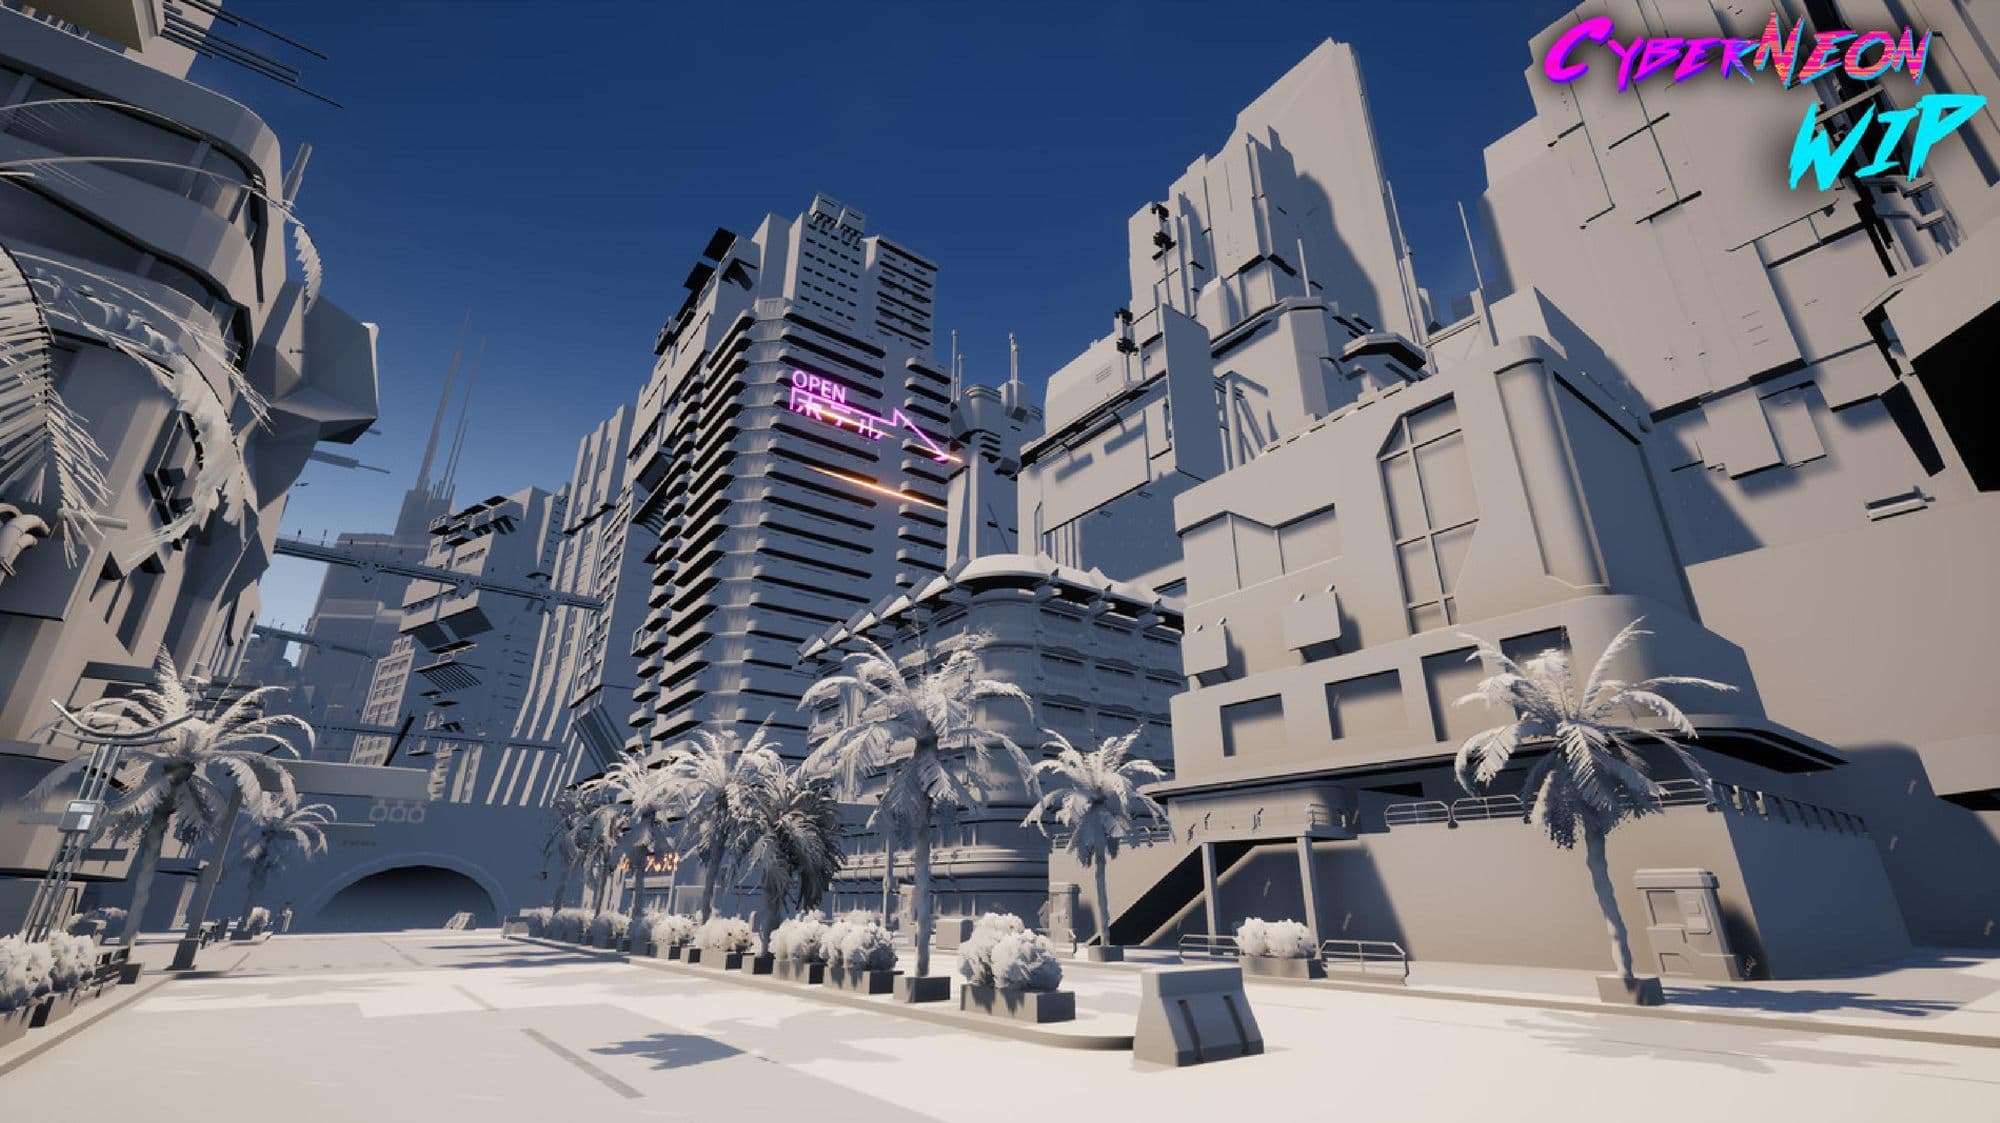
First of all, I created some of basic buildings to block out the city layouts and played different art styles, and compositions in order to get some ideas for the pre-production stage. I used modular modeling techniques for some of main buildings.
Every pieces was planning in Maya to snap perfectly together. As long as I already created a piece, it could modify to a lot of different shapes base on it, which was very useful and efficient.
For some of special building designs and background buildings, I just created one by one with hands. Using this way can give me some ideas for the assets looking and how long it would take. Sometimes, I could not figure out some cool ideas, I will go travel to see the real world, which it could give me a lot of fresh inspirations and ideas to my mind.
Using Spine Mesh blueprint in UE4
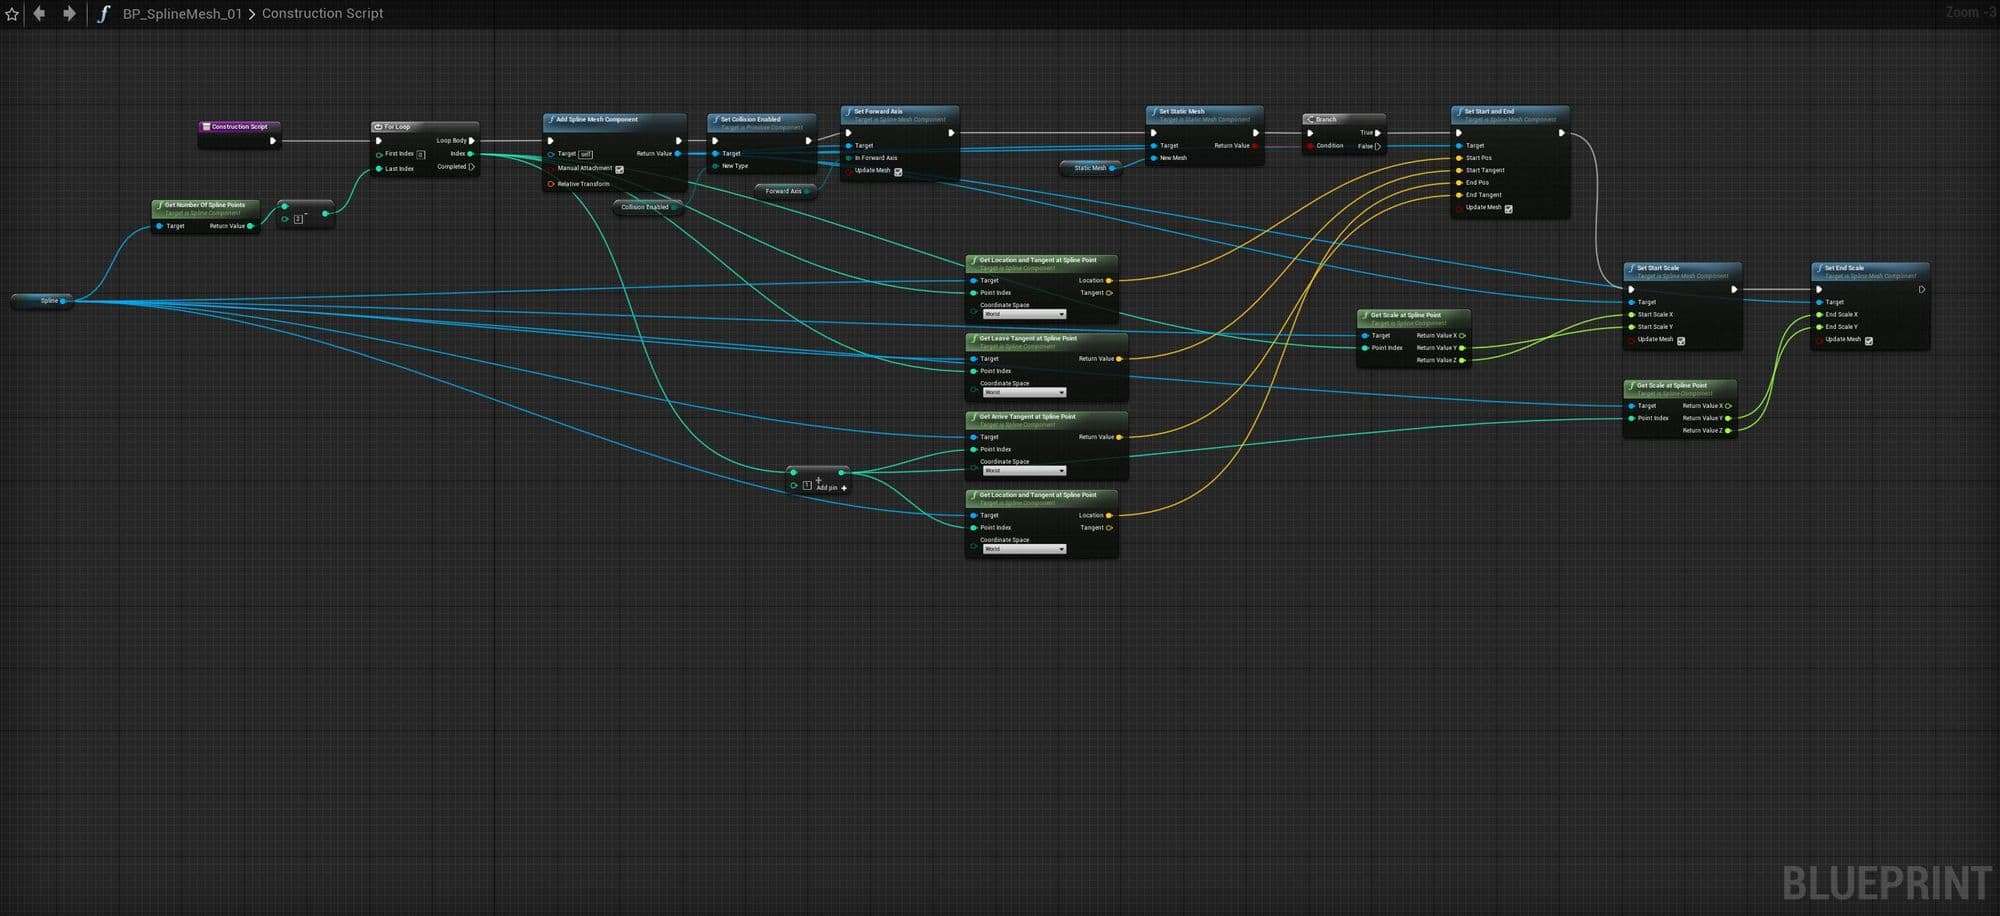
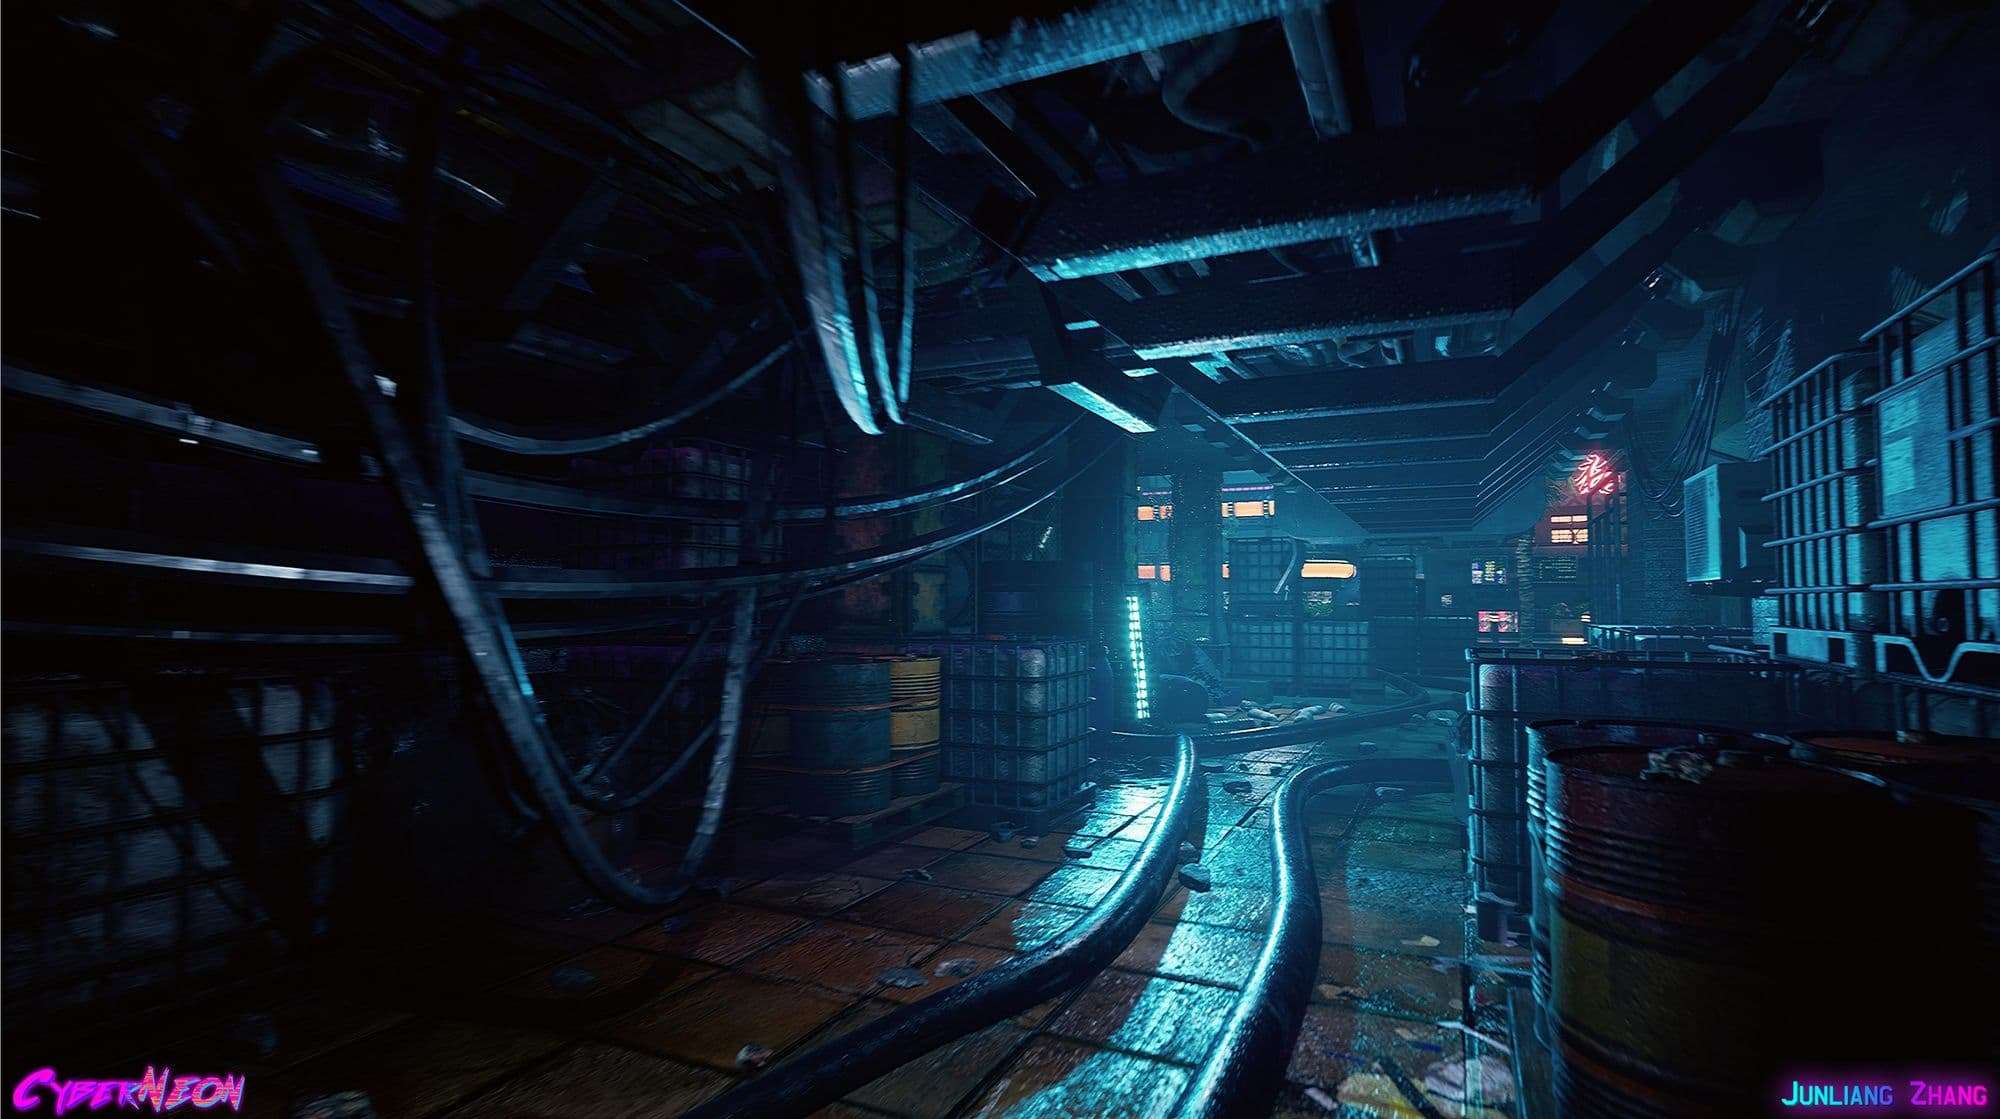
For the wires and pipes, I built a custom spline mesh component blueprint in UE4. It could speed up your workflow and save more time in Maya by doing manually.
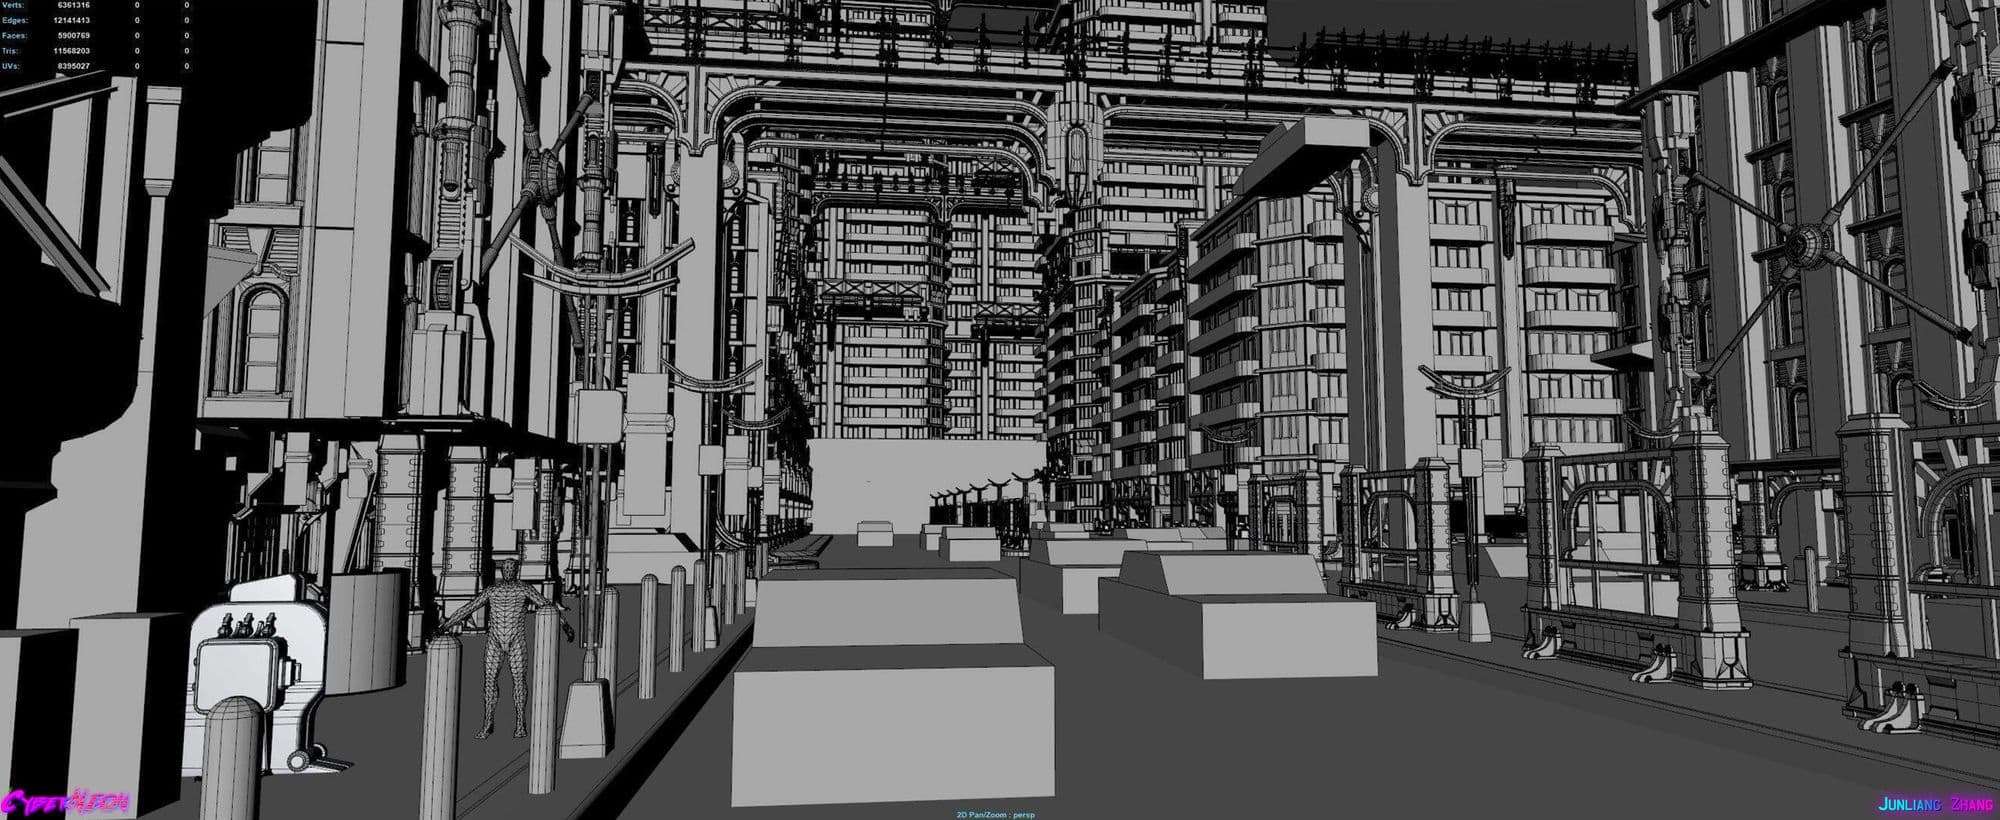
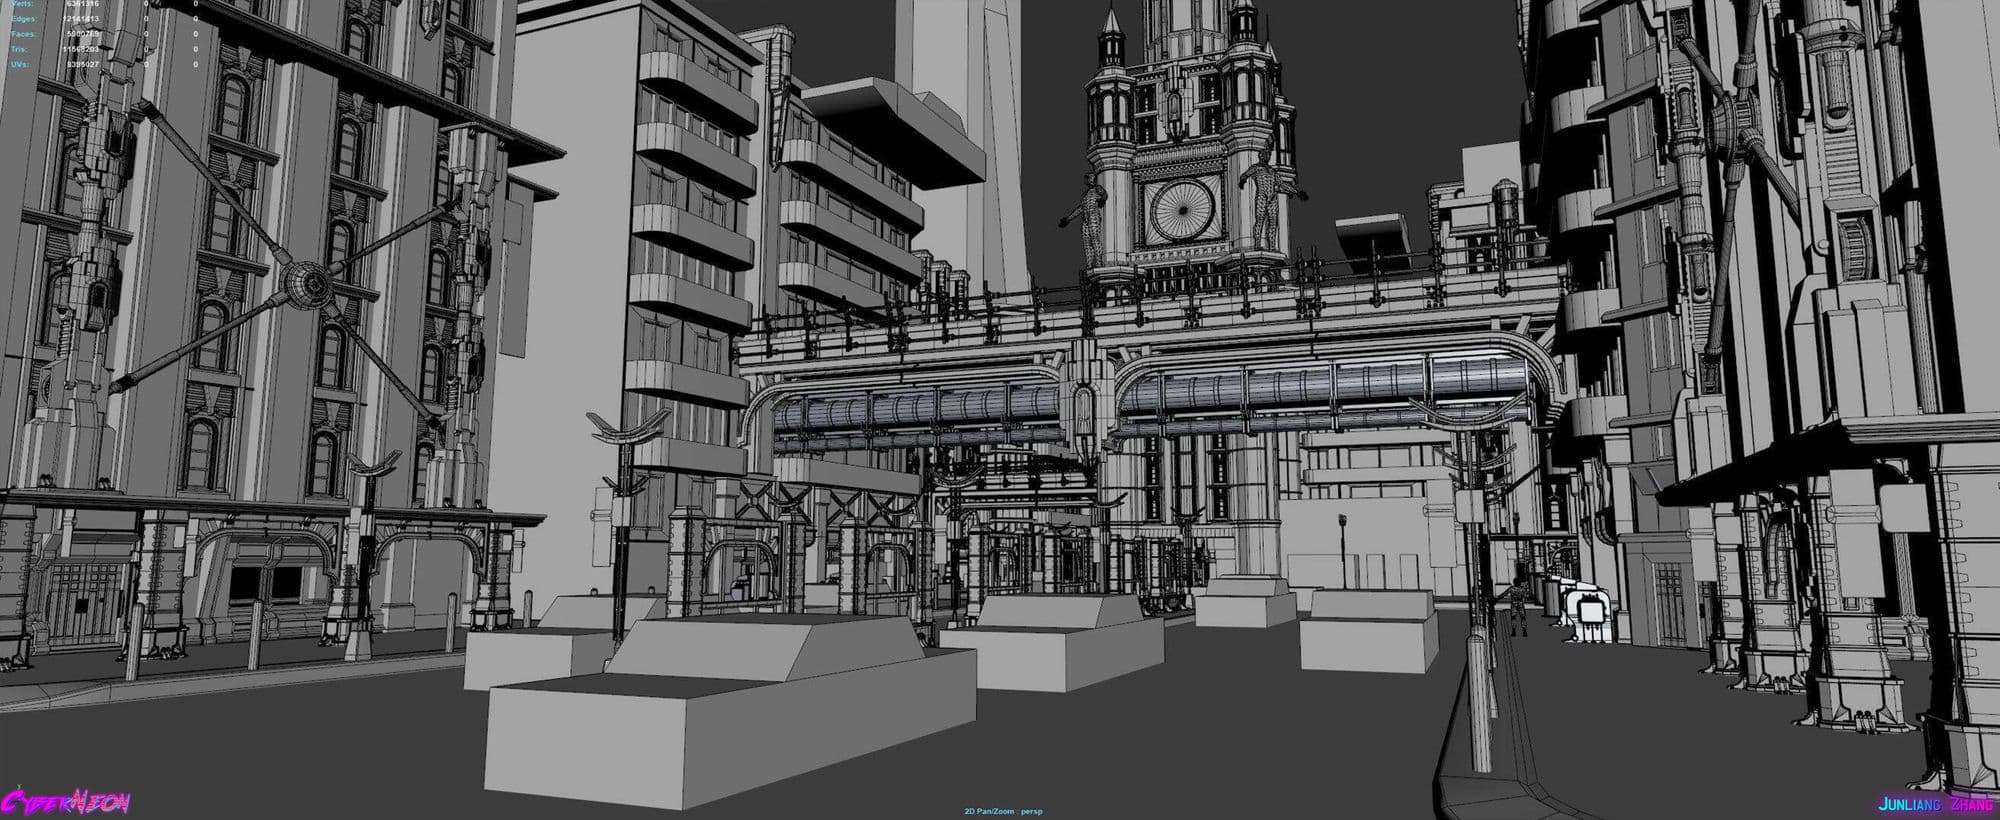
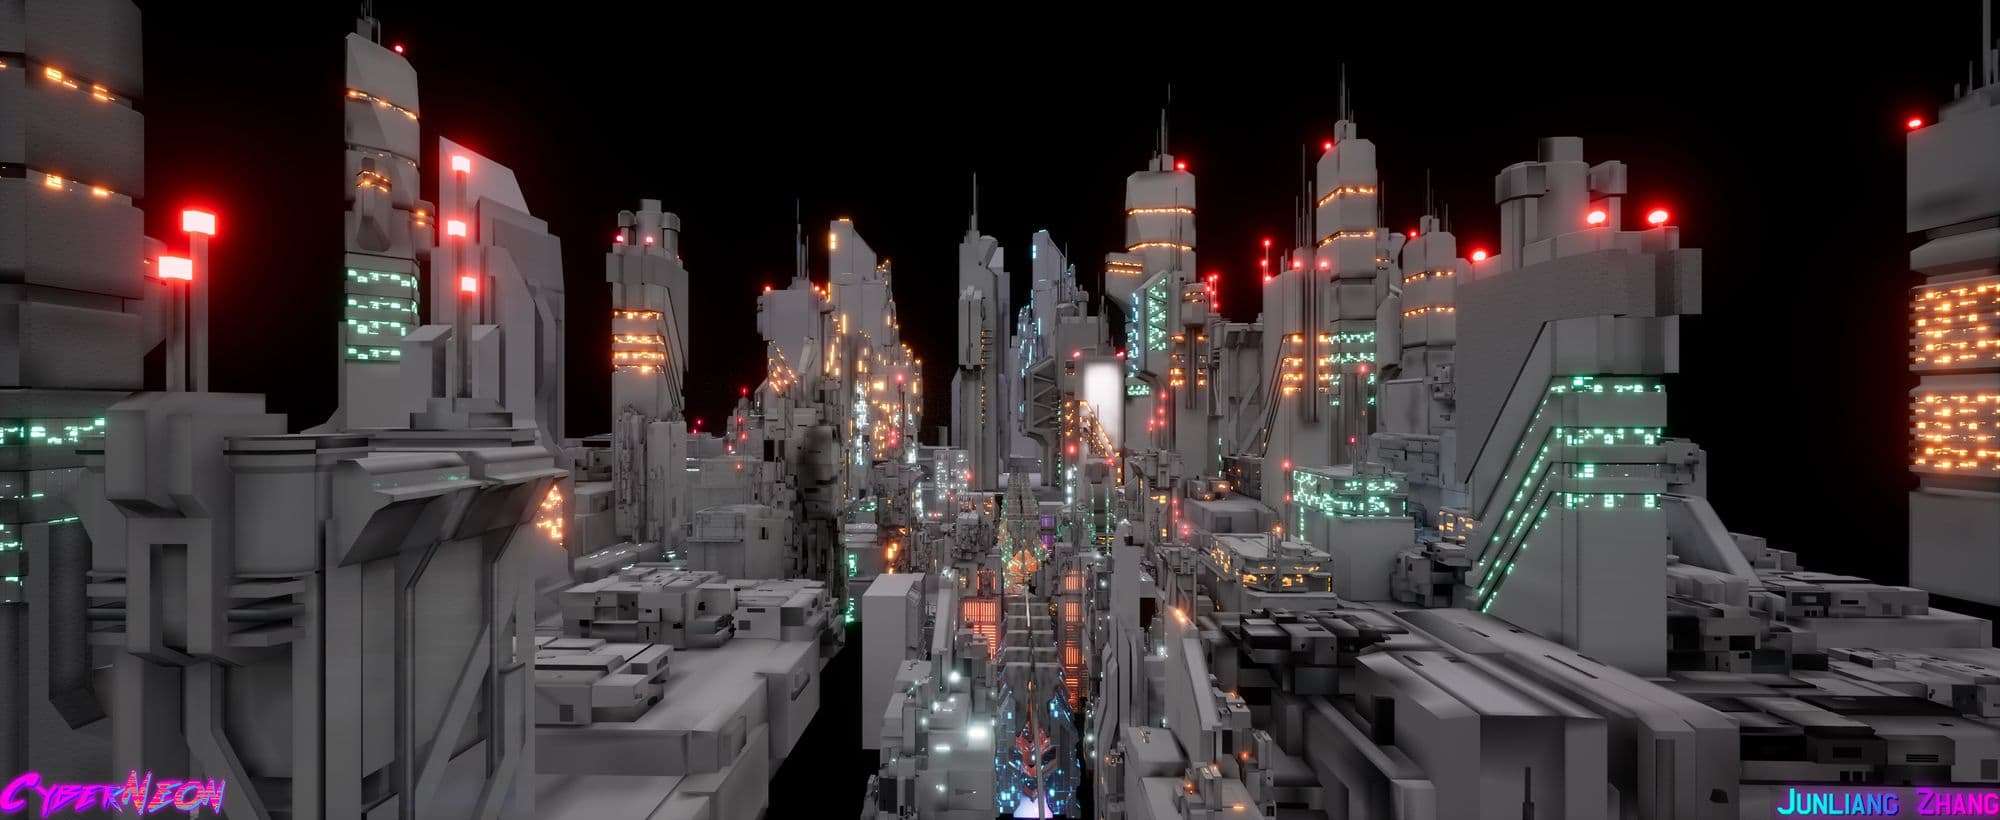
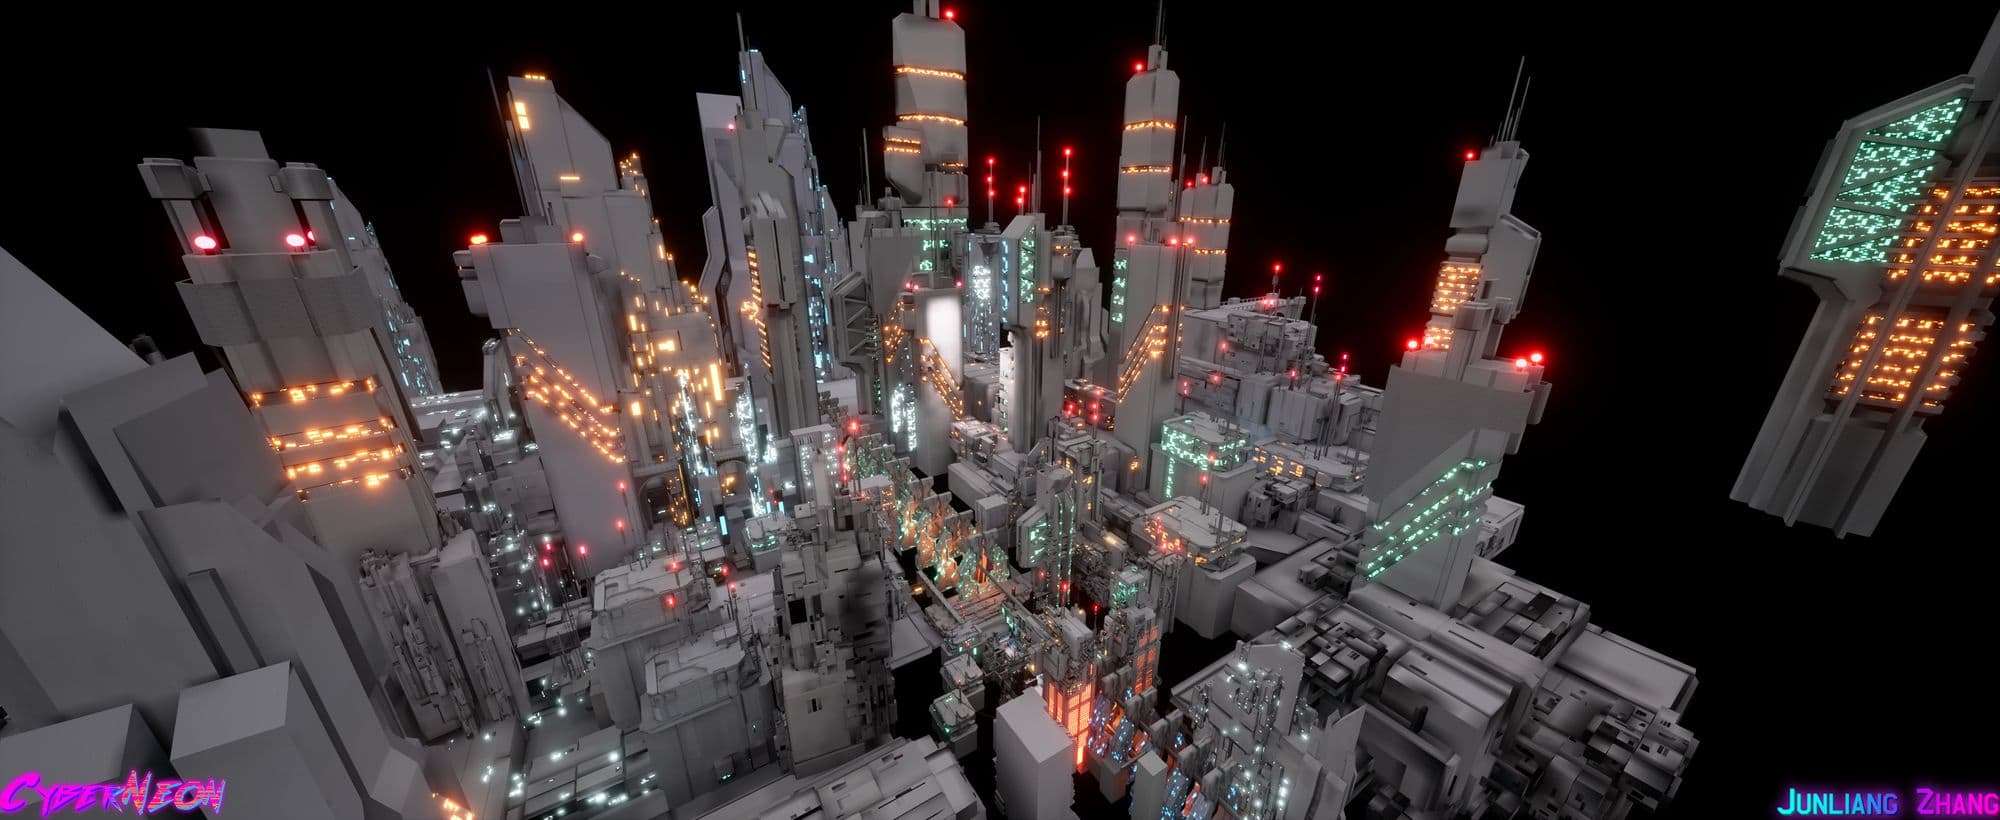
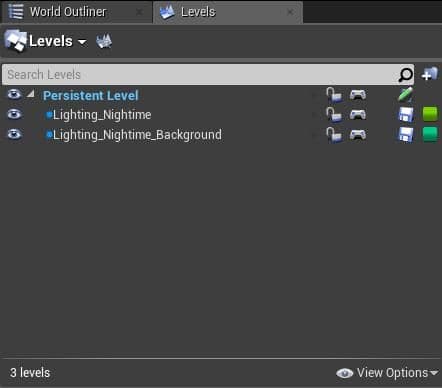
For the city buildings layouts, I created over thirty different types of buildings and three hundred props in total. You can see how large the scope of the city are in end of 2017.
Production of CyberNeon with Five Different Stage and Process
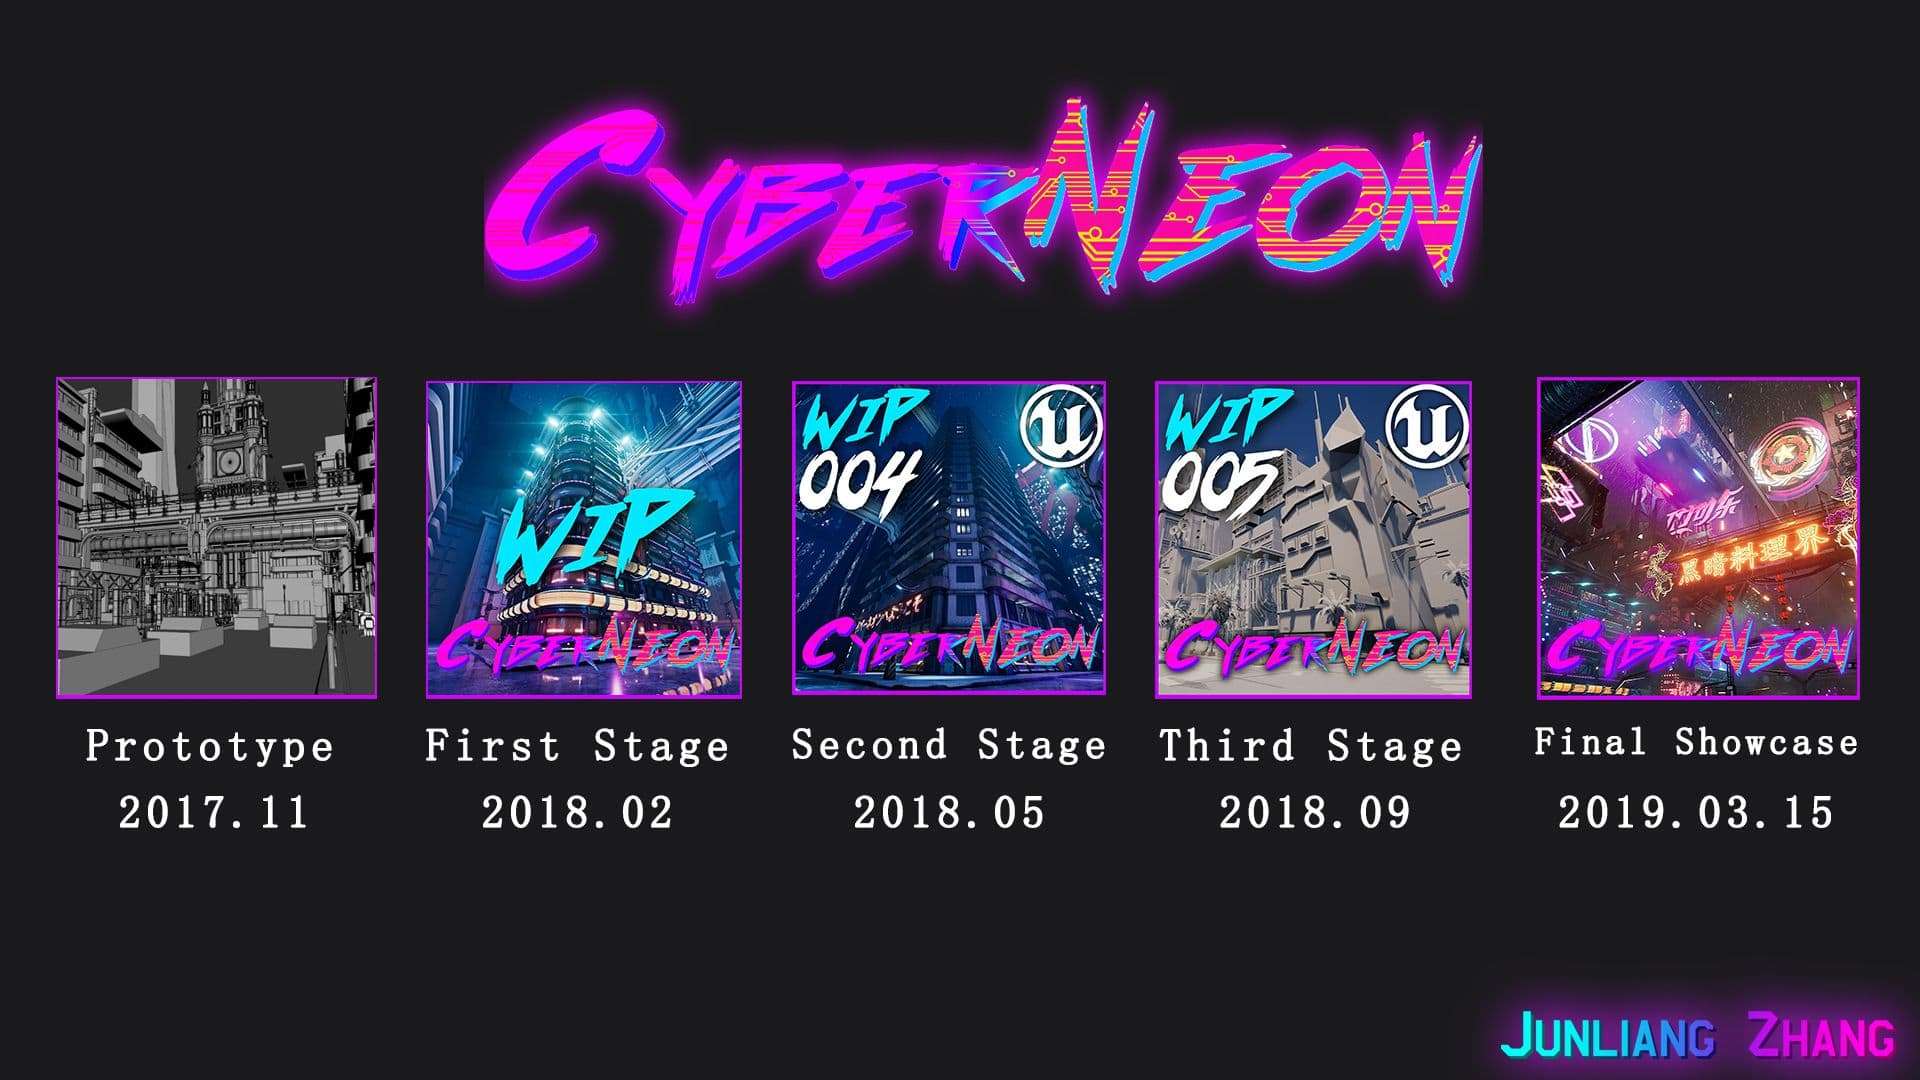
In the early 2018, I was mainly focused on workflows, pipelines, building designs, shader creations, compositions, color palette, and lighting.
The Workflow and Pipeline
1. UE4 - Blockout with simple white boxes.
2. Maya - Create low poly meshes.
3. Maya - Create high poly meshes.
4. Substance Painter - Baking and Texturing.
5. Substance Designer / Quixel Mixer - Create tilling procedural textures.
6. SpeedTree: Create organic foliage and trees.
7. UE4 - Scenes set up and create unique shaders if needed.
Once the workflow was clear, It was time to get started blocking out some simple white boxes and created some basic shaders and rain effects before the pre-production stage.
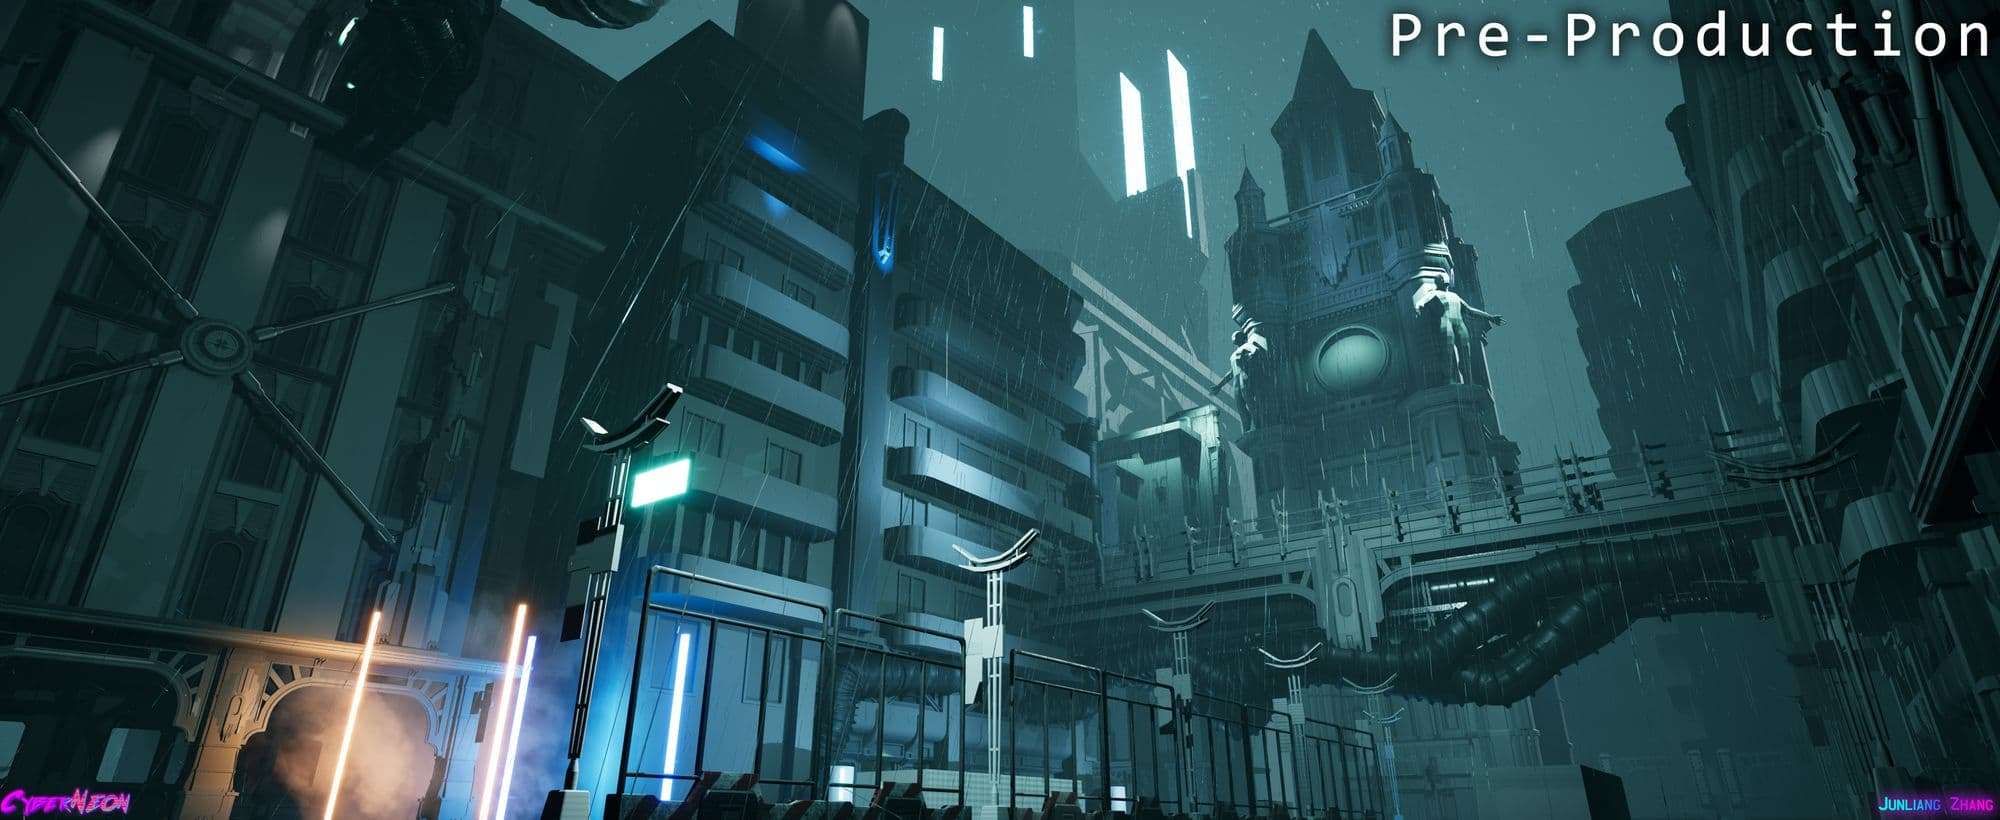
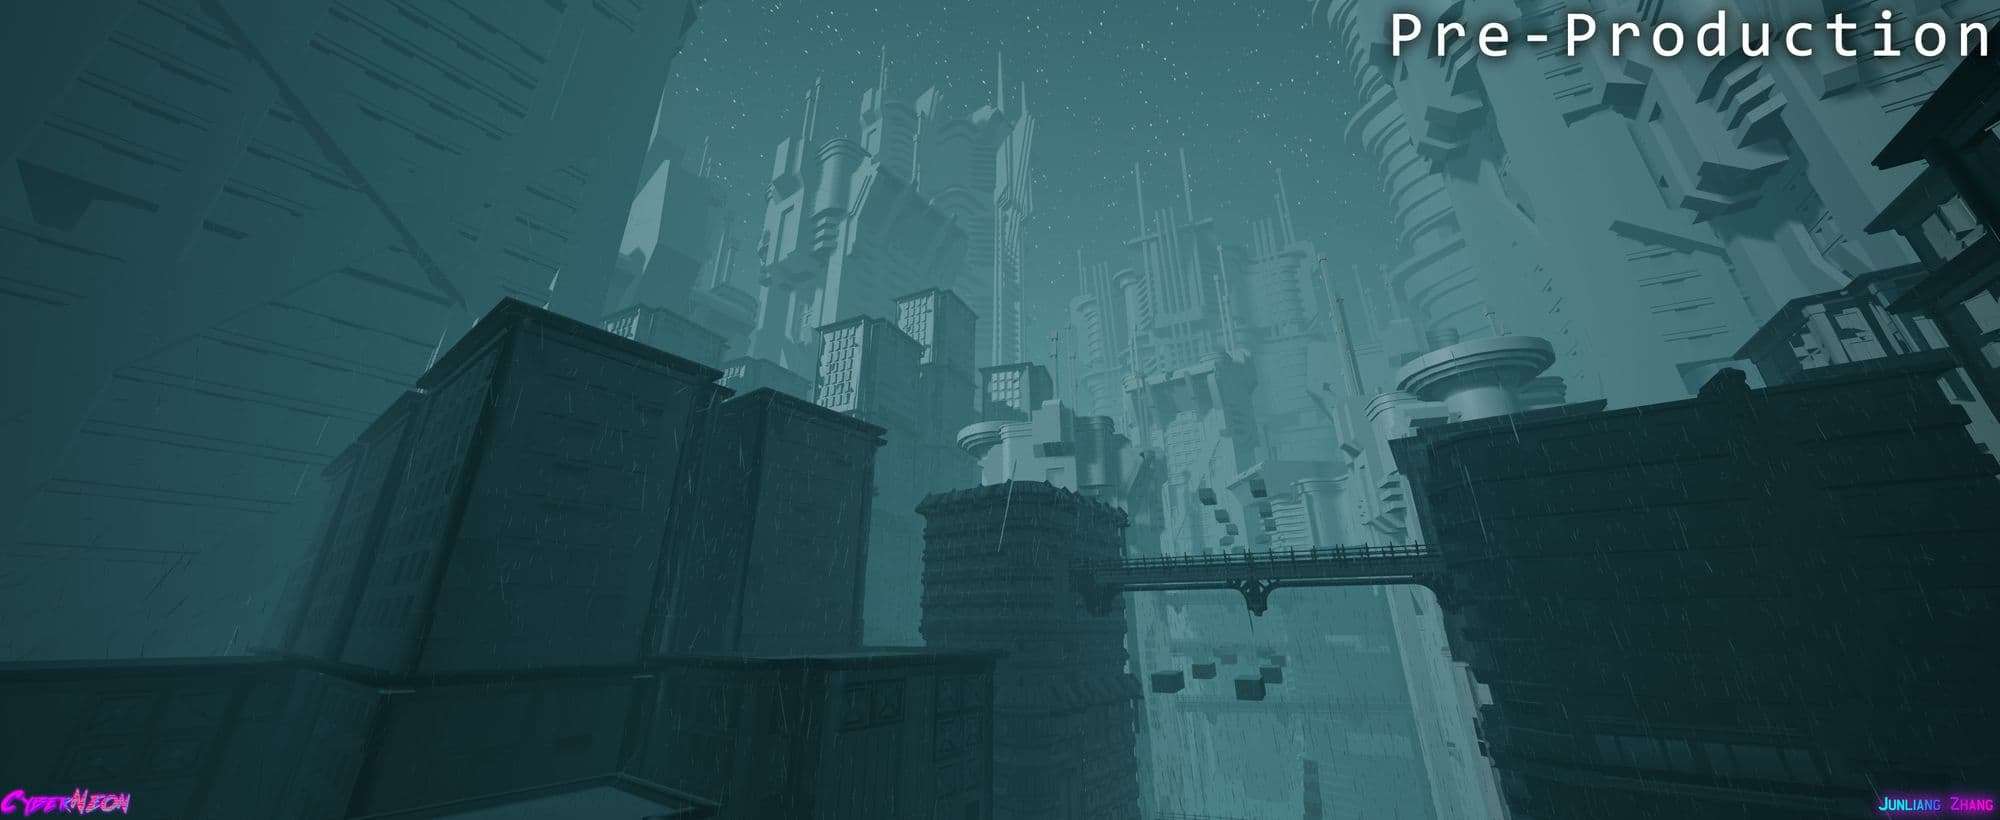
Here was my initial idea for the focal point of CyberNeon on the pre-preduction stage. I really wanted to create something that was combining Blade Runner styles and 80’s Cyberpunk styles at that time.
However, I changed my mind because it felt that the scale of the clock tower had some sense of space problems to solve. Therefore, I extended my background space so that it will give me a great composition for the environment.
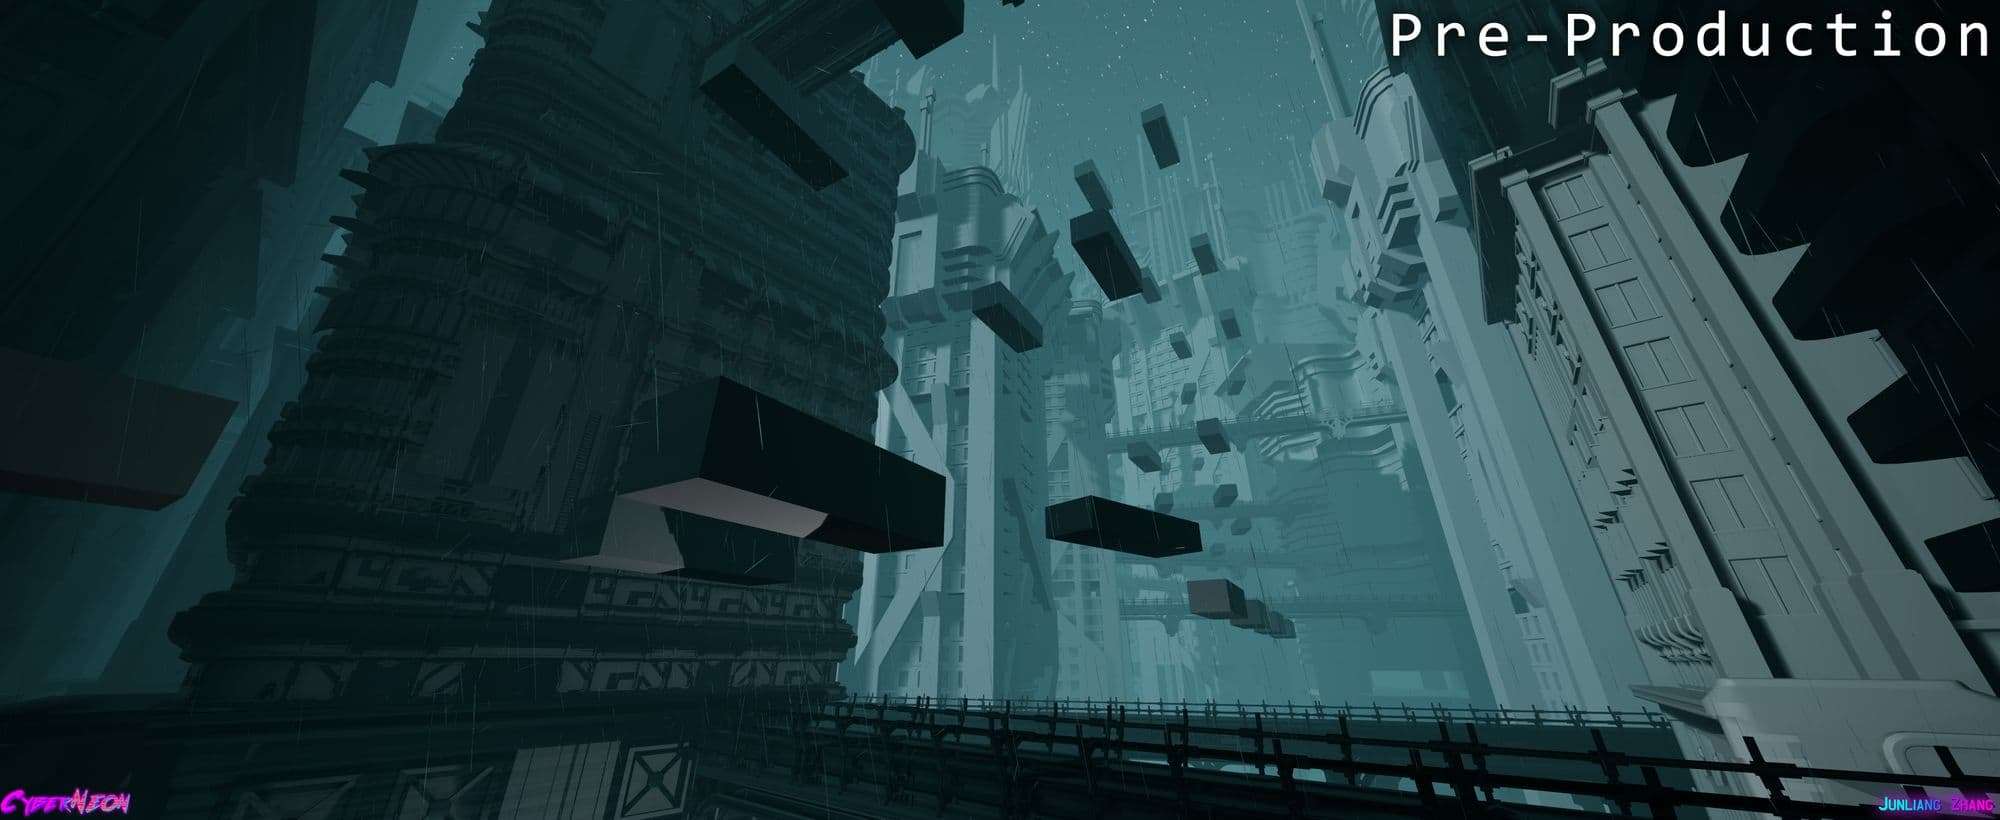
As you can see, I still stuck with blocking out the environment instead of texturing the scenes.
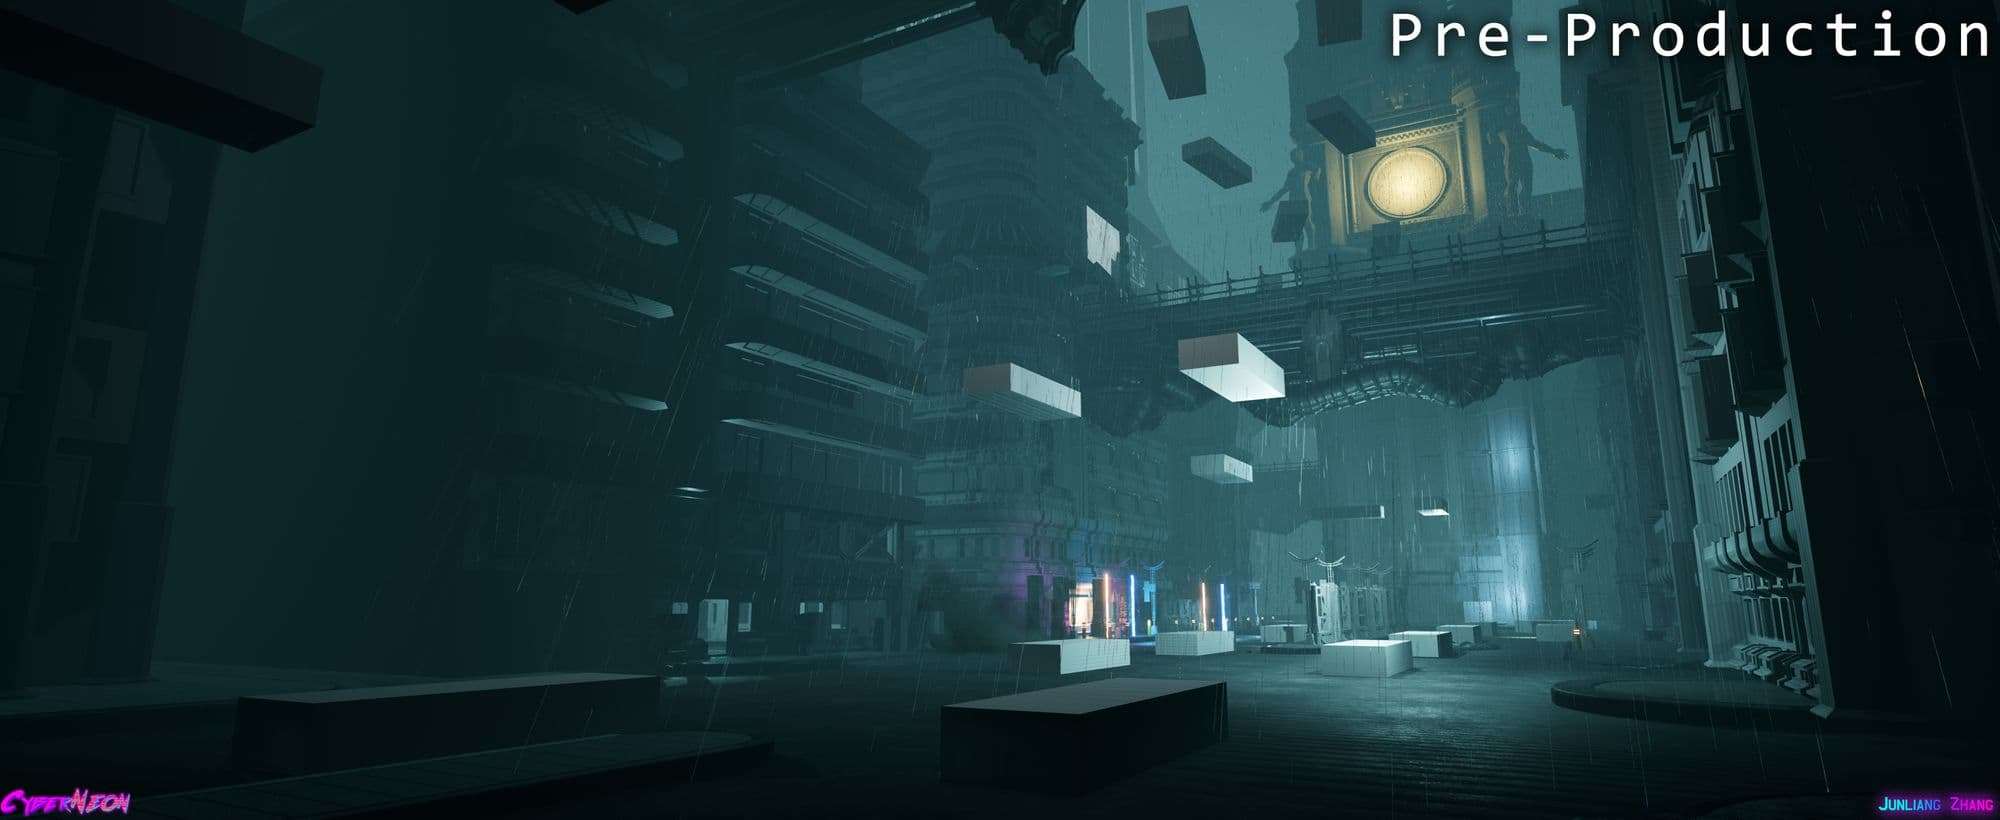
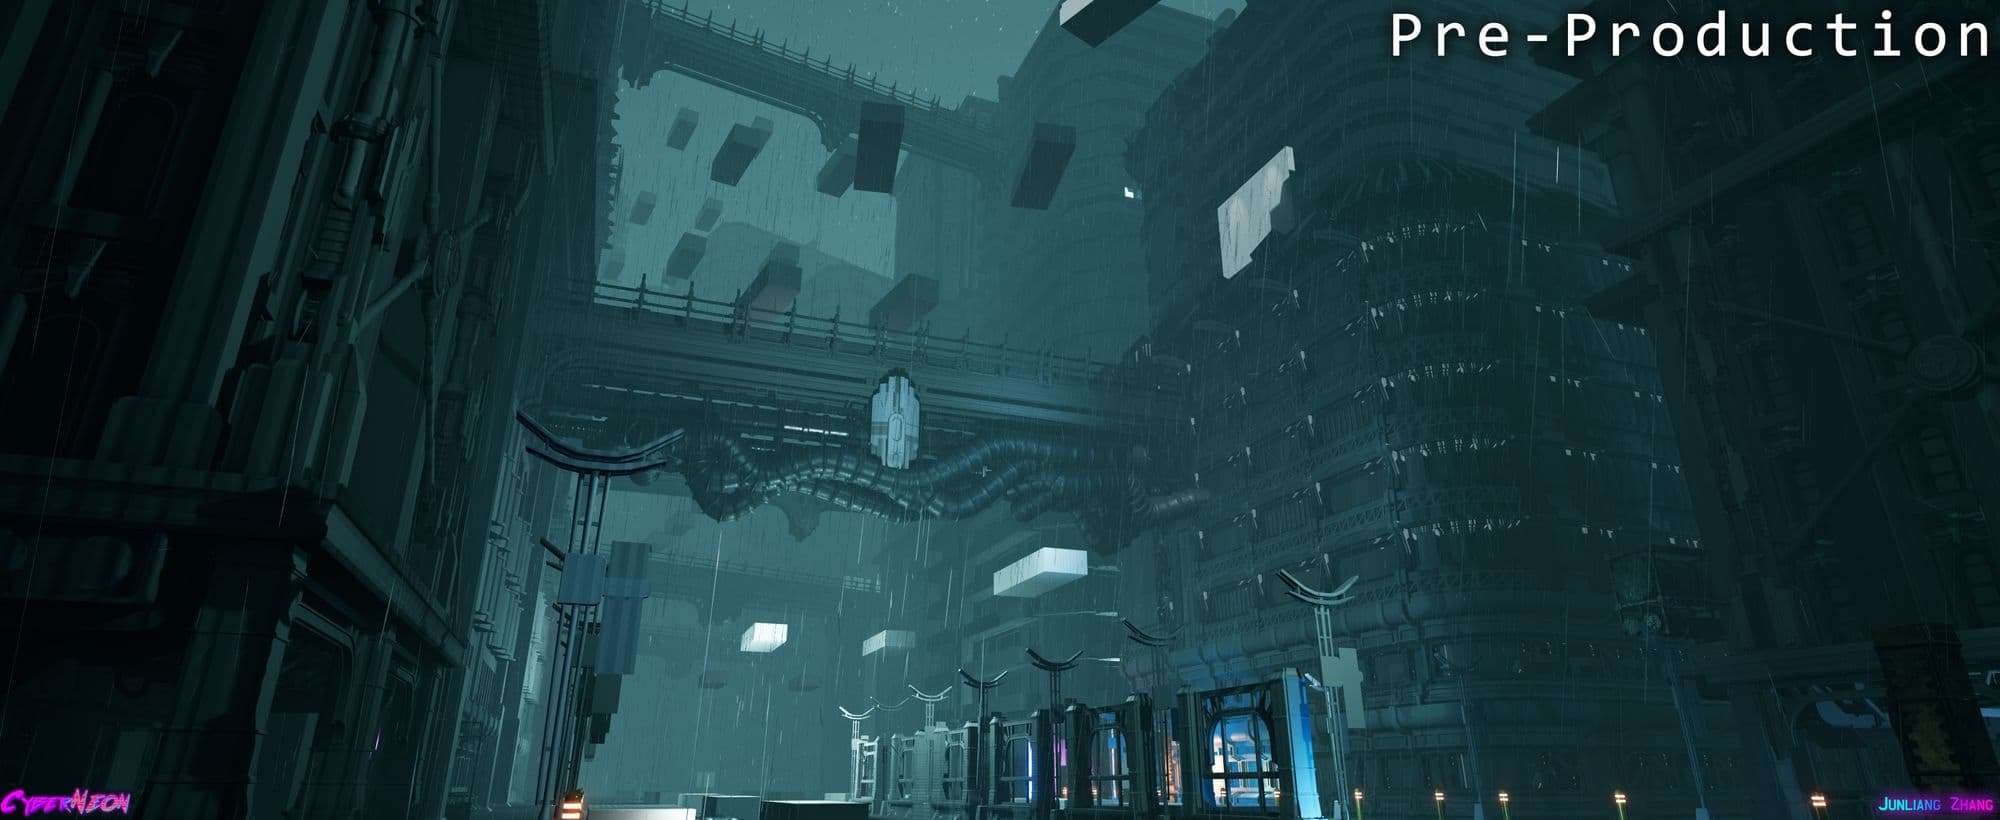

After one month later, I felt that the background had a lot of space I could utilize it, so that I started to create background builds based on the mood boards.
First Pass of Lighting Experiment:
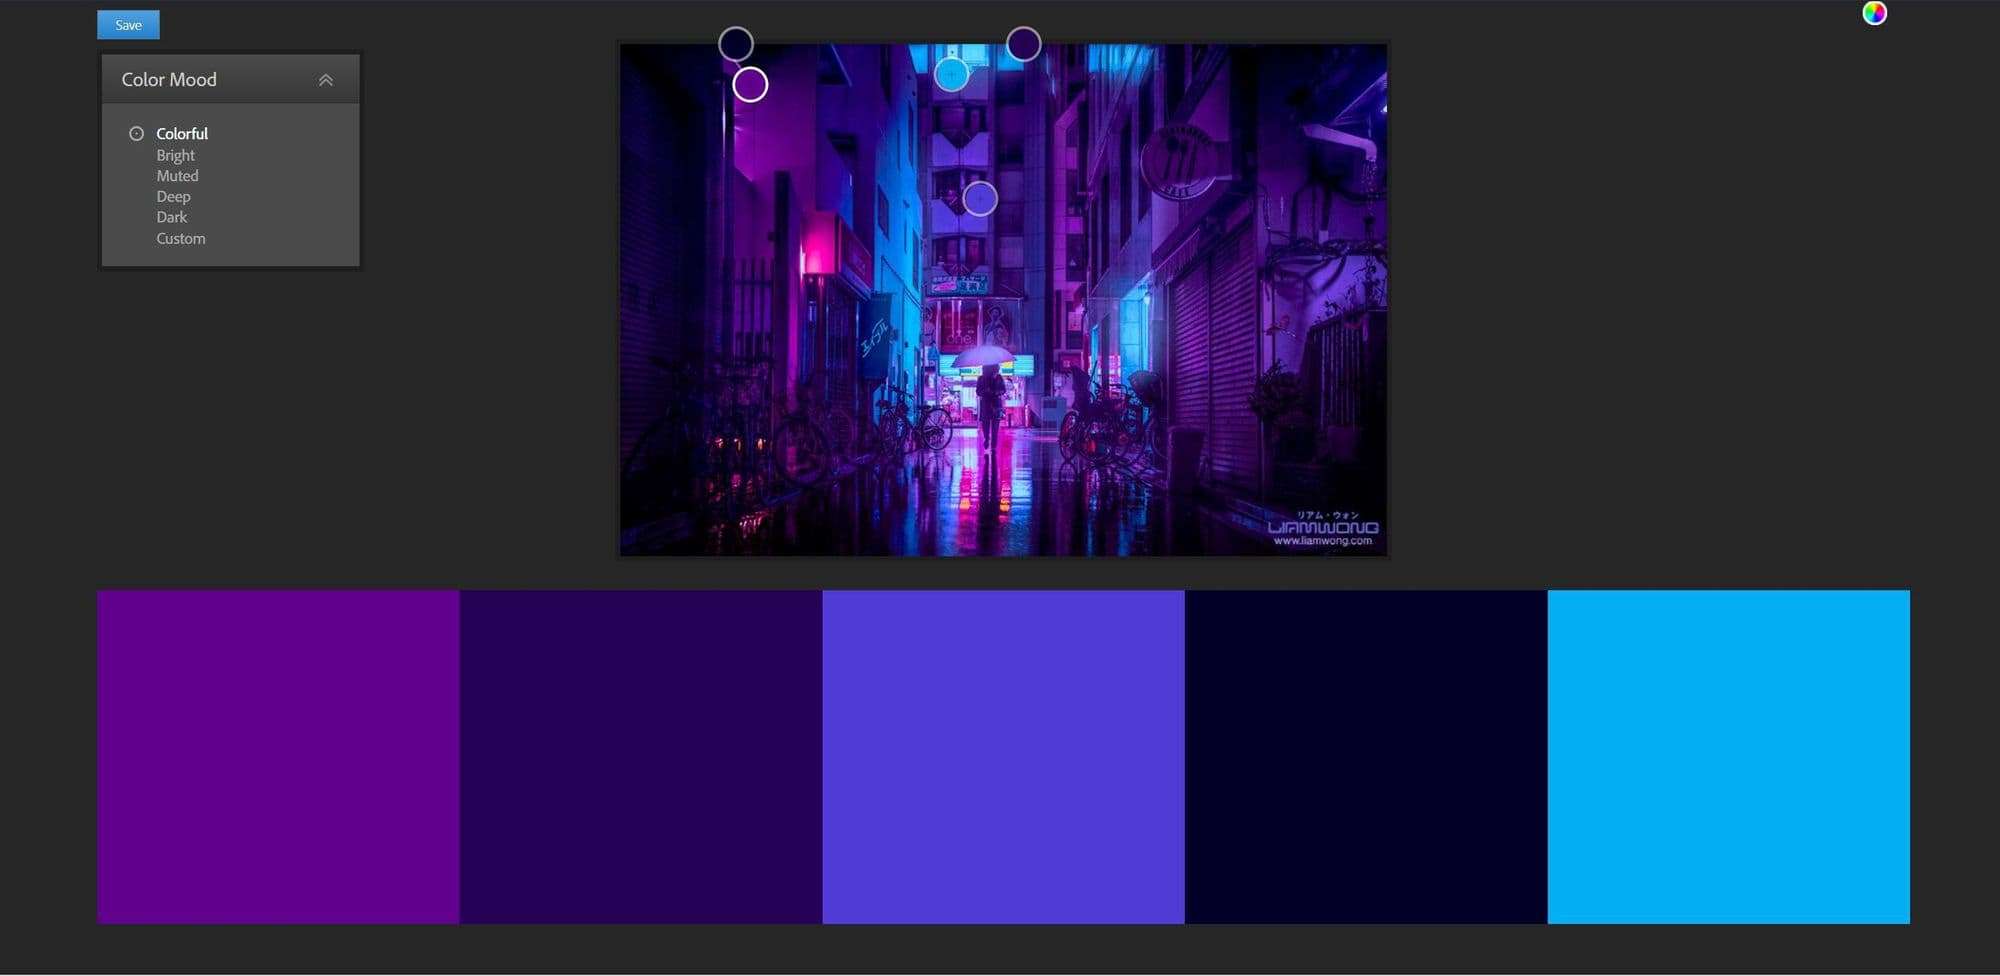
I unintentionally saw this amazing cyberpunk style artwork captured and edited by Liam Wong who is an award-winning director and photographer. I was inspired and attracted by his fantastic color palettes, lighting, and compositions.
Therefore, I used Adobe Color Wheel to capture all of the main color from it. This tool was very useful when you would like to do color palettes for your lighting scenarios of the scene.
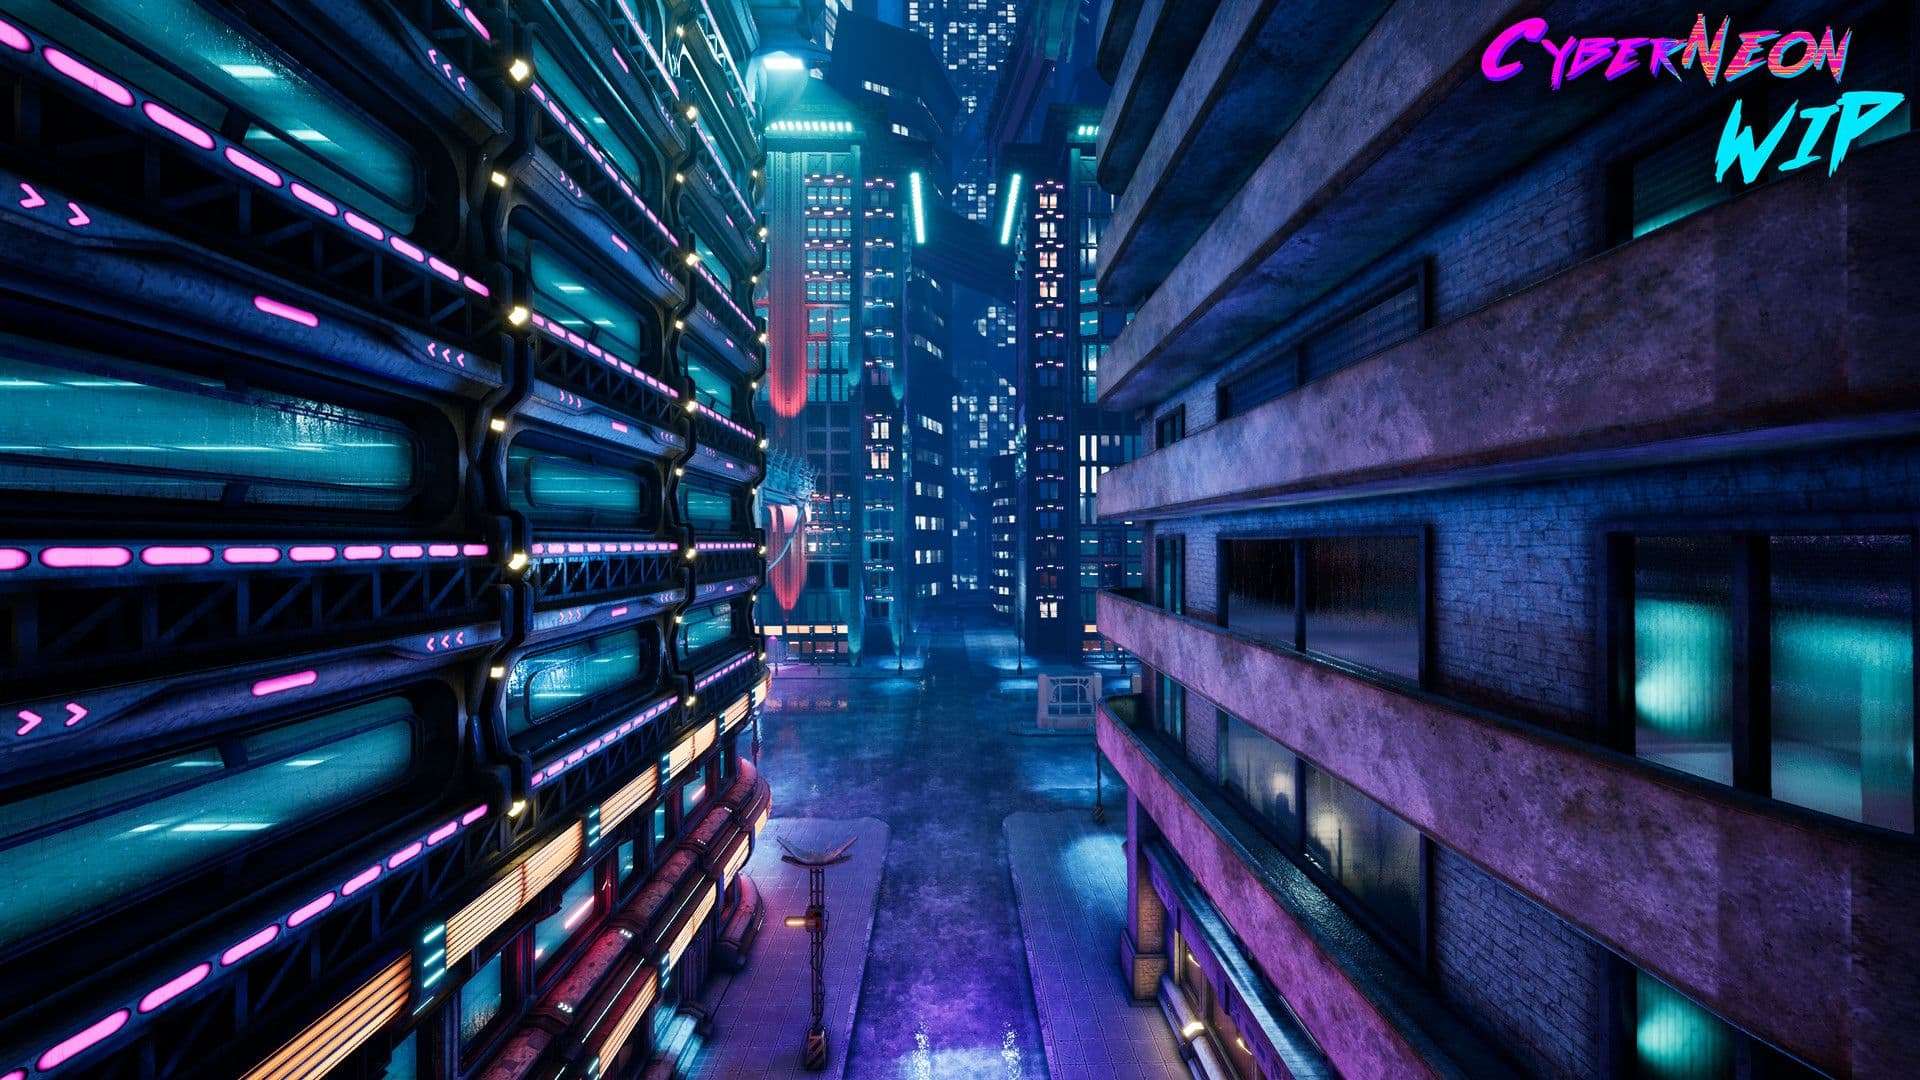
After two months later, I lost interests for this colour palettes because it just only purple and blue colours. I just felt tedious by constantly doing this way. In the meantime, I deleted almost 85% of buildings because it just lack of diversities. It was time to create something cool and great compositions.
I spent another two months working on the assets and wondering how can I get a nice compositions with different building design at this time. I removed all of the lighting from previous one.

At the same time, I redesigned a lot of different buildings because I wanted to make a great contrast between modern style and Sci-fi elements.
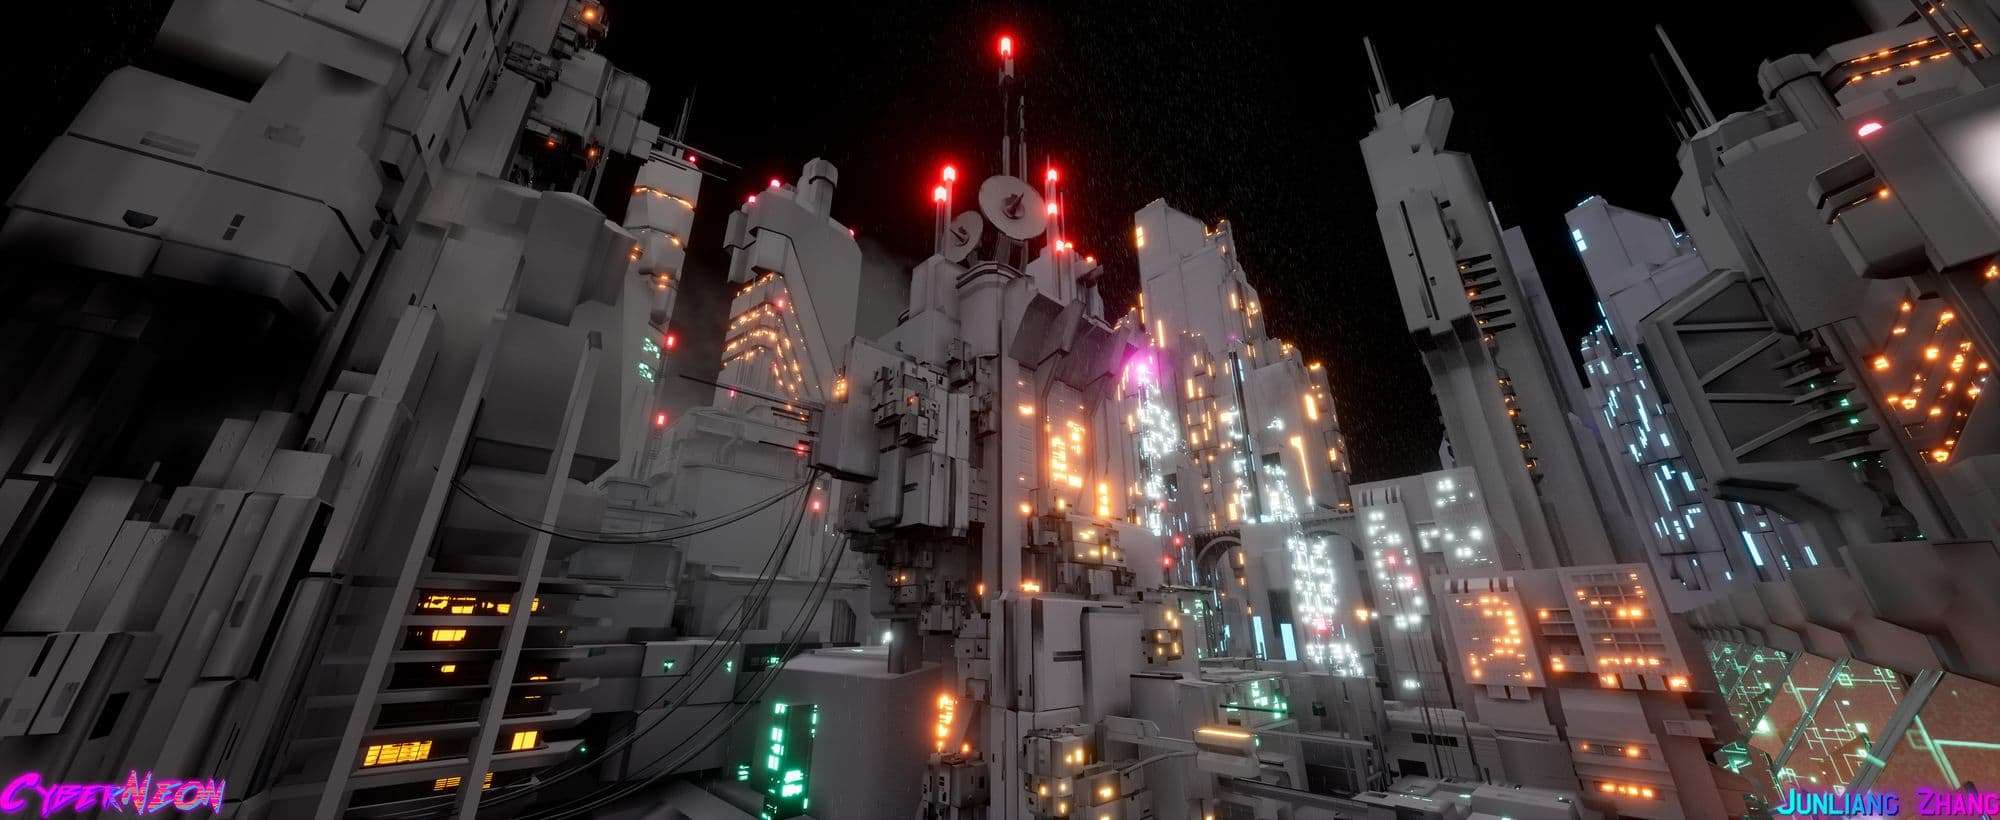
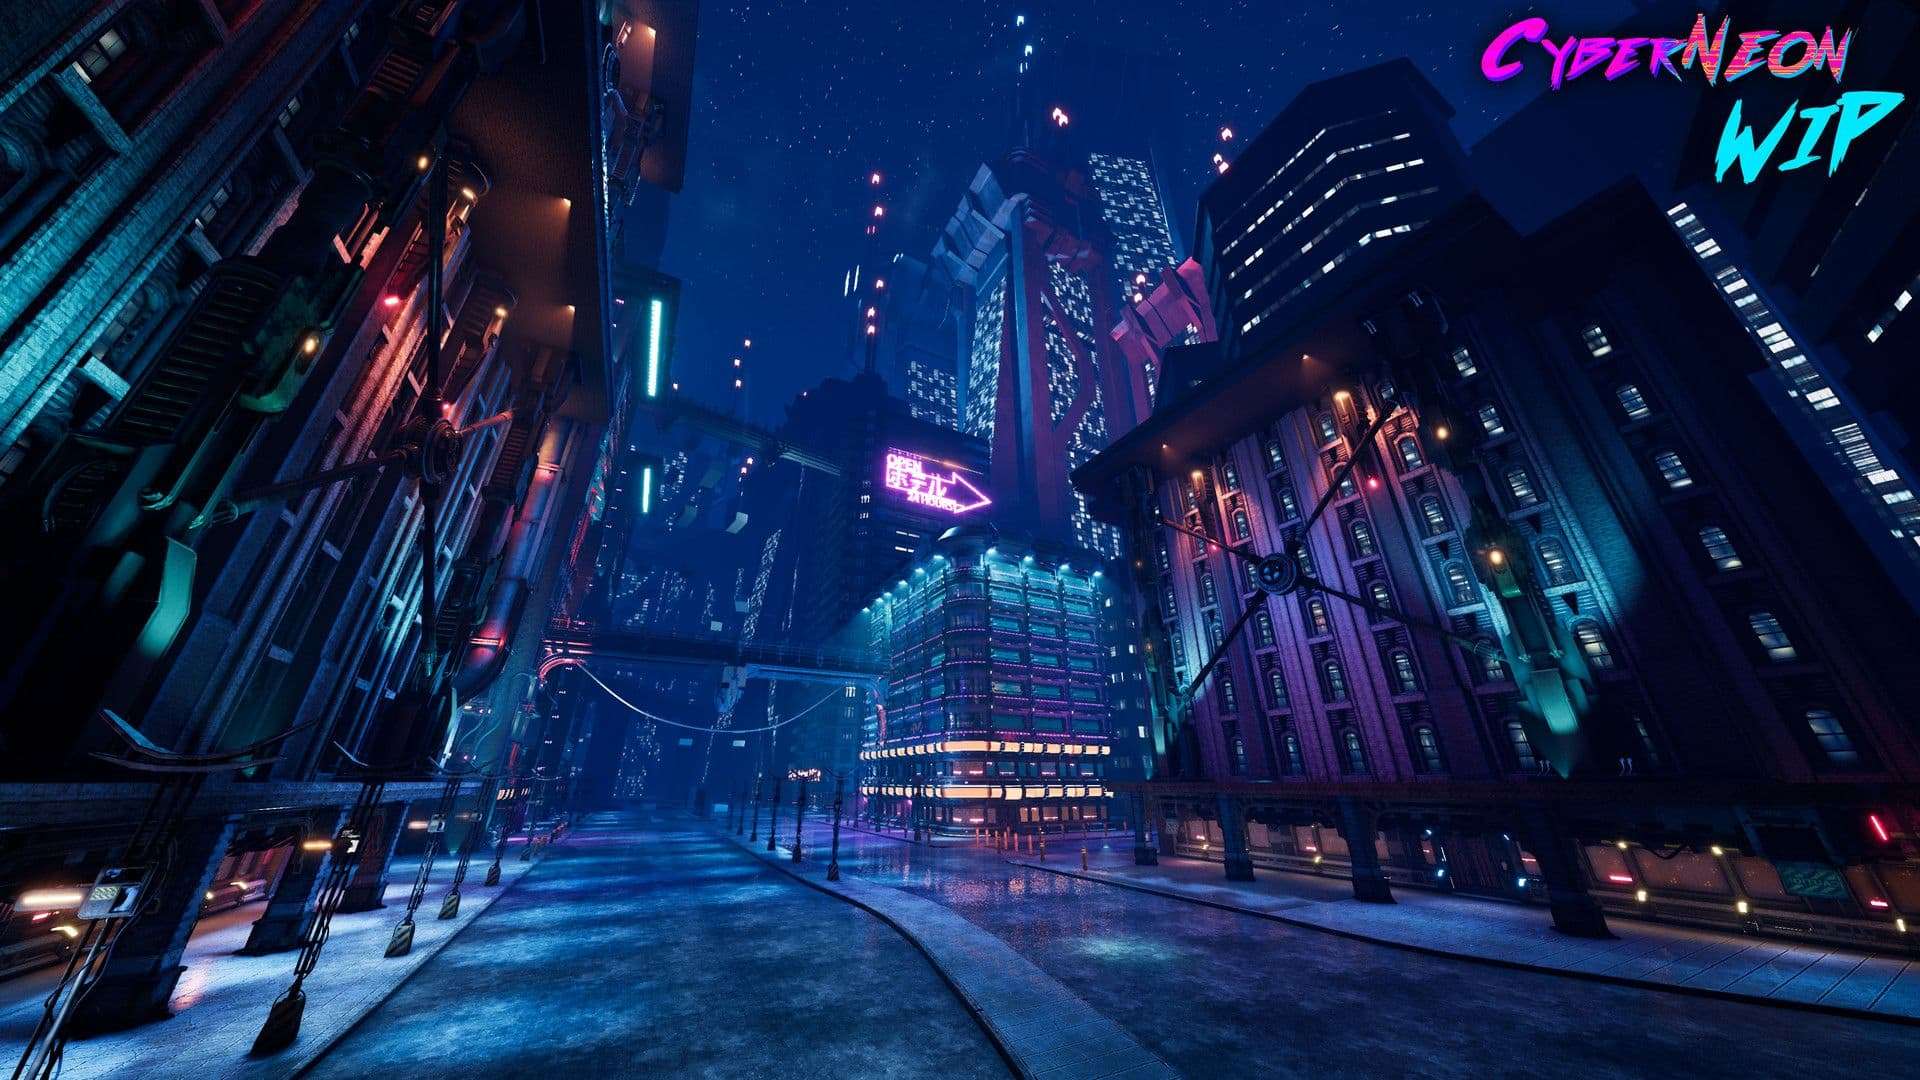
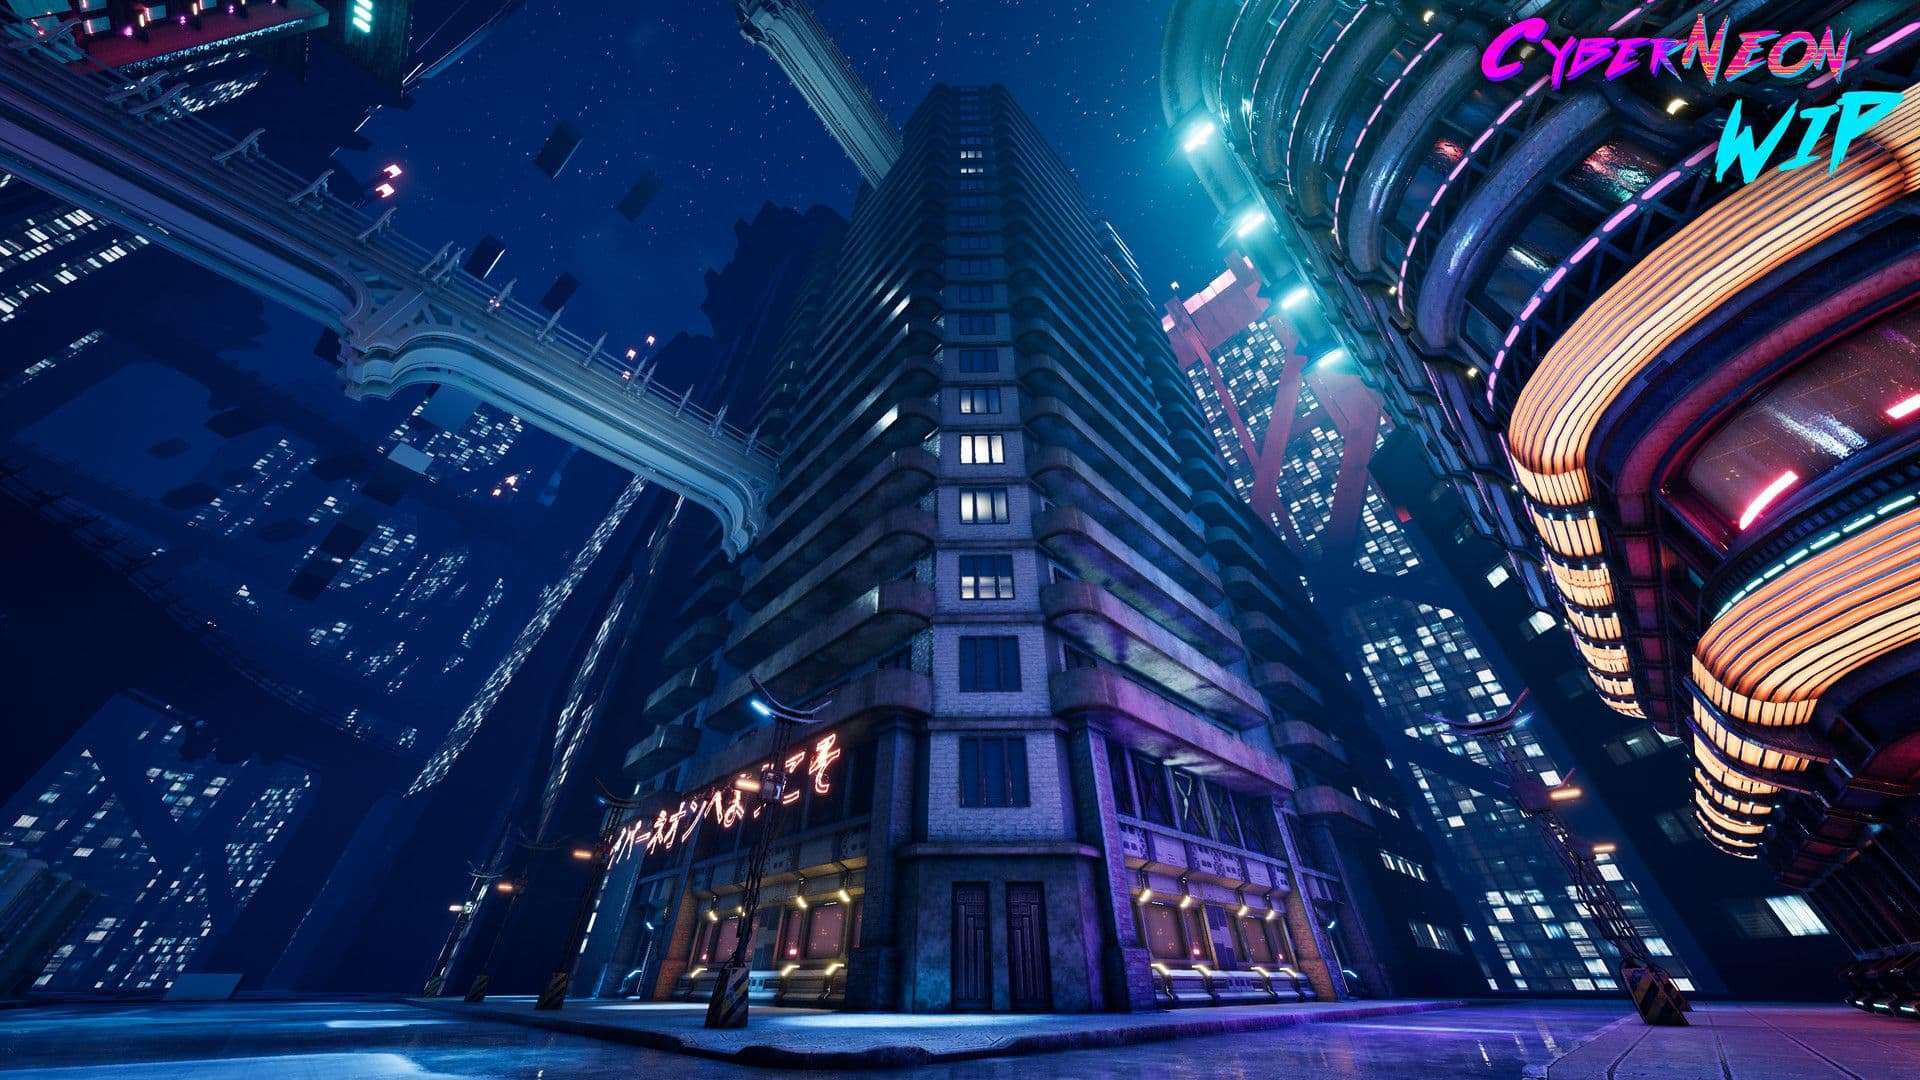
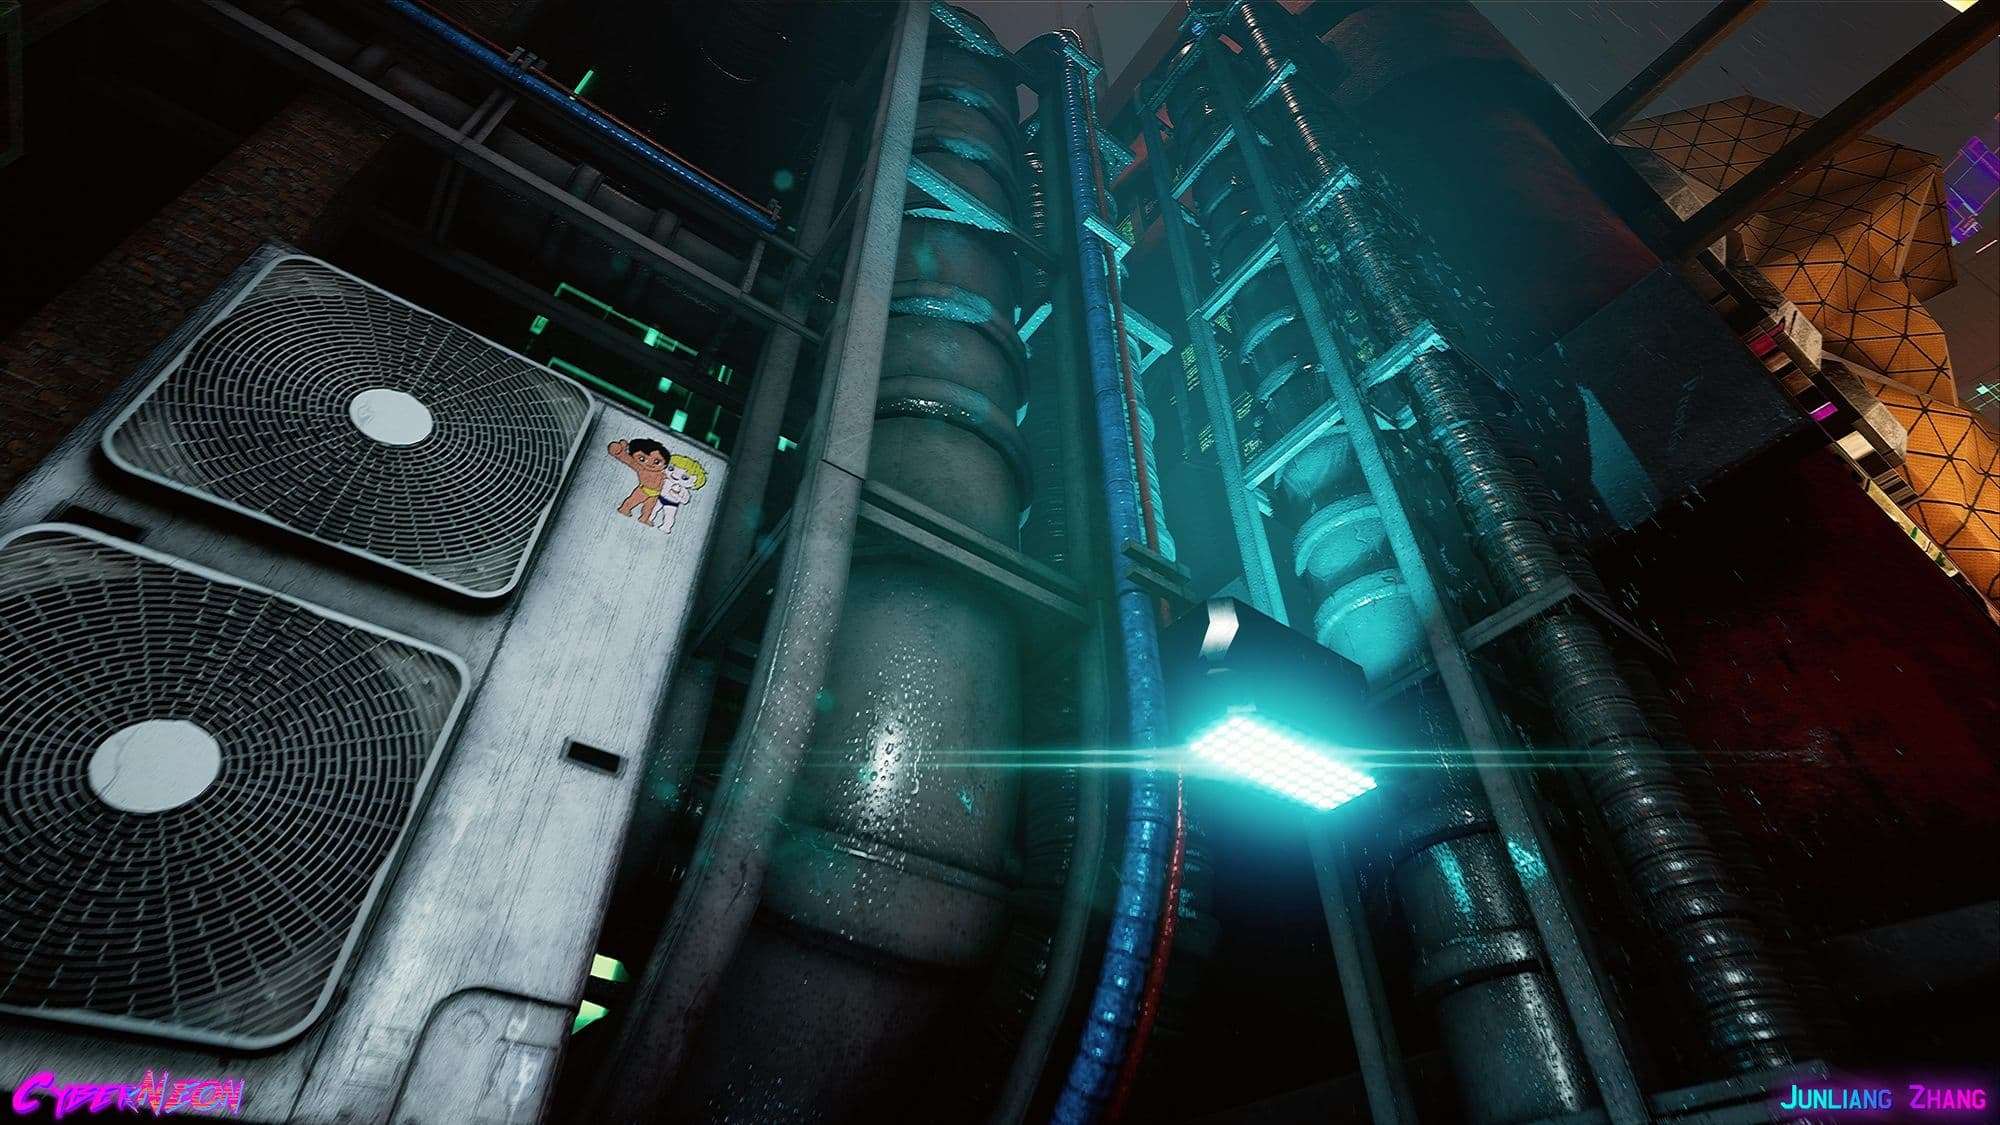
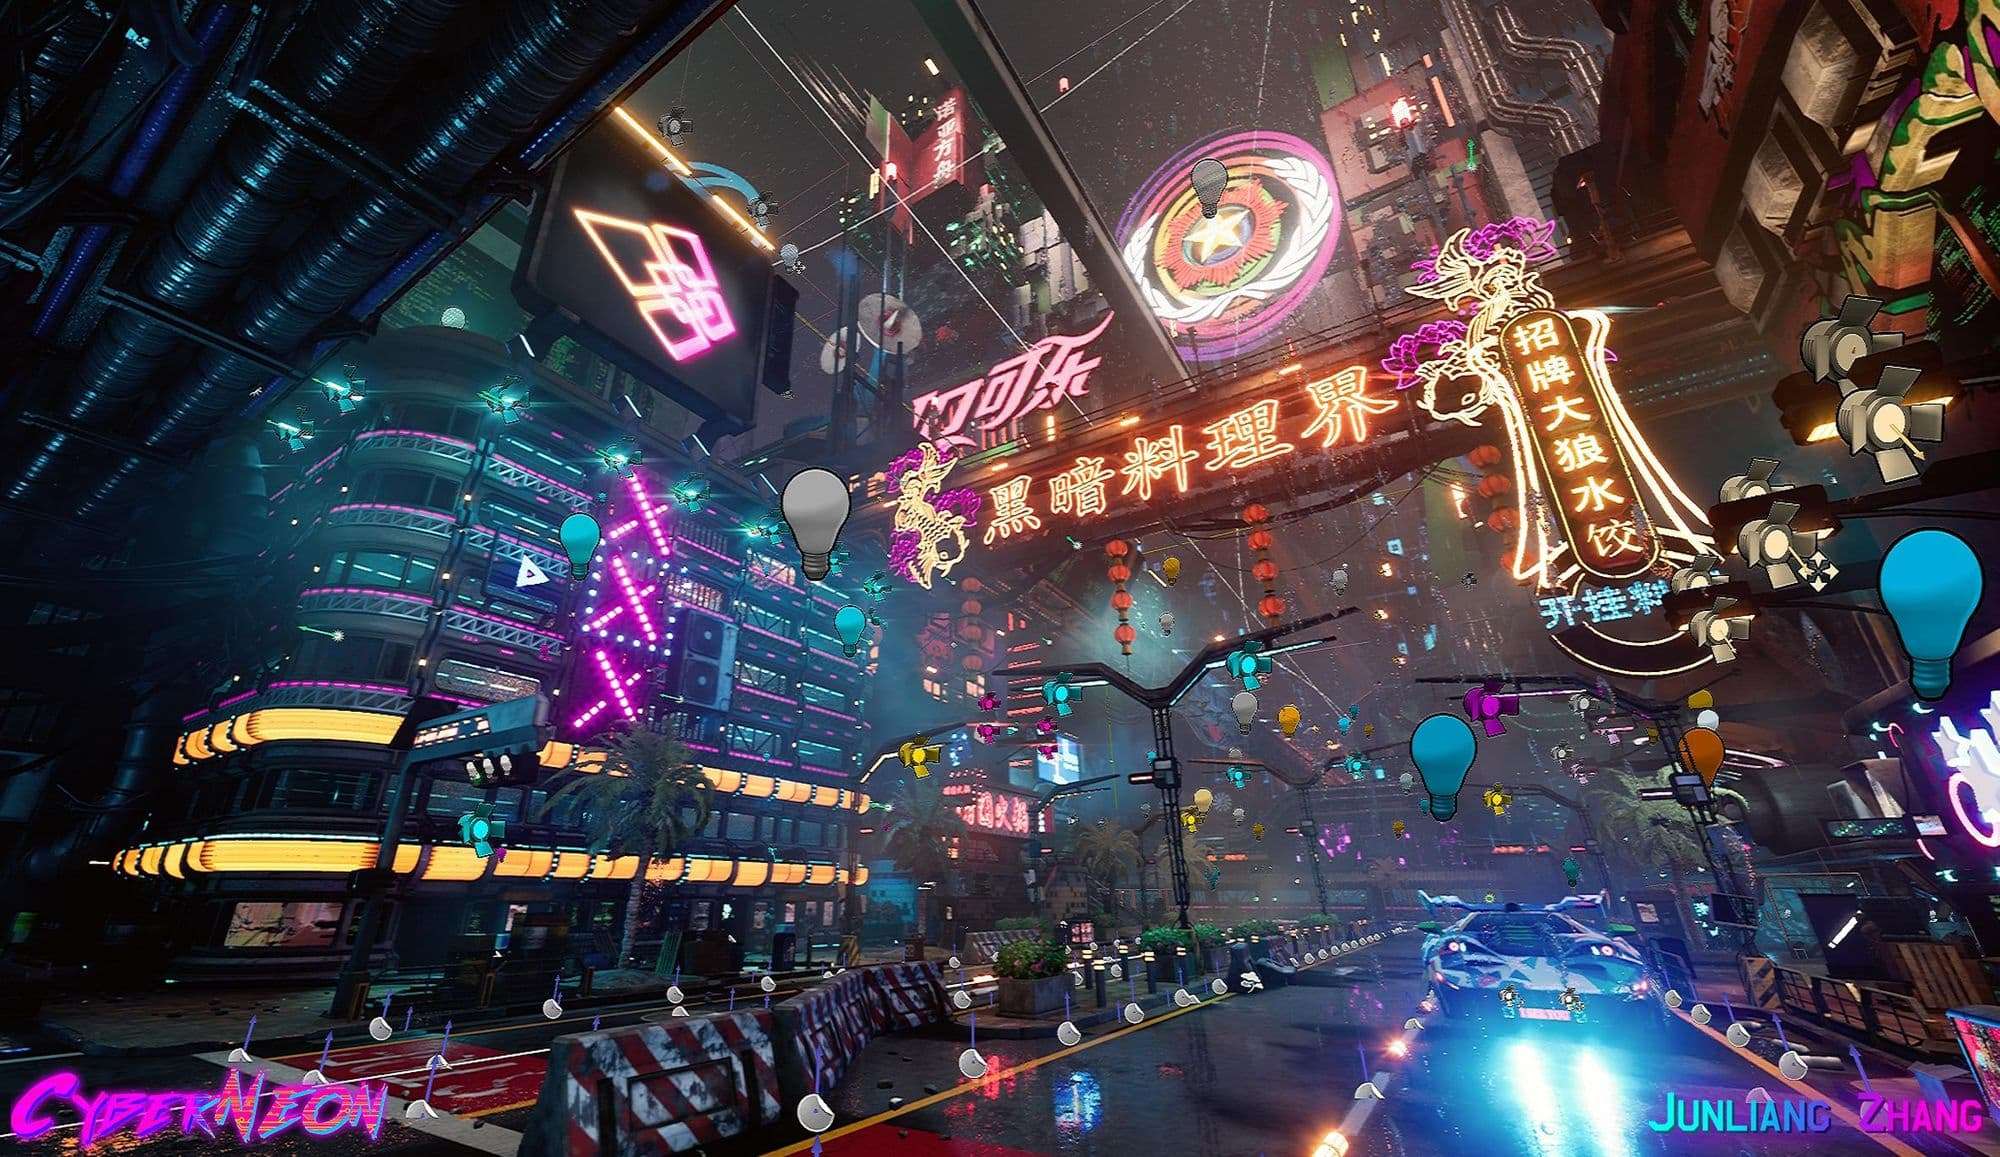
Unreal Engine 4 Screenshot Before Final Stage
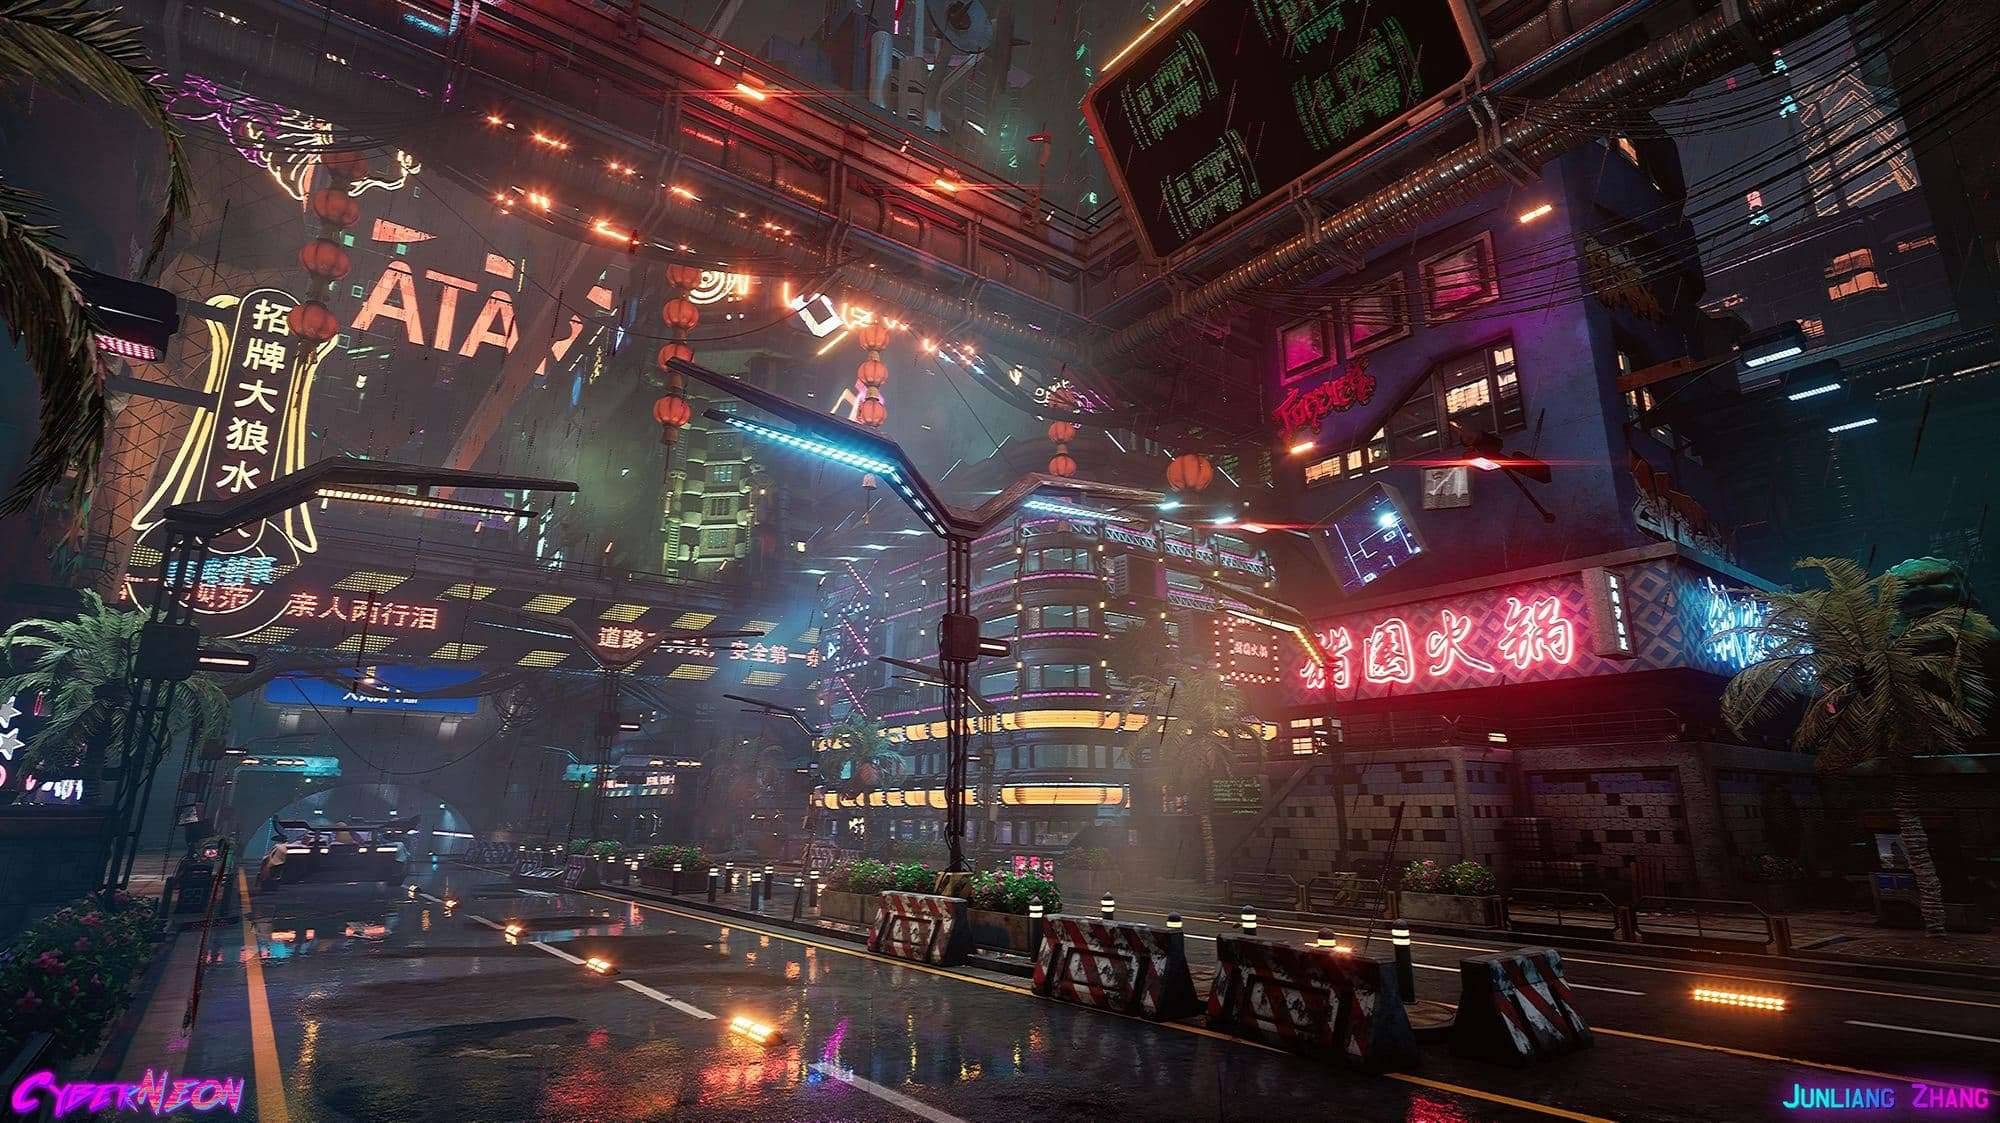
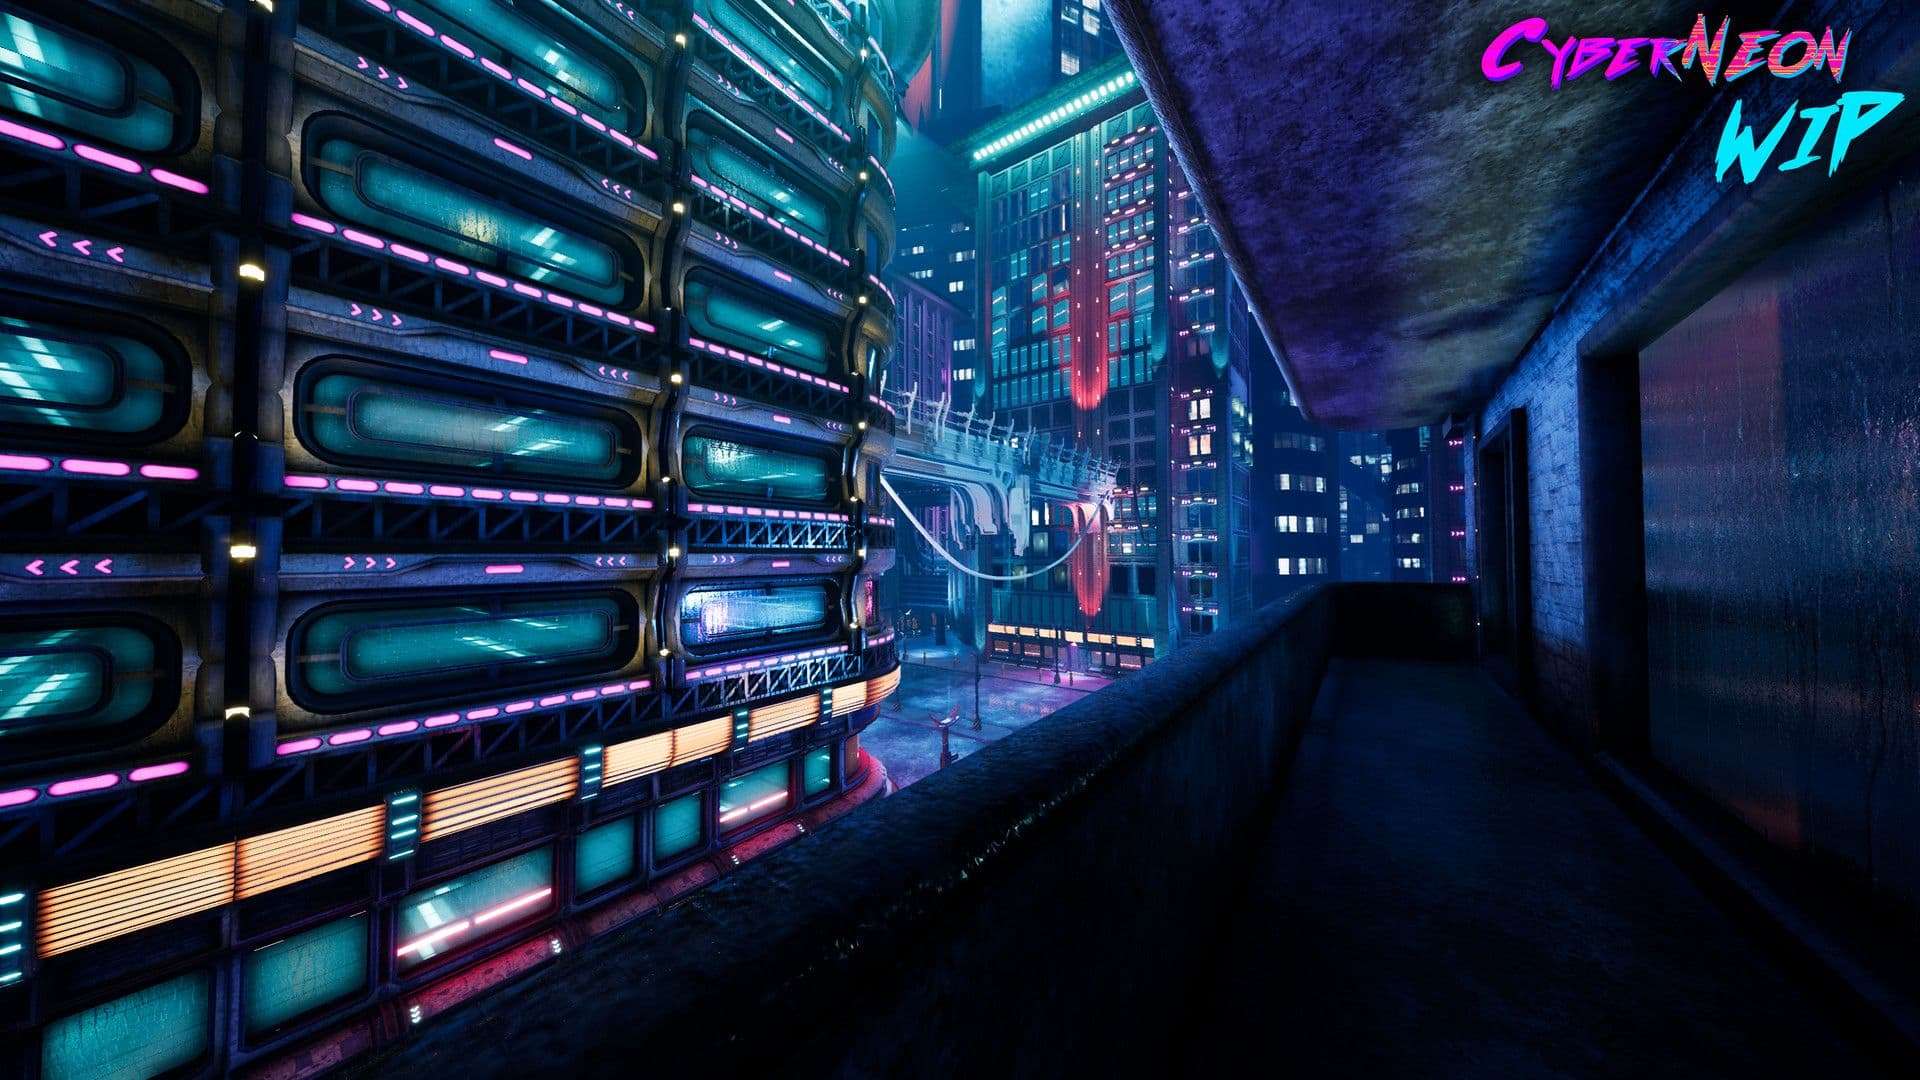
Here is the final stage; I had been finalized on this stage roughly for three months from Jan, 2019 to March 15, 2019. I created all of the neon signs, making new props and vehicles, refining the shaders, and testing different lighting scenarios.

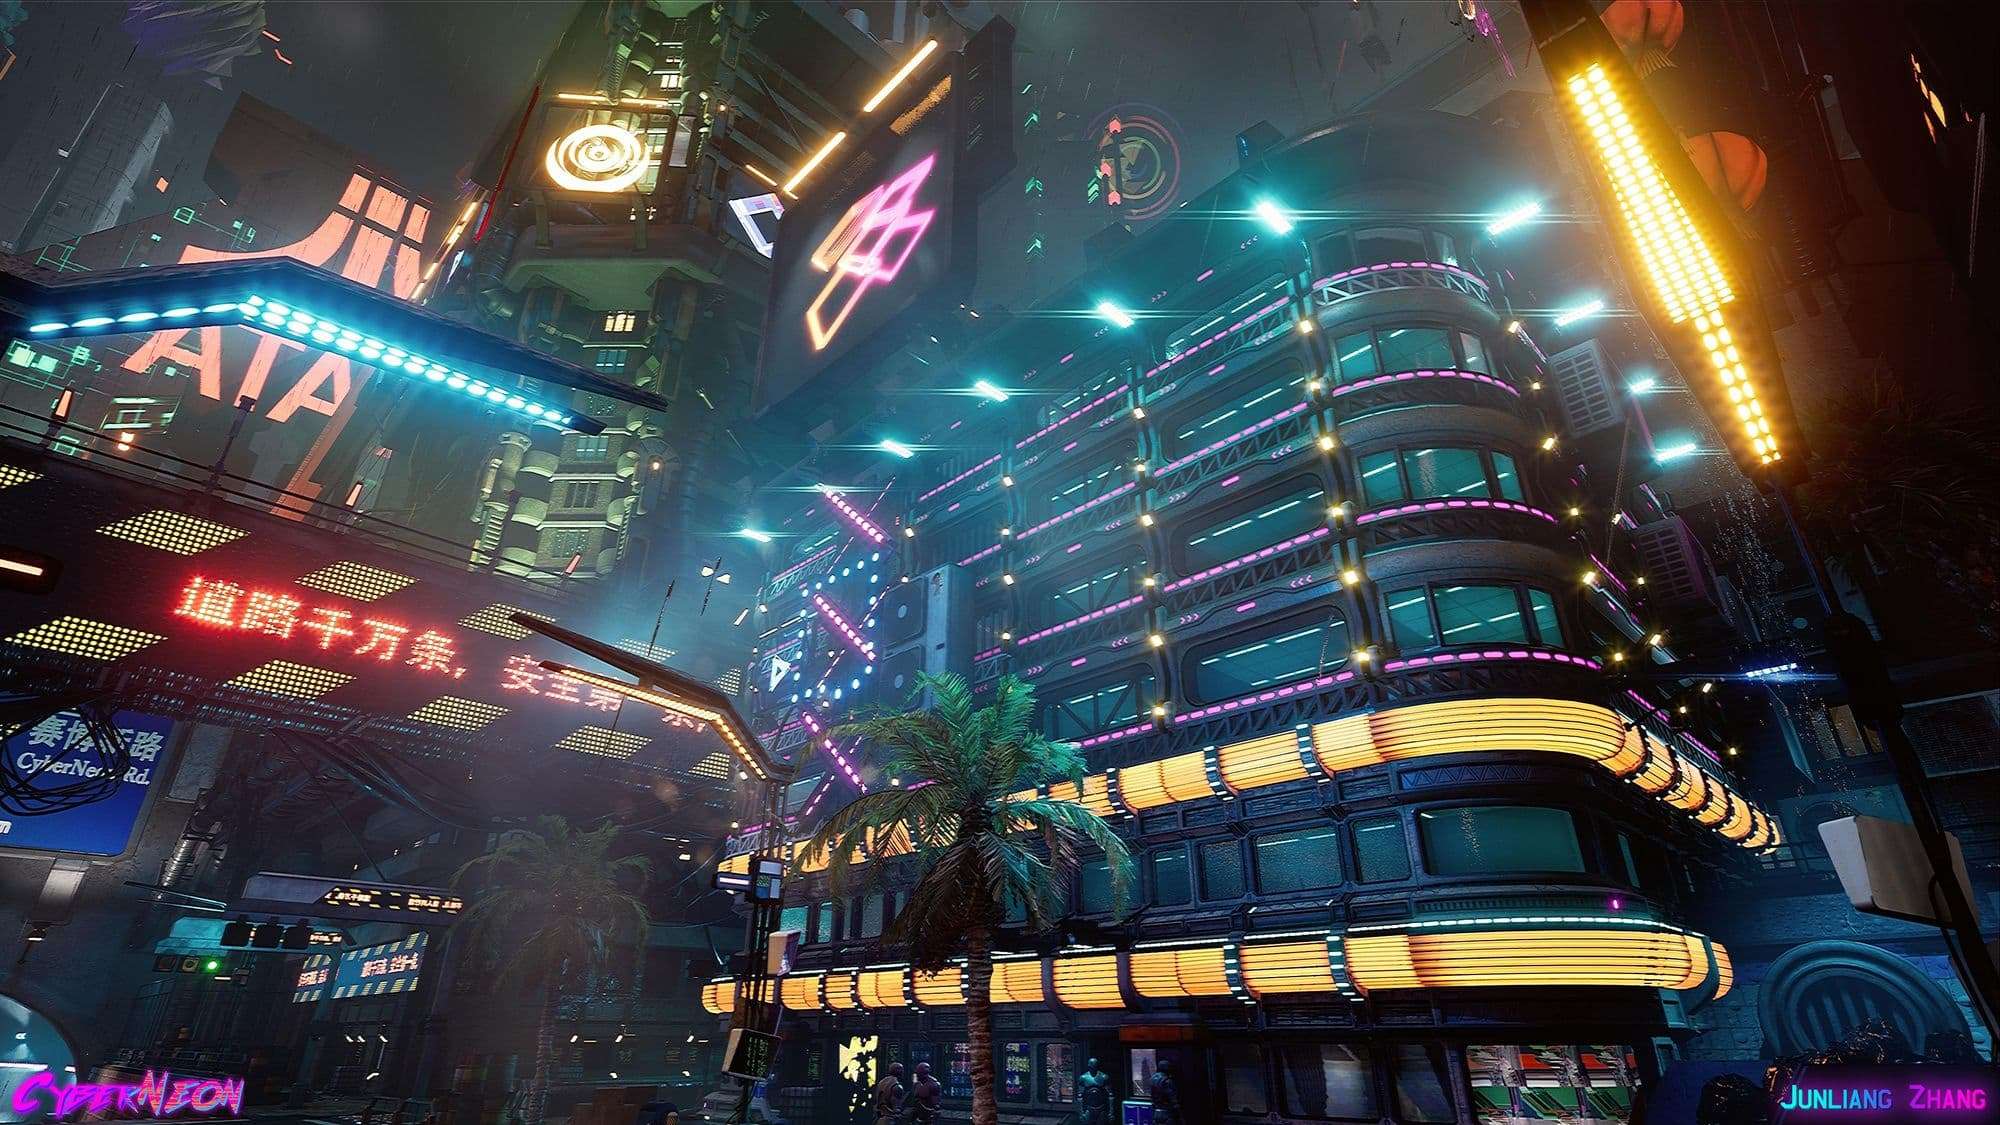
Here is the final background building designs. It is completely different from what I did previous on the pre-production stage.
Materials and Shaders Breakdown
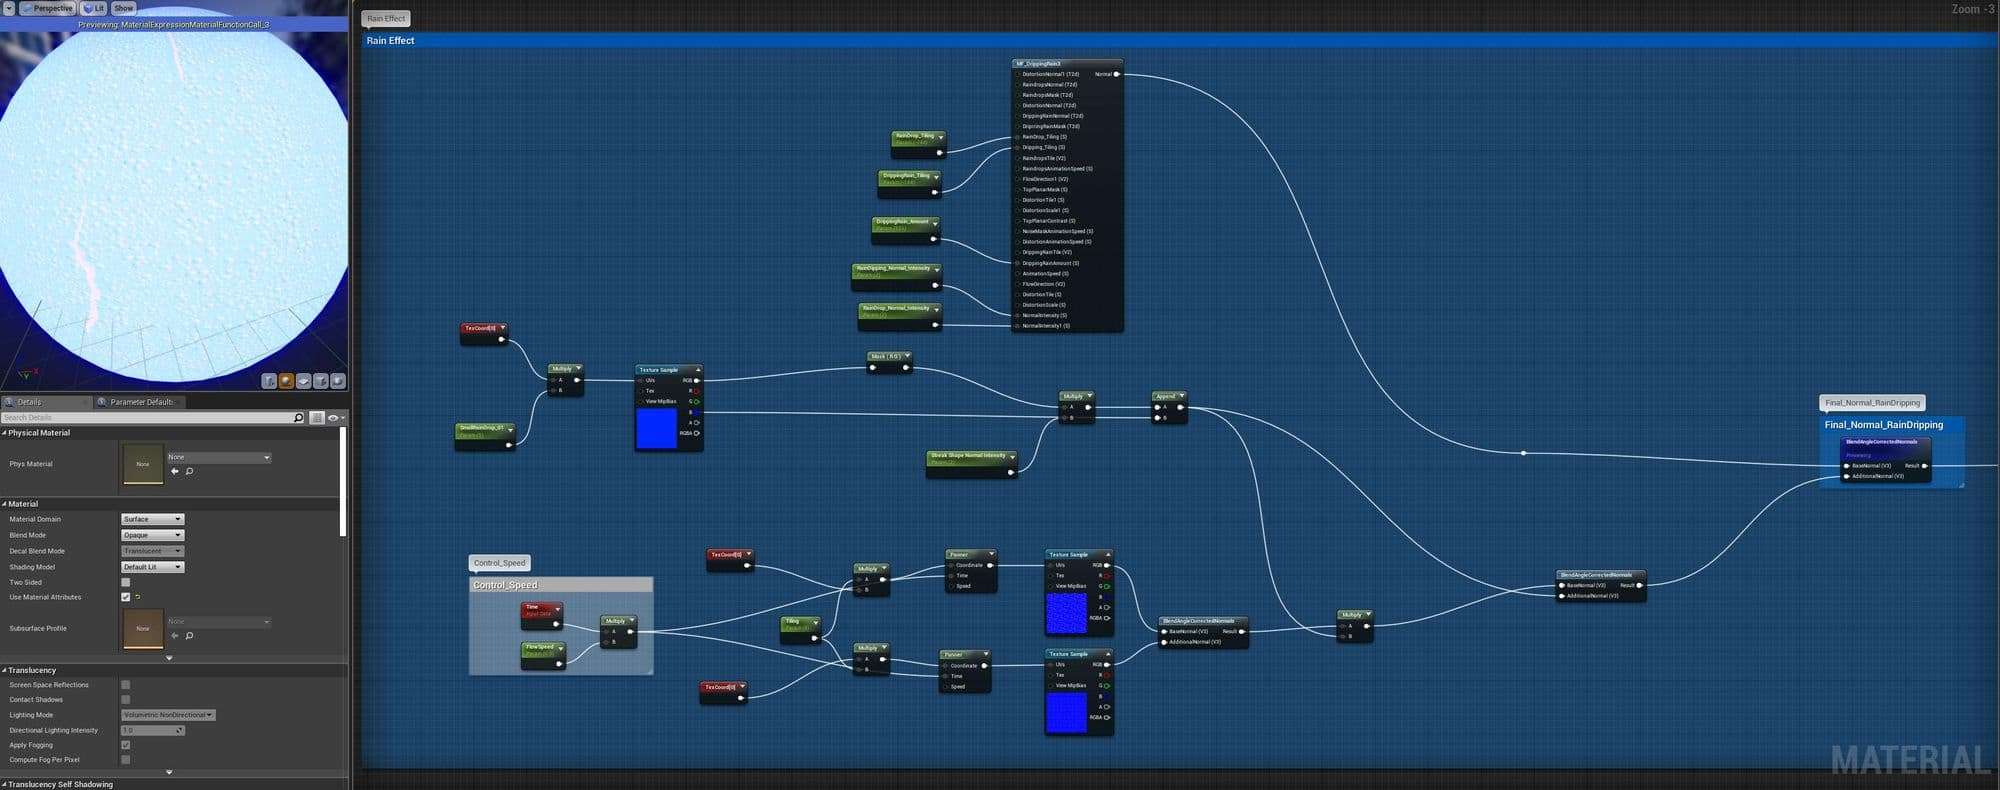
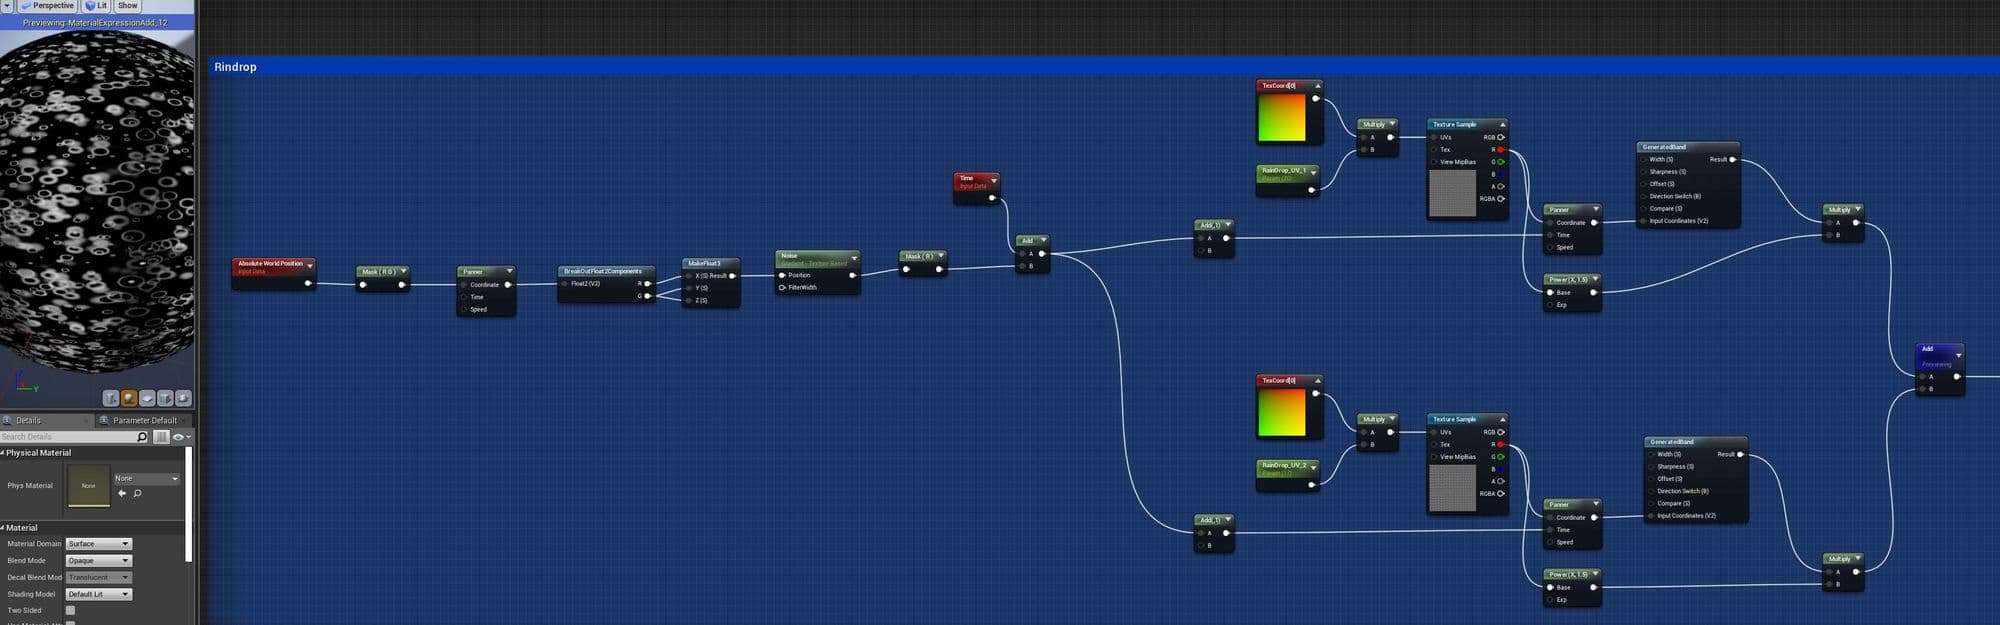
The creation of materials and shaders are huge challenge for me. The most of the challenge is to create a dripping water shaders for the master materials that I used everywhere.
For dripping water shaders, I used Animated Raindrop Material created by Harry “deBug” Emelianov. However, I did some researches and heavily modified his original shader.
What I wanted to achieve effects are water always go down base on any modeling position with world UV space mapping. Second, combining MF_Raindrops and MF_DrippingRain material functions into one from original setup. Third, splitting top rain drops and side dripping water effects.
Original Link Created By Harry “deBug” Emelianov:
Breakdown: Animated Raindrop Material in UE4
Water Shader Breakdown
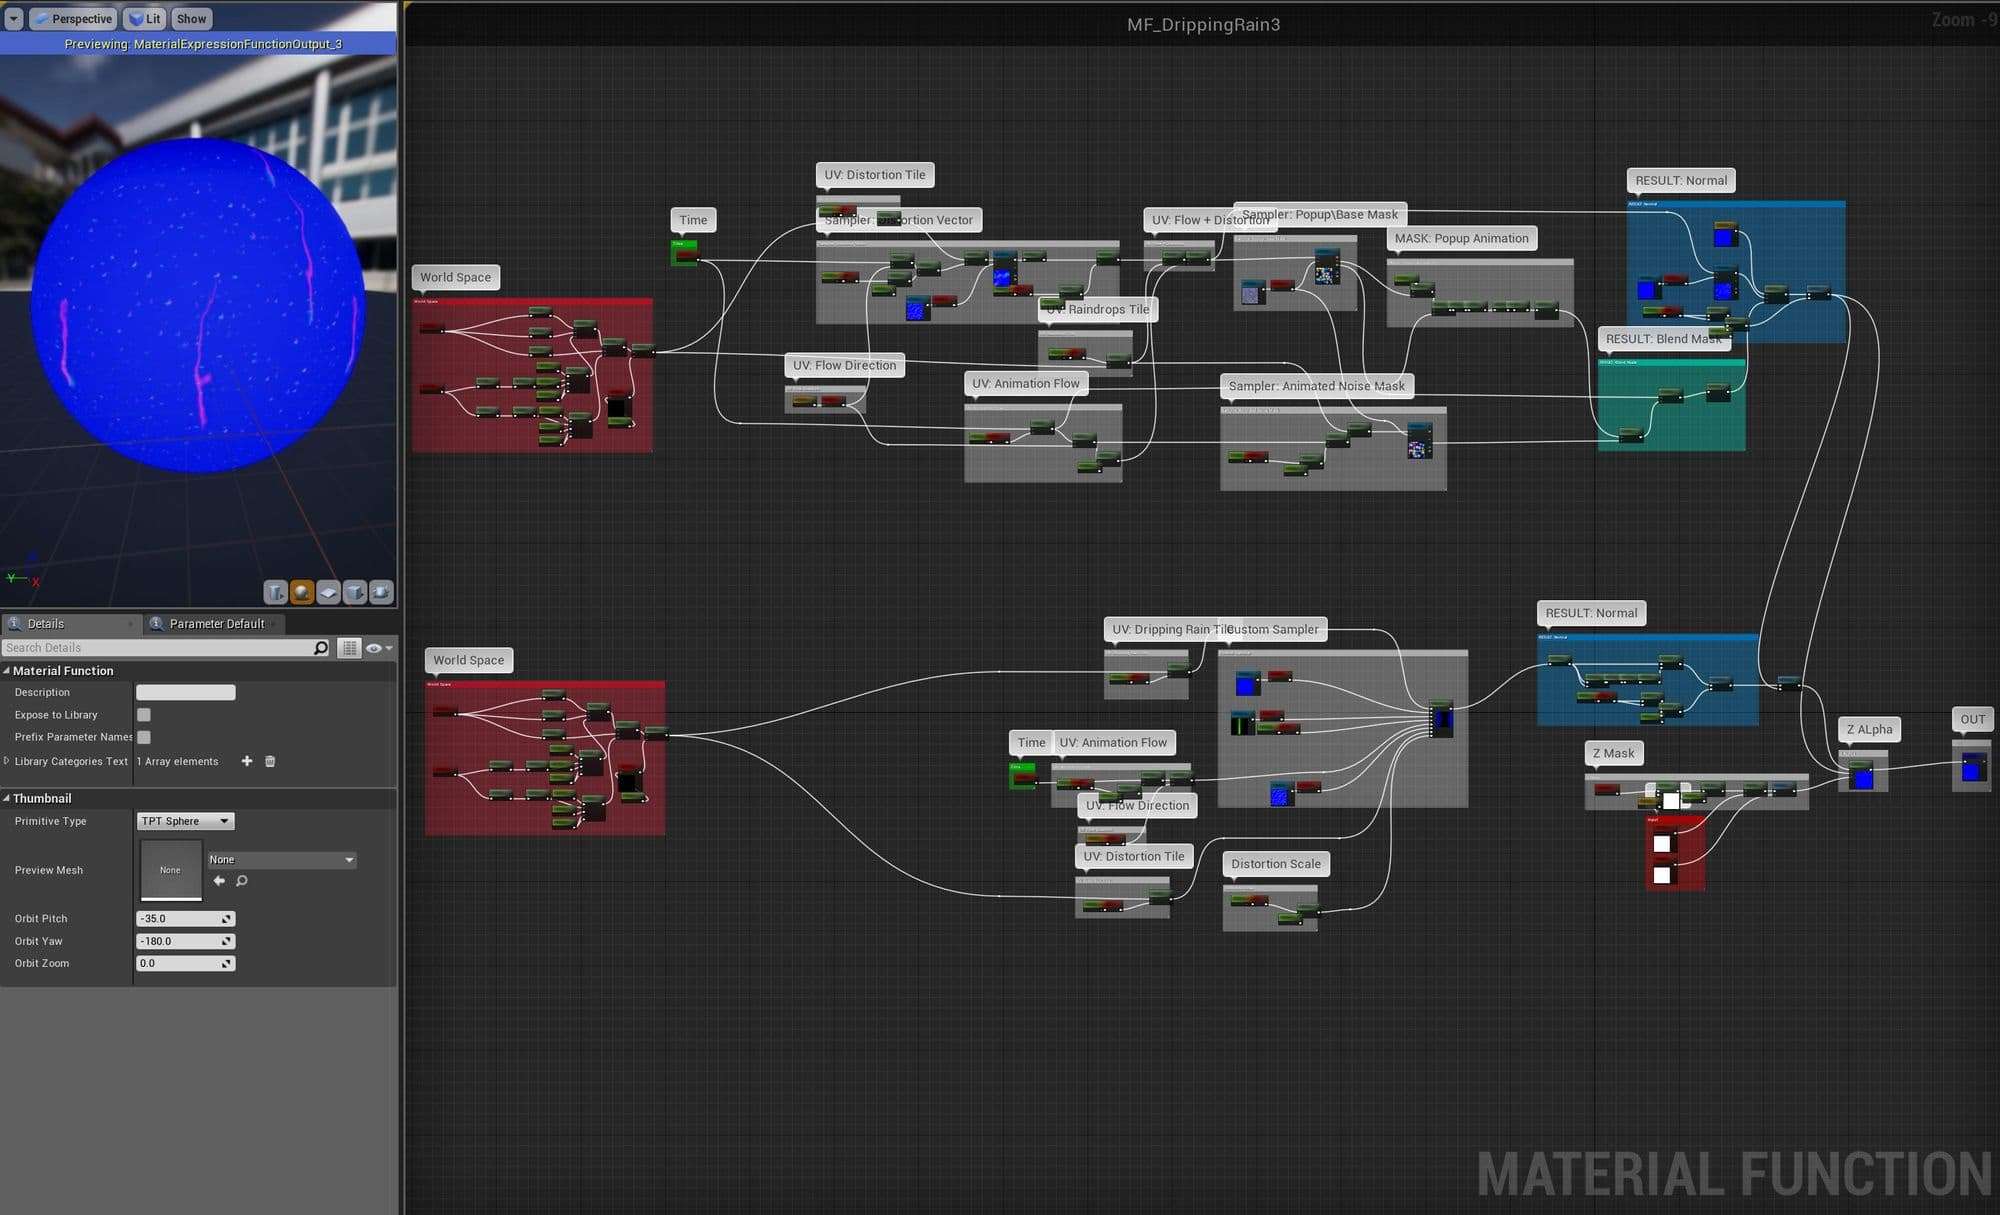
Here was my modified version for the water shader from original one.
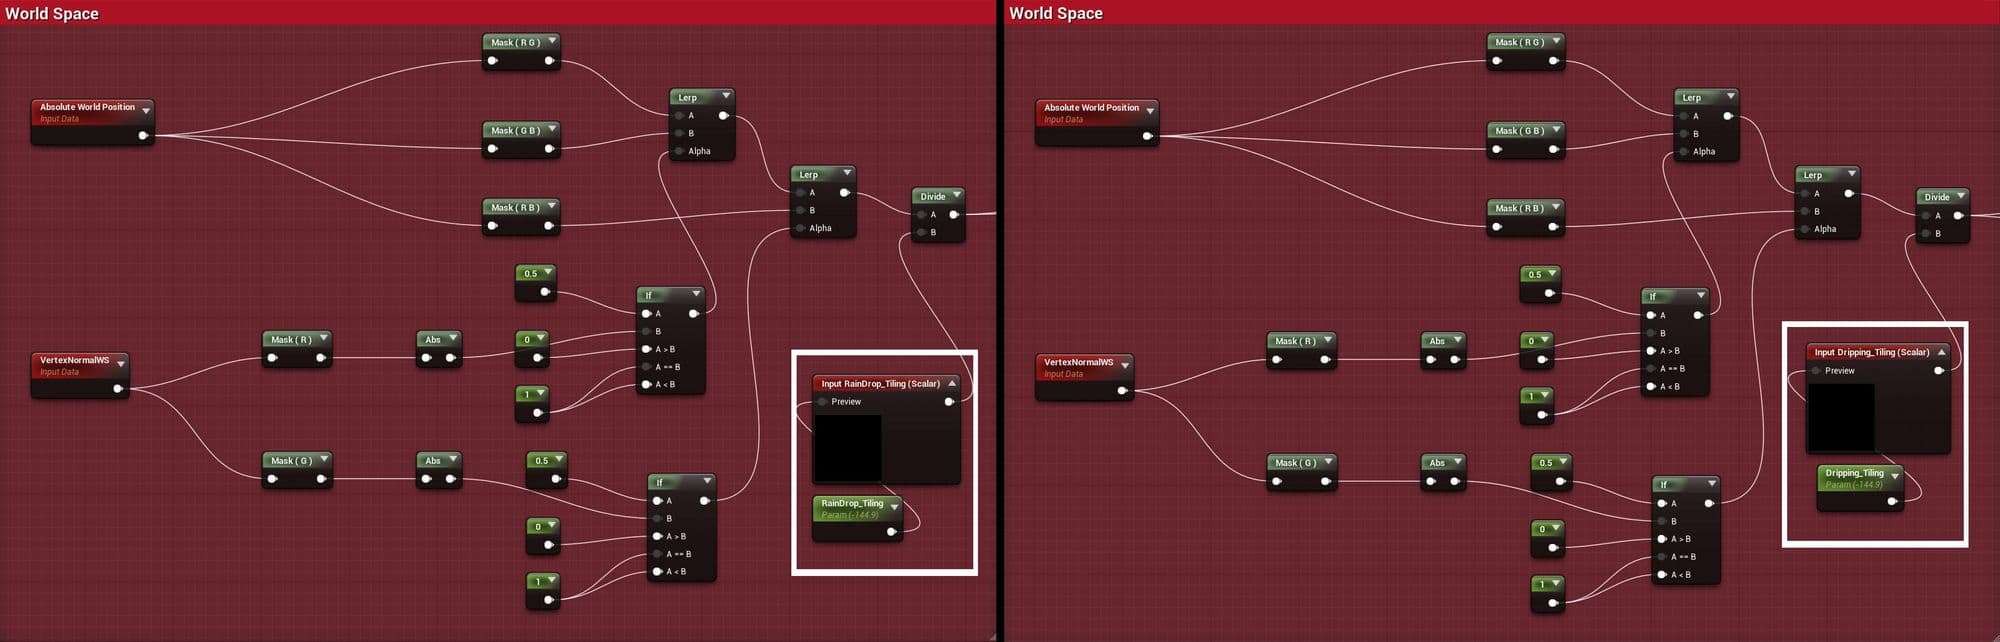
I used two World UV Space Tilling to split dripping water and rain drops.

I used topping alpha to split dripping water and rain drops with Lerp Alpha Node.
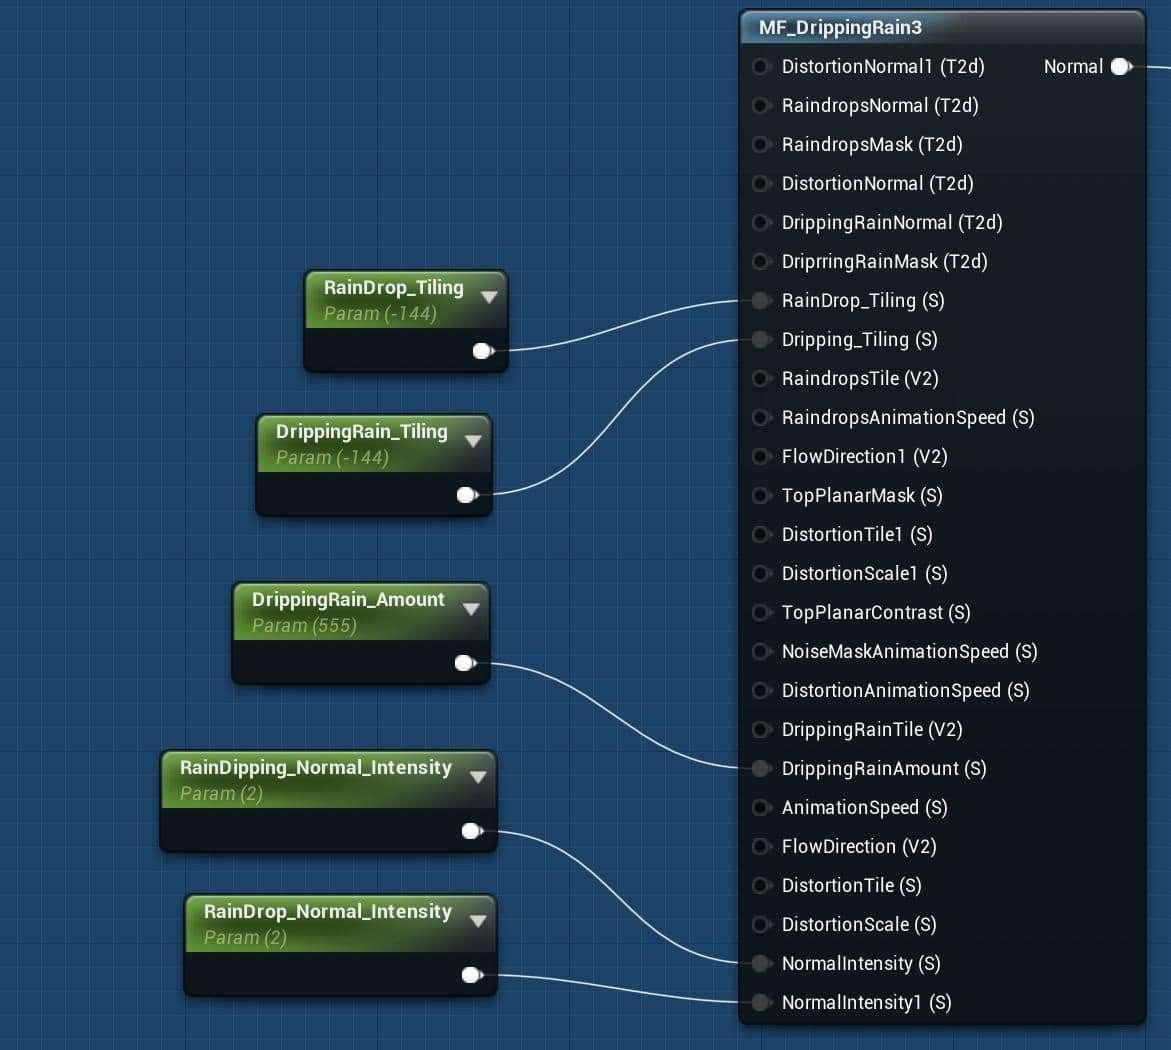
Here was the final all in one water material function. There were tons of settings you can change in real time, which was very faster and effective.
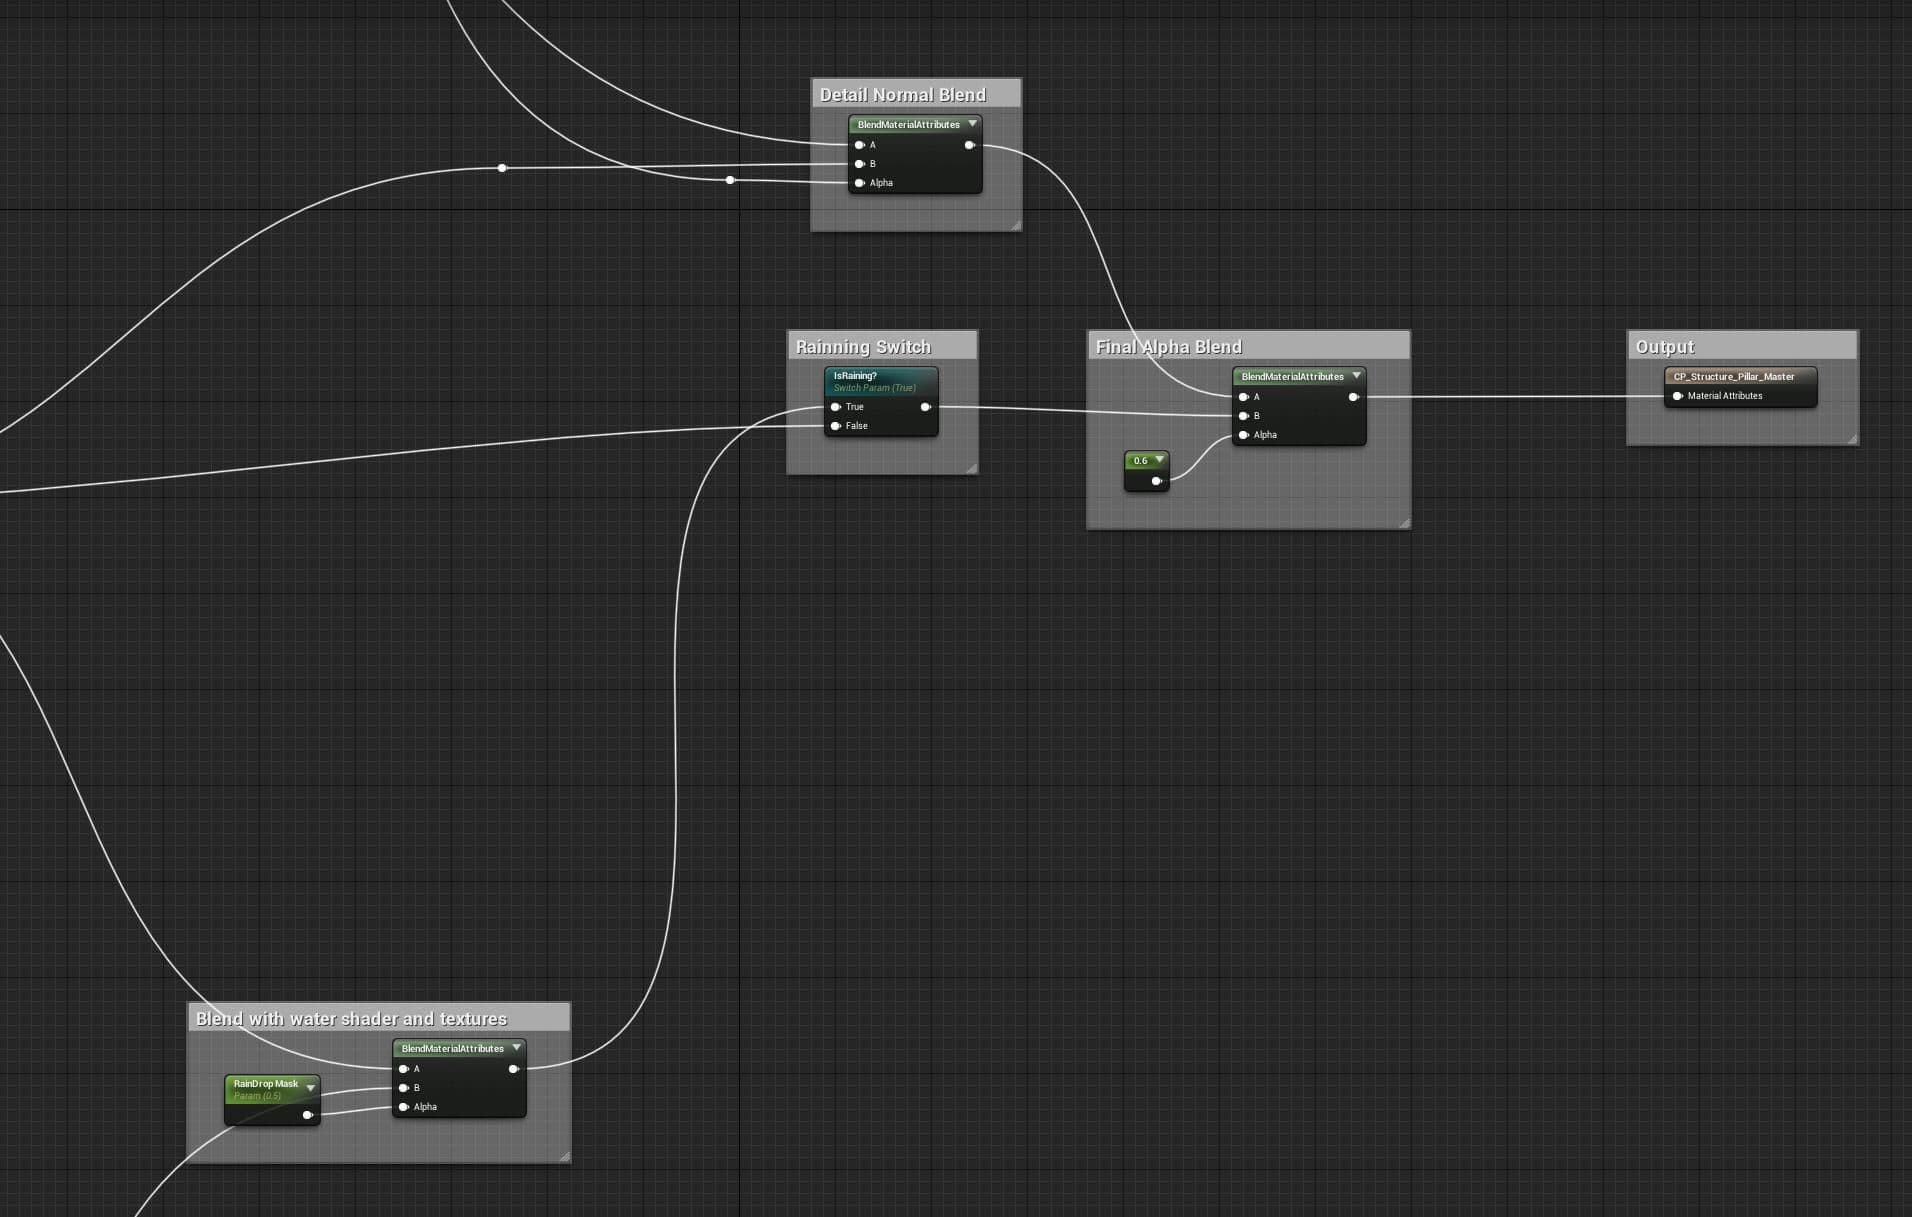
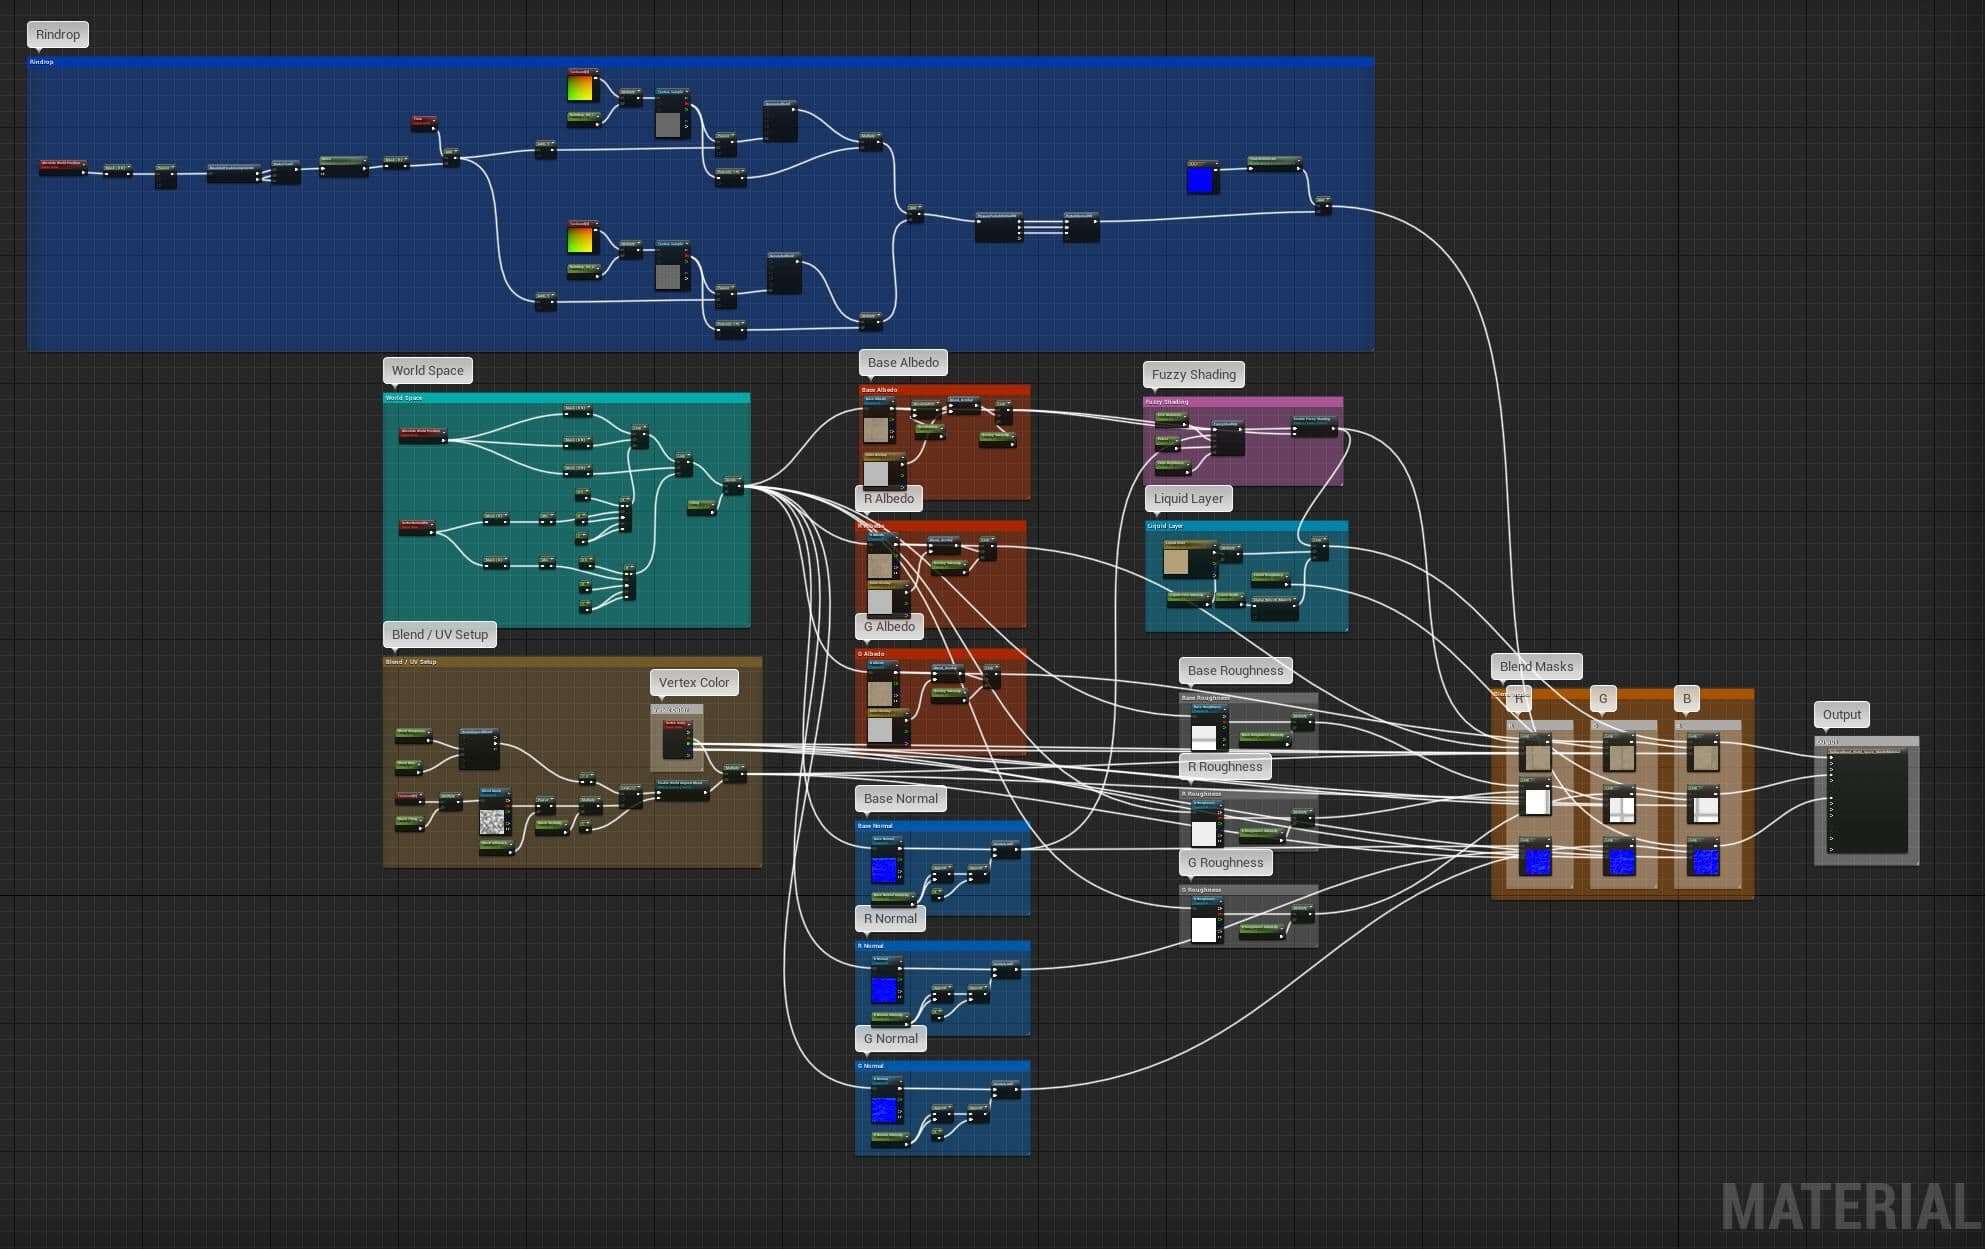
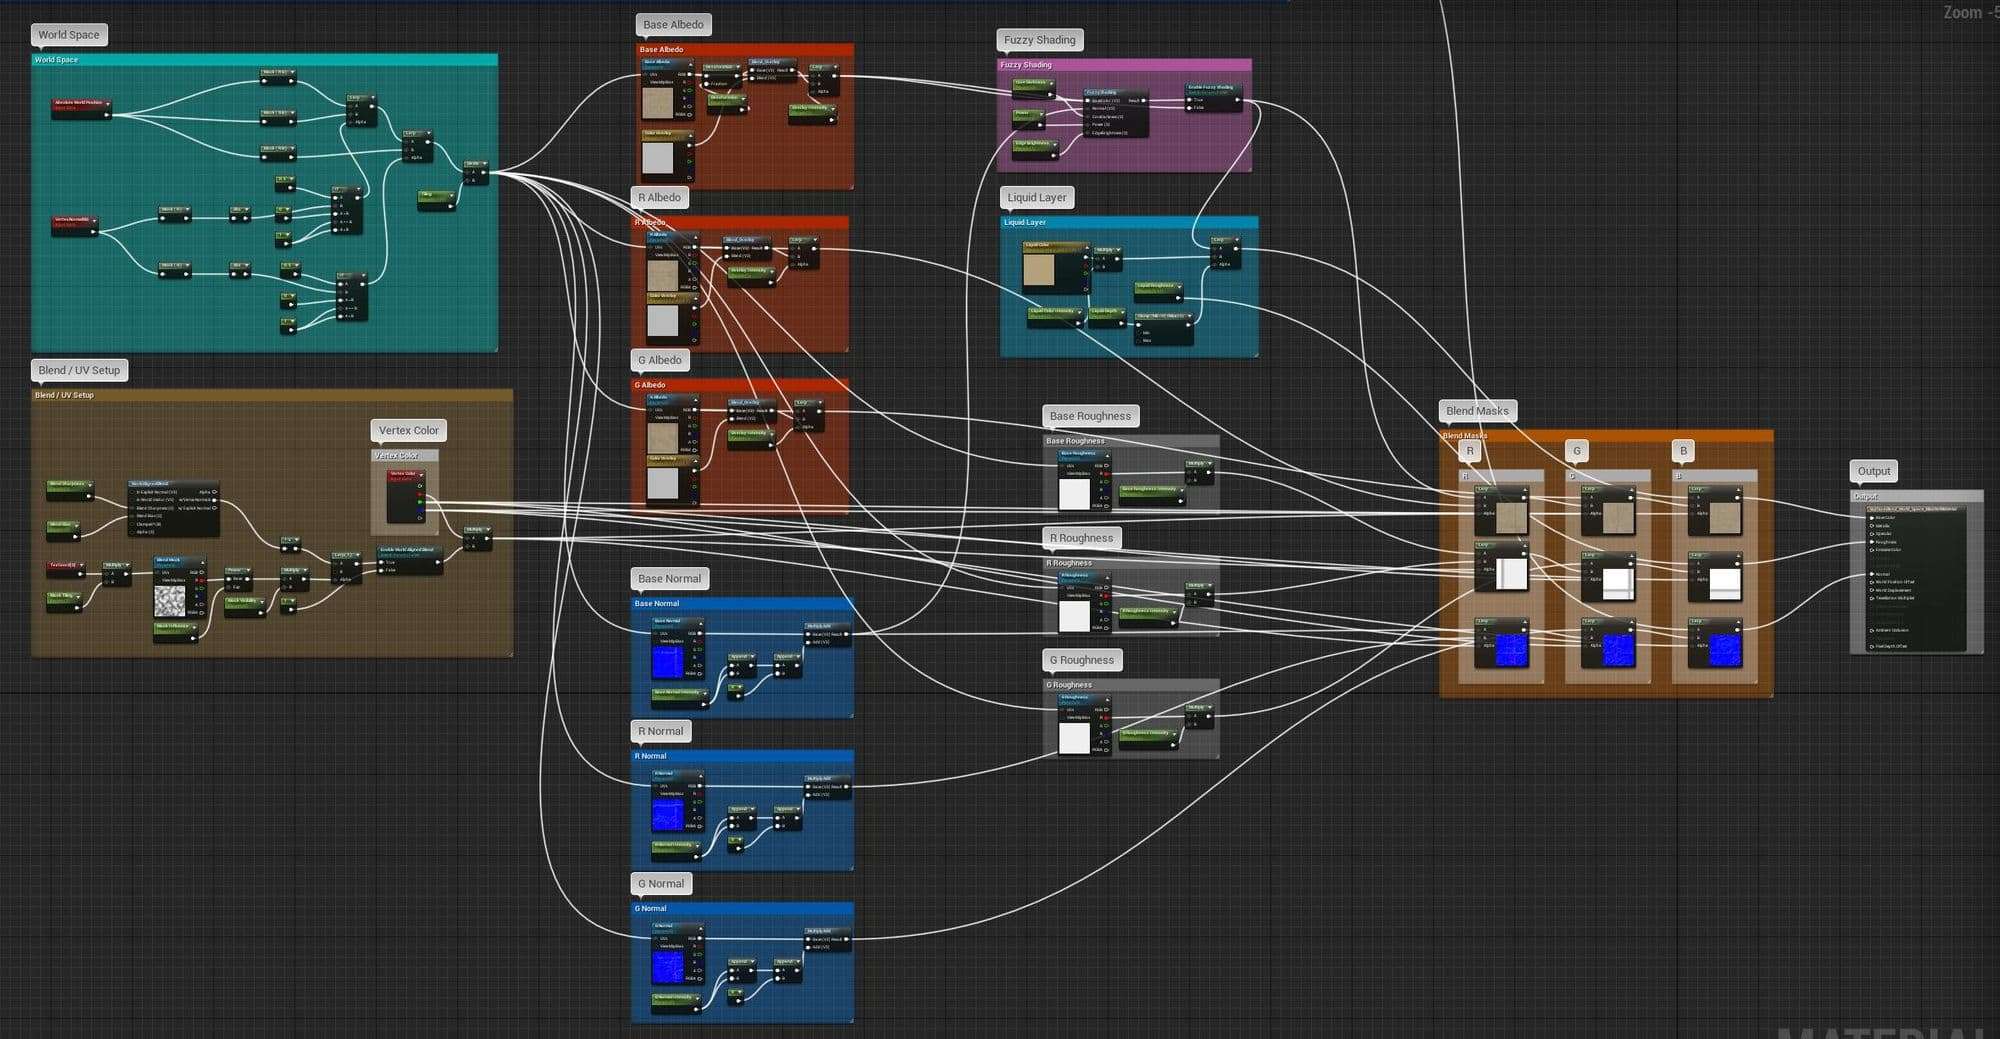
Master Material with Water Shader Breakdown
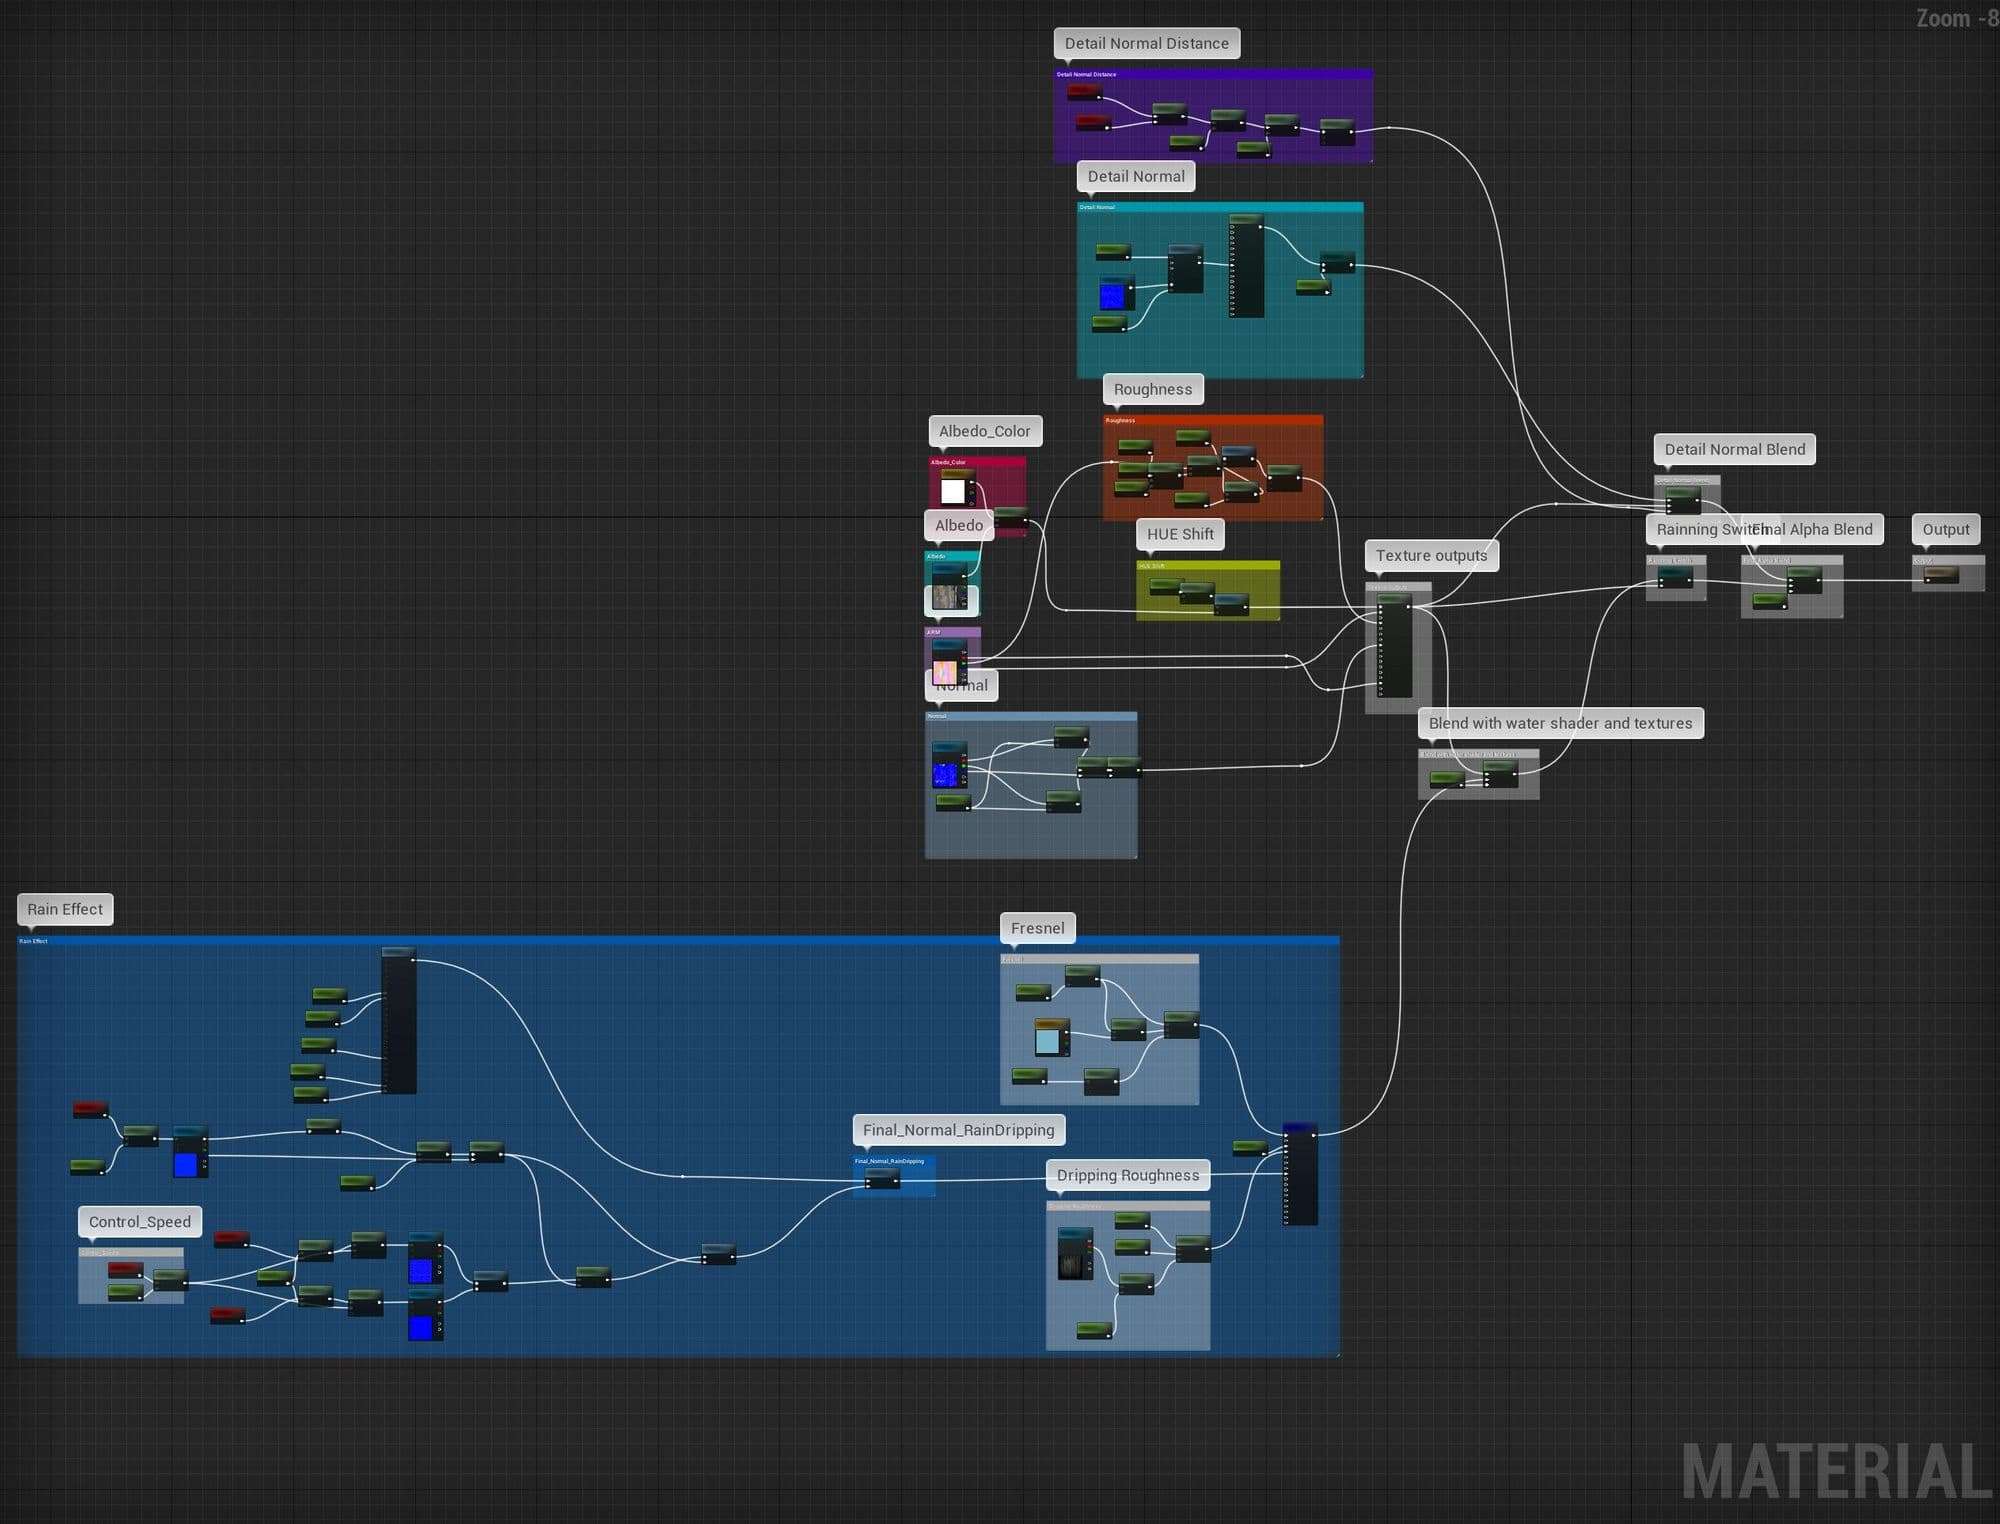
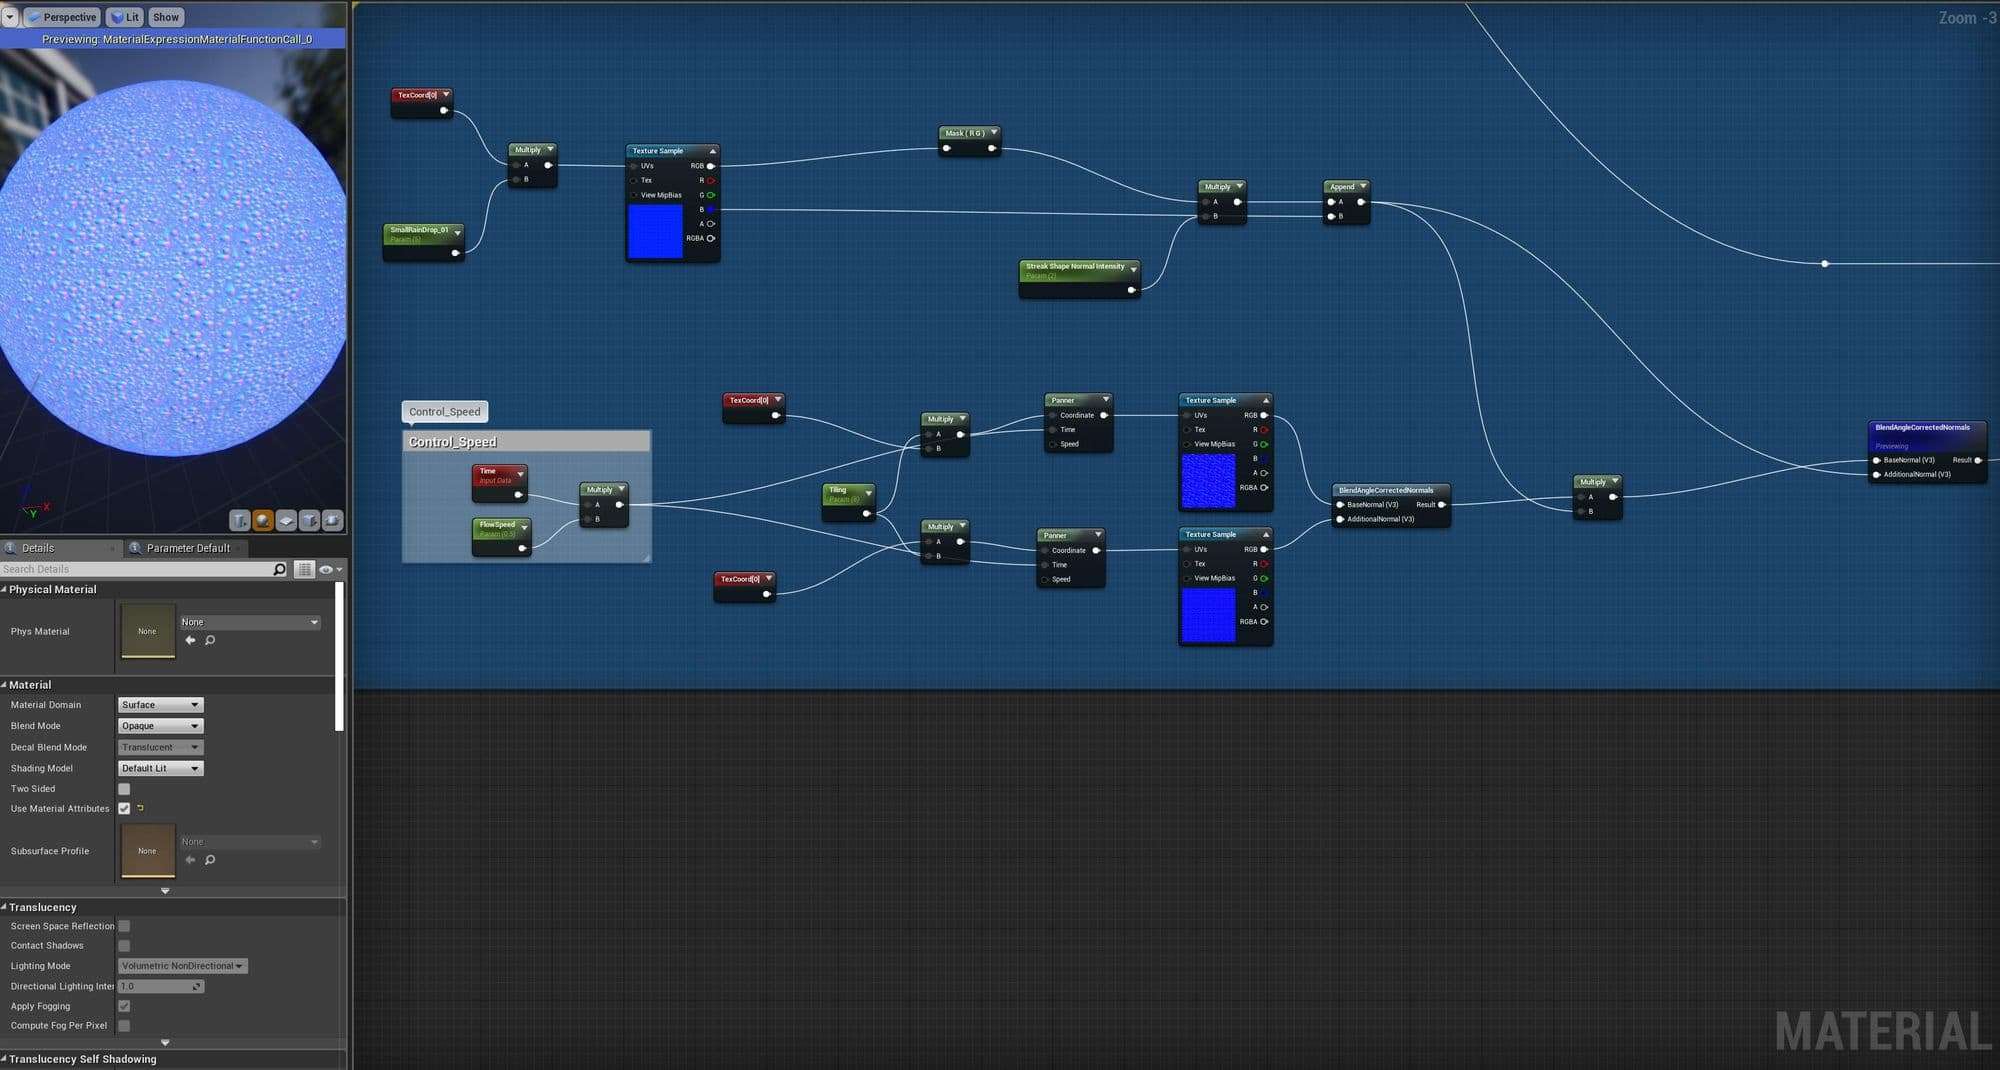
I used three different normal rain drop maps blended together.
I blended with final water shader material function that I did before.
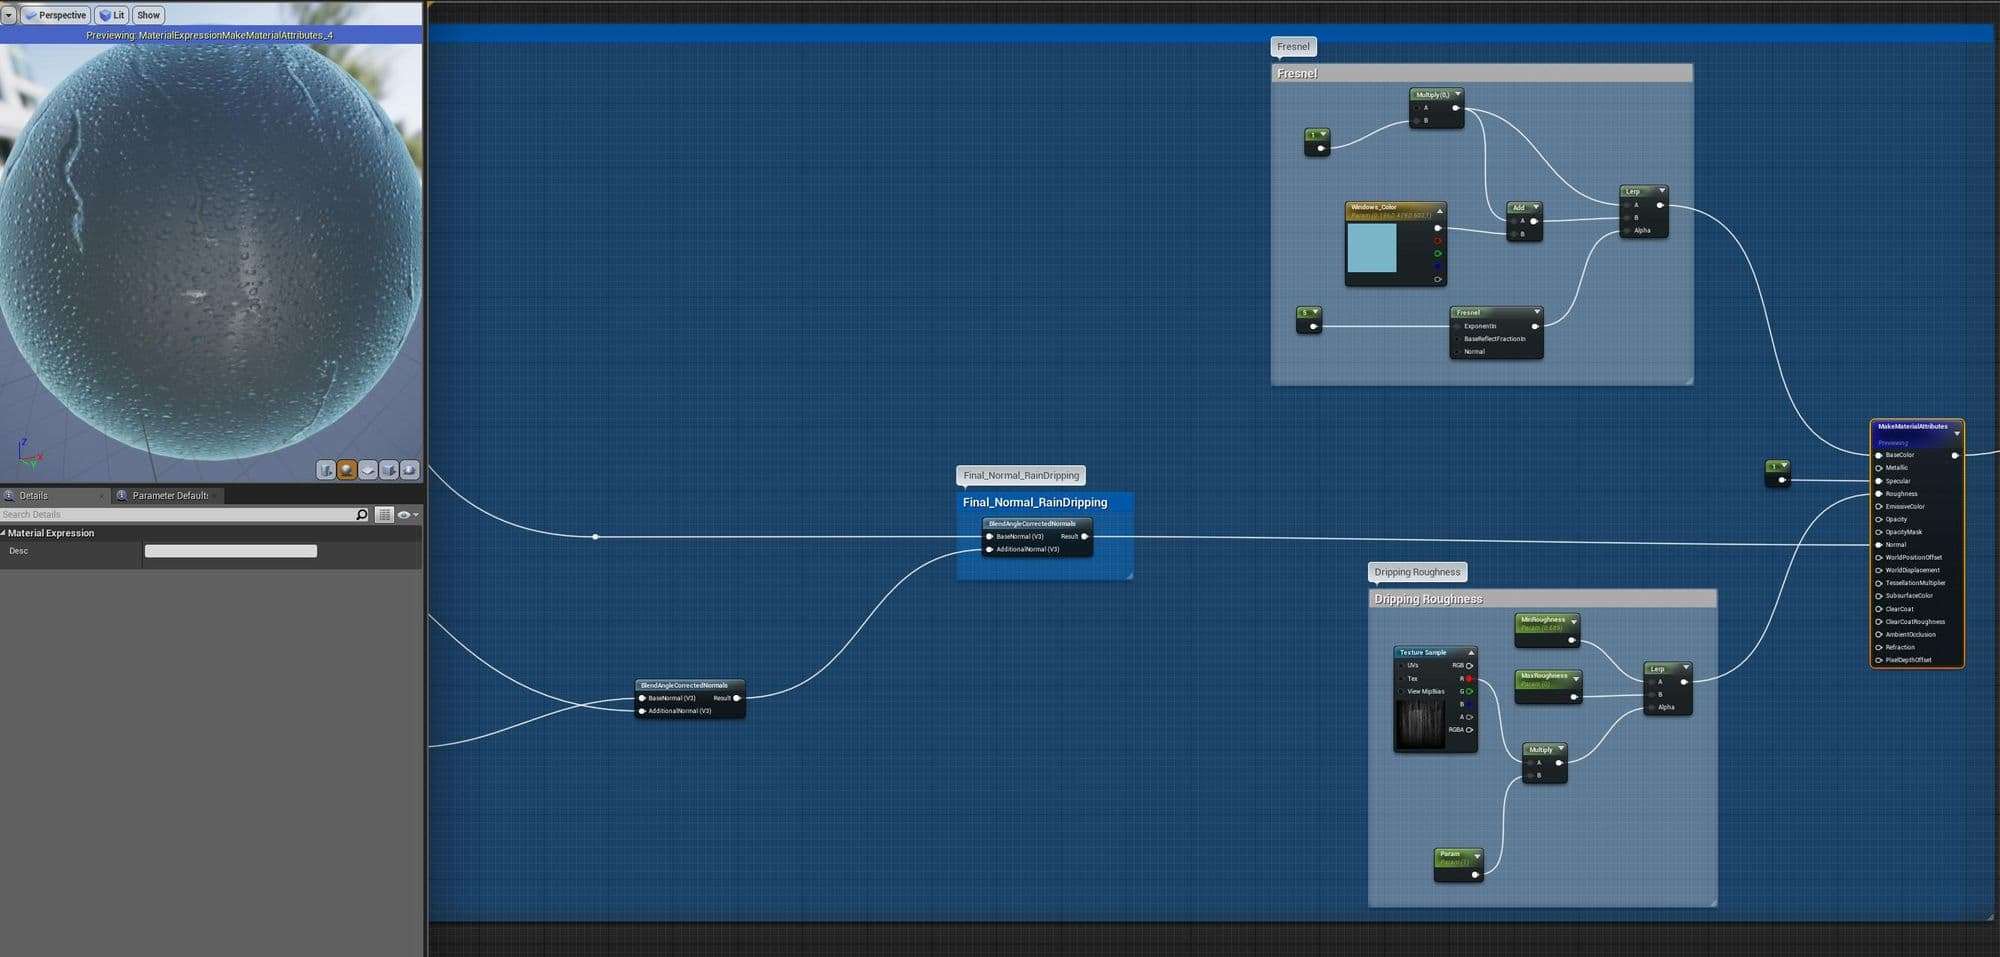
I used MakeMaterialAttributes Node to connect all of the nodes together. I used Frenel node to fake a water reflections. At the same time, I used dripping roughness map to represent leaking effects as well.
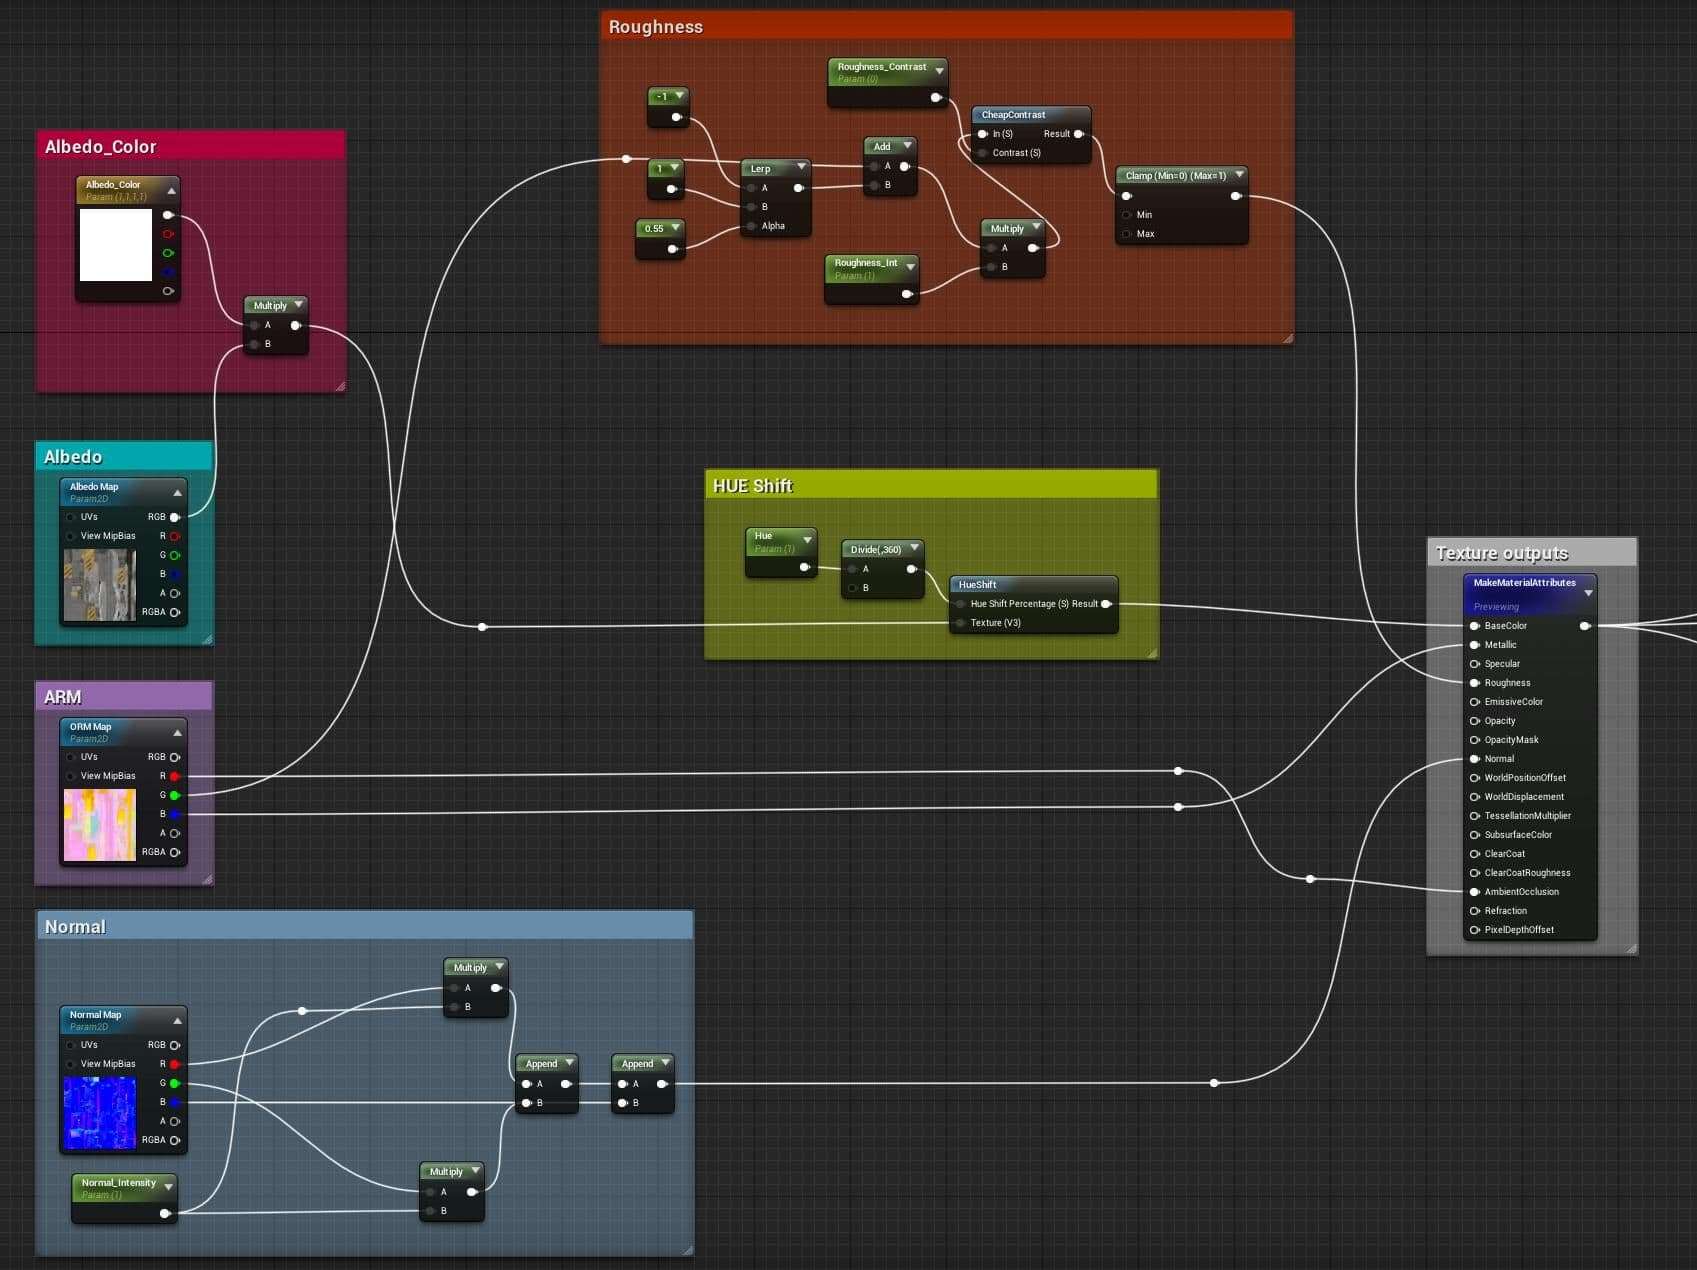
Here was PBR textures setup that I created all of the textures from Substance Painter.
I used HUE Shift Node, which was very useful creating different color variations on the same model.
For the normal map, I used Append Node to split X and Y channels to increase the intensity of normal map. This was very useful to avoid breaking normal maps by increasing to value to high.
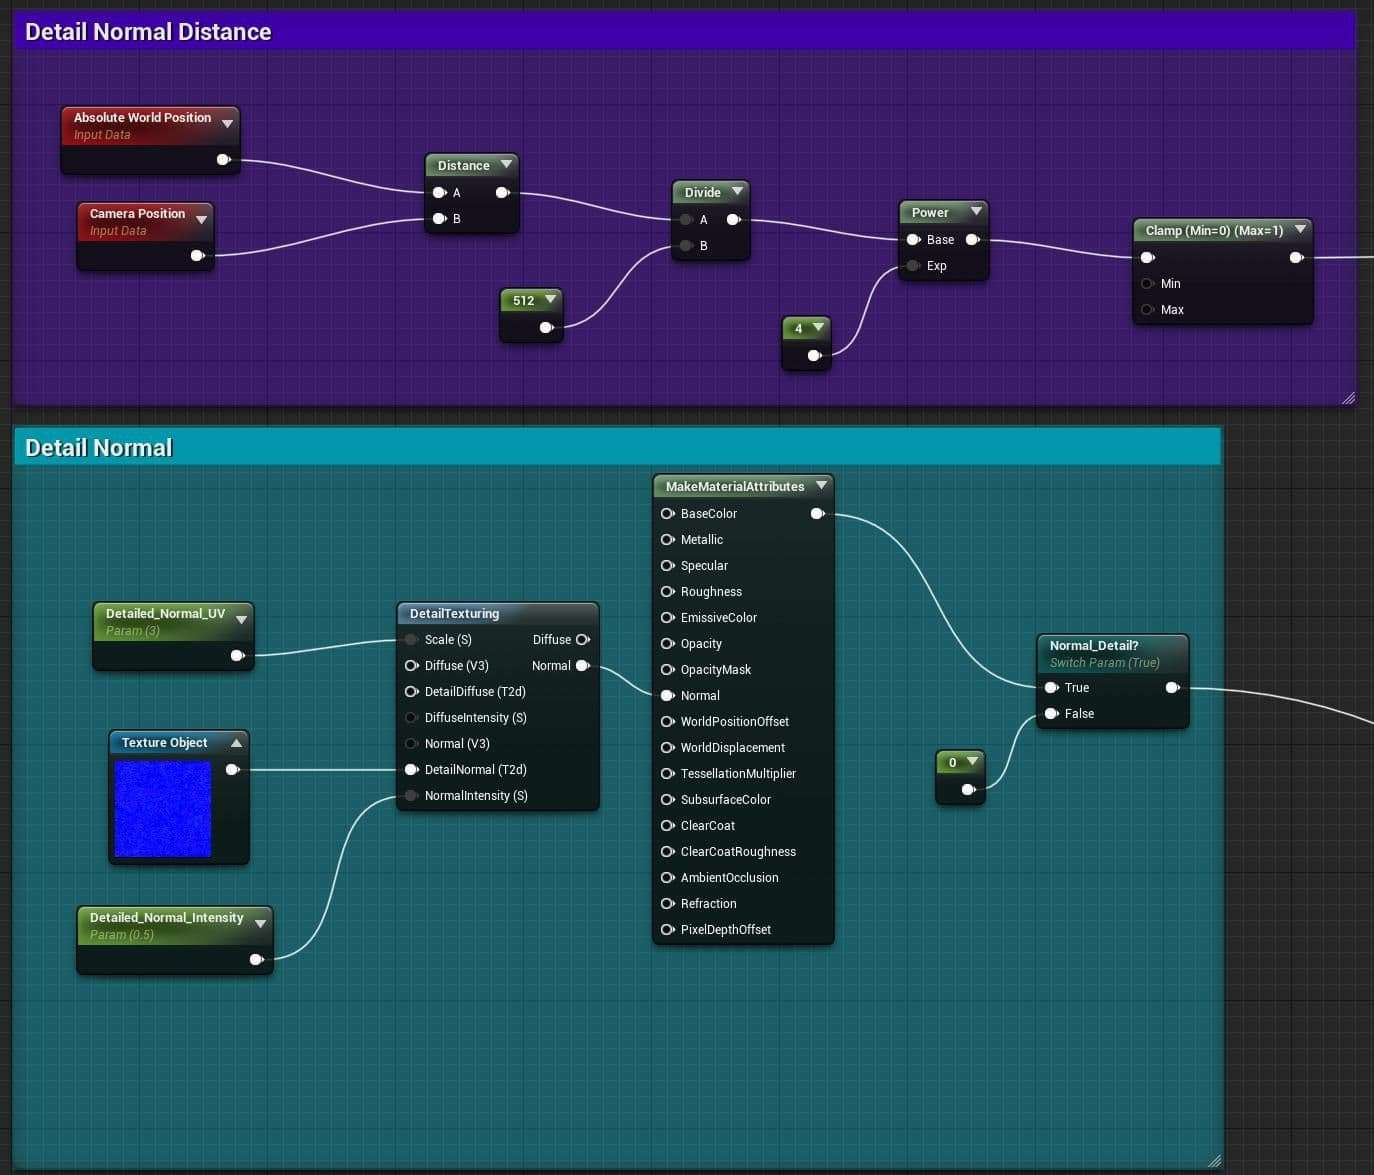
I used detail normal for the details. And also I used detail normal distance.
For instance, if the players closed to the props or buildings, it will represent normal details. If the player stay away from the props or buildings, the normal maps will automatically change to original texture looking.
Here was blending everything together and connected to output Node.
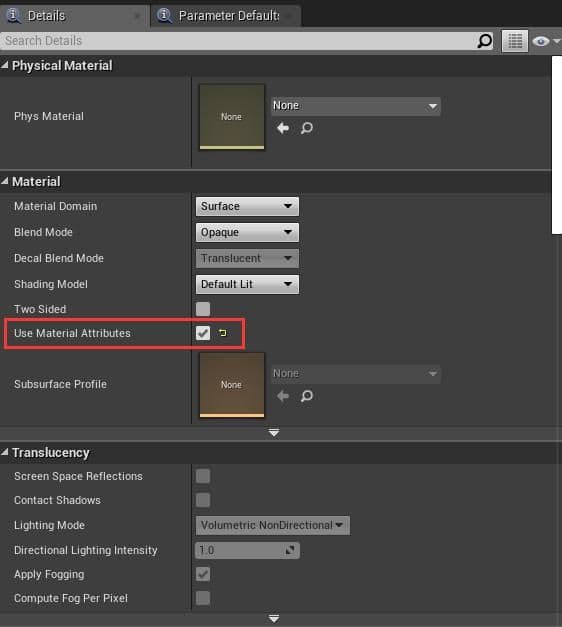
Just make sure Use Material Attributes has checked.
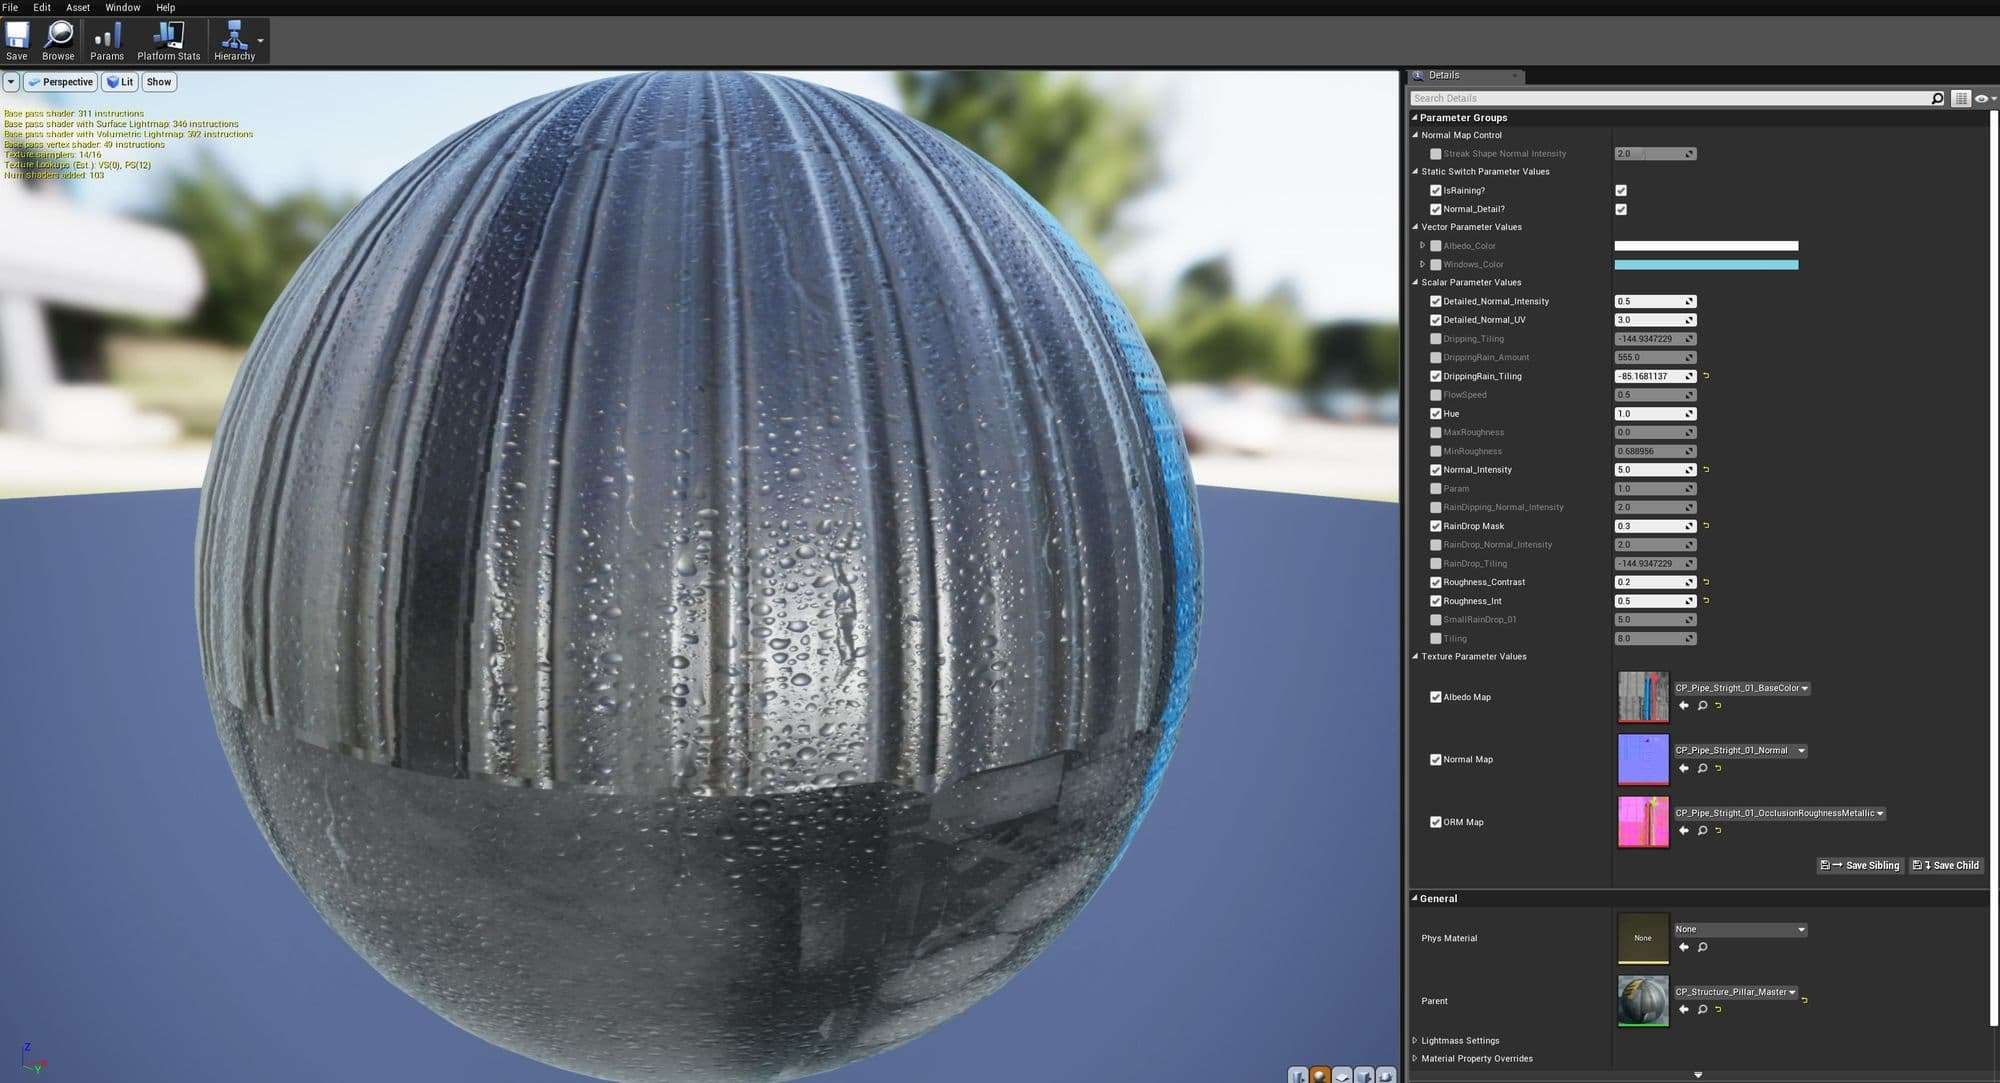
Final master material instance.
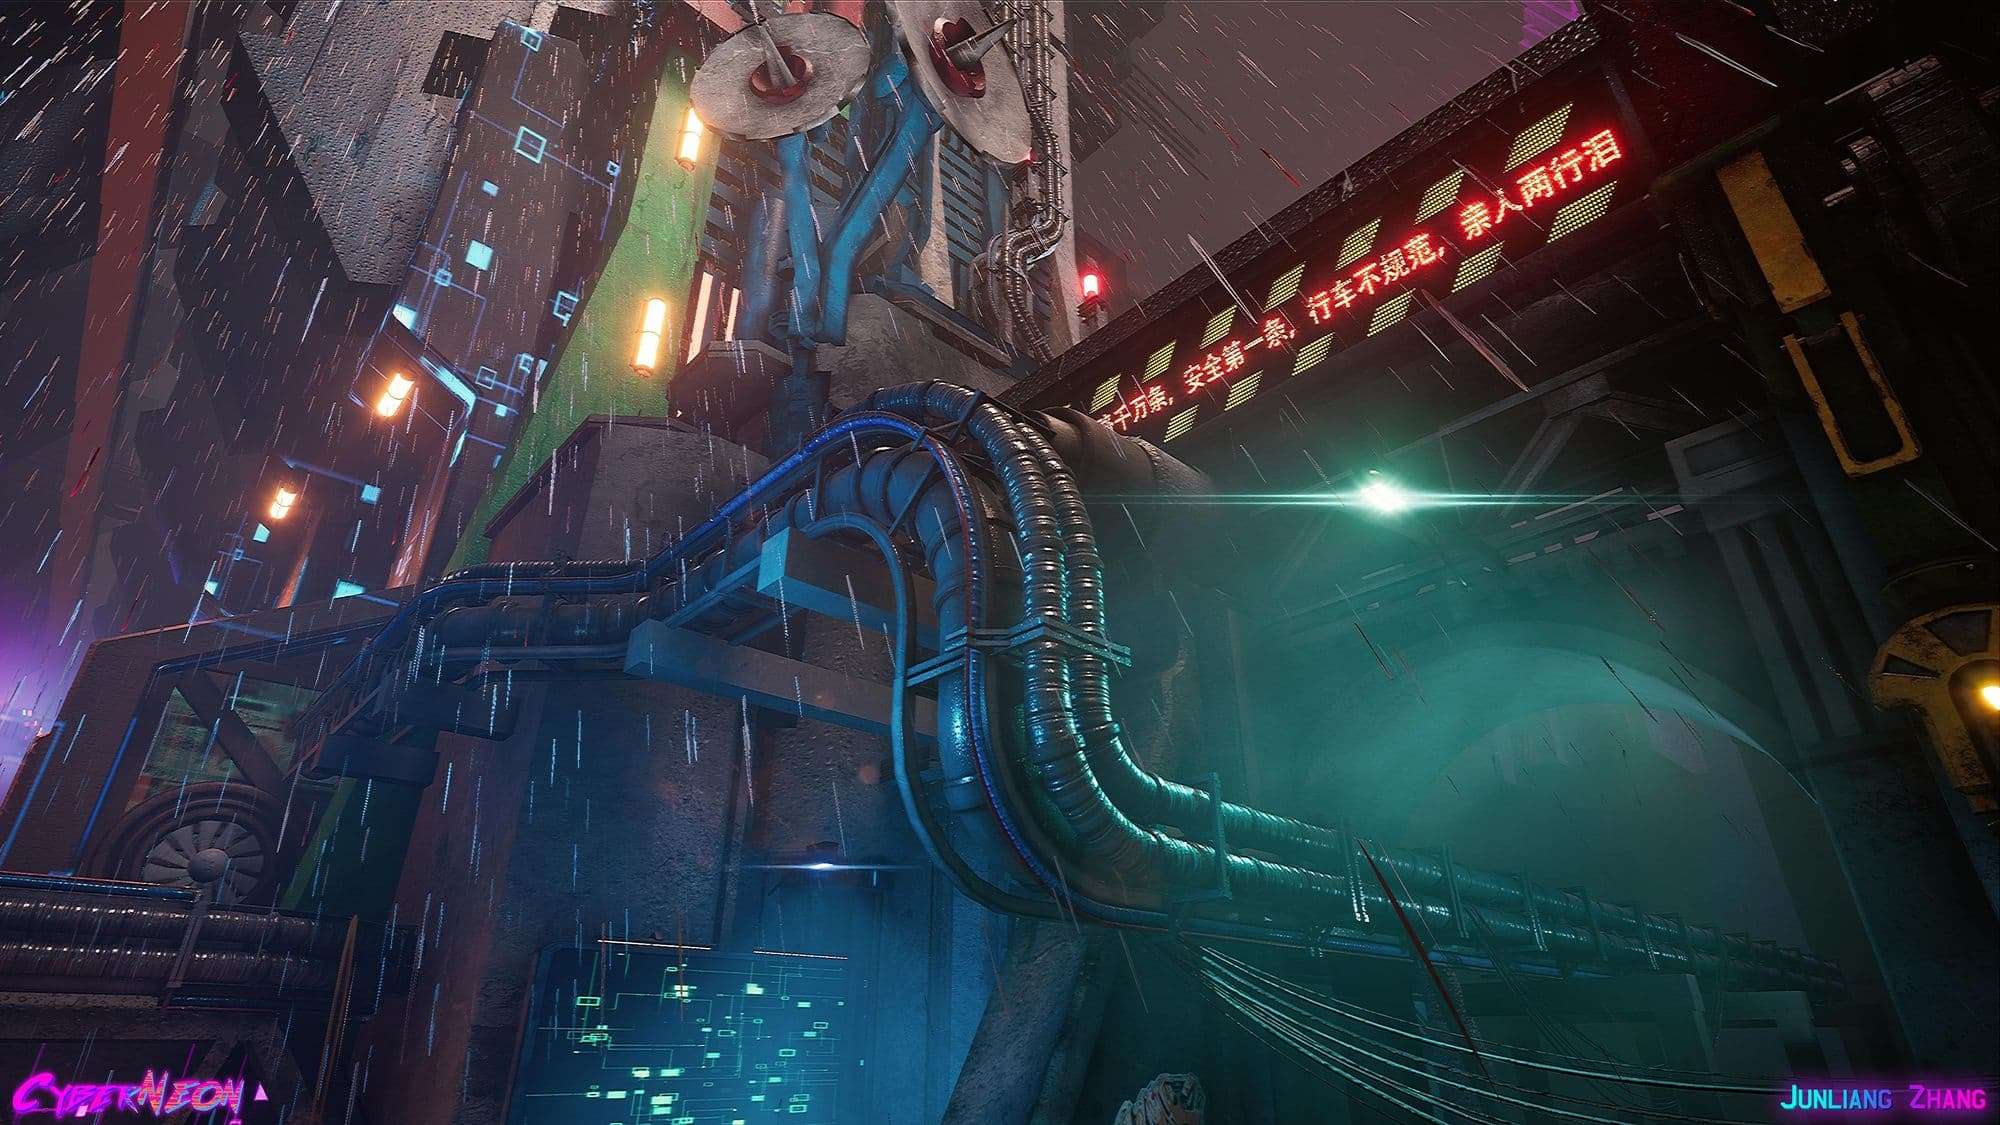
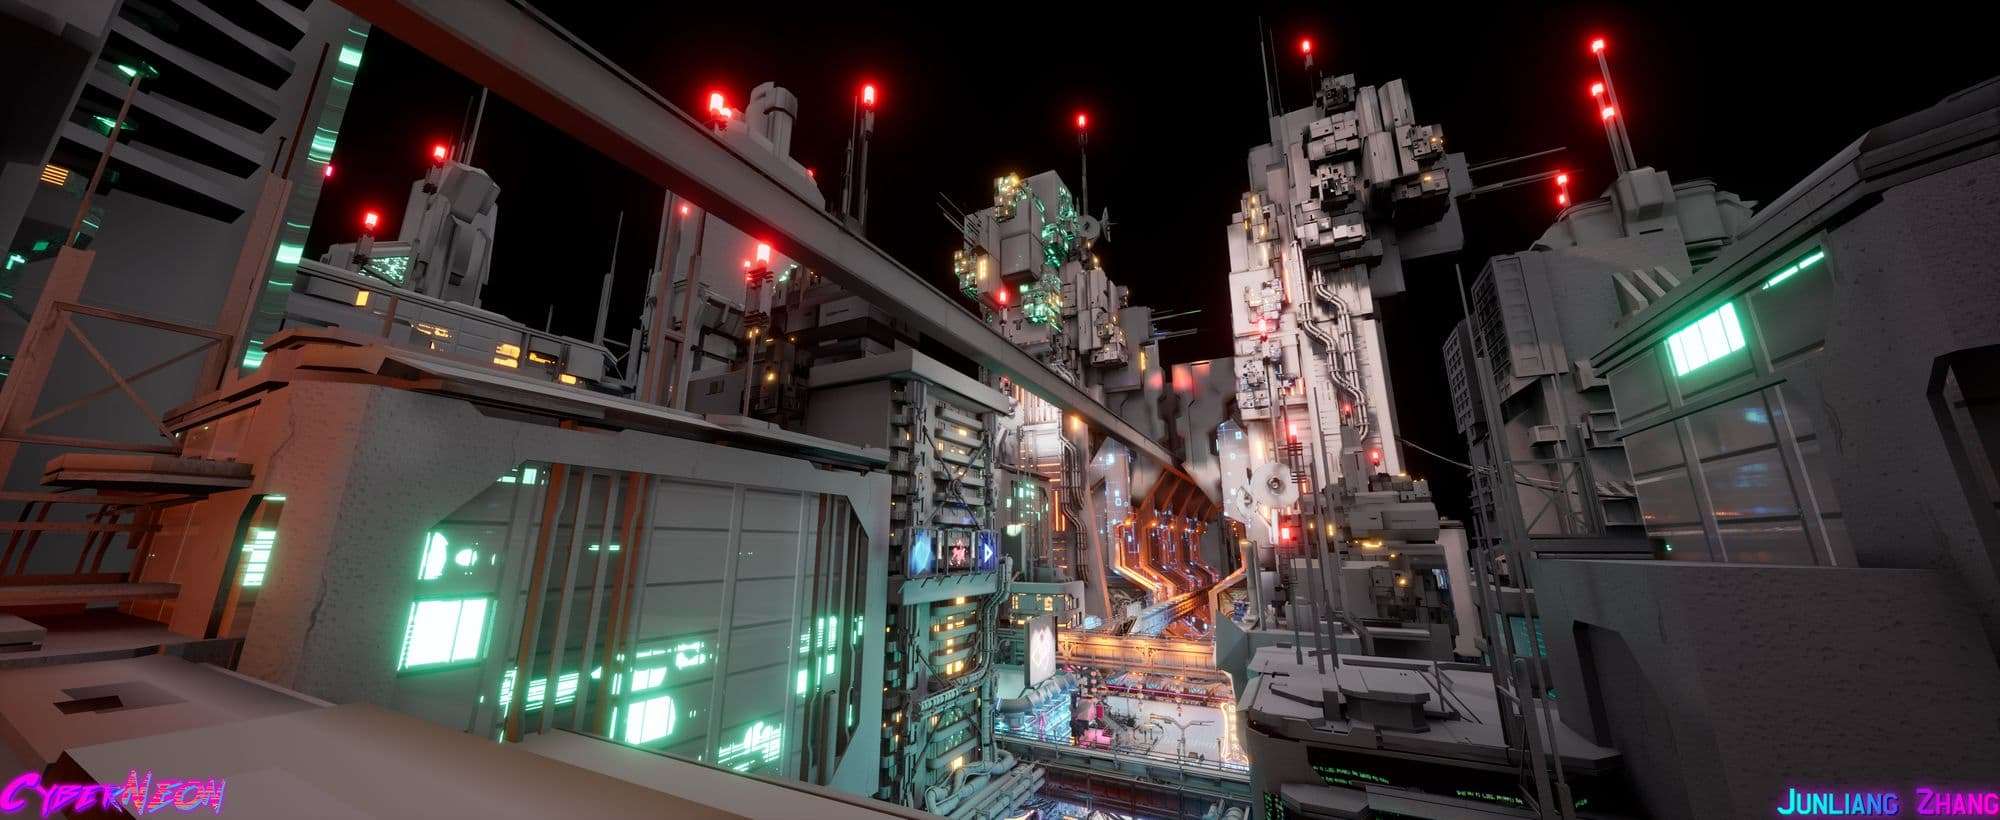
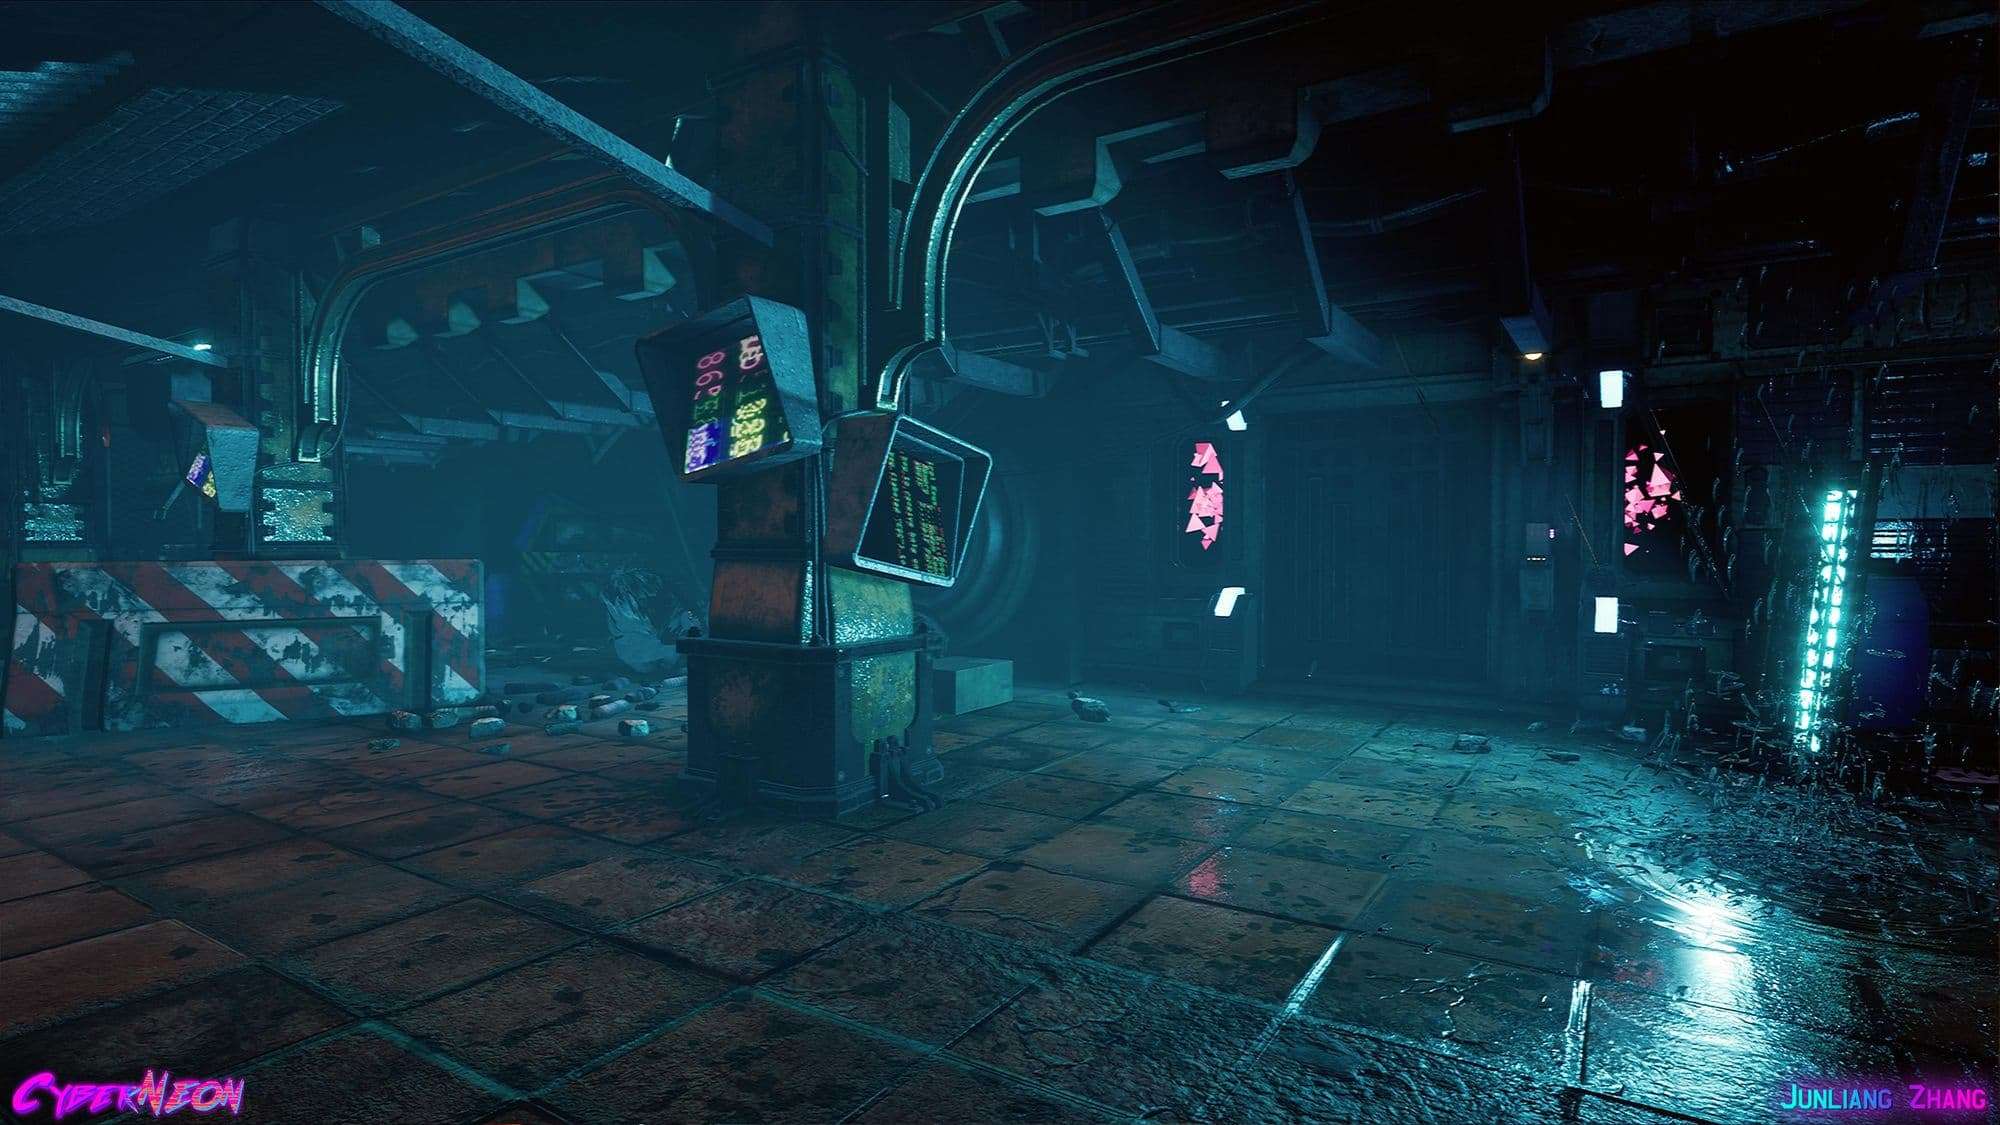
Final Rendering Screenshots.
Final Rendering Screenshots.
Vertex Painter Shader with Rain Drops Breakdown
I created a Vertex Painter Shader for the ground. I created channel “B” with rain drops.
I created an Alpha rain drops textures and blended two of them together with different directions.

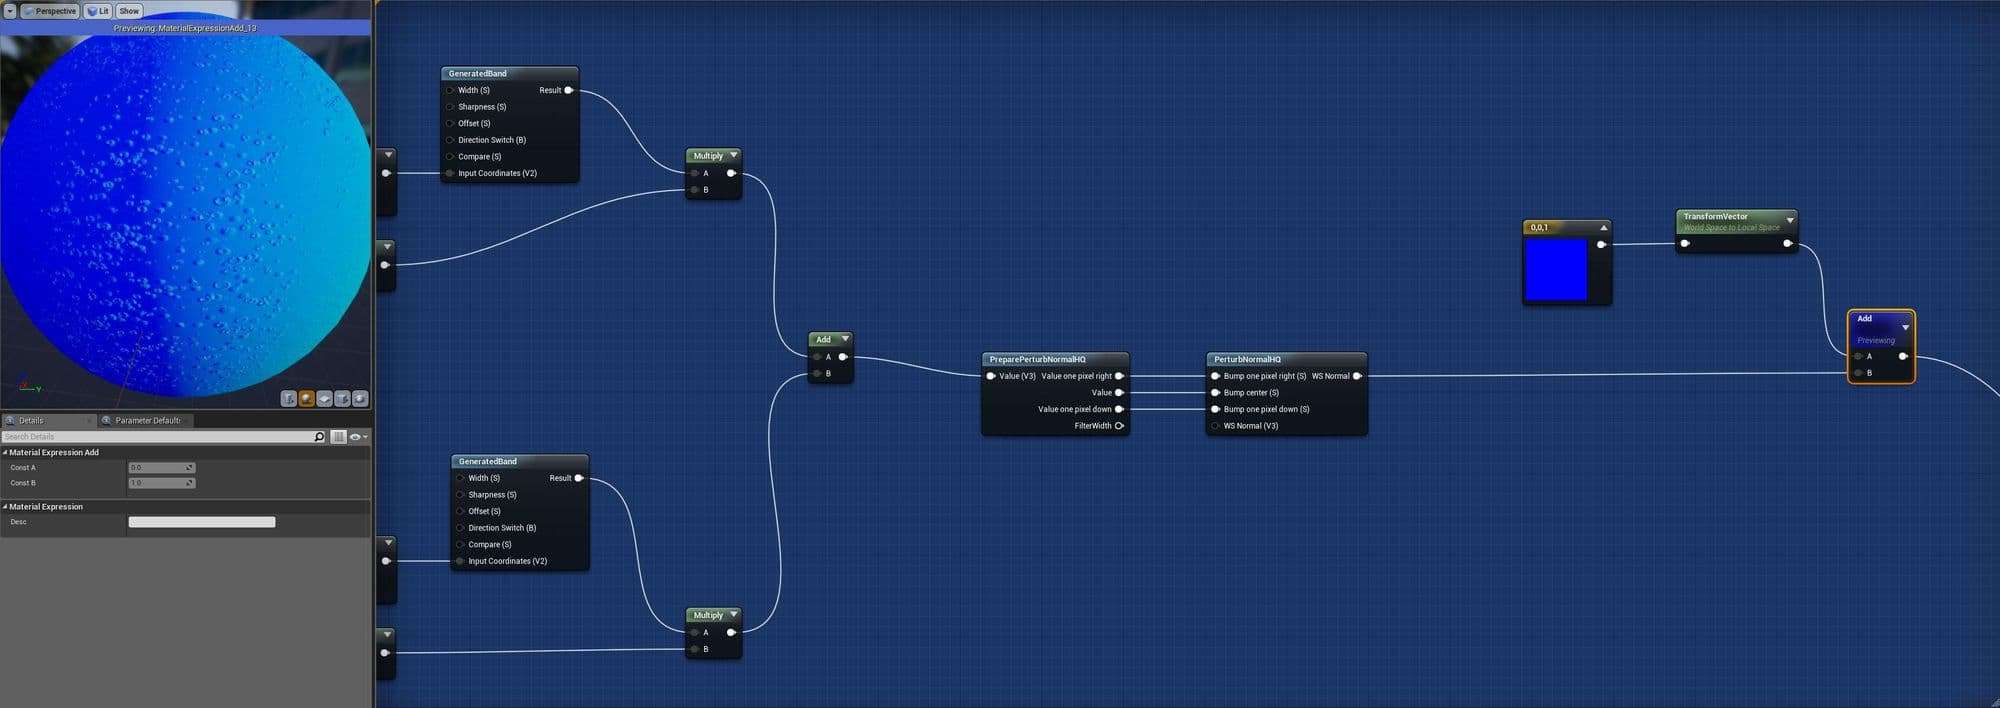
And then I used PreparePerturbNormalHQ Node and PerturbNormalHQ node to convert to Normal map from Alpha map.
Last step was to create a B channel of Normal map with Z Vector.
Here was the entire graph for vertex painter shader setup with world UV space mapping.
Final Rendering Screenshots for vertex painter shader
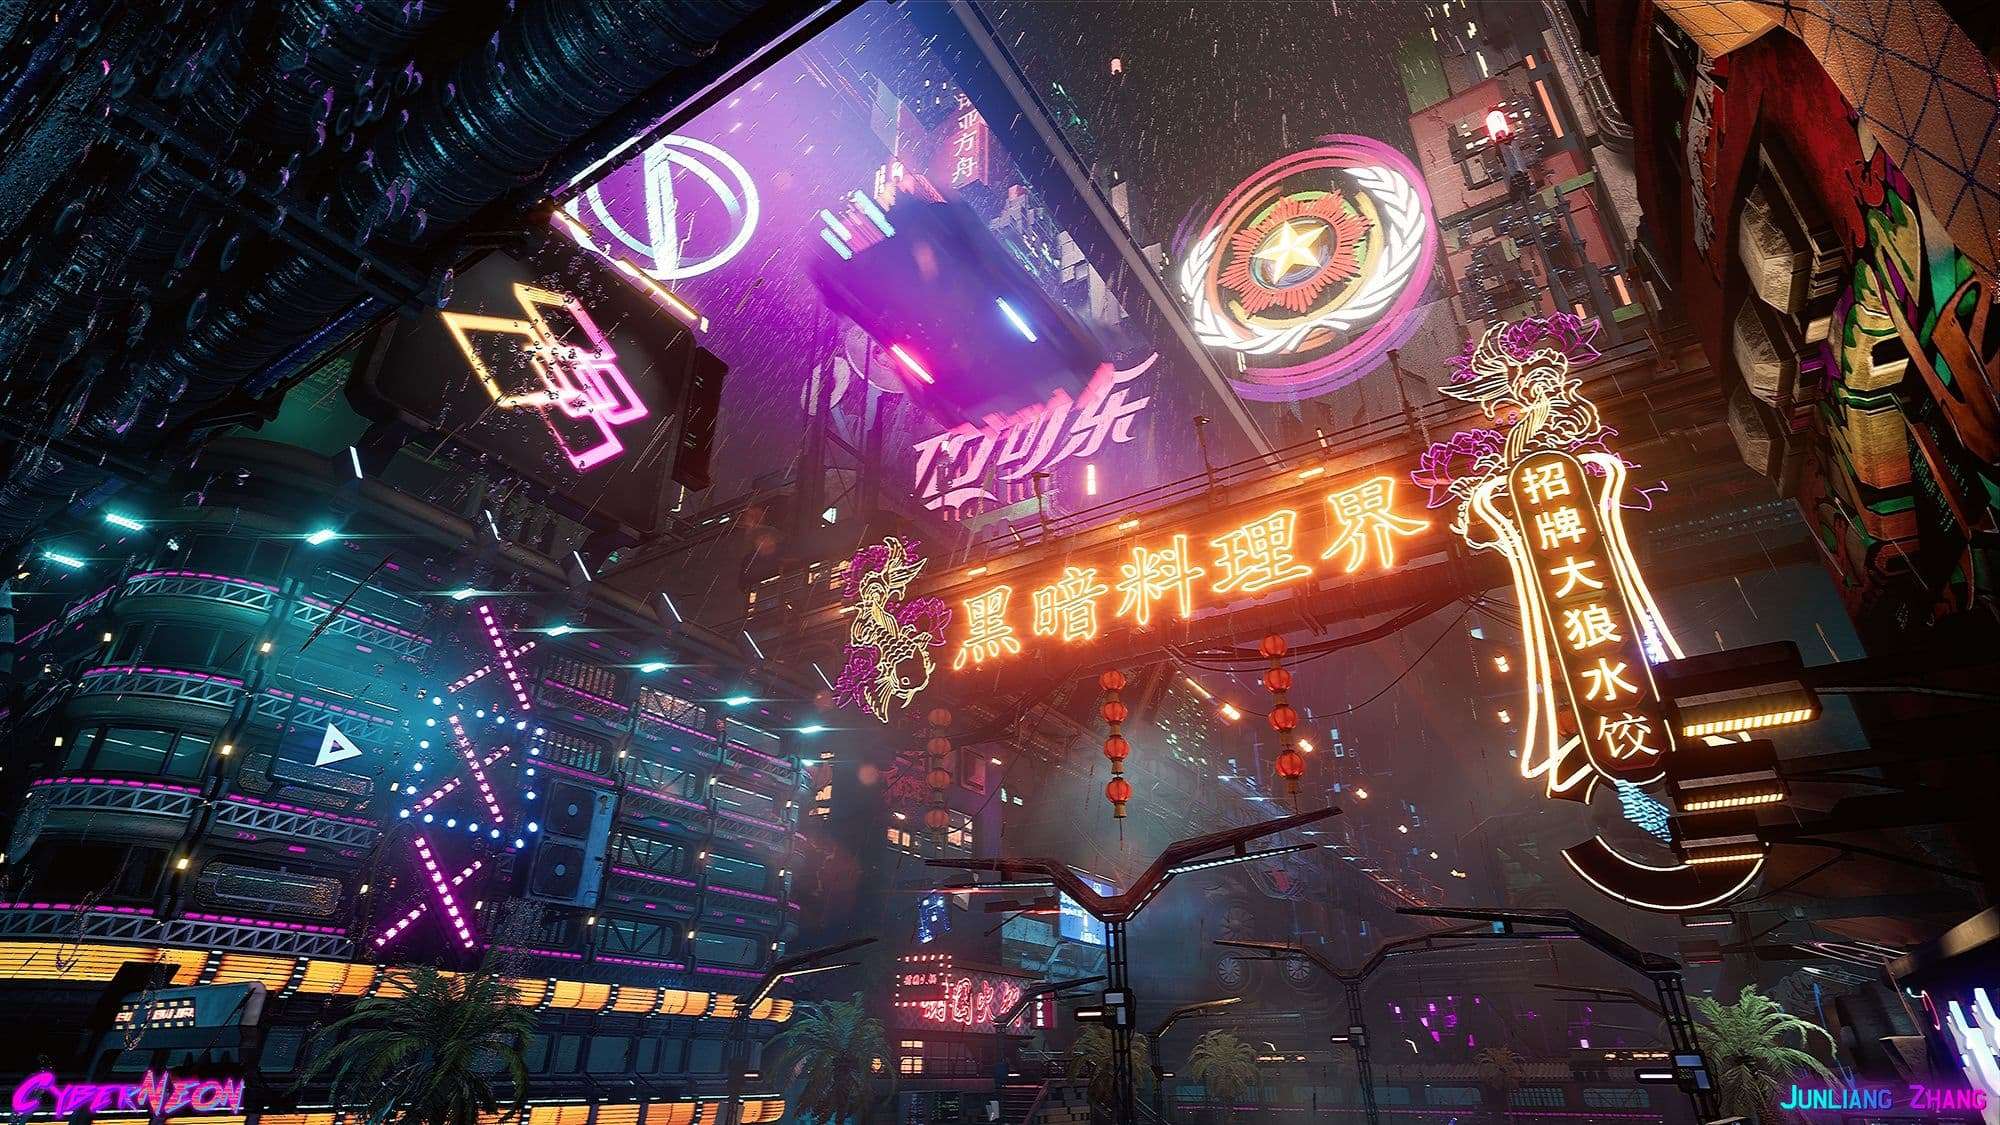
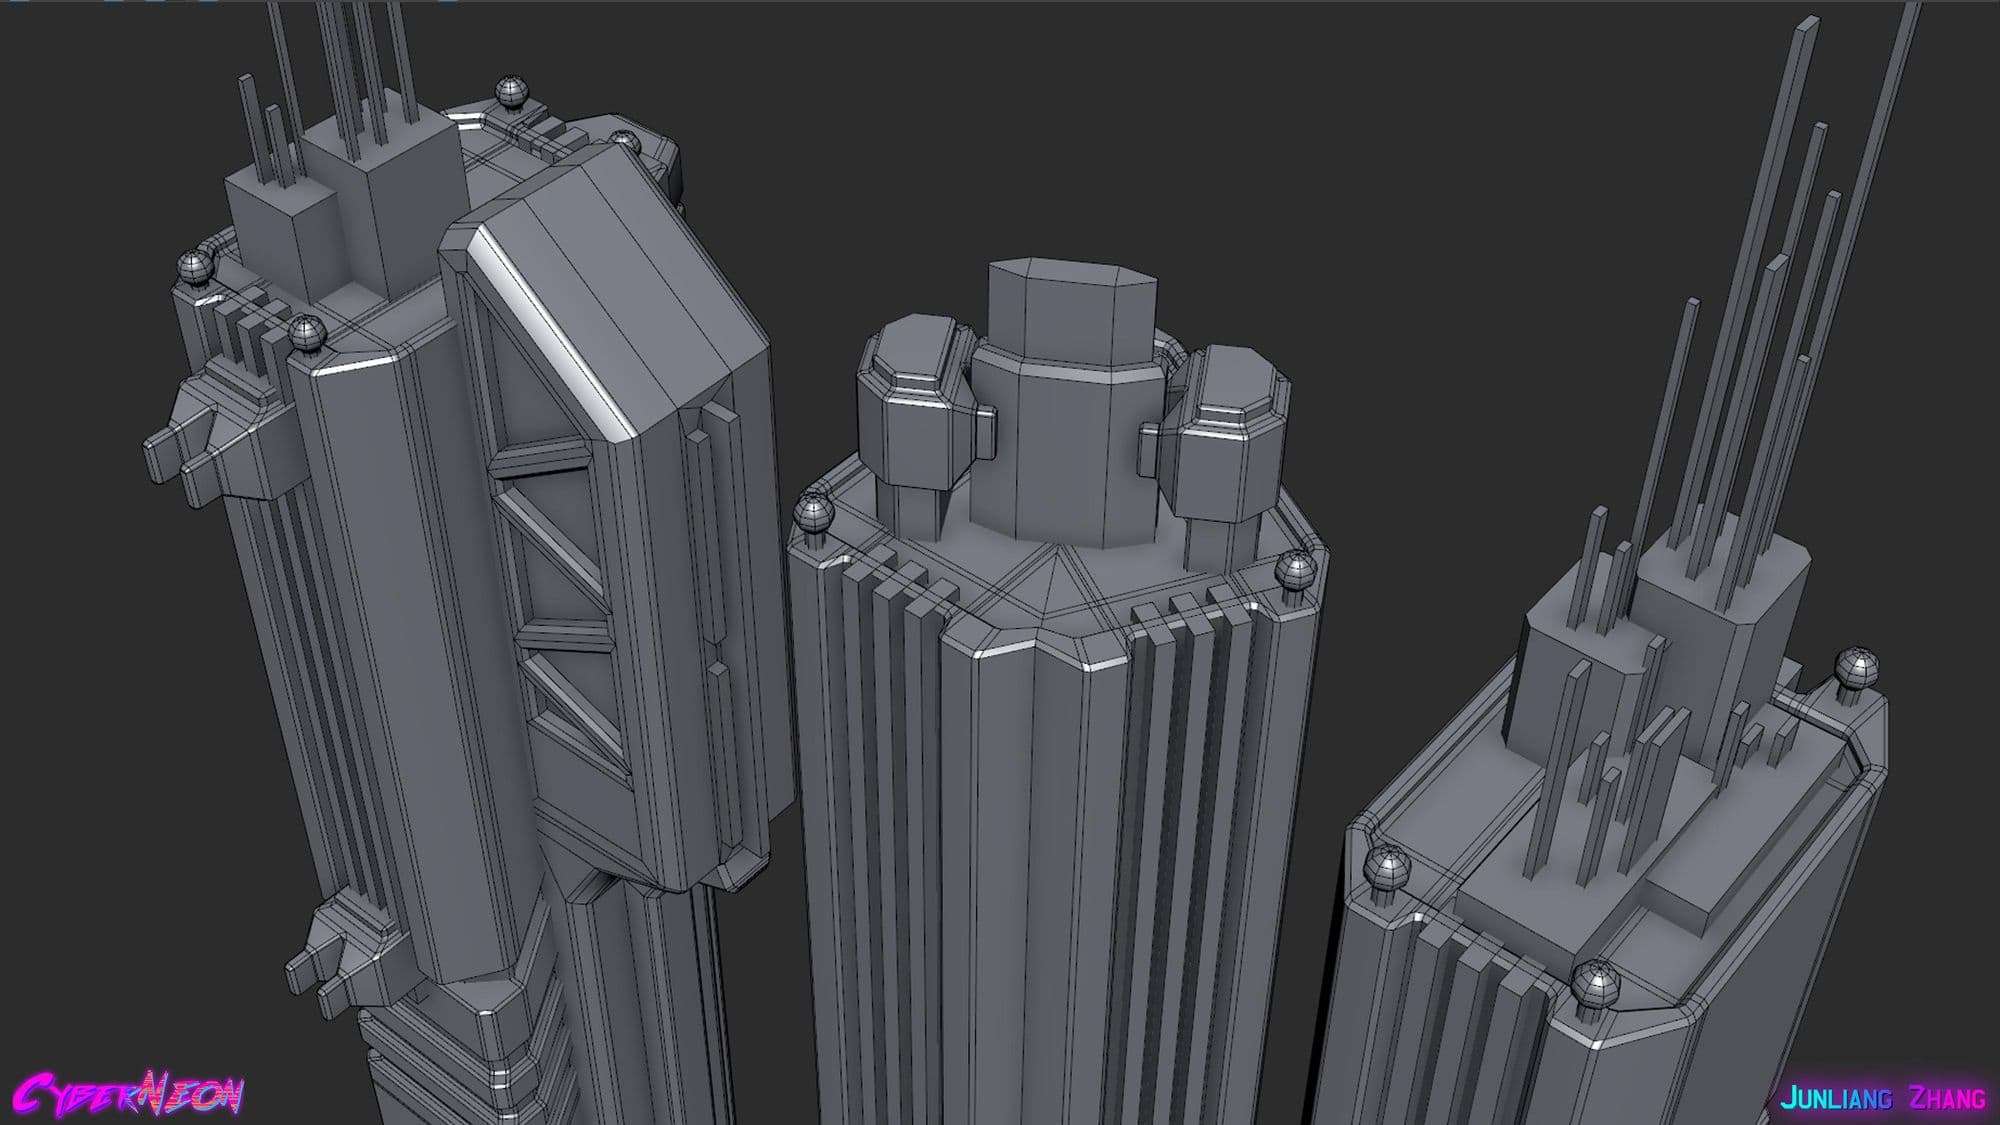
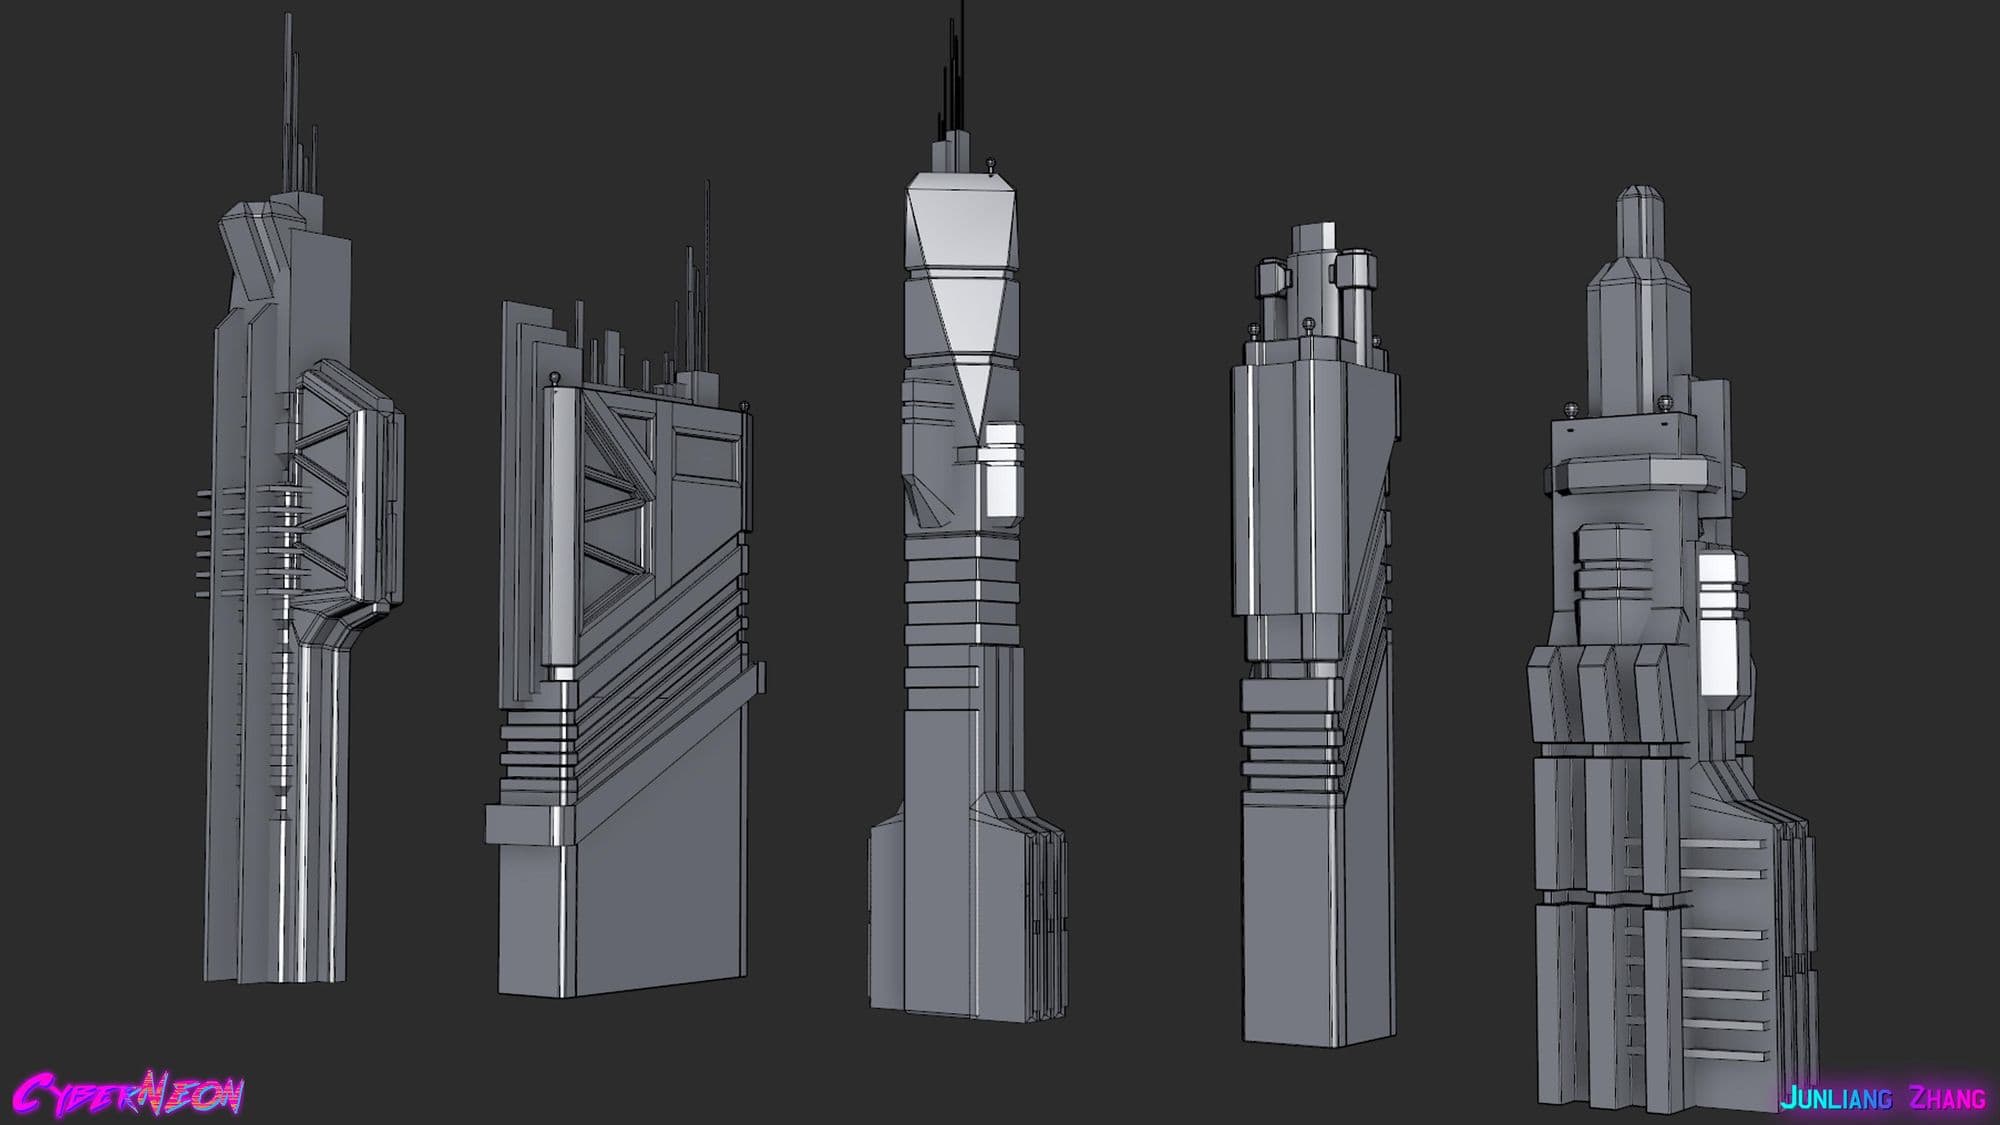
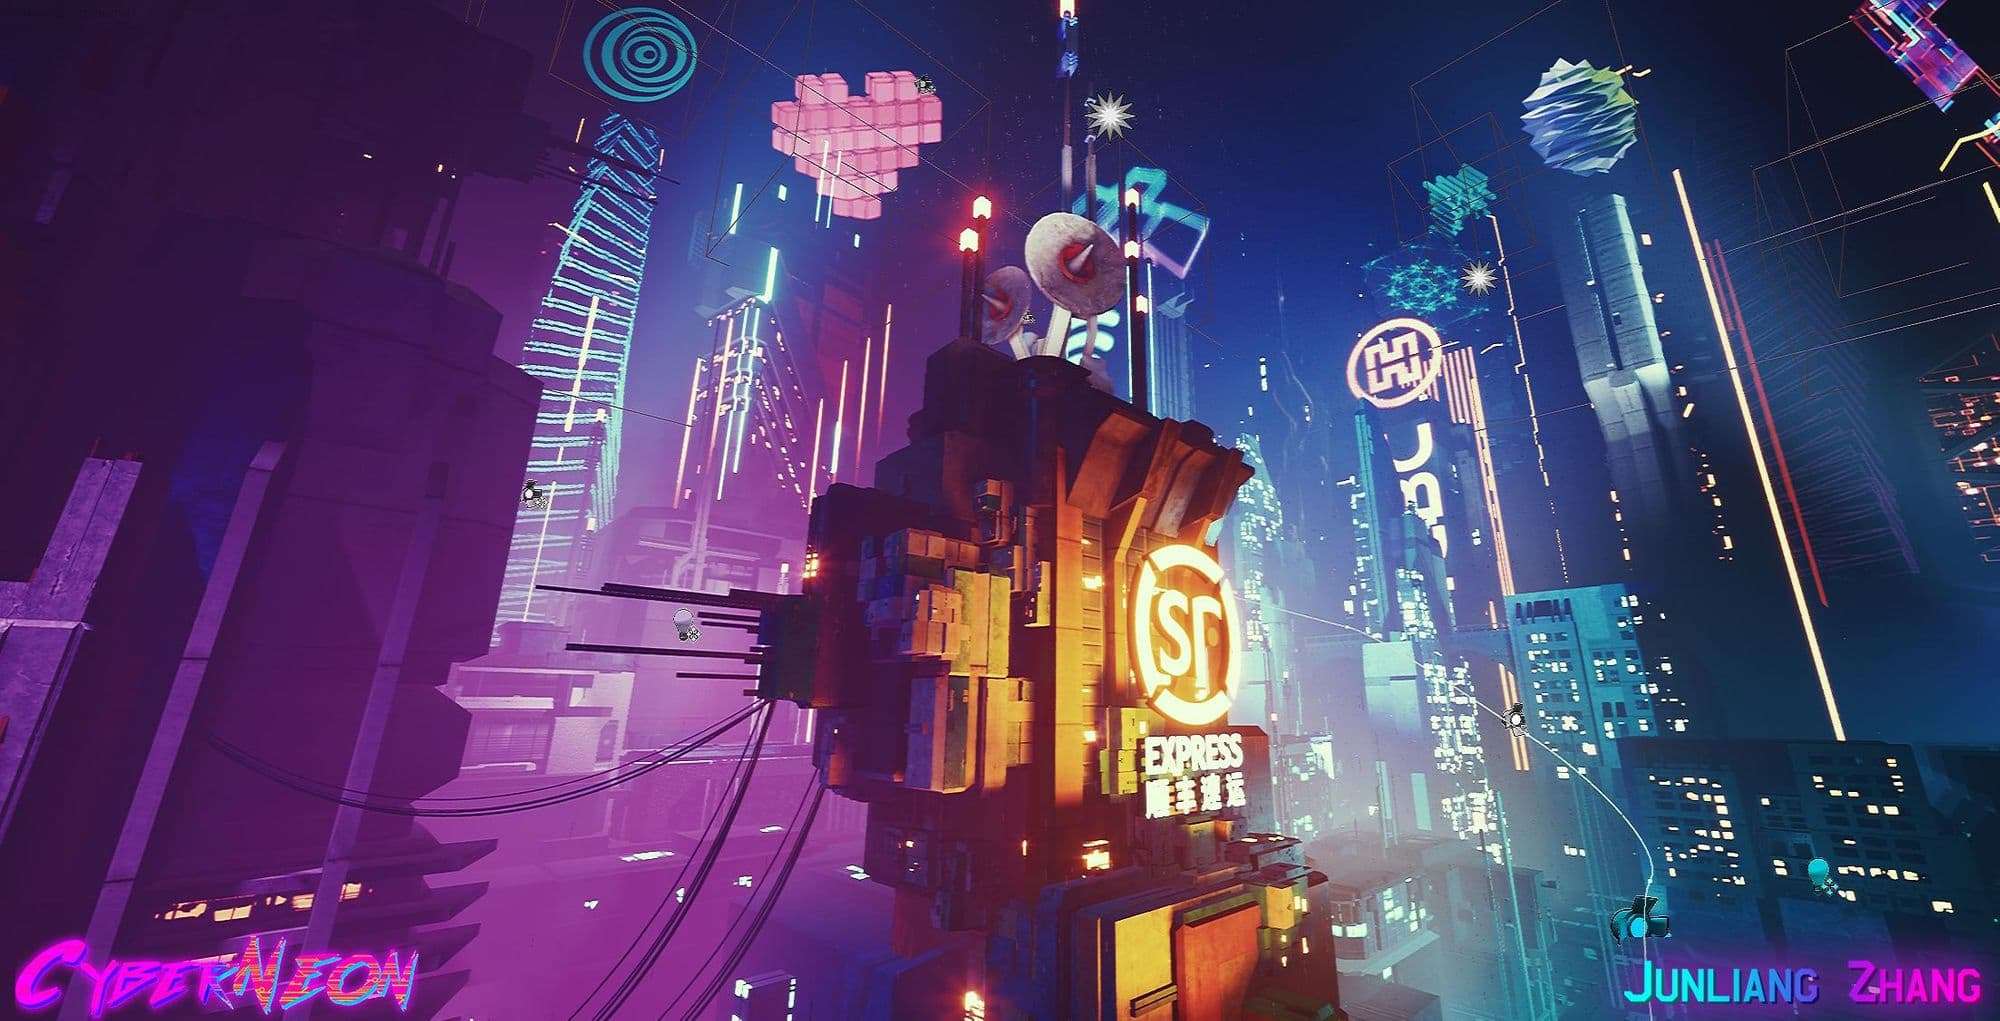
Creation of Skyline with Maya
I manually created all of the background buildings one by one with hands in Maya. I did not use any generators or procedural tools for this project. I started with references from a mood board. I did a base model for one of the buildings and modified to different shapes to be a new model. It was so much fun doing this process at that time. I was very enjoy it.

All models are simple and easy to create. What I need are cool shapes and looking.
Ceiling model screenshots from Maya.
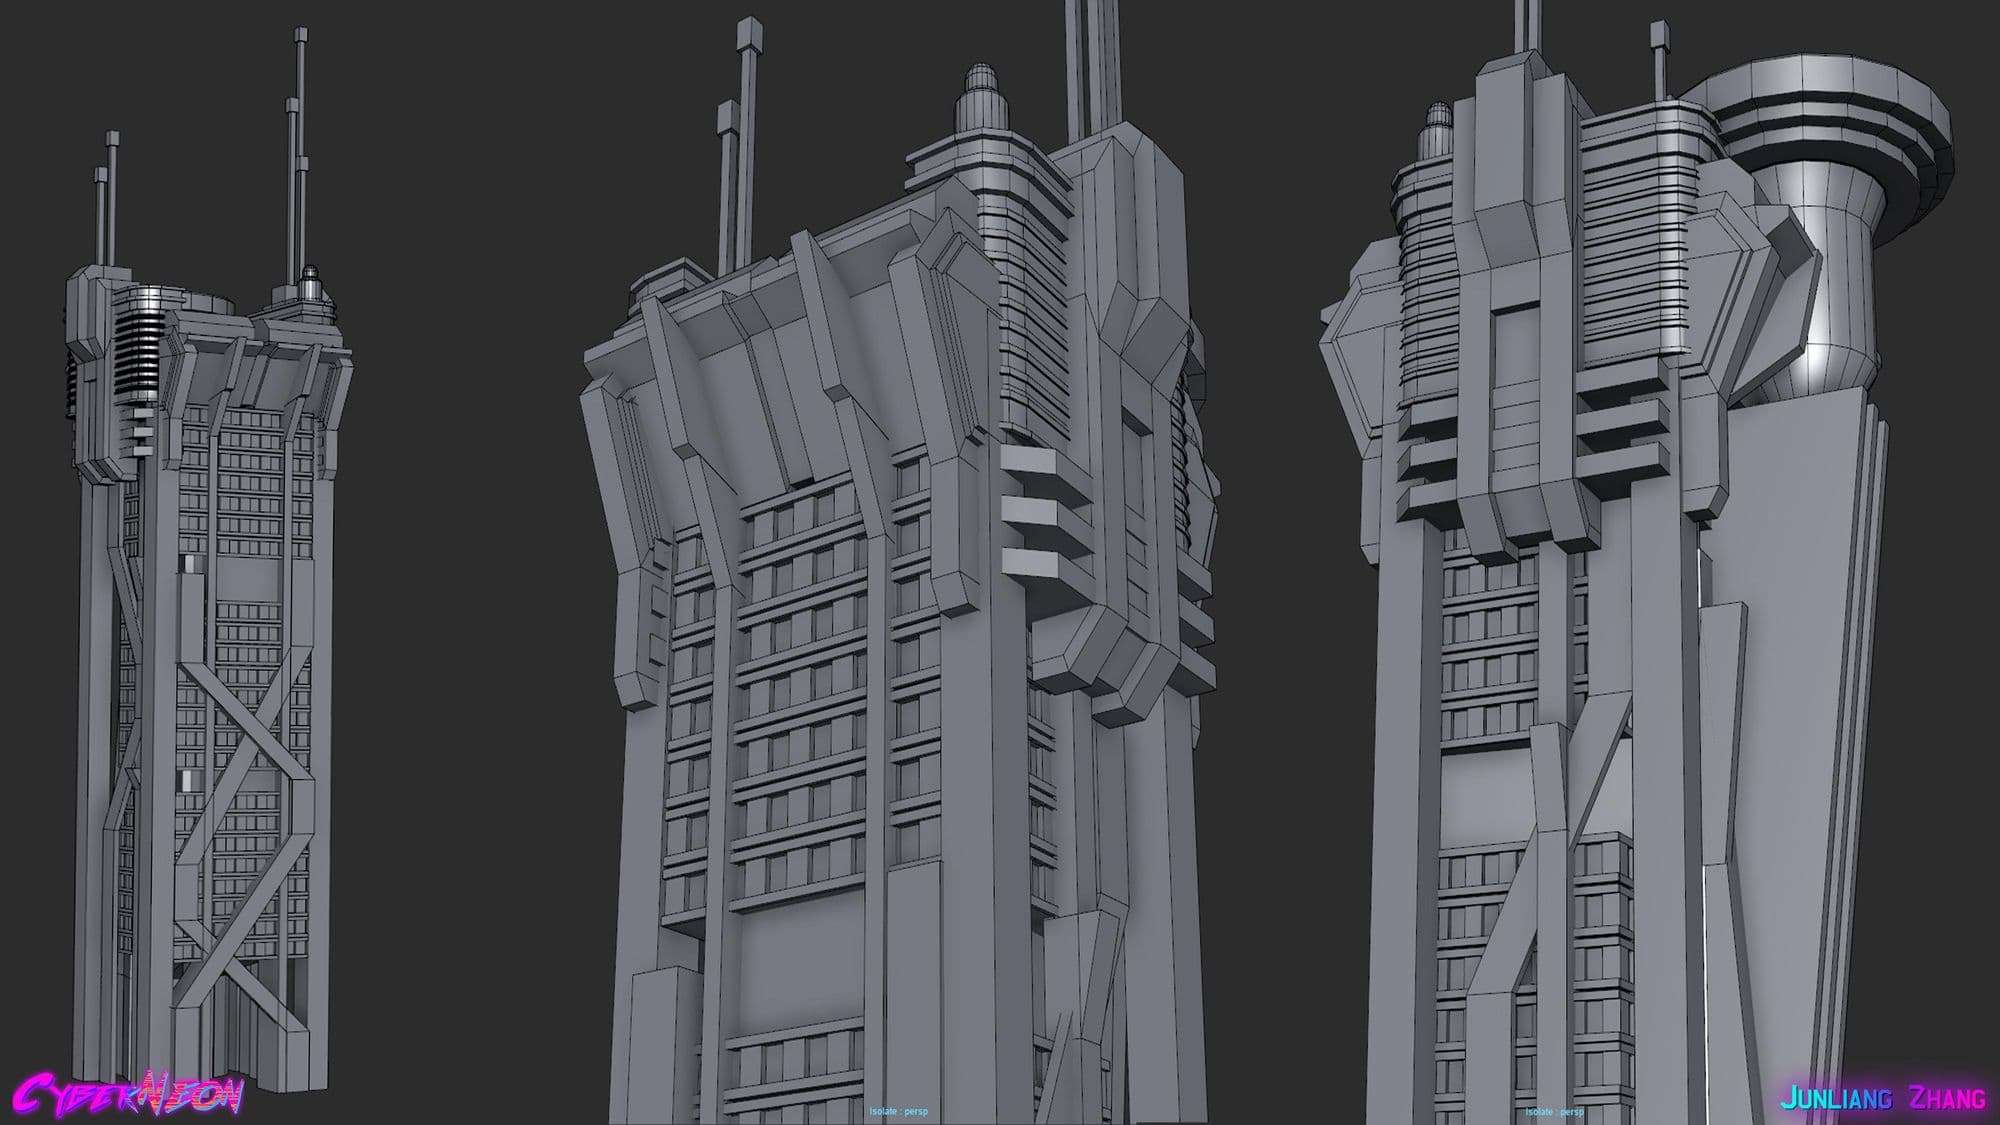
Main background building screenshots from Maya.
Building model screenshots from Maya.

Building model screenshots from Maya.
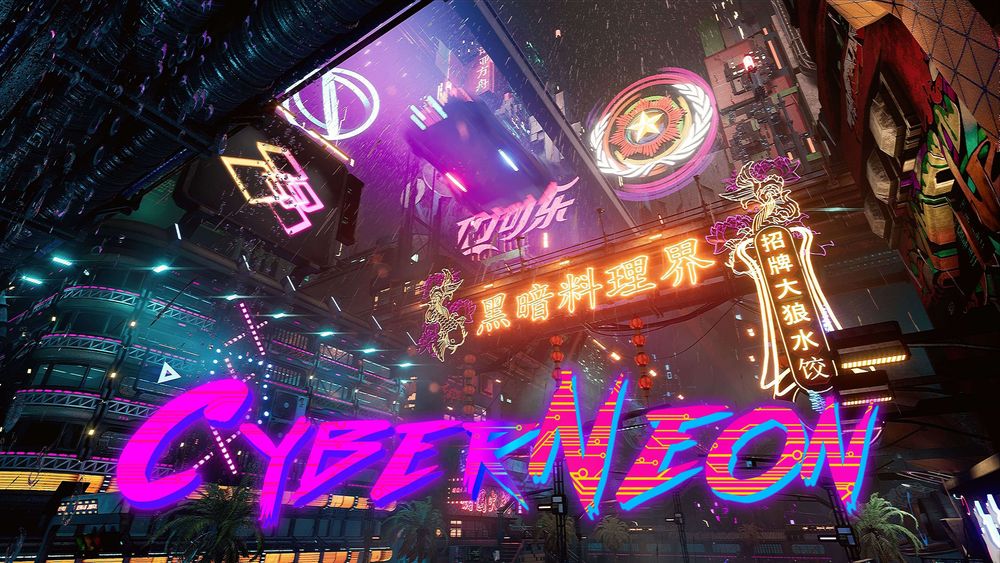
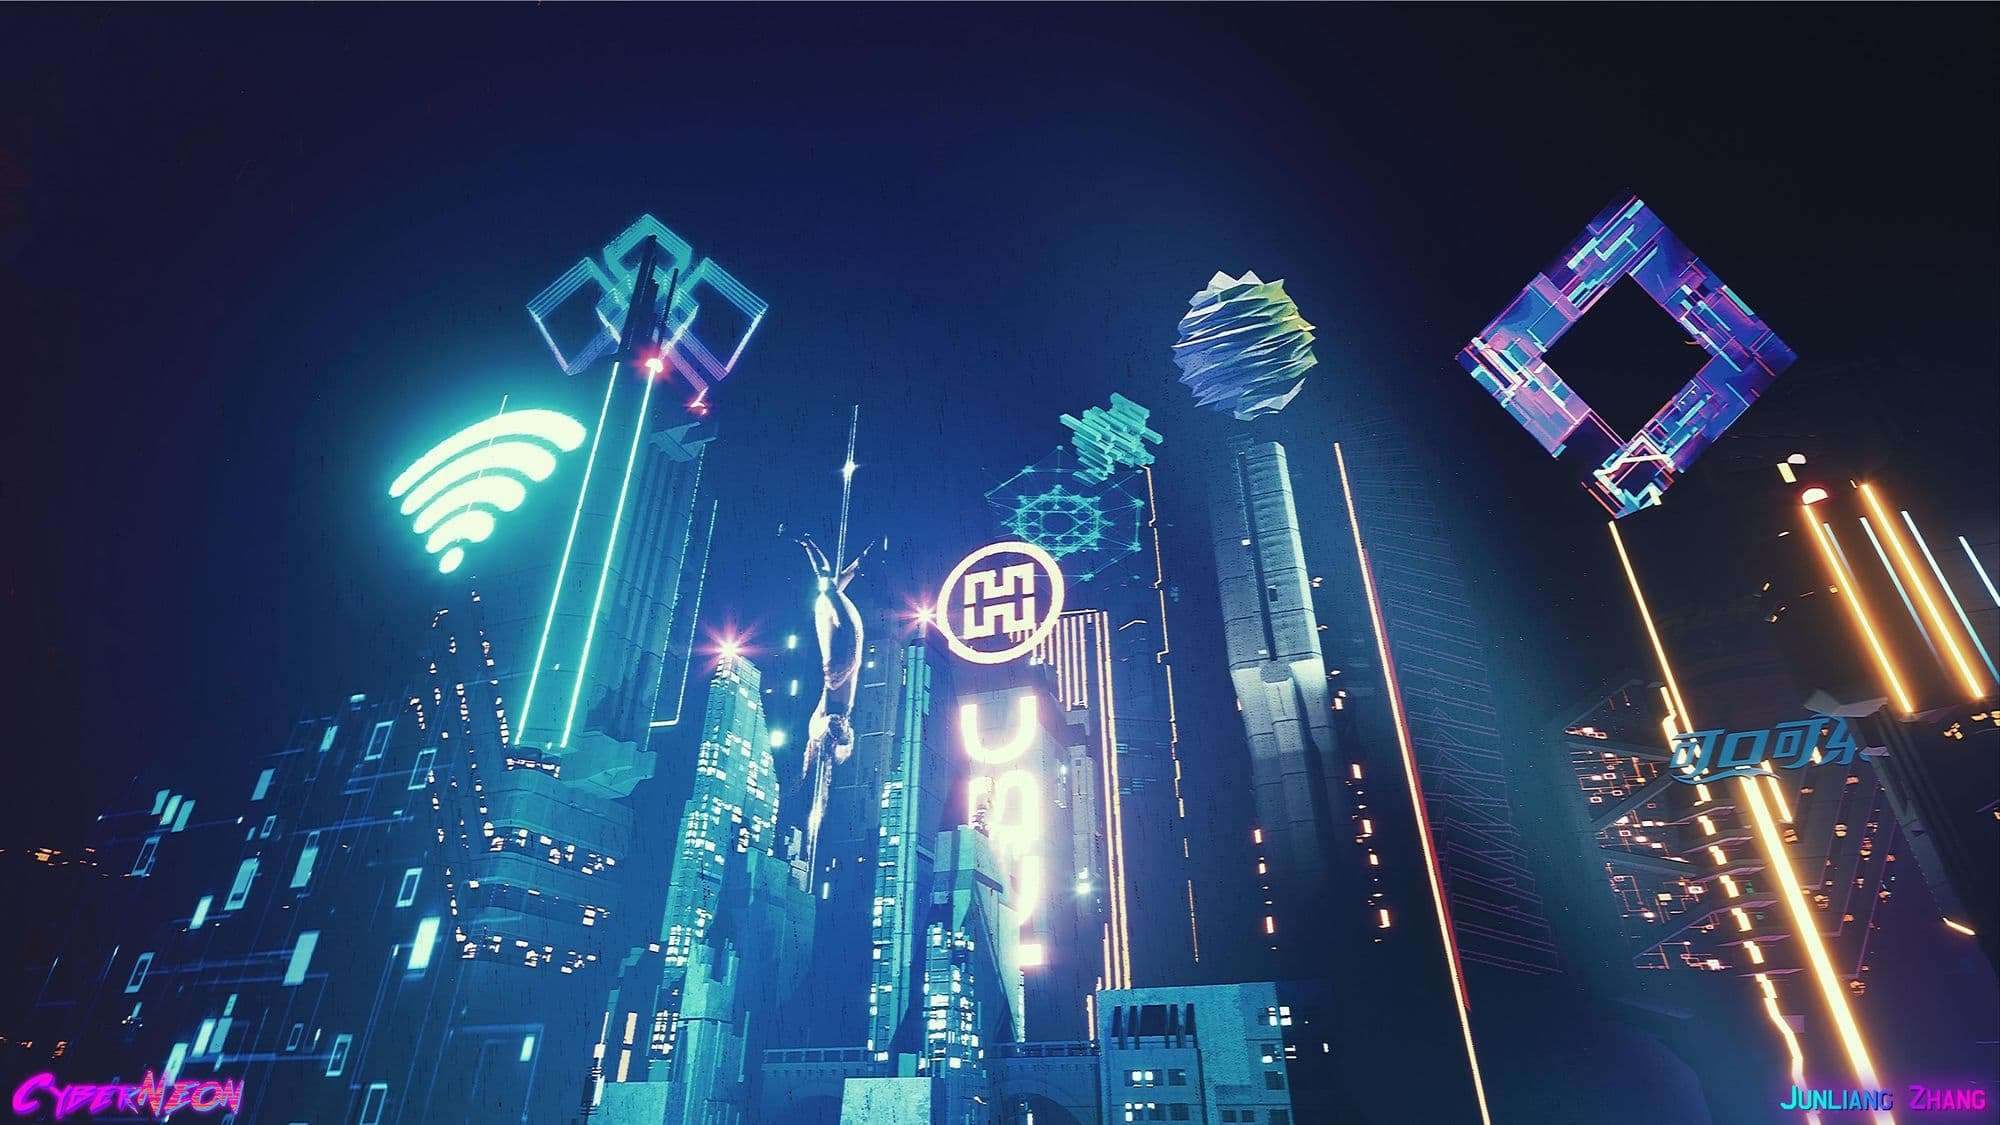
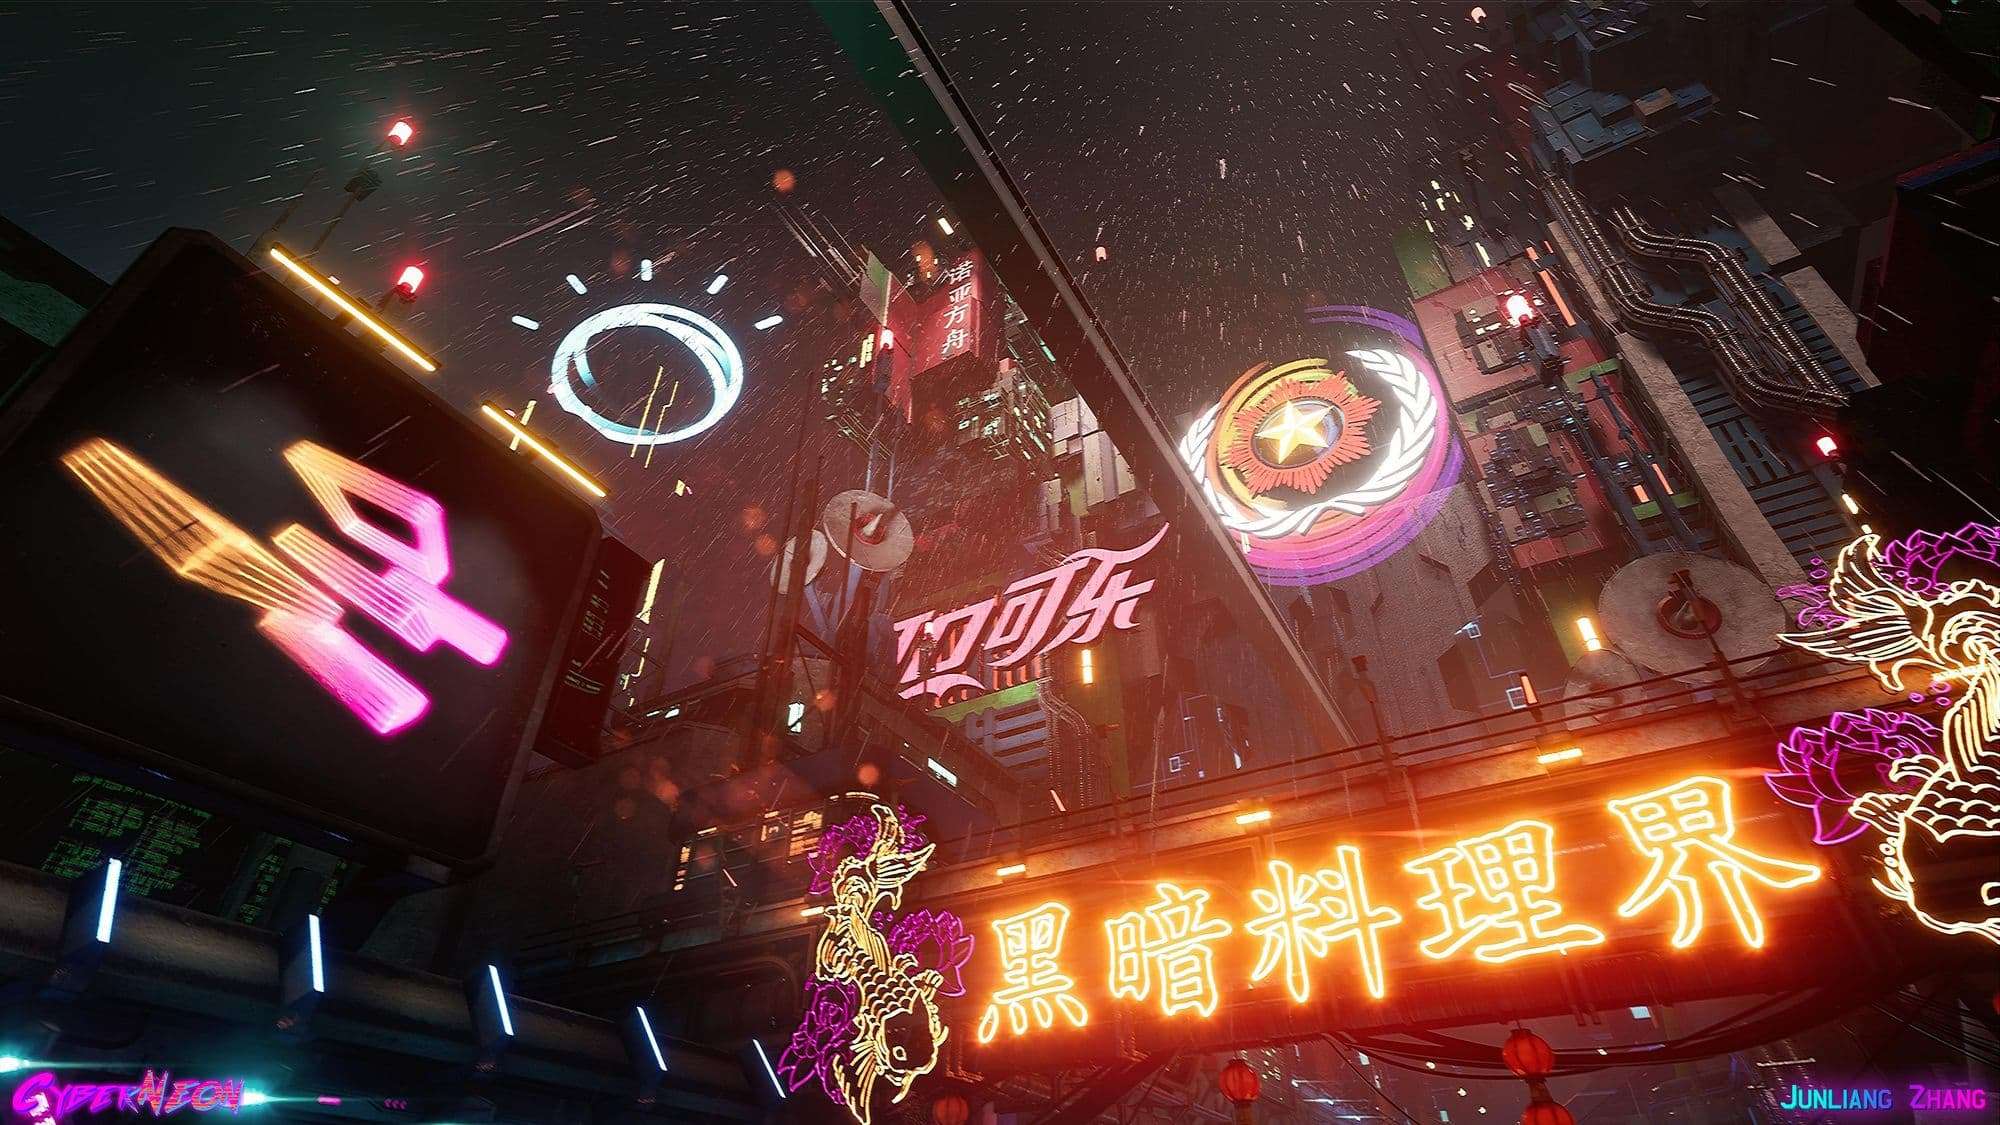
Creation of Neon Signs
I started working the neon signs by using a lot of different ways to create it. For some common Chinese words, I used PinYin input to type directly into Photoshop and exported to UE4 to setup the materials. It was very straightforward.
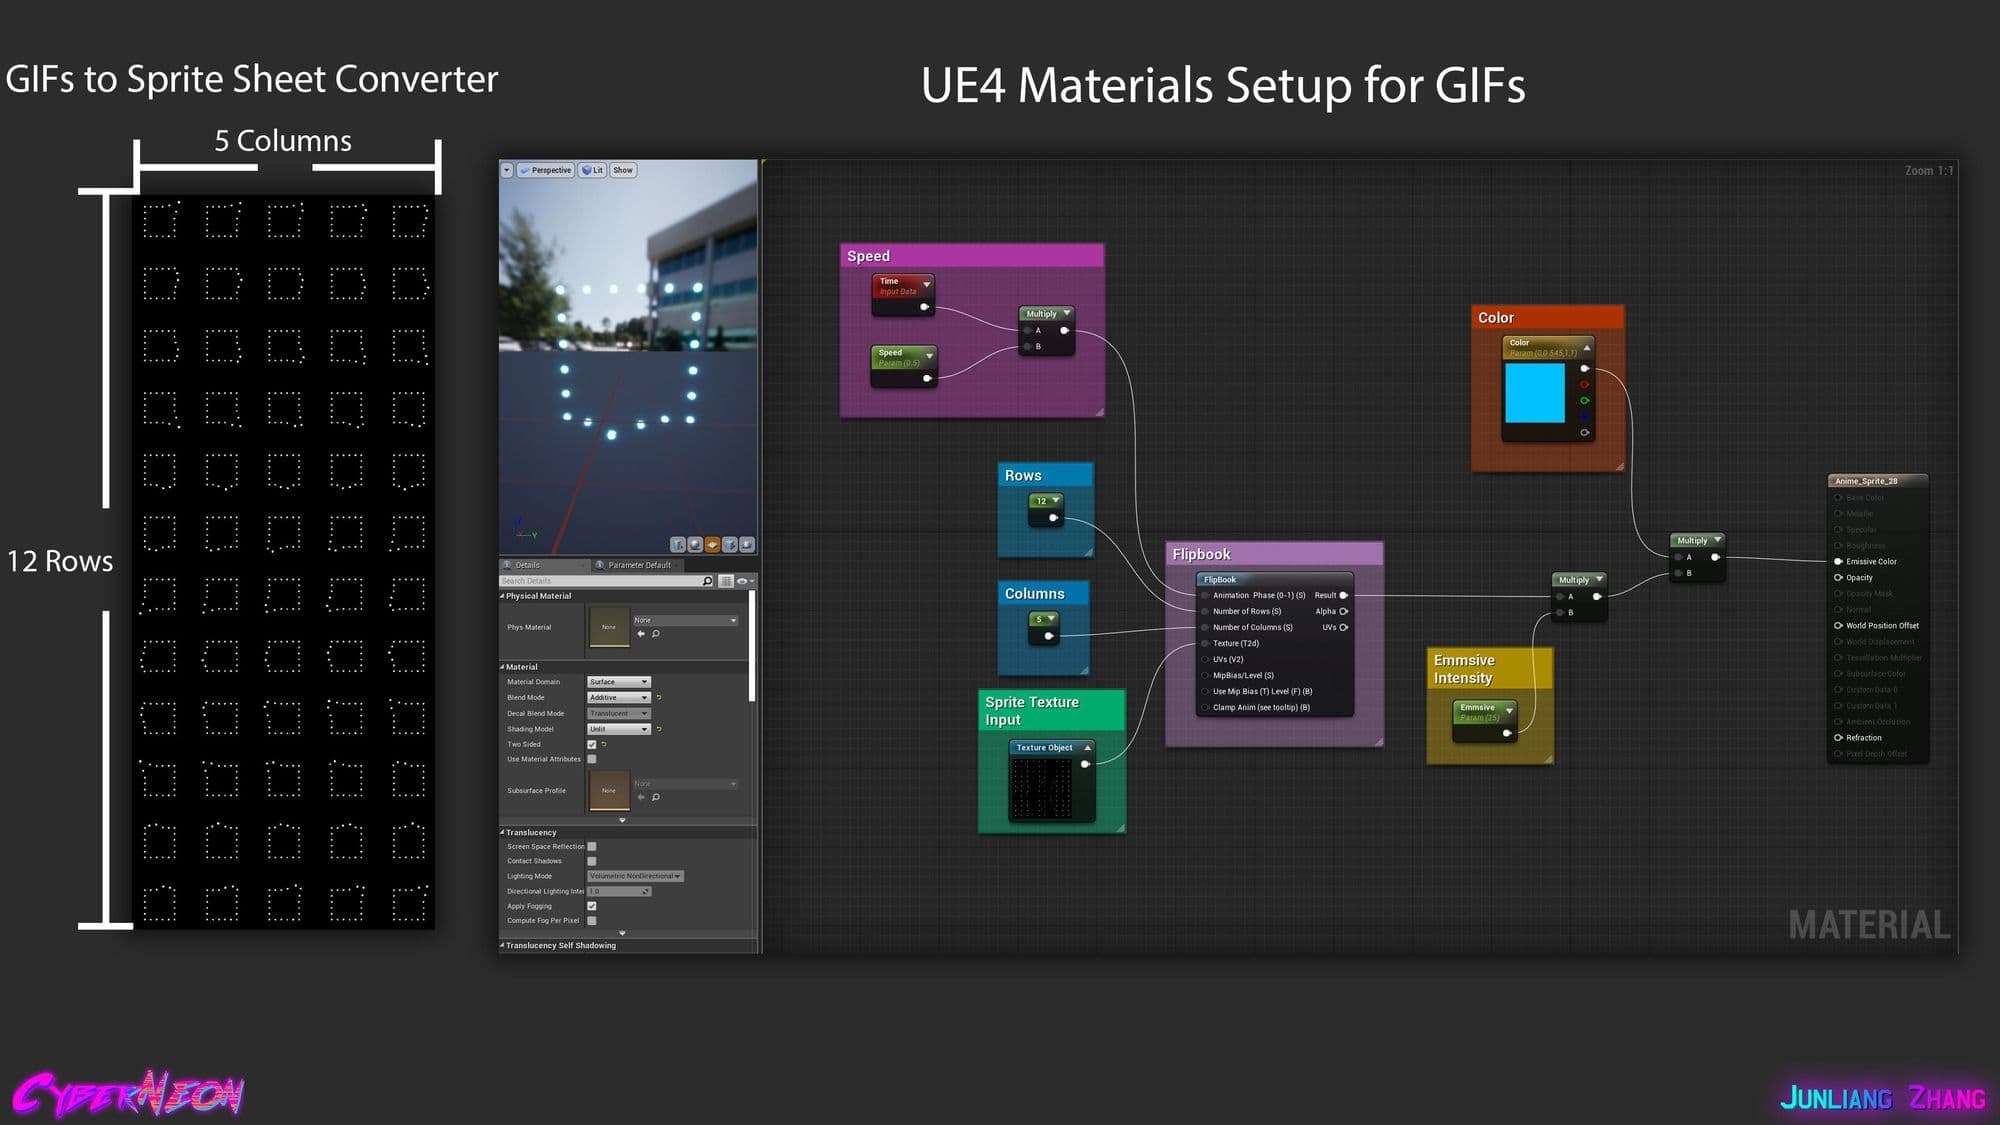
For some complicated dynamic neon signs, I started with black and white simple shapes of GIFs. I used GIF to Sprite Sheet Converter to create a sprite. And then I imported to UE4 and I created an unique material with Flipbook material function.
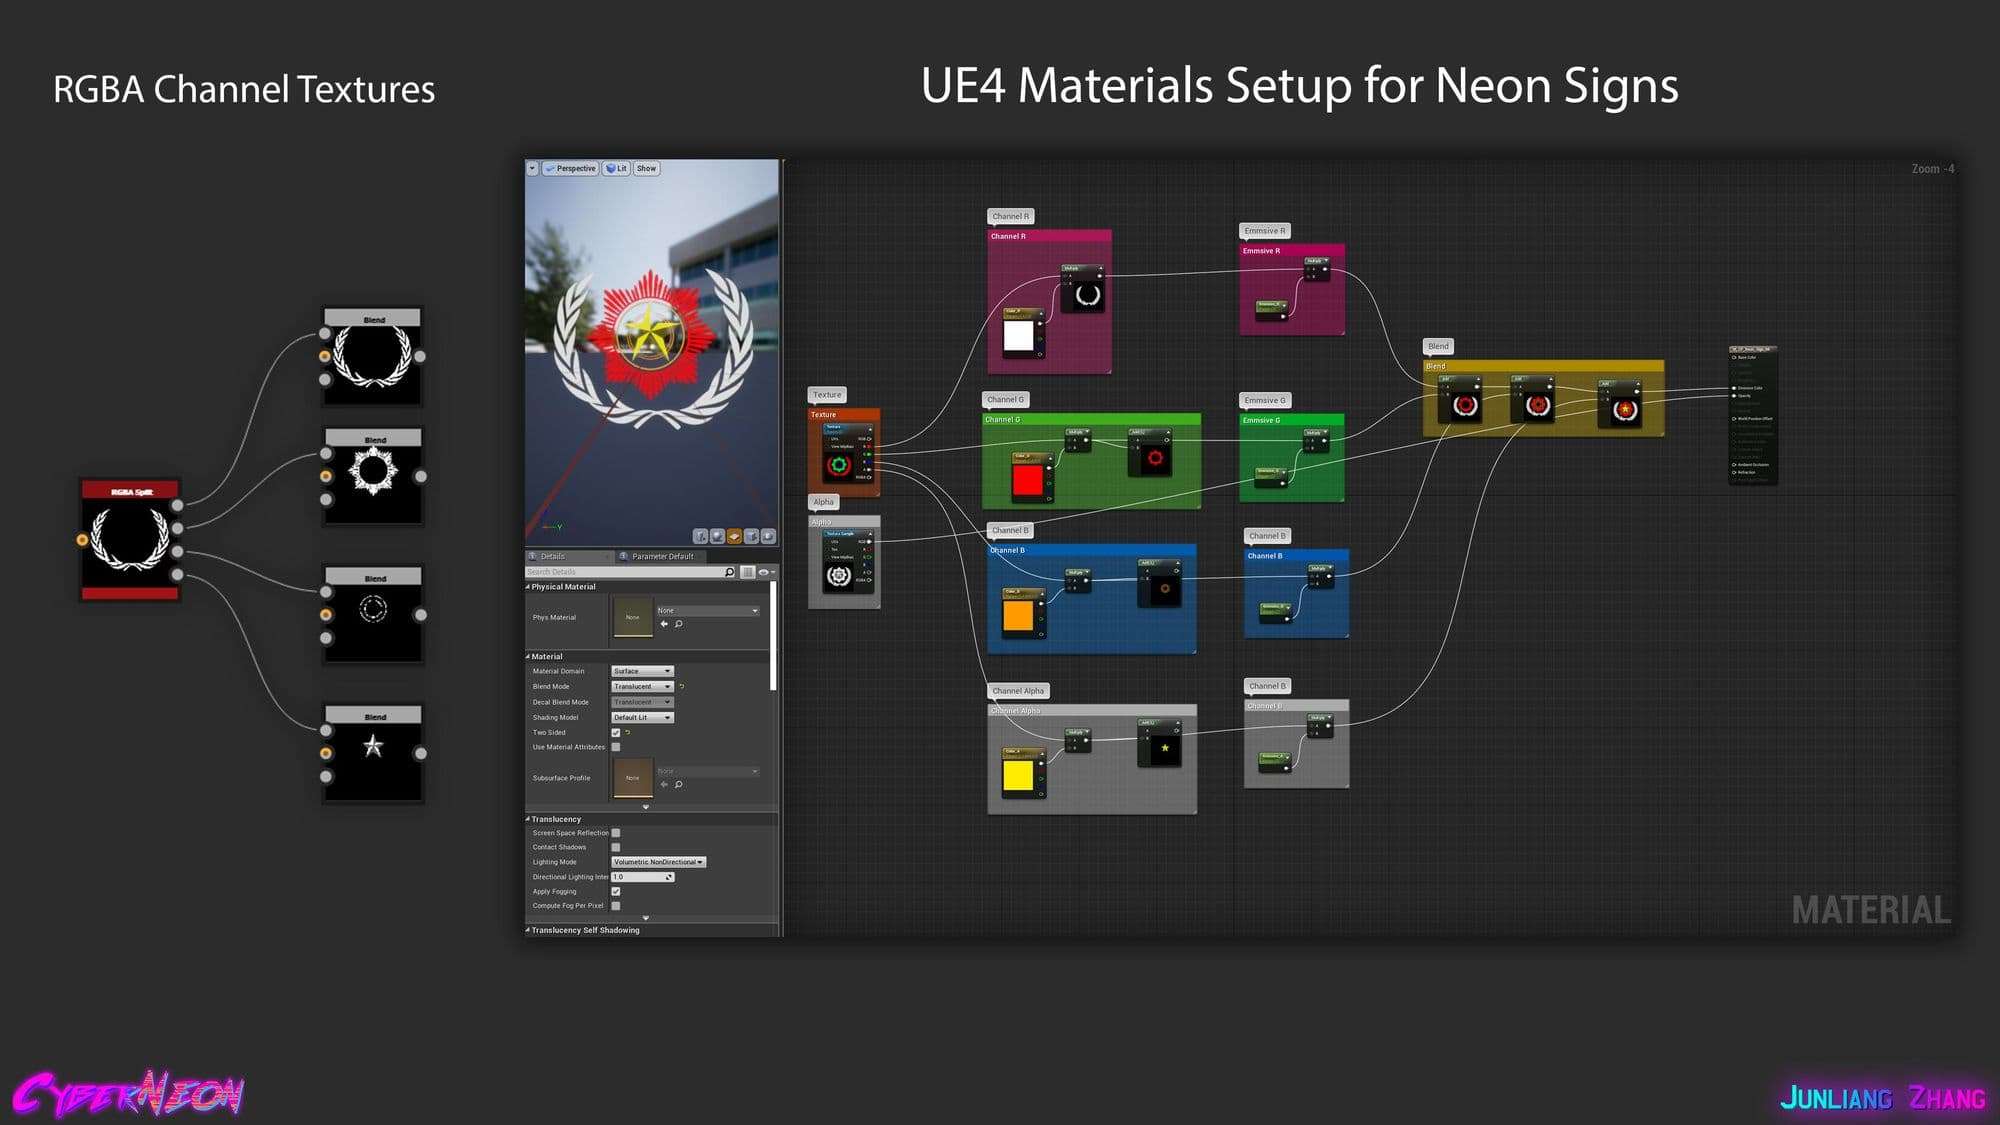
For the RGBA textures, I created all of the shapes in Photoshop. And then I imported to UE4 and create a master material for the neon signs. I only need to modify the color and emissive intensities for the materials.
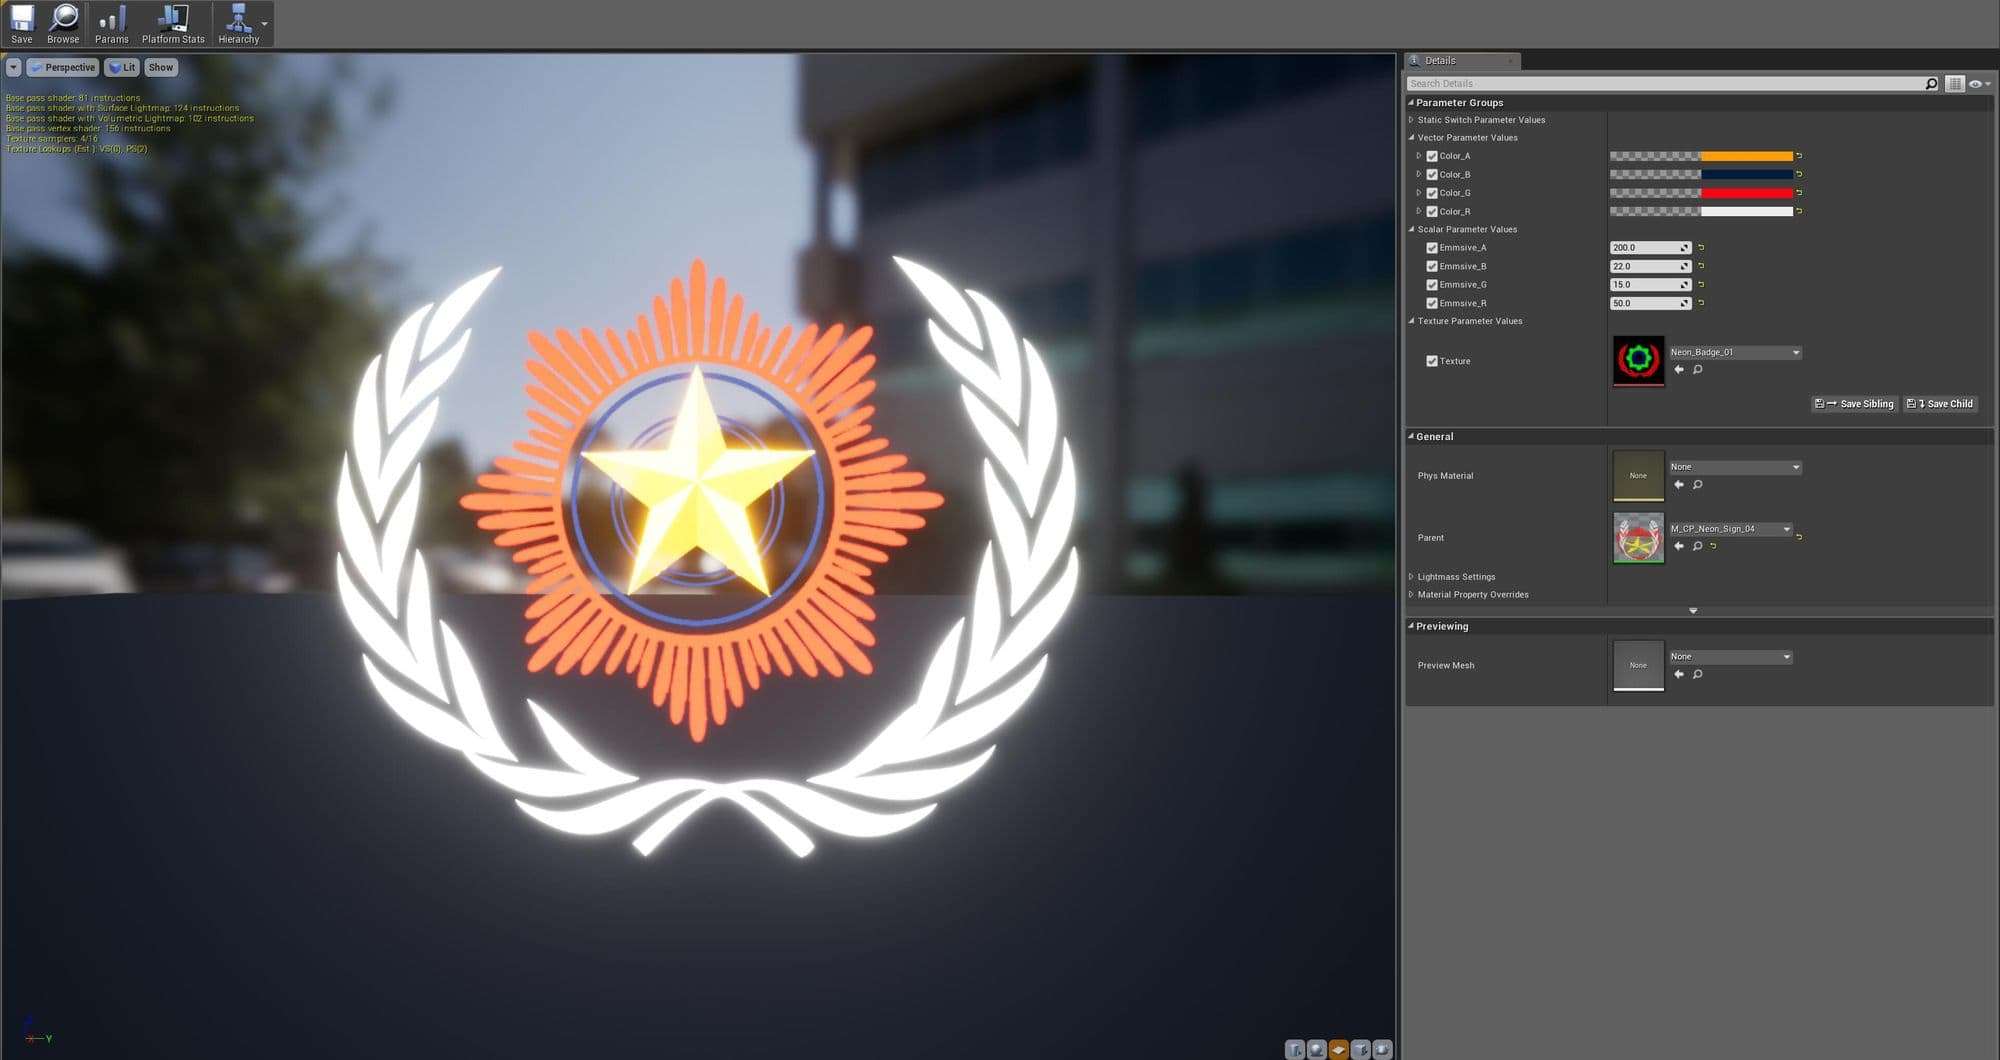
At the same time, I converted the textures, colors, and constants to parameters because I would like to change all of the settings with instance materials. Once the material has been finished, I will create a instance material so that I can instantly modify everything I want.
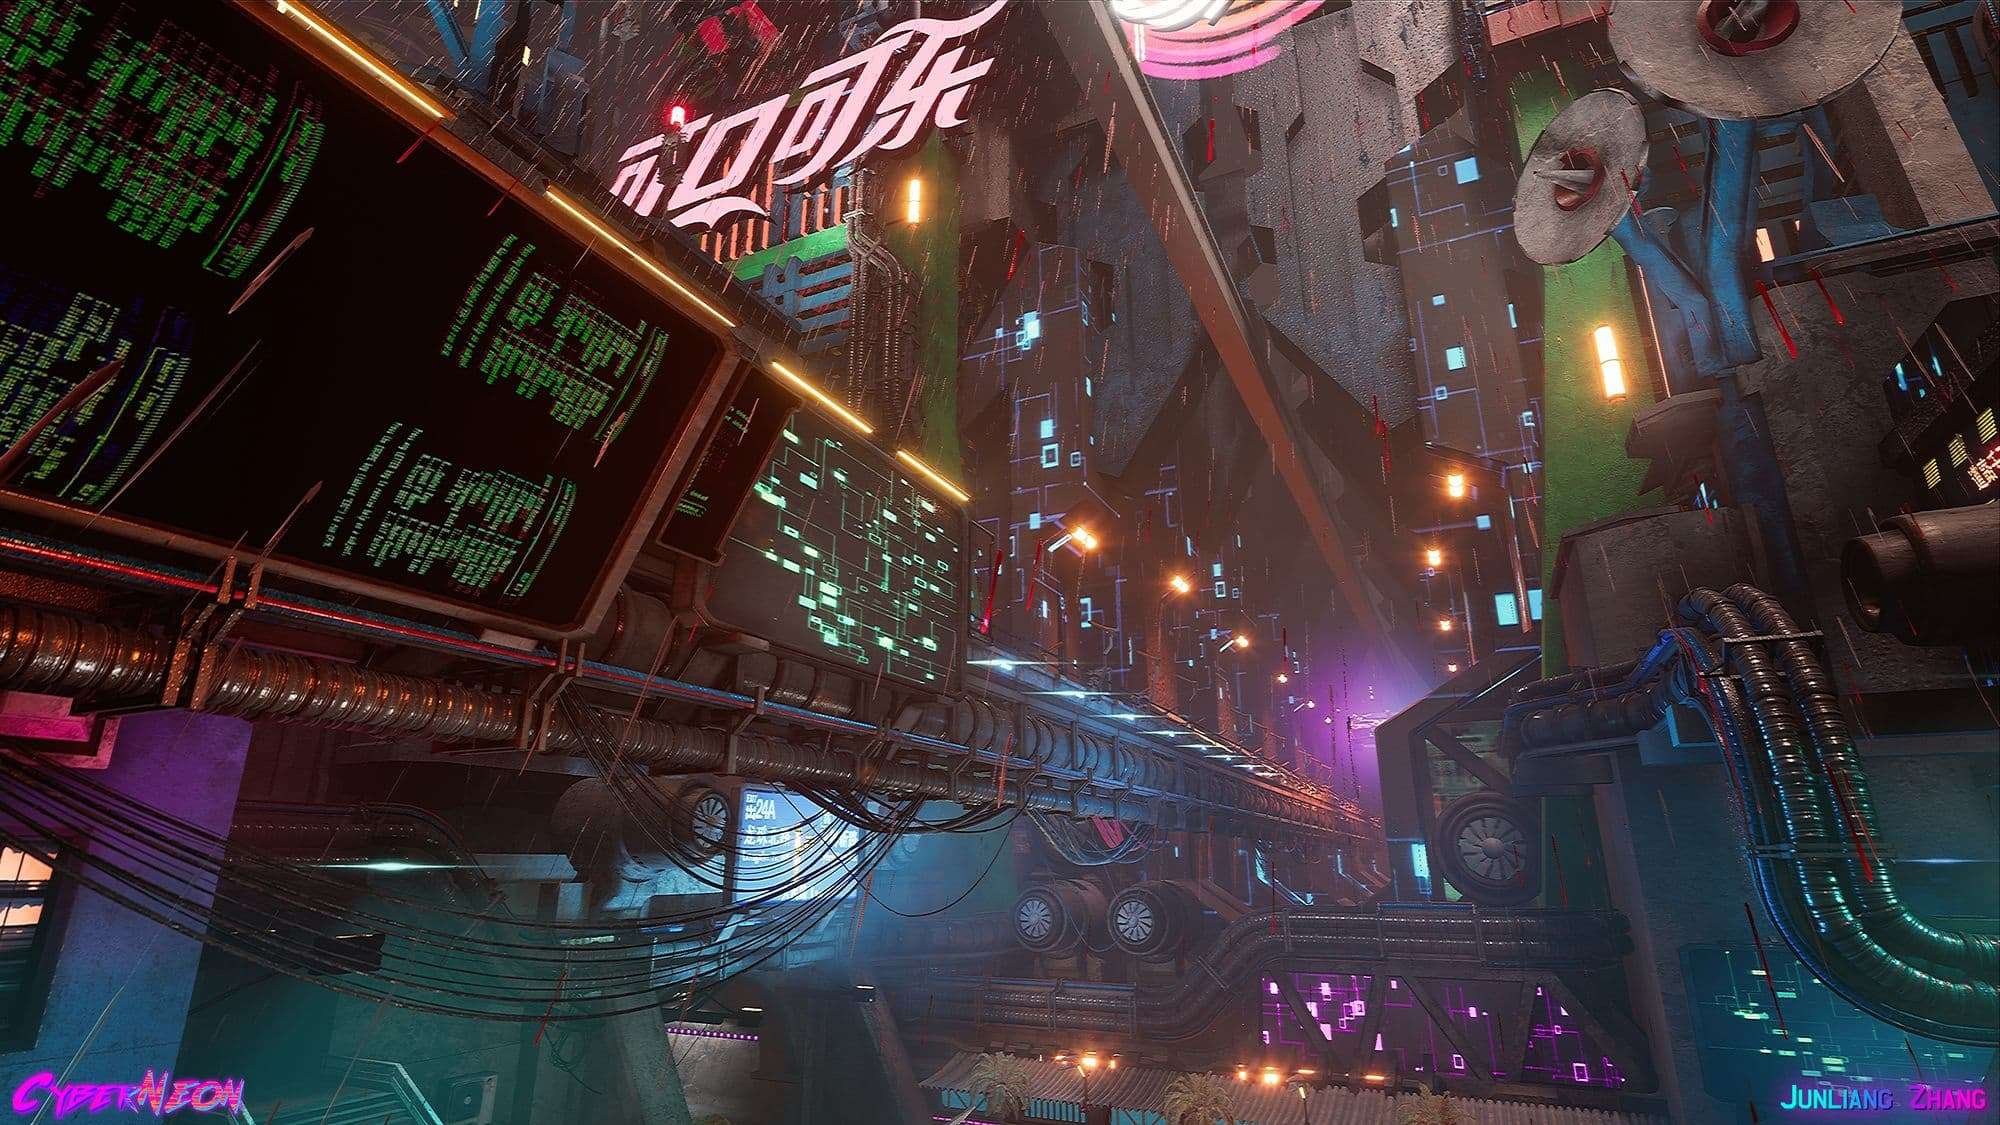
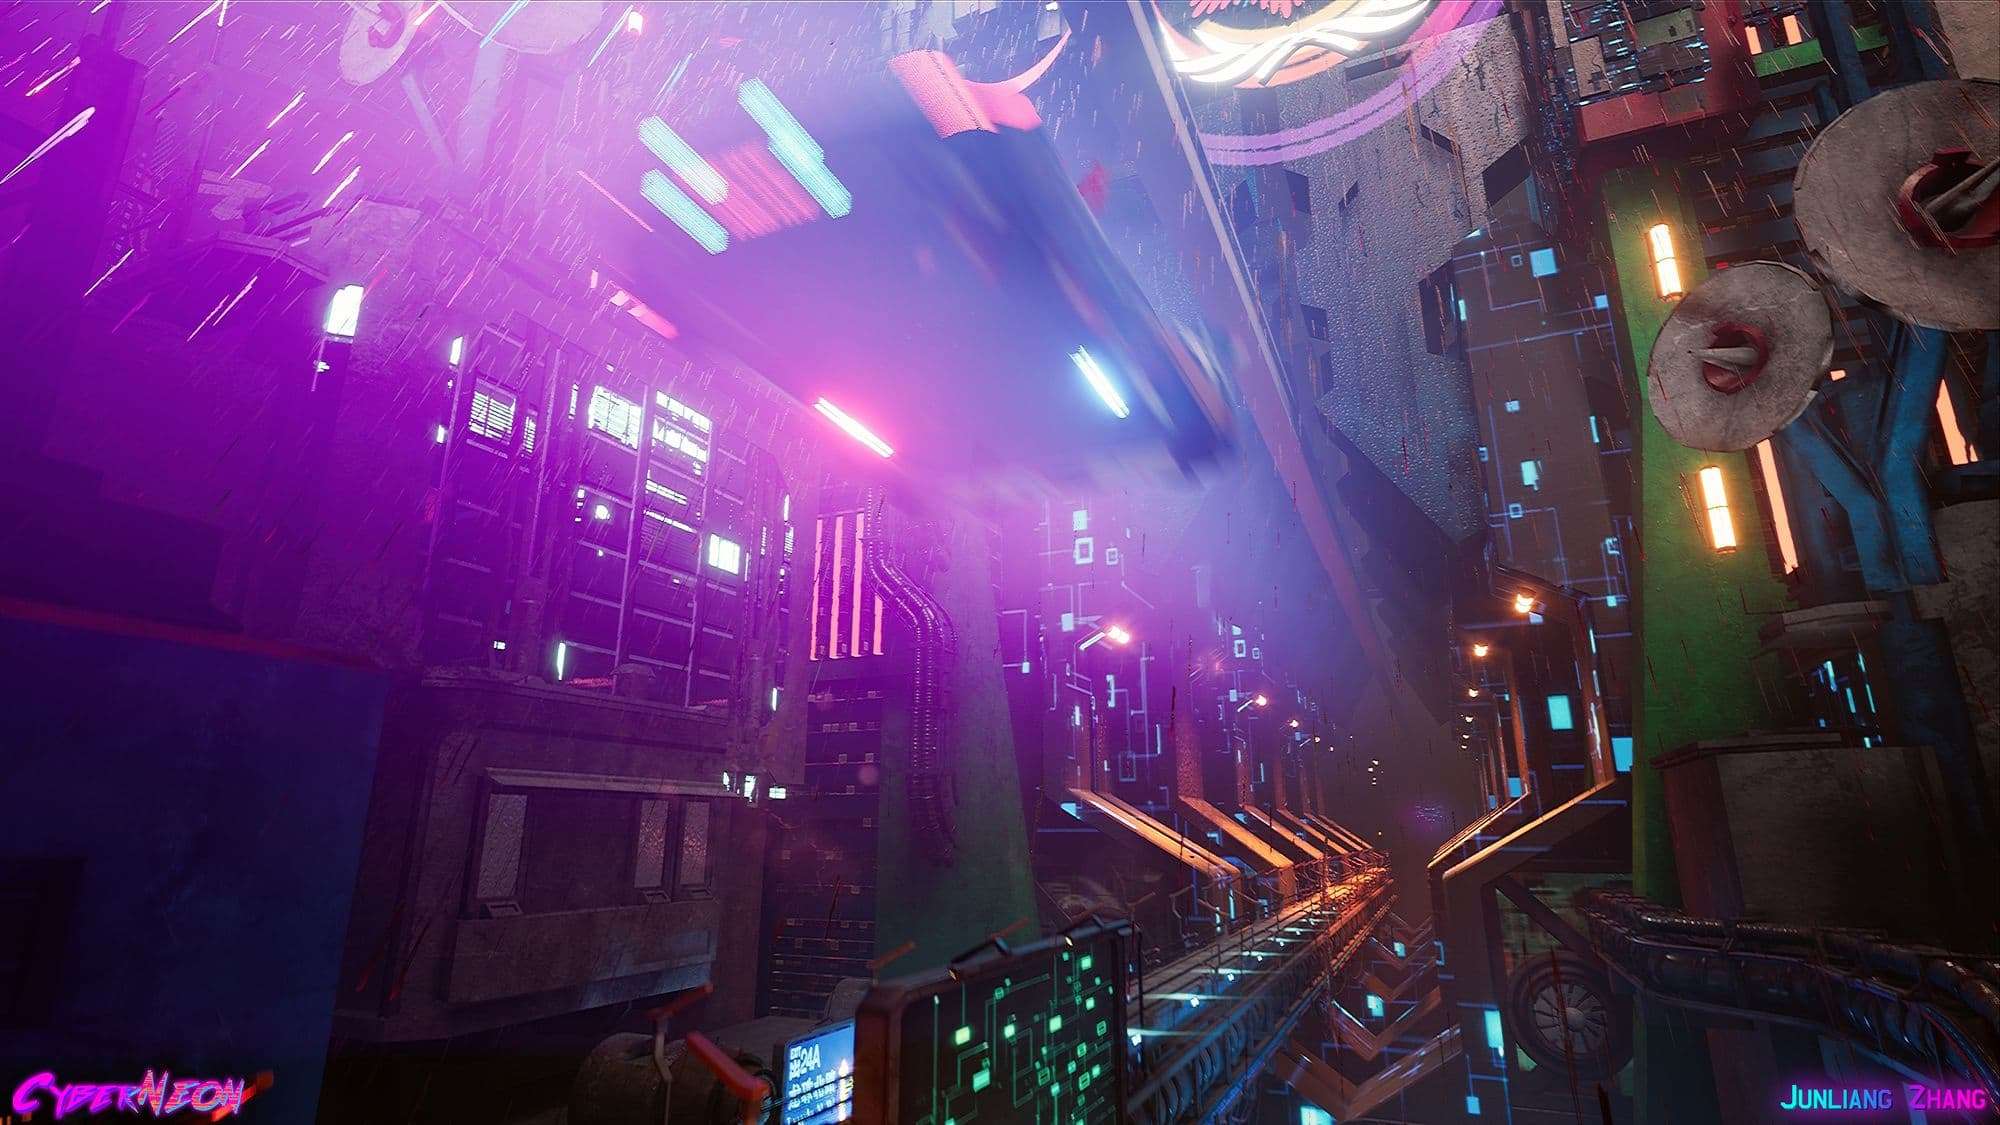
Lighting and Compositions
In general, lighting is usually the hardest things for artists. A bad lighting set up will ruin everything that you did. I usually will focus on the players the first view of sight when I make the environment of lighting for the first time, which means that what kind of objects or lights the players will see at first glance.
For the production of CyberNeon, I tried and created the entire scene’s lighting for over five times in order to get the best composition and different lighting setup. For the entire scene, I separate lighting from foregrounds and backgrounds. I can gain a lot of improvement of performance by using this way before baking because the environment was huge.
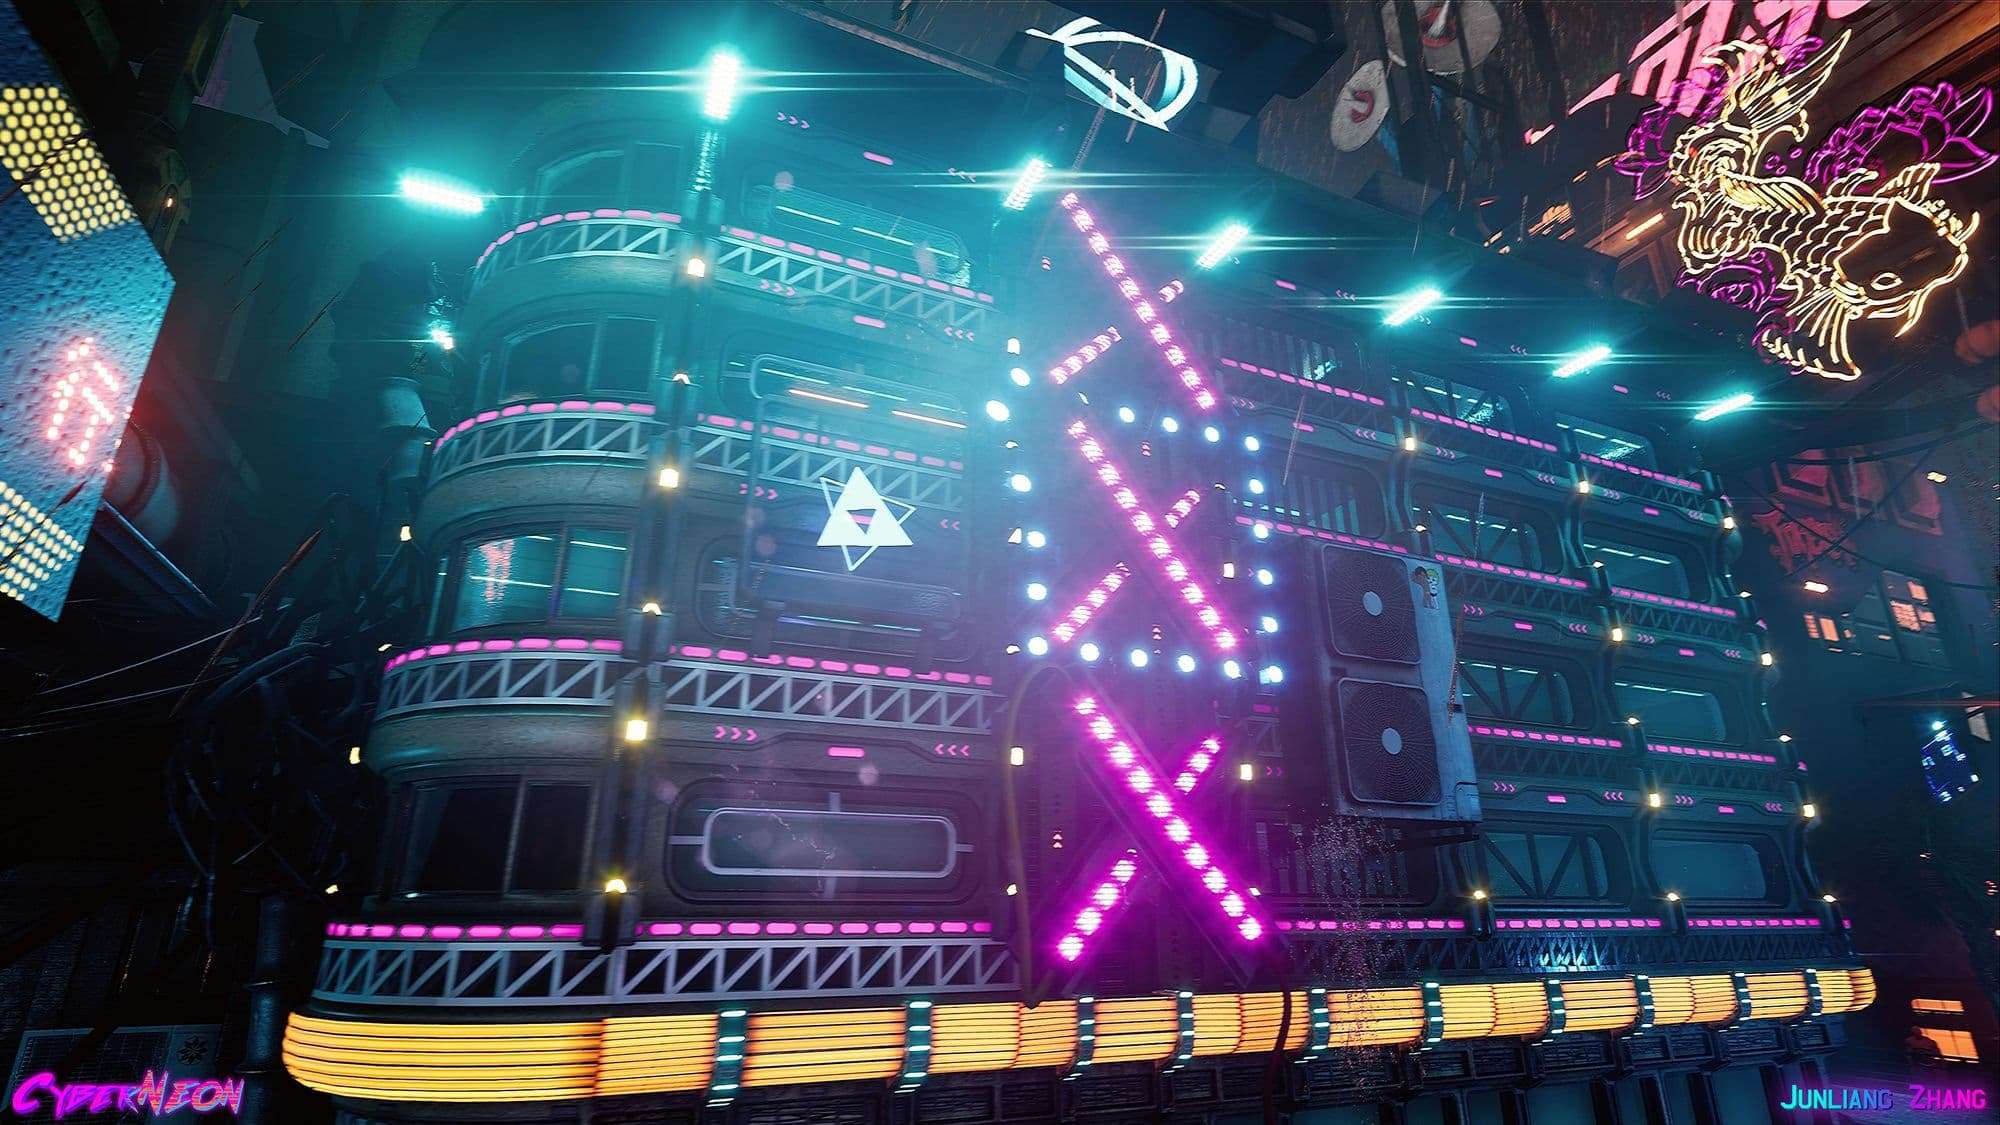
For the foregrounds, I created a dynamic star neon sign that was the focal point of the scene. And also, I used red color for the highest point with white Chinese words, which can make the scene standing out with a spot light. At the same time, I used Volumetric Lighting for the spot lights. The volumetric lighting will bring a very significant effect on the environment, which it can emit a light beam.
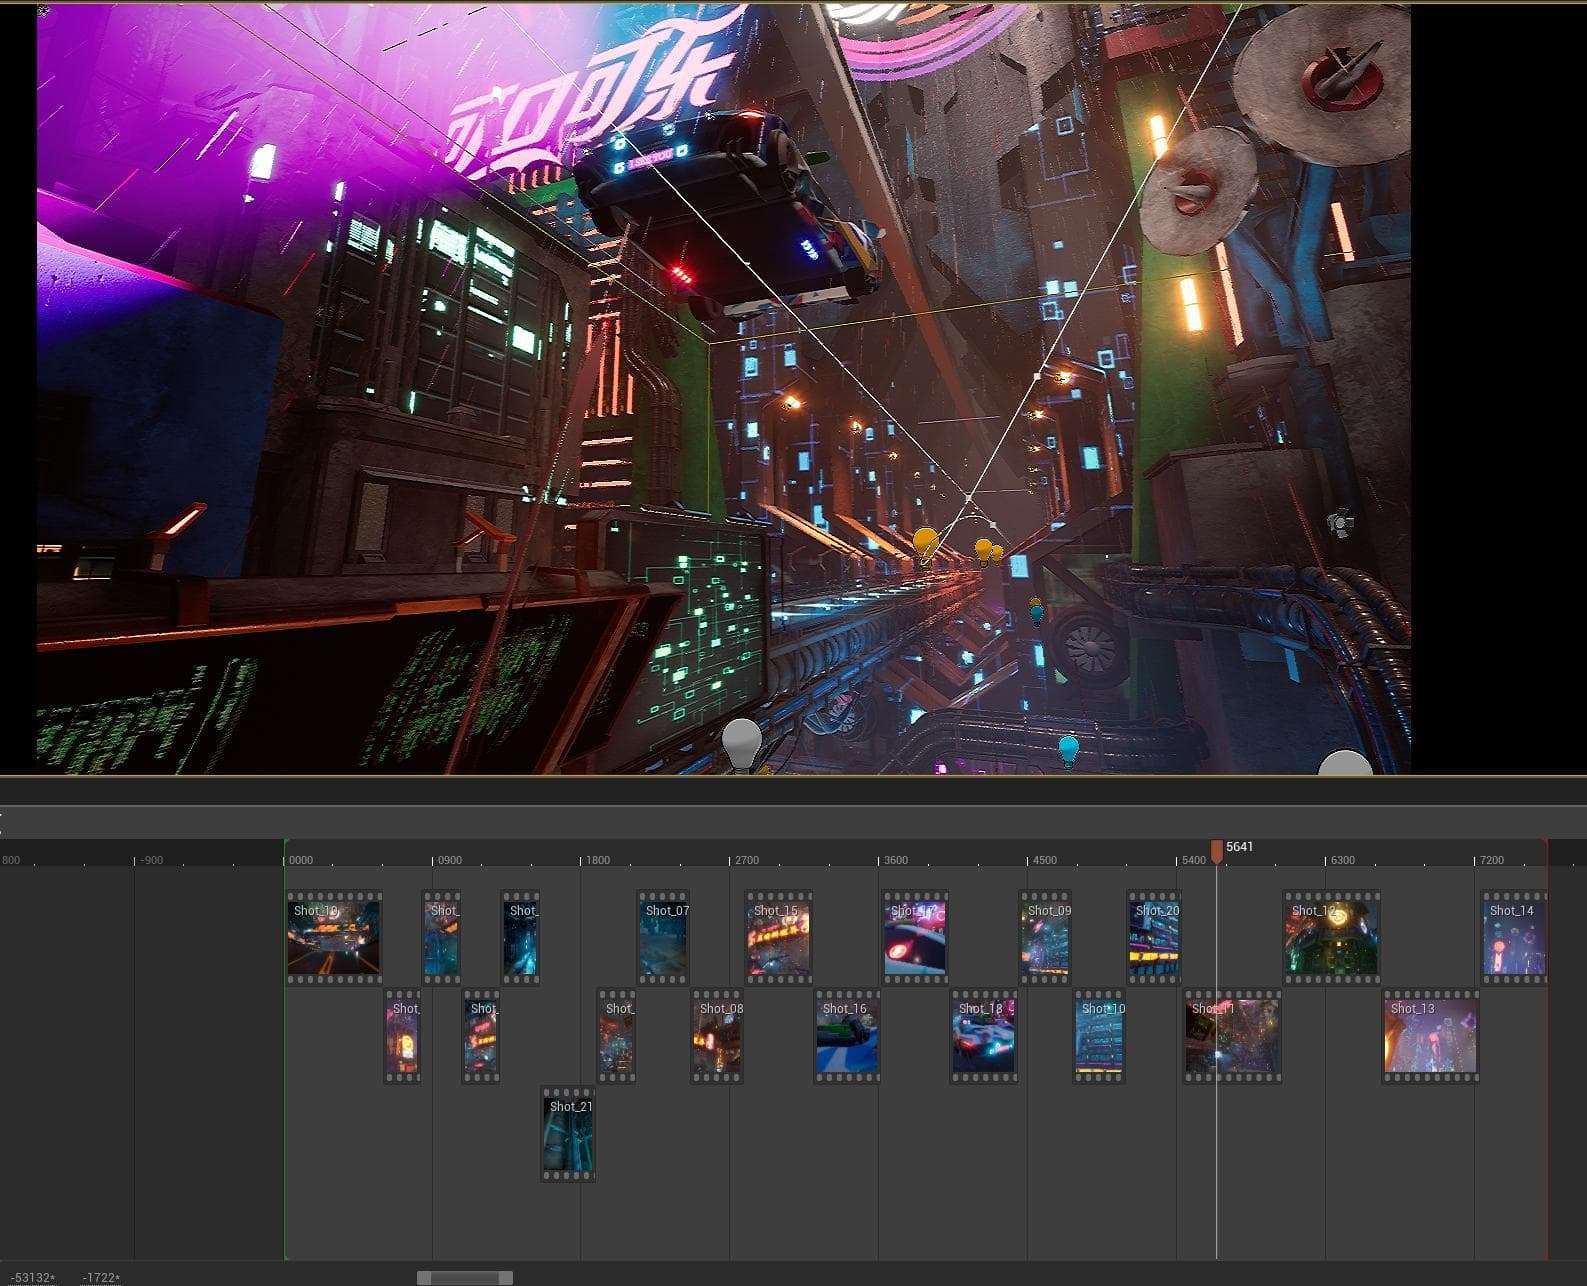
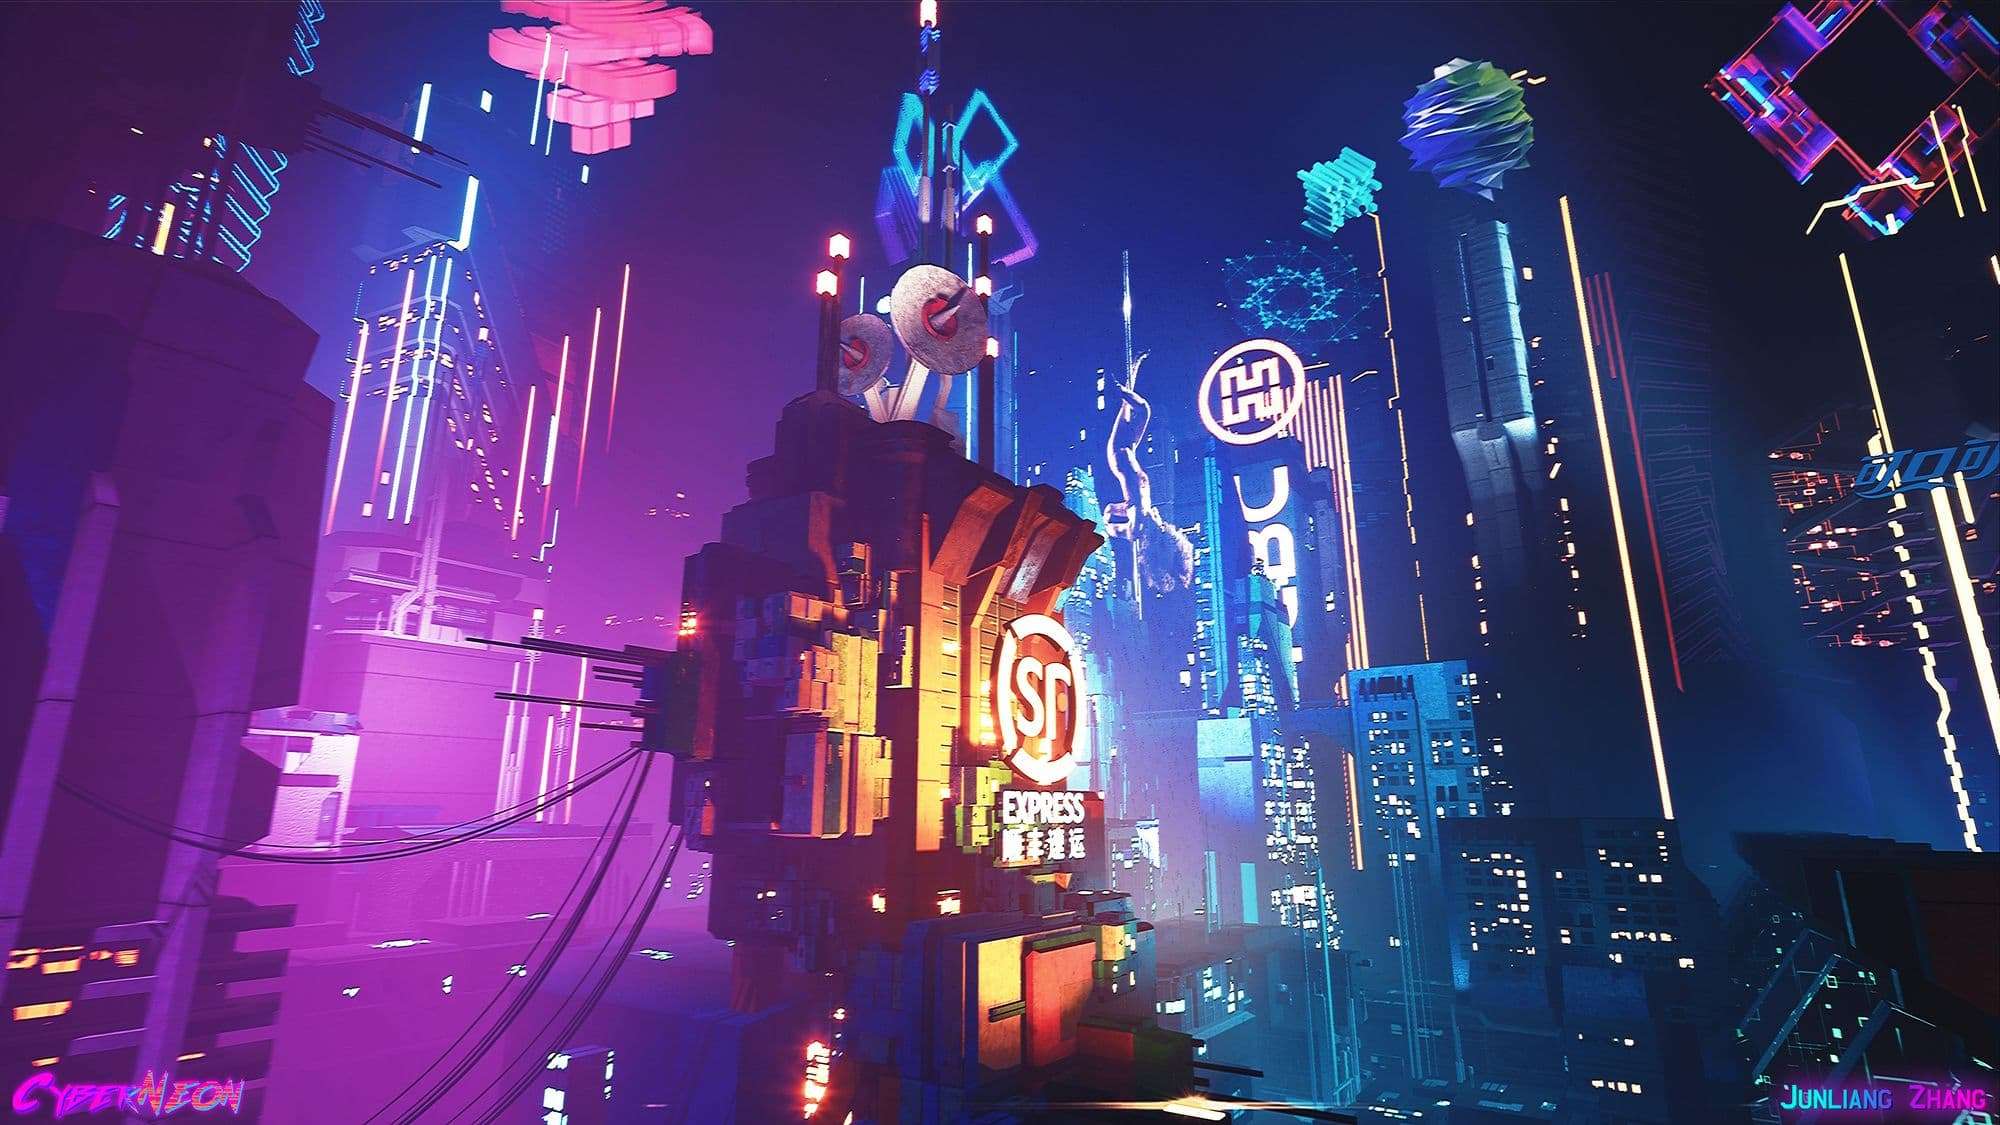
I spent a lot of times working on set dressing, creating new assets, adjusting lighting, and building compositions for the final fly through video. I studied a lot of cinematic angles, cutting shots from many great cyberpunk theme films and TV shows. Eventually, the video was shot entirely in the sequencer of Unreal Engine 4. I created over 20 different angle shots and one master sequences to put every shots together to be a final video.
As long as the key light was clear in my mind, I will be continually adding and positioning the fill lights and back lights. It would be the most important things in this area regardless of games or films. Using cold and warm colors represent primary lights and secondary lights.
Rain shader was definitely a key to make the entire scene vivid and materials pop up. It not only could help me to achieve a realistic texture presentations but also it could highlight cool rain drops and dripping water effects.
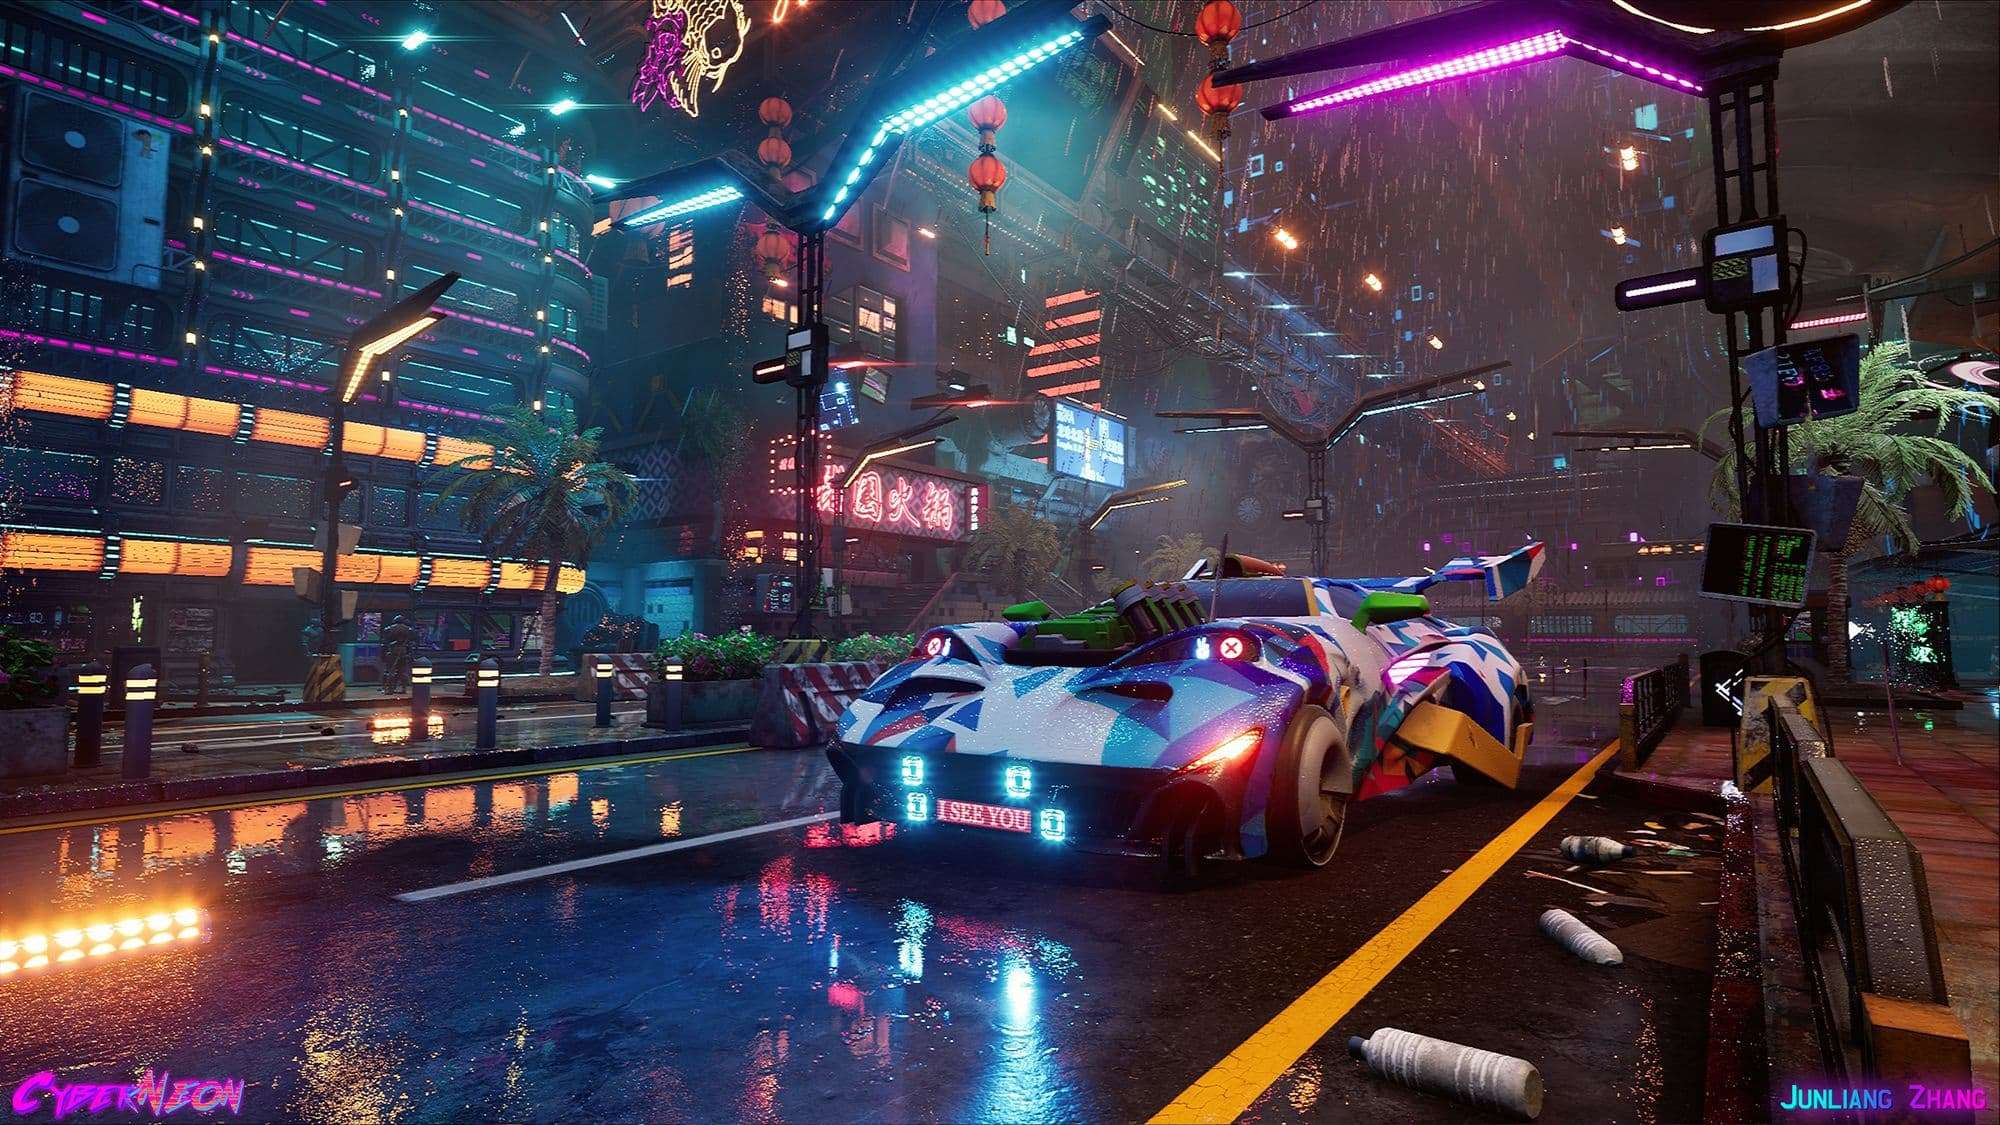
For the backgrounds, I used a lot of spot lights to light up a lot of buildings and neon signs with blue and purple as contrast color palettes. It can help me to make the main building pop up. In the meantime, I added some lit smoke, fogs, and raining particles for a nice atmosphere of cyberpunk.
Post-Processing Breakdown
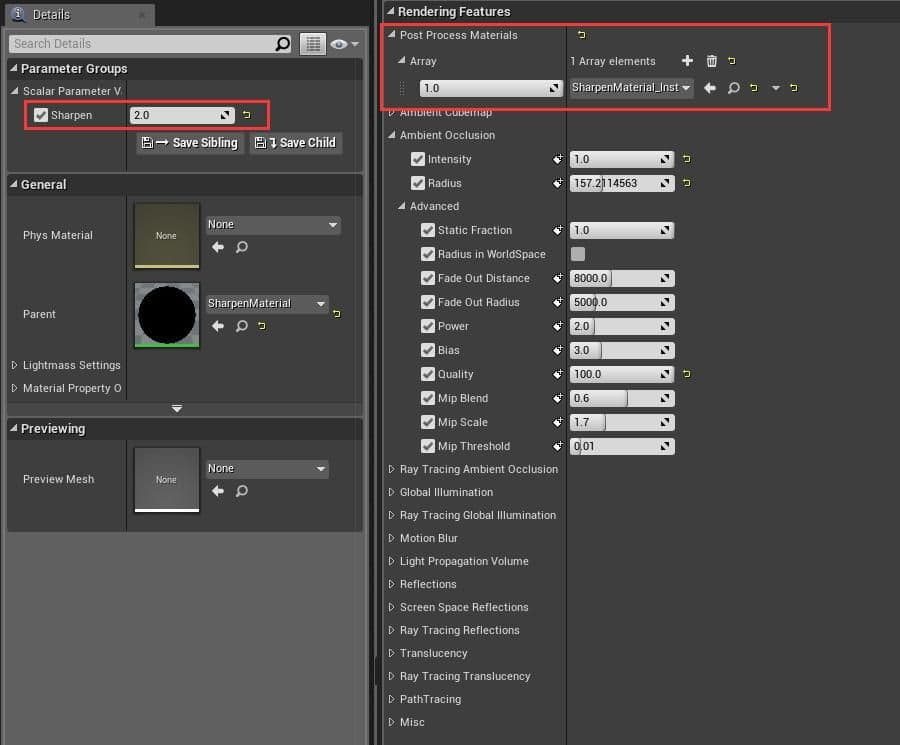
Here is my Lightmass and Post-Processing Settings:
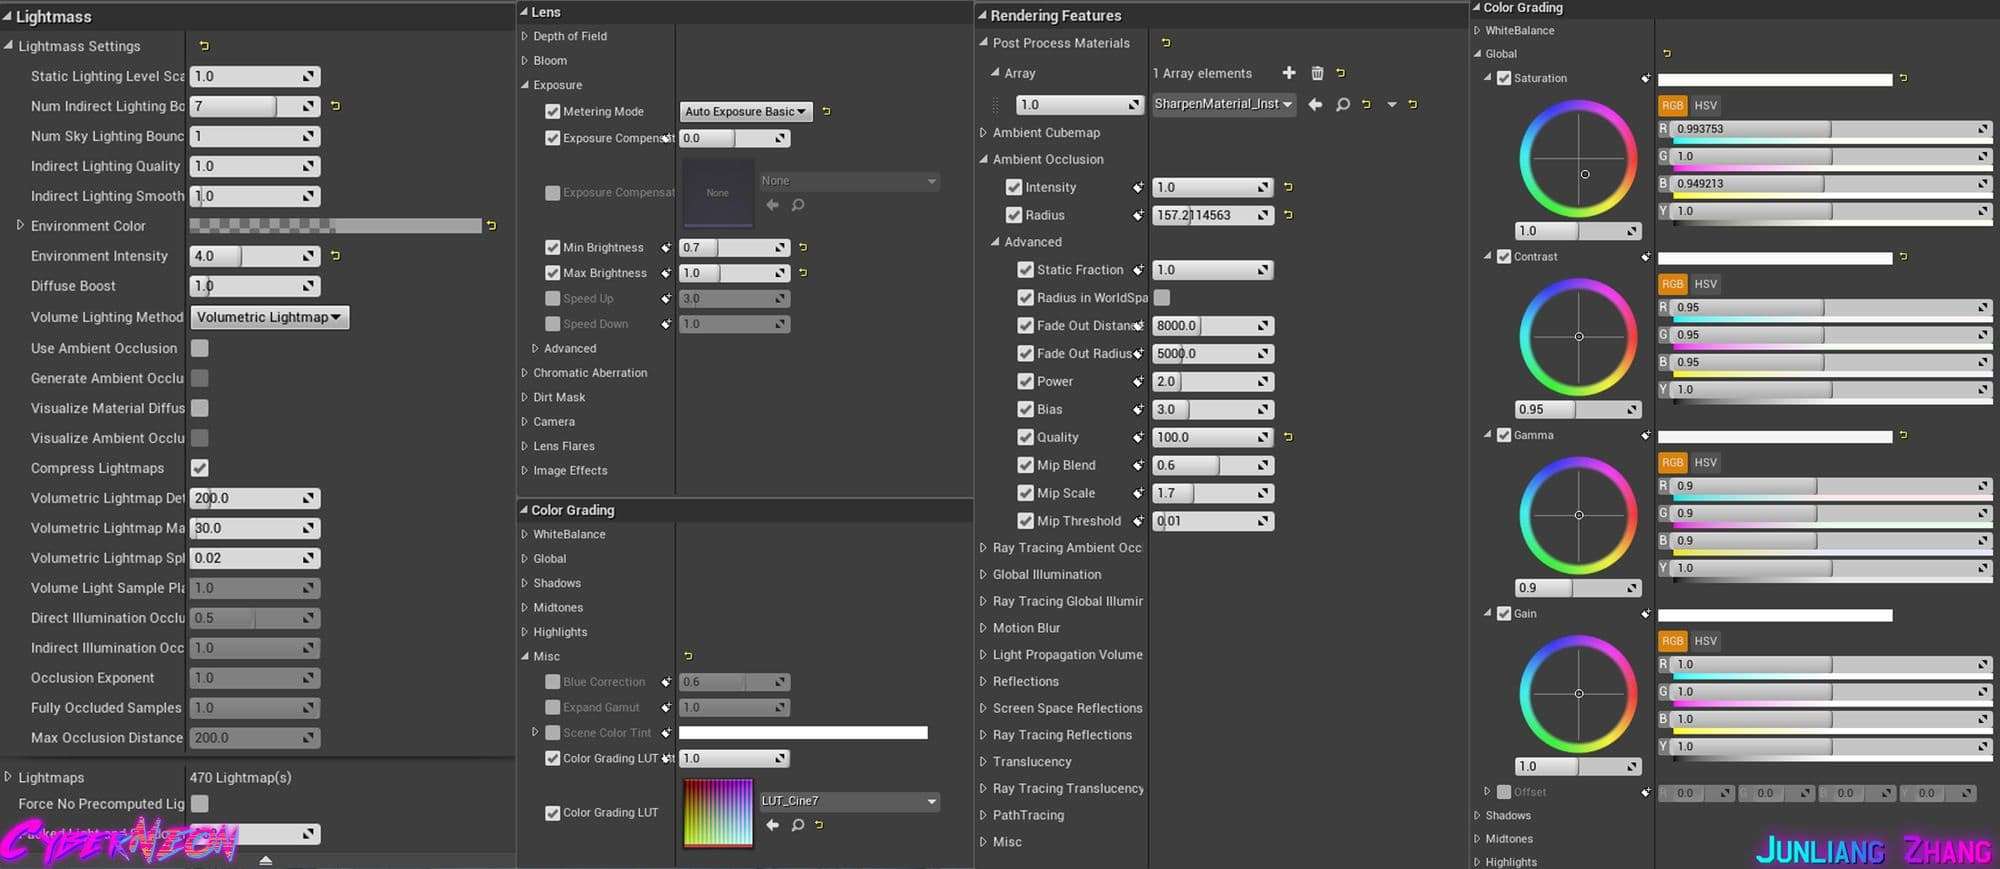
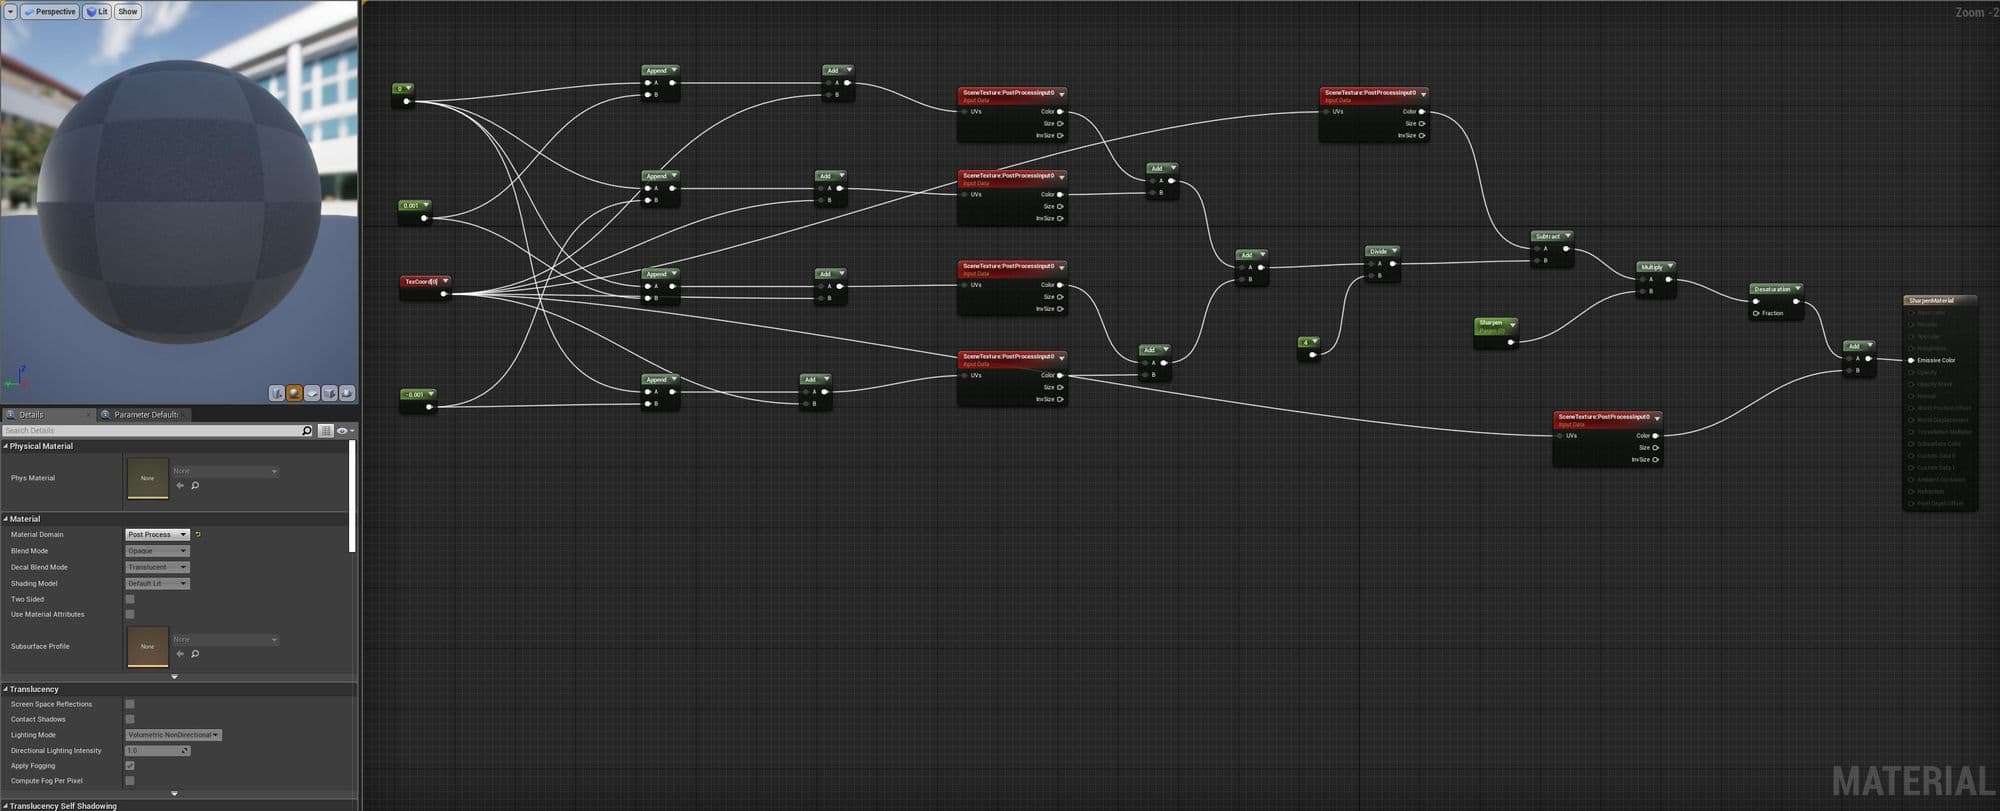
I created a post-processing sharpness material so that you can adjust the sharpness of the scene in the Post Process Materials.
In the end, I mixed almost 90% baked lighting maps and 10% real-time point lights and spot lights. I usually use lighting to tell a story because different lighting colors and moods will represent different feeling for the players. That’s why I will think about how to set up a good lighting from the player’s eye. That is very useful for the lighting artist to think about what kind of moods and colors you want to achieve.
Challenges and Final Thoughts
In conclusion, I think that the biggest challenges are compositions and design different new assets. I spent almost a year working for the pre-production stage. I spent a lot of times on shaders, designing new assets, resolving technical problems, studying blueprints and so on. In the meanwhile, I have learned a lot from CyberNeon project. From now on, I have been gaining a lot of great experience in 3D environment art, shaders, cinematic animations, compositions, and lighting experience.
If you could not figure out some cool ideas for your projects, I would suggest you to go outside and see the real world, which it could give you a lot of fresh inspirations and ideas to your mind. And enjoy the life!
In the end, I would like to thank the Rookies for this great interview and all of the readers. I hope you enjoyed this interview breakdown and can help you and your projects!
Useful Links
If you interested in more articles, you can check my tutorials and breakdown below!
Mimicking Prey and Alien Isolation Lighting in UE4
Creating Your First Snow Mountain with World Machine for Games
Creating a Space Fighter with Substance Painter for Games
Contact Information
If you have any questions or feedback, you can find me here:
Artstation
Linkedin
Facebook
Sina Weibo