Alejandro Díaz Magán is an Animum Creativity Advanced School alumnus and 3D Artist from Málaga, Spain.
In this article he will explain the workflow he followed to create his stylised environment 'The Ancient Light', in Unreal Engine, while sharing tips and tutorials he found useful.
Alejandro Díaz Magán is a 3D Artist from Málaga, Spain. After finishing his studies in the Master's Degree in 3D Character Modelling at Animum Creativity Advanced School, he is currently looking for a job in the Games Industry and working on personal projects as a self-taught artist.
In this article he will explain the workflow he followed to create his stylised environment in Unreal Engine, The Ancient light, while sharing tips and tutorials he found useful.
Introduction
After finishing my studies I felt that I still had a lot to learn and I was very excited to embark on new personal projects. I had a burning curiosity to do environment art, since I love to see other people's work and I've always wanted to do this kind of work. Something I want to emphasise during this article is that this was my first complete environment in Unreal Engine, experimenting with my workflow from start to finish.
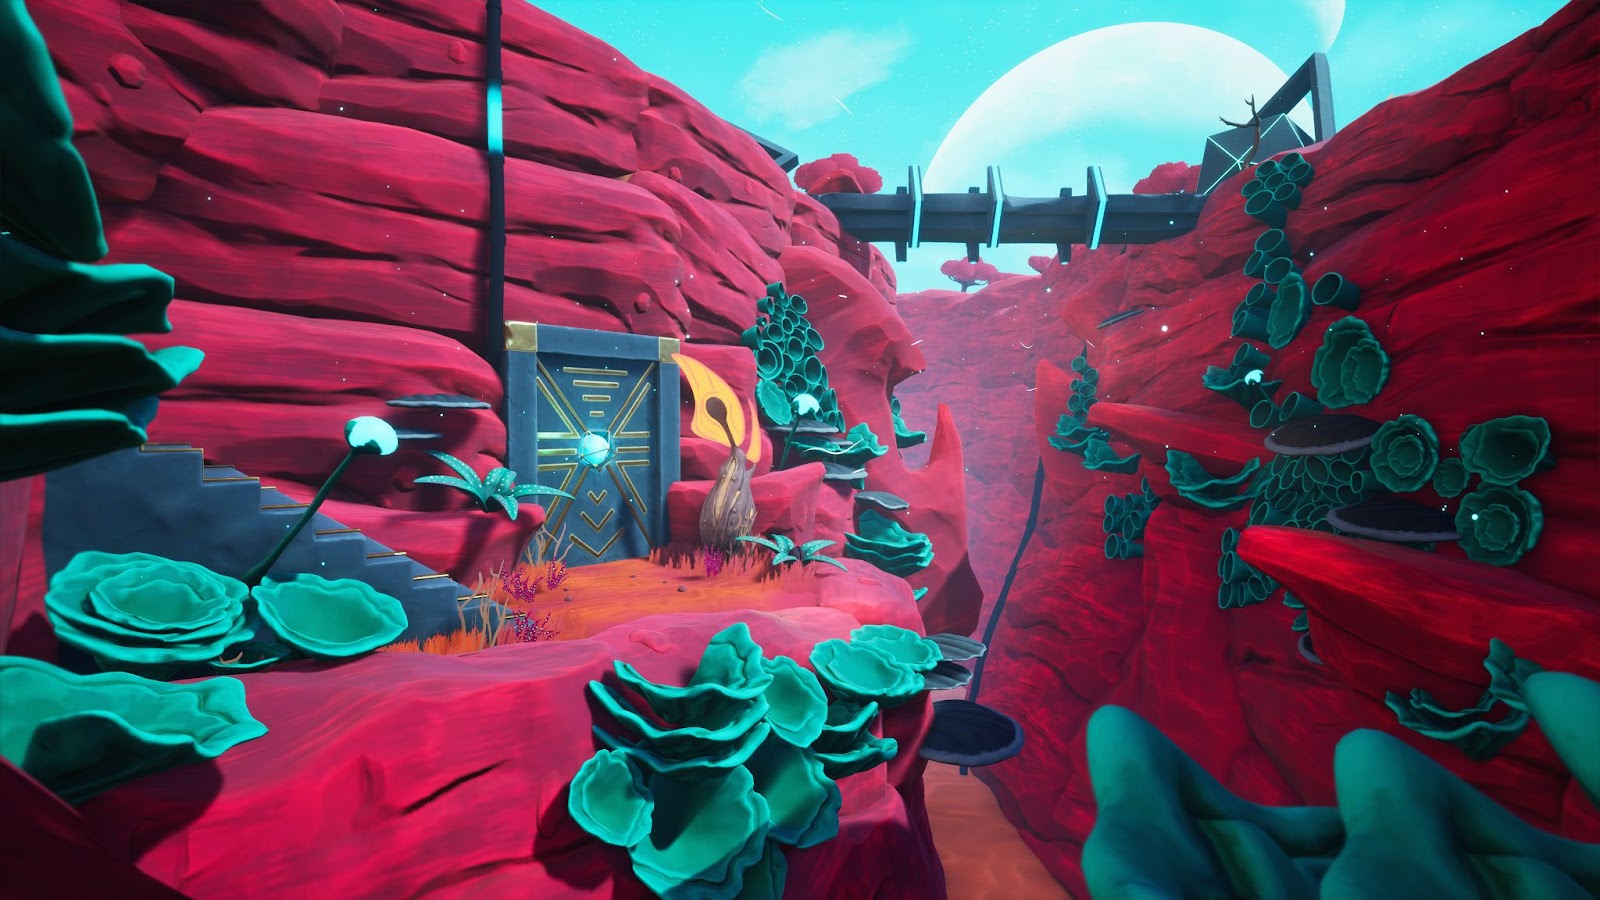
This project was made for the World of Realtime Discoveries contest at The Rookies. The contest's scope was to recreate a distant planet as a realtime environment; one which would evoke wonder, and curiosity. The environment had to include vegetation and plant life, which I had less experience working with. Here you can find my contest entry.
At the time the contest started I was in the middle of learning environment creation in UE4, but I was having a bout of artist's block! I was making an environment based on a concept by Tim Kaminski, but it was taking way too long.
When I found out about the contest I decided to put this project on hold and start from scratch, learning from the mistakes of my previous attempt. This seemed like a very good idea, because due to having a fixed deadline, I was able to set a clear goal and focus on it, getting the motivation I needed. Also, sharing my process with the community and giving each other feedback was a great encouragement.
I wanted to undertake this project from a stylised approach, as it's the style I enjoy doing the most, especially if it is vibrant! "The Stylized Station" community inspires me a lot and I've always wanted to find the time to do something similar to what they produce. I had less than two months as a deadline, so I got to it!
Ideas and Reference Gathering
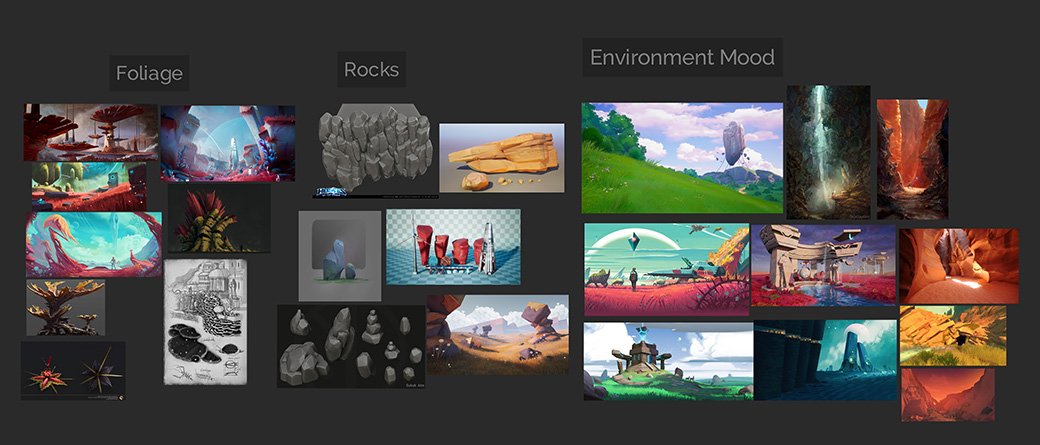
To begin with, I spent several hours collecting images and concepts of what I wanted to do, without any predefined ideas. I use PureRef for gathering references. It’s a really flexible and simple software that allows me to create boards with all my images, always on top of my other windows.
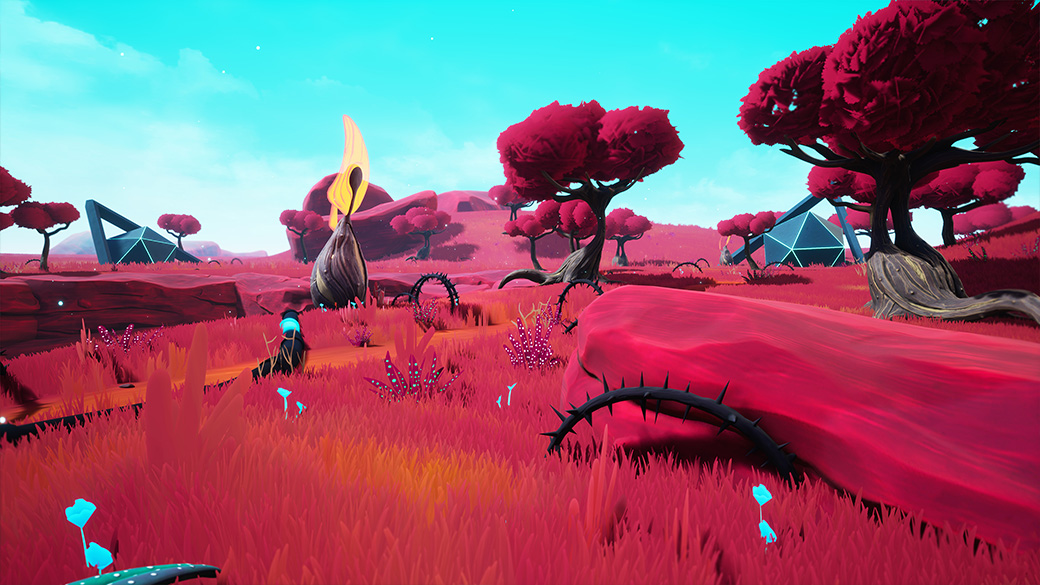
From the beginning it was clear to me that I wanted to have grass moved by the wind and to play with contrasting colours. I took the concepts from No Man's Sky as inspiration.
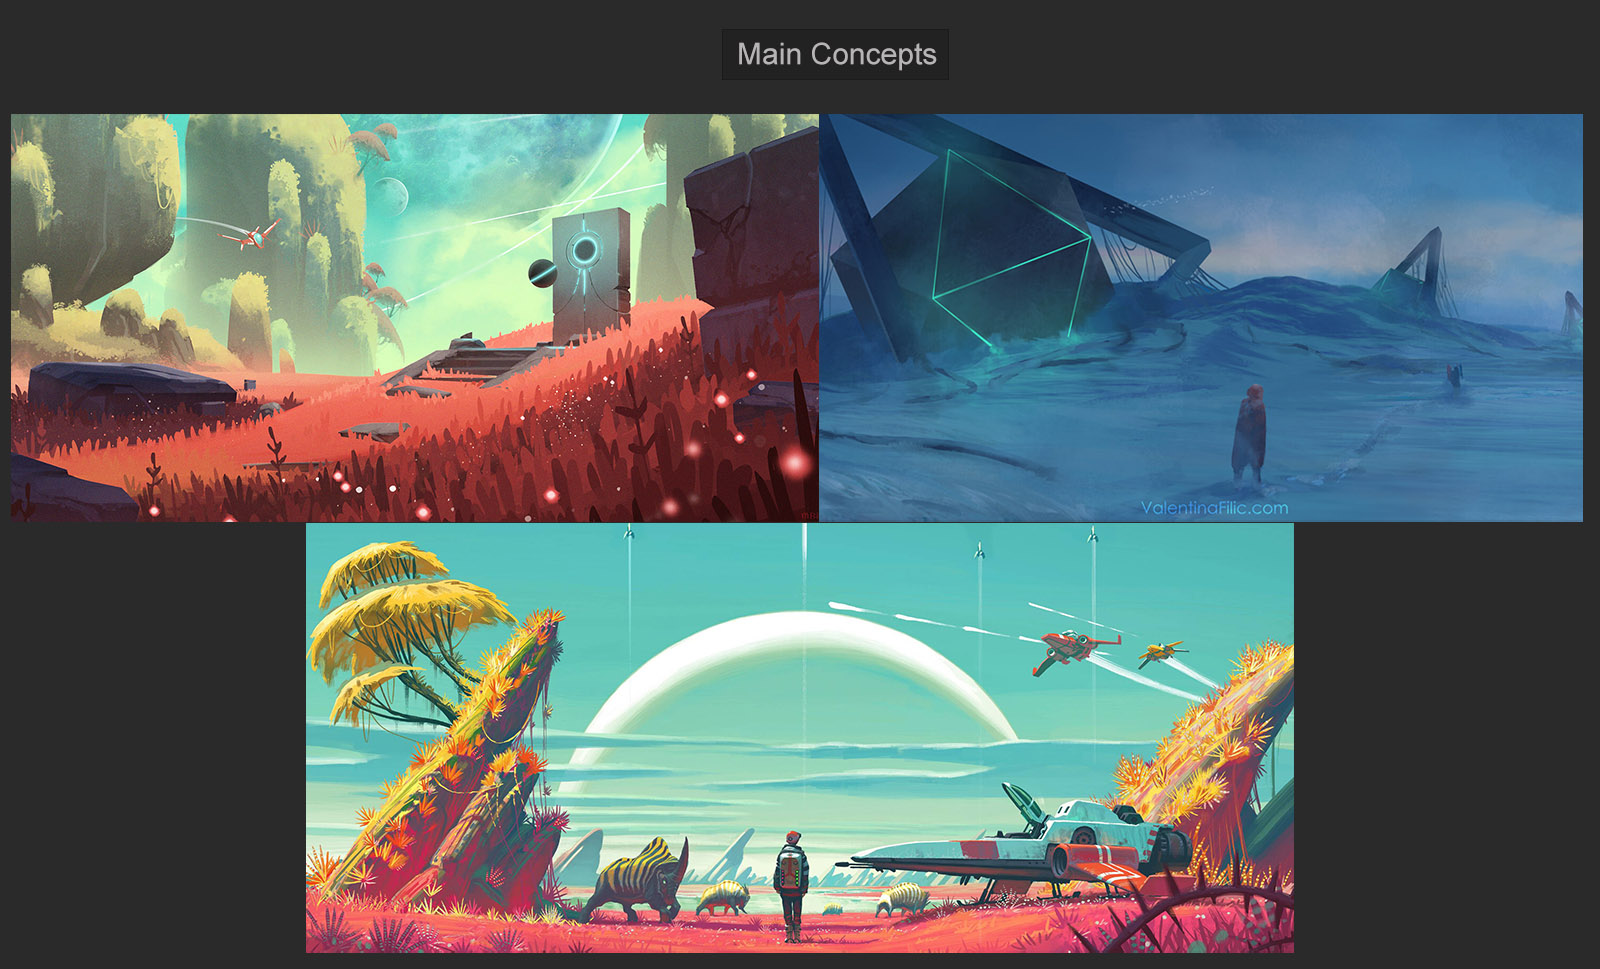
I collected a series of references, and I wanted to mix the above three images for the main render. They are made by (in order) Michael Bills, Valentina Filic, and No Man’s Sky. I liked the concept of these strange ruins and the potential they could provide to guide the player's eye to new possible environments. I also wanted to create a sense of depth; to have background and foreground elements that would close the view at the edges of the screen to keep the viewer's attention.
I have always worked with a single concept in mind, following it very closely.
For this work I wanted to get out of my comfort zone a bit, trying to do something more original. I gathered ideas from various sources to inspire me and then tried to develop my own personal vision.
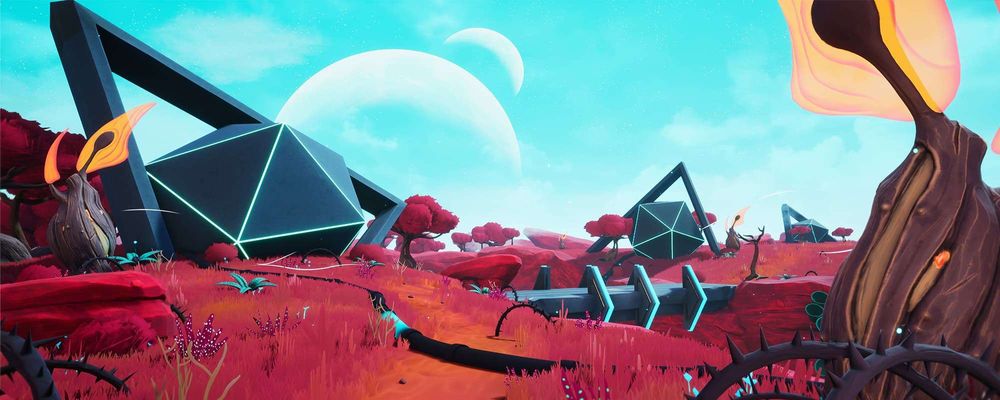
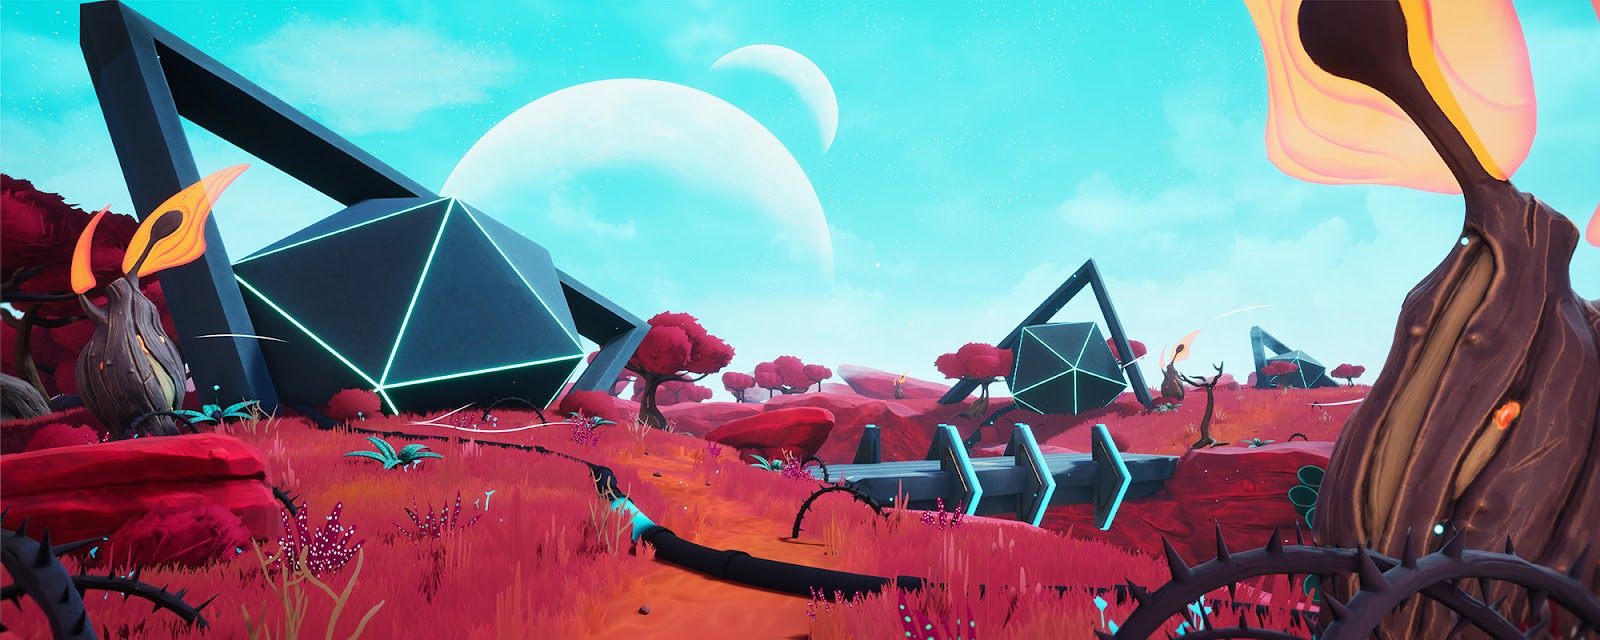
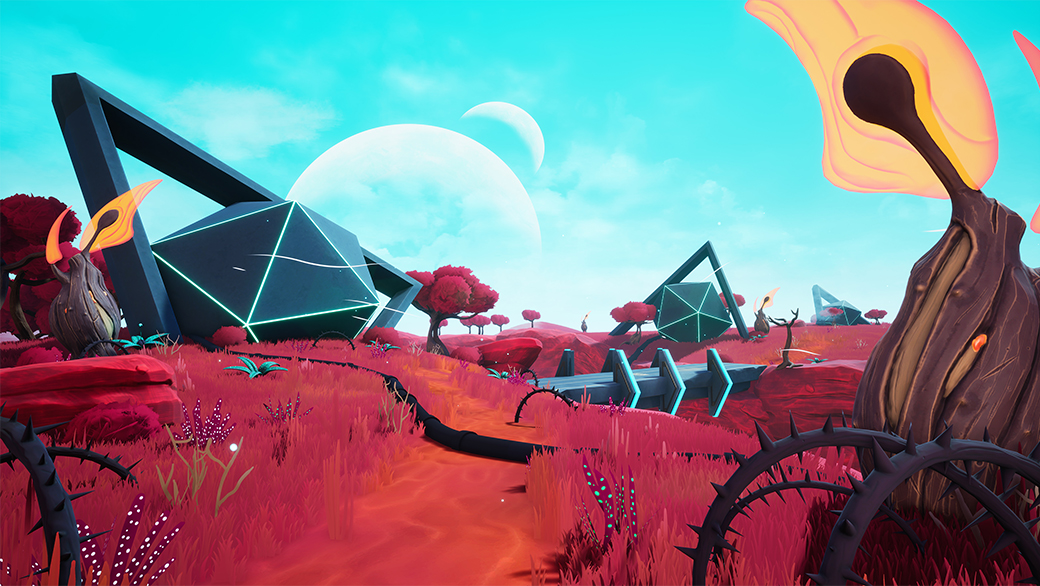
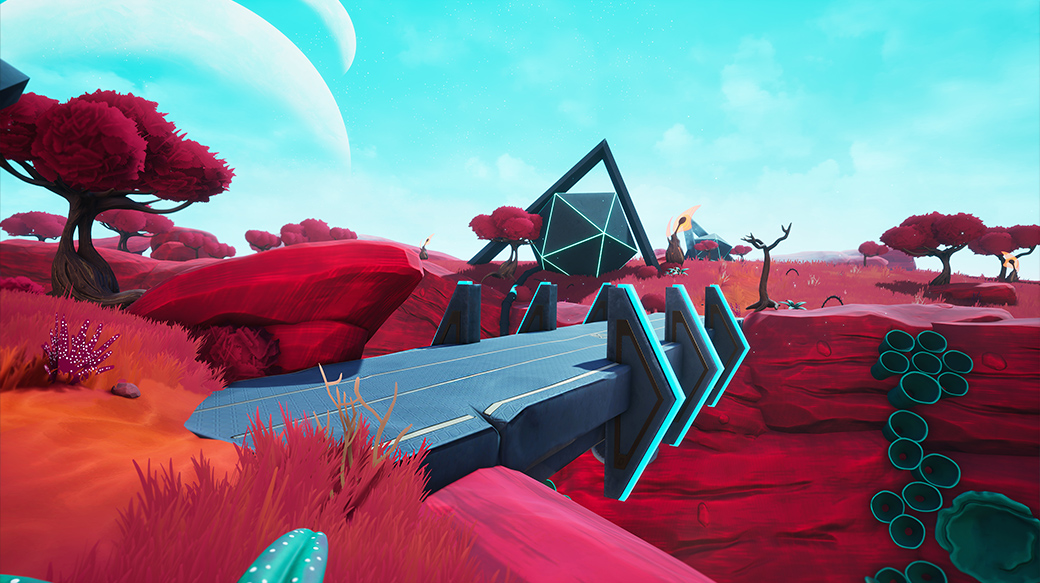
I knew I wanted to create an alien planet, with technology and structures long ago forgotten, but with energy still flowing through them. I thought about creating an open field, filled with plant life, amongst the rifts and chasm breaking the plains. Inside this chasm there will be a lot of vegetation, bioluminescent, along with ruins of the ancient civilisation that once resided here.
I did a lot of research on the style I envisioned. I searched for works by other stylised artists that could serve as inspiration and reference for the quality I wanted to achieve.
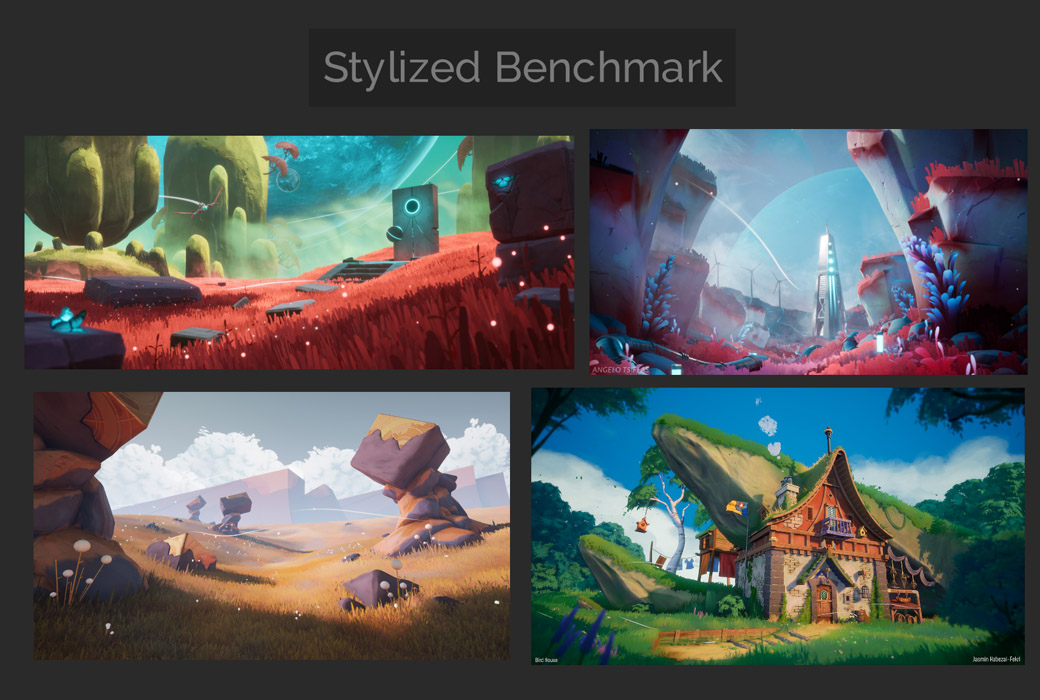
I was particularly inspired by theNo Man's Sky fanart by Thomas Corvée. He made an amazing alien environment and shared a breakdown on Stylized Station full of useful tips. I really liked his composition and lighting.
Other stylised works that marked the quality I wanted to archive were:
Red Hills by Angelo Tsiflas: I really liked the colours and vegetation of this work. He did an amazing job with the atmosphere, incorporating volumetric fog and wind lines.
Quiet Fields by Thomas Dayan: I loved his presentation video, with grass and particles blowing in the wind. This environment seemed so alive with movement, and I wanted to create something similar.
Bird House by Jasmin Habezai-Fekri: Jasmine is probably my favourite stylised artist. She has an amazing artstyle and I really enjoy researching her work. She did an extensive breakdown of how she did this environment, in which she also learned a lot about Unreal Engine, sharing what resources were helpful for her.
Blocking and Composition
As this is a portfolio piece, the camera positioning for each individual render is very important, but I also wanted it to work as a playable scenario, so I wanted to add a clear path for the player.
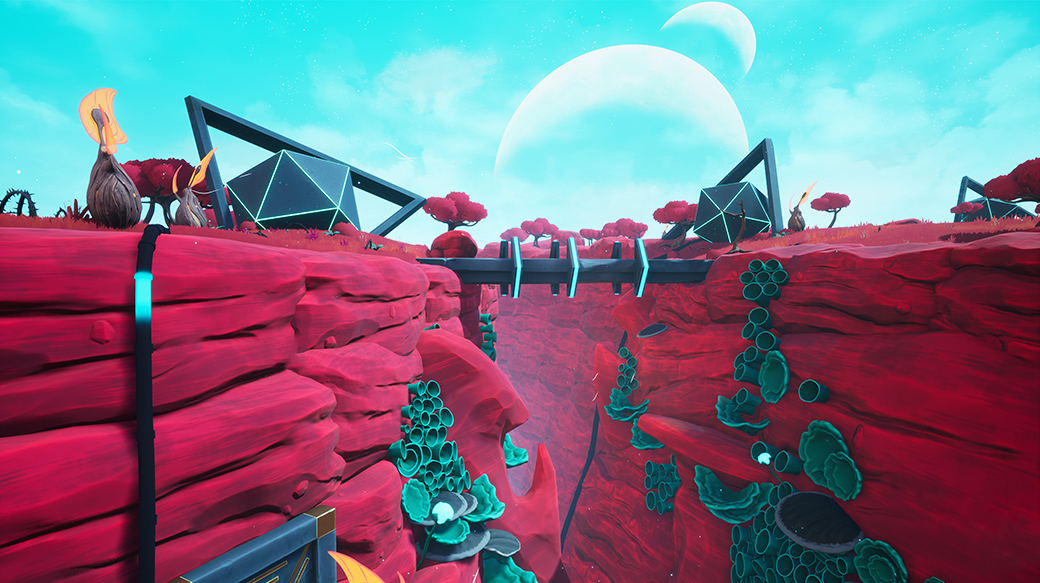
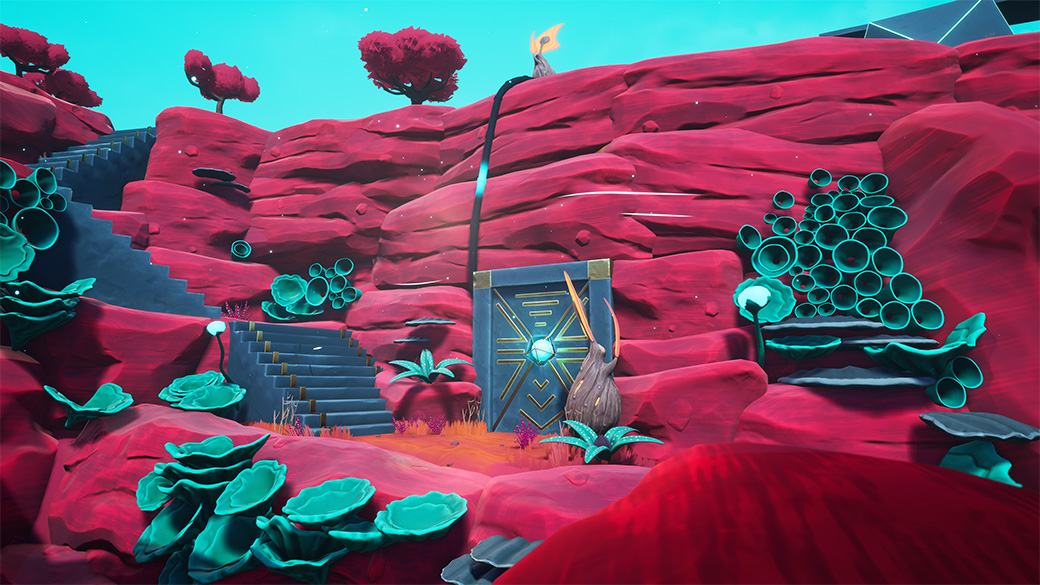
For the blocking, I first created the landscape in Unreal and started sculpting the different valleys and fissures. I wanted the surface of this planet to be fractured and full of chasms where the flora could have shelter from the sun, creating an area full of strange vegetation. This is inspired by Stormlight Archive, my favourite book series.
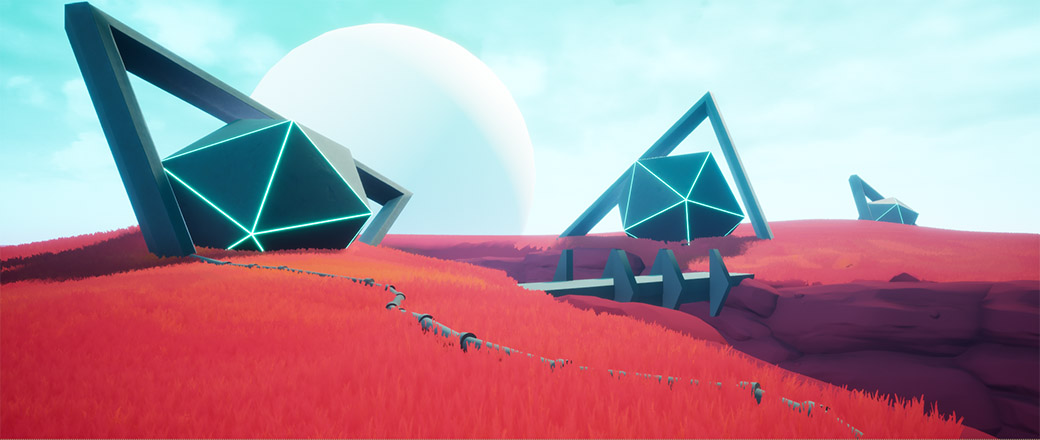
I created base meshes of the large structures that were going to take up most of the render space. I also wanted to place a gate in the chasm connected to these structures by a wire with light running through it, making a small visual guide for the player.
After looking at the concepts and blocking out what I intended for the main shapes, I could start working on the individual assets.
Vegetation and Foliage
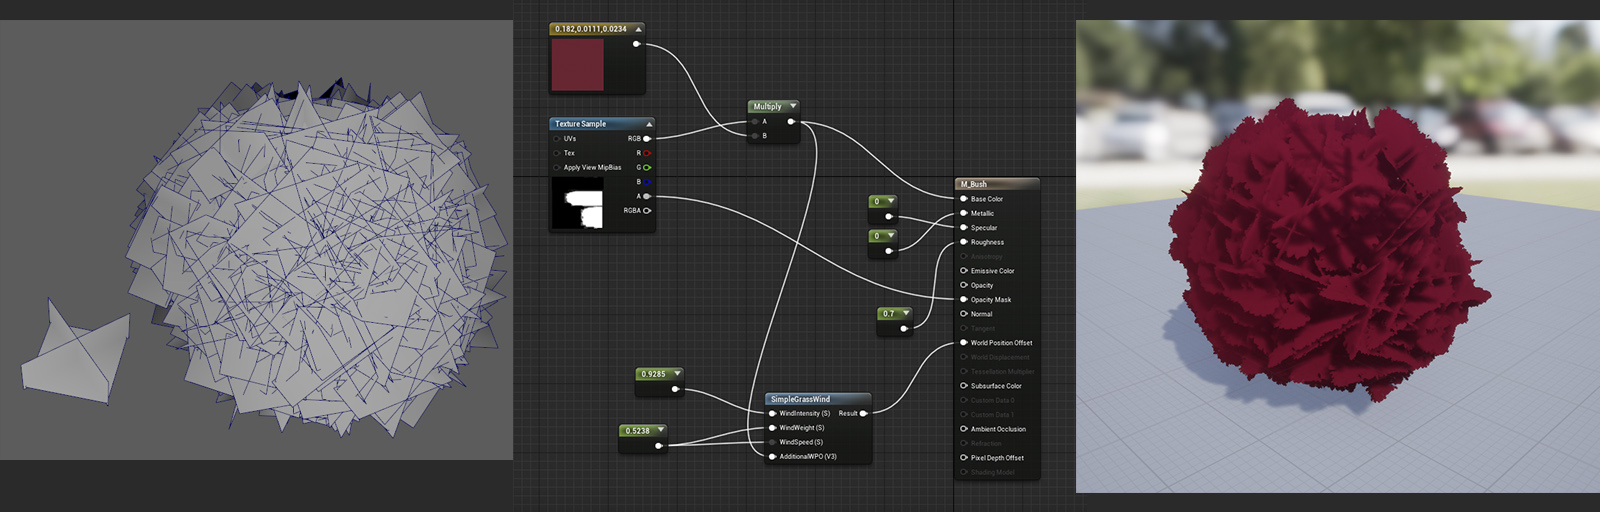
Something I started very early on because it was important for me to get right, was creating the grass. I had never done foliage before and it was very relevant to the contest, so a lot of the research for this project went into it.
It was quite tricky to get it just the way I wanted it. The process required a lot of trial and error. I had to do a lot of reading and research on others' works.
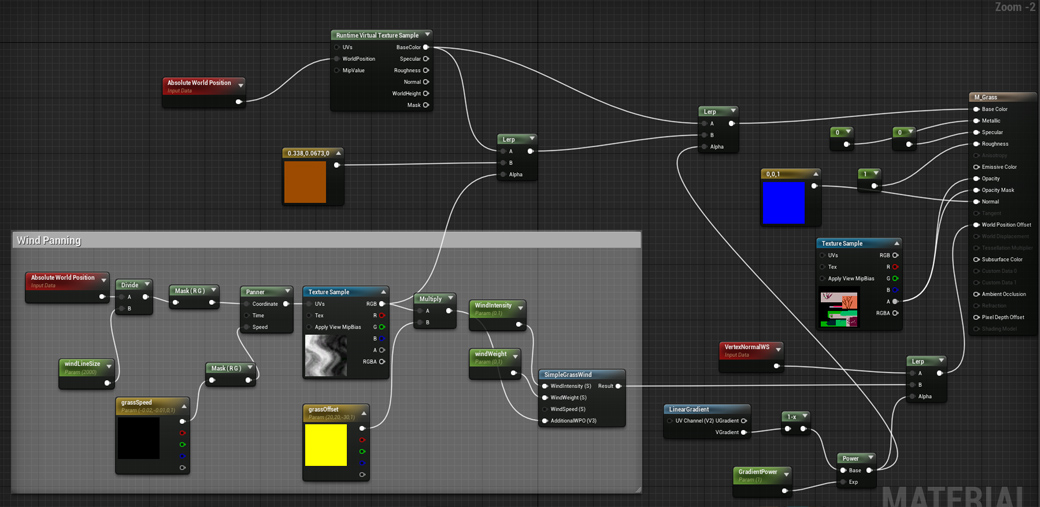
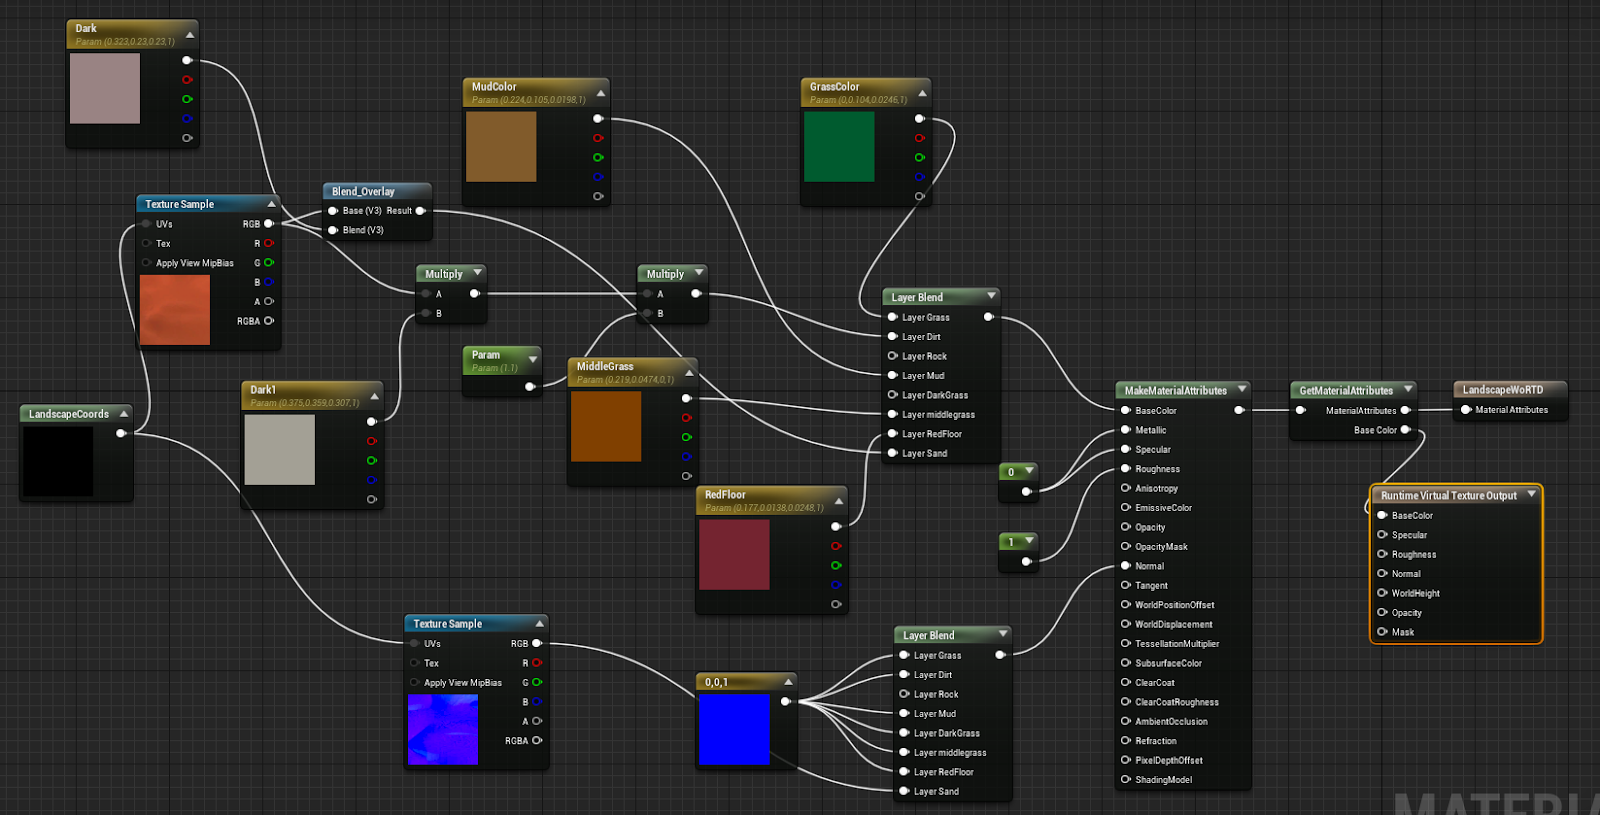
Thanks to this article by Jasmin Habezai-Fekri I managed to find the technique I was looking for. She talked about using Runtime Virtual Texturing (RVT) to make stylised grass that looks painted, like the style of the Ghibli backgrounds. It was something I quite liked, being able to paint the colour variation of the grass and make it look fluffy.
I found this video by PrismaticaDev in which he explained the whole process of making RVT work. This was a great help, as this workflow is more or less a beta feature and needs a little bit of tweaking to get it to work right. For the grass material I tried replicating this tutorial by Jess Hider in which she did a step-by-step explanation of how to make stylised wind blown grass.
By researching these sources, I managed, adapting it to my style, to make the grass work the way I wanted it to. It consists of an alpha map with the shape of the leaf, a few planes done in Maya, and a procedural map for the panning wind waves. What worked out best was setting the grass to not cast shadows and making it’s vertex normals face upwards. This way, I made sure it looked more cohesive and there were no strange shadows.
I still had to add a lot of variety and different types of leaves, but the base was already done and it was much easier from there. I made more textures for the vegetation later, painting them by hand in Photoshop. This way, I was able to put variety into the grass, making it distinct.
The terrain consists of different coloured layers that I can paint to colour the grass on top of it, achieved by using RVT. Using the paint tool in the landscape editor allowed me to paint the colour variation just where I wanted it. The result was just as I was looking for, having the grass blend well together, and that Ghibli painterly look.
Asset Creation
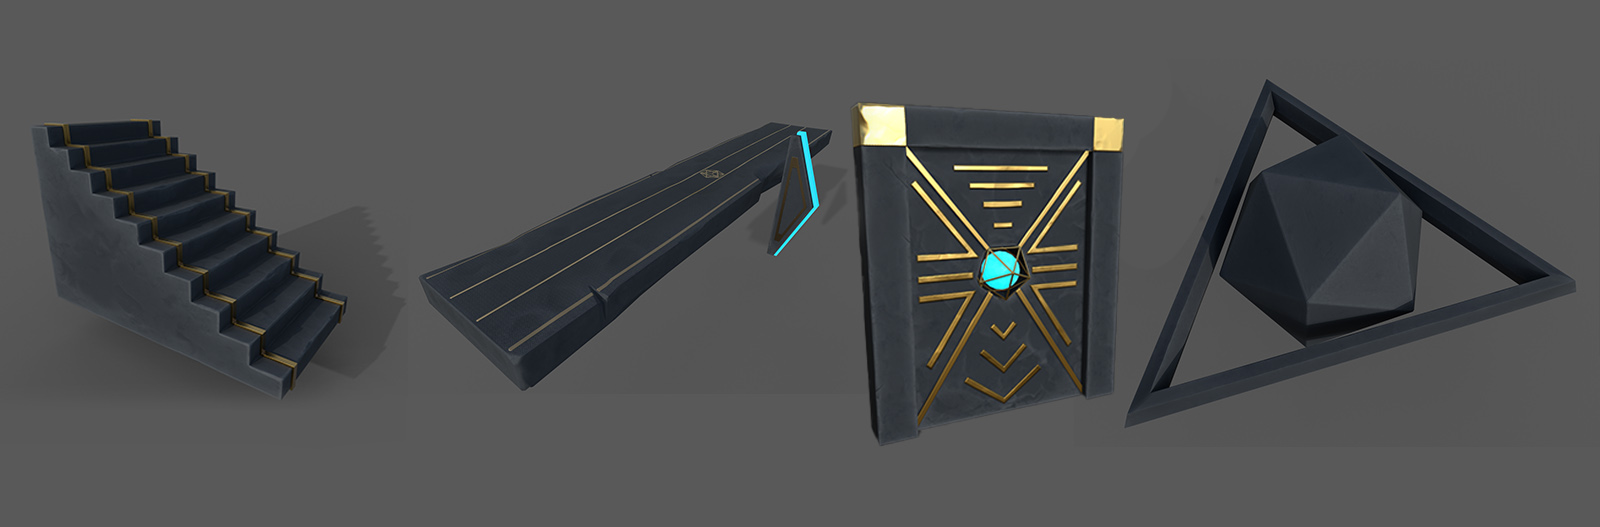
Next, I started modelling the alien structures in Maya, paying attention to the scale of each one of them. They are made from simple and basic shapes without too much complication.
I wanted these structures to be a break from the red tones of the scenery, making the player's eye focus on them. The blue glow of this technology is very different from the rest of the scenery creating a very appealing effect.
Once the base meshes were done, I moved them to Zbrush to sculpt the high poly. With a dynamesh and subdivisions I looked for enough resolution to be able to detail them. I used the Orb brush pack, which gives amazing results to make stylised rocks. Wearing the edges to make them look old, adding breaks and cracks, I made sure these details could be used later for texturing.
After doing the retopology of the necessary elements, and unwrapping the Uvs, I took each object to Substance Painter to texture it. To get a stylised look it works very well to use the curvature map to lighten the edges, making them look more weathered. I also used the slope blur filter to give colour variation and make it look more hand painted. After texturing the first model I converted the layers into a Smart Material so I could apply them to the other assets and have them textured cohesively with the same materials.
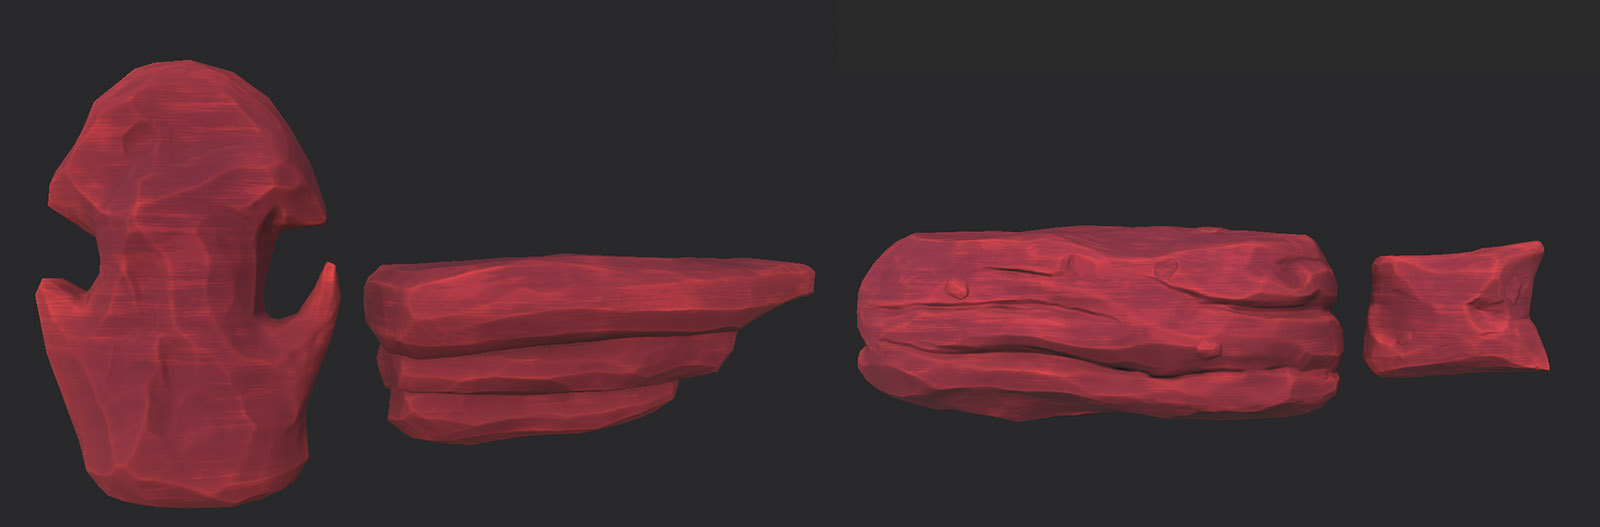
I repeated this process for the rest of the objects in the scene. For the inside of the crevice I quickly sculpted a couple of large rocks that I could place on the walls to get an idea of what the final result would look like. These models were just a decimated placeholder with flat colours, but they helped me to better understand the composition.
I filled the crack walls with these and once I was happy with the result I sculpted the final version, and went through the whole process of doing the low poly, uvs, baking details, and texturing in Substance.
I did the same with all the plants and corals, creating a wide variety of assets that I could spread around the environment.
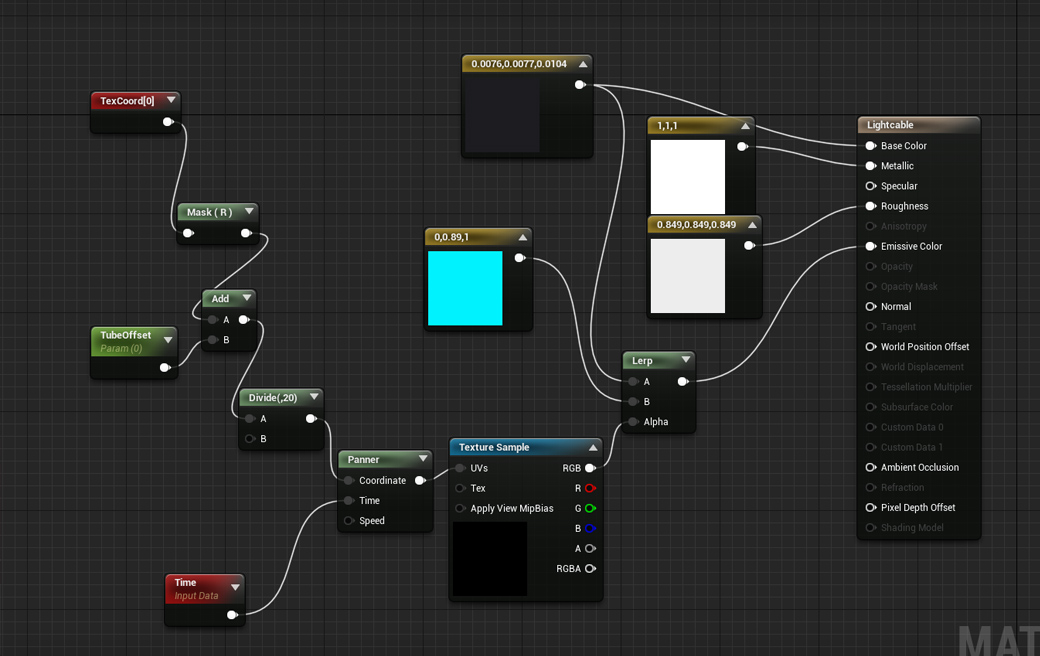
Light Cable
One thing I wanted to get from the beginning was a tube from the large structure on the surface to the strange door hidden in the chasm. I wanted this to guide the player to explore and spark their curiosity, and it seemed like a good idea to have a line of glowing energy running through it.
Special thanks to ThatGuyMike over at the StylizedStation Discord Server, who shared how he did something similar and guided me through the process, as I've never tried using blueprints.
The tube is made using a mesh being repeated through a spline. I made it following this tutorial. Then, I painted in Photoshop a white strip mask, that was used to be panned through the cable to get the flowing emissive energy working.
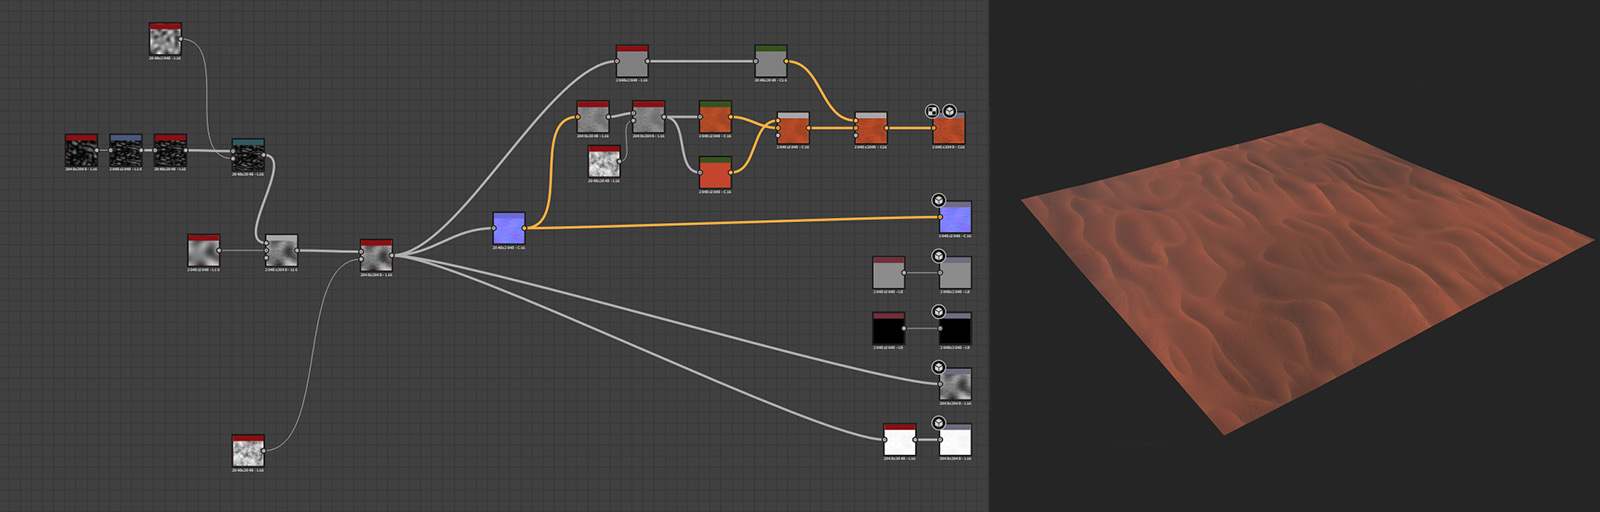
Tileable Sand Texture
I’m quite a beginner in Substance designer, but I wanted to learn more during this project.
I created a tileable sand texture to place in the areas where creatures would have passed through, creating a clear path for the player. It’s nothing too complicated, only some procedural cloud textures blended together to have that wavy dune look.
I like how it looks and how it blends in with the different colours of the terrain. This was used to add a clear path for the player, breaking up the monotony of the flat colours on the floor.
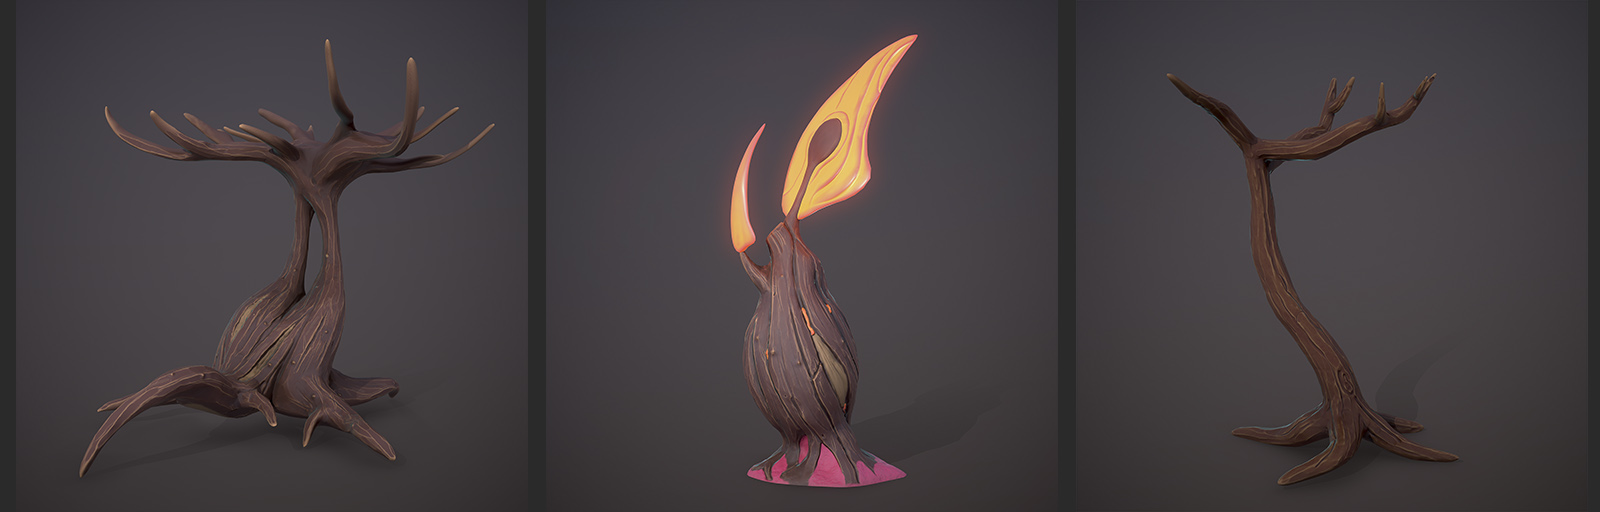
Trees and Bushes
To fill the scene and close the composition I wanted to have some different trees. I wanted to have a more alien look and add variation to the scenery so I started sculpting and texturing them. I especially like one of them, where I added large translucent leaves that seem to emit heat.
First I sculpted each tree in Zbrush, blocking it with ZSpheres. Once I had a shape I liked, I used Dynamesh in low resolution, adding the big details first, and then, increasing the resolution and subdividing to have the finer details.
Creating wood is a fun experience to me - having to think about the direction of the bark and grain. It’s quite enjoyable adding all the details like cracks, knots and hard edges.
After finishing sculpting the high poly I zremeshed the model, using guides to have the topology flow I wanted. After some cleanup inside Maya I unwrapped the UV’s and had the low poly ready for texturing.
Inside Substance Painter I baked the high poly onto the low poly. Thanks to the baked curvature and ambient occlusion maps I could get colour variation for the edges and details. I archived this using these maps in a mask generator, making a few fill layers with these masks. Using the lighter edges and curvature maps to paint colour variation is very important to achieve the stylised hand-painted look.
The leaves were challenging to get right. I spent some time researching for a way I could make stylised leaves, having them match the look of the rest of the environment.
I had the luck of finding this article by Romain Durand that explained the process of making stylised leaves look right. I made my leaf by arranging 3 planes following the shape of the image. I made sure the UVs were right before duplicating them. Scattering these planes to conform to the shape I wanted for the leaves canopy and then transferring the vertex normals from a bigger shape that enveloped the canopy, making them face outwards.
Using the SingleGrassWind node inside the material in Unreal, I made sure that it had the effect of being moved by the wind.
Varying the shape and colours, I used this technique to create the tree leaves and bushes throughout the scene.
Particles and Effects
I tried to give more life to the scenery with some animated particles. Watching Dean Ashford's tutorial I created some stylised wind lines inside Unreal, as you can see in the video. It’s something I’ve seen in a lot of projects and that I really wanted to include in mine.
I also added simple blue floating particles that looked like glowing spores to add movement to the scene.
For the background, I painted some cloud alpha textures inside Photoshop and assigned them to planes. Layering the background with these planes gives the impression of a much denser and volumetric fog. I added exponential height fog as well.
Planes were also used for the planets in the sky. They are only a texture painted in Photoshop assigned to a plane with an unlit material.
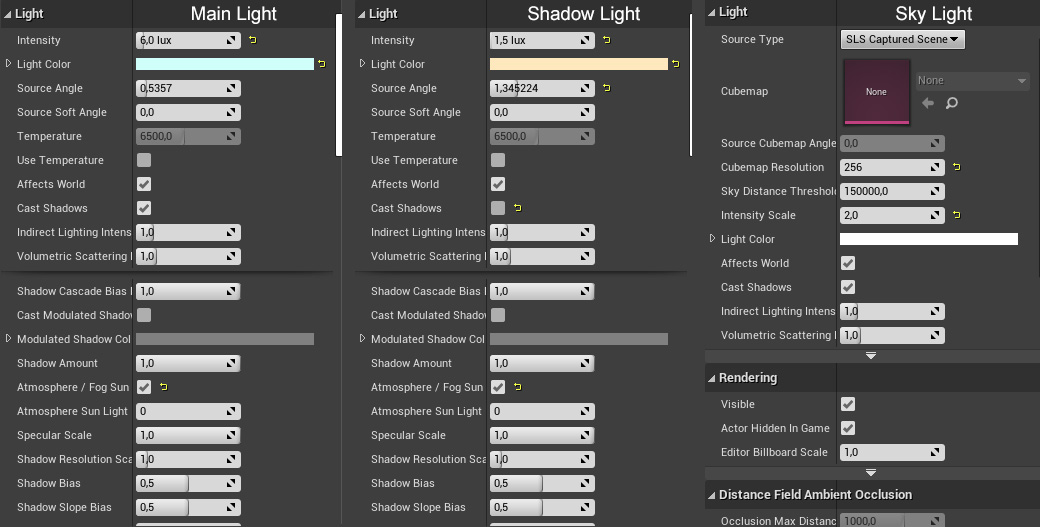
Lighting and Post-processing
The entire scene is dynamically lit. As this was a portfolio piece and performance was not that important, I didn’t use light baking. There are two directional lights. The main light is blue tinted, contrasting with the red colours of the environment, giving the impression of light and colour reflection from the cold coloured sky. This light is responsible for casting the main shadows.
The second directional light is warmer and with lower intensity. It’s opposed to the main light, making the shadows less hard and with an orange tint, also giving the impression of bounce lighting.
Thanks to a SkyLight capturing the scene, everything comes together, blending the atmosphere and giving more depth.
I also added some point lights to paint light in some areas. This allowed me to add bounce and rim lights to get the final look I wanted. There’s also exponential height fog, that gives the farthest parts of the environment that depth and volumetric look.
For the Post-processing of my environment, I didn't alter too much - A bit of white balance to get the colour I was looking for. I made a render, then I took it into Photoshop to edit the contrast, saturation and to do colour correction, as it's much easier for me there. I exported a LUT file to have these adjustments exported to put them into the Post Processing inside unreal so that it would automatically use all these adjustments to achieve the result I wanted. I did this researching the documentation from Unreal.
Rendering the final images was fairly simple.
While working, I was already placing cameras to get the composition right, thinking of the different angles I wanted to show. This helped me to know where to put the assets, and always catch the attention of the viewer.
As it was my first time using Unreal, I had to research how to export a video from the cameras. Using the sequencer, and animating my cameras, I could achieve a video "flythrough" to show the environment, as well as creating a video similar to a gameplay trailer. You can see them on my Youtube channel.
Conclusion
This has been one of the biggest projects I have ever done. I spent about two months on this contest. I had always wanted to get a foot into environment art and it gave me the opportunity I needed.
Working on it, I have investigated a lot of new workflows, learned Unreal Engine, and improved my overall skills.
I can’t recommend embarking on a [Rookies] contest like this enough as it forces you to try new things as an artist.
For me researching others' works, looking up to artists you like, and getting to develop your own style, is what motivates me the most.
Participating in communities has helped me a lot to share my work, receive feedback, and meet other people like me. Some of the groups in which I take part via discord are: The Rookies, StylizedStation, and ExperiencePoints International. It was great to share my process with other contenders of the contest and see their entries too.
My amazing partner was my biggest supporter throughout the project, always sharing her feedback and giving me fresh ideas. Thank you to my family who has always supported me and has interest in something which is so foreign to them.
I would like to mention my main inspiration, Outer Wilds. It is my favourite game, by Mobius Digital, and it arouses my curiosity and passion for creating in an overwhelming way. I can't recommend it enough, it's a life changing experience.
Finally, I must thank The Rookies for giving me the opportunity to write this breakdown article about my work, and for organising such incredible contests. Thank you so much for reading, hope to see you again soon!