Abbas Nikmanesh Sigaroudi, a student at Think Tank Training Centre in Canada, is near the end of his studies. With his final project underway, he aims to cover key aspects of game character creation, offering insights to fellow Rookie Awards 2024 entrants.
Canadian based, Abbas Nikmanesh Sigaroudi is currently enrolled at Think Tank Training Centre, nearing the completion of his studies. As he embarks on his final project for his mentorship term, Abbas endeavours to encapsulate the essential aspects of character creation for games within this article, hoping that readers will find this piece informative and valuable as they work on their own Rookie Awards 2024 entries!
Since childhood, I've always liked sketching characters with ordinary pencils, often seeking inspiration from magazines and movie posters. My fascination with the gaming industry started with Mortal Kombat 3 on the Sega Console, prompting me to start my journey into computer graphics during my college years. Though I initially started with architectural projects using 3ds Max and V-Ray, my heart yearned to become a character artist, driving me to explore ZBrush for its detailing capabilities. Despite facing setbacks in my home country, I persevered, honing my skills and nurturing my passion for character modeling, until finally, after more than a decade, I fulfilled my dream by immigrating to Canada to pursue a career in 3D.
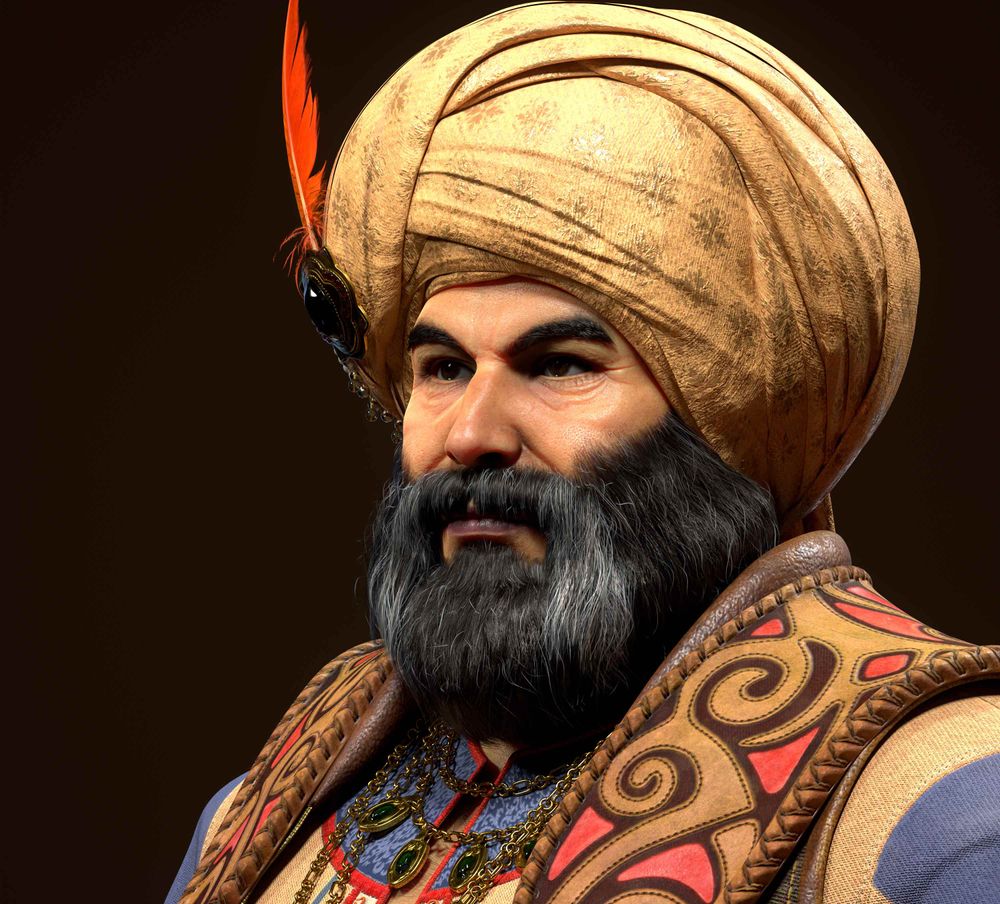
In this article, I am going to explore my workflow for creating the King Morad (Sultan Murad) character that I made for my advanced semester at Think Tank Training Centre Online. I chose this concept from Grafit Studio on Behance.net. We had 9 weeks to hand in our final projects. For this specific project, I strongly wanted to focus on my texturing skill and improve it.
Choosing the concept
Based on my learning at Think Tank, a concept should be attractive and inspiring. Additionally, as an artist, we must select a concept to showcase our abilities in both modeling and texturing. Therefore, in my view, the initial challenge lies in choosing a suitable concept based on the aspects we wish to emphasize.
The primary reason I selected the King Morad Concept is to demonstrate my skills in texturing and hair design. Moreover, for personal projects, I always leverage my creativity to enhance the model's appeal. Thus, I have no issues with concepts that may be somewhat unclear or lack shots from different angles, as I can infuse my own style into the character. For this character, I incorporated additional elements to the outfits and props during the texturing stage to enhance its visual interest. Saurabh Jethani supervised this project, and his valuable feedback greatly contributed to enhancing the character's appearance.
Time management
It is important to manage the timing of your workflow steps and adhere to it. For this project, I structured my time to allocate more focus to challenging texturing tasks in advance.
Week 1: Blockout
Week 2 & 3: Sculpting
Week 4 to 6: Texturing Clothing and Props
Week 7: Texturing the Head and Hand
Week 8: Creating Hair Textures and Placing Hair Cards
Week 9: LookDev and Rendering for Presentation
Firstly, let's discuss my preferred software for projects, followed by an overview of the workflow:
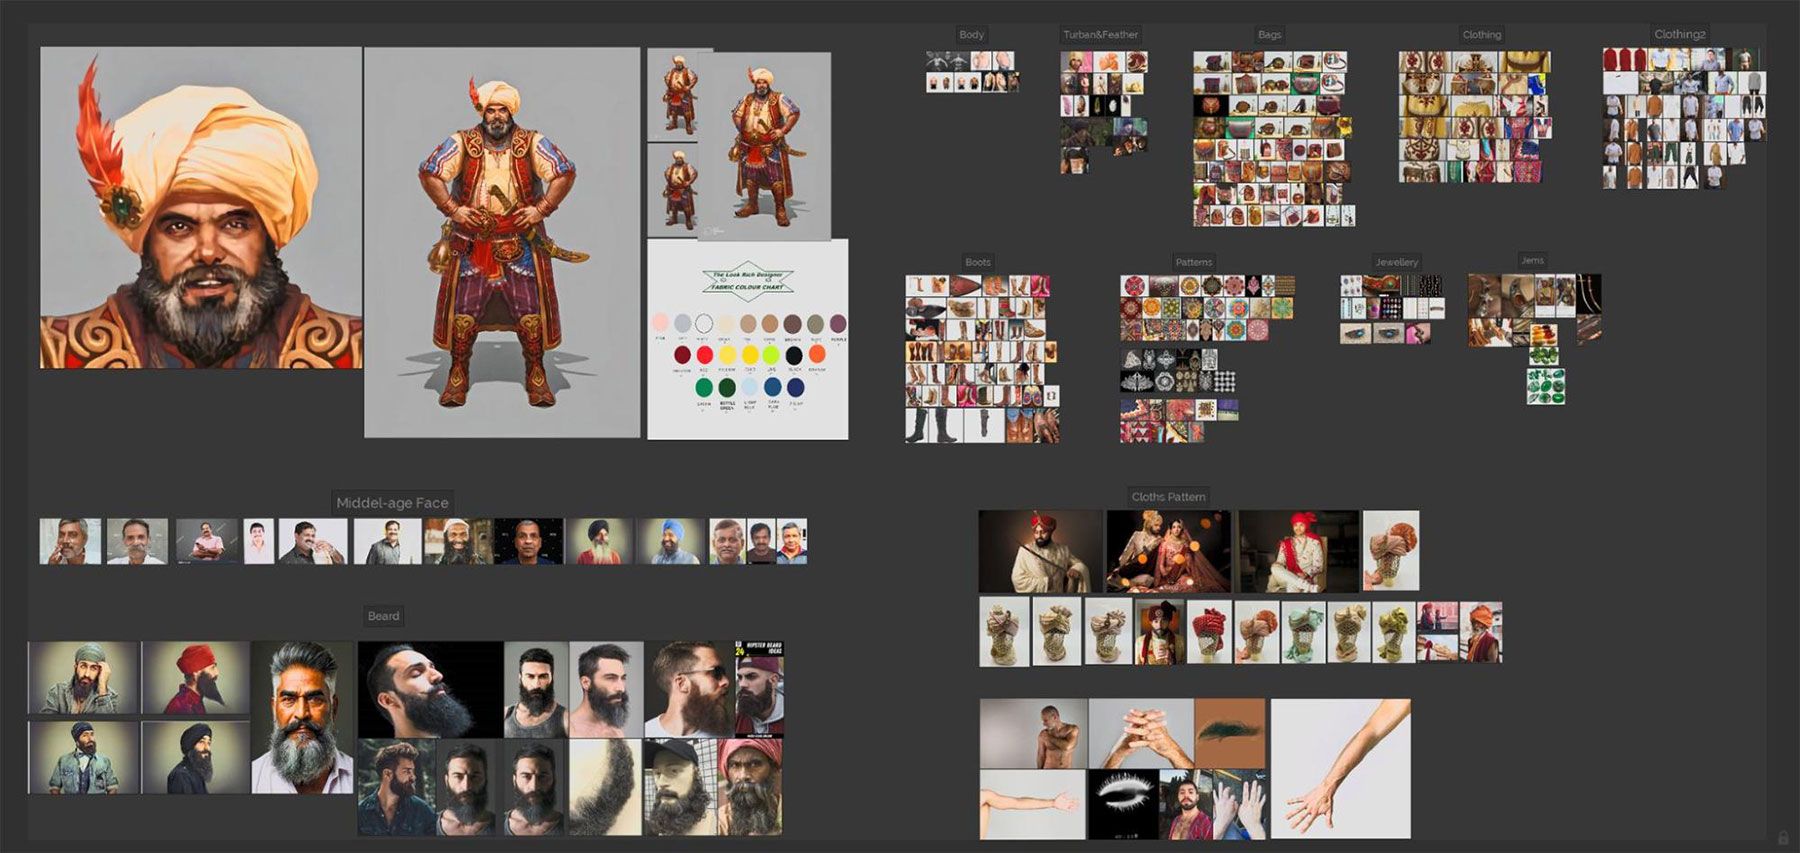
PureRef: Gathering references is crucial for modeling, and PureRef helps organise them efficiently, saving time and managing ideas effectively. It includes images of real faces resembling the concept, character belongings, prop details, decals, etc. I always dedicate at least one day to gather references before starting any project, with Pinterest.com being my favorite resource for searching.
ZBrush: Used for blockout and sculpting.
Maya: Utilised for blockout, UV unwrapping, and Retopology.
I would advise to minimise the number of software used to maintain coherence and avoid errors during file transfer. Maya, being powerful, suffices for UV mapping and Retopology. Previously, I used Headus UVLayout and Topogun for these tasks, but simplifying to Maya has streamlined the process.
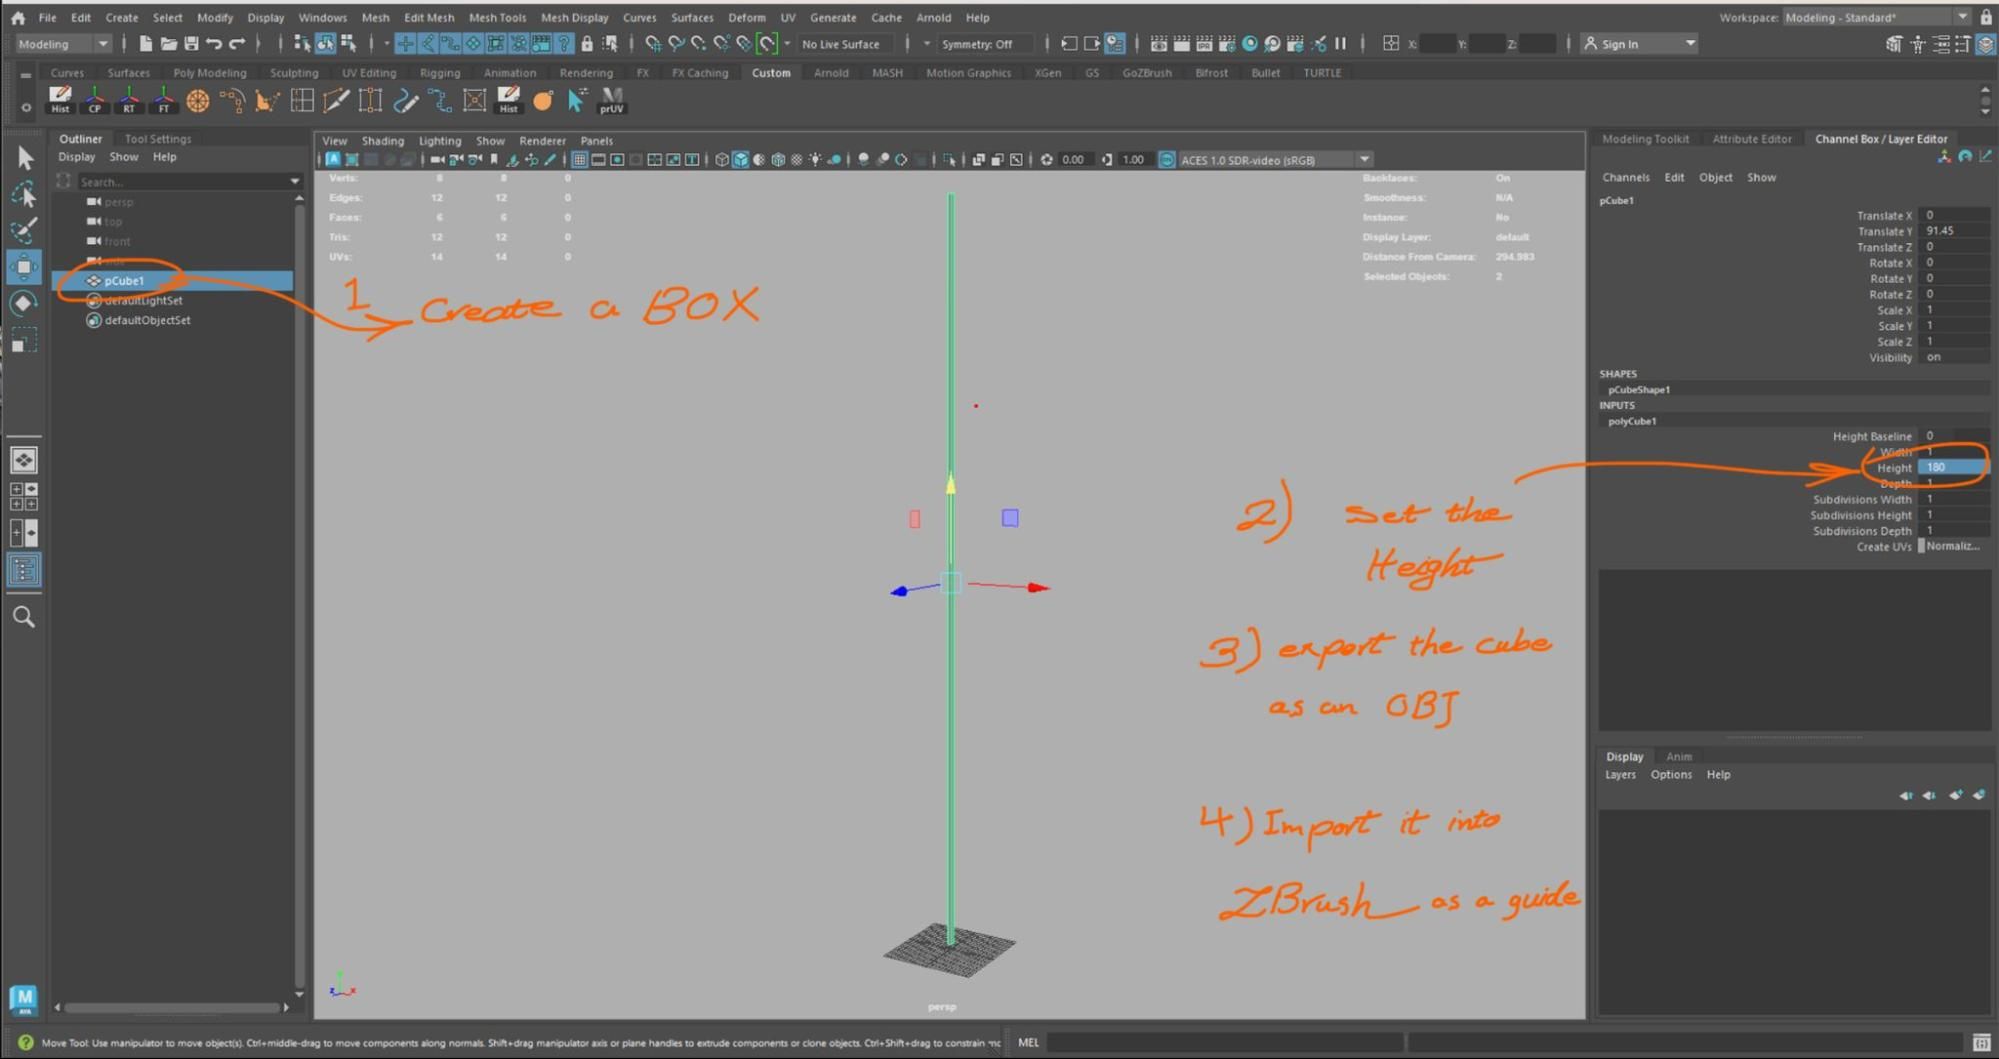
Scaling before blockout
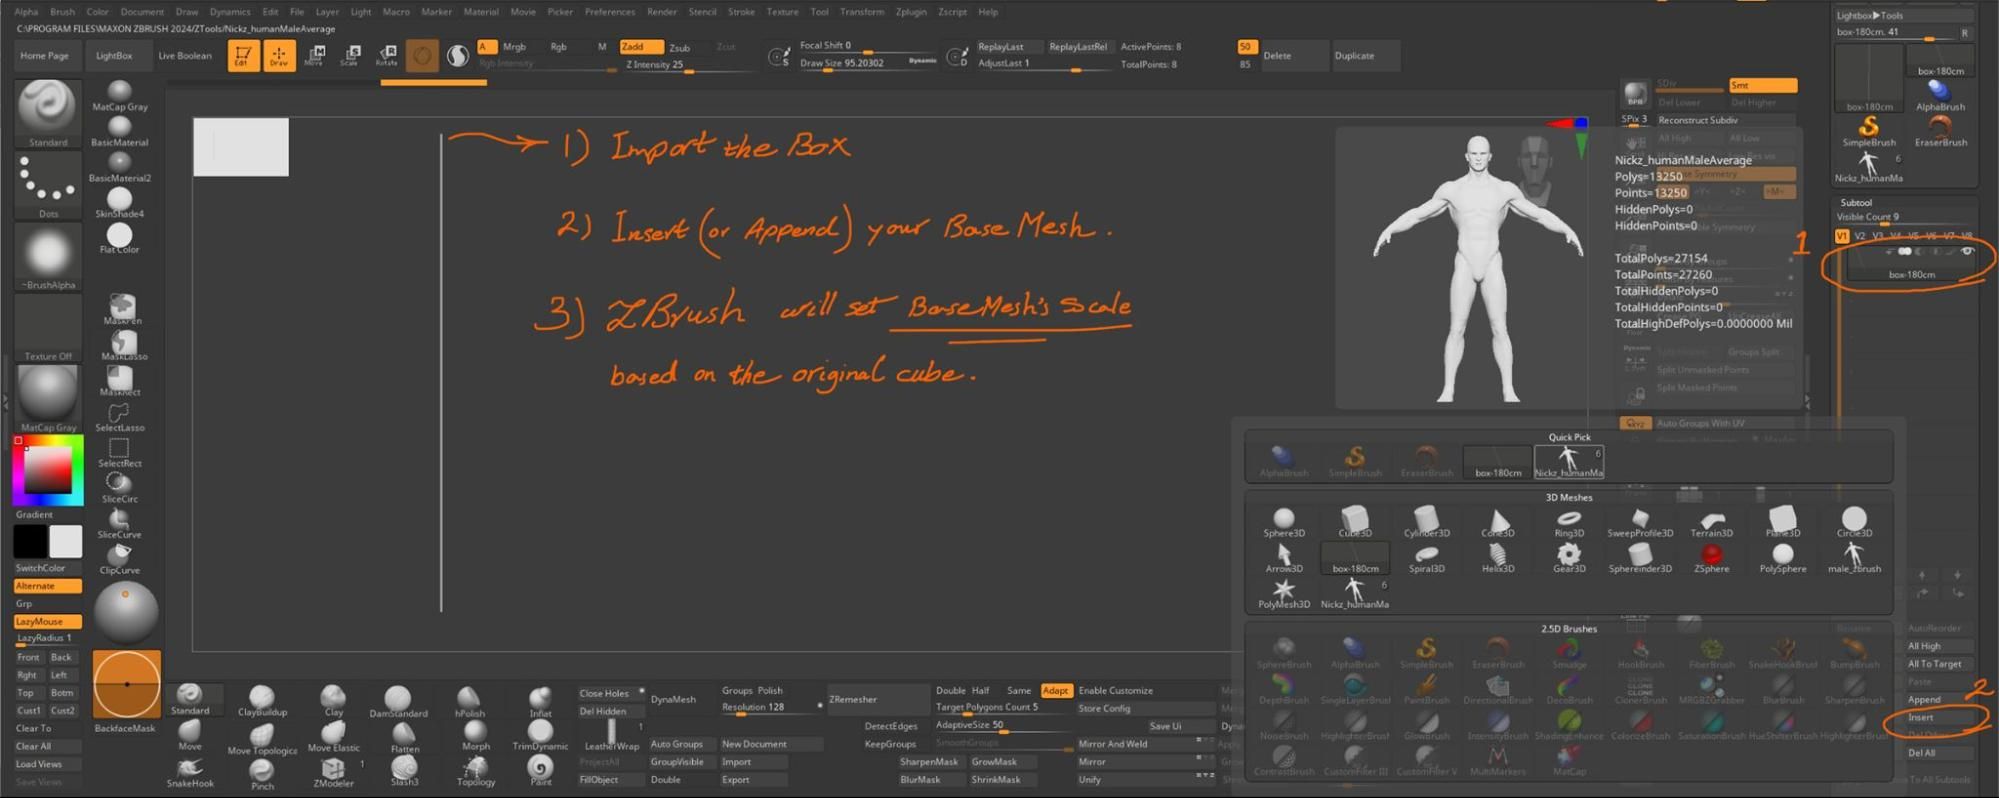
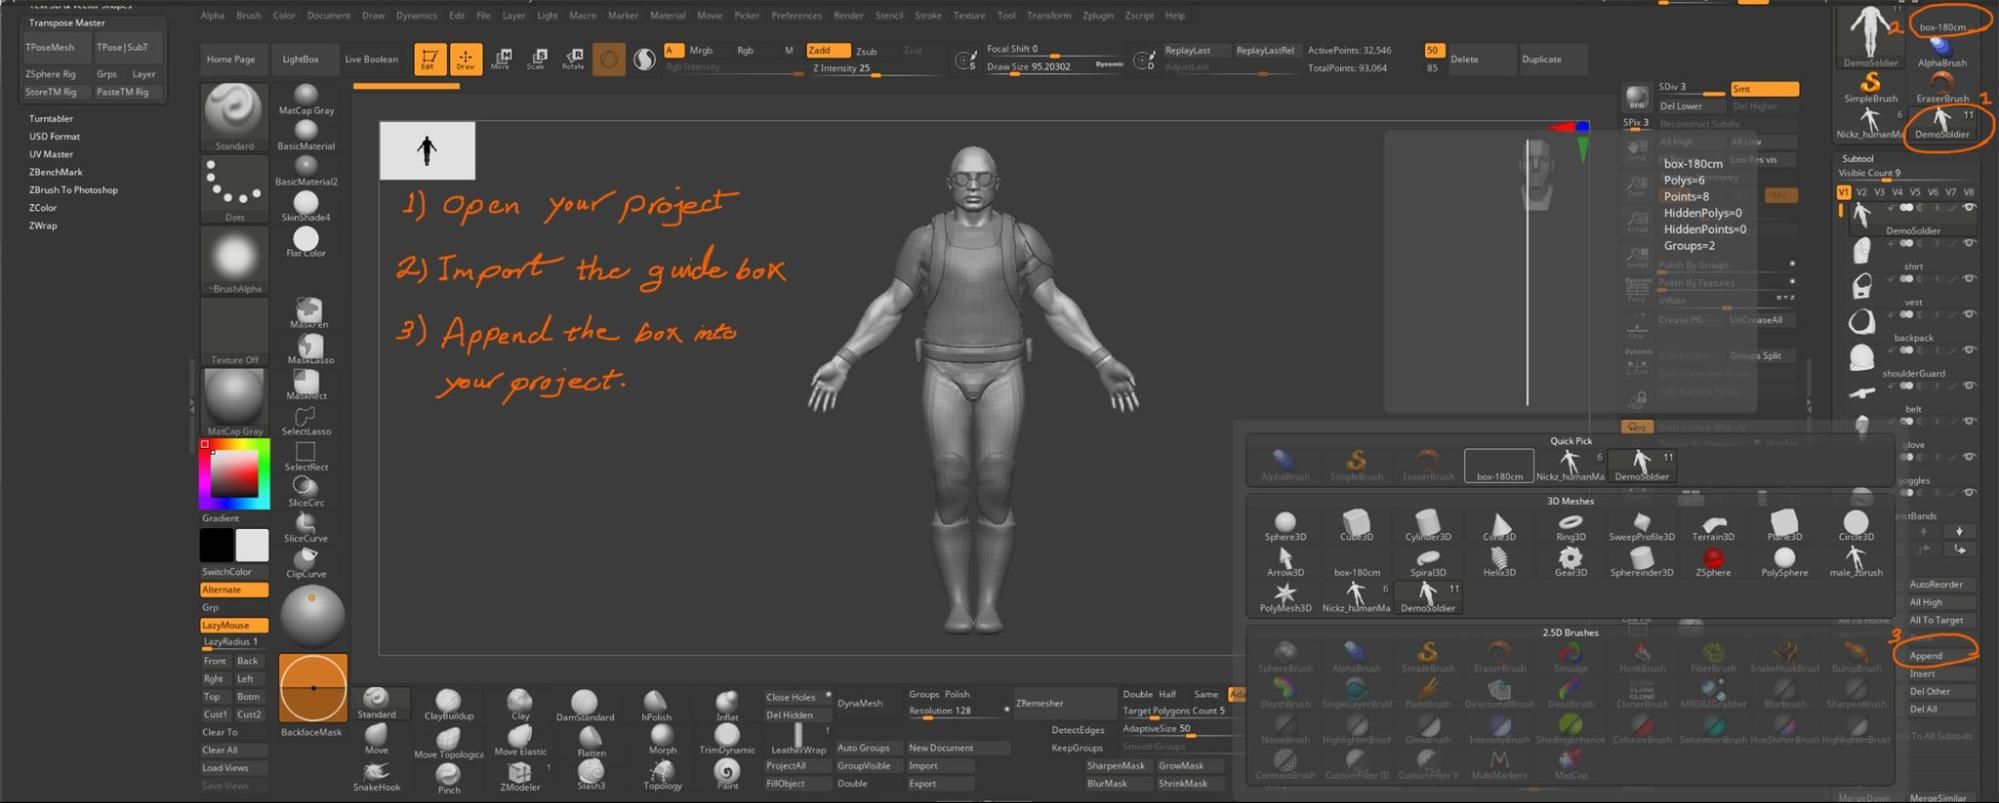
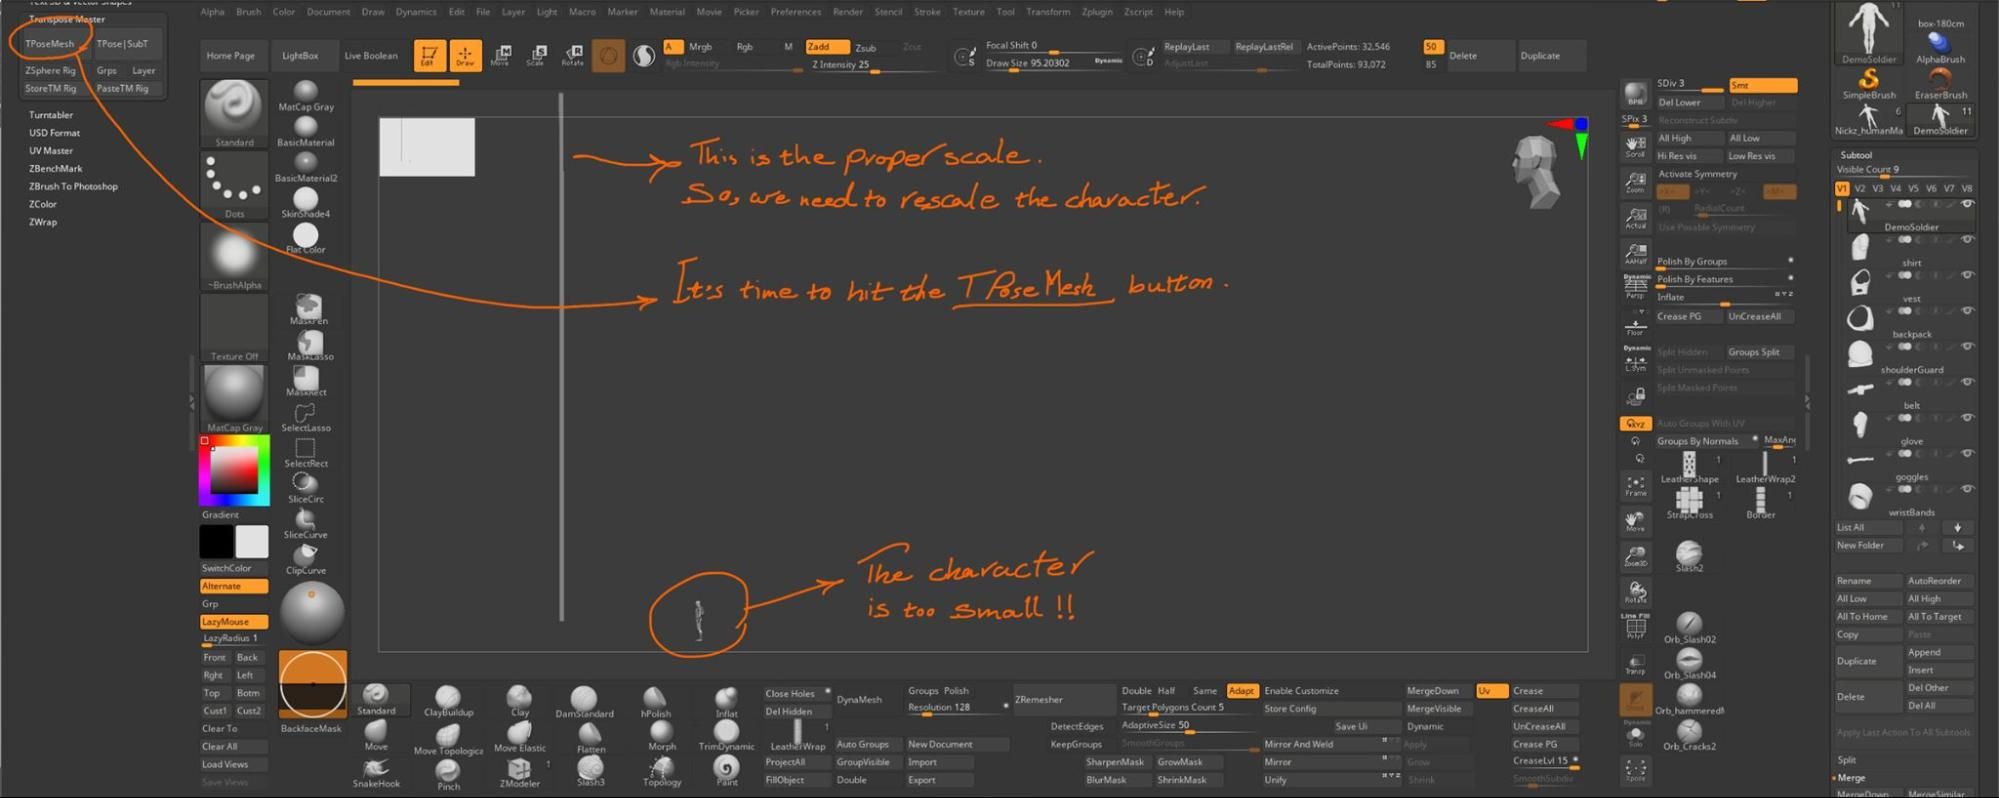
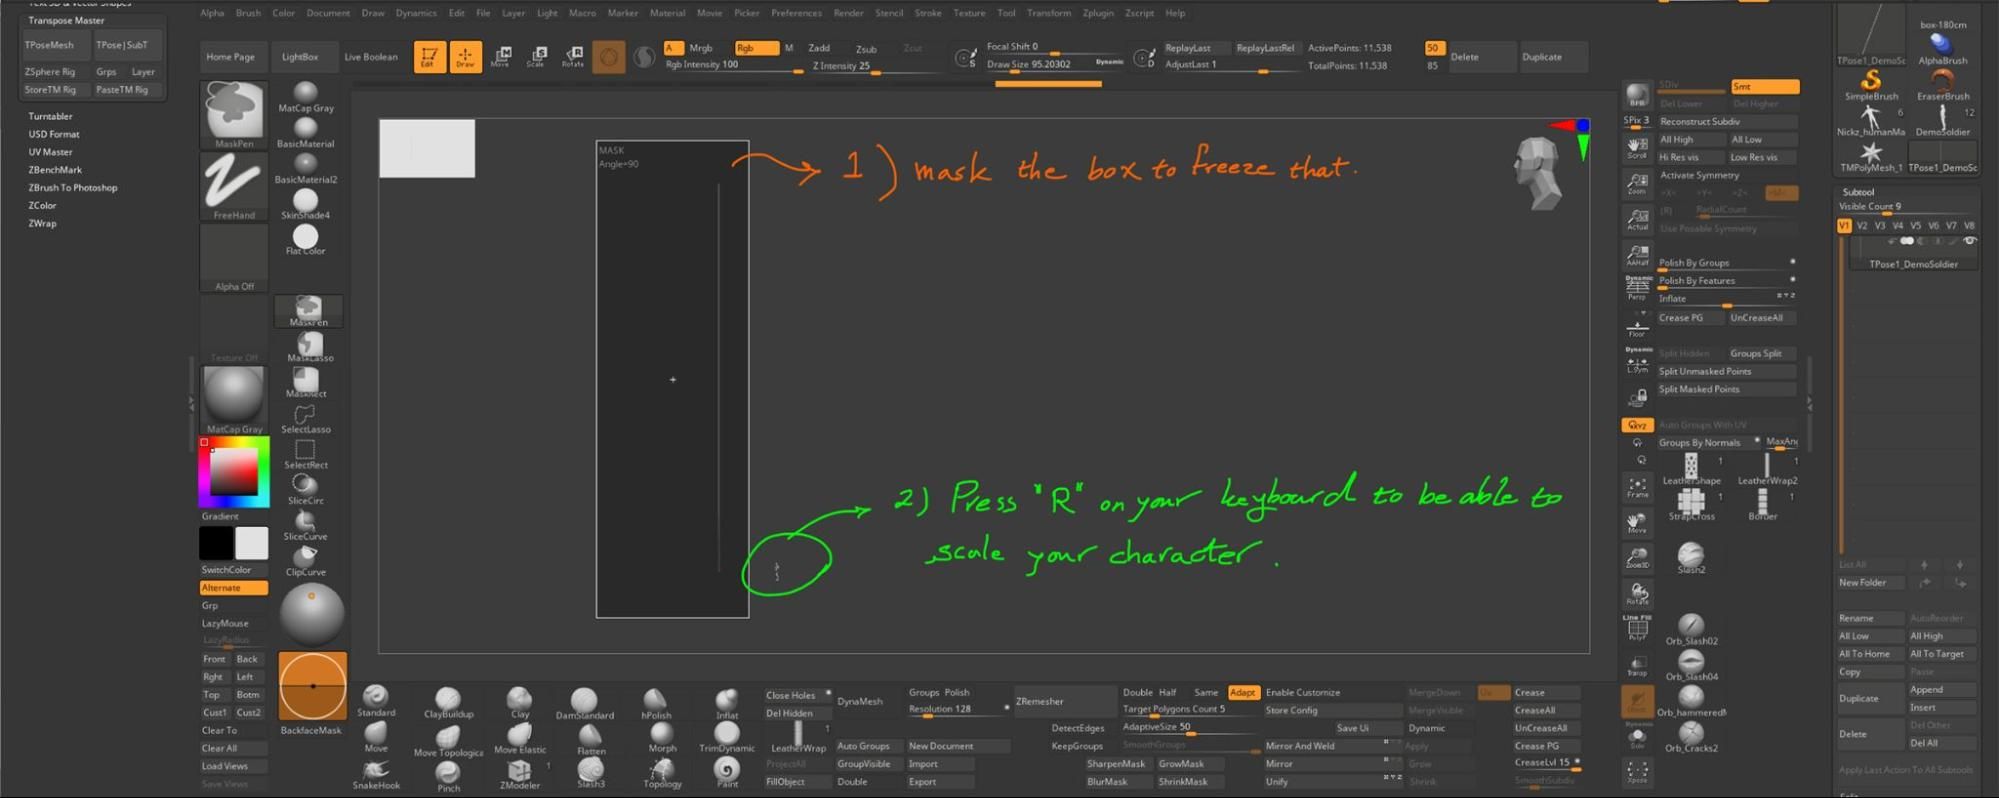
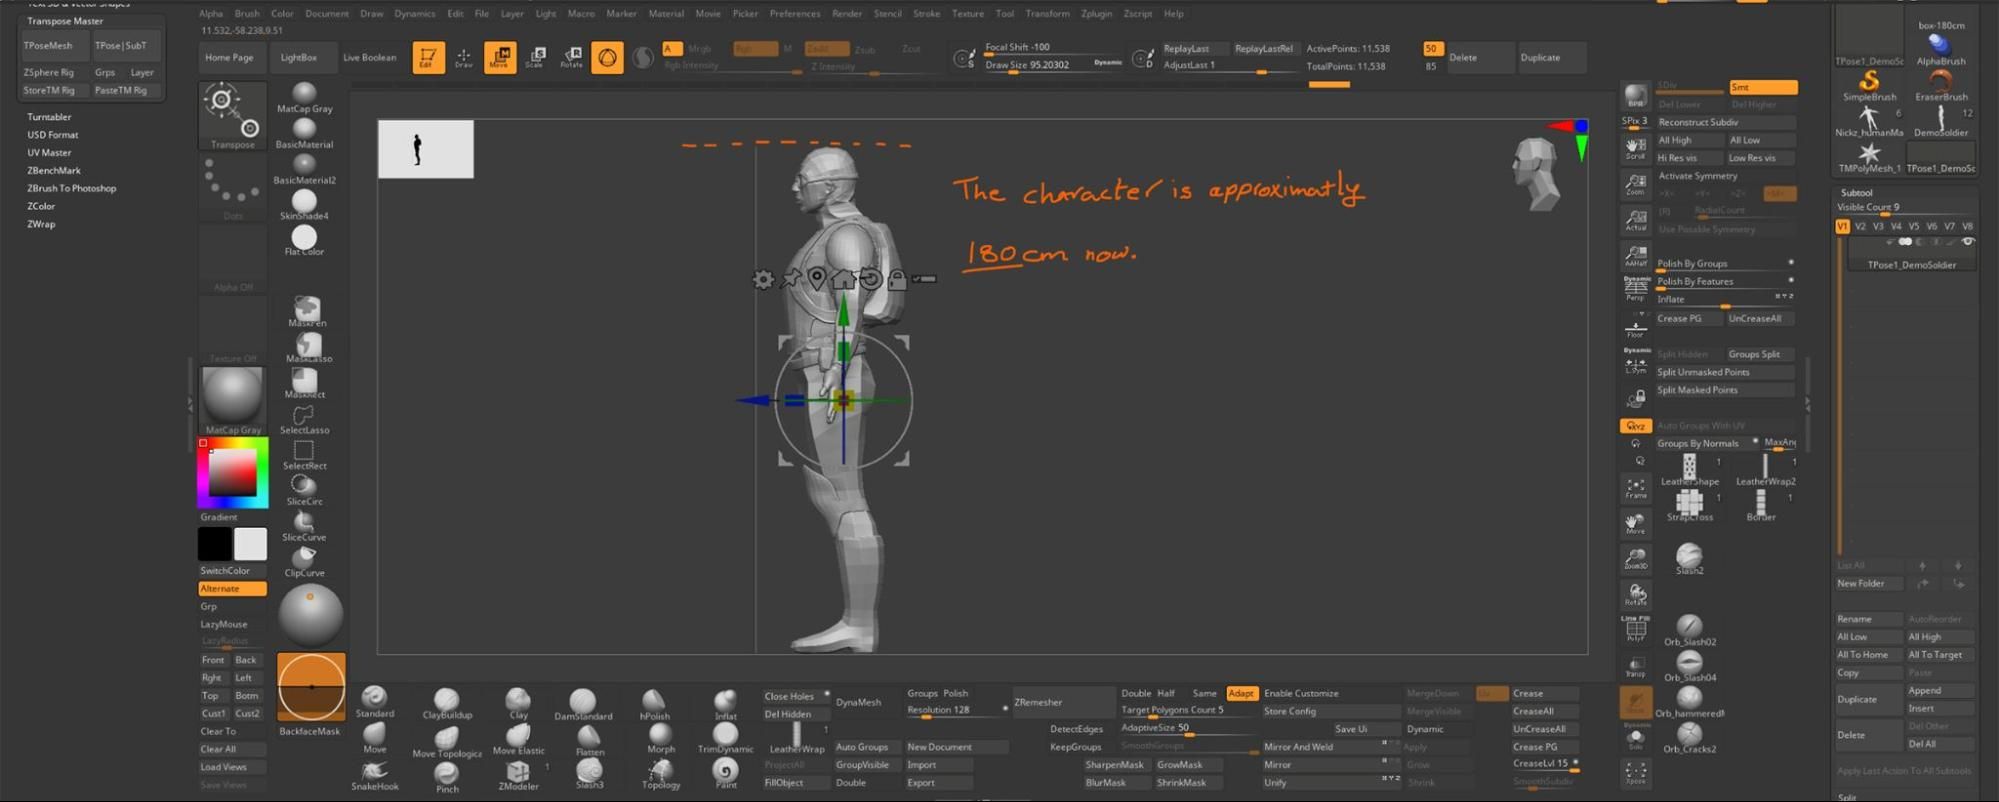
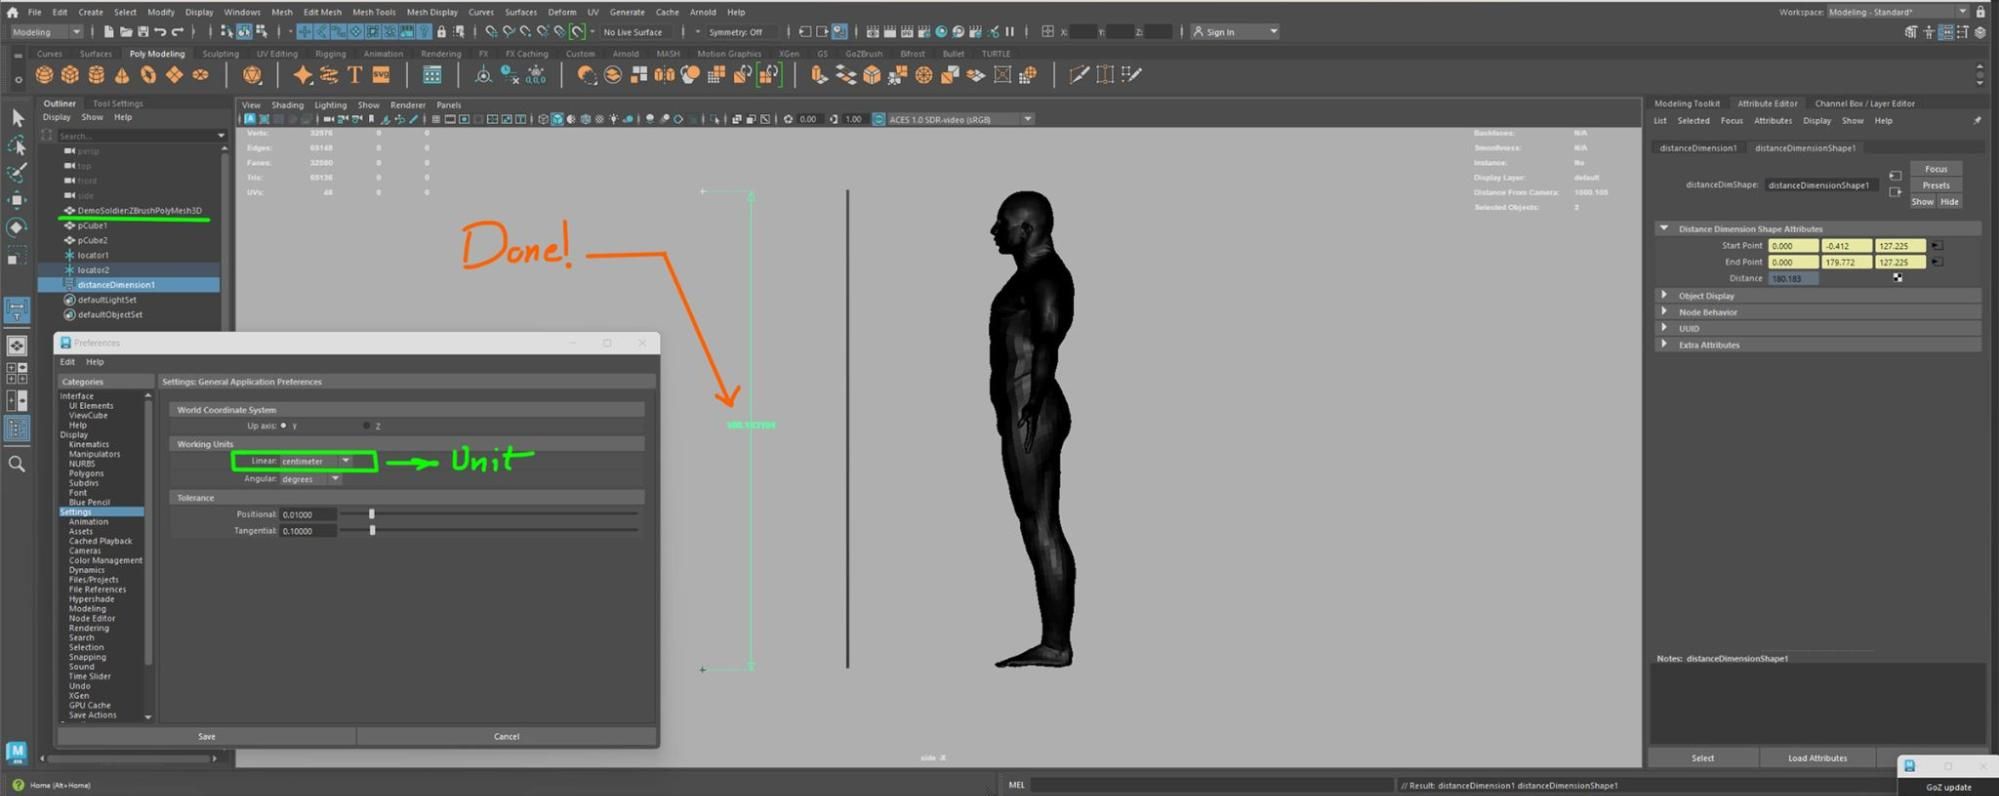
Characters should be created with the correct scale, preferably set at the beginning of the workflow. One simple method is to set Maya's unit to Centimeter and create a box with the desired height, e.g., 185 cm. Export this as an OBJ file and import it into ZBrush as a guide. If resizing becomes necessary mid-project, ZBrush's Transpose Master plugin is invaluable for uniformly resizing all subtools. It temporarily merges subtools for easy adjustments before reverting them with applied changes. Starting with the correct scale is recommended for seamless workflow. These steps outline how to set the scale at the project's outset.
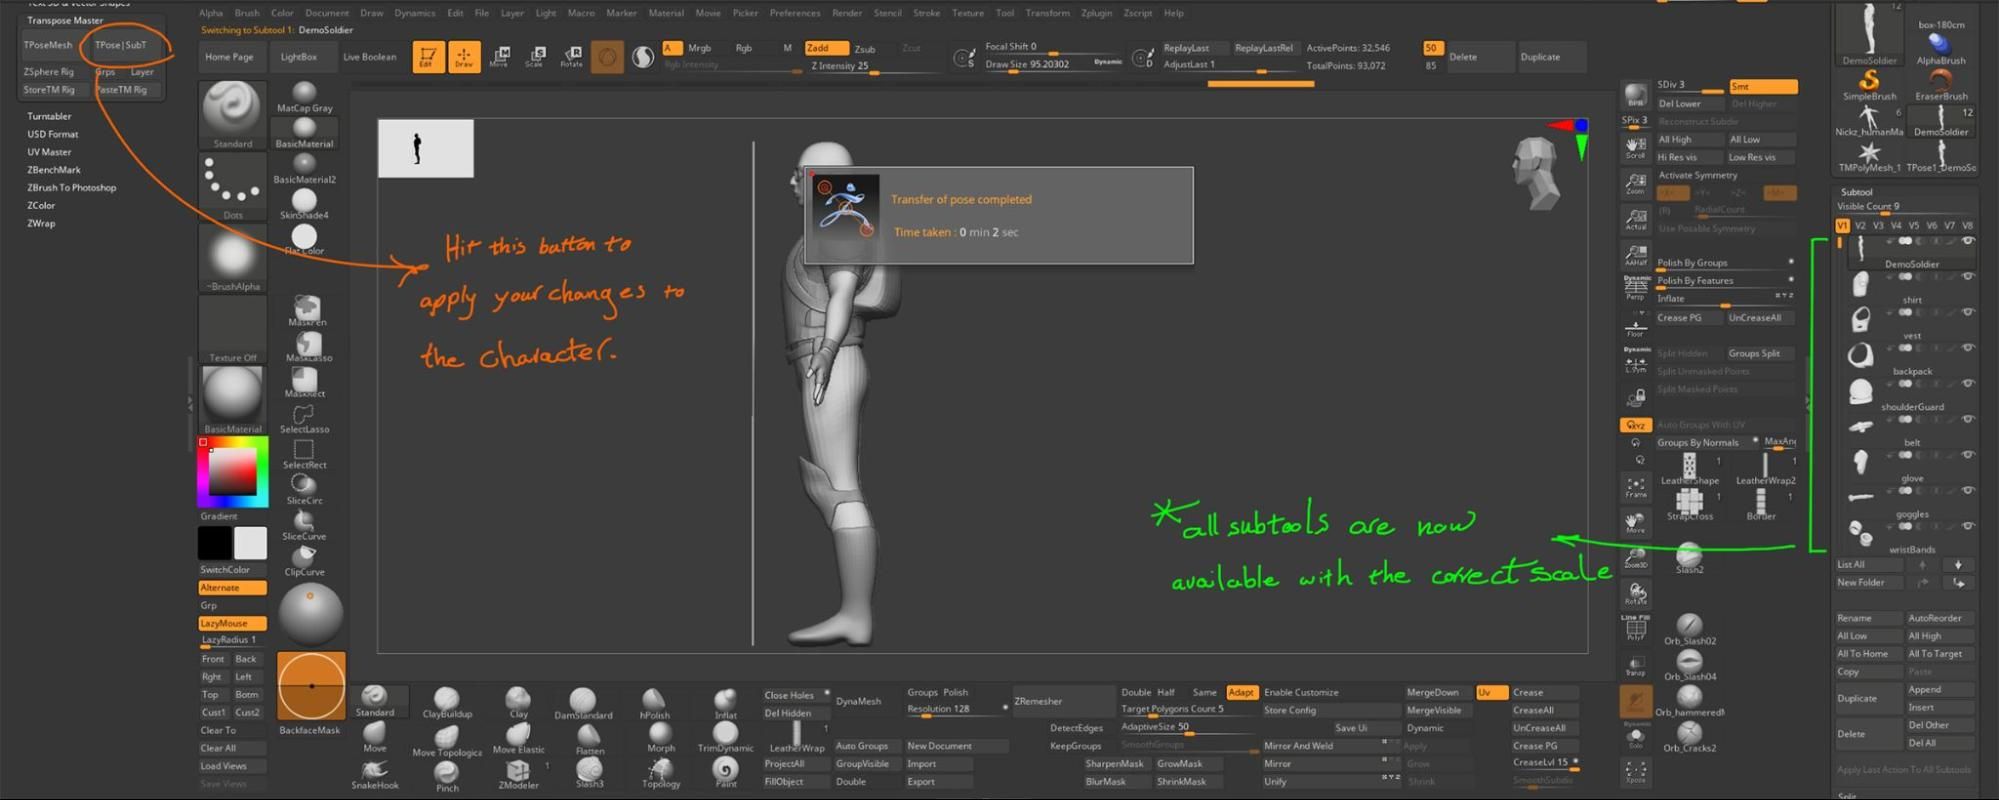
If you missed scaling at the beginning, no worries! Follow the same steps as outlined above. Suppose upon importing the guide box, your model appears significantly larger or smaller with numerous subtools. In that case, you'll need to utilize the ZBrush Transpose Master Plugin. Open the Plugins palette menu and select the TPoseMesh button. After resizing your character, press the Tpose/SubT button to restore all the posed subtools.
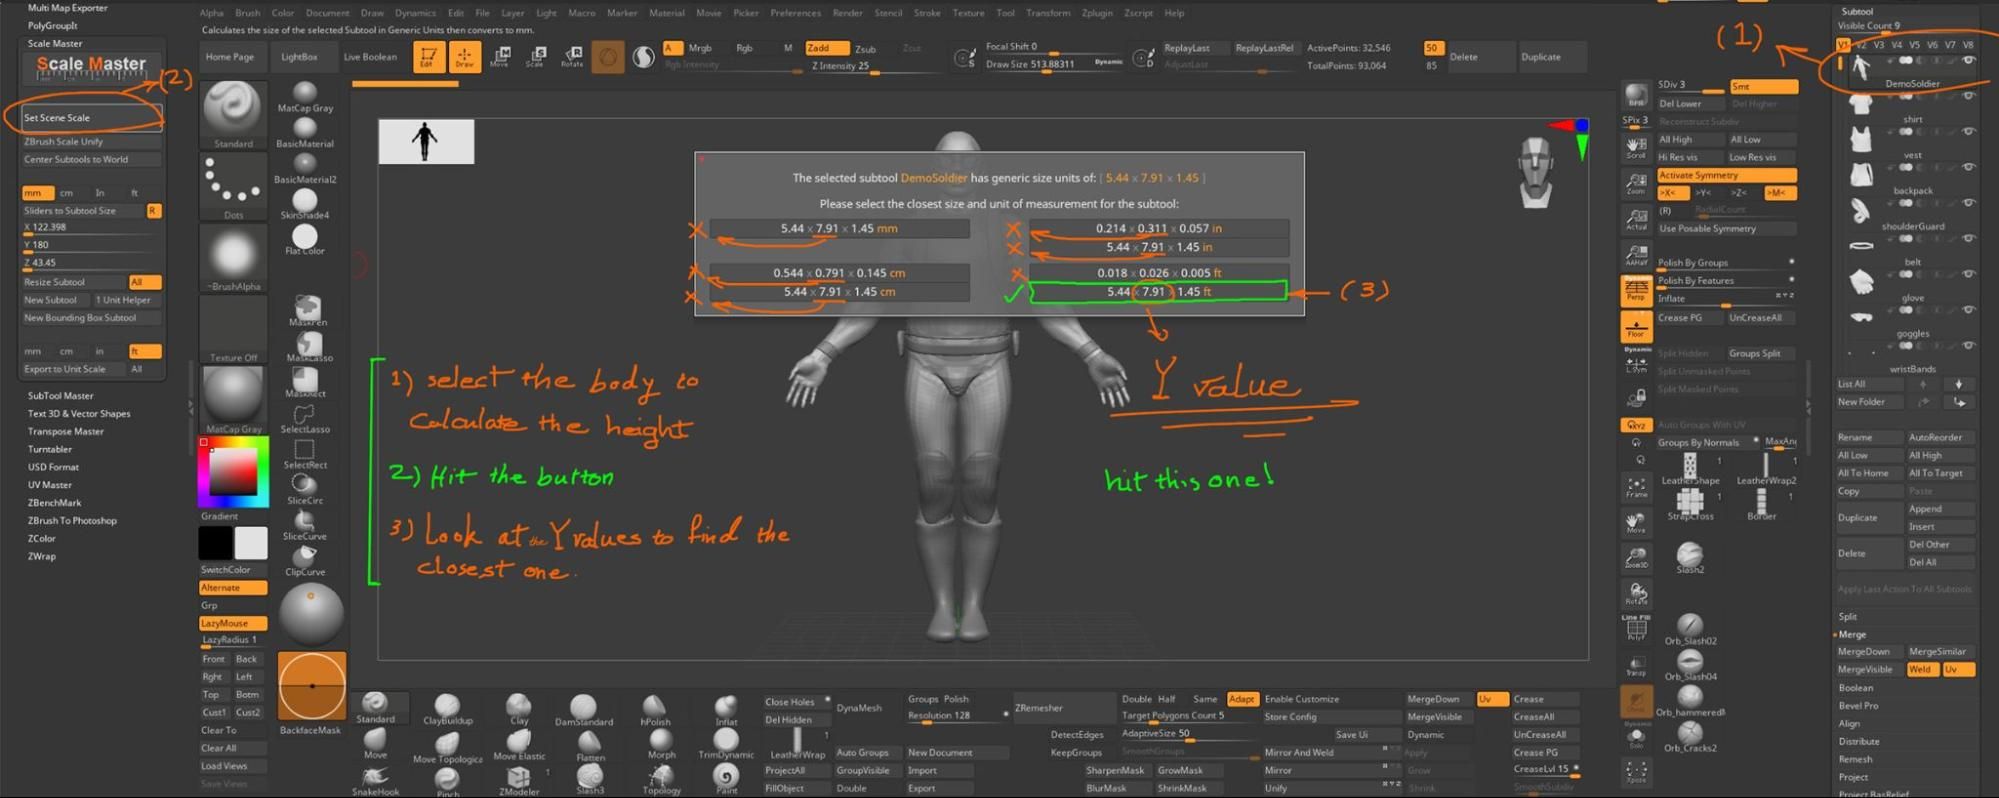
Another method to adjust the scale involves utilising ZBrush's plugin called Scale Master. This method may be slightly more complex than the previous one mentioned. I'll try to explain it as straightforwardly as possible.
First, we need to select a unit that we're comfortable with. ZBrush offers four units (mm, cm, inch, feet) for resizing objects. Let's opt for centimeters since I previously explained the method using this unit. Knowing that my character's height should be 180cm, I ensure the body aligns with this measurement along the Y-axis. Then, within the Subtool menu, I select the character body and click on the "Set Scene Scale" button located in the Scale Master Plugin.
If you don't have the entire body geometry in your scene, simply click the "New Bounding Box Subtool" button in the Scale Master plugin. ZBrush will generate a box that accurately encompasses the character. Rather than selecting the body, choose this box and proceed with the steps outlined below.
ZBrush presents a menu with various units after computing the subtool scale. We should select the one that is closest to our desired measurement. In this instance, aiming for a height of 180cm, we must opt for the unit that best approximates this value. Let's convert the height to other units to determine the correct selection!
180 cm = 1800 mm
180 cm = 5.9 ft …… (1 ft = 30.48 cm)
180 cm = 70.86 In …… (1 inch = 2.54 cm)
Let's look at the ZBrush to choose one unit.
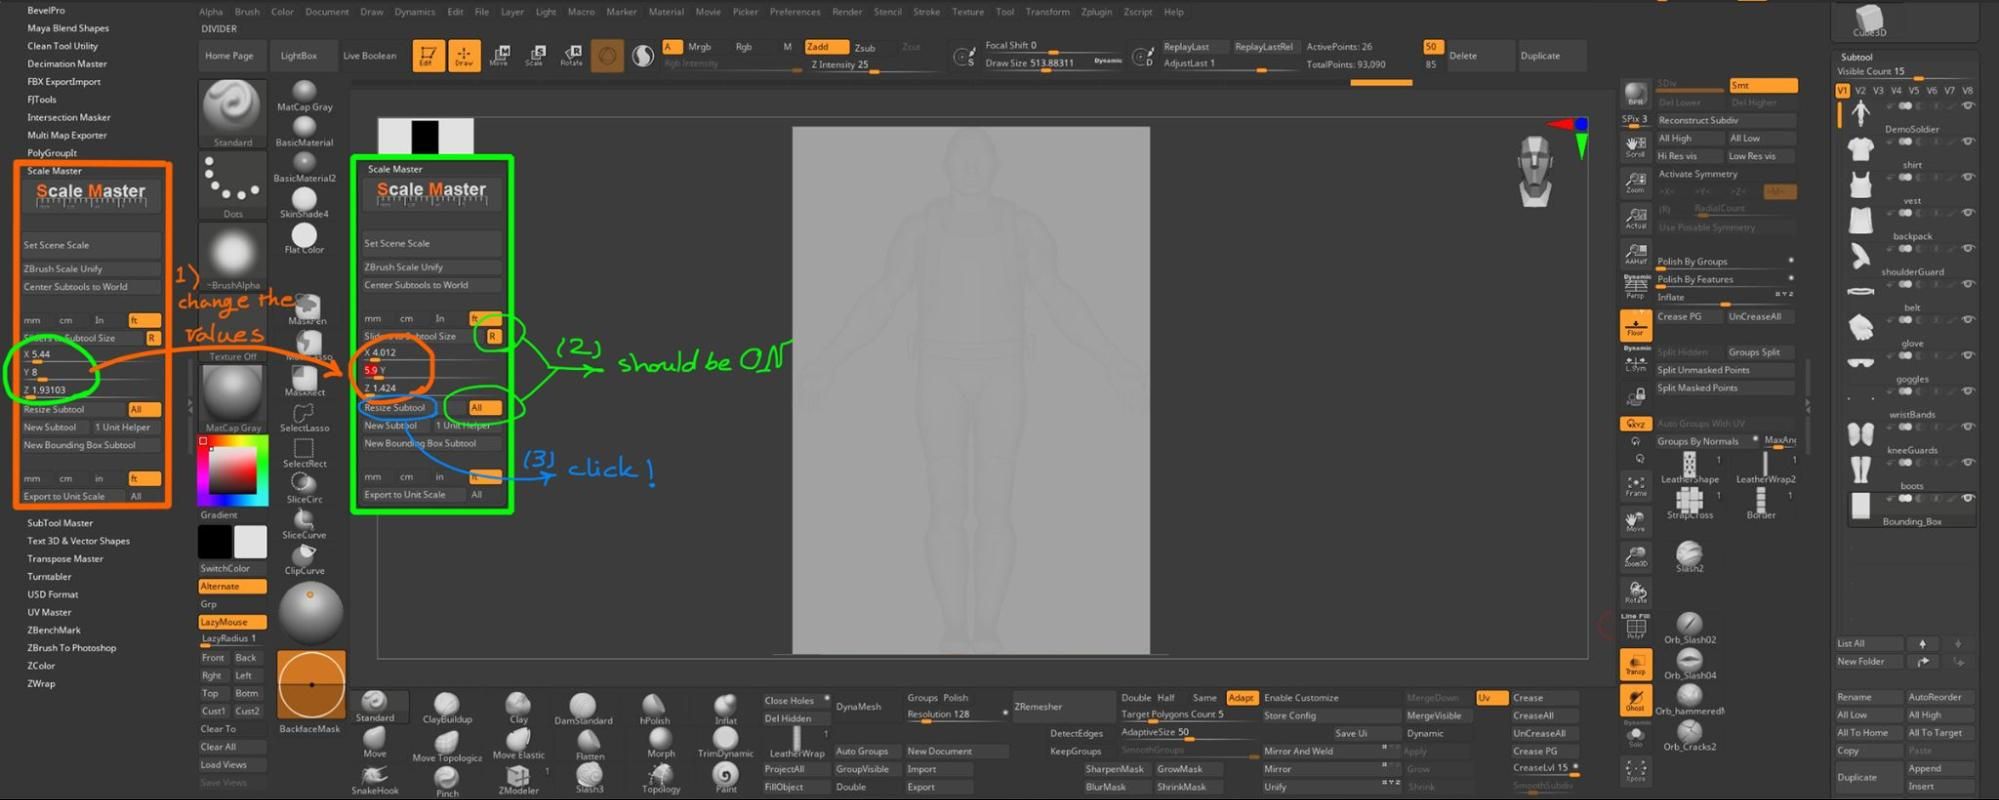
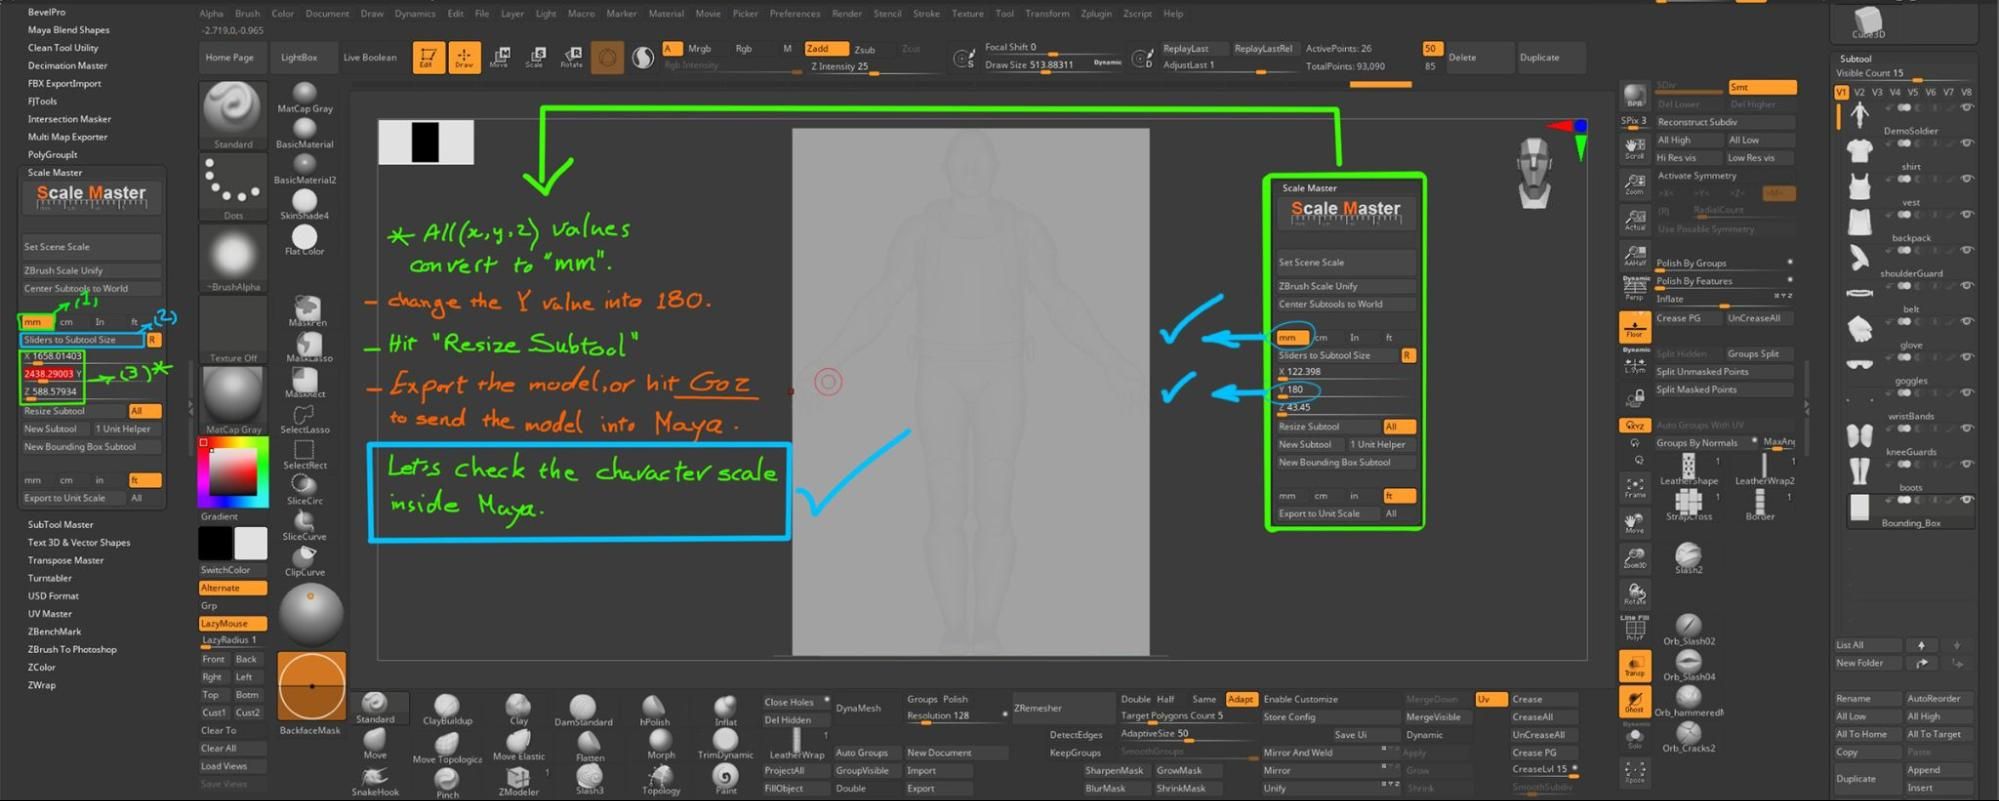
Important Note: This method ensures you work at Real World Scale in ZBrush. When transferring the object to other software like Maya, ensure the ZBrush Scale is set to “mm”. Upon exporting the model to another software, it will be converted to that software's unit. In this scenario, adjust the Y value to 180 and select the “mm Unit”. After clicking “Resize Subtool” and transferring the model to Maya, it will import with a height of 180cm. If Maya is set to "Meter" units, input the Y value as 1.8mm. Upon importing into Maya (or any other software utilizing “Meter” units), it will convert to 1.8 meters. Let’s proceed with Maya.
Blockout
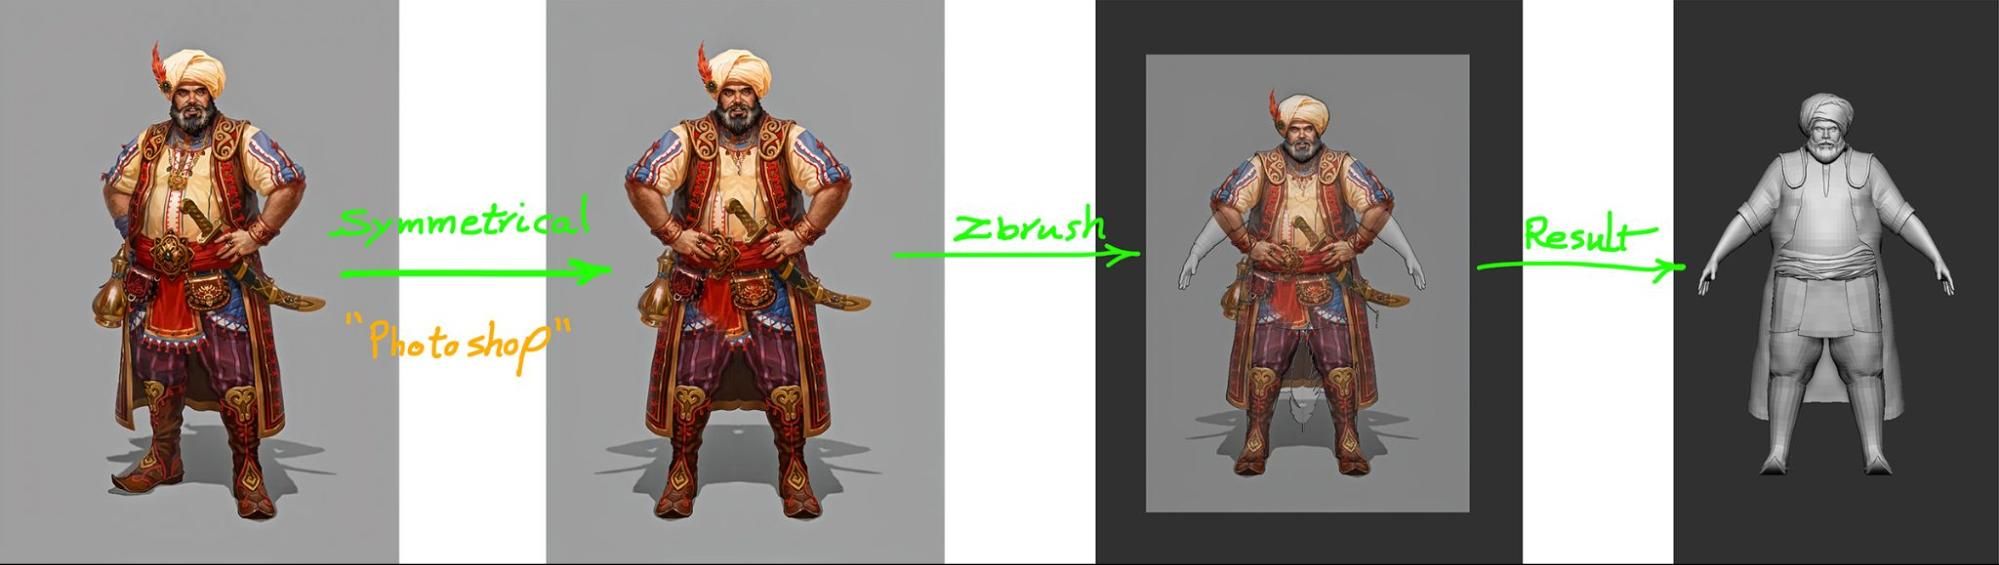
I typically create the block-out version in ZBrush because of its excellent handling of both high and low poly modeling. This phase is crucial, particularly for large and intricate projects with numerous objects. Block-out shapes should be kept simple for easy adjustment of shape and proportion later on. During this stage, I position everything according to the concept, excluding parts I want to keep symmetrical for sculpting and texturing purposes. Careful analysis of the concept helps identify which parts need separation later. This organization prevents the project file from becoming too heavy during sculpting and texturing.
In my case, I also made the concept symmetrical in Photoshop to have a better idea of the front view and make the proportion easier and more accurate.
Sculpting and texturing
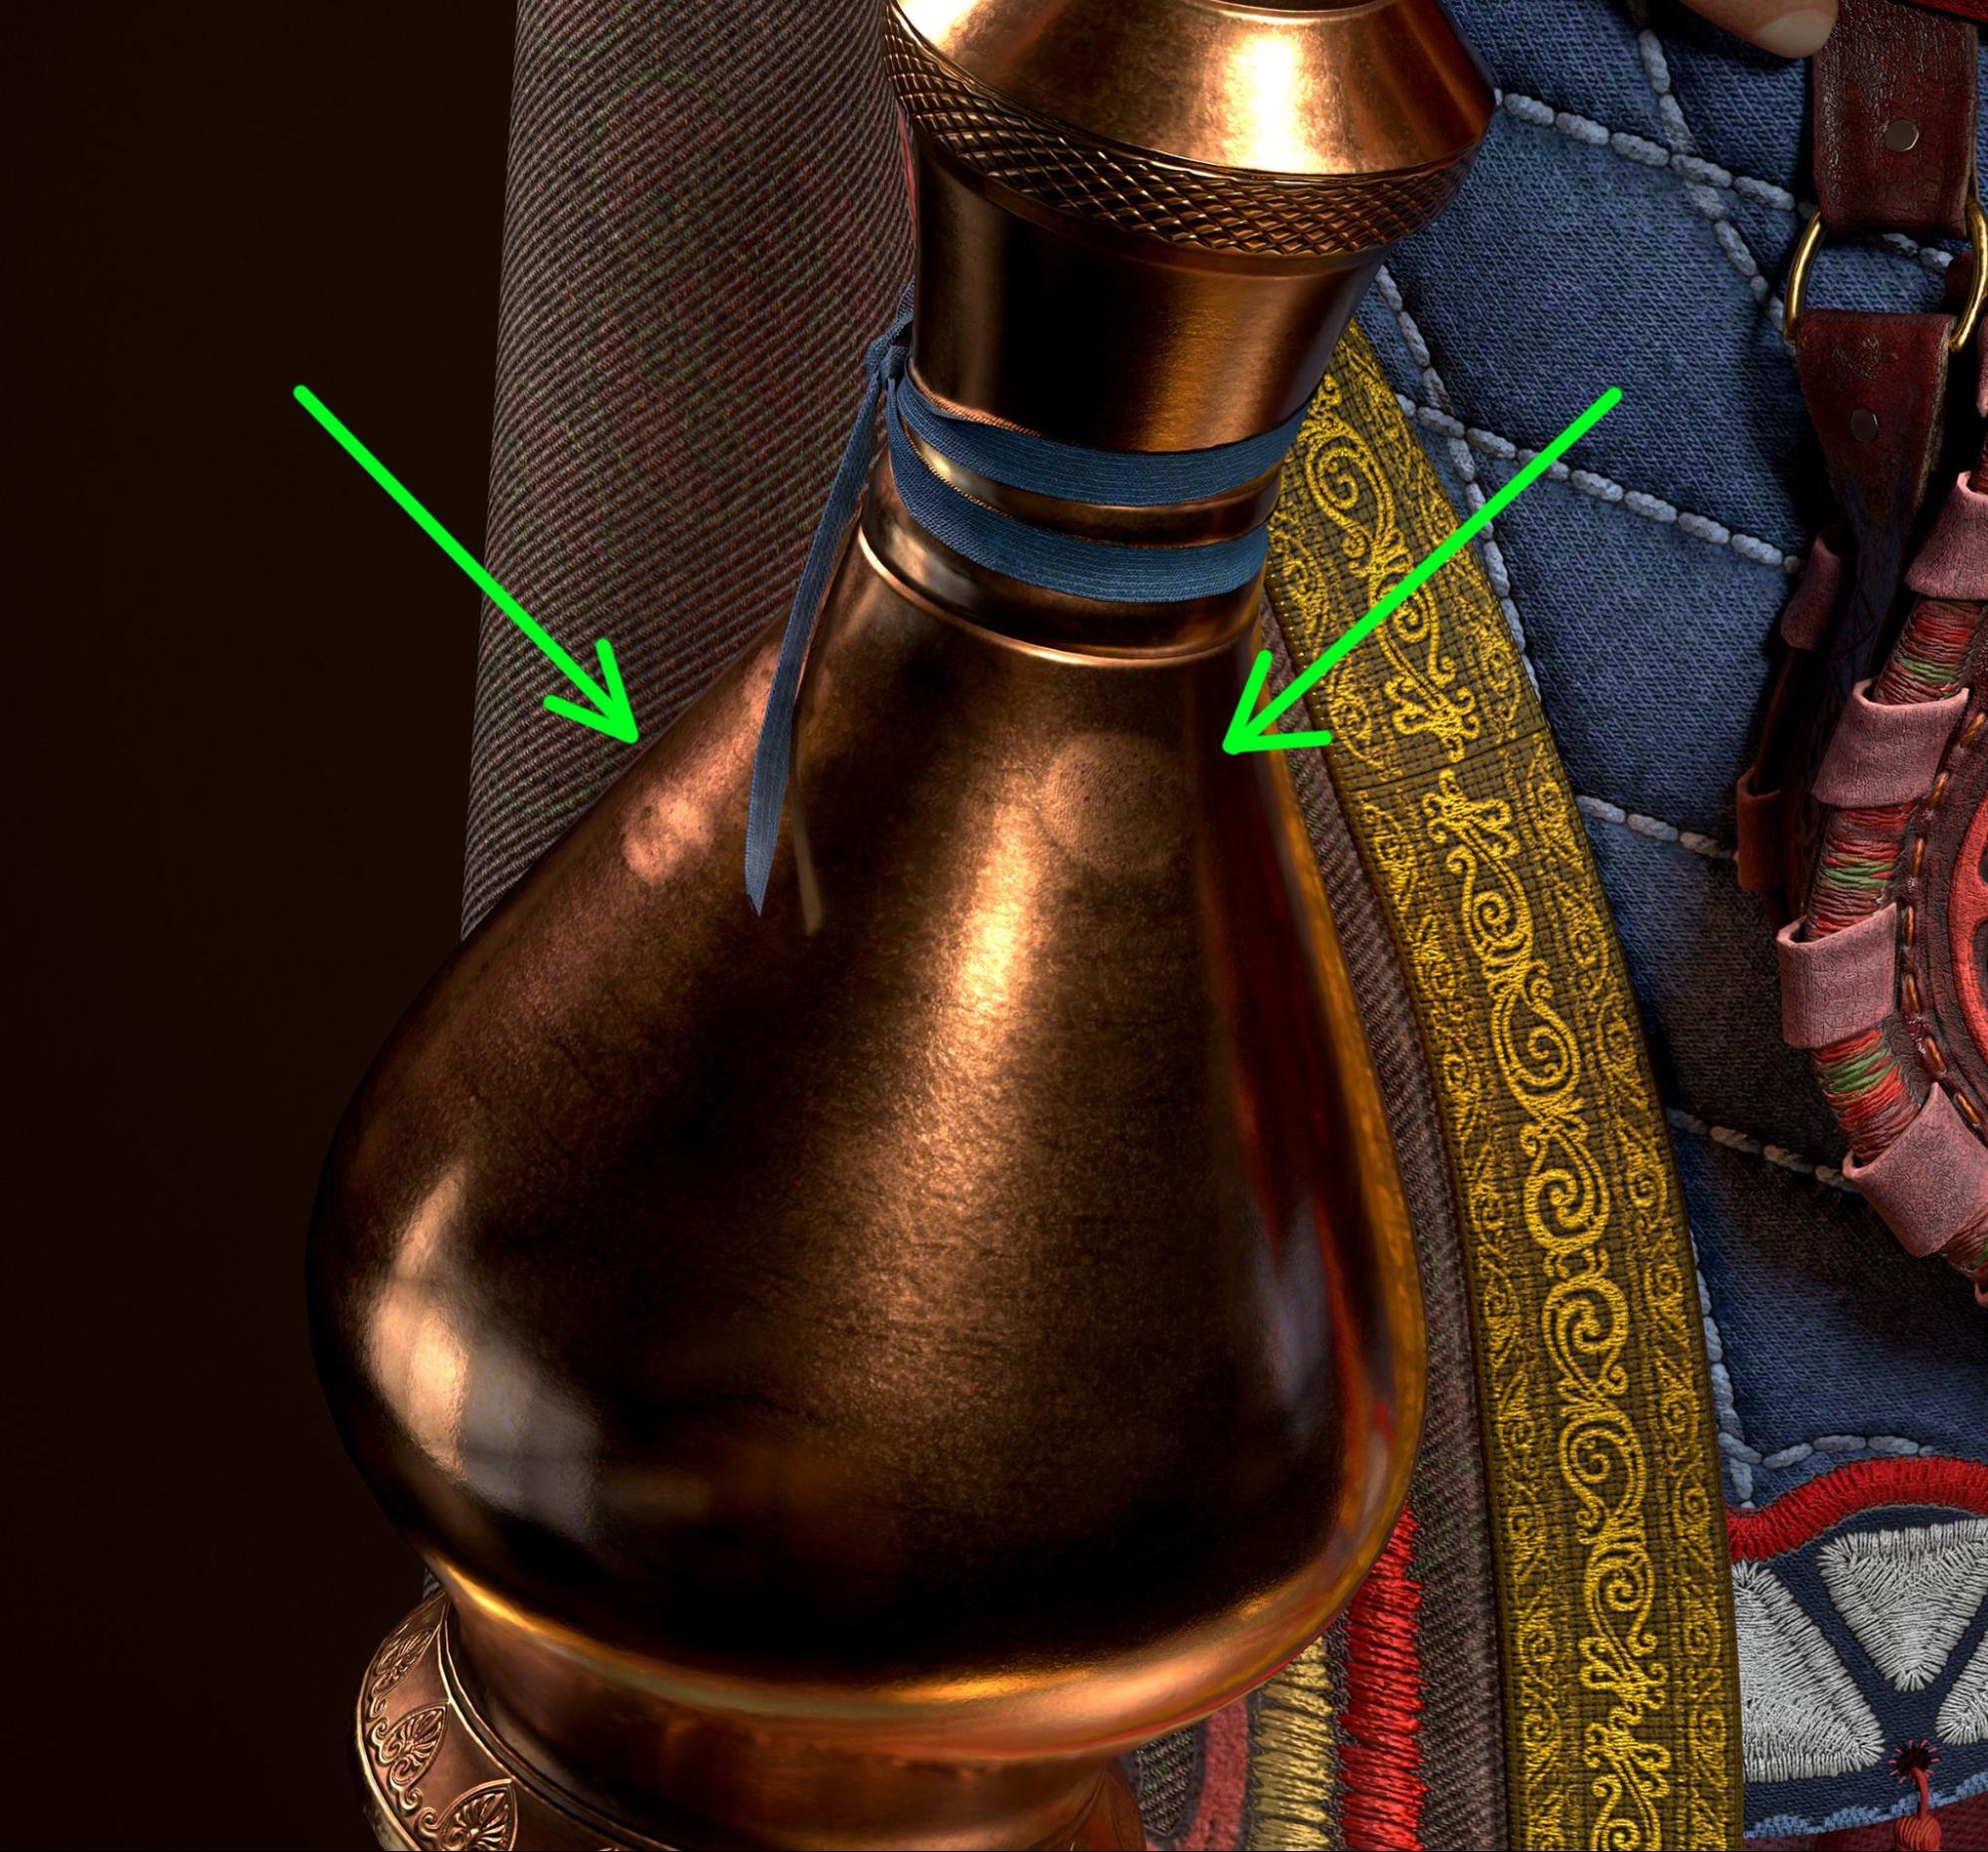
Note that storytelling is crucial in sculpting, especially for texturing. In my case, as the character is a king, I avoided excessive damage, dirt, and dust on the face and props. Such elements are more suitable for a fighter, warrior, or soldier returning from war. Therefore, I incorporated only subtle damages during sculpting and applied normal dust and dirt during the texturing stage, along with some fingerprints on the jar.
Preparing the model for sculpting
Once you're satisfied with the block-out and the proportions appear accurate, it's time to begin sculpting. Firstly, ensure that all parts of your model have square-shaped polygons rather than rectangular shapes to prevent low-quality geometry during sculpting. Adding support edges can aid in sculpting edges. I typically divide sculpting into two parts: first, I sculpt the main and large details visible from a distance, and then I focus on adding tiny details for the face, body, and props for close-up shots.
Outfits
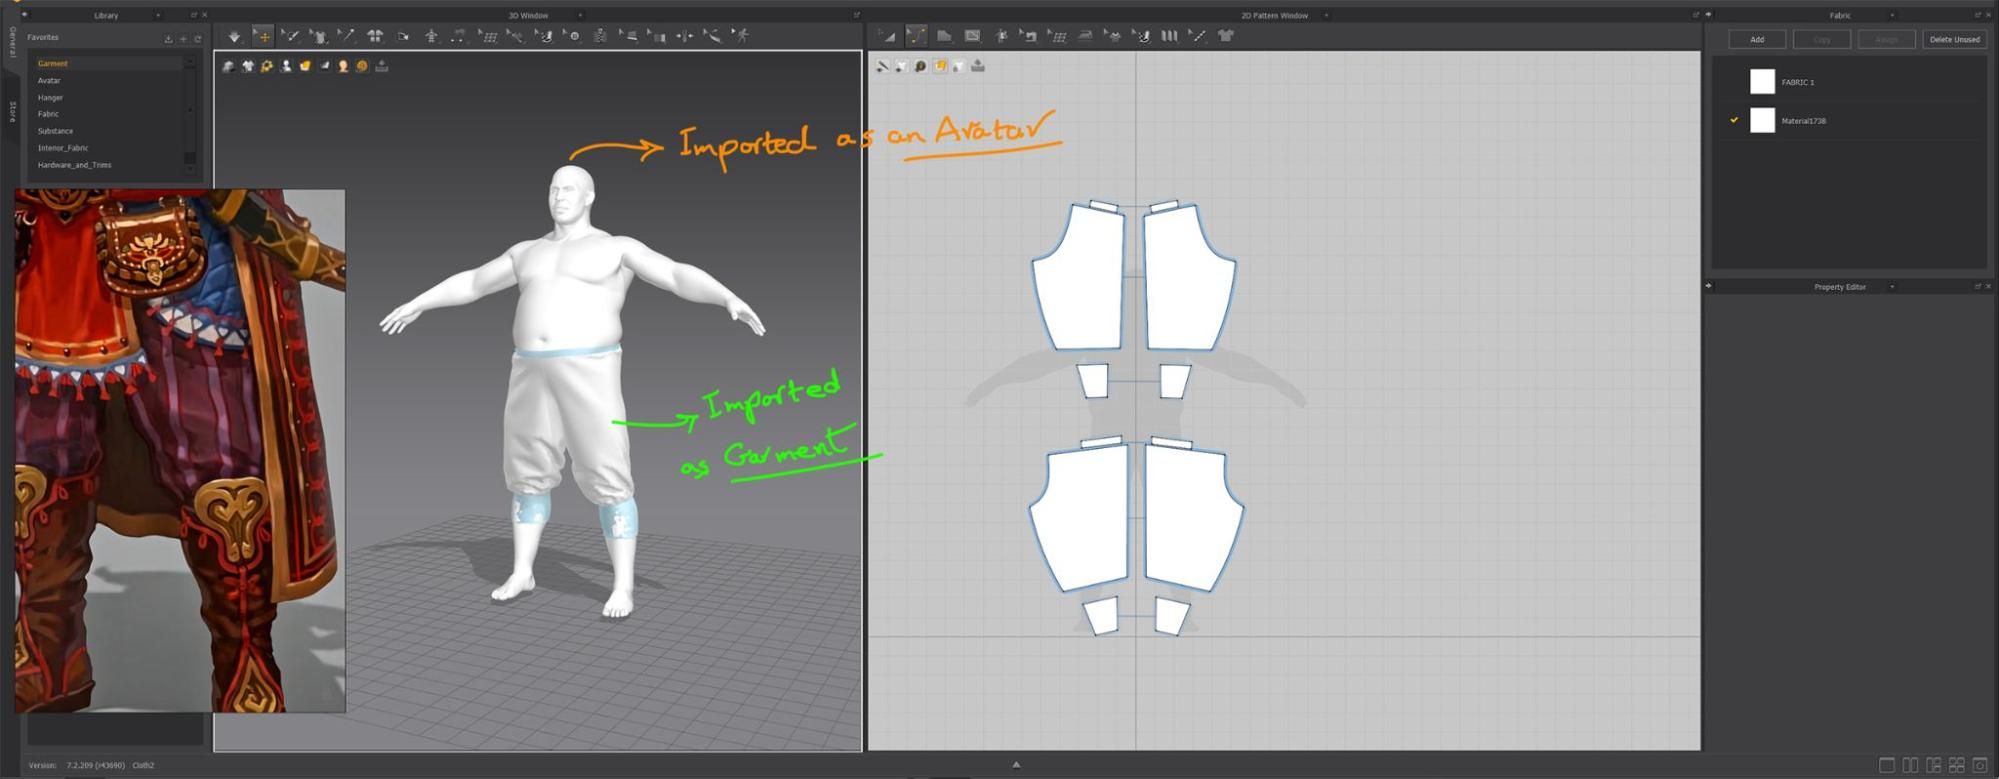
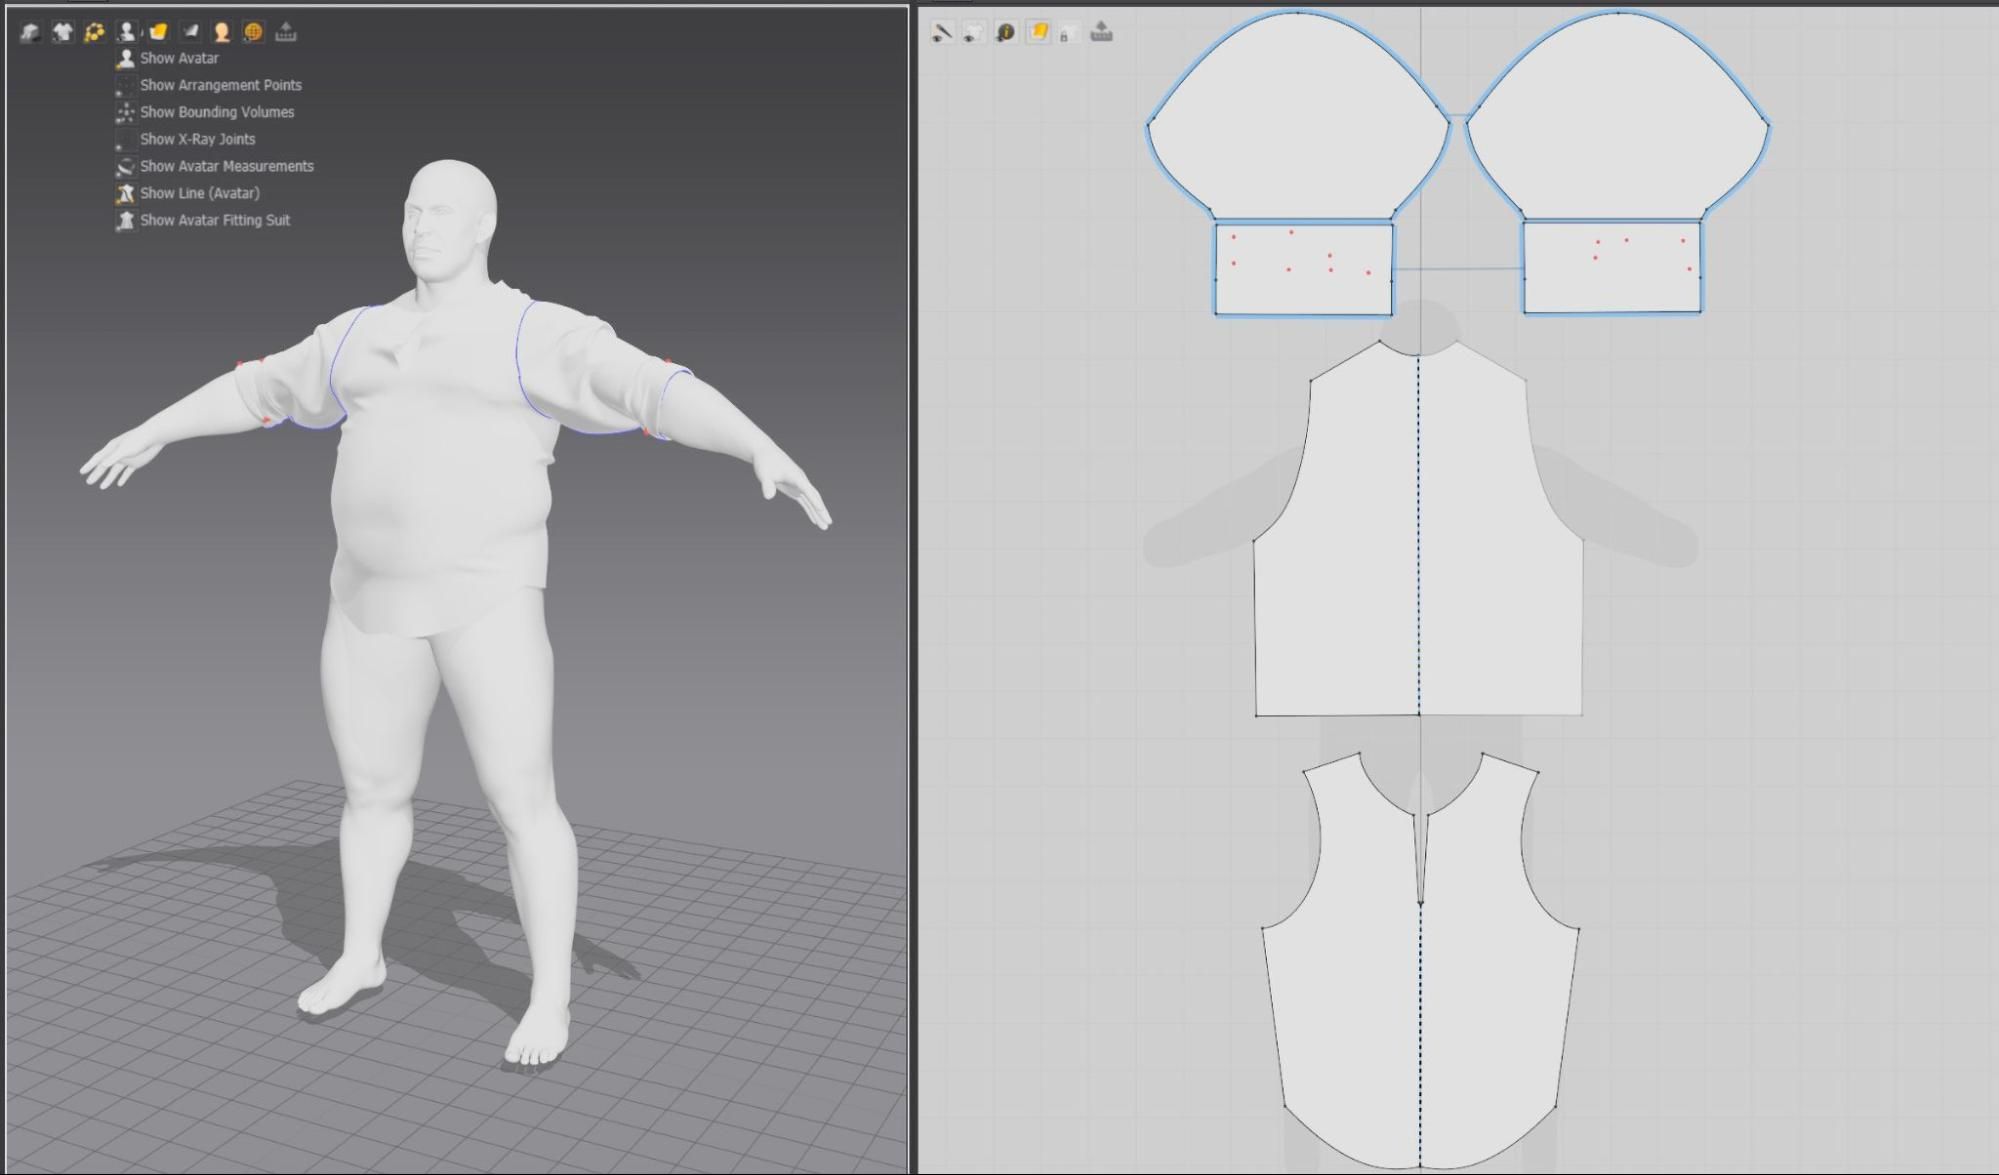
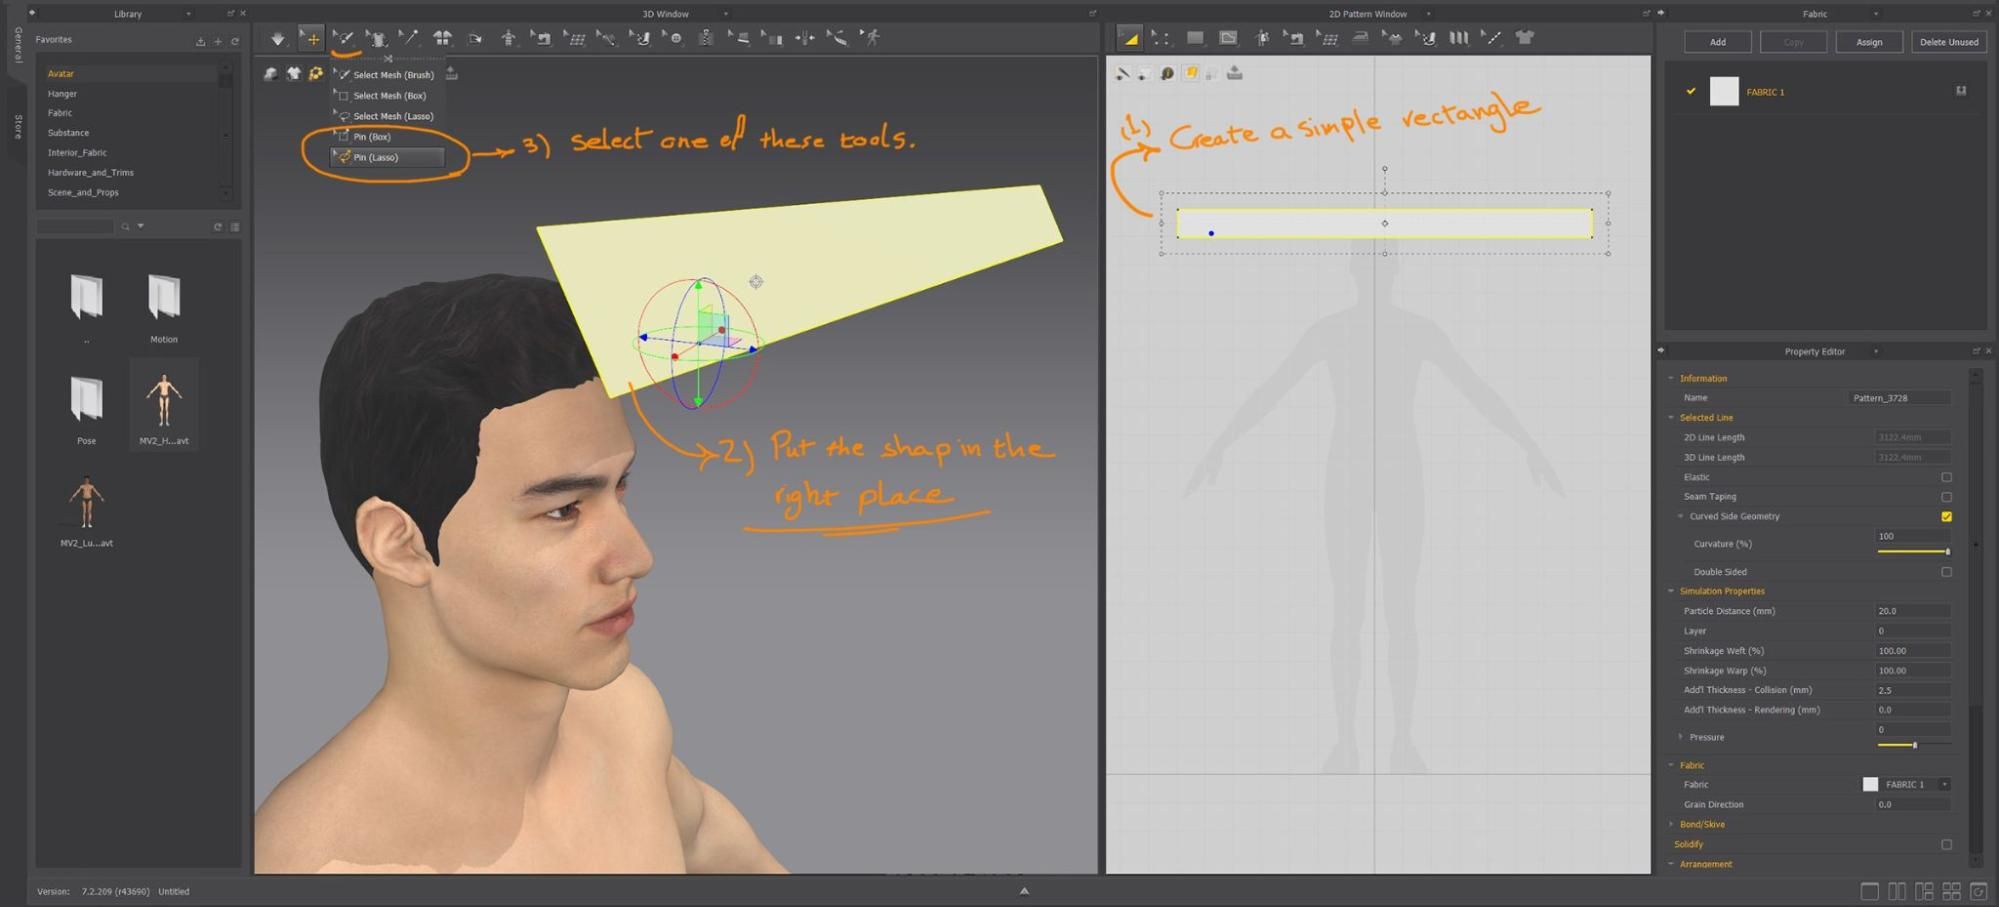
I typically begin by simulating clothes in Marvelous Designer and then refine them in ZBrush. There are several methods to achieve this. You can either start from scratch in Marvelous or import your garment block-out and simulate it there. For this project, as the outfits weren't overly complex, I opted for the second method. However, I created the Shawl and Turban directly in Marvelous. You can import the character as an Avatar and the clothing as the garment.
I recommend following this tutorial for exporting garments from Marvelous Designer with clean topology to have no problem during the sculpting process.
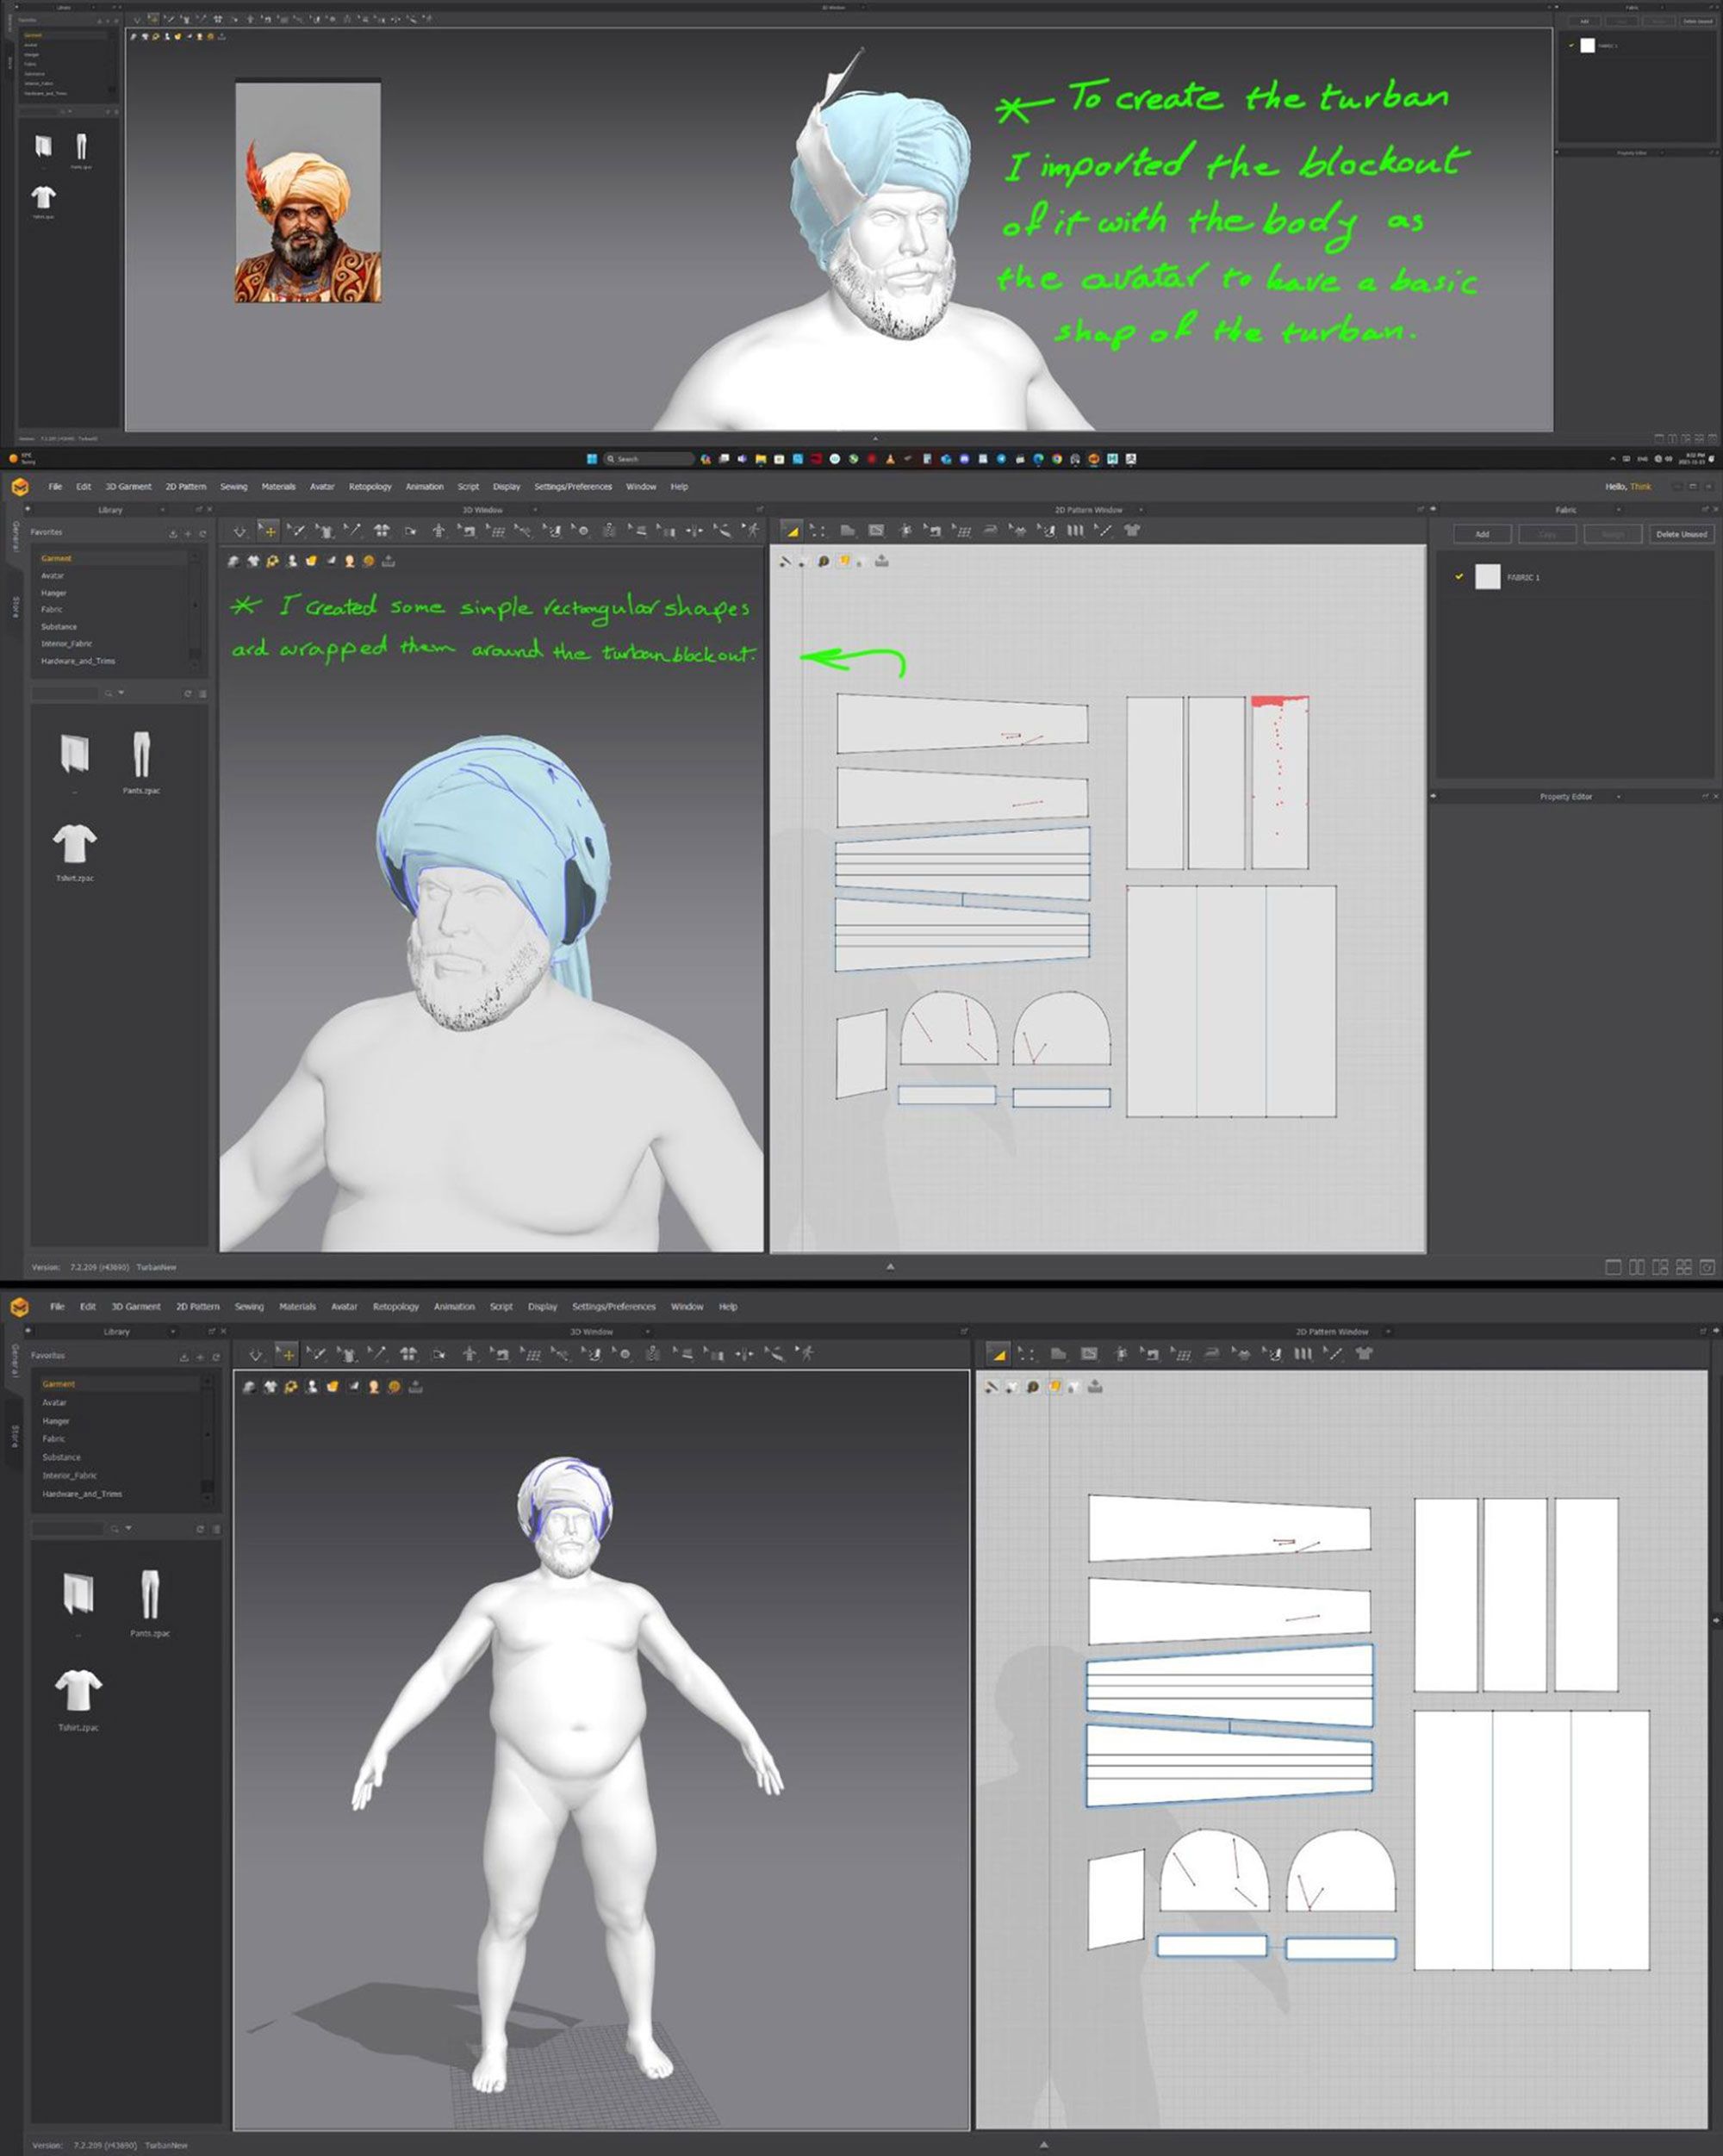
Turban
Creating a turban or rolled-up sleeves could be a little challenging for modeling.
Here is the way I created the turban and sleeves. First I brought the block-out of the turban into Marvelous Designer to have the original shape of it. Other steps are explained in the shots below.
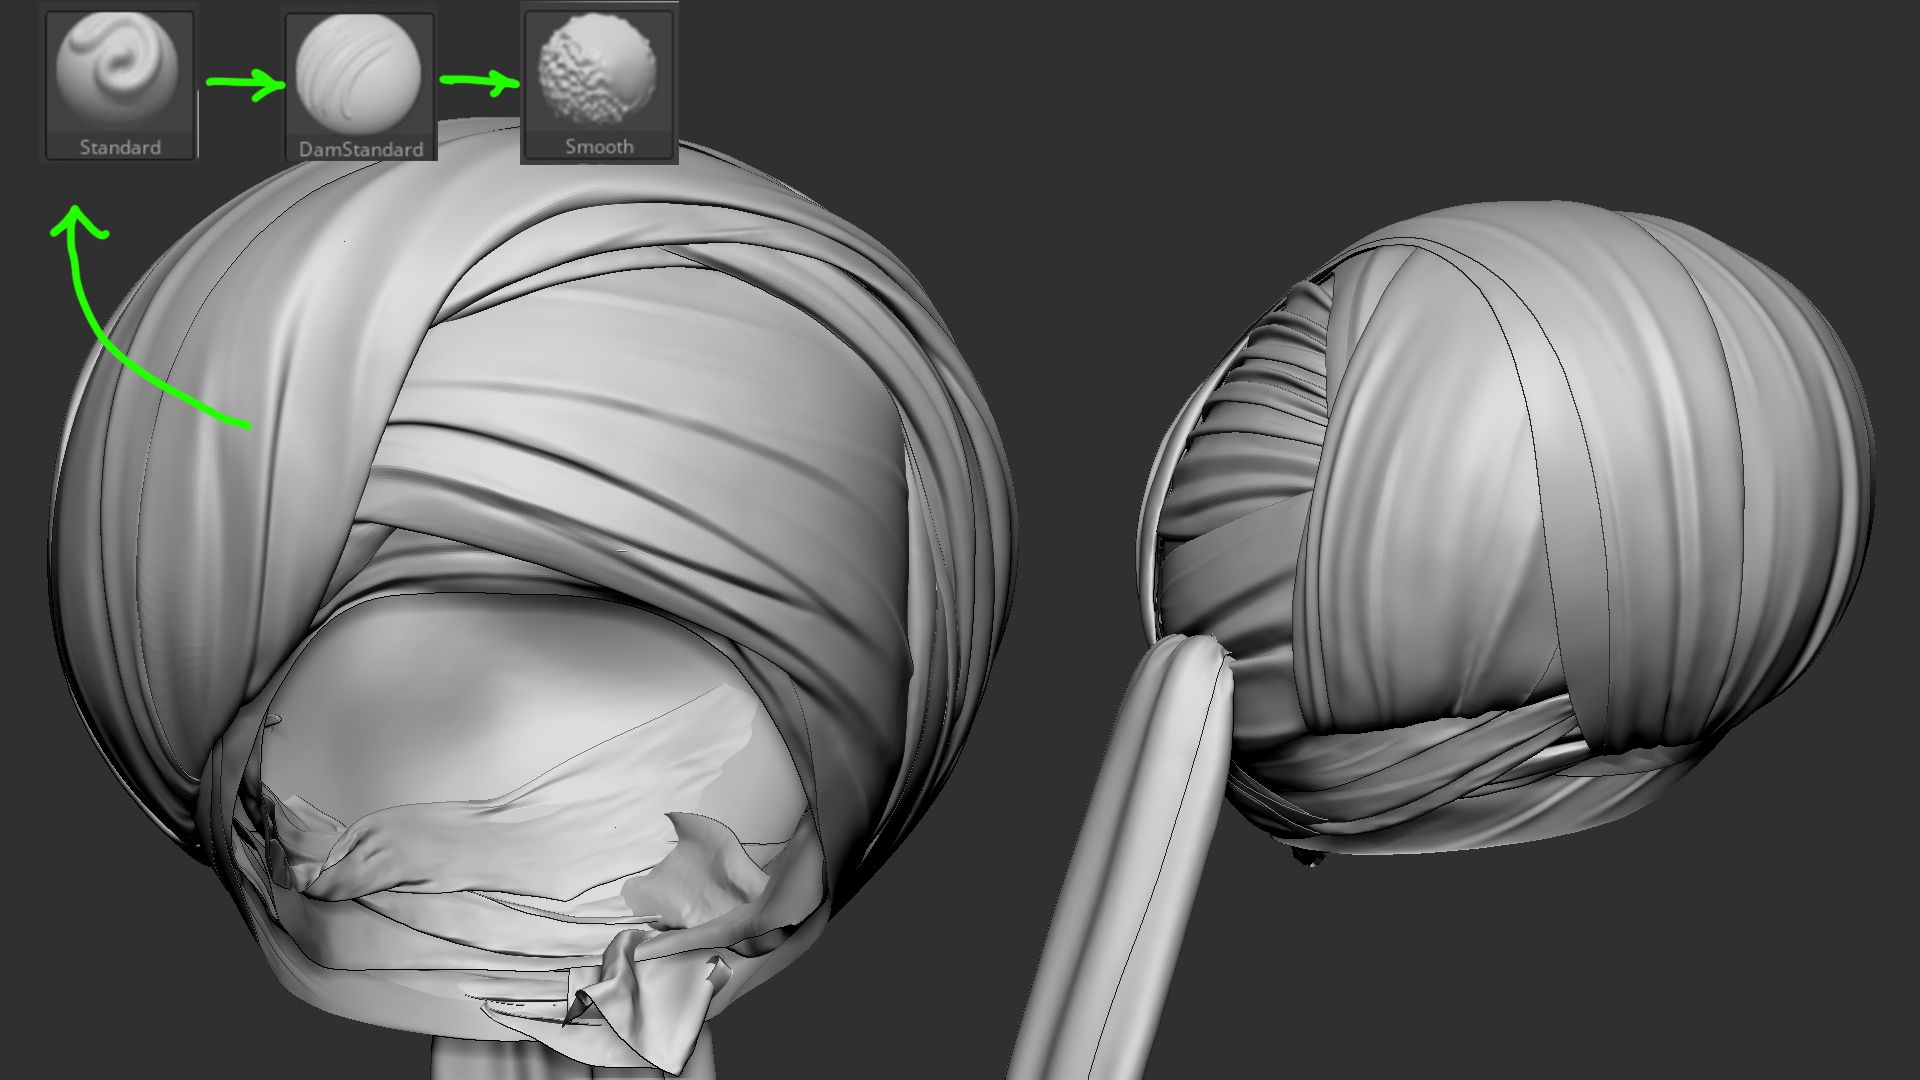
After simulating the garments and exporting them with clean topology, I brought them into ZBrush to sculpt and polish them. In this stage using Standard and DamStandard Brush Could be very helpful to create and edit the wrinkles and folds.
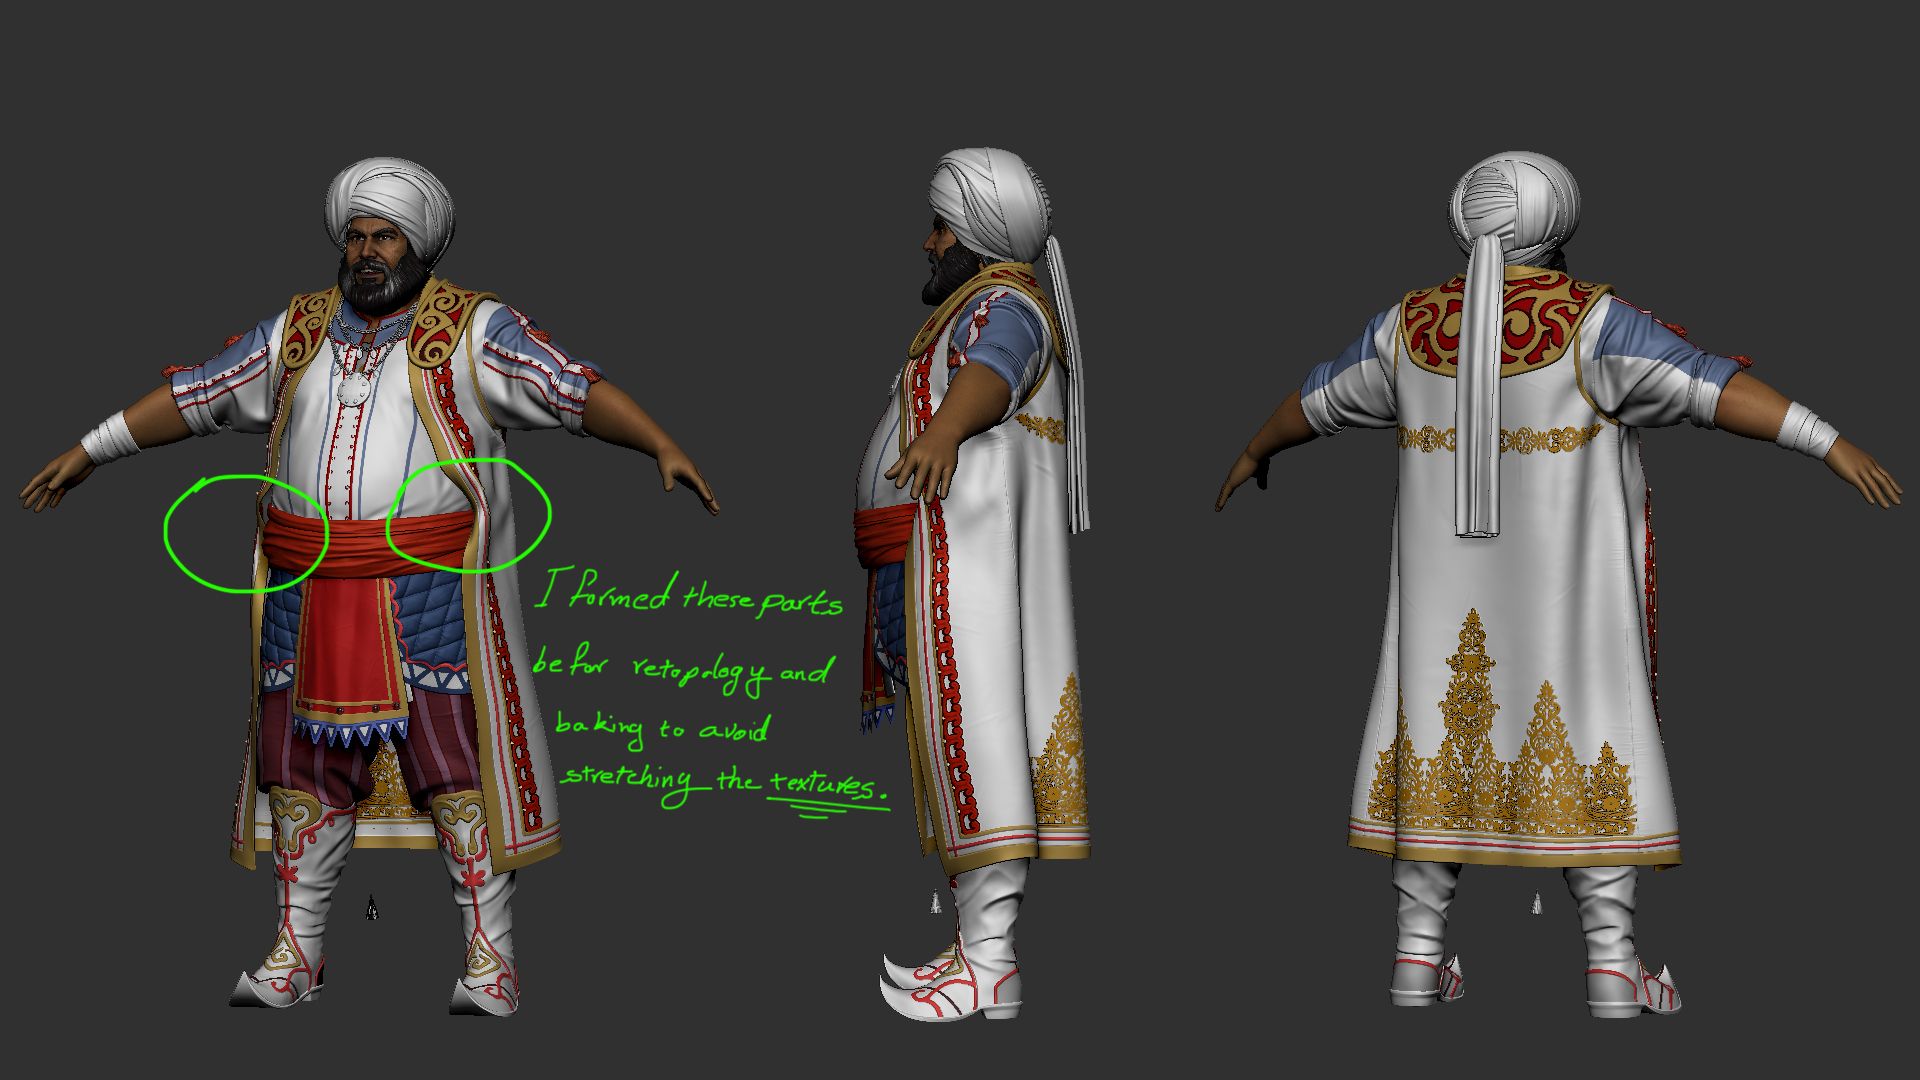
Since I knew I wanted to present the model in the same position as the concept, I rotated the lower part of the coat. I did this at this stage to prevent texture stretching during presentation. Note: It's a good idea to allocate some time to apply simple colors to the model, as shown below, to better understand your progress and how closely it aligns with the original concept.
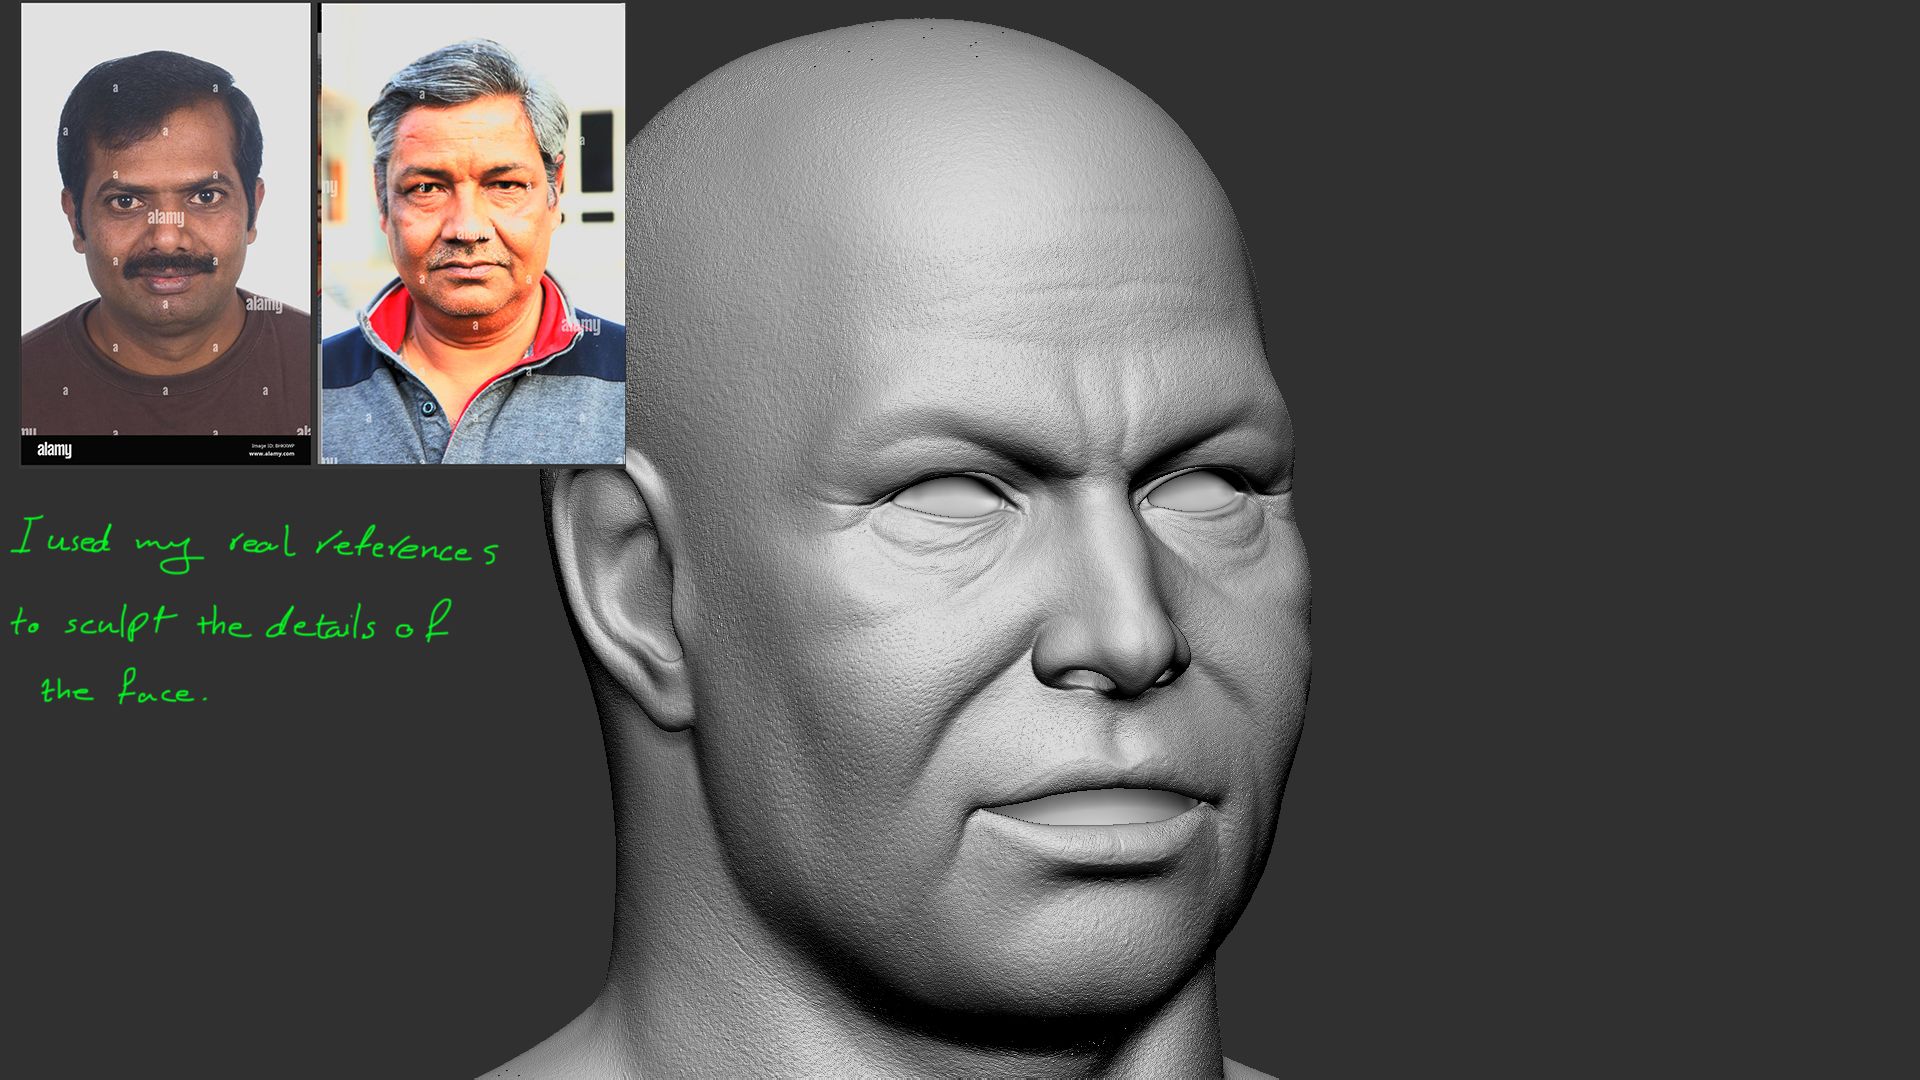
Head
For the head, I began with a sphere and sculpted it to match the concept as closely as possible. At this stage, I only added necessary wrinkles on the forehead, around the eyes, nose, and some lines for the neck. Skin details were added later.
I was satisfied with the sculpted head, so I imported the 3D Scan Store base mesh to project it onto my sculpted head. To do this, I used ZWrap. This company provides the Displacement and Albedo maps with a base mesh that already has its UV mapping. This means that after projecting the base mesh onto the sculpted mesh, you can easily apply both the displacement and color maps. Therefore, there is no need to project these maps again inside Substance or Mari. For more information, you can watch this video.
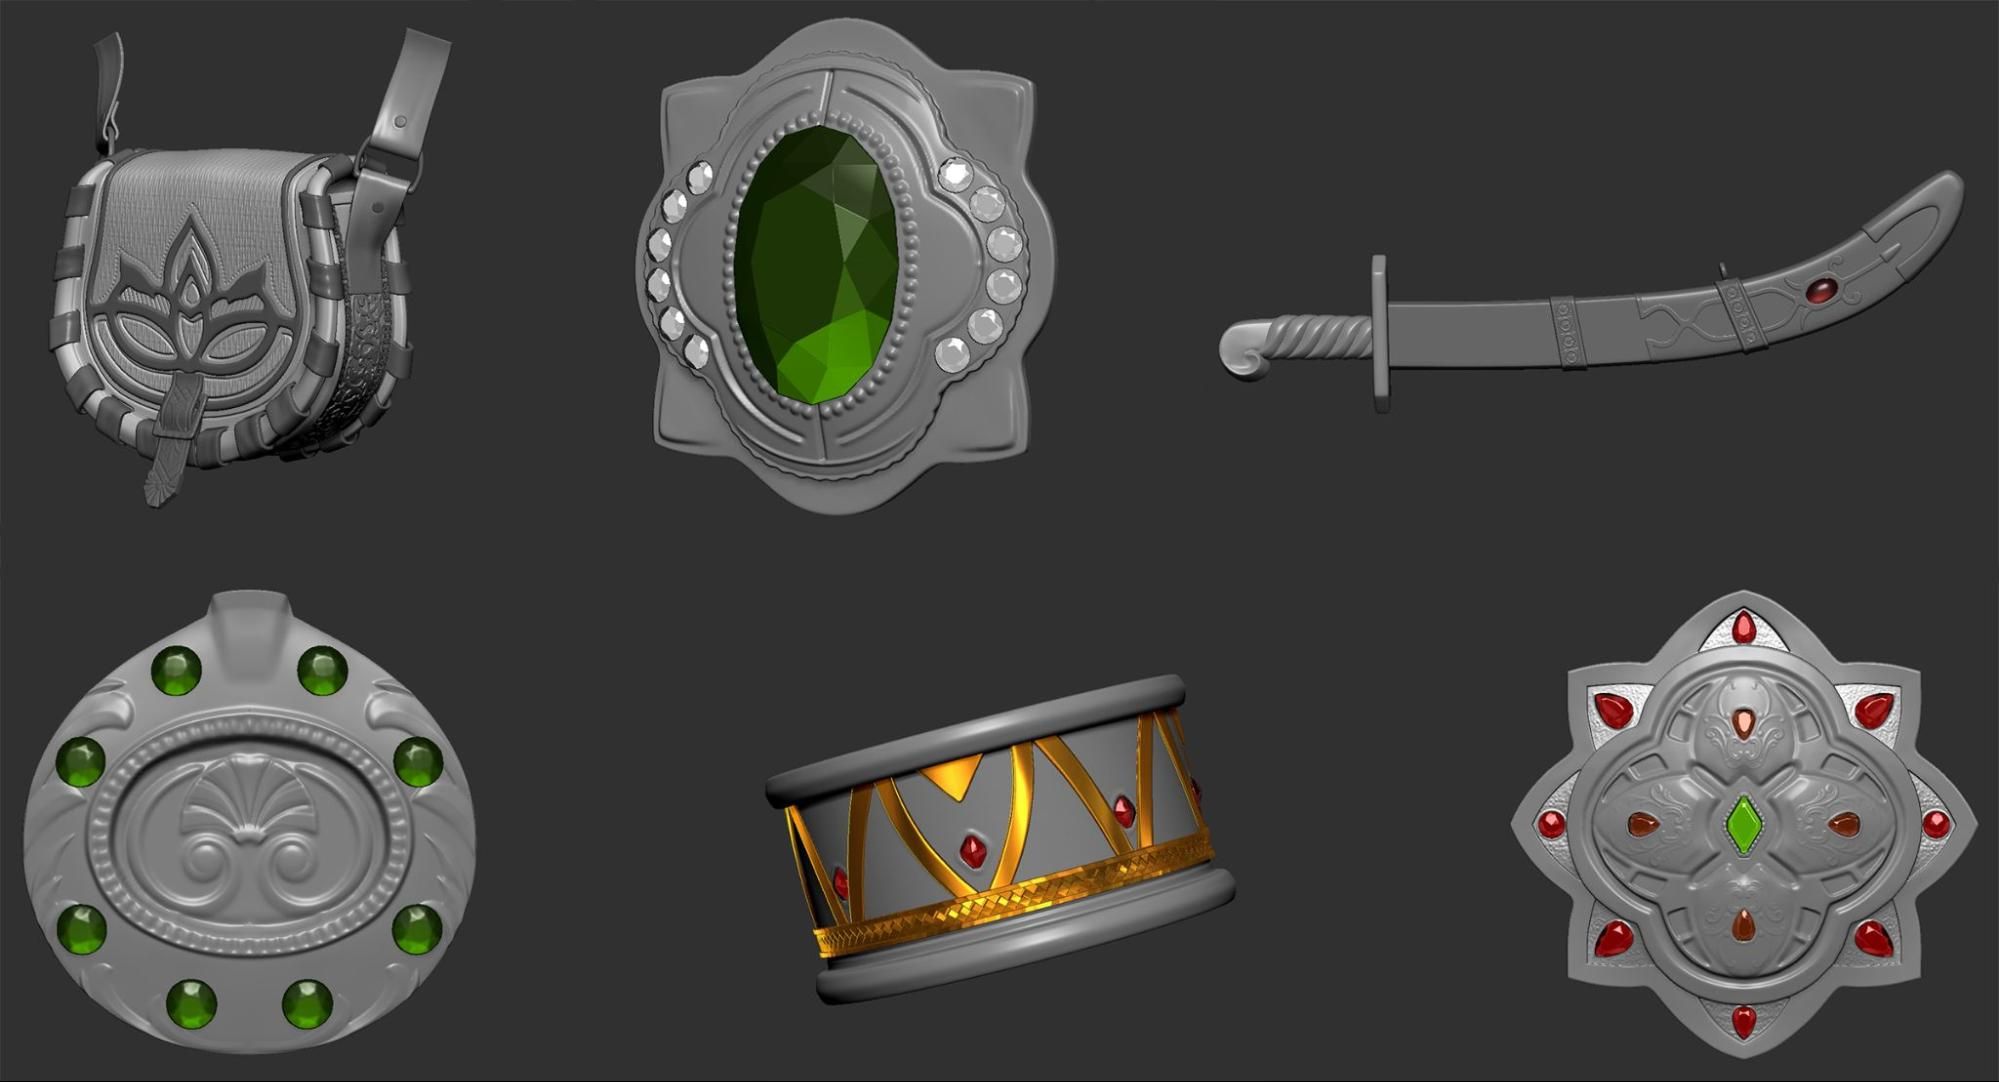
Accessories
As mentioned earlier, I kept some props symmetrical to make the sculpting and texturing faster, cleaner, and easier. Below you can see some screenshots of them.
To create ornamental shapes on the props, you can use Alpha or follow this method:
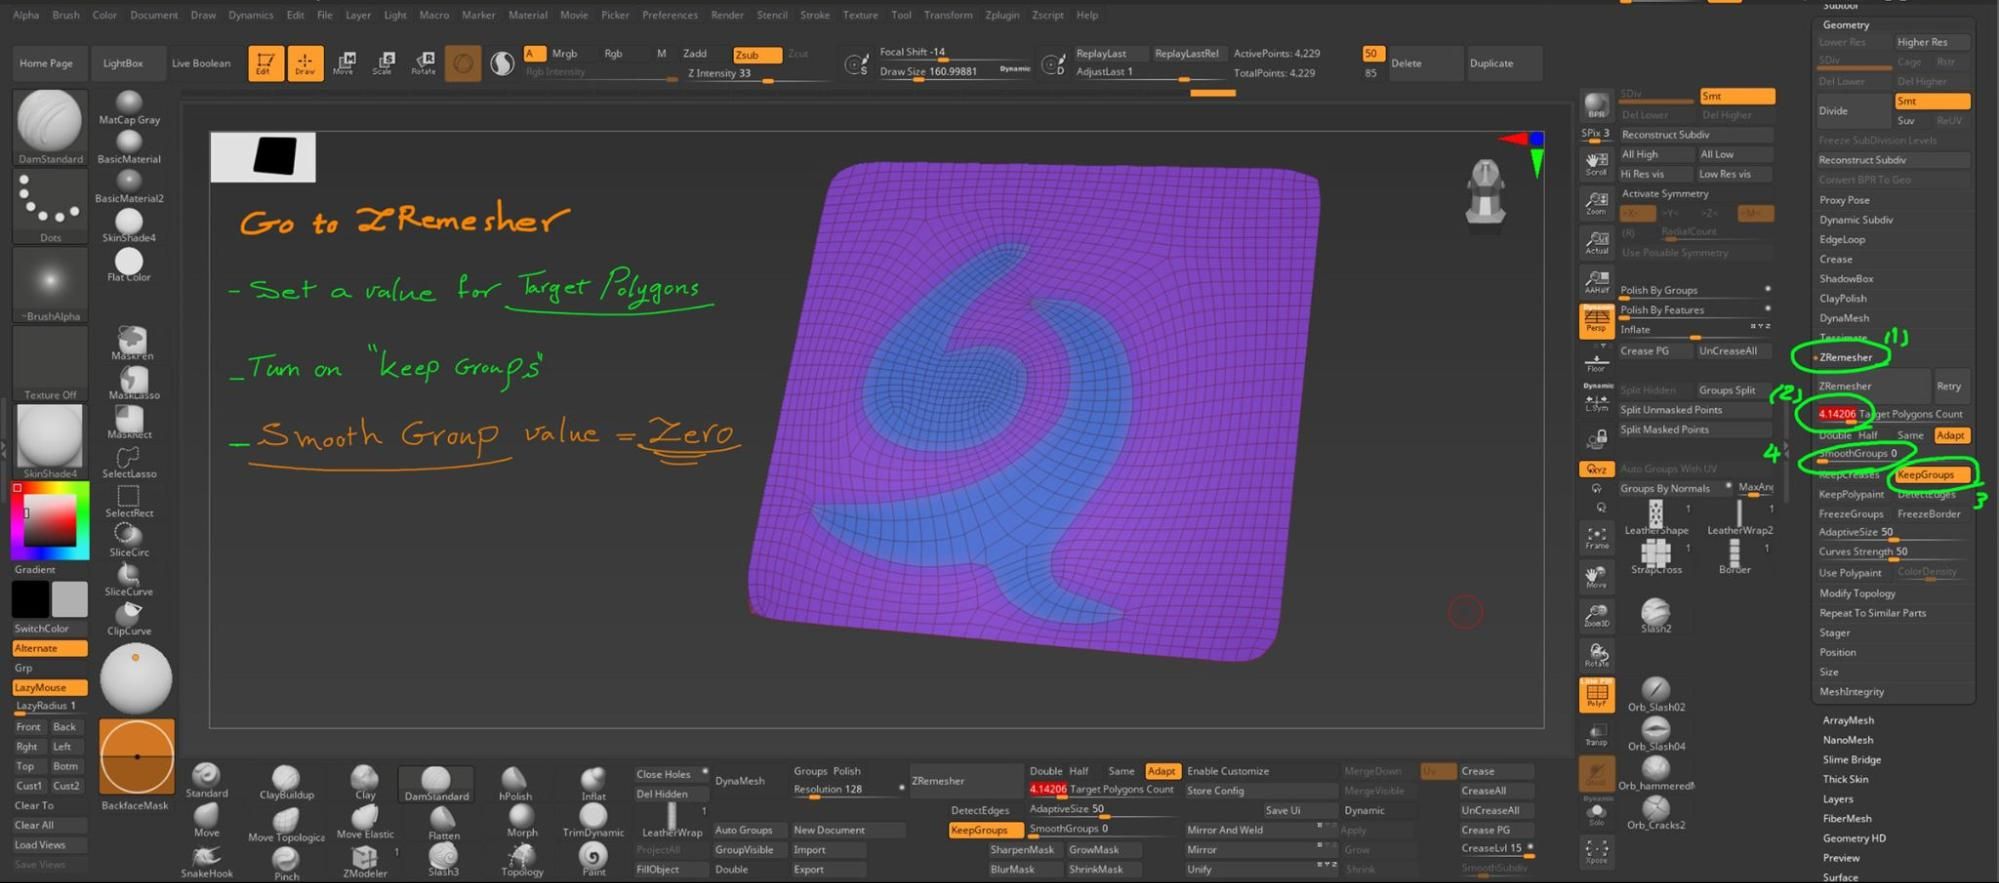
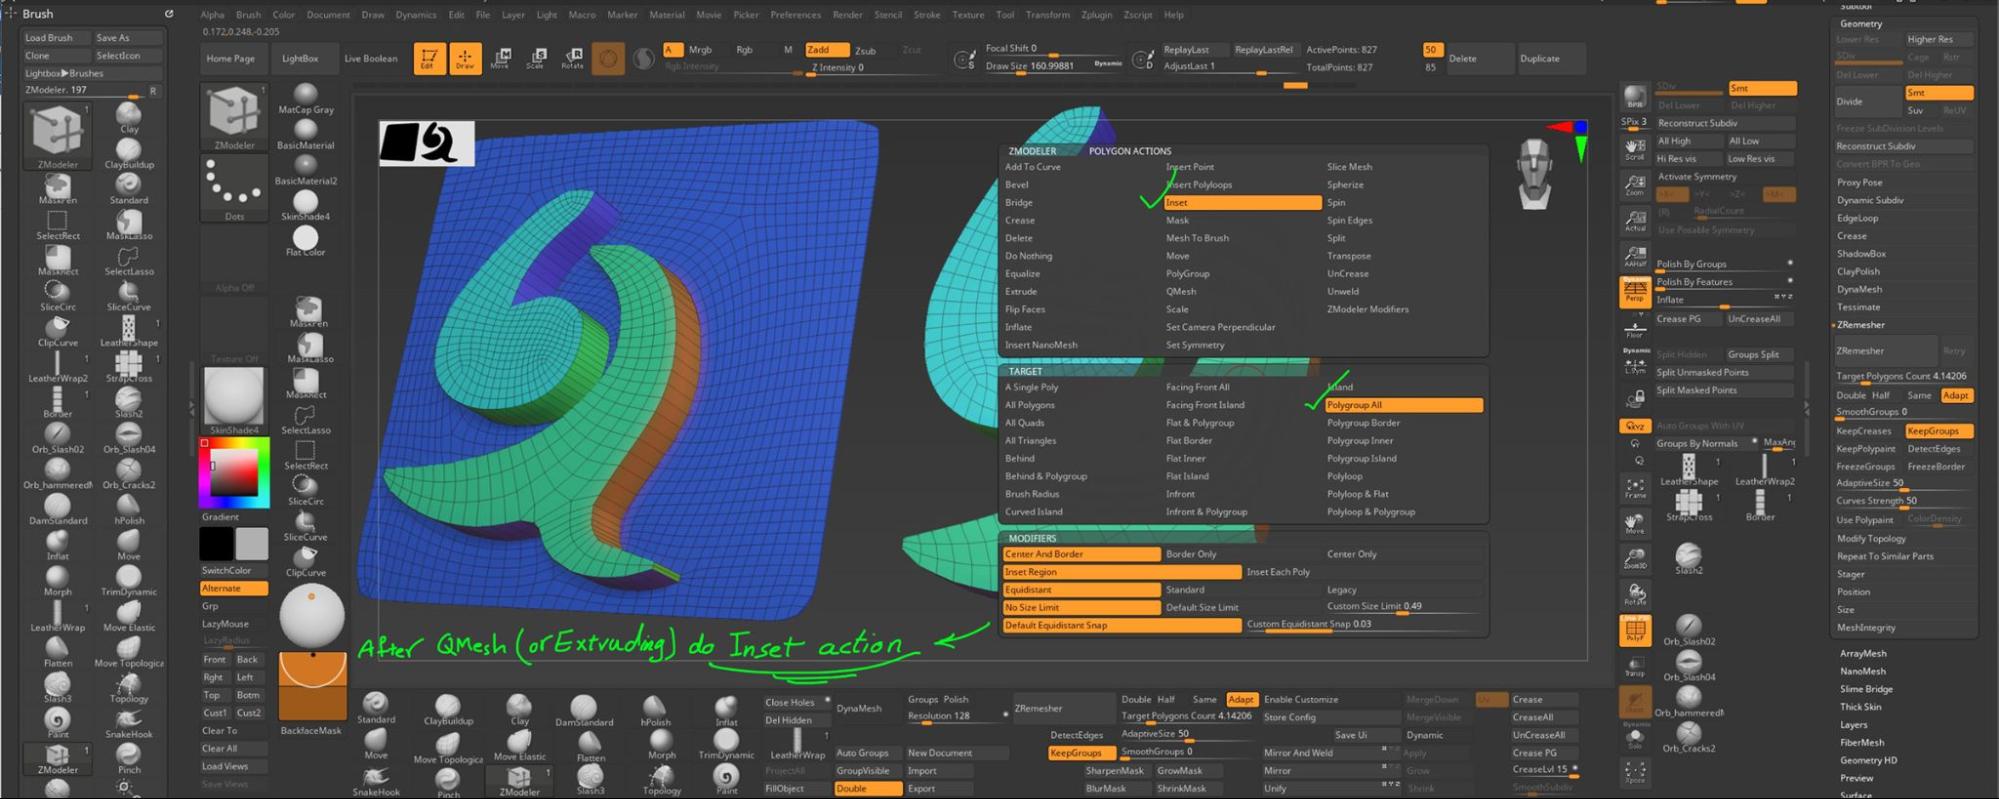
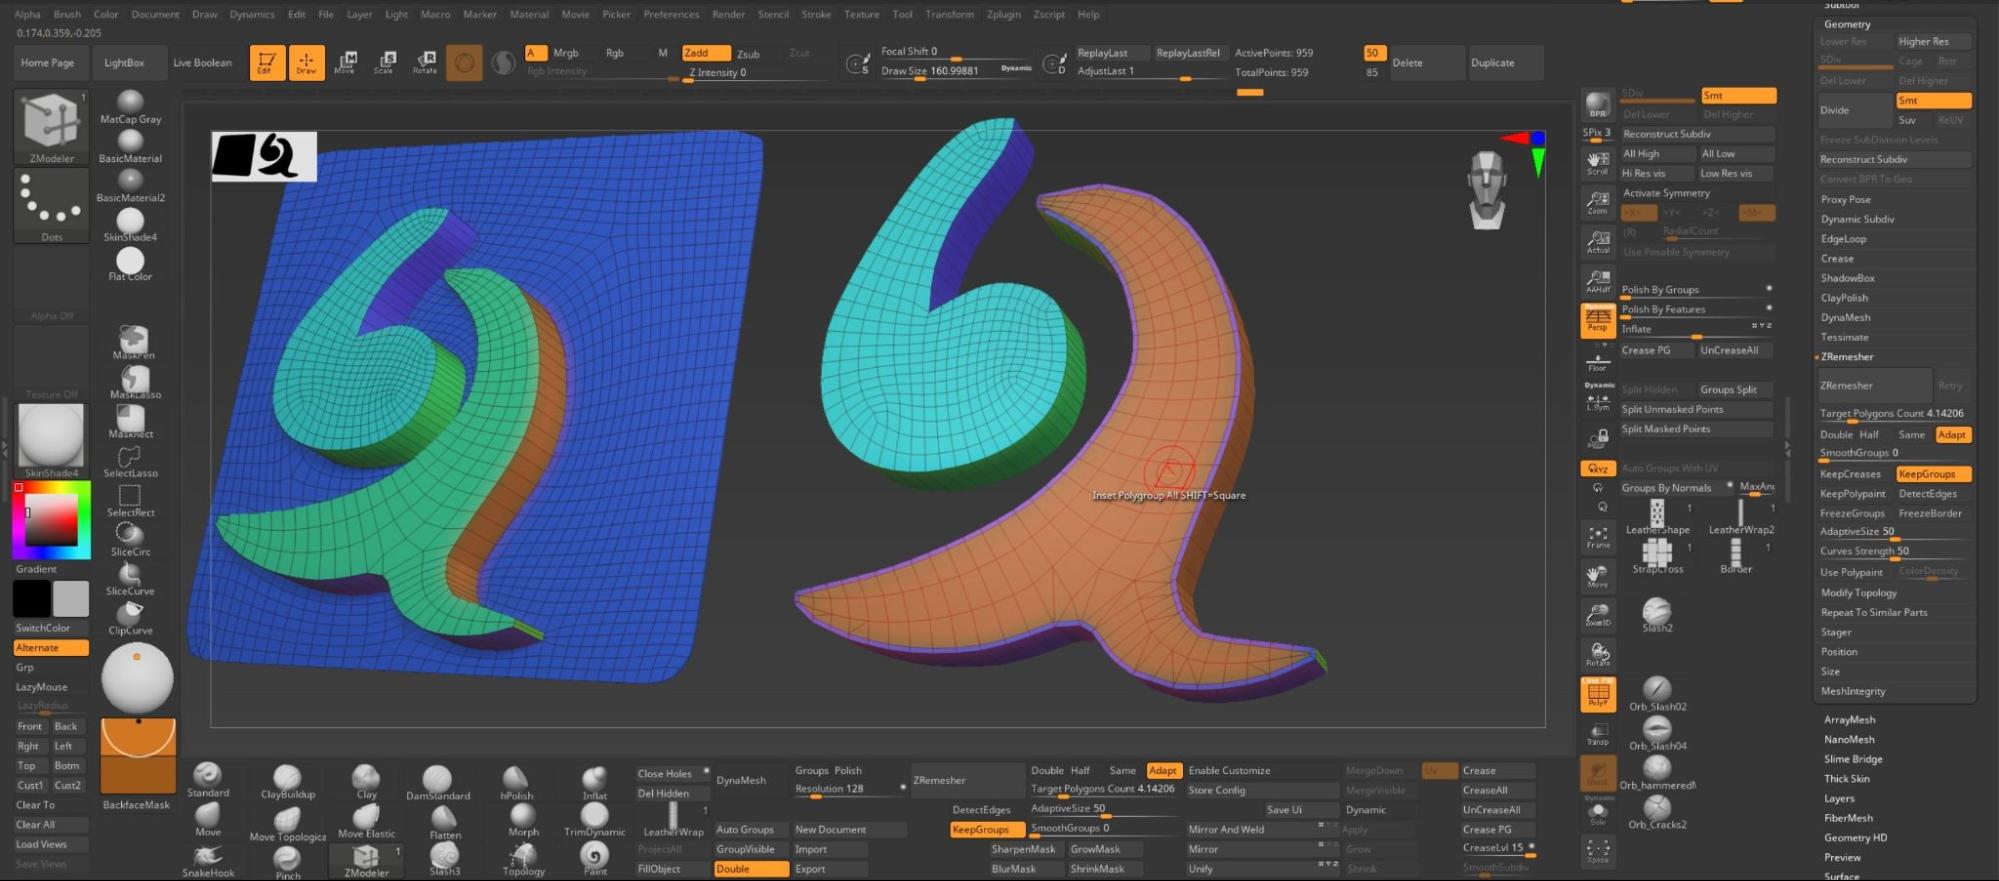
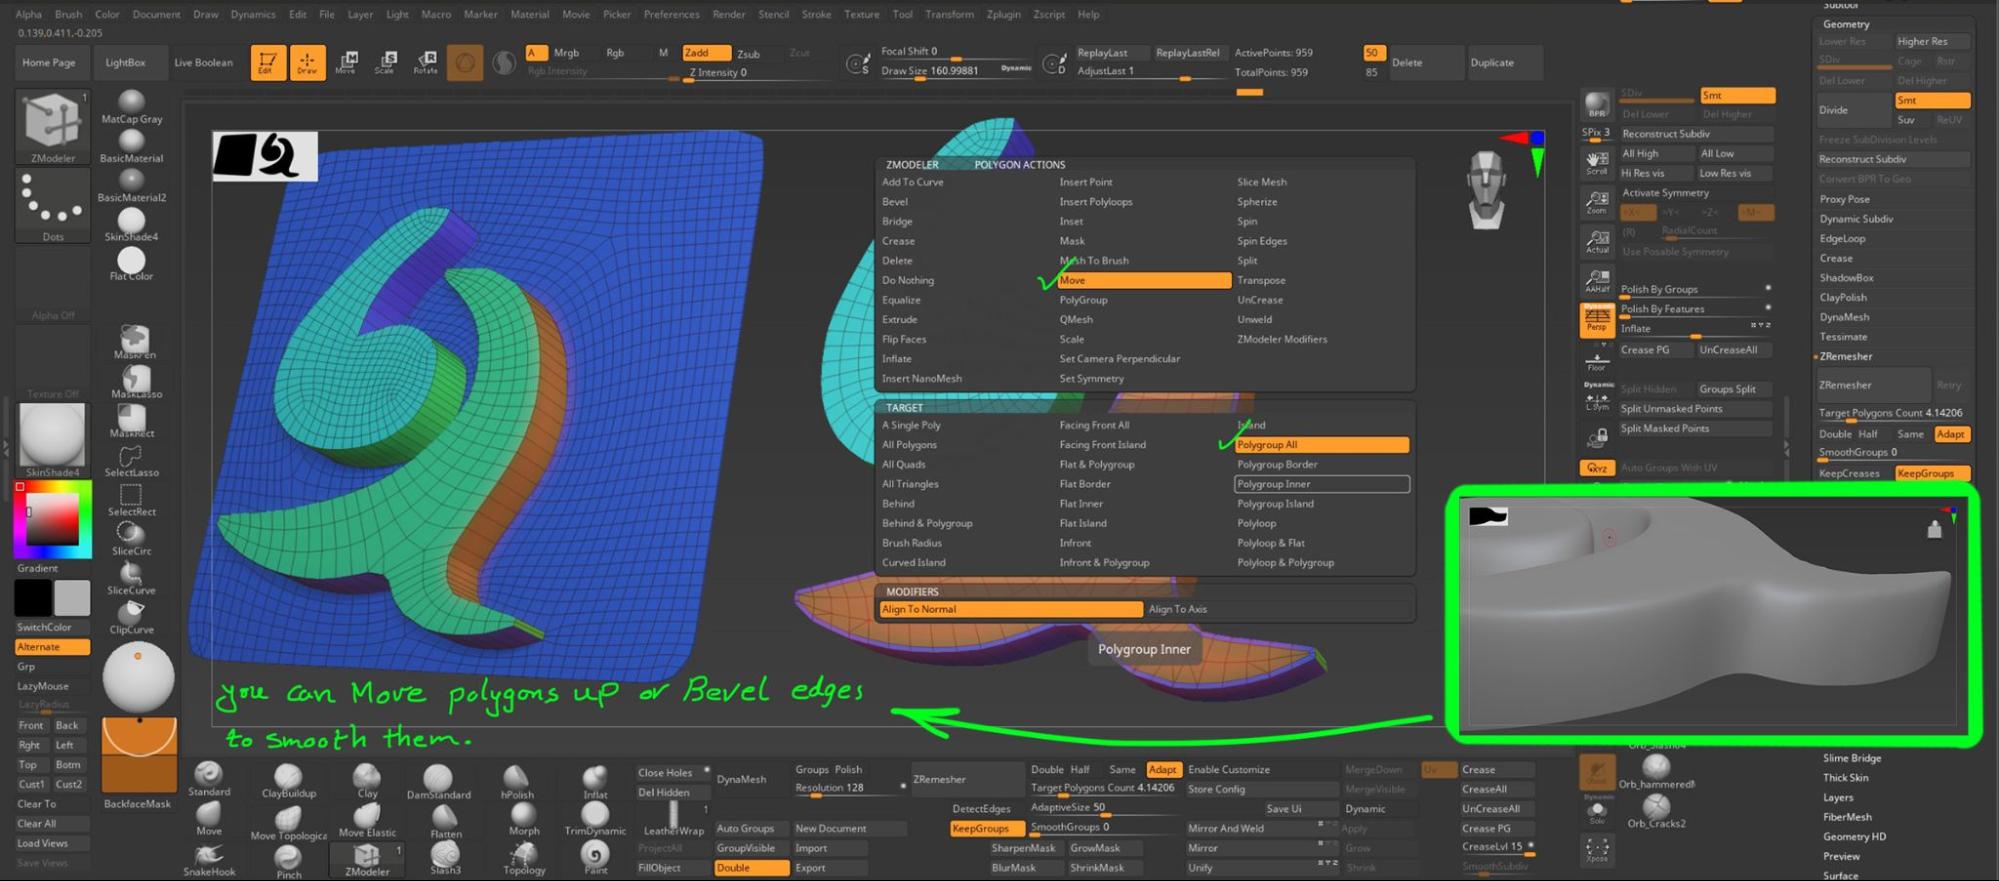
Retopology and UVs
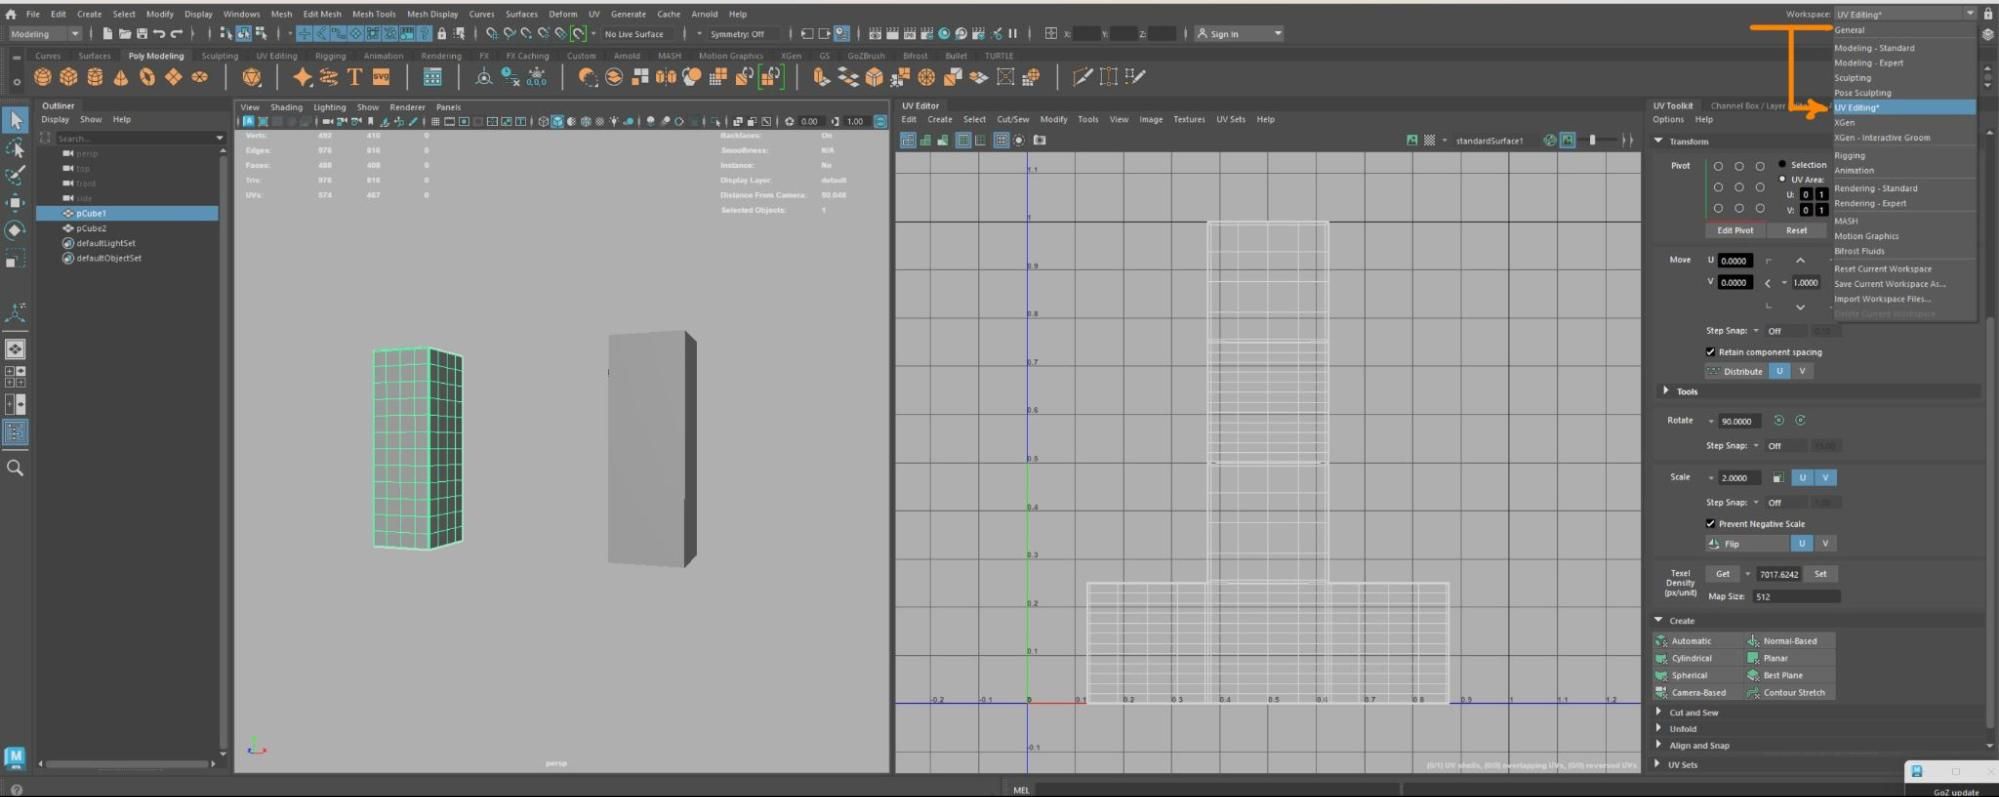
As mentioned earlier, I streamlined my pipeline by removing software like Topogun and UVlayout from my list. I performed retopology for all parts of the character within Maya, a step familiar to most Maya users. The Highpoly mesh should be decimated in Zbrush and then exported to Maya. After making it Live, you can begin retopologizing using the QuadDraw Tool. In this stage, start by creating large polygons to establish the base form and then divide them as needed to maintain the shape's silhouette. Remember, the "silhouette" is crucial. For unwrapping, I used Maya, switching to the UV Editing Workspace to have both the Perspective and UV Editor viewports side by side. This approach accelerates the unwrapping process and provides better control over editing UV islands.
To straighten the UV shells, you can watch this video.
Texturing
To texture this character, I divided it into three separate projects: Head and Hand, Clothes, and Props. This approach helps avoid making the Substance 3D Painter project too heavy. Additionally, for a personal project like this, I aimed for higher texture quality and utilized multiple UDIMs. This can lead to Substance project files becoming heavy, so dividing the project proved to be a good solution for this issue.
Point 1: Before starting, consider storytelling. Ask yourself the "W Questions" about the character: Who is this character? What is their job? What happened to different parts of the body, outfits, props, etc.? This is crucial.
Point 2: I believe the worst mistake an artist can make while texturing a realistic character is guessing how to texture different parts and materials! Of course, visualising can be helpful, but closely observing real references is the major key to achieving a decent realistic result.
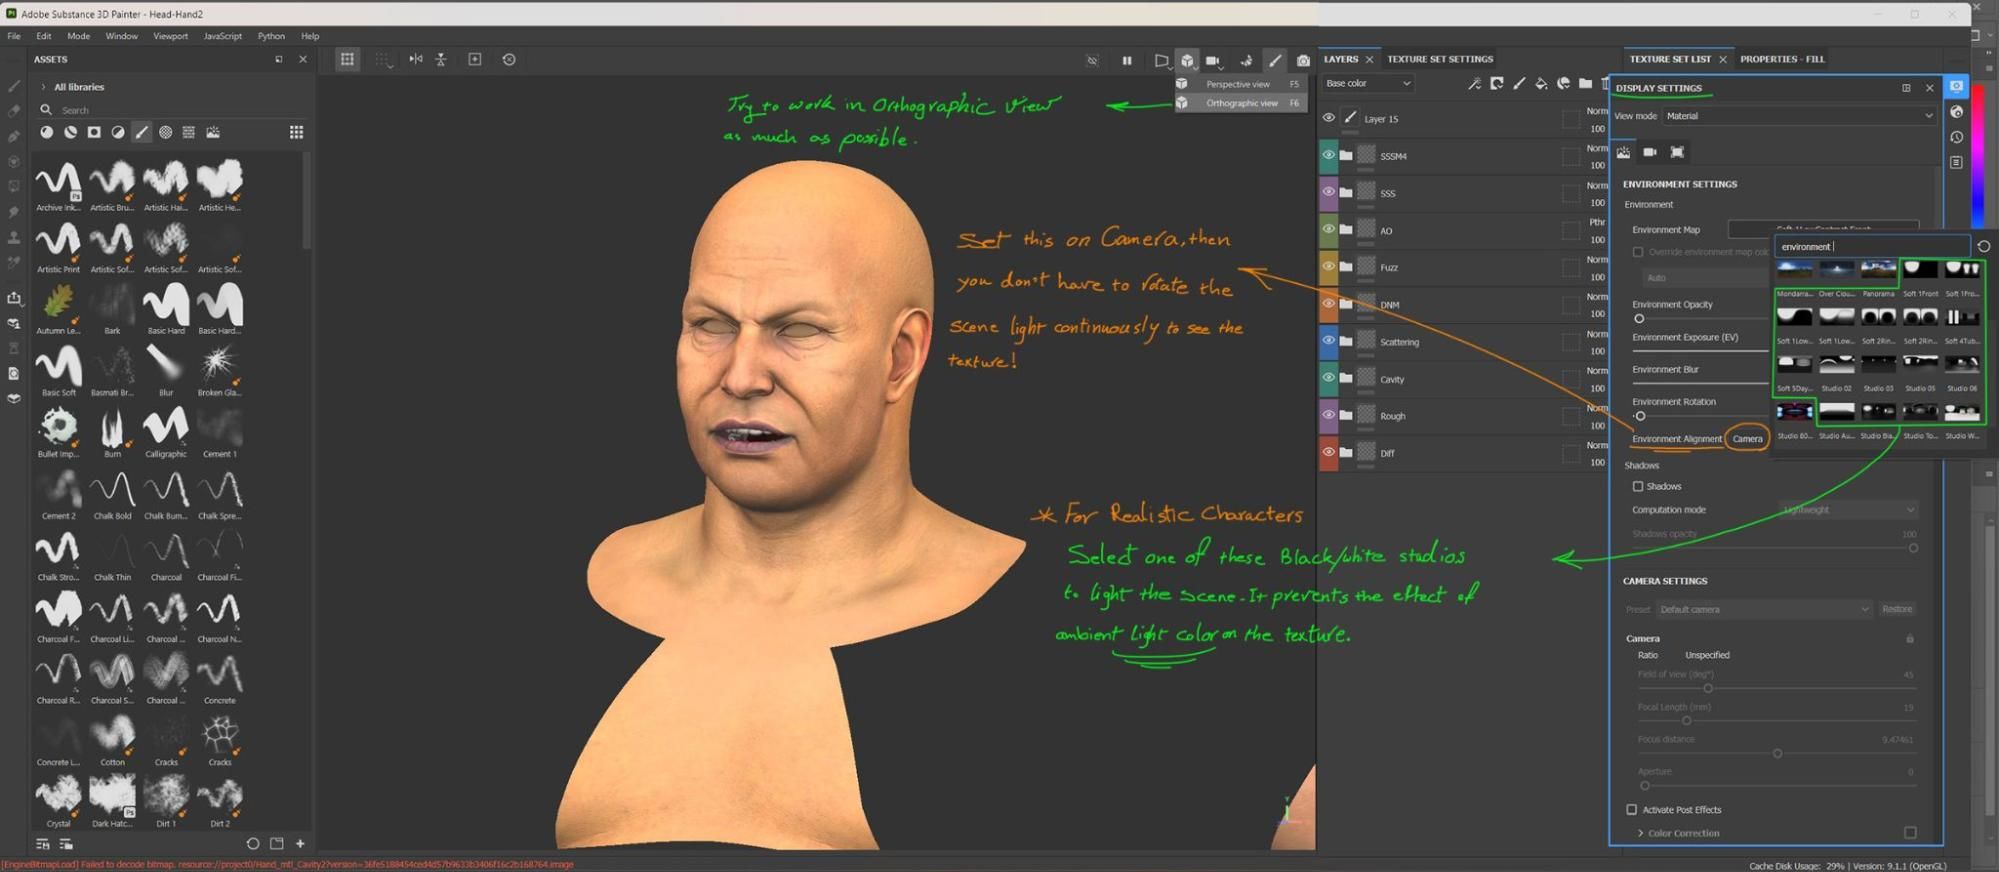
Point 3: First, adjust Substance Painter Display Settings.
Head Texturing
Head texturing holds significant importance for character artists as it's the area most frequently shown in productions. After sculpting the head and projecting the 3D ScanStore Base mesh, I applied the Displacement and Albedo maps. I edited both maps in ZBrush, using Polypainting for colour adjustments and XYZ Displacement for specific areas like lips, ears, and around the eyes. I then exported the Normal and Color maps at 8K resolution from ZBrush to refine any errors in Photoshop.
Note: When editing maps in ZBrush, utilize Layers for better control.
I imported the cleaned maps into Substance 3D Painter to generate additional textures and removed facial hair using hand painting and the Clone Tool. Since I aimed to create two separate materials for the head and hand, I exported the object as an FBX file from Maya with two assigned Lambert Materials. Naming materials in both Maya and Substance and organizing textures into separate folders, each colour-coded for clarity, aided in the process.
Here are other channels I created for the head.
Note 1: The SSS map is adjusted for Marmoset Toolbag 4 (White areas).
Note 2: Maintaining real-world scale for the character is crucial at this stage, as the SSS value operates in Millimeter Units in Marmoset. ** Additionally, I created a mask as a texture channel within Substance to facilitate exportation. This mask prevents the display of minute skin details in certain facial areas such as lips and ears. It will be utilized during the final render to restrict the depiction of small Normal Map details in the darkened regions. **
*Do not forget to check the textures regularly in the game engine.*
Outfits
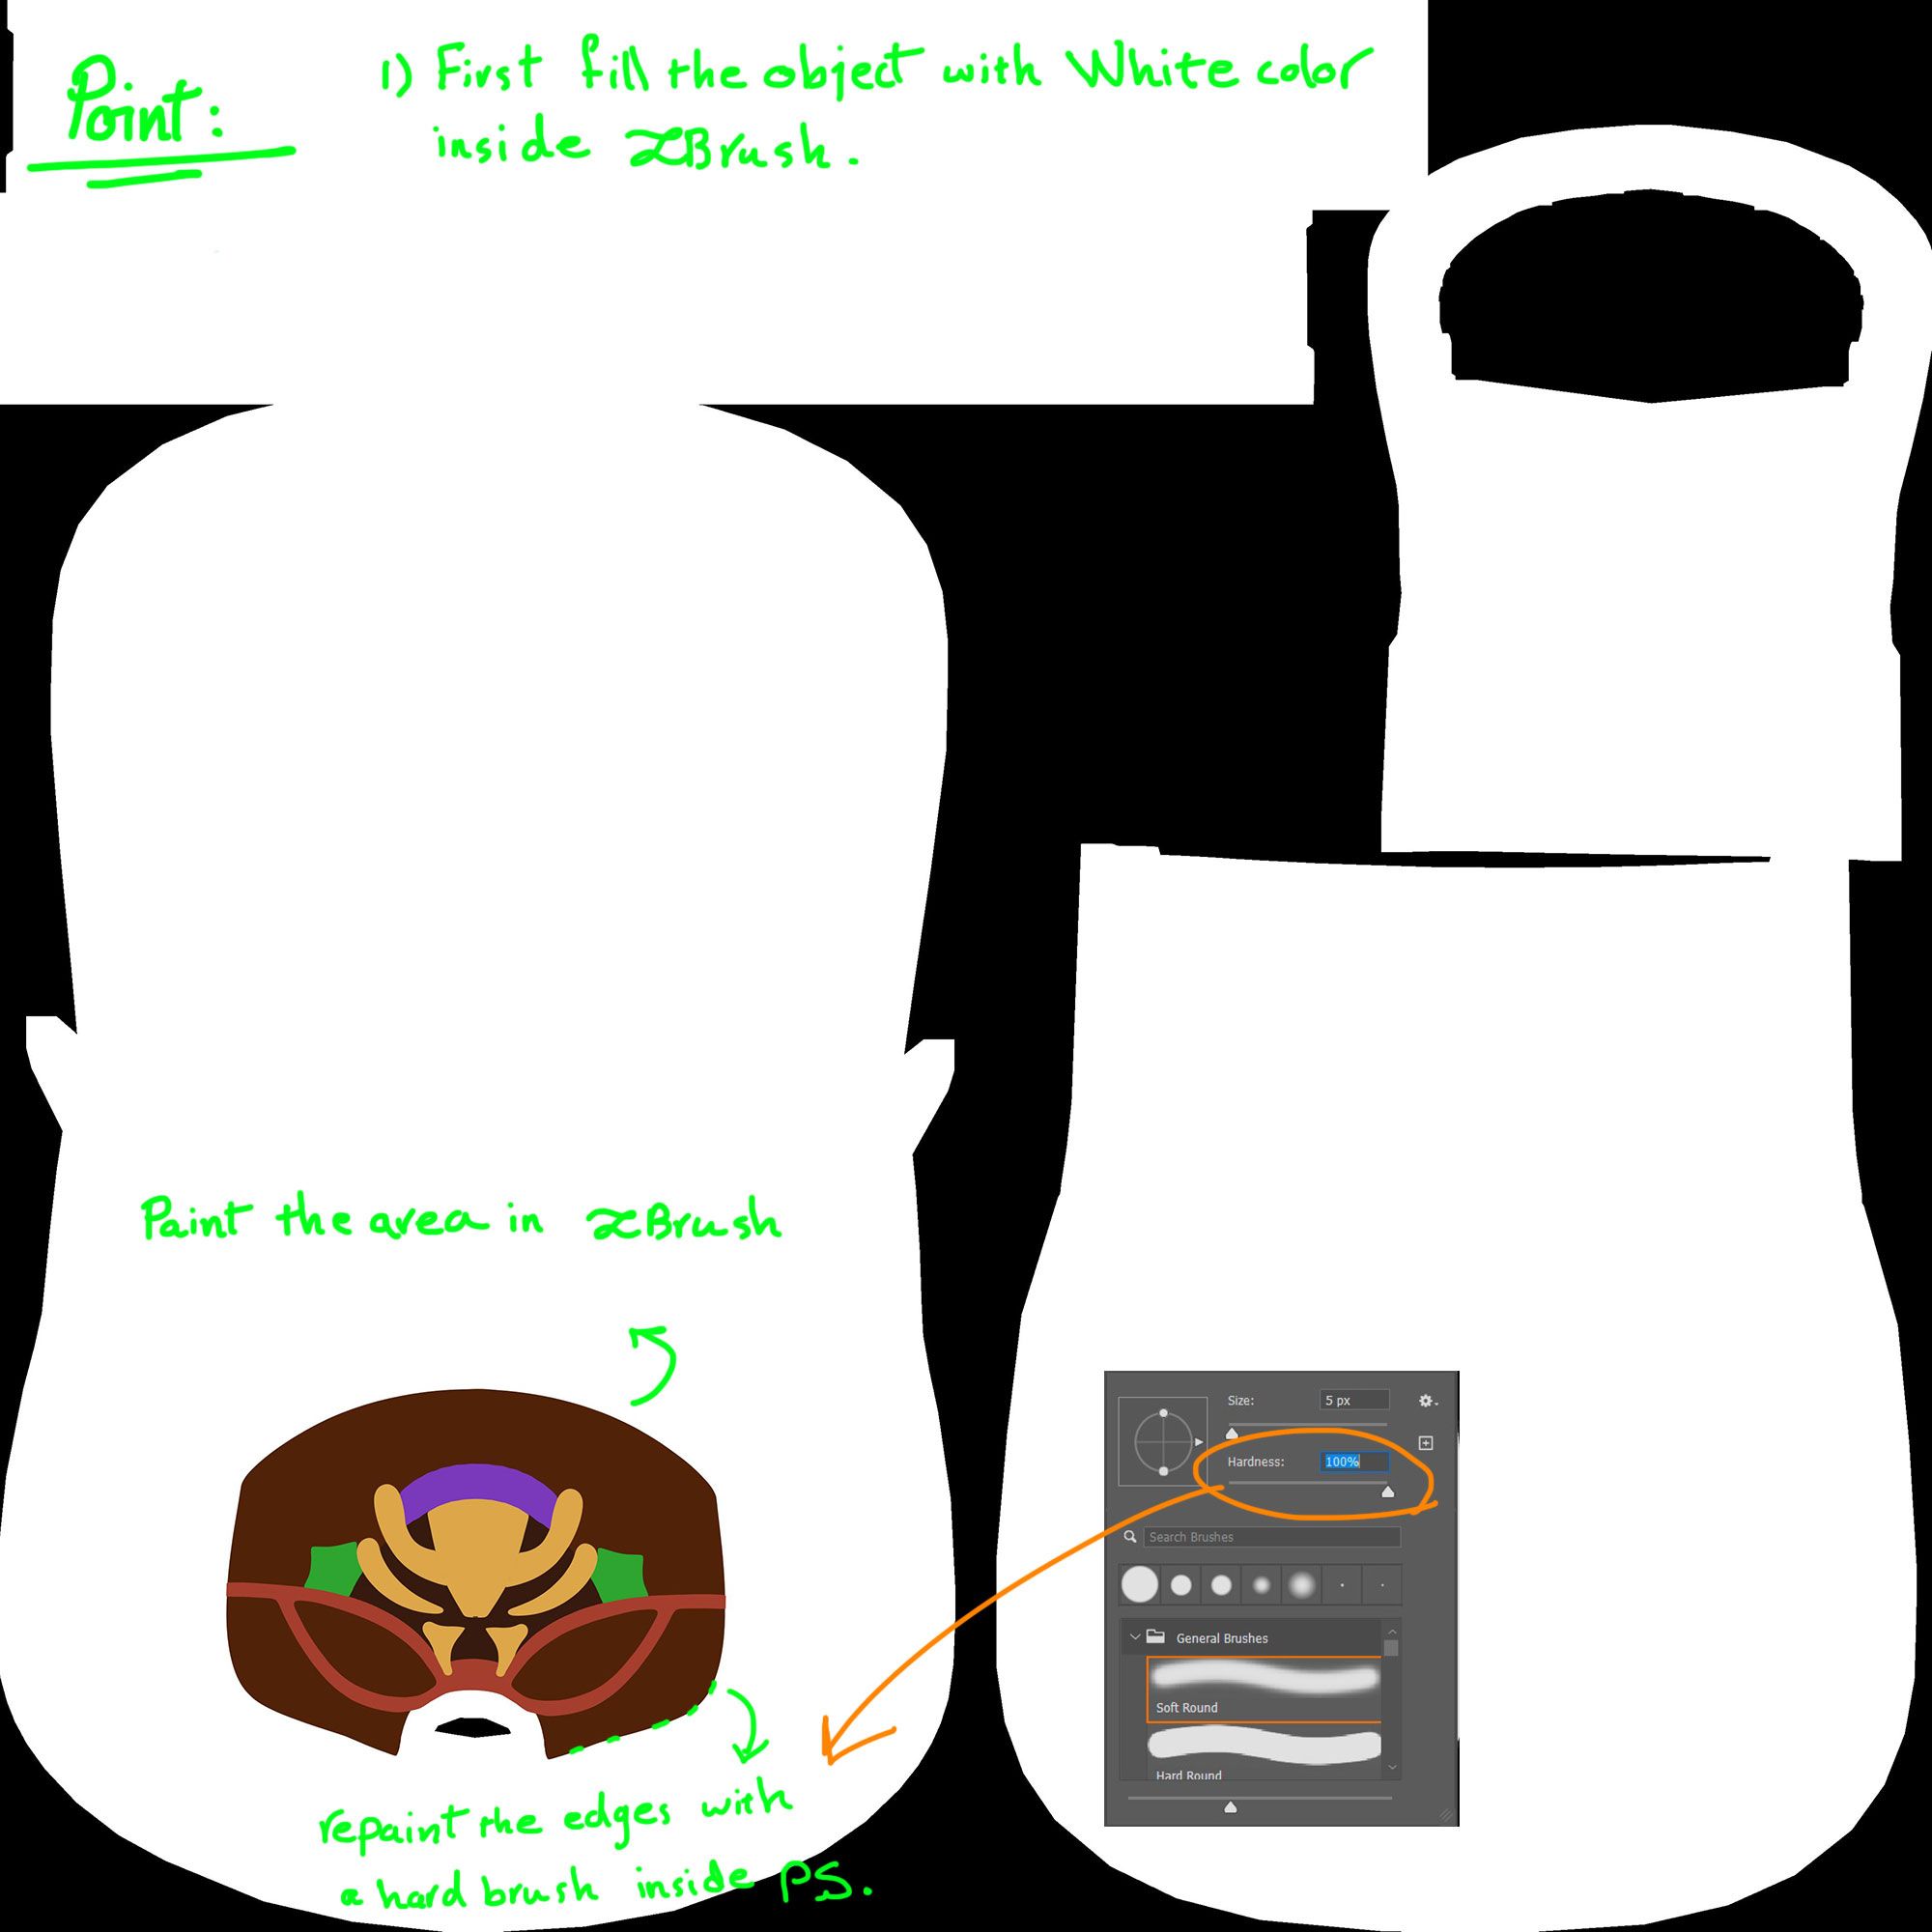
Texturing the outfits proved to be the most time-consuming aspect of this project, as I aimed to enhance certain areas with additional elements like embroidery and leather to elevate their visual appeal. Achieving this required a combination of ZBrush, Photoshop, and Substance 3D Sampler, alongside Substance 3D Painter. To create the embroidery parts:
Initially, I painted the shapes or patches in ZBrush and exported the texture as a PNG file for further refinement in Photoshop.
In Photoshop, I meticulously repainted the coloured areas using a hard brush to ensure crisp edges, a necessary step to achieve satisfactory results within Substance Sampler.
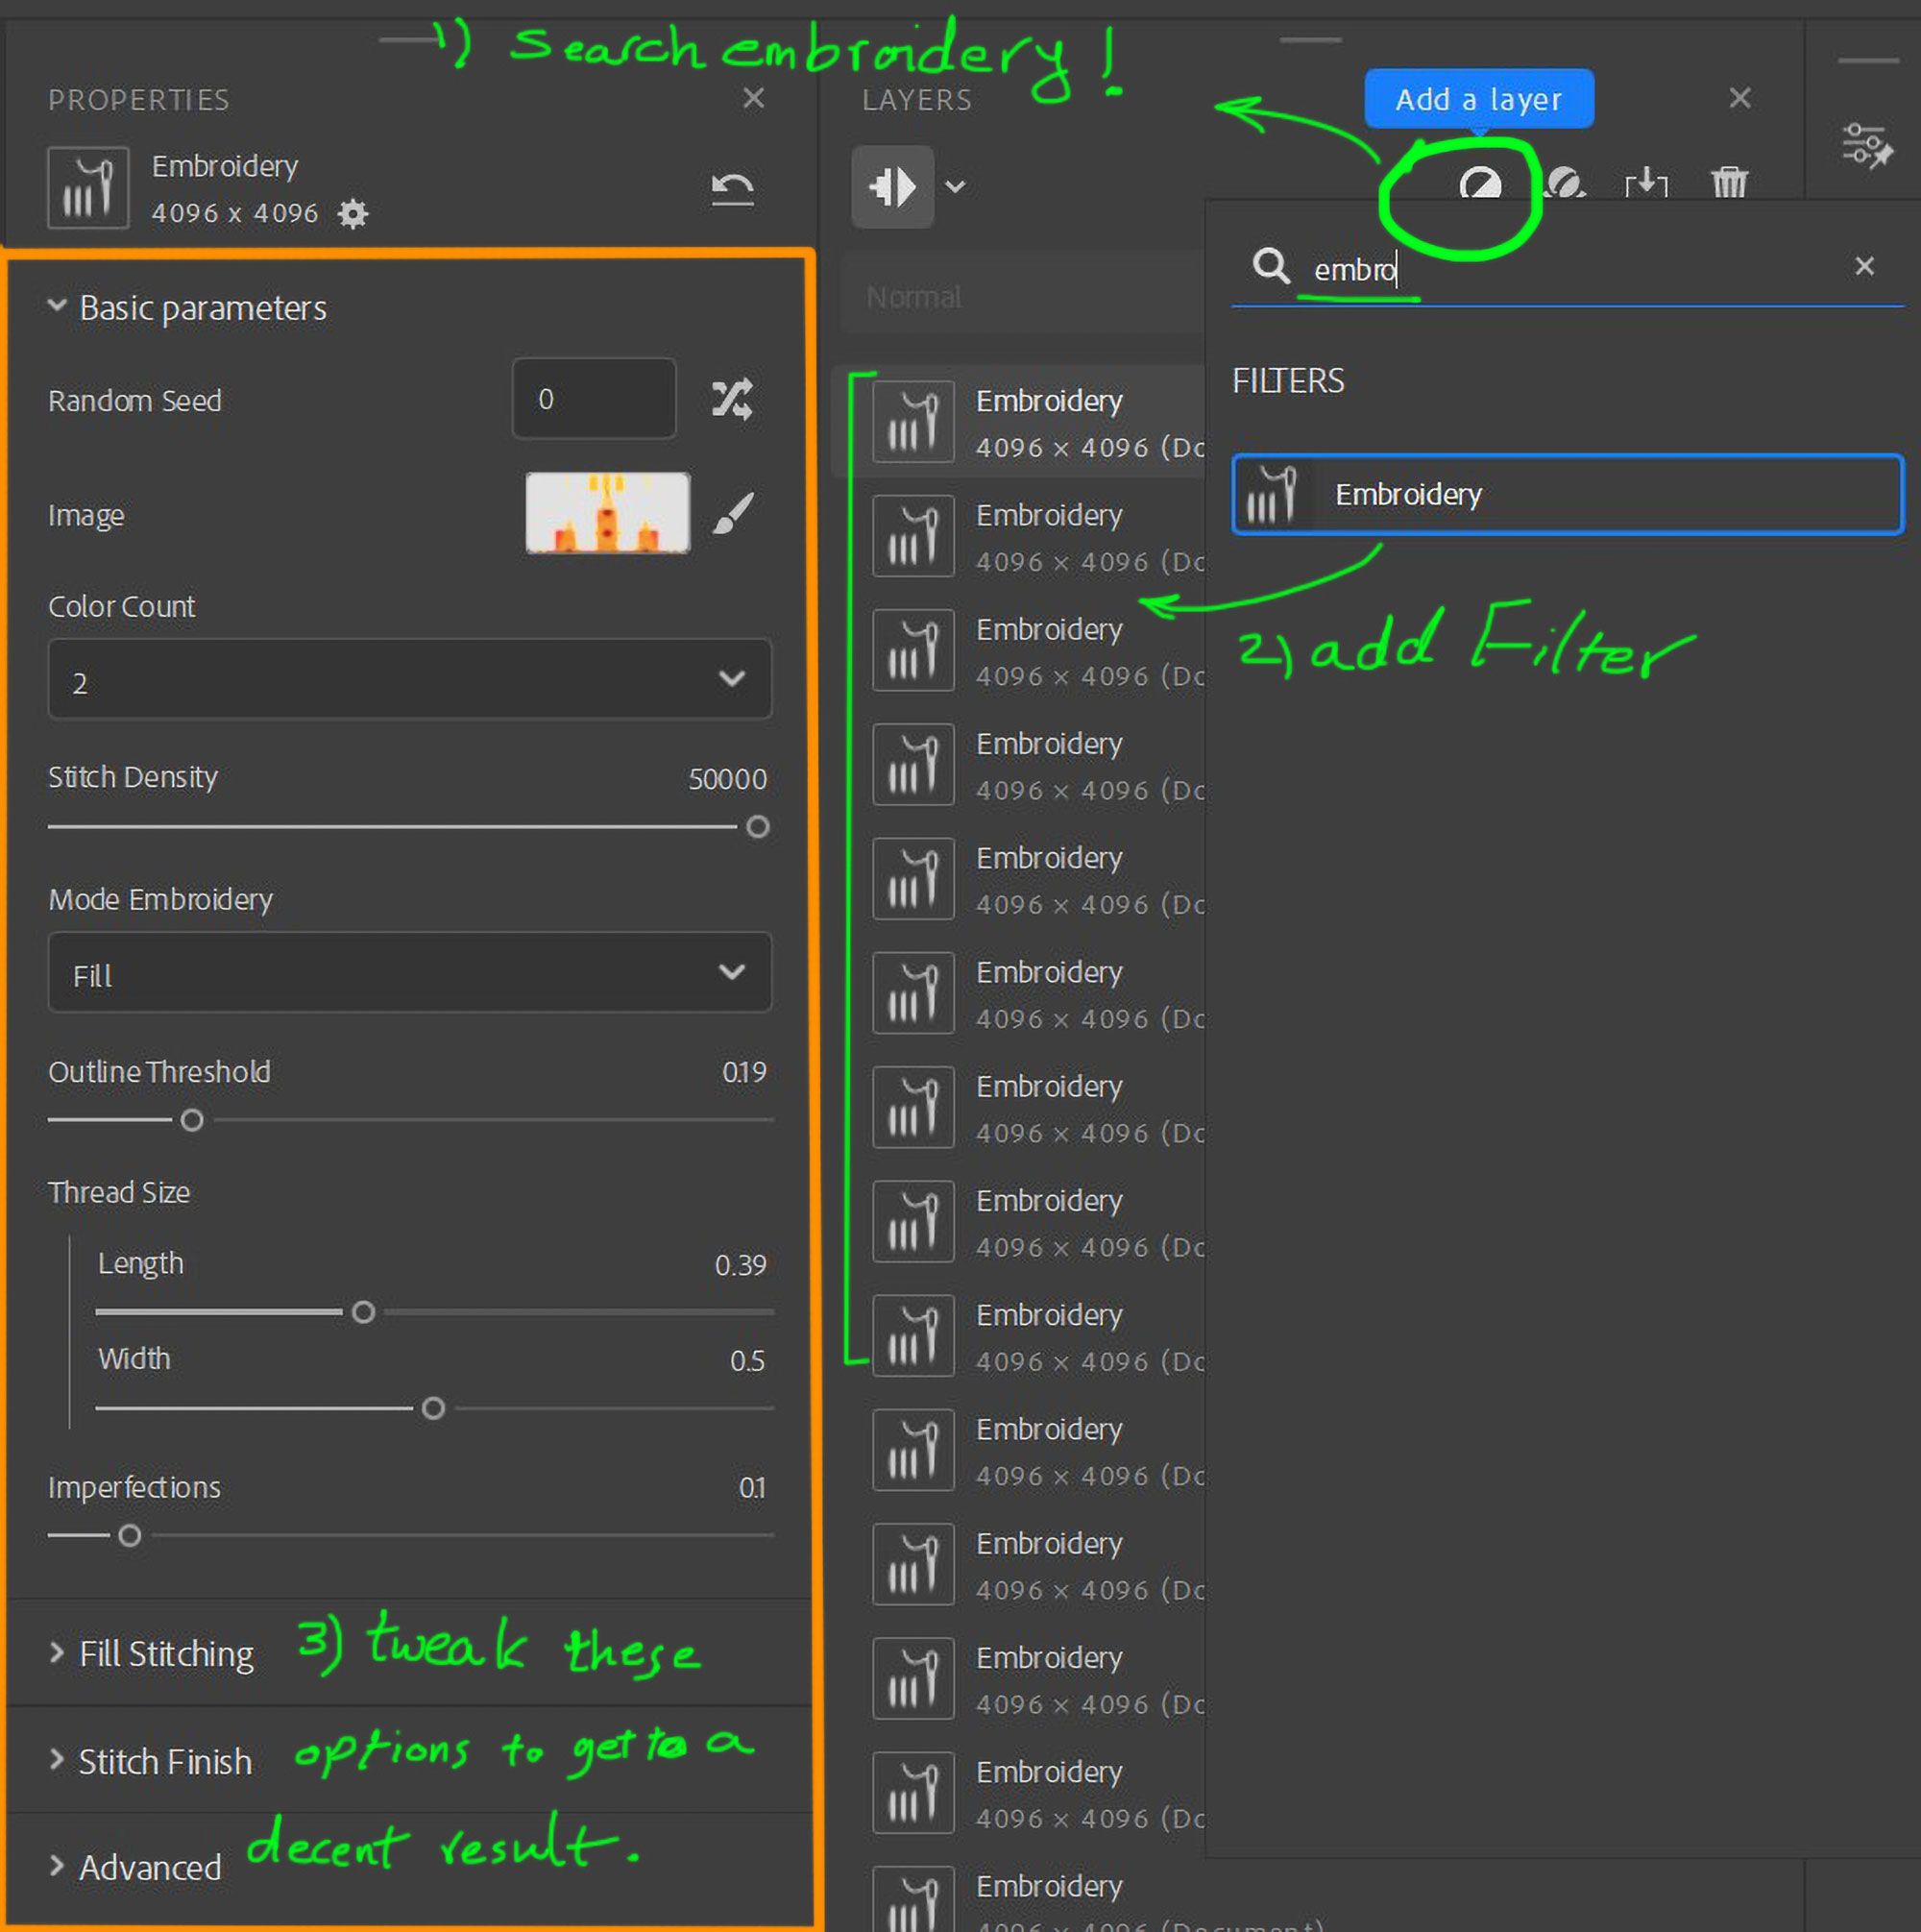
3. Import the image as a Bitmap into Substance 3D Sampler and utilise the Embroidery Filter to fill the painted area. Note: Ensure to eliminate the black and white areas, retaining only the painted parts, as the bitmap file should be a PNG file with a transparent background.
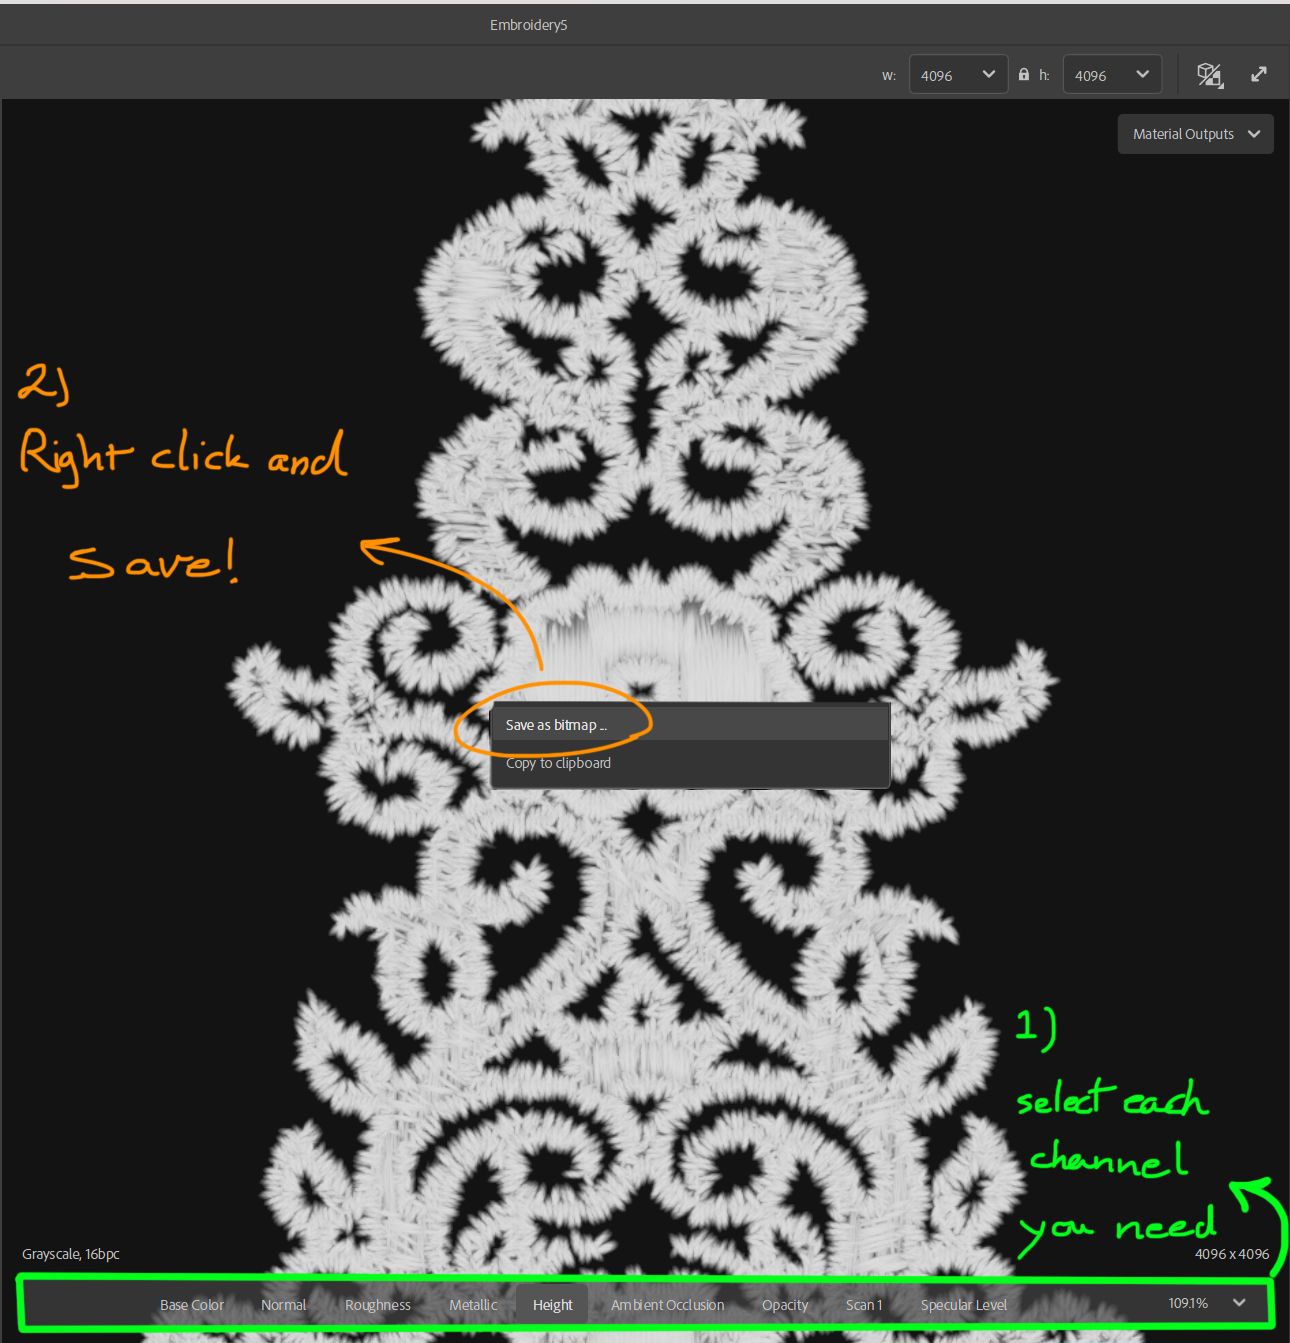
For this project, I exported the maps shown below. Then I put them on the main texture to merge them using Photoshop.
I usually create only one material for the whole object and during texturing create a separate folder for each part.
Note: Use the Geometry Mask feature to work easier! Watch this video to get more information.
As you can see below, I isolated the Boots to see and work better on them.
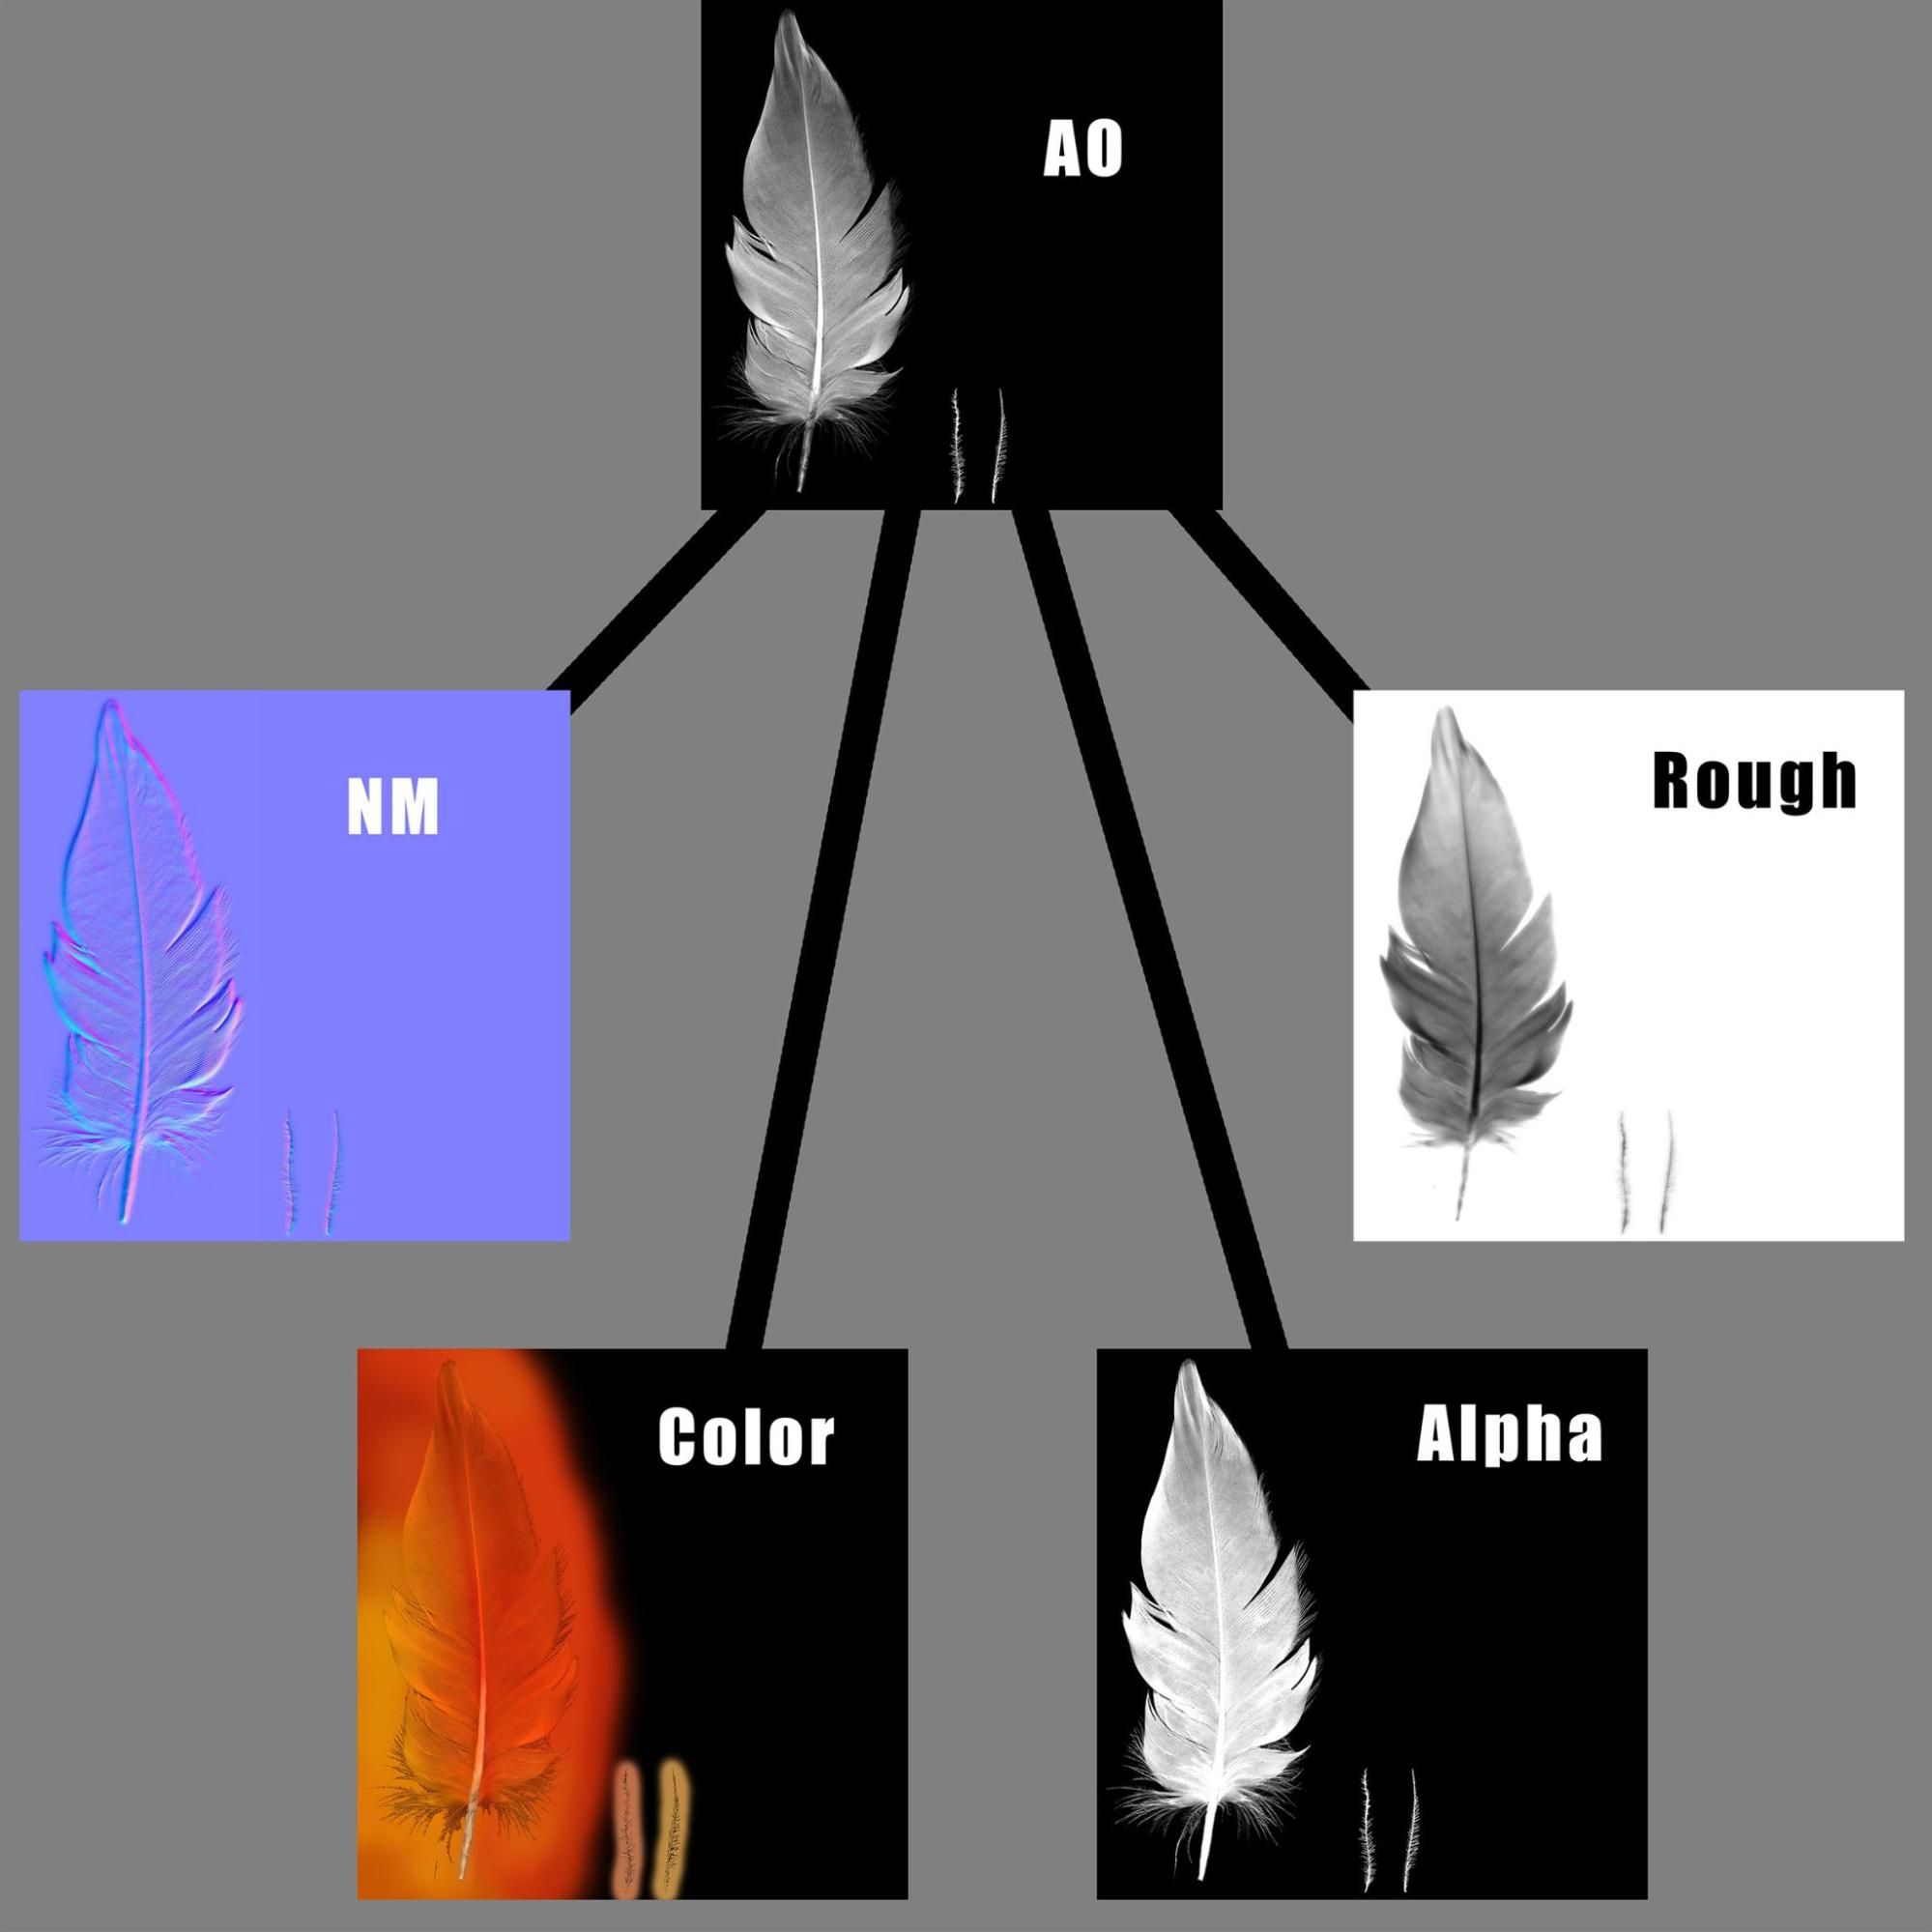
Feather
Creating a feather is also a somewhat time-consuming process for modelers. Initially, I attempted to sculpt a feather in ZBrush, but the outcome didn't satisfy me. Hence, I opted to approach it similarly to hair creation. To generate the necessary textures, I first collected some free images and merged them to produce an Ambient Occlusion map, as I anticipated that I could craft the other maps using AO within Photoshop. This is the final result.
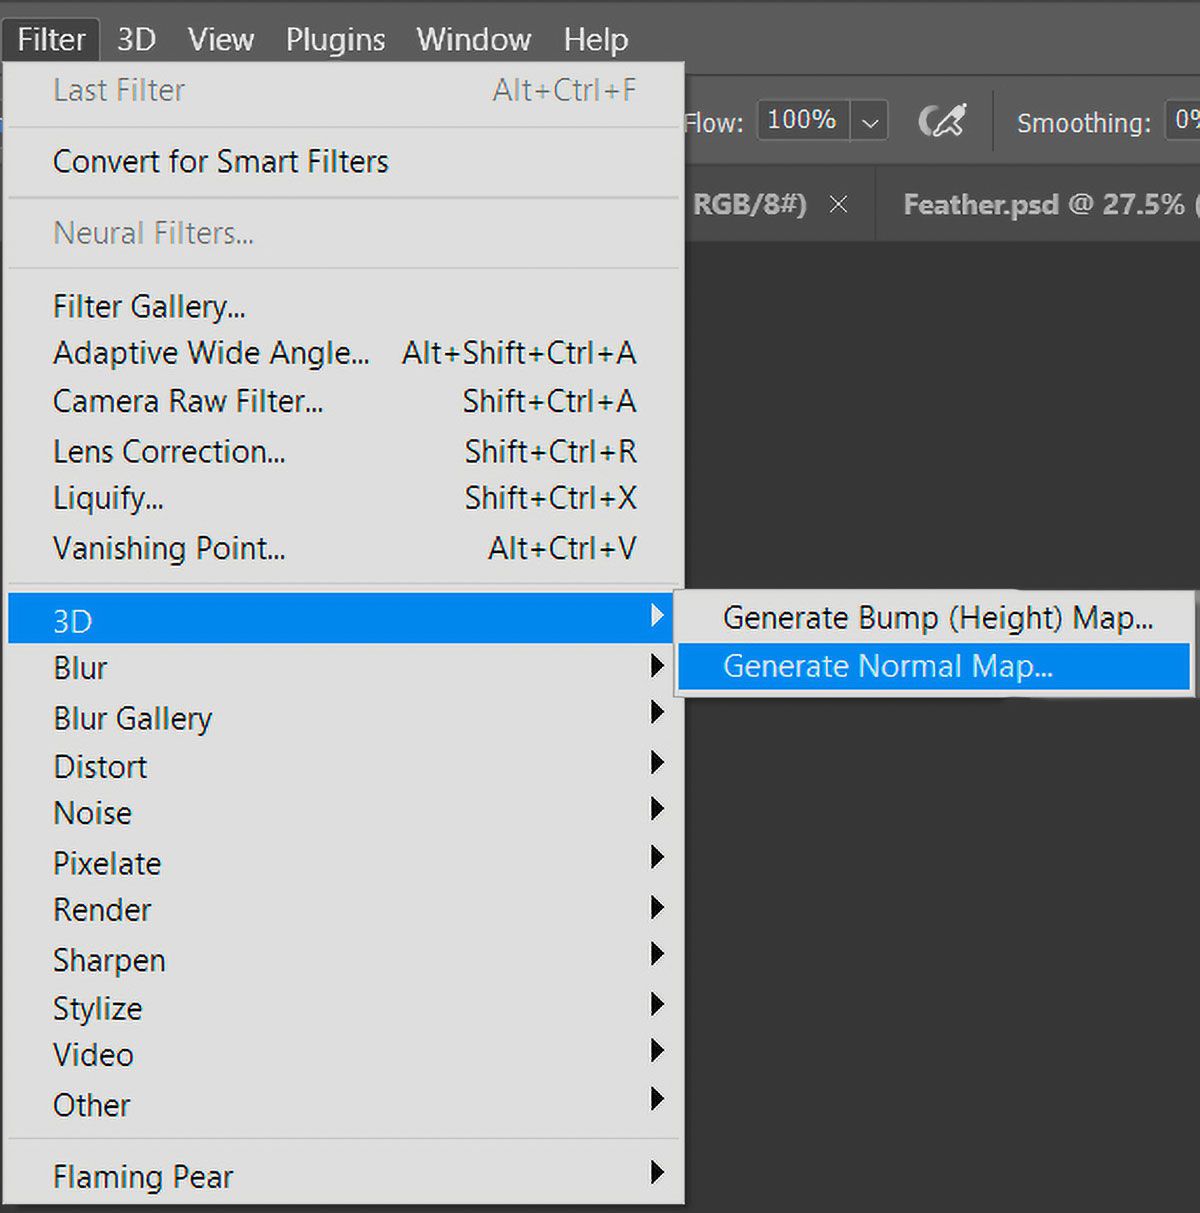
Point: To convert a texture to Bump or Normal maps inside Photoshop you can follow this path:
Feather Geometry
I created the feather geometry inside Maya using GS CurveTools Plugin.
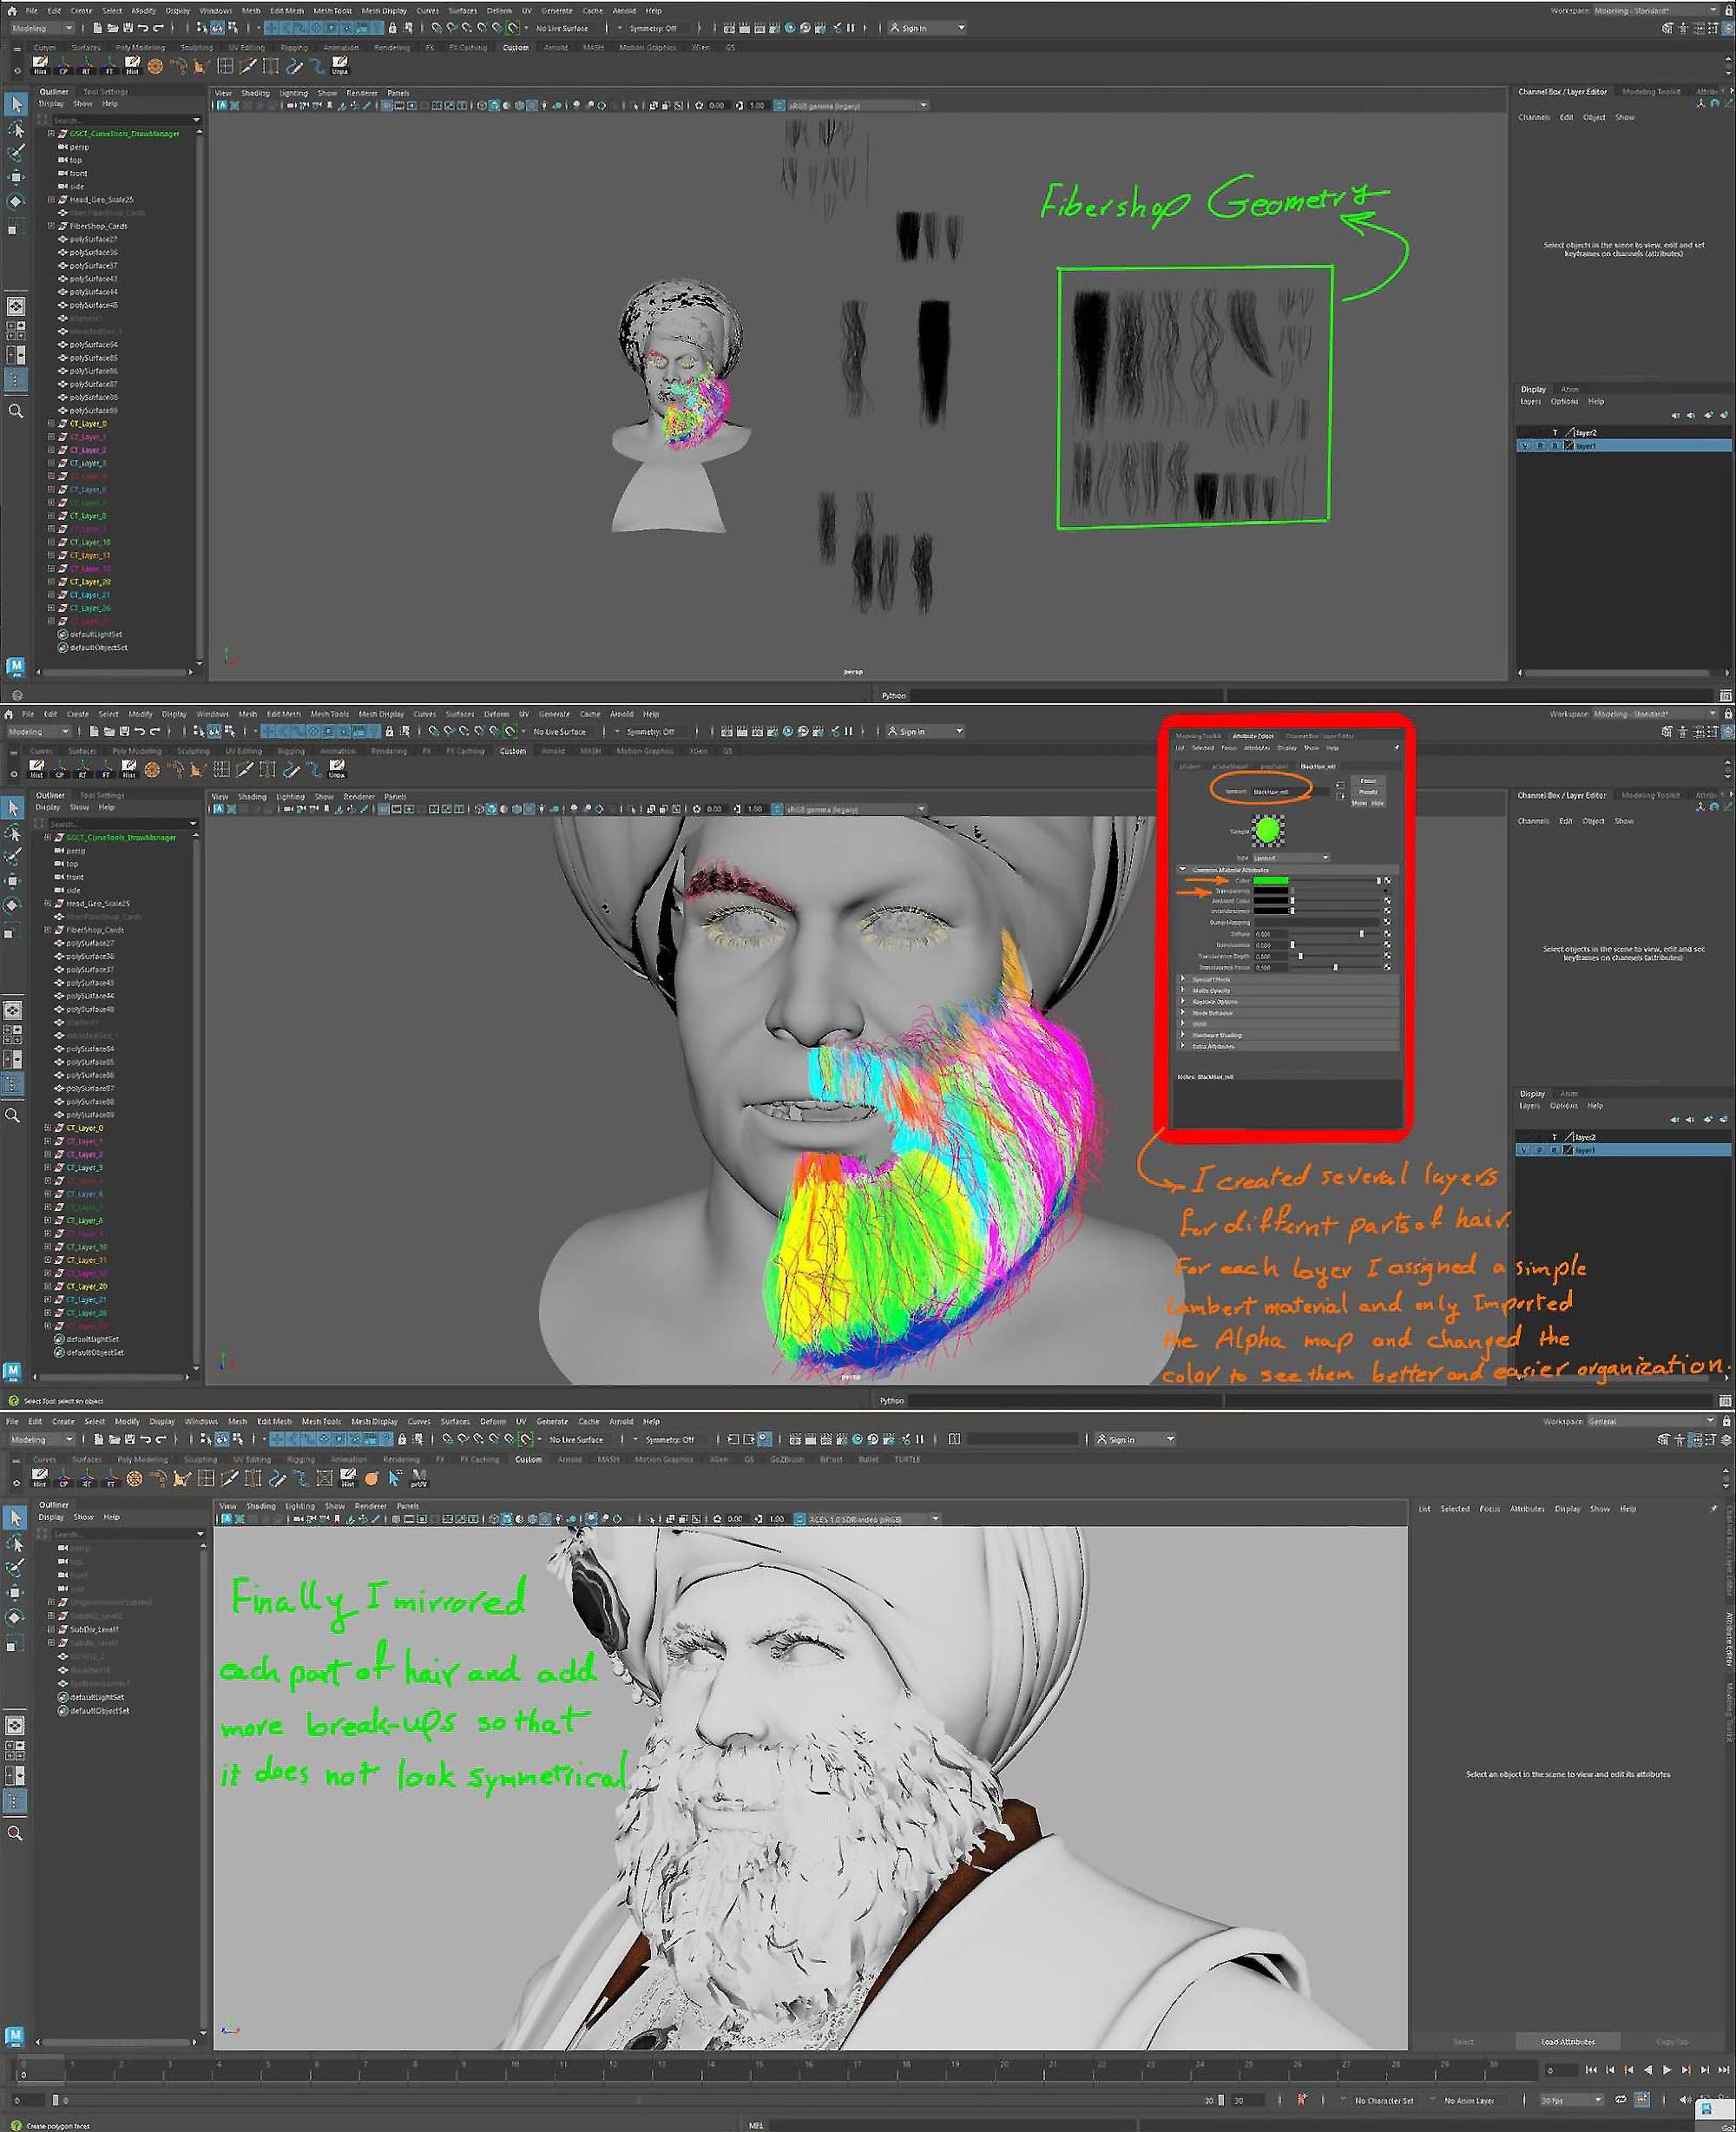
Hair Creation
I created hair cards in Maya using the GS CurveTools plugin, and for the hair textures, I used Fibershop. GS CurveTools is an excellent plugin for hair card placement, available for purchase on ArtStation. Fibershop, which you can acquire from its official website, proved to be a valuable tool for texture creation.
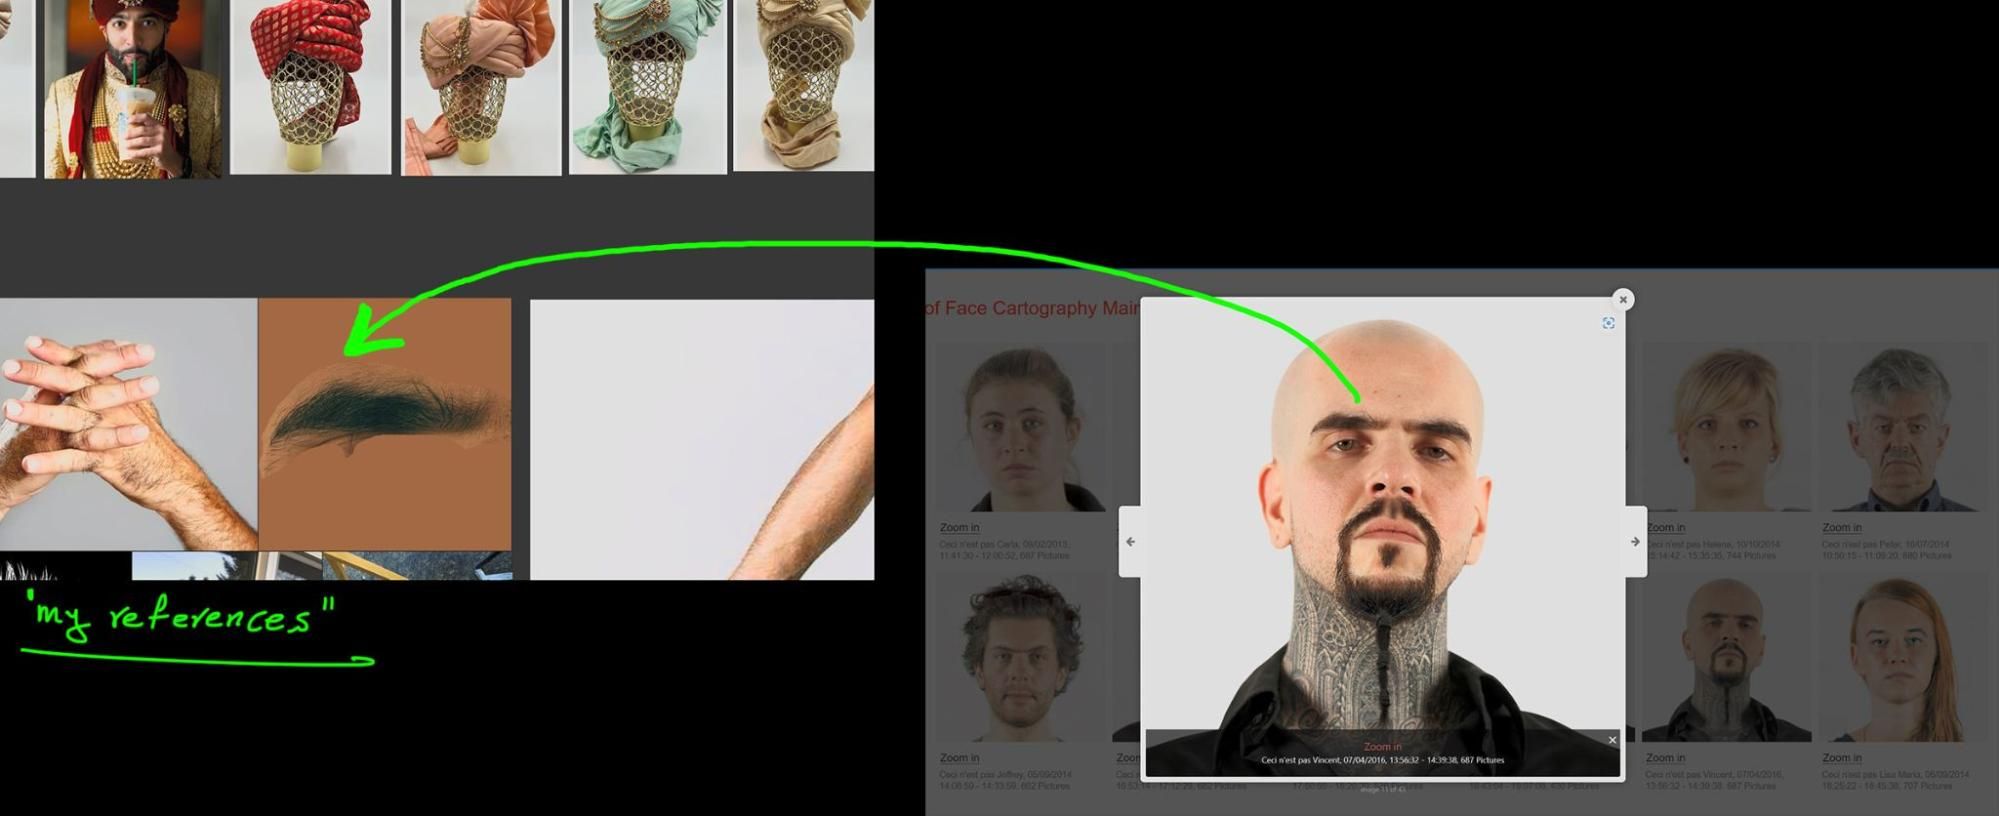
I began by looking at my references closely and sketching simple lines to understand the flow of the hair, an essential step in achieving fidelity to the concept. Using real references, I outlined the hair flows in Photoshop and then translated them into hair textures within Fibershop. I highly recommend this software for its ease of use, stability, and comprehensive features, comparable to XGen and favoured by many renowned companies.
Hair Placement
Fibershop can export straightforward hair card geometry based on the hair clump you generate. Alternatively, you can create your cards and apply the texture to visualize the result more effectively. As previously mentioned, I utilized GS CurveTools for this task, a highly capable plugin. The developer has provided ample tutorials for learning its functionalities; you can find them on his YouTube Channel.
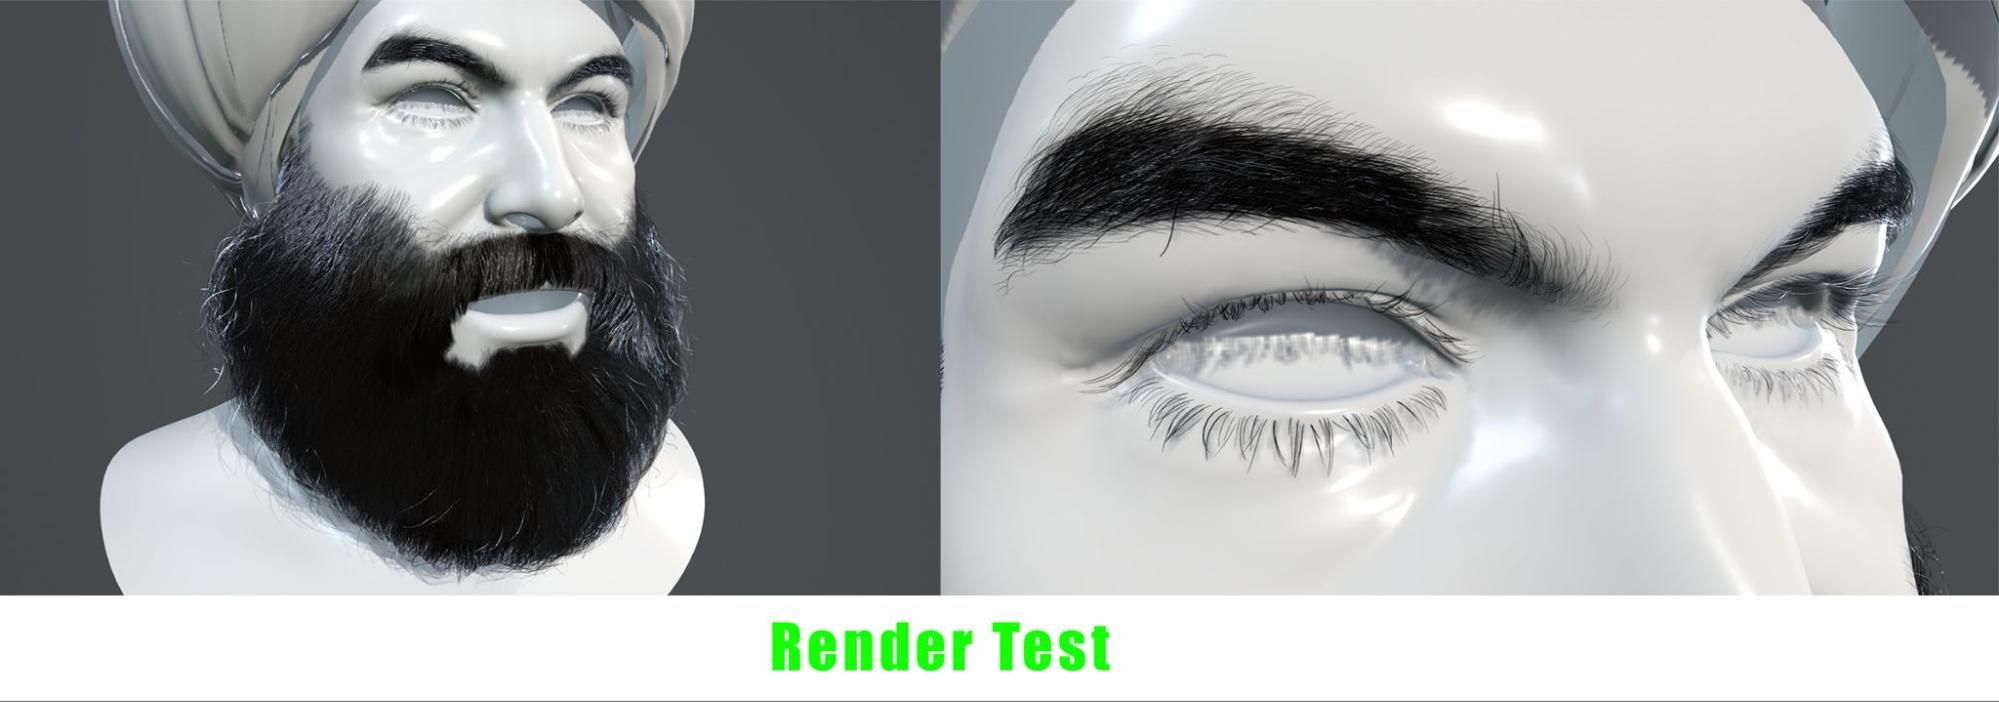
To create eyebrows and eyelashes, I closely examined high-quality images on this website. It greatly aided in visualizing the hair flow and placement accurately. Take a look at the reference below, which guided me in creating the eyebrows.
Body Hair
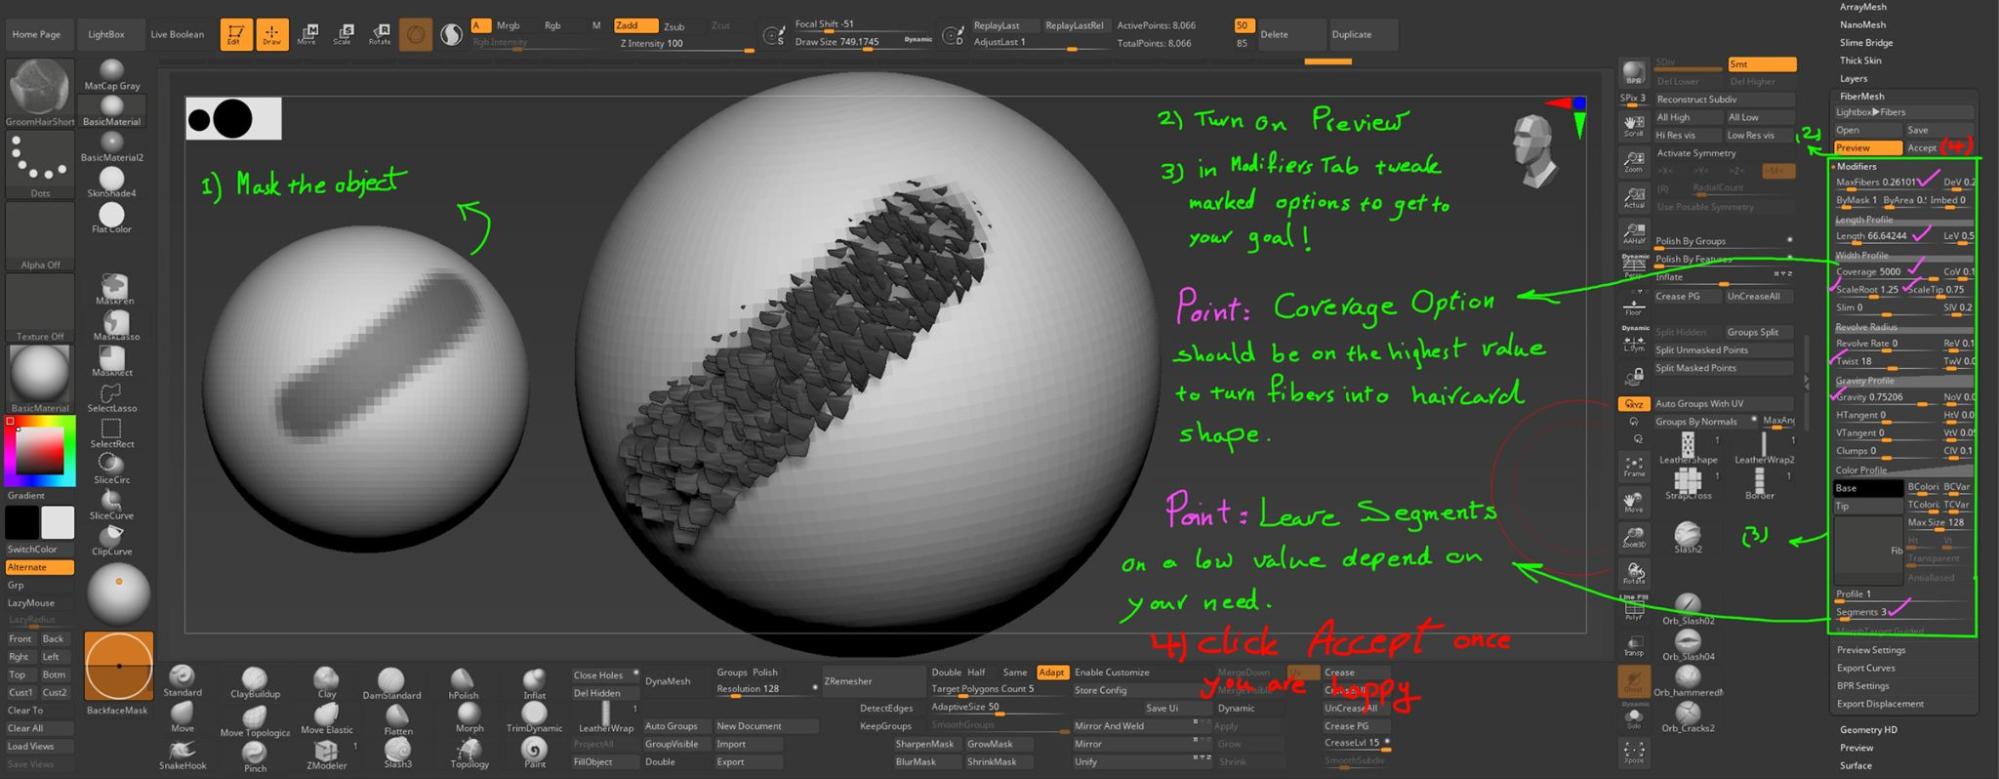
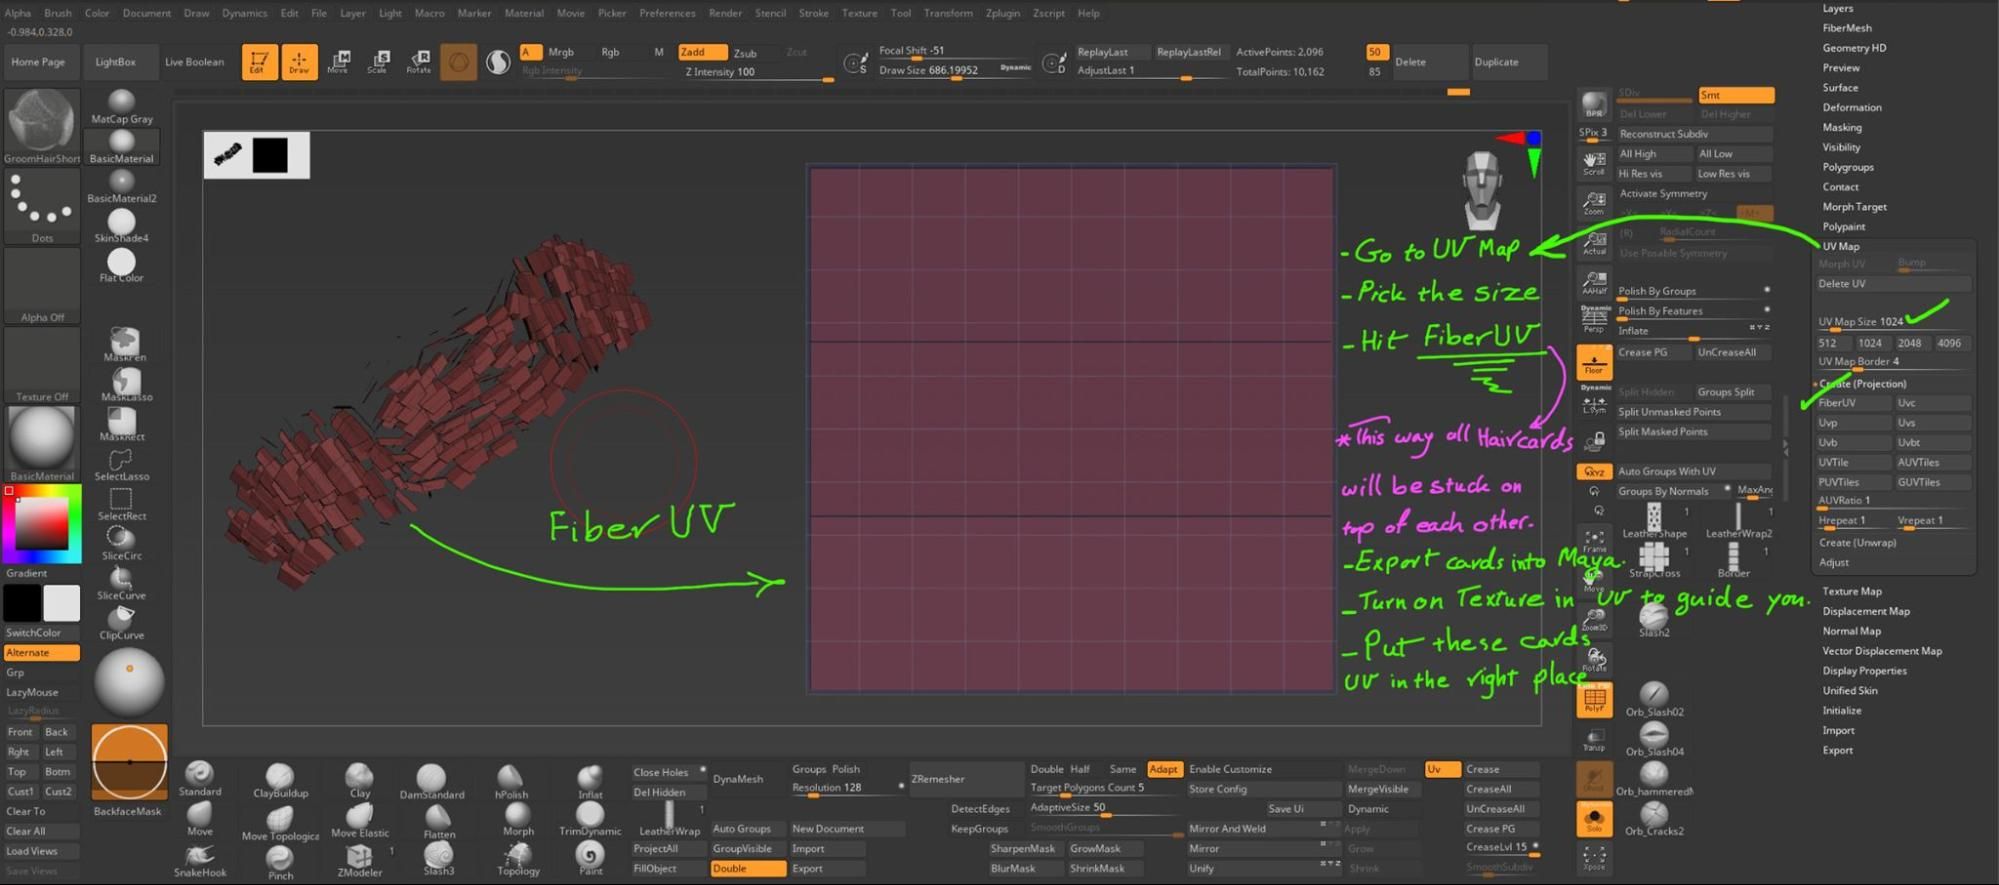
To create body hair cards I used Zbrush Fibermesh feature. I masked those parts that I wanted to have hair on the hand and chest. Then you can follow these steps.
Rendering
I used Marmoset Tollbag 4 for the presentation of this project. Here are the general changes I made to set the scene.
I added 6 Lights in my scene for lighting. Three main lights around the character and the other three ones are for specific parts. Look at the picture below.
I used 2 Rim Lights, one with a warm colour (orange) and one with a cool colour (purple) with very low amounts to lighten the shoulders.
I also set up two cameras for rendering: one for Wireframe Mode and another for High-Quality Mode turntables. Since watching just the turntable can be a bit dull, I created an additional camera to showcase all the model's components up close. I gave this camera a path and adjusted it multiple times until I was satisfied with the result.
You can view these three real-time renders via this link. Additionally, to learn how to animate a camera in Marmoset Toolbag, you can watch this video.
Final Words
Finally, I extend a special thanks to The Rookies for granting me this unique opportunity to connect and learn about the artwork of fellow artists worldwide.
I also express my gratitude to my supervisors at Think Tank for providing invaluable feedback during my time of study there.
If you have any further questions about any part of the pipeline, please feel free to reach out to me here via my Rookies profile here.