The Secret Room: A Beginner’s Guide to Storyboarding
Natasha Lowe, a second-year Games Art and Design student at Norwich University of the Arts, shares her first-time experience developing a storyboard for an engaging cutscene.
Natasha Lowe, a second-year Games Art and Design student at Norwich University of the Arts, shares her first-time experience developing a storyboard for an engaging cutscene.
Natasha Lowe is a second-year student pursuing Games Art and Design at Norwich University of the Arts. She was tasked with a project that involved developing a character, designing an environment, and ultimately creating a storyboard for an engaging cutscene. In this article, she shares her experiences of taking on the development of a storyboard for the first time.
For the first project in the second year of my Games Art and Design course at Norwich University of the Arts, we received various tasks to hone the specialism we each chose to work toward. In my case, I chose to specialise in Concept Art, in which three of the tasks were connected: the first was to design a shop front, the second was to design the merchant that would run it, and the third was to make a storyboard of a cutscene, where the merchant enters a secret room within the shop.
Through the first two tasks, I developed my concepts with an urban fantasy setting in mind. They involved a market stall made from a small shipping container, which is run by a fairy scam artist who sells cheap, fake and broken items to unsuspecting humans. This would be the subject of my storyboard, which I used to explore ways to show a deeper, more sentimental side of my morally dubious character.
I came up with ideas for the cutscene, the secret room, and the story centred around it in a few different ways, depending on what felt the most convenient. Since my course involves video games, I thought about the room both in terms of how the merchant would enter and view it, and how a hypothetical player might access it.
I made a mind map to decide what the room would contain, what it would say about the merchant, and how it would be entered. This was especially important when it came to the latter, because my shop is a small market stall, so I had to think of ways to make a separate room work. The fantasy theme helped a lot, since the ability to include magic gave me a wider range of ideas to work with. I ultimately chose to have the door to the room be summoned by a magic spell, allowing it to be accessed from the shop, despite not being a part of it.

As for the room’s contents and purpose, I took inspiration from a backstory I came up with while designing the merchant:
For reasons she refuses to share, she was exiled from the fairy community she hails from, and was left to live amongst humans for the rest of her life. Although she acts like a kind, fragile old lady around customers, and otherwise puts up a stoic front, she secretly misses her old home.
This led to the idea of the room being a home away from home, containing items she was able to salvage upon being cast out, and serving as a space for her to relive her memories. While I did come up with other ideas afterwards, this one stuck out to me because of the potential to explore a variety of emotions, as well as to give more depth to the merchant.
After this, I started thinking about the actions, atmosphere, lighting and framing that my cutscene would have. I gathered references that reflected my vision, and put them together in PureRef.

Since the room is private, and the cutscene depicts the build-up to the merchant entering it, part of my goal was to create a mysterious atmosphere. I wanted to keep the audience wondering what she is doing, up until the room, and her relation to it, is inferred at the end.
While I used stock photos if they conveyed my ideas well enough, it was recommended that we also use images from existing media. I used screenshots of scenes from a few games, TV shows or films that had a similar atmosphere and lighting to what I was aiming for. Knowing the context for the scenes I used allowed me to think more about the mood I wanted my cutscene to have, and how I could show it to the audience.
The next steps were to write a summary of the room itself, and a descriptive introduction for the cutscene.
Having some basic writing skills is incredibly handy for making a storyboard. It allows you to plan your scene in more detail, and better understand how you want it to communicate with the audience. In my case, I thought about what the room means to the merchant, and the nostalgic, bittersweet feelings it evokes for her.
The room summary needed to be short enough to fit onto one slide, and include references for how it would look. I gathered images from Unsplash to show that the room would contain trinkets, books and plants that are associated with the fairy community the merchant is from. I also included a painting that was part of my research into depictions of fairies while designing the shop and merchant (The Quarrel of Oberon and Titania, by Sir Joseph Noel Paton). I put these together on a PowerPoint slide.

The descriptive introduction is a written version of the cutscene, similar to a scene from a book. This helped to flesh out my ideas from my reference board, and think more about not only the actions the scene depicts, but why the merchant is taking them.

I also considered ways I could use her body language to show her feelings and thought process without dialogue. For example, her expression changes and she takes a deep breath, as she lets go of the sweet facade she puts on for customers, showing the viewer her real, more bitter personality. Additionally, I had her keep making sure nobody is around who could find the room, emphasising how personal it is to her, and adding to the viewer’s curiosity about why she’s so cautious regarding it.
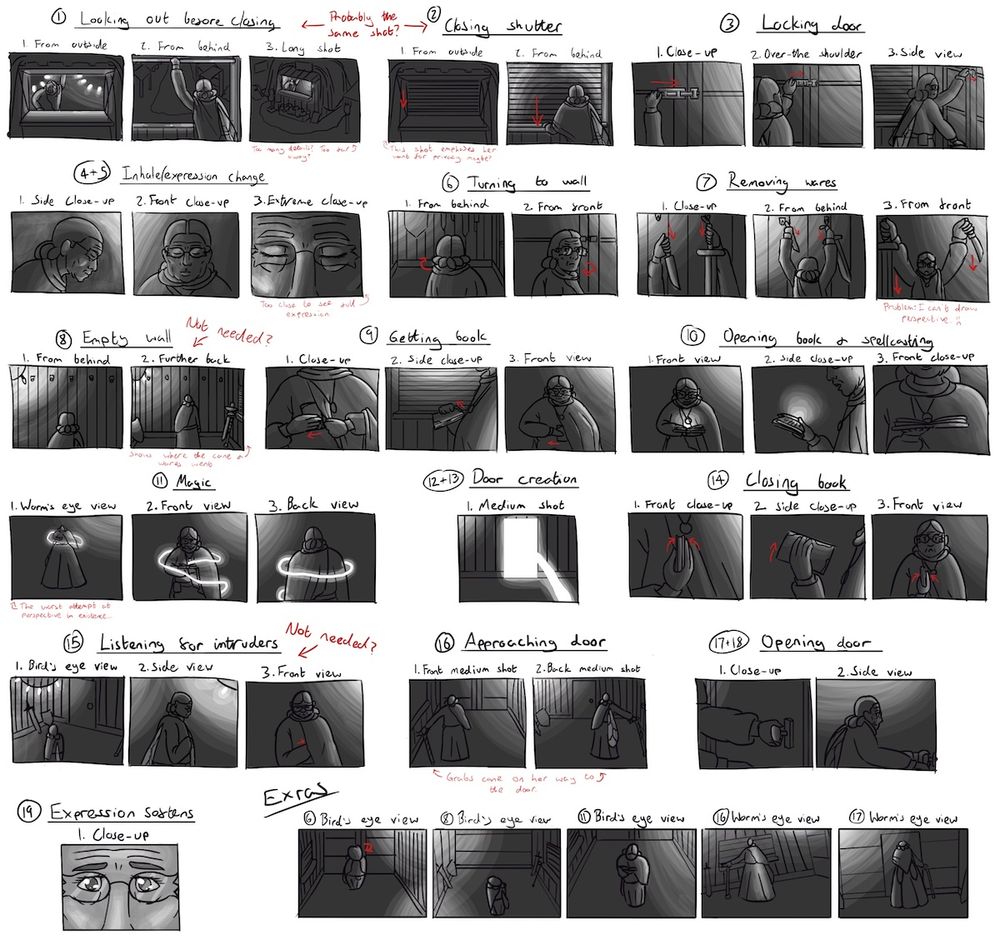
Now that I had a solid idea of the scene I would be drawing, I made some thumbnails for each possible frame I could make. I tried different camera angles for each frame, to see which ones conveyed the mood I wanted more effectively. Experimental thumbnails such as this would typically be drawn quite quickly and roughly. But in our case, we were also asked to experiment with lighting, so I put a little more time into getting used to the dark environment with minimal lighting that I would be using.

Another purpose for this step is to decide which of the actions from the descriptive introduction are relevant enough to keep for the final storyboard. Each frame should push the scene’s narrative, so those that don’t can be scrapped, or merged into other frames. I made a list of the frames to help me think about which ones to do this with – the red bullets being some of those that I decided not to use – and made a new list out of it, setting out the new structure and frame order.

Not only was it useful to think about how to communicate the scene more concisely, but it also reduced the number of frames I would have to put time into drawing, allowing me to focus more on the important parts of the scene. I thought about this even as I moved on to the final storyboard, where I combined the third and fourth frames from the new list into one.
It was at this point where it was also suggested that I try adding a flashback to the merchant’s past, to better convey the room’s purpose, and what it means to her. As such, I did some research into how some films and games have approached this.
Research can be useful at any point throughout the project, not only at the start. Being open to finding more inspiration can help you to come up with fresh ideas, and experiment with ways to improve your work, that you might not have considered earlier.
Additionally, while doing research, you shouldn’t be afraid to look in places that might seem so different from your project, that you wouldn’t expect them to be helpful. You would be surprised at where you can find inspiration. For example, the biggest influence for how I approached my merchant’s flashback was a similar scene from John Wick!
Finally, it was time to make the storyboard. I made some rectangles for the frames and numbered them, to make it easier to keep track of which actions go in each one. Additionally, I wrote a summary under each frame of the actions they depict, to give them some extra context. I also drew some arrows in some of the frames to show movement.

I continued to think carefully about how to convey the emotions my scene entails. Following the angles I used in my thumbnails, I started the scene by using a lot of long shots and angles that look down on the merchant, to reflect her loneliness, and her feeling downtrodden, in the shop. Then, once the door appears, I switched to close-ups, and a frame with the camera looking up at her, to emphasise the shift in her emotions. Notably, the extreme close-up on her eyes at the end shows the intensity of her feelings toward the room.
I also used cool, somewhat dark lighting in the shop to reflect the merchant’s cold and bitter emotions, and then had a bright, warm light come from inside the room, to reflect the feelings of warmth and nostalgia that it brings her when she opens the door. The room's light shining on the merchant serves as another representation of her feelings changing as she enters it.
The flashback adds to this, showing a younger, happier merchant around other fairies, compared to the now older merchant being on her own. The softer shading I used not only shows that it's a vision from her memories, but also gives it a more nostalgic look. The ways I emphasised her loneliness throughout the scene gave this frame, as well as the merchant’s reaction following it, more of the emotional impact I was aiming for.

For my storyboard, the use of shading and colour was important in achieving my goals – but this far from the only valid approach. The aim with storyboarding is to give a quick idea of what’s happening in the scene, so there’s no need to linger on certain details if they don’t serve a purpose. As long as they’re not too vague to understand, using basic sketches without colour can work just as well!
This was my first time undertaking such an in-depth process to make a storyboard. The best advice I can give is to keep in mind what you’re trying to achieve for your scene, and don’t be afraid to experiment.
If you’re new to storyboarding like I was, you might find that there’s more that goes into making a scene than you expected - from camera angles, to lighting, to examining how and why the characters act the way they do. As such, you may find yourself outside of your comfort zone at times, as you try to figure out how to approach this. But the best way to surpass that struggle is to jump in and try new things. As you do, you’ll start to gain a better understanding of how to make scenes that will truly speak to your audience.
Thank you for taking the time to read this article, and thank you to the Rookies for giving me the chance to write it!
Check out more of Natasha's student work on her Rookies profile here.