
Creating a Warhammer-Inspired Environment Concept in Four Weeks
Christofer Axelsson shares the outcome of a four-week environment art assignment completed while enrolled in the Game Art program at Futuregames, Sweden.
Christofer Axelsson shares the outcome of a four-week environment art assignment completed while enrolled in the Game Art program at Futuregames, Sweden.

Christofer Axelsson is a Hard Surface 3D artist with a passion for Sci-Fi and Warhammer 40K. Having briefly worked in the games industry as a Hard Surface Art Integrator at Avalanche Studios in Stockholm, he is currently enrolled in the Game Art program at Futuregames in Skellefteå, Sweden. Today, he discusses the outcome of a four-week environment art assignment completed in December.
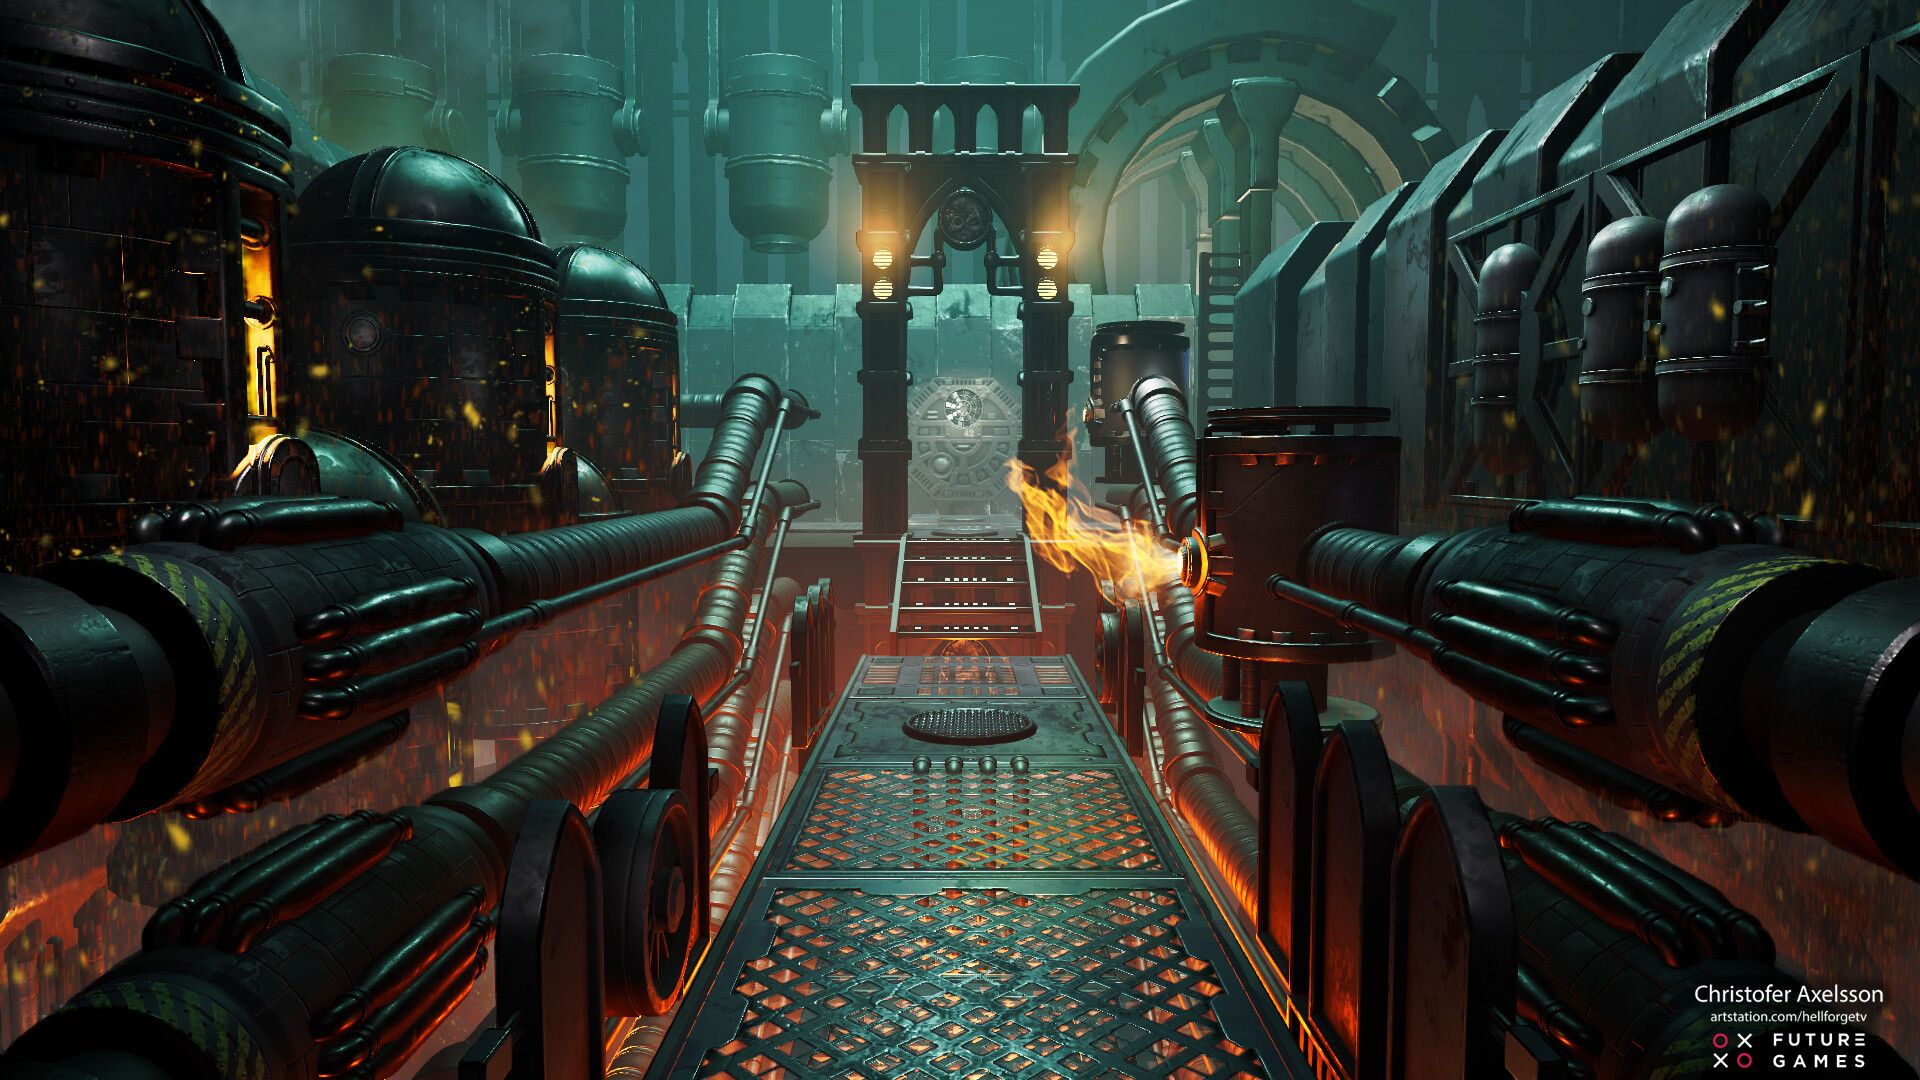
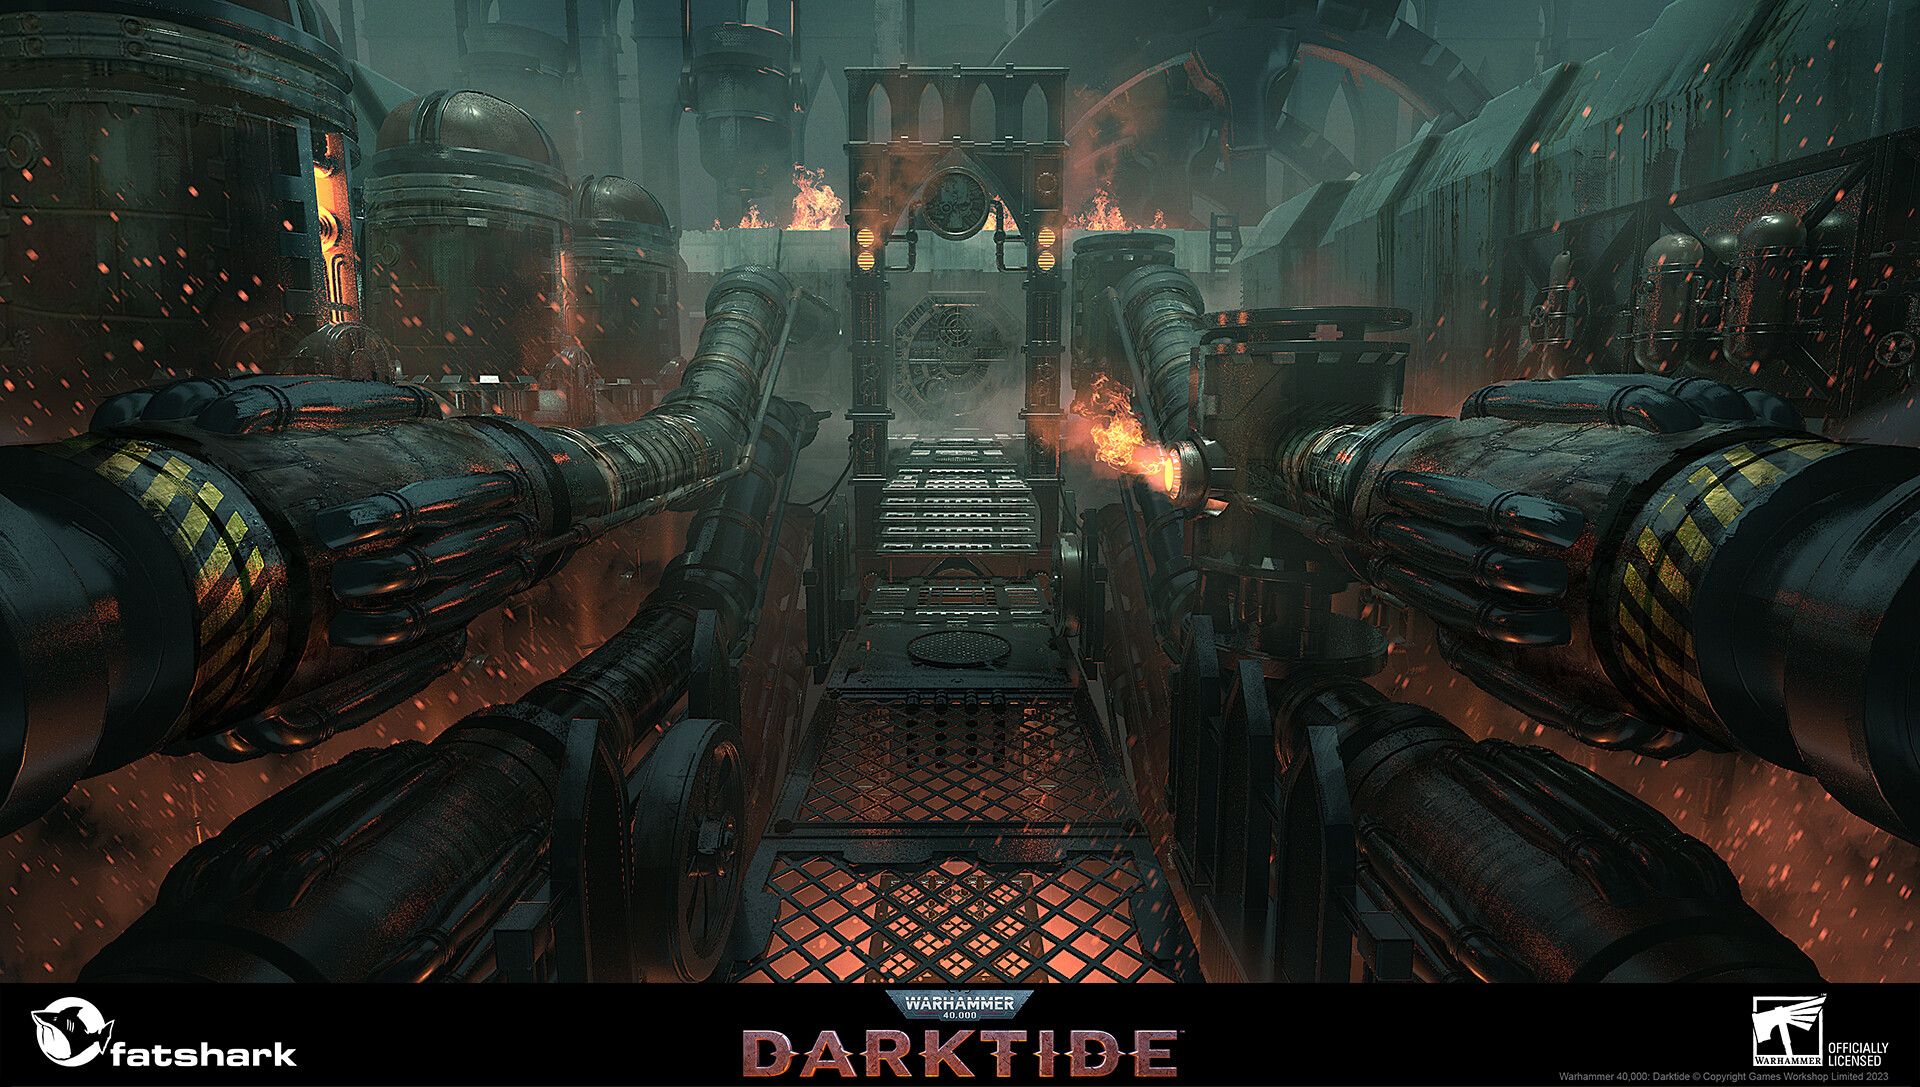
The assignment brief was to recreate an existing concept from a game, and I had ArtStation open and was looking at Darktide concepts before the teacher had even finished the sentence. I eventually settled on one of the concepts by Joakim Ericsson:
The primary challenges I identified based on the concept was the perspective and lighting. While I did the best I could within the time frame, If I had more time to work on it, I would have experimented a lot more with various camera settings instead of settling on the first one that was “close enough”. I would have also further leveraged the extensive lecture material Futuregames has access to, as well as reaching out to a few guest lecturers we’ve had to ask for feedback. It was, however, by far, the easiest concept to recreate based on assets, as I only had to create 2 unique models.
My process for this project was relatively straightforward. I started by collecting references for each asset in the scene, both from Darktide and the various terrain pieces that Games Workshop sells, and putting them on my Miro board.
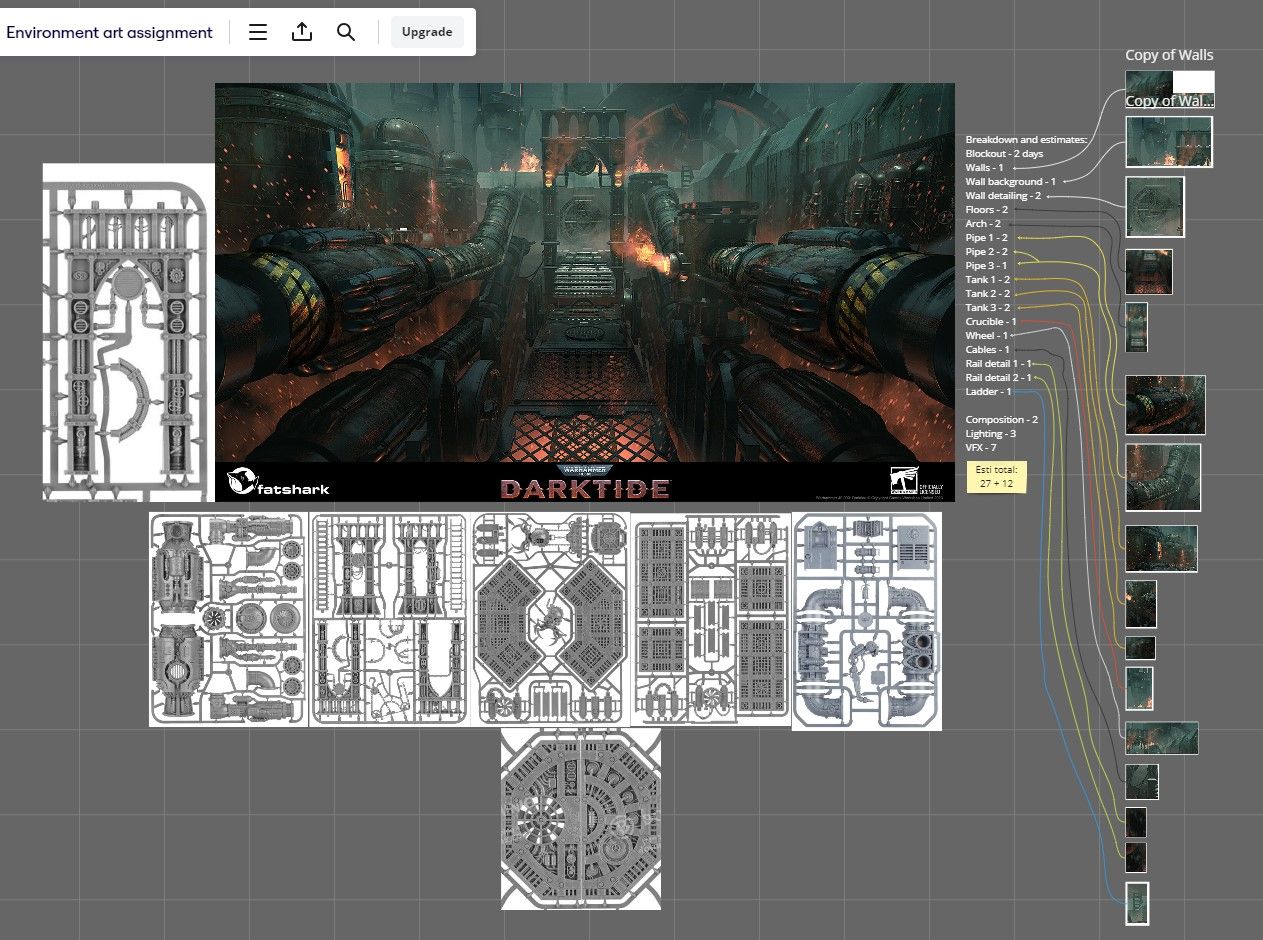
After I had the references, I started with a rough time estimate that came in at around 1-2 full work days to complete a single asset from blockout to pre-polish engine integration. I estimated an additional day for the assets closest to the camera for polish. Lighting and composition took around a week and a half to finish, and I was working on both at the same time to manage the deadline we were given.
I also organised the asset list in unique and reusable columns, with priority for how visible they would be in the render, which gave me a good overview of which models and textures I needed to spend extra time on.
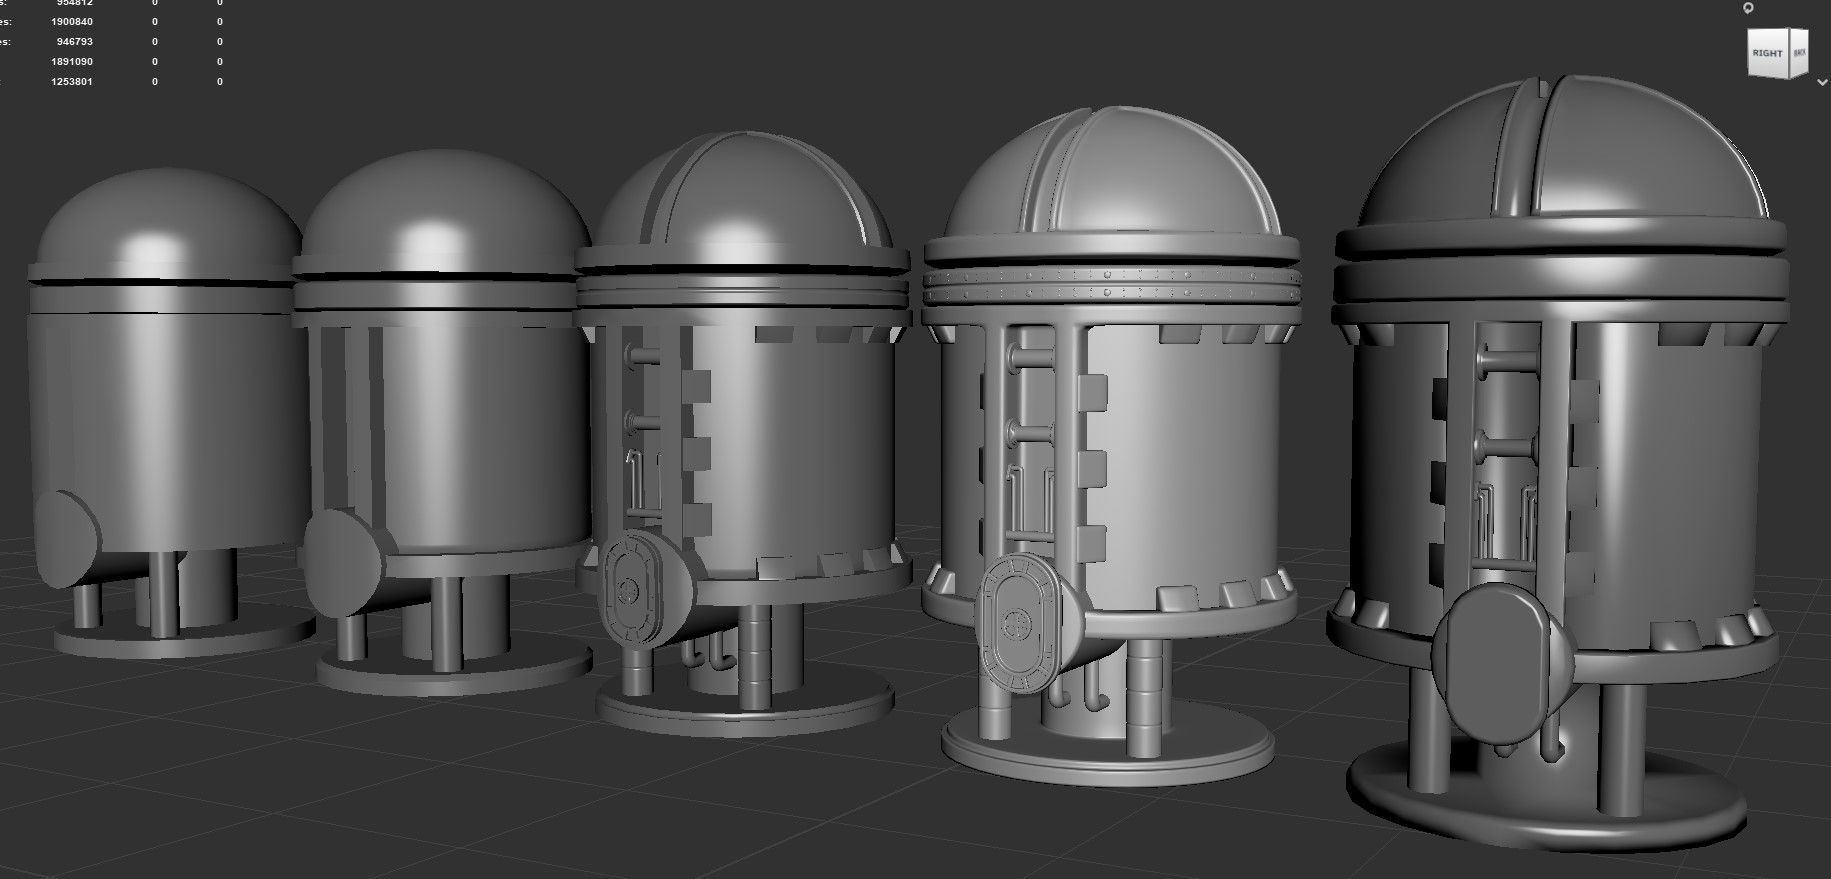
For the assets, the first step was creating a very rough blockout in Maya that I exported to Unity to give me an idea of layout and perspective. I also added a very basic lighting setup.
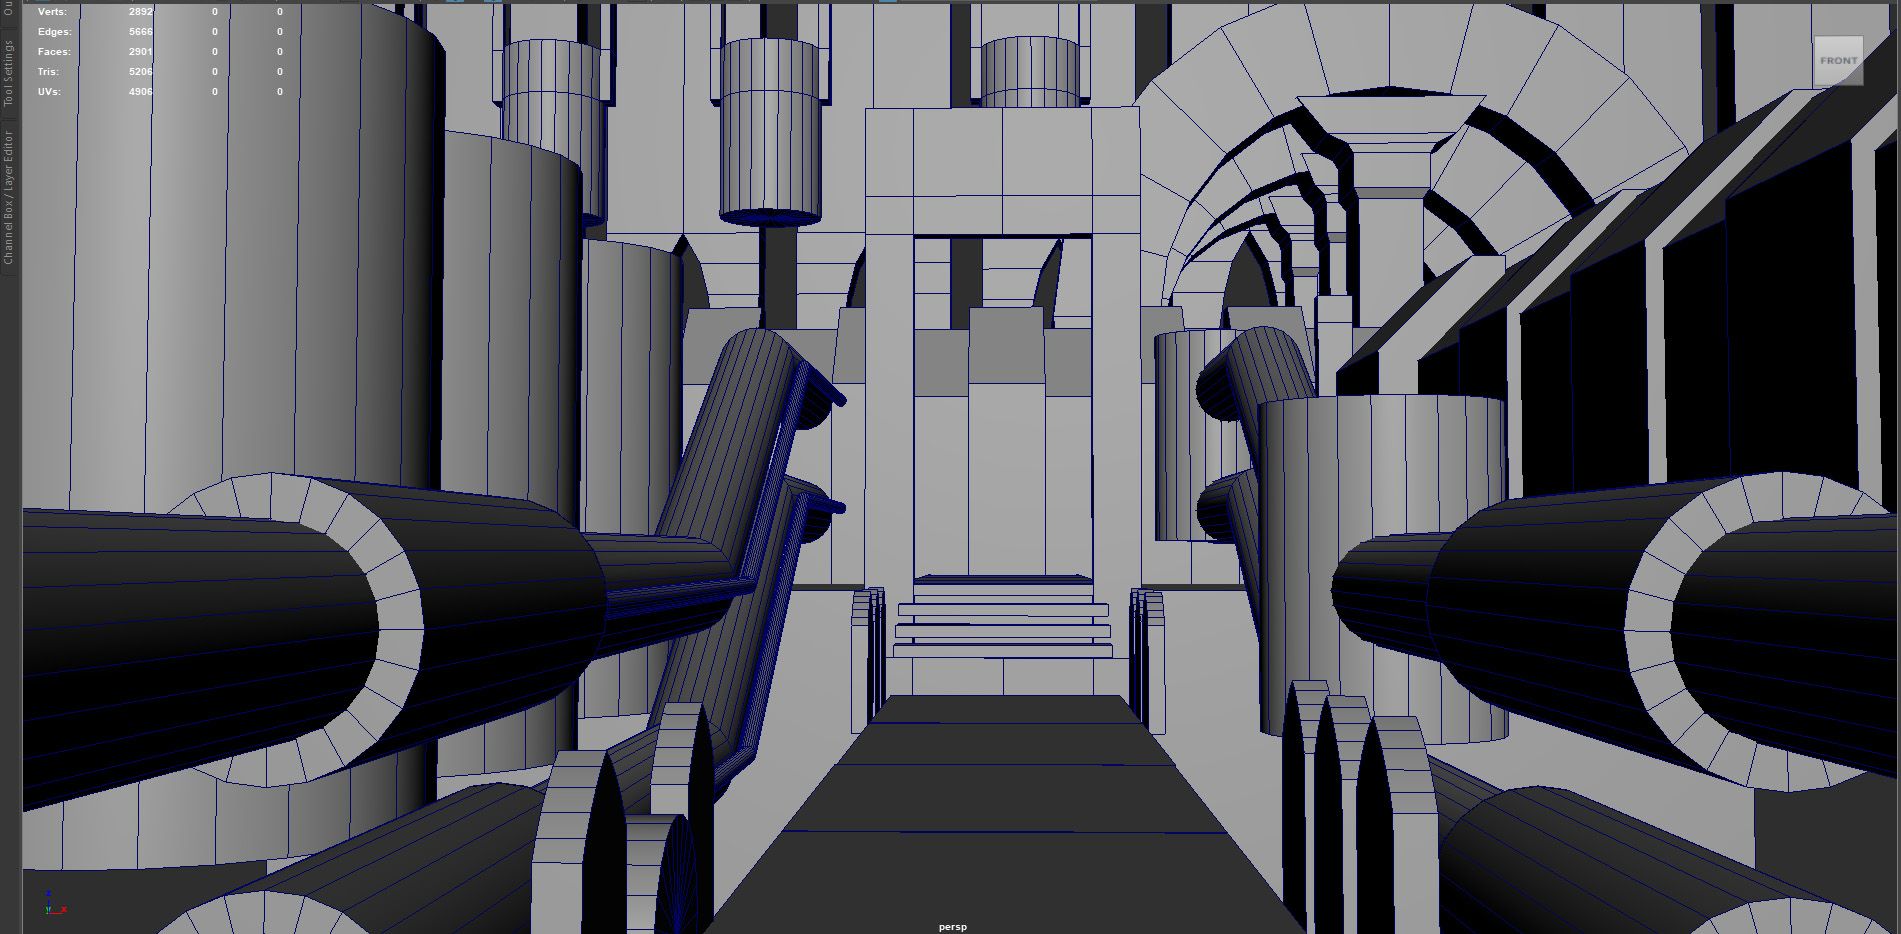
Next step was creating the high, mid, and low poly models. I went with a mix of mid and baked low poly models, as there weren’t any strict limits for geometry amount or texture resolution. The requirements simply were “within reason”. For the assets closest and most visible in the render, I added additional details in the geometry, while the less important assets had most of the details in the texture instead. The reason for this was that it’s more time efficient to add certain details in the texture rather than on the model itself if it doesn’t affect the silhouette.
As there were no restrictions on software, I modeled everything in Maya, baked the maps in Marmoset Toolbag, and created all the textures in Substance 3D Painter and Designer.
The main reason I used Toolbag for baking is the excellent problem solving tools built into the software. In Toolbag, I can explode a mesh, manually adjust the ray distance in certain areas without creating a cage mesh, and I can correct a skewed bake without having to create an additional mid-poly model or use Photoshop. This saved a ton of time during the process, as I had a couple of assets that were problematic to bake in Substance 3D Painter without additional work due to their shape and included details.
Toolbag also bakes maps incredibly fast which helped keep me in the productive flow state longer, rather than hit “bake” in Painter and go grab coffee and a cinnamon roll across the street, and it might have finished by the time I get back. (Not as much of an exaggeration as it sounds when working on a laptop).
A core aspect of my process is the iterative workflow, and I import the assets into the engine at the end of each cycle to make sure it looks correct.
After I finished the initial blockout and made sure it worked in the engine, I moved onto the first pass where I refined the large shapes of the model and got a good idea what the final silhouette would look like. After a quick engine import to make sure there weren’t any issues, I advanced the asset to the next pass where I worked on the medium shapes. This is usually the stage where the final silhouette is finalised, and I start actively seeking feedback. Based on the feedback, I made additional iterations of the large and medium shapes. Once finished and imported in the engine, I start working on the small shapes and details. This stage usually takes the longest to finish.
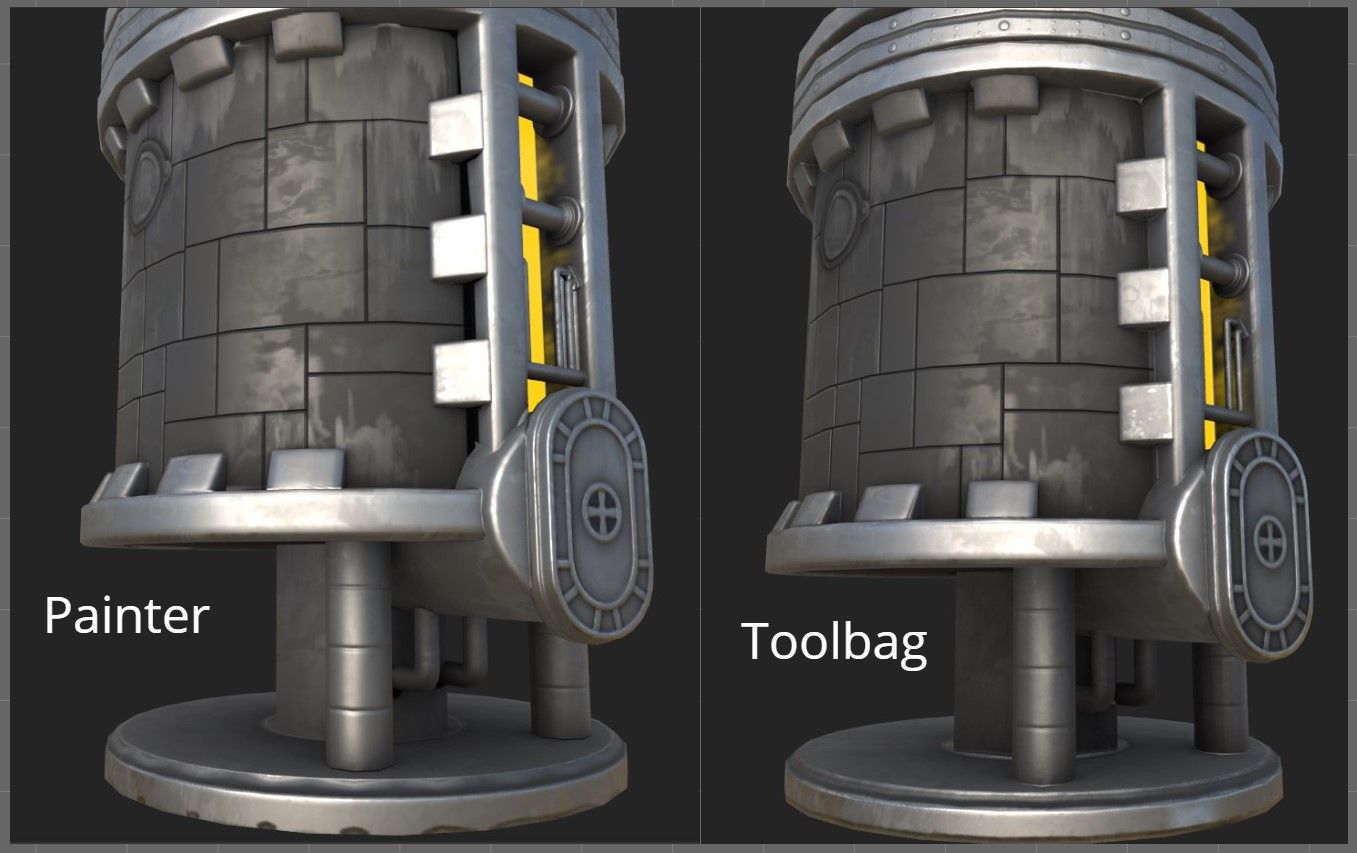
My texturing process is almost identical to the modeling process. I start with a blockout texture that has the base color and roughness value and import that into the engine. After that, I cycle through the large, medium, and small variations and details. This is where frequently importing the progress into the engine is critical to make sure the changes you’re making look correct. I’ve learned the hard way that what you see in Substance 3D Painter isn’t always accurate compared to the lighting and post-processing setup in the engine, so it just saves a ton of time and frustration in the long run.
For the background assets, instead of going with baked unique textures, I created a few generic tiling textures and used a mask to layer in material breakups to stop the tiling from being too noticeable.
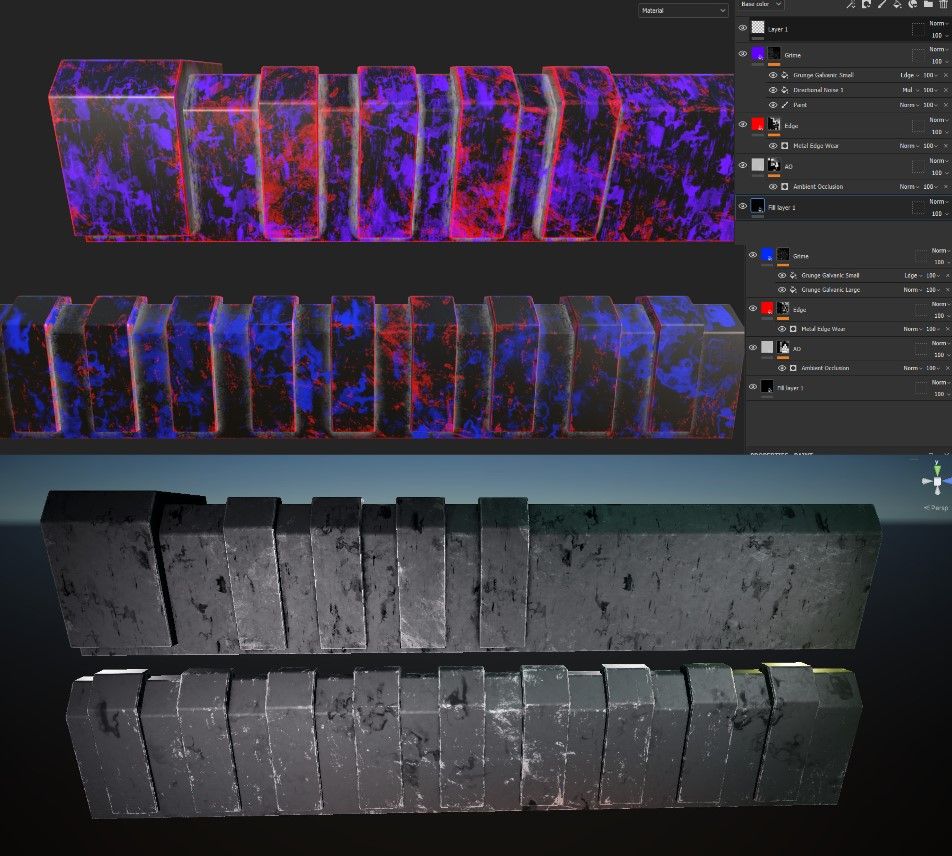
I hadn’t used the masked tiling workflow on a personal project before as I’ve mainly done smaller props with unique textures, but now that I have seen first hand how incredibly useful this way of working is. I’m going to dedicate time to explore it further. I want to create more large-scale environments with tiling textures in the future, which will require me to find good ways to blend materials to break up the obvious repeating textures, and this workflow is a good first step.
At this point, the scene was largely finished but it was still lacking a few details to really tie it together.
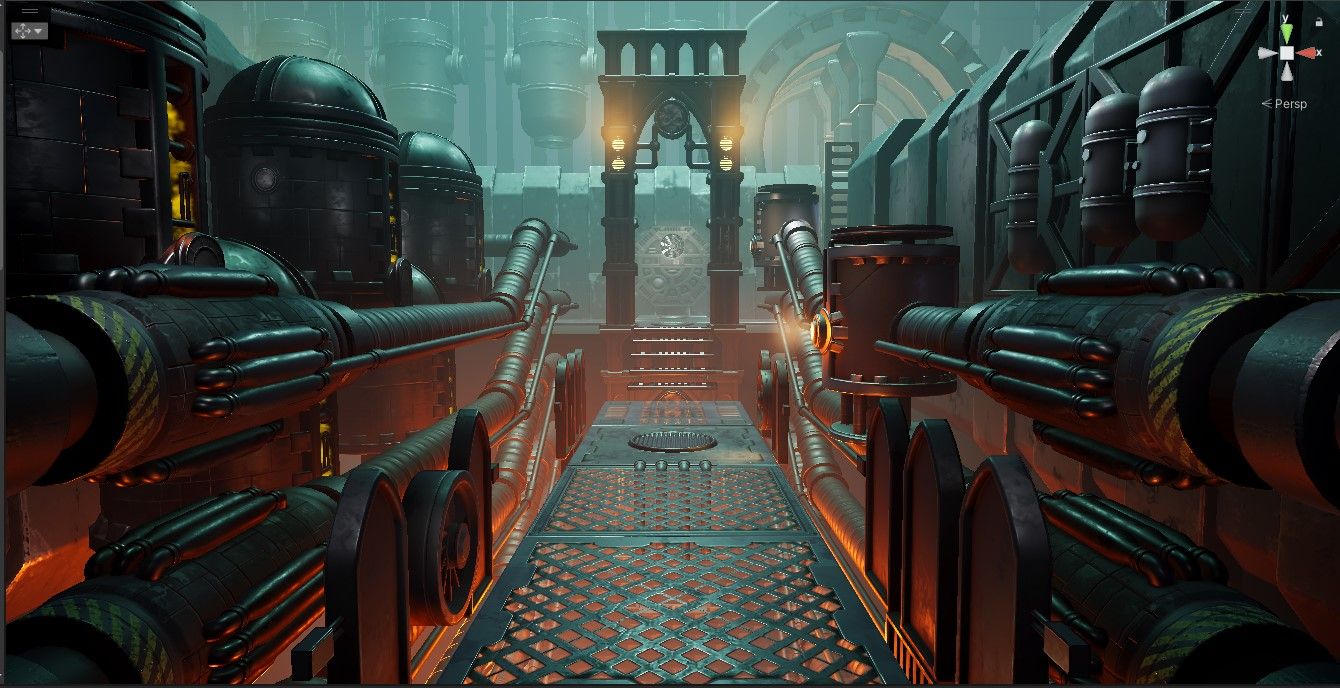
I went back to Maya and created a frame for the floor tiles and for the staircase, and assigned the floor material to them to maintain the coherent look. I also created an anchor point for the tank frame on the right side. To further fill out the scene, I reused parts from the tank and pipe models and placed them along the walls and tanks with different scales.
After I finalised everything in Unity, I rendered a high quality screenshot that I imported into Photoshop for post-processing and final touches. I initially tried to create the fire, embers and steam with particle effects in Unity, but eventually settled on using Photoshop instead due to time constraints.
I would like to say a huge thank you to my best friend and partner, Holly Welch, for helping me with the Photoshop aspects of this project, as I hadn’t used it until I started at Futuregames while she’s been using it professionally for longer than I’ve done 3D modeling. Those final touches massively improved the final result in a way I simply couldn’t achieve using Unity alone.
I had a ton of fun working on this project and I learned a lot, especially about lighting and composition. It was also great to work on a Warhammer 40K project again, as it was my love for that universe that initially made me want to learn 3D modeling.
I want to wrap this up by sharing a piece of advice for other artists, especially newer ones, that’s been critical for my artistic growth once I embraced it: Always ask for feedback!
I understand that it’s uncomfortable to have someone criticize your work, but there’s no faster way to improve as an artist than getting good feedback, and it’s also a core part of your work week at a studio. The moment it clicked for me and I went from being afraid of it, to embracing it whole-heartedly was seeing the night and day difference between an asset I made on my own, compared to the same one I reworked with my old mentor. It truly blew my mind how incredibly different they looked and the quality I was able to achieve with help. This environment project was no different as I constantly asked both teachers and friends for feedback, and it turned out great as a result.
Thank you for reading, and thank you to The Rookies for this opportunity!
Christofer Axelsson
Hard Surface 3D Artist and FutureGames Art student.
Reach out to Christofer via his Rookies profile here.