
A Guide to Creating Your Own Concept Art IP
Janessa Kuek, a recent concept art graduate from Cestar Collège - Syn Studio, offers insights and inspiration for developing personal IPs.
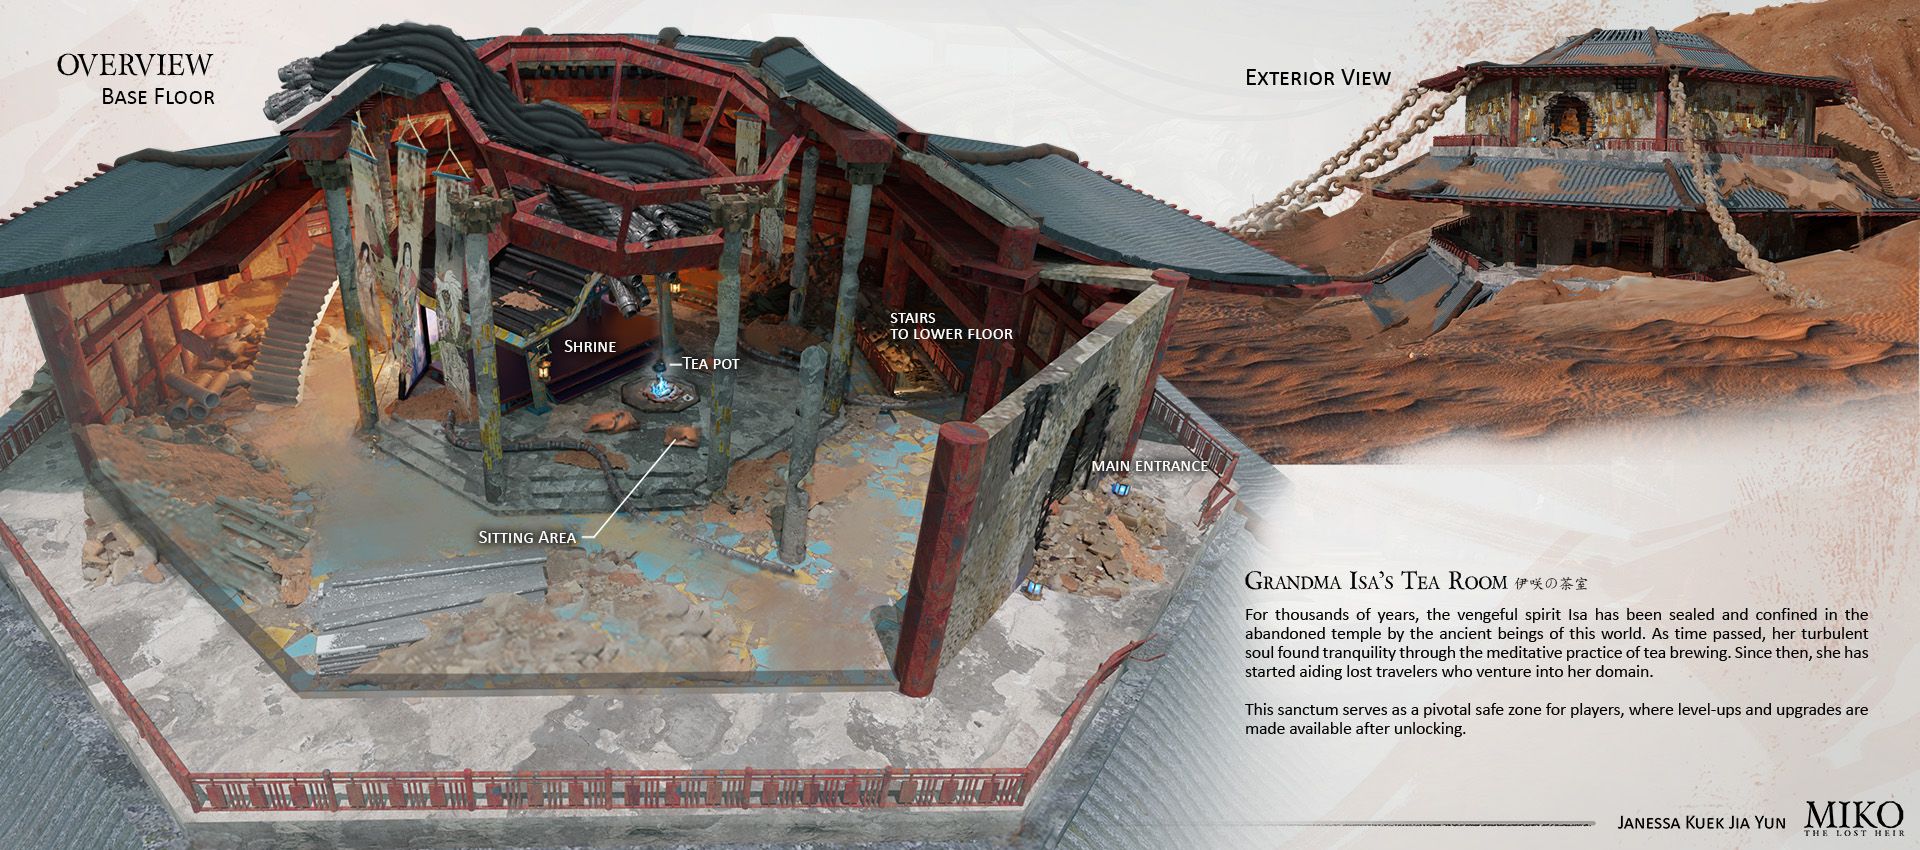
MIKO || Grandma Isa's Tearoom
Janessa Kuek, a recent concept art graduate from Cestar Collège - Syn Studio, offers insights and inspiration for developing personal IPs.

Janessa Kuek, a recent concept art graduate from Cestar Collège - Syn Studio, is based in Montreal. She specialises in crafting immersive storytelling within her environments, showcased on her Rookies portfolio, offering inspiration and tips for developing a personal IP.
Hi, my name is Janessa, and I am an environment concept artist from Malaysia. I was fortunate enough to be accepted into Syn Studio, and here I am, graduated with a finished IP project in my portfolio! I used to be terrified of starting a project in concept art as I was afraid my fundamentals weren’t strong enough, so I would do studies after studies to no avail. However, later on, I realised using my creative brain cells to develop a project can be really enjoyable! Starting can be extremely difficult, but once you get through that, you’re on to one hell of a journey (quite literally)! So today, I’ll be sharing my experience and process in developing my personal IP, MIKO: The Lost Heir.
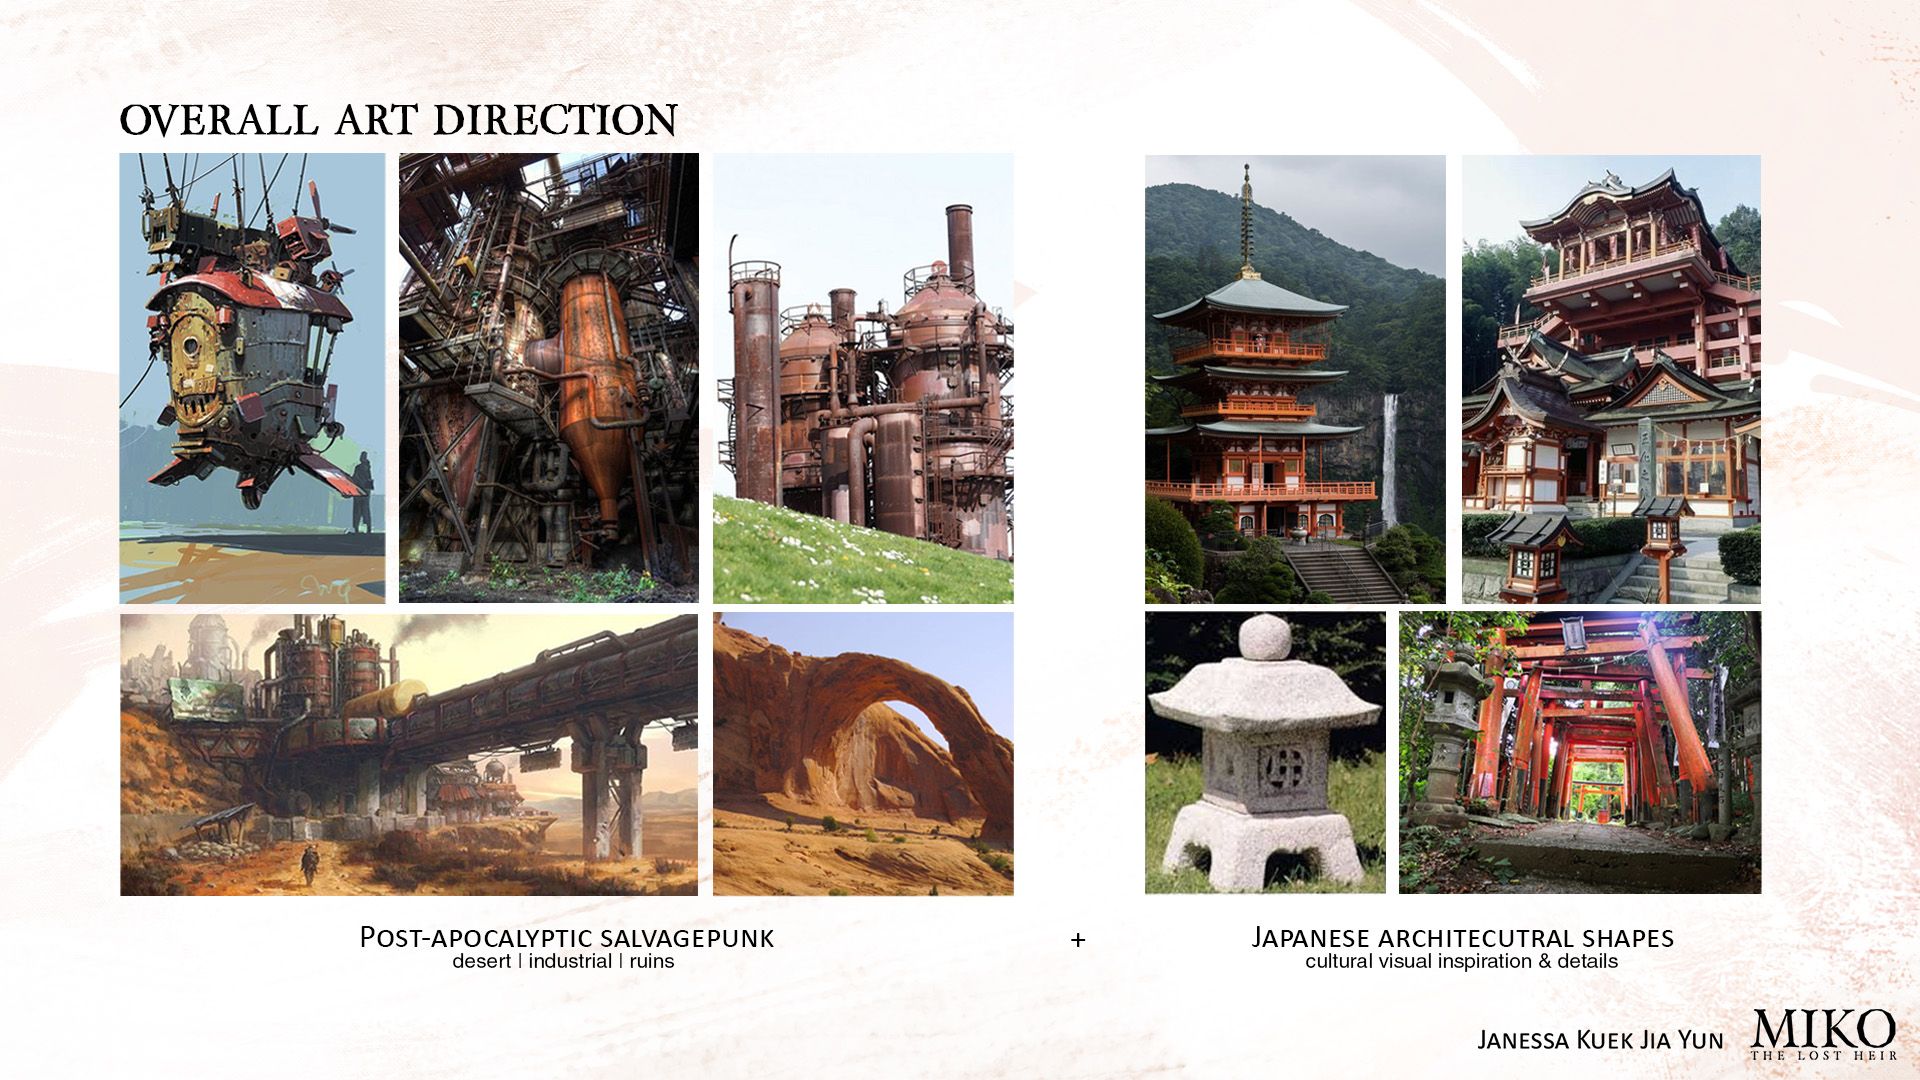
MIKO: The Lost Heir was an individual project completed during her time at Syn Studio. The idea stemmed from a desire to explore and combine familiar cultural motifs with a fresh and imaginative twist, offering a unique narrative and visual experience for the audience; hence, a fusion of post-apocalyptic and salvagepunk elements within a Japanese cultural context was born.


In my world-building process for this project, I started with thorough research and a clear goal in mind. I established an art bible that defines the art direction and key design elements, focusing on the setting, culture, historical events, and level of technology that will bring the world to life.
For MIKO, I decided to blend post-apocalyptic salvagepunk aesthetics with traditional Japanese shapes and repurposed present-day technology. I was fascinated by the idea of fusing old and new, thus setting the foundation for my design pillars.
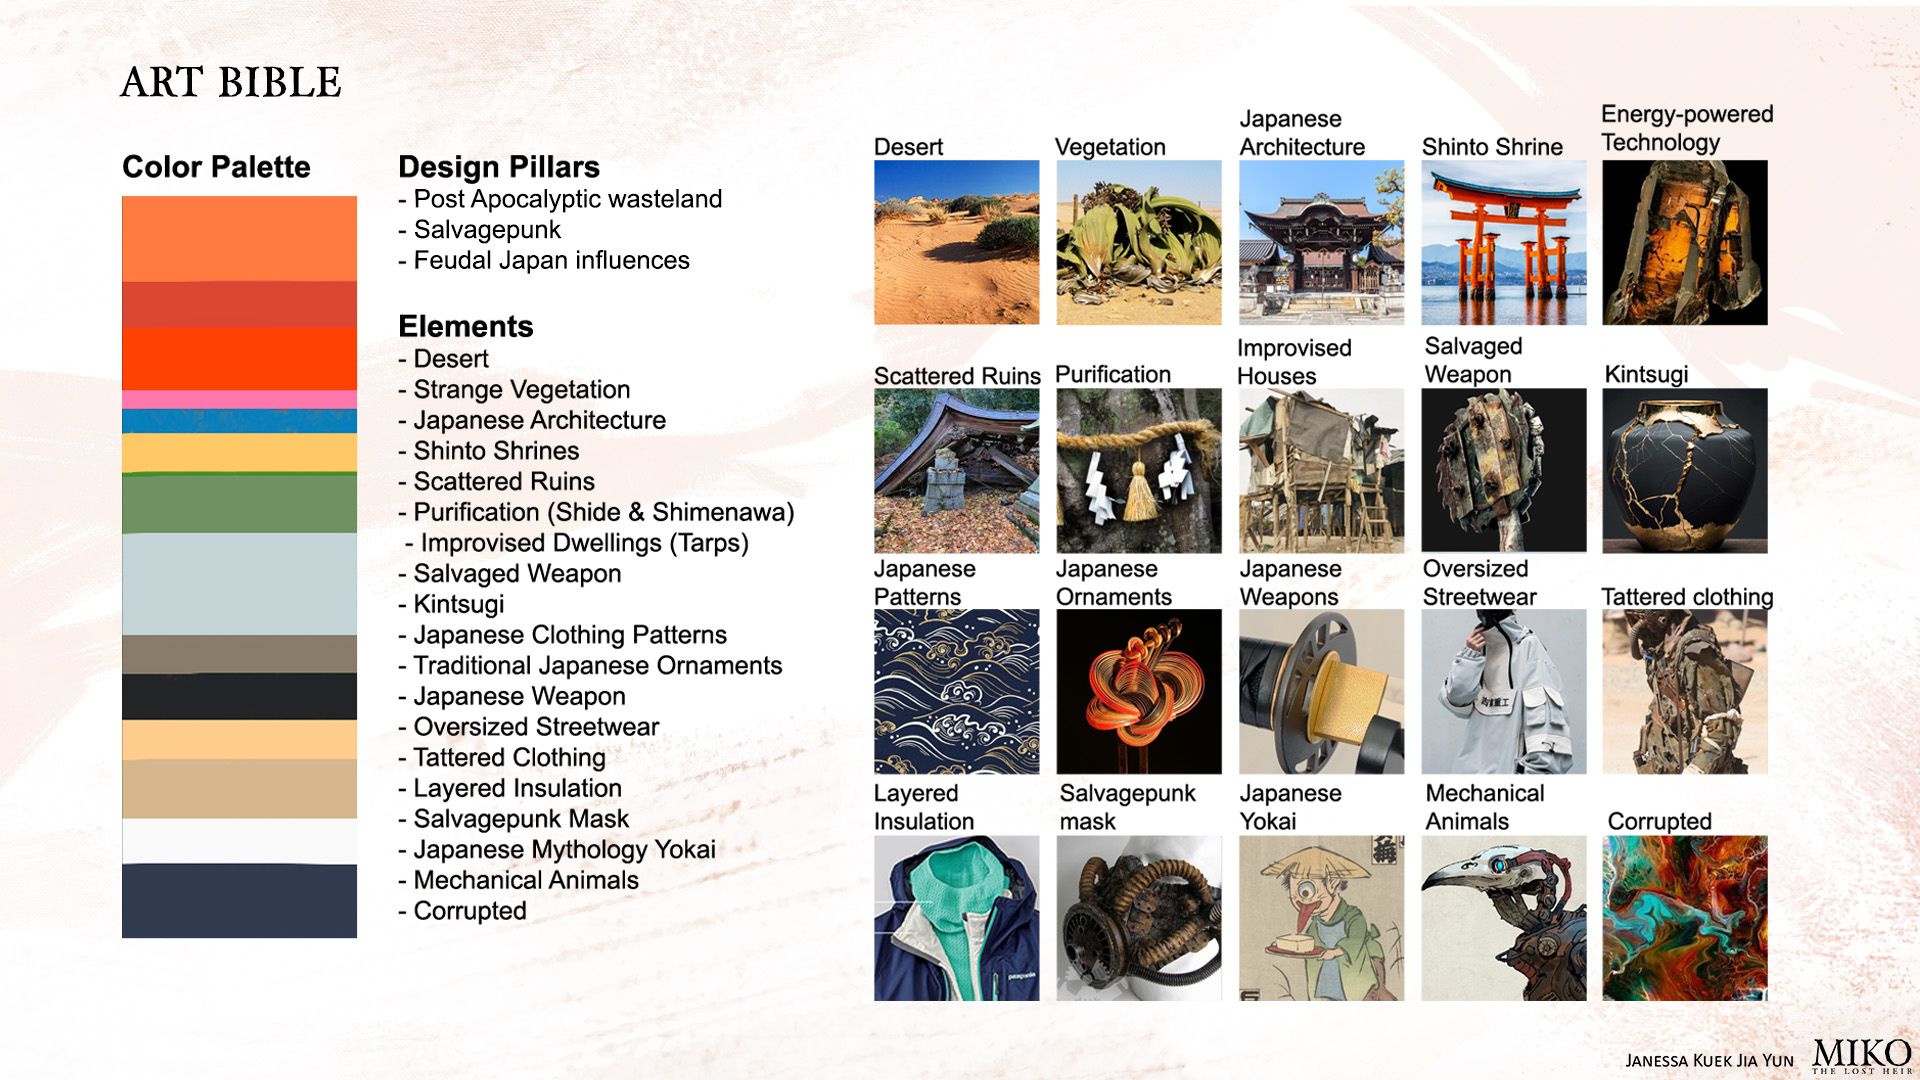
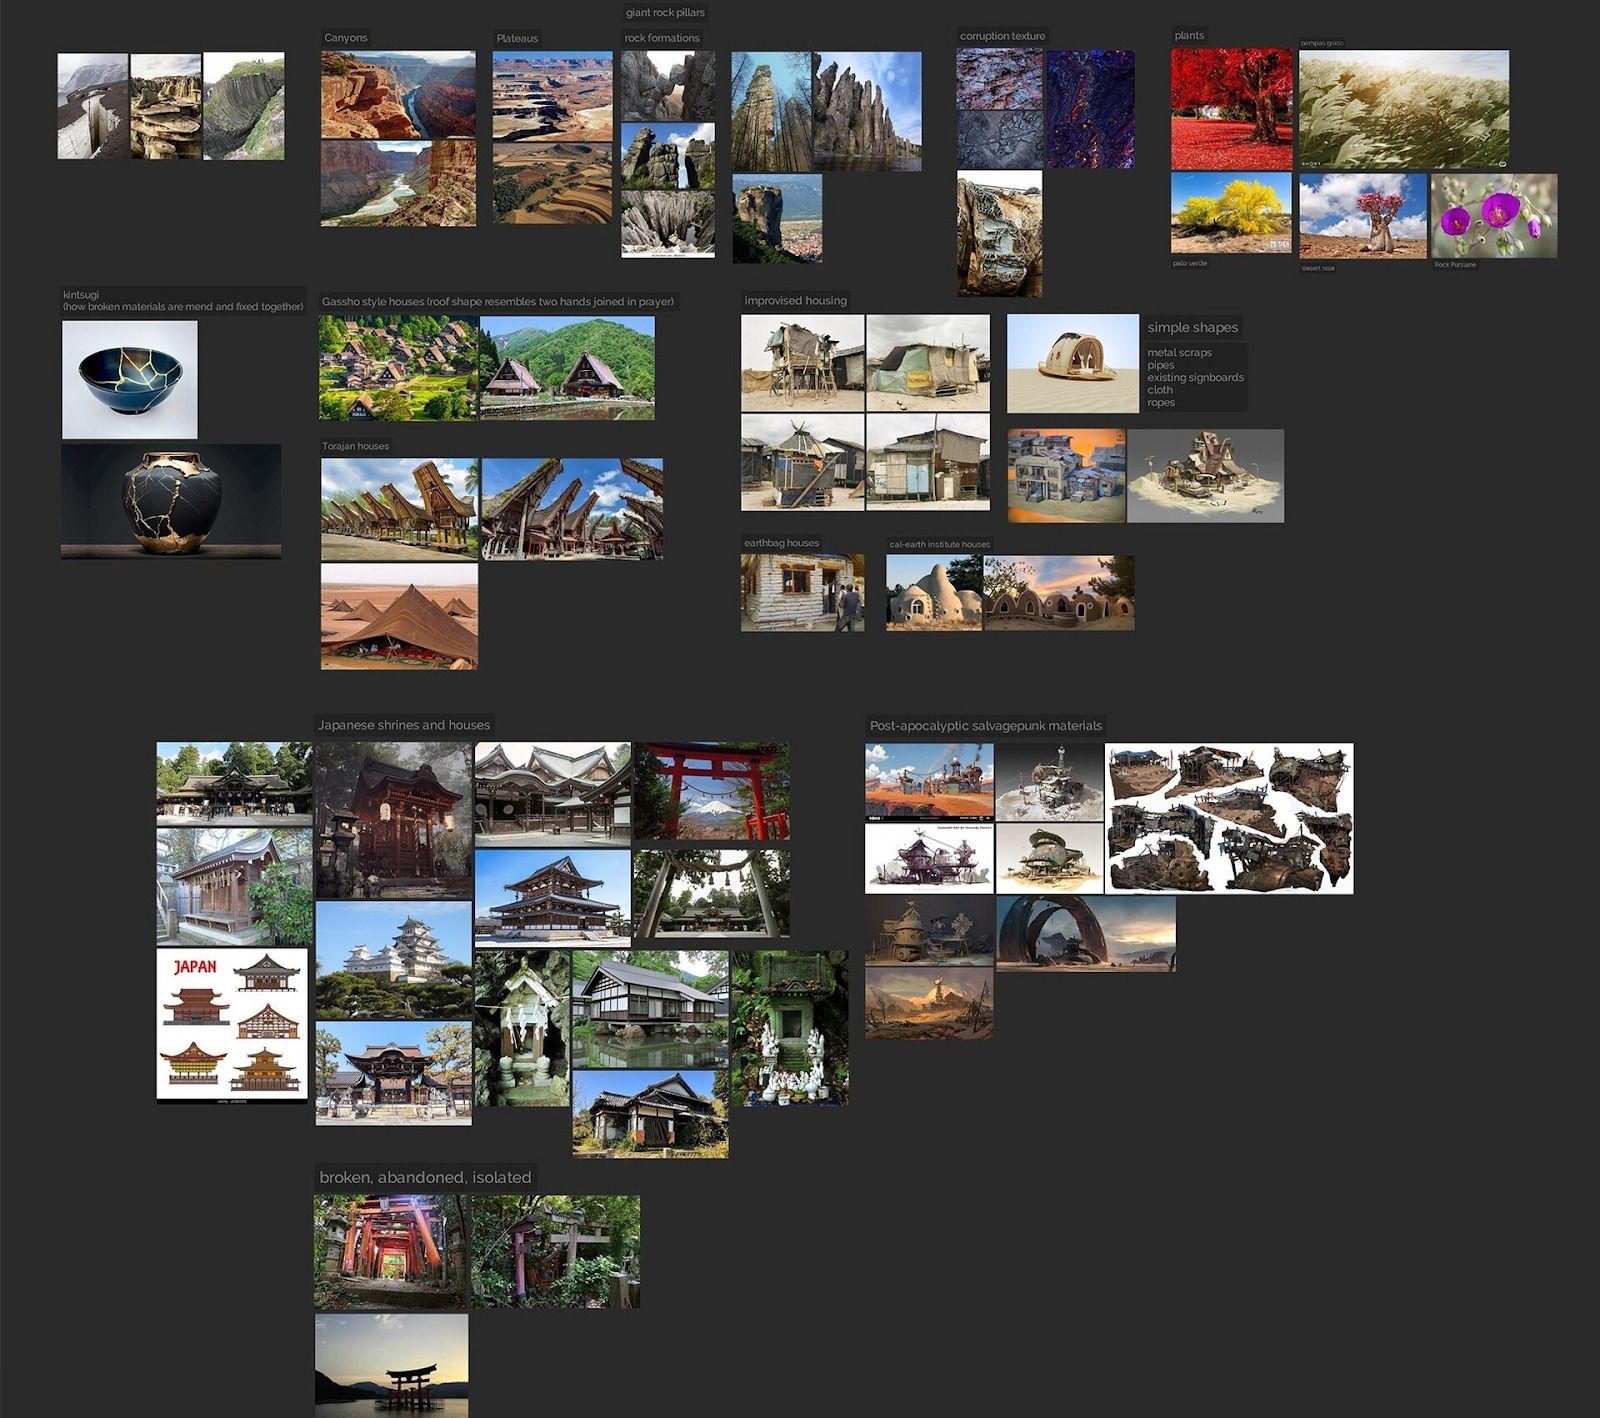
I found establishing design pillars to be incredibly helpful in maintaining my vision throughout the long process of world-building. While ideas may evolve and pillars might change mid-process, having them set at the beginning provides a solid foundation that guides and supports the entire project. Then, I created a general mood board to visually encapsulate these ideas, helping me get an idea of how the world would look. I also focused on making notes of ideas during the research and brainstorming phase before jumping into sketching. This allowed me to have a clearer sense of what I was trying to create (even if the exact details weren’t fully developed yet), which definitely helped provide more clarity and direction as the project evolved.
Gathering references is one of the most crucial steps in any concept art process. Before diving into the rabbit hole of references, I make sure to set a clear direction and a specific goal for the piece. This focus helps me avoid going overboard during the research phase and ensures that all the references I gather are aligned with my vision. Establishing this groundwork early on allows me to stay on track and maintain a cohesive and consistent aesthetic throughout the project.
Now, we move on to the actual pieces.
Experimenting, figuring out the art direction
“It’s okay to fail, learn how to fail fast”
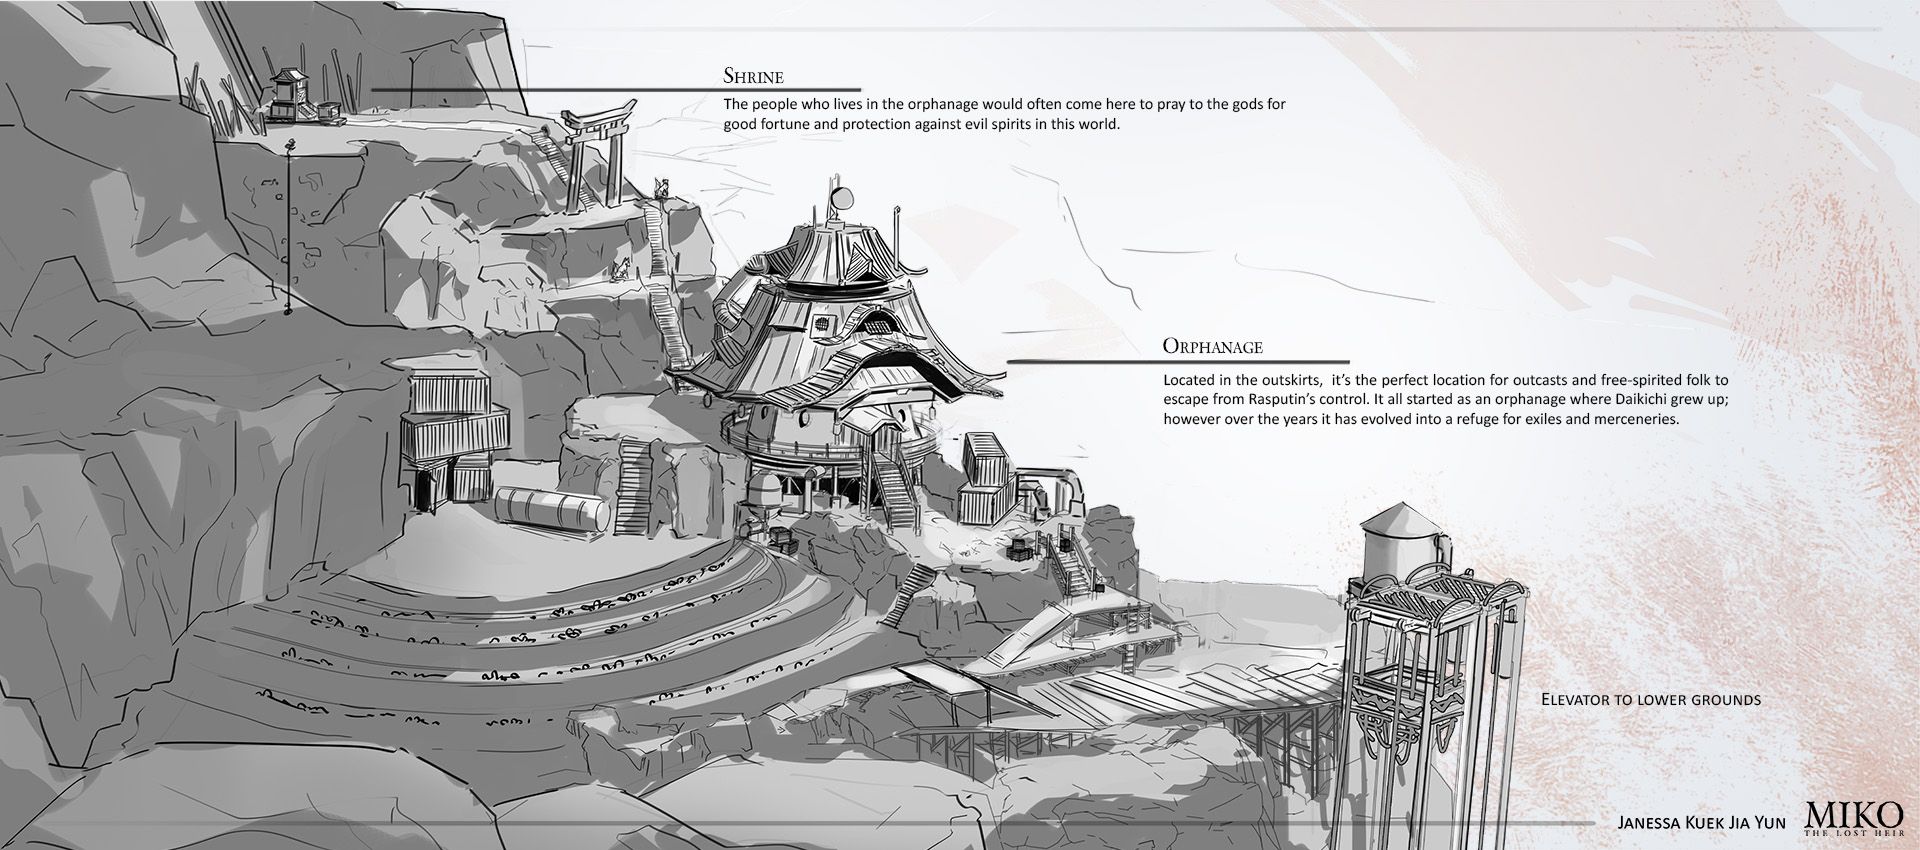
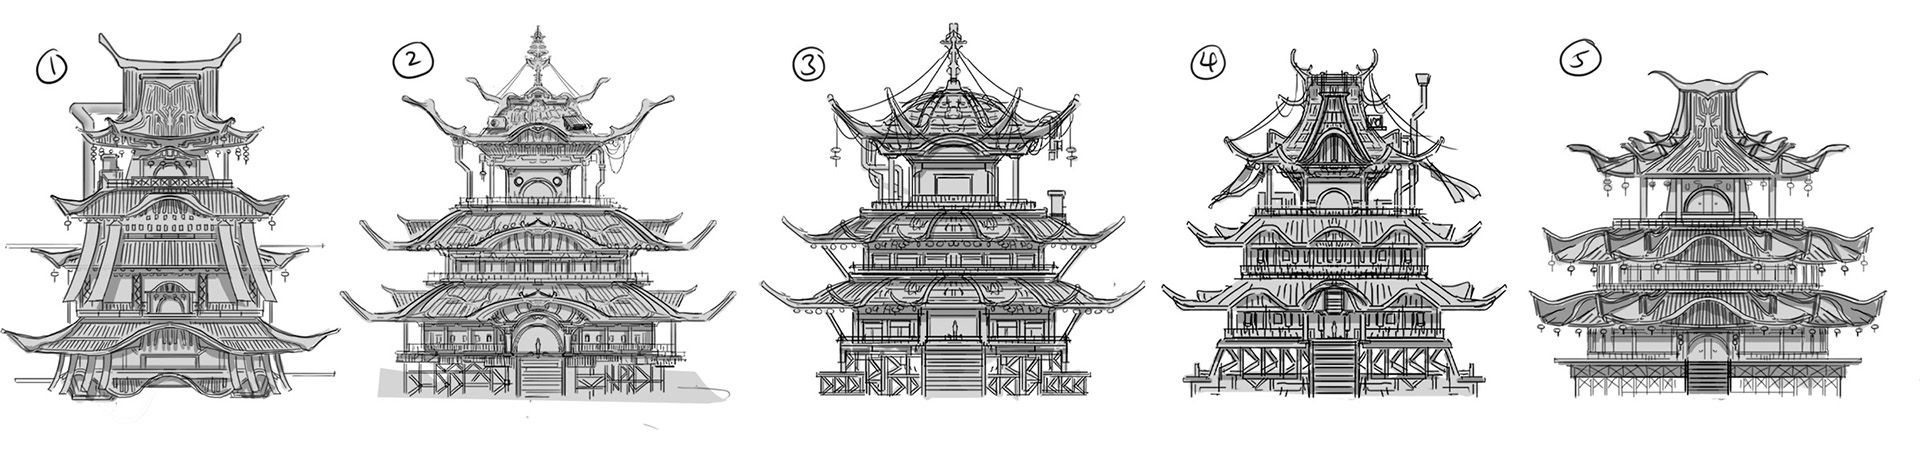
Before starting each piece, I always set a clear goal. For "The Orphanage," my aim was to experiment with architectural styles and determine the art direction for the IP, as it was the first environment piece for the project. This made it the most challenging piece, as it would set the tone for the entire project. The process involved extensive ideation and heavy revisions—heavy revisions. This included moments of self-doubt, changing ideas mid-process, and even starting over. I embraced the mindset that it's okay to fail, knowing that each misstep is part of the learning curve. I reminded myself that if I wasn't struggling through this, I wouldn't feel the immense satisfaction once it was completed. This iterative approach, despite its difficulties, was key in achieving a final design that truly captured my vision.
So, I started with sketches. I wanted to figure out what the architecture would look like before sketching out compositional thumbnails that explore the geography and environment of this world.
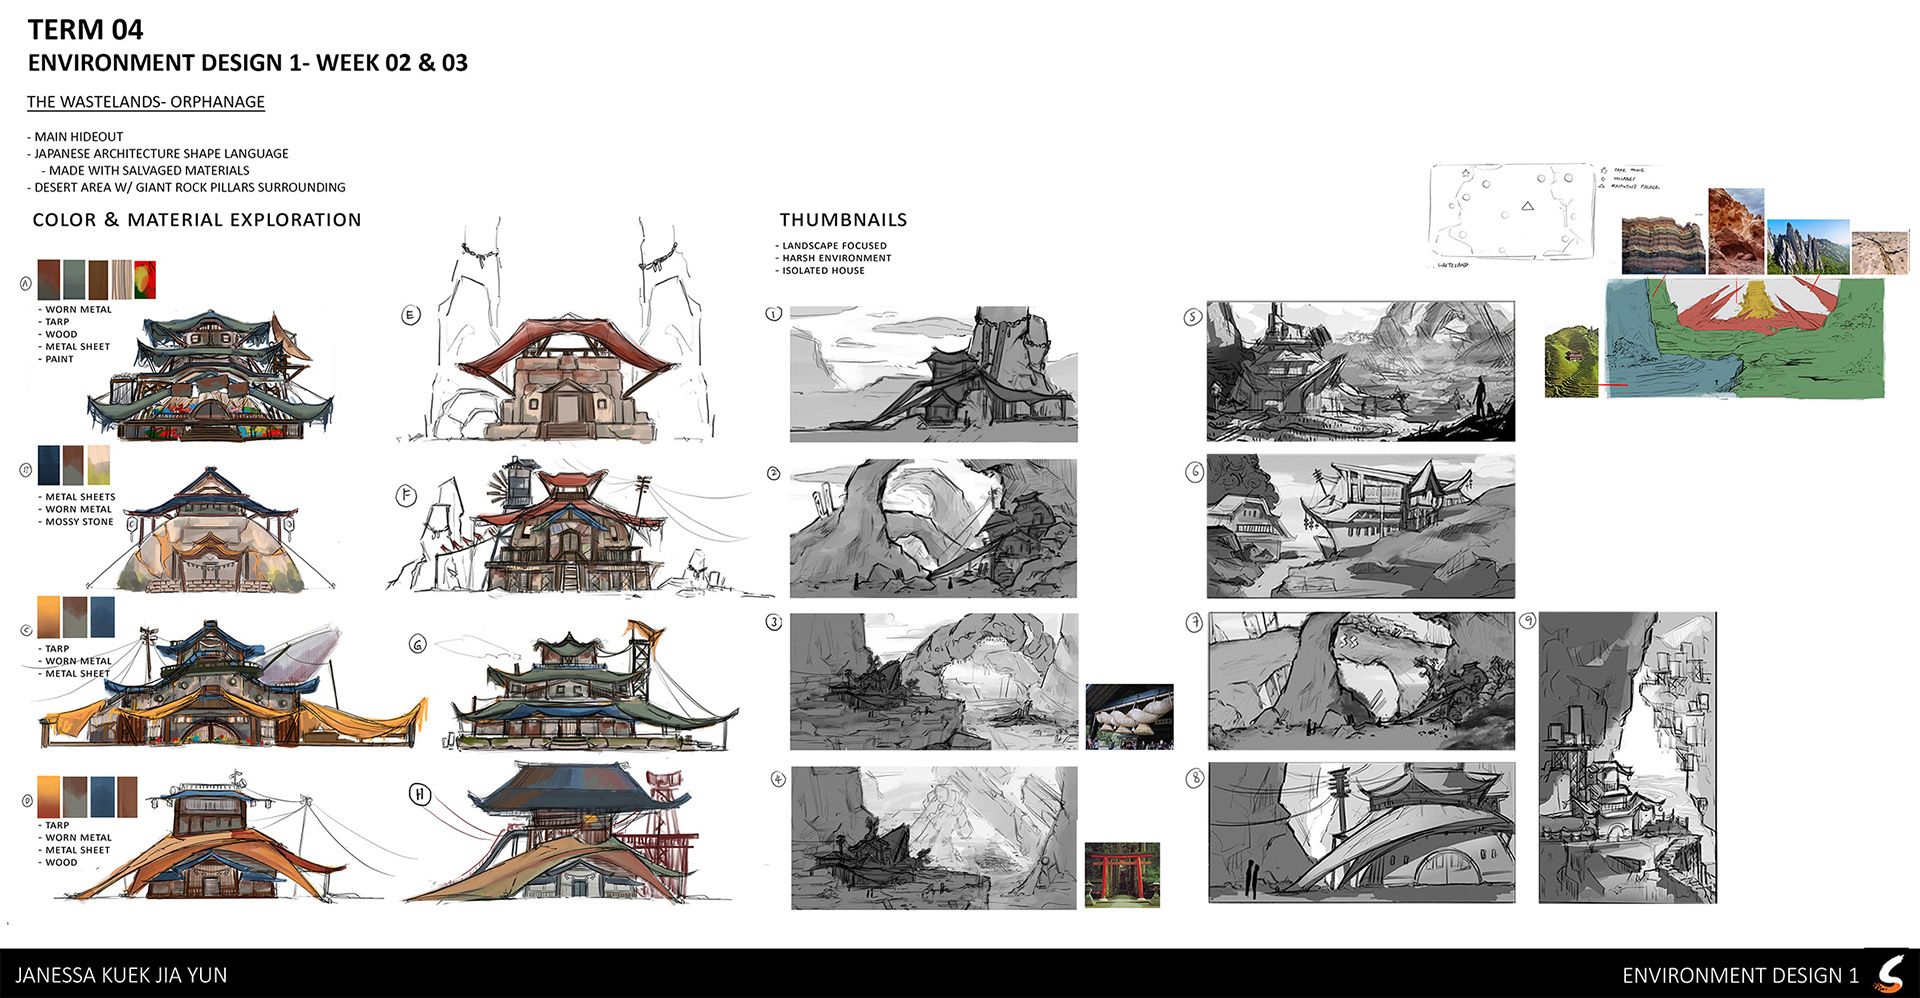
After I got a general idea of the design, I started blocking it out in 3D. Now, don’t judge me—my skills at the time weren’t great, and my workflow wasn’t solid yet, so it took a lot of iterations and reviews to nail it down. I like to dabble in Blender quite a bit, so I prefer to have a pretty detailed 3D scene before moving on to photobashing and refining in post-processing.
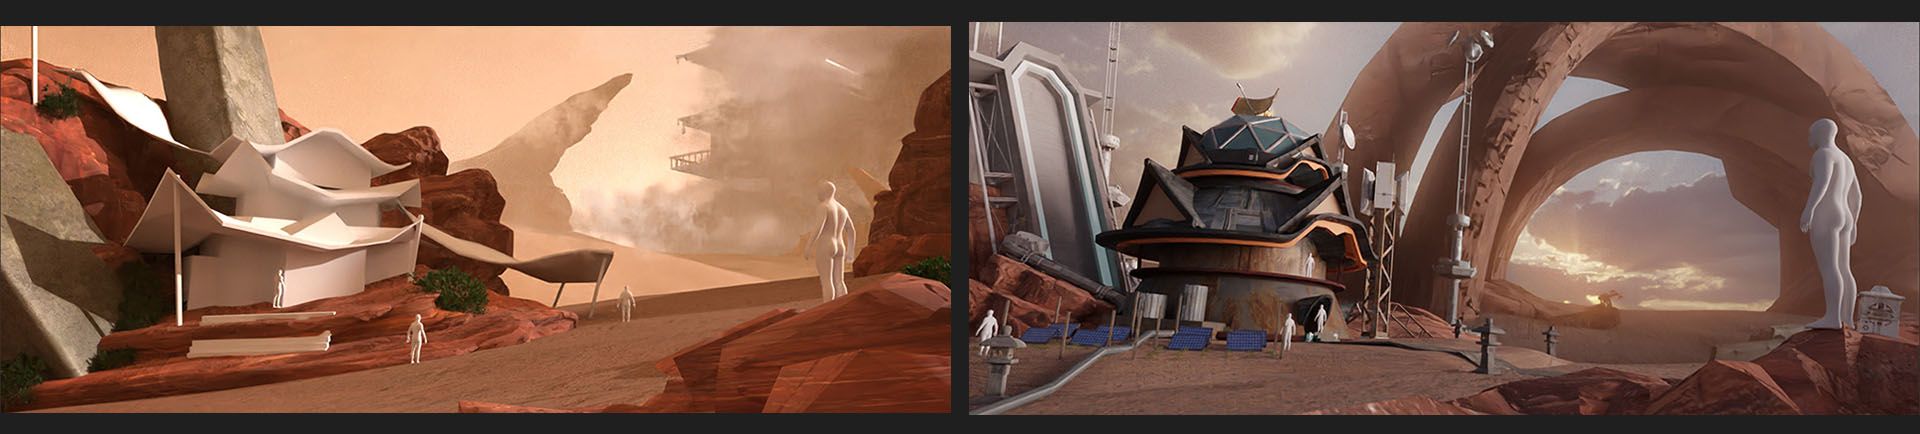
I went through several revisions for the house and ultimately decided that simpler is better. I settled on a rounded form crafted from salvaged metal with hints of Japanese architecture to create a design that feels fresh and not entirely traditional Japanese.

This iterative process involved going through multiple versions, allowing me to explore different ideas and approaches, and understanding that each iteration brought me closer to achieving my vision.
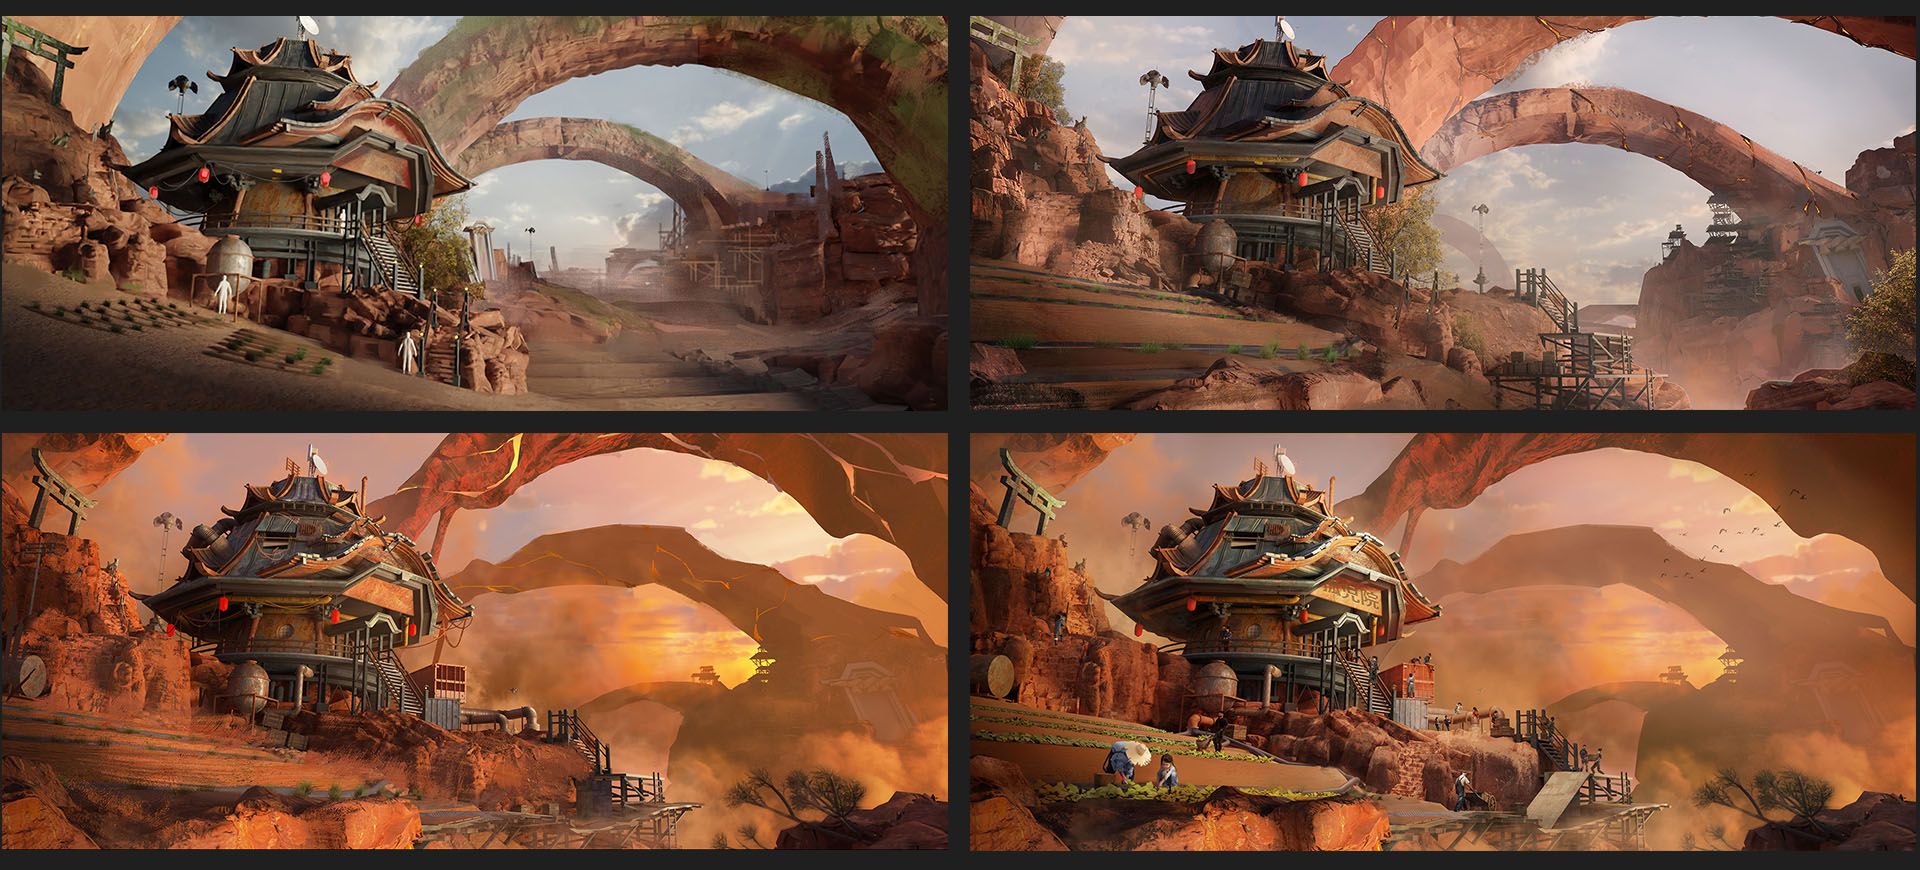
Final

Figuring out my workflow & focusing on narrative design.
Always start with an idea—it could be sketched or written. I prefer to write down my goals and ideas before I begin sketching. For this piece, my ideas evolved quite a bit in the first few weeks, which is absolutely normal! Ideas can change throughout the entire process, and as long as you believe in the possibility that it could be the right direction, don’t be afraid to go for it! Even if it doesn’t work out, you'll be sure to learn a thing or two along the way.
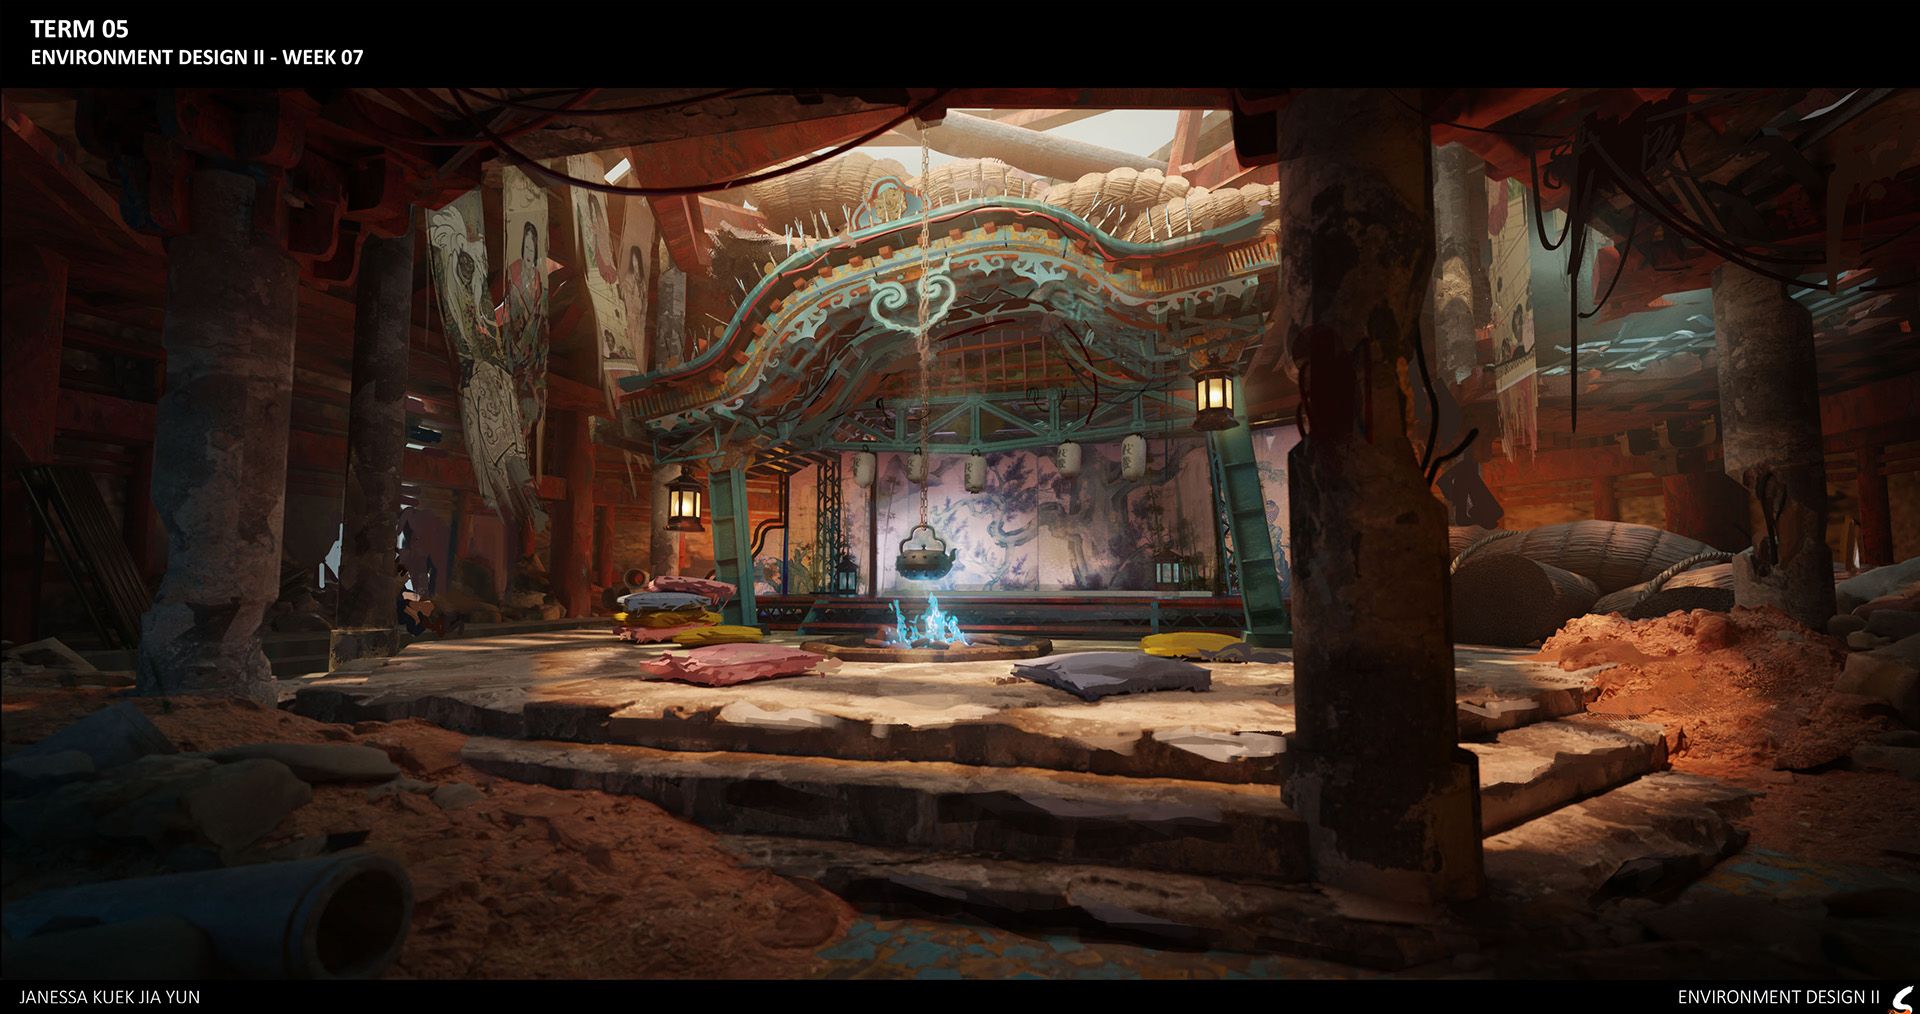
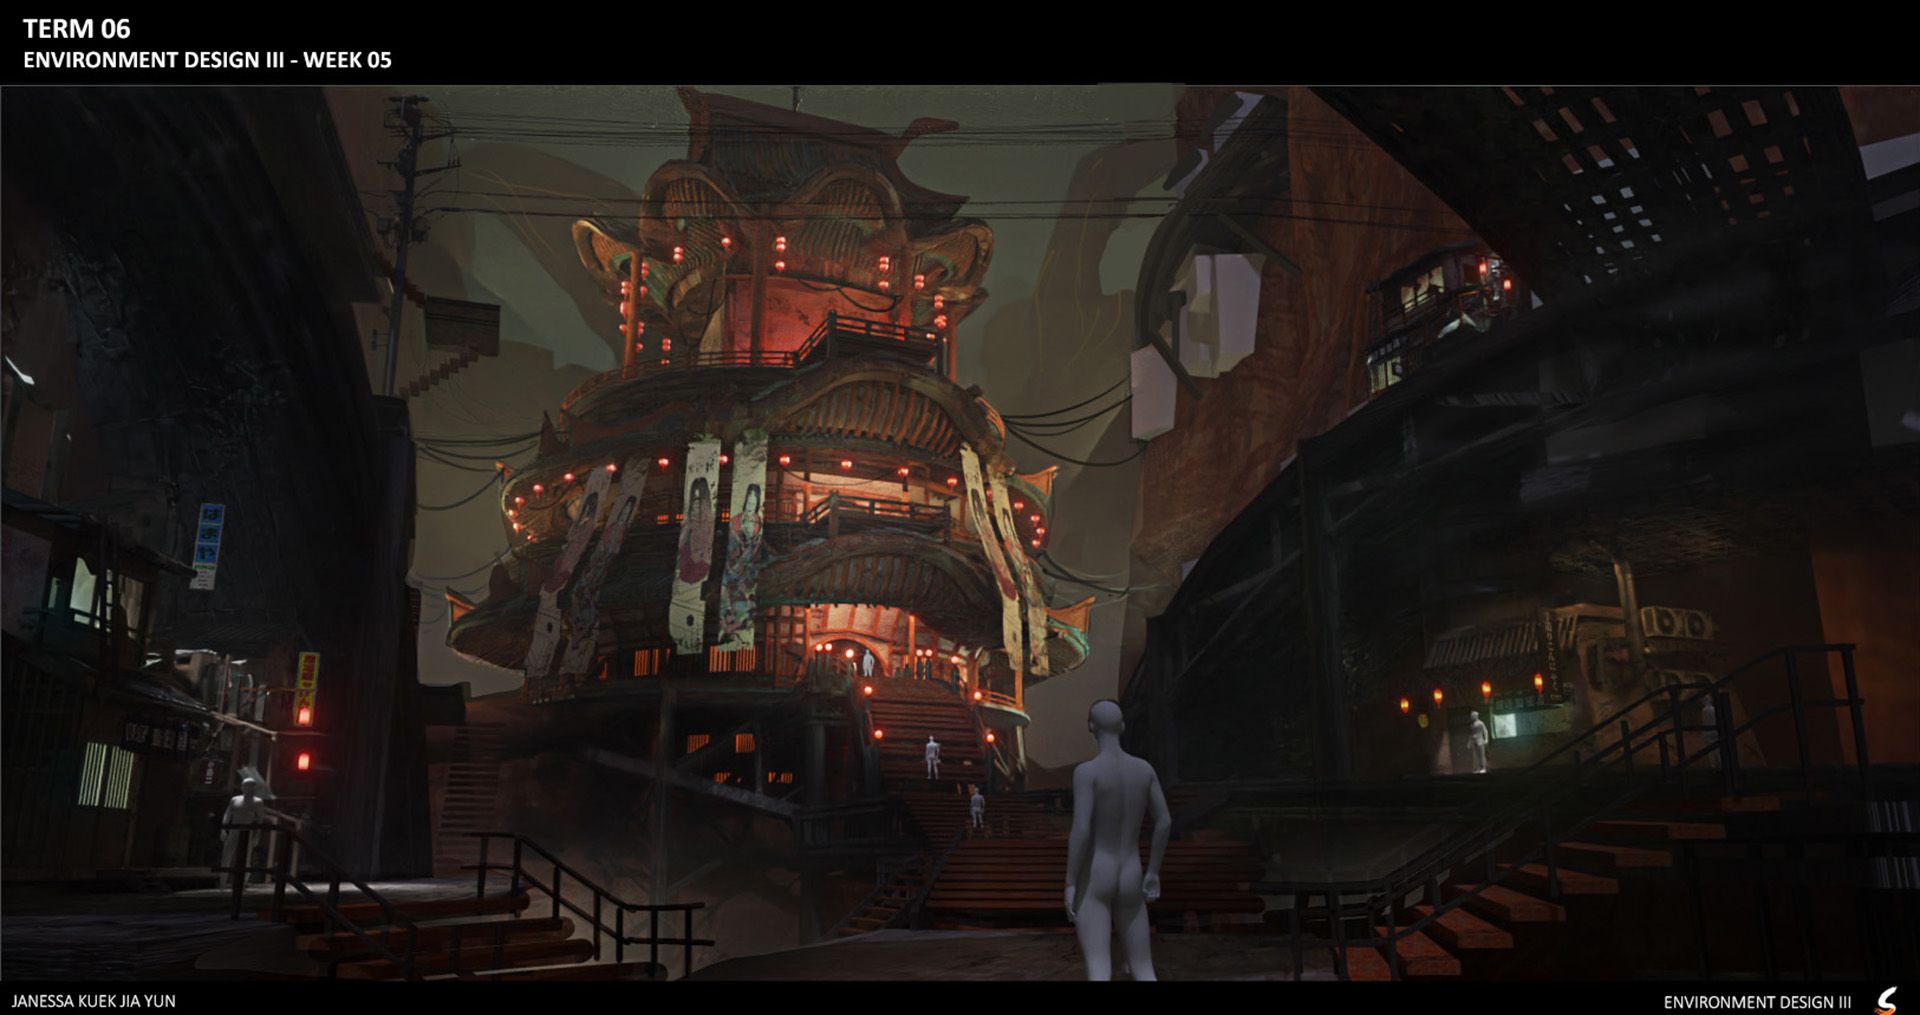
The goal for this piece was to refine my workflow and focus on storytelling, specifically by creating an interior space—a known challenge compared to exterior environments. I am fairly confident in my execution skills at this point, so I aimed to tackle something that required more strategic thinking and planning, as storytelling has been one of the things I wanted to improve in.
Initially, I envisioned a boss fight arena set in an underground cavern inspired by the story of Izanami from Japanese mythology. The concept was to create a space resembling underground sewers (salvagepunk) that constructed a Japanese stage-play setting, hinting at the boss’s identity and backstory. However, feedback indicated that it felt too much like an exterior in the form of an interior, which conflicted with my goal of creating an interior with restricted space.
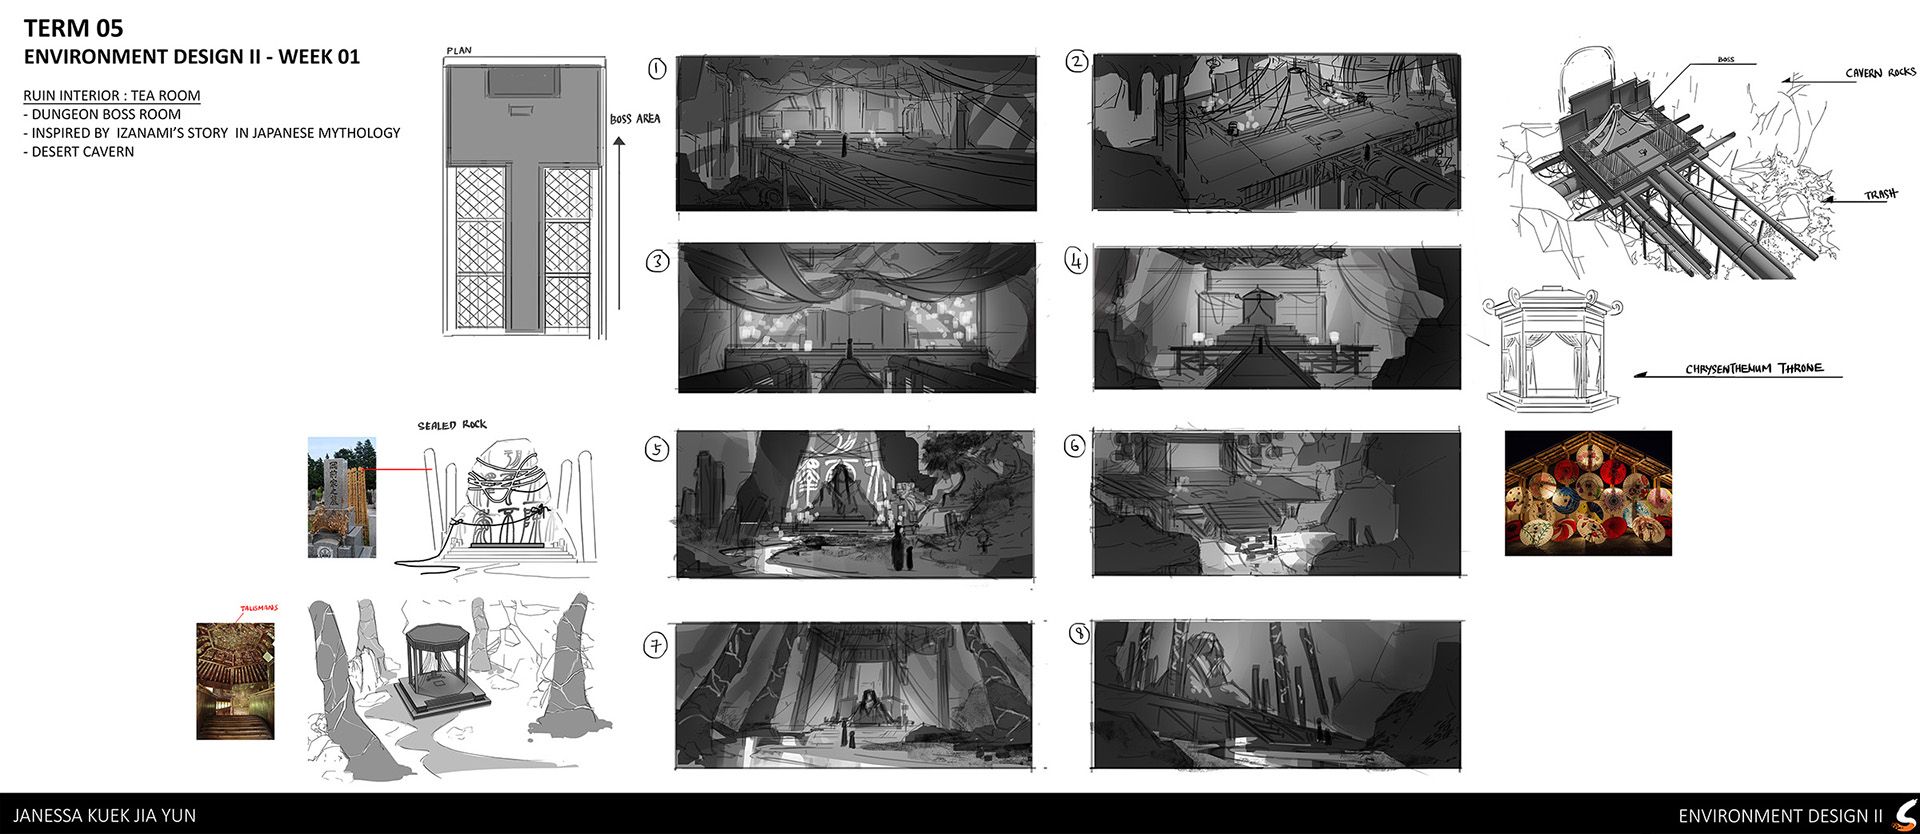
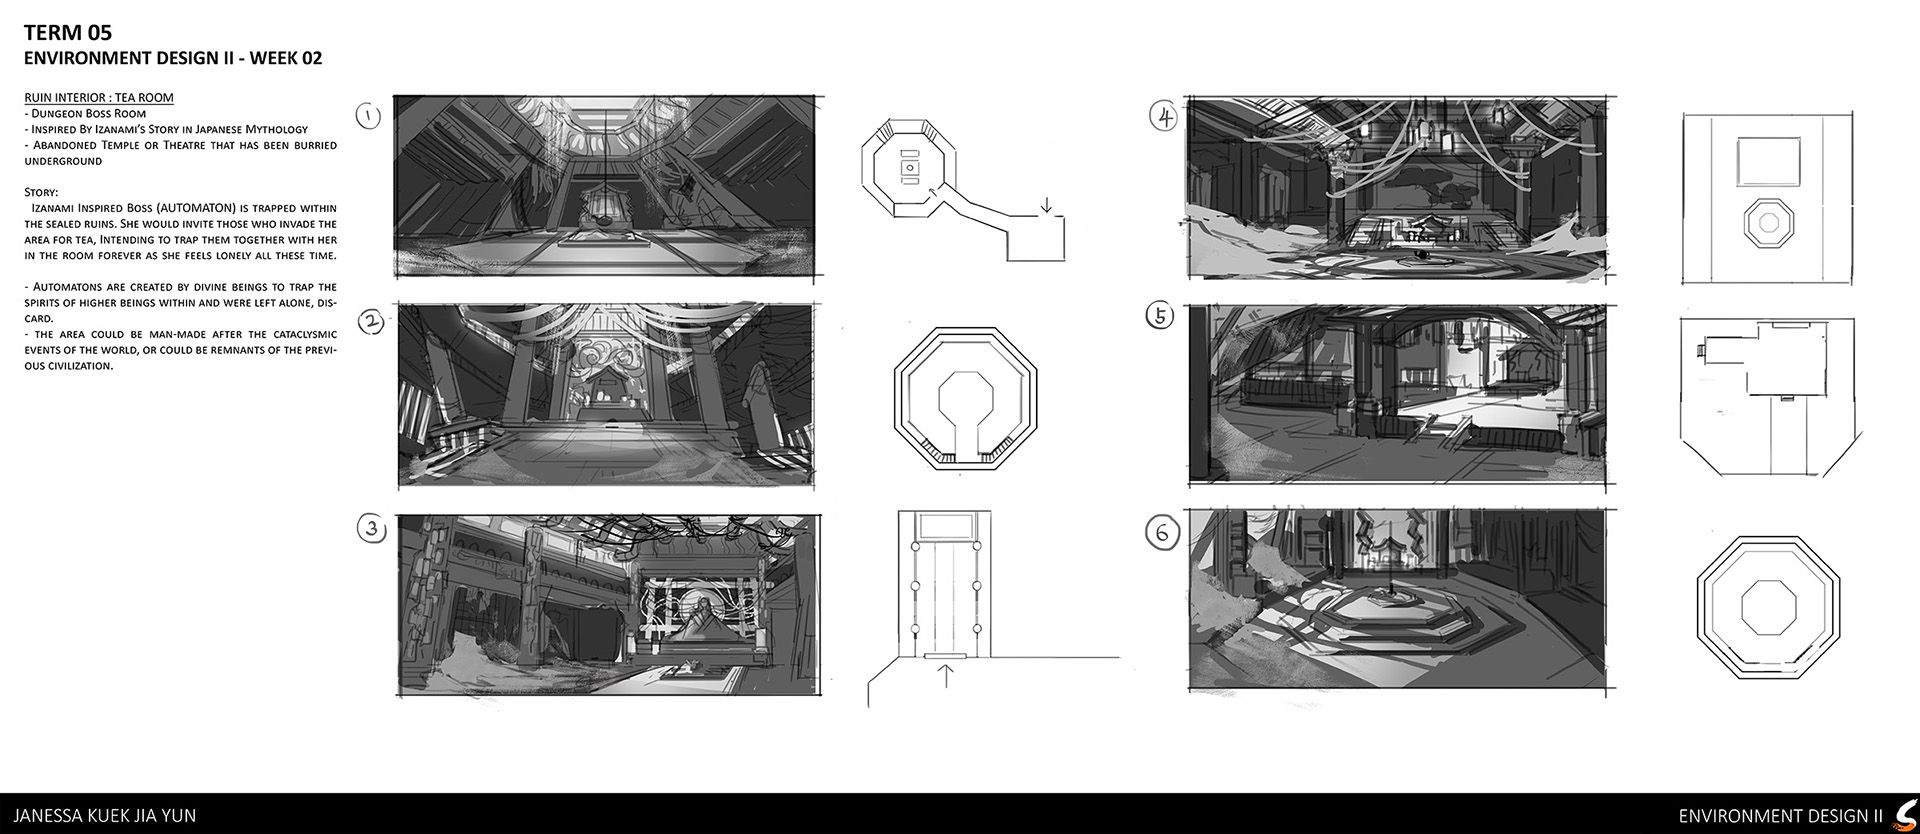
The concept then evolved into the interior of an abandoned temple or theatre buried underground. I also developed a more elaborate backstory for the boss/NPC that resides in this space. This helped me generate more ideas and ensured that the environment felt cohesive and rich with context, making the design process much more engaging for me.
Later, I narrowed my ideas down to two sketches and ultimately chose the first one. I sketched out the plans even though they wouldn't be visible in the final shot. This approach helped me better understand the space before diving into the details. After all, environment concept art in video games isn't just about creating a beautiful image; it's about understanding how a player would navigate and interact within the space.
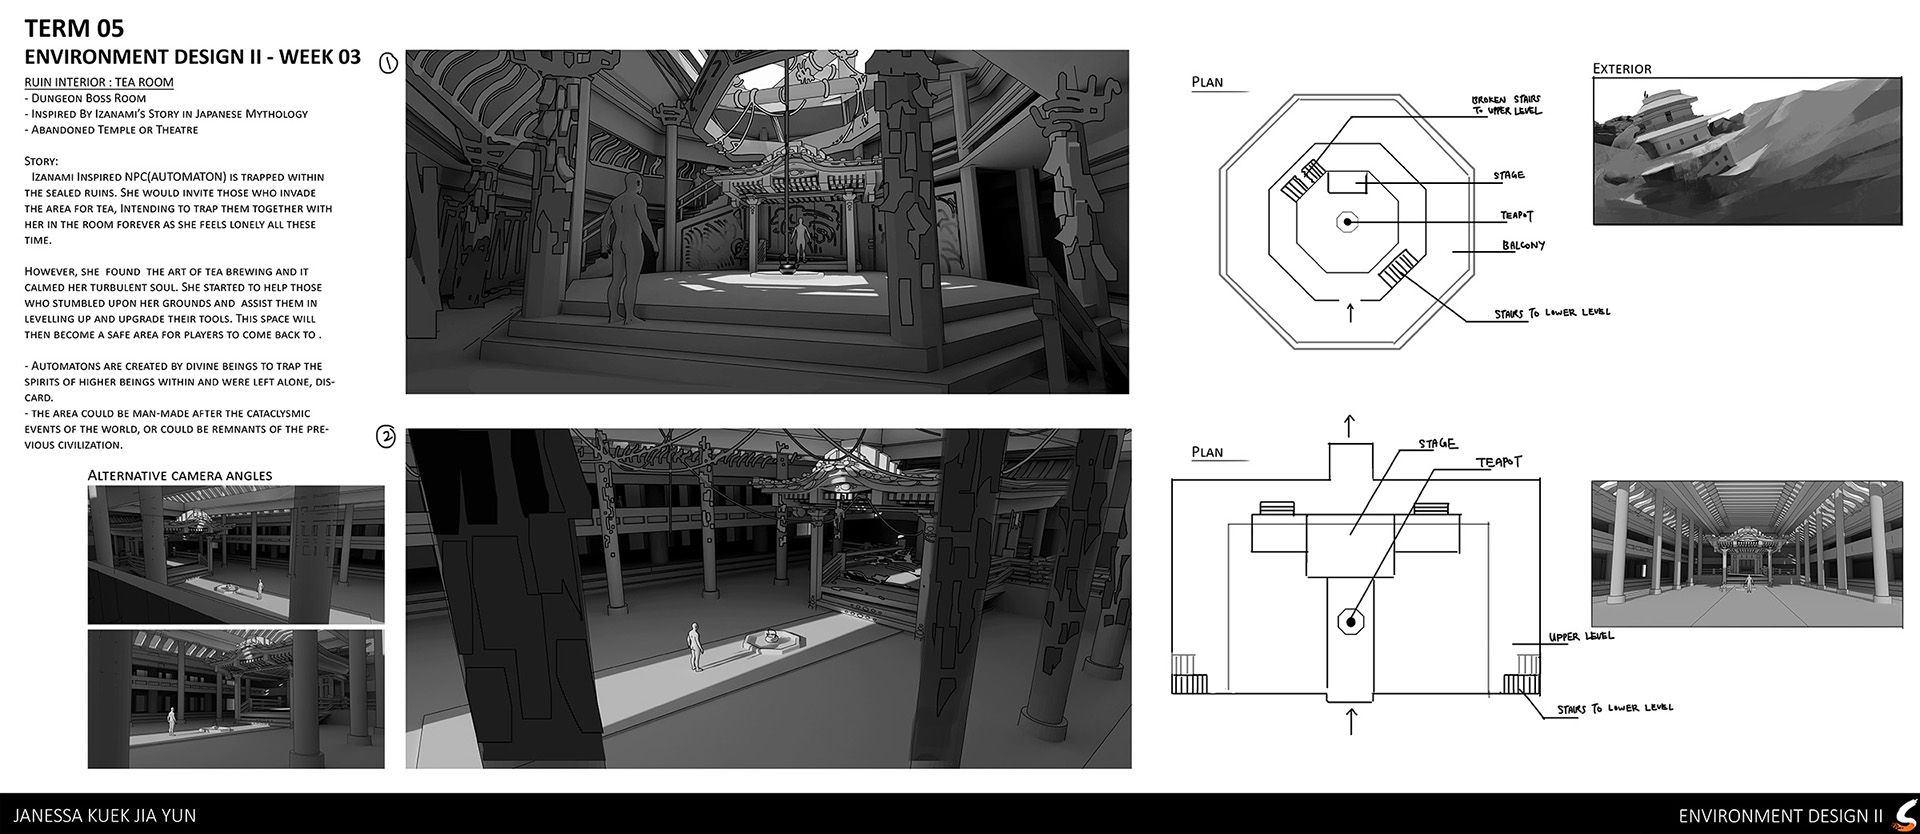
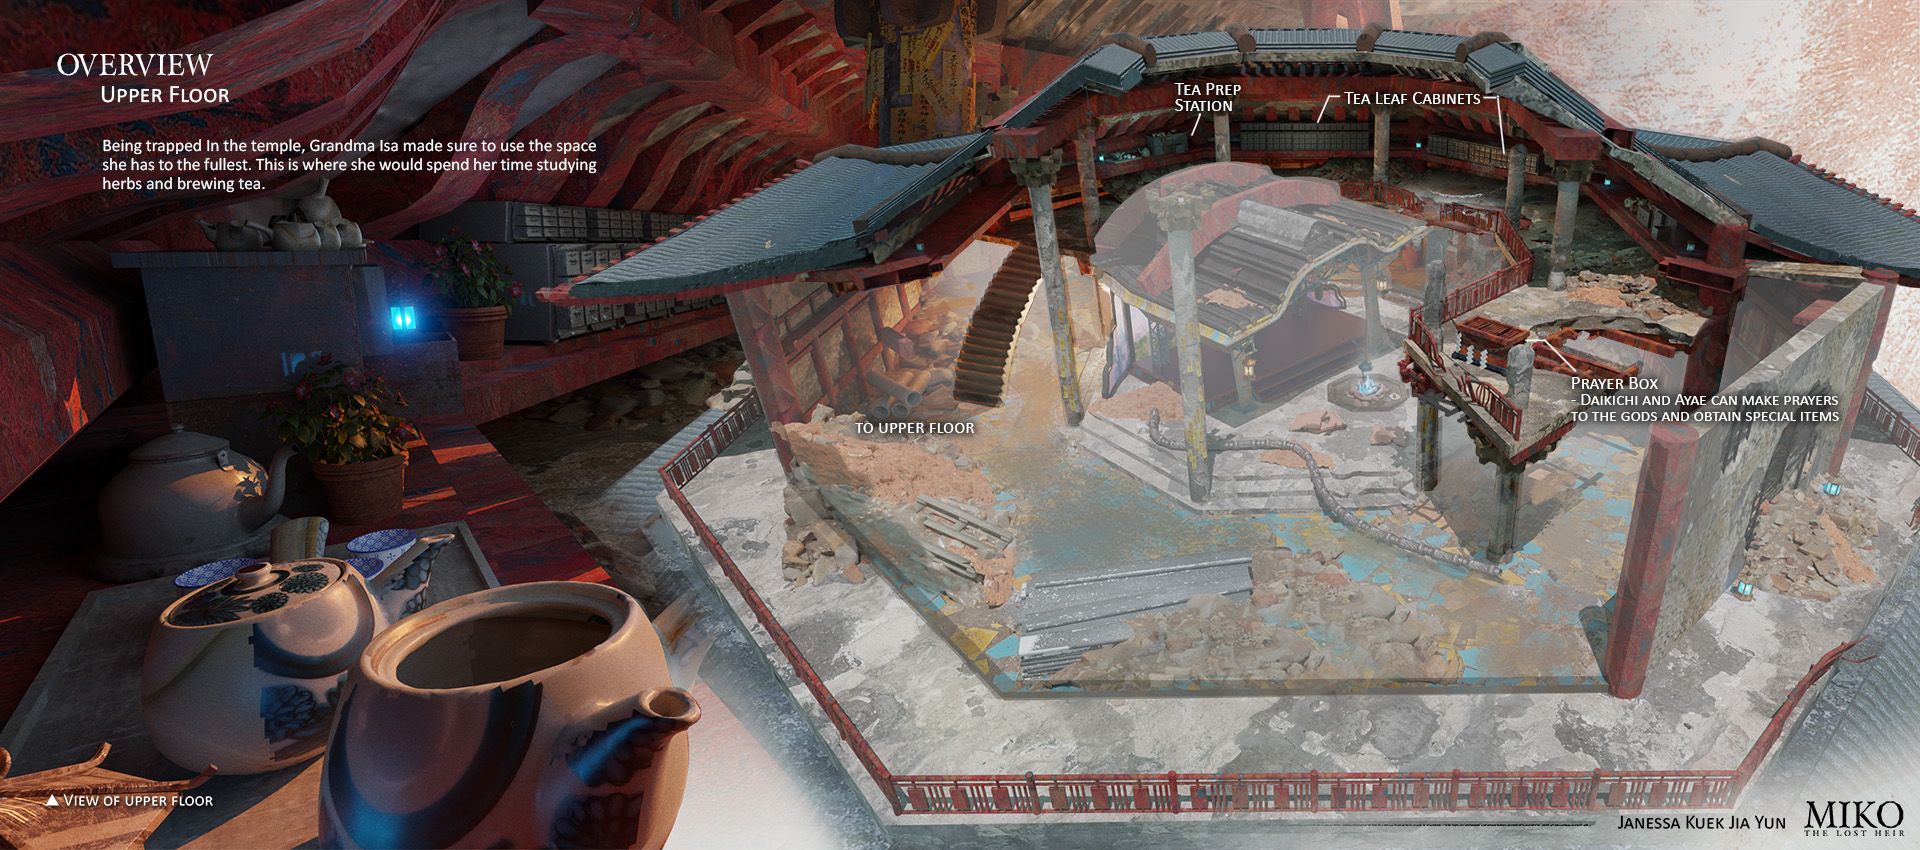
Next comes the 3D blocking phase! This is where I figure out the scale of the space, so placing naked mannequins is always a good idea to establish accurate scale and proportions, even if there won’t be people in the final image. This technique helps establish a realistic sense of scale and spatial relationships.
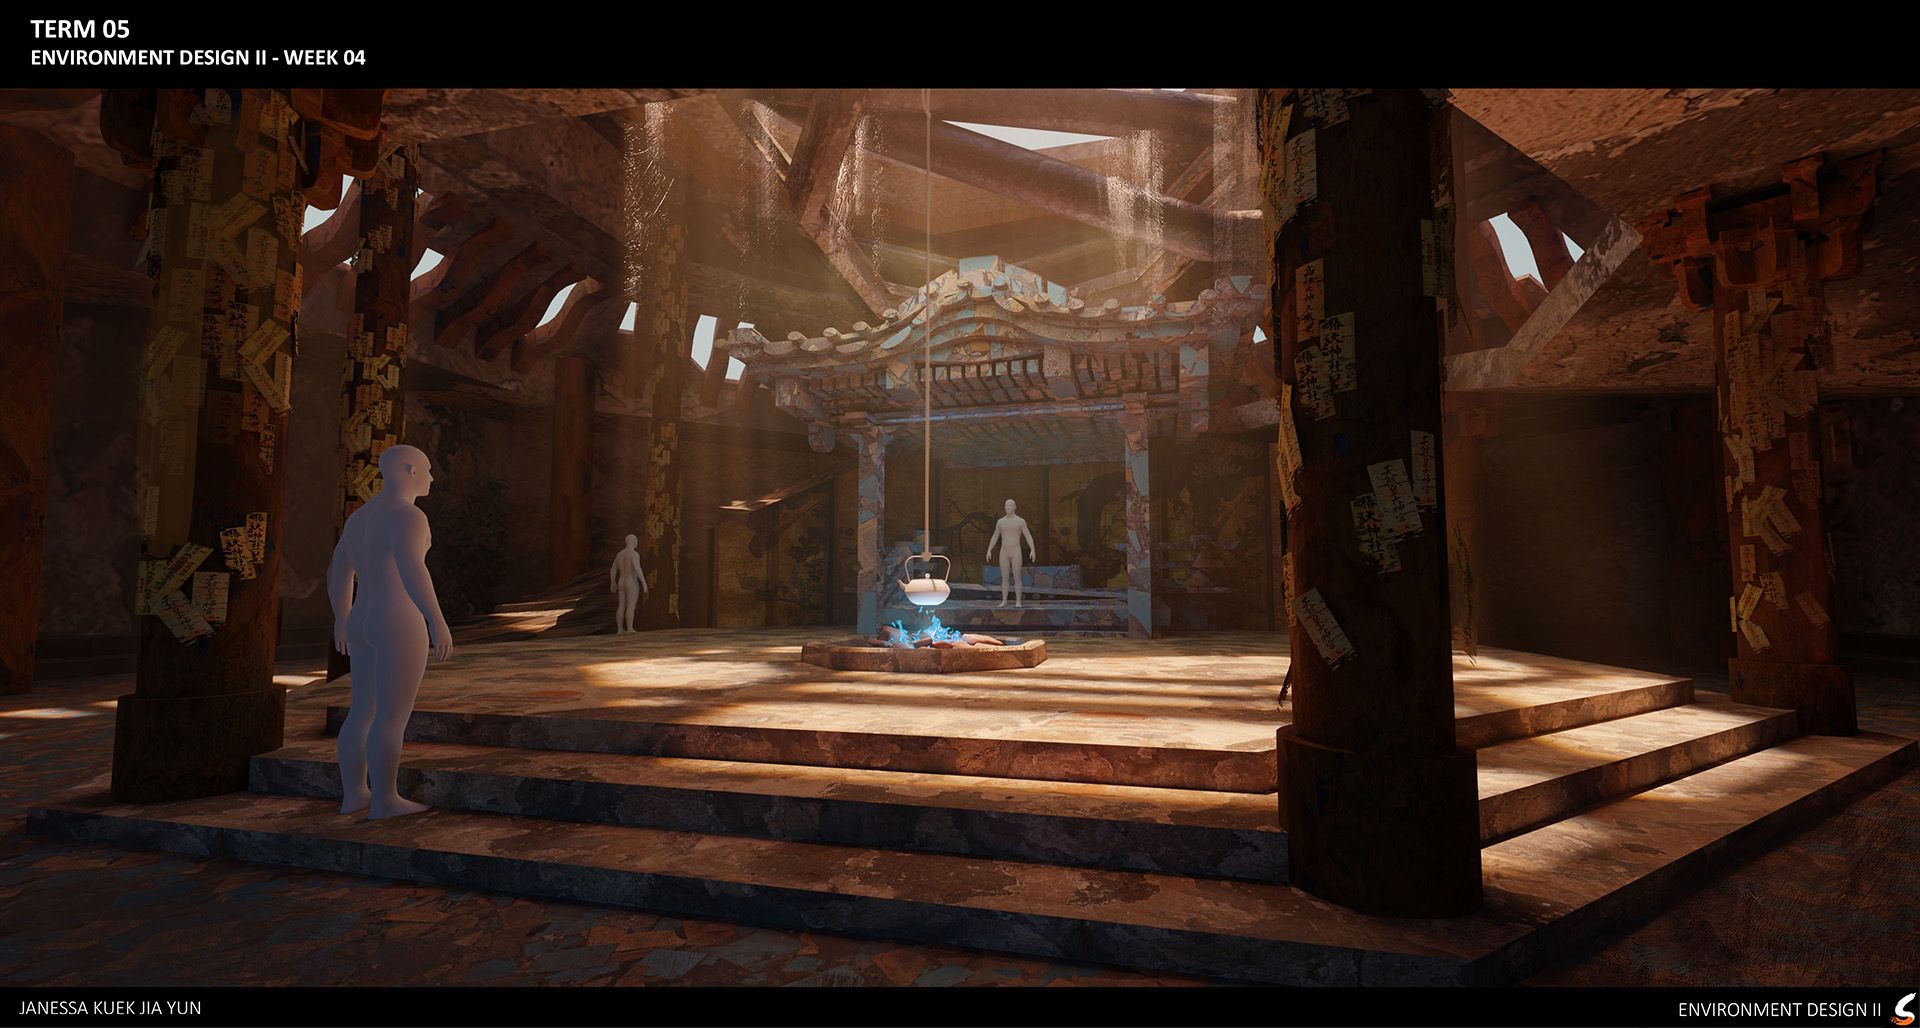
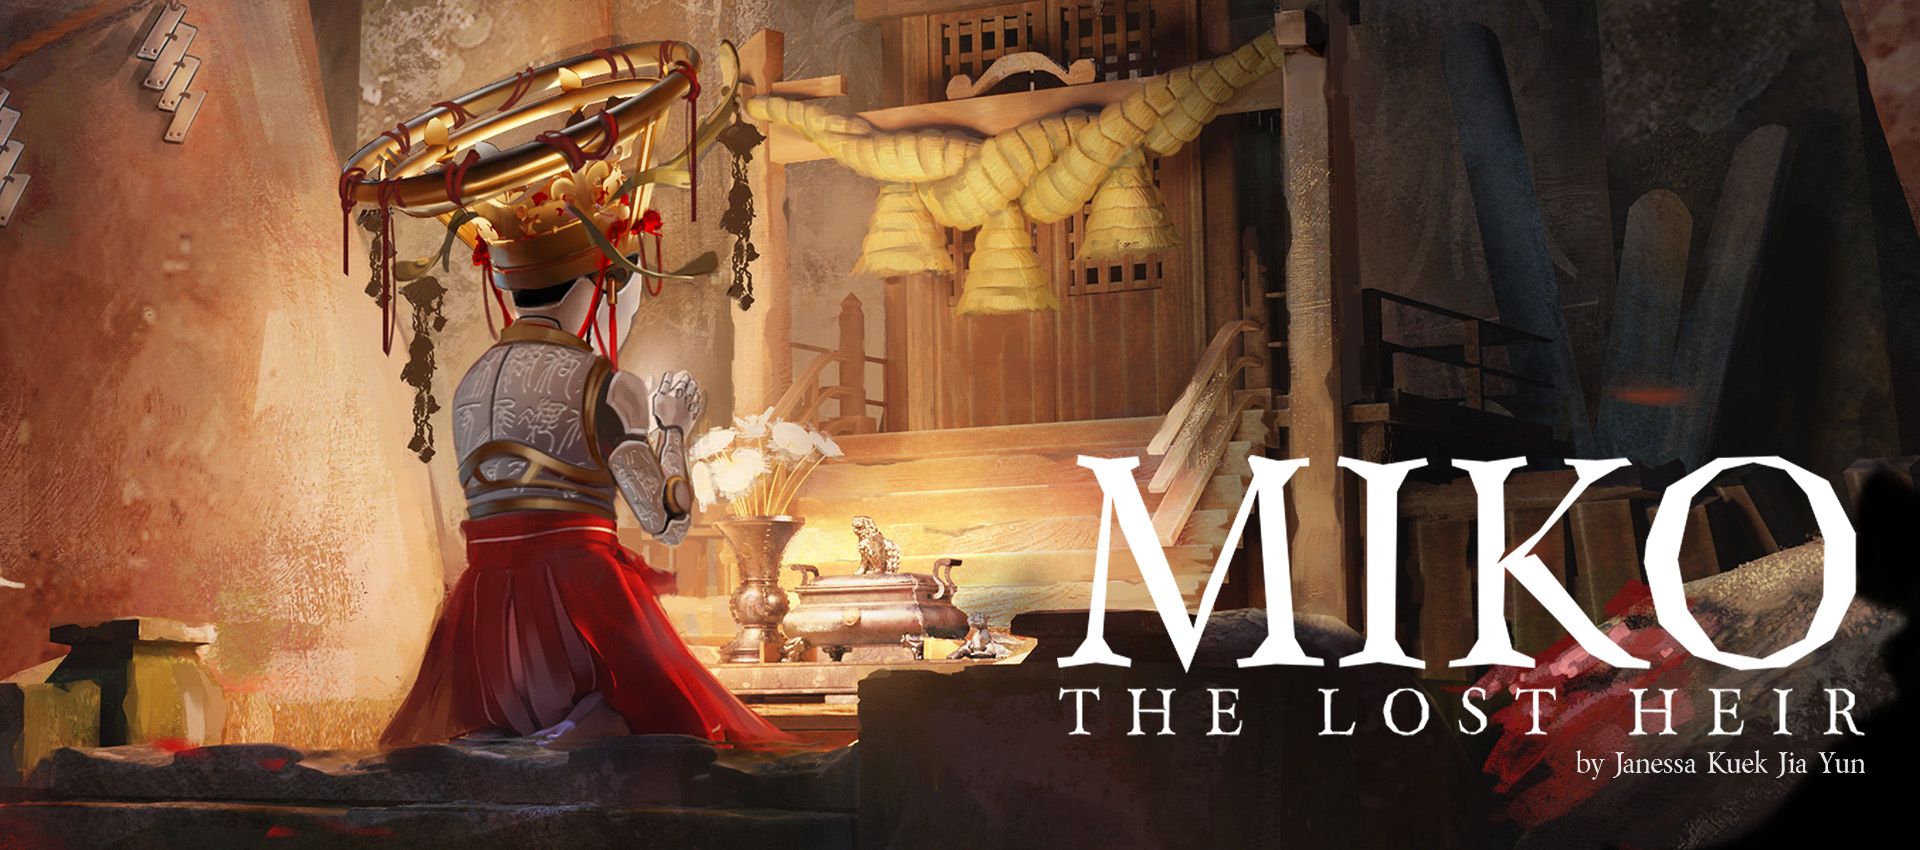
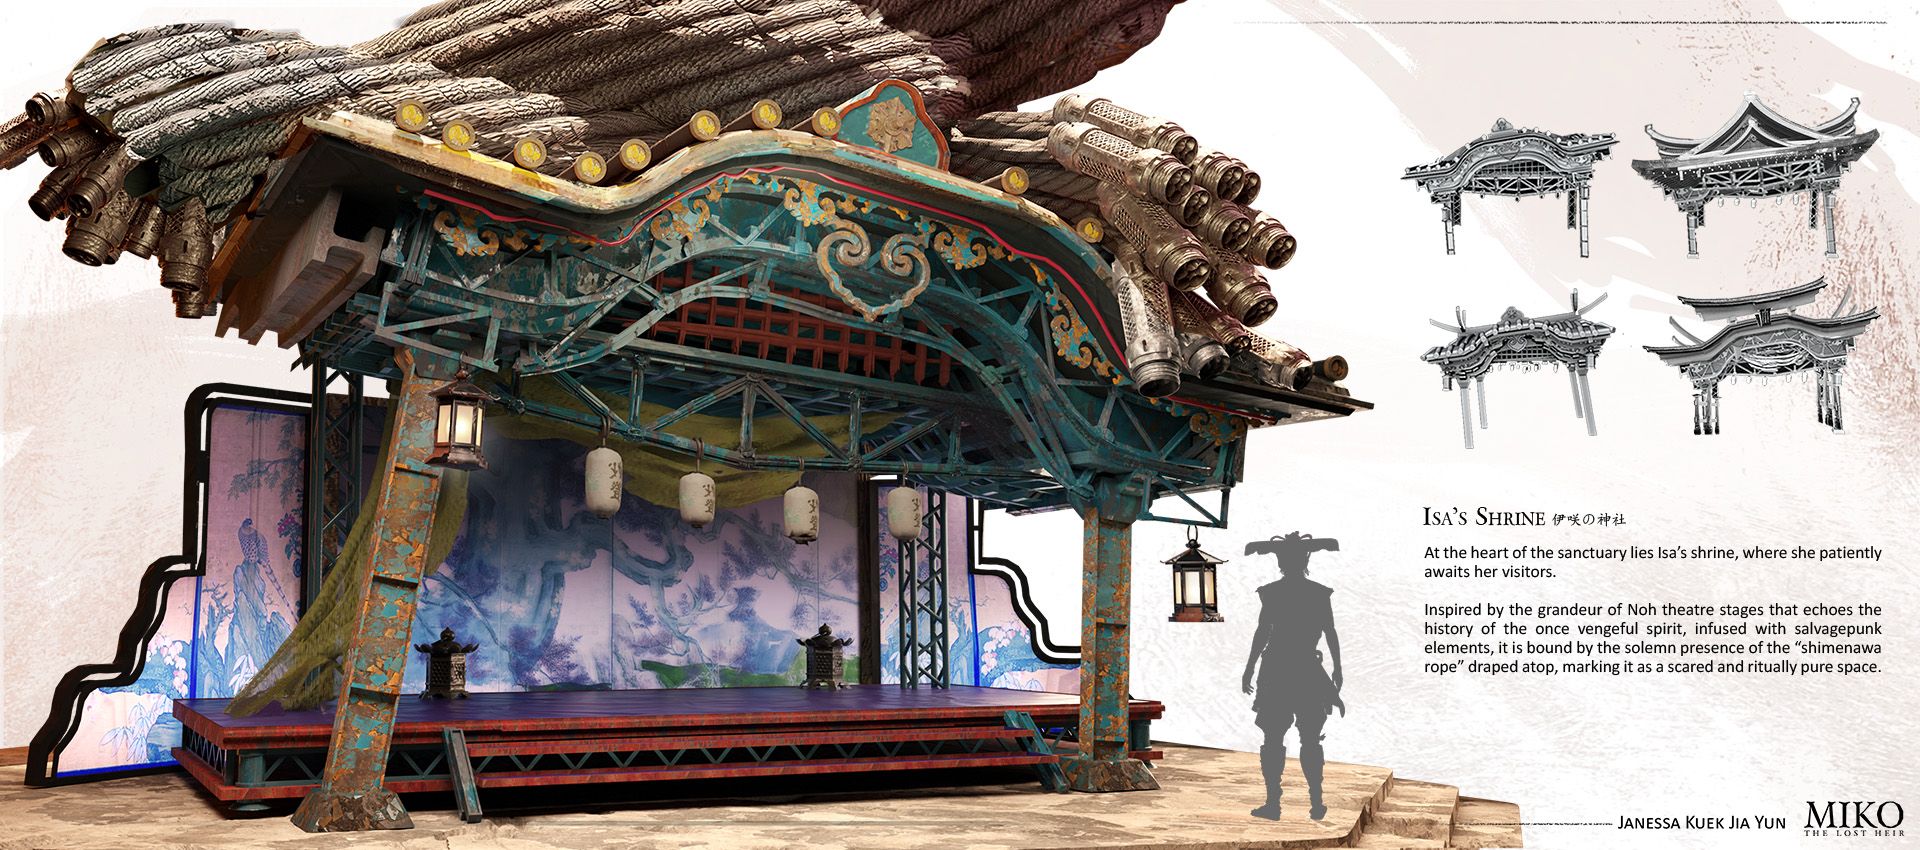
Whenever I'm unsure about the direction during this phase, I take a screenshot of the scene and do quick paintovers in Photoshop to figure out my next steps. At this stage, I decided to add a Shimenawa rope above the shrine. In Japanese culture, Shimenawa ropes are used to mark sacred or purified areas, signifying protection and safety. By incorporating this element, I aimed to convey that this space is a 'safe' zone, imbued with a sense of purification and sanctity.
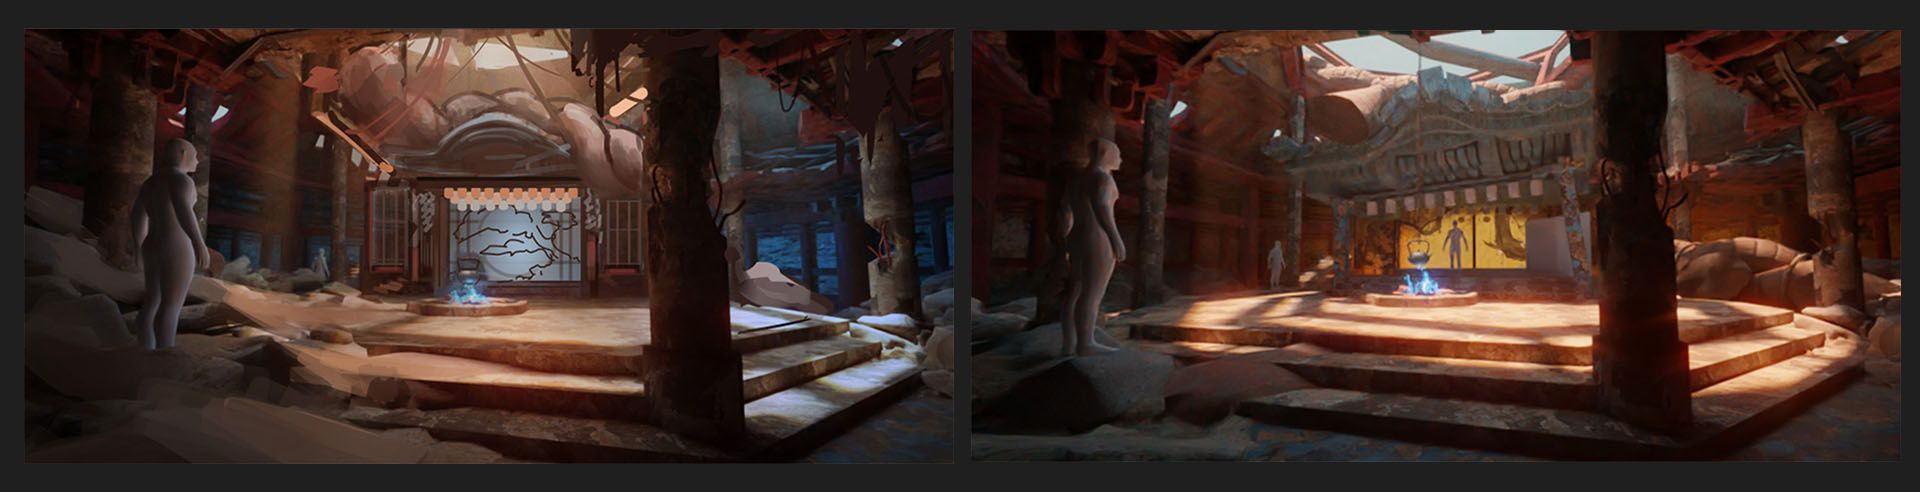
Now, the area surrounding the shrine was in a much more complete state than the shrine itself, so I needed to bring the shrine up to the same level of detail. I began iterating on the shrine's design, ensuring that it fit within the scene while incorporating both salvagepunk and Japanese elements.
I introduced some pillows into the scene to convey the welcoming nature of the NPC living there, suggesting the possibility of shared tea moments with visitors. Additionally, I continued to refine and iterate on the shrine's design.
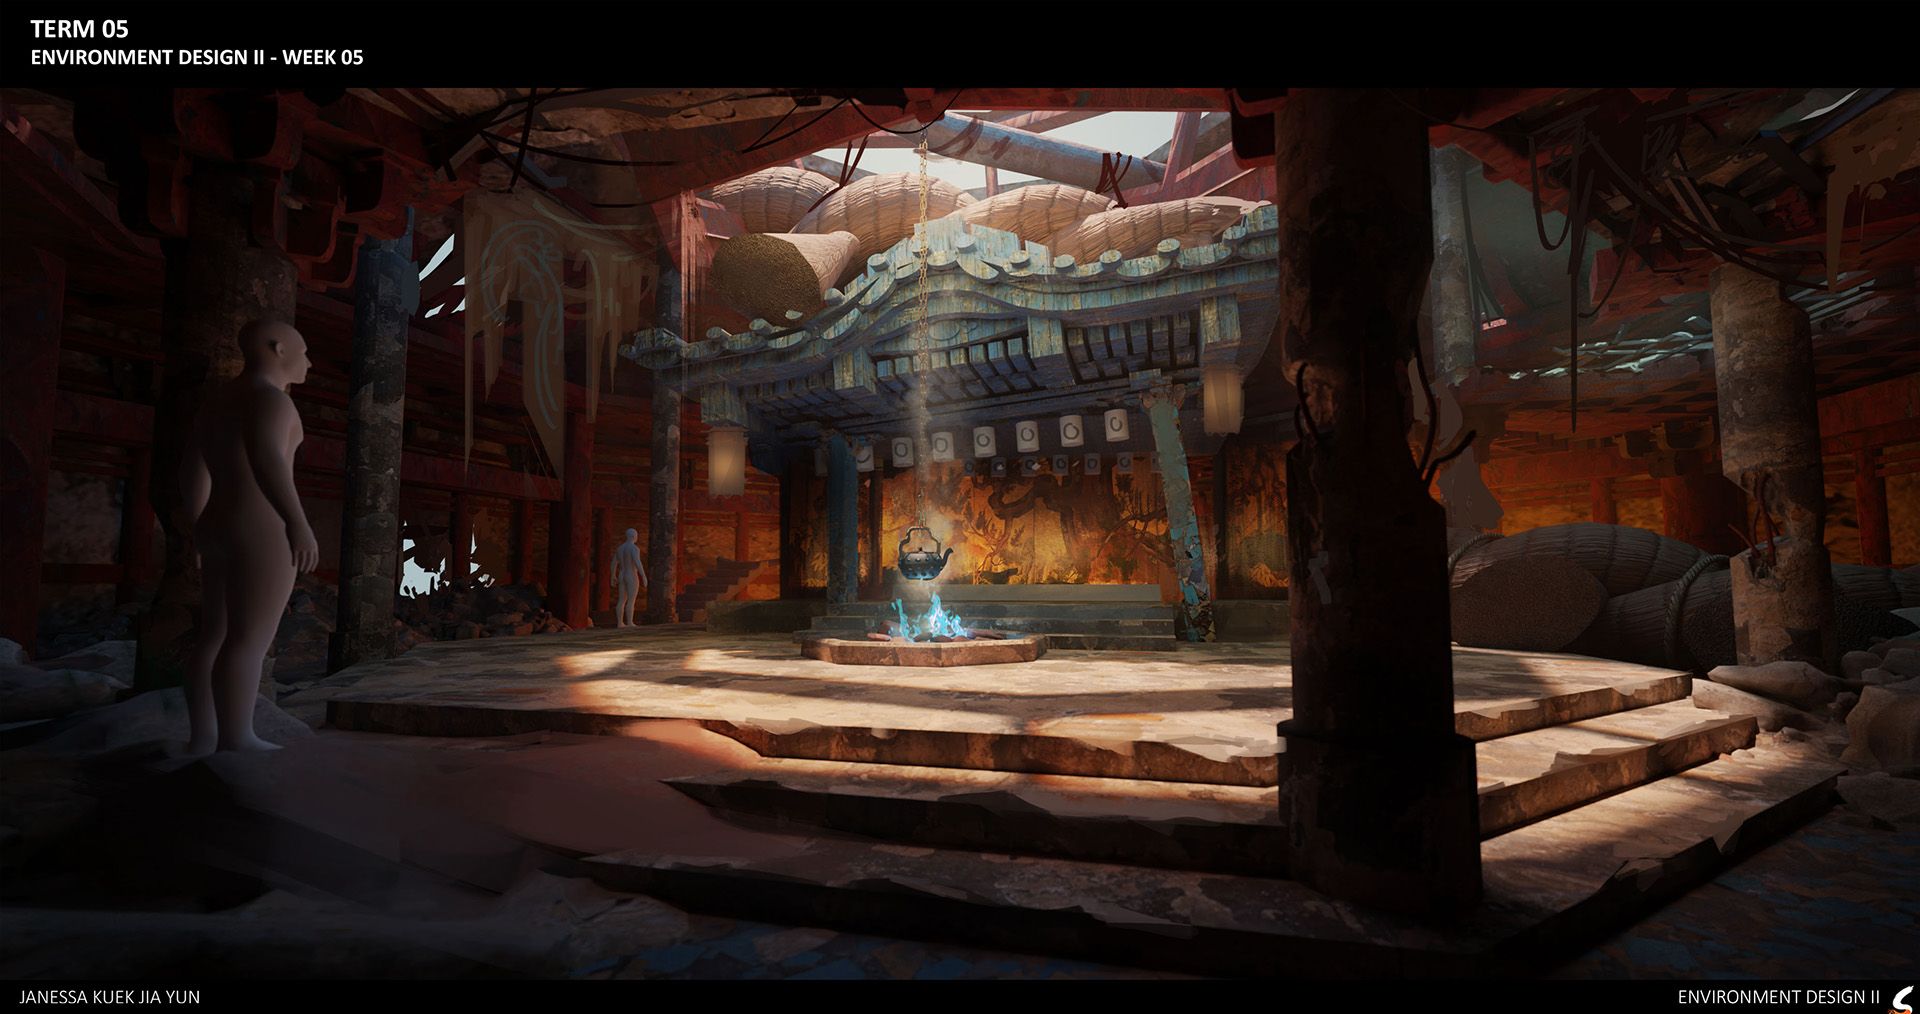
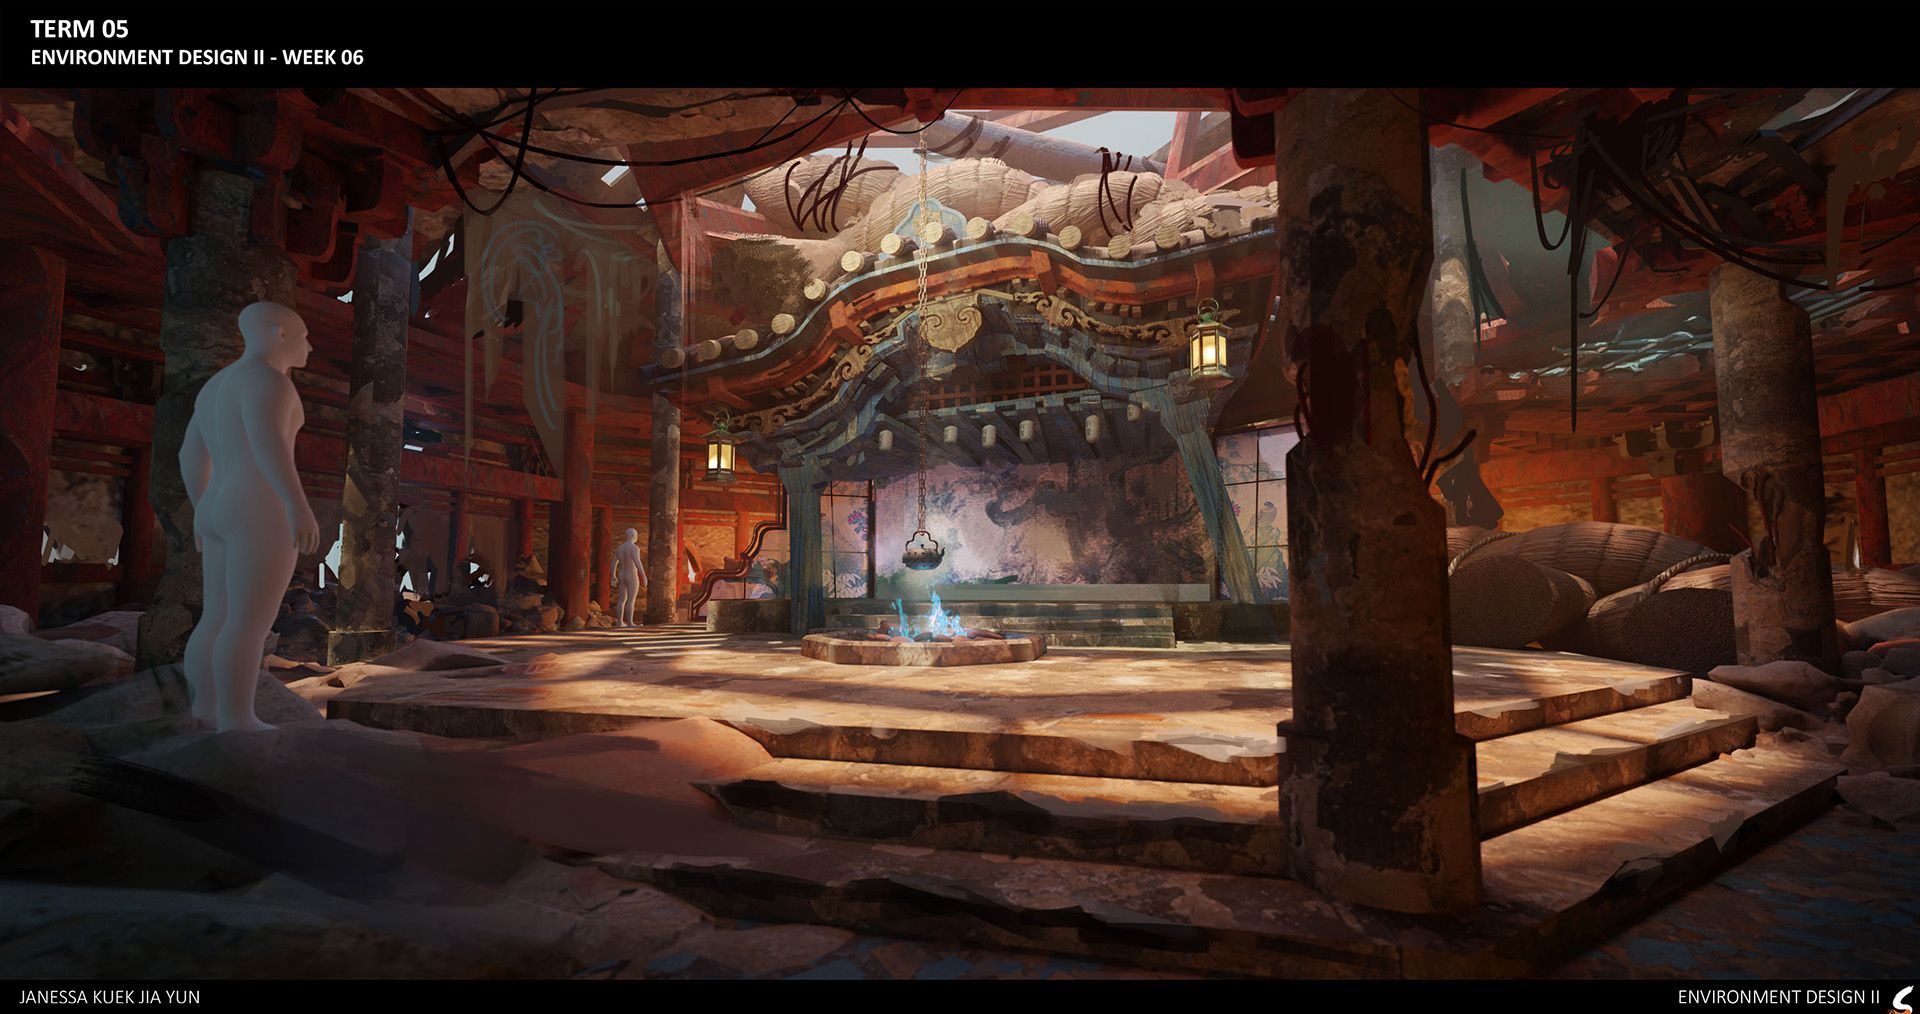
To further enrich the atmosphere with Japanese stage-play elements, I incorporated torn banners depicting scenes from Noh theatre plays. Noh theatre is a traditional form of Japanese musical drama that has been performed for centuries. It combines elements of dance, music, and drama to tell stories often rooted in Japanese folklore, history, and mythology, thus deepening the connection to mythology within the scene.
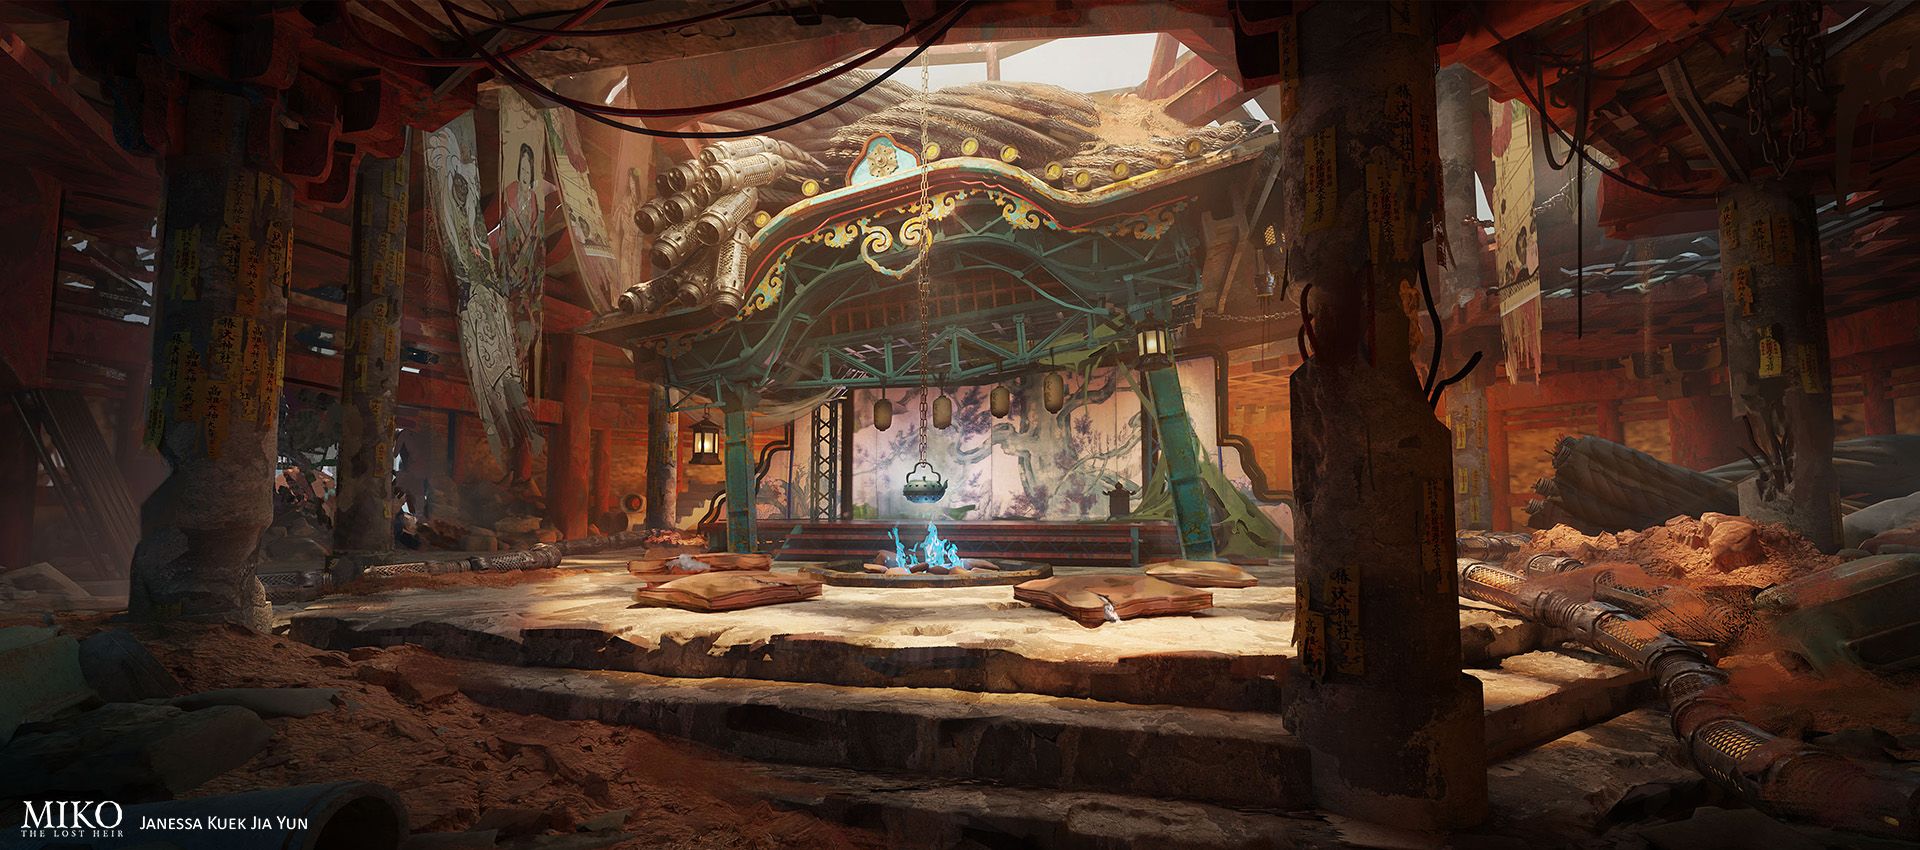
Finally, I decided to change the Shimenawa ropes to pipes to fit the salvagepunk theme better while keeping the original rope's shape. One of my goals for this piece was also to learn how to kitbash efficiently, as I intended to create this piece with minor paintovers.
In the final stages, I decided to replace the Shimenawa ropes with pipes, aligning more closely with the salvagepunk theme while retaining the original shape's essence. Additionally, one of my goals for this piece was to learn how to kitbash efficiently, intending to minimise paintovers throughout the creation process, which is why this piece was mostly done in 3D.
Developing an efficient workflow
For the final environment piece, I challenged myself to create a more complex and crowded scene—something I had always wanted to try but never had the courage to tackle. To make this work, planning ahead and working efficiently was crucial. As usual, I began with sketches, brainstorming ideas, and further developing the narrative to connect and blend elements I had established from my previous pieces.
I think better in 3D, so after outlining the key points and sketching rough ideas based on them, I quickly transitioned to 3D to better visualise the scene. Sketching over raw 3D renders also helps me refine my ideas.
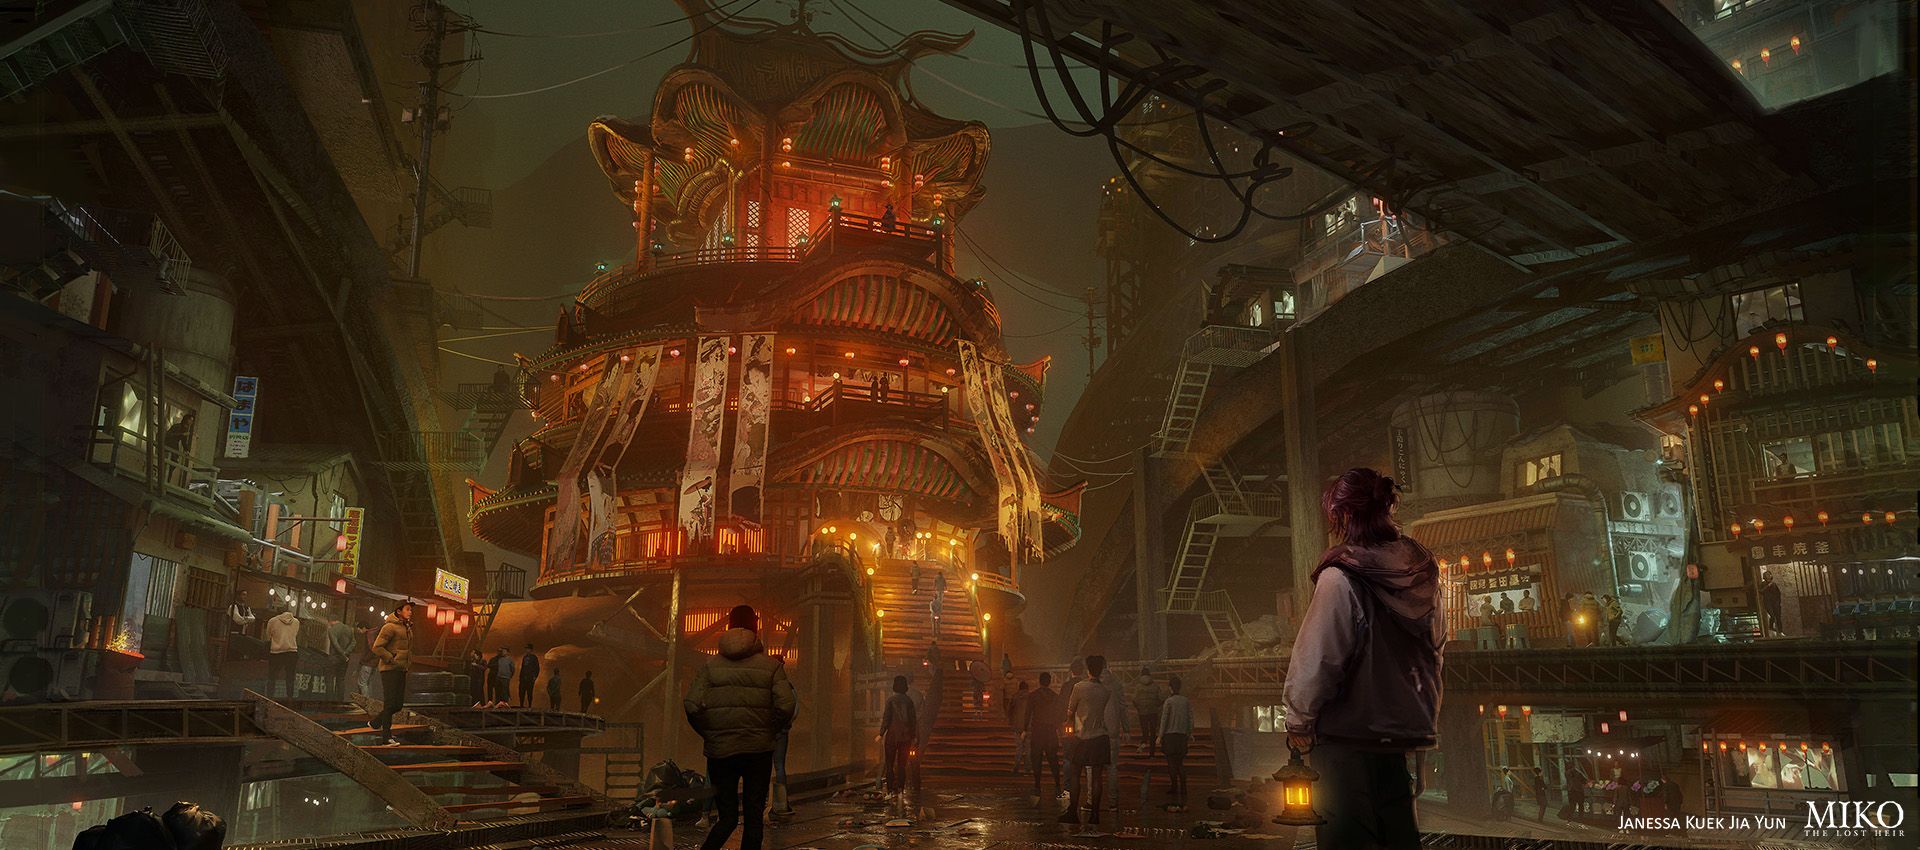
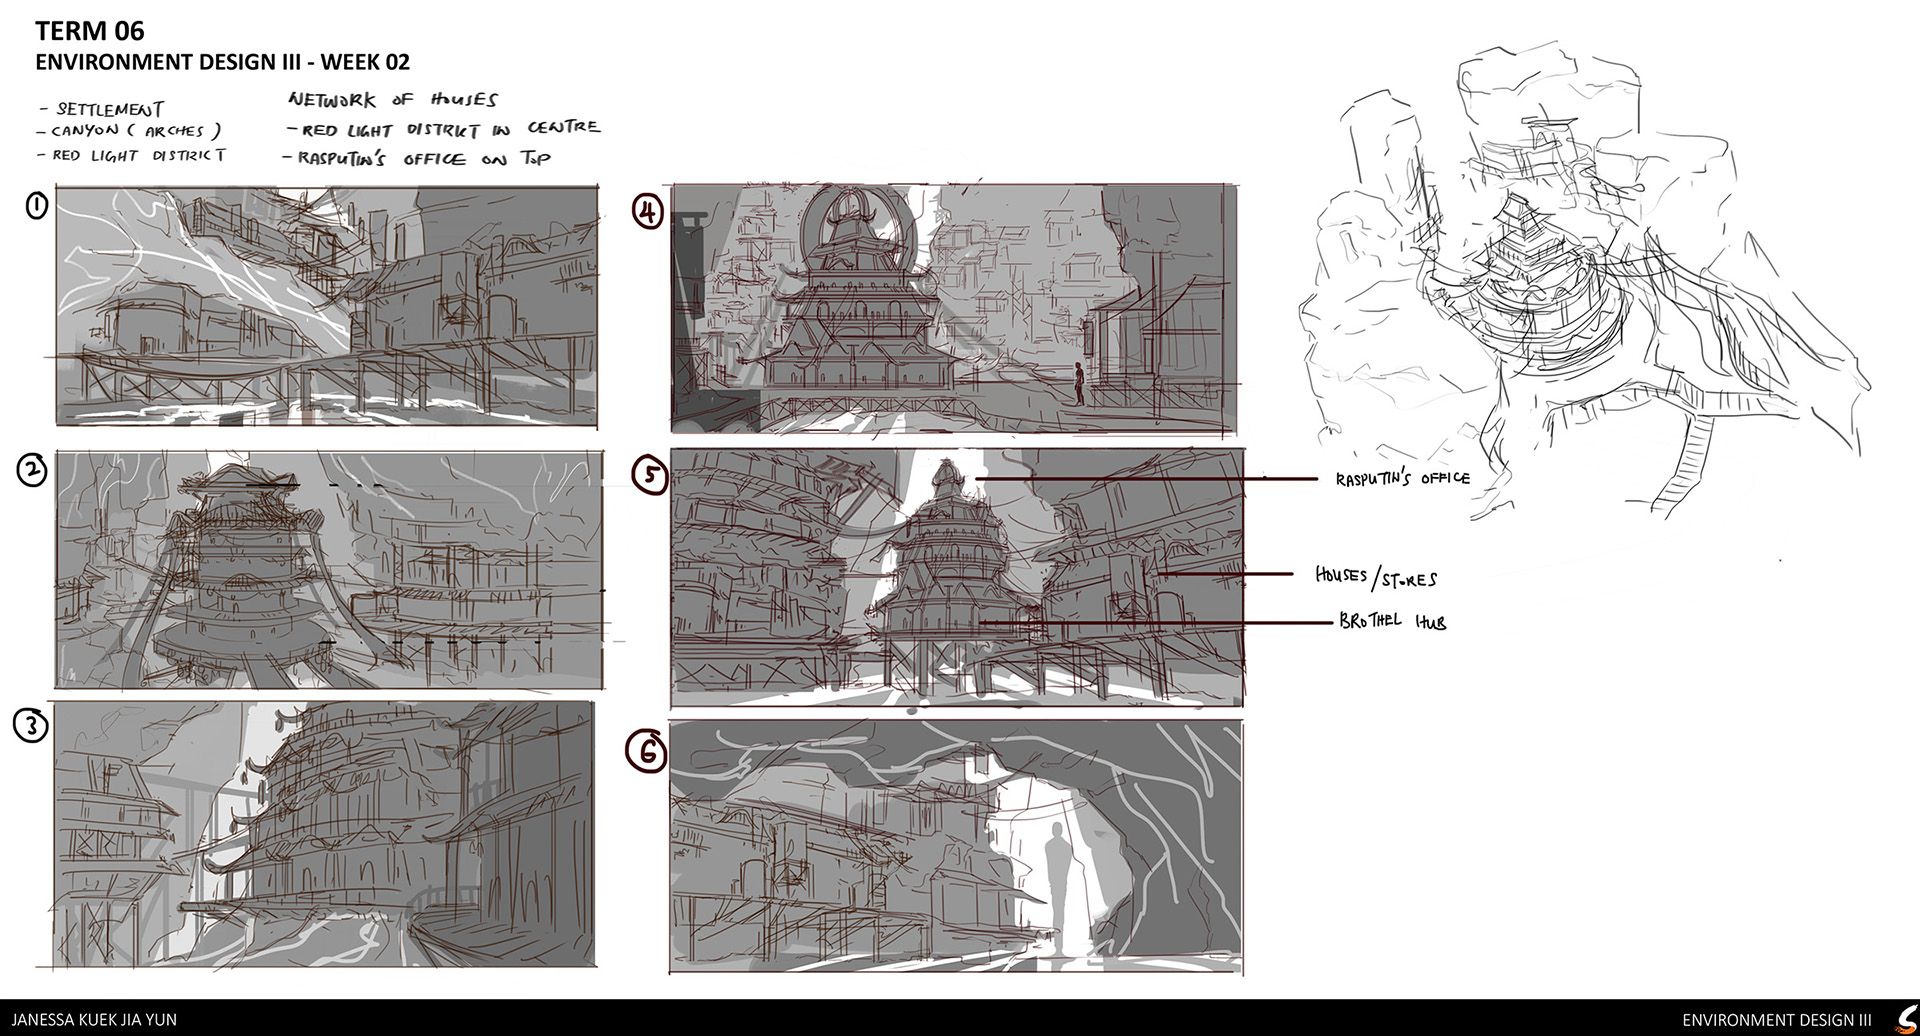
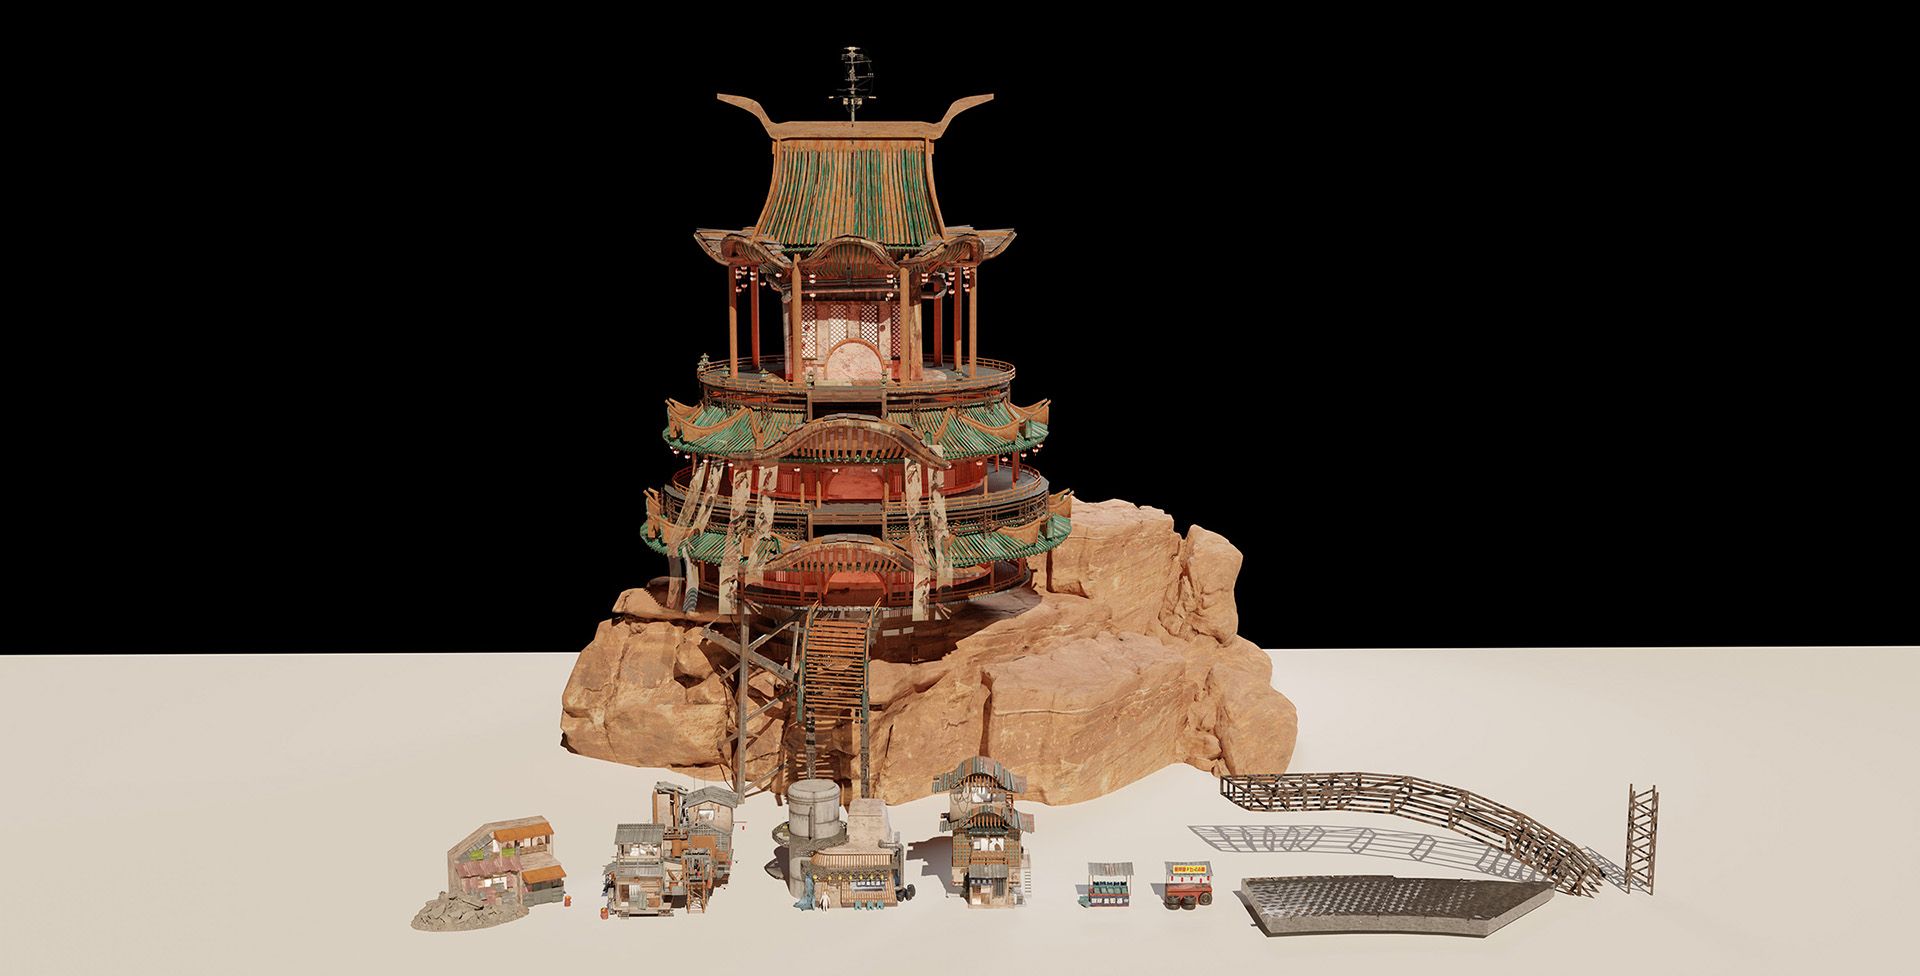
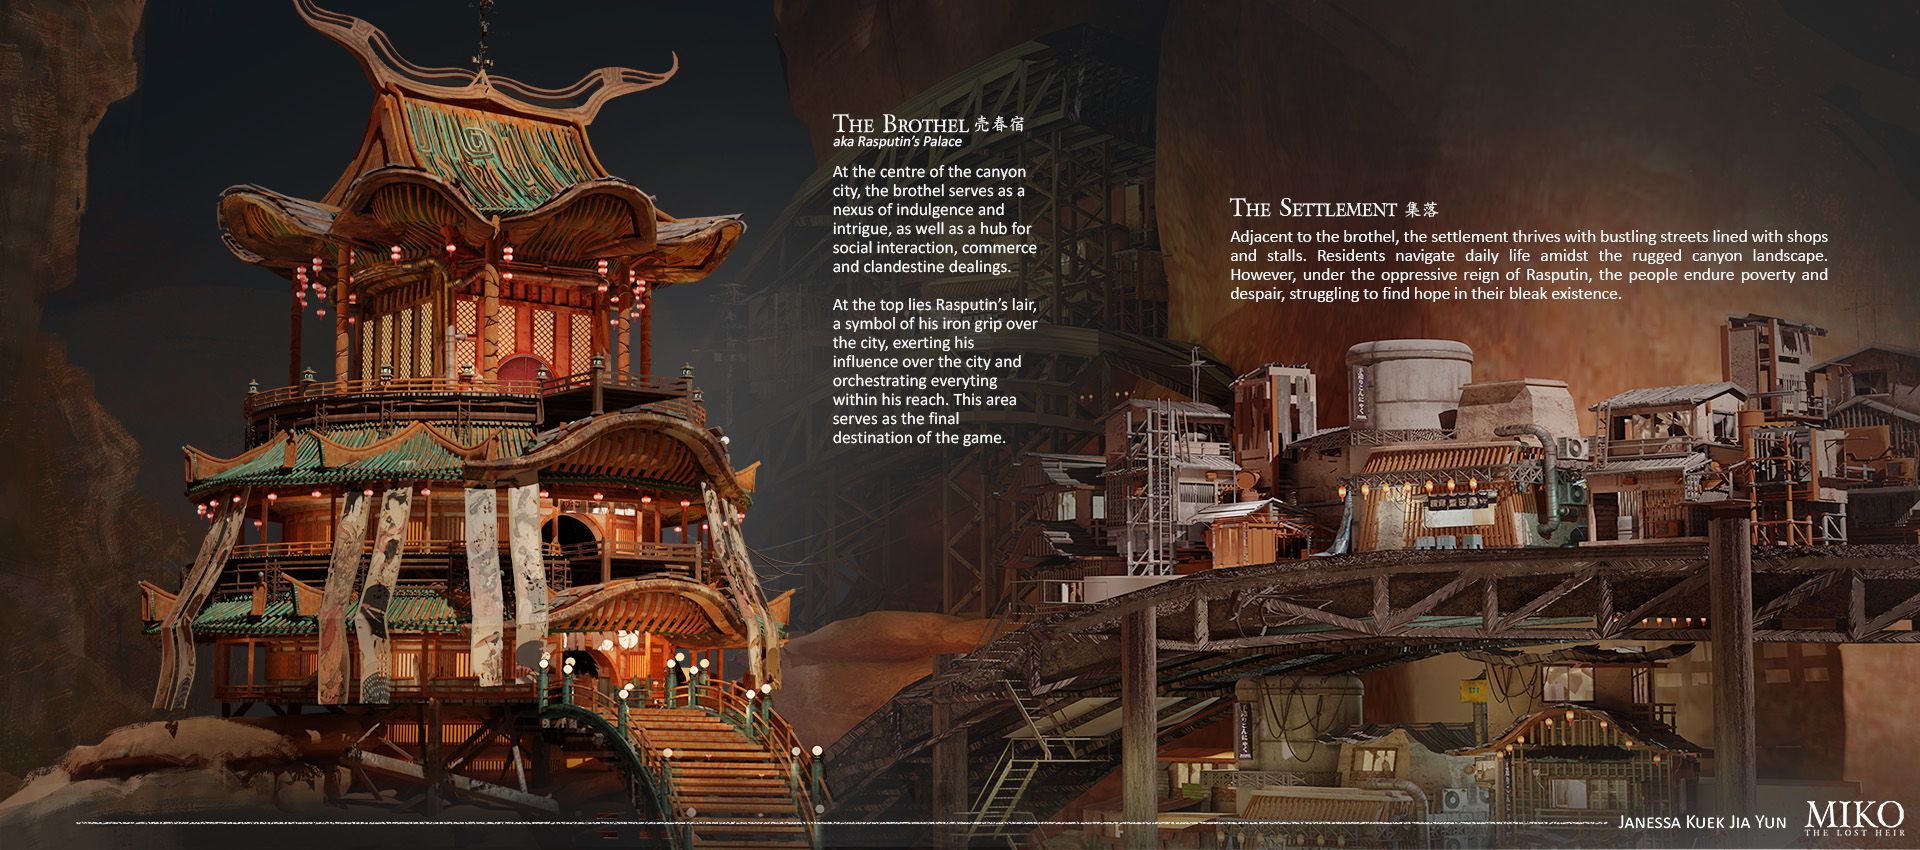
The idea for this piece was to depict the main settlement of my world, where the main villain and ruler, Rasputin, resides. The city is situated between canyons, with the primary focus being the red light district, where Rasputin lives on the top floor of the brothel. In line with the salvagepunk theme of my IP, which implies a "chaotic" visual language, I wanted this settlement to reflect that aesthetic. The scene would feature a network of houses and shops tightly packed around the brothel, creating a sense of claustrophobia and discomfort for the viewer. The goal was to create a dense, chaotic environment that enhances the unsettling atmosphere of Rasputin's domain.
As I blocked out the scene and took notes, I realised the composition would work better with a visible entrance to serve as a directional visual guide for the character in the foreground. This led me to remove the prostitute showcase walkway idea I had envisioned in previous weeks.
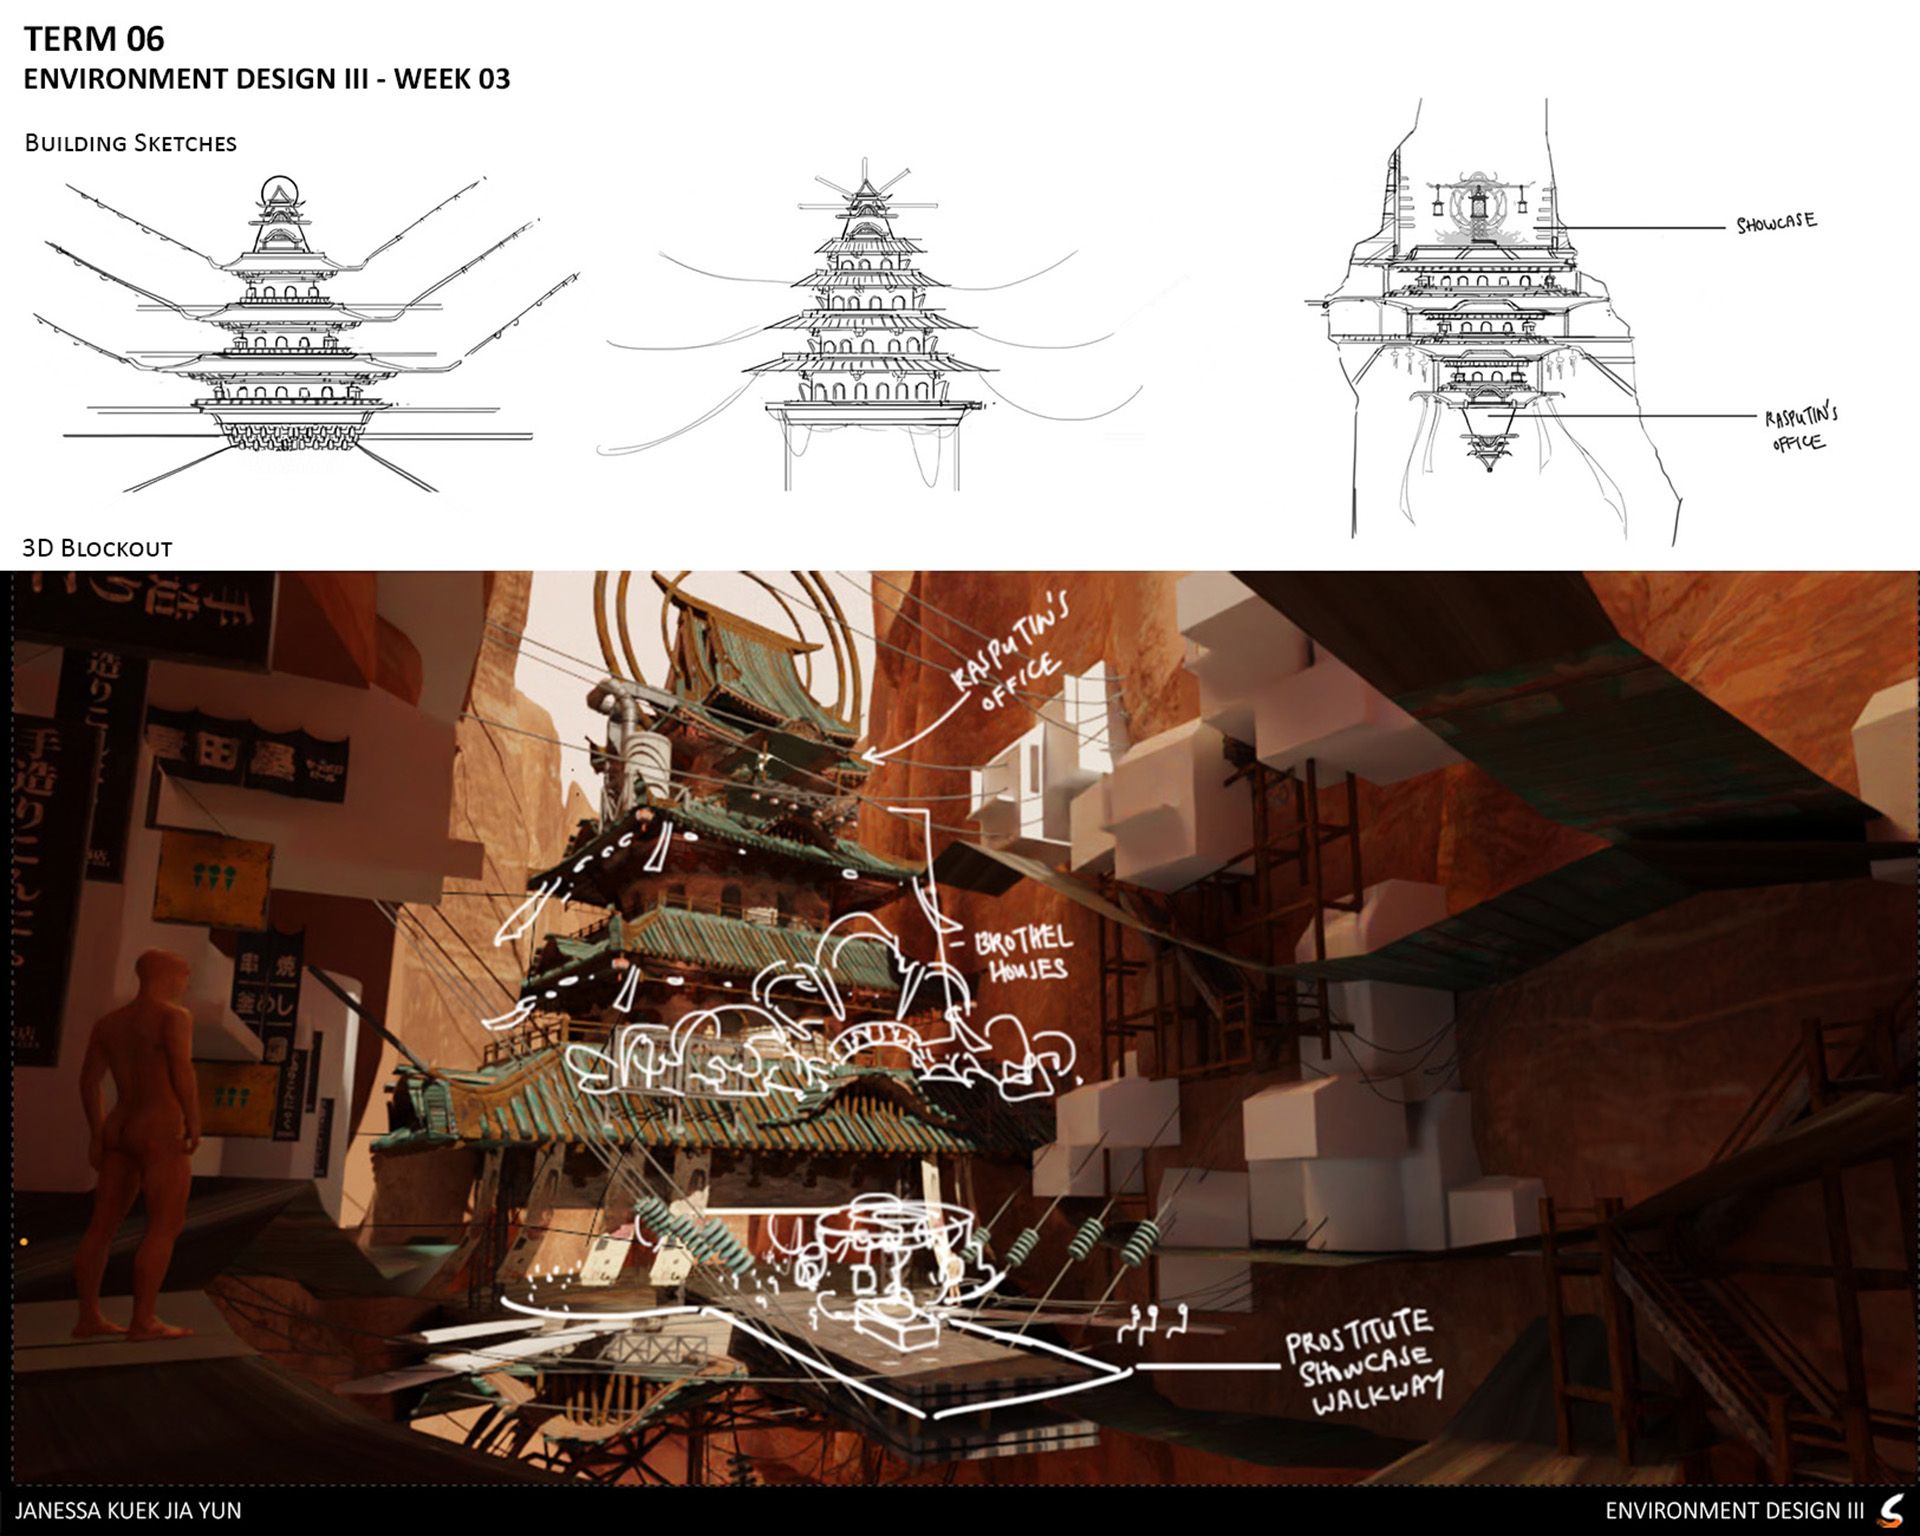
At this point in the process, I was experimenting with the architecture in 3D. I initially aimed for a traditional Japanese-style castle to convey grandeur and power, but it clashed with the architectural language I had established previously. Therefore, I sketched out more ideas and rebuilt them in 3D. Due to the complexity of the composition, I aimed for a simple silhouette for the focal point to stand out without adding chaos to the scene. Additionally, I arranged the surrounding buildings of the brothel in a curved manner to create a stronger leading line directing attention towards the main focal point.
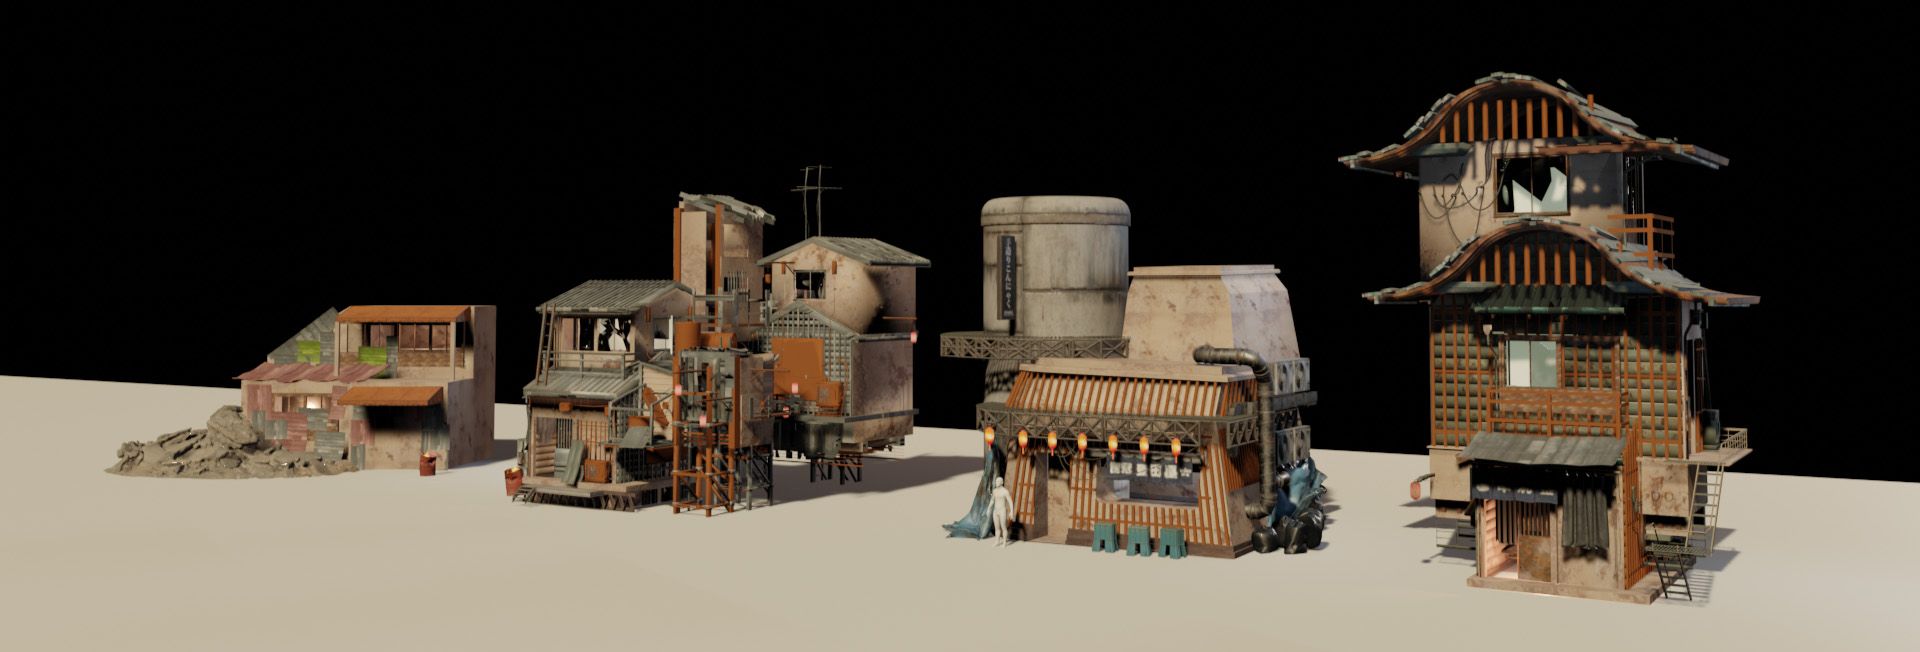
To streamline the process, I created my own modular building kits and established the materials and photo textures early on, enabling quick production of various buildings for my scene. I chose to kitbash the tertiary details, ensuring efficient use of time while maintaining a cohesive look throughout the environment.
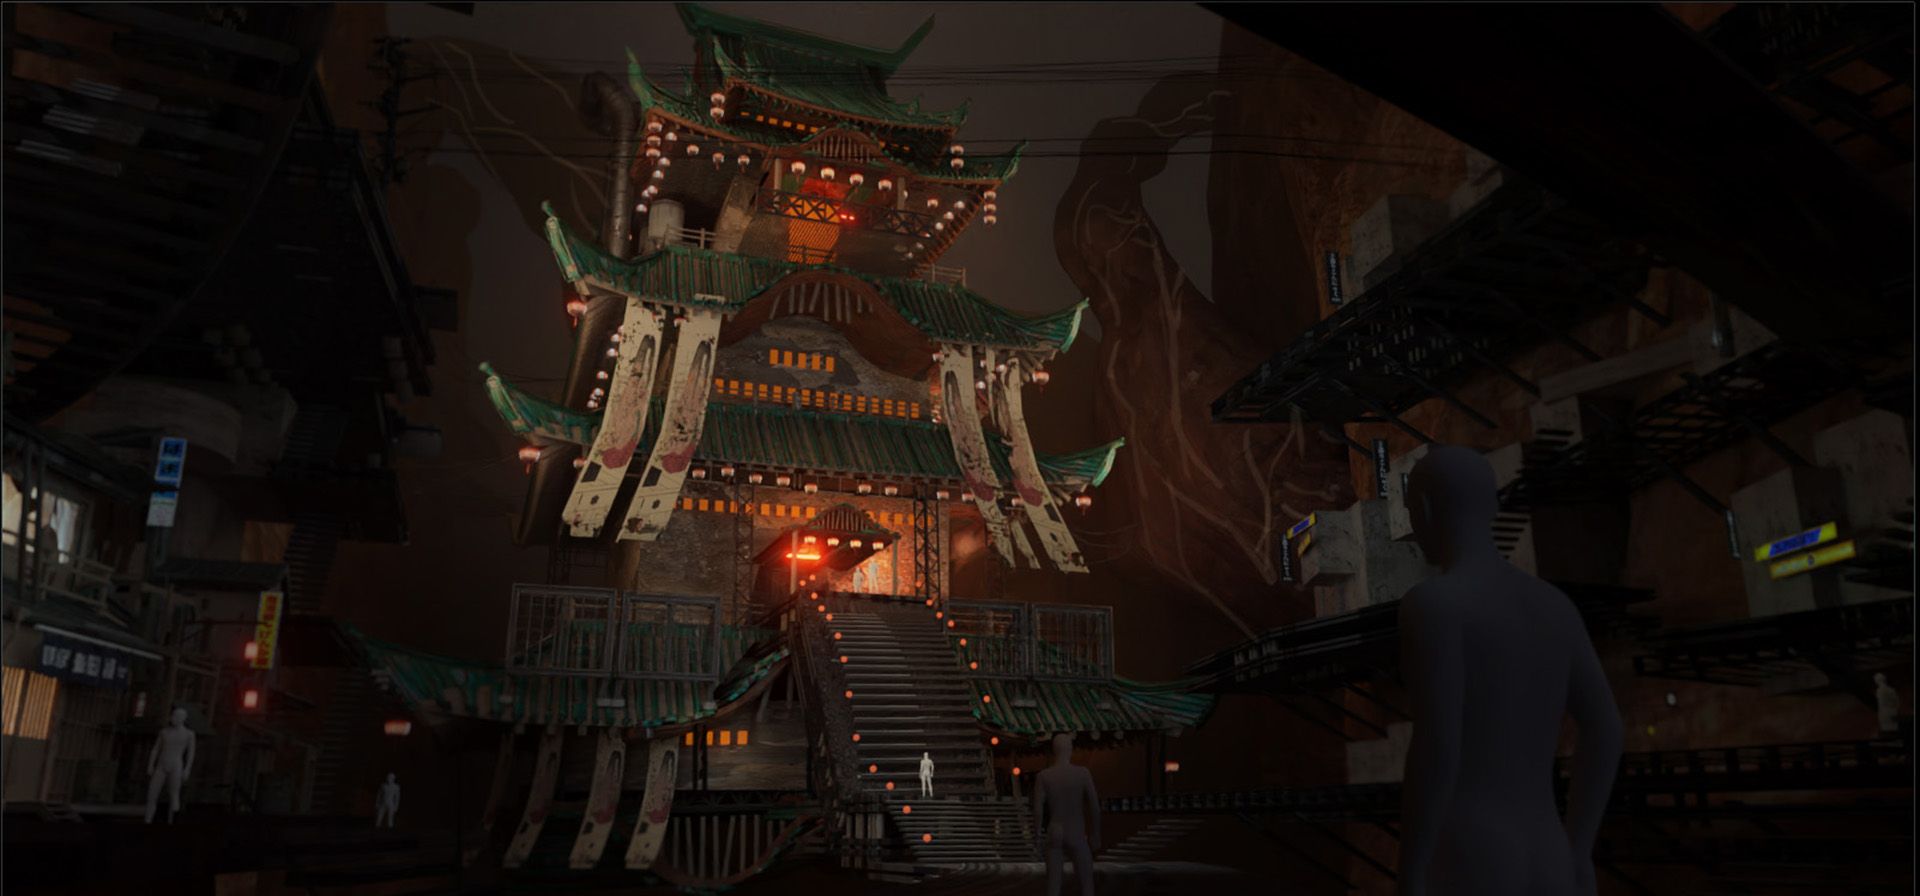
Recognising the scene's nighttime setting, I realised that excessive building detail wouldn't be necessary since much would be obscured. Opting for a night scene may seem minor, but it significantly saved me time in the process.
In order to bring life to this dystopian city, I needed to add lights and people to the scene. I was dreading this latter task until I discovered Procedural Crowds from Diffused Studios, a Blender addon that allows us to create crowds of people with just a few clicks. This tool helped me add that extra layer of depth and realism to my scene.
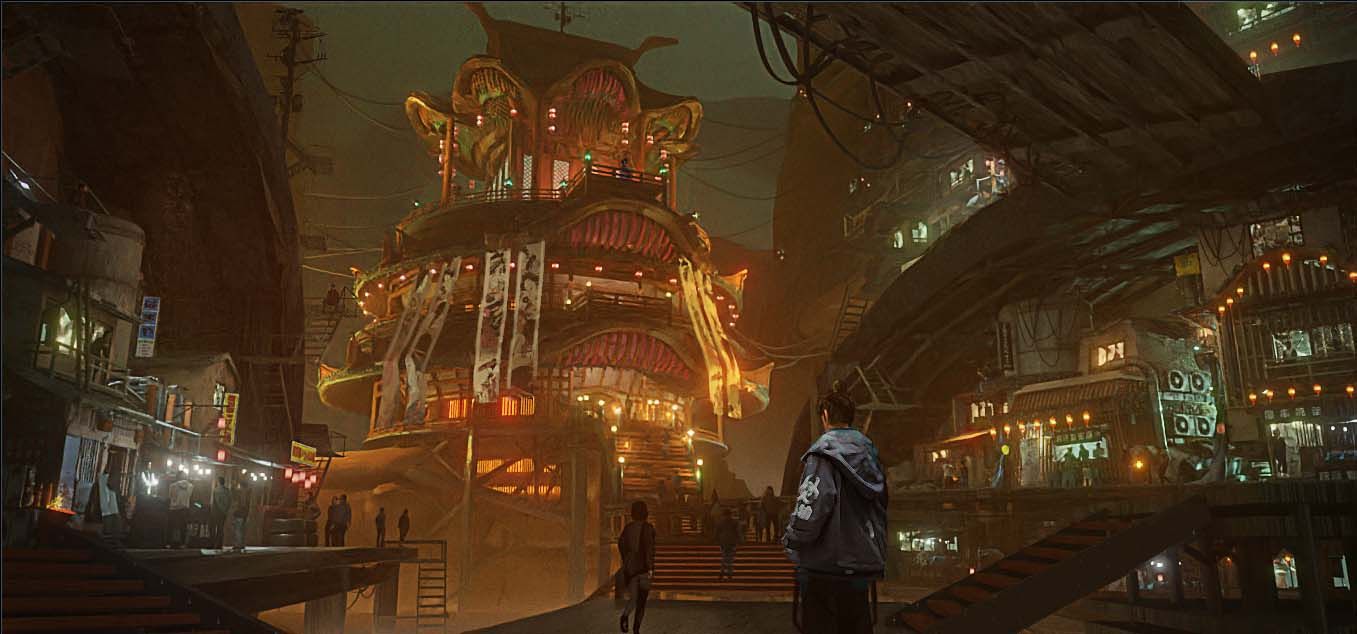
Finally, I wrapped it all up with paintovers and corrections to refine the overall look and ensure everything fit together smoothly. Voila, my scene is done!
Final

And that concludes my article on the environment pieces in MIKO: The Lost Heir! You may have noticed how things sped up and became easier with each piece, proving that practice pays off. Embracing the discomfort of learning is where real growth happens—after all, as they say, "Today's challenge is tomorrow's breeze."
Thank you for taking the time to read through this lengthy article! I hope I didn’t ramble on too much and that my journey encourages you to continue pushing your creative boundaries. A big thank you to The Rookies for reaching out and giving me the opportunity to share my workflow. Feel free to reach out if you’d like to connect, and check out more of my work on my Rookies and ArtStation pages.
Please connect and check out my work via my Rookies portfolio here.