I started from polygon primitives and worked my way from there. This was where I needed to pay the most attention. I needed to make sure my volumes had the correct proportions. After I was satisfied with the model's silhouette, I moved on to adding the rest of the shapes that define it.
Olivia Curelariu graduated in Architecture and Urban Planning in 2012. After six years of working in the Architecture industry, she decided to change careers and find a new path for herself as a 3D Artist.
Olivia is now a self-taught 3D Artist, gravitating to game development. We are pleased that she has taken the time to share how she created small props for her Rookie Awards 2020 Entry.
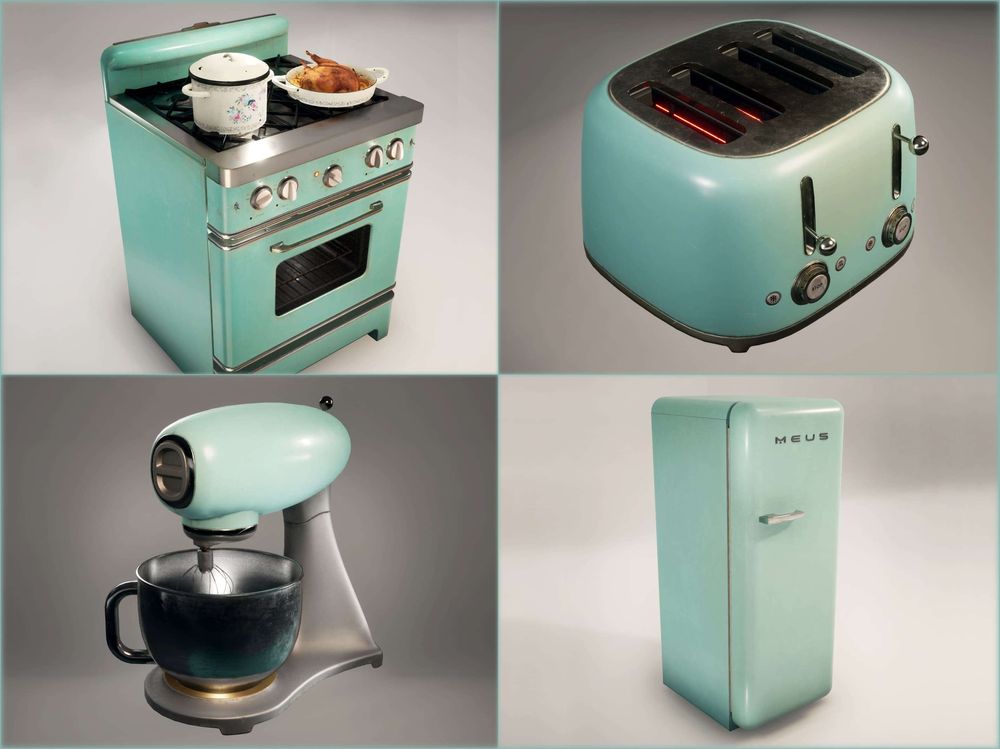
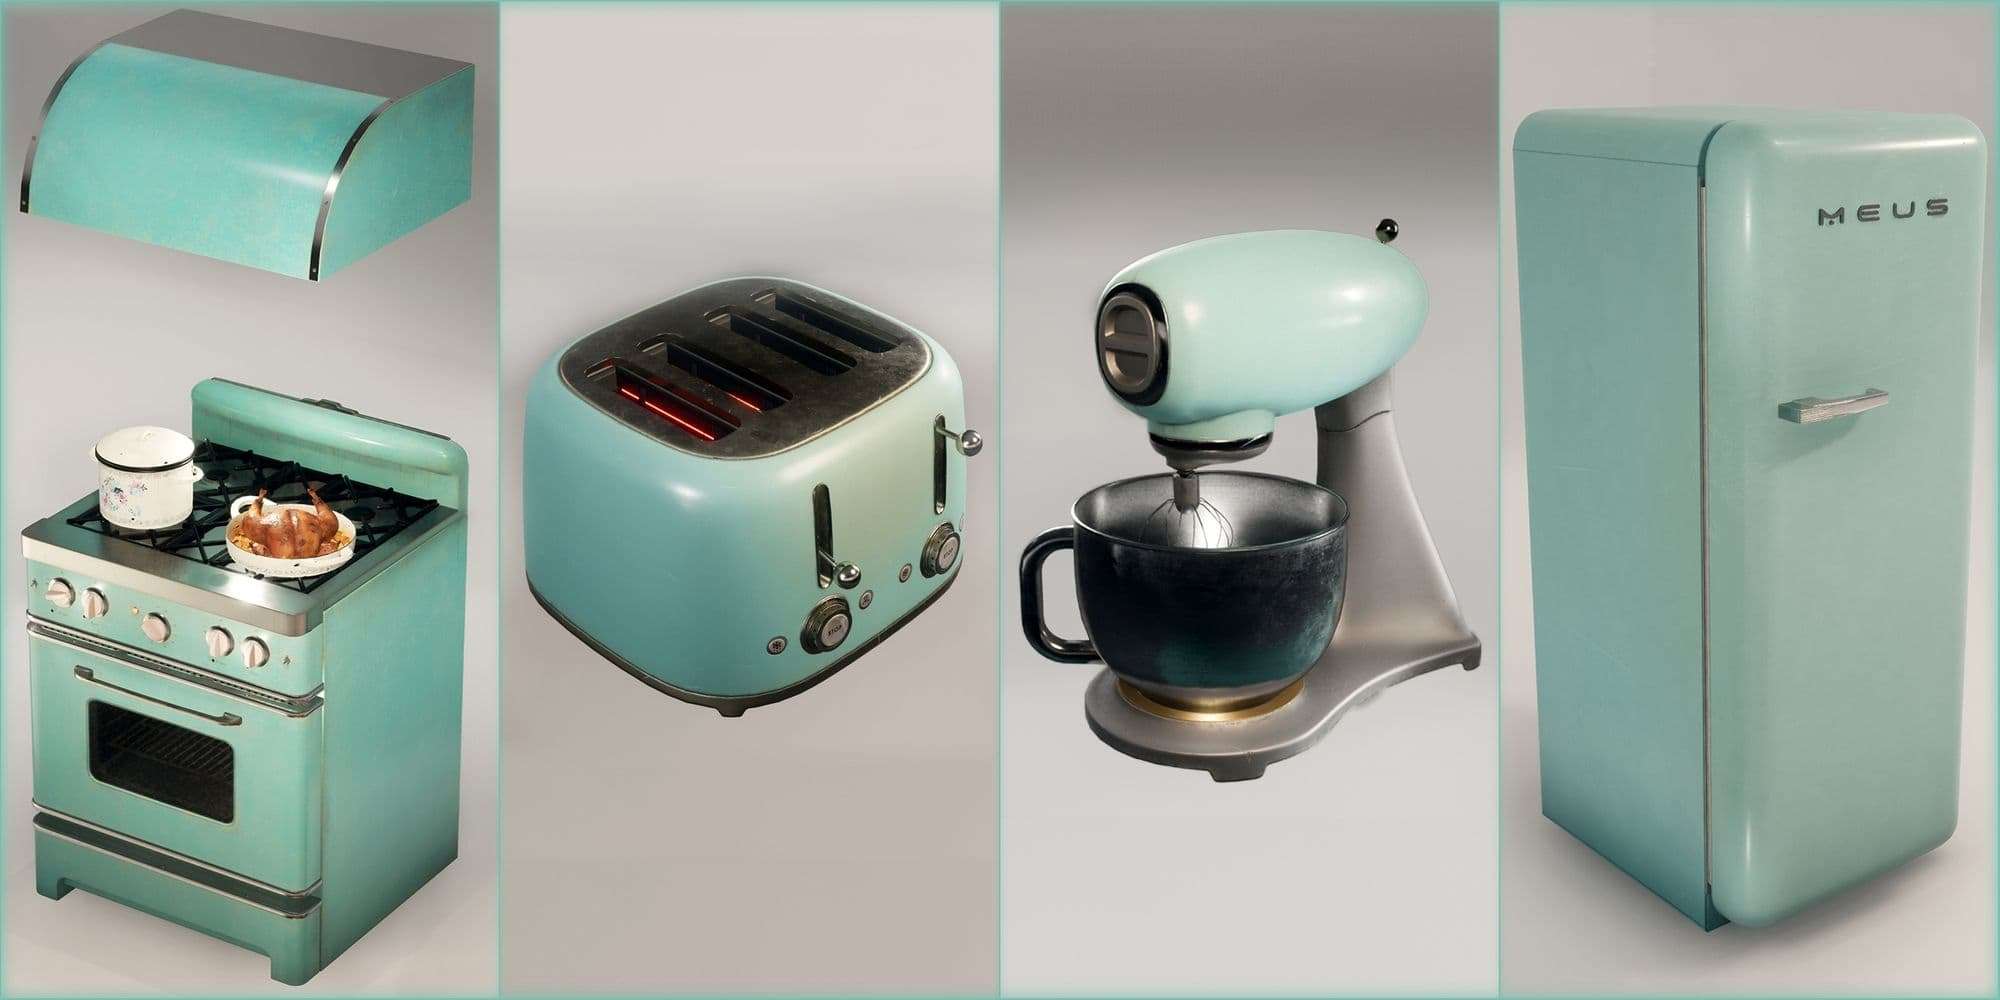
My entry for Rookies Awards 2020 consists of four props: a toaster, a cooker with a hood, a mixer, and a fridge. Earlier this year, I made a plan to create a bigger, more complex project, a kitchen scene, that would include these four props.
I am still in the early stages of learning and I felt I could feel overwhelmed by taking on too much at a time. So I treated the first couple of objects as smaller, independent projects. In this way I could:
Set clear objectives for each model;
I would be able to better understand all the processes;
I would get more familiar with the workflow;
And hopefully, I’d soon feel ready to put together the whole scene.
Dealing with smaller projects meant that I could complete them faster. And after each completion, I would get a sense of fulfilment and enthusiasm for the next one!
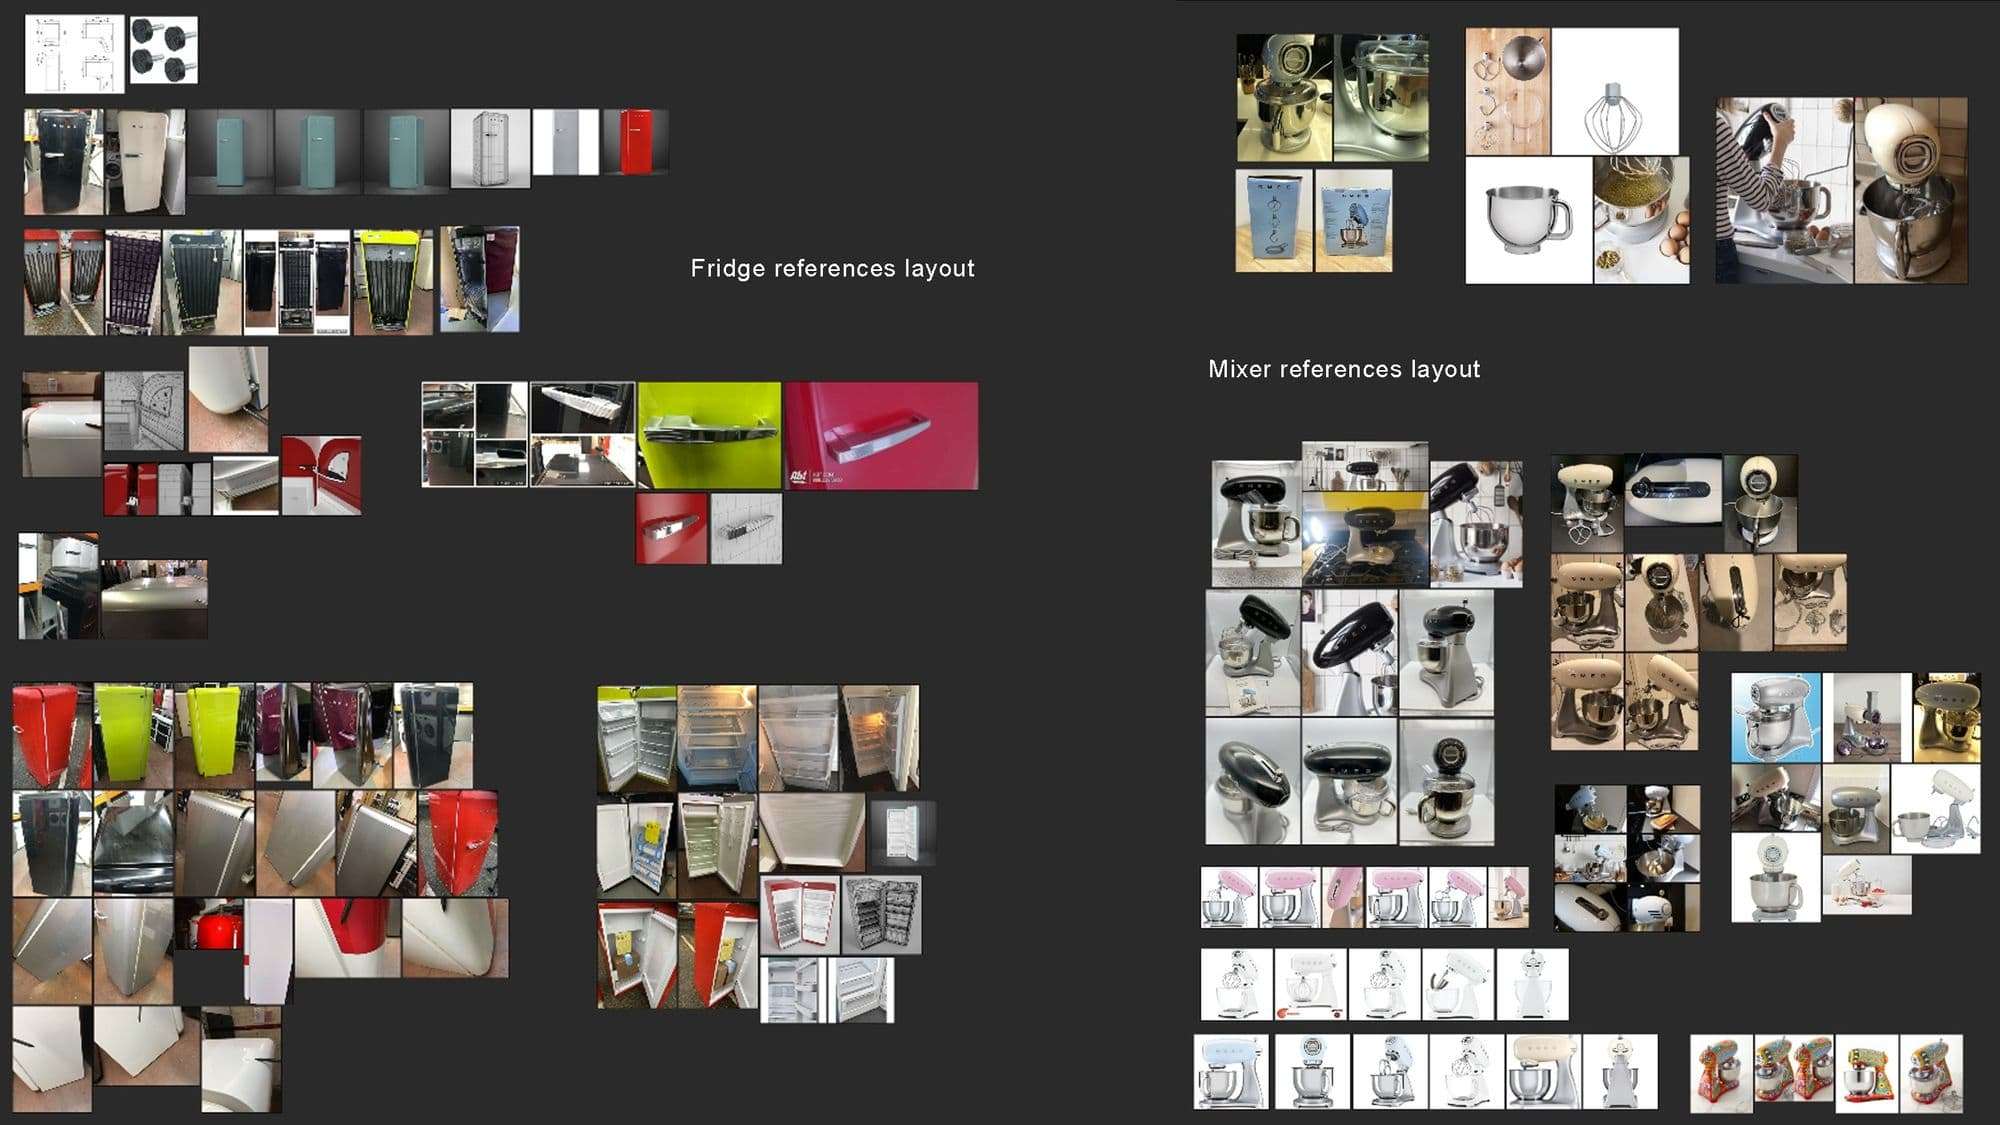
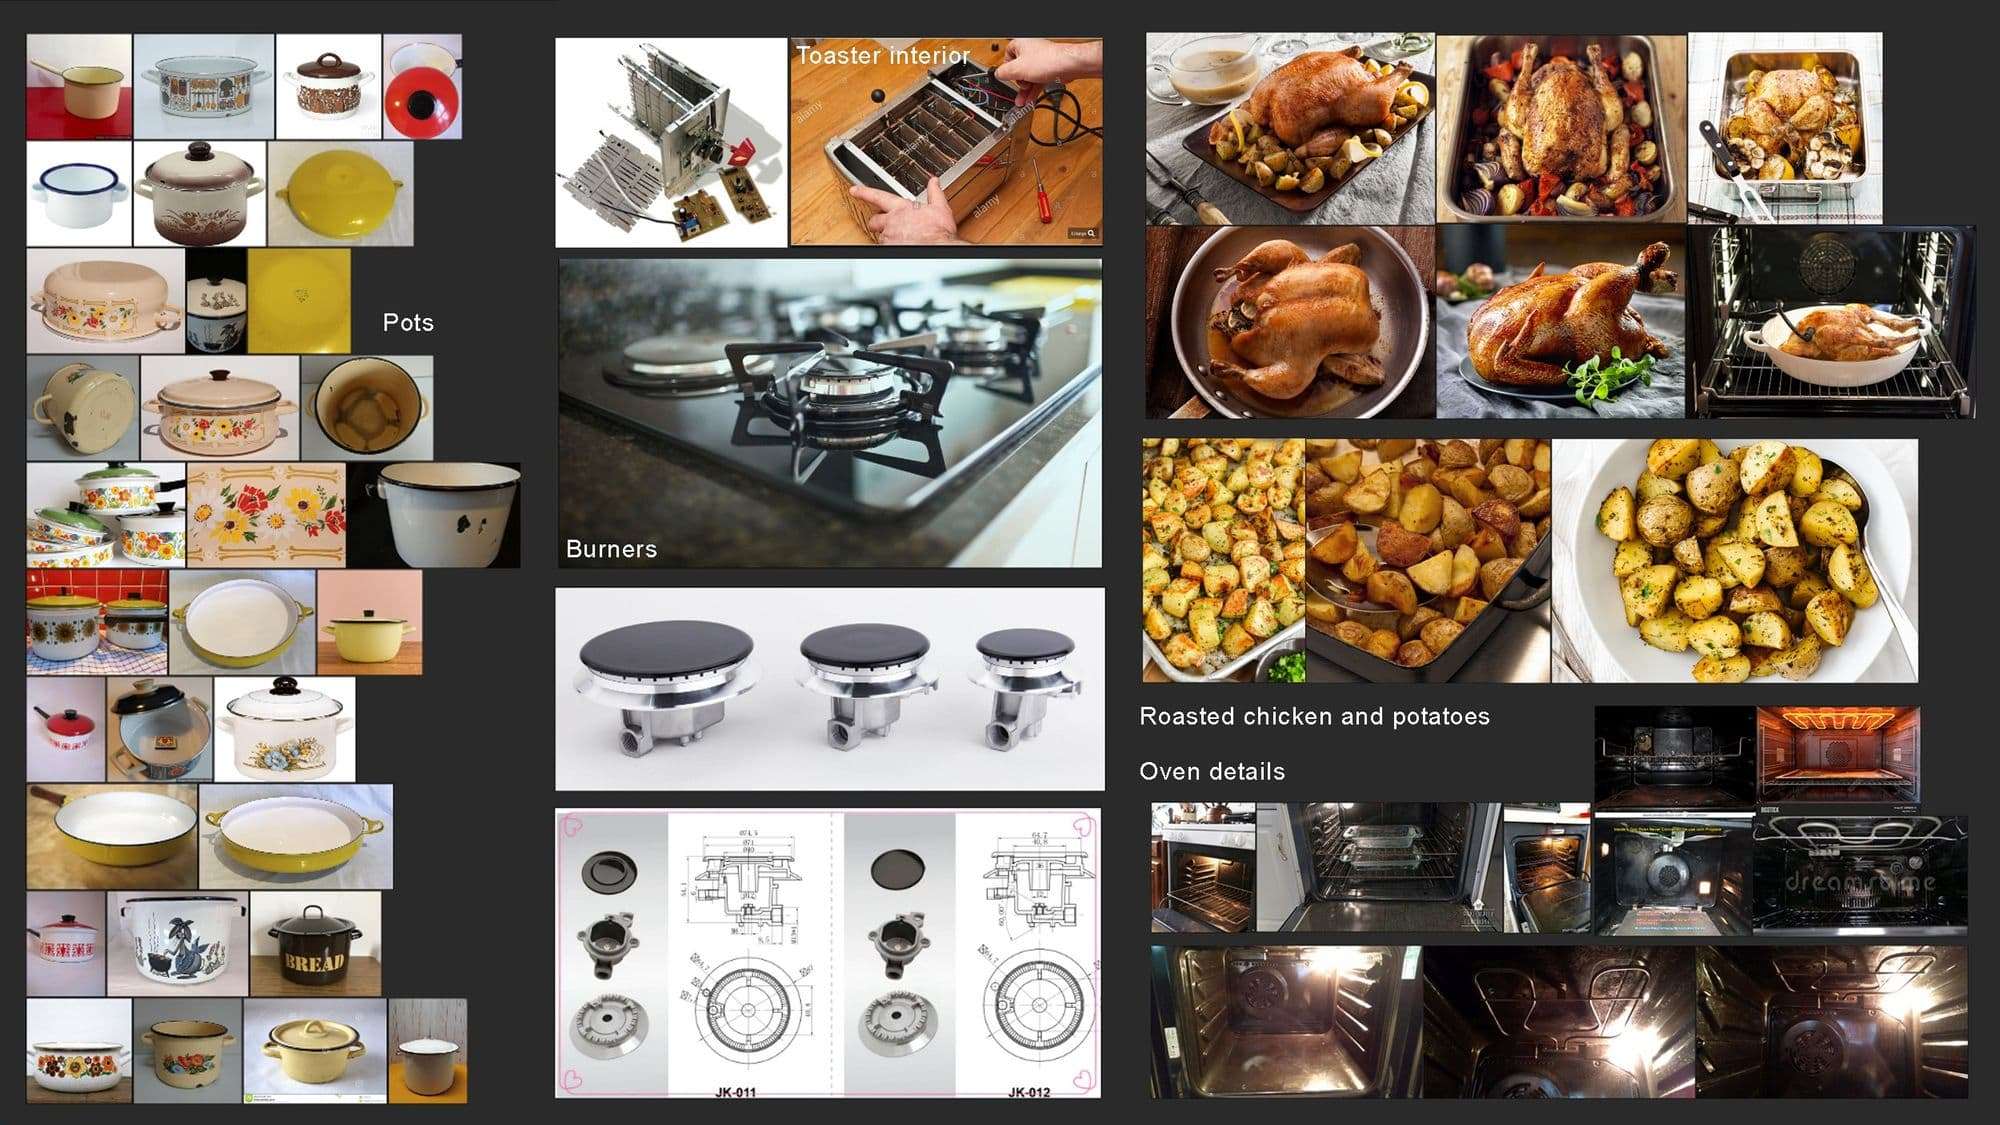
Reference
I used PureRef to organise the references for each asset. I researched many models from all sorts of suppliers and producers. First, they needed to look good and interesting in real life, and I needed to have a minimum amount of information about each item. For example, if I knew the dimensions of an object I didn't have to guess it's scale.
If I had views from more angles I didn’t have to imagine what the object looked like from behind or elsewhere. If I had close up shots it would help me when I got to creating finer details. Having all this information made my work easier to focus on getting the best out of my model and not worry about how to fill in the missing details.
After deciding on an object and gathering reference, I made a reference folder with sub-folders: general perspectives, details, wears and so on.
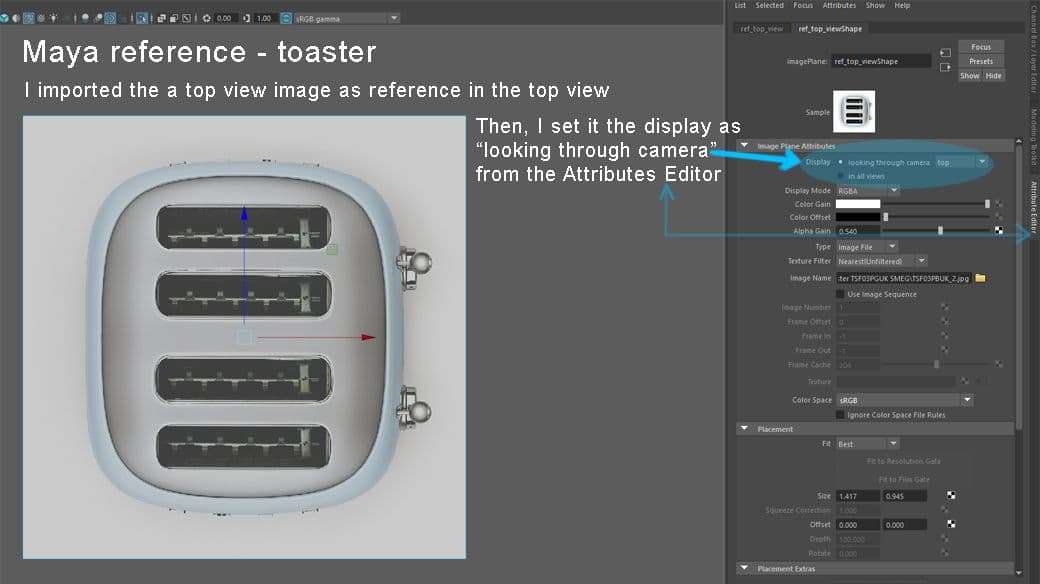
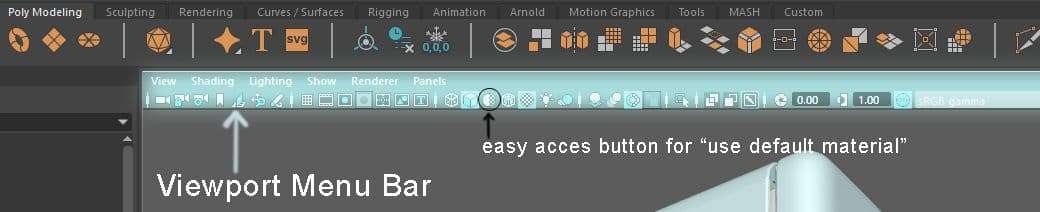
In some cases I imported reference into Maya, to help me with the modeling. If I had 2D orthographic views (or close to orthographic) I imported them as “Image Planes” from the View Menu located in The Viewport Menu Bar.
Modeling
I did the modeling in Maya. For each prop I followed a 3 steps approach: block model, high poly, and low poly. I mostly worked with a single panel layout and I used the “spacebar” marking menu to navigate between different views. If I needed to check the model from all views, I used the 4 panel layout. Or, if I needed to move a piece of geometry and see how it looked from another view, I used the 2 panel layout. I toggled between the custom panels views from the Tool Box.
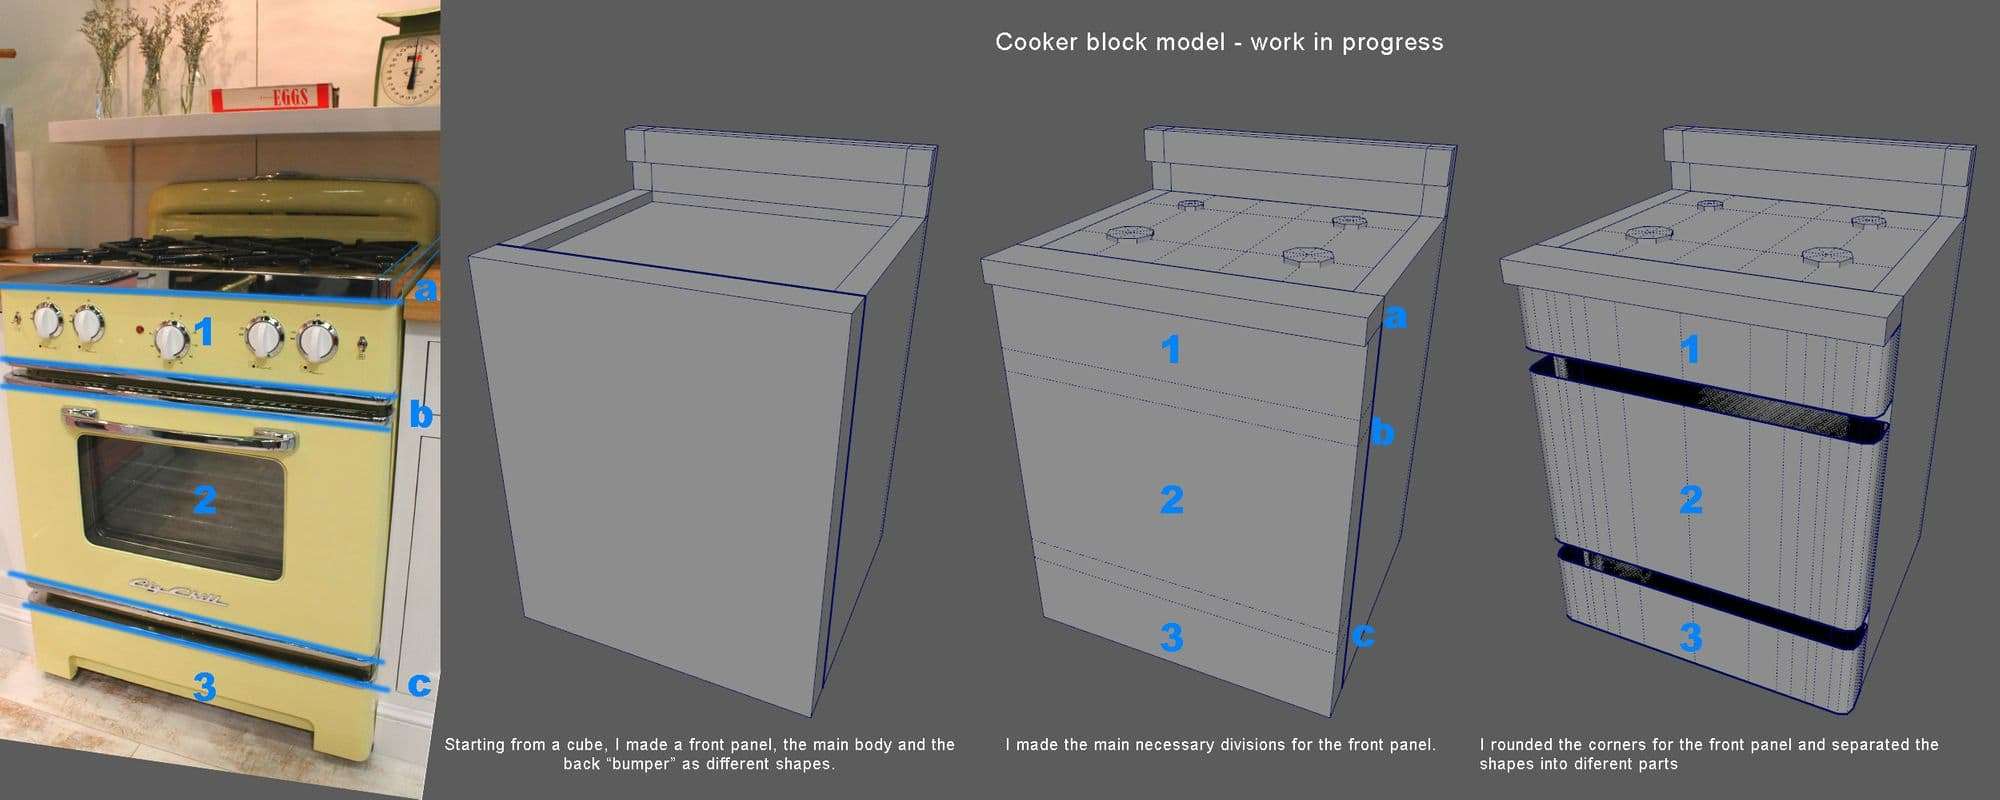
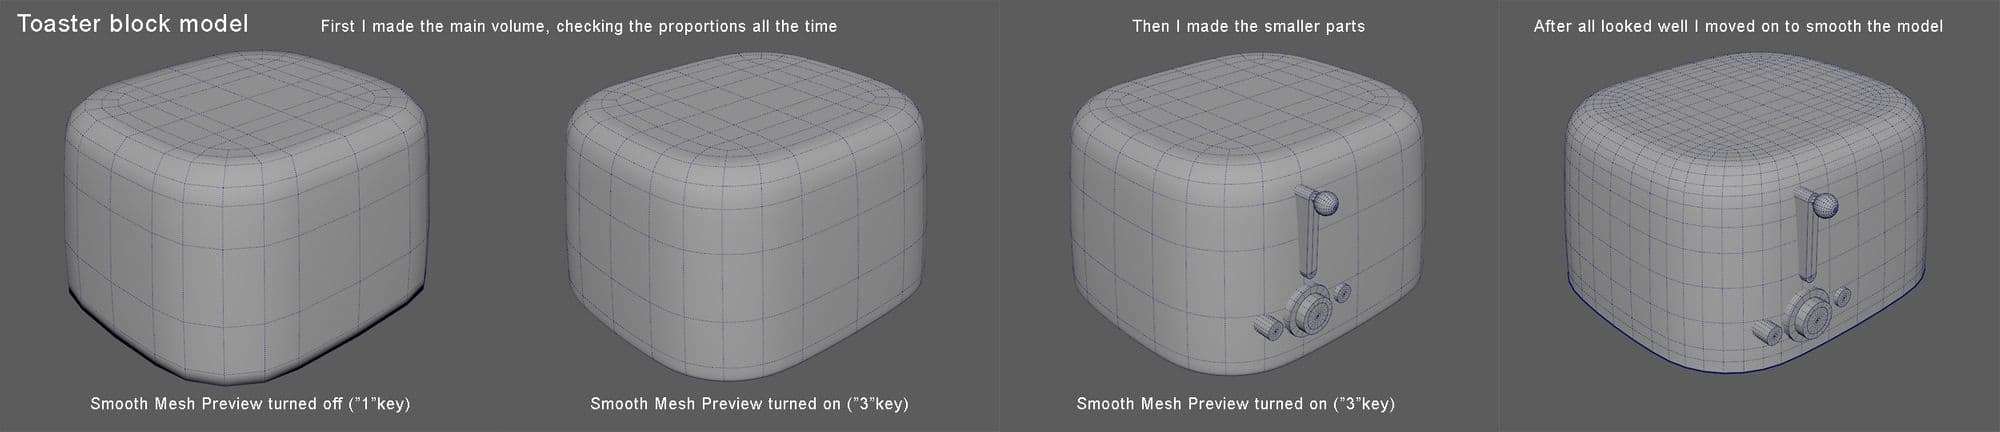
Block model
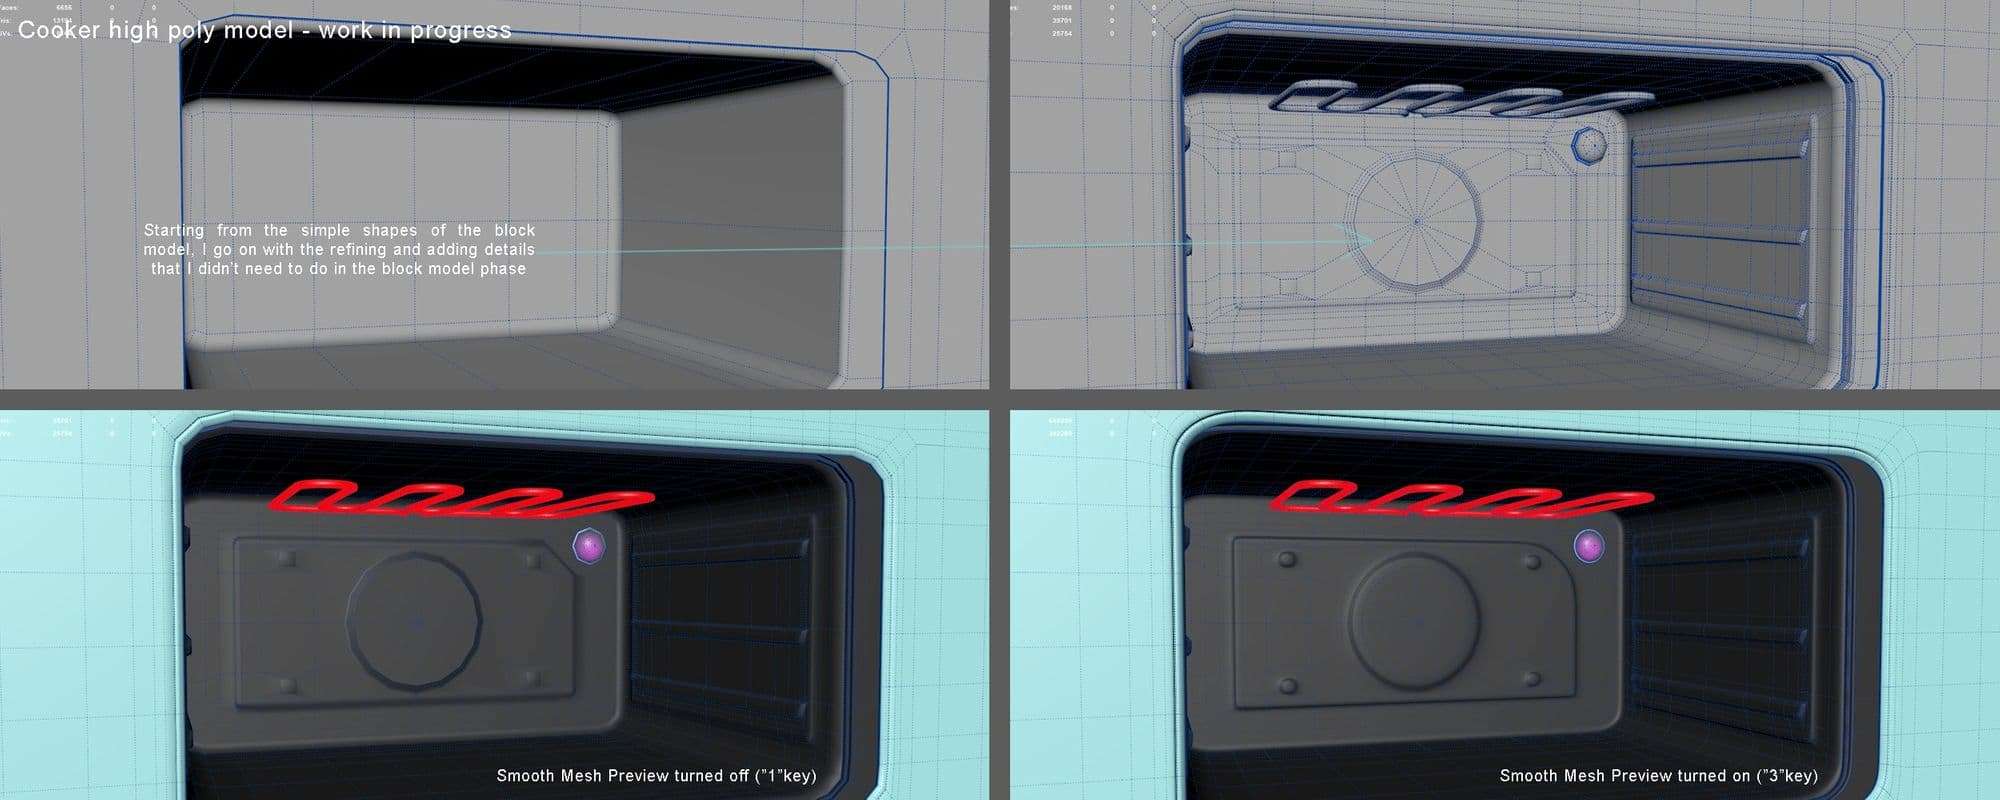
I started from polygon primitives (cubes, cylinders, planes, spheres) and worked my way from there. This was where I needed to pay the most attention. I needed to make sure my volumes had the correct proportions. After I was satisfied with the model's silhouette, I moved on to adding the rest of the shapes that define it.
I only smoothed a model after I was ready to move on to the next step in the modeling phase. I used the smooth preview mode (“3” key) until I was ready to actually smooth something.
I made a group of all the pieces that represent the final block model. I put it in a new layer that I named appropriately. When I went on with the detailing for the high poly phase I worked on a copy of this group. This meant I'd have a clean, rough version of the block model as backup in case I needed it later. I tried to keep my scene tidy, so I cleaned stuff I didn't need from the Outliner before moving on.
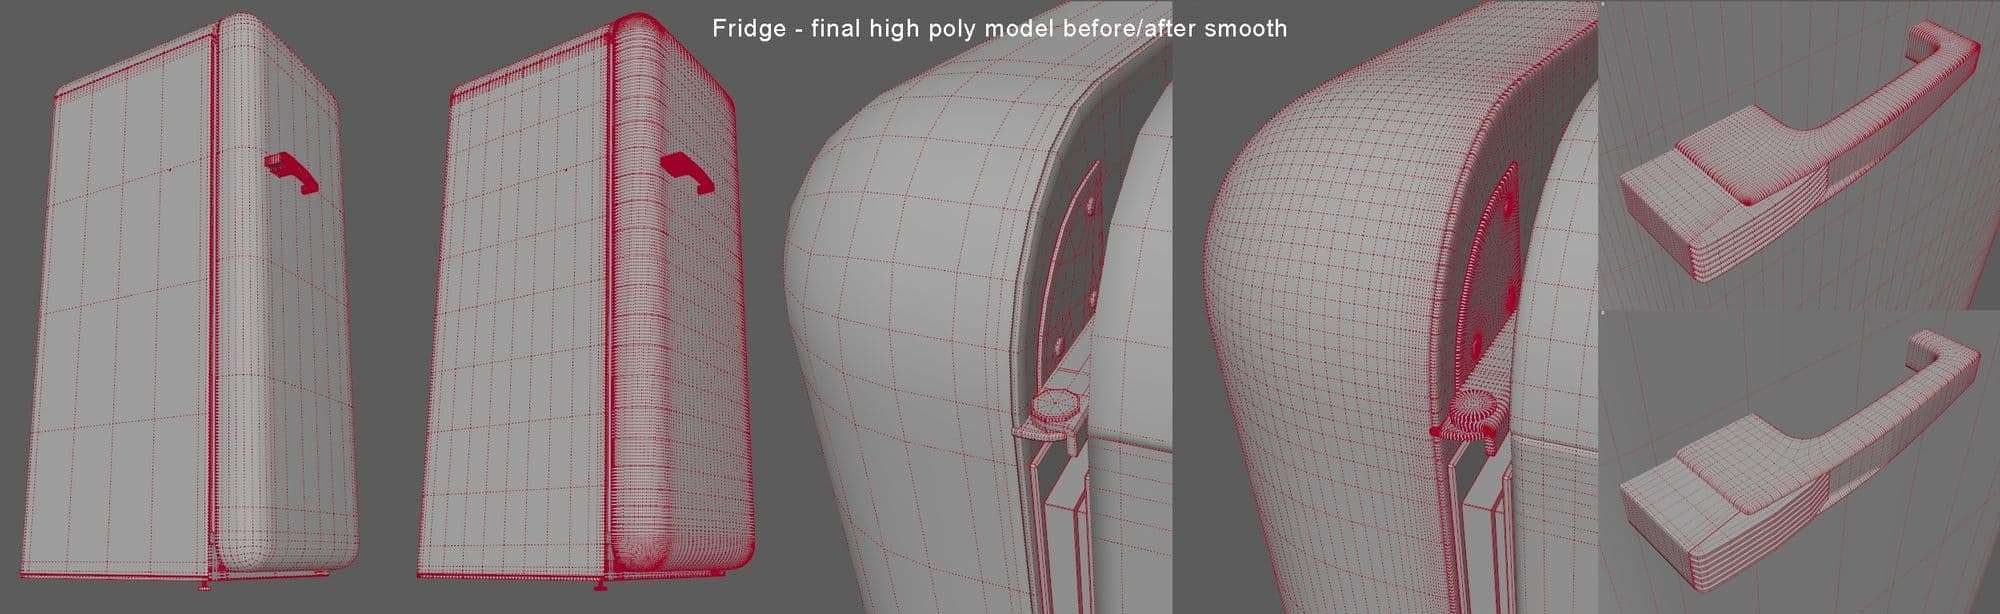
High poly model
The high poly phase went well if I got the proportions of the block model correct. When I spotted mistakes in the shapes I came up with, and if they were too difficult to fix while working on high poly, I went back a step to the backup block model group. I worked towards having clean topology by the time I reached the end of the block phase.
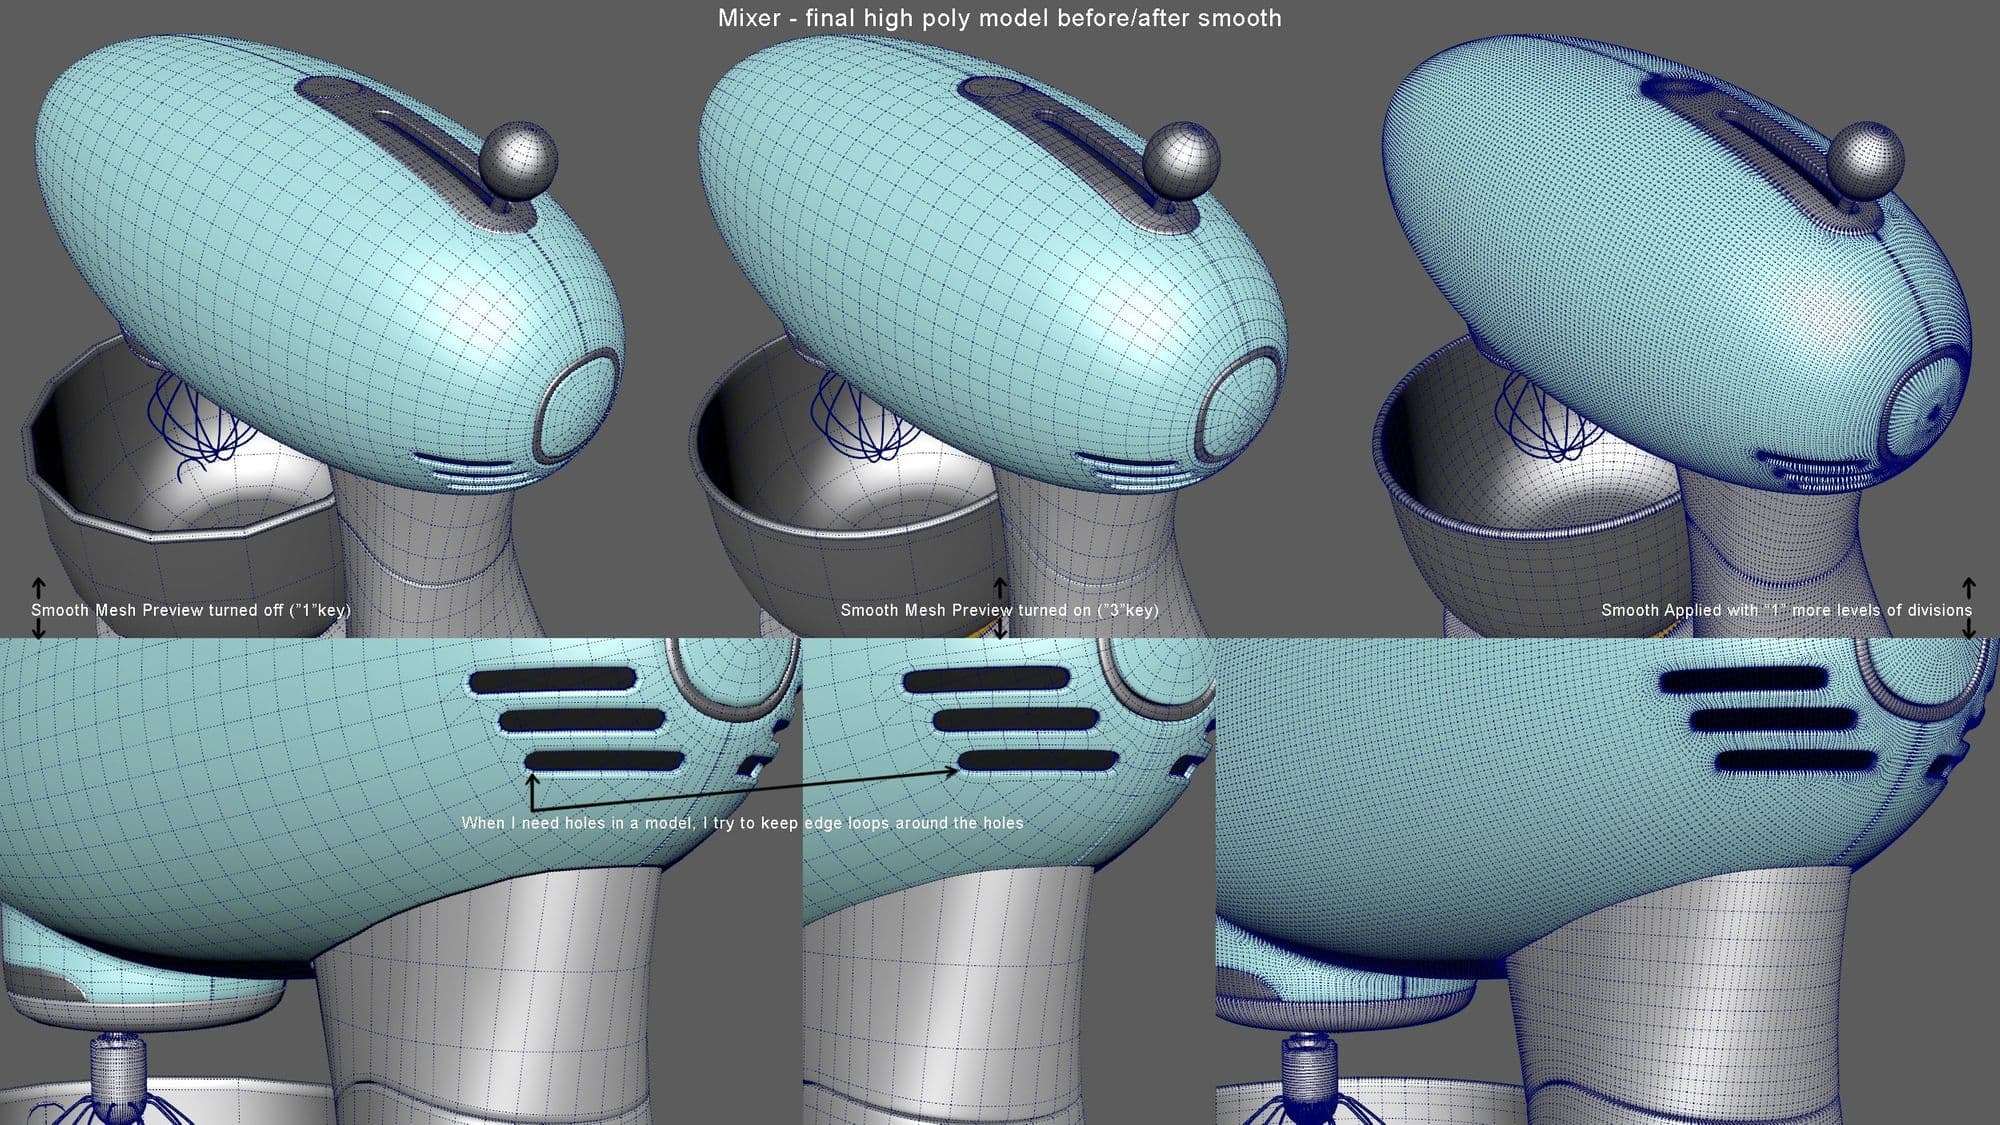
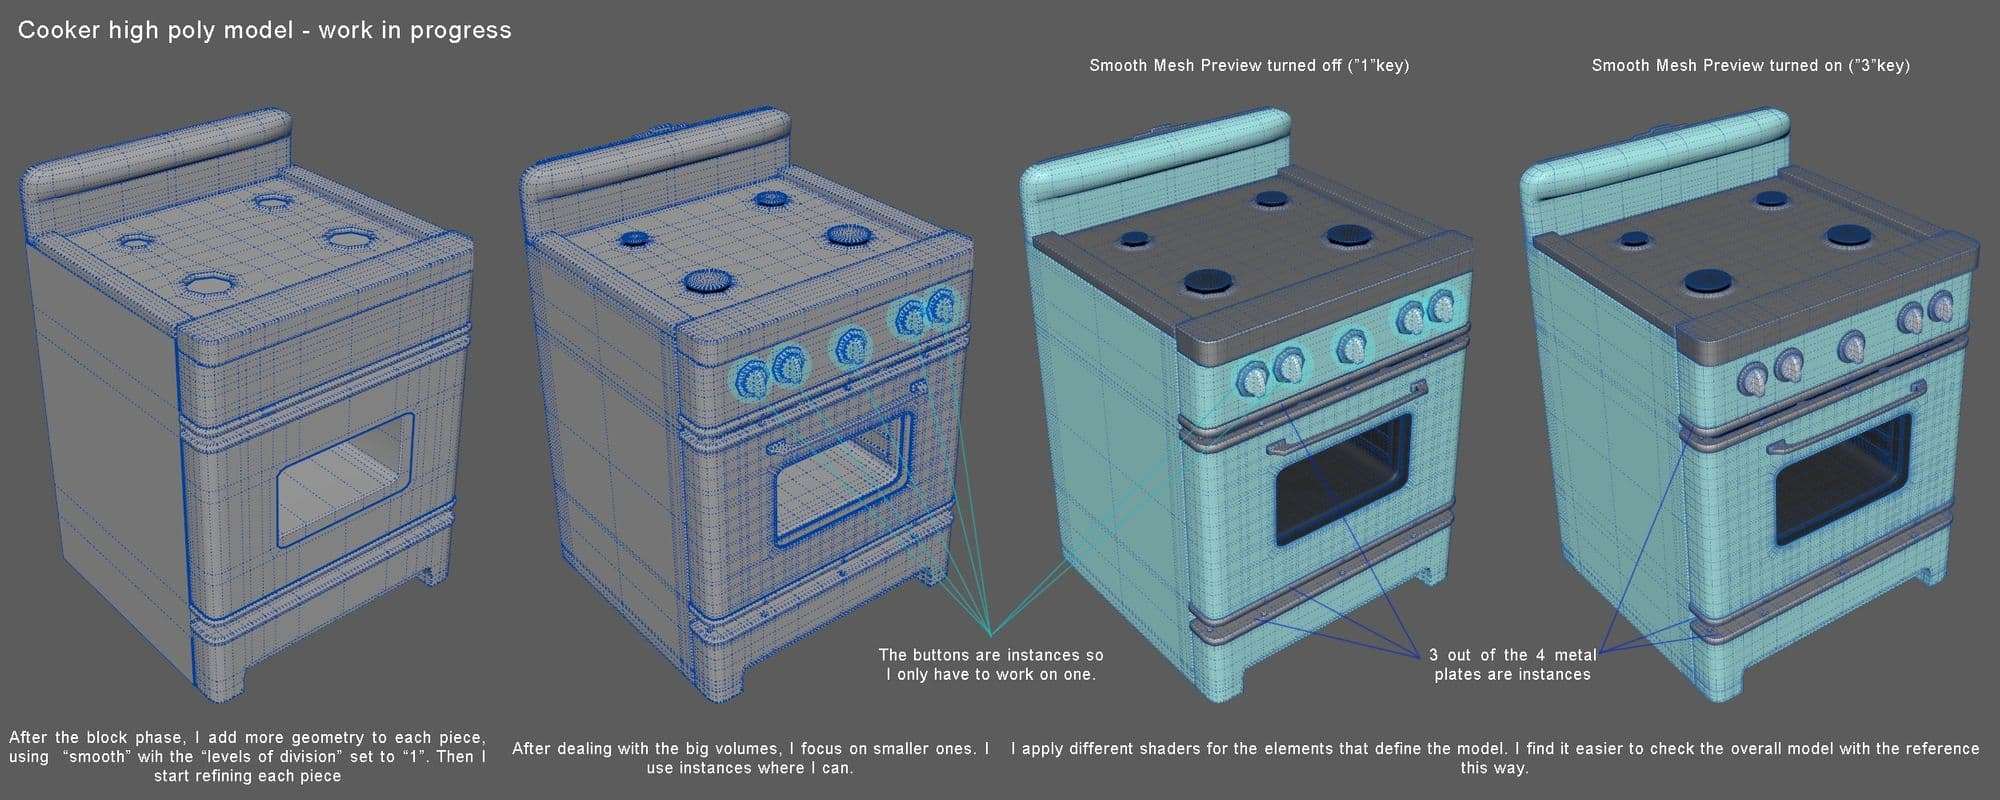
The high poly process was the same for all the assets. I started with refining the biggest shapes, then moved on to the smaller ones, then added details. I toggled a lot between smooth preview on/off (“1” vs. “3” key).
I made and applied different materials on my high polys. I had materials for the blue-plastic case of the objects, for the grey metals, for the golden metals, and so on. I found it easier for me to compare my model to the reference this way.
I started from polygon primitives (cubes, cylinders, planes, spheres) and worked my way from there. This was where I needed to pay the most attention. I needed to make sure my volumes had the correct proportions.
I could easily switch to a preview with “default material” from the Shading Menu located in The Viewport Menu Bar, if I needed to.
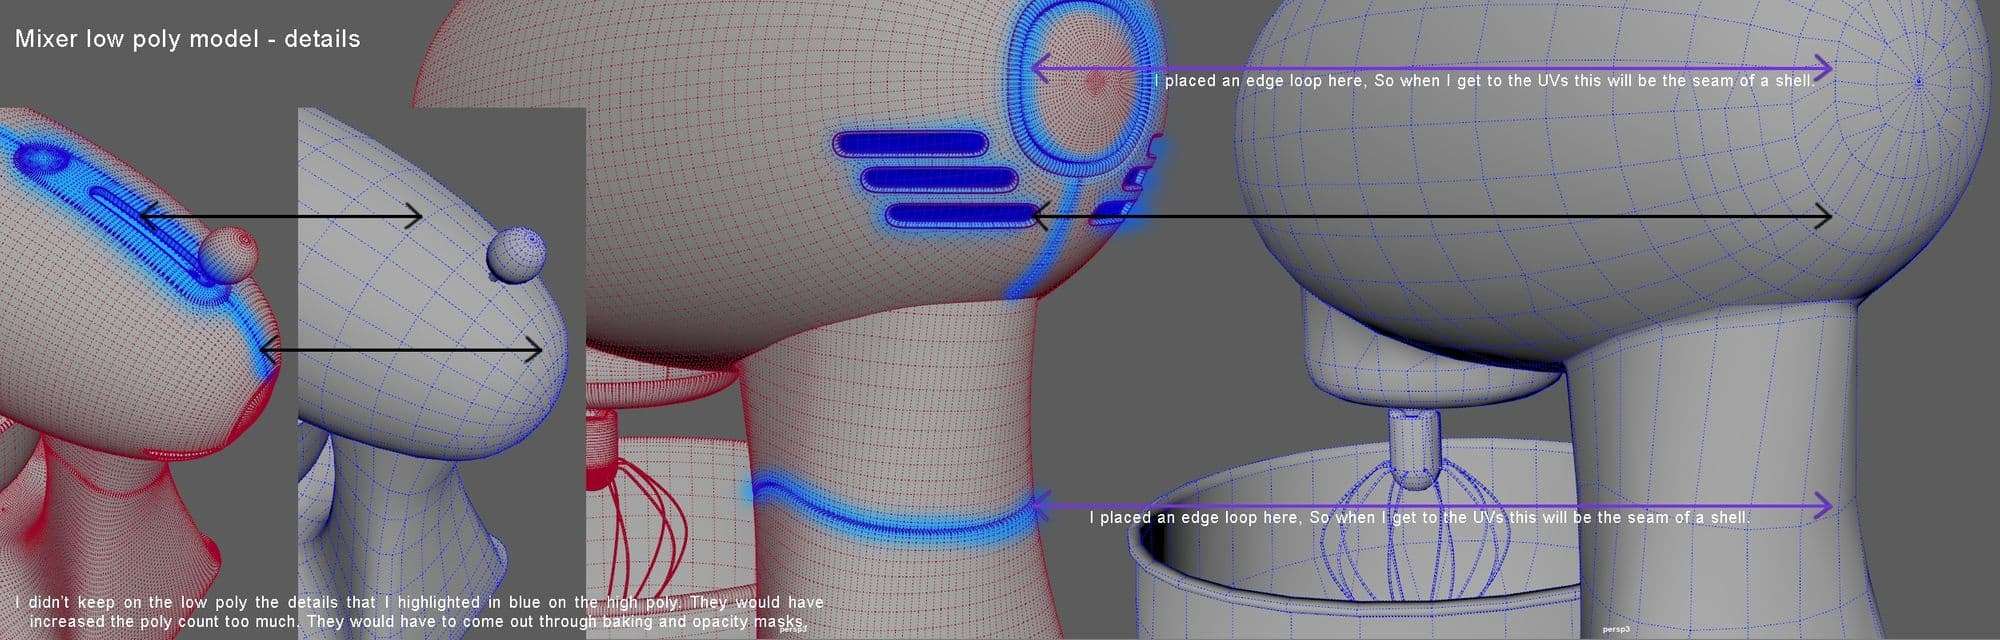
I only smoothed the parts of the model where I needed more geometry to work with. Let’s take the mixer as an example. I added mode divisions to the top part, because I needed to add lots of geometry details to it, whilst the bowl had a much lower poly count because it didn't need so many details.
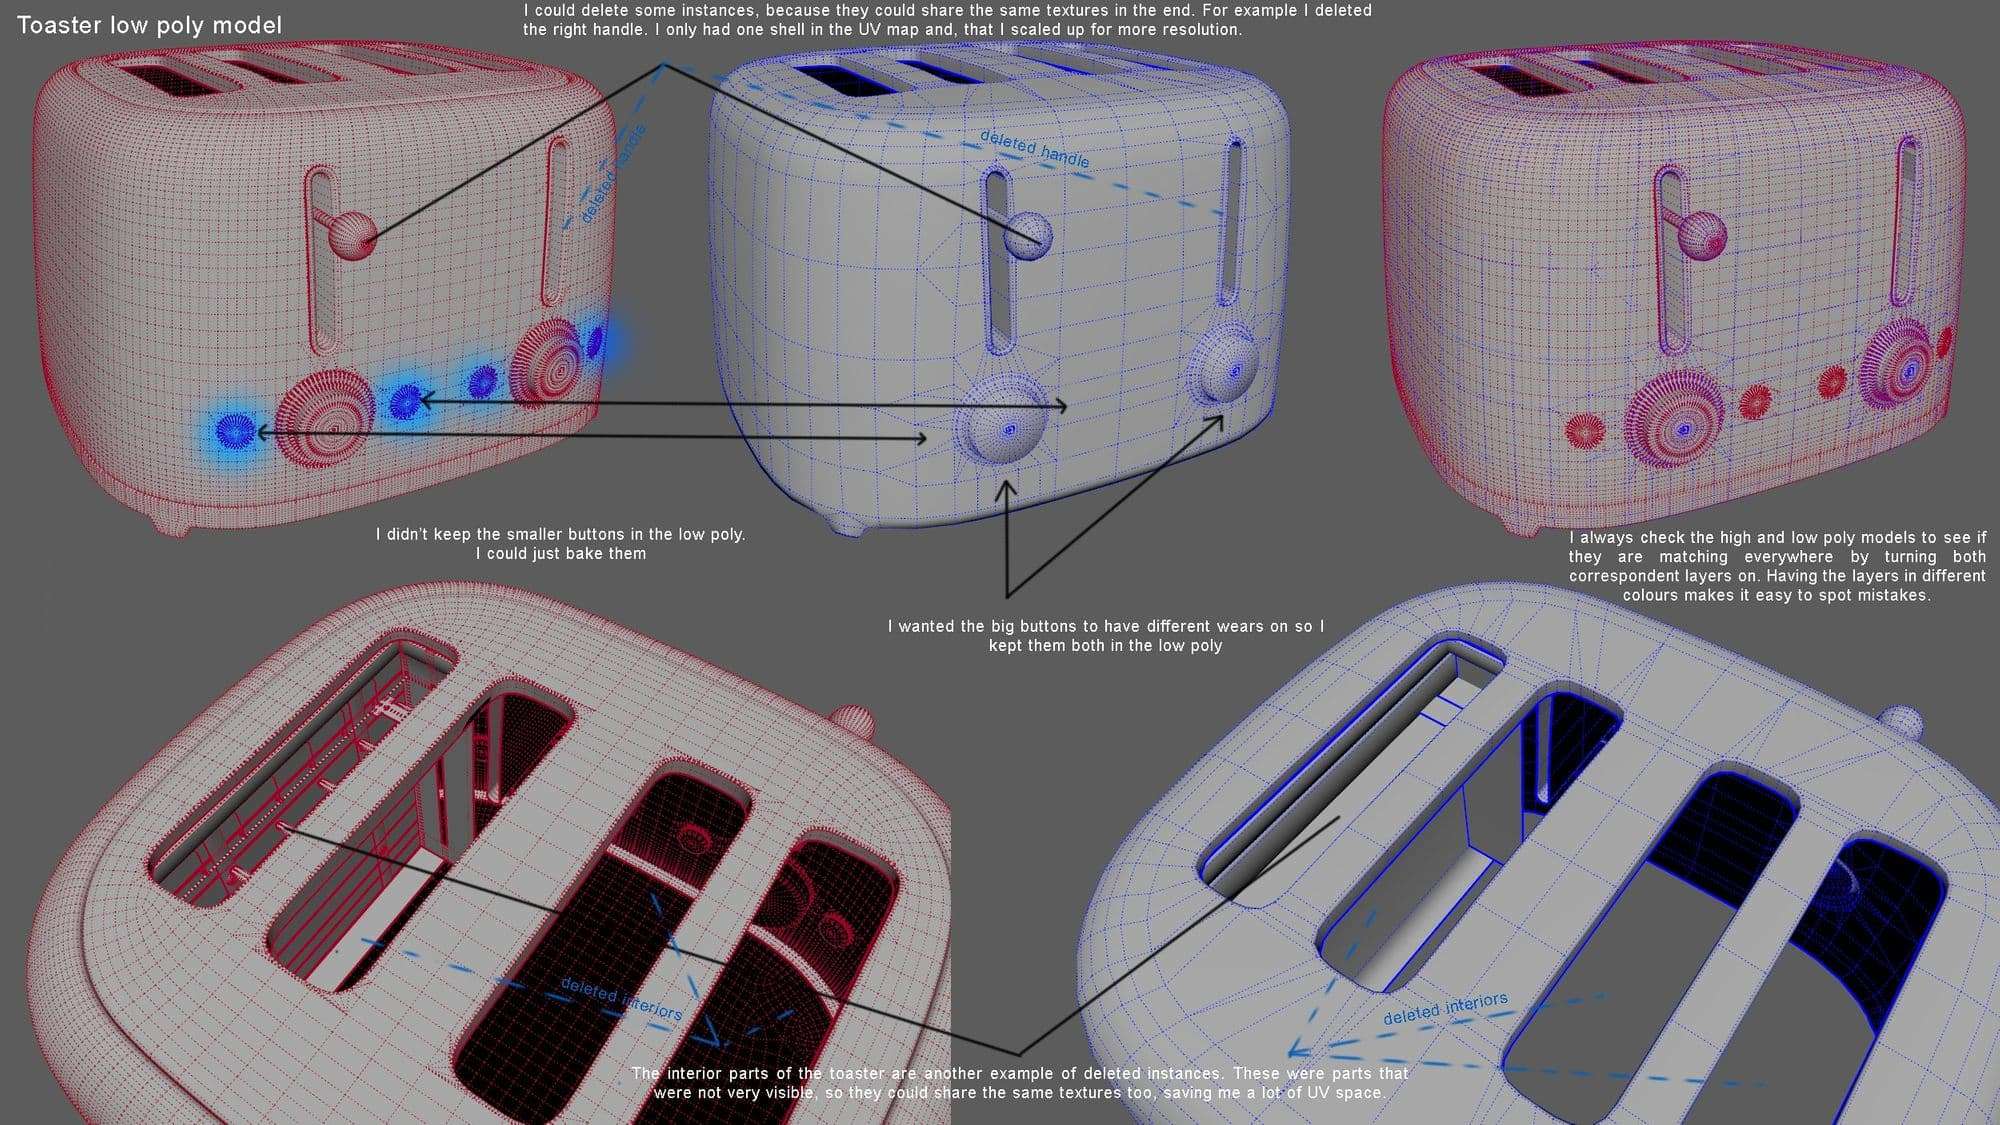
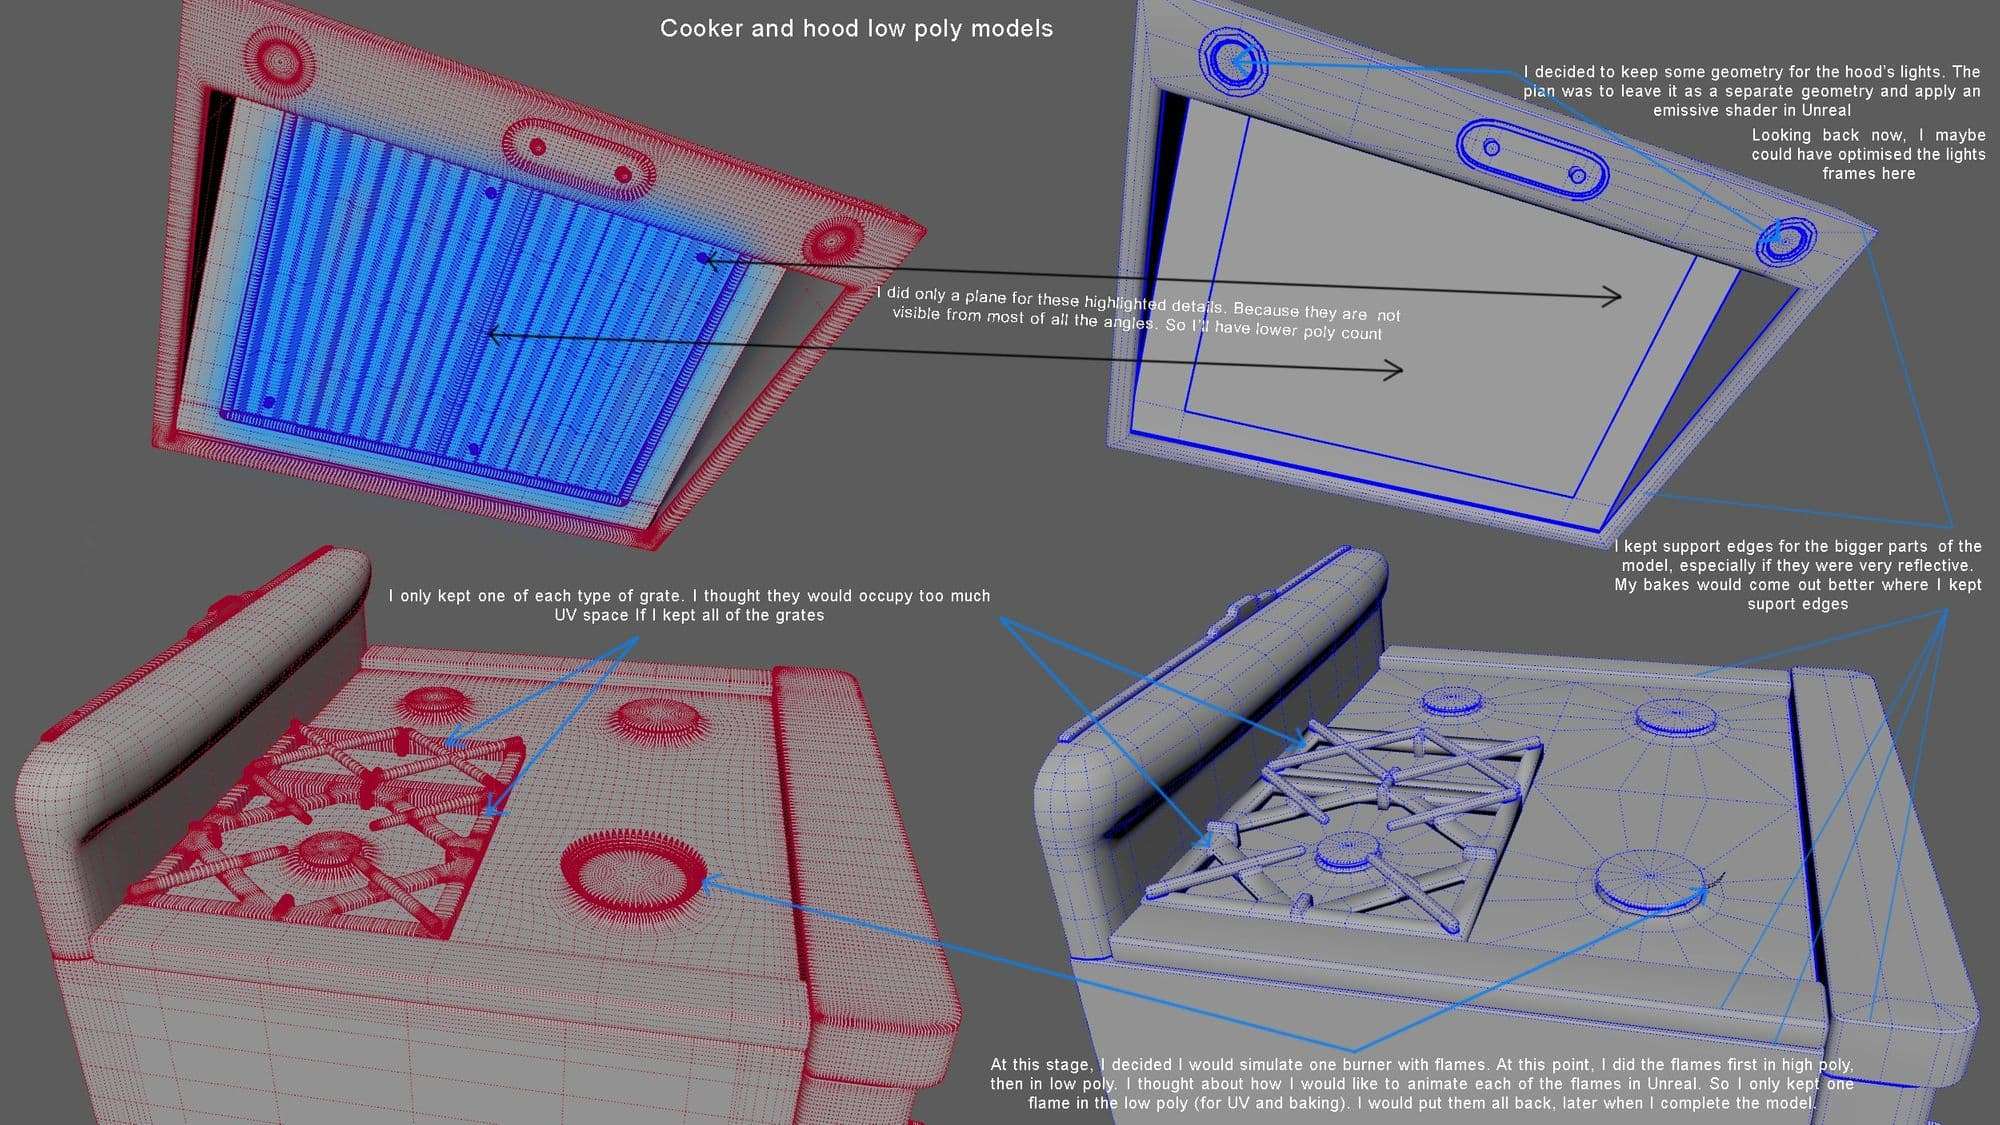
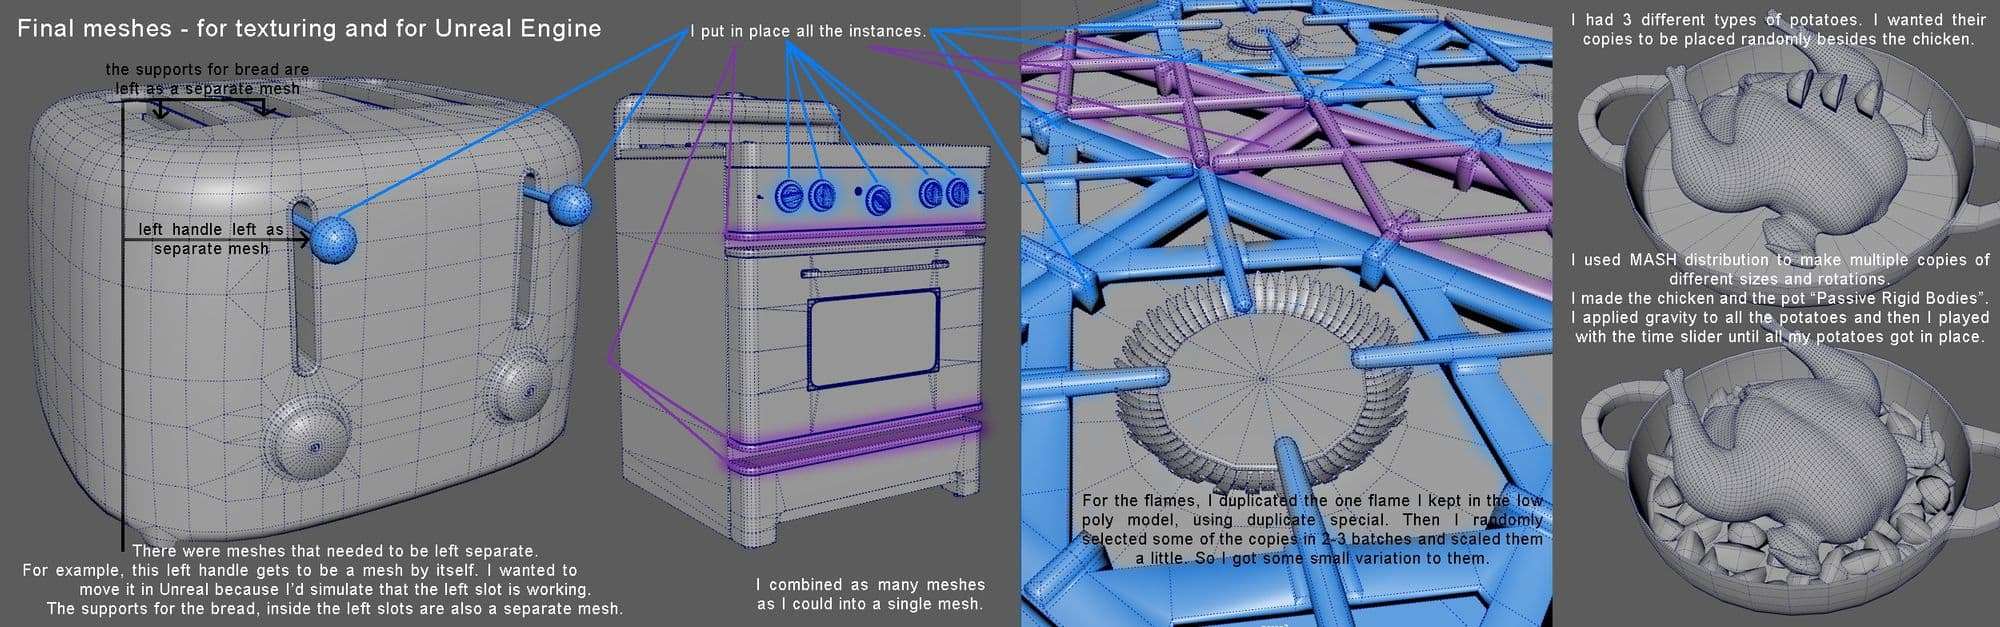
Where possible, I worked with instances. I made the general shape of the “parent”, then I placed the instances where they needed to be. This way, while I was refining the shapes I could see in real time how the whole model looked.
I made a backup group with the high poly model before applying the final smooth. I placed the high poly groups in a new layer that I had named appropriately. Then, I locked the movement/rotation/scale, for my model (including the block out backup group, if I didn’t do it before).
Low poly model
Most of the times, I started the low poly from one of the high poly groups (smoothed/not smoothed):
If I had rounded/curved surfaces, I started by selecting and deleting every other edge loop.
If I had surfaces that were plain I cleaned as many edges as possible.
If my high poly model was too complex, I did retopology from scratch. I used “Quad Draw” and “Multi-Cut” tools from the Modeling ToolKit. When needed, I made my high poly model a “live object”. The low poly model I worked on followed precisely the shape of the high poly.
I made buttons on a custom shelf for the operations I use the most. For example I have buttons for: collapse, select edge loop, select every other edge in a ring, bridge, fill hole, and so on.
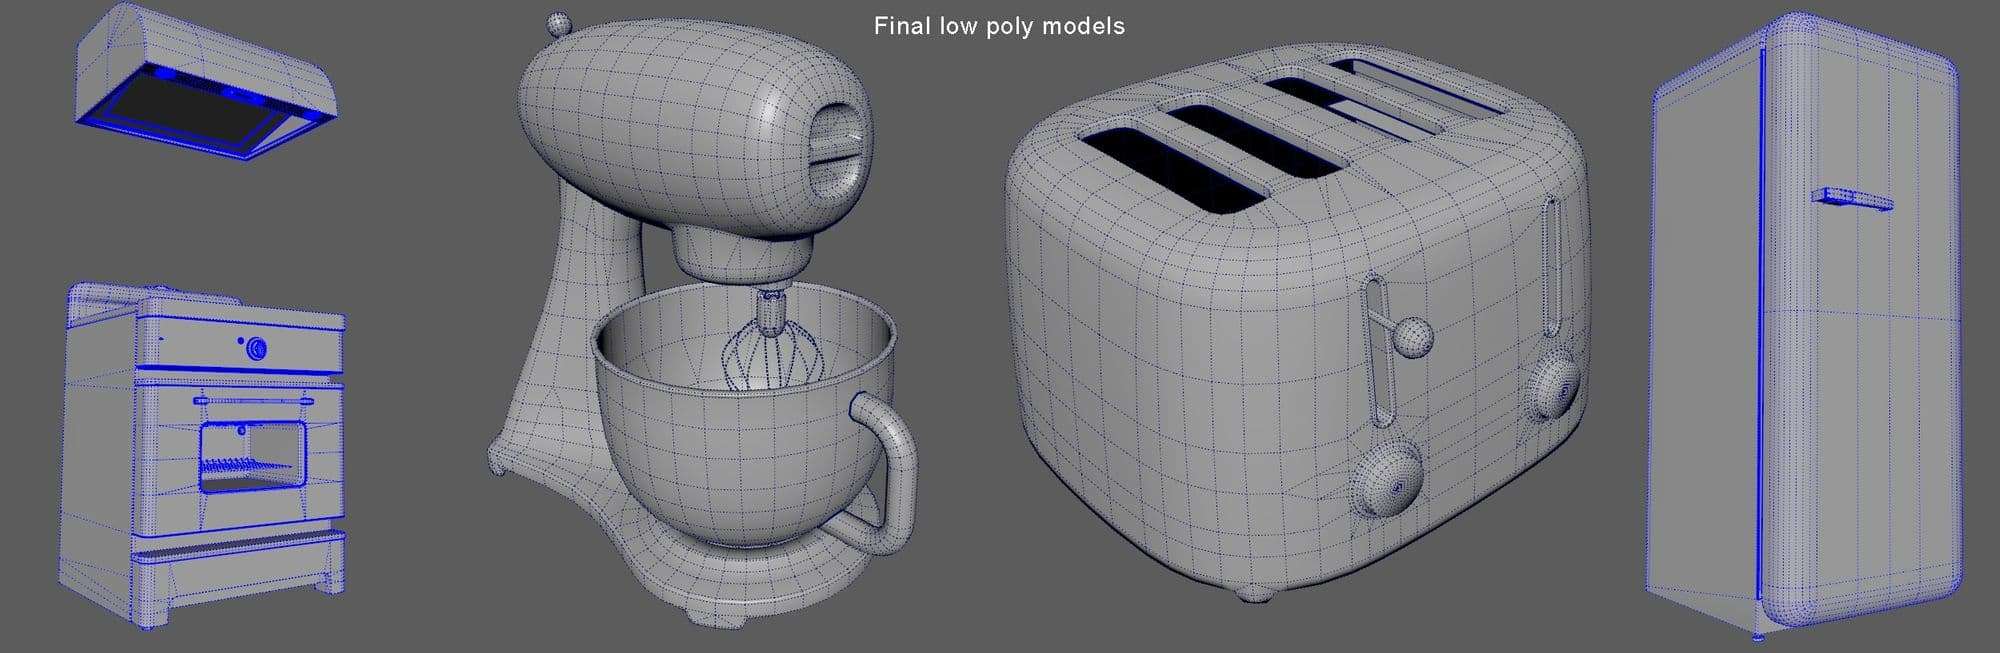
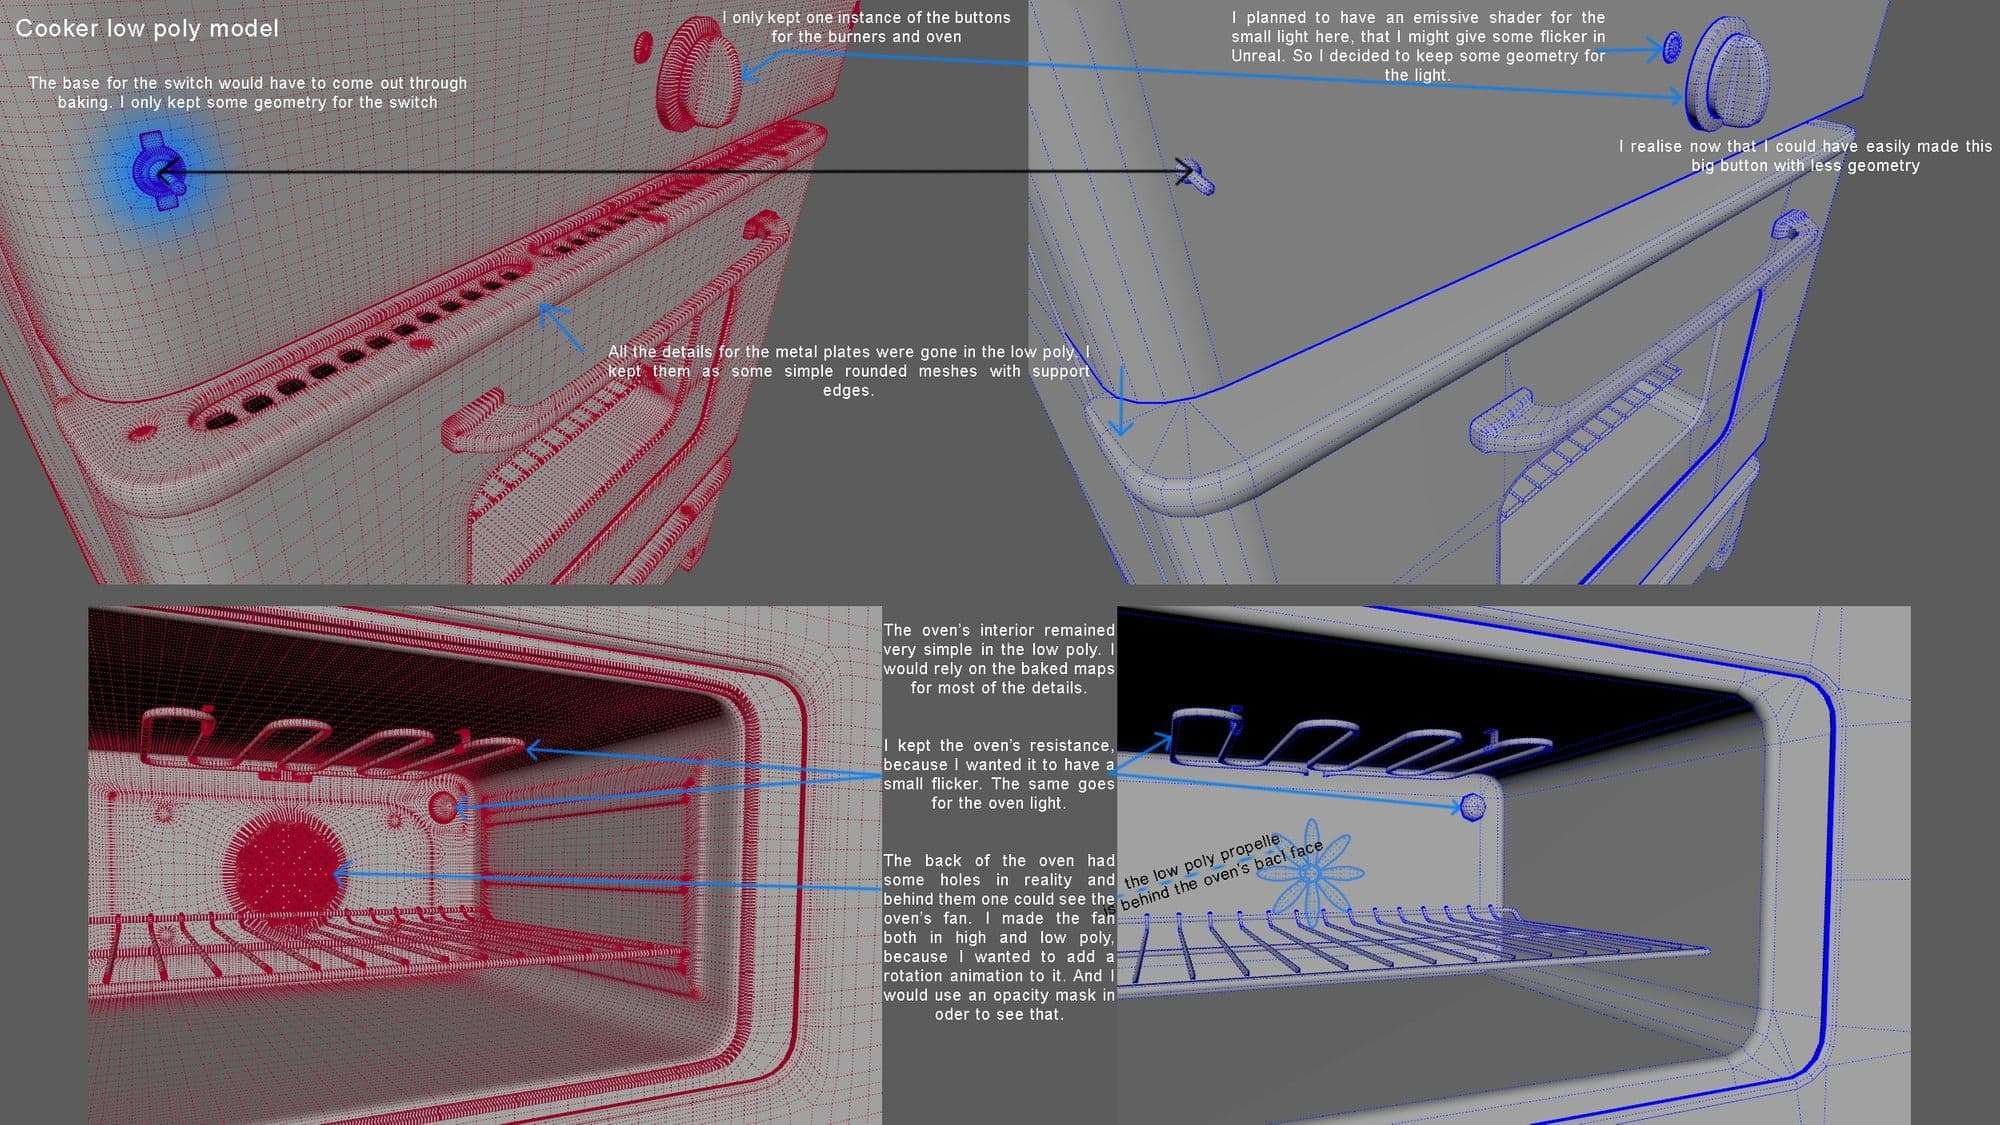
Check out the following images to see what my low poly models looked like. I made notes for some of the things I considered important when making these models.
UV’s and Baking
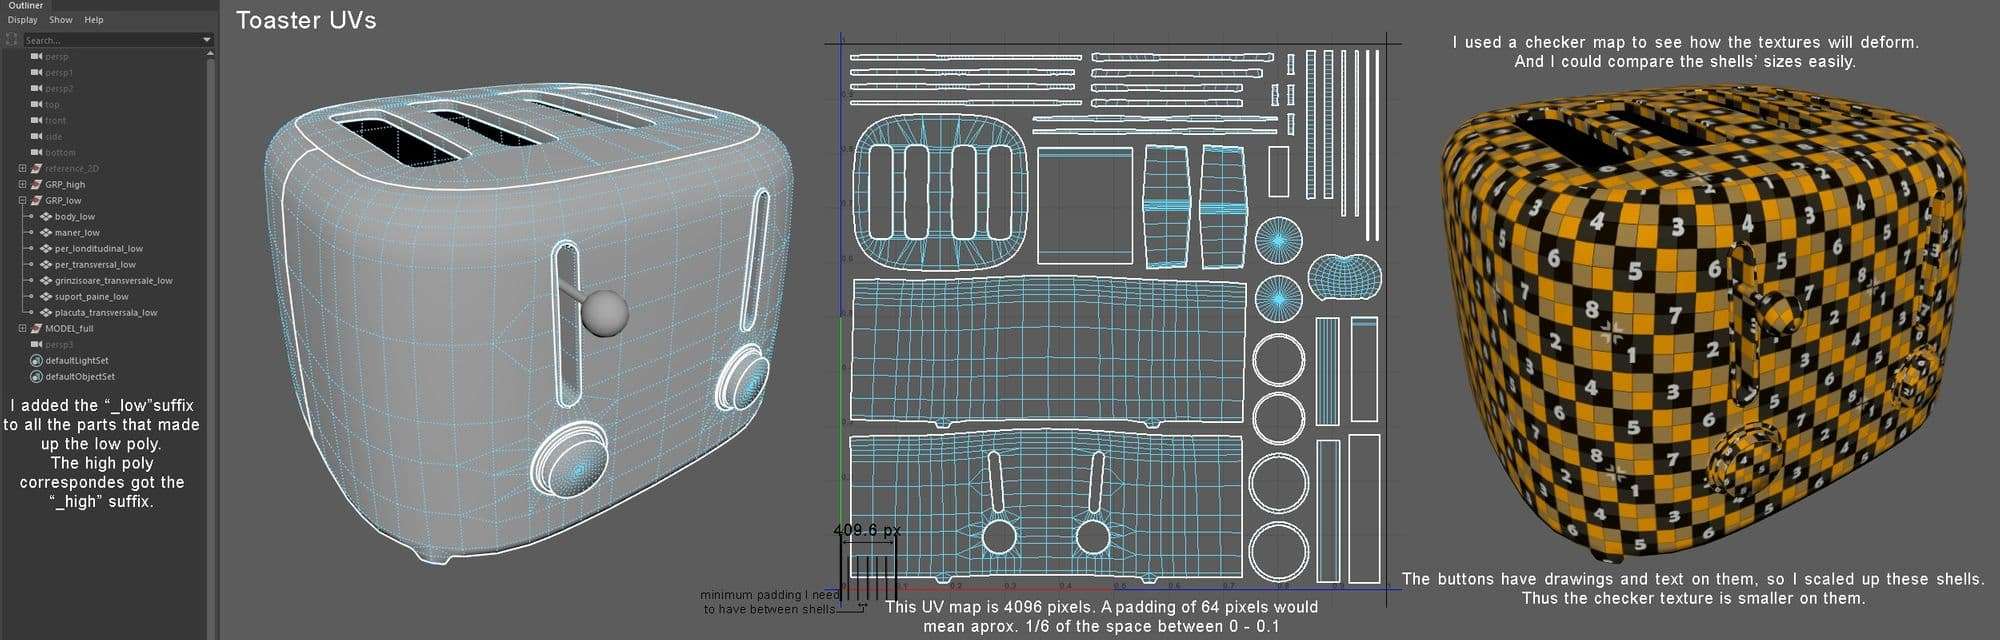
Before I actually started the UVs, I dealt with the naming of my meshes. I applied the “_high” and “_low” suffixes for all the meshes. I could do this in bulk if I selected all the meshes from one group, went to the Modify Menu and Search and Replaces Names.
Now I could move on with the making of UVs:
For most meshes I started from an automatic or a planar UV projection.
I continued with cutting/sewing seams until I got the best shells I could.
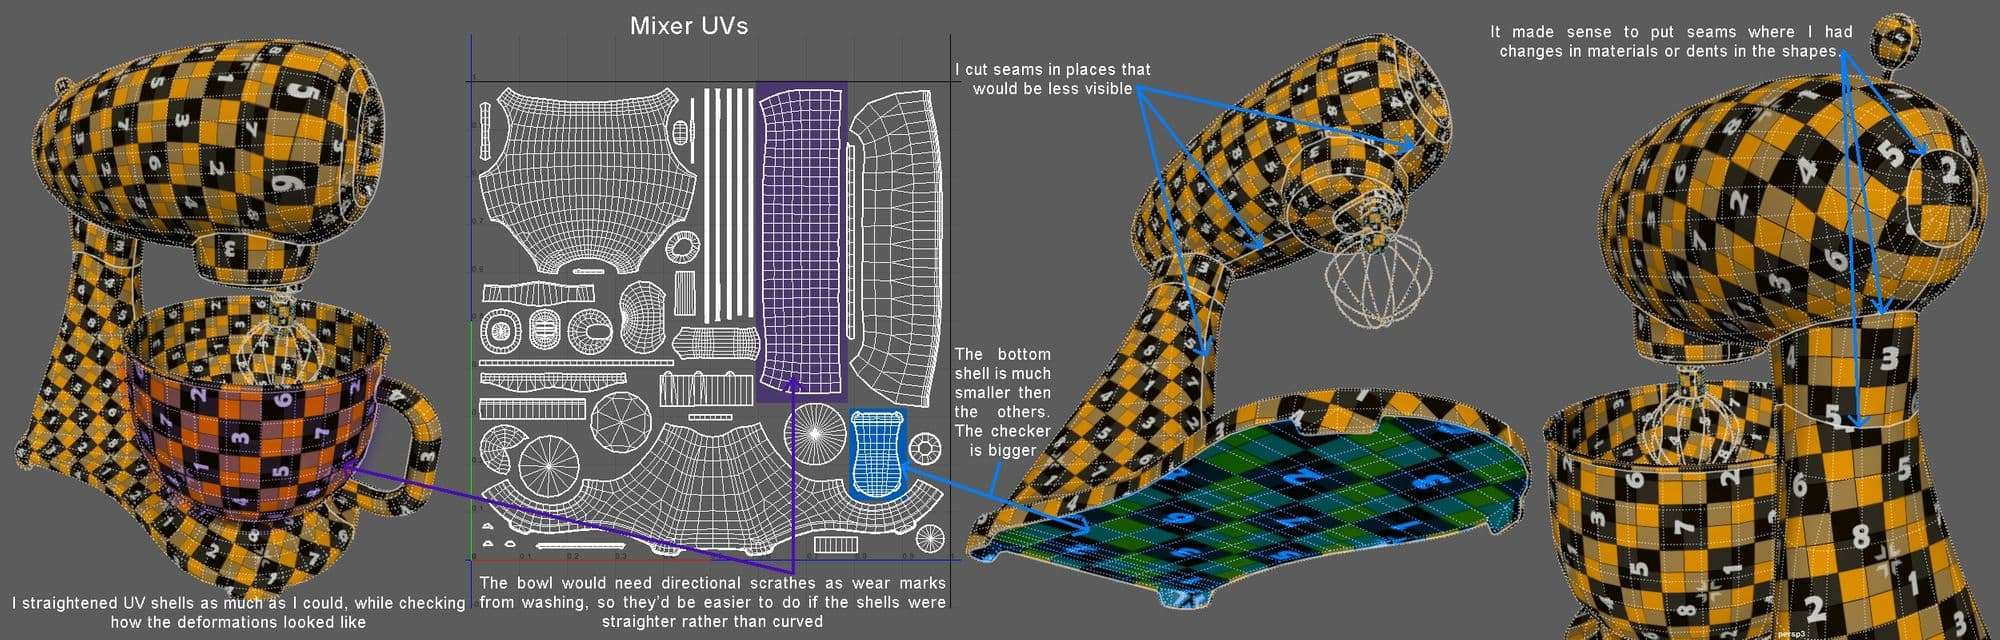
I tried to place my seams in the least visible places possible.
Also, I straightened the shells as much as I could with the least amount of deformation I could get.
After I finished all the UVs, I set the size for my UV Map. I made an automatic pre-pack with all shells to see what the optimal texel density should be. I set the Map size from the UV Toolkit Panel and Transform Tab. Then, I used the "Get" and "Set" buttons to make sure all my UV shells have the same scale.
I tried to pack the shells as efficient/logic as I could:
I needed to leave enough space between shells, but not so much as to waste UV space. Choosing how much padding I needed was dependent on how big my UV Map was.
I scaled some shells up or down, depending on factors like visibility, reflection amount, necessary level of details, importance.
I used the operations from “Align and Snap” and “Arrange and Layout” from the UV Toolkit a lot when packing my UVs.
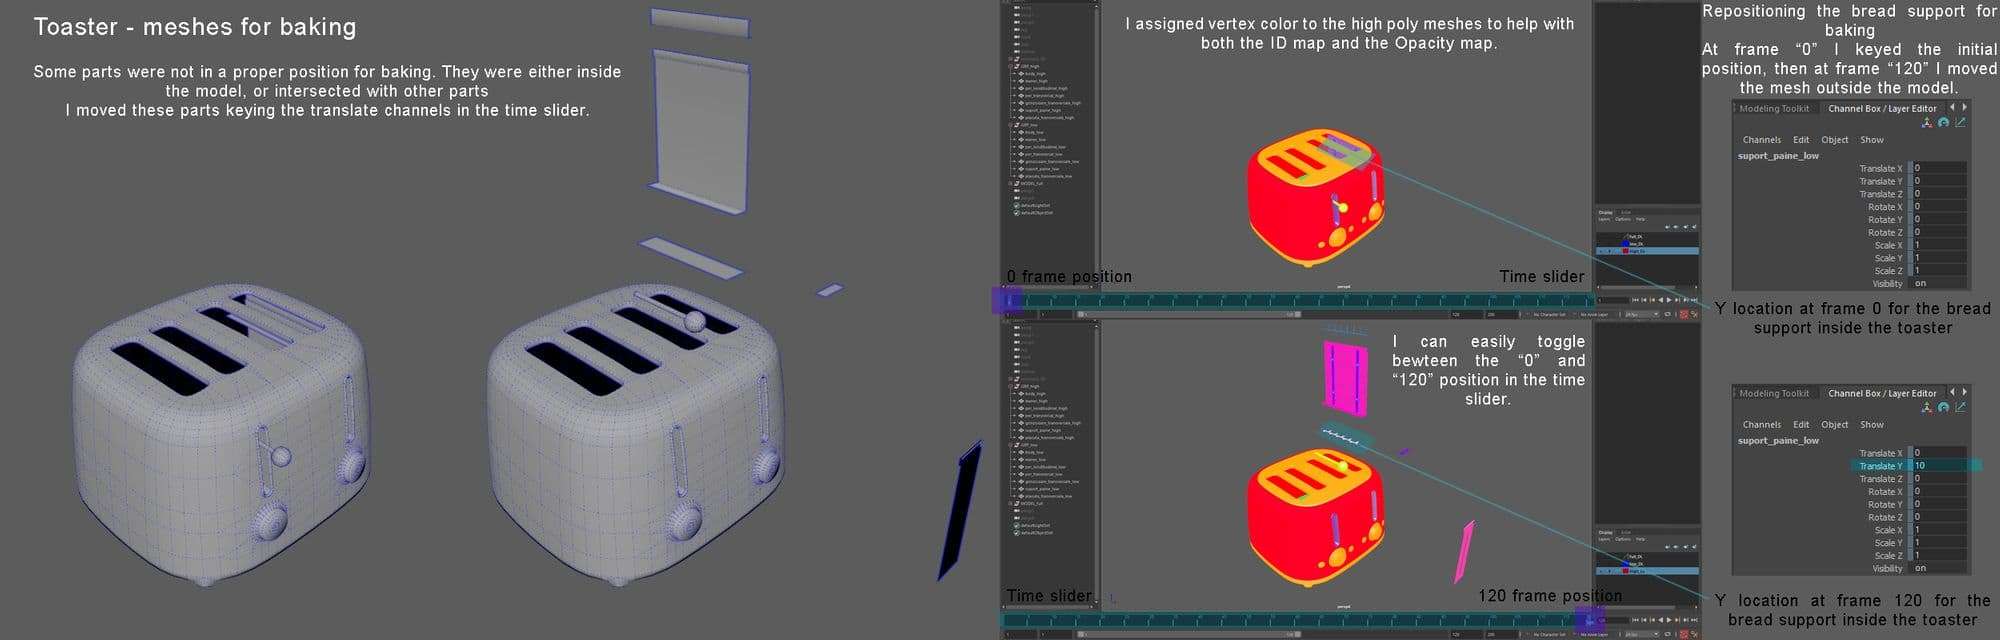
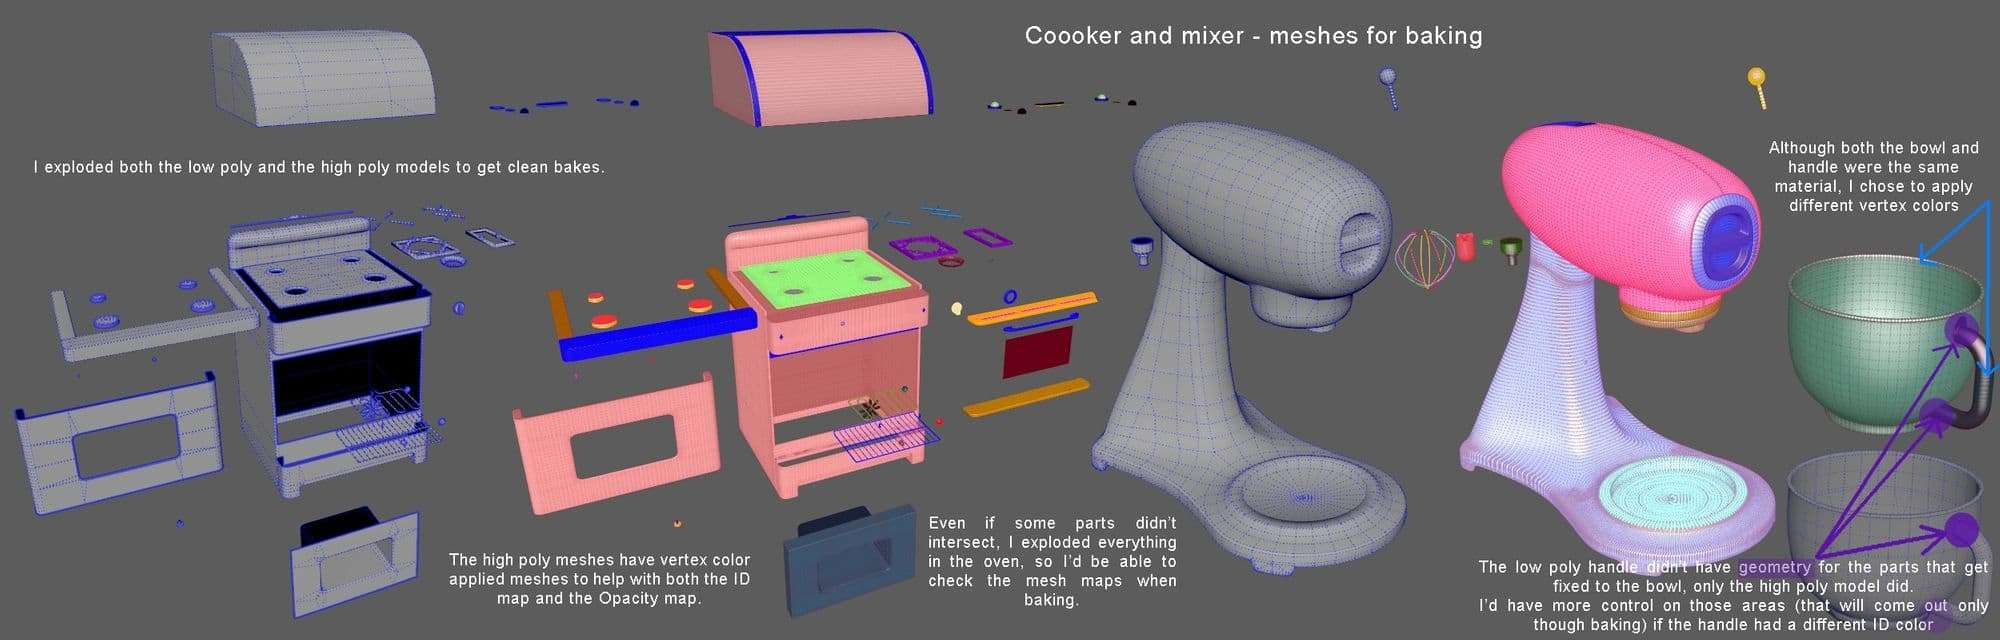
Then, I made other preparations for baking. If some pieces of a model were too close to one another, I exploded the model. I assigned different vertex colours to the parts that made up the high poly model. This helped me not only with ID maps but also with Opacity Masks.
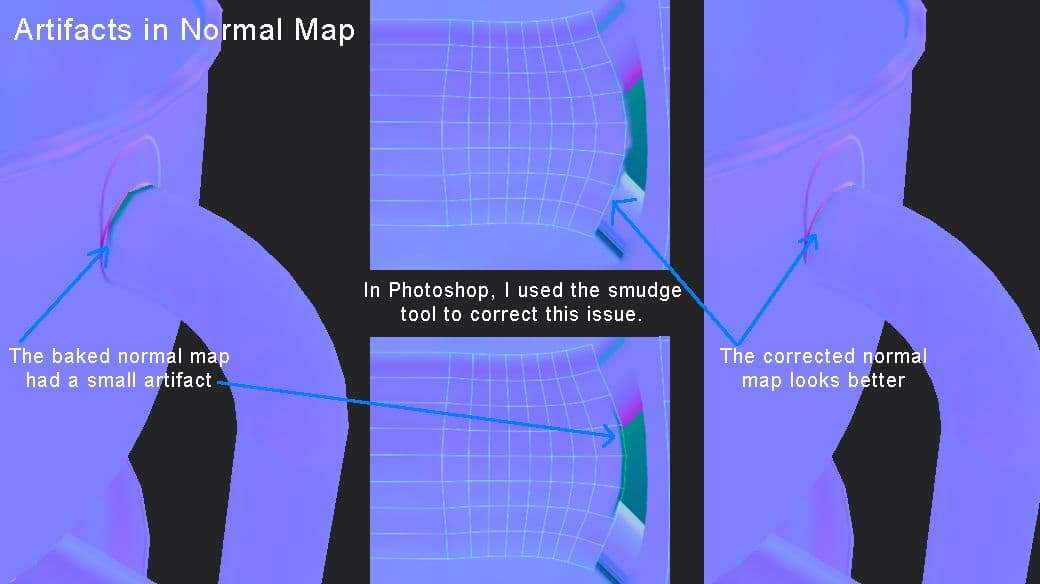
I used Substance Painter to do the baking. The first thing I baked was the Normal Map. I checked for artifacts, rotating the model and the environment. If I didn't see artifacts I moved on to the rest of the maps. If there were small artifacts I exported the map and corrected it in Photoshop. Then I imported that version back into Painter and plugged it in the Normal slot.
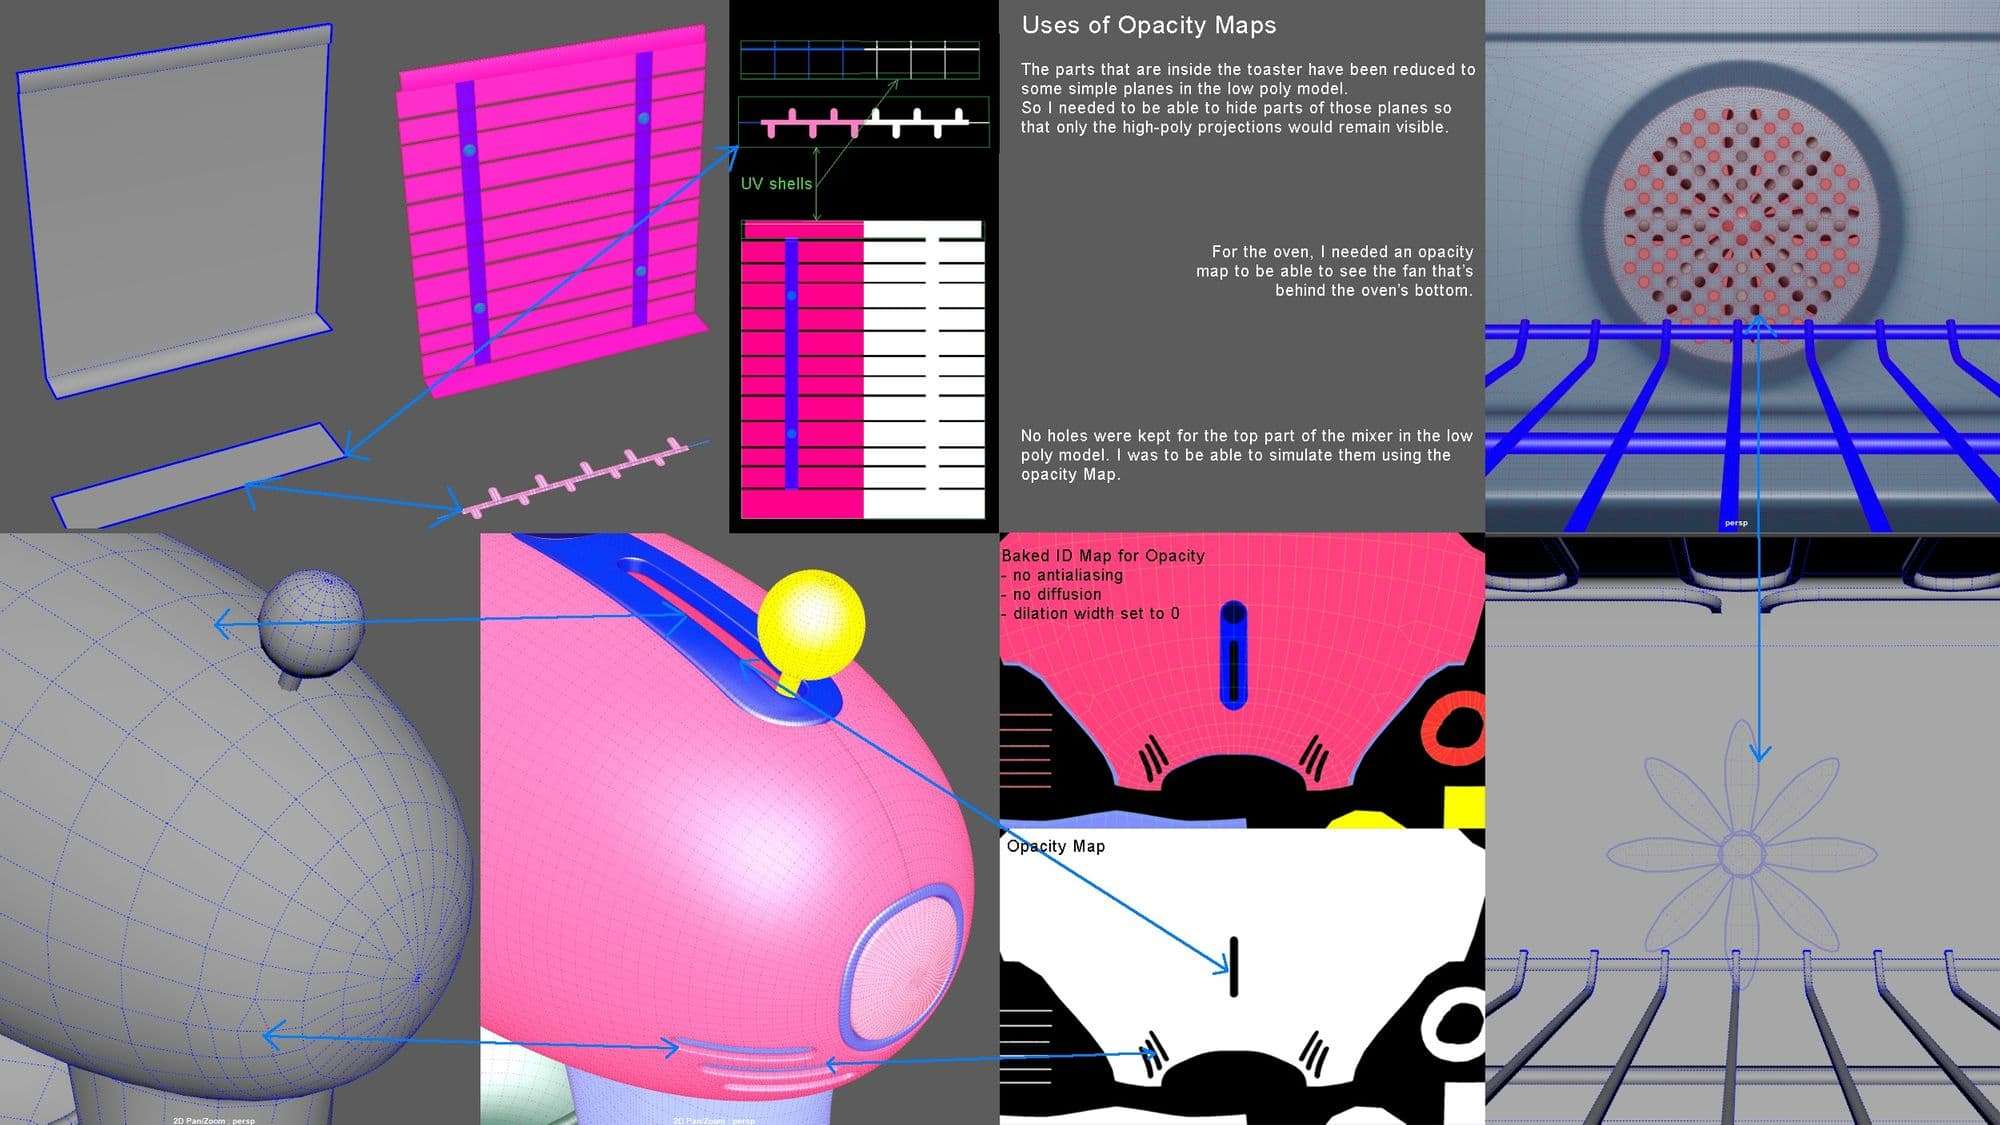
Next, I moved on with making Opacity Maps where I would need them. But I couldn’t bake them directly. This is where having vertex colour on the high poly came into play.
First, I baked an ID map. I set the source color to “vertex color”. In the common parameters I set the “Dilation Width to''0”, I unchecked the “Apply Diffusion” box, and I set the Antialiasing to “None”. I exported this map.
Then, in Photoshop I masked out everything that was black, so everything that wasn’t a baked color. I activated Color Overlay in the Blending Options of the layer. I chose a Normal Blend Mode, with a White colour, with 100% Opacity. I put a black layer in the background.
Everything that got a color on the high poly model has a white value in my Opacity Map, everything else is black.
Then, I continued with baking the rest of the Maps with no problem whatsoever. The only mention is that I baked the ID map with some “Dilation Width”, 32 or 64. The rest of the settings for this map were the same as the ones I used when I baked an ID Map for the Opacity Map. After I baked all the Maps, I exported them as “*.png” files with 16 bits.
Texturing
Before starting the texturing in Painter, there was one more step I did in Maya. I had to put together the models with all the pieces in the right location.
The first step in Painter was to adjust some settings:
In the Display Settings, I set the Environment Map to the Tomocco Studio map. I find it’s better to paint textures with a neutral environment on. I don’t get unnecessary color tints and the colors that I see are exactly what I paint them to be.
I activated Anti-Aliasing, with Accumulations set to something like 16. And I set the Anisotropic Filtering to Medium. I increased the viewport's quality without making performance compromises.
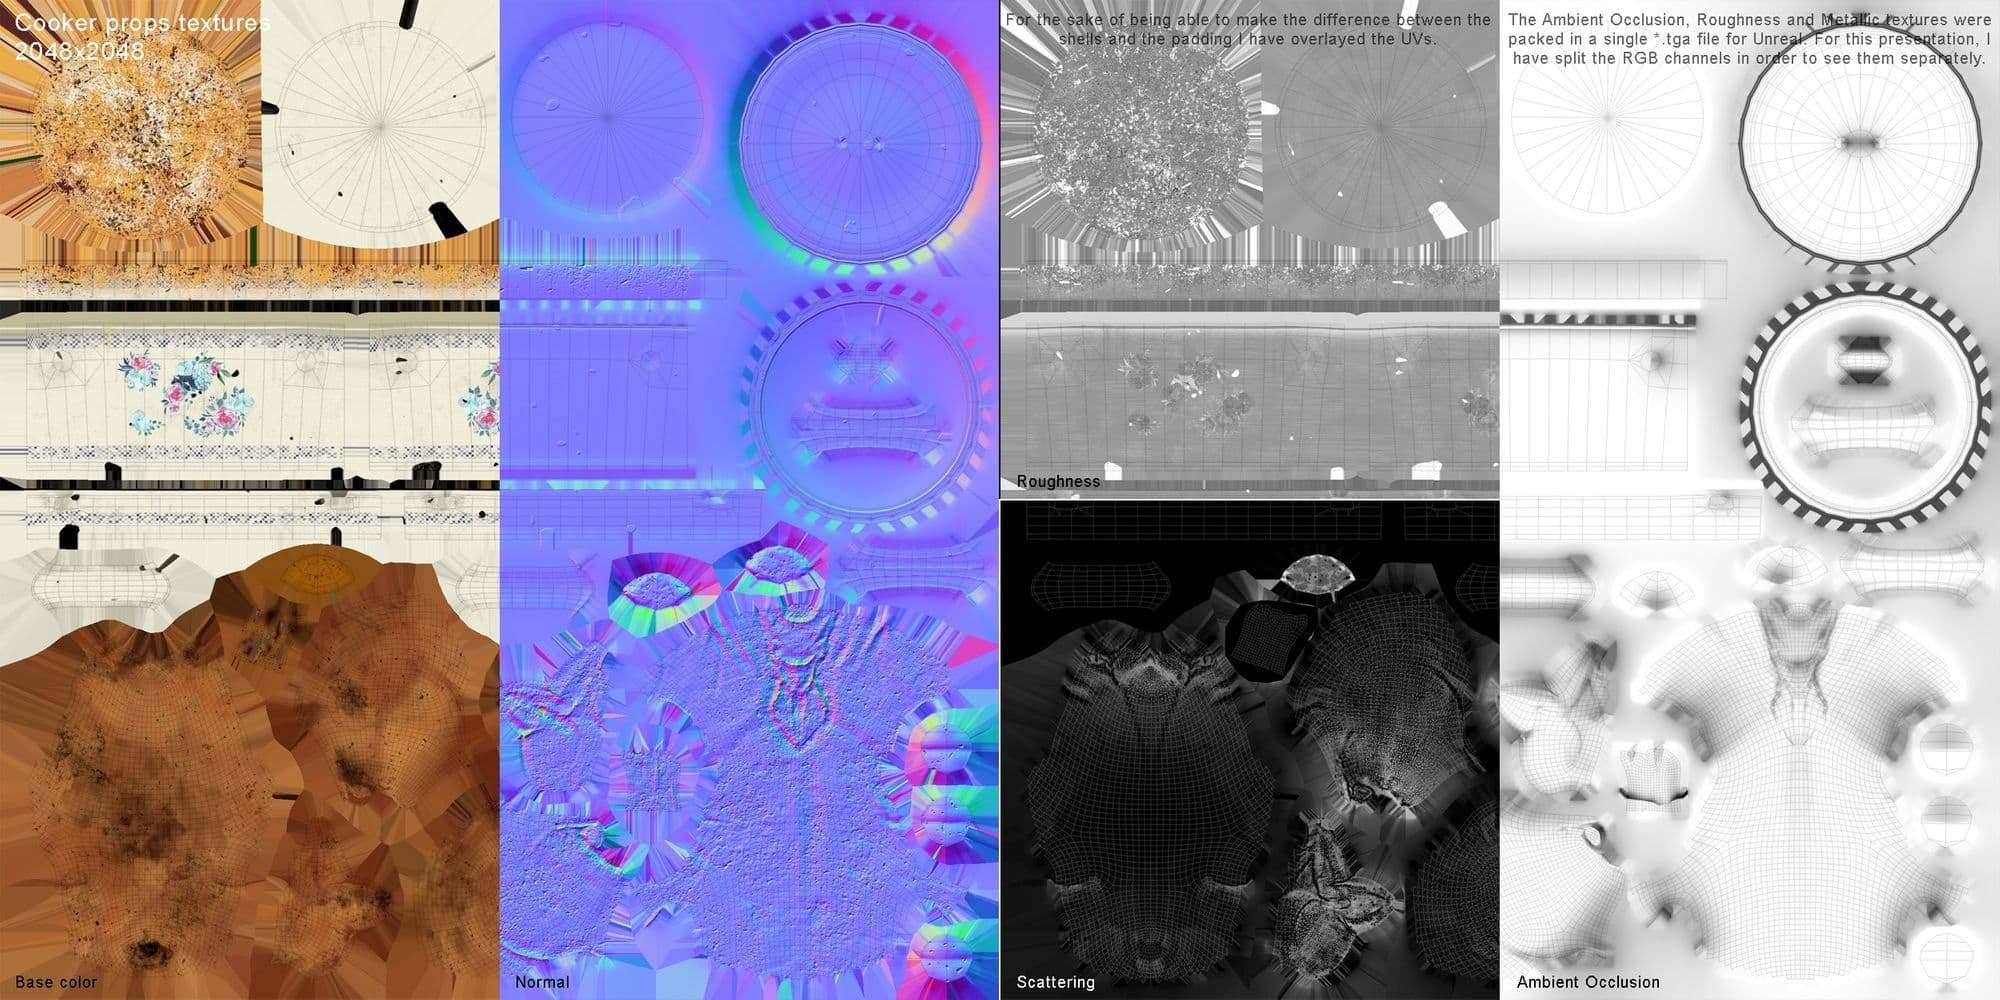
For the chicken prop, I also activated the Subsurface Scattering.
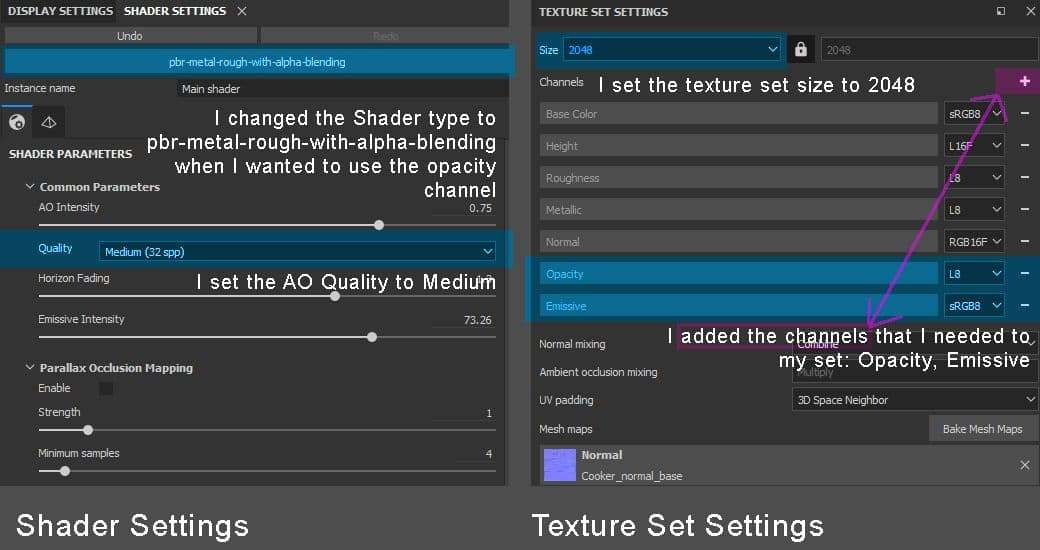
In the Shader Settings I changed the type of shader I needed. When I knew I would work with the Opacity channel, I selected a “prb-metal-rough-with-alpha-blending” shader. I set the AO Quality to Medium in Common Parameters.
In the Texture Set Settings, I checked I was working on 2048 pixels sets. This was the case even if I intended to have some textures in 4096 pixels in the end. This is because Painter tends to get some lag after some operations on the laptop I am working on. I could switch to 4k anytime I needed to work on fine details or check how my final textures look like.
Then, I would add whatever channels I needed in my set, like Opacity or Emissive.
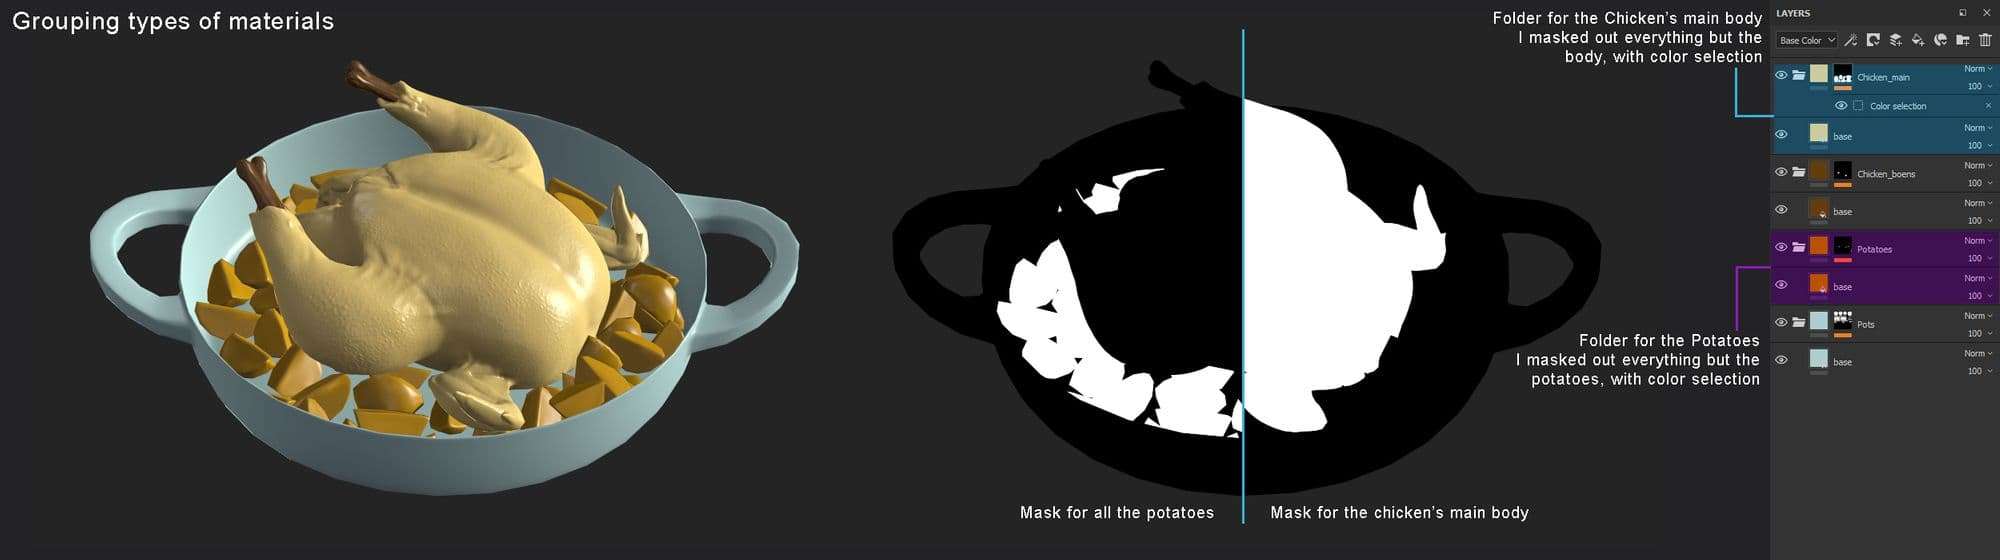
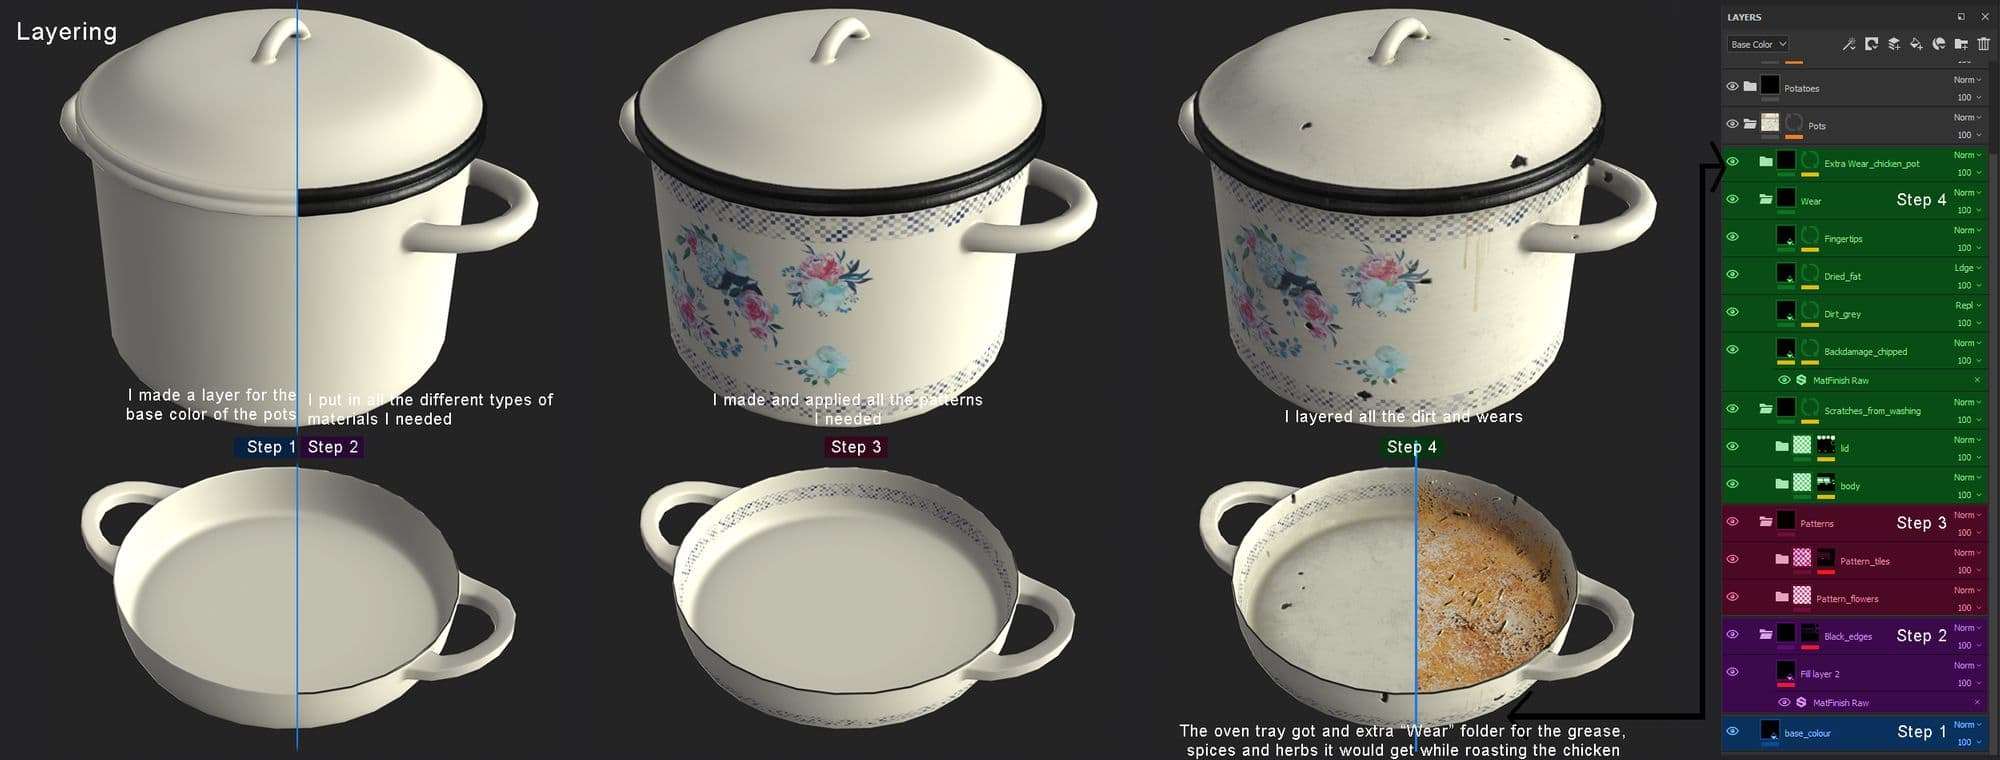
Now I could start working on the textures. I first made groups with only a coloured fill layer for each type of material I’d need. I made a folder for one material at a time and applied a mask with colour selection. Sometimes I completed the mask by hand painting.
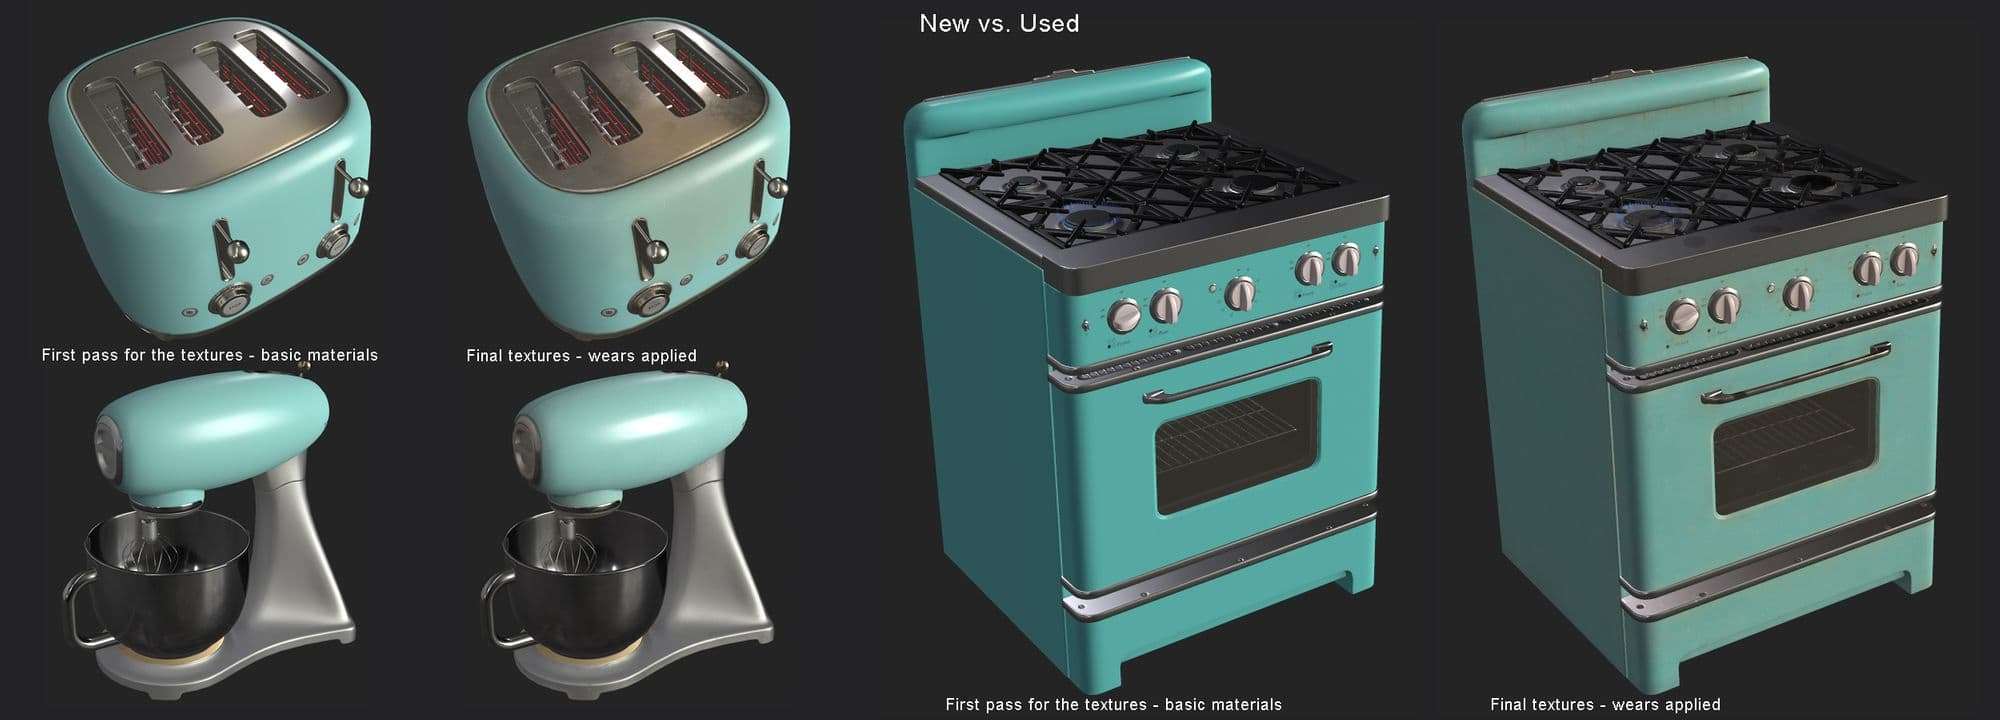
After I organised all my materials in folders, I moved on with making the right base materials. This meant to make the "new look" version for each of the materials. After I got this as good as I could, I moved to making all the wears and dirt.
I didn’t want that “ancient/broken/deserted” look some assets have in games. I was going for more of a subtle look. I wanted to make an appliance one would have and use in his house. So, I needed just the right amount of dirt and wear to suggest the appliance wasn’t cleaned very recently.
After I worked up the toaster, I saved everything as a Smart Material. For the next models I had a good starting point. The way I worked when applying dirt and wears was with layering. I kept making folders/layers for each type of dirt/wear I applied. I had layers for scratches, indentations, grease, fingertips, and so on.
In the next paragraphs, I’ll describe some things I dealt with while working on these 4 models.
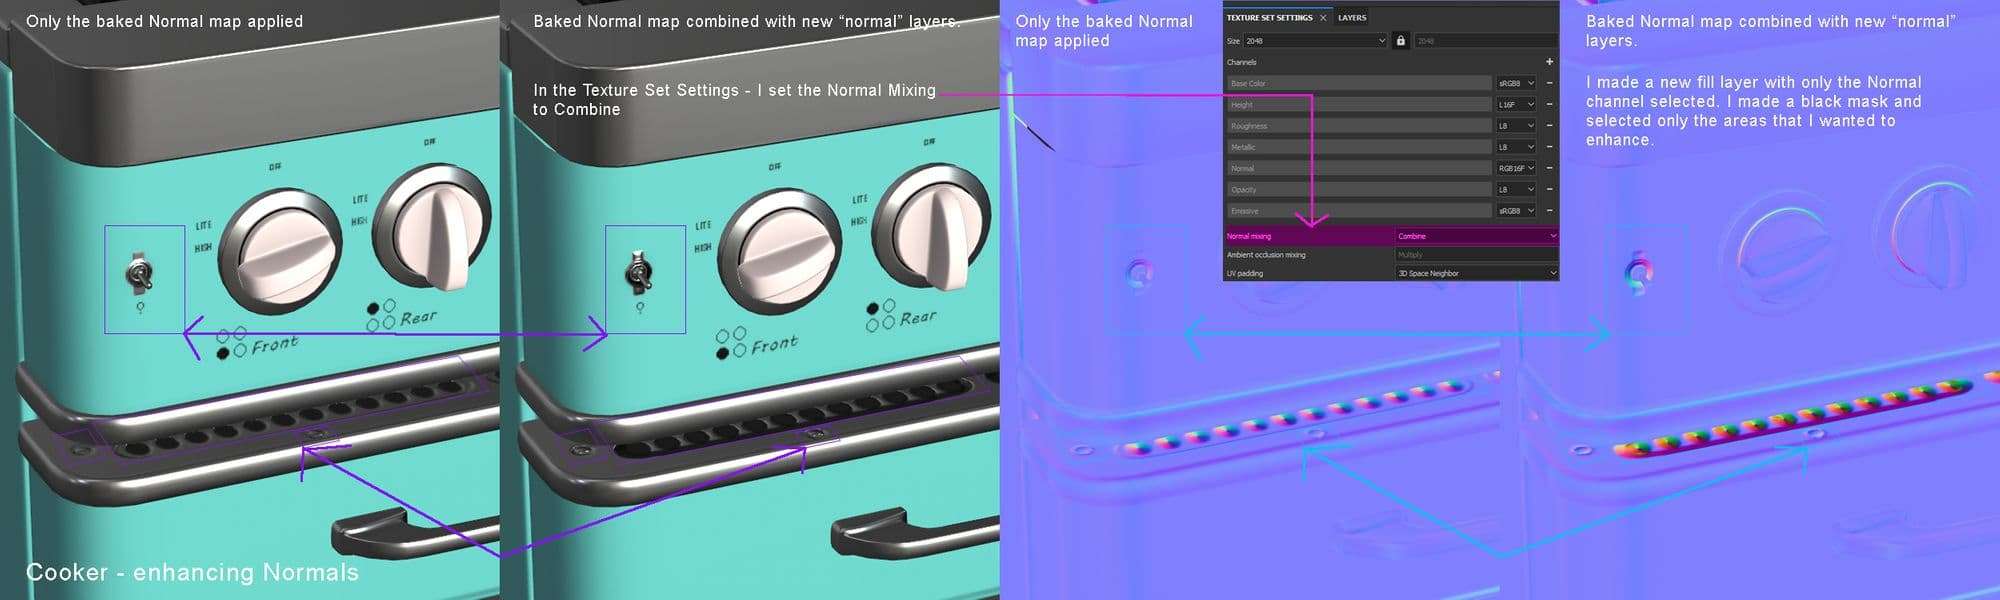
Sometimes I realised I wanted some areas to stand out more in regards to the baked normals:
First, I needed to set the Normal Mixing to combine in the Texture Set Settings.
I would create a new fill layer with only the normal channel selected and load the baked normal map there.
Then, I’d apply a black mask on this layer and either color select or hand paint what needed to stand out more.
I could always refine these masks, using filters or simple painting.
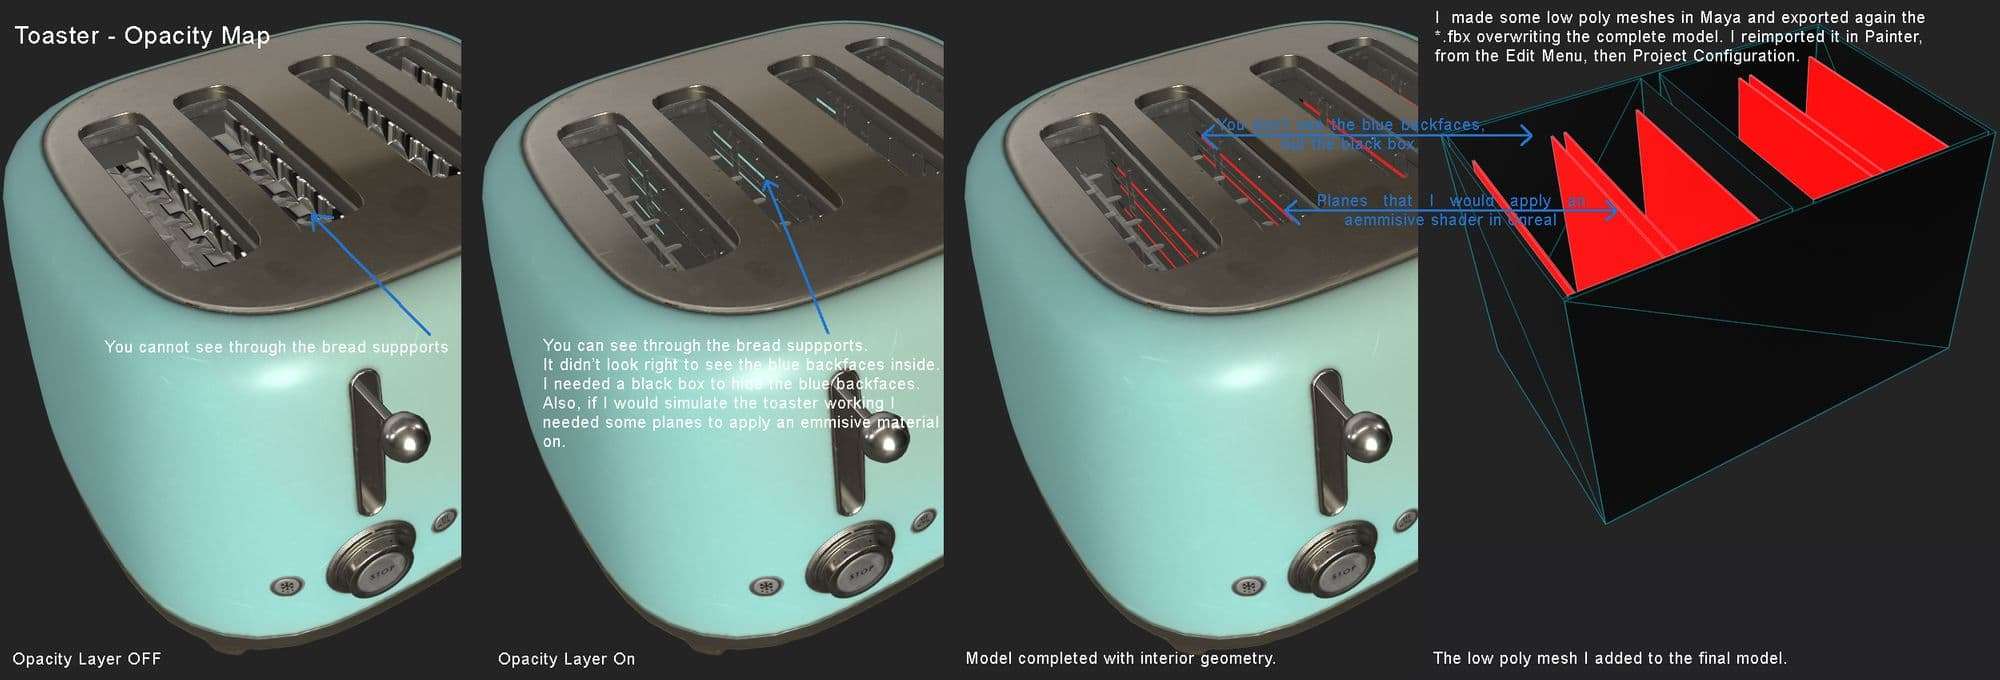
I worked a lot with Opacity. I used Opacity to represent the bread supports and the inside parts of the toaster. In the low poly I only made some simple planes for these areas. While in the high poly there were all kinds of changes in geometry and gaps:
On a new layer with only the Opacity channel selected, I put on a mask to which I plugged my black and white opacity map. I set this layer to be completely transparent: set the opacity to 1.
Now I could see beneath/behind these parts, but I would see the blue backfaces of my outer shell.
So I went back to Maya and I did a simple box and some planes that I should “see” instead.
I applied a new material to these meshes and made a small UV map for them.
I exported the complete model as *.fbx.
In Painter I re-imported the complete model, from Edit Menu then Project Configuration.
Now I had 2 shaders in Painter. One was for the new materials applied on the inside box and other was the one I had worked on until then.
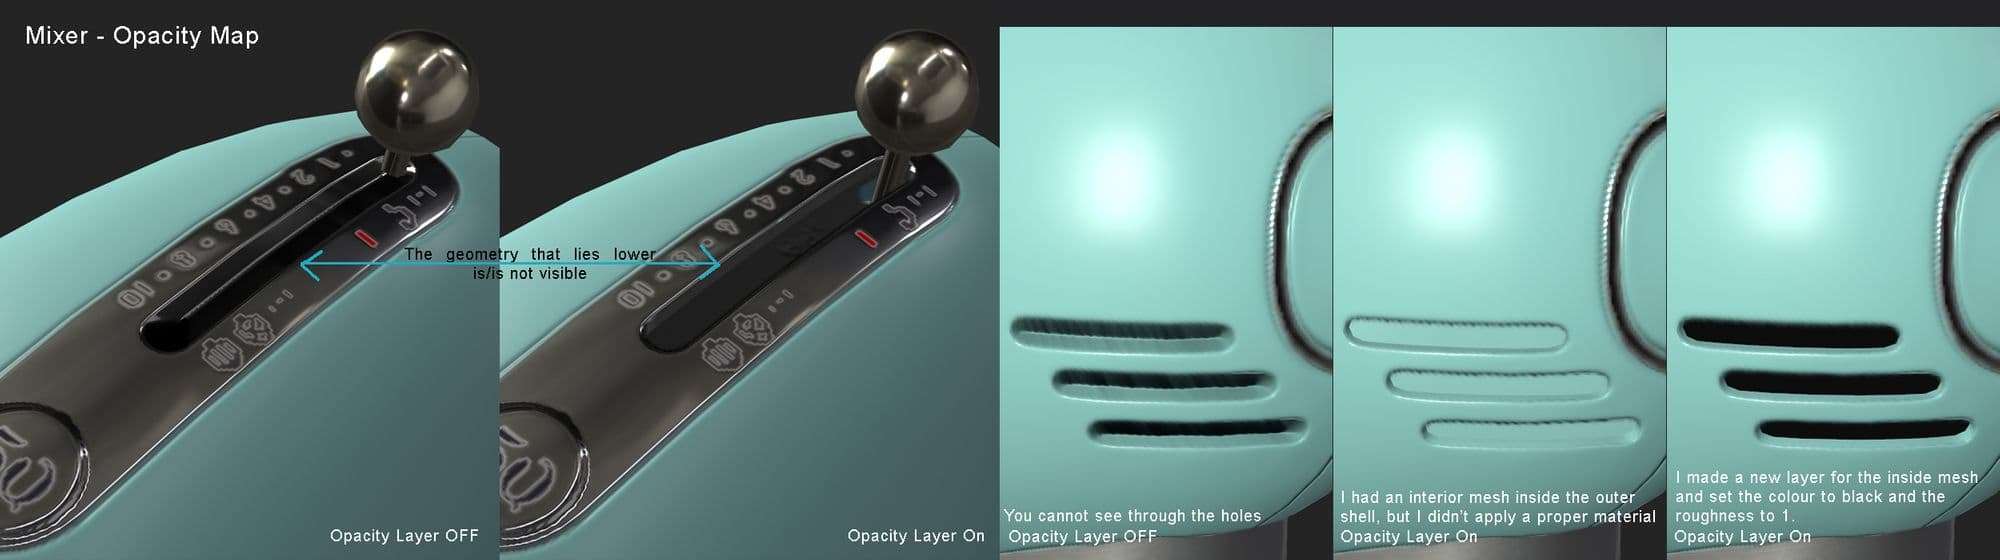
When I was working on the mixer, I knew I’d have to take some of the same steps I did with the toaster. I didn’t want to keep any of the holes in the low poly model, so I’d need some meshes inside the mixer that I could “see” in black. I did these interior meshes before moving on to Painter for baking and texturing.
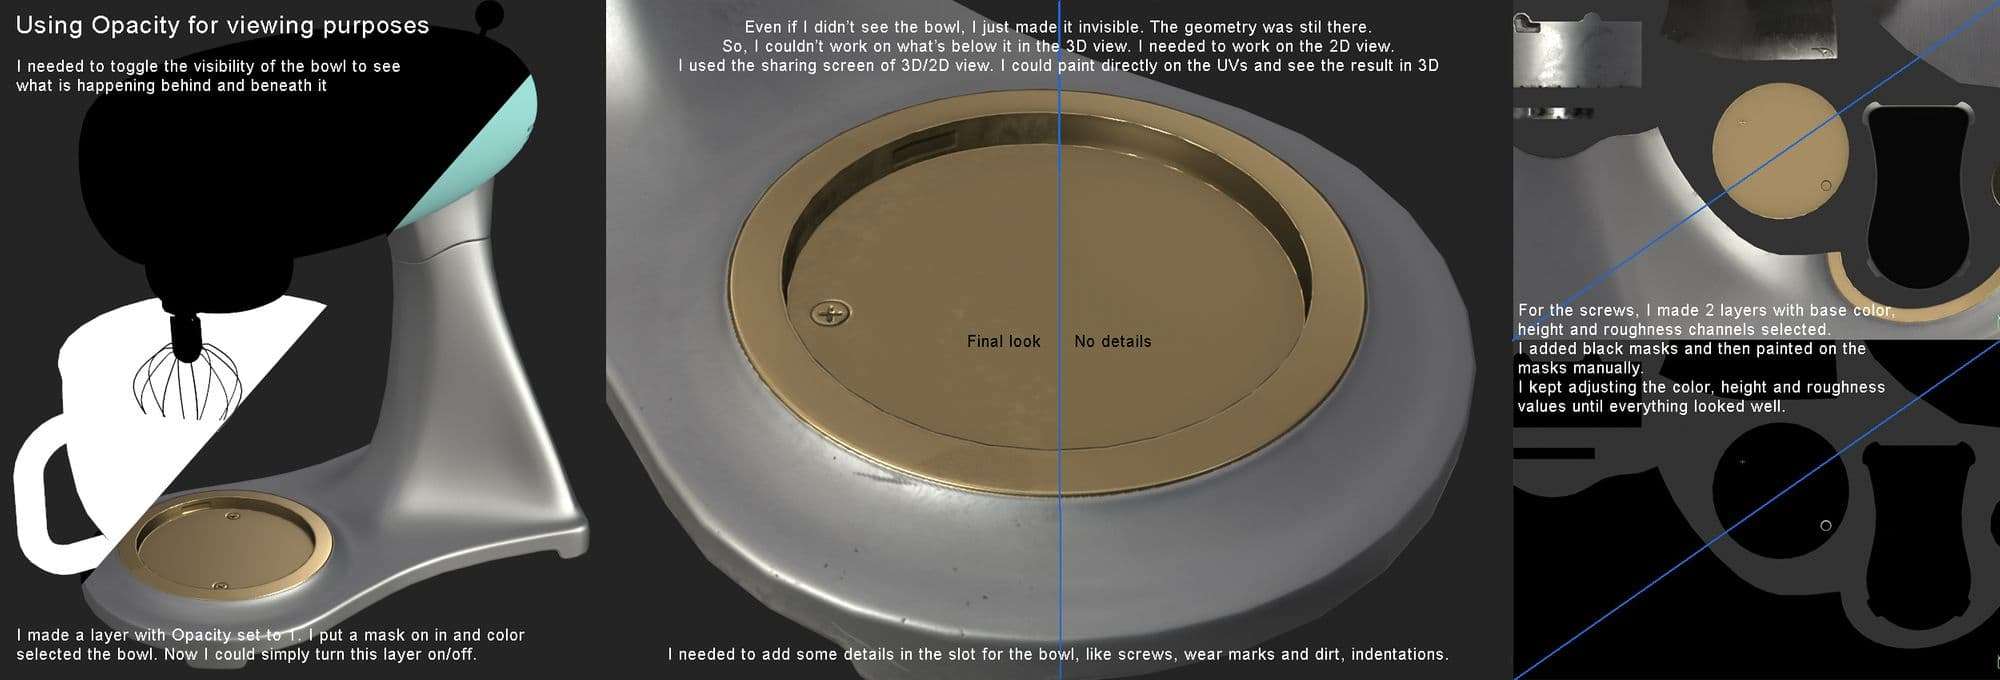
I also used Opacity when I needed to work on some areas that weren’t very visible because of some other geometry.
For example, I couldn’t work properly on the body of the mixer because of the bowl. Even if I worked on the 2D view mode, I still couldn’t see it in 3D.
The workaround was to make a temporary layer that I would use to toggle On/Off the bowl’s visibility. I made a new layer, selected only the Opacity channel and set its value to 1. I applied a mask to this layer and I selected all the parts of the bowl.
However, having changed the bowl’s visibility didn’t mean the geometry was not there anymore. I still couldn’t work in the 3D view, but I could split the viewport between the 3D and 2D view and I could paint in the 2D view and see the changes in the 3D view.
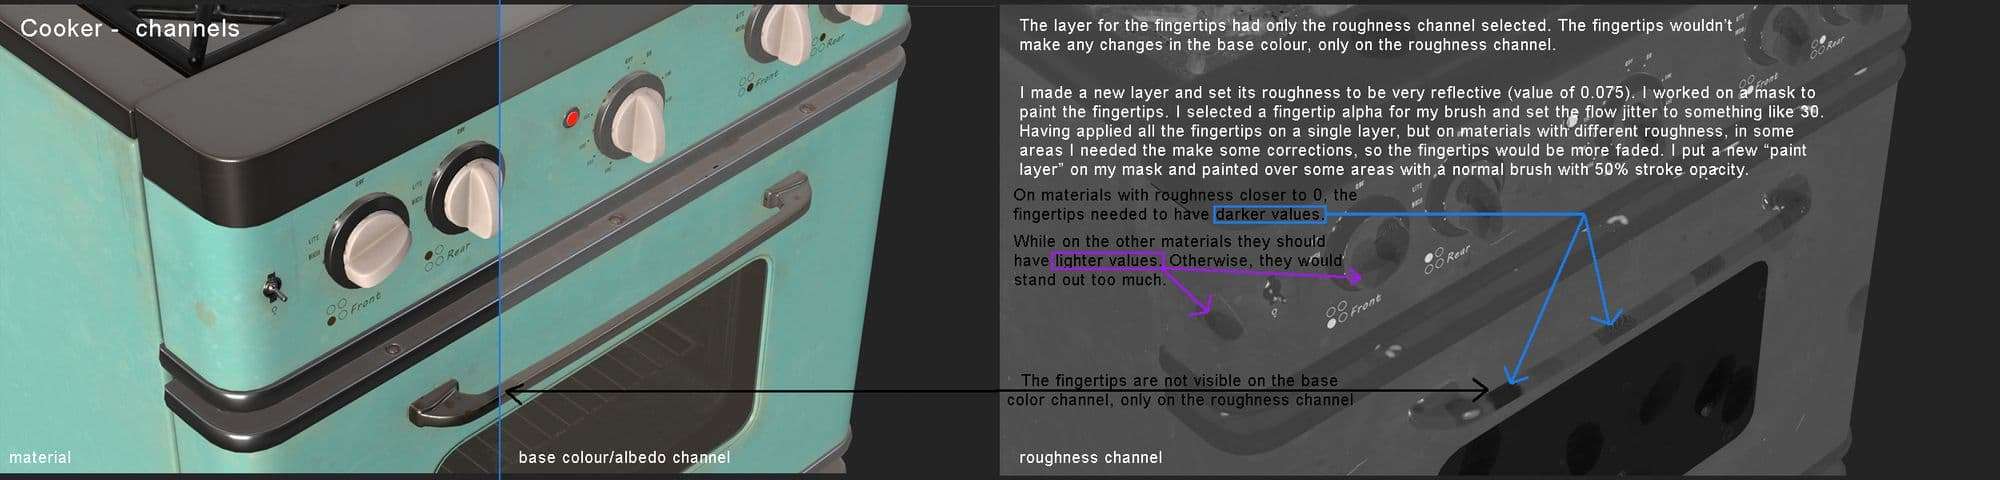
When I was applying some types of dirt and wear I would check my model from time to time on different channels.
For example, when I put on grease spots or fingertips I kept checking out the roughness channel. Because these spots needed to stand out more in some areas while in other areas more faded.
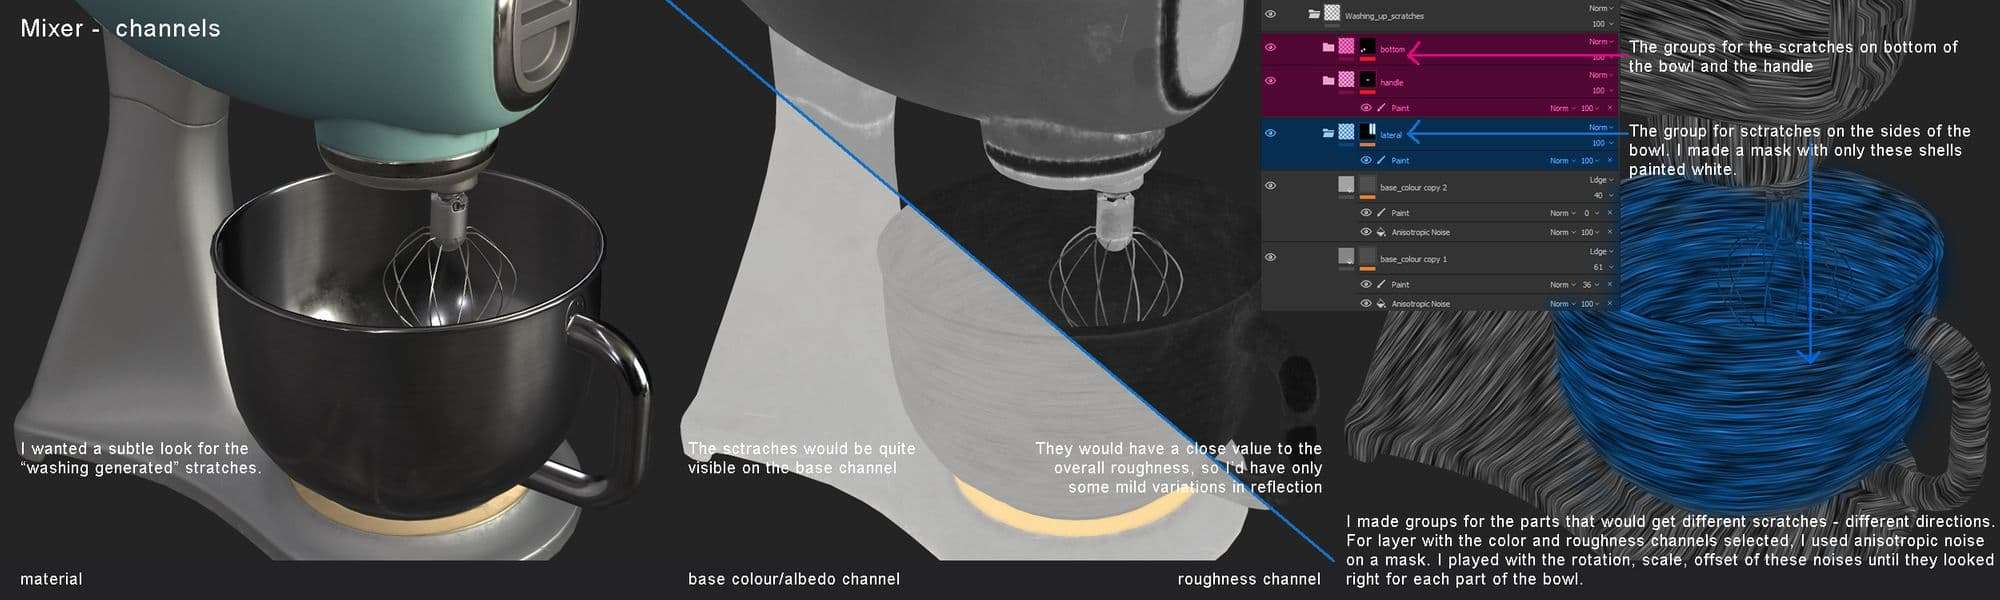
Another channel I would check often was the base colour one. For example, when I was working on the bowl of the mixer, I wanted to give the bowl some directional scratches, like marks from rubbing with a wool sponge. But the effect needed to be subtle. When adjusting the blending and opacity of a layer I'd toggle between the material, base colour and roughness channel.
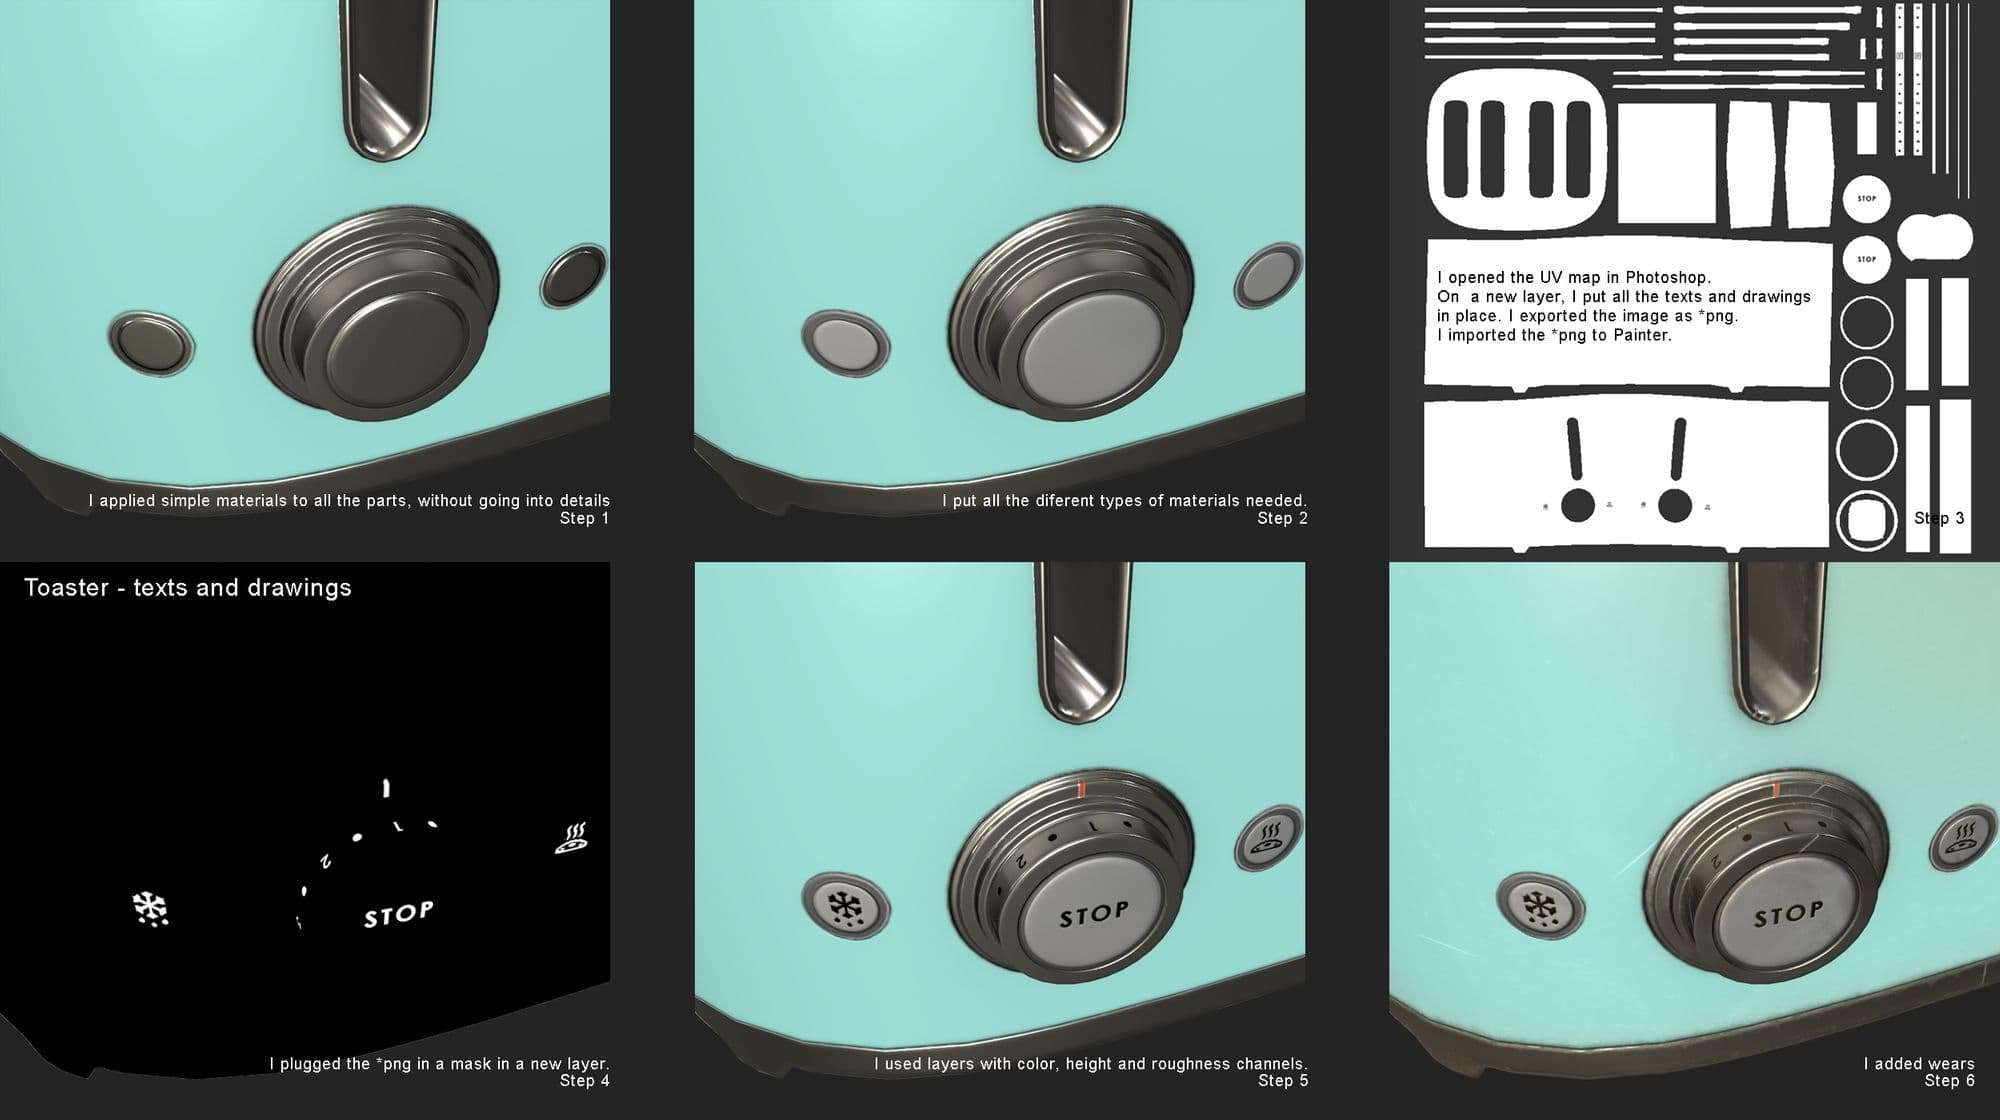
Sometimes, I needed to work on very fine/precise details. One example is the texts and drawings on the toaster's buttons.
I made the drawings and texts in Photoshop and everything looked good there. But because of the texture resolution limitations I needed to make some corrections in Painter.
The markings on the big buttons looked better in Painter from the beginning. This is because I kept some low poly geometry for them. And I could make their UV shells bigger on the UV map.
But the drawings on the small buttons needed a lot of work. I didn't make separate geometry for them in the low poly so they'd come out only through the baked maps. For these areas, I had very small resolution on the UV map. I used the smallest size brush to make these drawings look good.
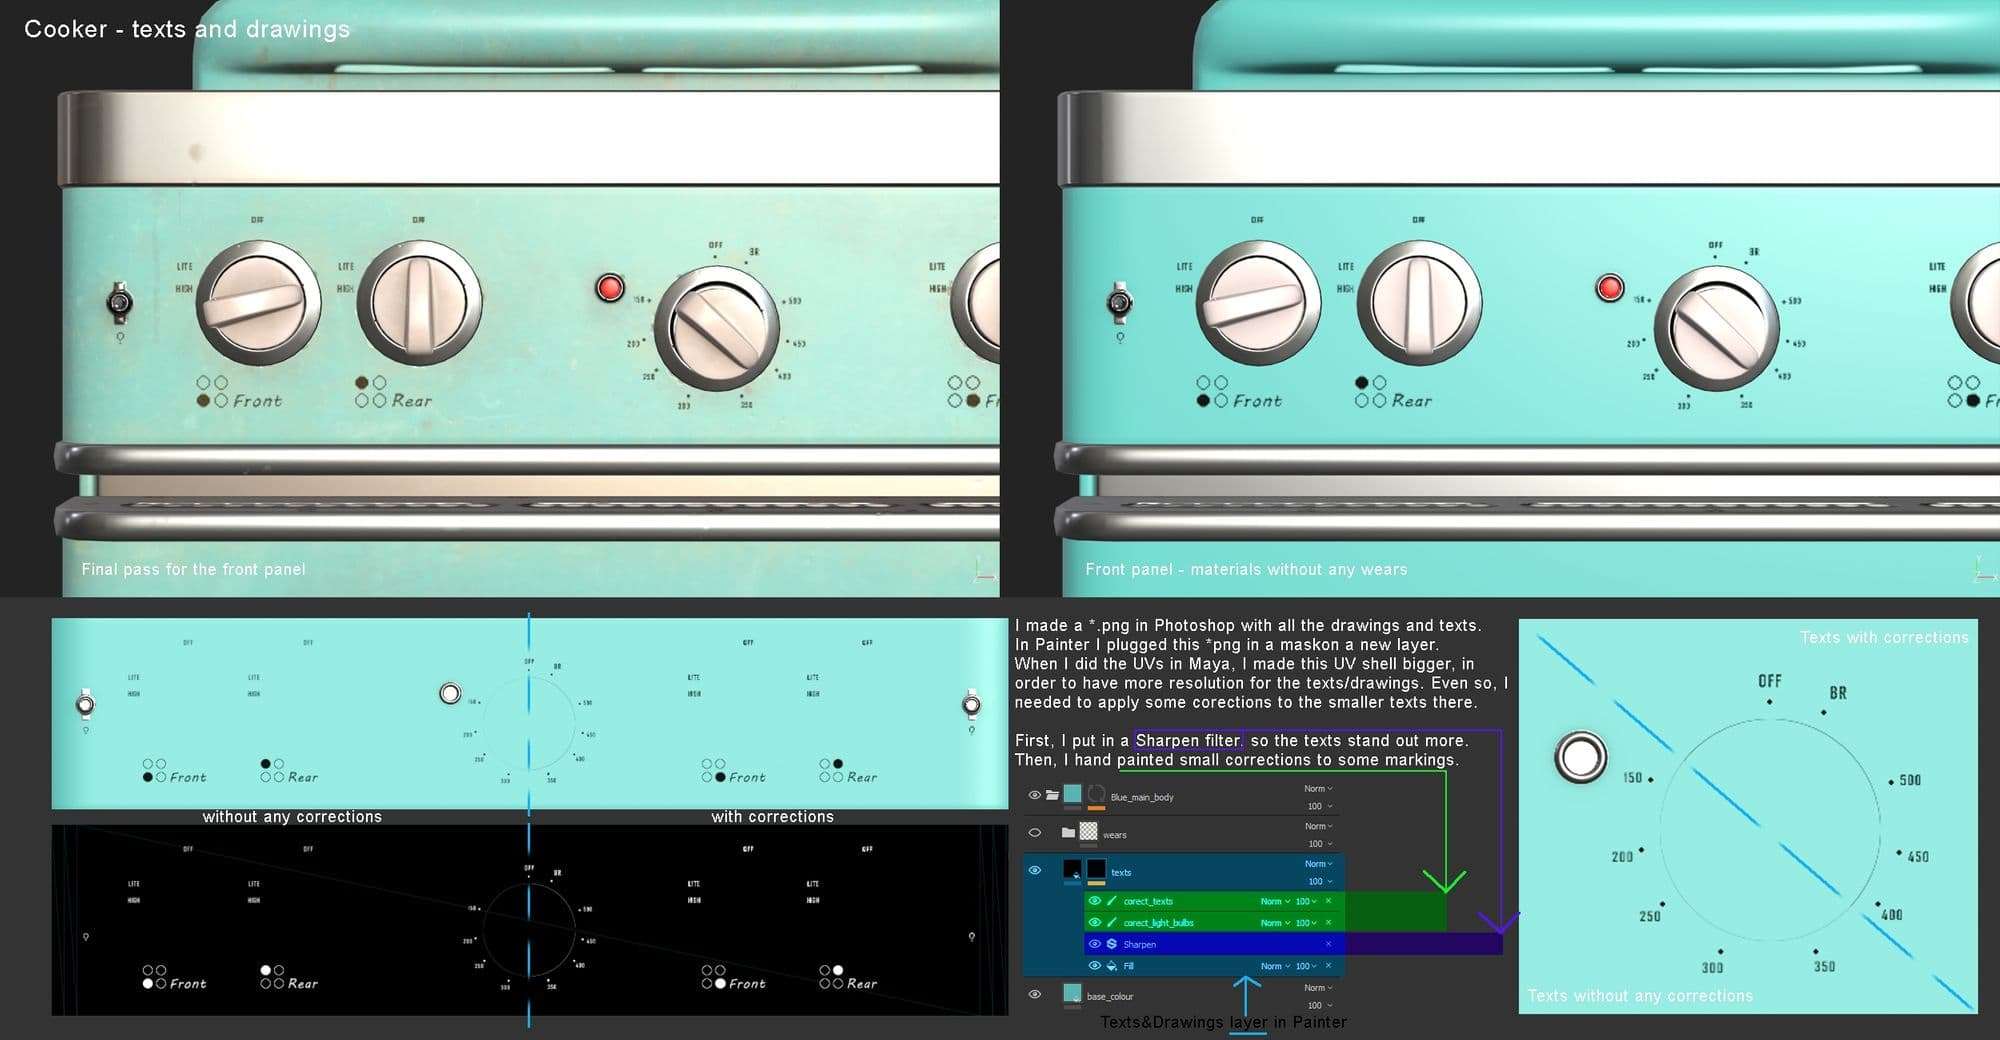
When I got to the stove, I knew I would need to make a lot of small texts and drawings for the front panel. So, when I did the UV map I made the shell for that panel much bigger so I’d have more resolution to work with. Even so, I needed to make small adjustments and corrections for better results. While doing these, I changed the texture set size to 4096. When I finished the texturing part I exported the textures in *.tga format.
Final Render
I made the renders and the movie in Unreal Engine. When I finished the first model, the toaster, I started a new project in Unreal. I planned to keep all these models in a single project so I’d be able to re-use some things from one model to another.
First, I made a level map with a basic setup for studio lighting. I would duplicate this level map for each model later.
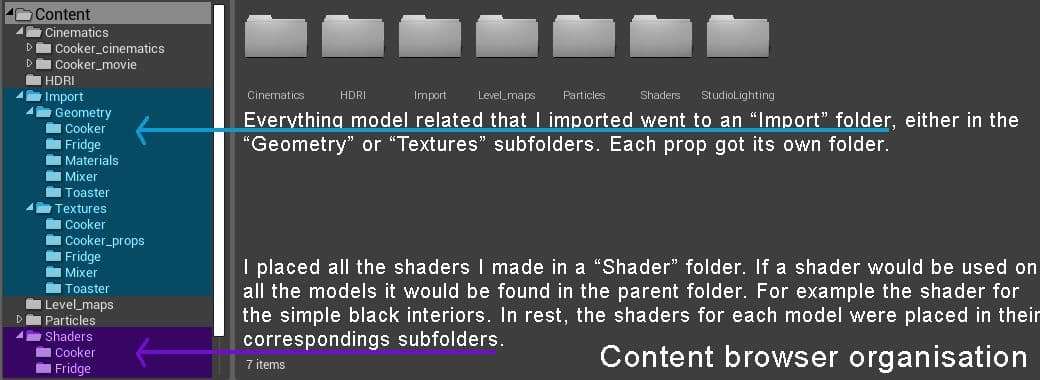
I decided how I would organise the Content Browser and the World Outliner. I wanted to keep it clean and easy to use when I got all the models in.
Lights
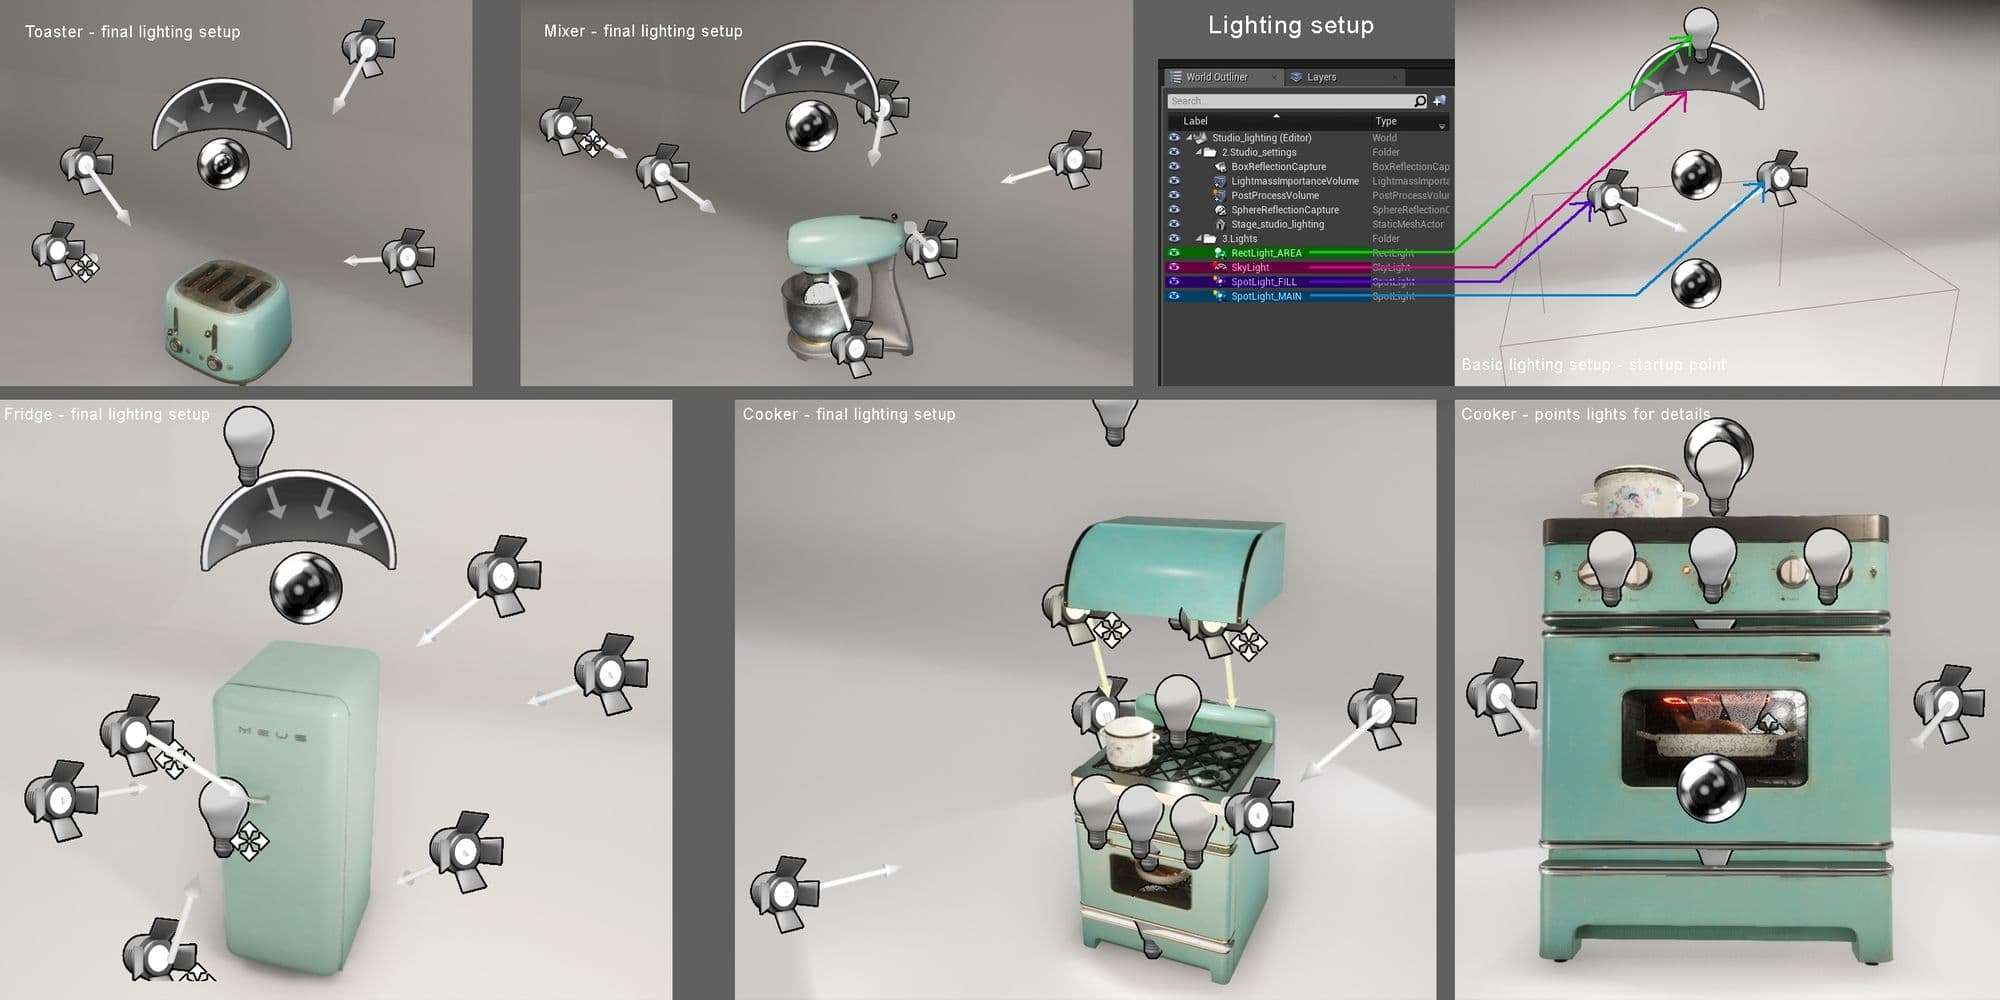
I imported a stage I did in Maya and applied on it a white material with some medium roughness and specular. Then, I added a couple of lights.
I oriented an area light to light up the edge of the stage's ceiling. This gave back a soft, low intensity light towards the stage's center.
I added one spot-light as a main source of lighting and another one as a fill light with much lower intensity.
I also put in a sky sphere and a skylight to which I plugged in a neutral HDRI.
For each model, I started from the basic lighting setup and built up from it.
Shaders
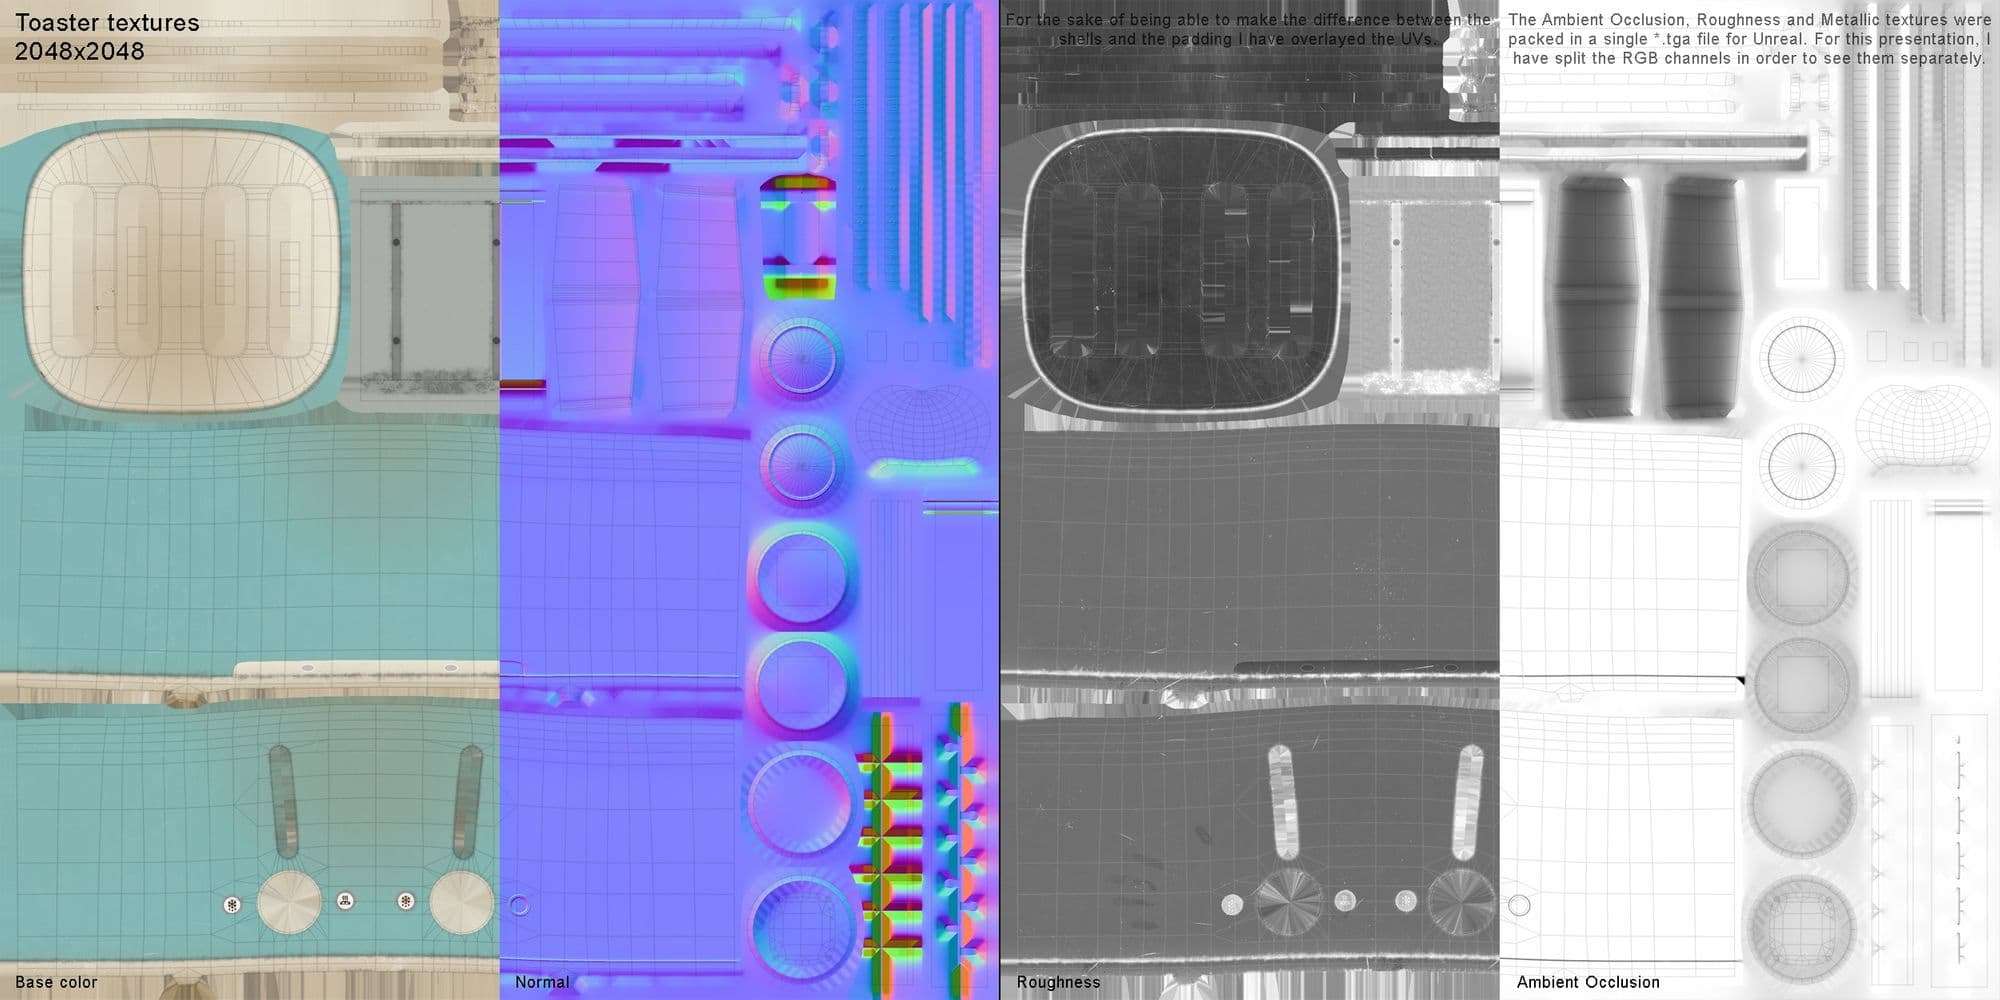
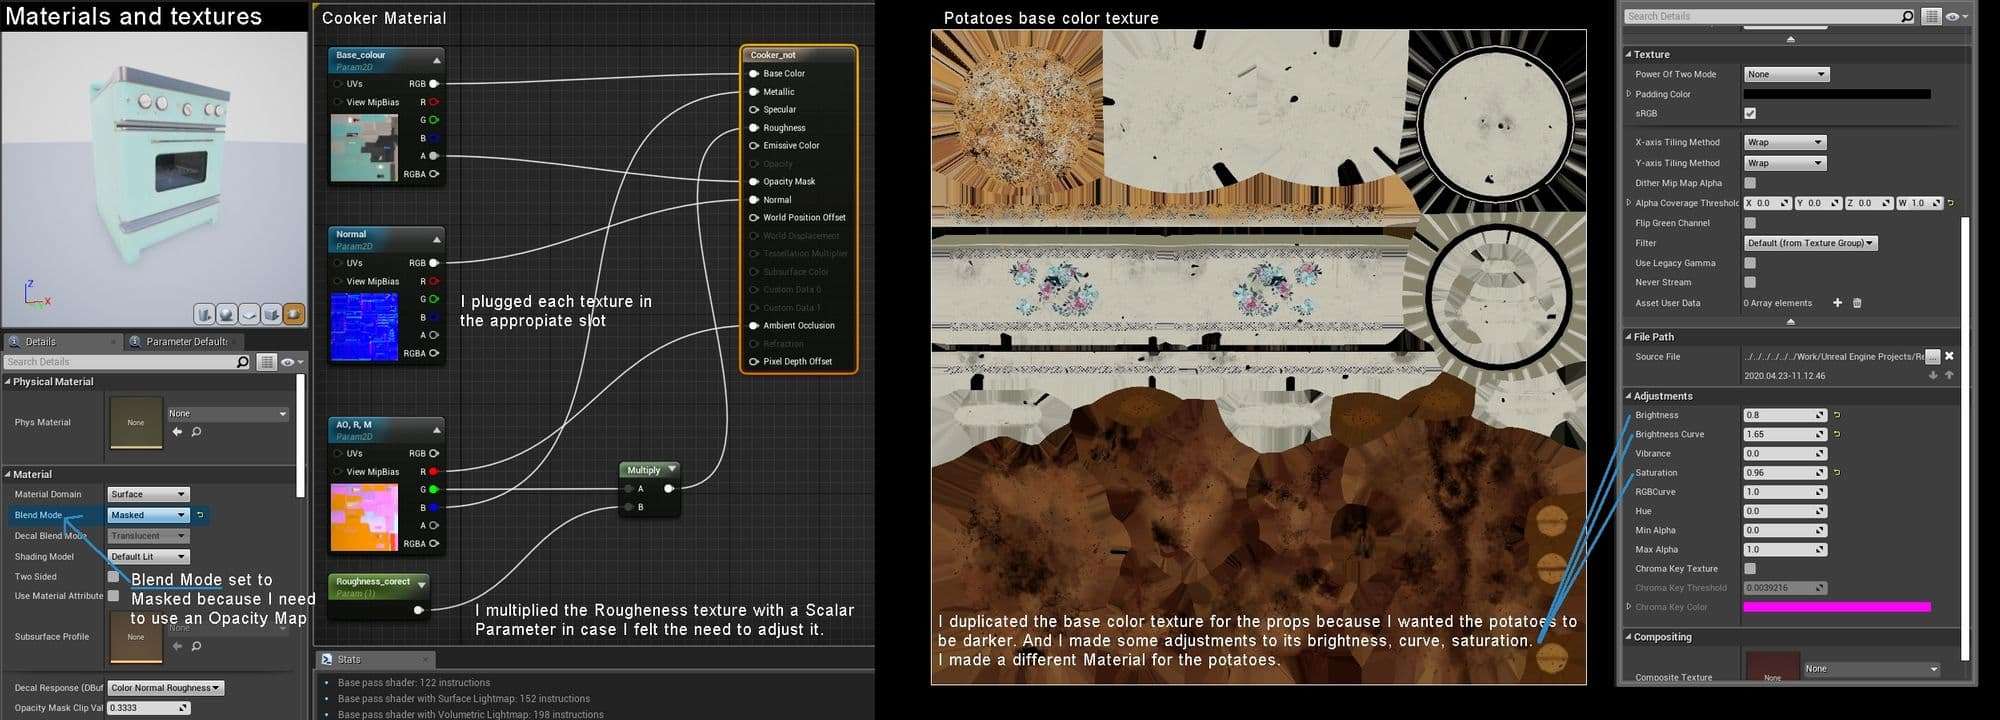
For each model I made a new simple shader in which I plugged the *.tga textures. I just needed to be careful when plugging in the proper channels from the single packed Roughness, Metallic and Ambient Occlusion *.tga.
The green channel goes to Roughness.
The blue goes to Metallic.
The red goes to Ambient occlusion.
If I needed a shader with Opacity, From the Material’s Details Tab and Blend Mode I’d choose Masked. Then I plugged the Alpha channel of my base color *.tga to the Opacity Mask slot.
Sometimes I added a Scalar Parameter to make small adjustments to the roughness. I used Material Instances on a mesh if I intended to try out different parameter values.
Other times I made small adjustments directly on a texture in Unreal.
Render Passes
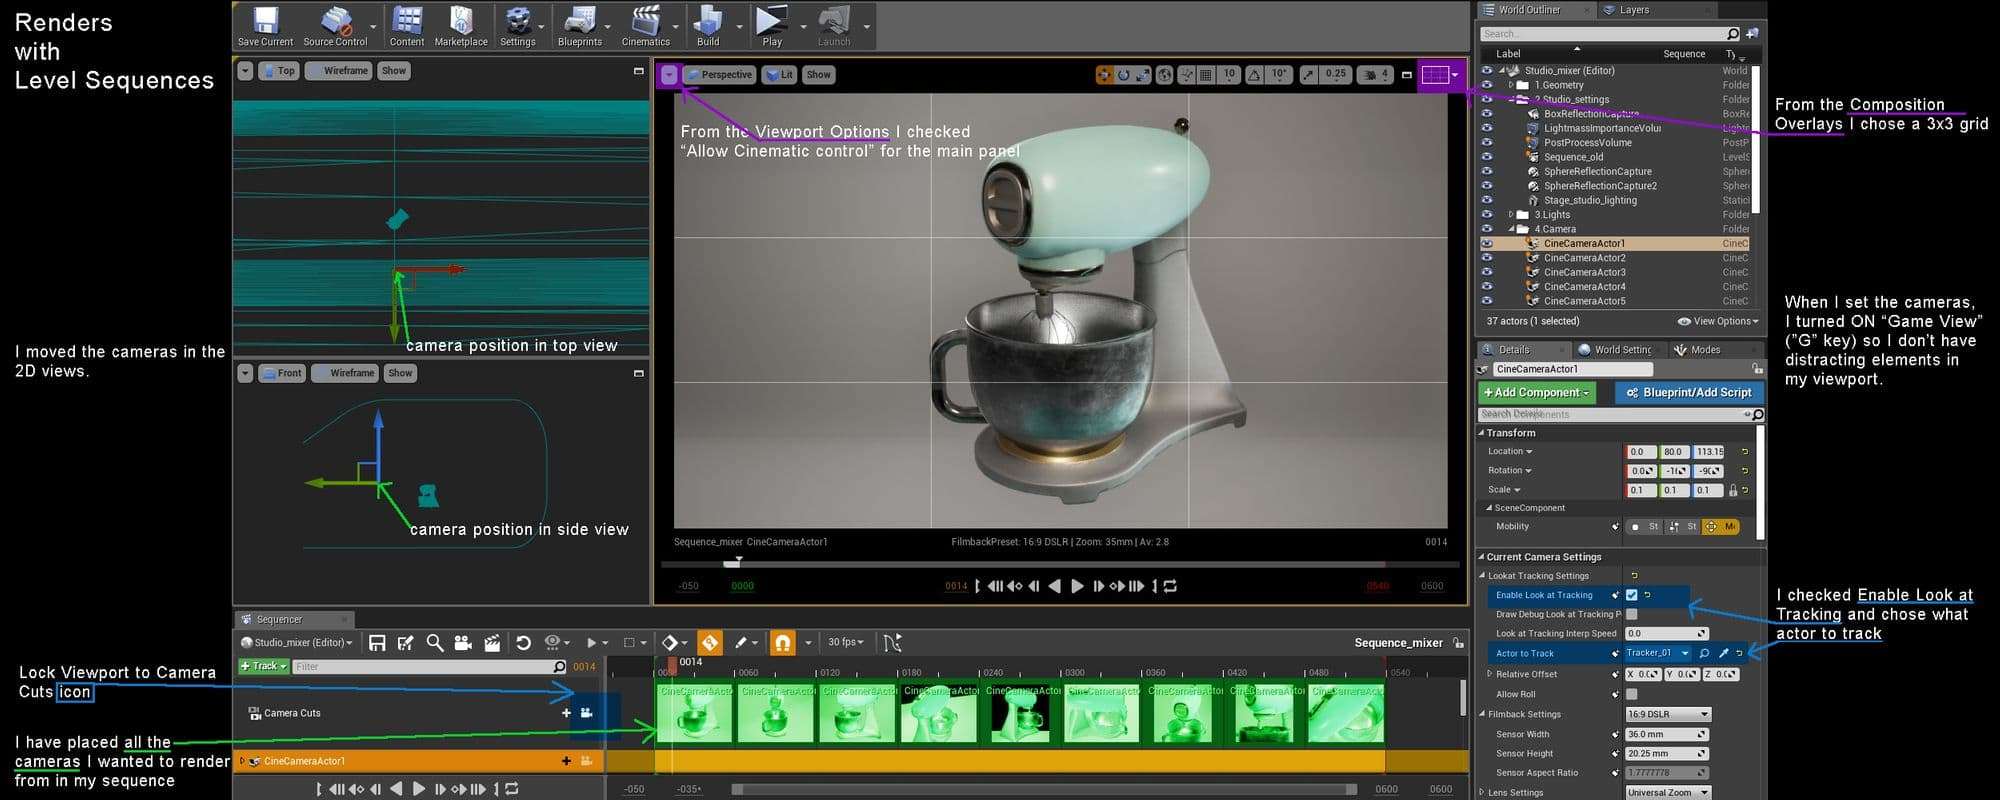
I chose to make my renders using Level Sequences and Cine Cameras.
I like to have as many controls as possible to my cameras. I find it’s easier to make fine adjustments. So I used cameras with trackers for all the shots.
First of all, I added a Camera Actor and a Sphere Static Mesh.
I scaled down the sphere and made it invisible from the Details Panel and Rendering Tab.
In the Current Camera Settings I enabled “Look at Tracking” and I chose my sphere as the “Actor to Track”.
I set the desired “Sensor Width” and “Focal Length”.
When adjusting the cameras for renders I worked with a 3 panes layout. For my main panel, I’d “Allow Cinematic Control” from the Viewport options.
Now I could move on to binding my cameras in my sequences.
In the sequencer, I added a “Camera Cut Track”
I “Locked Viewport to Camera Cuts”.
I made a new binding for my Camera and for its Tracker
I adjusted the camera and tracker locations until the shot looked good.
I kept adding new cameras and trackers, following the same steps.
I turned on the 3x3 grid from the Composition Overlays to help me better fit the model.
After I chose all the renders angles I went through all the cameras again and I improved each shot.
For example, I could move the tracker a little so the composition fits better against the render edges.
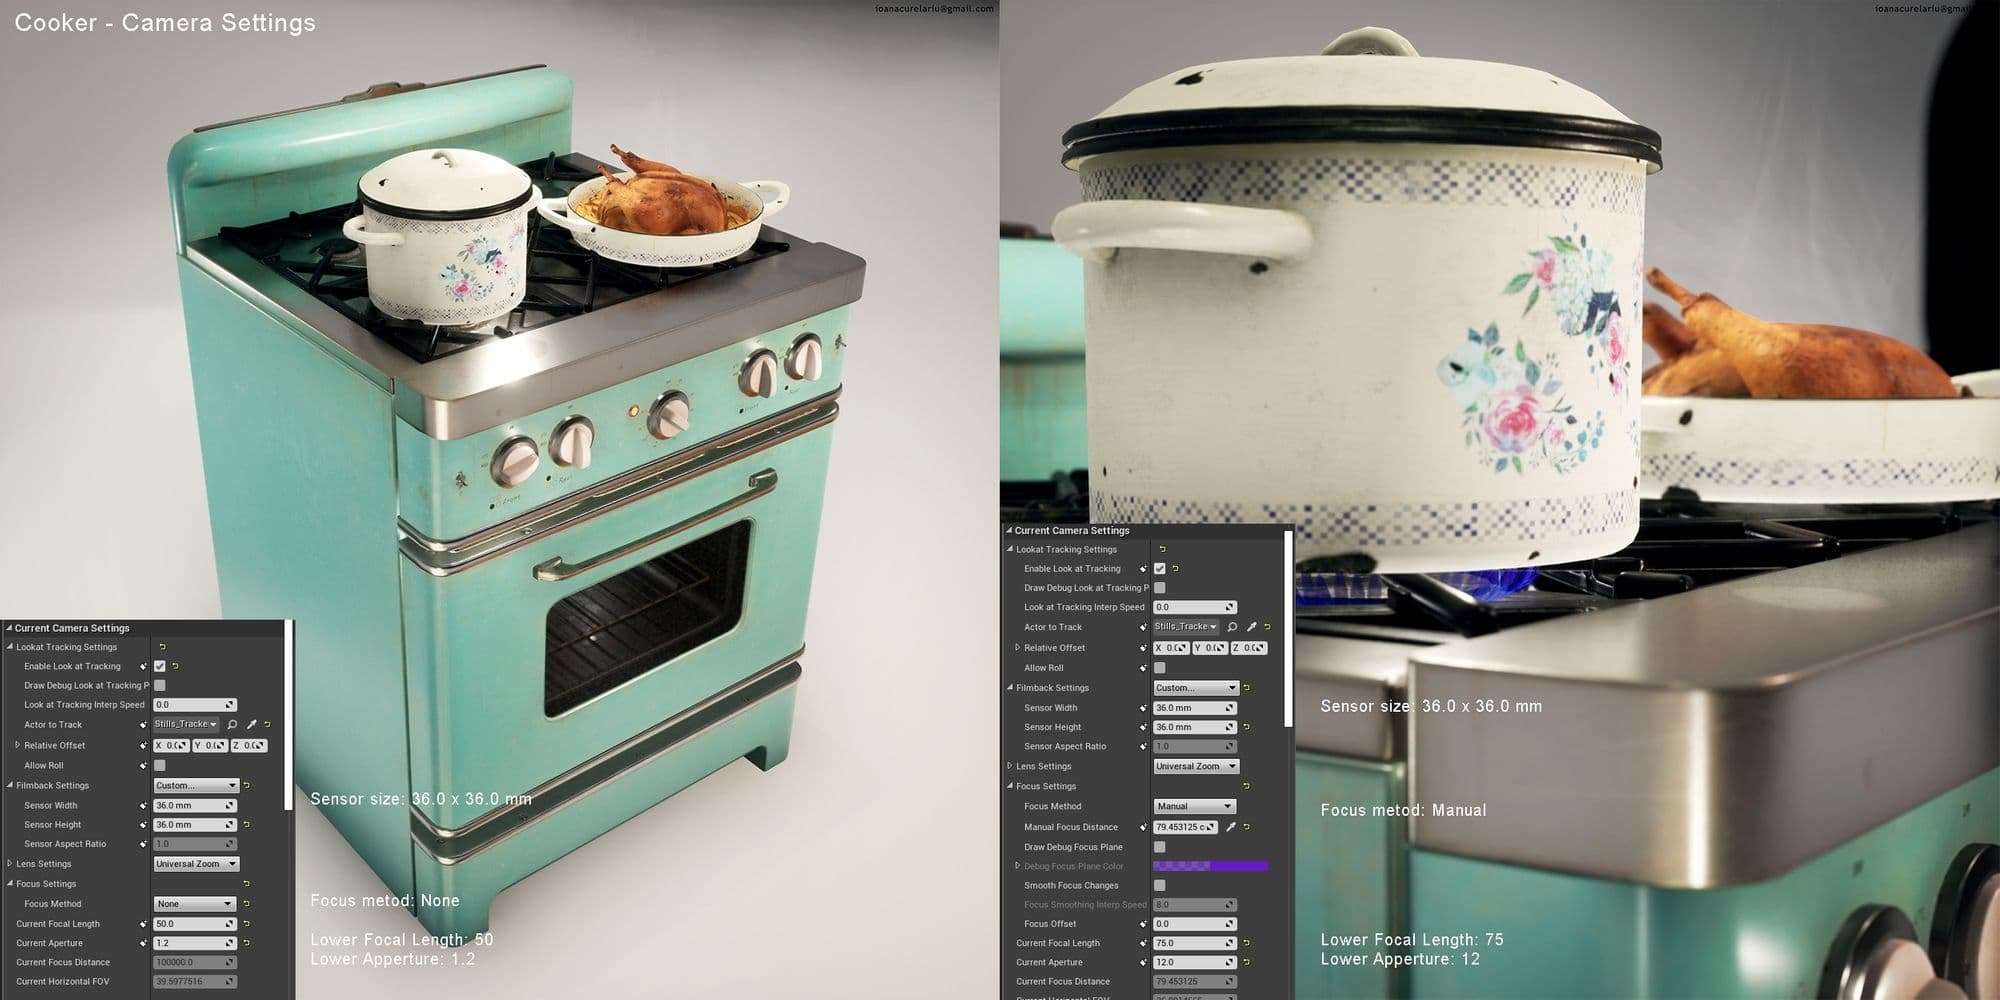
Depending what type of shot I wanted, I made changes to the Camera Settings.
For a general shot I used lower Focal Length like 35-50. I sometimes chose the focus to be on “None” so all the parts of the model would be clear.
For close ups I used higher Focal Length like 60-120. I changed the camera’s Aperture and chose Manual Focus. I used the Debug Focus Plane to see where my focus is.
I saved the renders as *.jpeg files using “HighResShot [render size]” in the Command line.
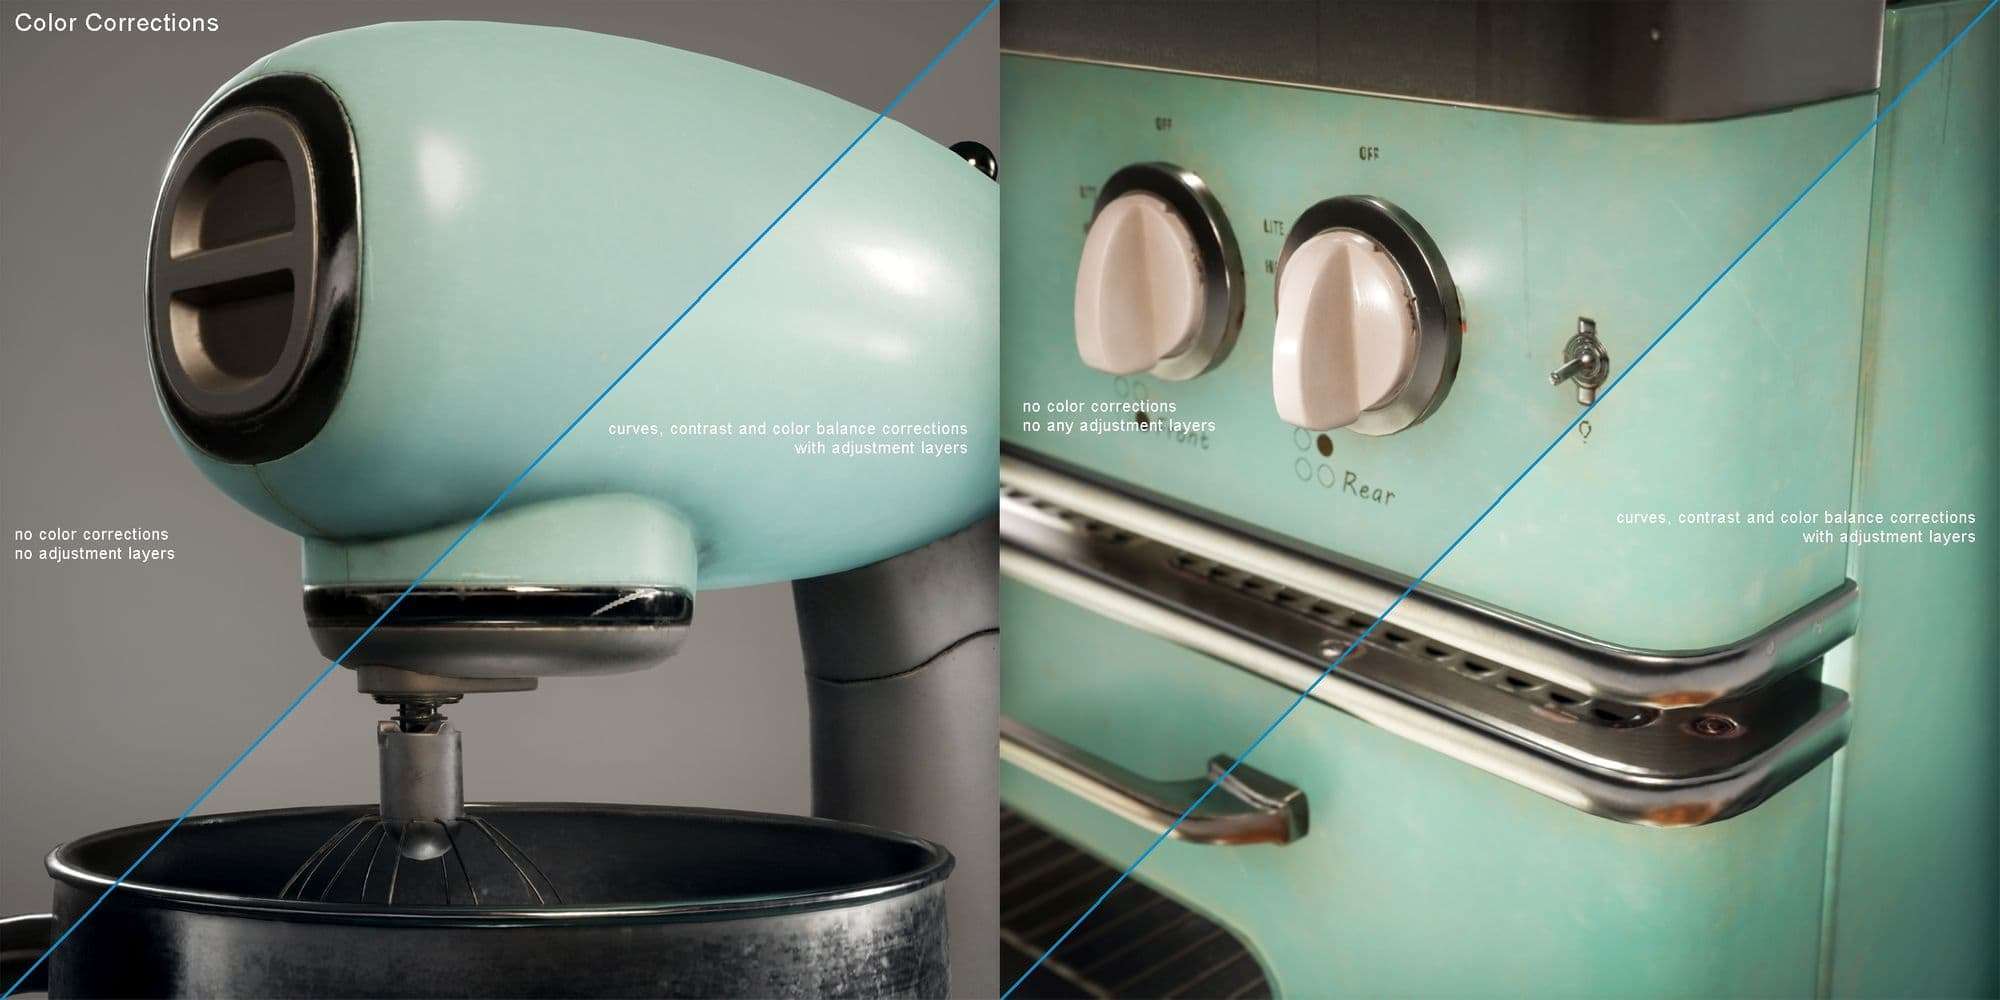
Lastly, I opened the “raw” renders in Photoshop. I applied a couple of Layer Adjustments to enhance colors and contrasts.
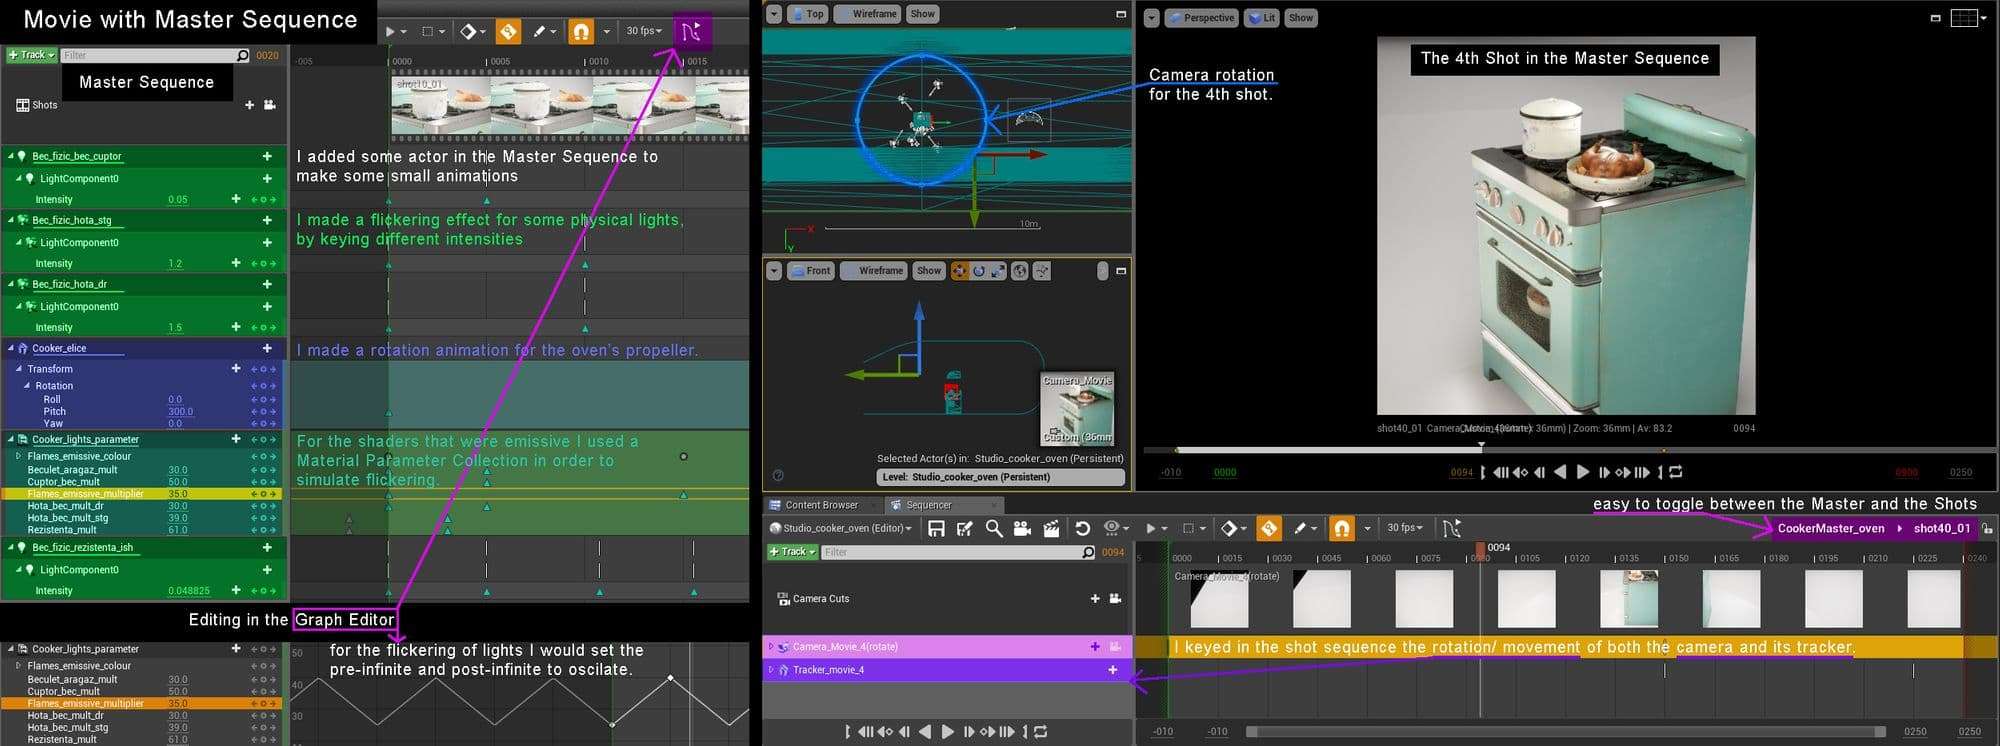
The workflow was similar with what I had done for the renders. I used Cine Cameras and a Master Sequence with a Shots Track, instead of a Level Sequence with Camera Cut Track .
For each shot, I made the camera move along a certain route from the beginning of the shot to the end. The focus and aperture needed adjustments at times. Also, the camera’s tracker needed small location changes.
After I finished adjusting the cameras, I moved on to making some small animations. I added actors in the sequences and made keys to some of their components at different frames. One of the animations I did was the rotation of the oven's fan. Another example was making flickering effects for some lights.
For some physical lights in my scene I keyed some small intensity changes in the sequencer. Then I made the "animation" repeat forever using the Graph Editor. I did this for the 2 spotlights that I added to the hood and for some point lights inside the oven.
I also wanted to have flickering on some Emissive Materials. In these materials, I plugged in Scalar Parameters from a Material Parameter Collection. I could key these parameters in the sequencer.
I wanted the flames to have some idle animation. It worked out by adding some nodes to their Material.
In the World Position Offset I plugged in a Simple Grass Wind node. And I plugged in 2 Scalar Parameters in this node so I could adjust them in an Instance Material.
I also wanted the flames to have small hue changes. I used both Vectorial and Scalar Parameters from the Material Parameter Collection. I could then add keys to these in the sequence. I multiplied these parameters and plugged the result in the Emissive slot.
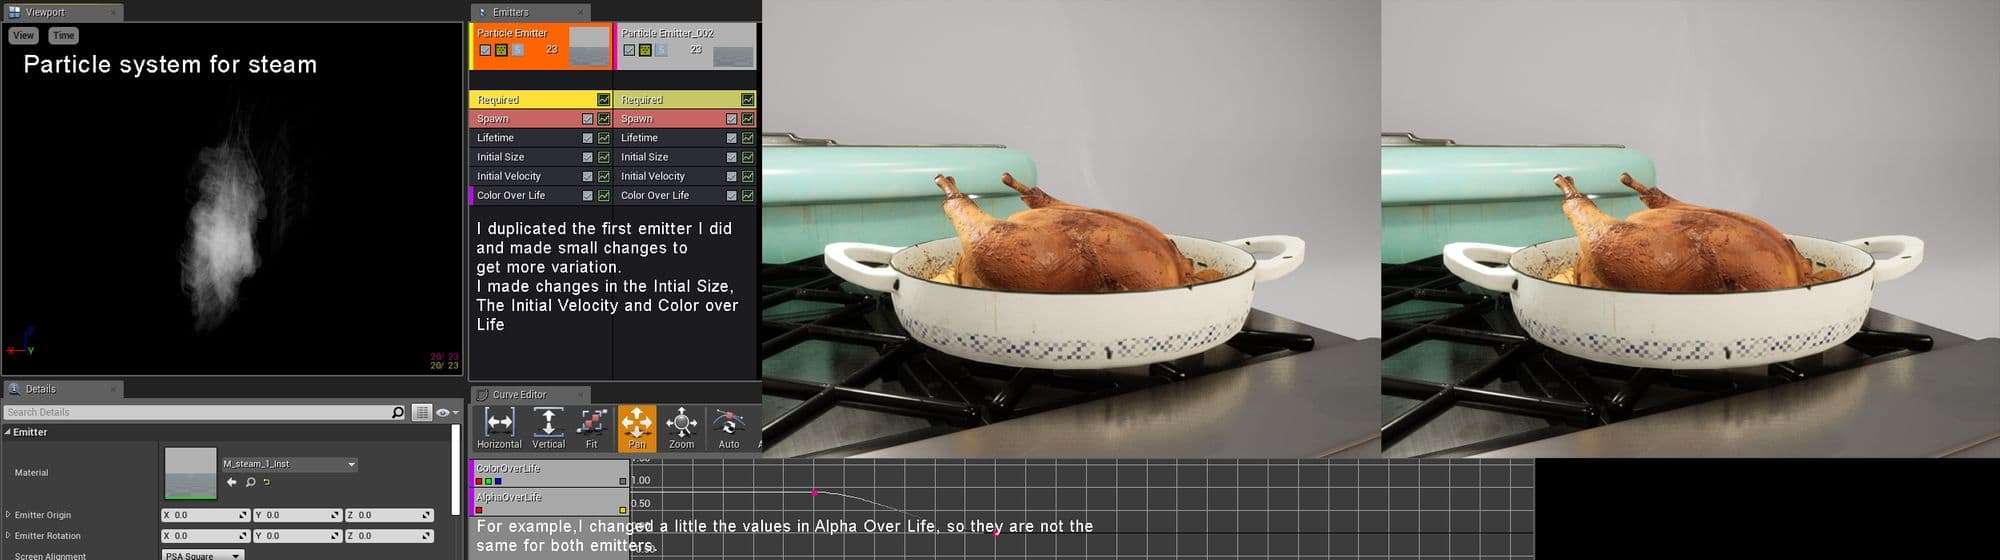
I needed one more element to complete the scene before rendering the movie. That is the steam lifting off the roasted chicken. I simulated this using Particle Systems.
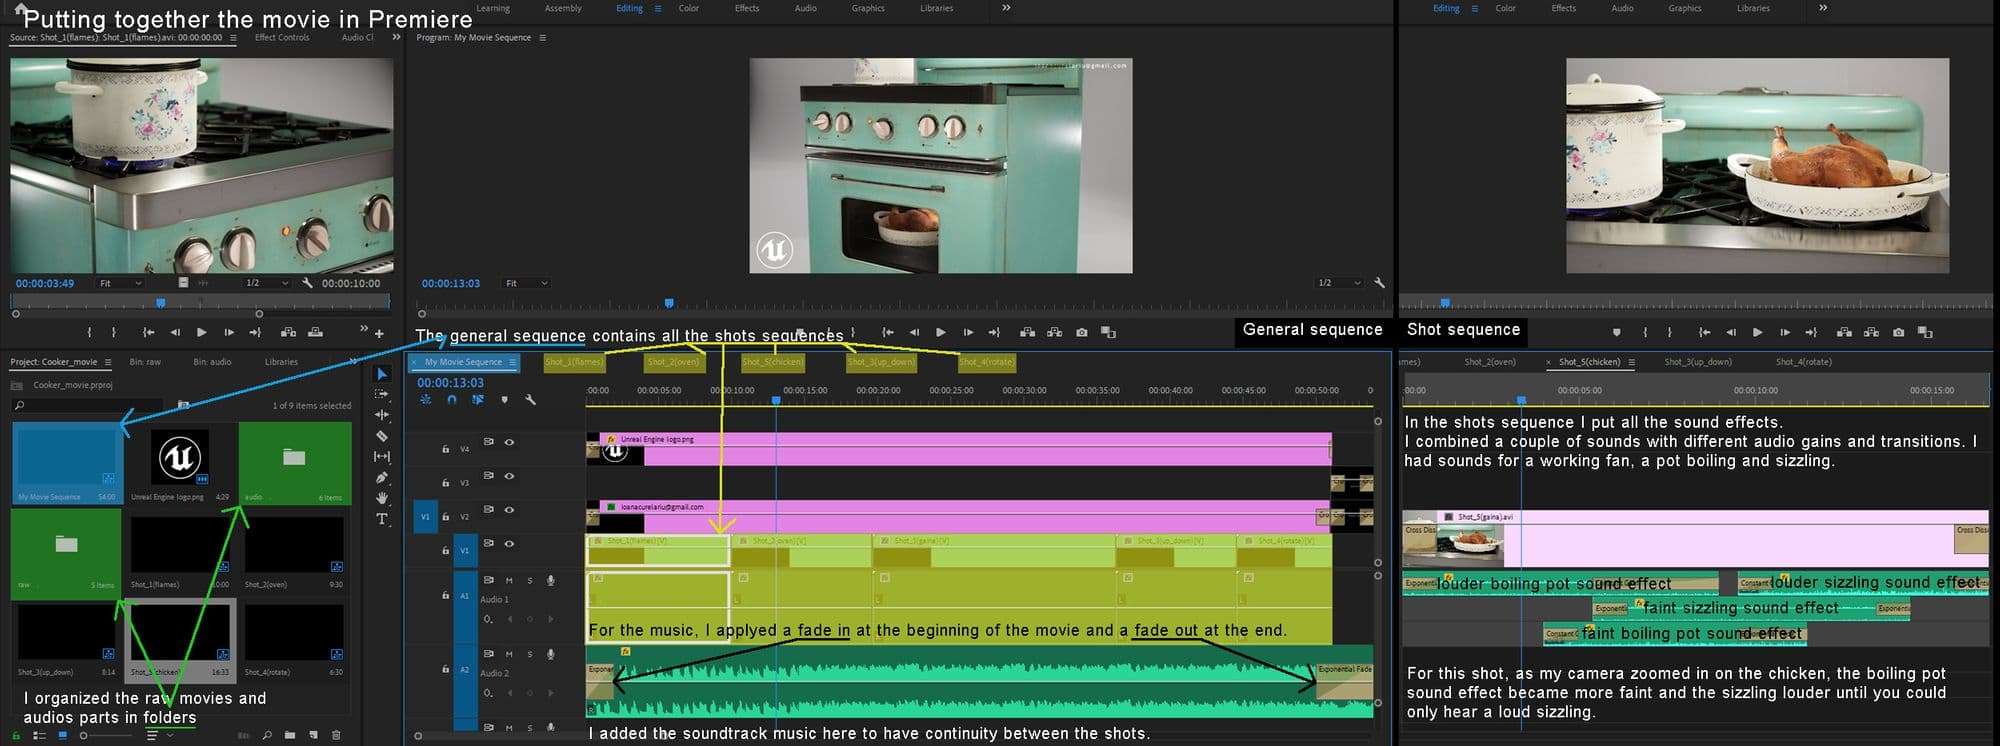
I rendered the movie by each shot with a 2560x1440 resolution and 60fps. I imported the “raw” shots in a new Premiere project. I found some Free Royalty music and sounds effects that I added to my project.
I organised my work similar to how I did with the Master Sequence in Unreal. I made a sequence for each of the shots and put them all in a General Sequence.
In each shot sequence I put only sound effects and not any music. I applied here some audio and video transitions. I put the music as a background soundtrack in the General Sequence.
Conclusion
Working on these props helped me get more comfortable and confident with the asset creation pipeline. I even started to optimise and improve parts of my workflow, if I were to compare the approaches for the first asset, the toaster and lastly, the cooker.
I learned I need to think ahead of the things I intend to do. This can save me a lot of time in the long run.
I kept improving the way I work, from the particular steps of the workflow to my files. I found out I enjoy trying to make myself more efficient and keep my files cleaner and better structured.
I realized I needed to have a certain attraction to the models. So that when I finished them, I could be really proud of what I managed to do. The work needed to be a little challenging, but not so much as it became overwhelming. Taking on one smaller task at a time was an insurance that I could definitely see it through till its end. And if I encountered some yet unknown issue, I could focus on searching for solutions, then finish my task.
On a final note, I learned feedback is really important. Receiving advice and/or appreciation was a good incentive for me to keep up with my work.
Being given the chance to make this breakdown feels like some sort of recognition that I am doing it right. So I want to thank The Rookies and Andrew Mcdonald for giving me this opportunity.
I hope this made sense to you and that you could find something informative and helpful here.