How to Model and Light a Detailed 3D Scene
Israeli Animation College student, Ofir Tal Buchris is also a freelancer specialising in Maya and Blender. She shares with our readers how to model and light a detailed 3D scene.
Israeli Animation College student, Ofir Tal Buchris is also a freelancer specialising in Maya and Blender. She shares with our readers how to model and light a detailed 3D scene.

Ofir Tal Buchris is studying 3D animation for her second year at IAC (Israeli Animation College) in Tel Aviv. She has also studied painting and drawing at Frame By Frame with Ben Ozeri and recently participated in a workshop led by Adam Goldstein (lead texture artist at Framestore).
Ofir is also working as a freelancer in 3D animation with Maya and Blender, specialising in texturing, lighting, rendering, modeling, and animation. A very busy artist, Ofir has taken the time to share how to model and light a detailed 3D scene.
Ever since I was a child, I loved cars. Especially the classic Volkswagen Beetle. I’ve tried several times to model it and realised how difficult this task is. I enjoyed creating this project, improving my modeling abilities thanks to the many challenges I encountered during its creation. I hope you learn something from my work process, making it easier for you in your next project.
While working on this project I found some tricks that helped me and I would love to share them with you:
Try to describe your model in words. That way, you’ll focus on finding solutions and ways to get the same descriptions. For example, some of the words I used to describe the car were ‘smooth’, ‘curved’, and ‘wavy’. I realised that I had to find a way to ensure that the model was smooth since cars and most mechanical models are supposed to be very polished. I found a simple, but very effective way: using a Blinn material. This allowed me to see the shine on the model effortlessly even before the render, so I could make sure the model was sharp only in the places I wanted it to be.
Start with a flat (2 dimensional) model. I had a very hard time getting the particular shapes of the car while thinking about the shape in 3D. I found blueprints of the car on the web and placed them in Maya. In the first modeling phase I started working on the large and significant parts of the model. I started by creating a flat, 2D model of the parts, adjusting the position of each point in the space according to the blueprints from each side, and only then went to the perspective view.
Make sure you enjoy the process! Develop the unique character, style, and appeal of your model from the beginning. This will help you relate to your model and make the process of working on it more enjoyable. This can be done by adding basic colours and materials to the model. For example, it was important for me to feel as the car was “smiling” from the early stages of the modeling process.
Save many versions of the model process. This way you will not be afraid to make changes and even dramatic changes (which are sometimes necessary).
During the modeling process I connected and disconnected parts of the car, previewed the model as the continuous shape it should become, and achieved a polished model whose parts connected well.

I decided that this project is a great opportunity to learn another software, so I decided to model the tires in 3ds max, an experience that will help me get to know it better. I created the tire in a few simple steps:
First, I modeled the basic part of the tire’s tread pattern and duplicated it several times.

Then, I combined all the duplicates into one mesh and welded the vertices that share the same location.

Finally, I used the "Bend" modifier to bend the whole flat tread pattern into a circle.

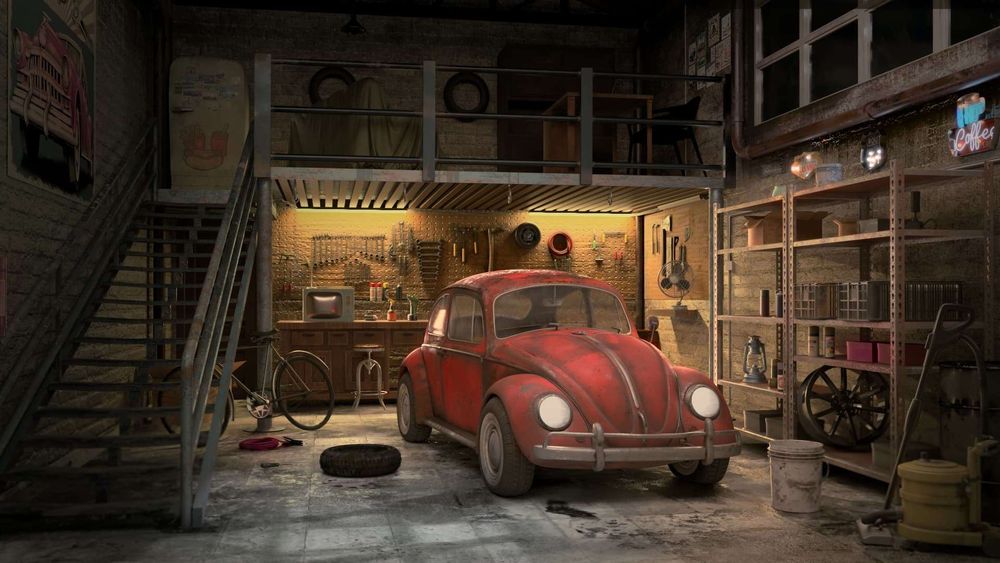
After the car was roughly modeled, I decided it should be placed in an interesting environment, like a garage, so I looked for references until I found some I liked.
Develop the unique character, style, and appeal of your model from the beginning. This will help you relate to your model and make the process of working on it more enjoyable.
I started modeling the rest of the objects I wanted and detailed them depending on their location in the frame. I didn’t want to spend too much time on objects that would only be seen from a distance, so most of the objects seen in the final result are not as detailed as they should have been if they were photographed up close. That way I could get a lot of details that enriched my scene in very little time and effort.
I tried to create a harmony of colour tones by using both warm and cold light sources. I used Curves and other tools in After Effects to further tune the lighting in post-production (more about that later).
I wanted to emphasise the details of all the objects in the scene, even if they appeared in the dark parts of it, so I added a Rim Light to almost all the objects.


I used Substance Painter for the texturing process. I imported each model separately into the software for texturing in order to avoid overloading the software. When I needed the effect of a certain object on another object (Ambient Occlusion for example), I imported it as well, so that it would affect the baking of the maps for the object I was texturing.
For the car, I used 10 UV tiles (UDIM) and made sure to maintain a uniform density of the resolution for the entire model. This is what the cars UV layout looks like:


To render the project, I used VRay for Maya. I used VRay's built-in Denoised to achieve a less grainy result in a shorter time.
These are the render settings:

To achieve a higher quality result, I used the denoiser only after rendering all the frames To achieve a higher quality the denoiser works smarter, comparing one frame to another to achieve a better result.
Denoising methods can be divided into:
Spatial denoising methods, where image noise reduction is applied to each frame individually, and Temporal denoising methods, where noise between frames is reduced.
All you need to do is go to your Render Settings, choose the ‘vrayRE_Denoiser’ in the Render Elements tab, go to the Attribute Editor, and under the tab ‘Extra VRay Attributes’ activate ‘Enable’ and change the mode to ‘Only generate render elements’:

I used selective colour grading in After Effects to focus the viewer’s attention on the car. This was achieved by darkening the surroundings and highlighting the model’s red texture.

This project was very challenging for me, mainly because of all the high detail work. I hope you found this article helpful, and that it will empower your use of 3D software when creating your next amazing project!

You can find more of Ofir's work on Facebook, Artstation, Instagram and The Rookies.