Character Lighting Techniques to Improve Your Animated Story Telling
Annabelle Doucet-Circé is a recent graduate of CDI College and currently enrolled at the Academy of Animated Art to specialise in lighting for animation. In this breakdown she shares her character lighting techniques to help tell moving stories.
Annabelle Doucet-Circé is from Montréal, Canada. In late 2019, Annabelle finished her studies at CDI College, graduating with a 3D modeling, animation, art, and design diploma (generalist program). In 2020 Annabelle enrolled at the Academy of Animated Art to specialise in lighting for animation. Below is her breakdown of the piece she created at the Academy of Animated Art with Michael Tanzillo as her mentor. She goes through the character lighting techniques to help tell her story, and explains the creative and technical decisions that were made during the process.
Storytelling and Mood
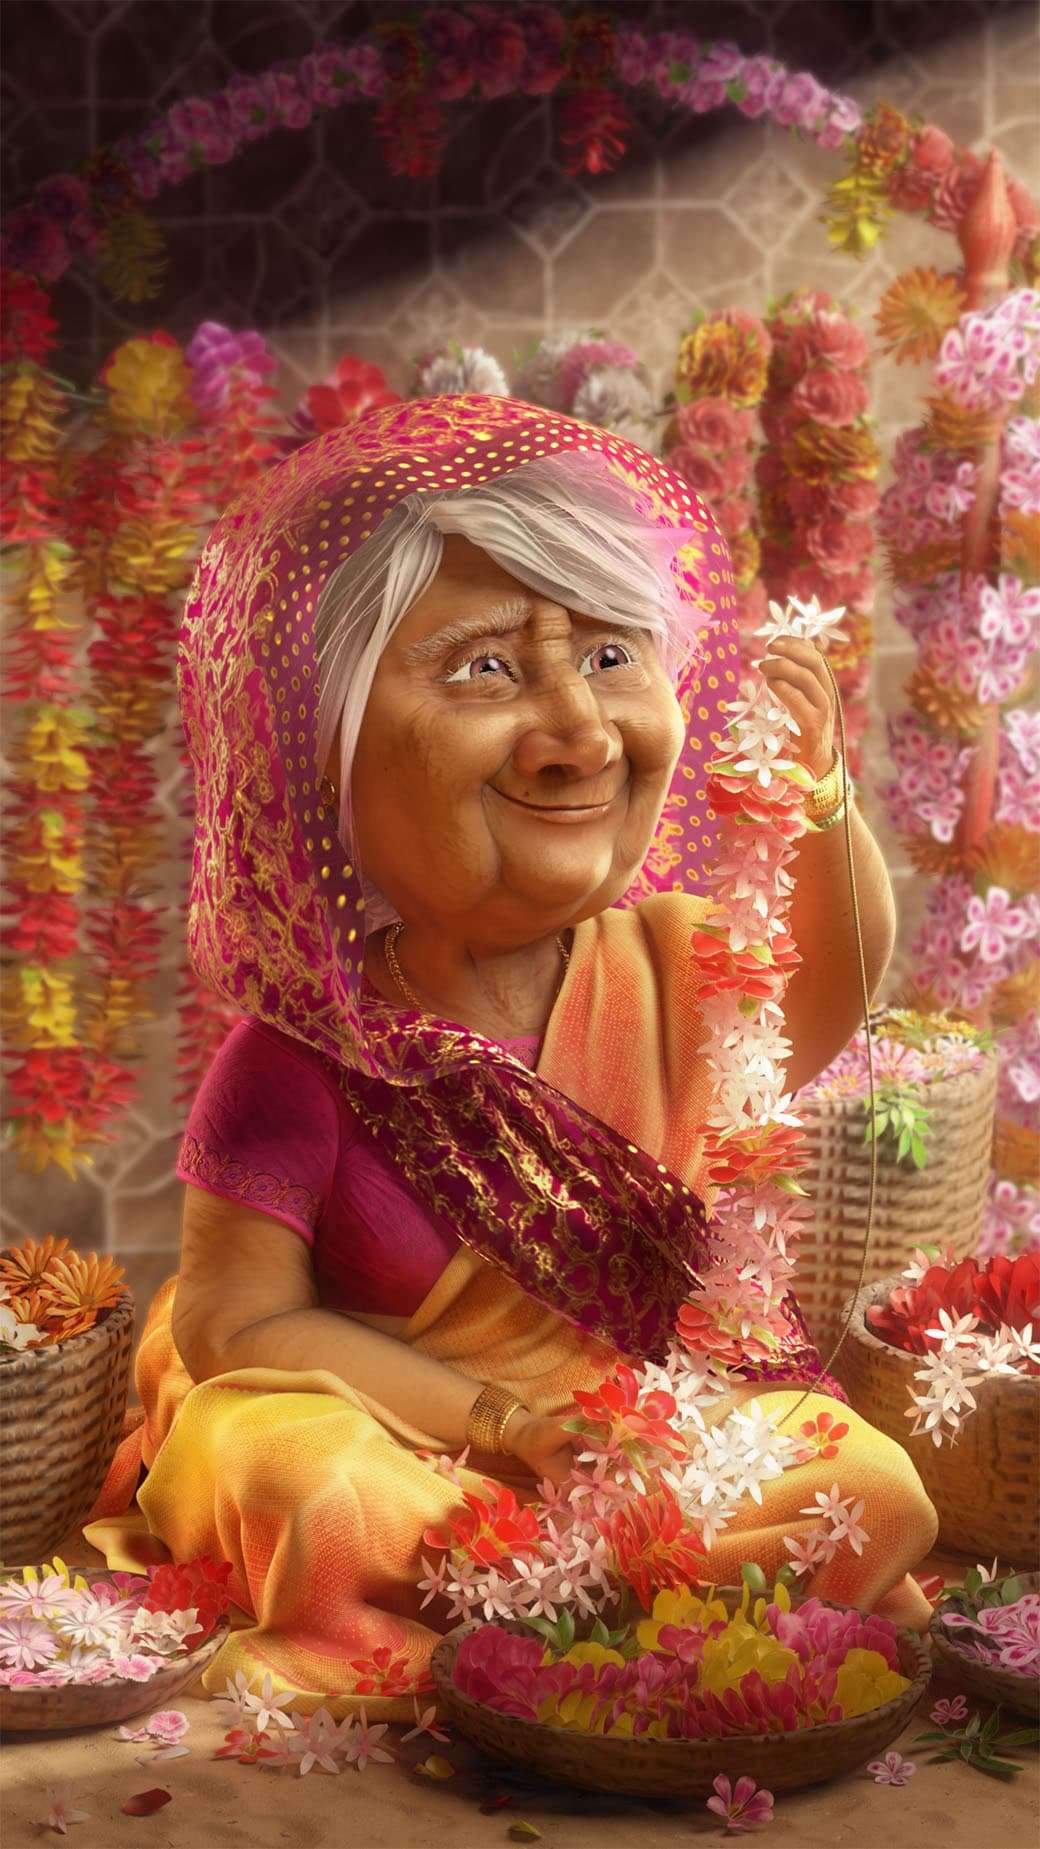
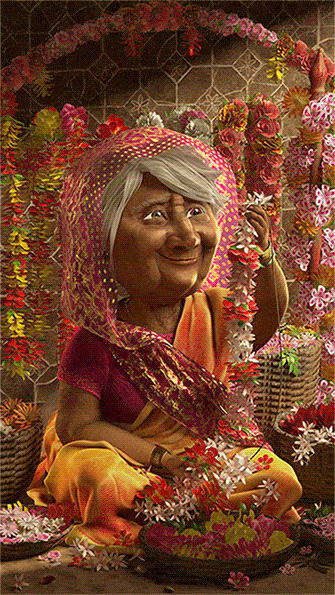
Sometimes it can be difficult to find inspiration for the story you want to tell. In my case, I didn’t have to look too far to find what I was looking for. The Academy of animated art provided me with a scene created by Sara Tarr called Prisha. I found inspiration from the character itself. I decided that the story I needed to tell was of a passionate old woman who finds joy and pride in her craft. Next, I need to think about how I was going to tell the story. That’s where finding good reference comes into play.
Searching for Reference
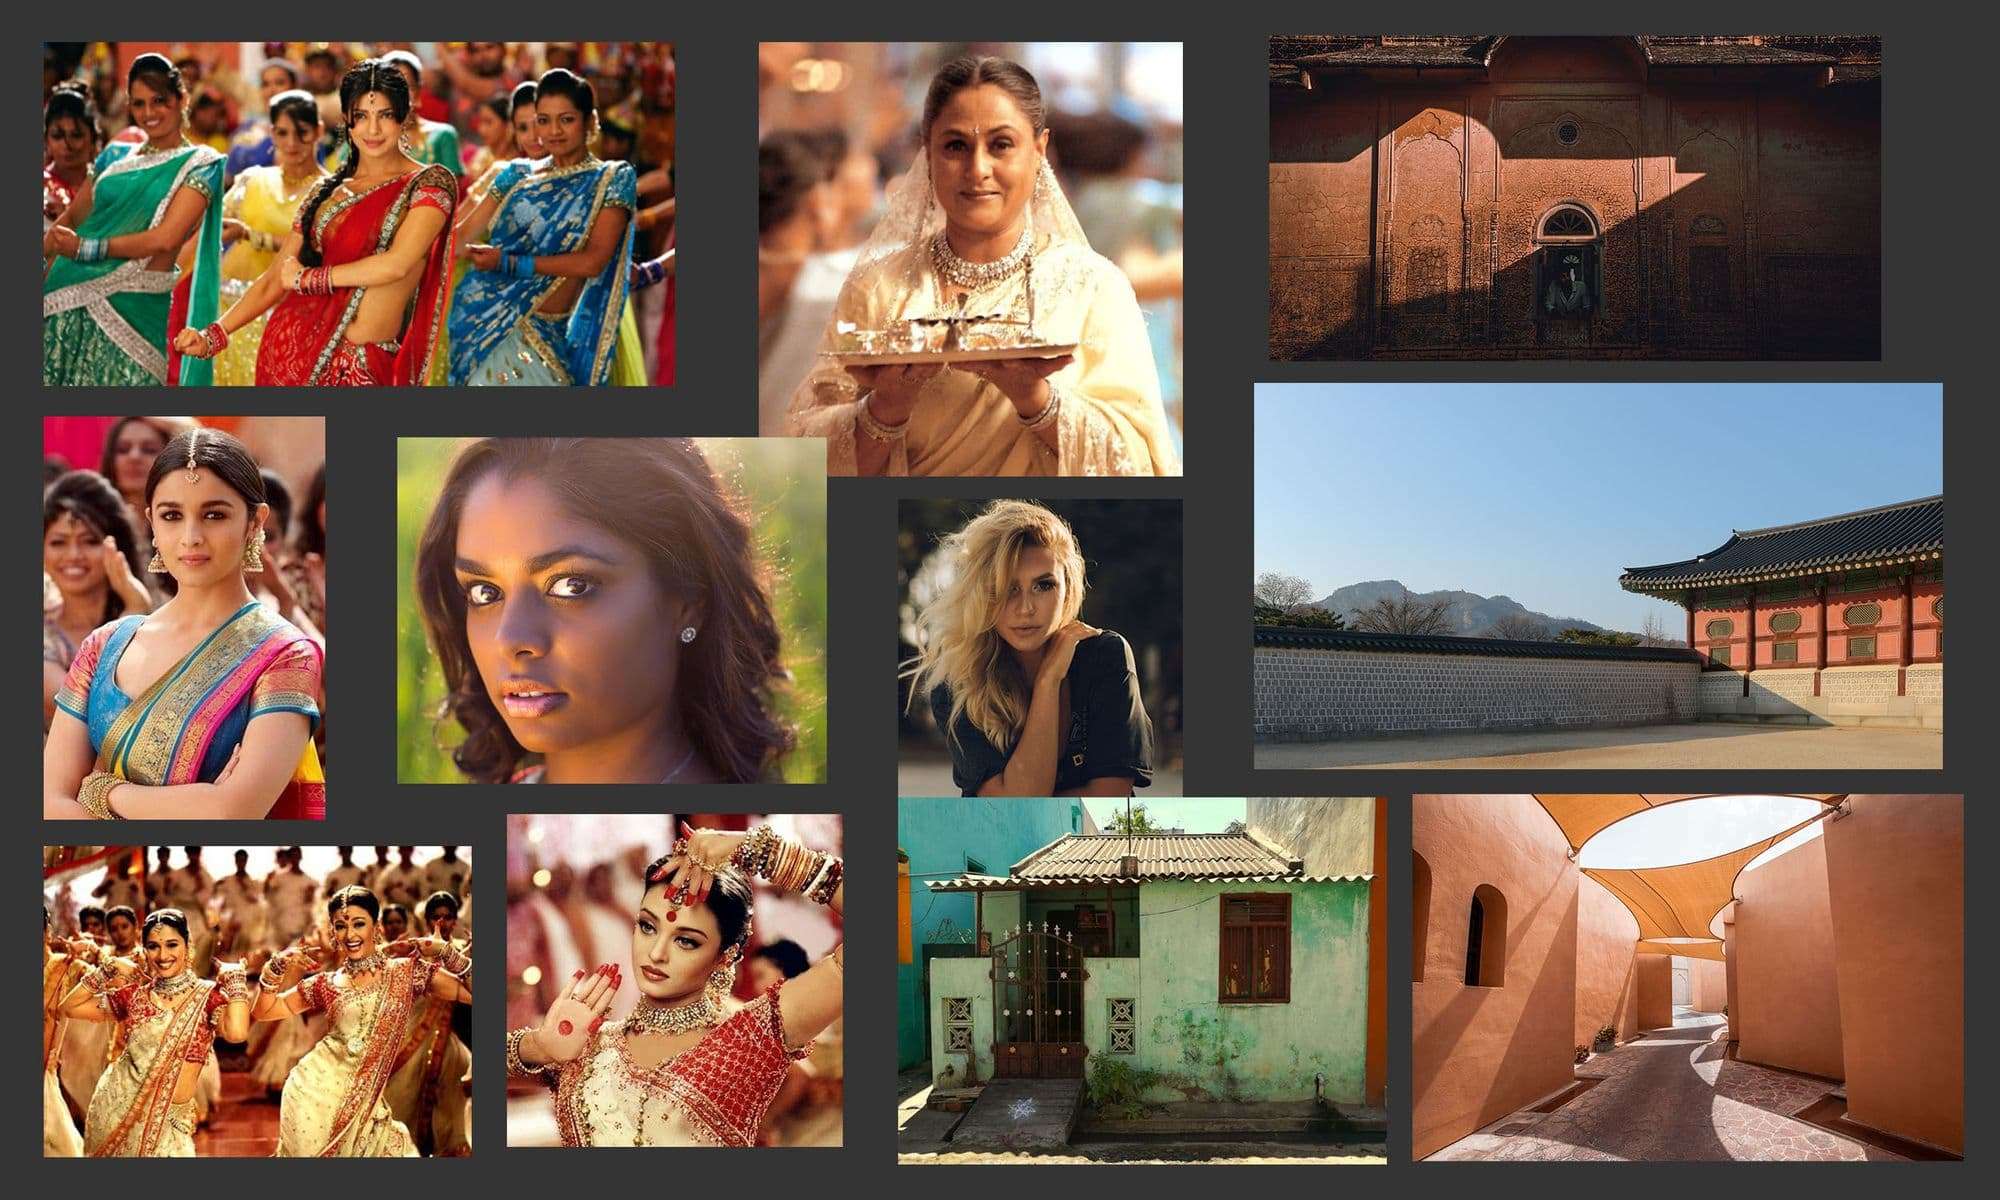
Searching for reference can be the most rewarding and hardest step of a project. The rewarding part is that you get to surround yourself with inspiring concept art and images. The hardest part is that sometimes what inspires you isn’t always what’s the best or most reliable choice. Hence, the importance of choosing good references. Here are a few links I find very helpful while looking for reference:
Once I’ve got all the reference images I need I will start to organise my scene. Maya has many pre-made workspaces that are available and ready to use. I prefer create my own space that will speed up my workflow. Afterwards, I'll organise all the assets with my personal naming convention. It can be overwhelming to work in a scene with many assets, lights, and materials, thus, the importance of keeping everything well named and organised.
It’s crucial to decide on the right camera angle before moving on to the next step, so that you're only lighting what needs to be lit. In college, I had a teacher who would always tell us that it was better to work smart than to work hard. Which is very true. Even if you are working hard it doesn't mean you are making the most of your time if the quality of your work is not improving.
So, in my opinion, it is essential to try many camera angles and focal lengths before making a final decision. Most of the time my first idea won't be the best one. After much thought, I decided to go with a portrait view (1080 x 1920), a focal length of 85mm, and an eye-level angle.
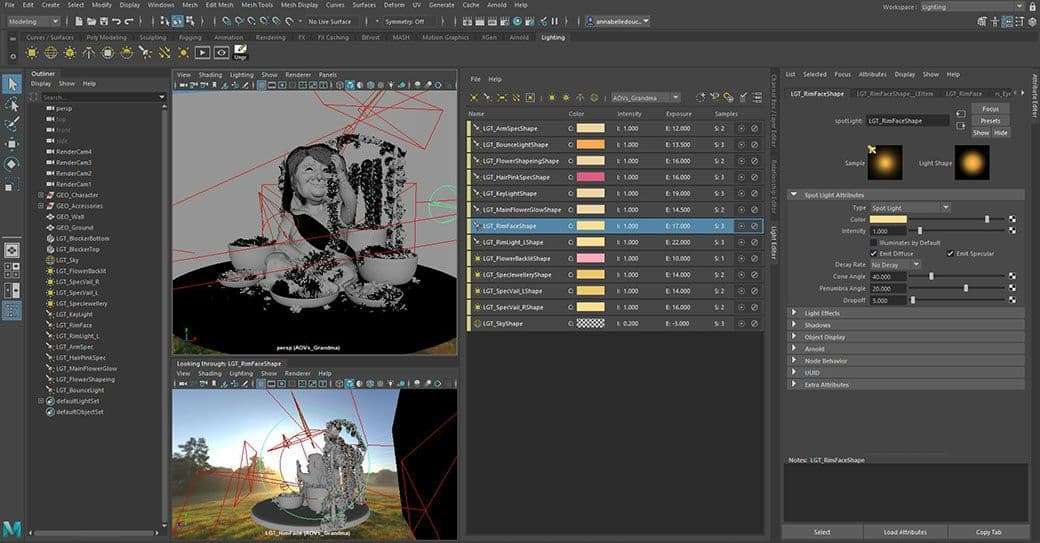
Now that i've chosen my camera position, i’ll block out my main lights. I used a key light, a rim light, and a fill light. I like to see the full effect that the lights have on the scene before adding any materials. Later, I’ll go back and adjust my main lights as well as adding some secondary lights.
Look Development
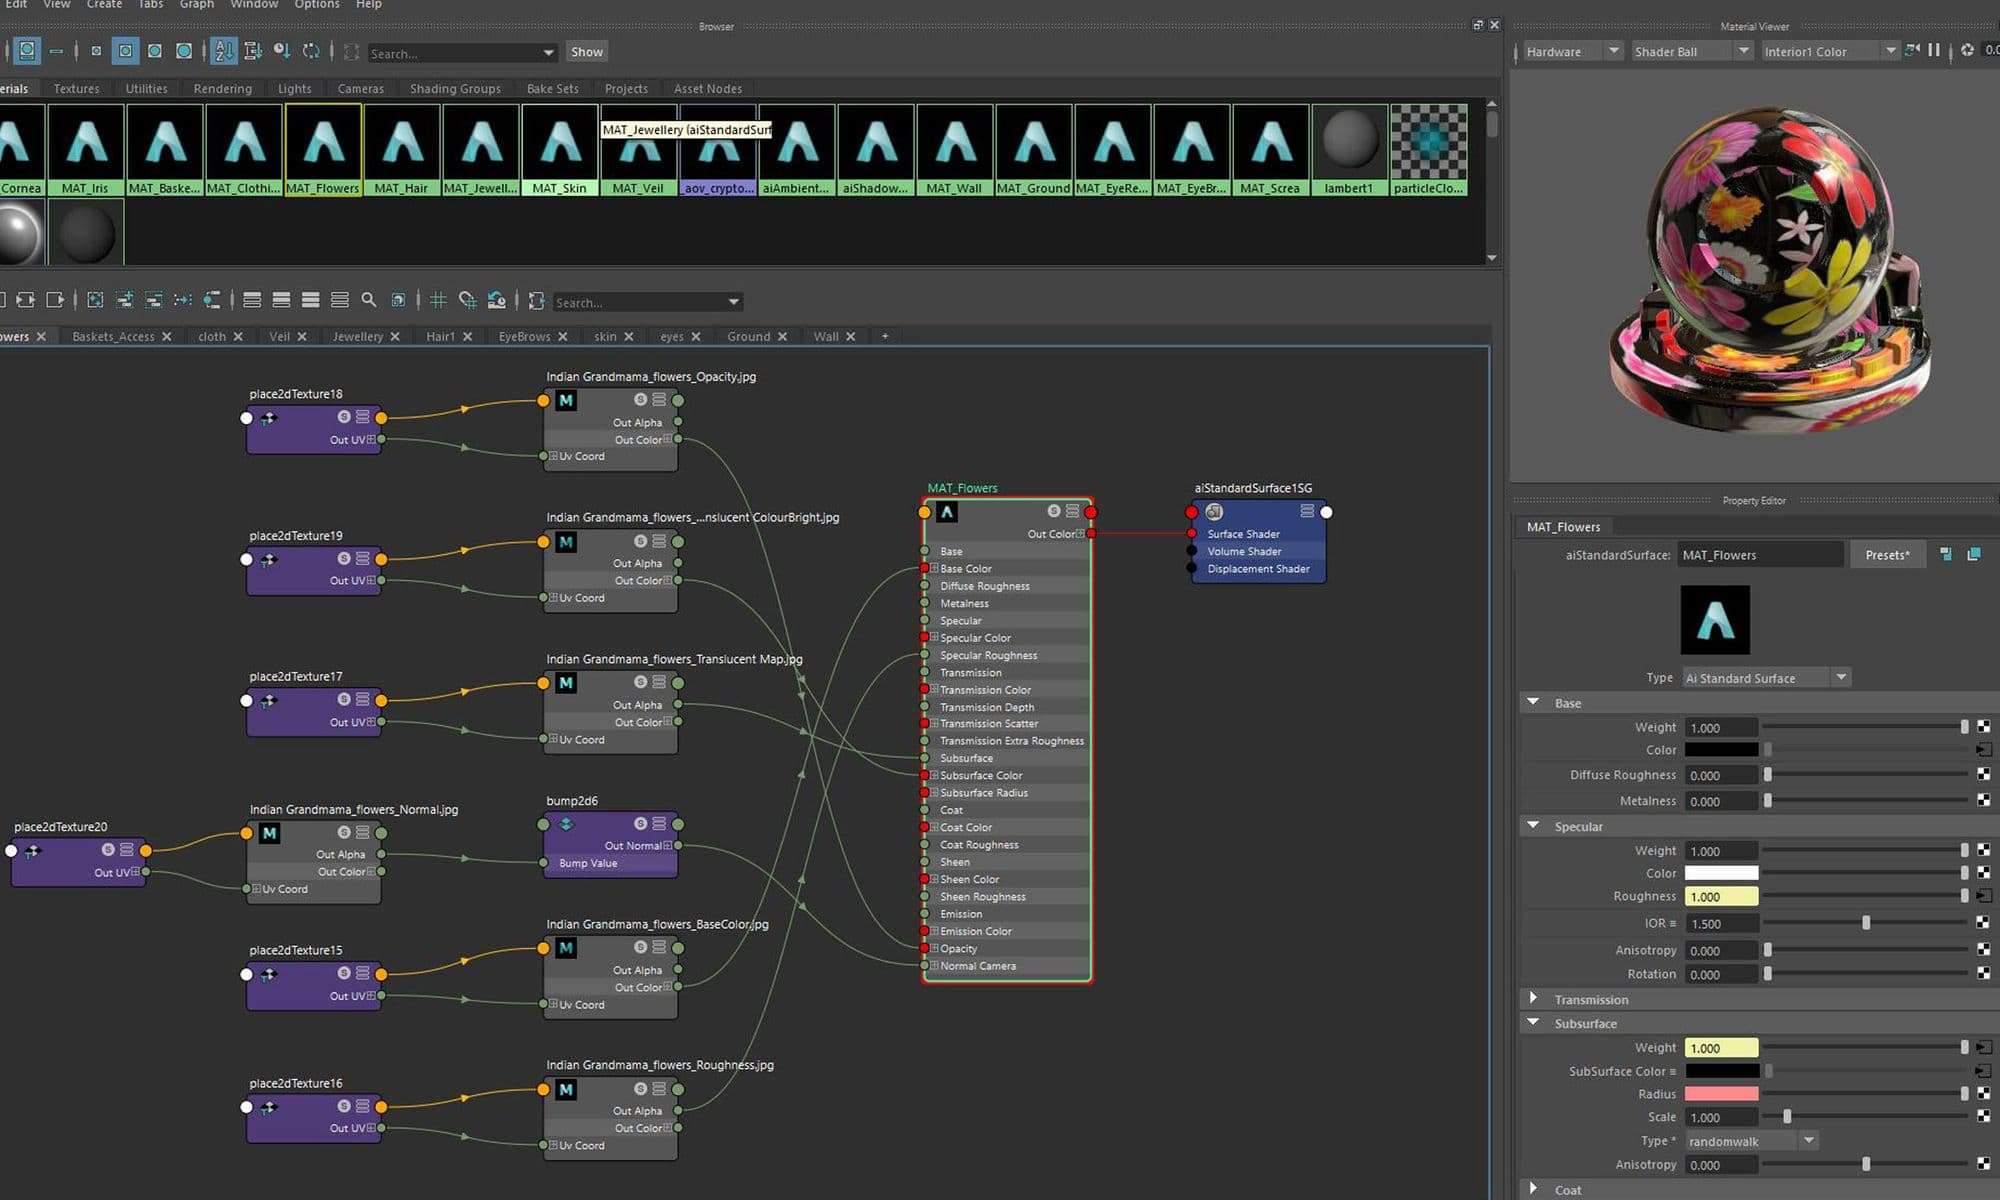
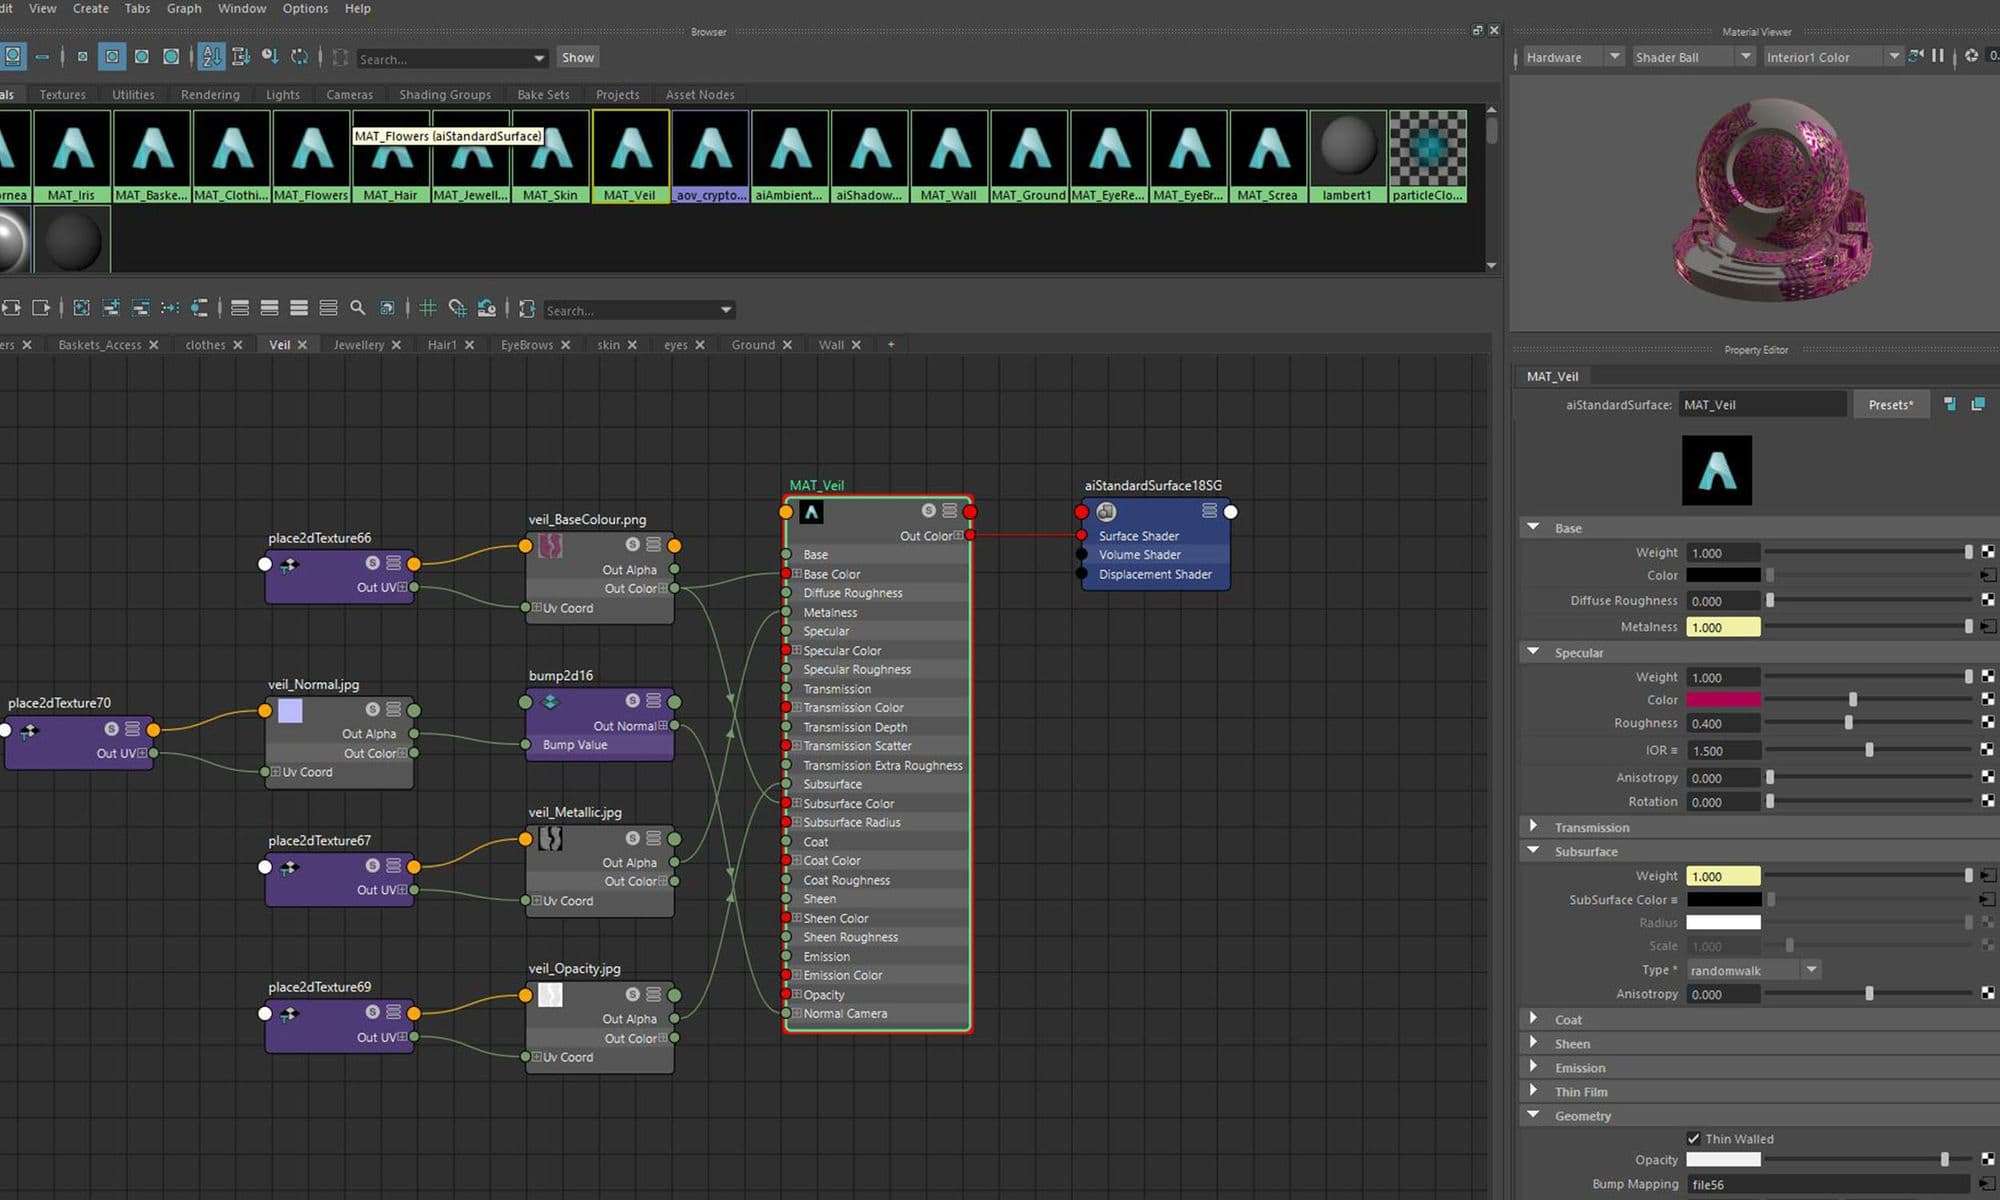
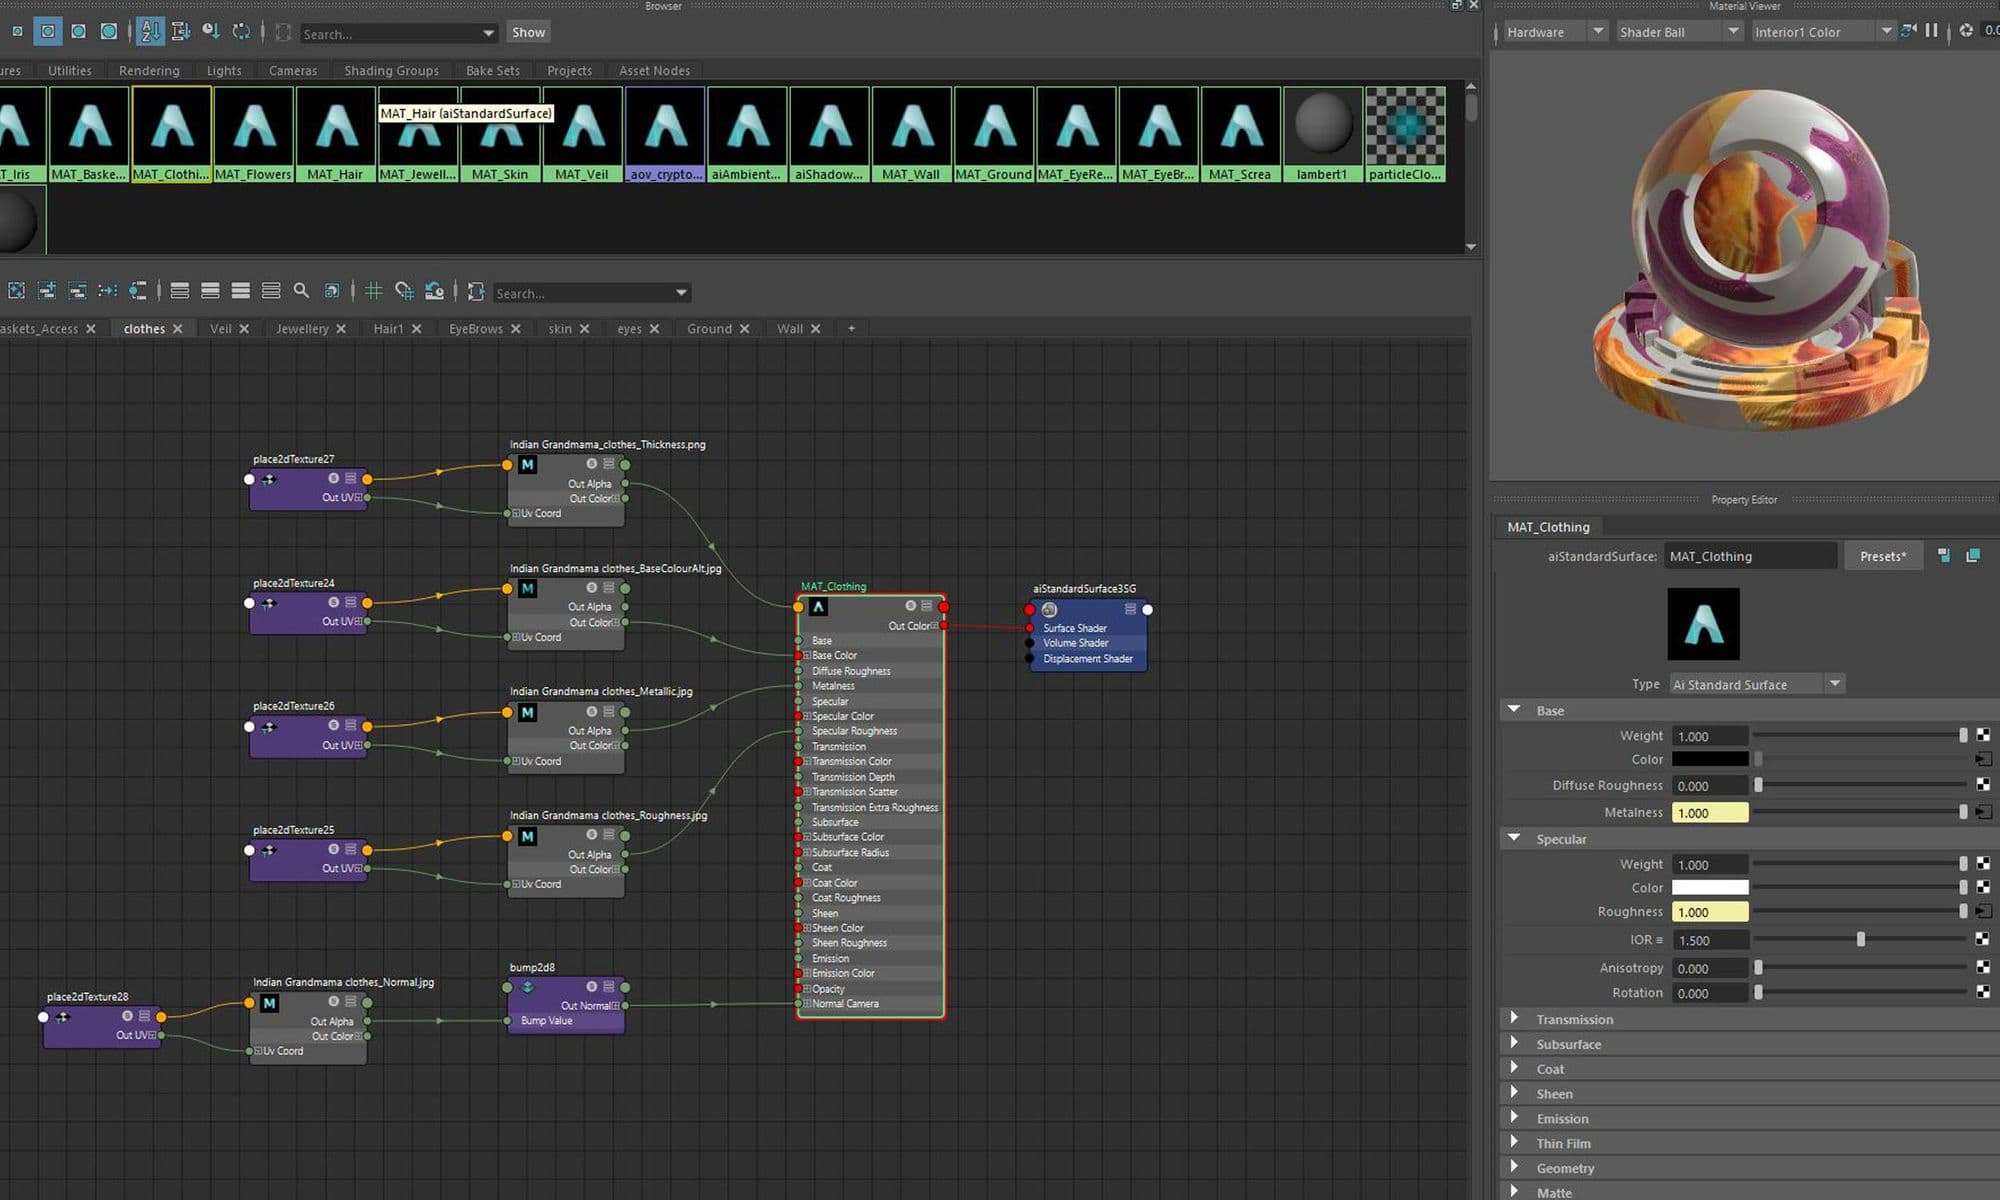
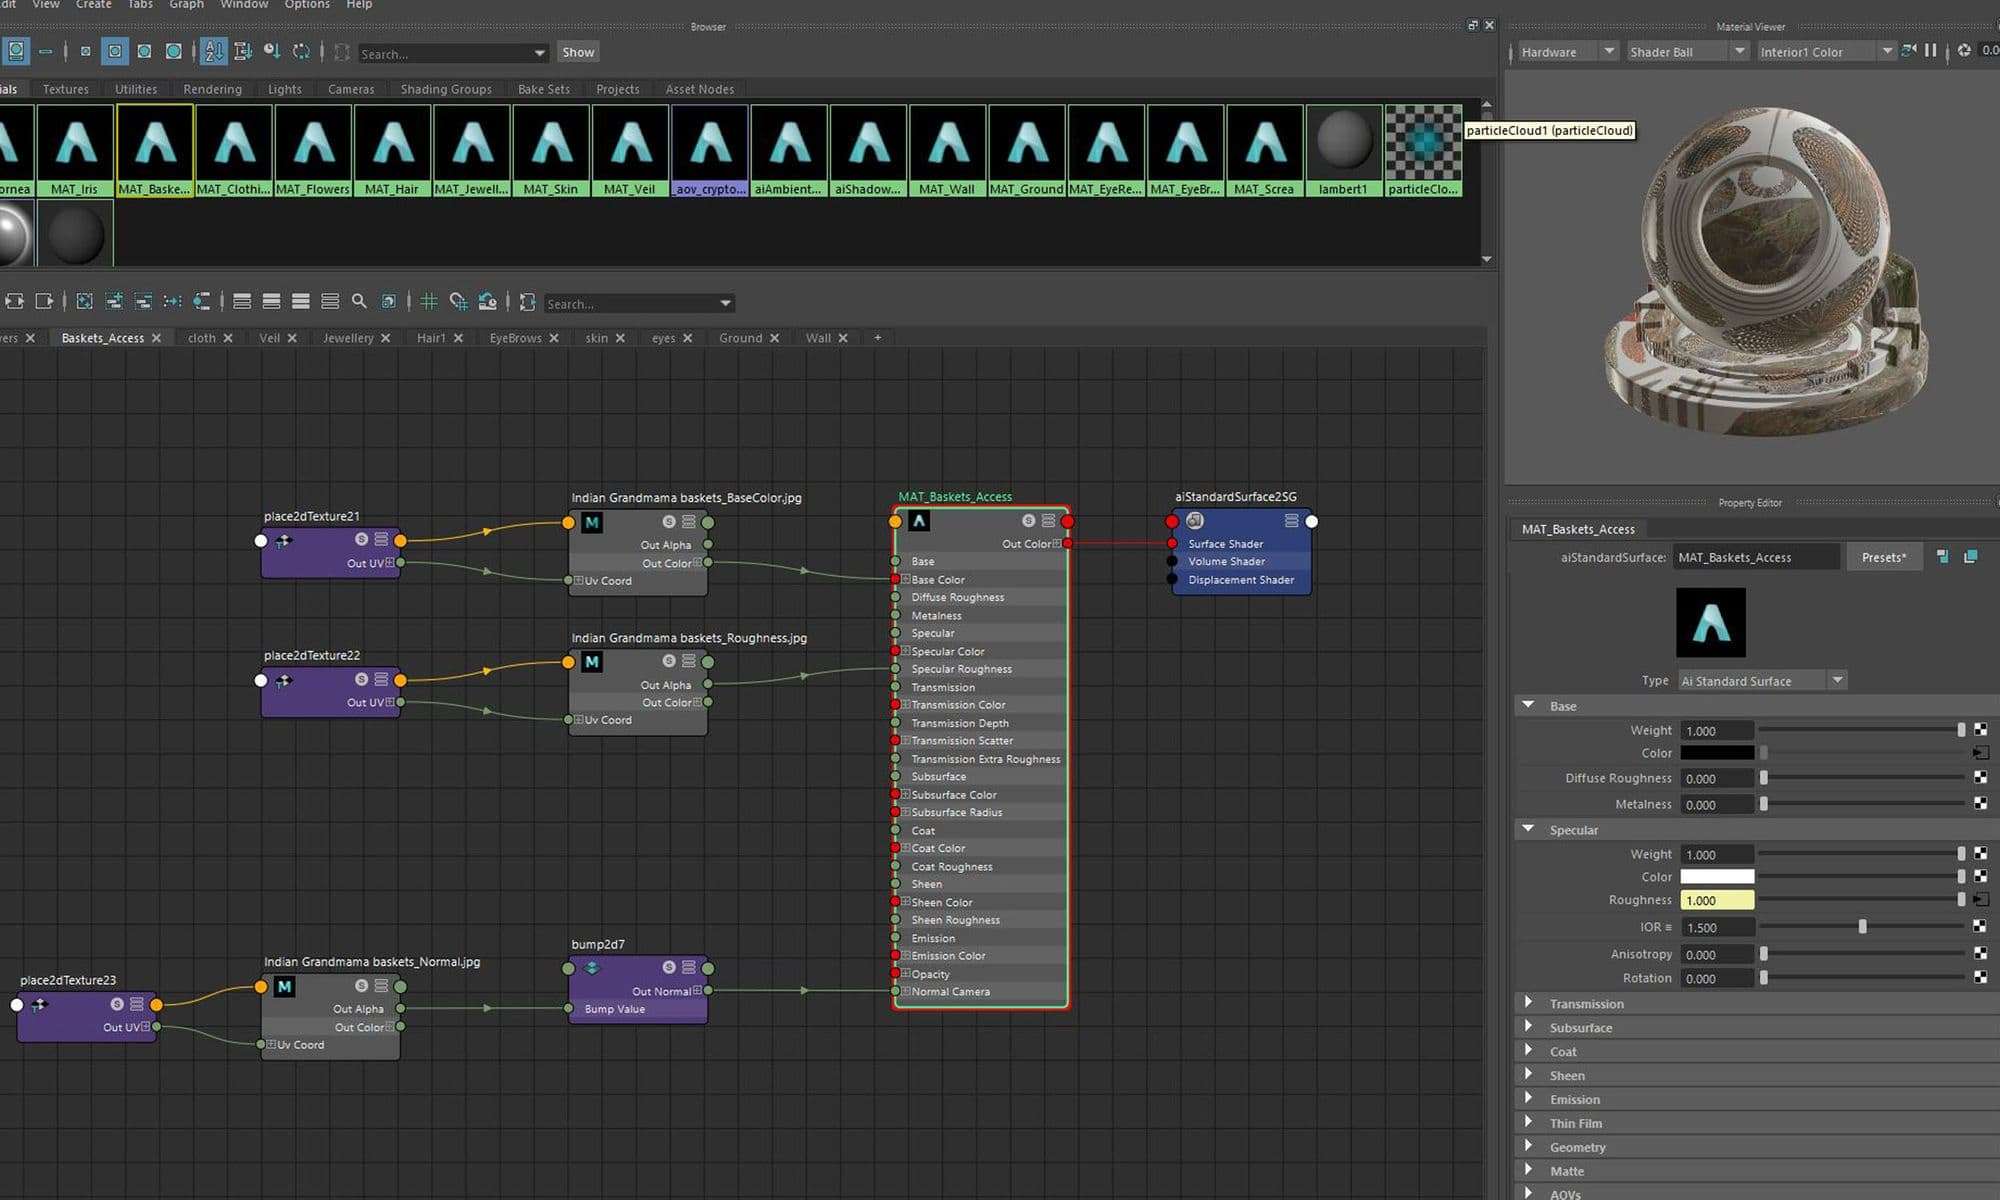
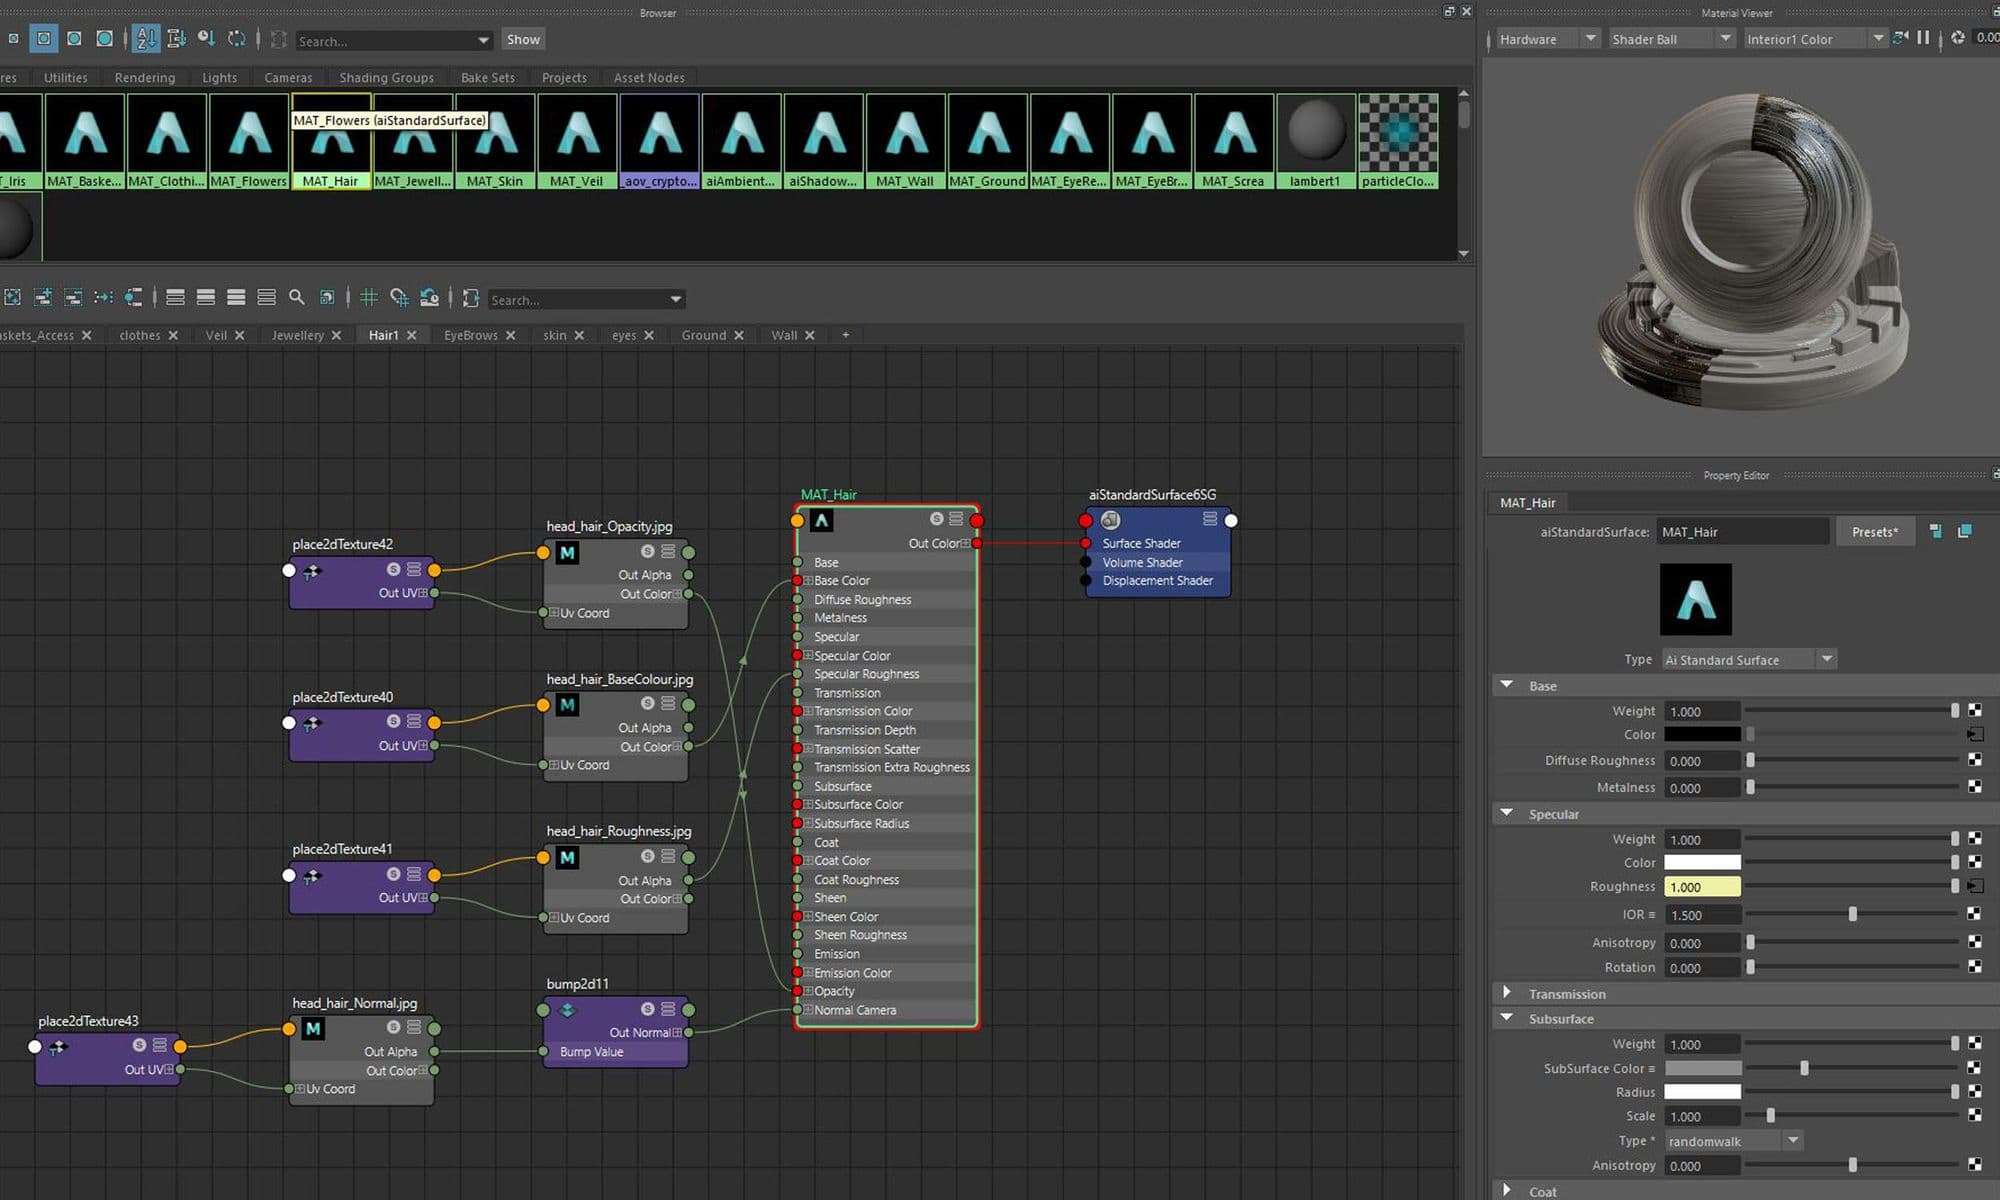
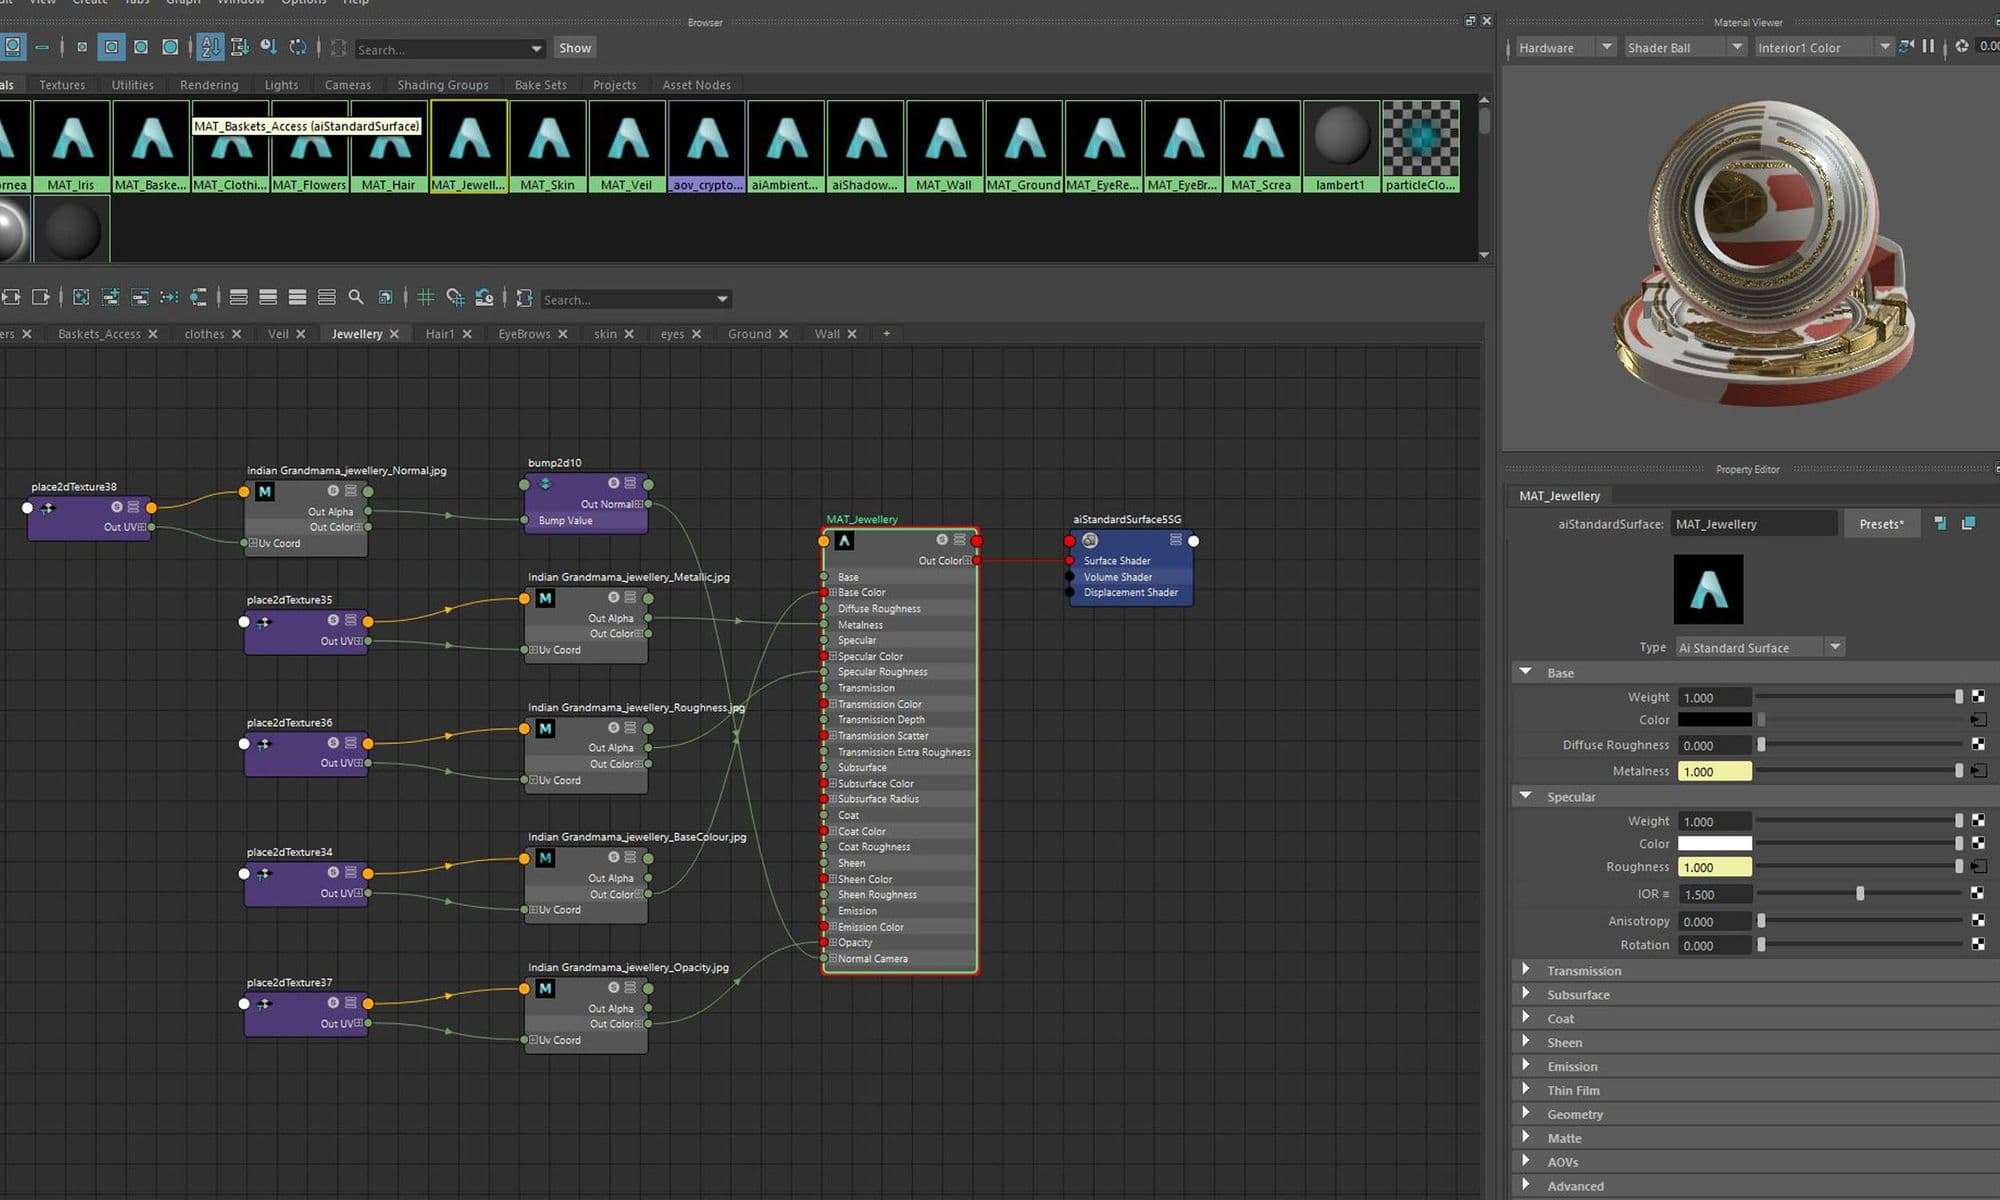
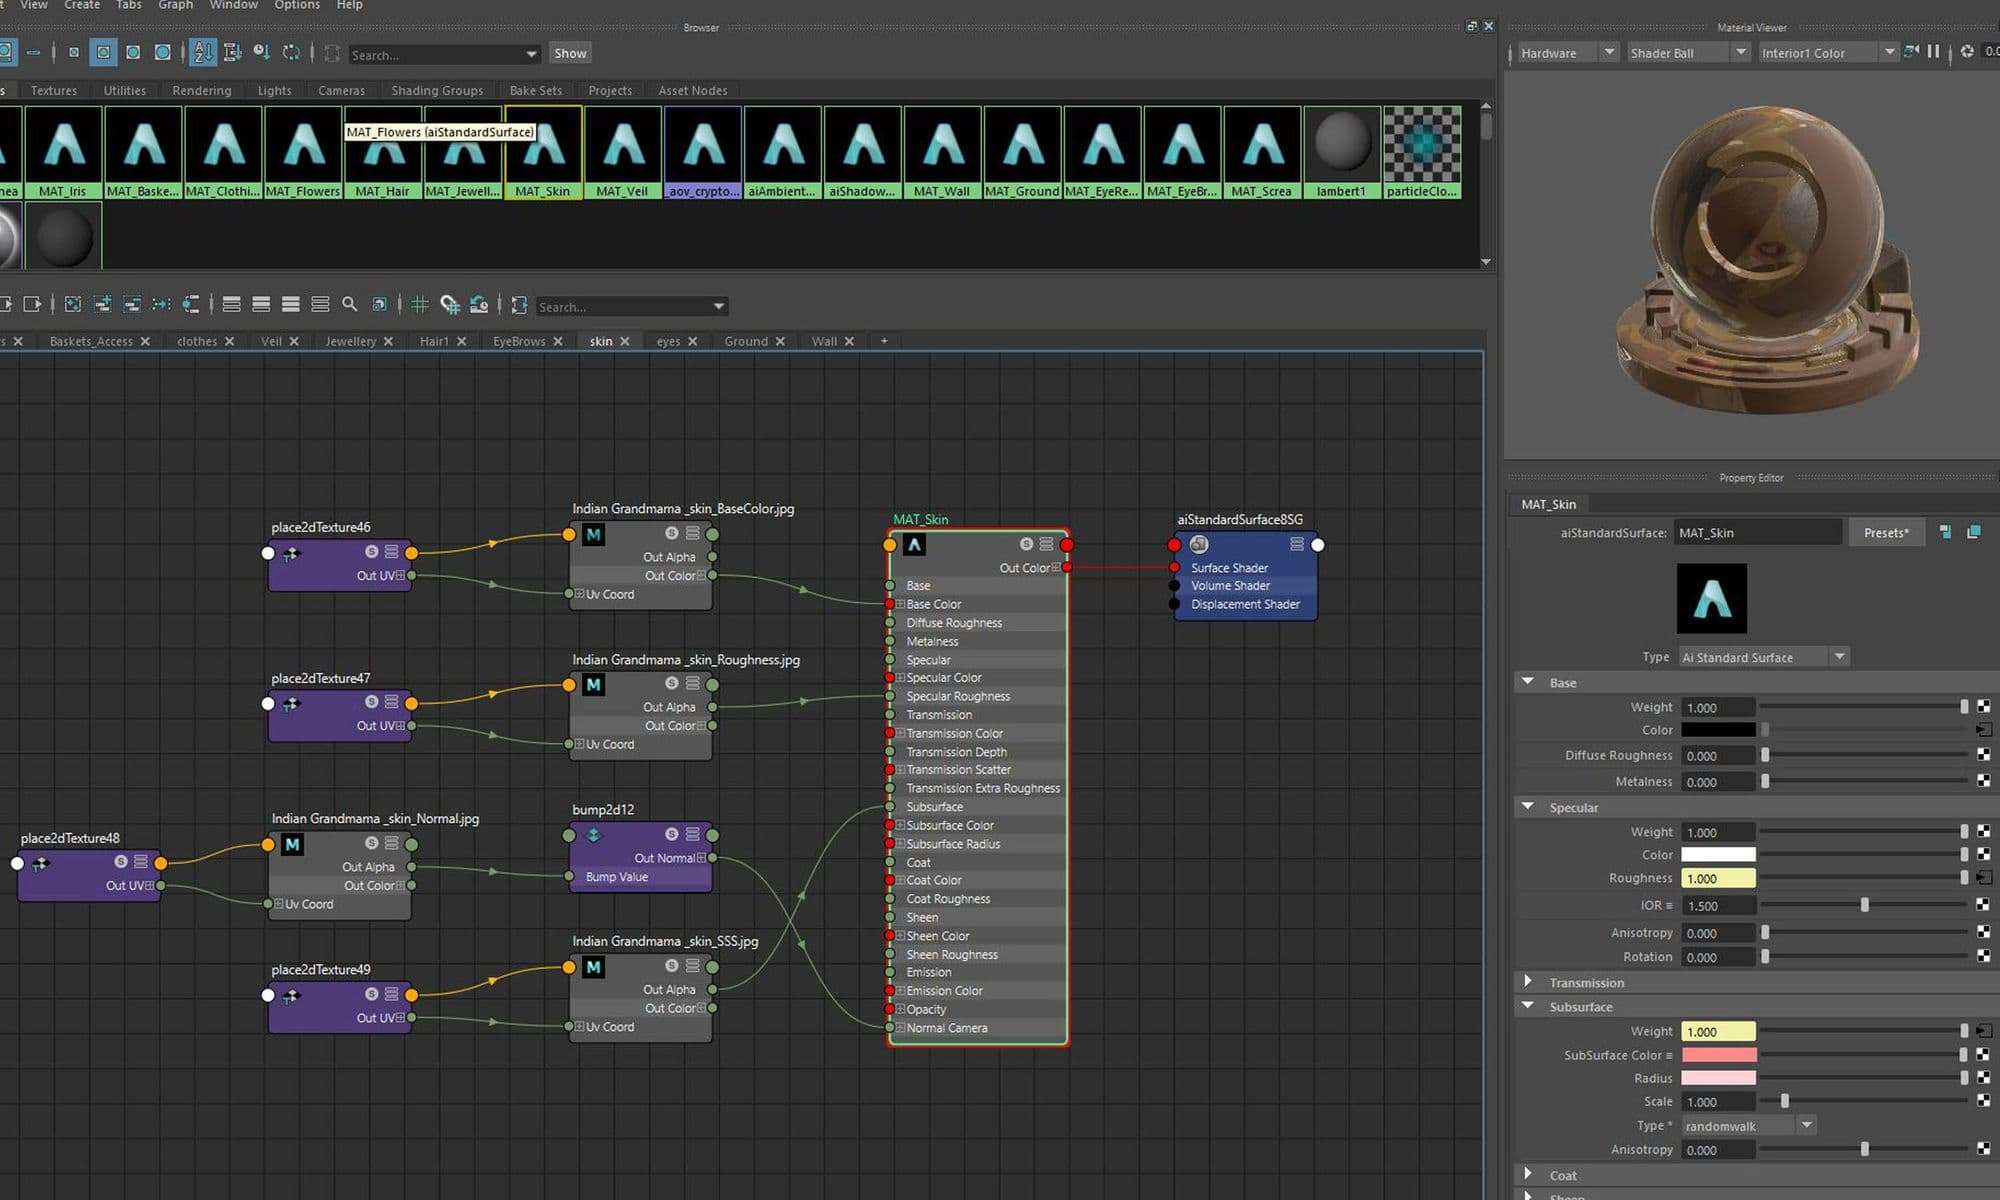
During the shading process, you get to see the textures and materials come to life. The biggest concern I had was trying to get the flower material to look right. Flowers are translucent. So it’s difficult to maintain their colour without making them look too saturated or too dark. Here's how I made some of the shaders using Arnold:
Lighting
For me, lighting is the most important, fun, and satisfying part. Good lighting is what makes everything look good. With lighting, you can tell a story without even saying a word, and make your audience feel all kinds of emotions.
Furthermore, I needed to ask myself, how can I use lighting to portray her story? Prisha's a joyful and passionate character. Upon reflection, I decided to light the character in a warm and sunny environment. I used a spotlight for the key light which acts as the sunlight in this scene. To add contrast and draw attention to the character. I tweaked the key light by adding two light blockers to create some directional shadows. Light blockers can come in handy. Especially if you want to have more control over the softness, and opacity of the shadows.
Next, I used a Skydome with an HDRI as my fill light. It's a perfect way to fill the dark areas in your image, as well as adding a little bit of colour and reflections. Yet, it’s best to keep the exposure on a low setting as you don’t want the skydome to have a big impact on your scene. One of my main sources for HDRI images is HDRI Haven. They have a big library of quality HDRI and they're all free to use.
With lighting, you can tell a story without even saying a word, and make your audience feel all kinds of emotions.
After tweaking my main lights, I added a few secondary lights. For example, I applied a bounce light to add colour to the shadows. Then, I pointed a spotlight at the garland that the character is holding. I want to emphasise how important that object is to the character. The spotlight was making everything in that area look too bright and I overcame this issue by using the Light Link editor. It allows you to decide on a specific light to illuminate a specific object. I also used this method to add more shaping to other elements.
Rendering and Compositing
When it comes to rendering, I'll try to be as efficient as possible. However, due to the big amount of subsurface scattering throughout the scene, it was very heavy to render. I did many tests to make sure I was optimising render time without losing quality.
Compositing is the last step of the process. This is the moment to add all the finishing touches.
In college, I had a teacher who would always remind us—It's better to work smart than to work hard.
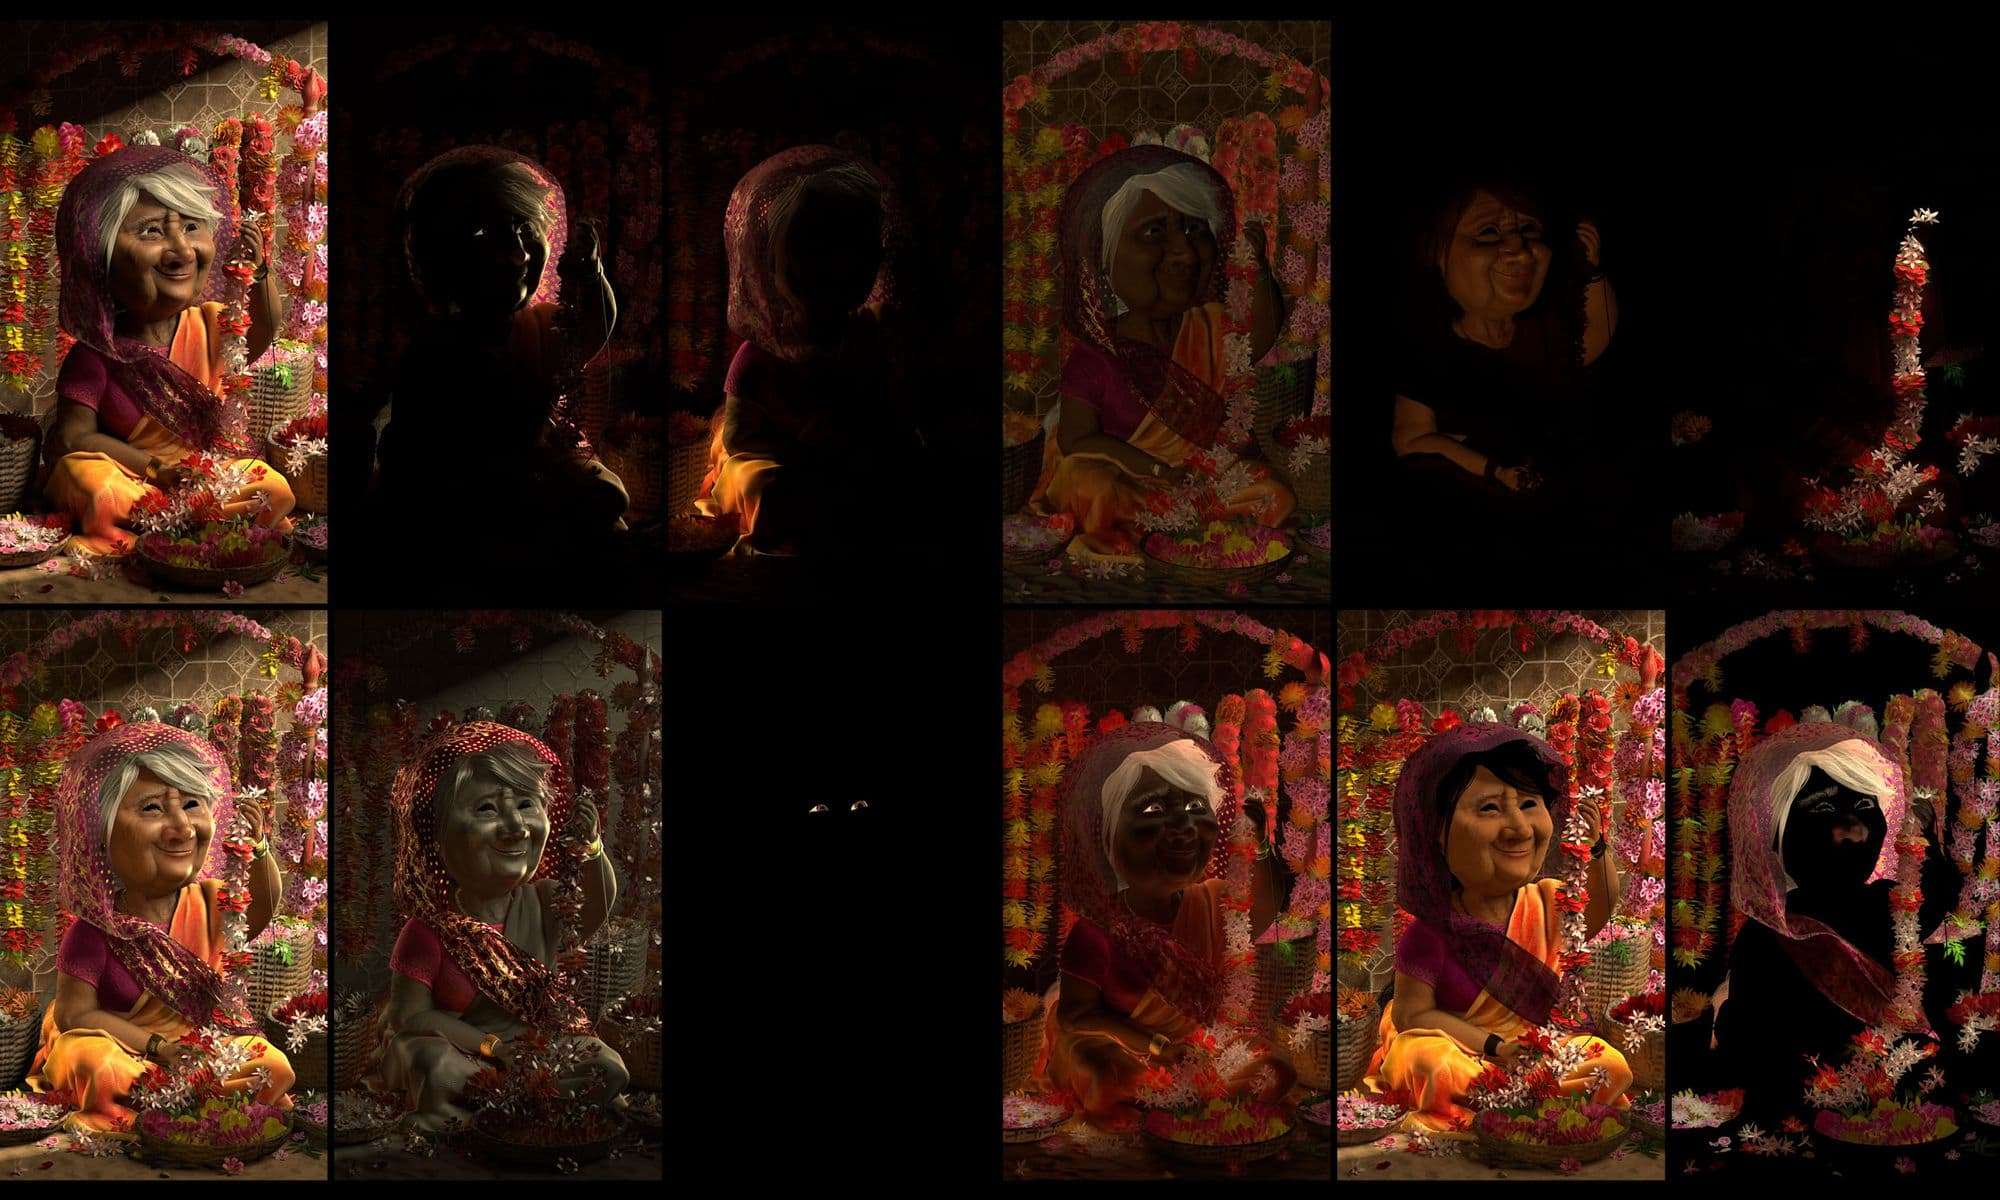
To have more control while compositing the final image I rendered different layers, such as Diffuse, Specular, Direct, Indirect, SSS, and transmission. I added some secondary layers like, AO, Shadow pass, Cryptomattes, and light passes. Additionally, I like to render the eye dings and eye reflections on their own.
For still frames, I like to use Photoshop with the EXR-IO plug-in to do the compositing. I'll start by adjusting the render layers to match the beauty pass. I use Cryptomattes to add more colour, saturation, and exposure to certain objects. Then, I colour grade the entire image, and add some depth of field to tie everything together. Finally, I apply a diffuse pass to the highlights. I achieve this look by making a copy of the final image. Then I completely blur the image, set it to screen mode, and drop the opacity. I want this to affect only the highlights, so I mask out the rest.
Exploring different moods
My mentor Michael Tanzillo suggested that I create two different moods for this piece. I’m glad I took his advice. It pushed me to surpass myself, and I'm pleased about how they turned out.
I hope you enjoyed the breakdown of my process and found it helpful. If I can give any last advice it's to ask for feedback. Constructive criticism is the key to improving your skills.
Finally, I want to give a special thanks to my mentor Michael Tanzillo, as well as the entire community of the Academy of Animated Art. Thanks for the amazing advice and for helping me achieve a result that I'm proud of. I enjoyed working on this project and it was a great learning experience.
I want to thank all my teachers from CDI College, Corey-James Weber, Erick Casia, and George Kanaras. I’m grateful to have so many amazing mentors who helped me learn and grow as an artist.