In this article, Sergi Coca, currently undertaking a degree in 3D Content Creation for Games, Animation and VFX, takes us through his workflow when creating realistic real-time characters for video games.
Sergi Coca is currently undertaking a degree in 3D Content Creation for Games, Animation and VFX in Barcelona. Although passionate about cinema and all aspects of visual effects, it wasn't until the end of his sophomore year when he realised that character creation was his true calling.
In this article, Sergi takes us through his workflow when creating realistic real-time characters for video games.
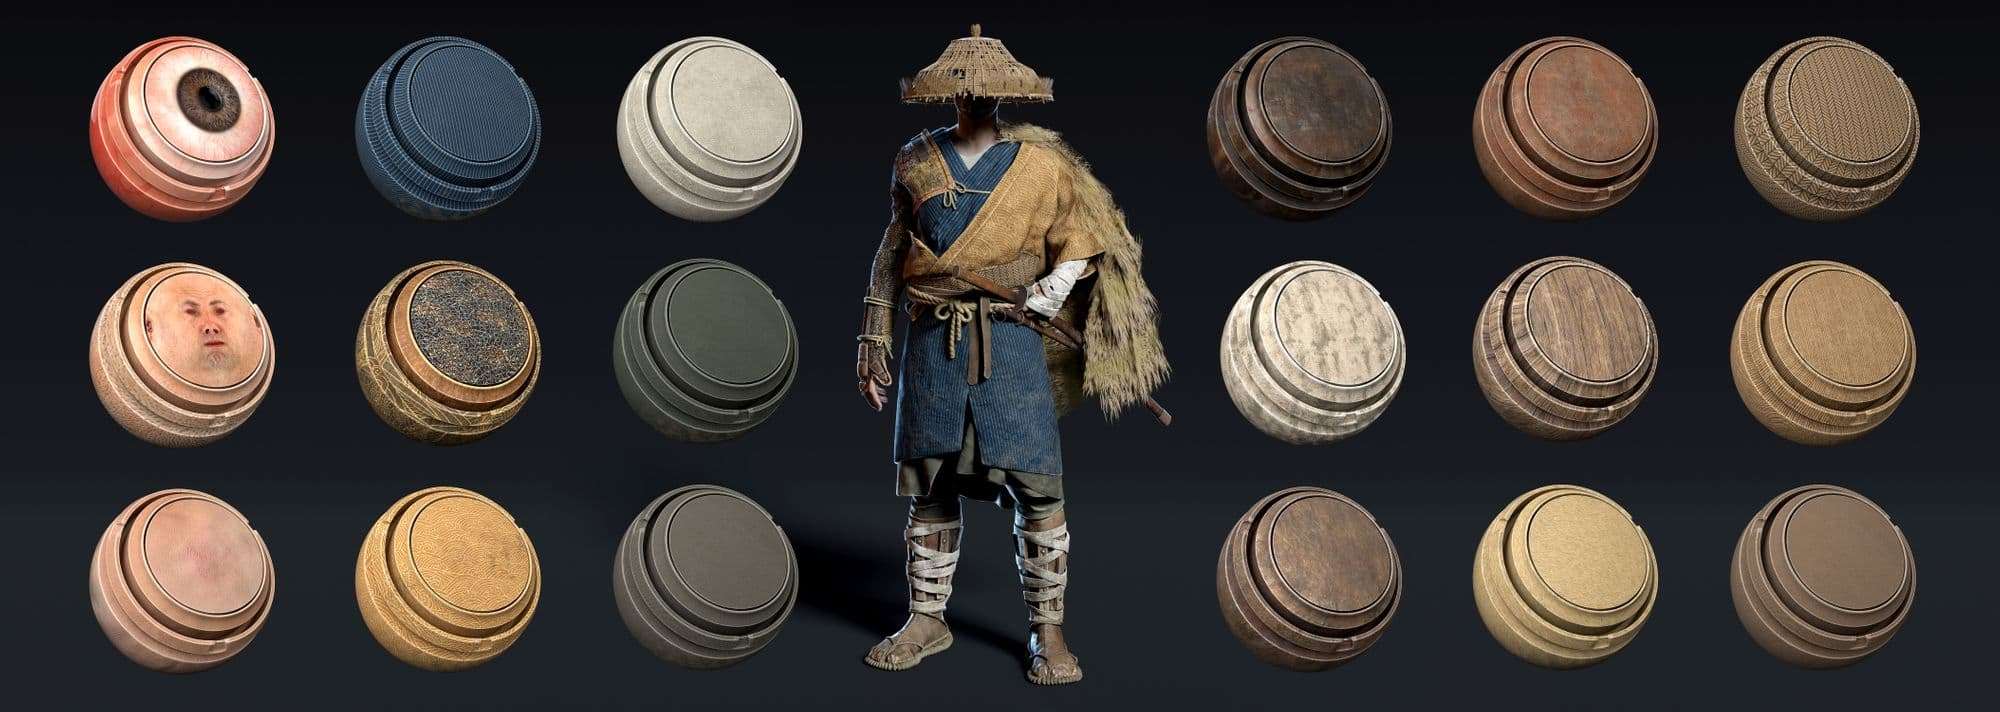
The brief for my first semester Bachelor Degree final project was to produce a high quality original real-time character, for which I had five weeks to complete. I was inspired by the Feudal Japan era, and that's how my character "Ronin - Haru Kishaba" was born.
In this blog post, I will share the workflow of the whole character as well as specific techniques like skin creation, clothing and other important points.
When starting a new project it is important to choose a subject that you are passionate about. Working with 3D characters can easily become frustrating because of all the time it takes to create a character, especially when you are just starting out. This is why choosing a theme is so important, because if you don't like it, it will probably end up in your WIP folder.
Reference
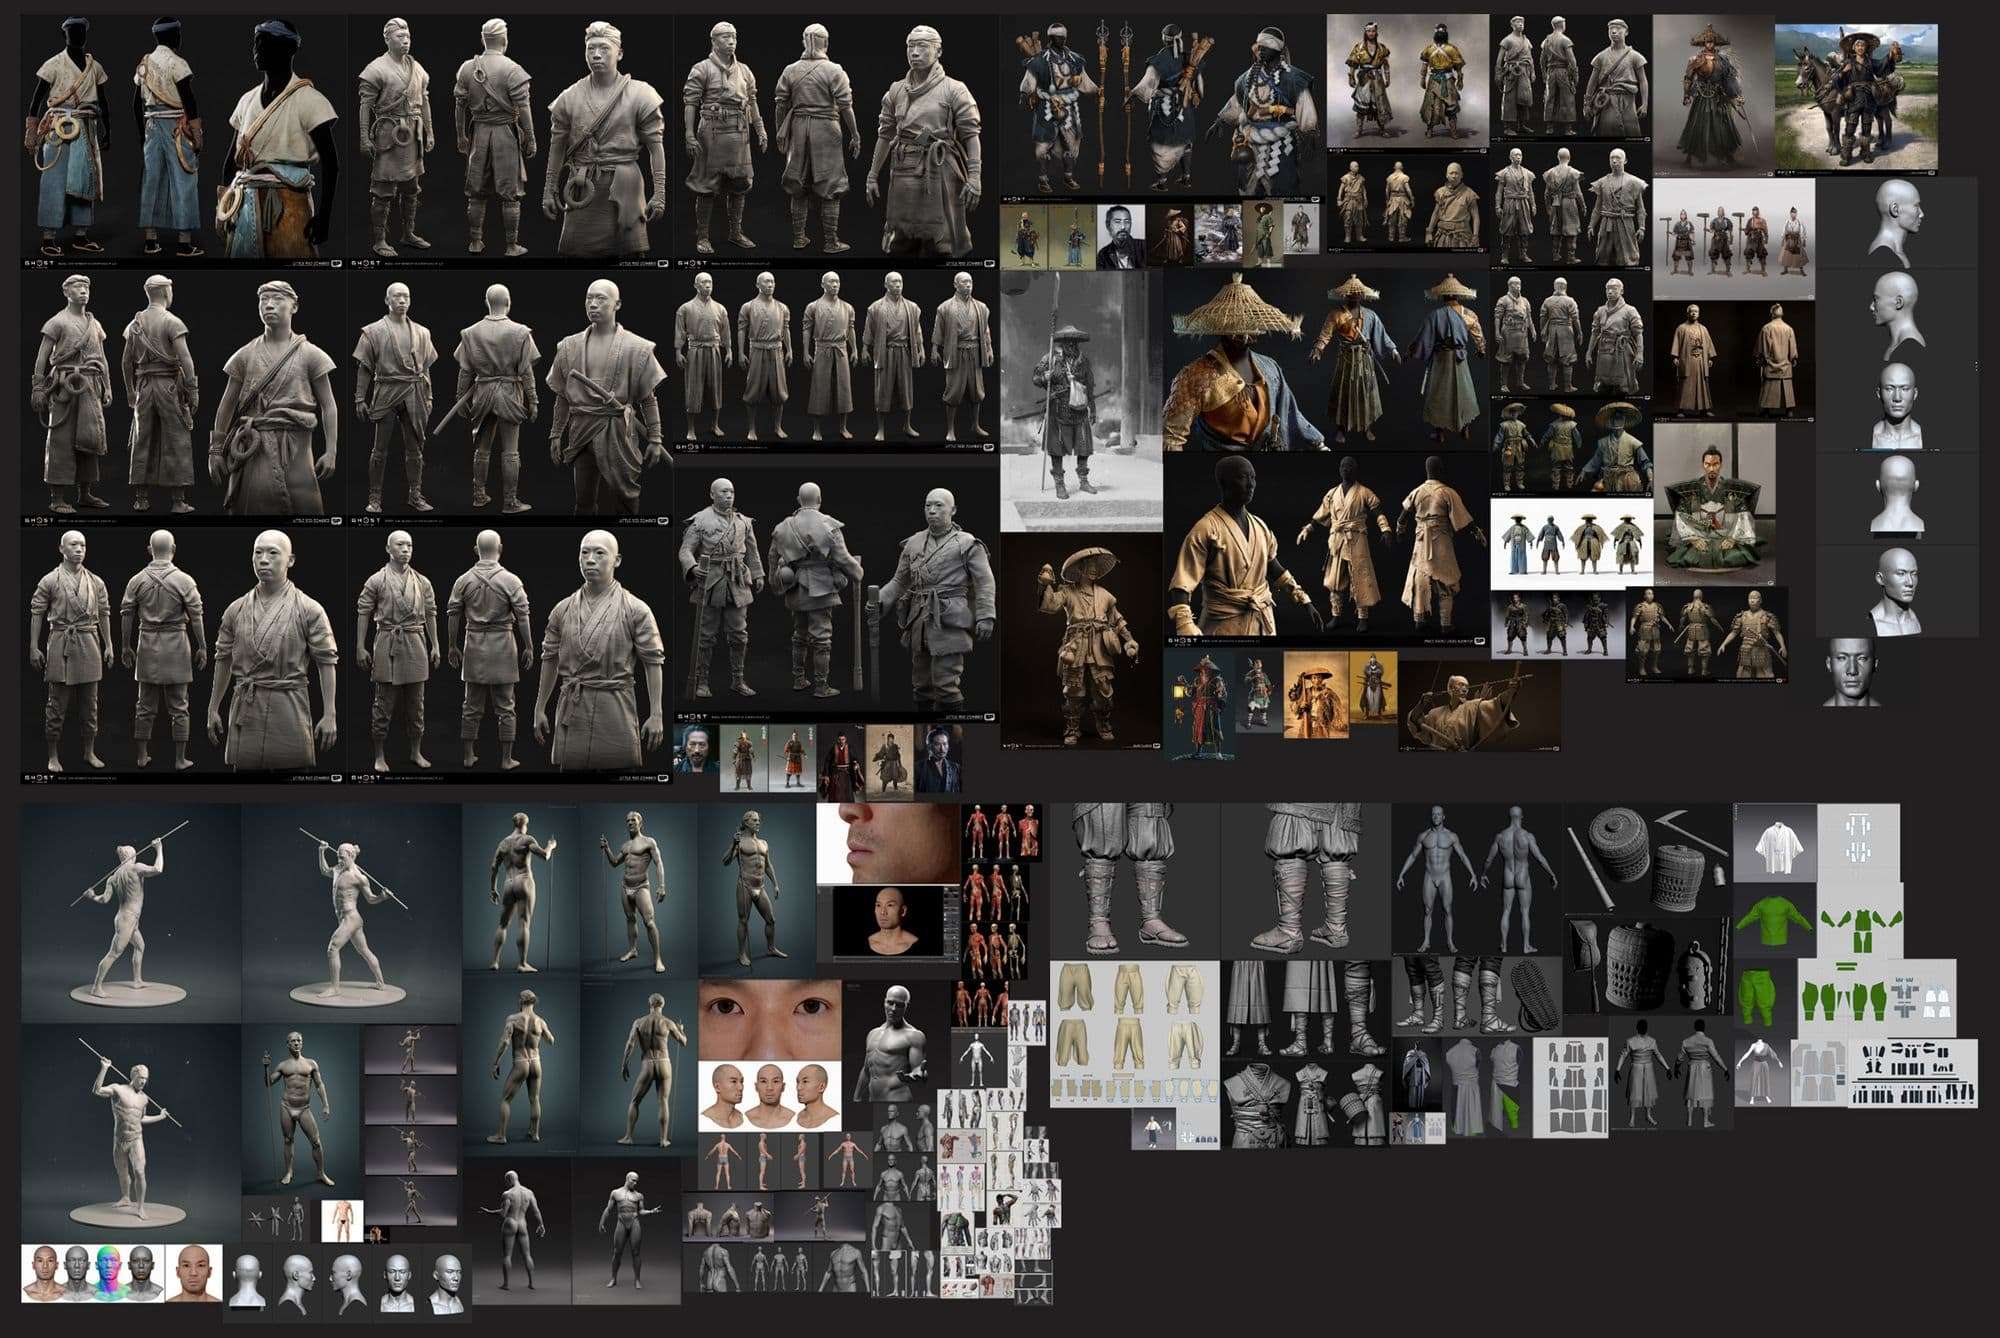
Gathering references can help you do a great job - spending a lot of time choosing references and guiding the initial and premature direction of the project is a key point and that is why I usually spend a lot of time on this point.
When looking for references I usually resort to both real life images and work done by other artists that I find inspiring. My most common sources for references are Google Images, Pinterest and Instagram, I also often look for similar work by other artists on Artstation.
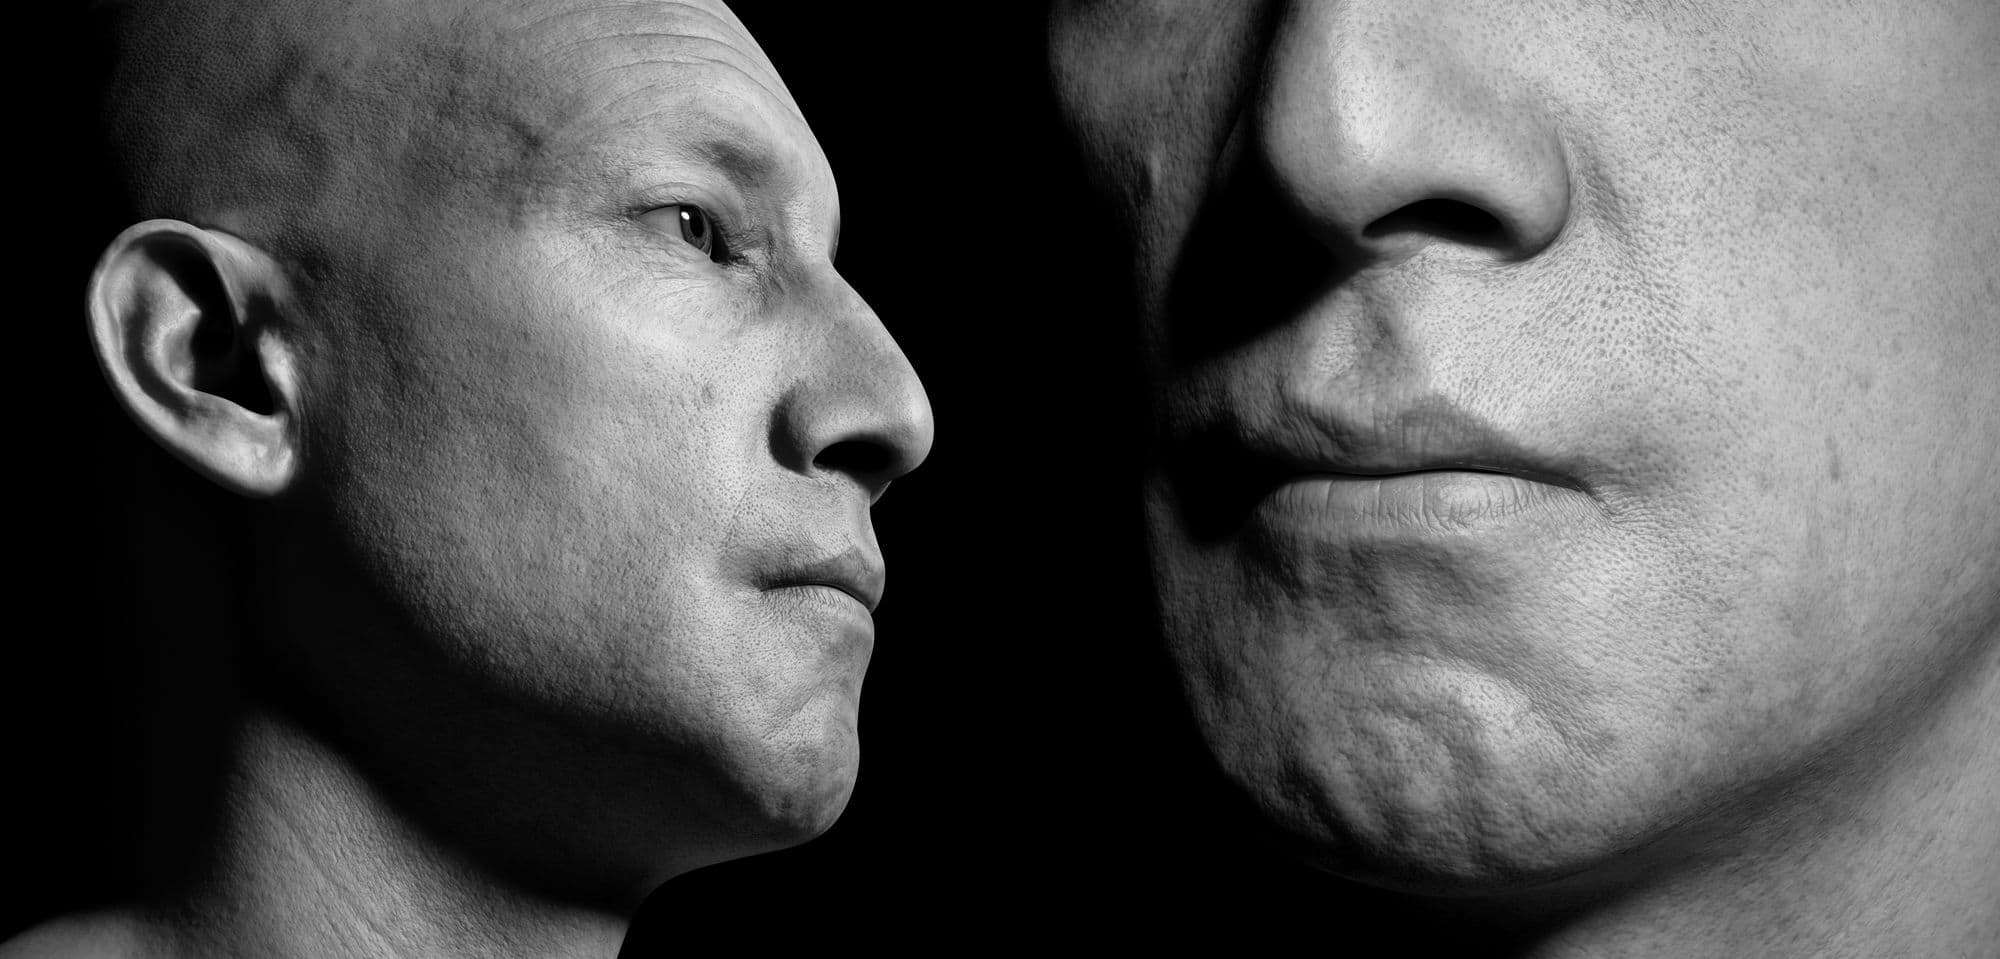
Many of the references include anatomy. Anatomy is a very complex thing and there is no secret to learning how to sculpt the human body other than observation and practice.
I personally use PureRef to display and manage my references. It makes image management much faster and I always have it open as I work, especially when sculpting and texturing - I never stop looking at my references so as not to get too far off track from my goal.
Modeling & Sculpting
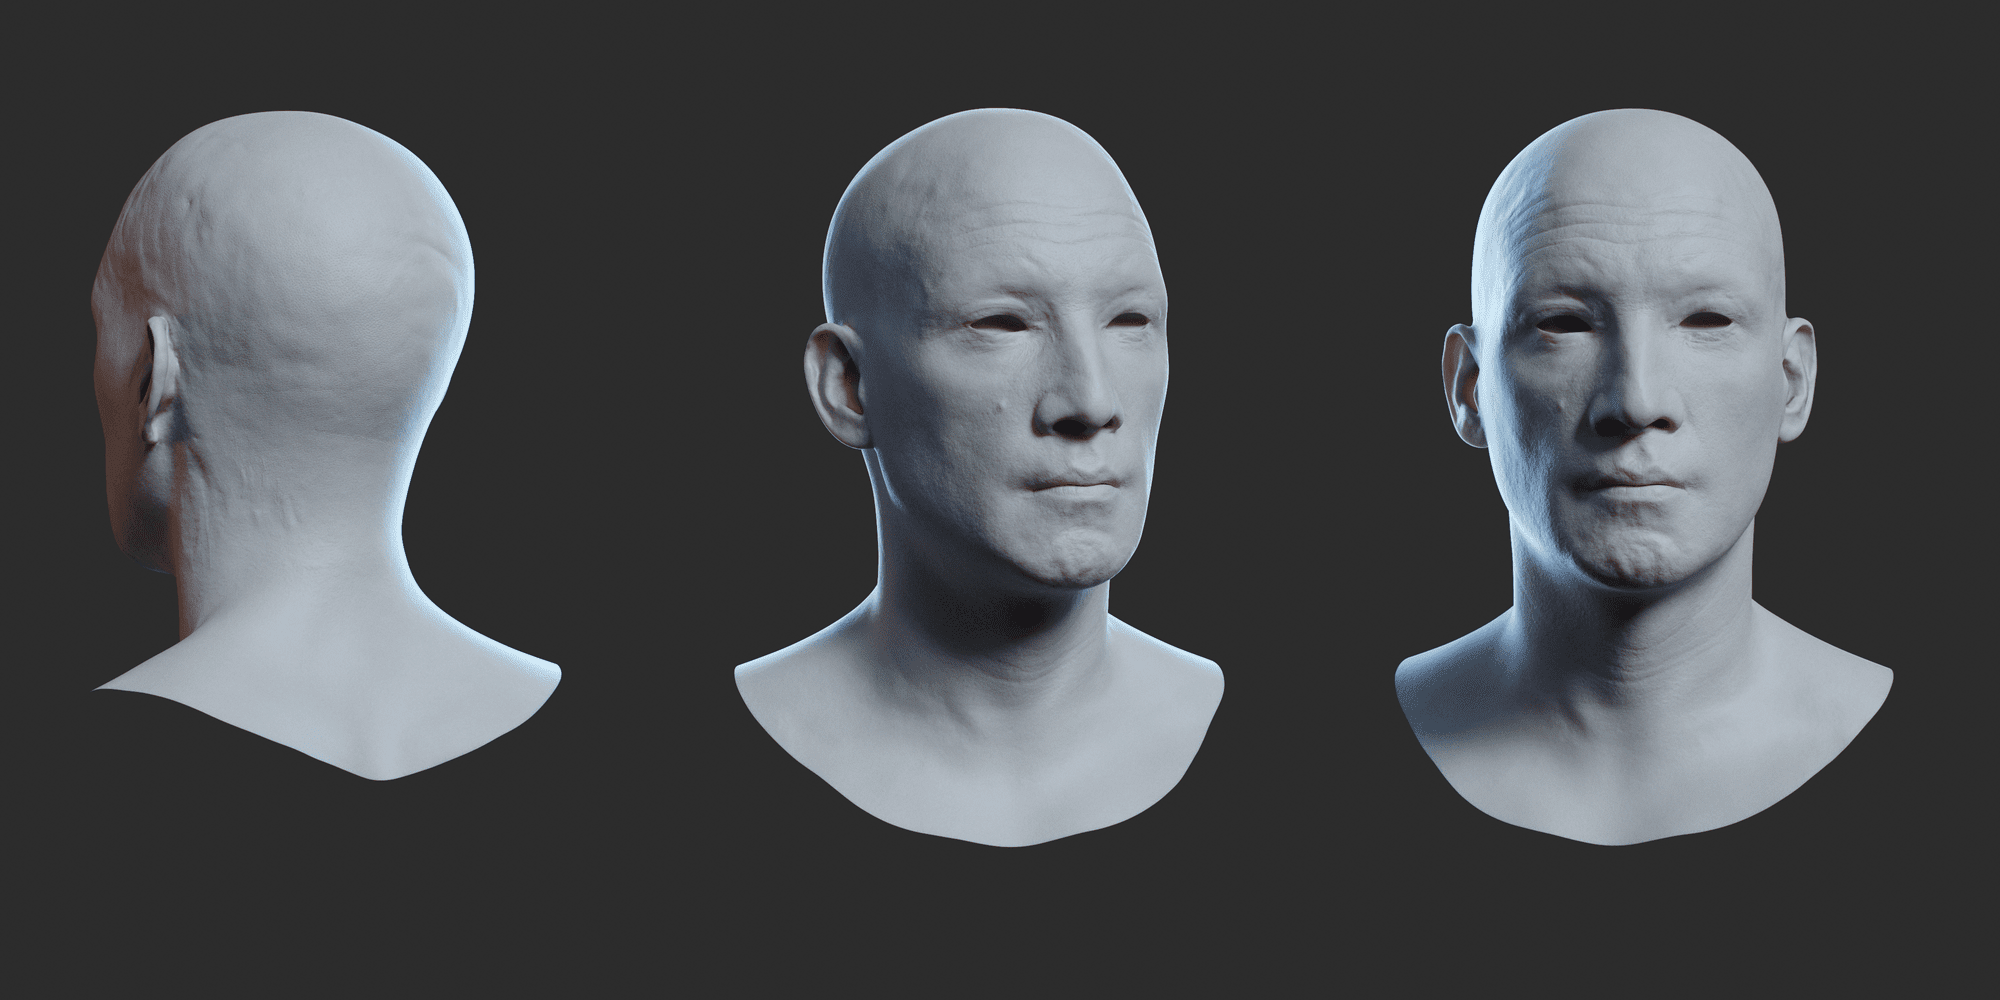
For sculpting I use ZBrush software to create the base mesh. Initially, I start blocking with a sphere. Figuring out the proportions from the observation of the references, I always start with the whole body and leave the head for later stages. I do this so that I am not tempted to spend too much time up front on the details of the head, leaving less time for the rest of the body.
The primary forms are essential to get to the essence of the character, once the proportions are adequate I begin to define the general shapes of the muscles and establish the skin around them. This is done keeping everything symmetrical for a while.
Anatomy is a very complex thing and there is no secret to learning how to sculpt the human body other than observation and practice.
The brushes I use for the construction in ZBrush are “move”, “clay buildup”, “dam standard” and “smooth” brushes, mainly to get the desired shapes. While doing this I keep checking my model through different angles and I keep changing the lights and materials to get a good look at the shapes.
For the head I create basic shapes for the nose, eyes and lips. At this point I start to add more detail and richness to the shapes. I usually use see-through to capture the details of the references. The reference images sometimes play tricks, so it is necessary to set the right angle of view.
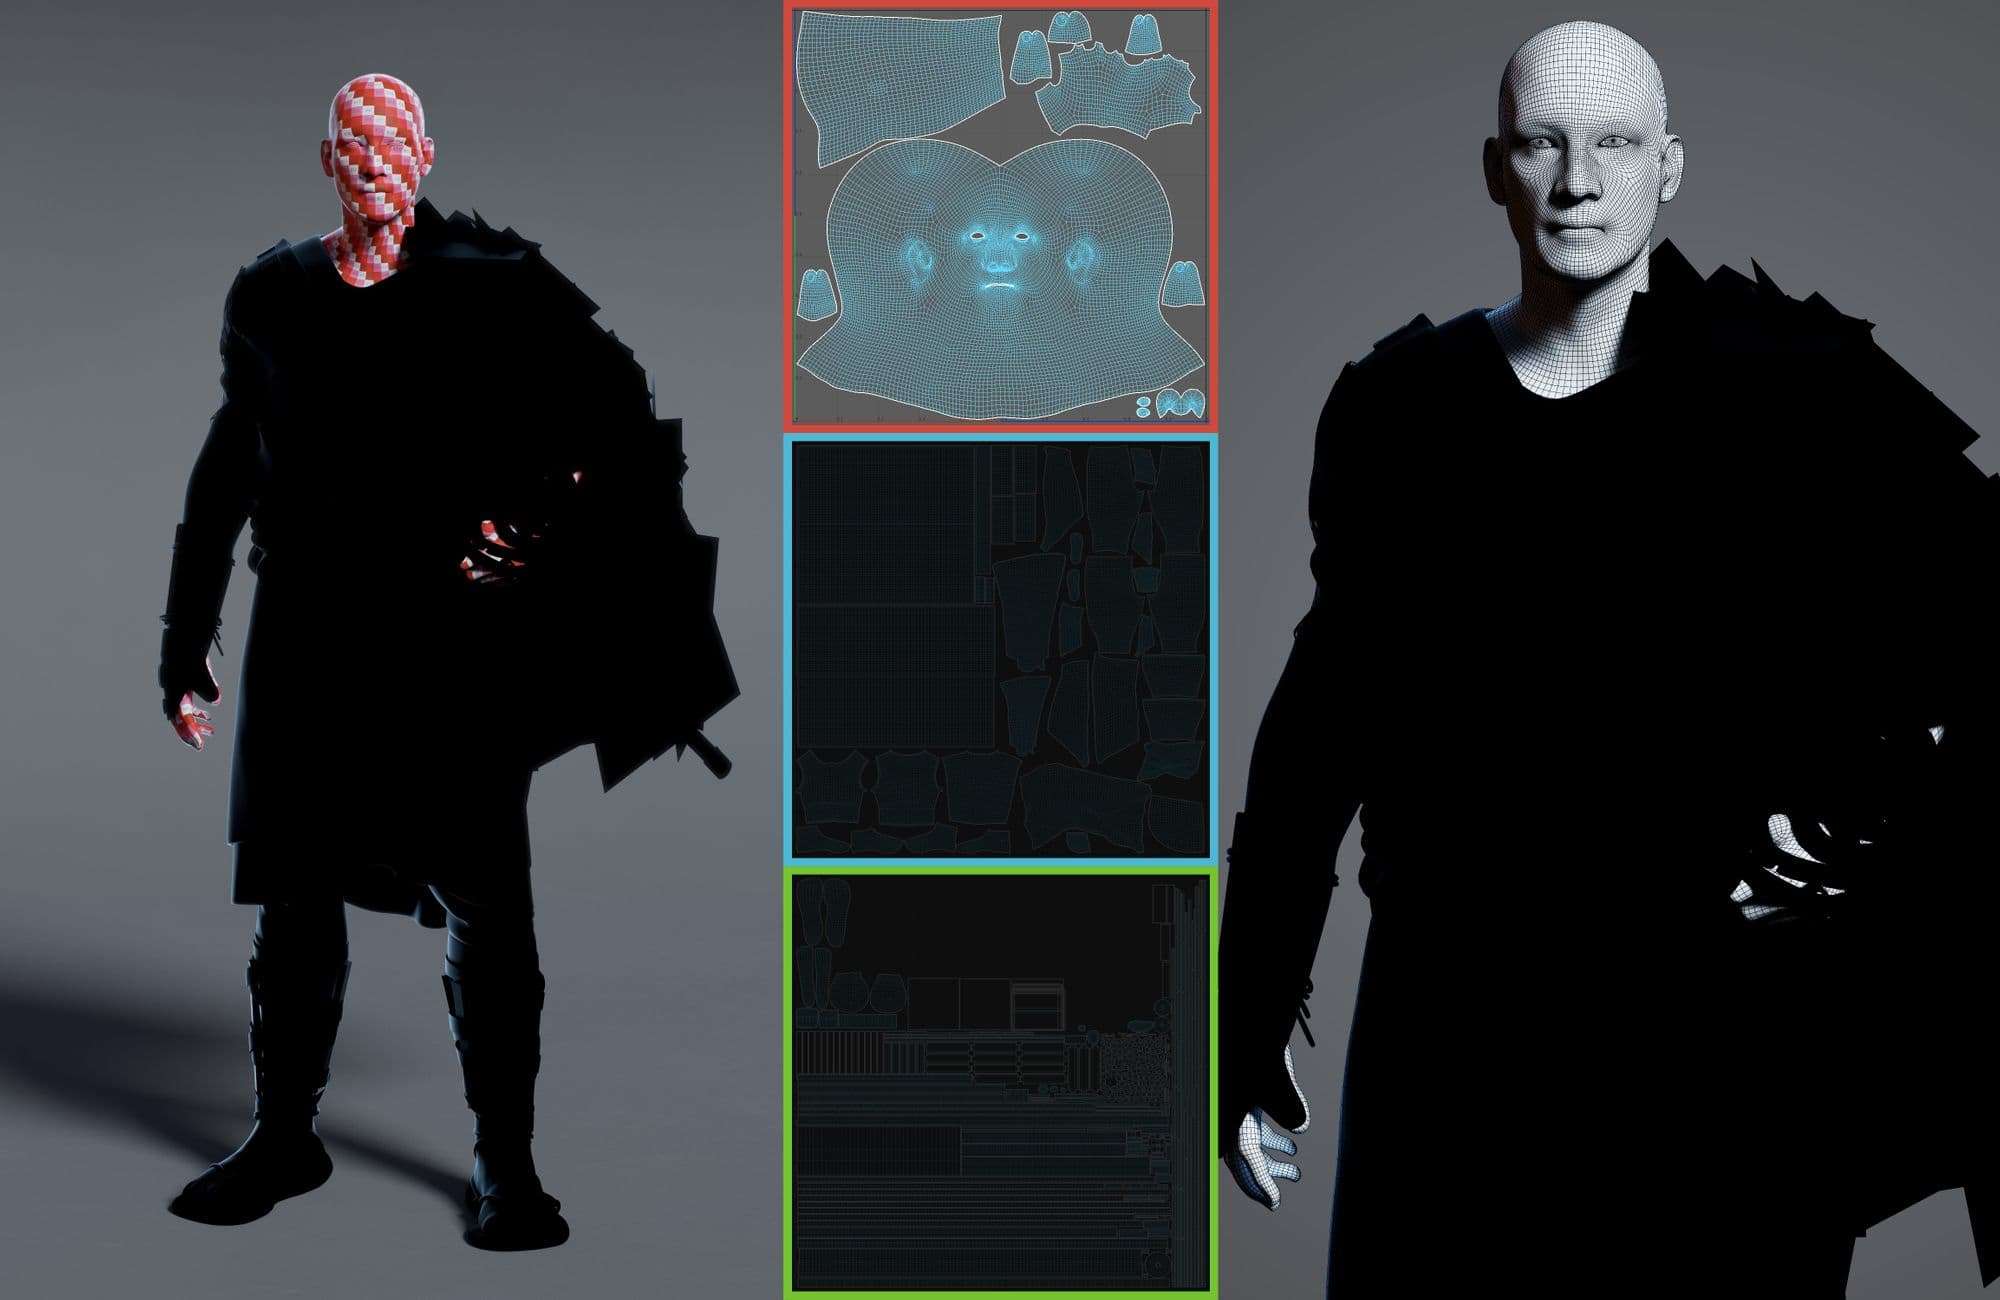
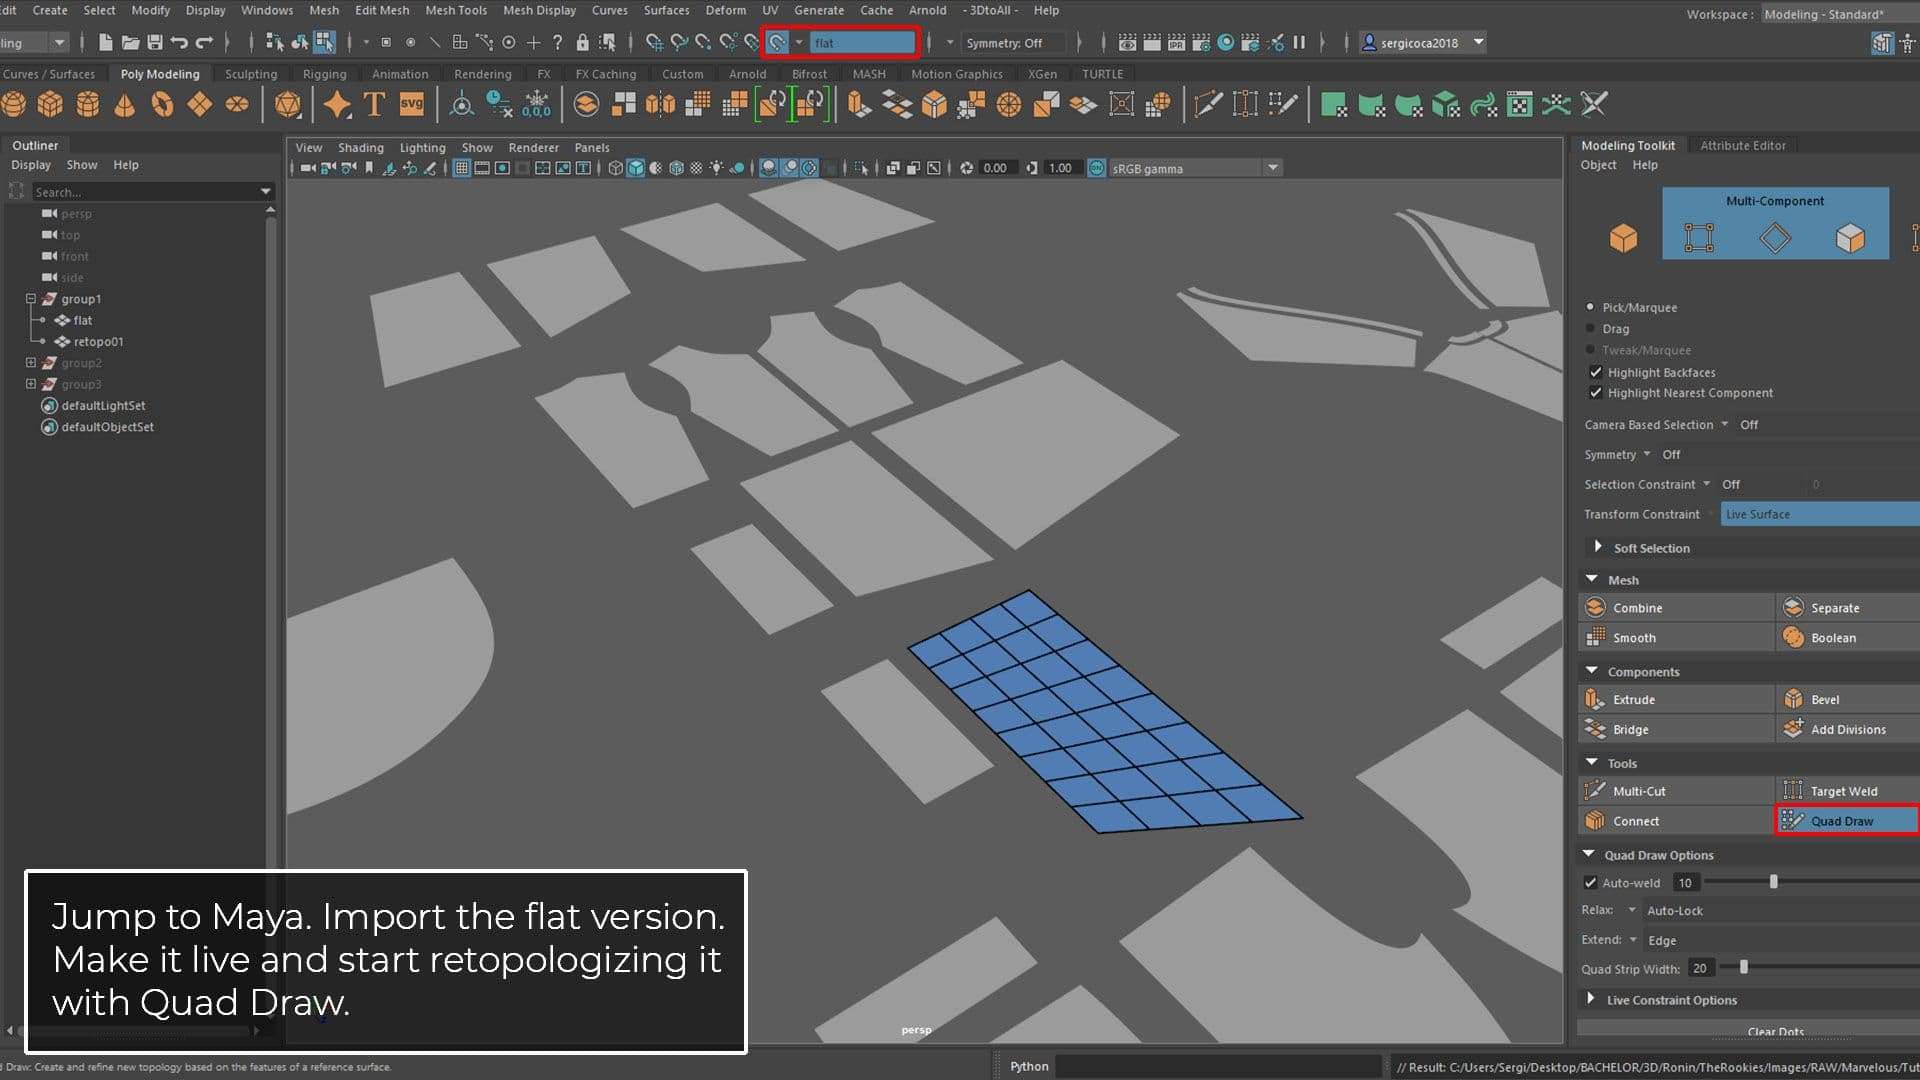
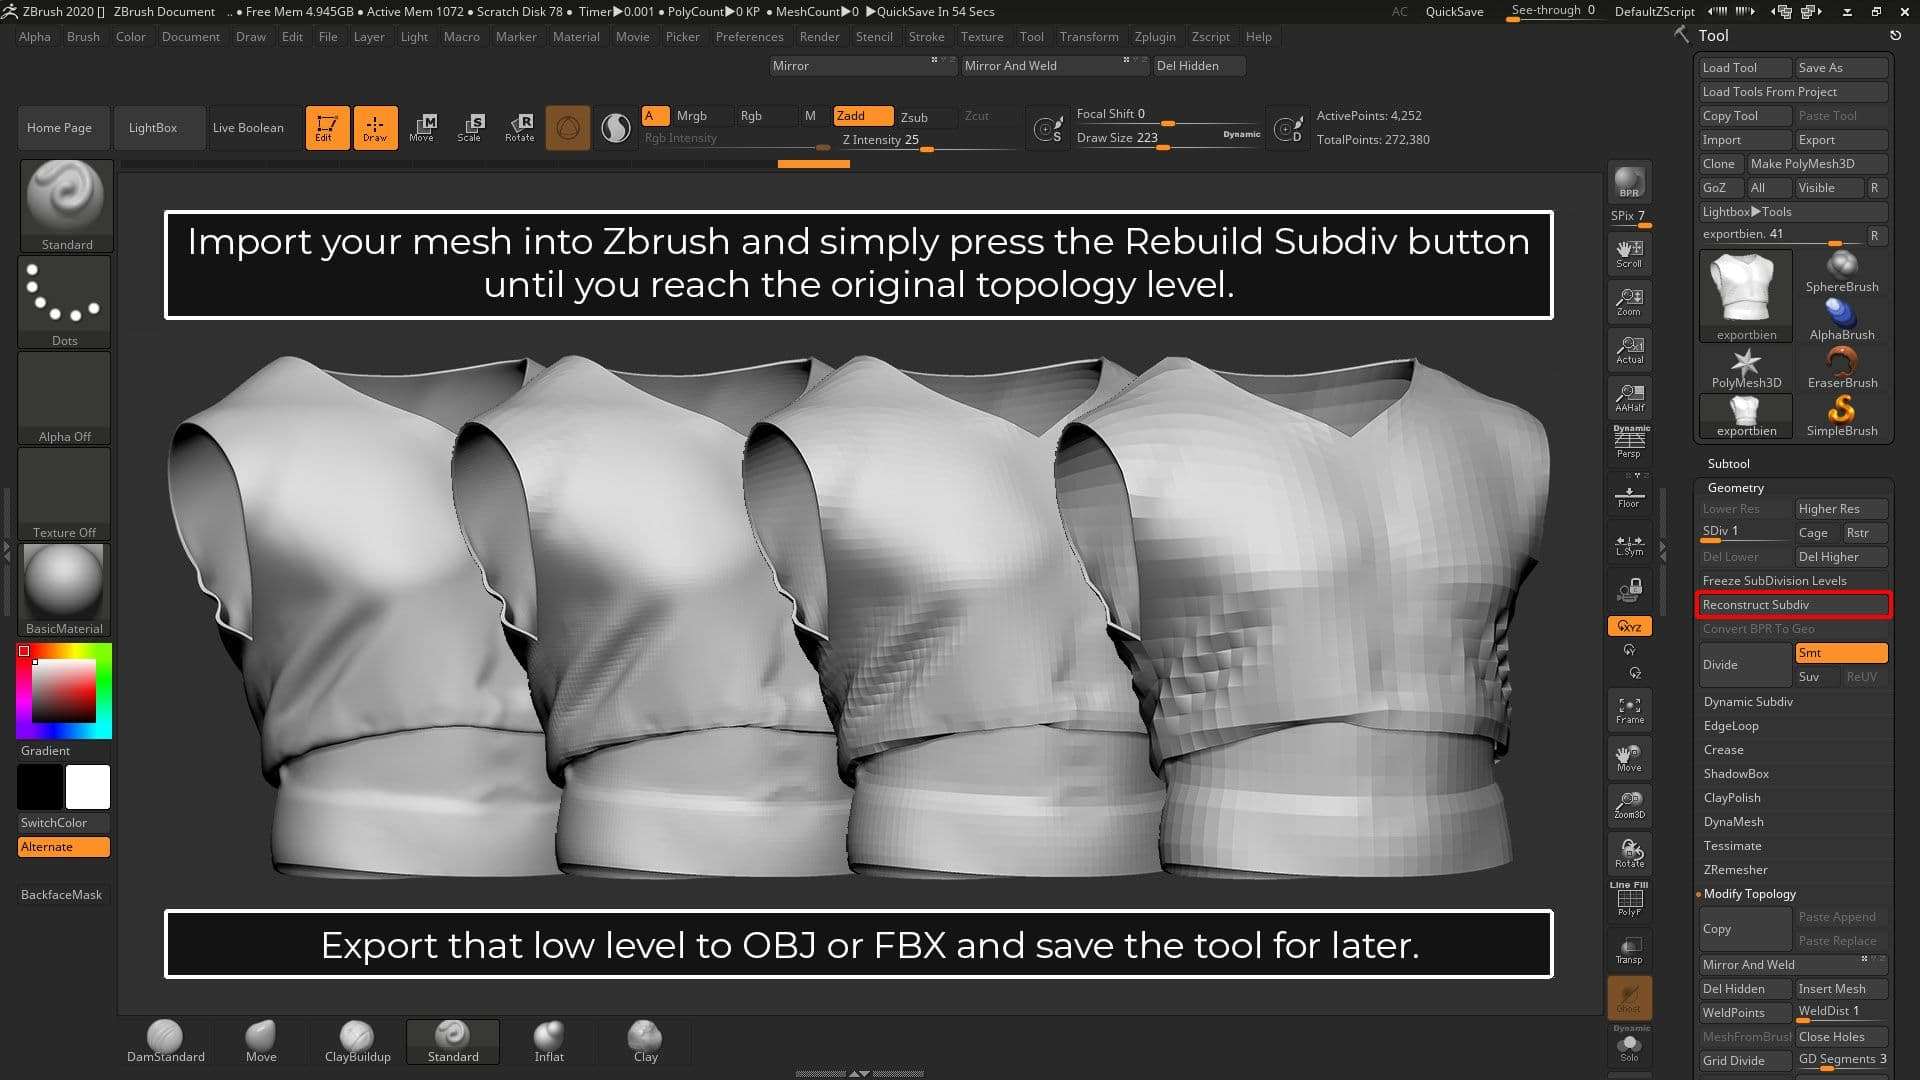
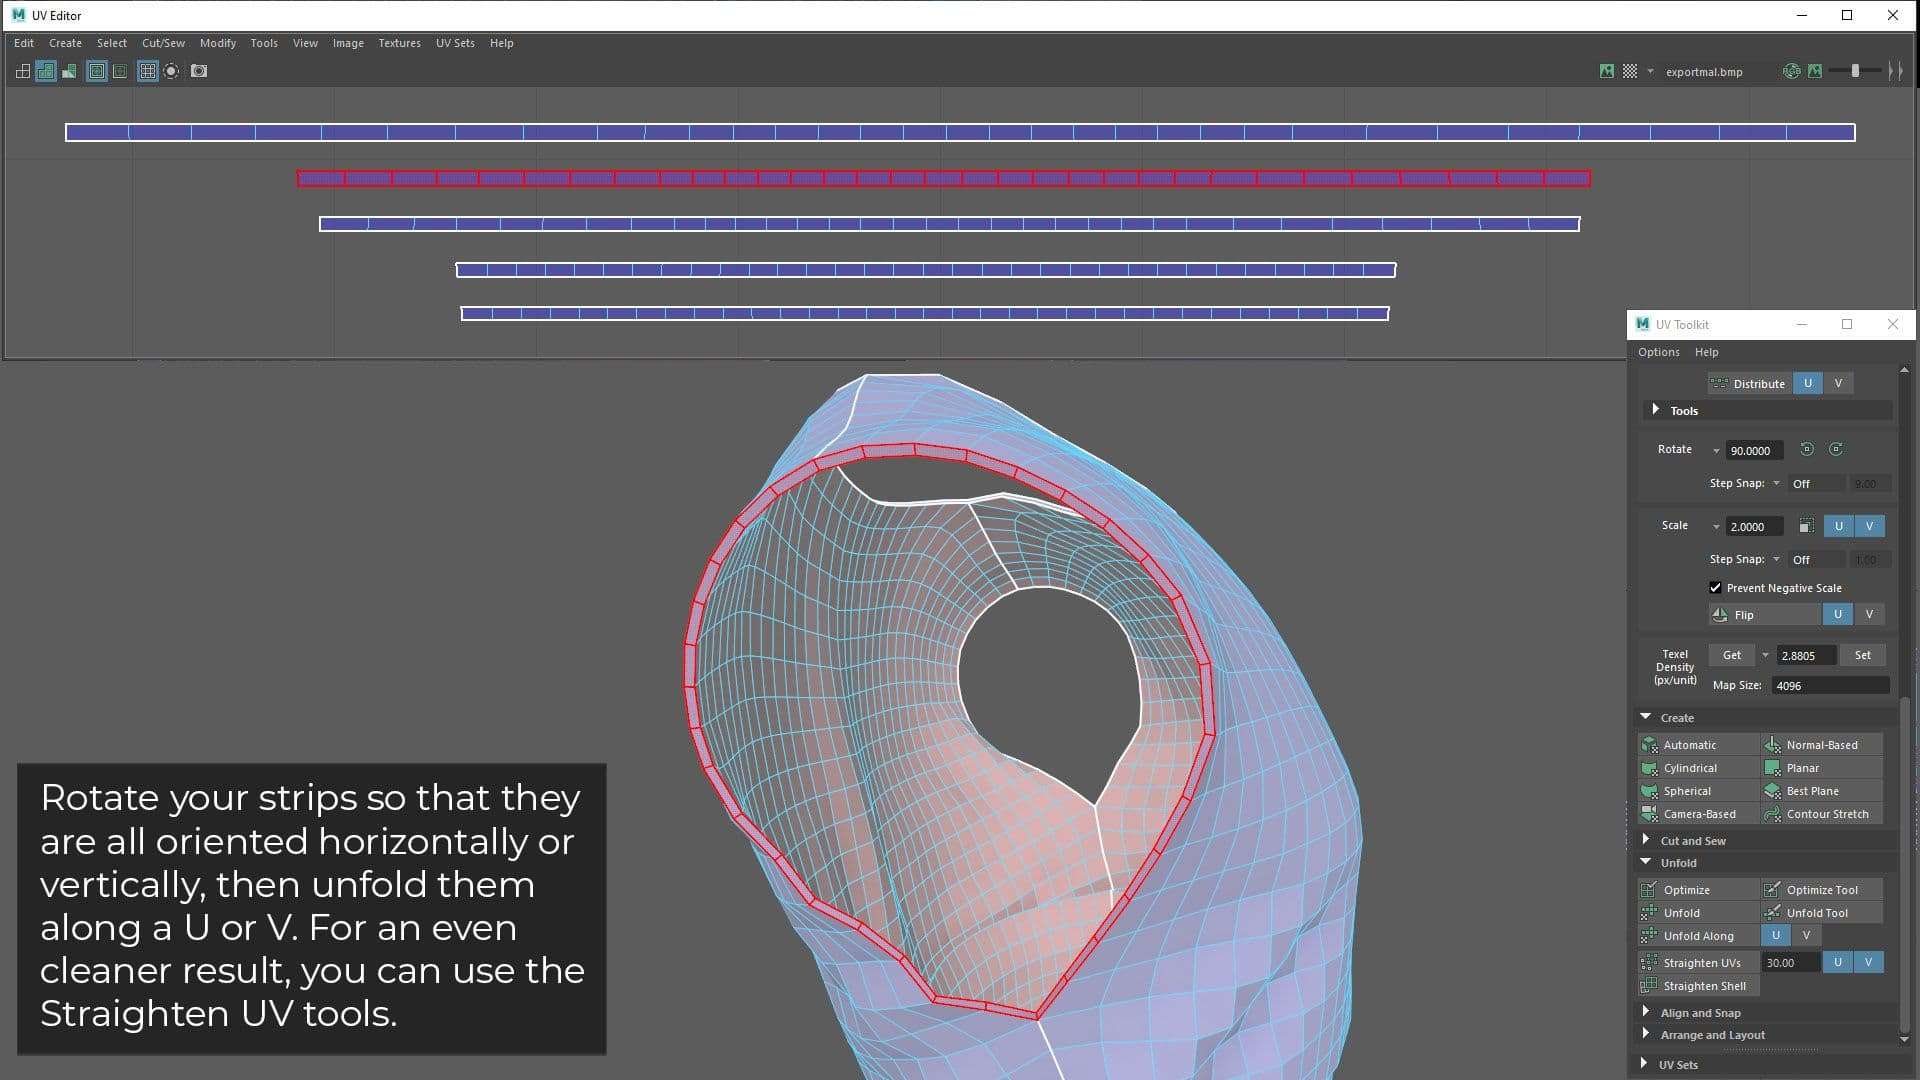
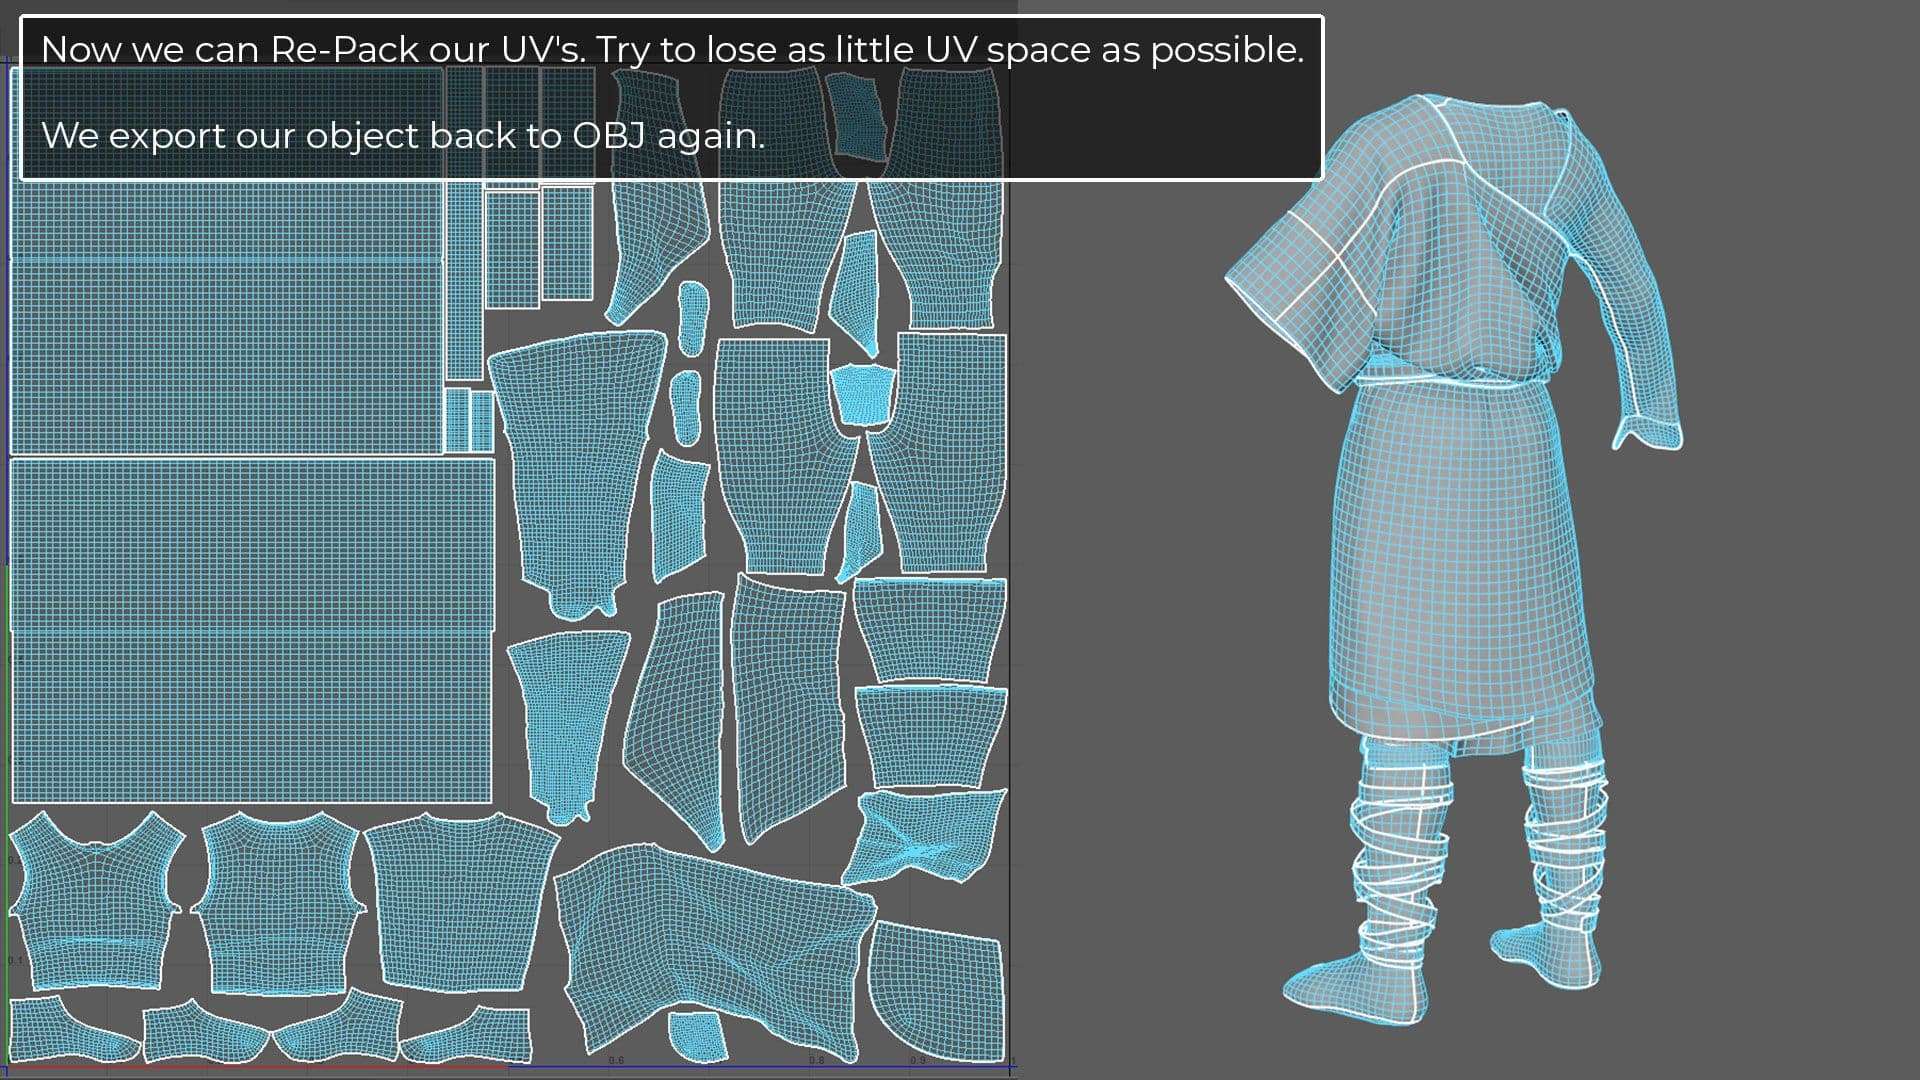
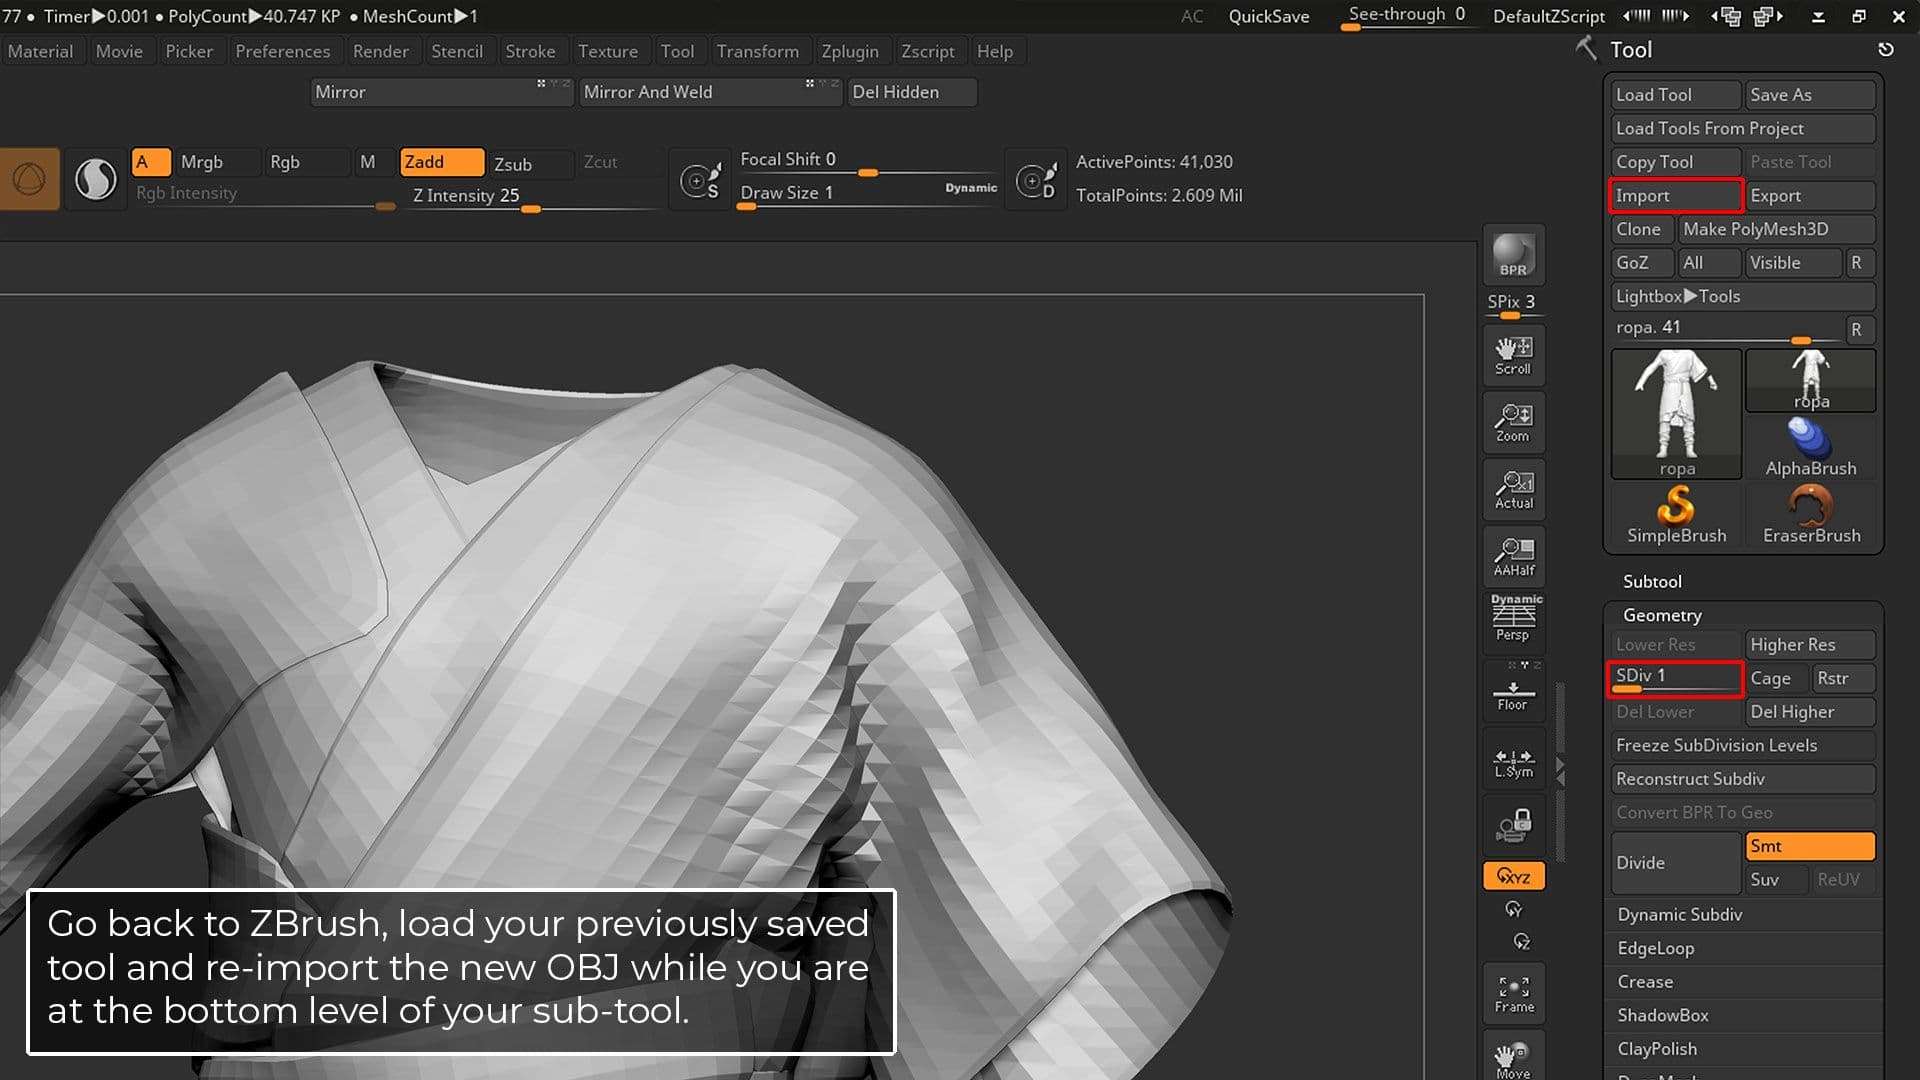
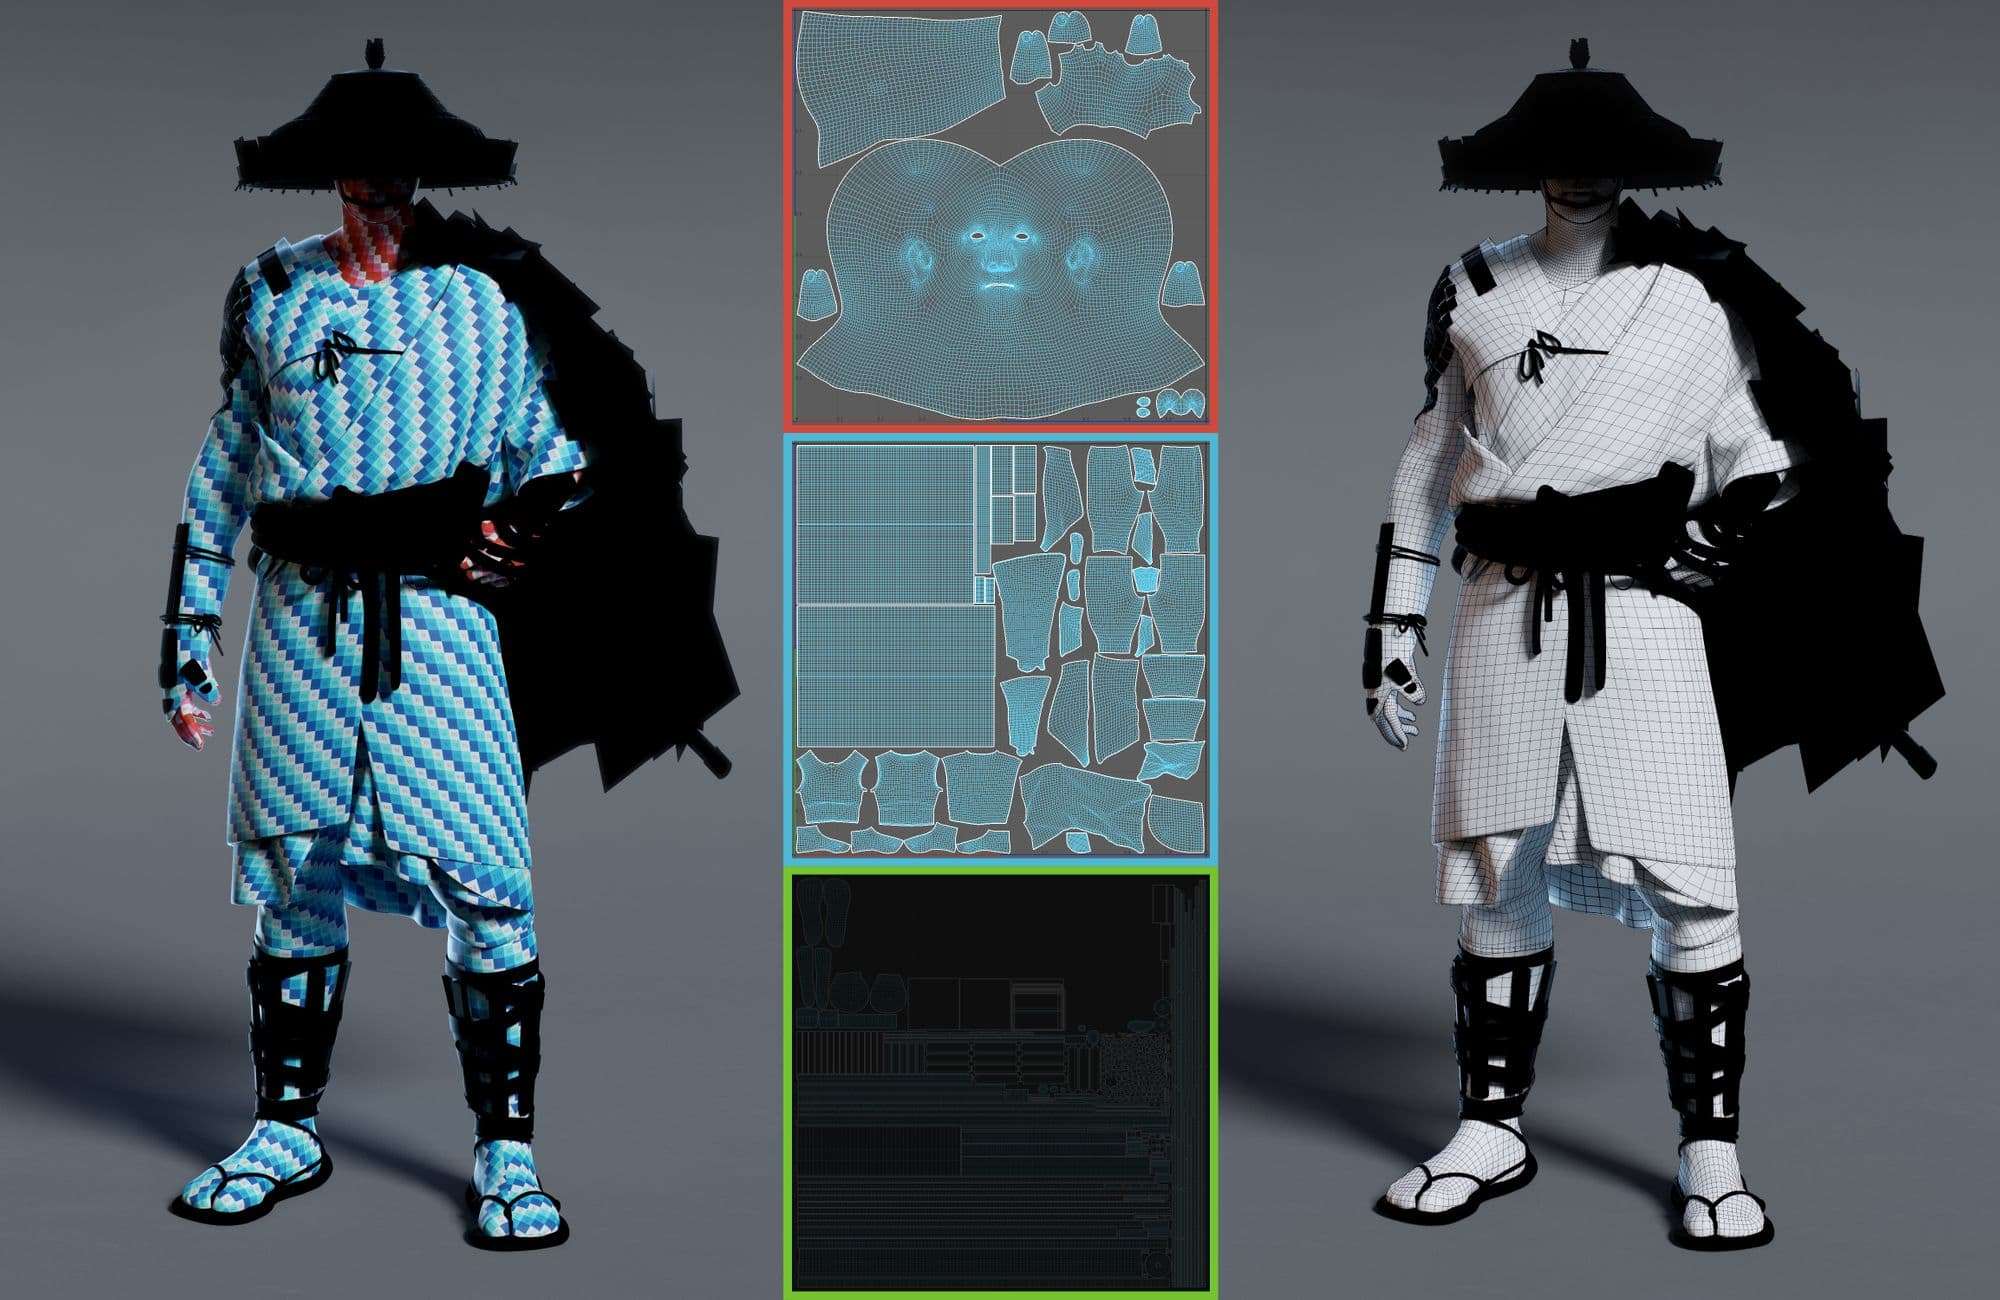
Once I have the base structure, I export it to Maya for retopology and UVs.
I like to create the UV's in Maya, and during this process I make sure that all the UV's are arranged correctly and do not overlap. I also check to avoid UV distortion and check the UV scale.
I usually have a clean topology before I start adding pore detail and finer details.
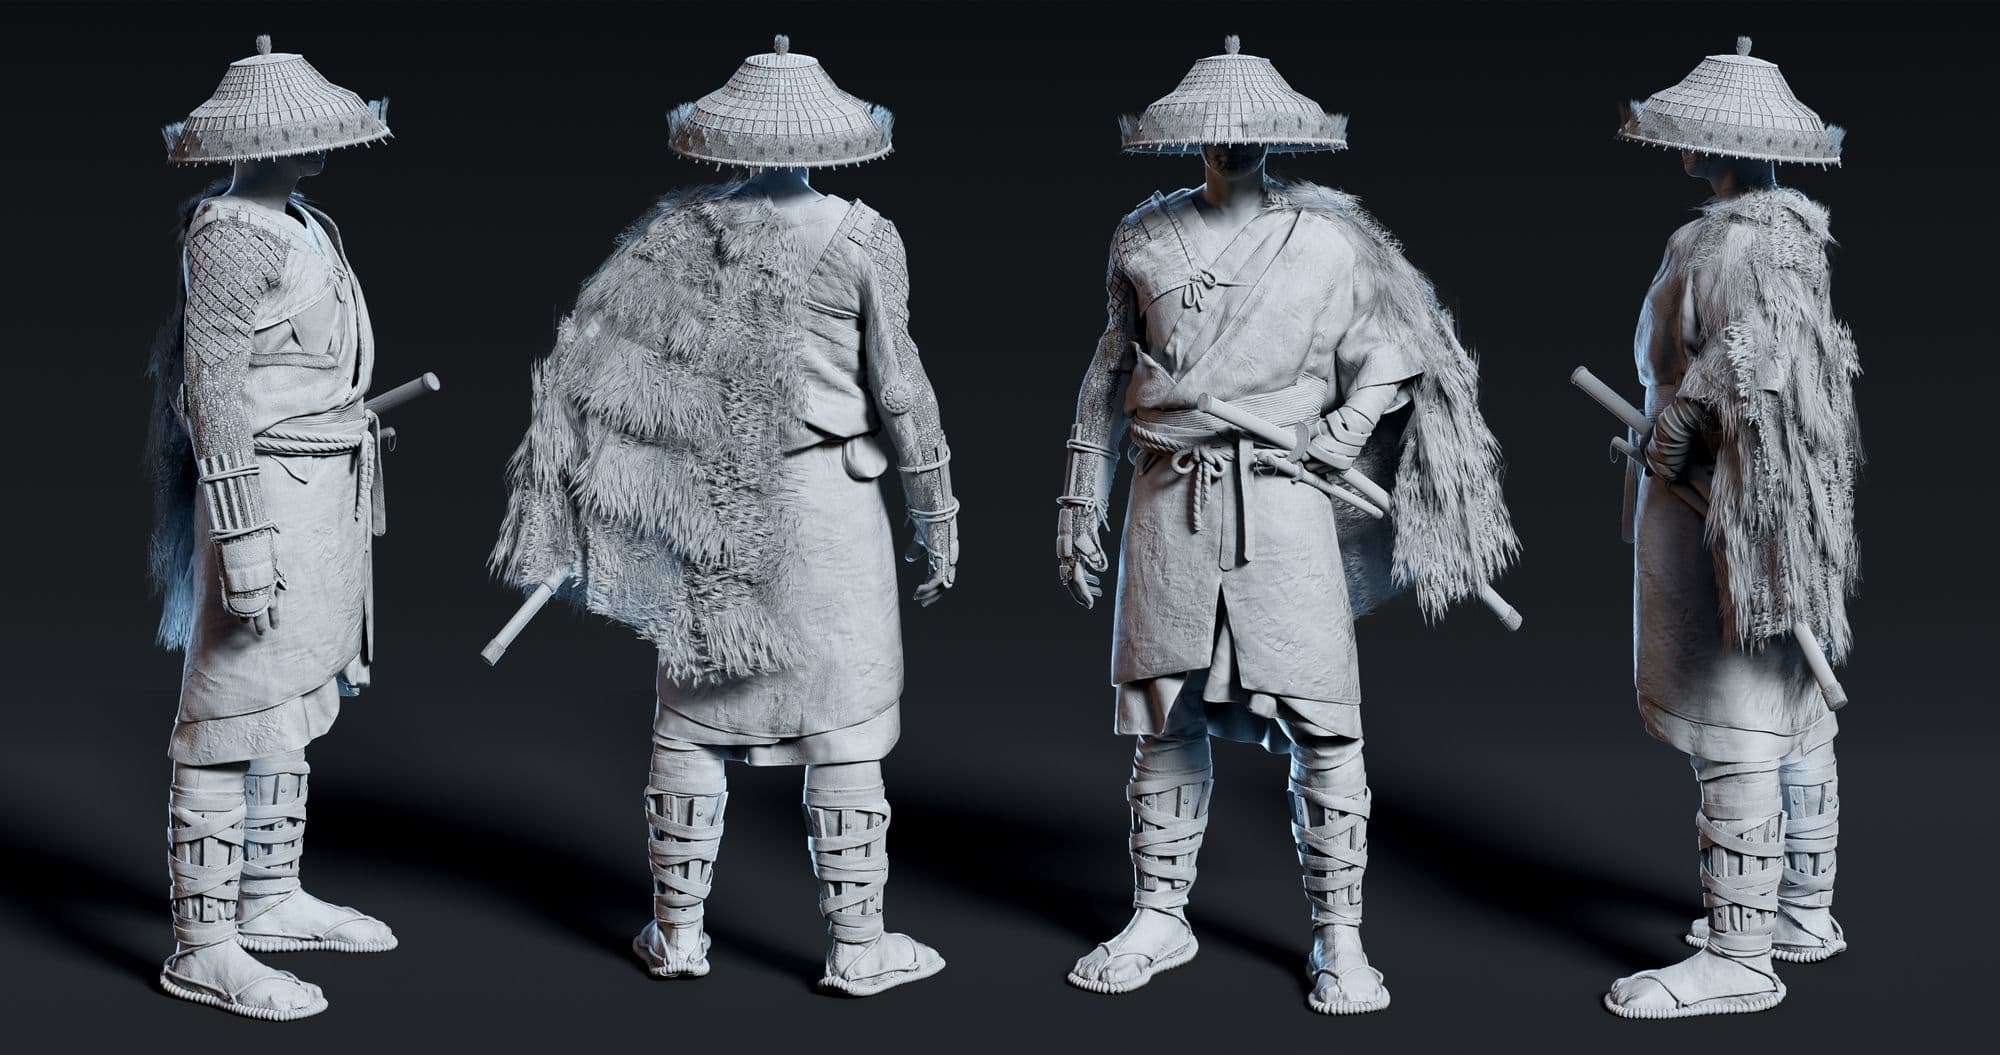
Clothing
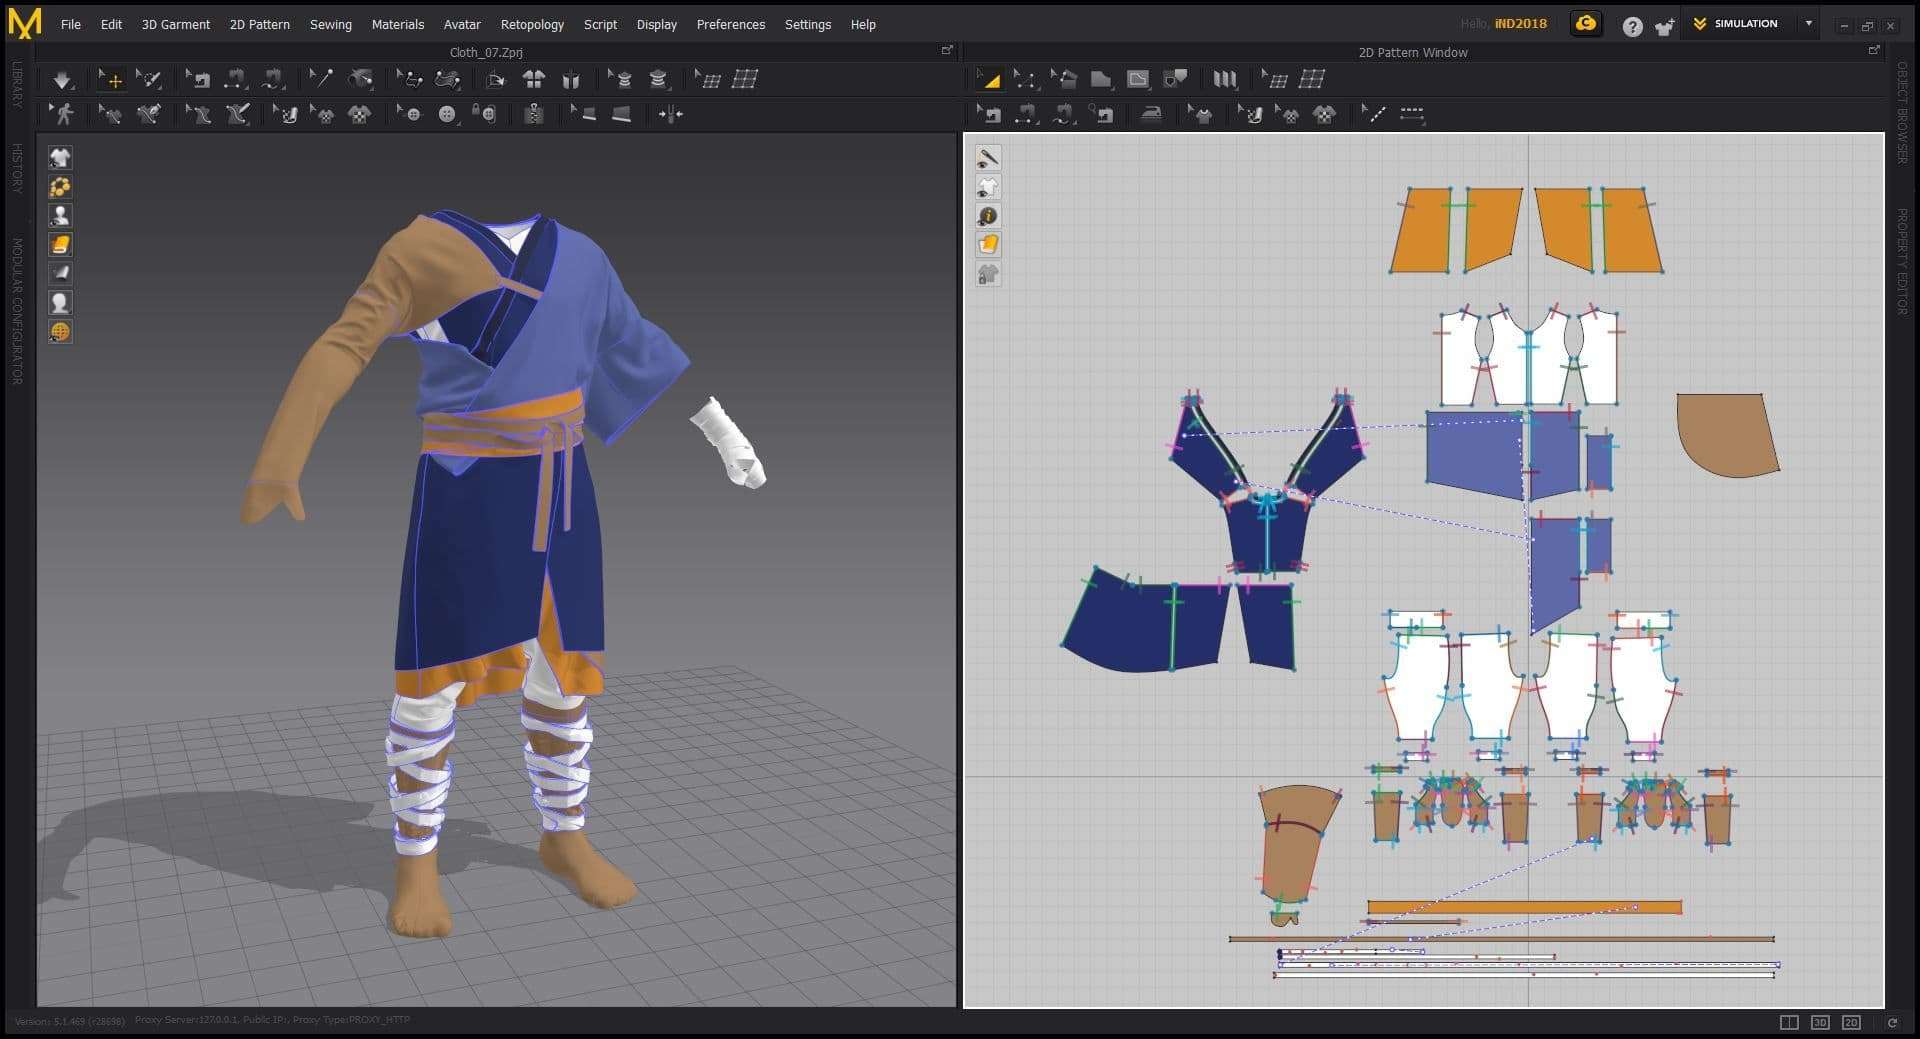
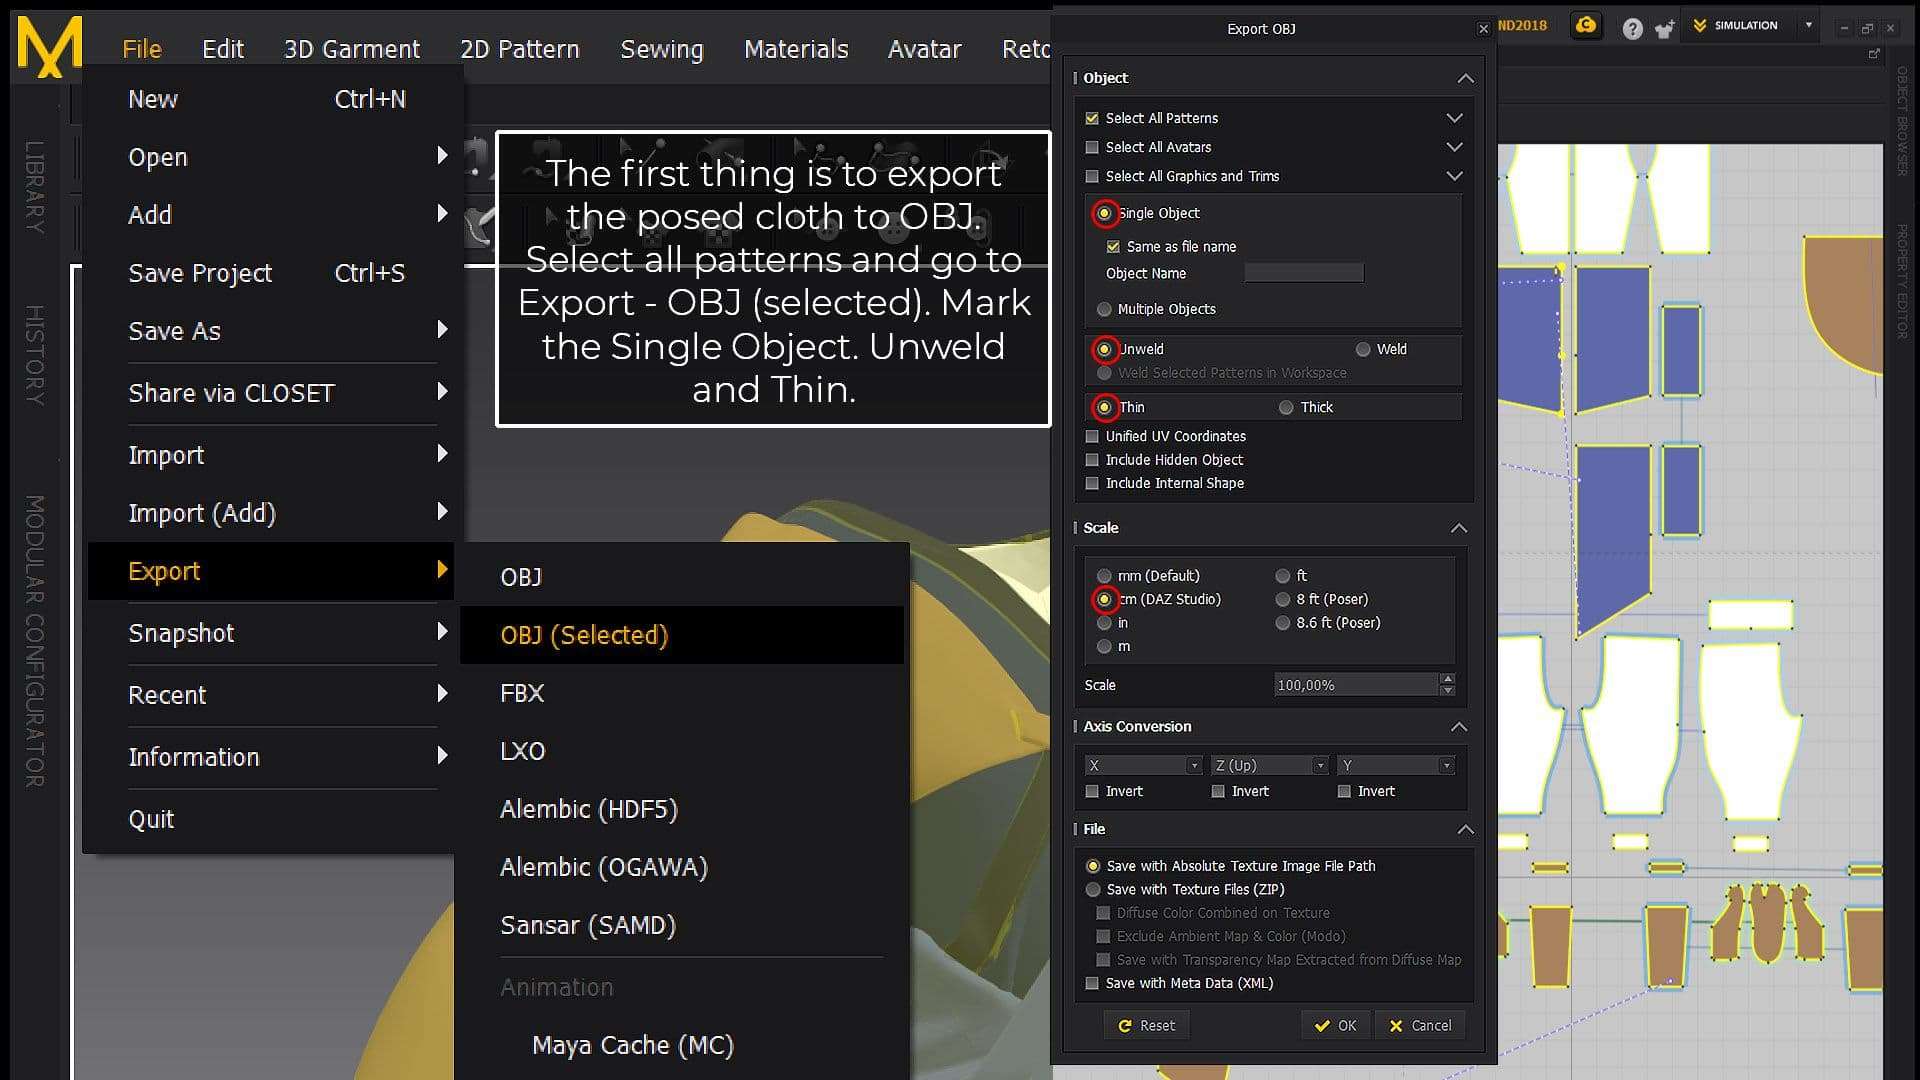
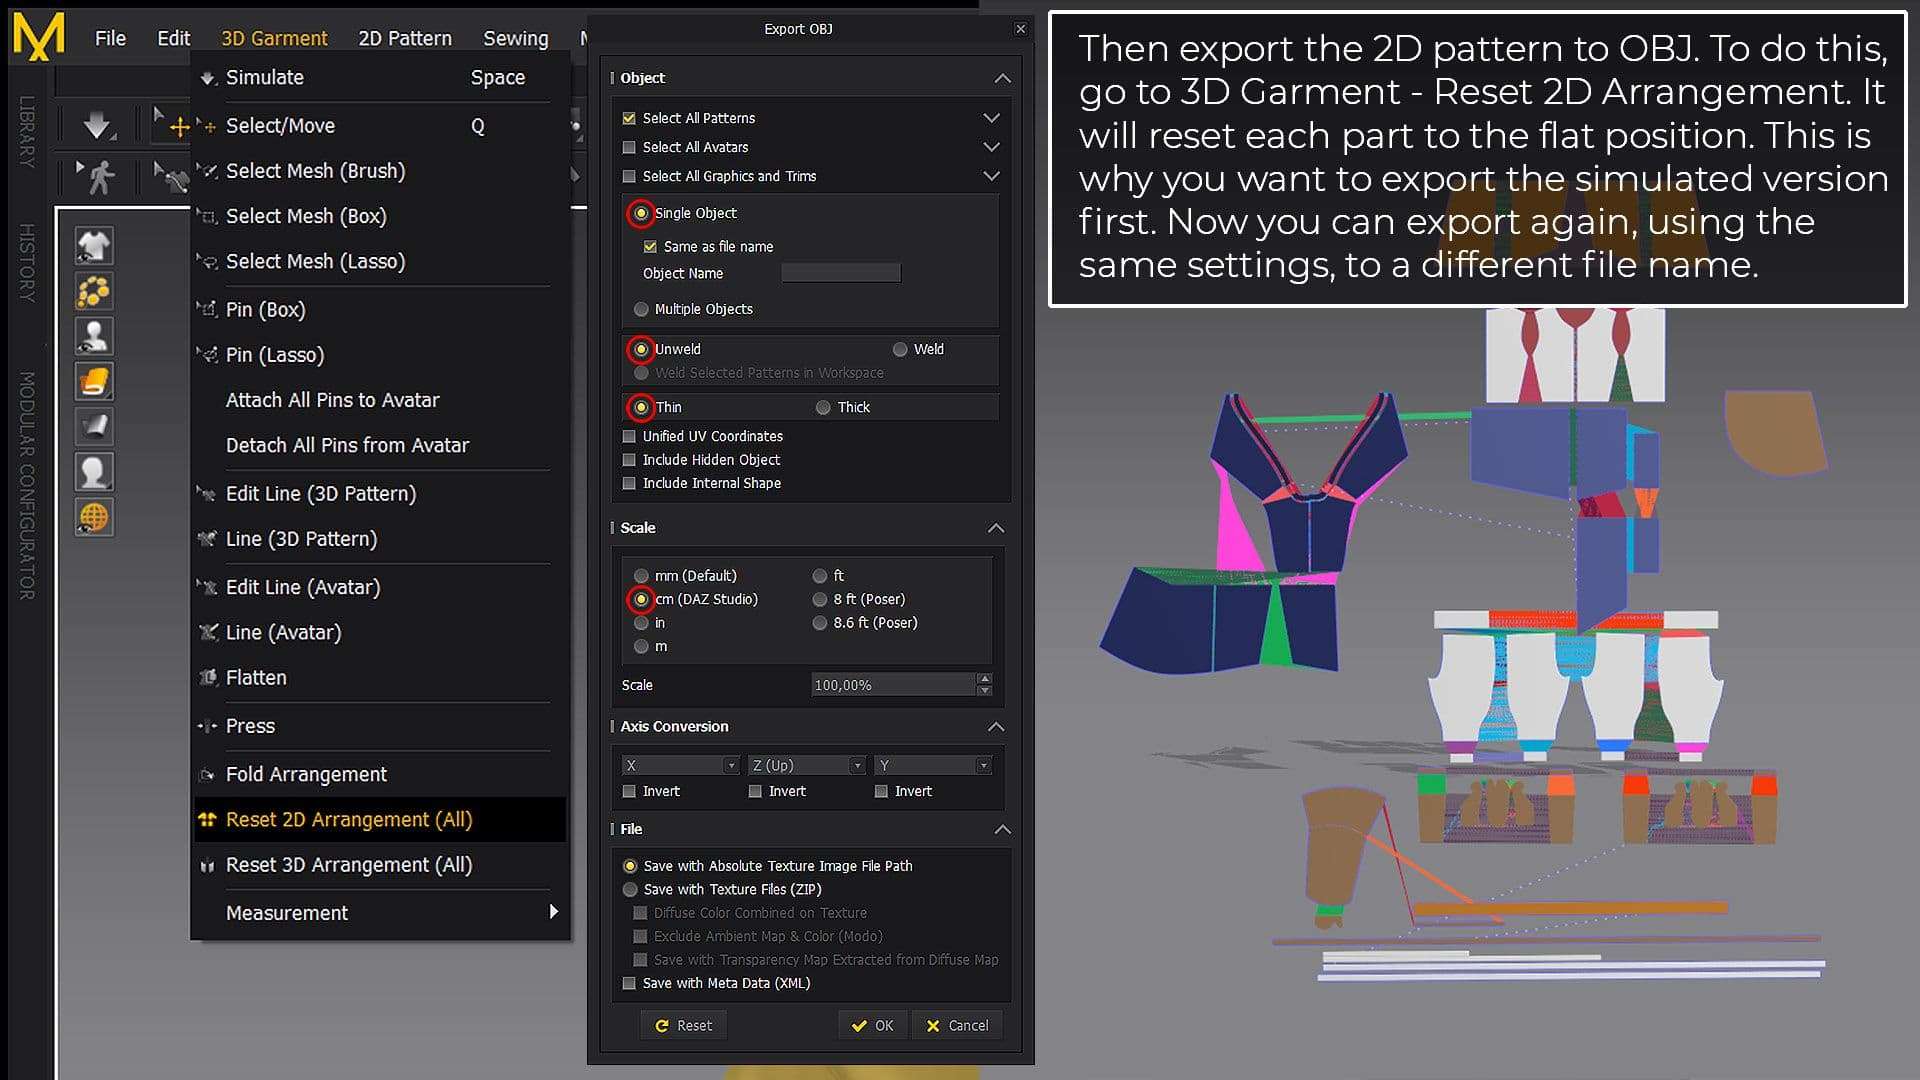
The process of creating clothes in Marvelous Designer was in my case relatively simple. As I mentioned before, it is very important to use references and before I started to create the patterns in Marvelous I took my time to look up how they were actually created in real life; this gave me a helpful guide to follow.
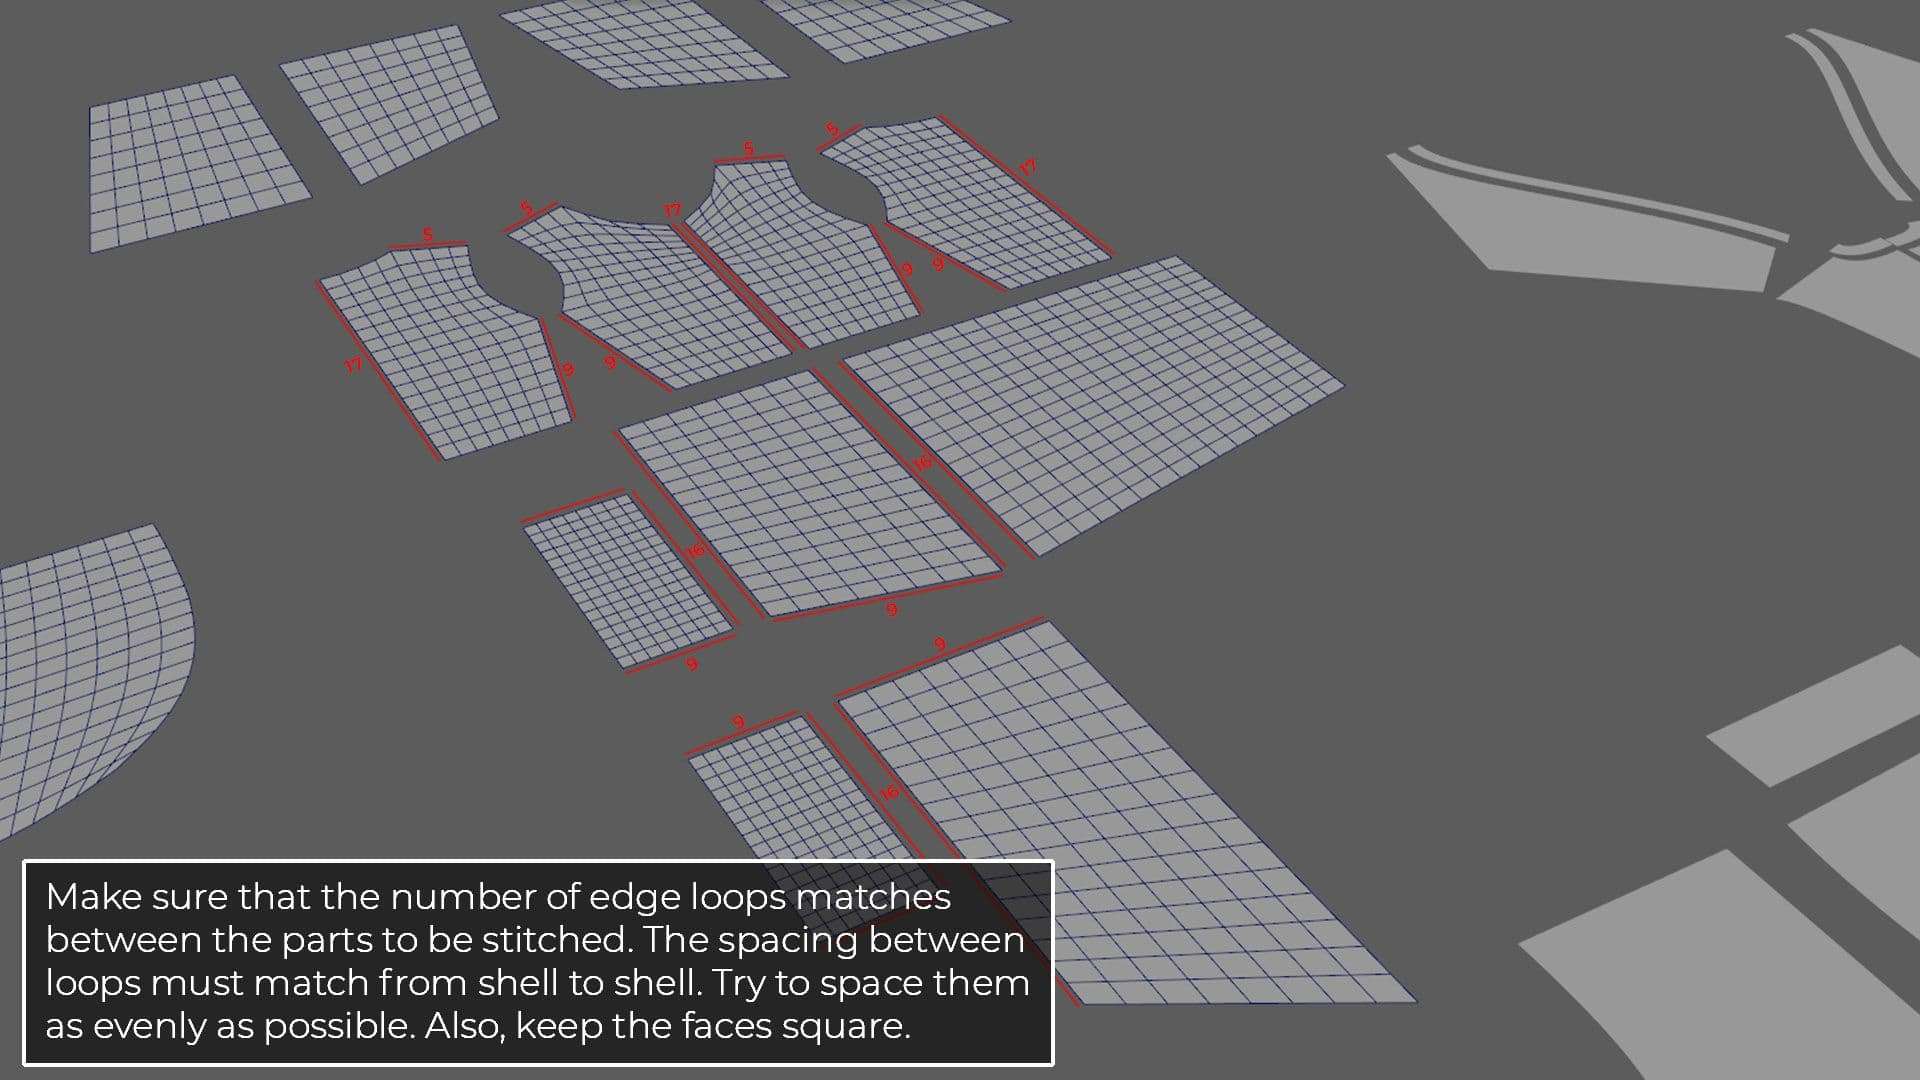
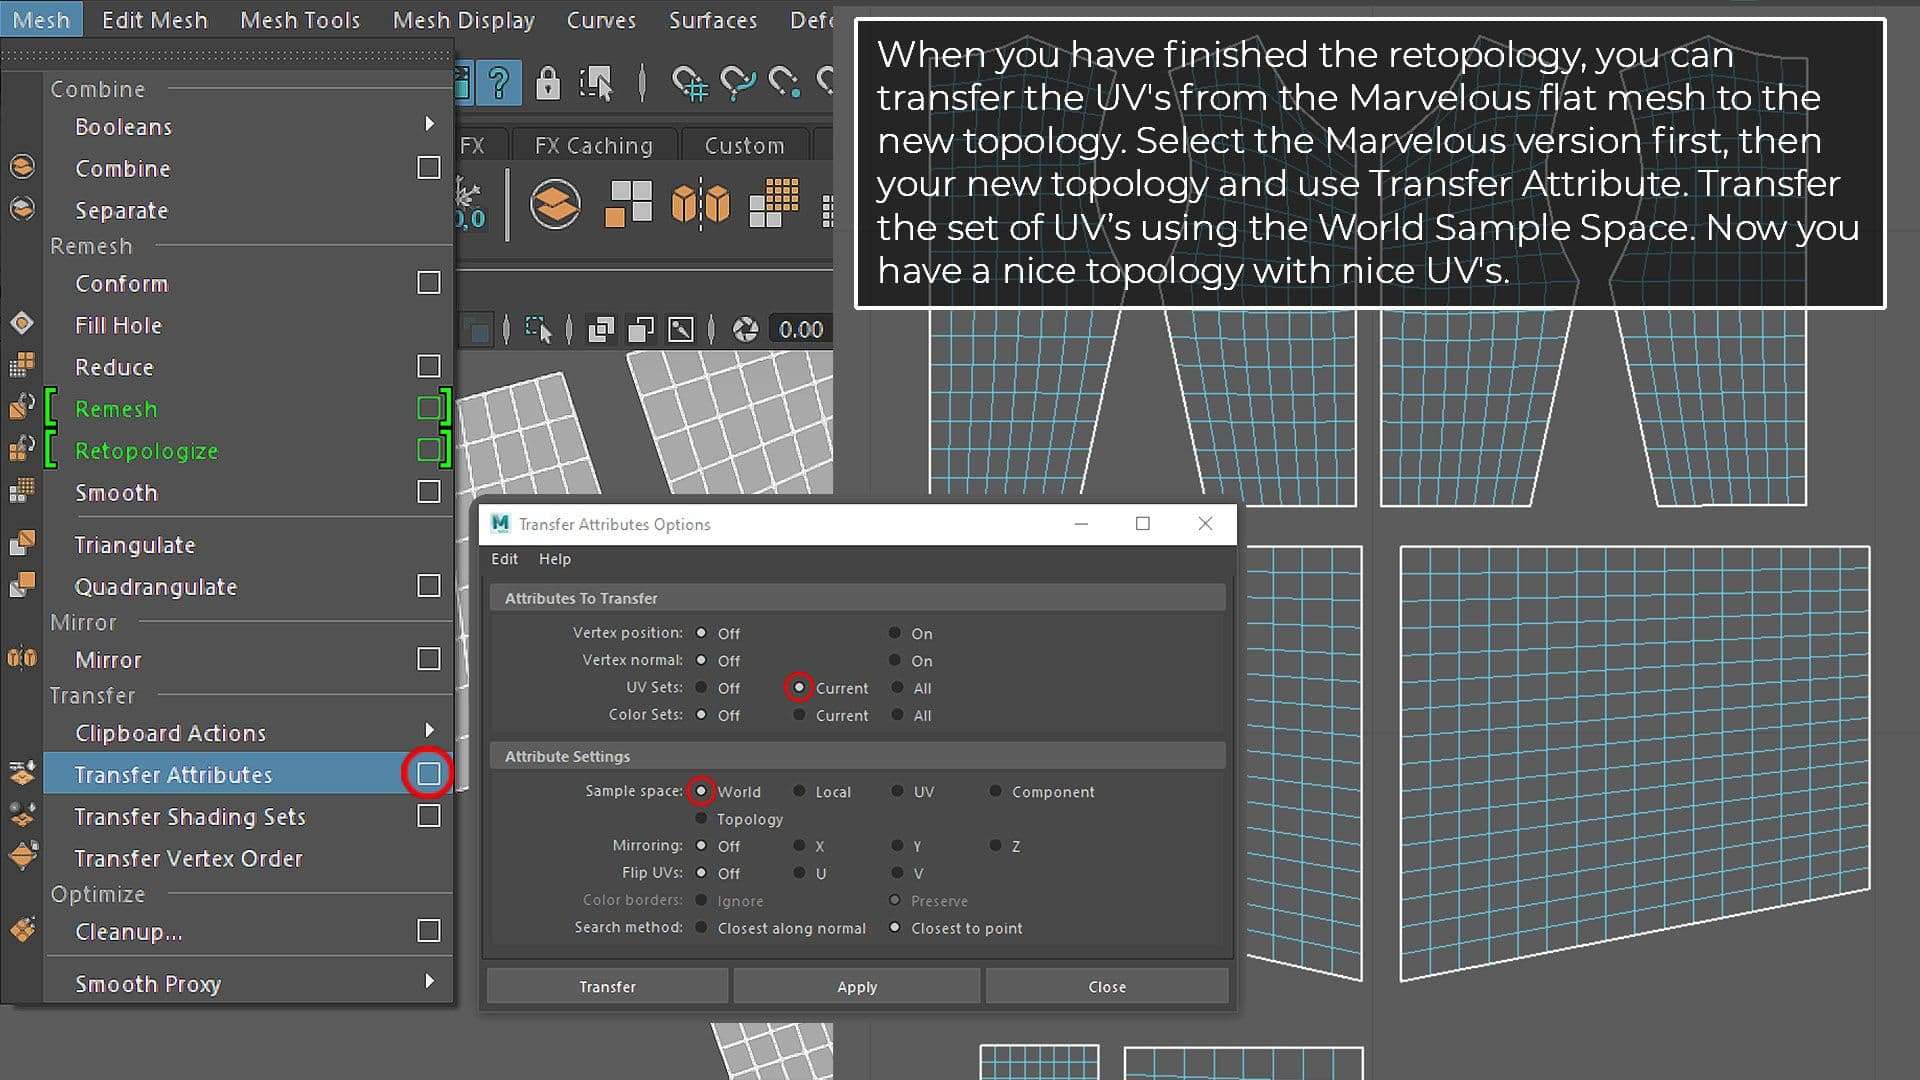
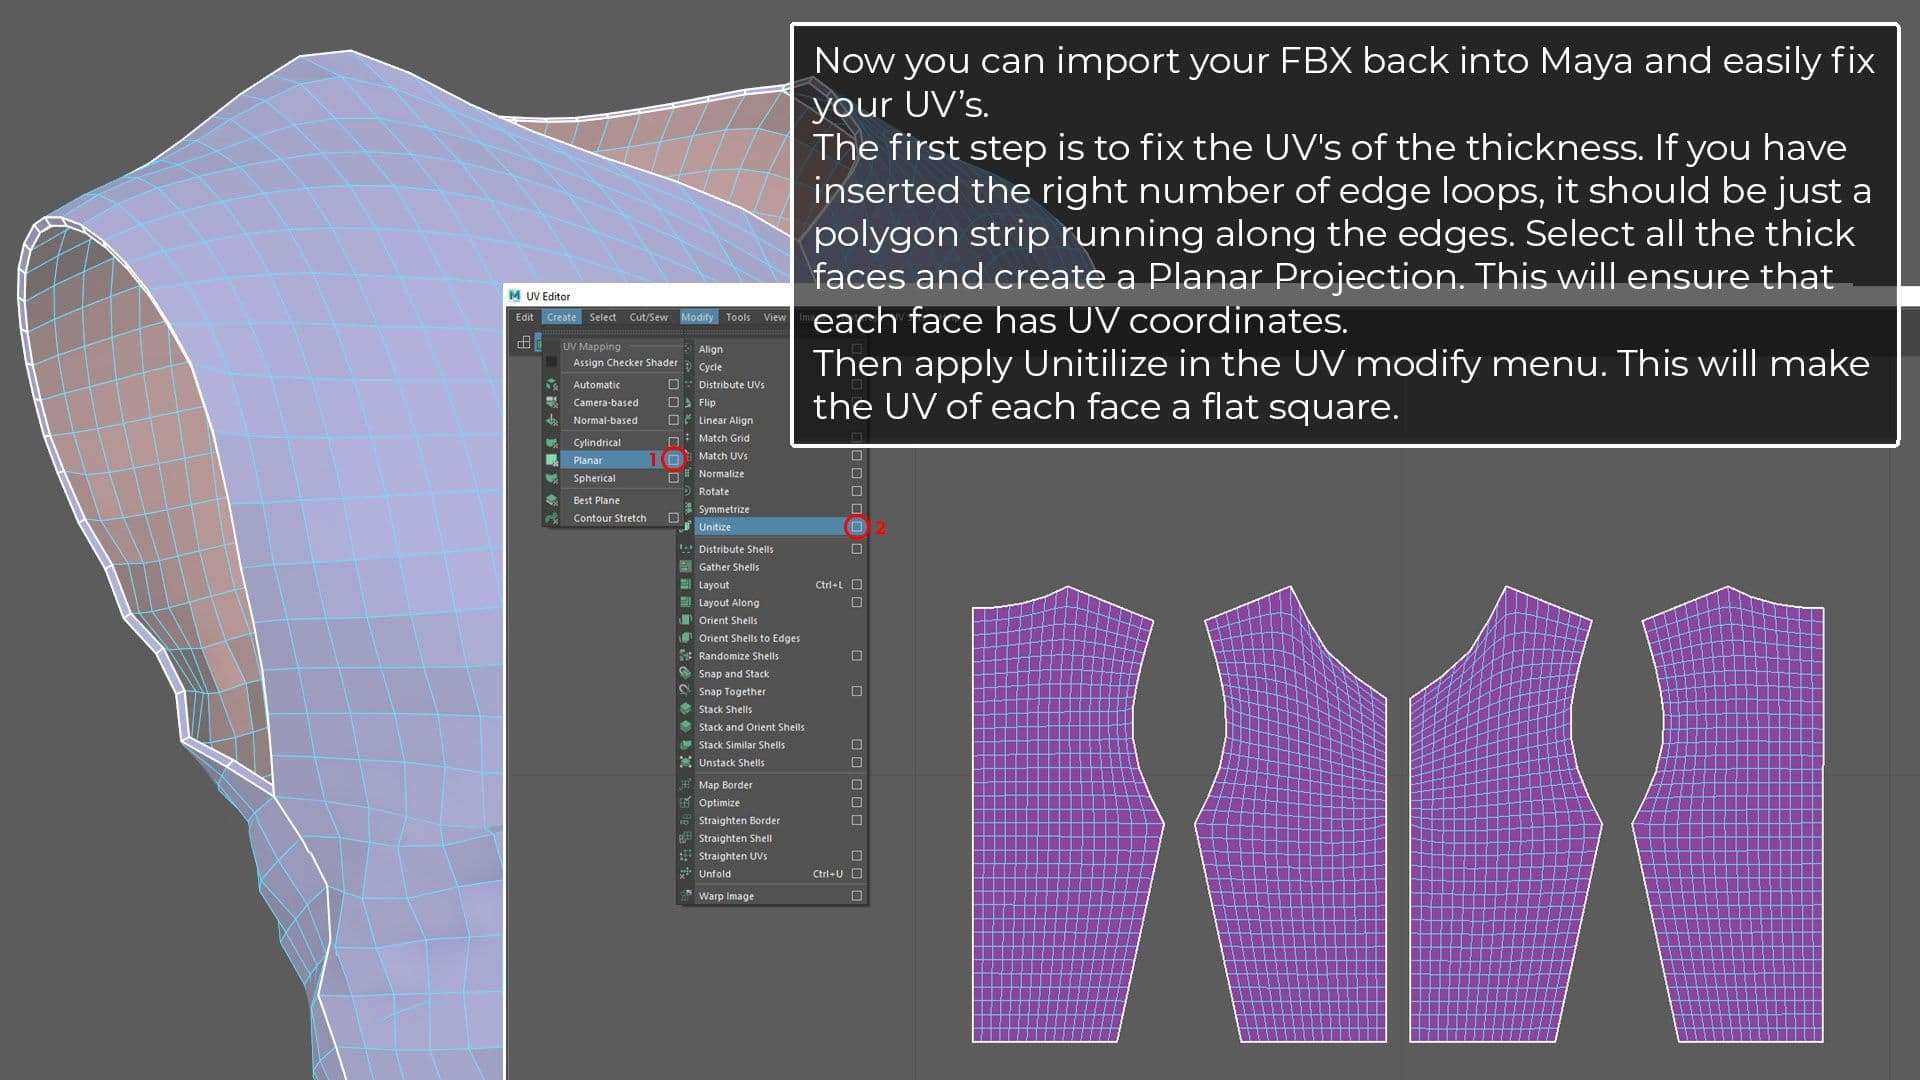
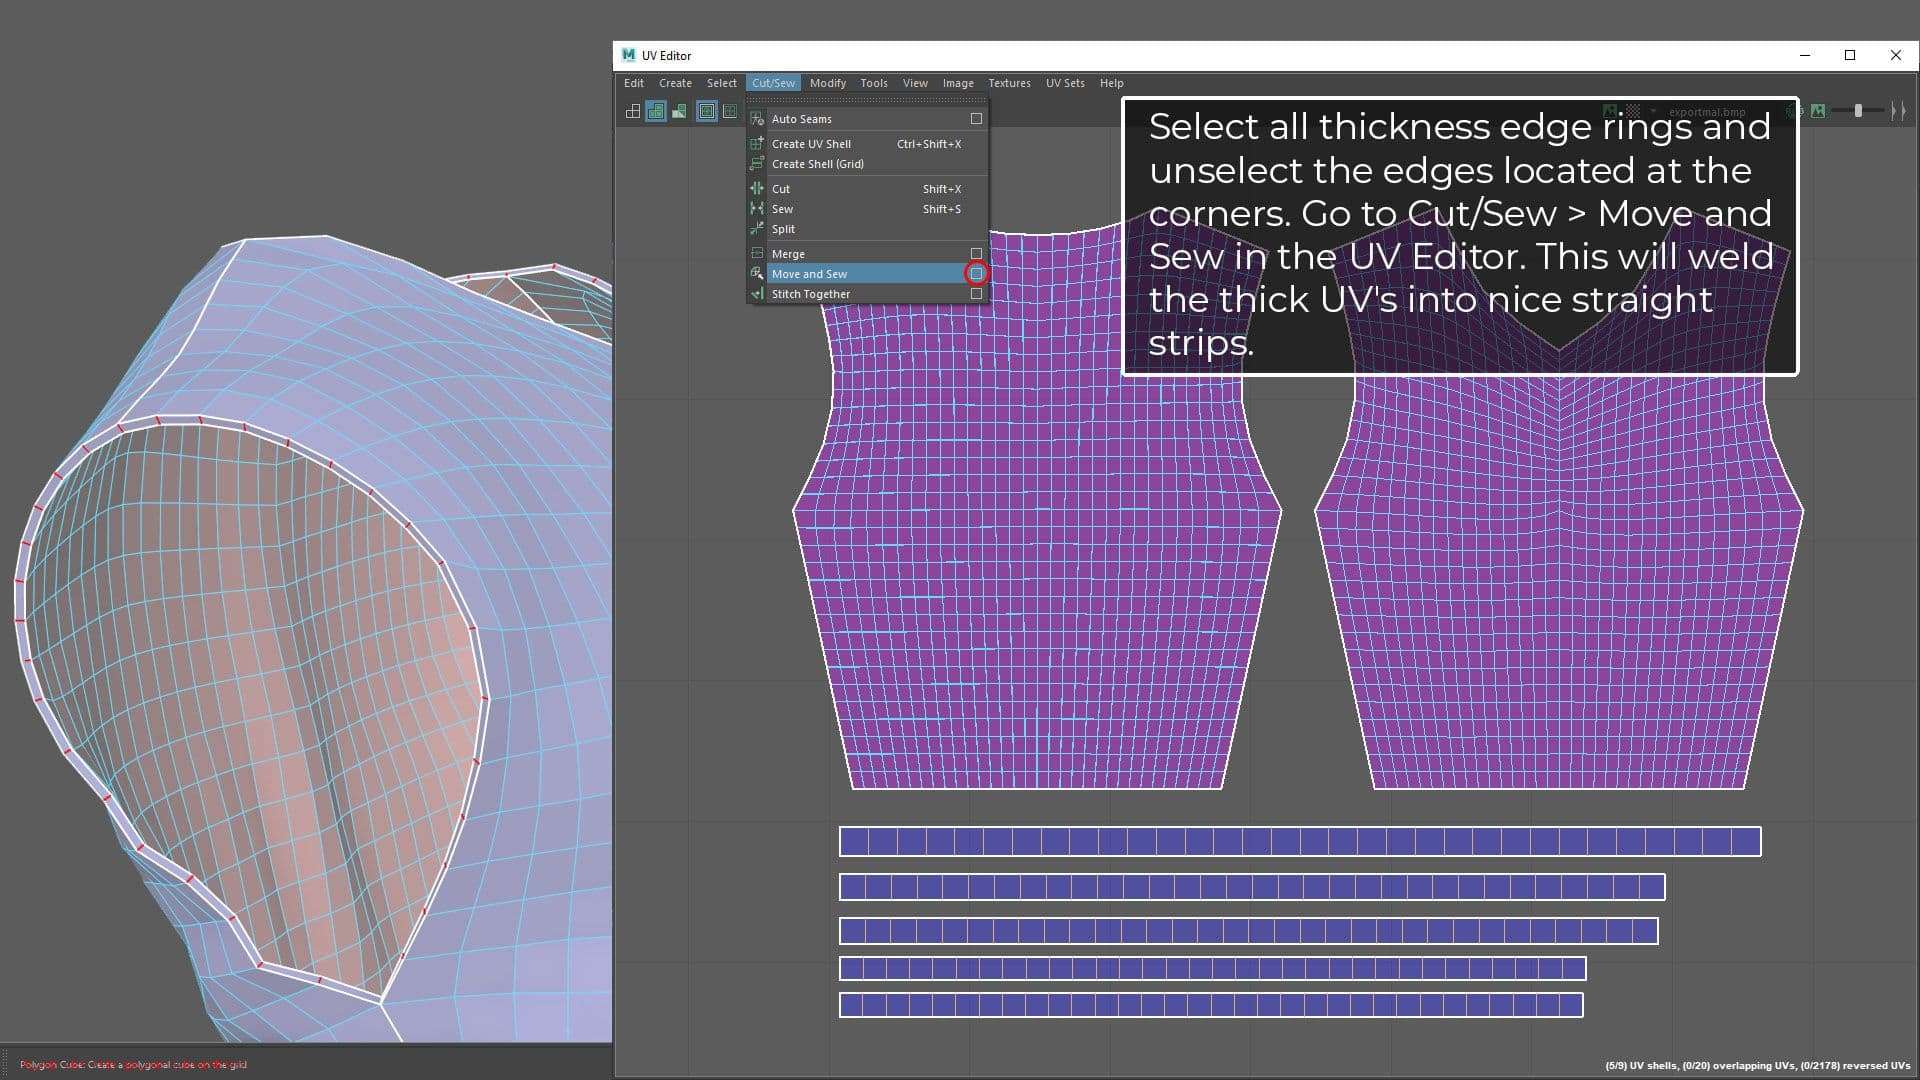
Throughout this process I used several tutorials for the creation of clothing such as Travis Davis', that were very helpful. I also followed Olivier Couston's methodology when it comes to exporting, retopology, uvs and detail projection.
Next, I will explain this workflow in a series of images below:
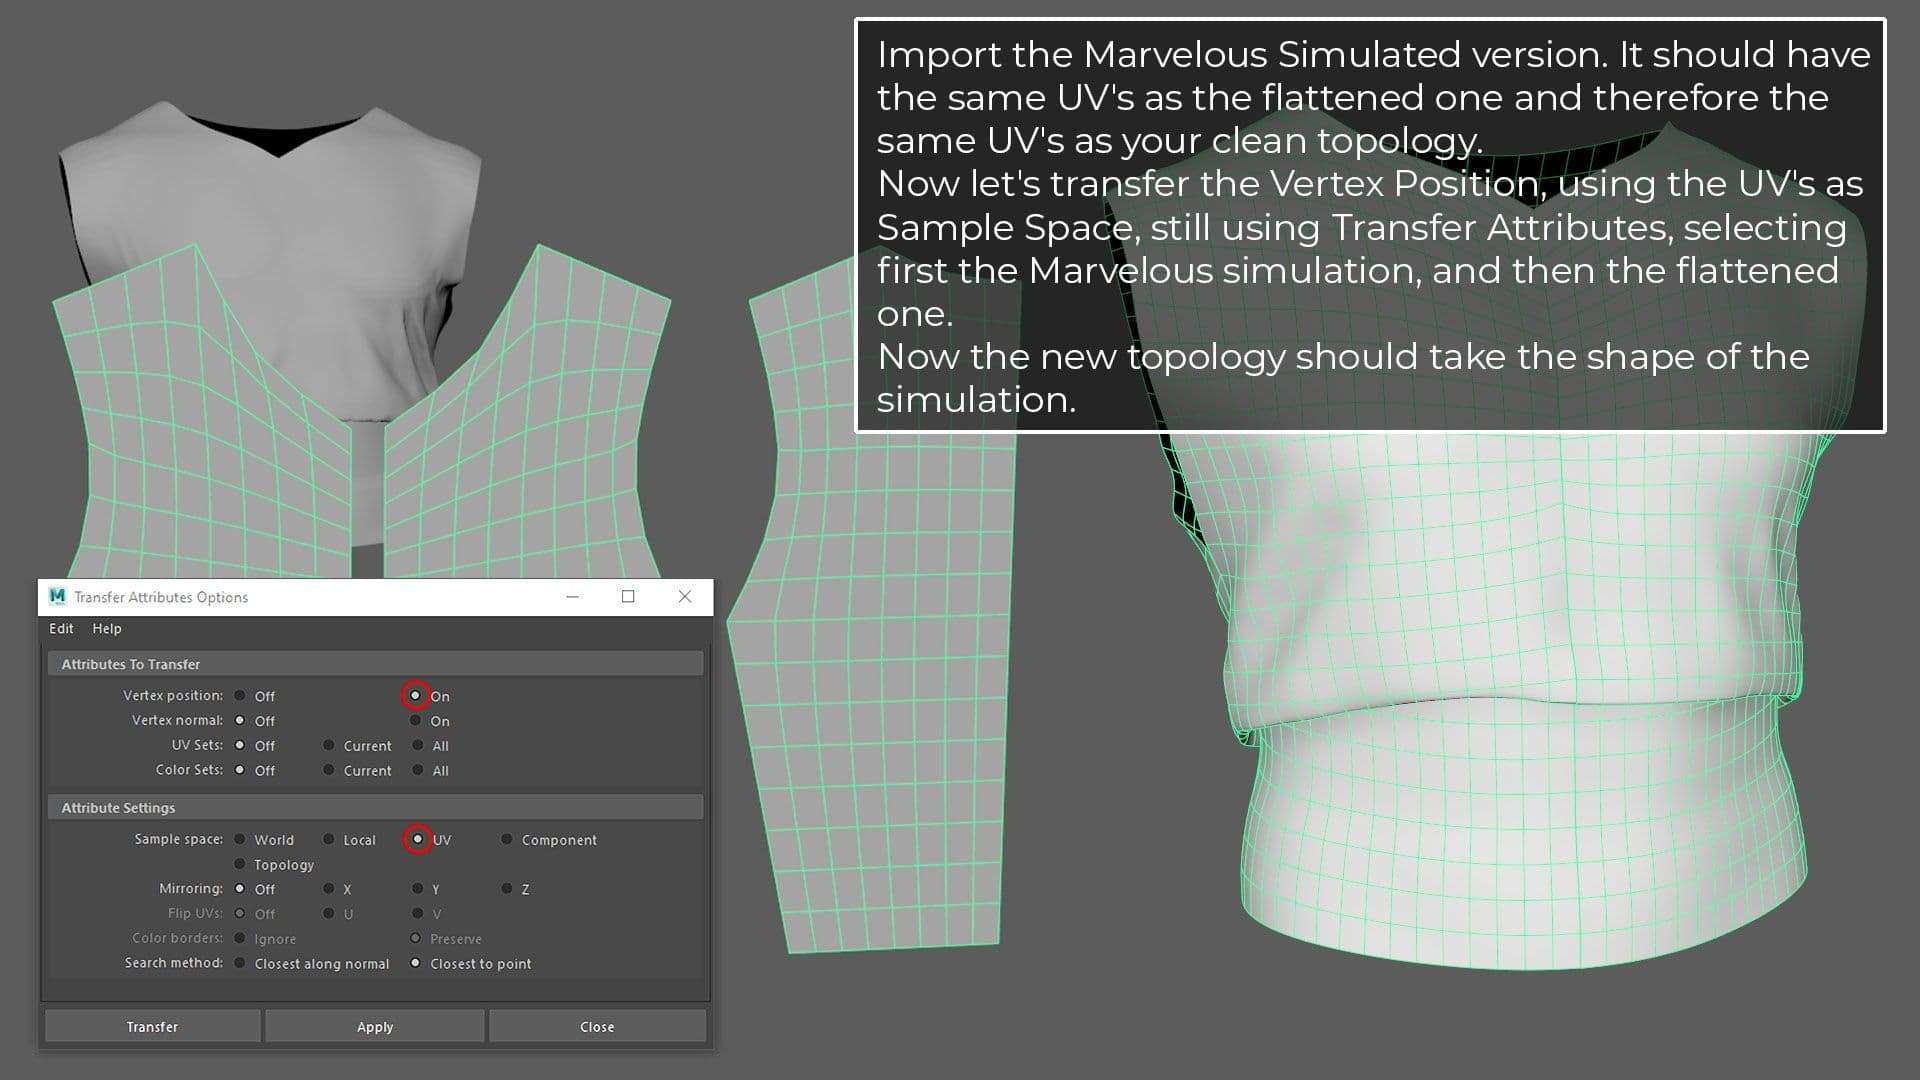
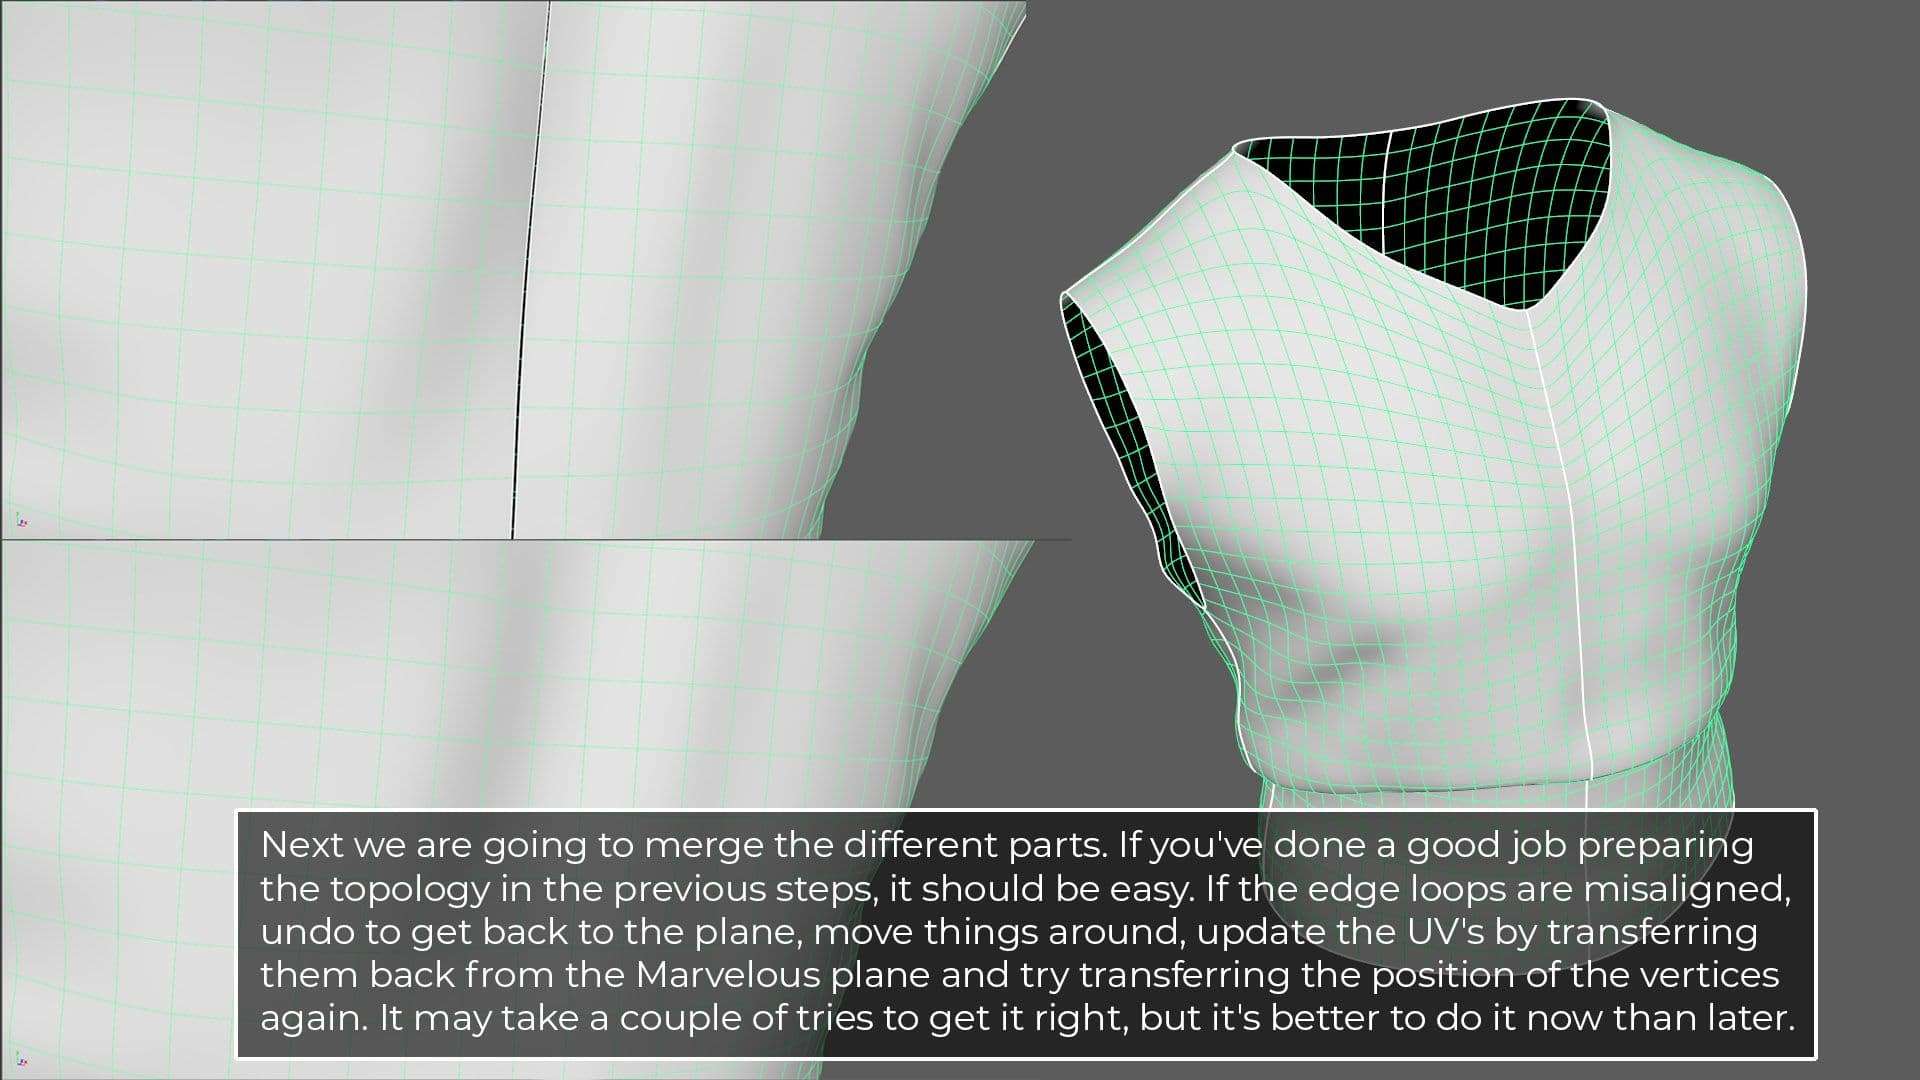
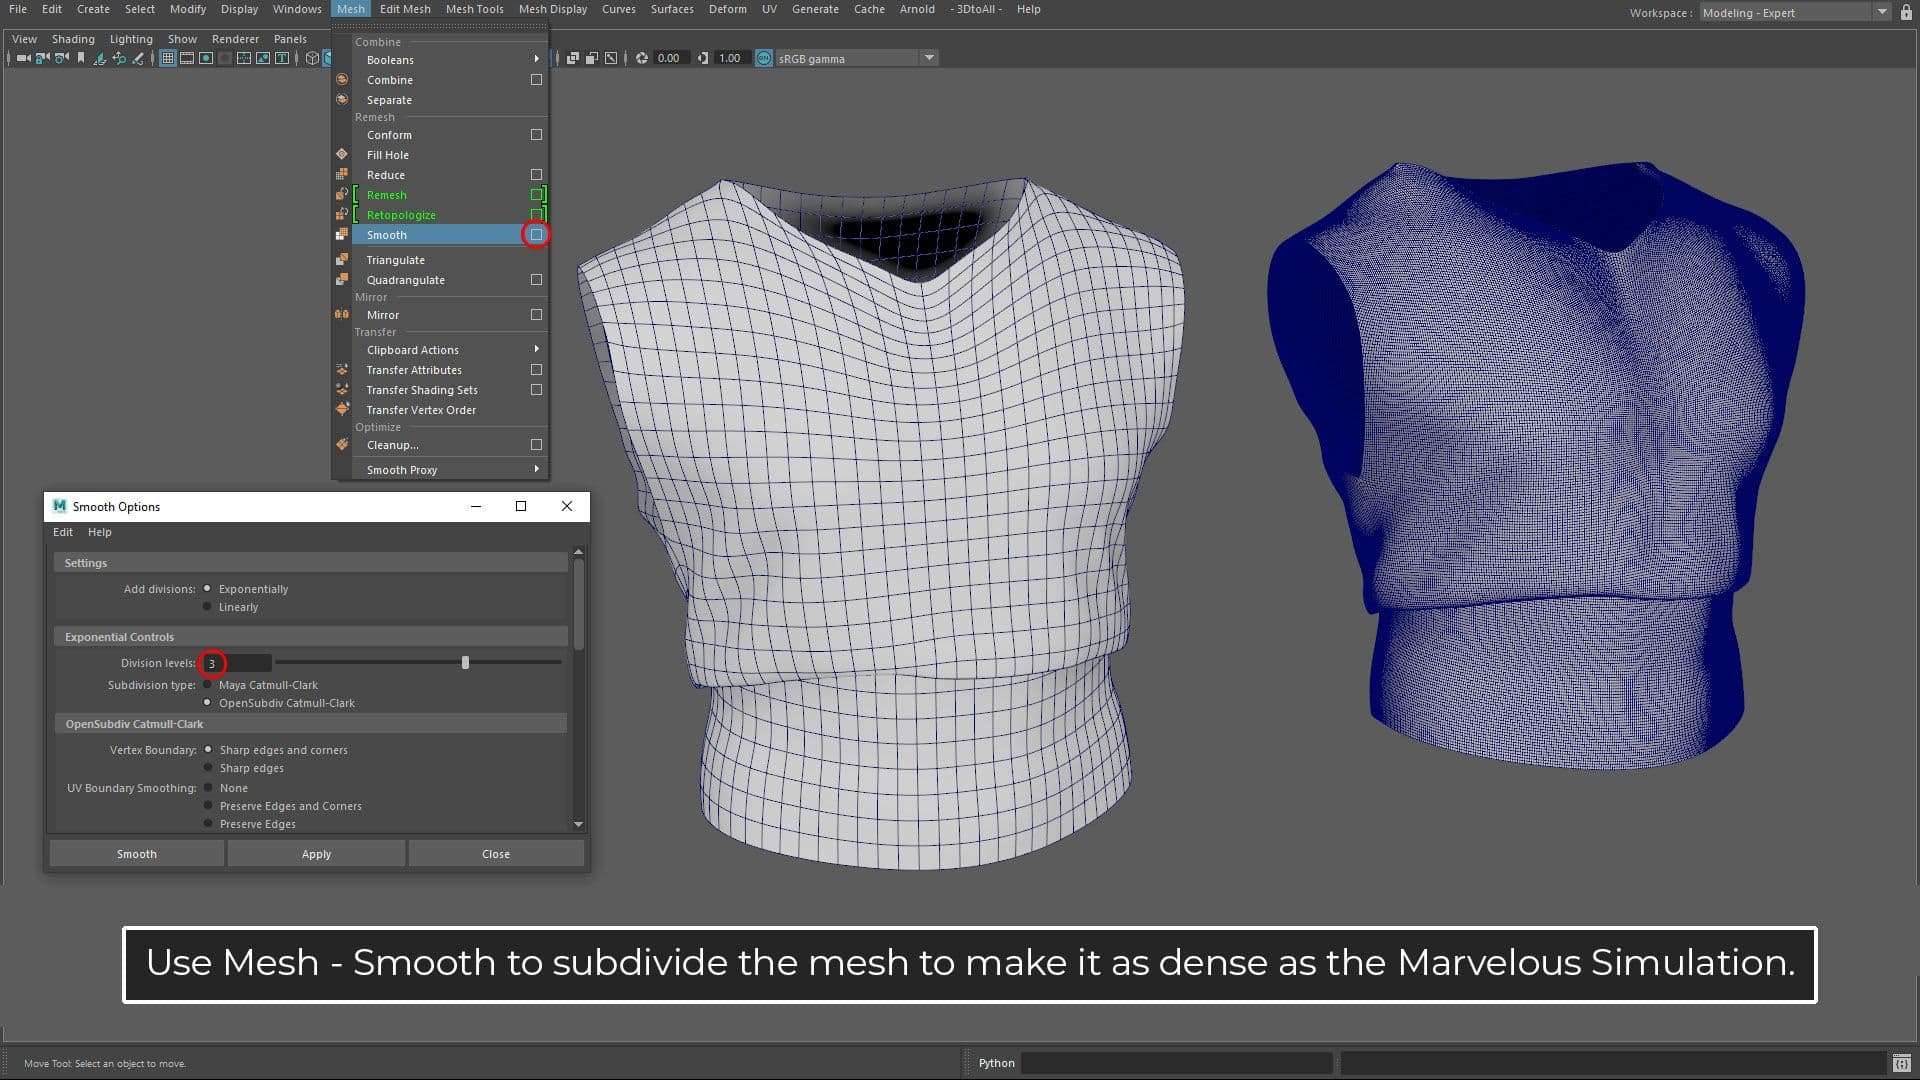
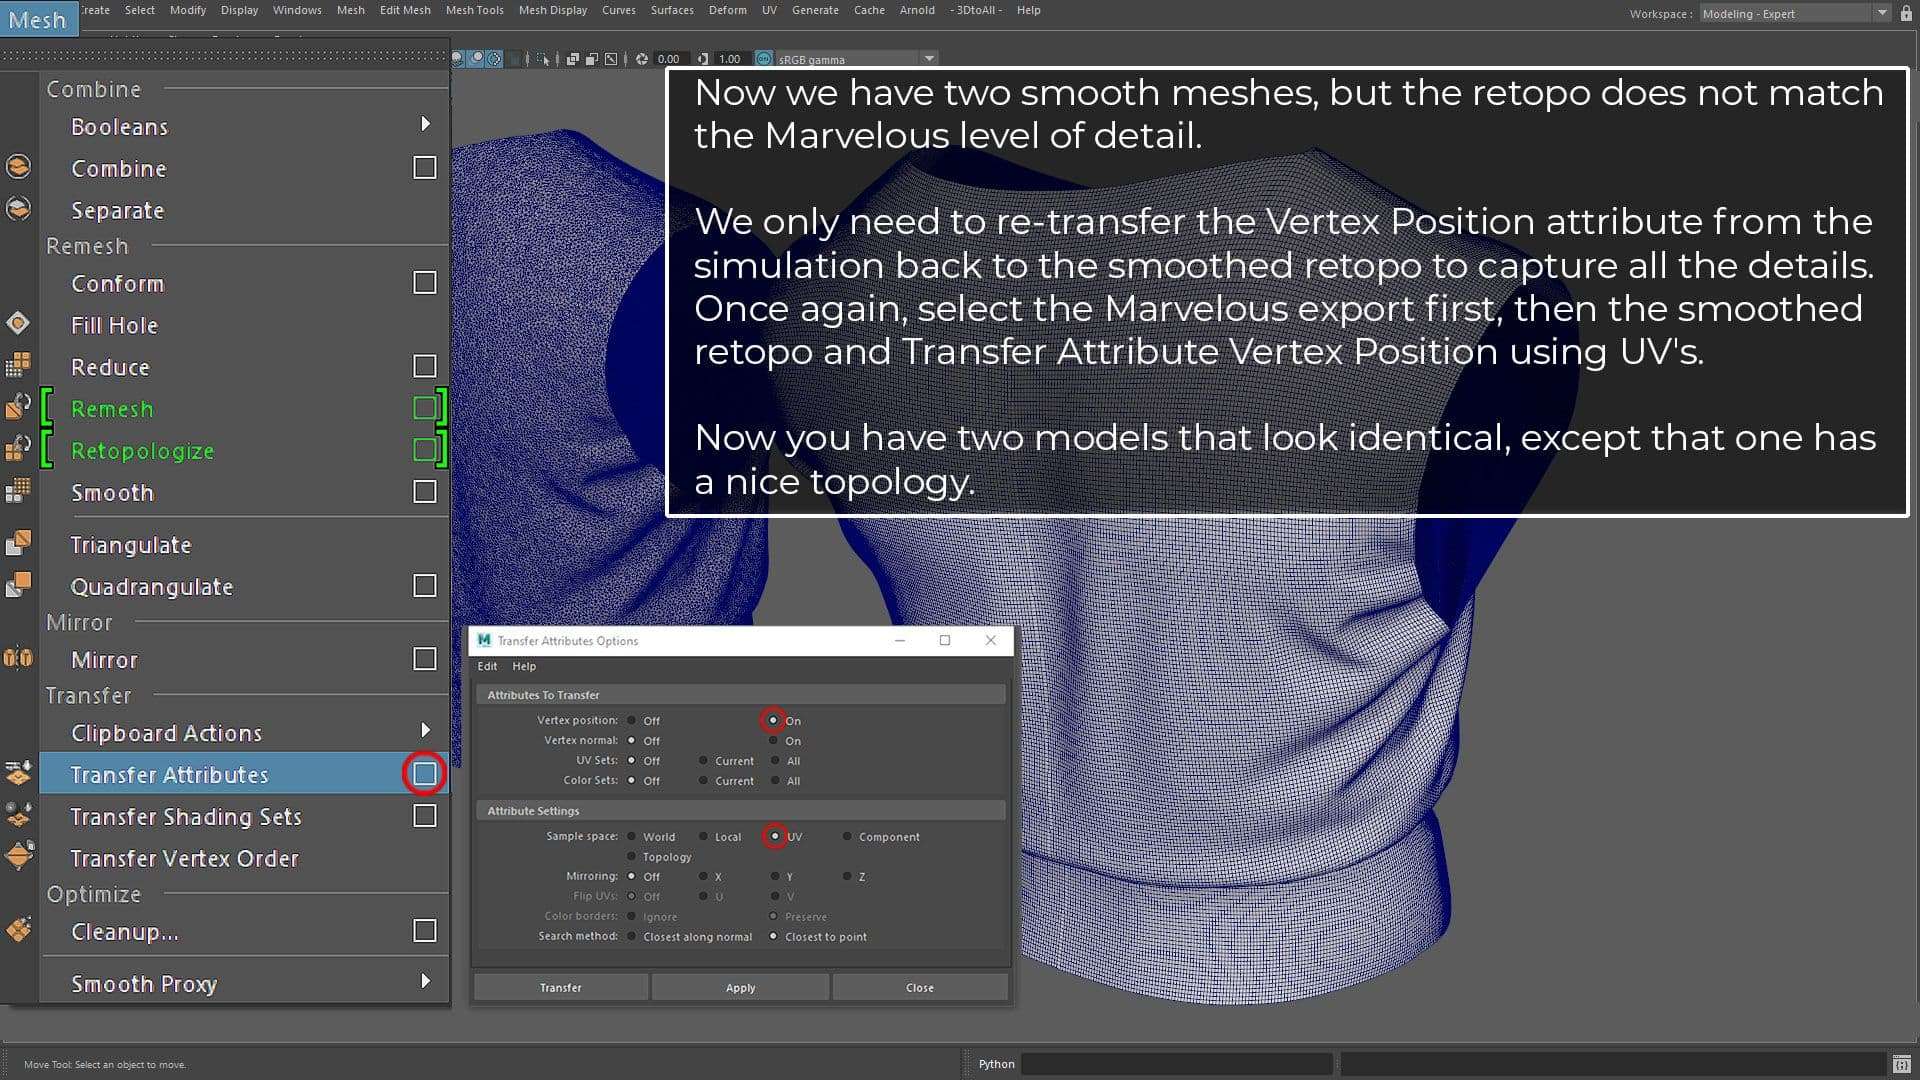
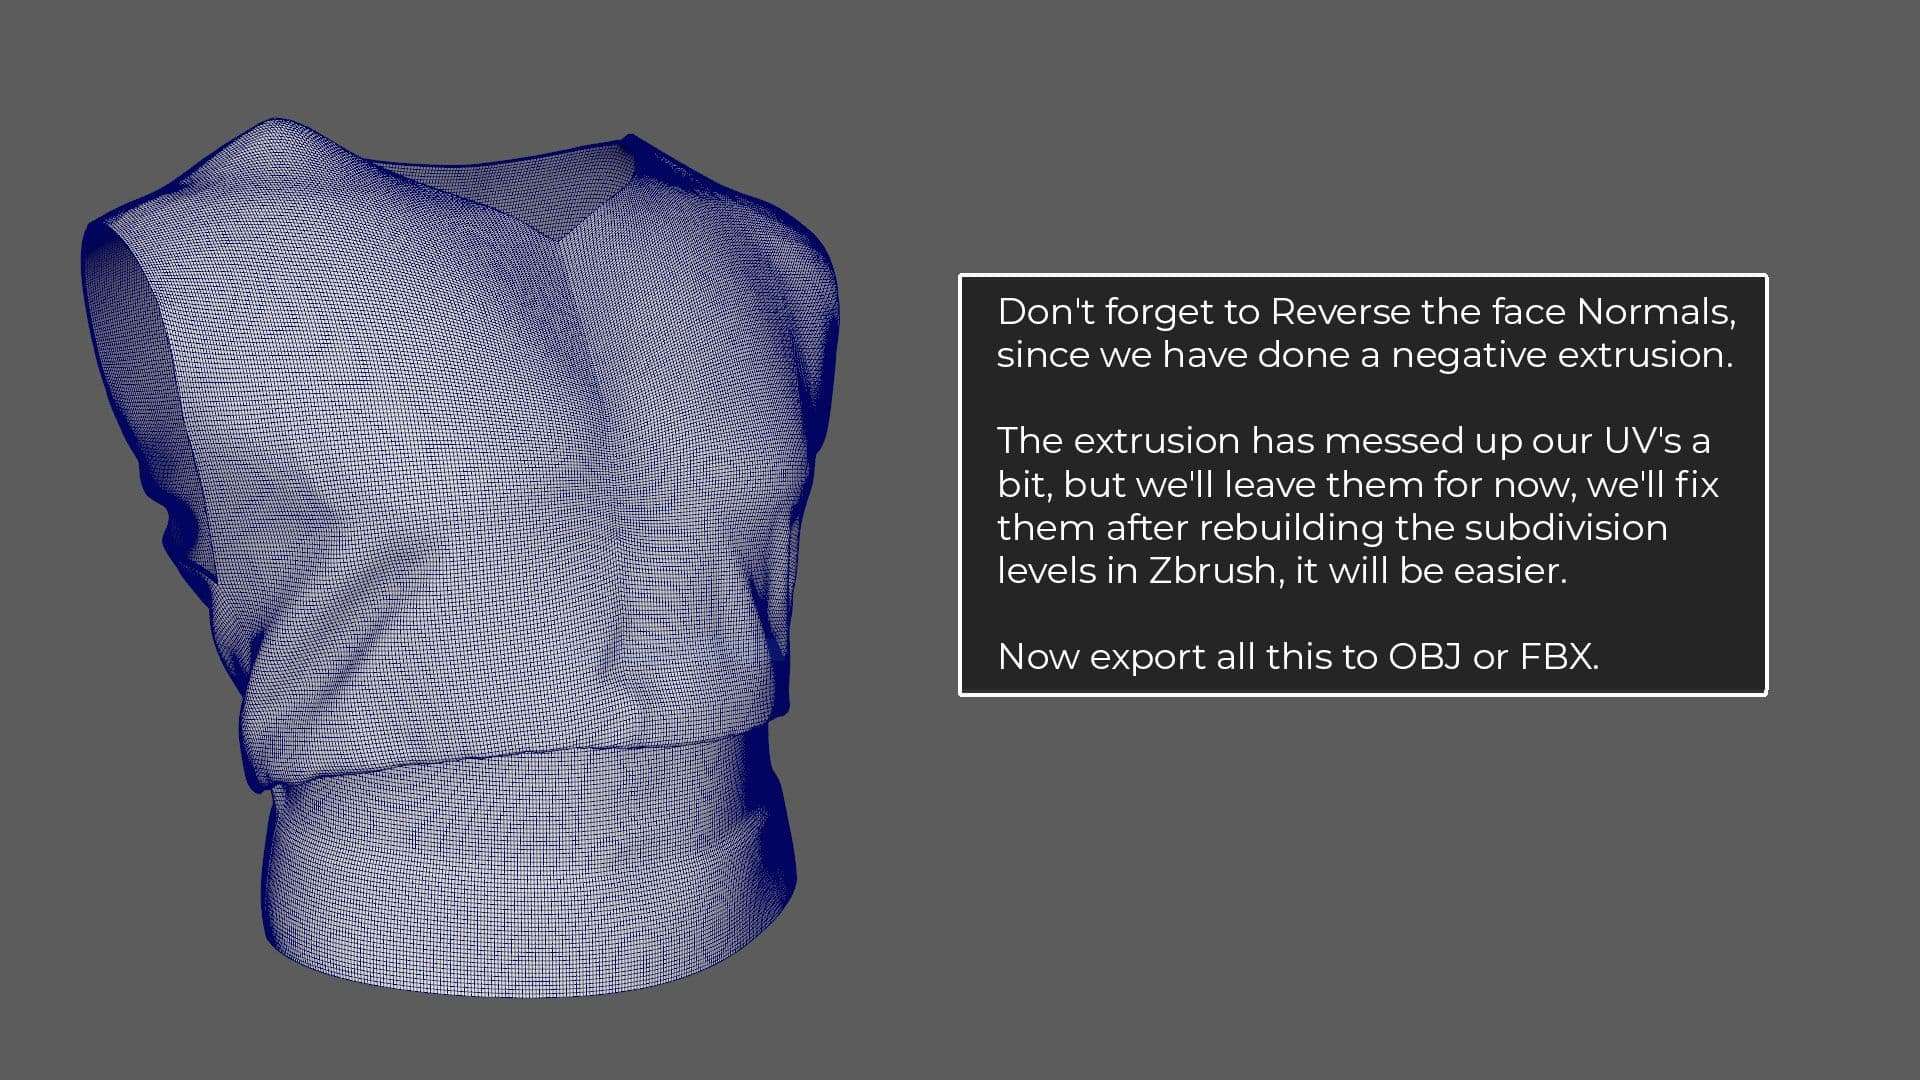
Let's say you have a piece of fabric that you are happy with in Marvelous Designer. It's already fully simulated and the 2D pattern is well designed.
Now you have a nice topology, with perfect UV's and all the original details in the sculpture.
Character Props
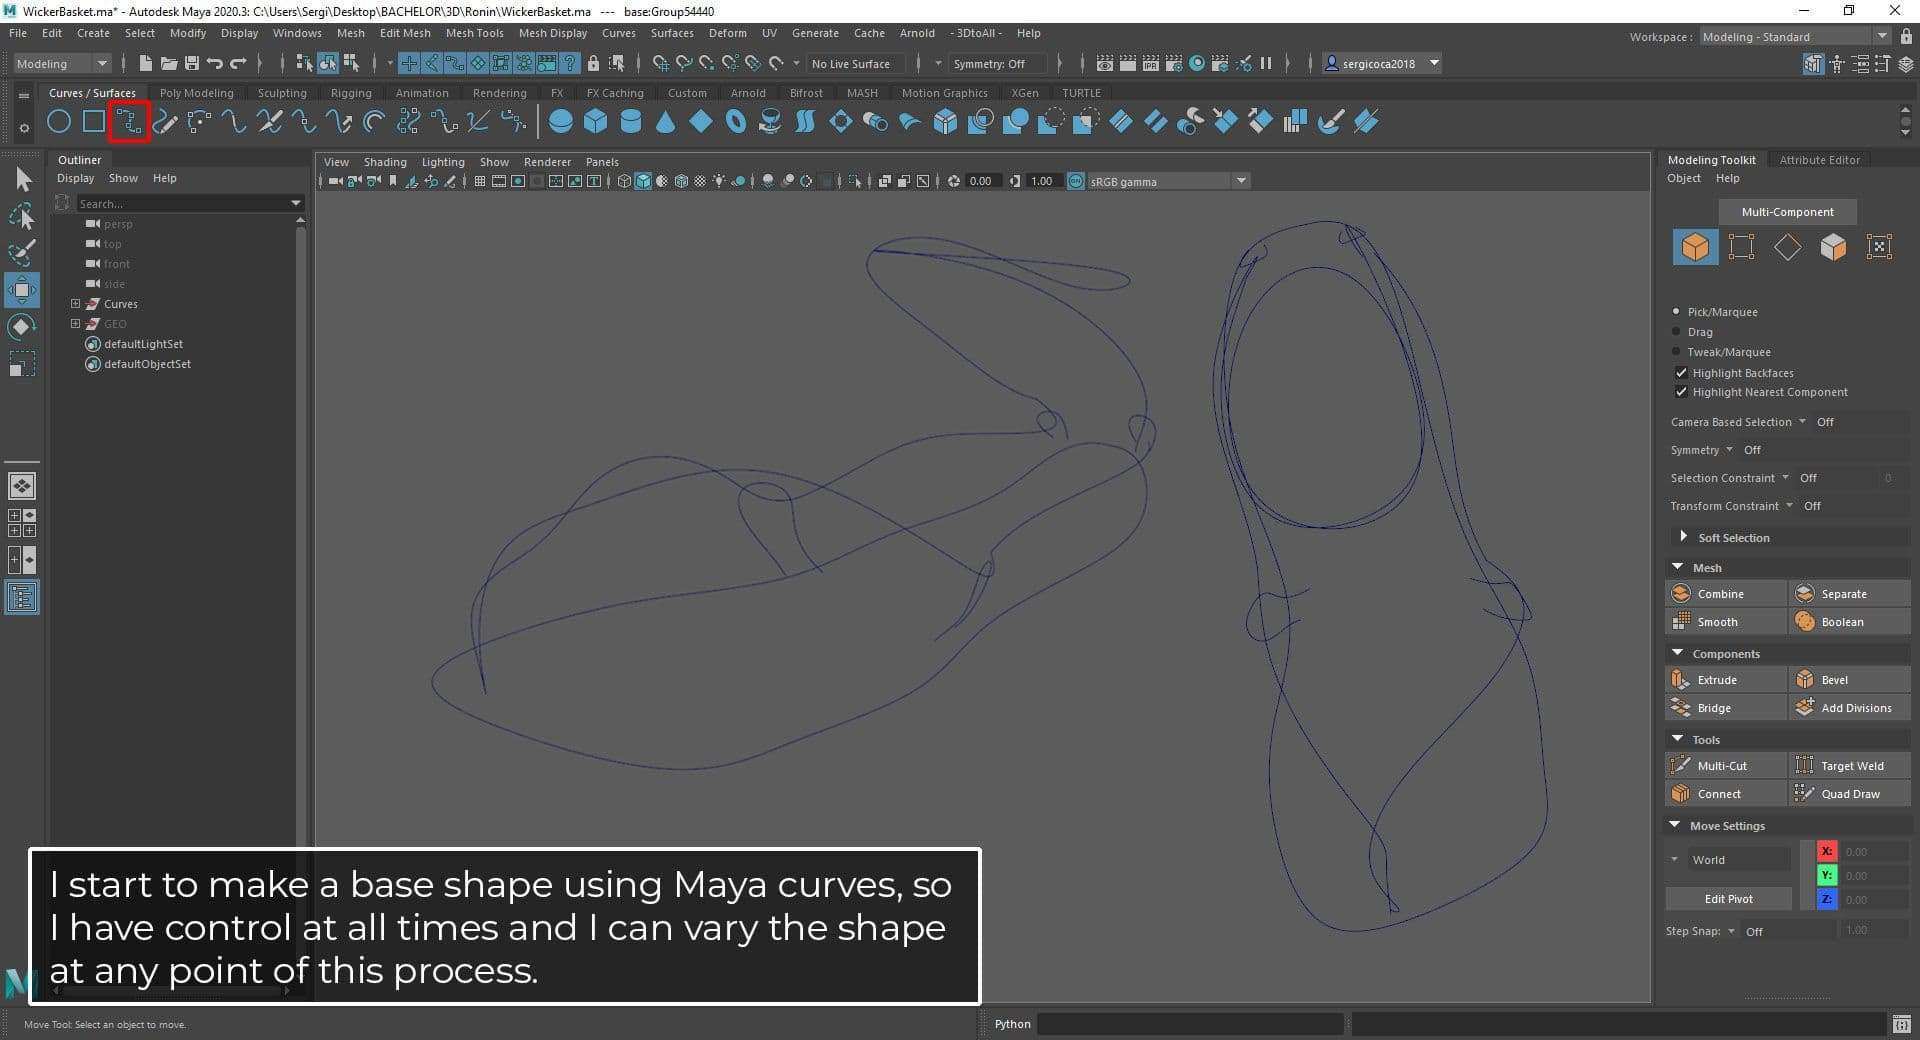
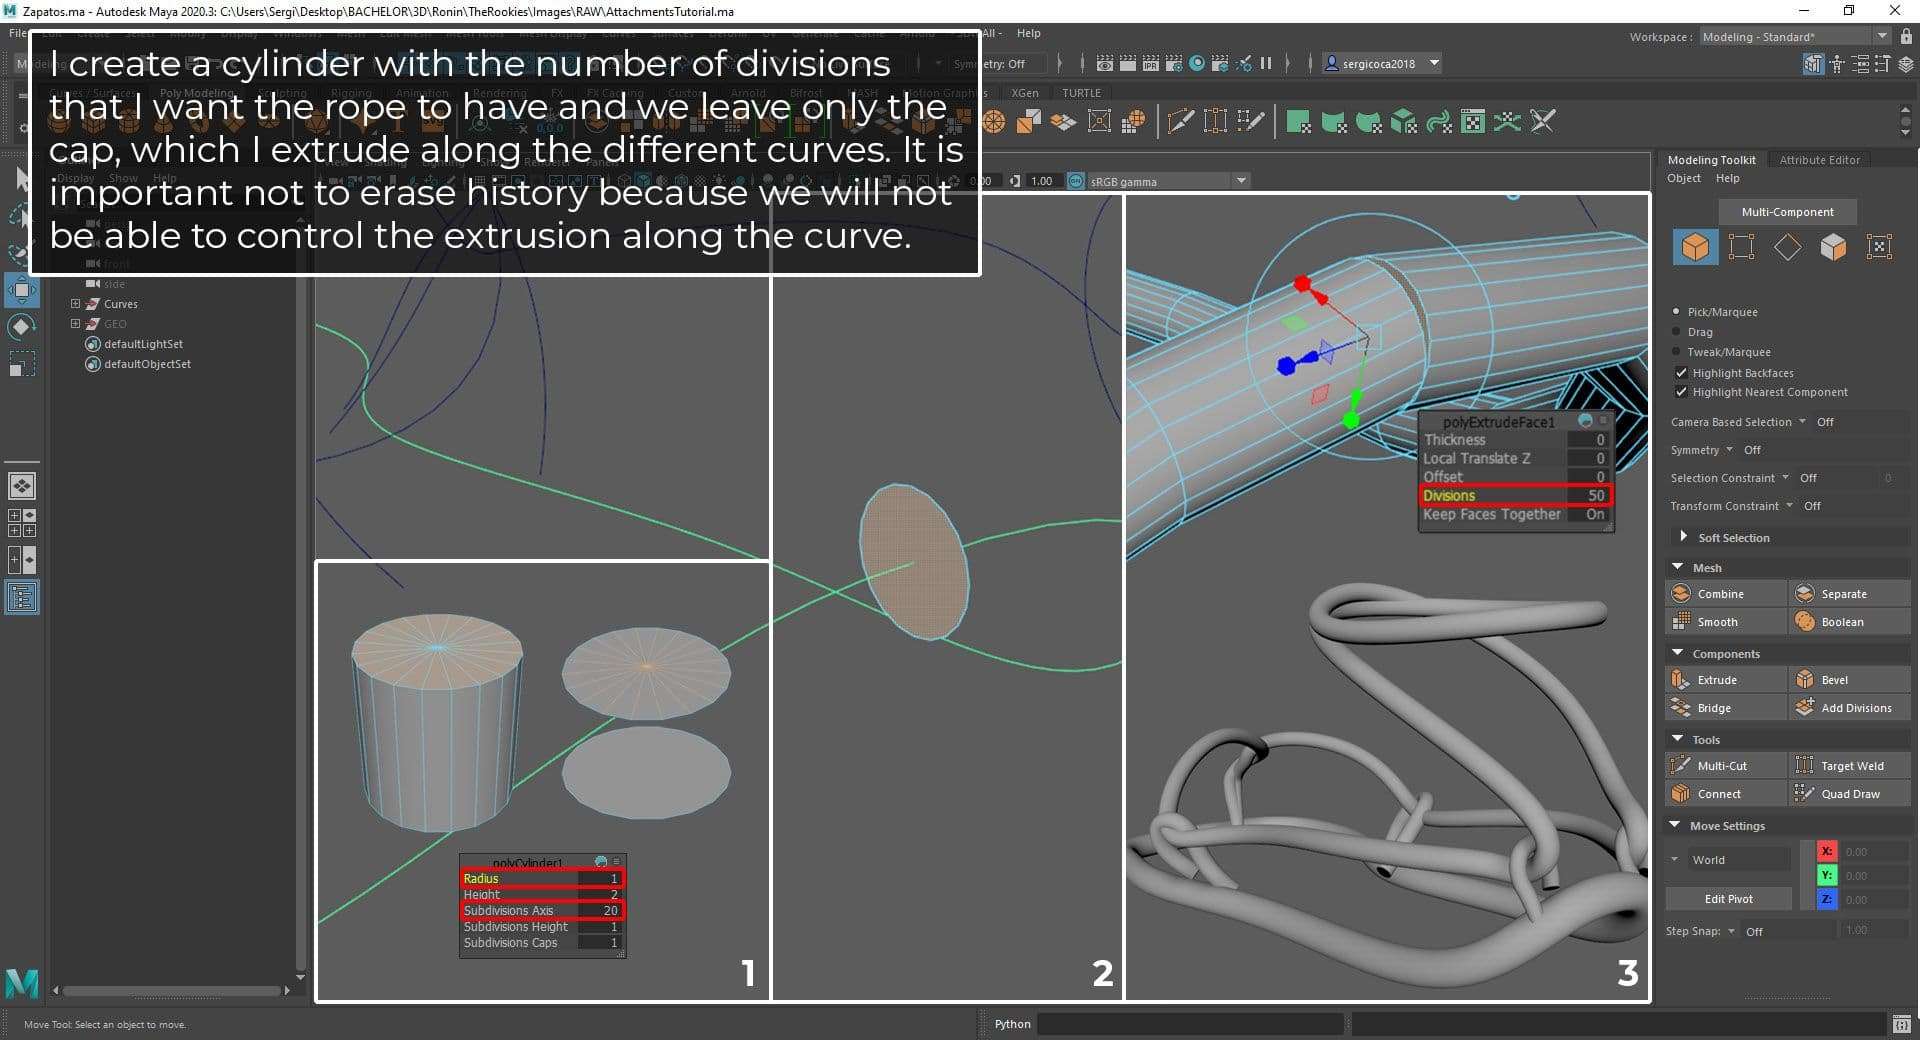
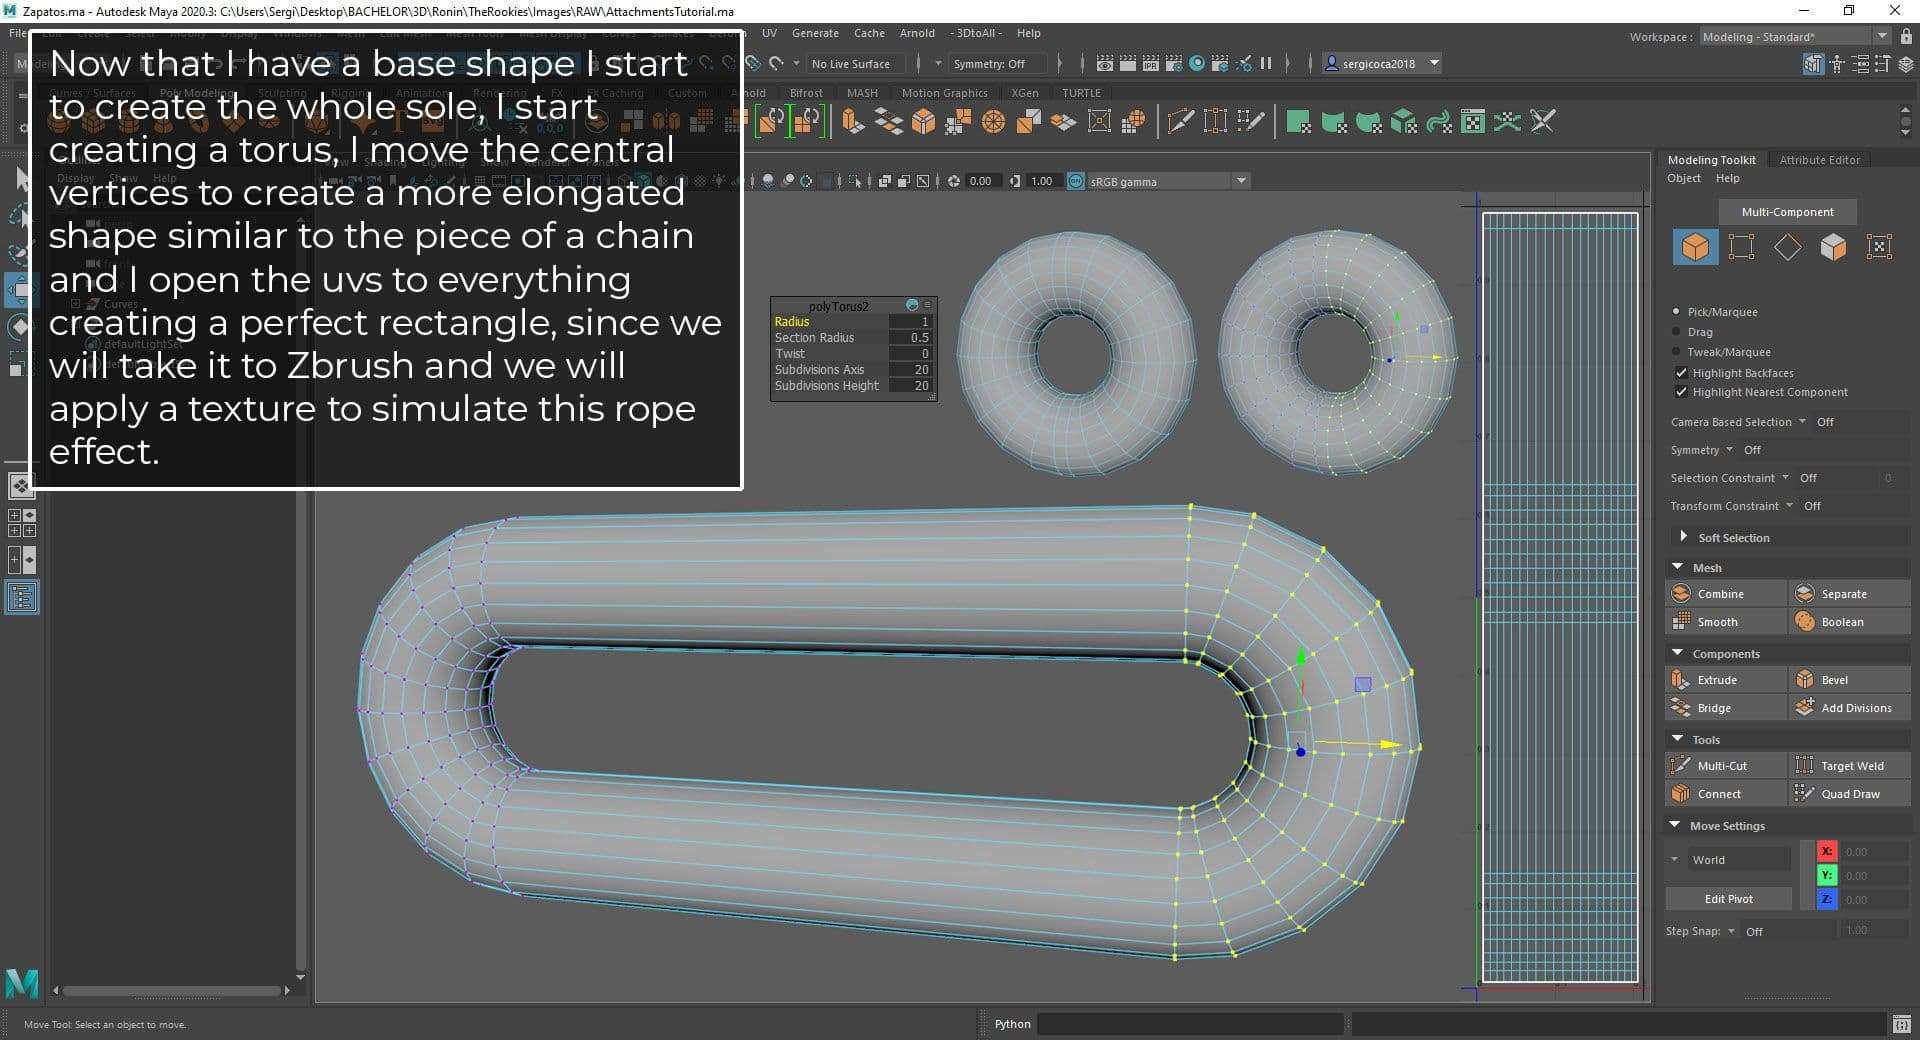
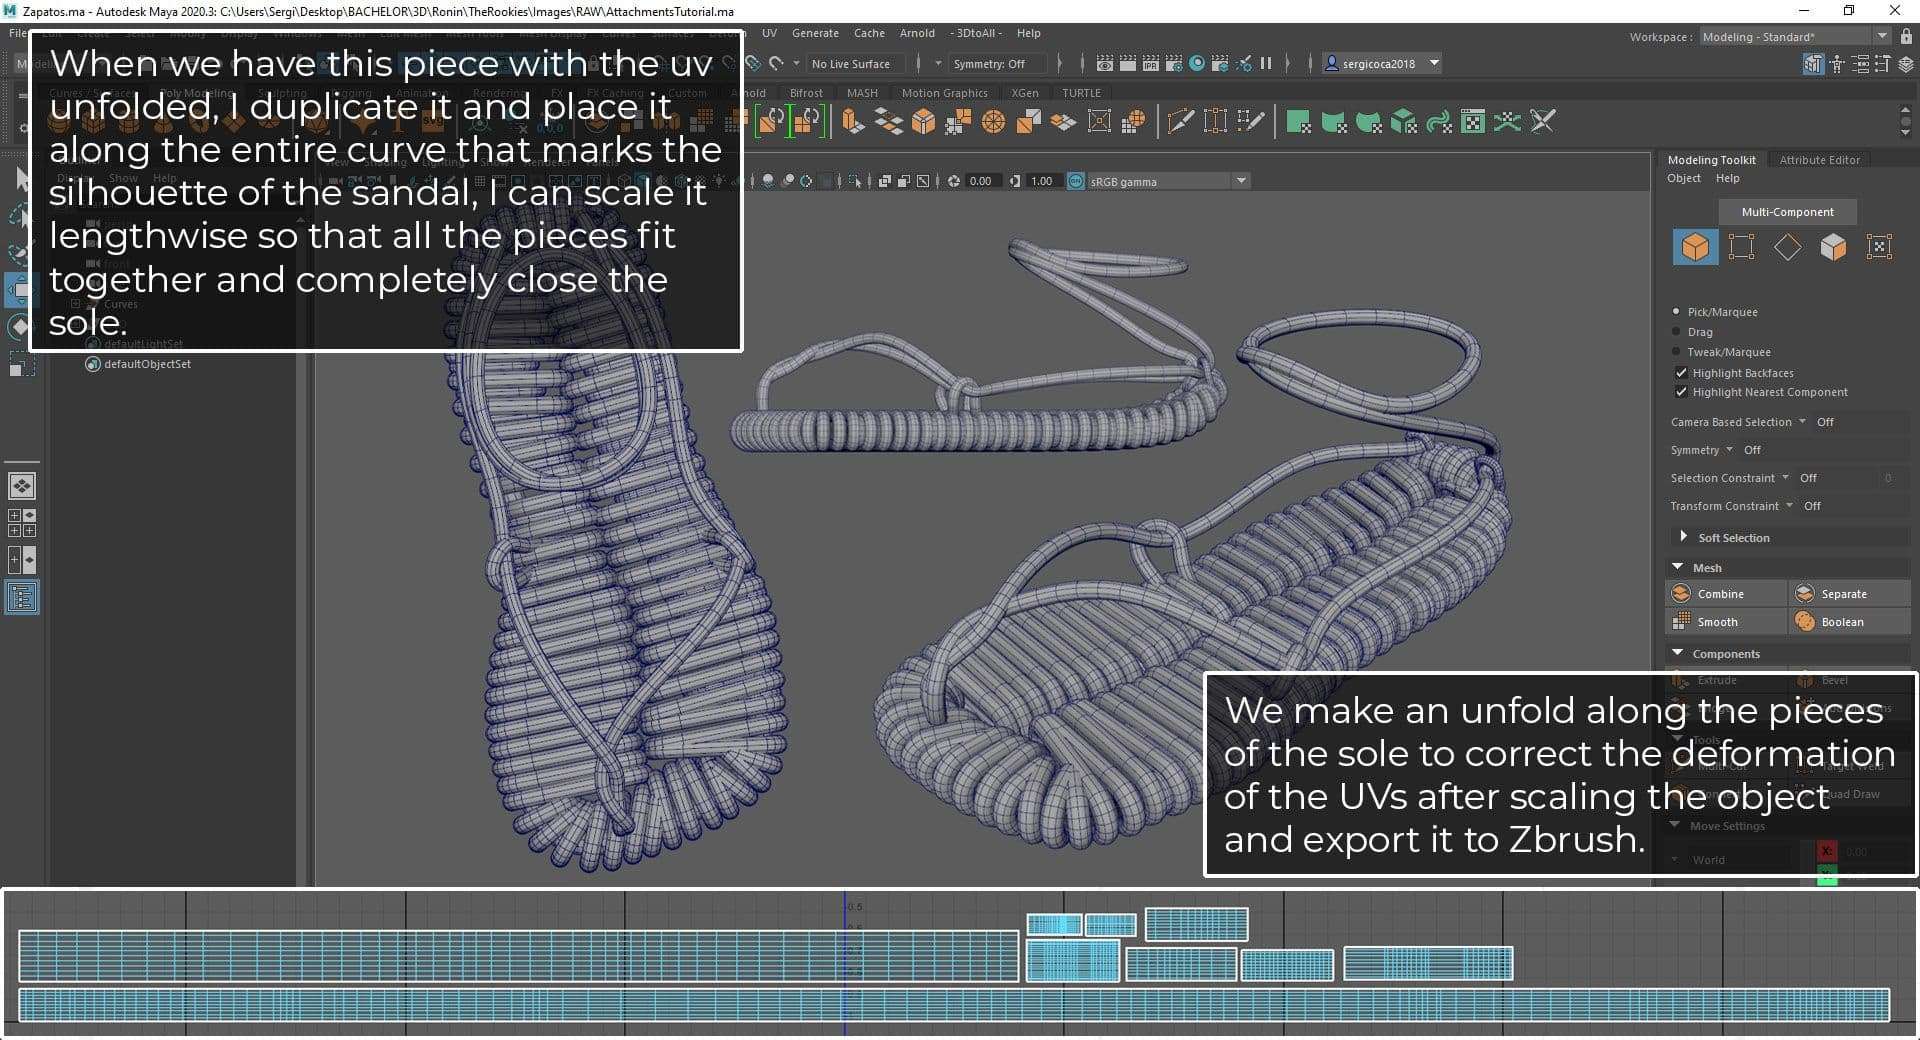
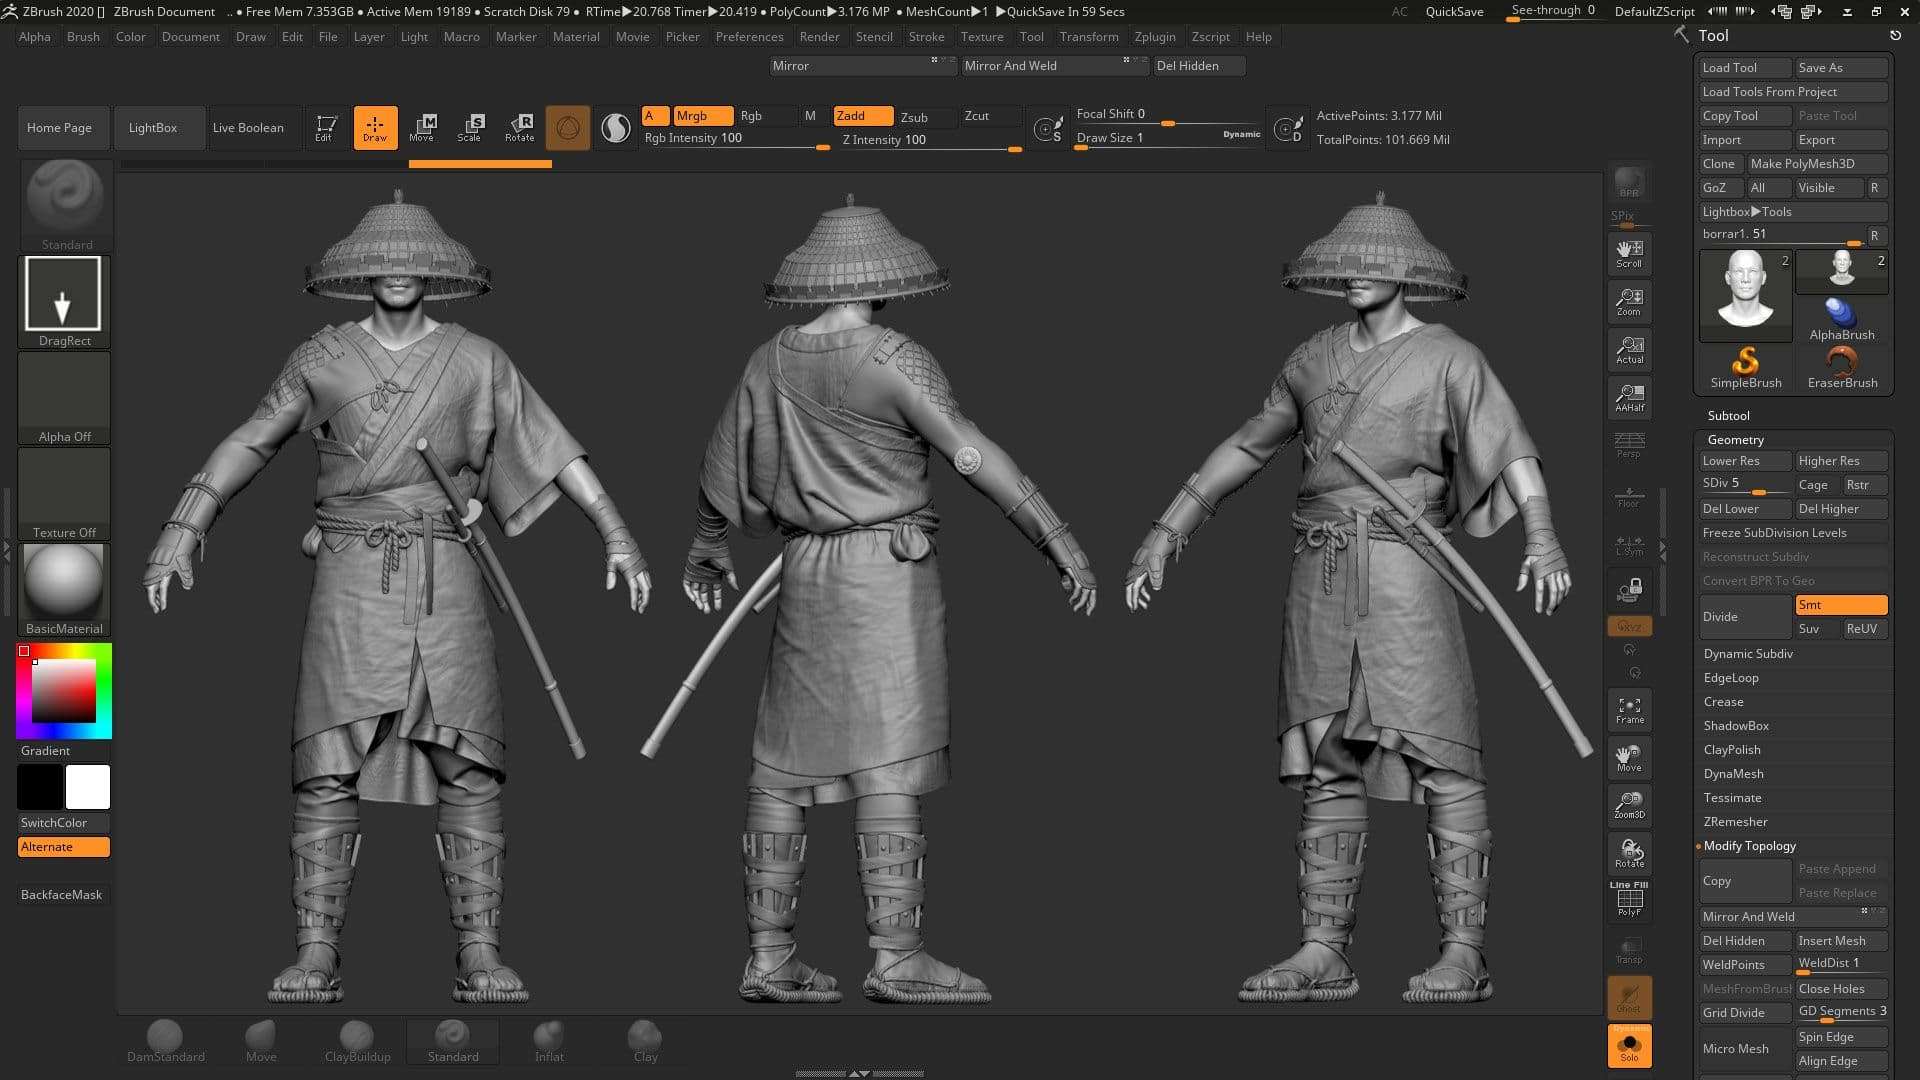
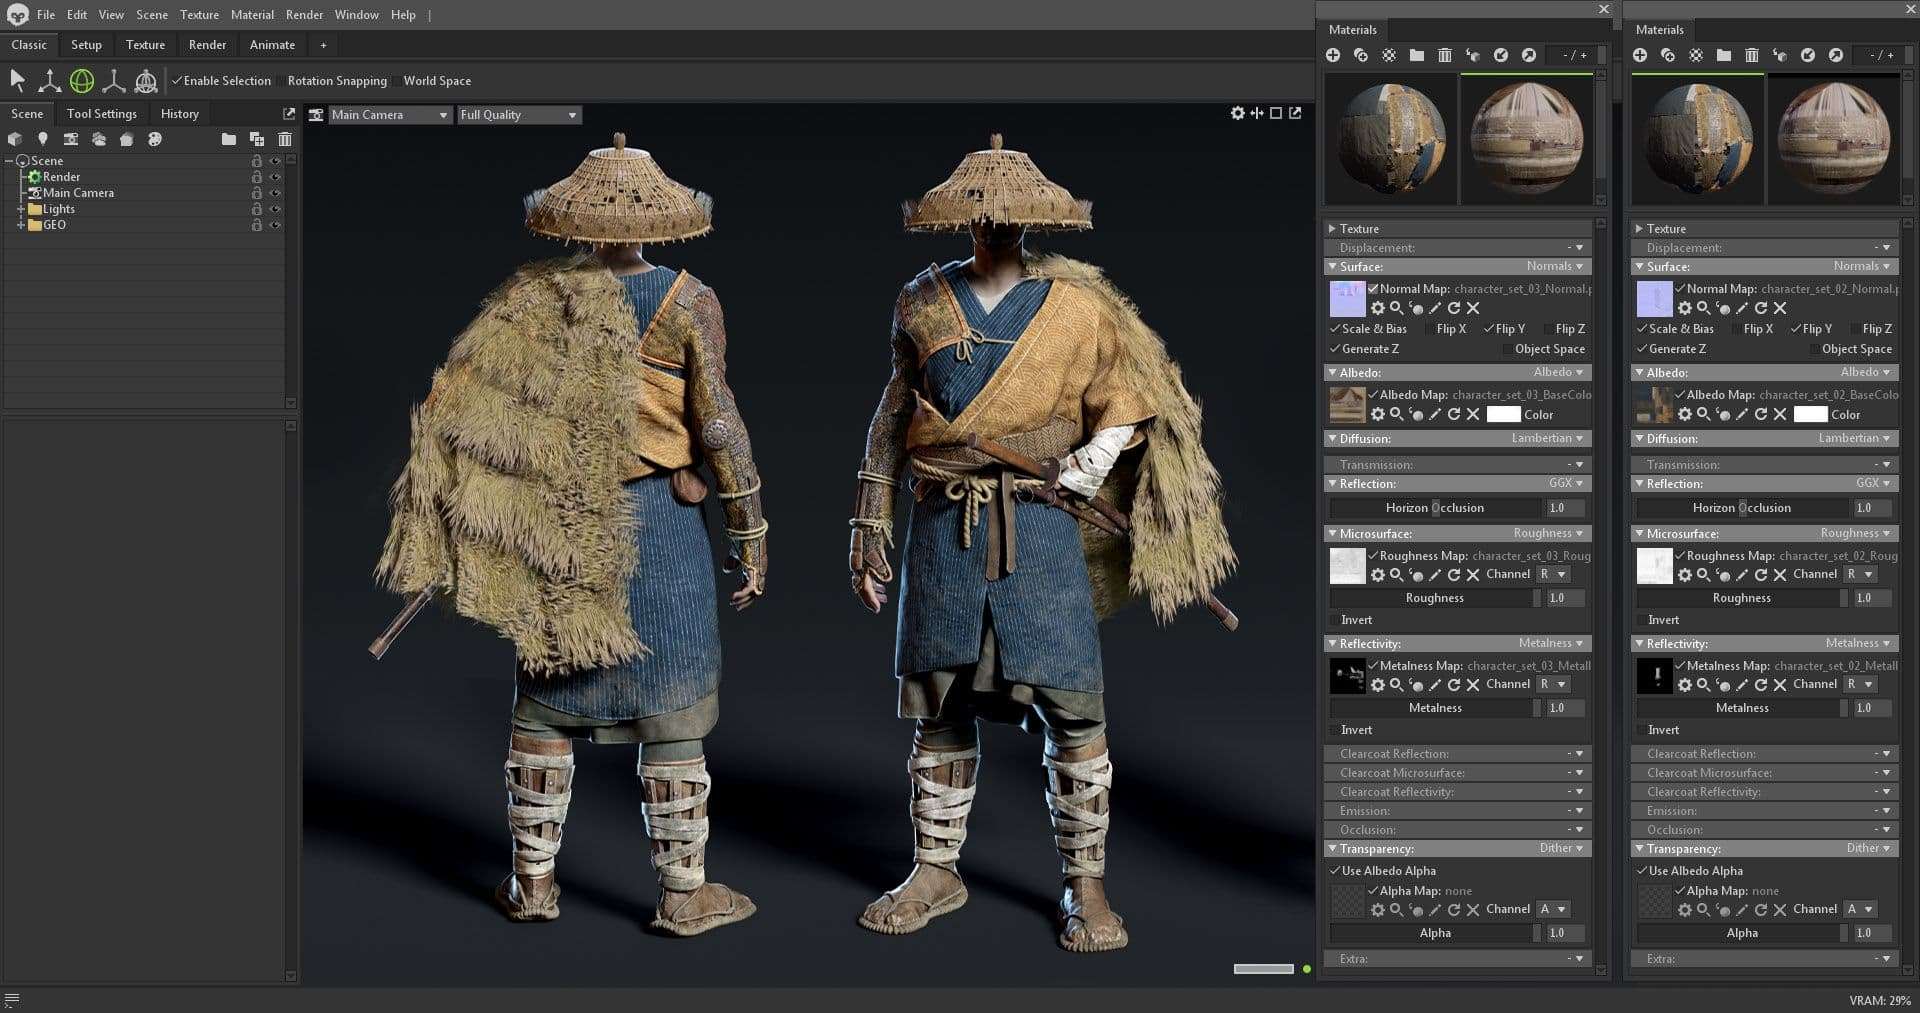
When modeling the Ronin props, I use both Maya and ZBrush to work on the different elements of the character.
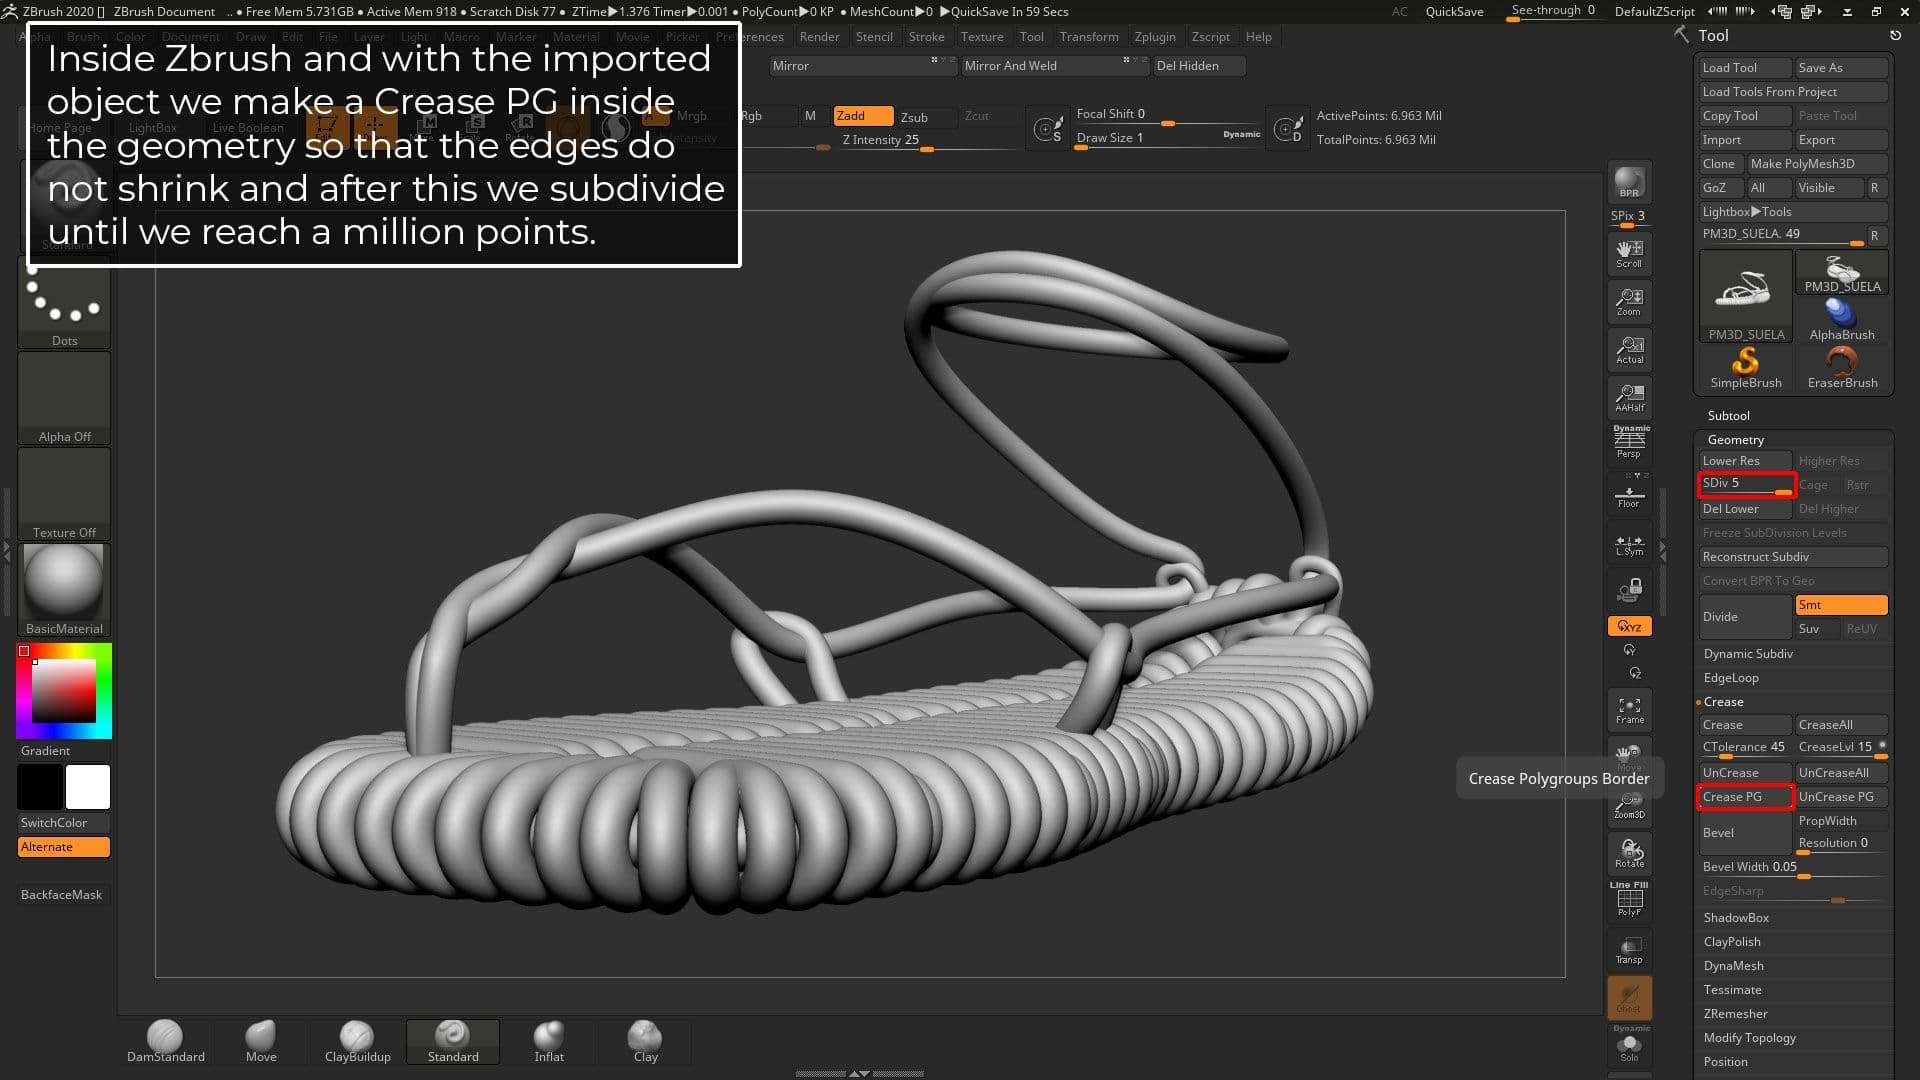
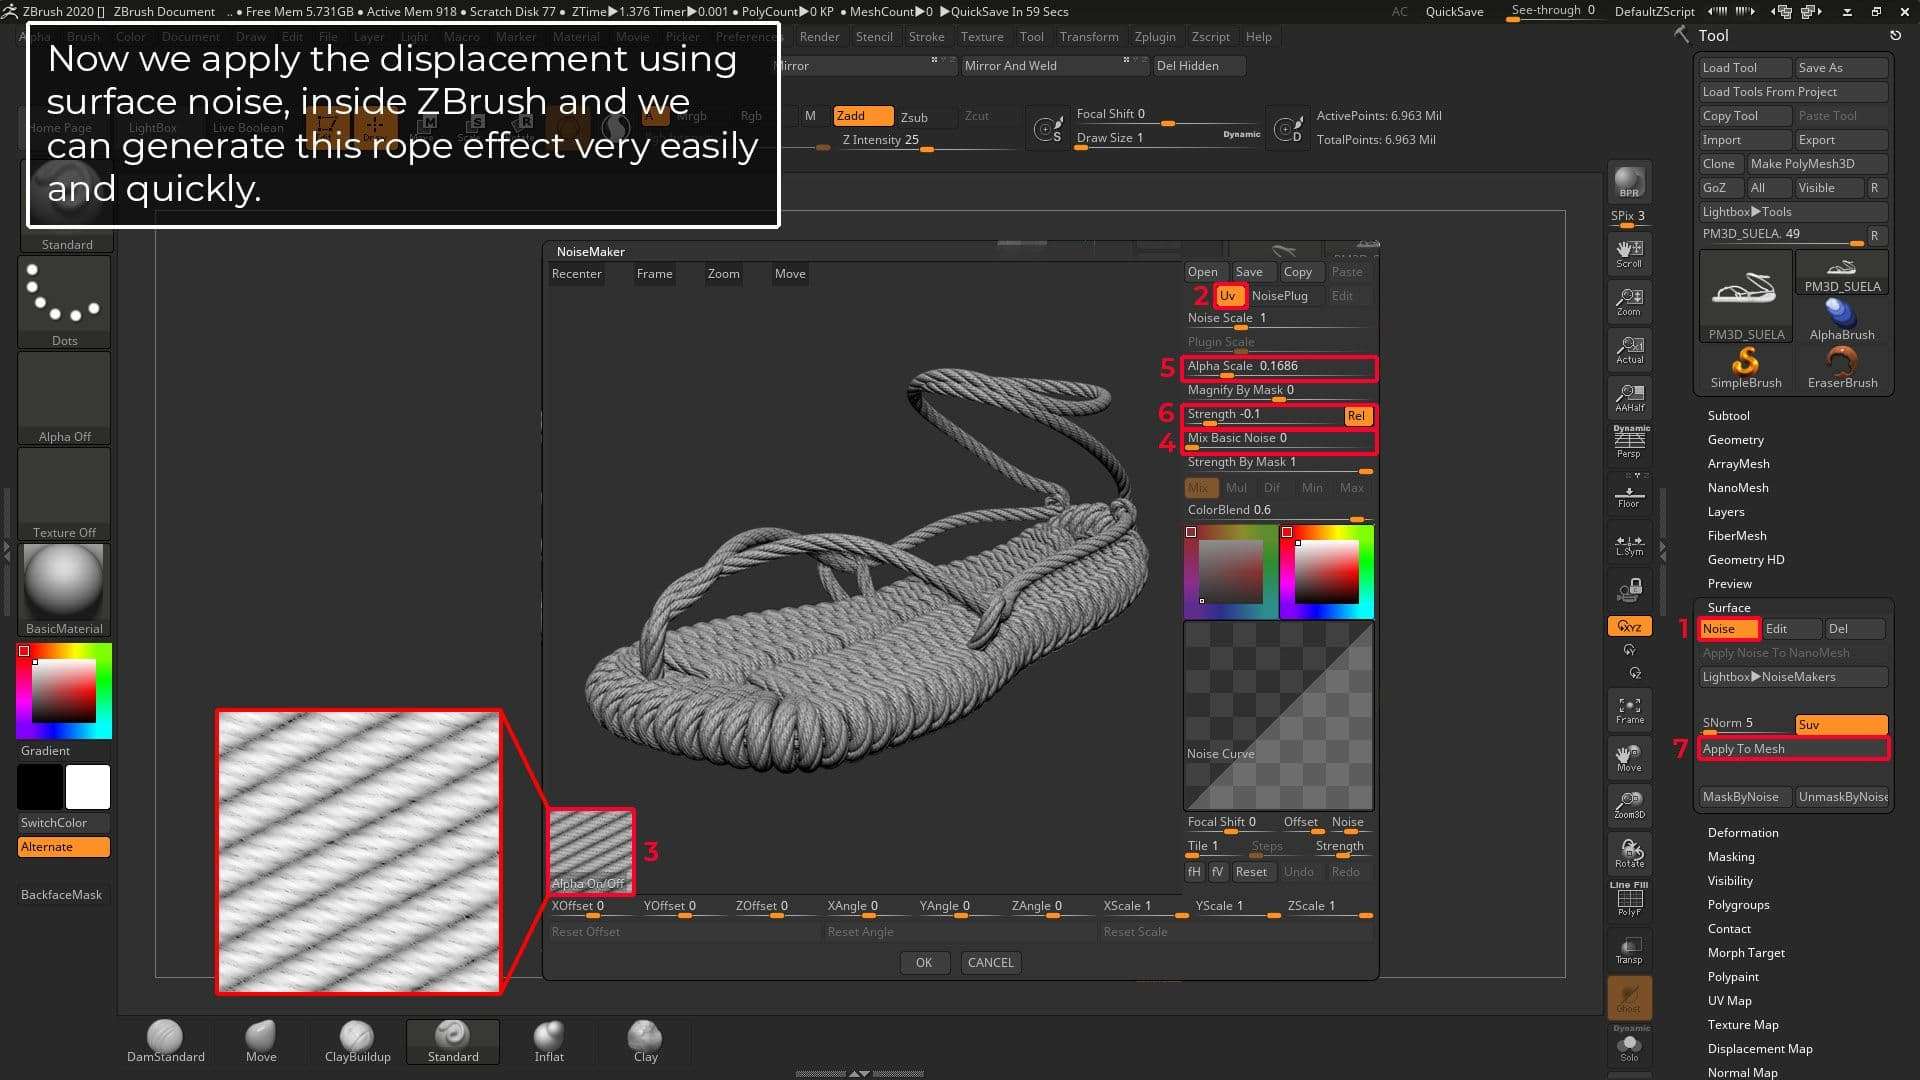
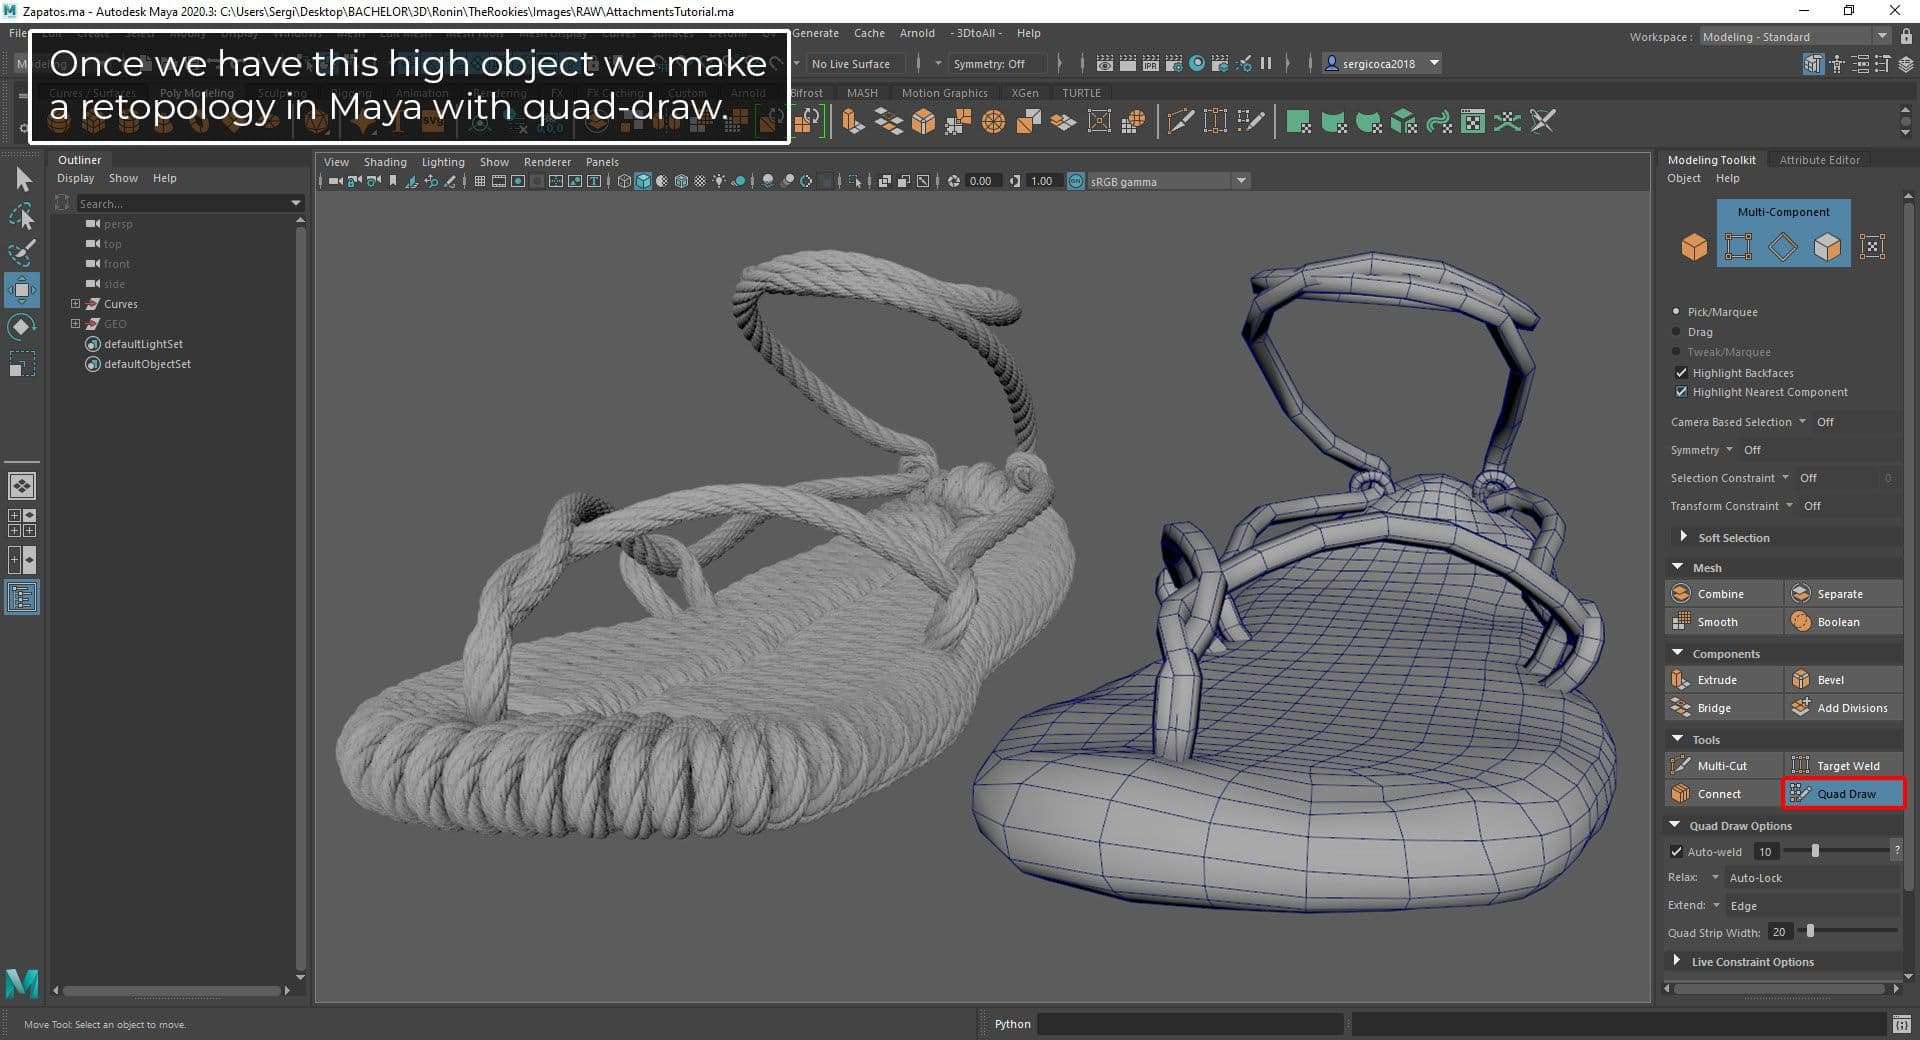
I work up an initial blocking, to see that everything works correctly and once this is done I use their proportions to make a more finished looking model with good topology. Actually, all the objects in this process are relatively simple and were modeled directly in low-poly, instead the sandals were created directly as high-poly and then baked in Marmoset Toolbag in the lowpoly, following the next process:
This process is the same that I have used for all the strings of the character.
Once we have the whole model in low-poly and with the UV's open we can move on to the final detail of the whole final character.
Detail Sculpting
Skin Detail
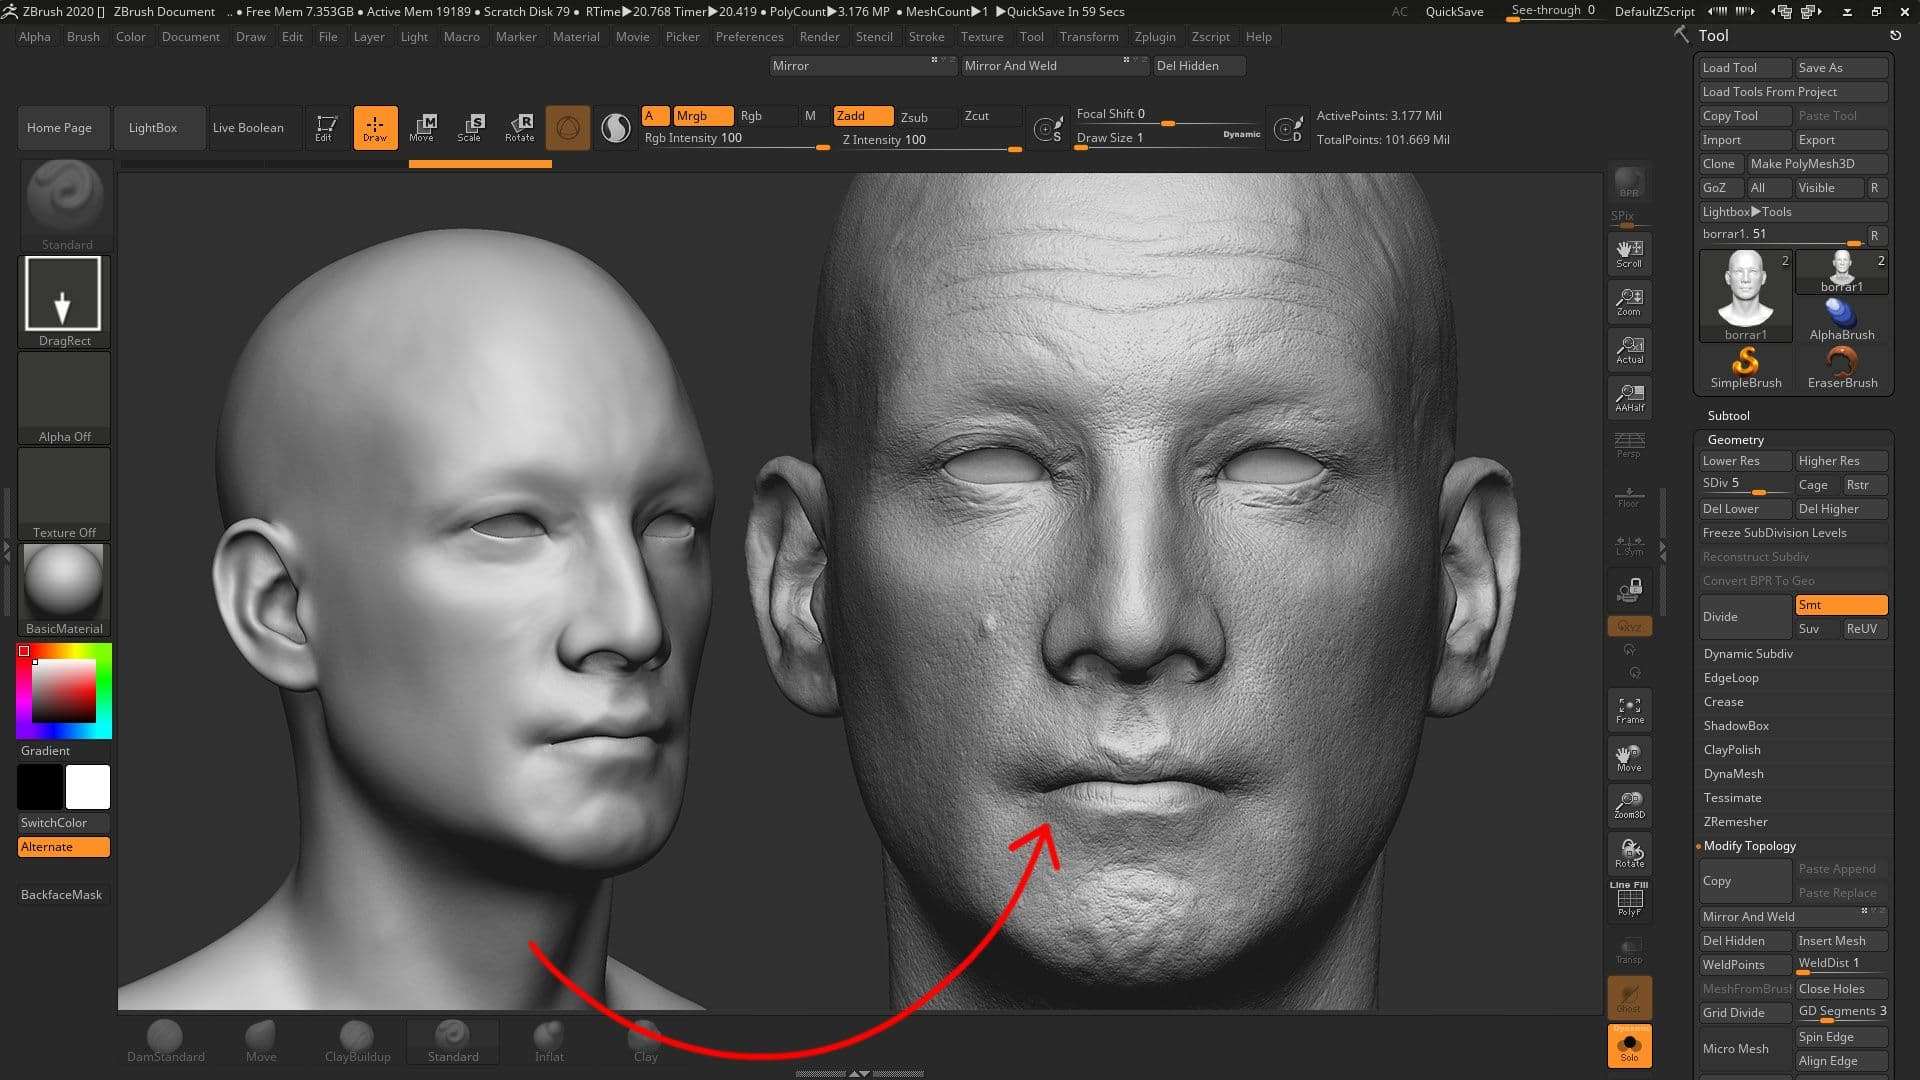
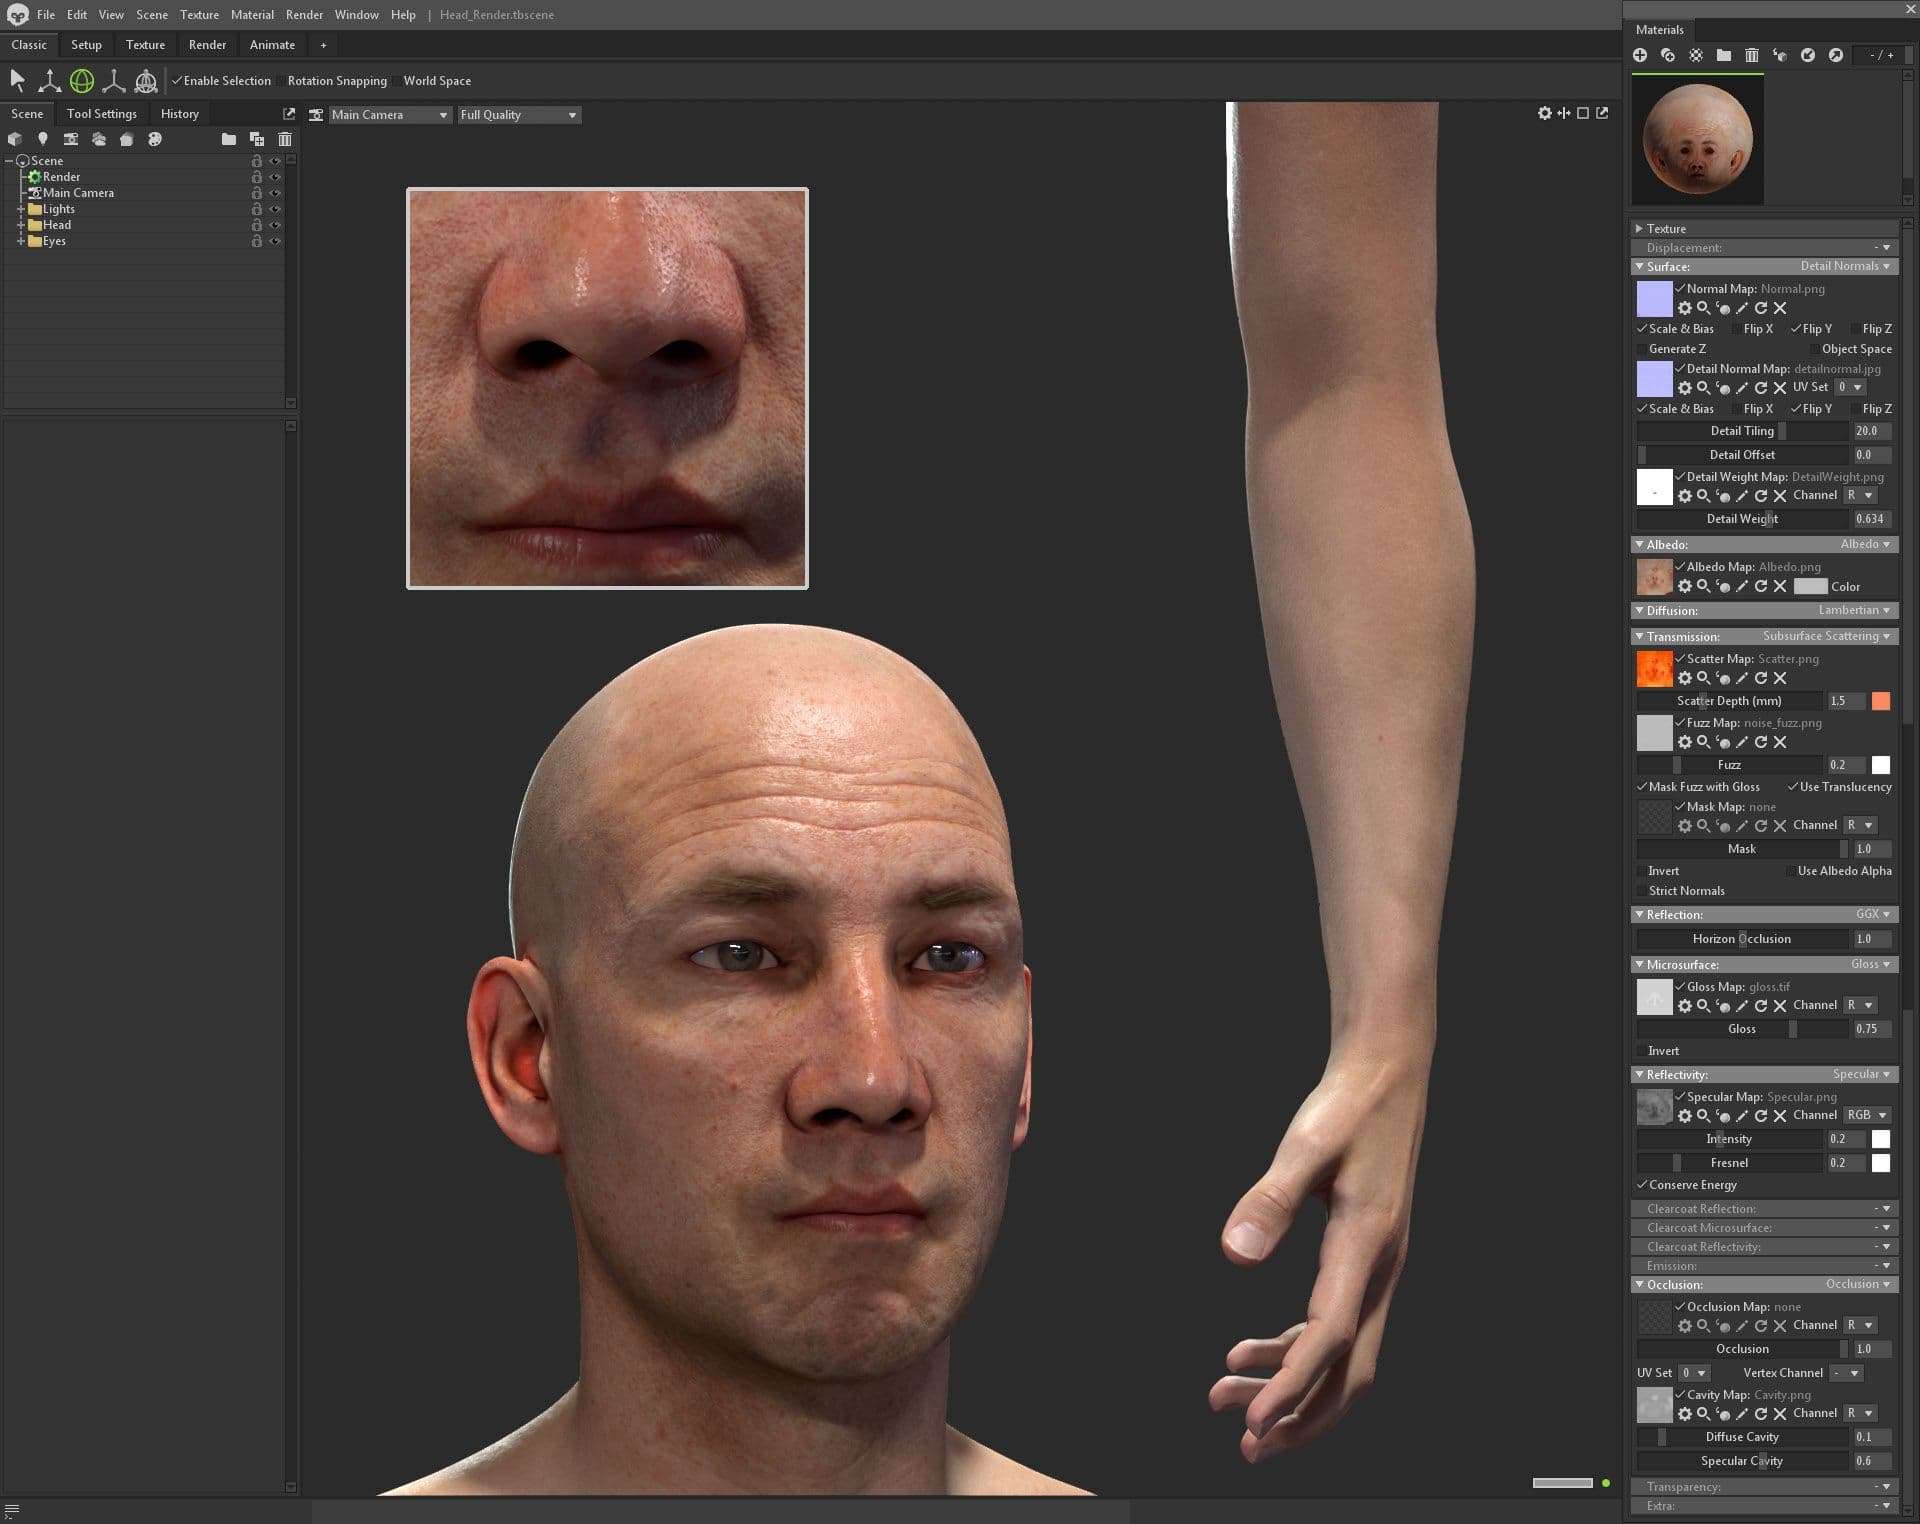
At this point I have not yet added the tertiary details of the skin. My approach was to project a multi-channel pack containing multiple Texturing.xyz maps and project it into ZWrap. This workflow presented here is universal and could work with all of our multichannel packs as well as the displacement pack.
First, I had to prepare the maps for projecting and painting. Generally you get 3 maps from Texturing.xyz: displacement map, micro and tertiary maps. I convert each map to RGB and arrange the scans in Photoshop; pasting the secondary, tertiary and micro detail maps in the red, green and blue channels respectively. I recommend Ibrahim Sefki's tutorial for map preparation, which is a great resource for creating textures for a realistic face.
For this whole process of projecting details in ZWrap I followed the following tutorial created by the creators of Texturing.xyz where they explain this process step by step.
And once I have all the XYZ texture I repaint the details inside Substance Painter. It is an iterative process between ZBrush and Substance Painter.
At the end of this process it is important to create different layers so that you can adjust the intensity of the displacement according to its channel.
Cloth & Props Detail
The detailing of all the clothes and props is based on different alphas created in Substance Designer, Zbrush, different packs and manually. This process is not difficult at all but rather time consuming, it is very important to dedicate time to this step as it gives a lot of richness to the character and a lot of irregularity, this is why I usually dedicate a lot of time to the detail of the clothes and different elements of the character.
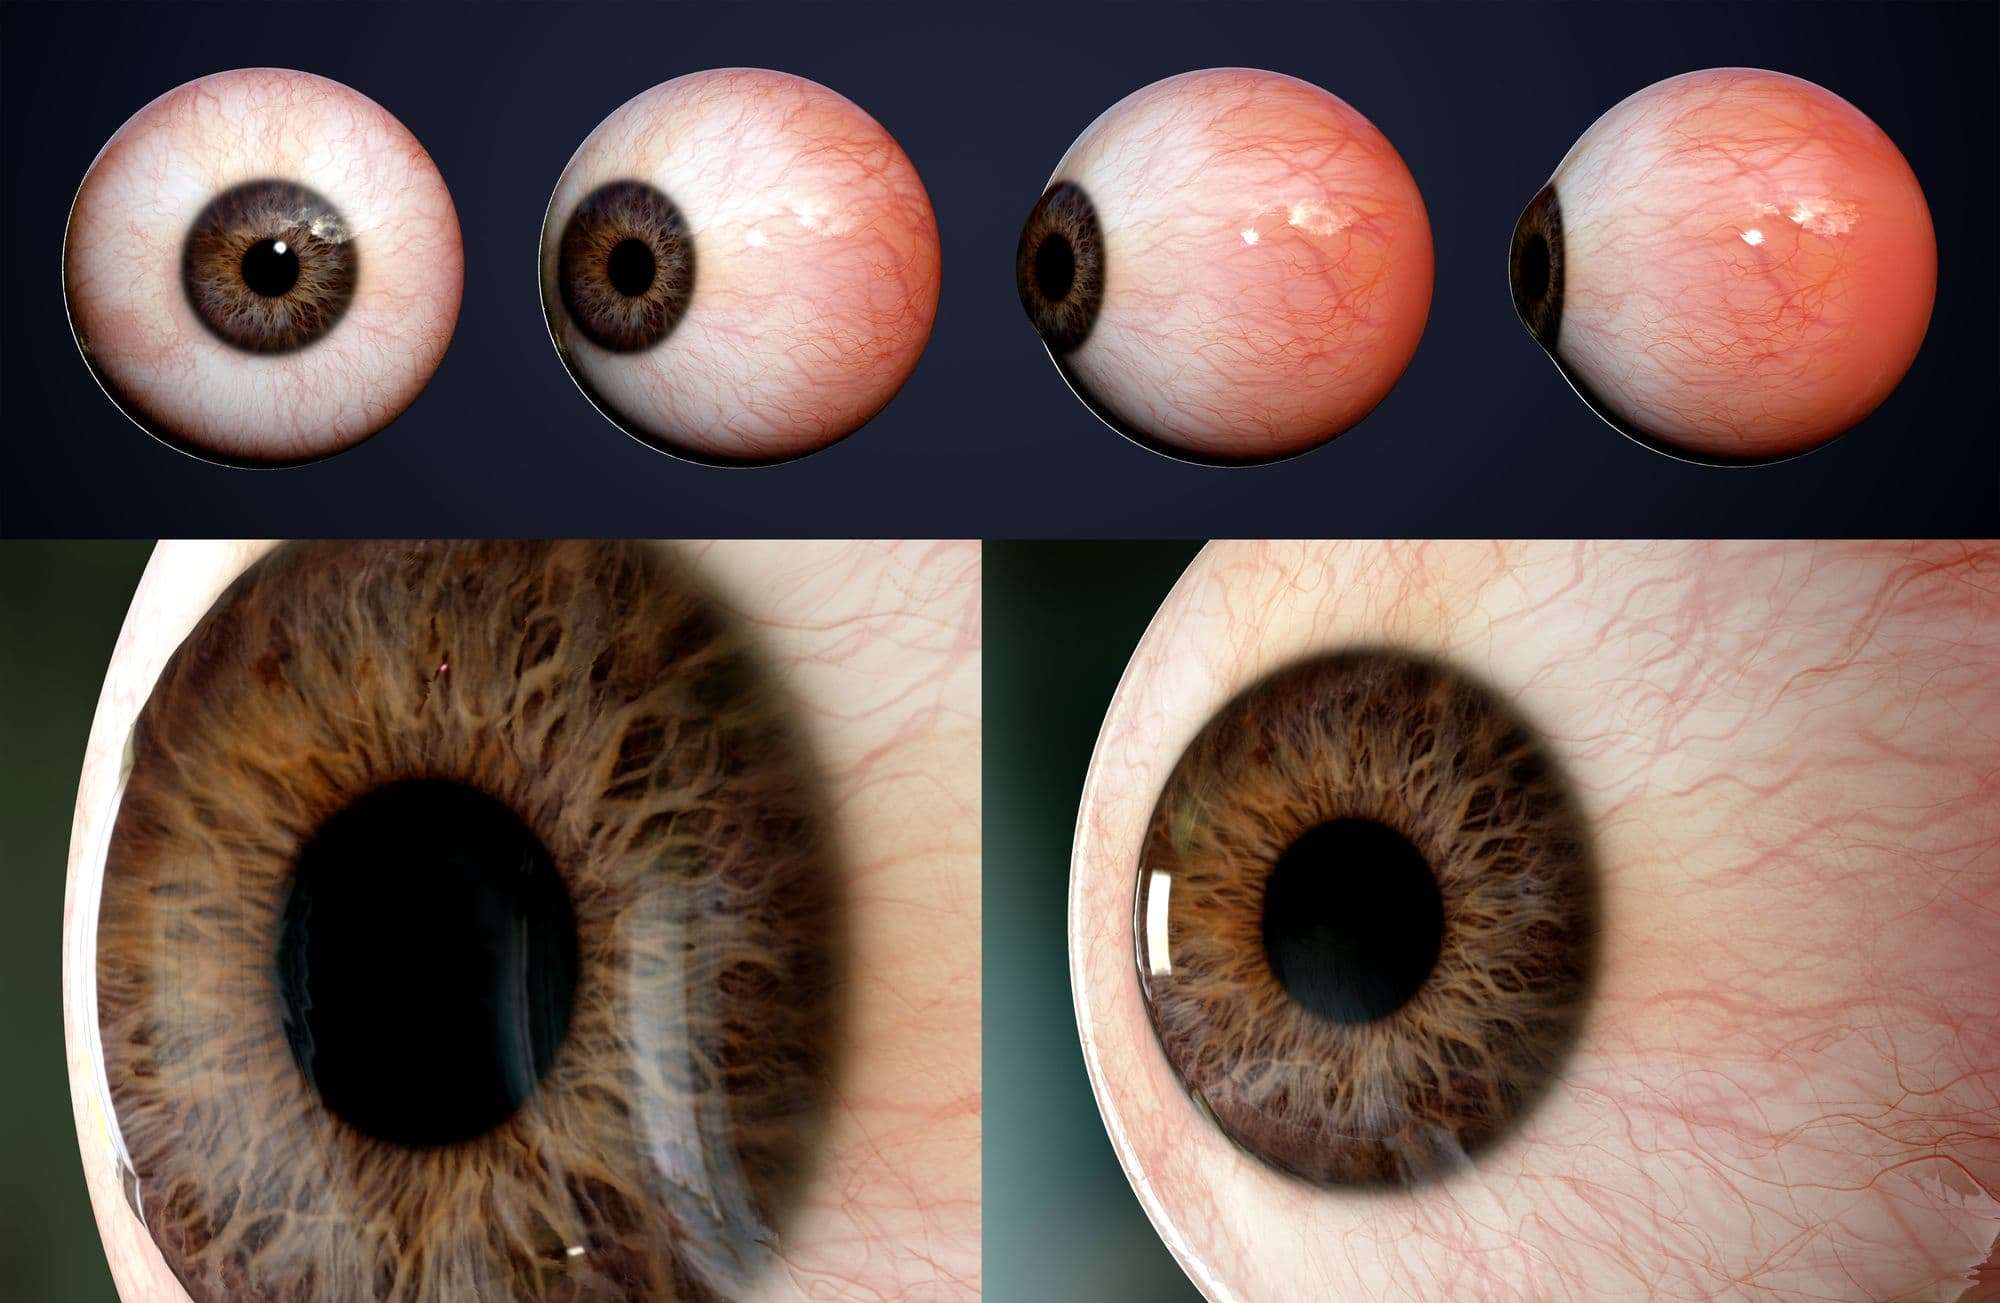
Eyes
The way I create the eyes is following Peter Zoppi's methodology. I have also followed the guide by Juan Puerta who follows the same method of Peter Zoppi.
Zoppi's method is very good at faking the refraction of the ocular eye, you use photos and convert them into other maps.
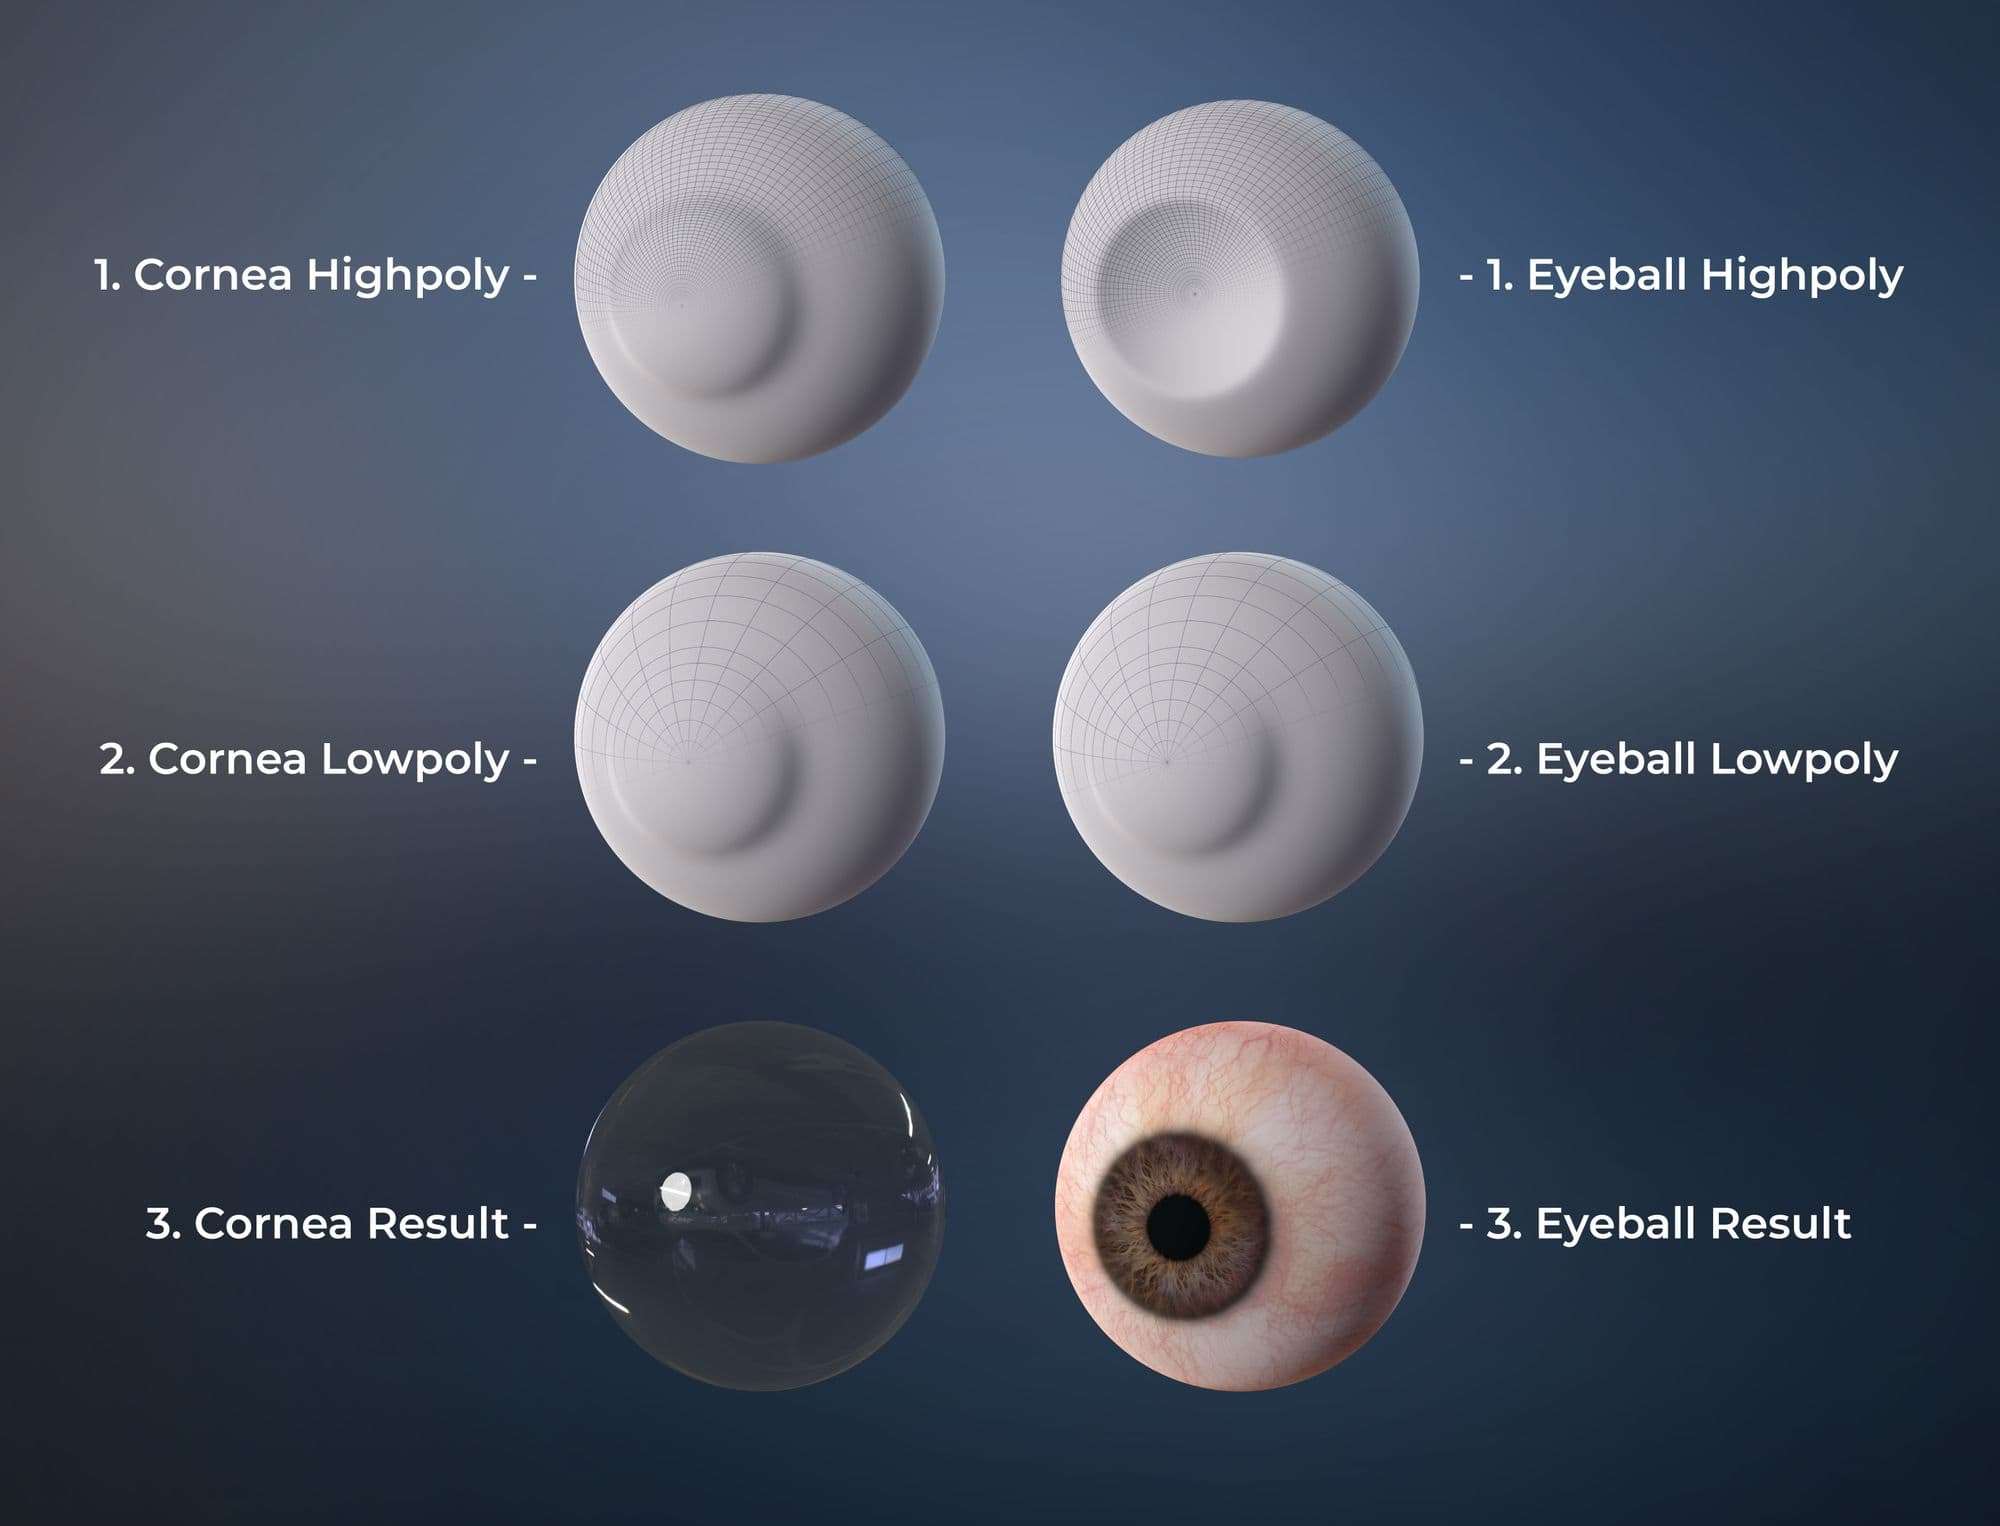
Geometry and Baking
The geometry consists of the cornea and eyeball which are part of the same low poly mesh and share the same UV's, but will have different maps as they will be baked differently, this is the best way to fake the refraction is to bake the eyeball geometry.
Maps
After baking, the process becomes simple and you can texture the eye as you like.
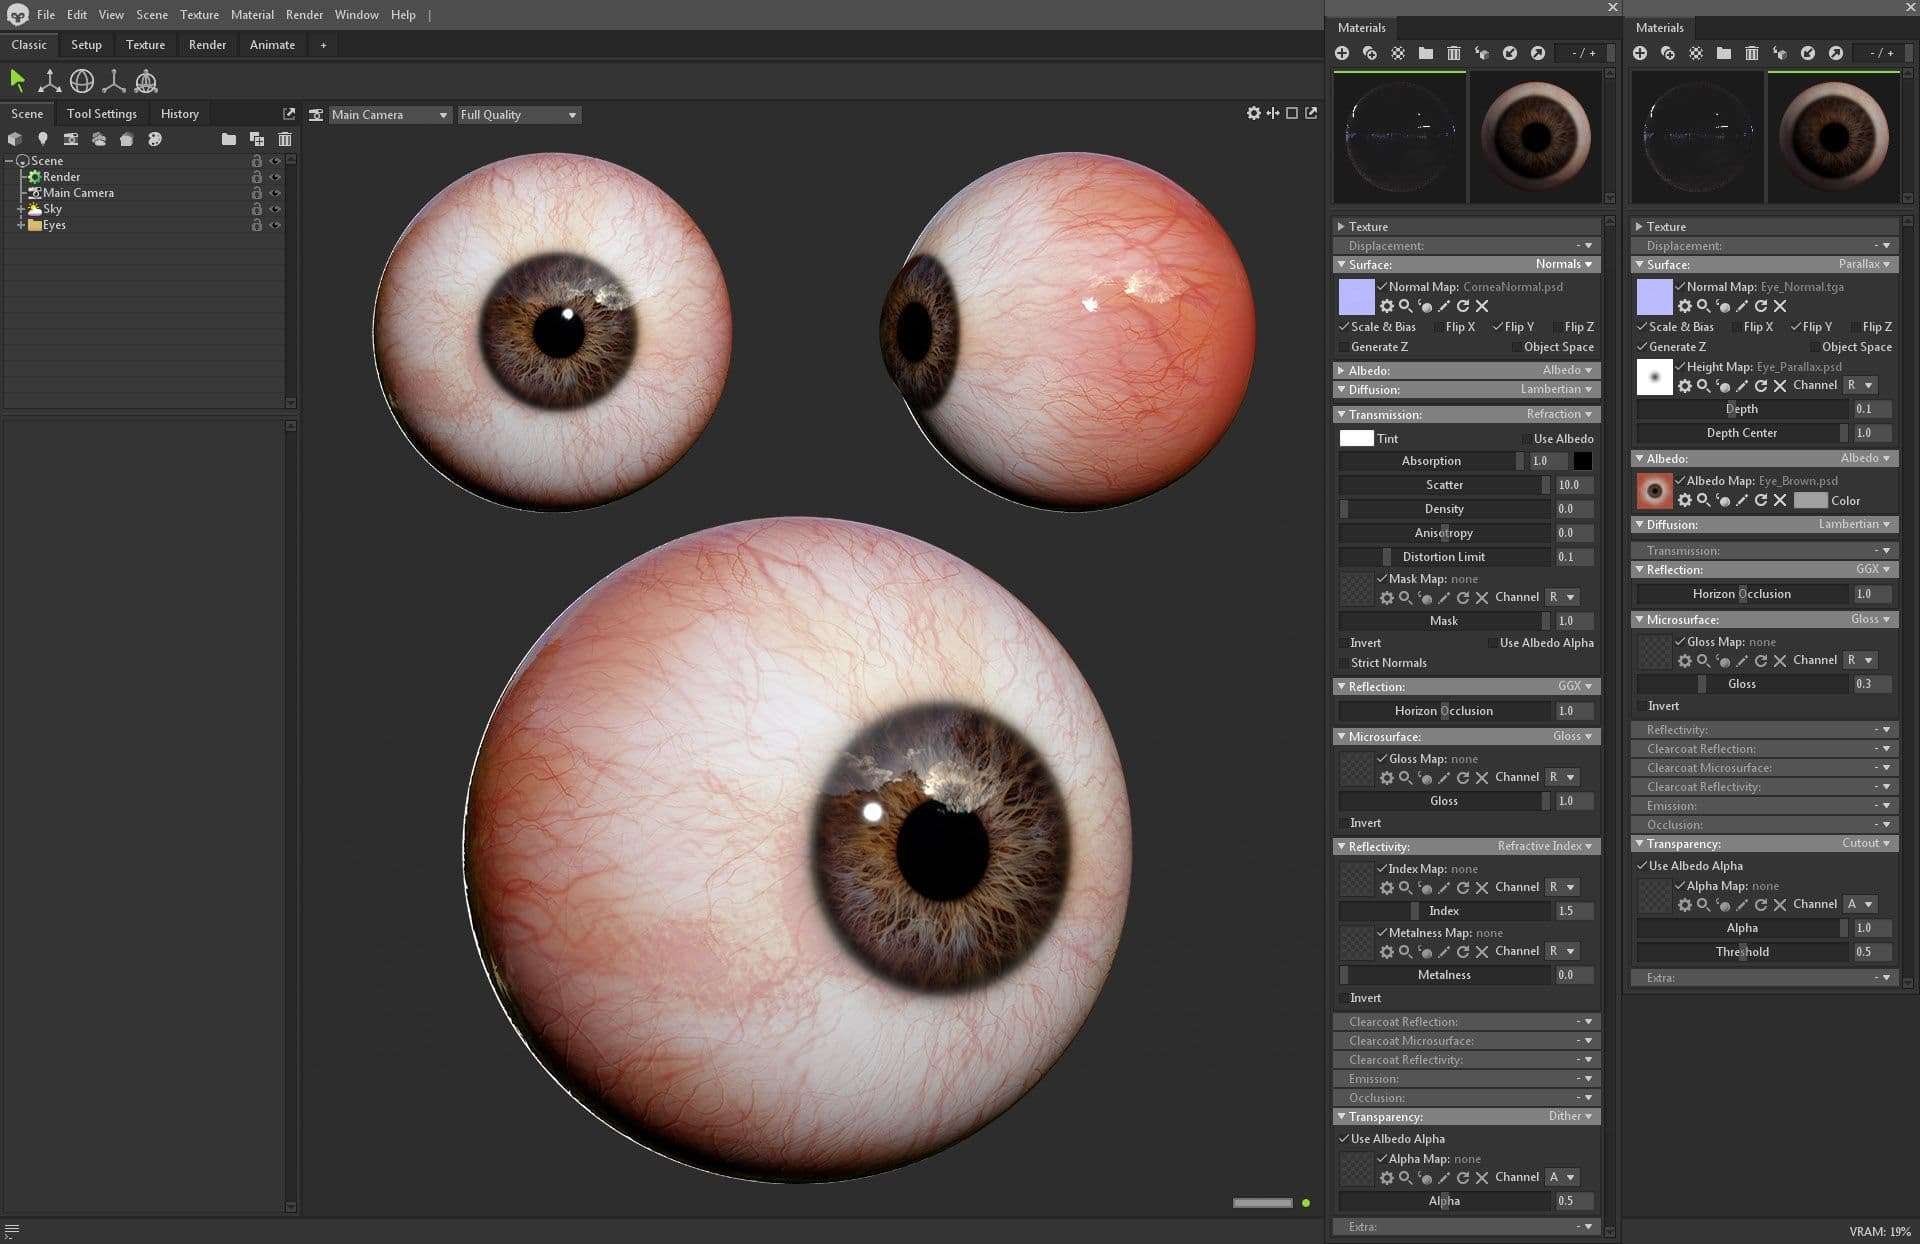
Eyeball Albedo: I always start by making the albedo of the eyeball since from this map I later generate other maps such as normals. The diffuse color I get it through the internet looking for photographs of iris, a page that I highly recommend that has a wide gallery of very good quality is Eyemazy, and the detail of the veins I get inside Substance Painter creating them with organic brushes.
Eyeball Normal: This map I create it from the albedo as I mentioned before, I open the albedo with Photoshop and inside here we convert the image to black and white, we play a little with the curves to make the highlights whiter and this map we take it to substance painter we assign it as heightmap inside a fill layer in the project with the eyeball cooked, we export the maps and we keep the normal map.
Parallax: One thing that will help to improve the refraction is to add a Parallax Map. It is a flat white map and a black pupil with gradient borders, I generate this map directly in Photoshop with a gradient and from the albedo in black and white mode to create some edge variation.
Cornea Normal: The normal vein information should come from the normal cornea map with noise applied to give it a wetter look, I paint the veins inside Substance Painter with organic brushes. I usually do a combination of vein layers with different levels of opacity and blur.
Shader
Setting up the eye material is simple. You'll need well painted textures, a normal map and a parallax setup that works well. Anything extra is a personal preference.
Texturing
During the development of this character I used Zbrush, Substance Painter and Designer to create the textures. At this stage I like to analyse how my maps look inside Marmoset, without relying only on the Substance Painter viewport. You have to do these checks to get a more accurate idea of what works and what doesn't in the composition.
Skin Texturing
I found Vadim Sorici's tutorial for marmoset very useful for creating the skin, especially the facial skin.
The texture maps I used were:
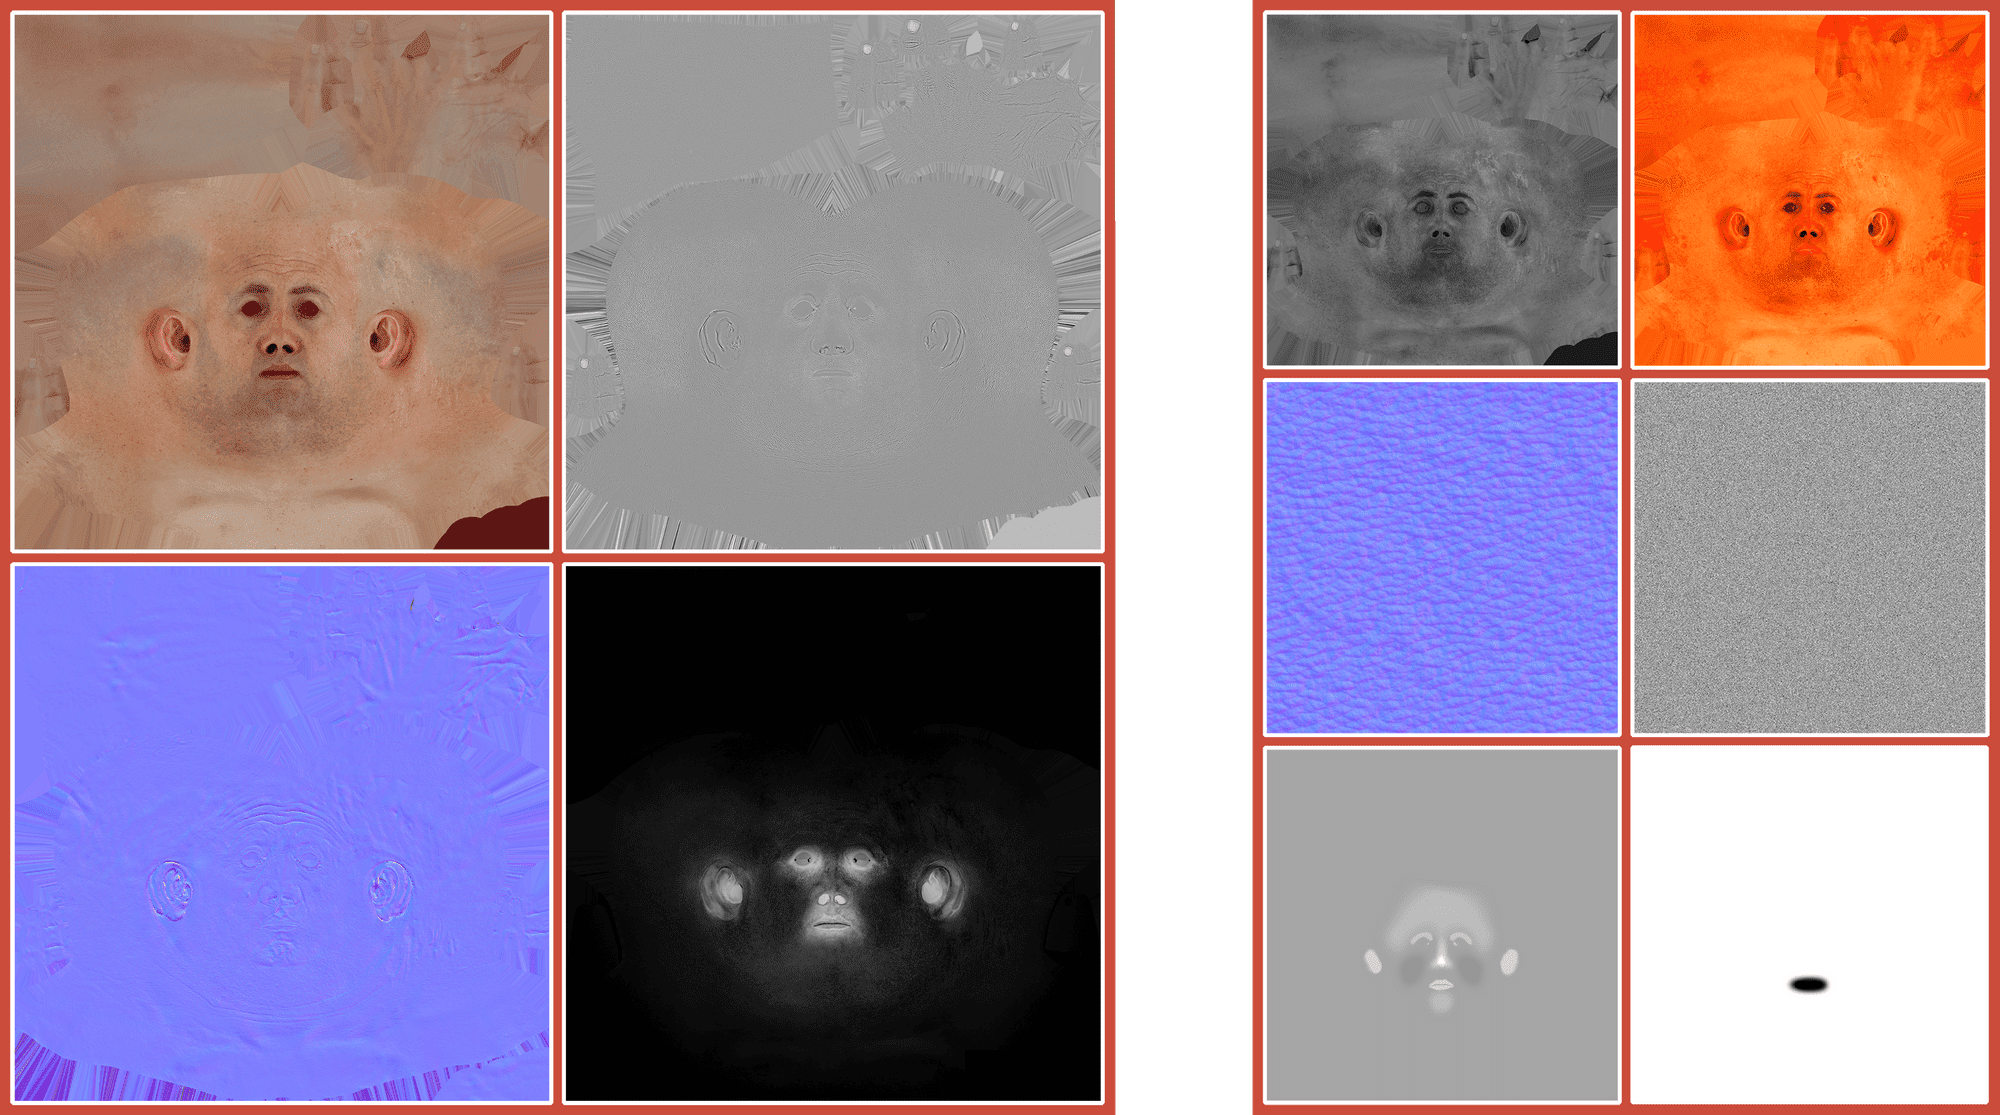
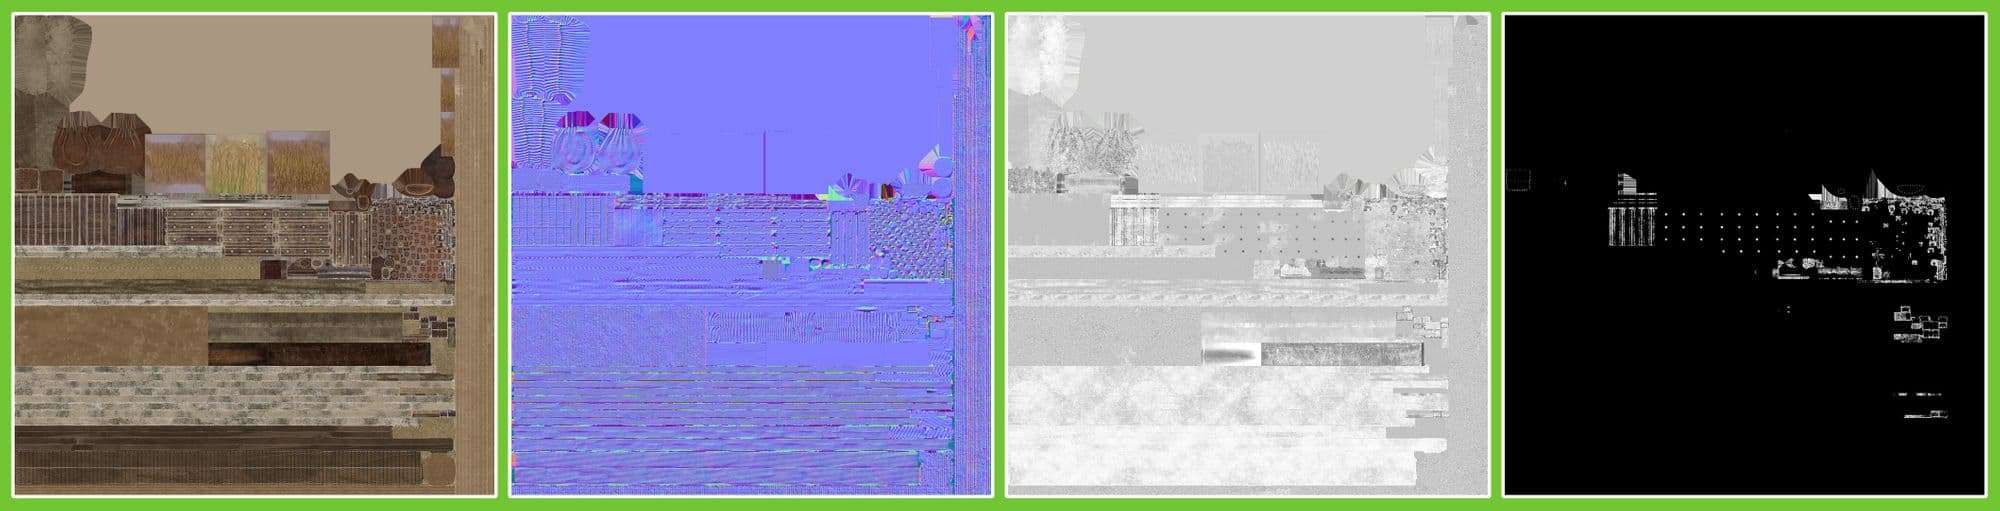
Albedo: For this project, I projected the albedo data from texturing.xyz as I mentioned above, I clean the main pores and wrinkle details from the projection using a combination of cavity maps from displacement data and hand sculpted details, my goal is to transfer the sculpted data to the diffuse so that the details match both in the high poly.
Cavity: Cavity maps can be used in multiple maps, such as Albedo, Specular and Roughness. It is simply a black and white map where the pores are completely black.
Normal: Bake the high polygonization mesh over the low polygonization mesh.
Translucency: This defines how much light scatters through the surface. Brighter values on the map define thinner areas such as the ears, tip of the nose, nostrils, eyelids and lips. The map can be derived by inverting the thickness map baked from the high poly. I tweak the nose area on the map to make it more intense and give it a more fleshy look.
Specular: This map along with the gloss map is very personal depending on the artist. You have to have a base gray value that defines how rough or shiny the face is in general. And I paint different values on specific areas of the face that are rougher or softer along with mixing with other maps like albedo and cavities.
Scatter: Scatter maps describe the color that bleeds at the transition point from light to shadow. A flat peach color works quite well for realistic skin, and can be obtained by fully saturating the albedo map.
Detail Normal: This normal map helps textures appear more detailed than they really are. Substance Painter includes a few detail maps in its library that can be imported into Marmoset Toolbag.
Noise: This map is used to help the fuzz look better.
Gloss: This map is personally very personal depending on each artist. You have to have a base gray value that defines how rough or glossy the face is in general. And I paint different values on specific areas of the face that are rougher or softer.
Detail Weight: This is a black and white map that determines where the detail normal map will be applied. Black is where there is no effect. Lips have specific pore information, so you don't want it to affect there.
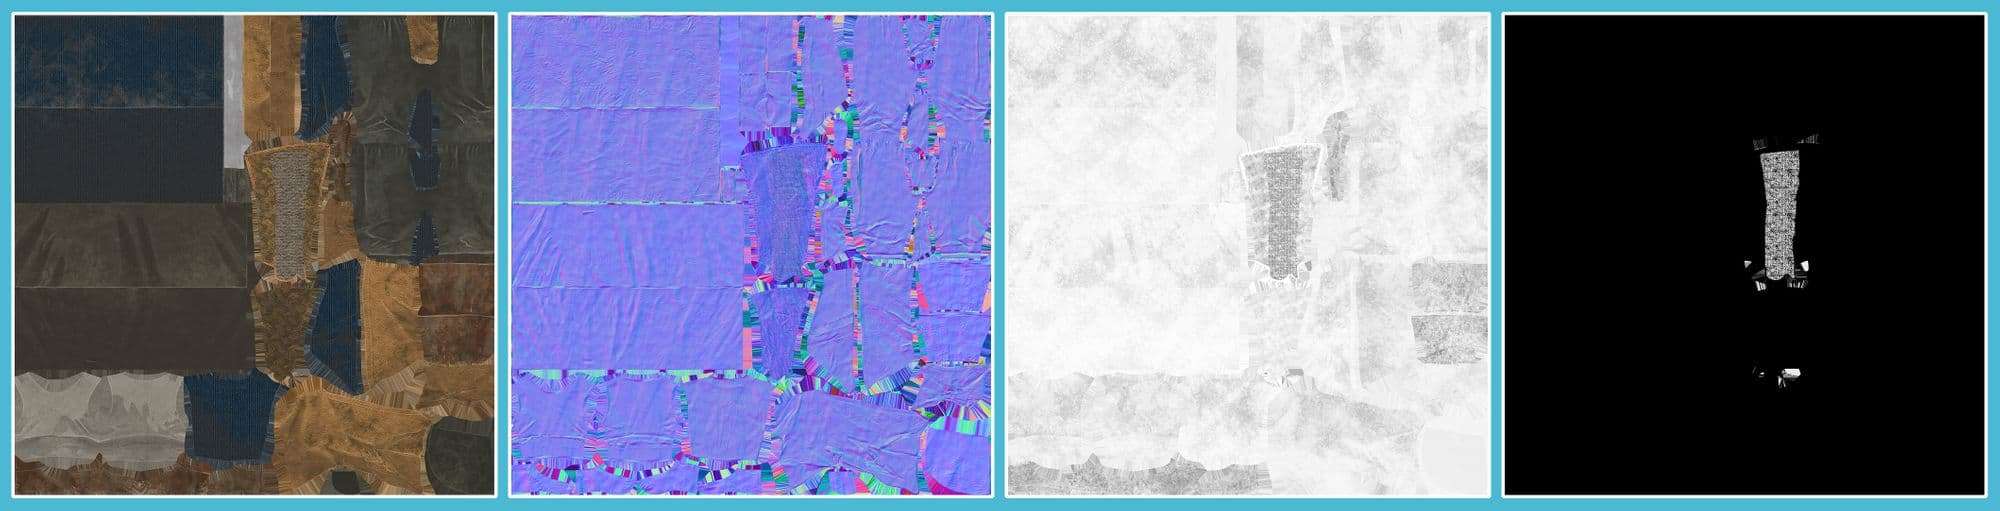
Cloth & Props Texturing
The textures of the clothes and accessories are made exclusively with Substance Painter and Designer. The first step is, as really in every point, to analyze the references, some key points are to think about what color variations are more present, how damaged the object is and how everything behaves with the light.
The workflow I usually use is to create layers according to how I think the object was worn over time, what possible, what damage came first, what kind of dirt it acquires over time, it helps me to start planning the texture. One of the most important details and usually one of the most common mistakes are imperfections, and that is that there is nothing in the real world that is 100% clean or pure color, variation is the key. Another trick is to try to avoid very saturated colors as well as pure blacks and pure whites.
I always try not to abuse the prefabricated materials offered by Substance Painter. I usually use them as a complement, I add a smart material and analyze how they are created layer by layer and if any layer is according to the finish I want to make to my texture I can always use it, this can bring variations that maybe you hadn't thought of.
Shading
Skin Shader
The material is easy to build and the result with Marmoset Toolbag 4 is very good. There are no exact values for the skin to make it look realistic, as it can vary from project to project.
Before starting anything in Toolbag, make sure that the scale of the scene is set correctly. Use Show Scale Reference to adjust the scale of the scene. Below is a demonstration of how I set up my skin material inside Toolbag.
The skin has several specular layers instead of one, which allows for better rendering. The Secondary Reflection helps to get extra specularity and shimmer around the highlights to mimic the oily surface of the skin.
Skin is a matter of subtleties. Find good references and try to match them while making sure it looks good under any lighting conditions.
Cloth & Props Shader
Apart from opacity to some object, setting up textures for clothing and accessories is straightforward. I created a preset in Substance Painter, which meant I could export it immediately and plug it into Toolbag. Since Toolbag automatically detects changes to .pngs, I didn't have to manually update my textures each time I exported them.
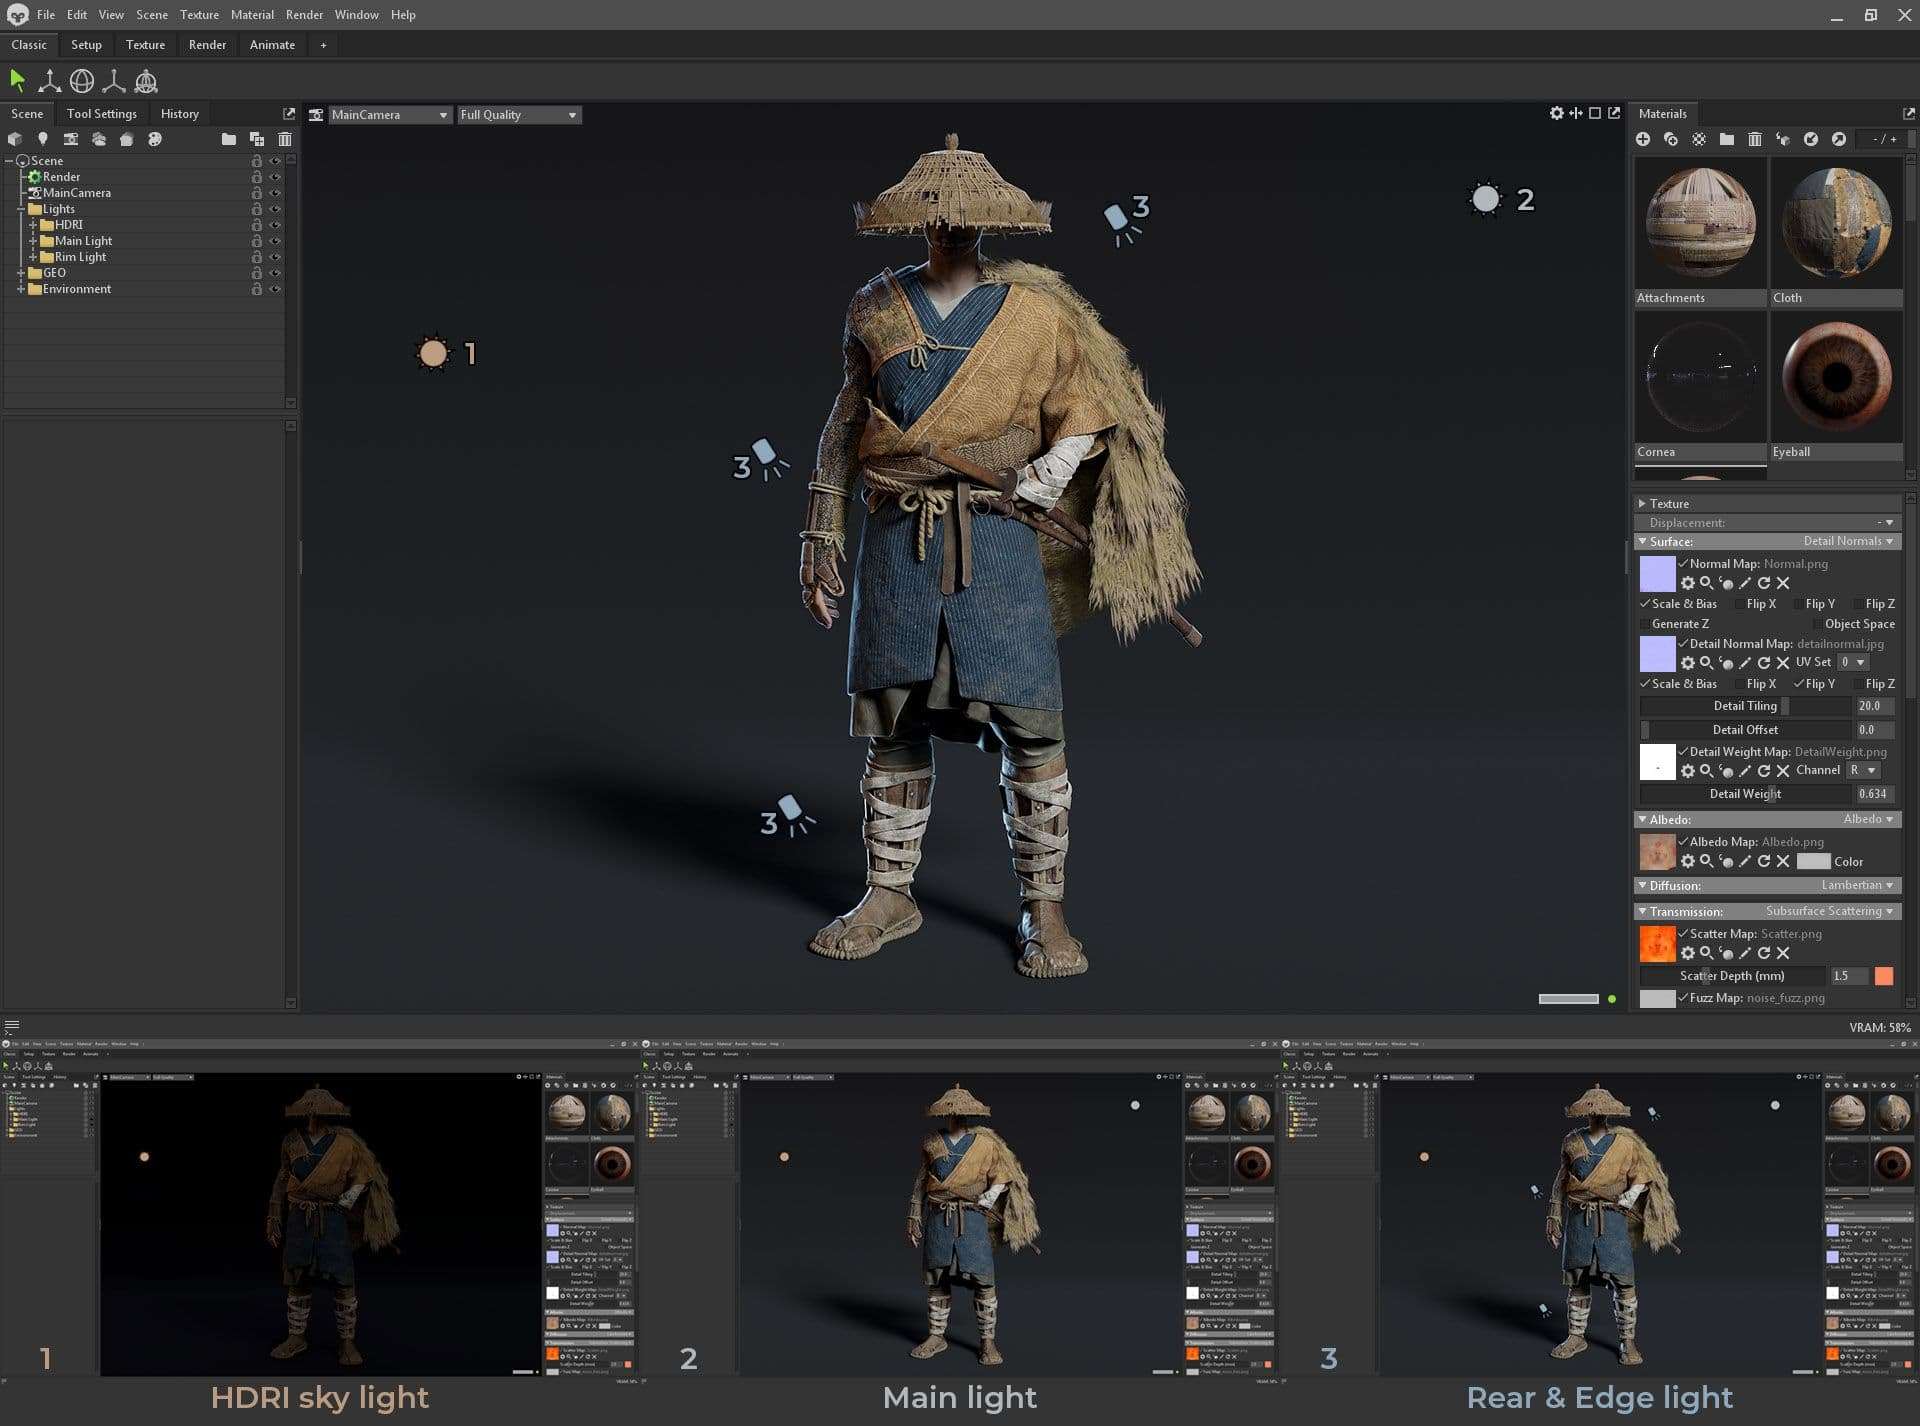
Lighting
Good lighting is crucial to get the right mood in a scene. This project has different lighting sets and different environments, trying to create in some of them a dramatic touch. Normally when creating the lighting I start by adding a HDRI with a very low intensity to create the basic ambient light and reflections. The whole lighting setup is made up of different lights but I usually use the following:
Rear light: A strong light placed behind the character to highlight the silhouette of the character.
Edge light: A light to give the head a nice rim light.
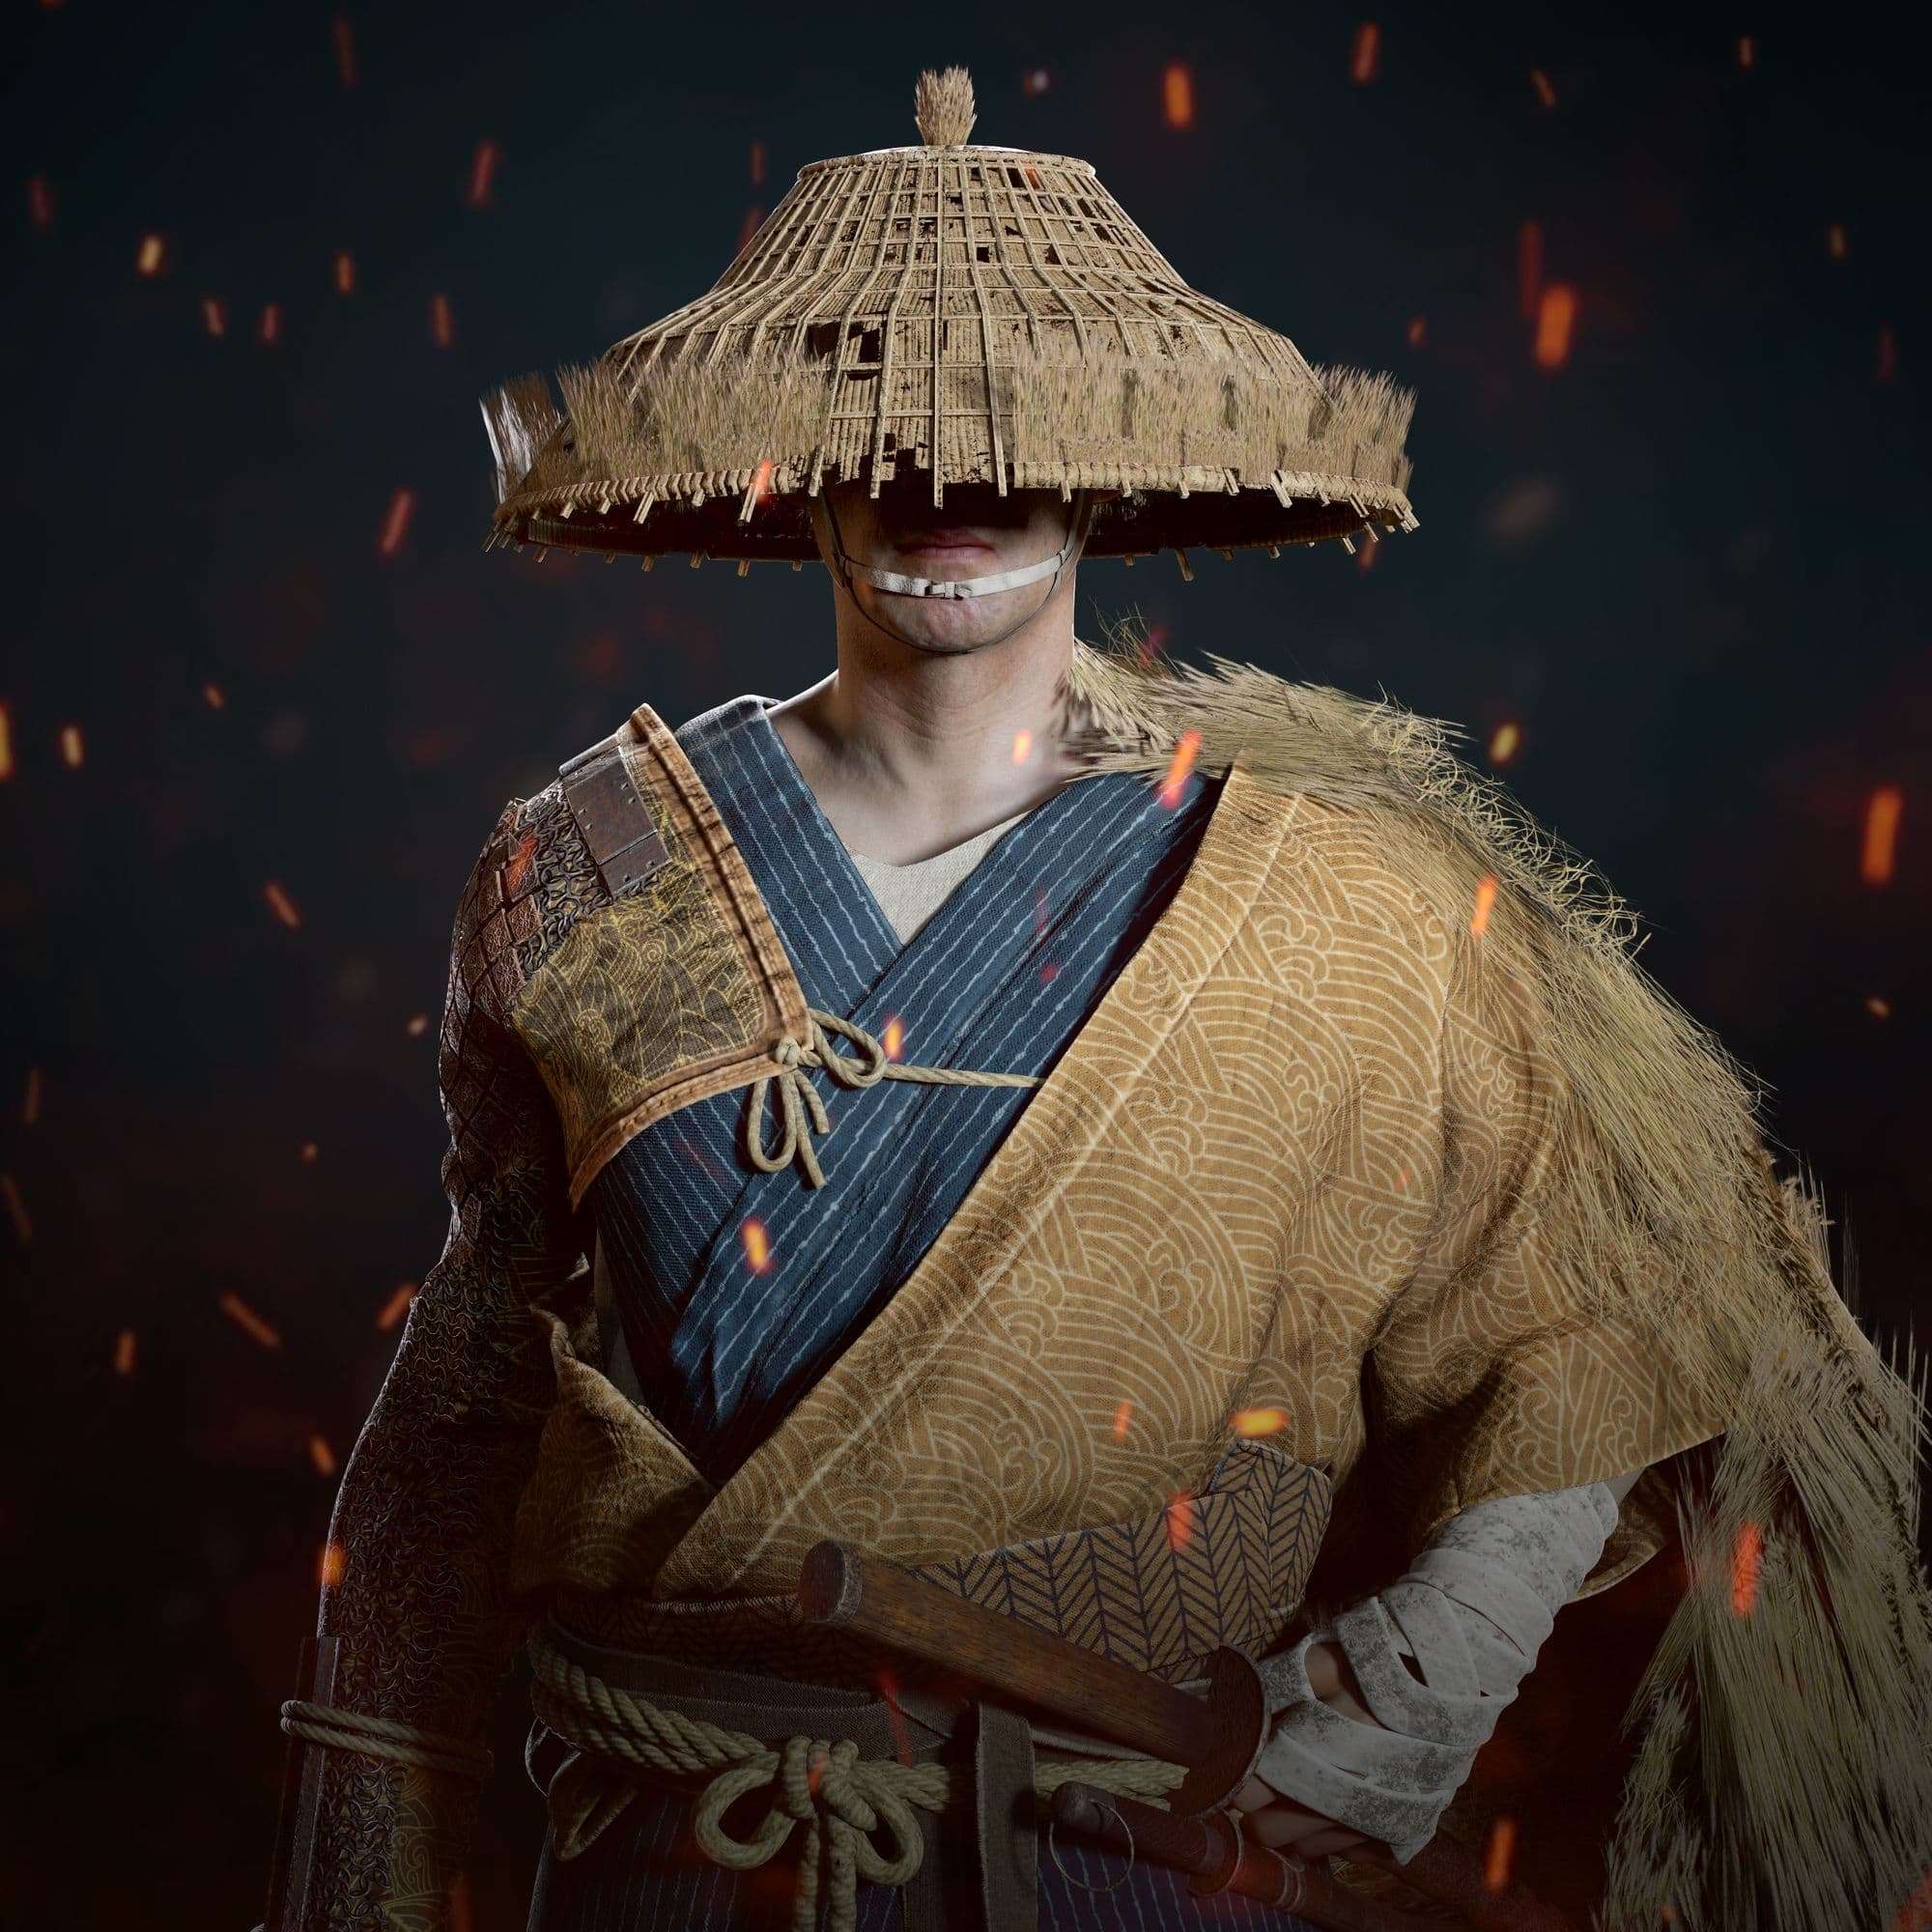
Presentation
Within Photoshop it all depends on your final render, the intention you want to give to your scene and if you need to correct something that has gone wrong. You have to keep in mind what is the main focus of the image, and work in a way that you don't end up taking the attention away from what matters.
Good lighting is crucial to get the right mood in a scene.
In my case with Photoshop I retouched curves and levels to correct a little the render and give more intensity to the colors, besides adding smoke and different effects to create the desired atmosphere.
Final Thoughts
Thanks to the people at The Rookies for giving me the opportunity to write this article. Thanks to the people who have read it and made it this far as the article is much longer than I wanted it to be. I hope you find it helpful.