Lighting and Compositing a Futuristic Cityscape
Thomas Eckstein, a Lighting/LookDev Artist at TRIXTER, shares his breakdown of how to create a stylised futuristic cityscape by pushing the boundaries of look development, lighting and compositing.
Thomas Eckstein, a Lighting/LookDev Artist at TRIXTER, shares his breakdown of how to create a stylised futuristic cityscape by pushing the boundaries of look development, lighting and compositing.

Thomas Eckstein, 2021 Rookie of the Year Finalist for VFX, is a Lighting/LookDev Artist at TRIXTER, one of Germany’s leading VFX studios for feature film and television. Always fascinated with virtual worlds and how to create them, Thomas embarked on a bachelor's degree in virtual & augmented realities, deciding to pursue this passion and start his journey as a 3D artist.
After watching countless breakdowns and behind the scenes footage, Thomas shares his own breakdown of how to create a stylised futuristic cityscape by pushing the boundaries of look development, lighting and compositing.
I really wanted to create a big landscape or city where I could use a lot of different techniques to push myself. I ended up finding this amazing Concept Art by Fanny Poulain, and the idea for a large scale futuristic city began to take form. This is definitely my largest and most ambitious project I have done so far.

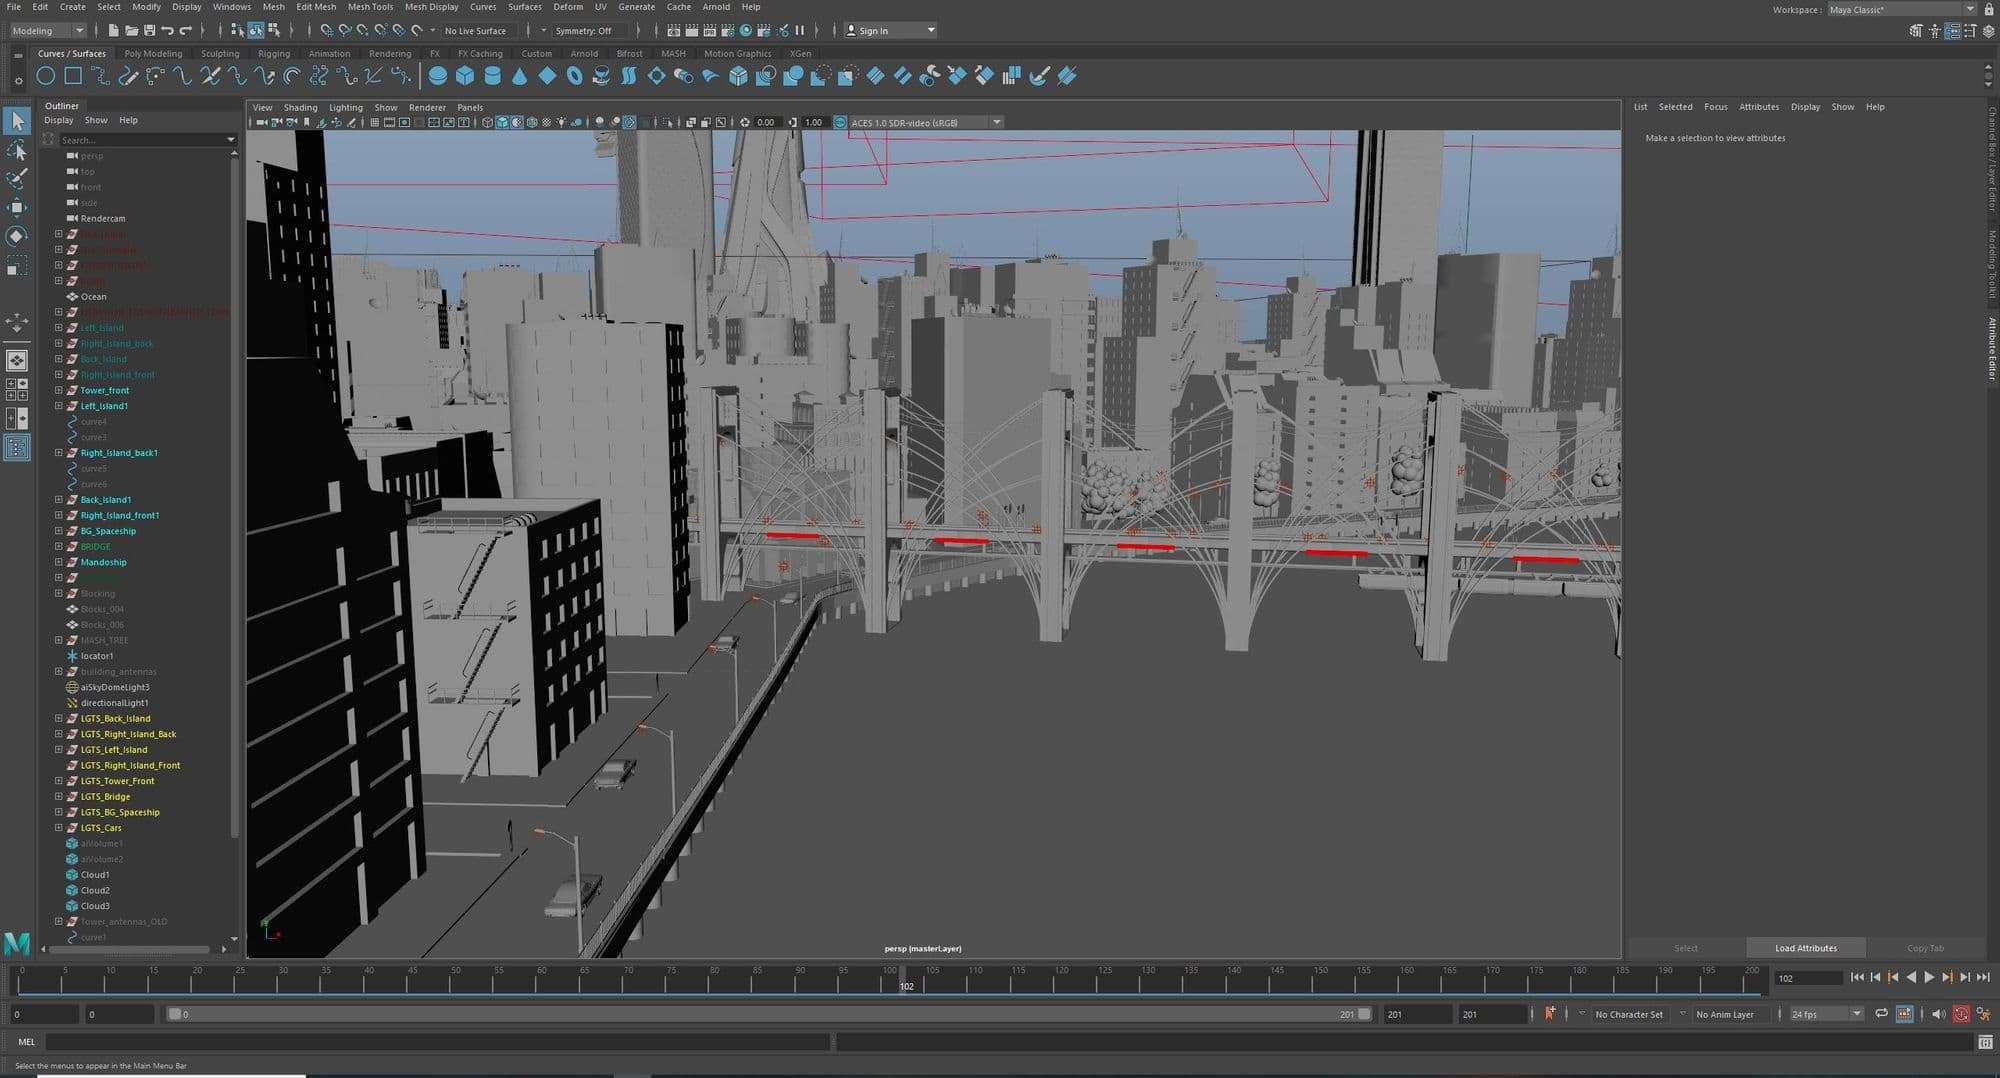
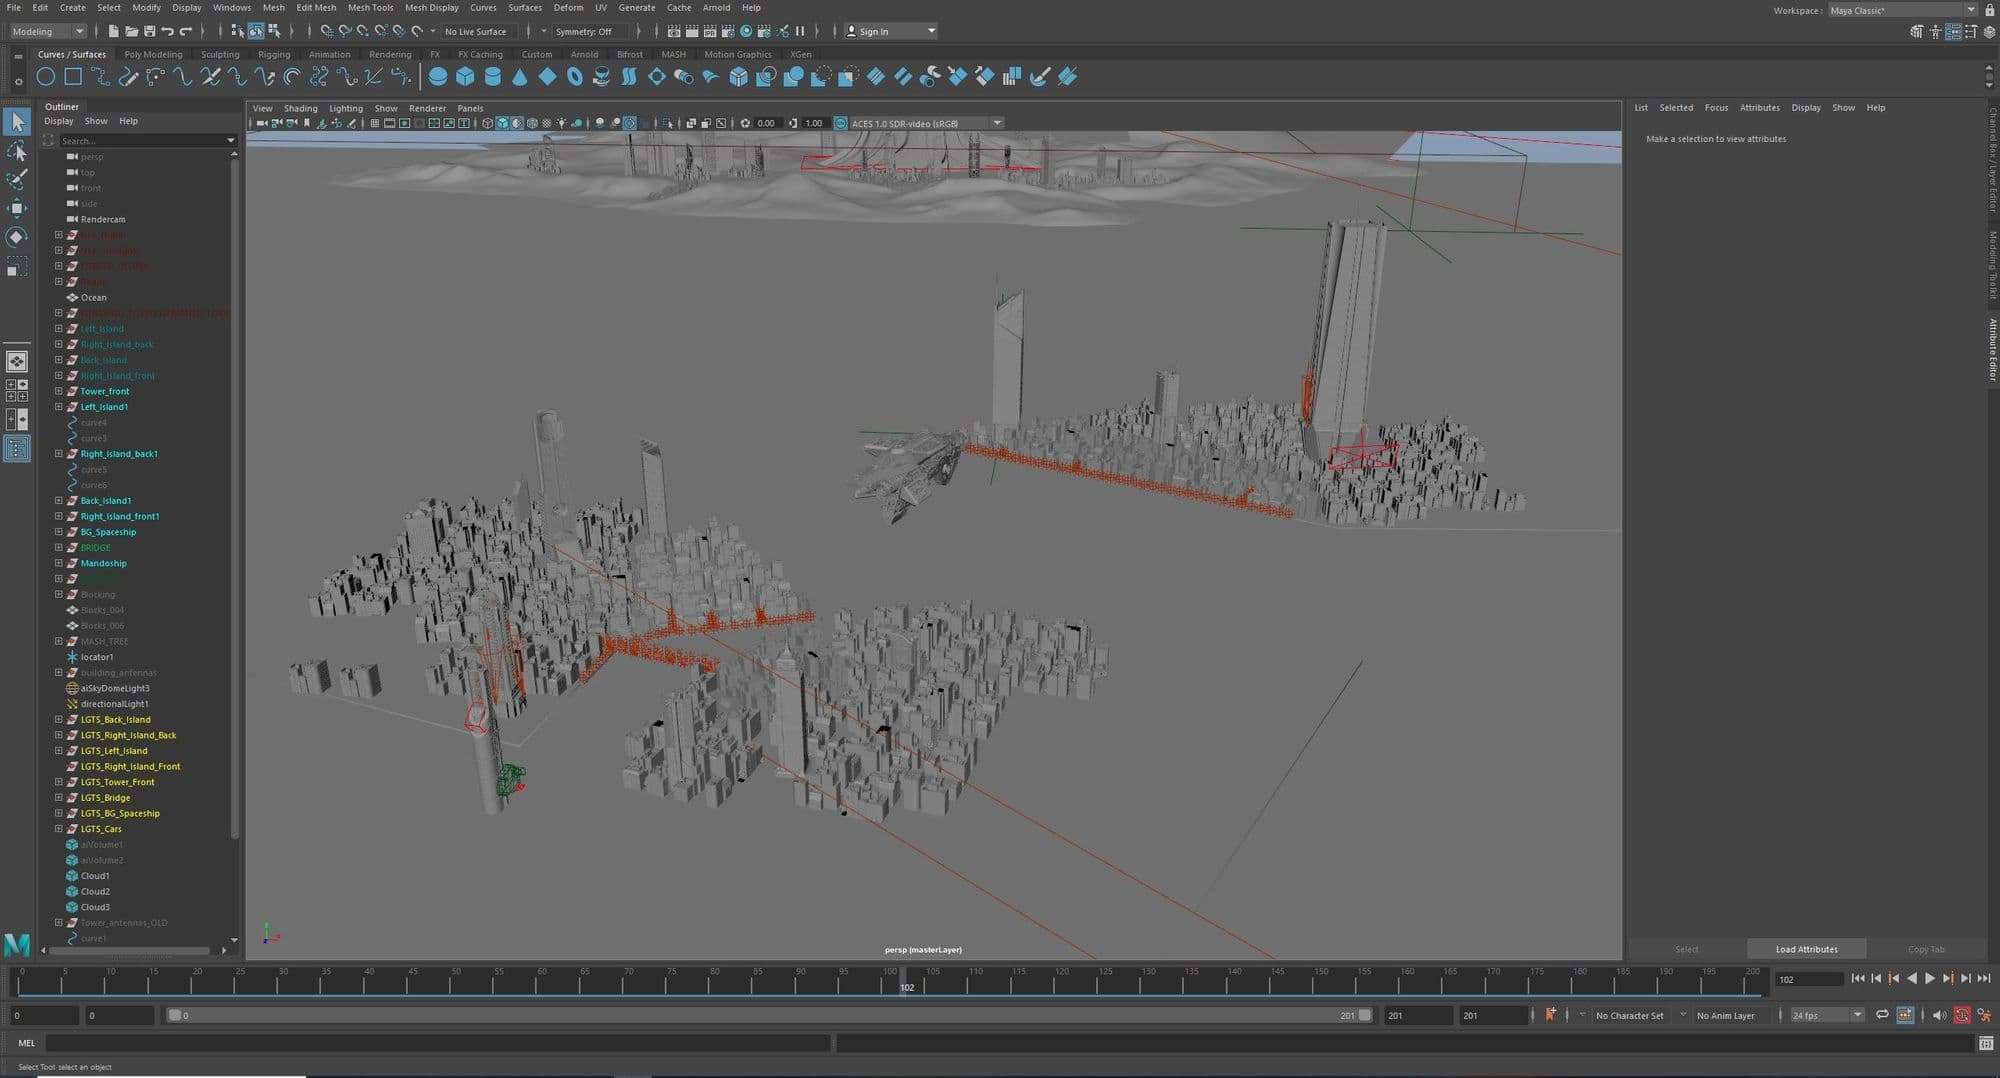
For this project I already had a great reference to base my layout on, so I had a good start in the blocking phase of my scene. During the blocking I also started searching for more specific references to help me with some of the smaller details like the transition between the city and the water. More importantly though, I searched for references of glowing windows, as it was essential to get these right.

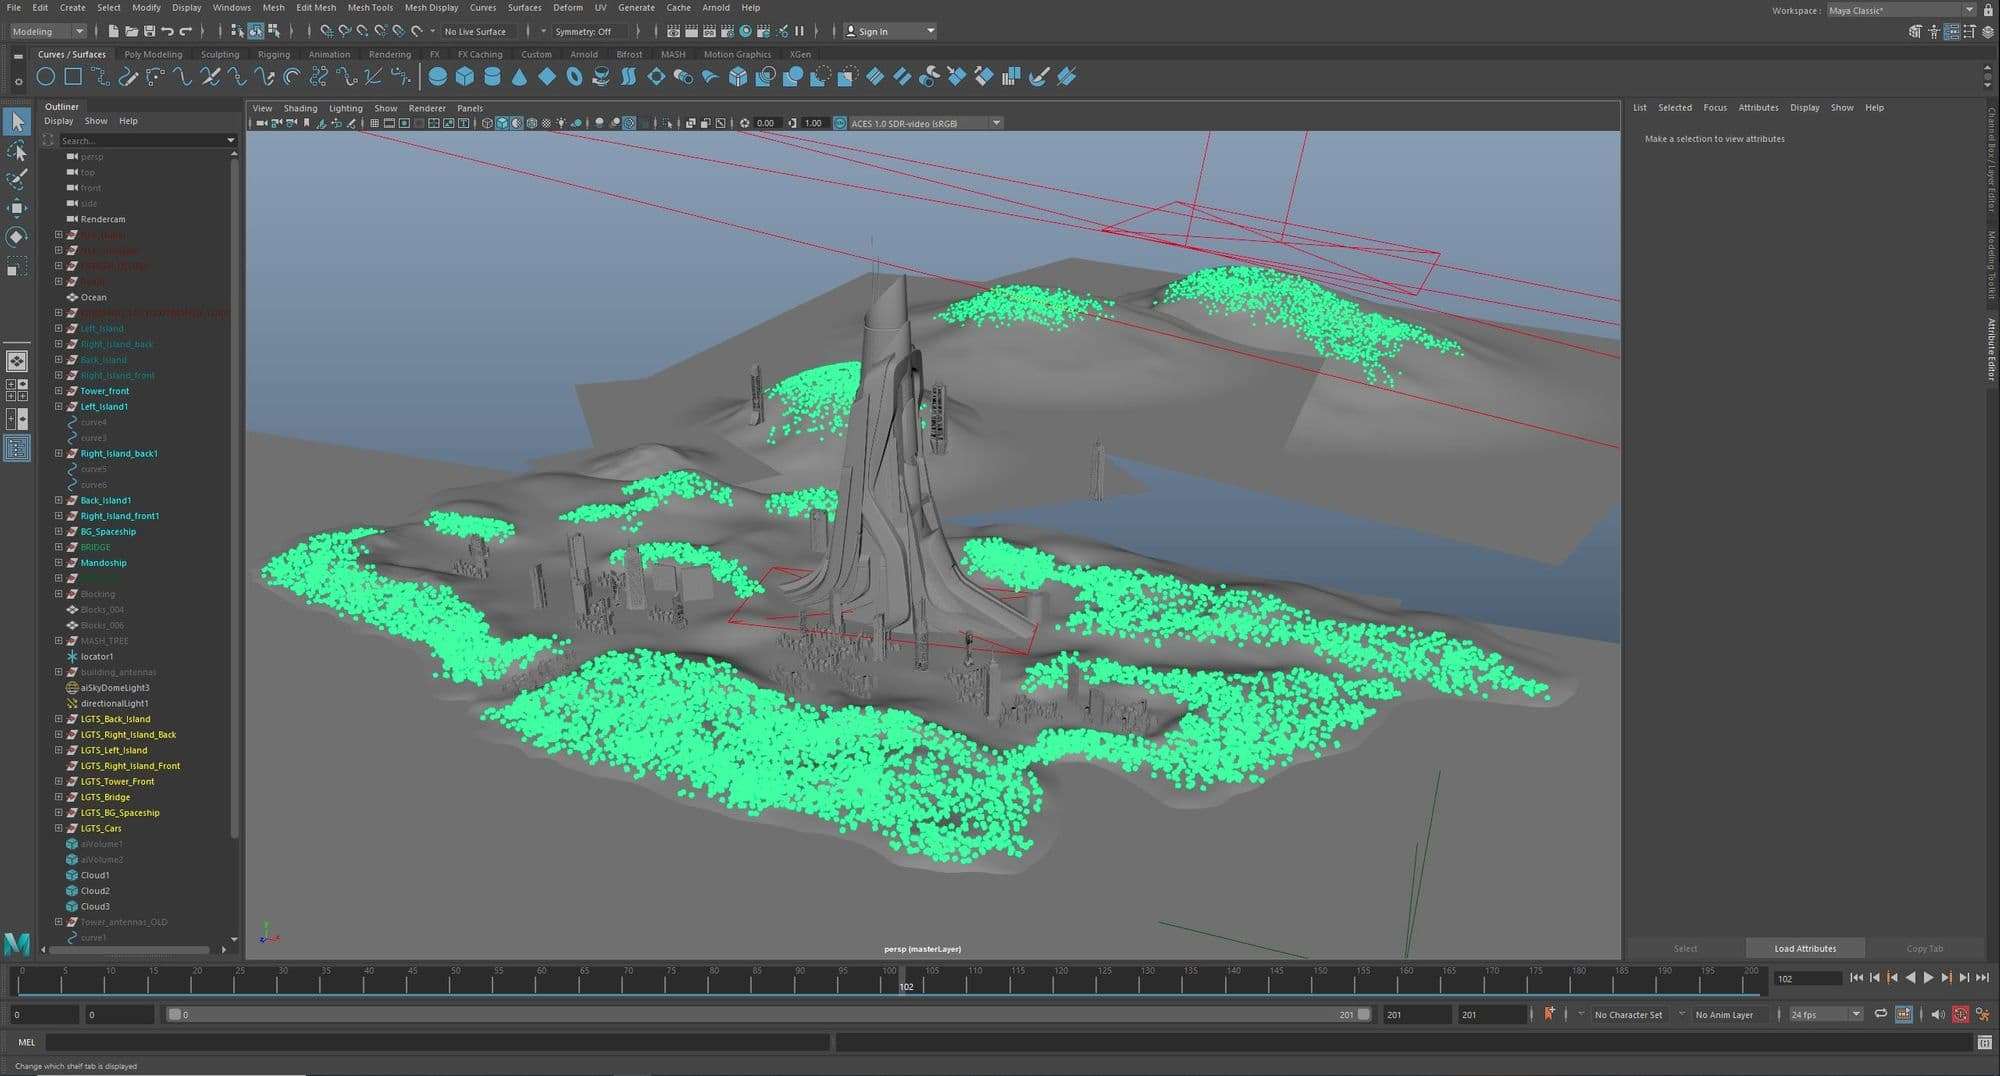
After the blocking phase it was time to add some more detail. The front islands are simple blocks formed out of a cube that I also used for the blockout, since they would be covered in buildings anyway. For the back island however, I sculpted some hills directly in Maya. I then used MASH to scatter a lot of low poly trees which populated the outskirts of the island.
The spaceships are from CGTrader and all of the buildings in the scene are models from Kitbash3D. Smaller buildings were instanced and again scattered with MASH on all of the islands. However, the buildings by the water, the towers, as well as the bridge were placed by hand to get them looking just right. I turned all of them into Arnold Standins (.ass files), as it would have been way too heavy on the scene otherwise.
Finally I wanted some movement on the closer islands, so the city wouldn't seem empty or abandoned. For this I found low poly models of streets online, which I hand placed along the city outskirts to have some cars driving along them. I also placed a lot of streetlights and railings along the road to have more small details.
Curves created along the streets were used to animate all the cars on a set path. A similar procedure was used to animate the small spaceship in the front.
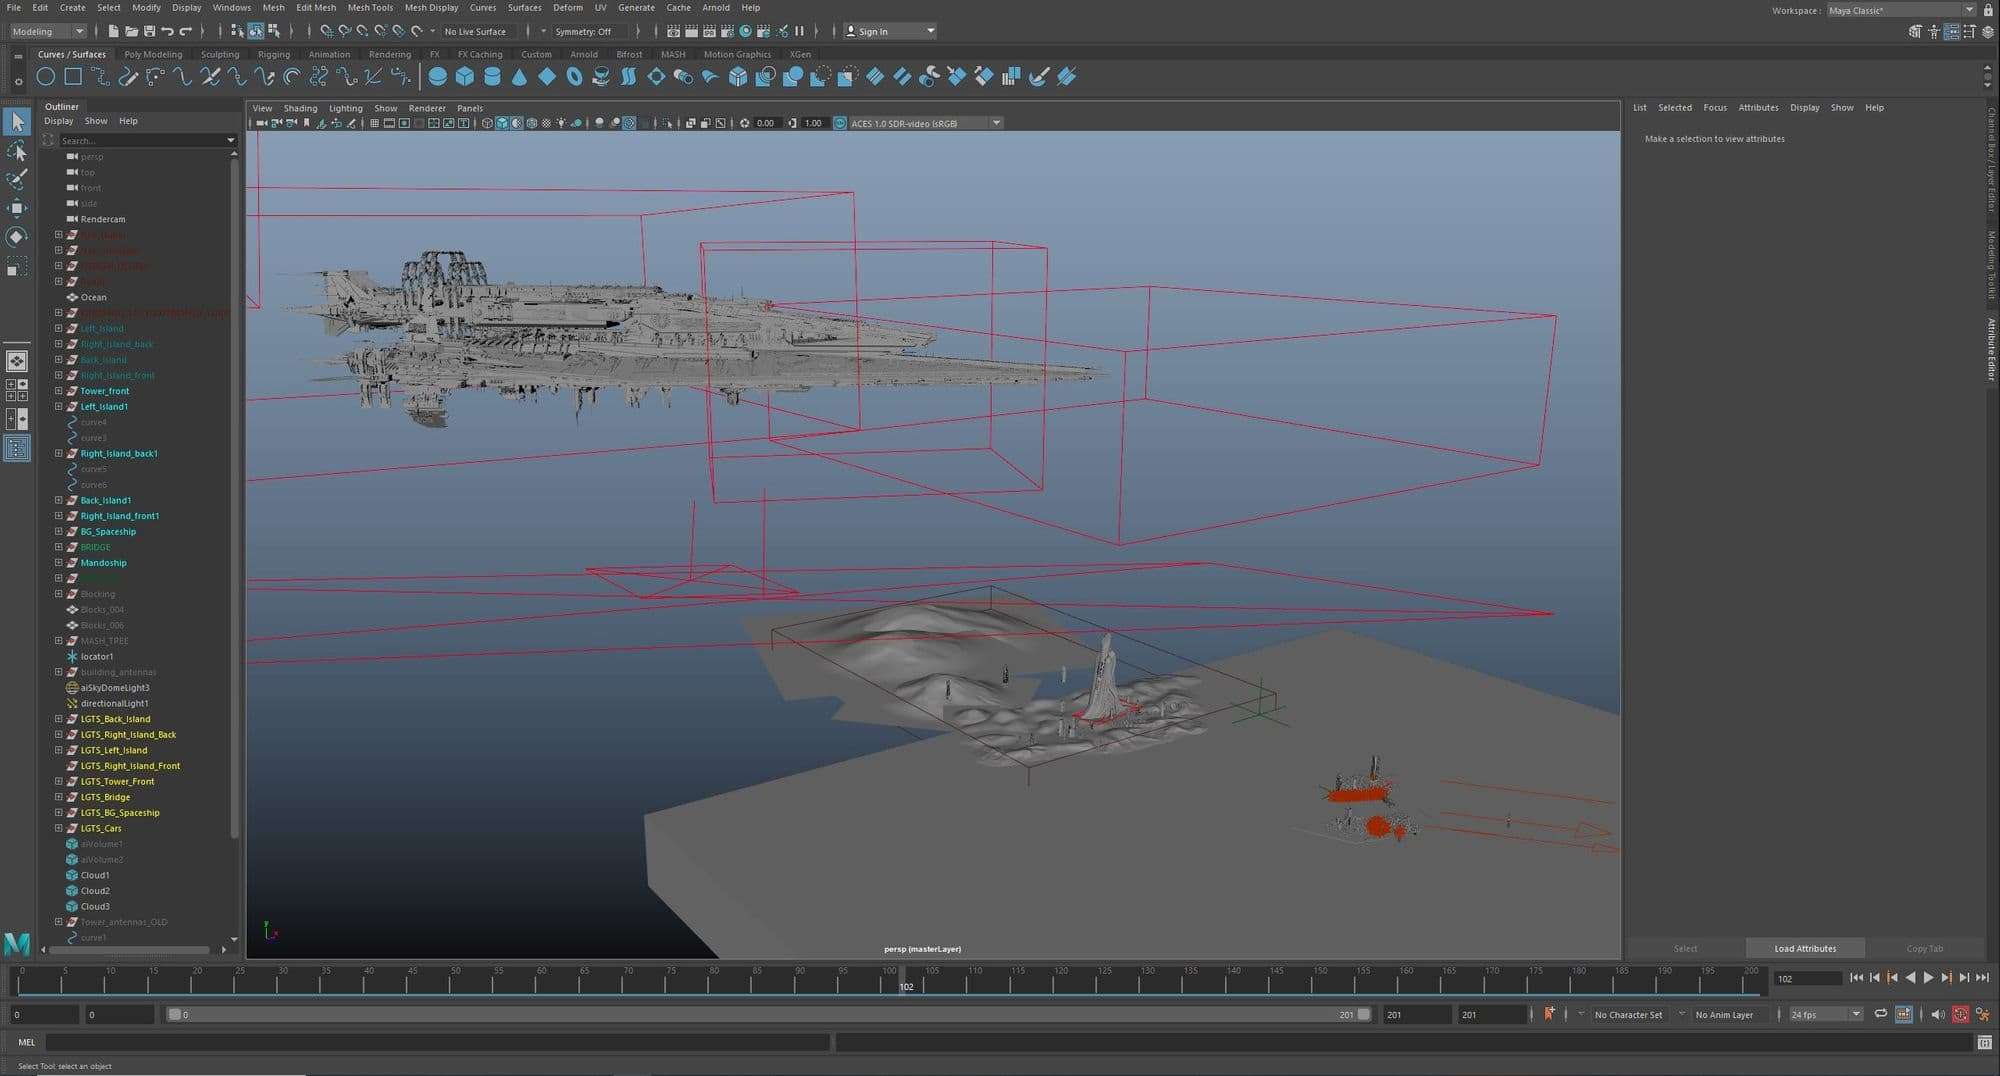
Since I wanted the large spaceship to be partly obscured by clouds like in the reference, I opted for adding some volumes (clouds) around it.
Since the Kitbash models were fairly complex and had a lot more shaders than anticipated, it took quite some time to complete the lookdev of all the assets. Looking back at it now, I could have probably saved a lot of time in this part, because many details of the shaders aren't really visible in my final lighting setup anyway.
For the ocean I combined a bunch of animated noise patterns and plugged them into the bump map. At this distance it gave me enough detail to seem believable.
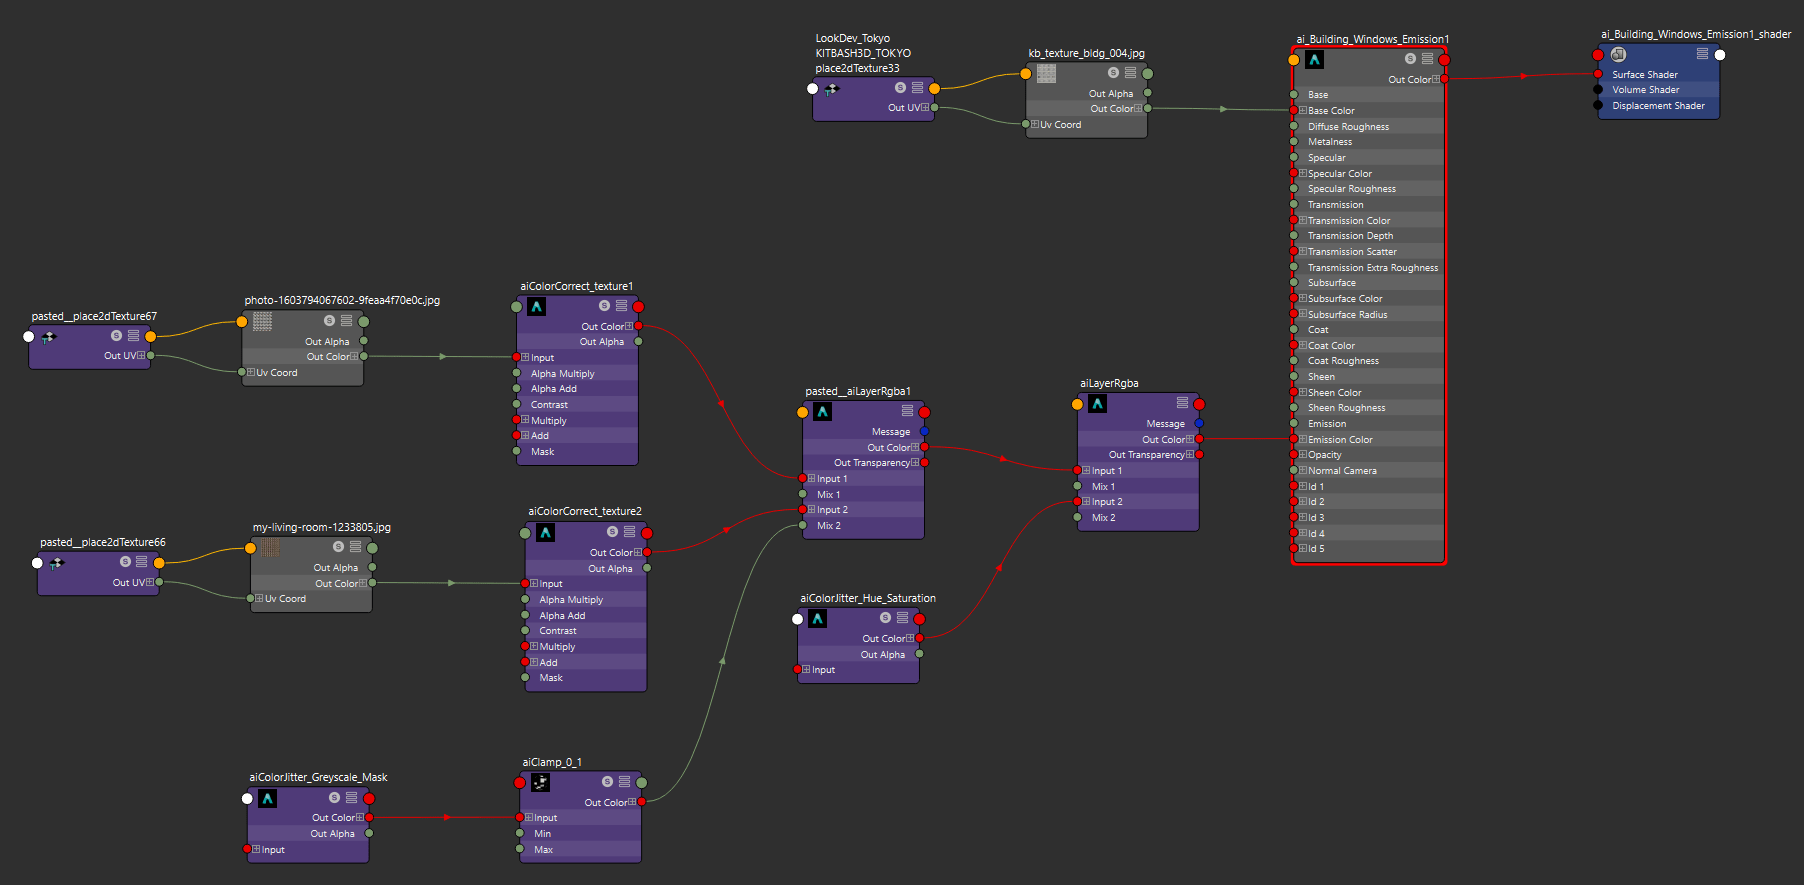
The final part of the LookDev was to add glowing windows to the buildings. This was the most important step in Maya to get right in my opinion, so that I would have a nice variation of on/off building lights. A lot of tweaking of the windows was done in Nuke, but more on that later.
After some testing I came up with a fairly simple solution... I combined two different textures in an aiLayerRgba node using a greyscale colour jitter (set to faces) as a mask. One of the textures was almost completely darkened, so that I would have some windows seeming completely black (lights turned off). This way I had a lot of variety in the brightness of each window. Another colour jitter node was used afterwards to vary the hue of the windows for each building. The result was then plugged into the emission channel of a new window shader. I duplicated this shader 3 times for all the small buildings and once more for some of the towers, varying the settings each time.
Below you can see one of these networks:
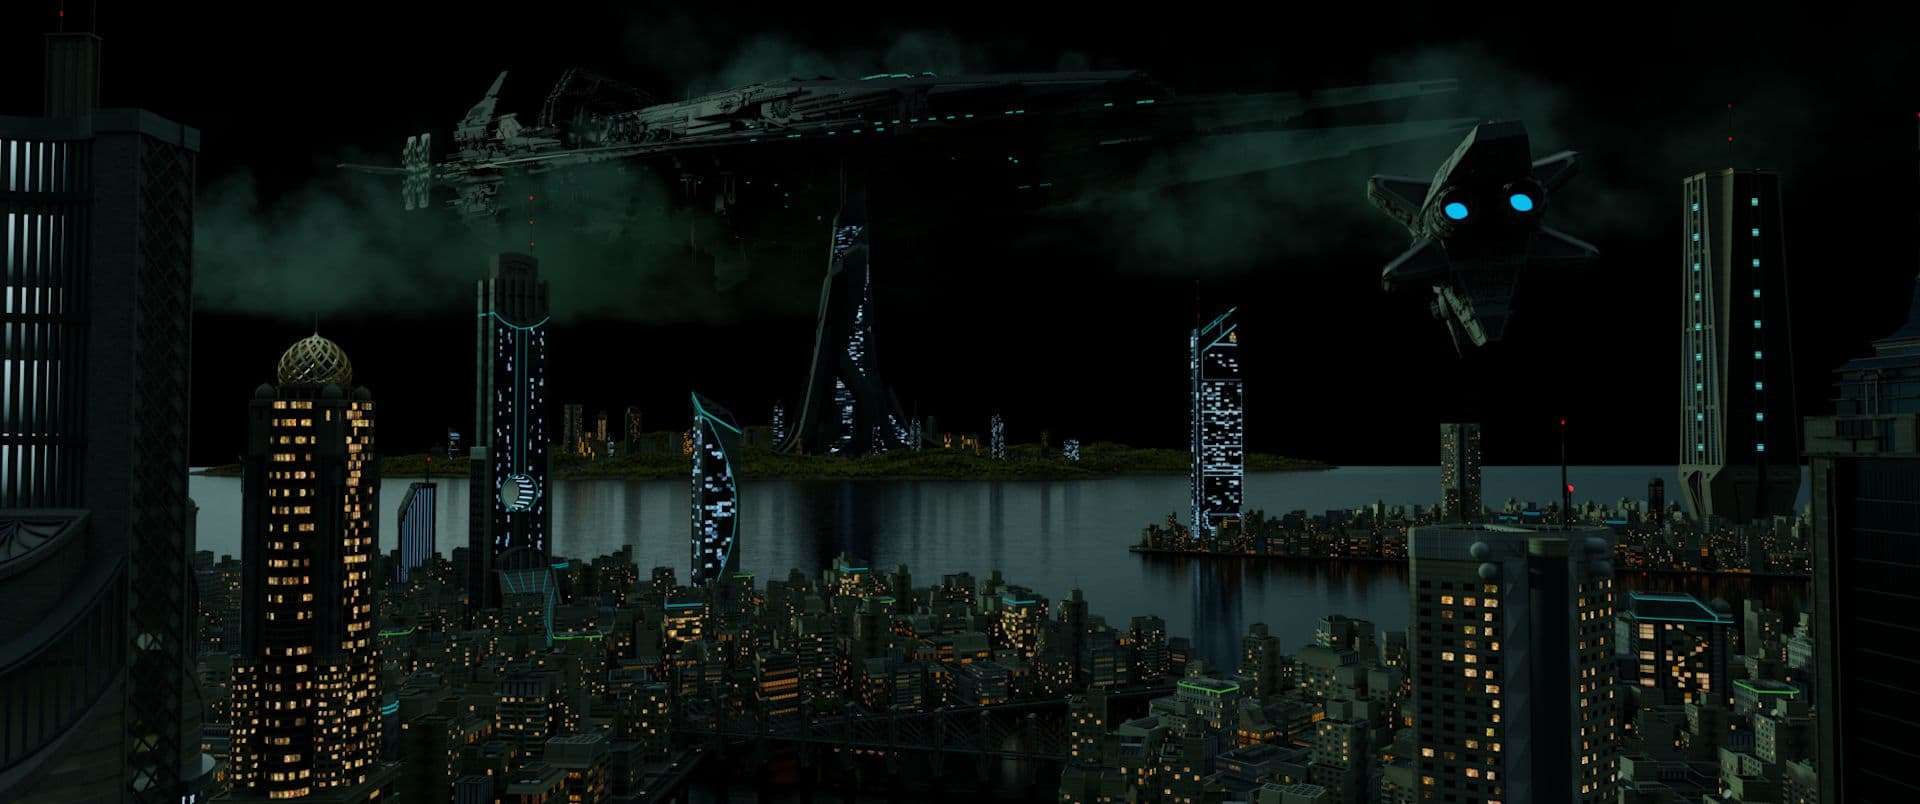
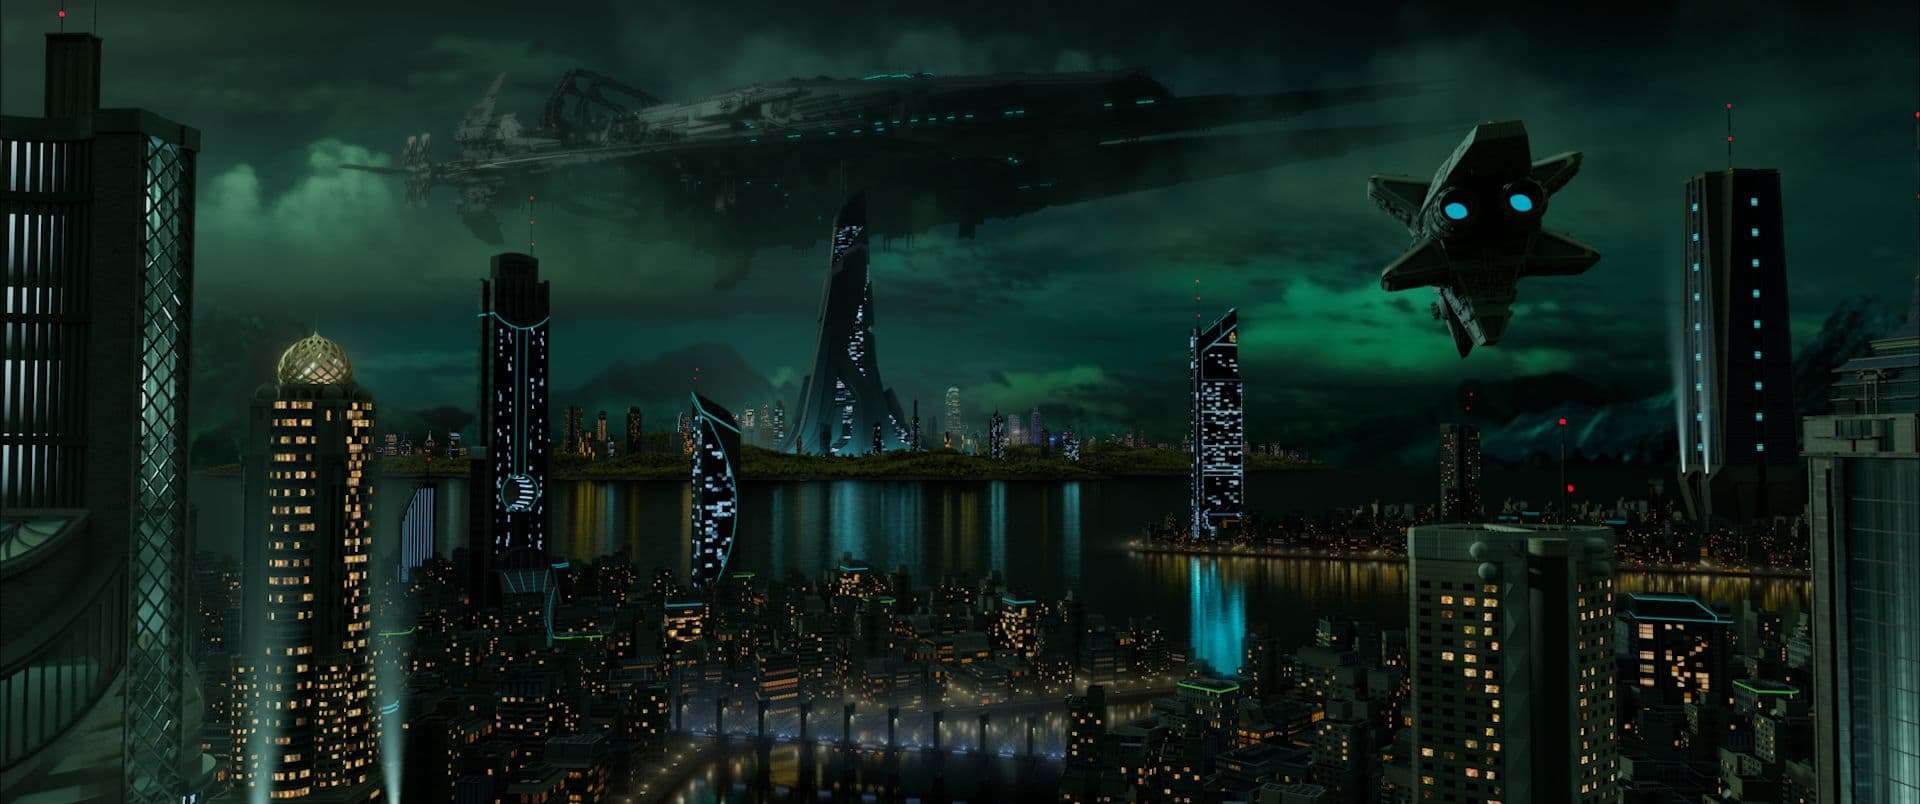
The lighting started off quite rough... I tried matching the lighting in my main reference, but was never satisfied with the result, so I decided to go hunting for more references. It was at this time that I was sent another amazing reference from the anime "Ghost in the Shell" (see my references above). I liked this green/blueish Sci-Fi look much more, so I decided to go into this direction.
First, I defined a general light direction coming from the left. Since I wanted the glow of the buildings to stand out I darkened down my skydome and directional light, so that the scene felt fairly gloomy. After that I added a lot of smaller lights to liven up the city. This included streetlights, spotlights, lights inside and around the front left and right towers, as well as a lot of static and animated lights on the bridge connecting the front islands.
The main focus of the composition was on the big tower in the background, so I decided to add a large area light, which simulated the bright, lively city below to help direct the focus even more.
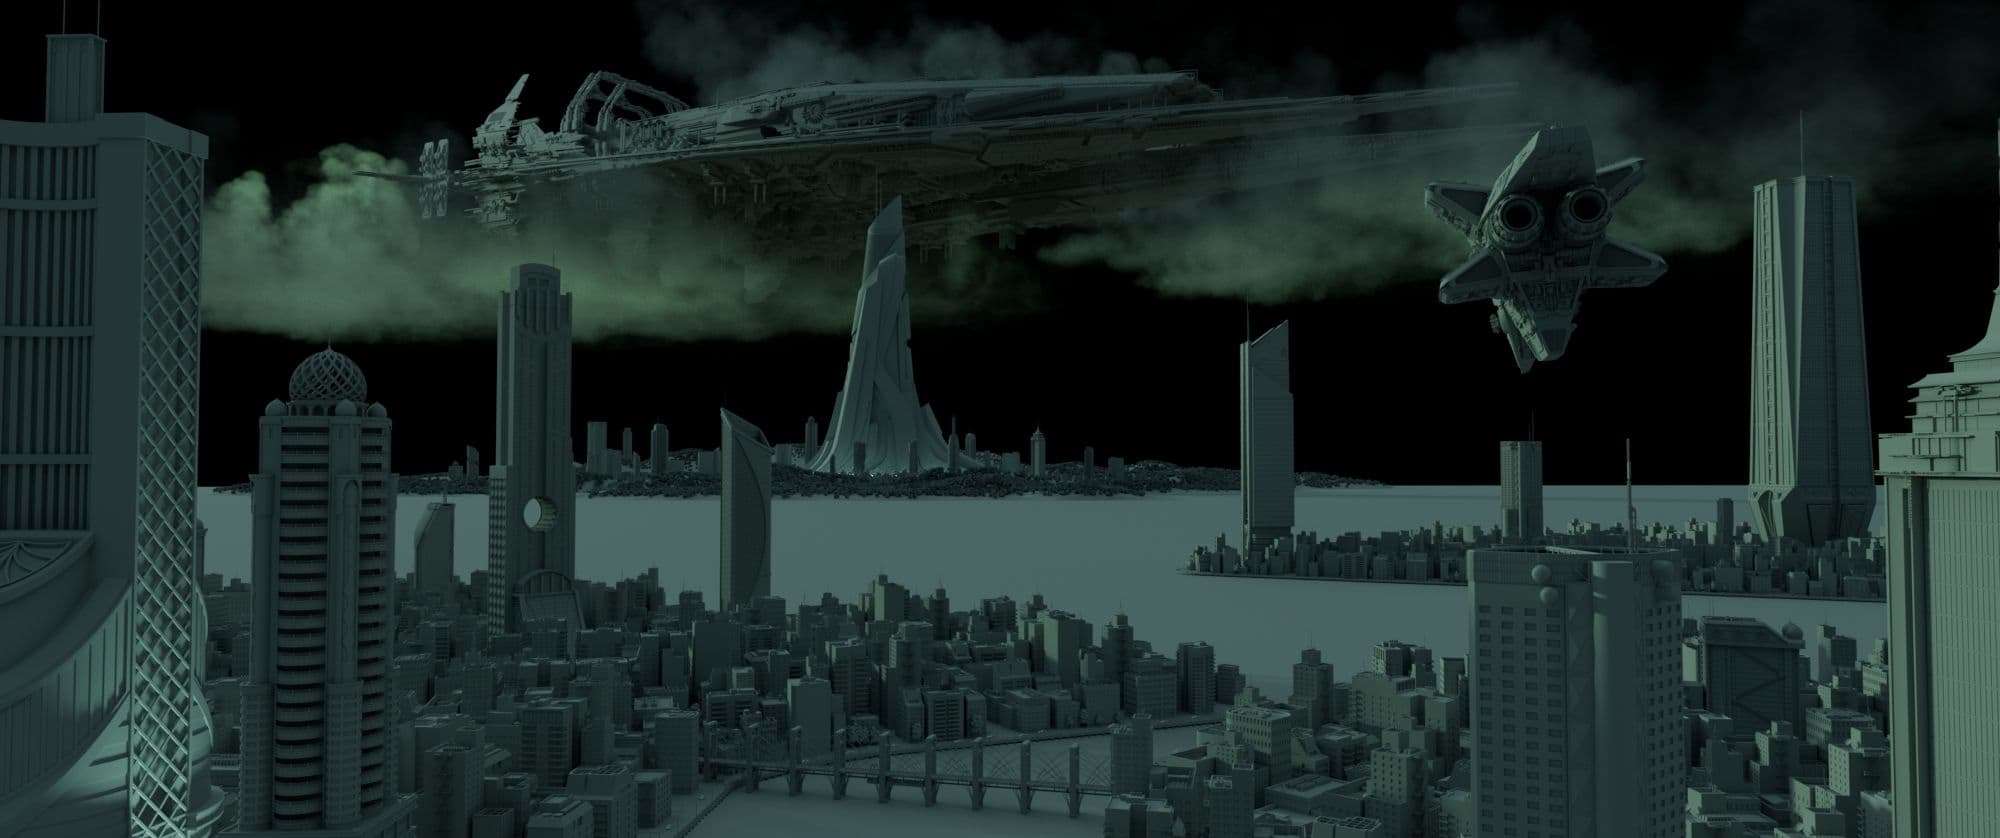
At this point the shot looked a lot more like the futuristic city I envisioned, so it was time to move on to Nuke where most of the work was done to get the final look. I ended up rendering 23 render layers including all the smaller lights in the scene, as well as 3 overall atmosphere (fog) passes. I also decided to do the motion blur of the spaceship in Nuke, so a motion vector AOV was added to the export.
Here are some screenshots of the scene setup:
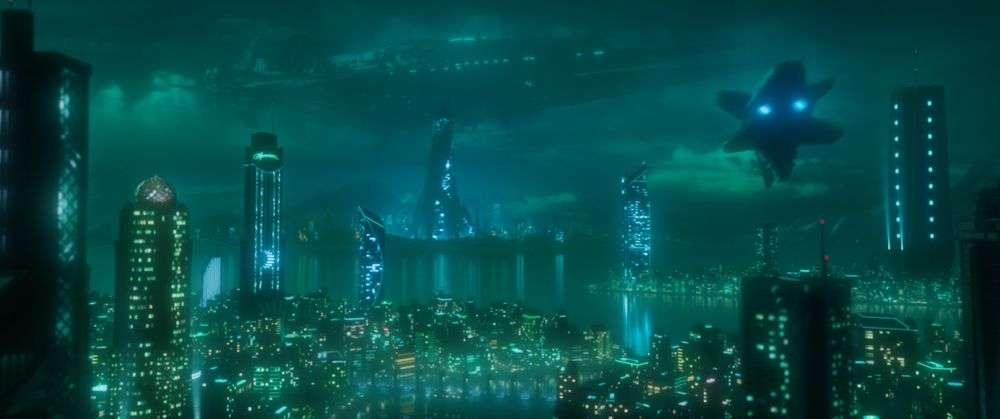
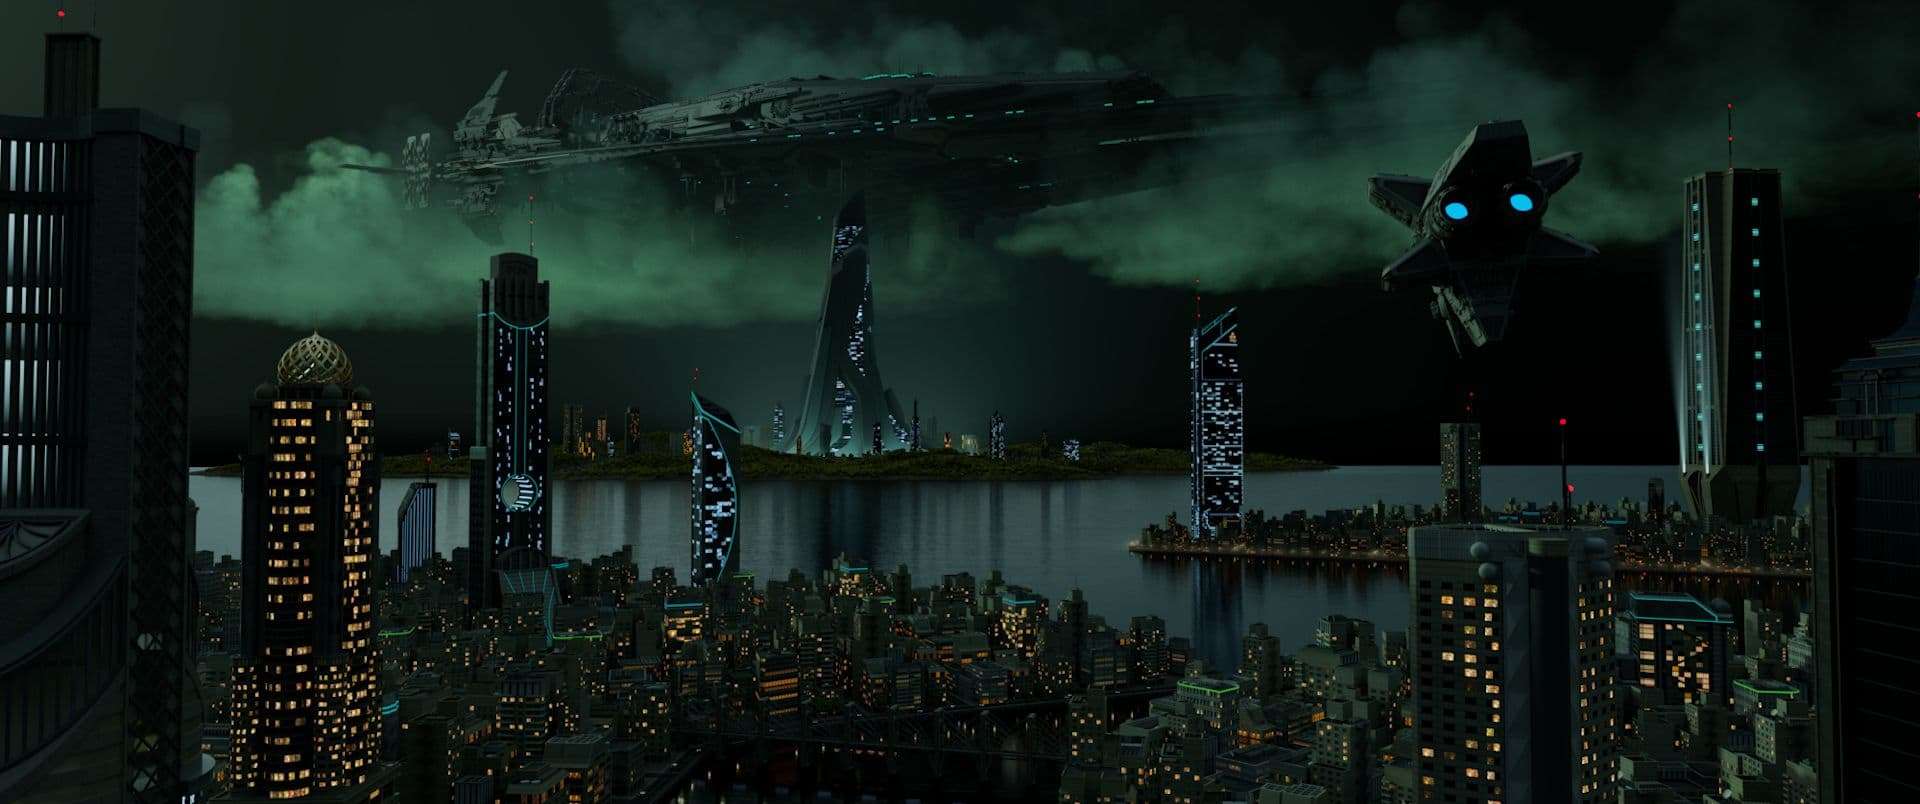
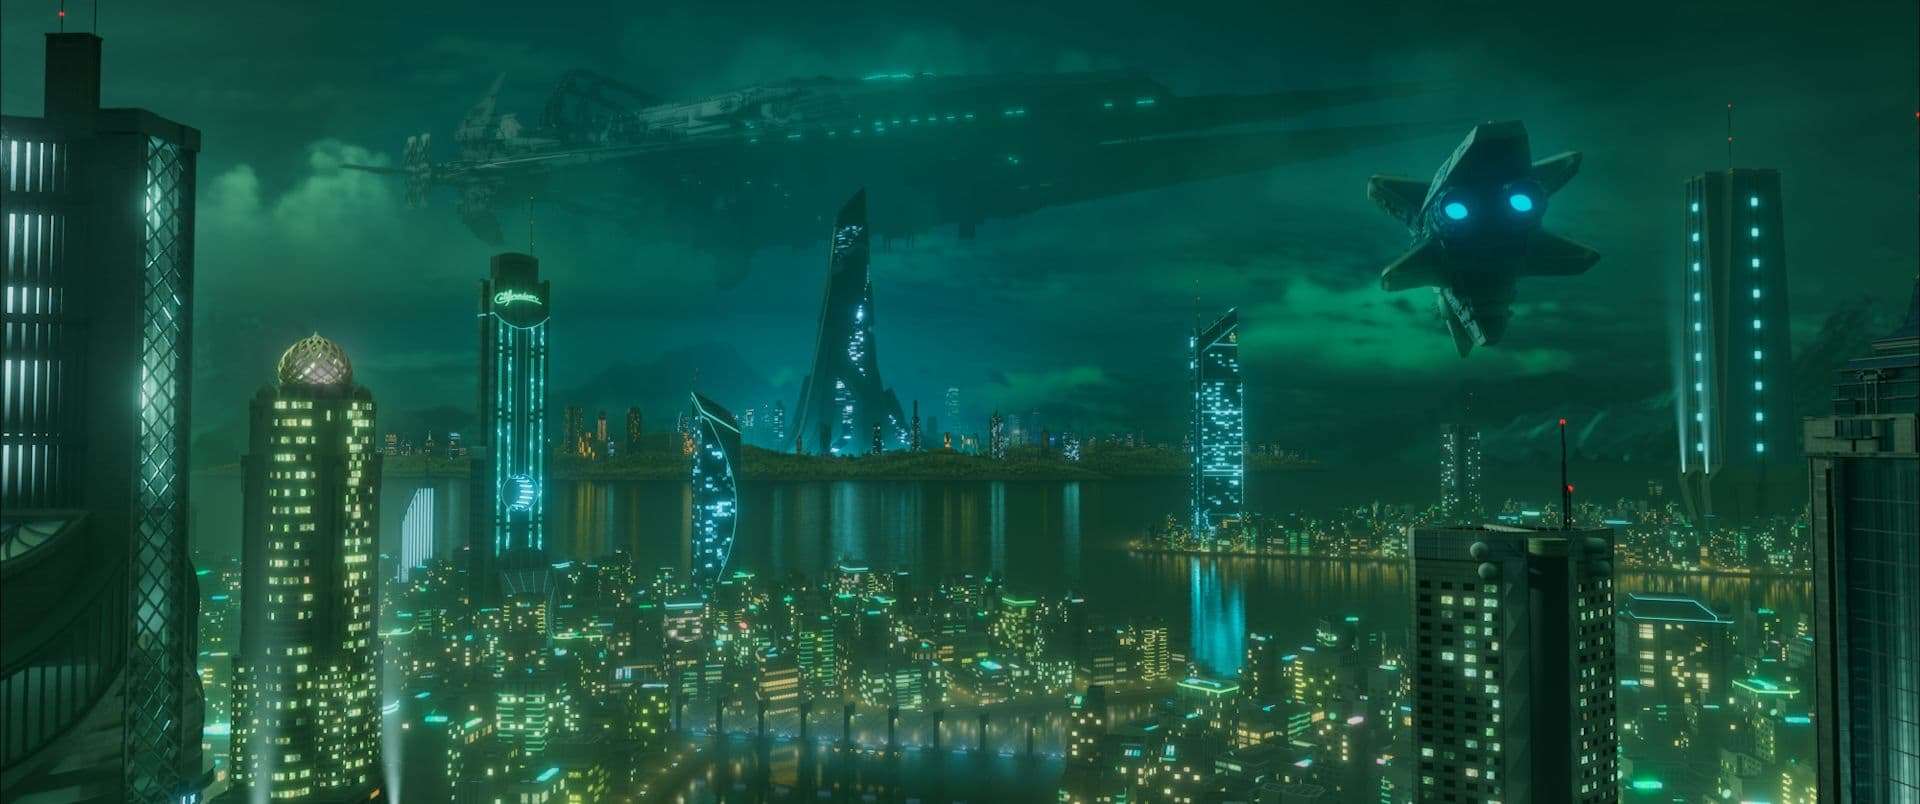
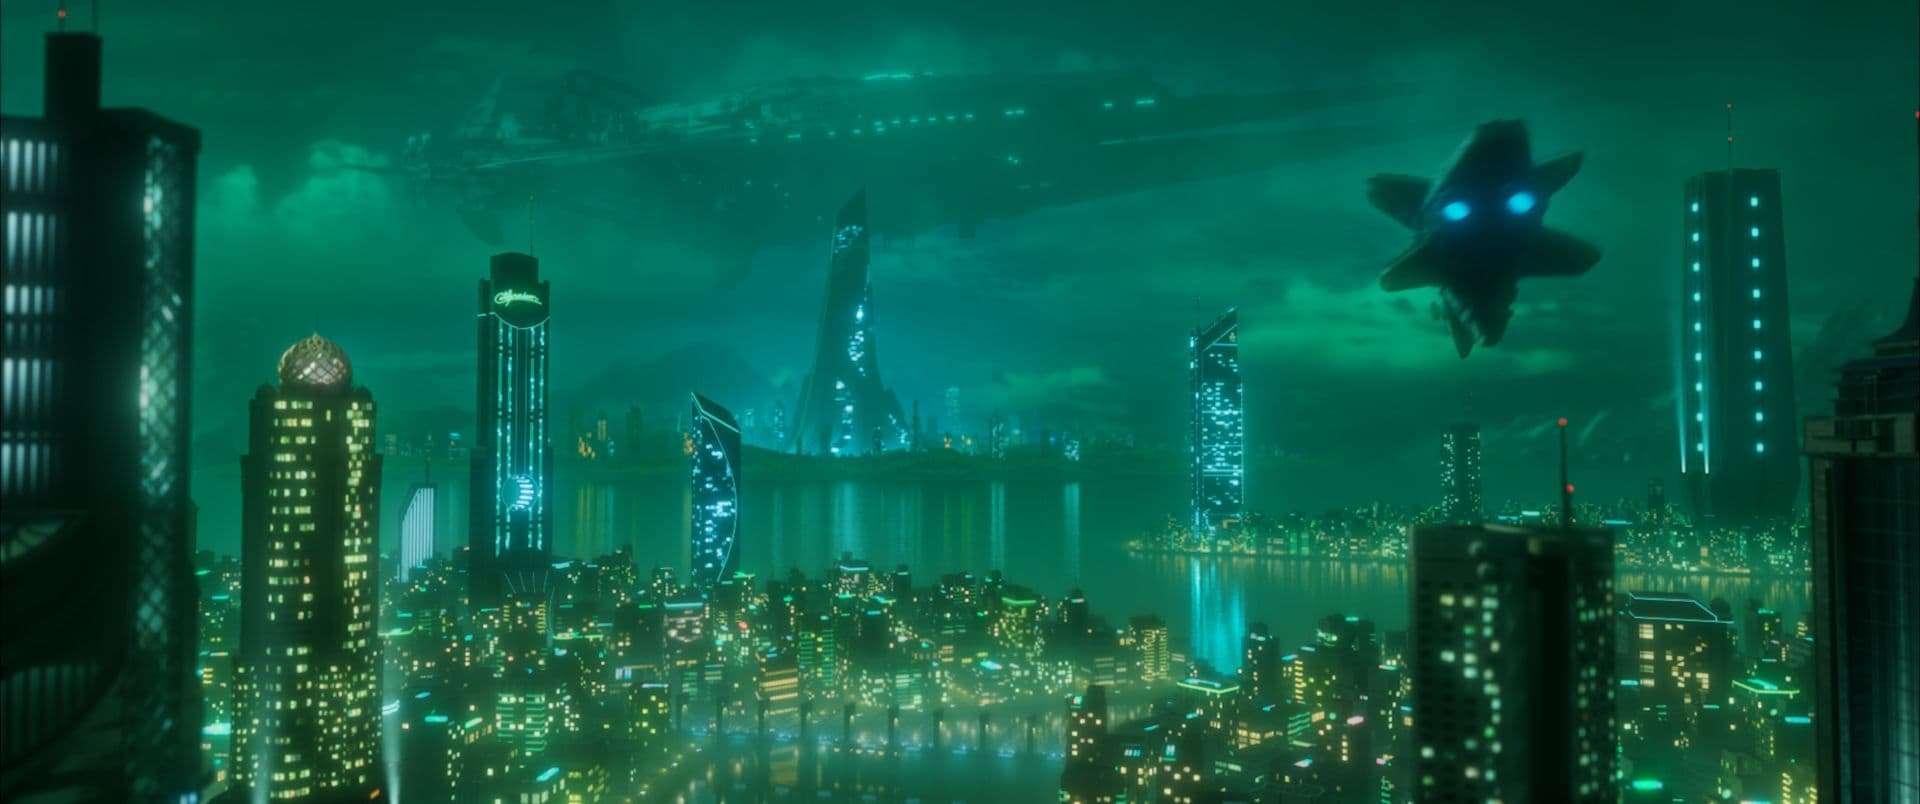
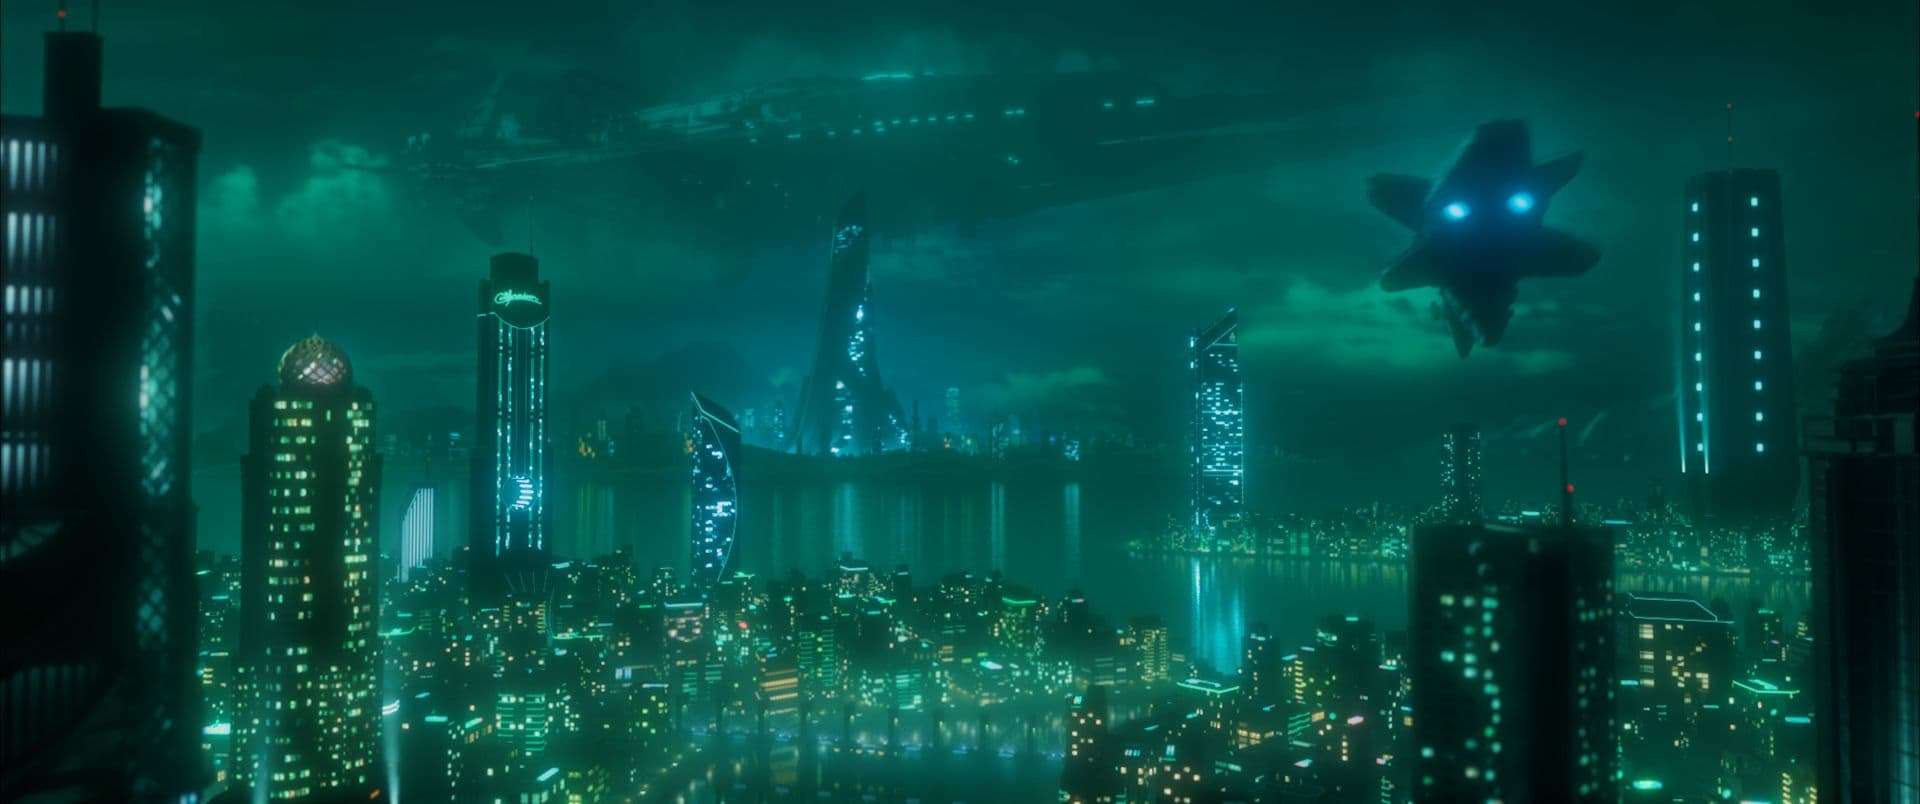
As mentioned before, quite a lot of work was done in Nuke to turn the raw render (see above) into the final image. The first thing I did was to balance out the lights. This meant giving everything a bit more saturation and toning down the lights in the front left tower, as it seemed to take away the focus from the big tower in the back. I also made the water a lot darker to make the shot more gloomy but more importantly, to make the reflections of all the lights pop more.
After that I decided to tackle the Background. For this I created a 3D scene in Nuke and added a projected a sky onto the inside of a sphere, as well as some mountains projected onto cards. I also put some towers (cards) behind the back island to add detail to the horizon line and to convey the feeling of a dense Sci-Fi city even more, essentially creating a basic matte painting. Lightwrap nodes were used to blend the render and the background together.
Then it was time for the window glow. At this point most of my windows had a yellow / red tone to them, which didn't fit the style I was going for in my reference. So with the help of Cryptomattes I made a bunch of masks for some grade nodes to change the colour tone and to add more variation. This worked perfectly, but something was still missing...there still wasn't enough detail in the city to really make it seem alive. Again, I used Cryptomatte to mask out certain building parts. With the help of these masks I put even more coloured windows into the city, which would later receive the "glow treatment". For more detail I also added a sign in 3D space to one of the towers on the left. I used a generated point cloud to make sure it was placed in the right spot for the camera movement.
I then moved on to the glow treatment: adding the 3 remaining fog passes, as well as a lot of glow to breath live into the city. With the help of a great gizmo I found online ("VirtualLens") I was able to introduce some haze into the scene, which blended everything together nicely. Because the 3 fog layers made the scene much brighter I had to colour correct it back down.
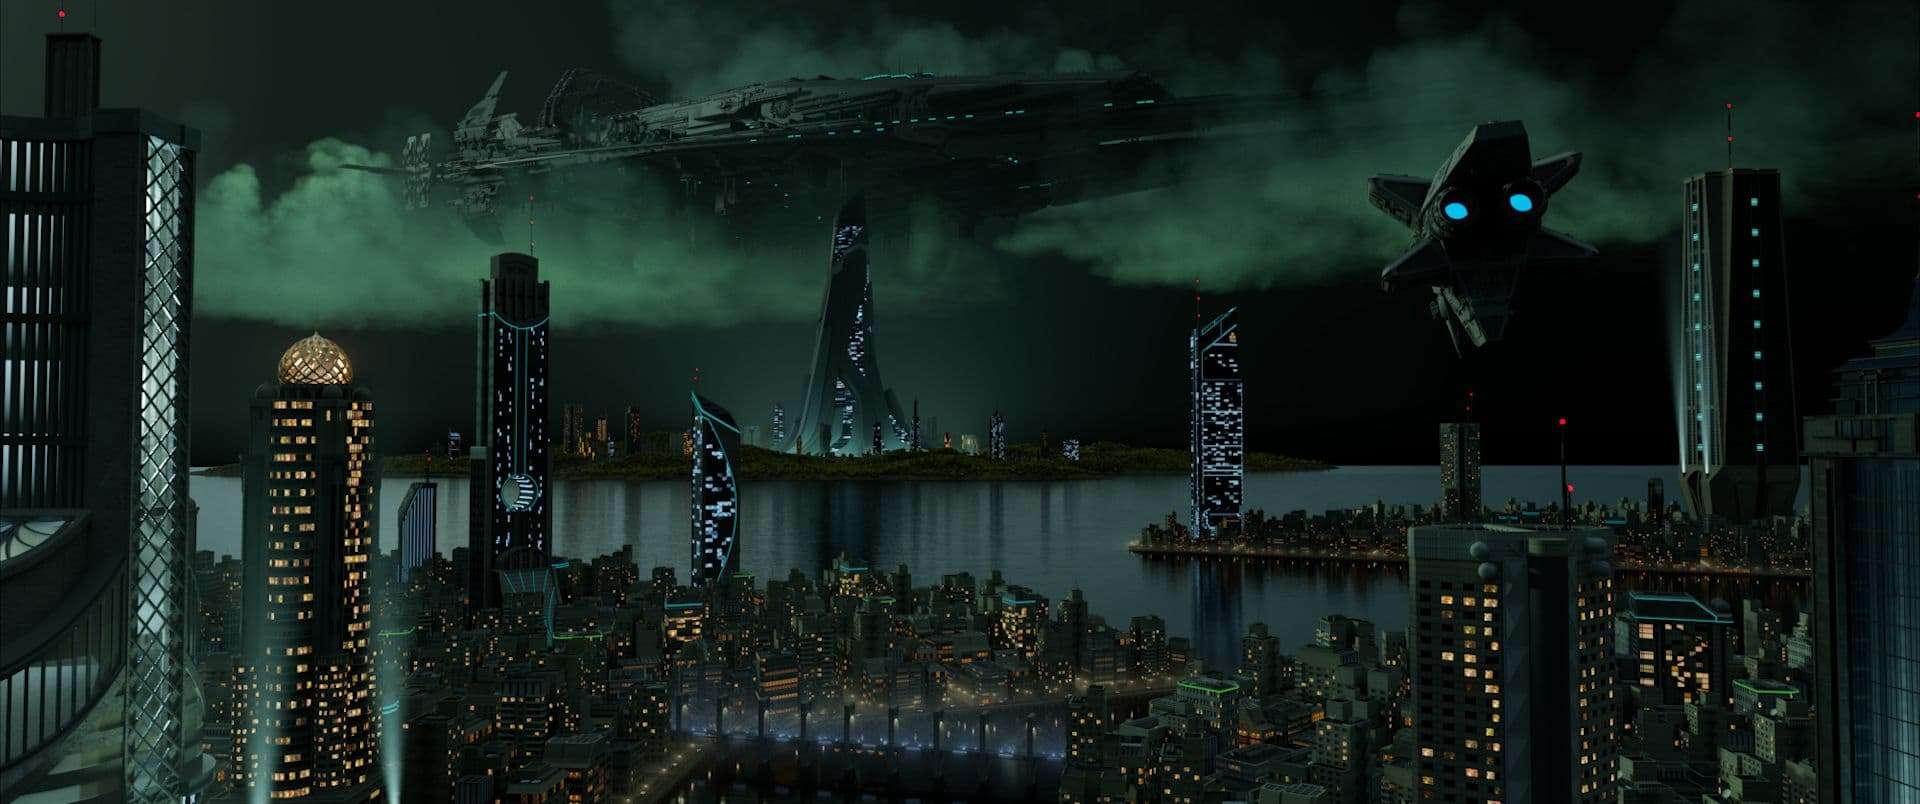
For some final touches I added depth of field, motion blur, chromatic aberration, lens distortion and camera shake to the comp. Lastly I used a LUT to give my shot the final Sci-Fi look. I've added a screenshot of my node tree below:

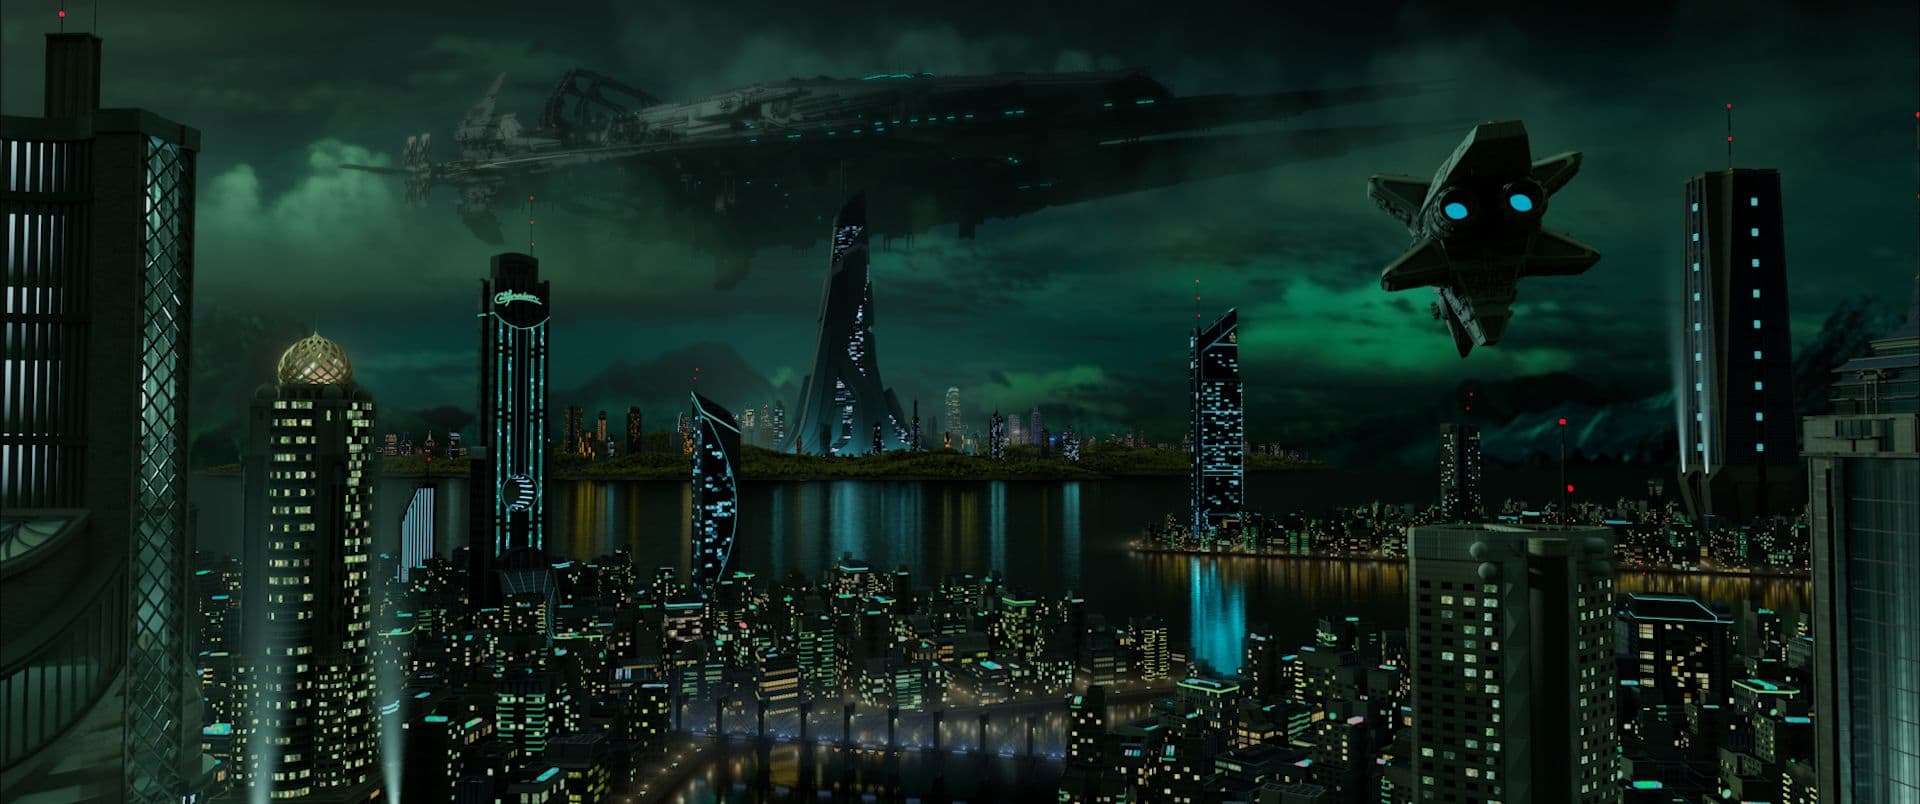
Raw Render - Final image:

For the full breakdown, be sure to check out the video below!
Because of the great reference in the beginning I got off to a great start. It was really fun to see the city grow during the layout phase. Even though I ran into some troubles during the lighting of my scene, I pulled through because of my second amazing reference. This just shows me once again how important references are in the creation of my projects.
I also learned how much work can be done in Nuke alone. Every time I compare my raw render with my final comp out of Nuke, I am blown away to seeing the huge difference. With more planing I feel like the workflow can be optimised better, to spend less time on things in Maya that can more easily and quickly be done in Nuke. Lastly, I learned to love Cryptomattes. It was the first time I used them to this extend and I have to say they are amazing - Can't recommend them enough.
For my first large scale shot I am overall very happy with the result and look forward to bringing even larger environments to live in the future!
Thanks for reading through this article! Hopefully I was able share some useful tips with this article and maybe even inspired you to start creating your own amazing artwork! If you have any questions or just want to connect, don't hesitate to reach out to me.

You can find more of Thomas' work on Instagram, ArtStation, and LinkedIn.