How to Paint and Lookdev a Spaceship Using Mari
Learn how to paint and lookdev a detailed spaceship asset using Mari, with Gal Ravid-Tal, an IAC-(The Israeli Animation College) alumnus and 3D generalist at YASHINSKI Visual Effects Studio.
Learn how to paint and lookdev a detailed spaceship asset using Mari, with Gal Ravid-Tal, an IAC-(The Israeli Animation College) alumnus and 3D generalist at YASHINSKI Visual Effects Studio.
Gal Ravid-Tal is studying 3D animation at IAC-The Israeli Animation College in Tel Aviv, and worked as a student practitioner during his course. Gal is currently working as a 3D generalist at YASHINSKI Visual Effects Studio in Tel Aviv.
Gal's Rookies portfolio is impressive, and we asked if he could share how he textured and lookdev'd his award-winning spaceship asset using Mari exclusively.
The project I am writing about, "Spacewoods", started as a part of a mission in college. We had to choose a theme - animation, modeling, etc., and pick up a project that showcased our abilities at that stage in our learning.
I like creating works with atmosphere and story behind it and so I started to look for ideas for a project. The project actually started as an abandoned boat, located in the heart of a lake.

After I prepared everything and looked at the frame I was not happy with the result and felt the project was incomplete.
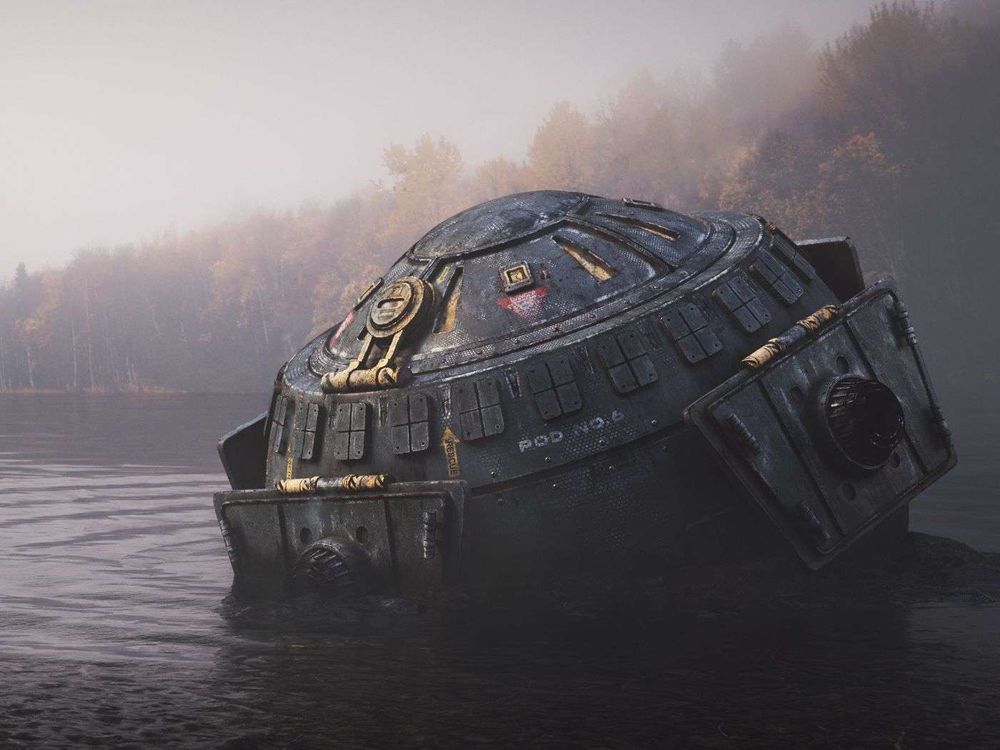
I went back to looking for other references and I came across a picture that immediately caught my eye, the pod in the forest by Charly Barrera.

I liked the atmosphere and the pod itself; it was pretty much what I was looking for without even knowing it. I got the idea of combining the frame I already had with the pod from the new reference. I liked the combination, especially when the goal was to create a frame with a mysterious atmosphere and a sense of curiosity.
At some point during my work I felt that I did not have enough references for the pod itself, more specifically, the materiality of the pod and it’s structure. So, I decided to look for spaceship engines and any information that could help me.
Texturing is all about storytelling, a way to bring your 3D model to life.
My goal was to give the spaceship an old damaged rusty look that helps to give a sense of time and history.
A good approach to start is to break down the final result into separate materials,
it will make things easier and allow you to pay attention to each material.
Baking utility maps (ambient occlusion, curvature, normal) and basic mask creation were done in Substance 3D while all the rest of the work was done in Mari.

I chose Mari because I wanted to dive into the main VFX texturing software, it offers great control over the texturing and involves node based workflow.
I created some costume setups to have better control over my masks, creating separation for each material so I can work faster, smarter and nondestructively.
I wanted to be able to come back and tweak whatever I needed to.

Base layer:
I made a uniform color and mixed it with some texture and some color variation to help me break the consistency.
Graphic elements:
I took some pictures and elements, placed them and created a mask with some scratches and smudges for the damaged look
Wear and tear:
Here things started to get interesting. I focused on the variations of wear and tear, some hard damage in specific places that cause the reveal of the underneath material.
I created this by using my masks and mixed them with some more textures for breakup and variations to give it a more organic look.
Rust:
How will my prop look like an old spaceship without some rust?
By tweaking my masks and more hand painted details I revealed the rust on some parts of the model.
Burn marks and wetness:
I used gradients to isolate and fade the areas of the engines and the bottom part of the spaceship with some more textures and masks to enhance the effect. I also used dark values to give the spaceship burn effect and wetness.
Summary:
This process was for the diffuse channel so I can see my textures and their effect, and when I was happy with the results I converted the diffuse map to specular by changing some setting, colors values etc.
The last step was to convert my diffuse that contains color data to black and white texture with some more tweaks for the glossiness map.
By separating materials, parts of the model and masks it was very easy to make changes and to keep things synced.

To have the most control on my textures in my shader setup I created some RGB textures that contained my materials masks.
Each mask assigned to single channel, R, G, B, allowed me to store 3 types of masks in a single file so I could make chances and adjustments if necessary.
This method is very efficient and can save you a lot of time so you can tweak things without re-exporting your textures.

I chose V-Ray to render with, as it offers great GPU rendering while using my RTX graphic card.
It's easy to have control over the render elements, as you have the options to change the light colors and intensity without re-rendering.
Adding post effects helped me create many versions and better representation of the look I was after without compromising the final result.
I chose Nuke to do my compositing, as it is industry standard in the VFX pipeline and I was curious about what I could do with it.
Using Nuke allowed me to tweak my render elements, add some more details to the water, and even do some 3D relighting to my scene.

This project was challenging for me, I had to overcome both technical and creativity challenges, lack of references, and new software to learn.
I knew that I was going to jump into unknown territory but I had a clear vision in front of me.
My advice when approaching projects that require new skills and learning, is to follow your own instincts as you create something and trust yourself. Most importantly, enjoy the way.

If you have any questions or other things you would like to know or share, feel free to contact me!
You can find more of Gal's work on ArtStation, Instagram, Facebook and LinkedIn.