Creature Concept Sculpting in ZBrush
Learn how to create a creature concept sculpt inZBrush, with 4th Year VFX Student at ArtFX School, Alexis Jorion.
Learn how to create a creature concept sculpt inZBrush, with 4th Year VFX Student at ArtFX School, Alexis Jorion.

Alexis Jorion is a 4th Year VFX Student at ArtFX School, Montpellier, France, who is passionate about VFX in Cinema, and captivated by the creation of 3D environments and creatures. This passion led Alexis to test himself to create a creature concept with ZBrush, Photoshop and Nuke in just a few hours, without sacrificing quality.
How is it possible to create a quick creature concept with Zbrush in just a few hours including the rendering?
I’m very excited to present you with my process for creating high-quality textured and rendered creatures in just a few hours.
To explain my process, I've picked this concept : "CLICKER".

Softwares used:
To begin, you need to find the right references and imagine a story with them. For this creature, my main inspiration was the Clickers of “The last of us”. It’s a horrible creature, but I want to imagine a Clicker more elegant. It’s why I decided to choose contrasting references, gly mushrooms, blob and mould to be juxtaposed with the beauty of a flower.

Now I have my main idea: a horrible Clicker like "The last of us" with the shapes of the flower. I can start the timer!
You can watch the sculpting part in ZBrush on YouTube. I did all aspects of this model in 6h10.
To summarise the key phases:
1) Blocking of my model.
2) Creating the dynamicsshapes to reflect my original story: the Clicker Flower.
3) Adding the teeth, mushrooms and the first layer of details. I've worked only with the "dynamesh", not the "subdivision", to have a better control on my sculpt.
4) I then sculpted with more precision the placement of my muscles, to have a believable anatomical creature.
5) Once the model with a good anatomical structure was done, I then started to push the skin details. For instance, adding gravity.
6) To finish the speed sculpt part, I started working with "subdivisions levels". I wanted to push the details of the thinner muscles and with the alphas, add more skin's surface details.
7) I then placed a camera render in ZBrush, posed my model and broke up the symmetries to get a more natural aspect.
Don’t forget, the goal it’s to be fast - you don’t need to refine all the details in the model, the rest of the high-quality details can be done within the texturing phase.
Now comes the very important part, the rendering. I setup a three-point lighting to highlight my model. Then I rendered the Z depth, AO, Shadow and an alpha mask with a basic material.
Once this was done, I used different MatCAP to have a larger choice of effects for the texturing and to be able to simulate various light reflections. You can download all of these MatCap's here.

To finish, I rendered a "Framer" material to keep all the details of my sculpt in Photoshop.
Nowthe 3D part is done, we can start the texturing. First, I composited all of my ZBrush Material renders together. Most of the time, I love to use the "Blending Options" of Photoshop to mix the textures more quickly.
I combine photobashing and painting techniques to add irregularity in my model. I play with a mold: skin texture with the "fusion modes" in Photoshop.
Note that you can do all the compositing in Photoshop as well, but I personally love to use After Effect or sometimes Nuke, as I have my custom presets for the grading.
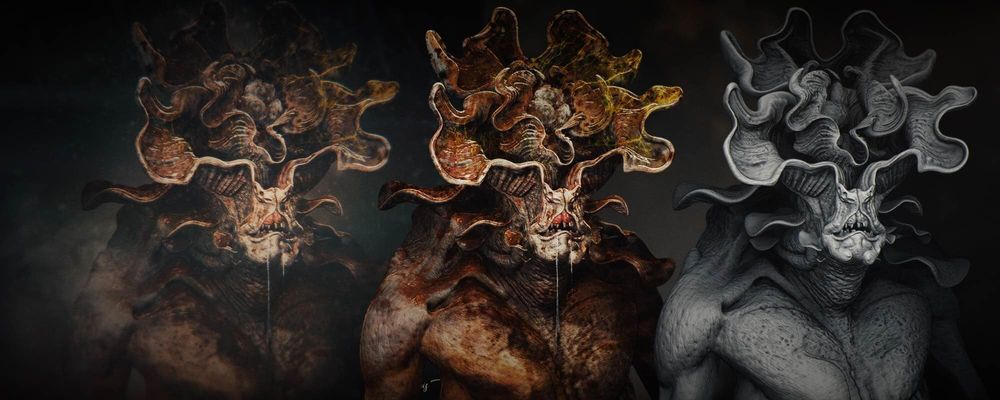
As we can see, I have an interesting creature now, with colour and skin details, but she doesn't quite seem alive yet.
To add some more realism and credibility to my concept, I needed to work on a background, create a mood, add some atmosphere and play around with a few colour corrections.
For the environment, I've blurred a picture on the background of my creature. Now I can imagine my monster interacting with the background. It's more immersive.
To finalise my image, I added some layers to add a photorealistic element to the image, such as lens flares, stock footages, lens distortion, dirt, chromatic aberration and grain.

In this article, I'm sharing with you my method when I sculpt quick concepts. I try to always be true to the original idea and know where to put the details. It's very important for me to be focused on the references, be sure I'm telling the story I want and translating the proper emotion through my creatures.
You can find more of Alexis' work on The Rookies, ArtStation, Instagram and LinkedIn.