Creature Grooming Techniques in Houdini
In this article, Thitaphon Palm Piraban, covers techniques in Houdini to help you create your first creature groom.
In this article, Thitaphon Palm Piraban, covers techniques in Houdini to help you create your first creature groom.
Thitaphon Palm Piraban is a recent graduate of Savannah College of Art and Design, who has aspirations of working in the Visual Effects industry as a look development and grooming artist. In this article, Thitaphon Palm Piraban, covers techniques in Houdini to help you create your first creature groom.
My name is Thitaphon Piraban, aka ‘Palm’ Piraban, and I am currently a CG Generalist for FuseFX in the United States. I'm originally from Thailand, and my previous education includes a B.Sc. in Animation from the College of Art, Media, and Technology in Chiang Mai, Thailand, and a M.A. in Visual Effects from Savannah College of Art and Design (SCAD) in Georgia, US.
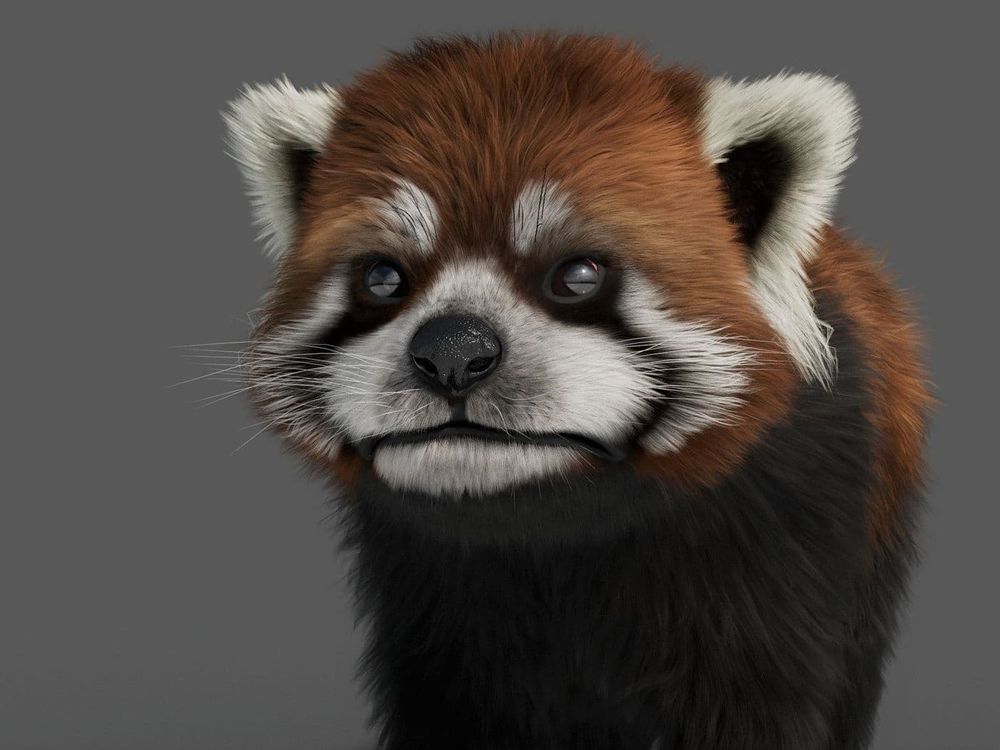
In the Summer of 2021, I embarked on a project to groom a red panda as a way to learn Houdini. The main focus was grooming its hair and fur, as well as enhancing my expertise in 3D look development and lighting.
Please enjoy this article in which I demonstrate my process of creating Red Panda. This was my first creature grooming in Houdini, which implements the knowledge from online tutorials by Jesus Fernandez, a VFX artist specialising in hair and fur.
The model I used was created by Alejandro Castiblanco.
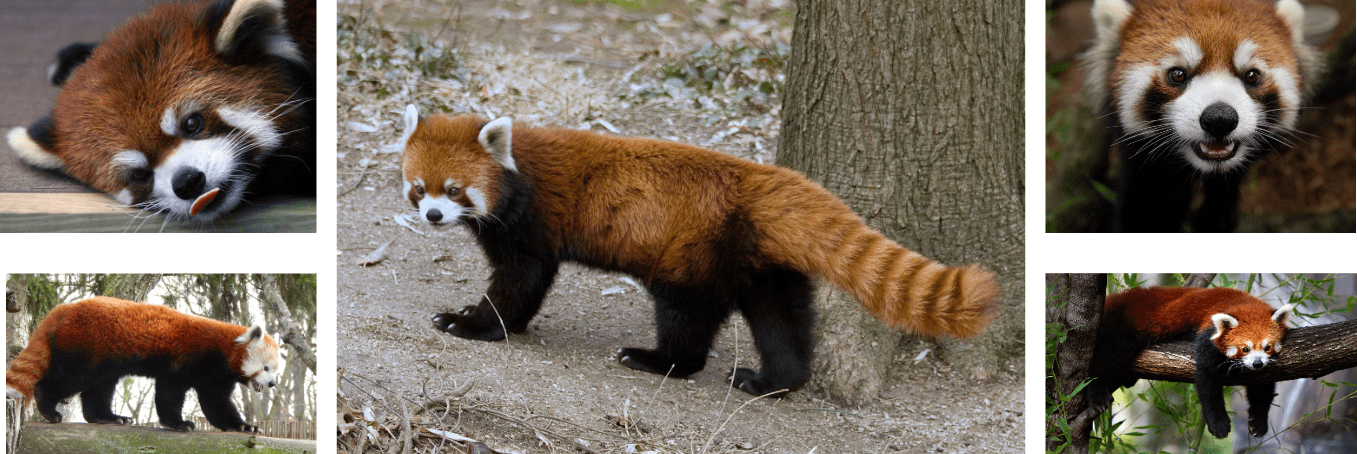
I used the middle image as the primary reference because this image has a unique fur style that is good for making a creature grooming.
I began the project by grooming a 3D model made by Jesus FC. I split the guide grooms to make it easier to brush, but it was difficult smoothing each border.
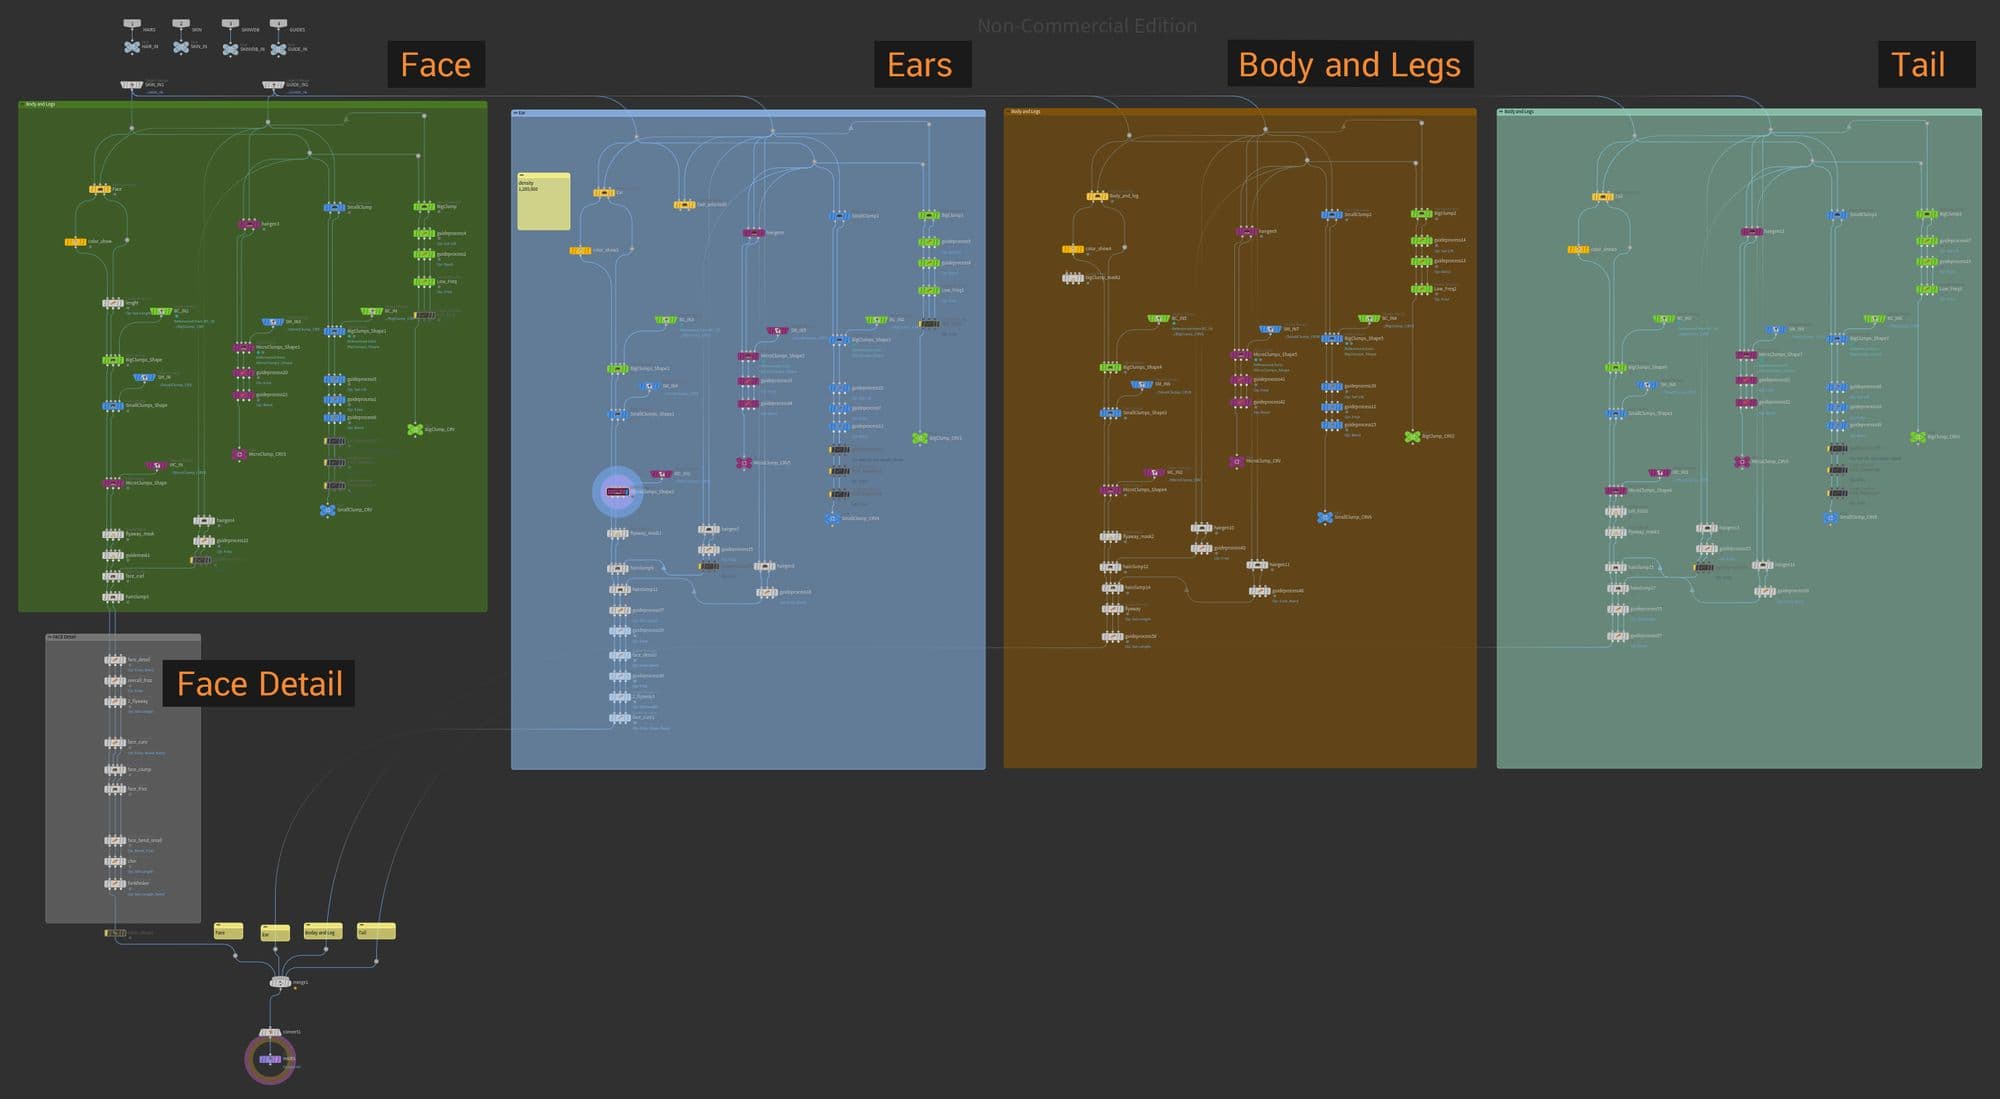
I created a Geometry node named redPanda_GEO and a Subnetwork node named GROOM_OBJECT. I separated the groups by material: BodyGroom, Body, Eyeline, Eye, and Nail inside that Geometry node.
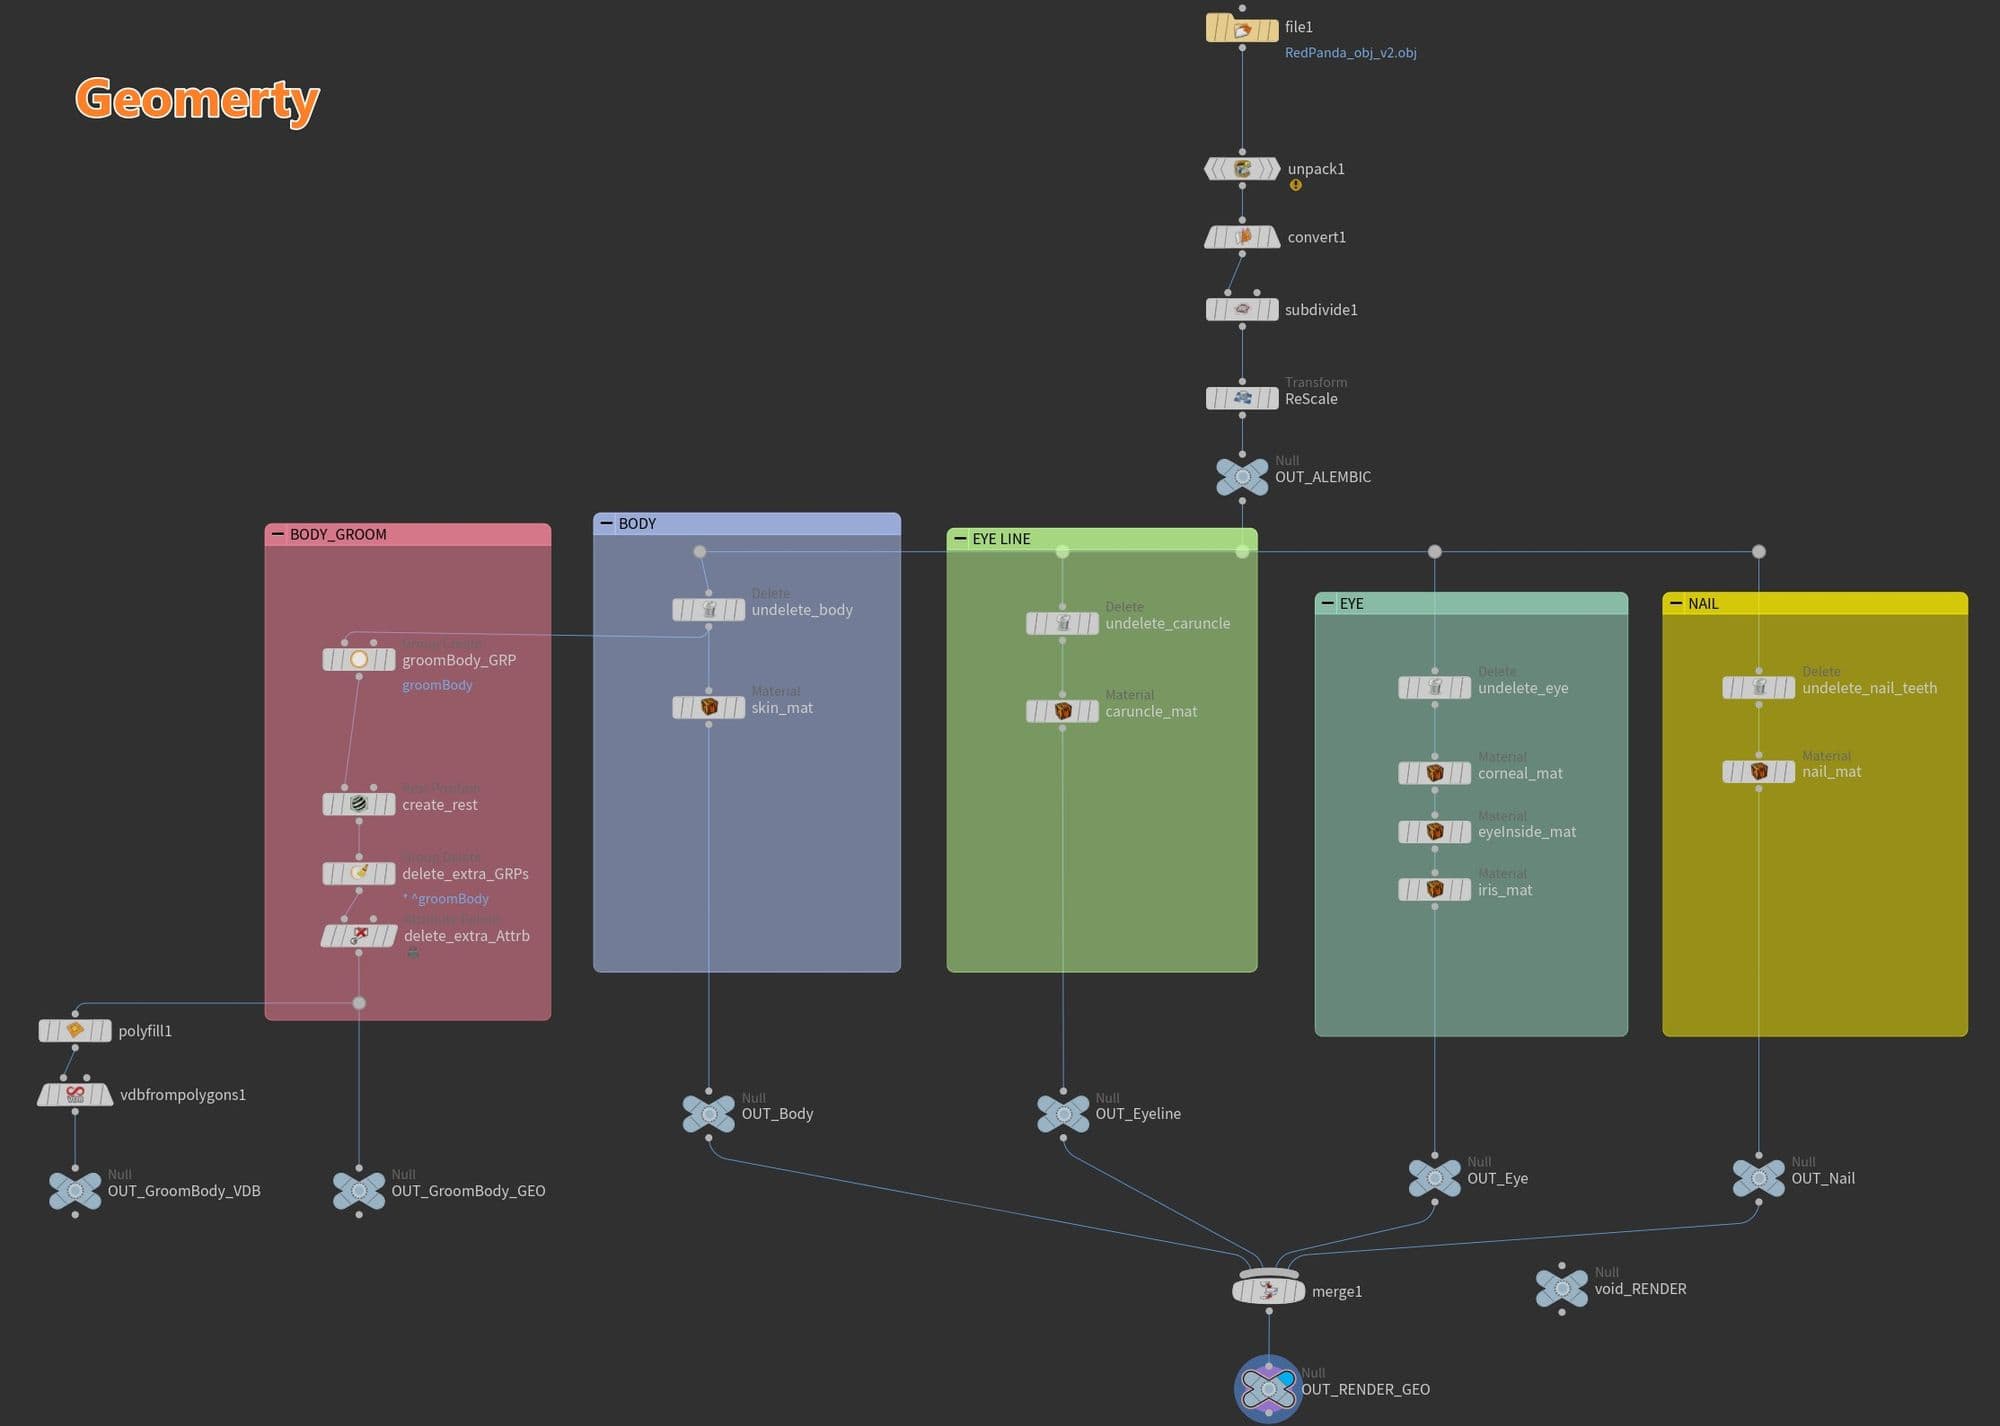
In the detail of the connection, I picked the geo that I needed, and then I used the “Delete” operation and changed it to “Delete Non-Selected”. Next, I connected the material node.
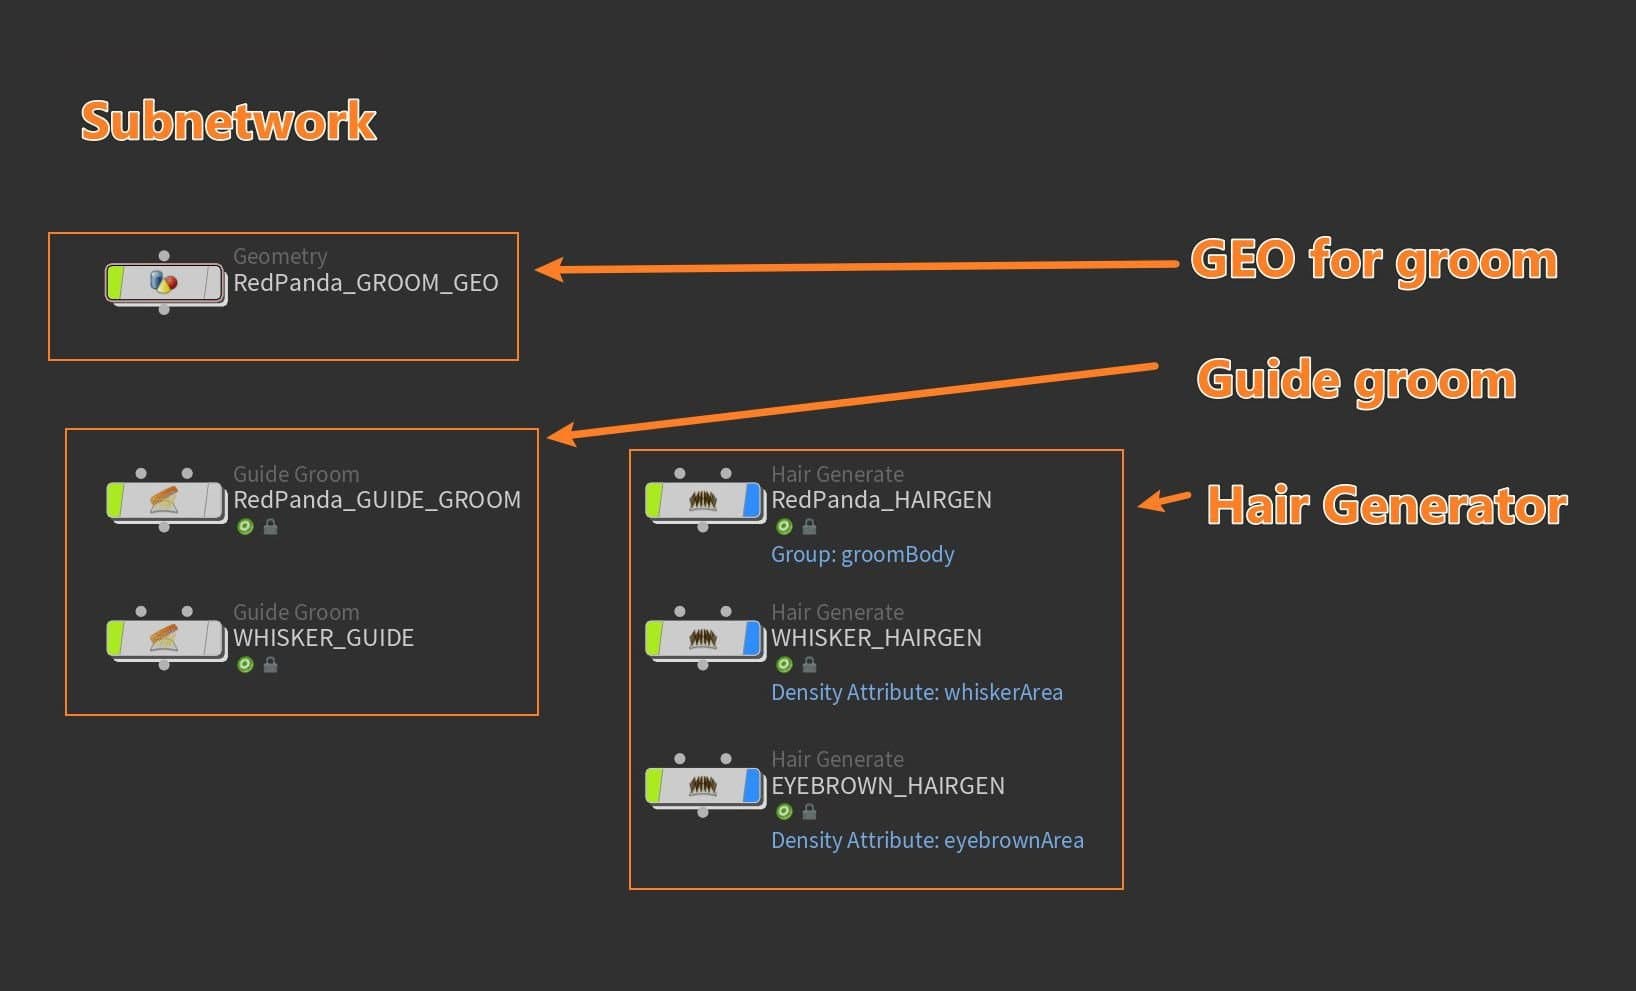
The Subnetwork Node looks like a folder at the object level that can contain a lot of nodes. In this project, I put all the groom stuff in this subnetwork. For example, …_GROOM_GEO, …GUIDE_GROOM, and …HAIRGEN are in this subnetwork.
In the Subnetwork/Redpanda_GROOM_GEO, I used two objects to merge the nodes and selected OUT_Groom_Body_GEO and OUT_GROOM_BODY_VDB, respectively.
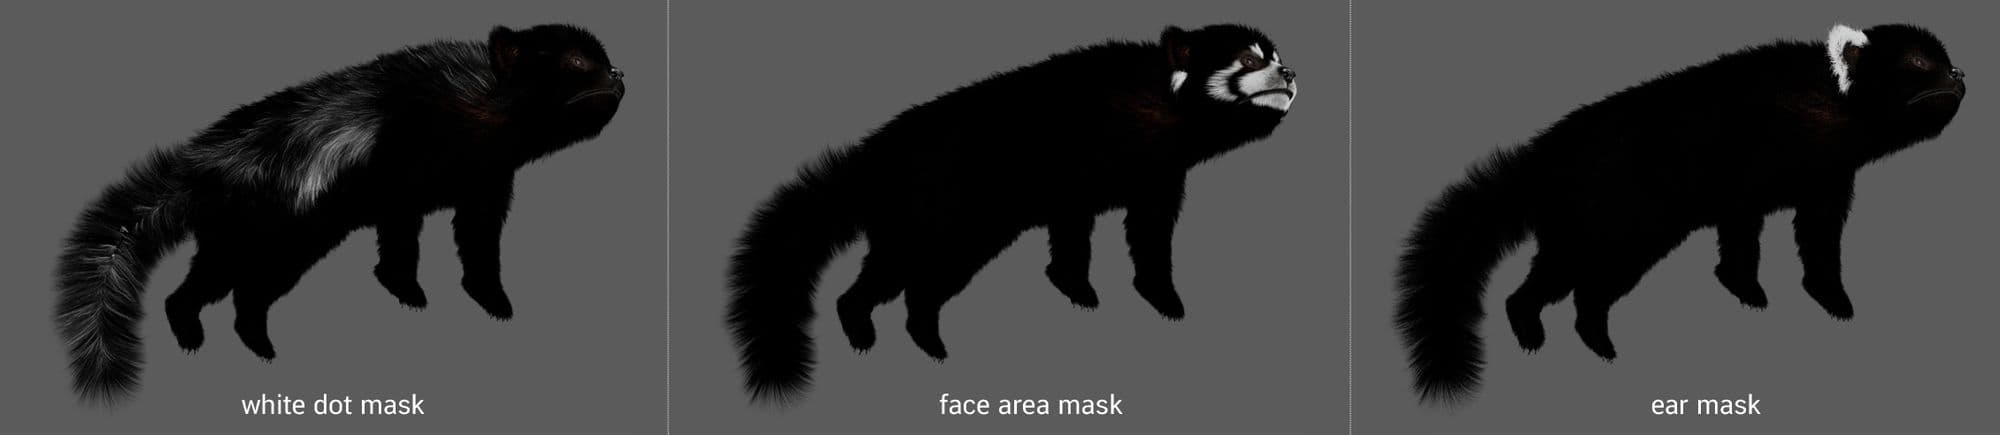
Attribute Paint Node: I separated the geometry face by body part, which includes face, ears, body, legs, and tails (sometimes I select from existing UV or select manually). I also paint masks in this node: density, length, and clump.
This is the original guide creation of the connection. I started from an Object merge that links with GEO Node Outside the Subnetwork. I created a guide groom node from the Groombear plugin.
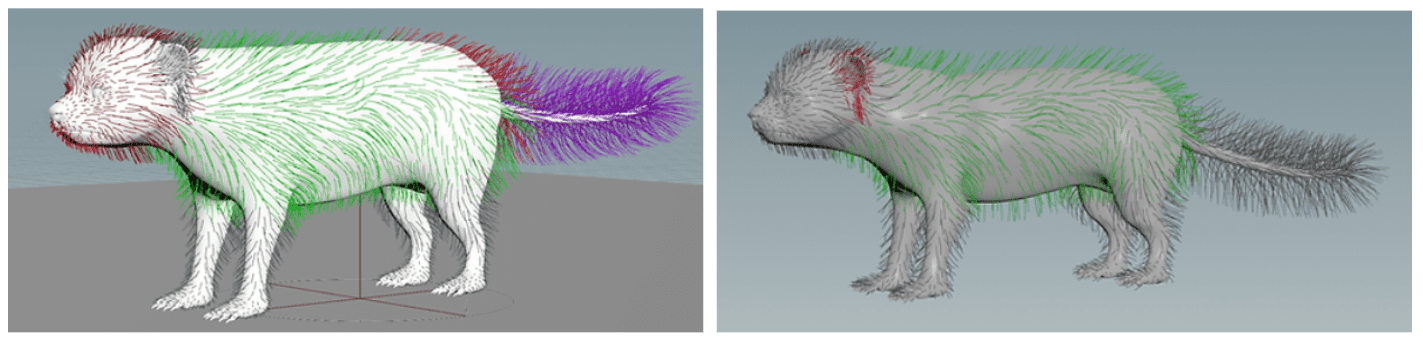
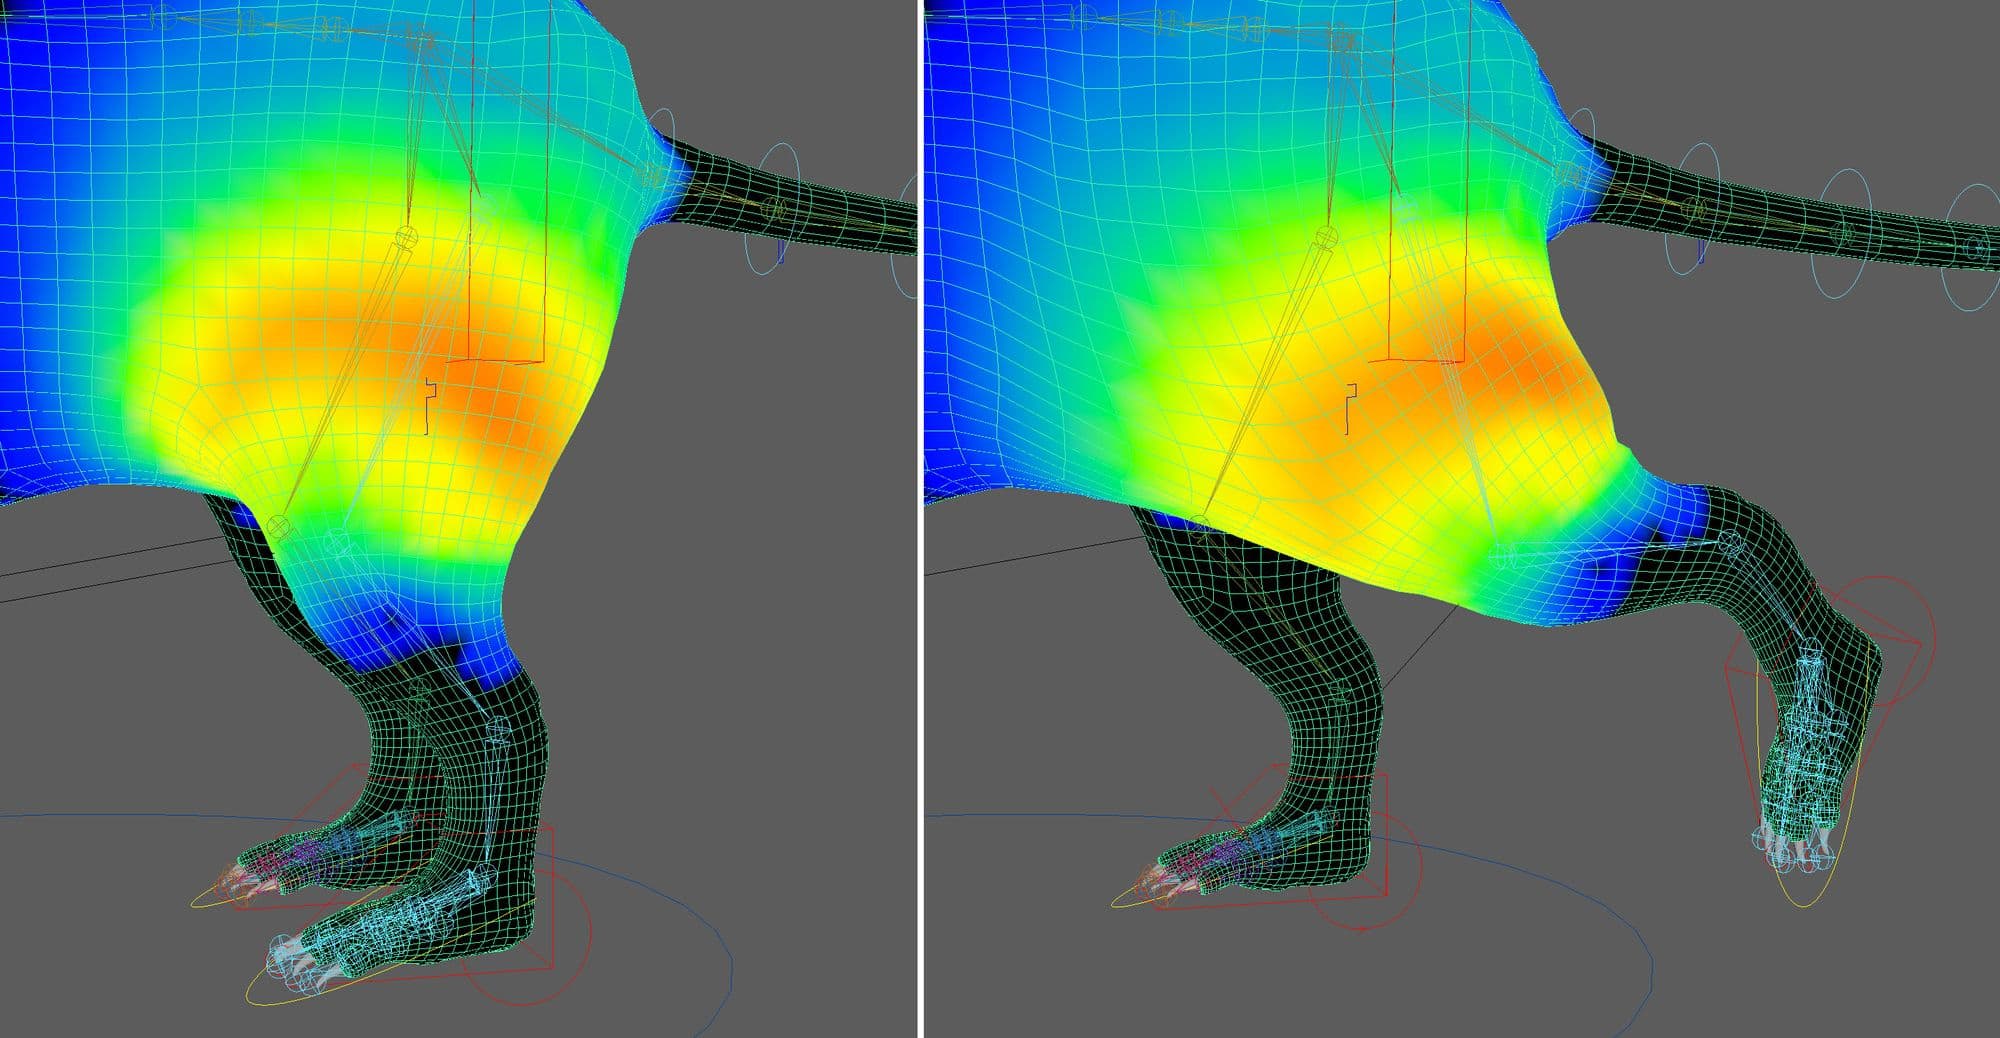
These are all my guide groom nodes. I split the guide groom to make it easier to brush, but it was hard to make it smooth on each of the borders.

For the face guide groom, I started with one side and mirrored them to that node. After that, I made two sides look asymmetric. Next, I merged the face guide groom node into the main line (merge2).
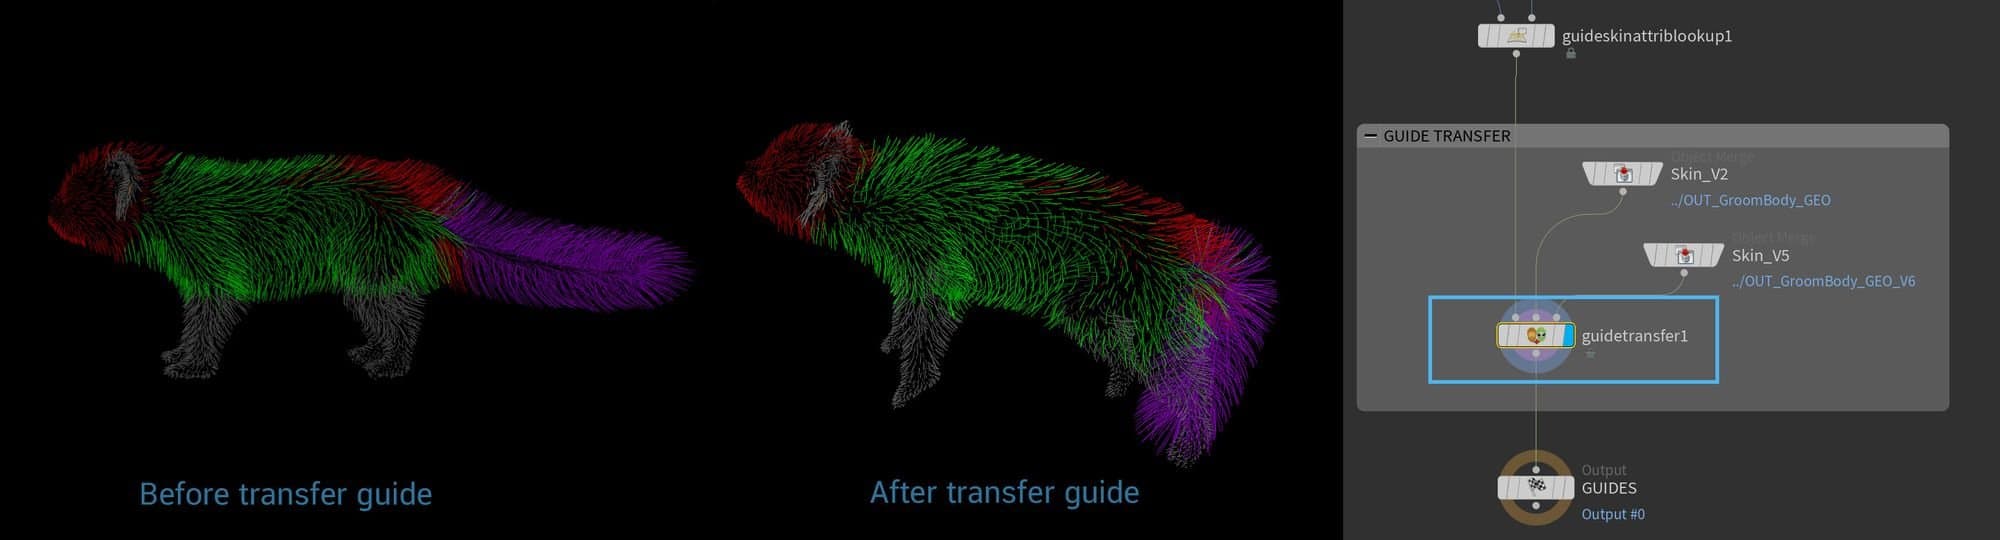
After the merge2 node, I used “guideskinattriblookup” to connect the clean guide and skin. Then I transferred the guide groom to a new model by using a "GuideTransfer" node.
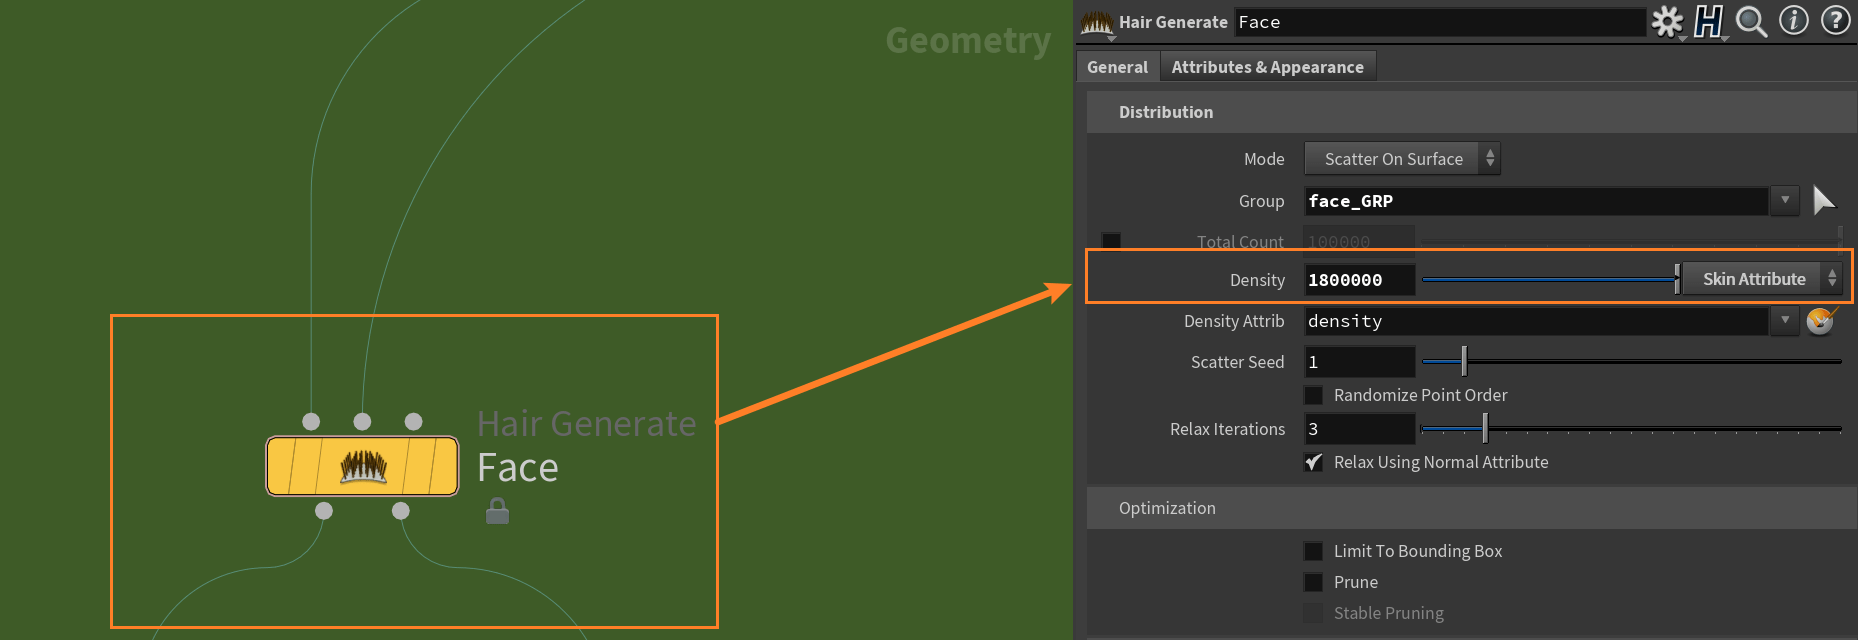
I split the Hair Generate group into four parts: face, ears, body+legs, and tail. In each part, they have their own hair generator node. This is because each part has a different density and look.
As recommended by Jesus FC in his tutorial, I reduced the wired connections by creating a null node and using an object merge node to call it.
Density: I set Face Hair Generate for Face Group and I set Face Density at 1,800,000.
Clumping: I separated clumping into three sizes: big, small, and micro. Then I added it to the main line. After adding three clumps, I adjusted the hair using a guide process node (bend, frizz, set length).
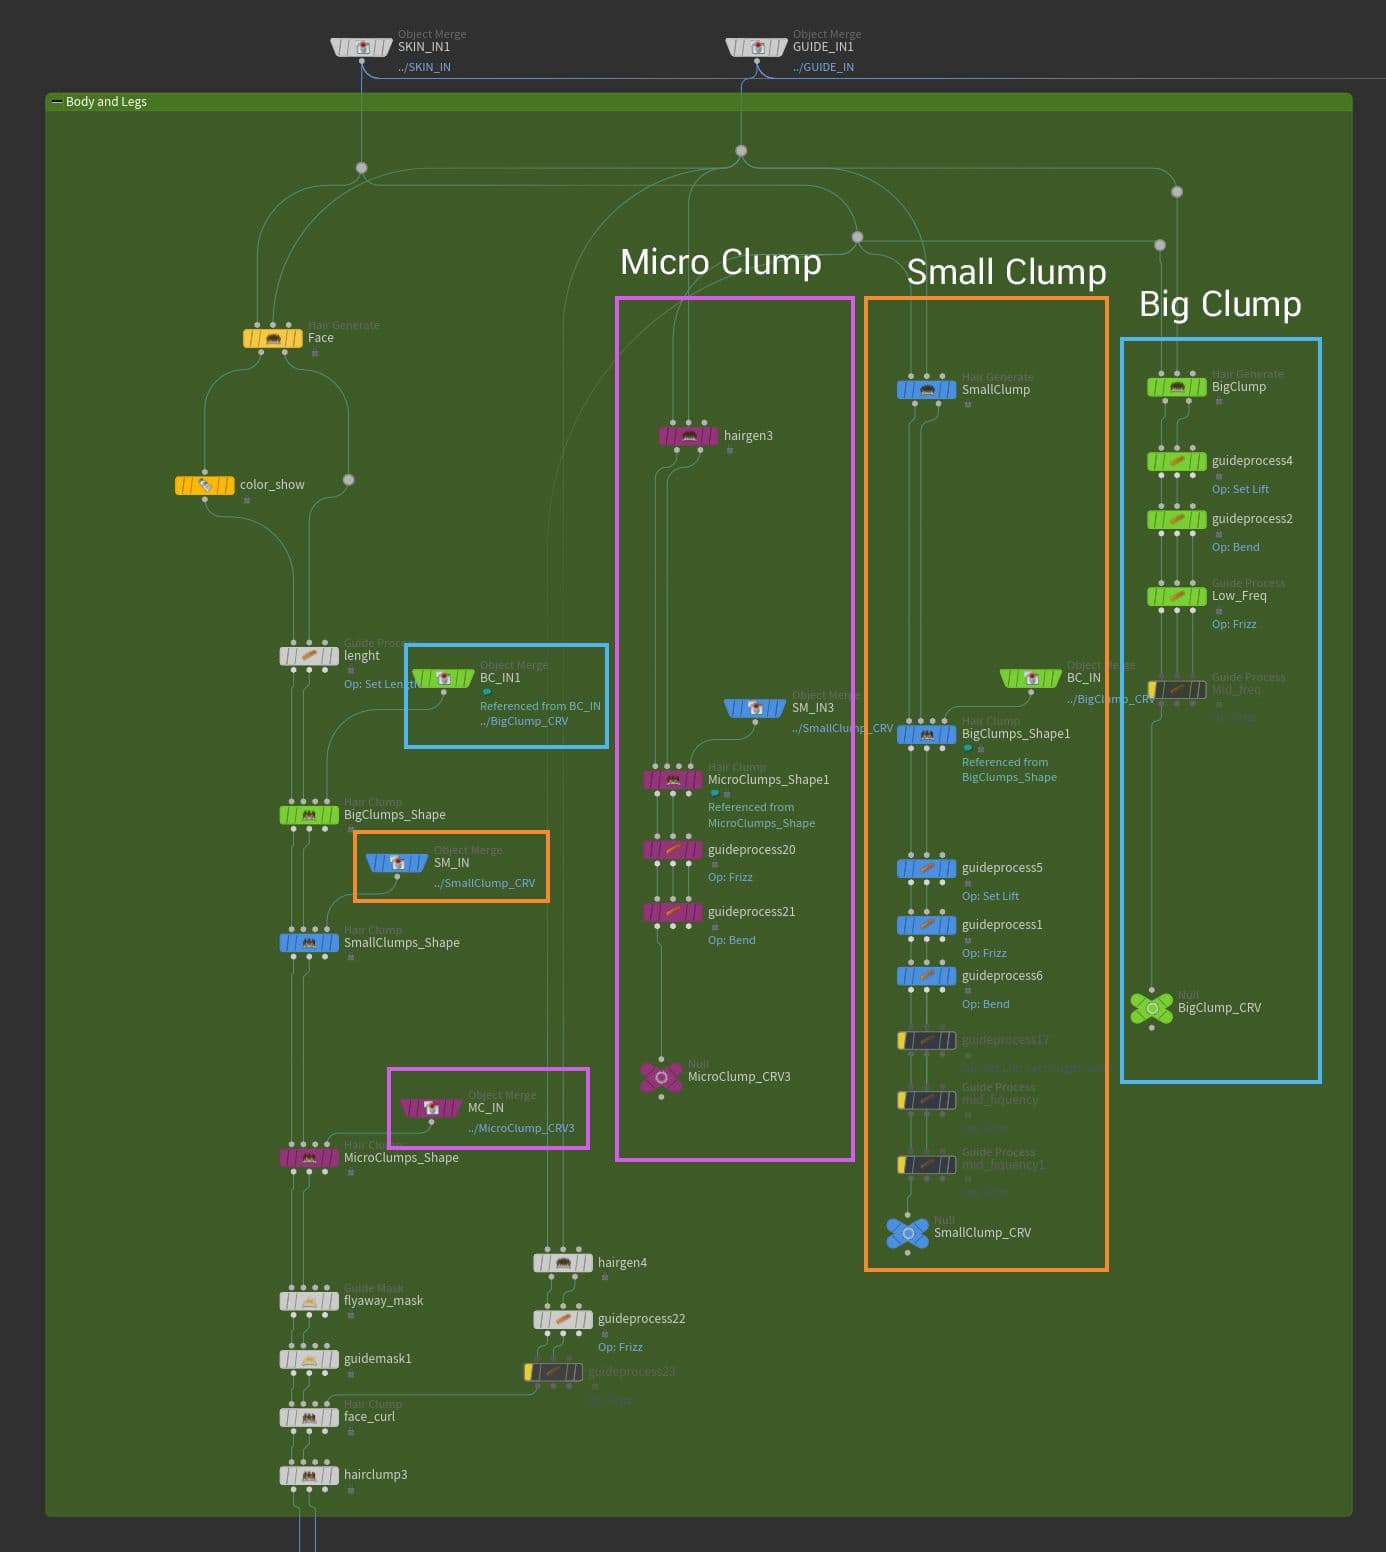
In each clump generator, there is a Hair Gen node Density:
Big Clump Density: 7,000
Small Clump Density: 20,000
Micro Clump Density: 45,000

To create the Small Clump inside the Big Clump, I made a connection from the Big clump to the custom curve in the small clump hair clumping node. Then, I did it again in the micro clumping node.

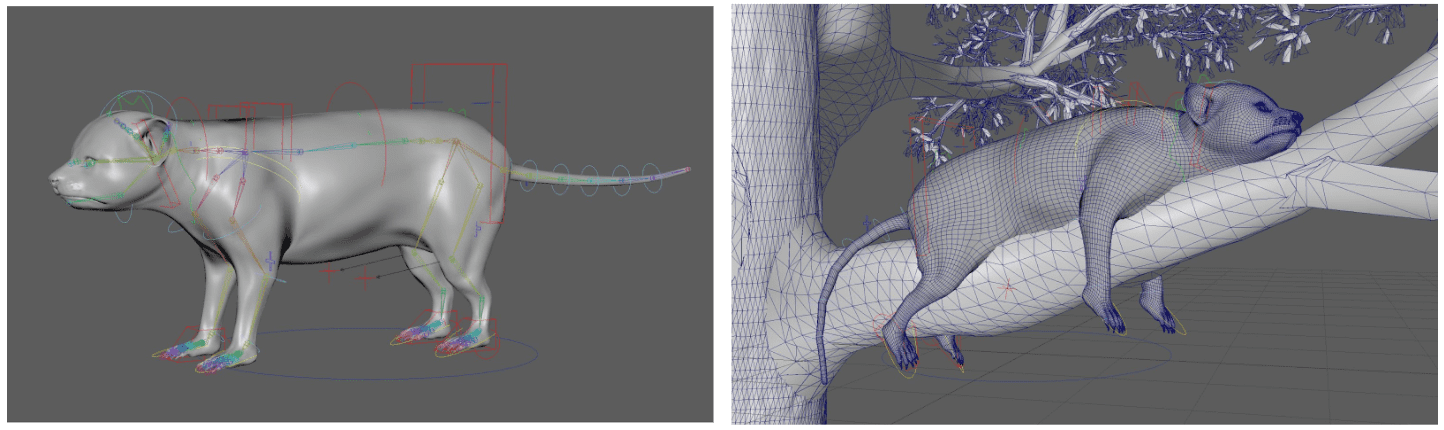
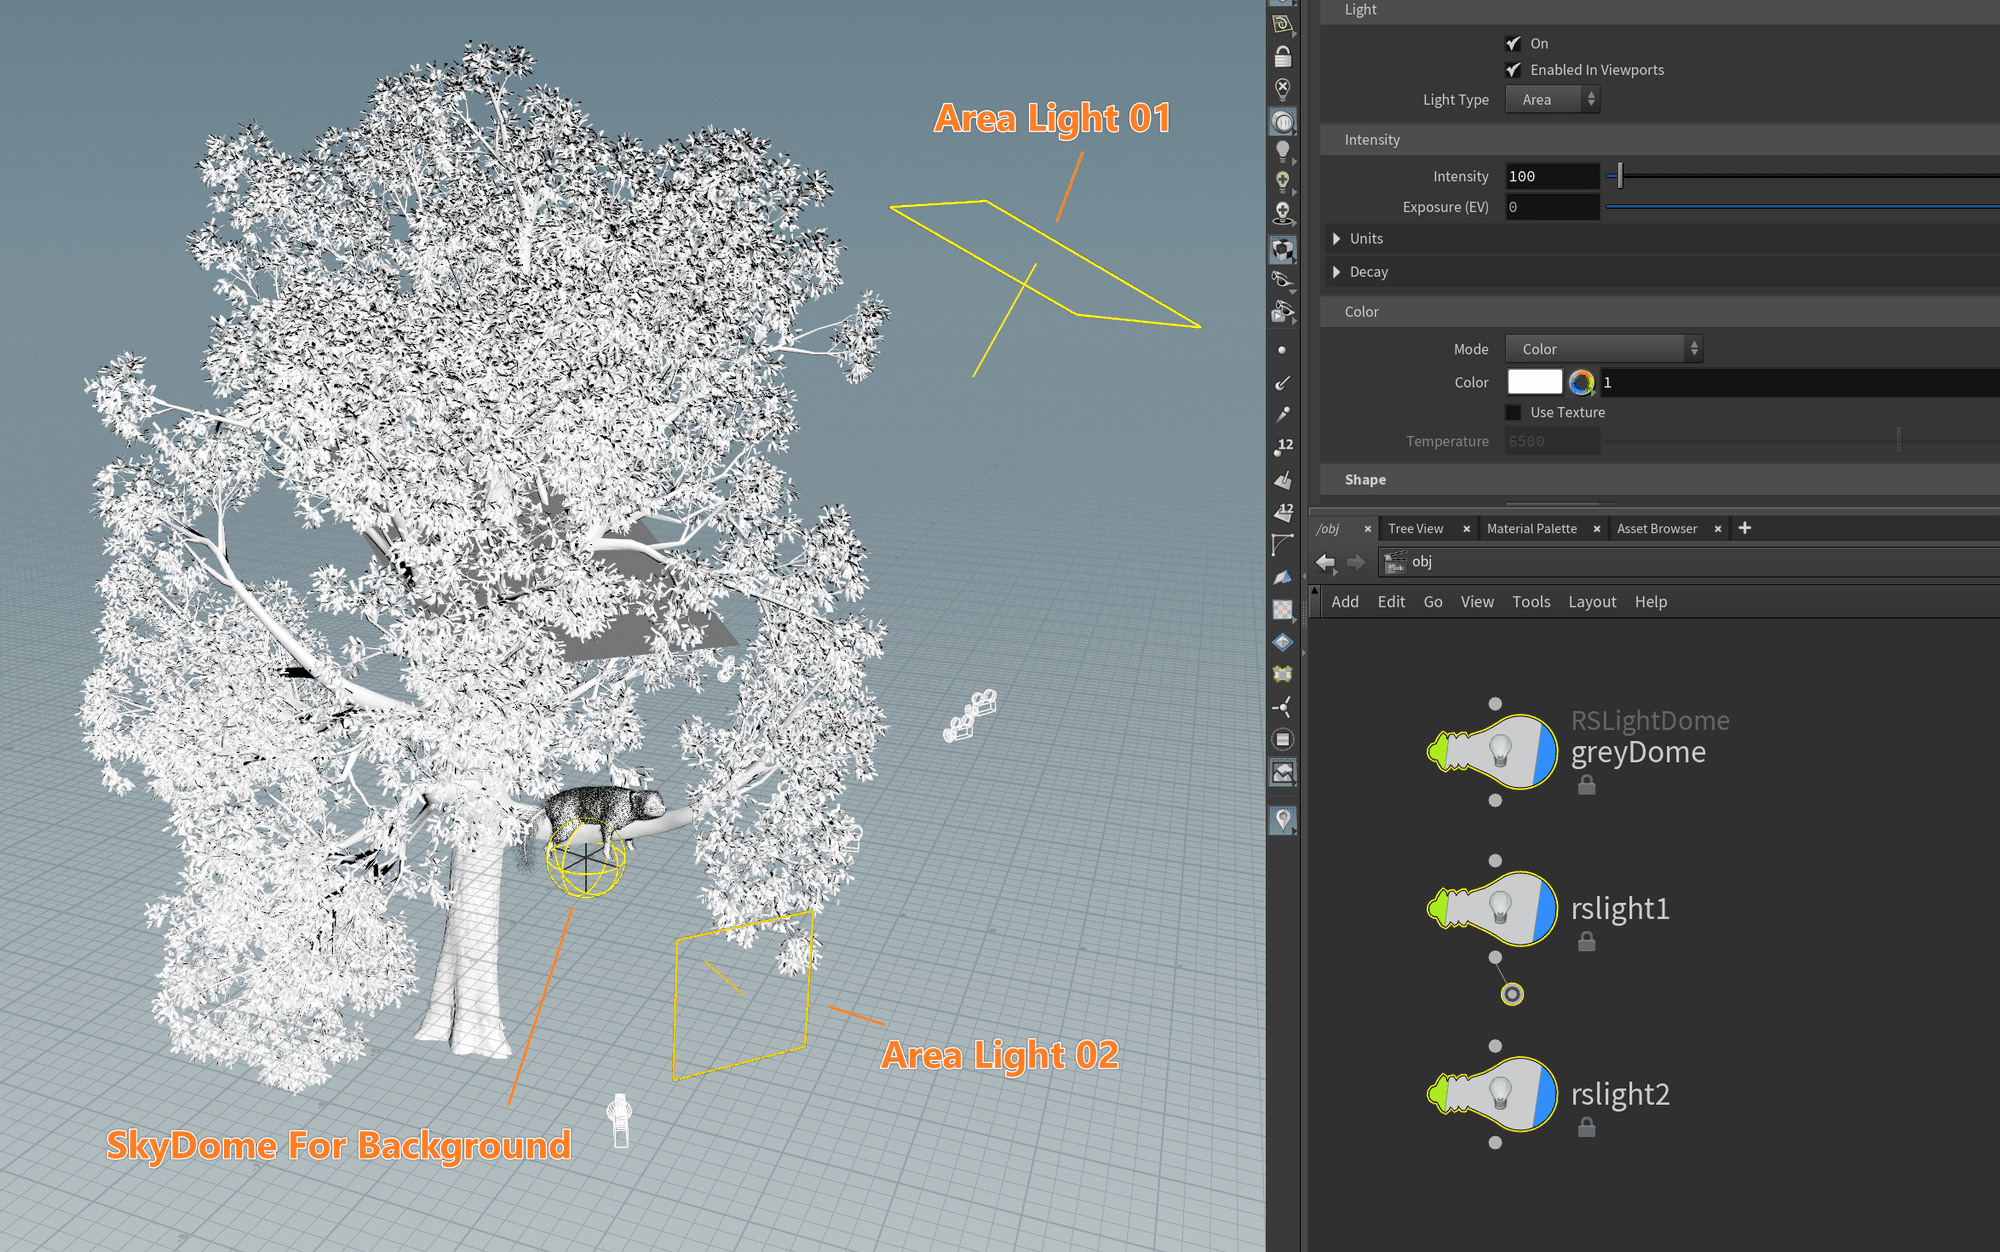
The red panda was rigged in Autodesk Maya using Advance Skeleton which allowed me to create a simple quadruped rig and paint weight for the whole mesh. I also imported a big tree into the scene as a reference mesh for hanging the red panda in the correct position.
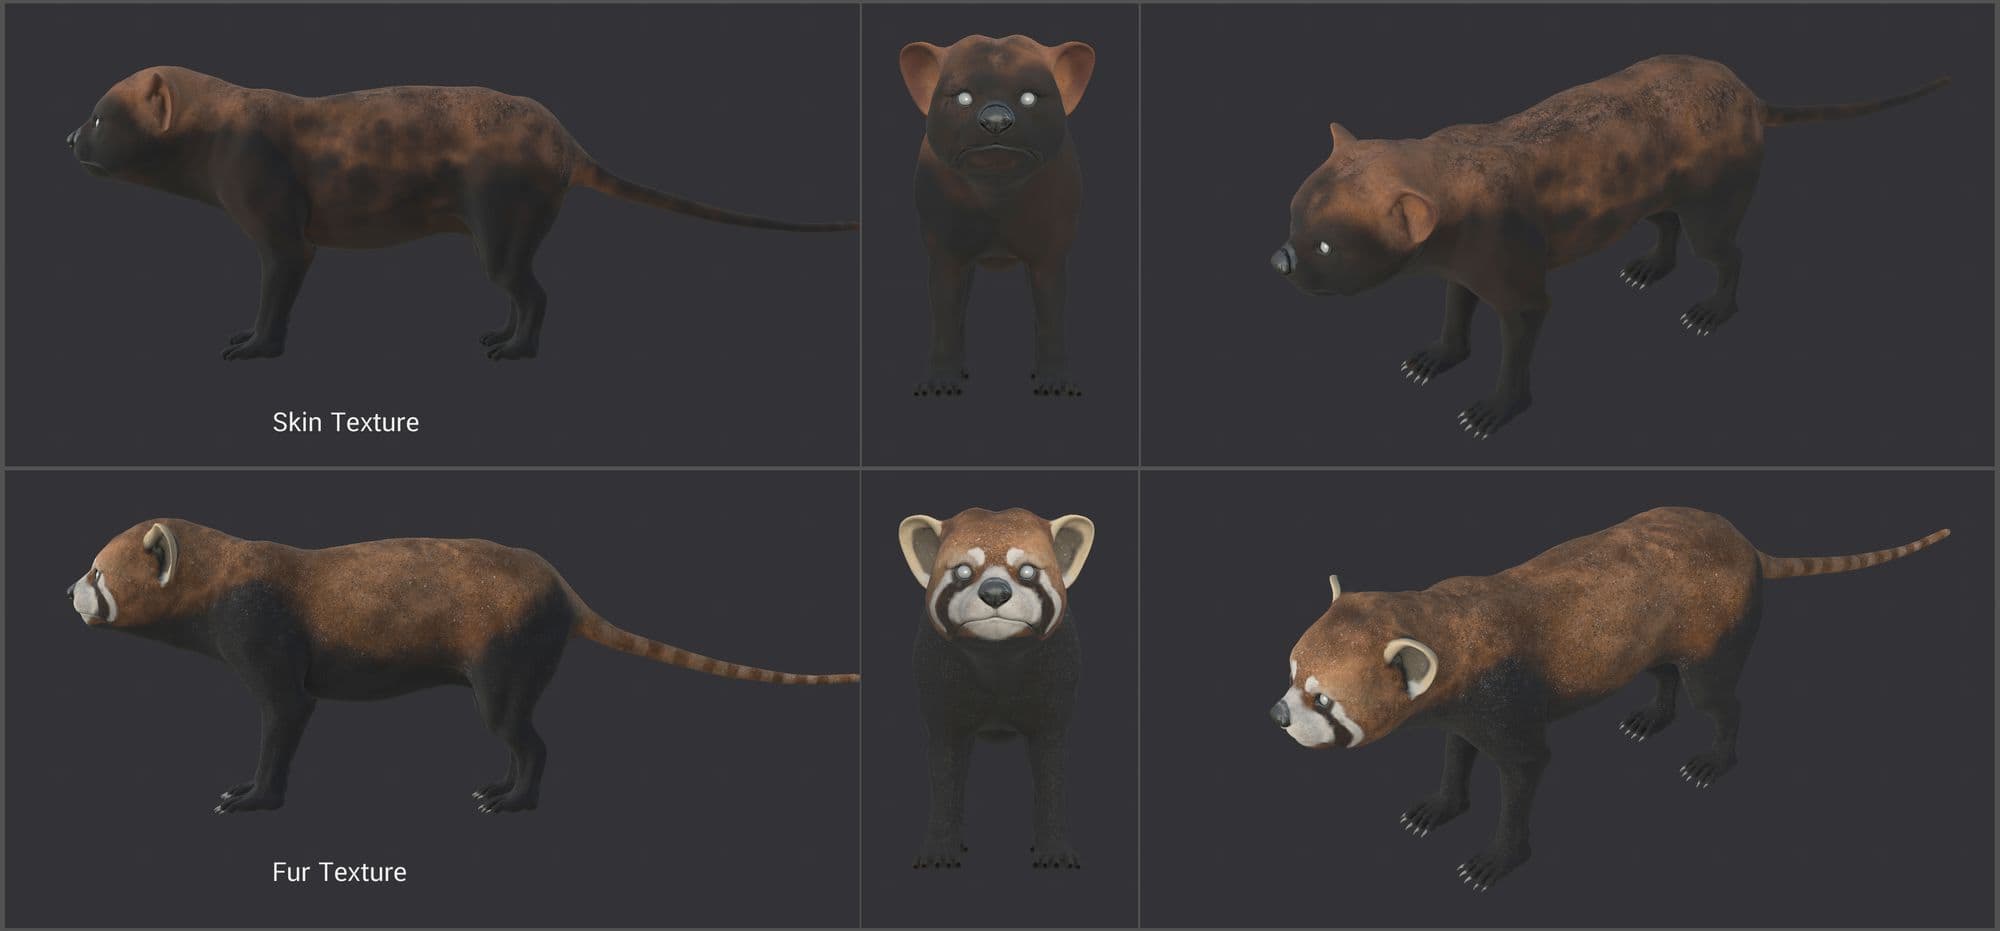
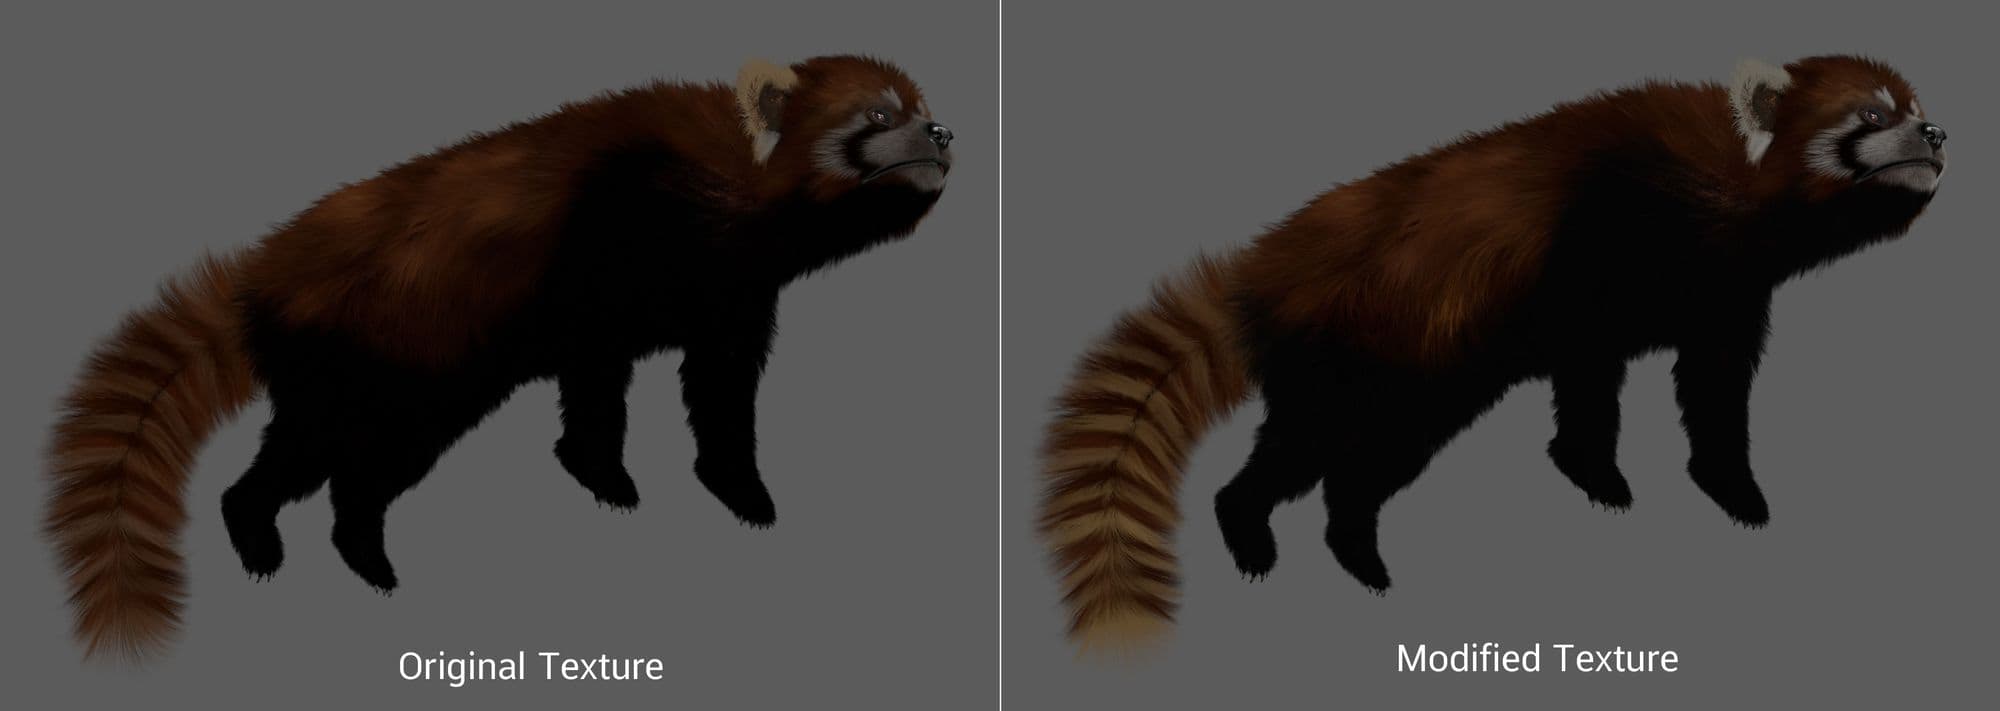
Using Substance 3D Painter, I painted the skin and fur textures separately with 4096x4096 resolution. I painted in the old UV (before changing the shape) because the new geo had the same UV proportion as the old one.
The spray brush was later used to add more detail and variation to the fur texture. I sprayed the whole geometry evenly with a small brush size because the real fur generator required the imperfect colour of the hair. Finally, I exported the texture as a Redshift template.

I started with a look dev light rig, the standard lighting for making a material that helps me to focus on shading. I DIY'd the simple light from one neutral or low contrast HDRI and one key light in the Houdini Scene. I used the “Kloofendal 38d Partly Cloudy” from Poly Heaven.
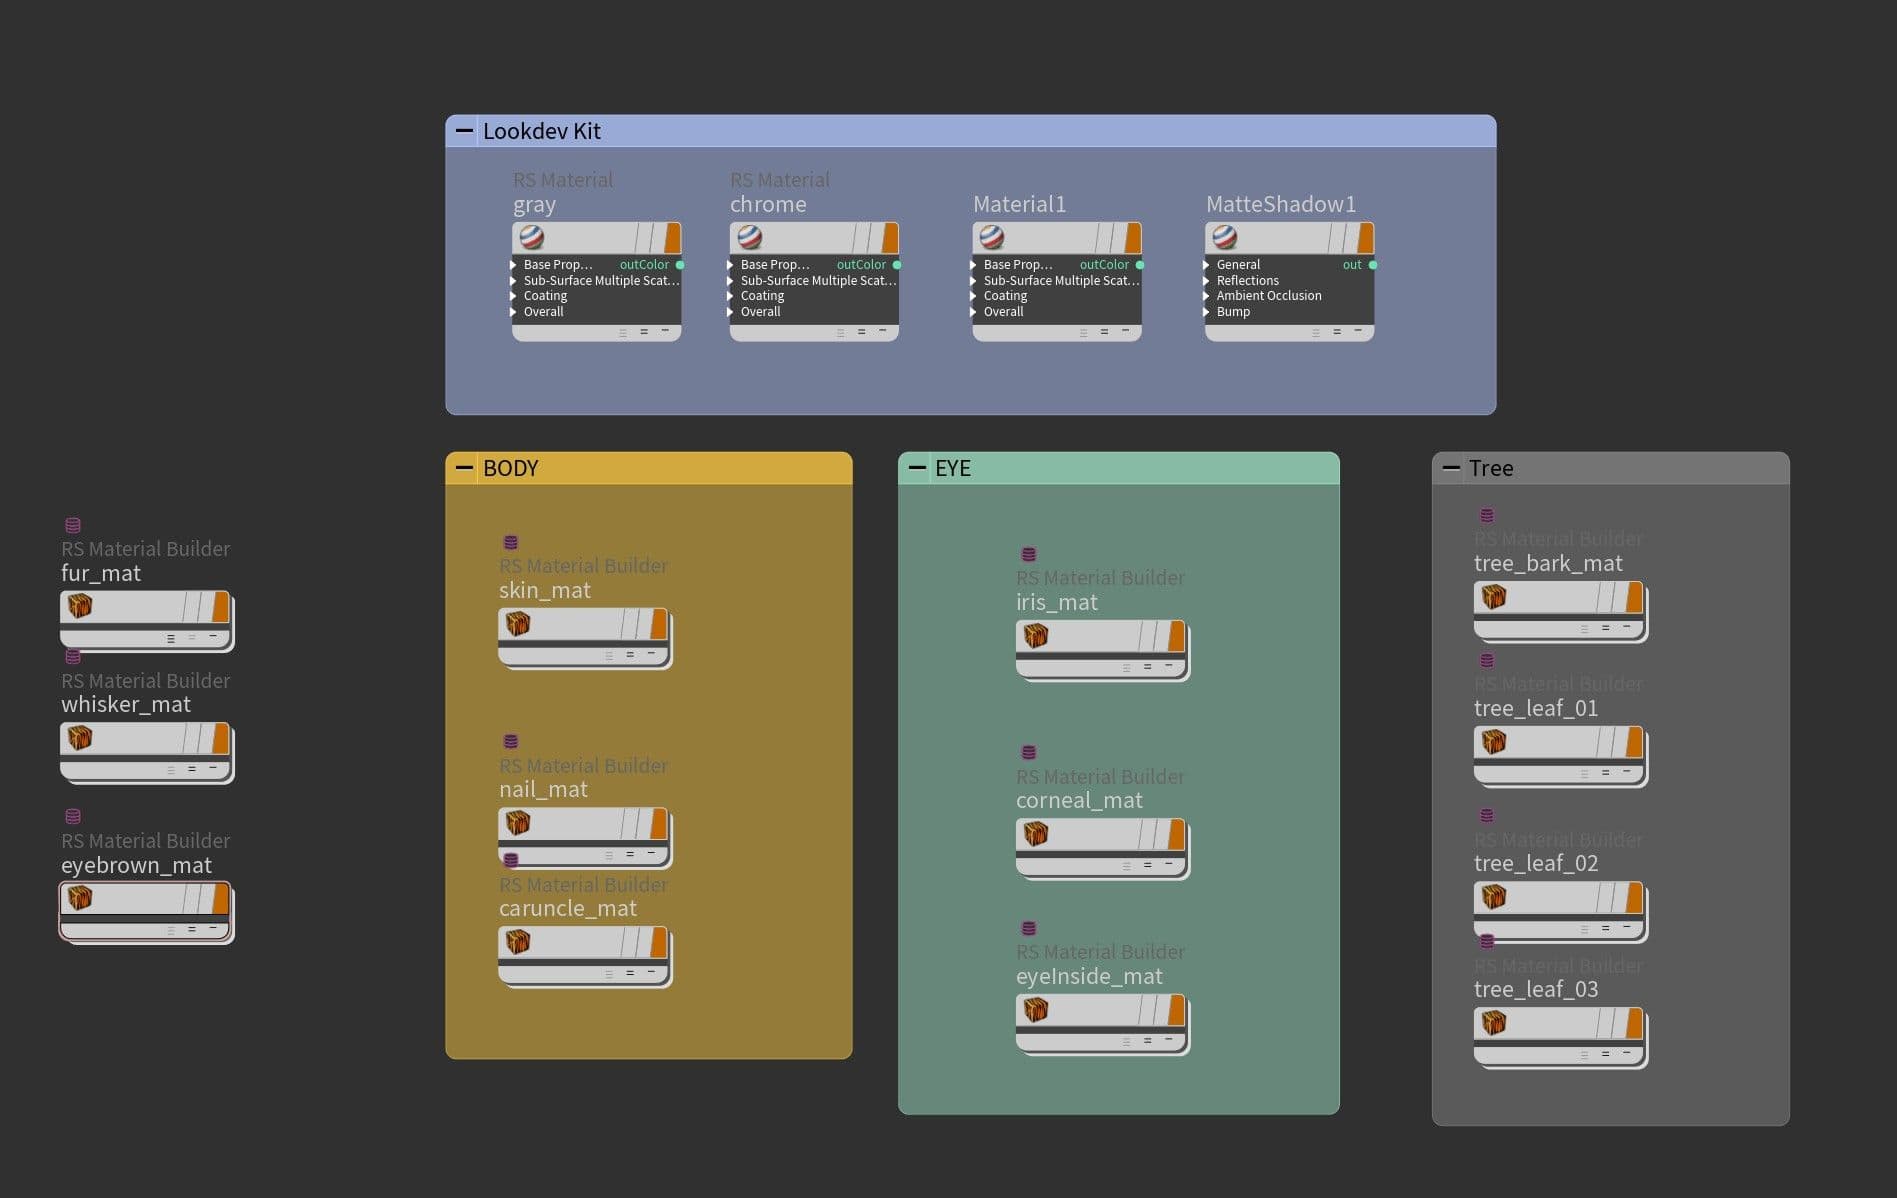
In this project, I used Redshift - GPU-Based rendering. RS Material Builder is the main node. I created a bunch of them and named them, for example, skin_mat, nail_mat, and caruncle_mat in the Body group. Then, created nodes for eye group, tree group, lookdev group, and fur group.
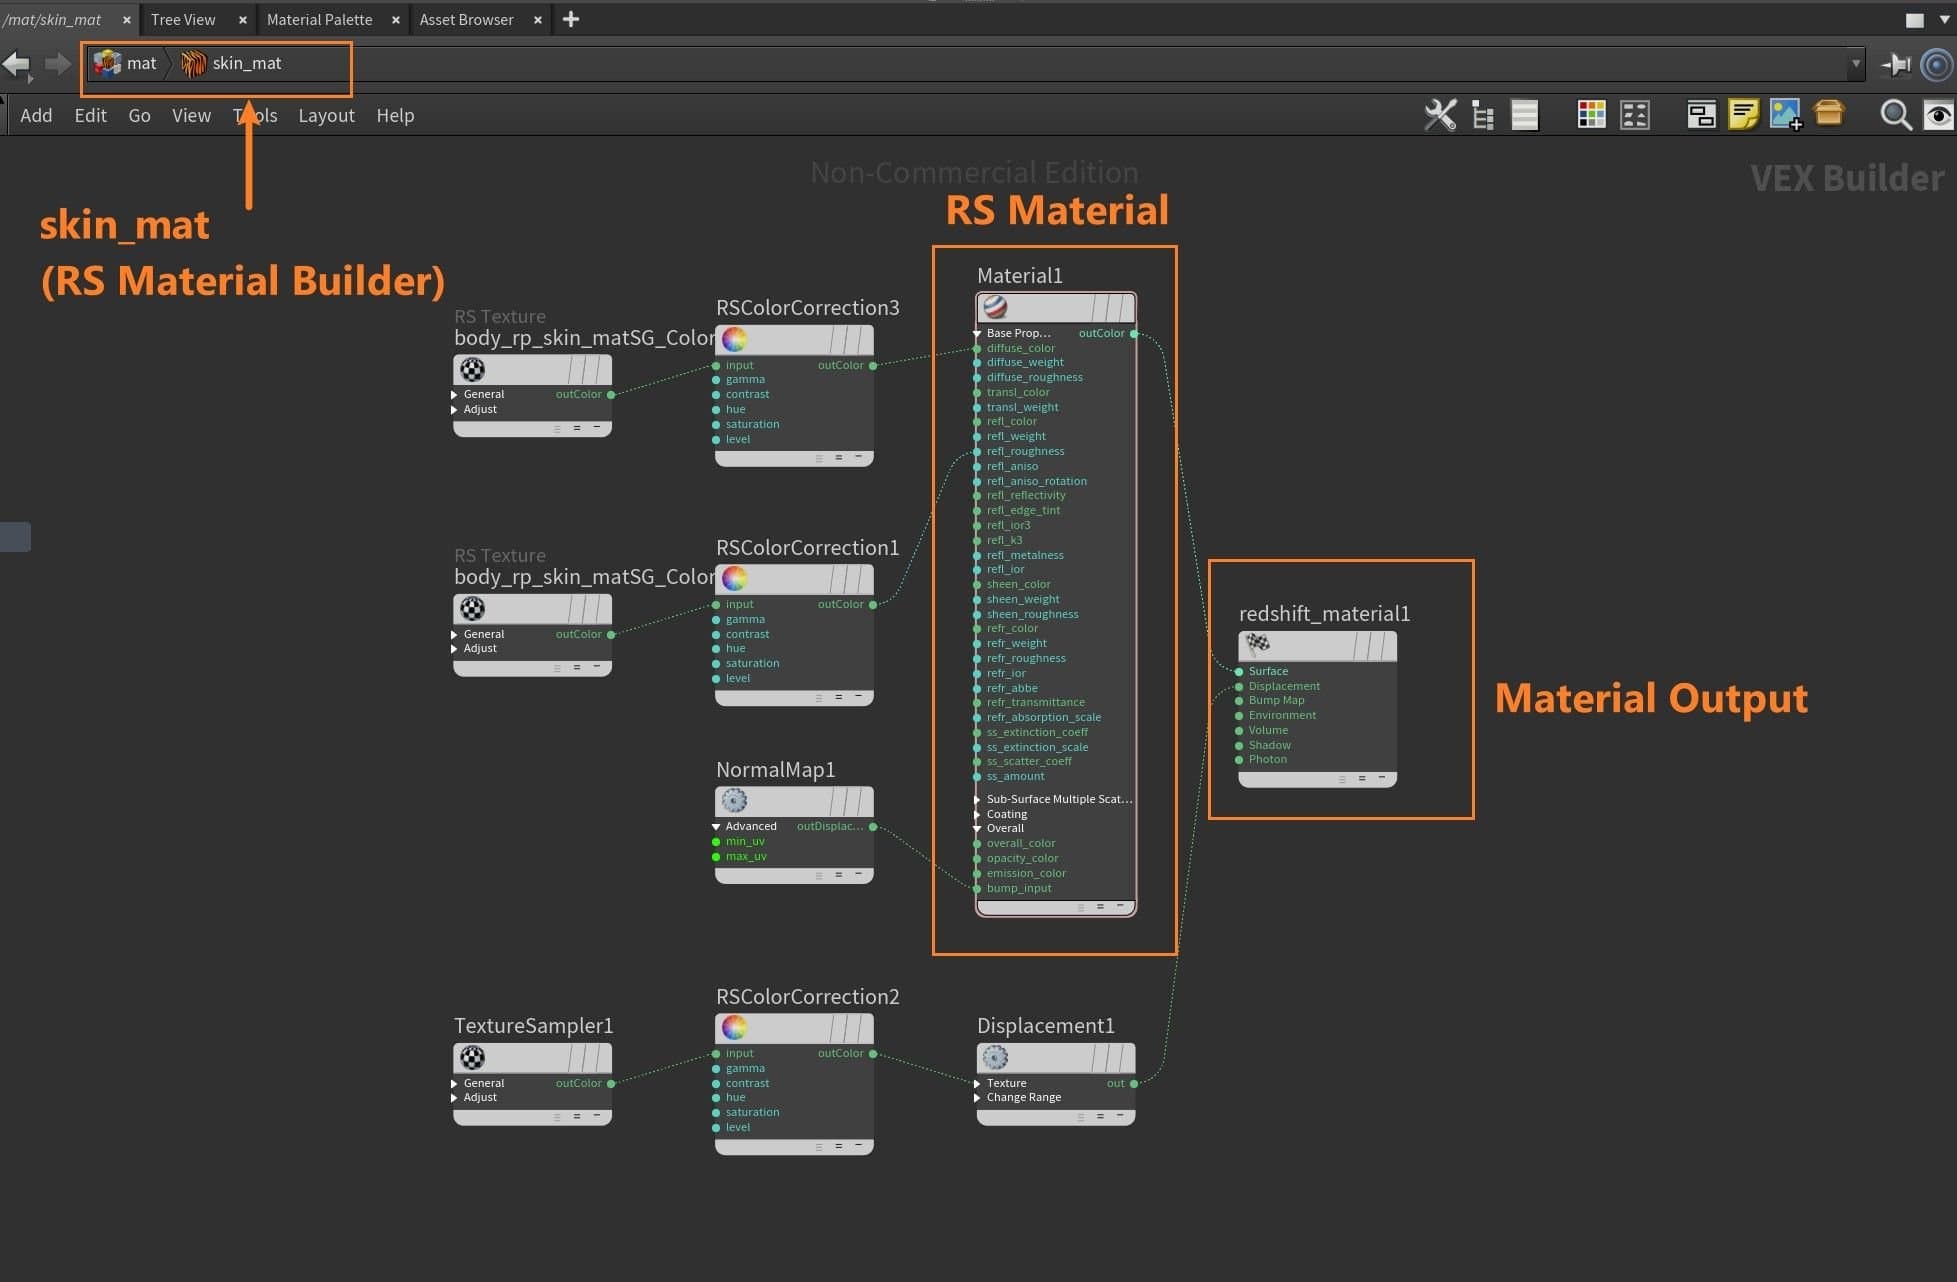
Skin_mat node is contained with RS Material that connects with baseColor map, roughness map, and displacement map. I use the “RSColorCorrection” node to adjust the colour (it is faster than I go back and edit in Substance Painter) and connect it to the RS Material input.
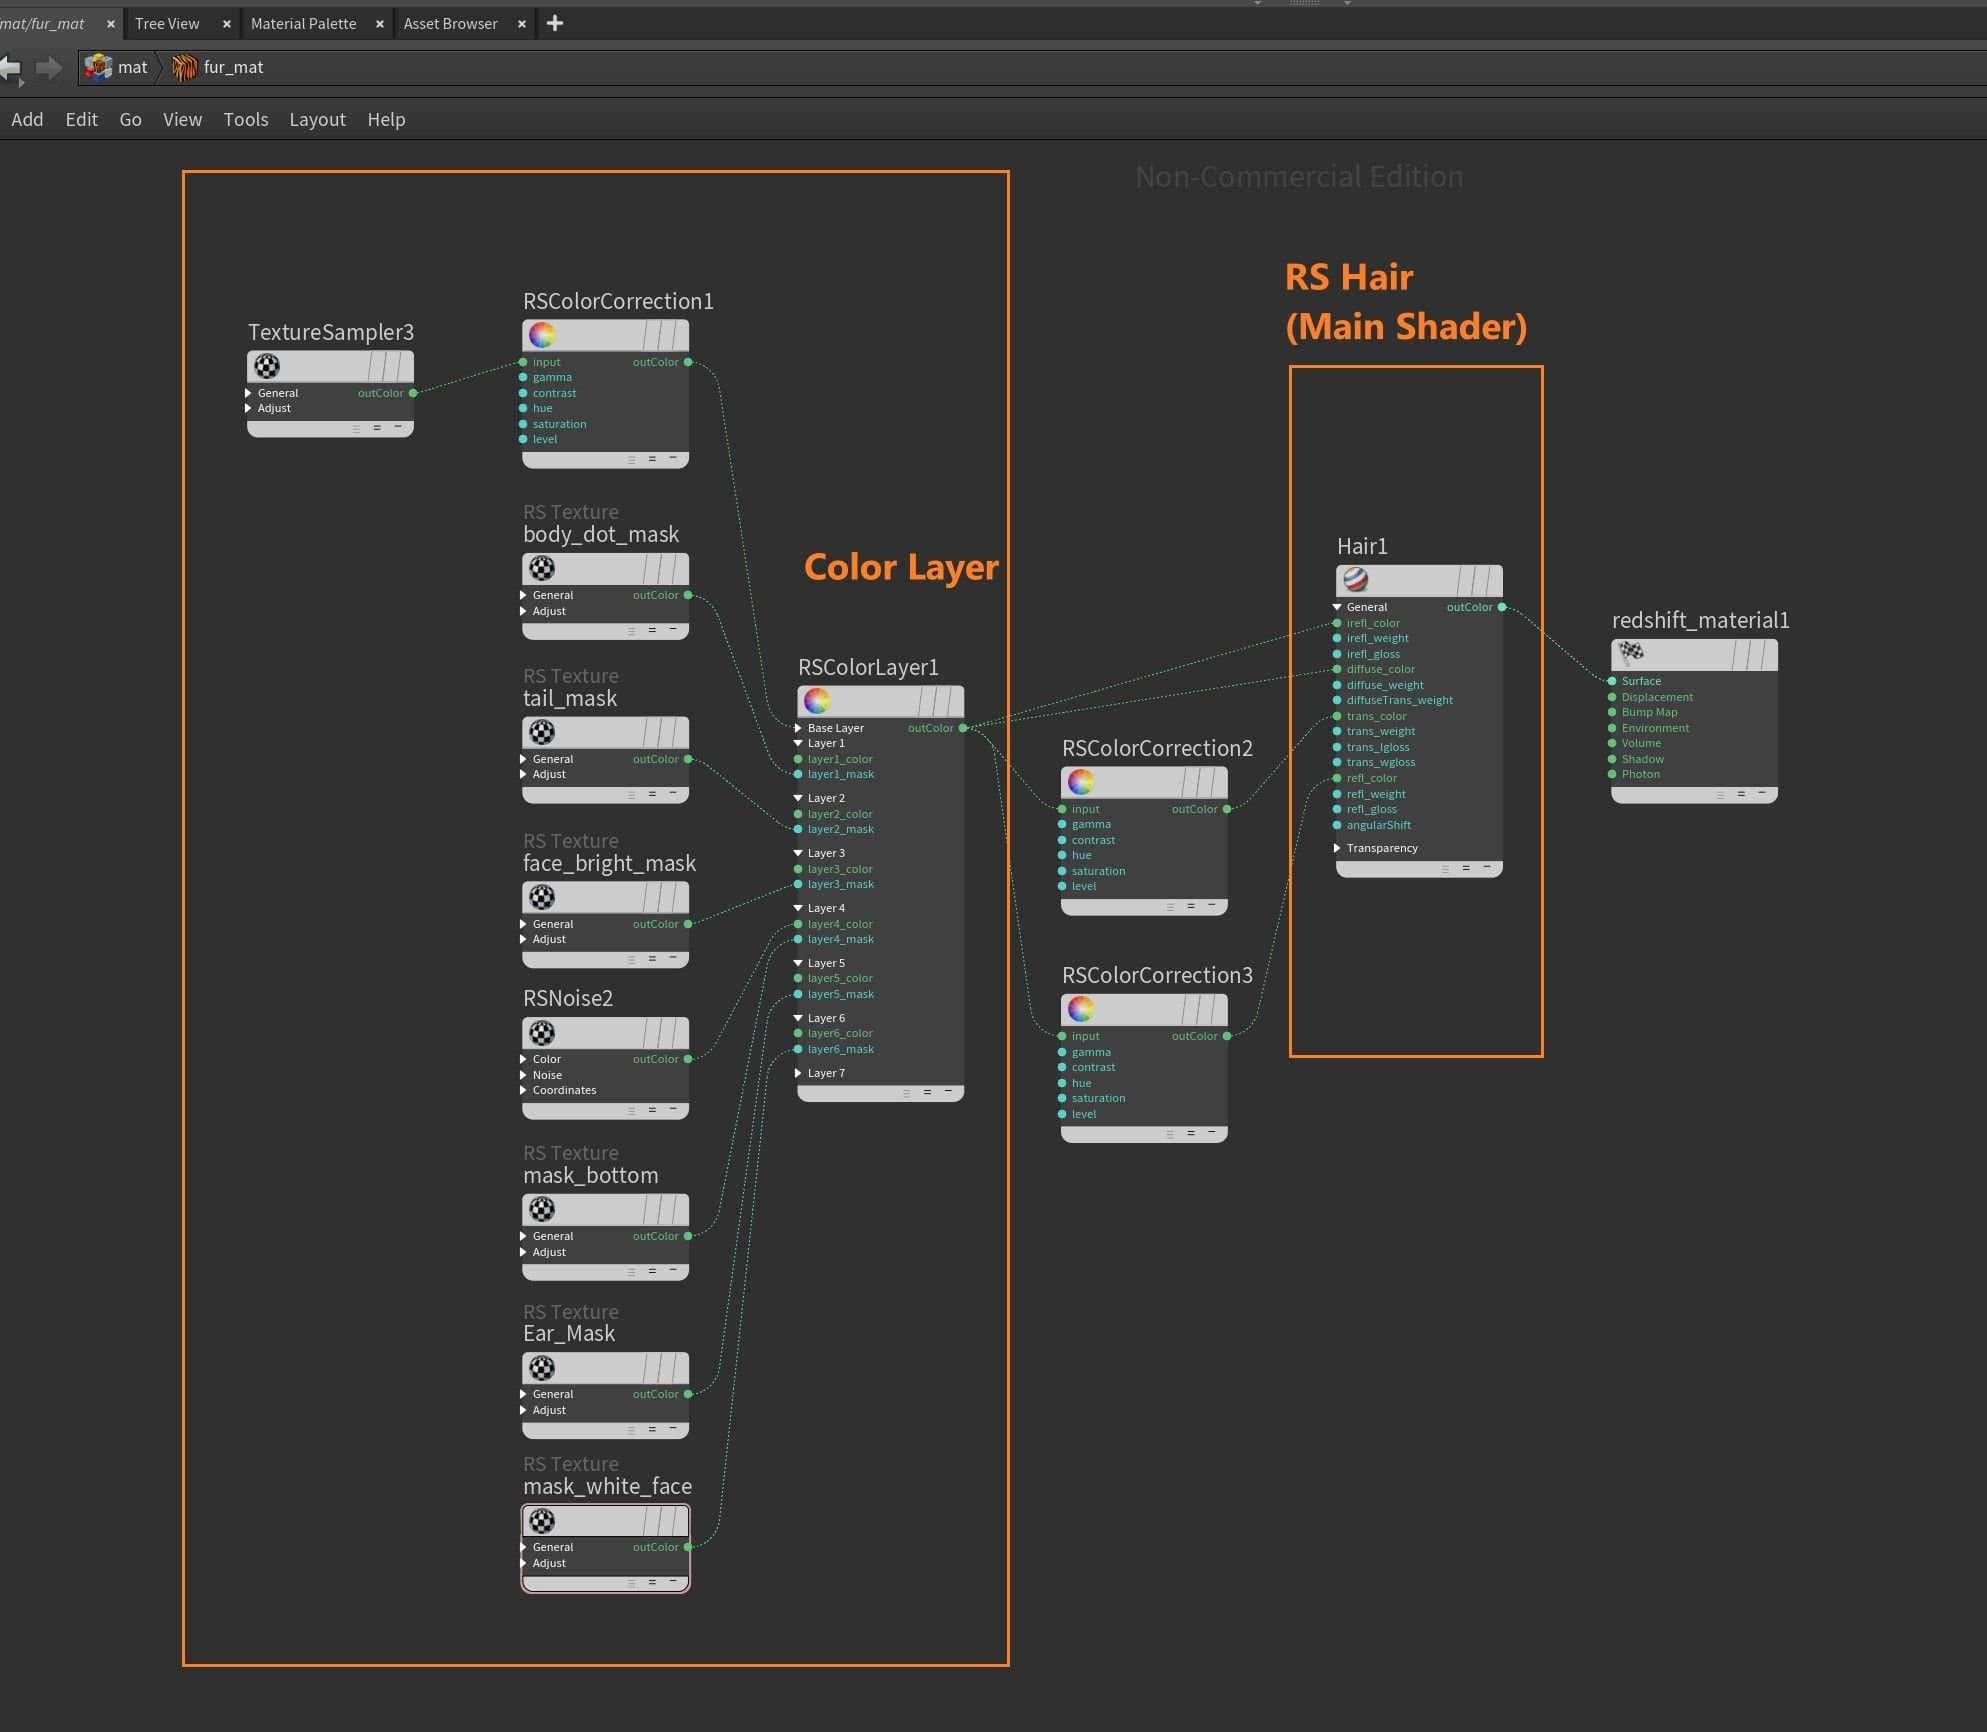
For the fur shader, I also used a RS Material builder but I changed the main material from “RS Material” to “RS Hair”. In the “colors layer” node, I mixed a series of layers including base colour, body mask, tail mask, ear mask, and more before connecting to reflection colour and diffuse colour in RS Hair.
For the final part of the project, I created a simple lighting setup using a sky dome with a low contrast HDRI as ambient light, and 2 area lights which gave me the flexibility to control light direction and exposure separately from overall brightness, to direct the audience’s eyes to the subject.
I chose to use an area light to achieve a softer effect (but at the cost of longer render time), because a directional light would result in high specularity and small falloff.
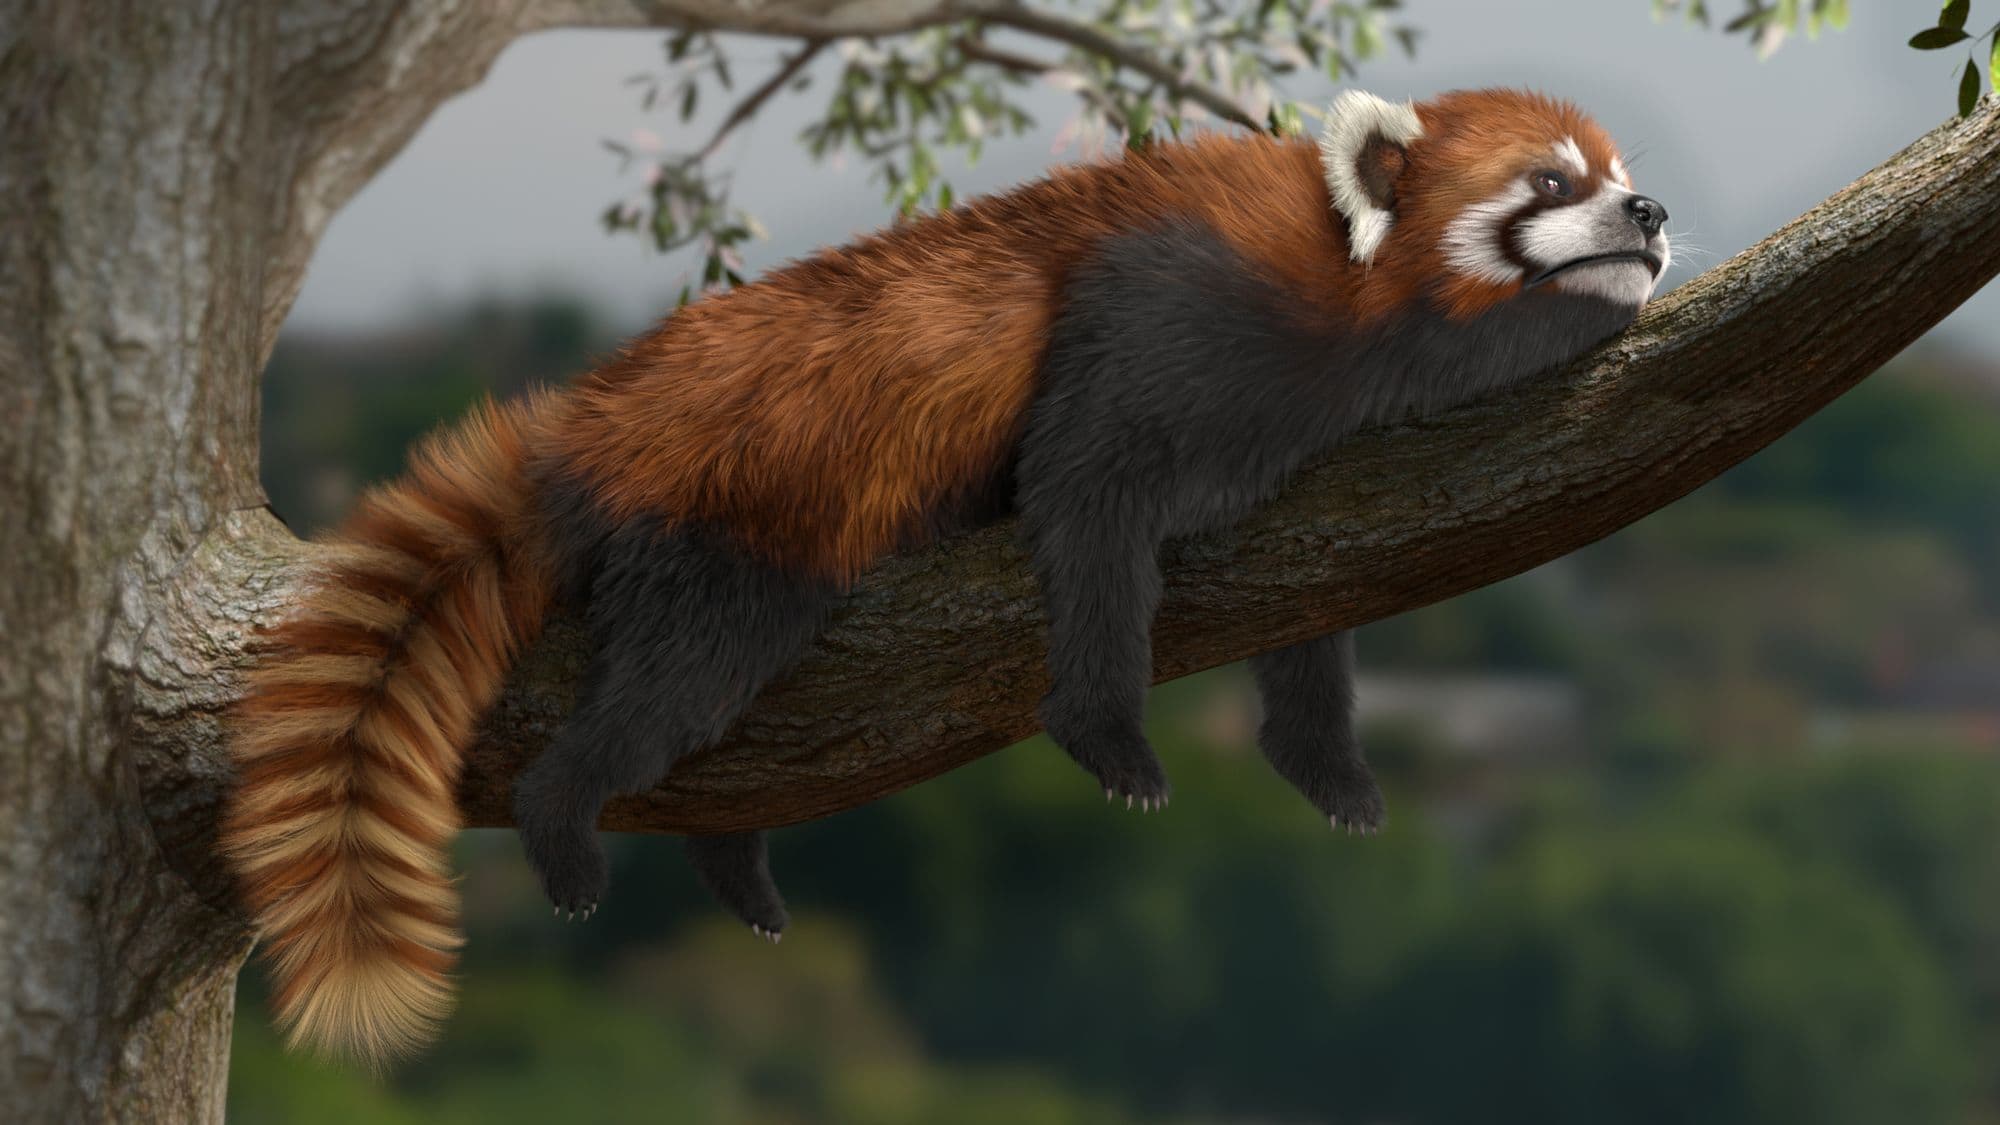
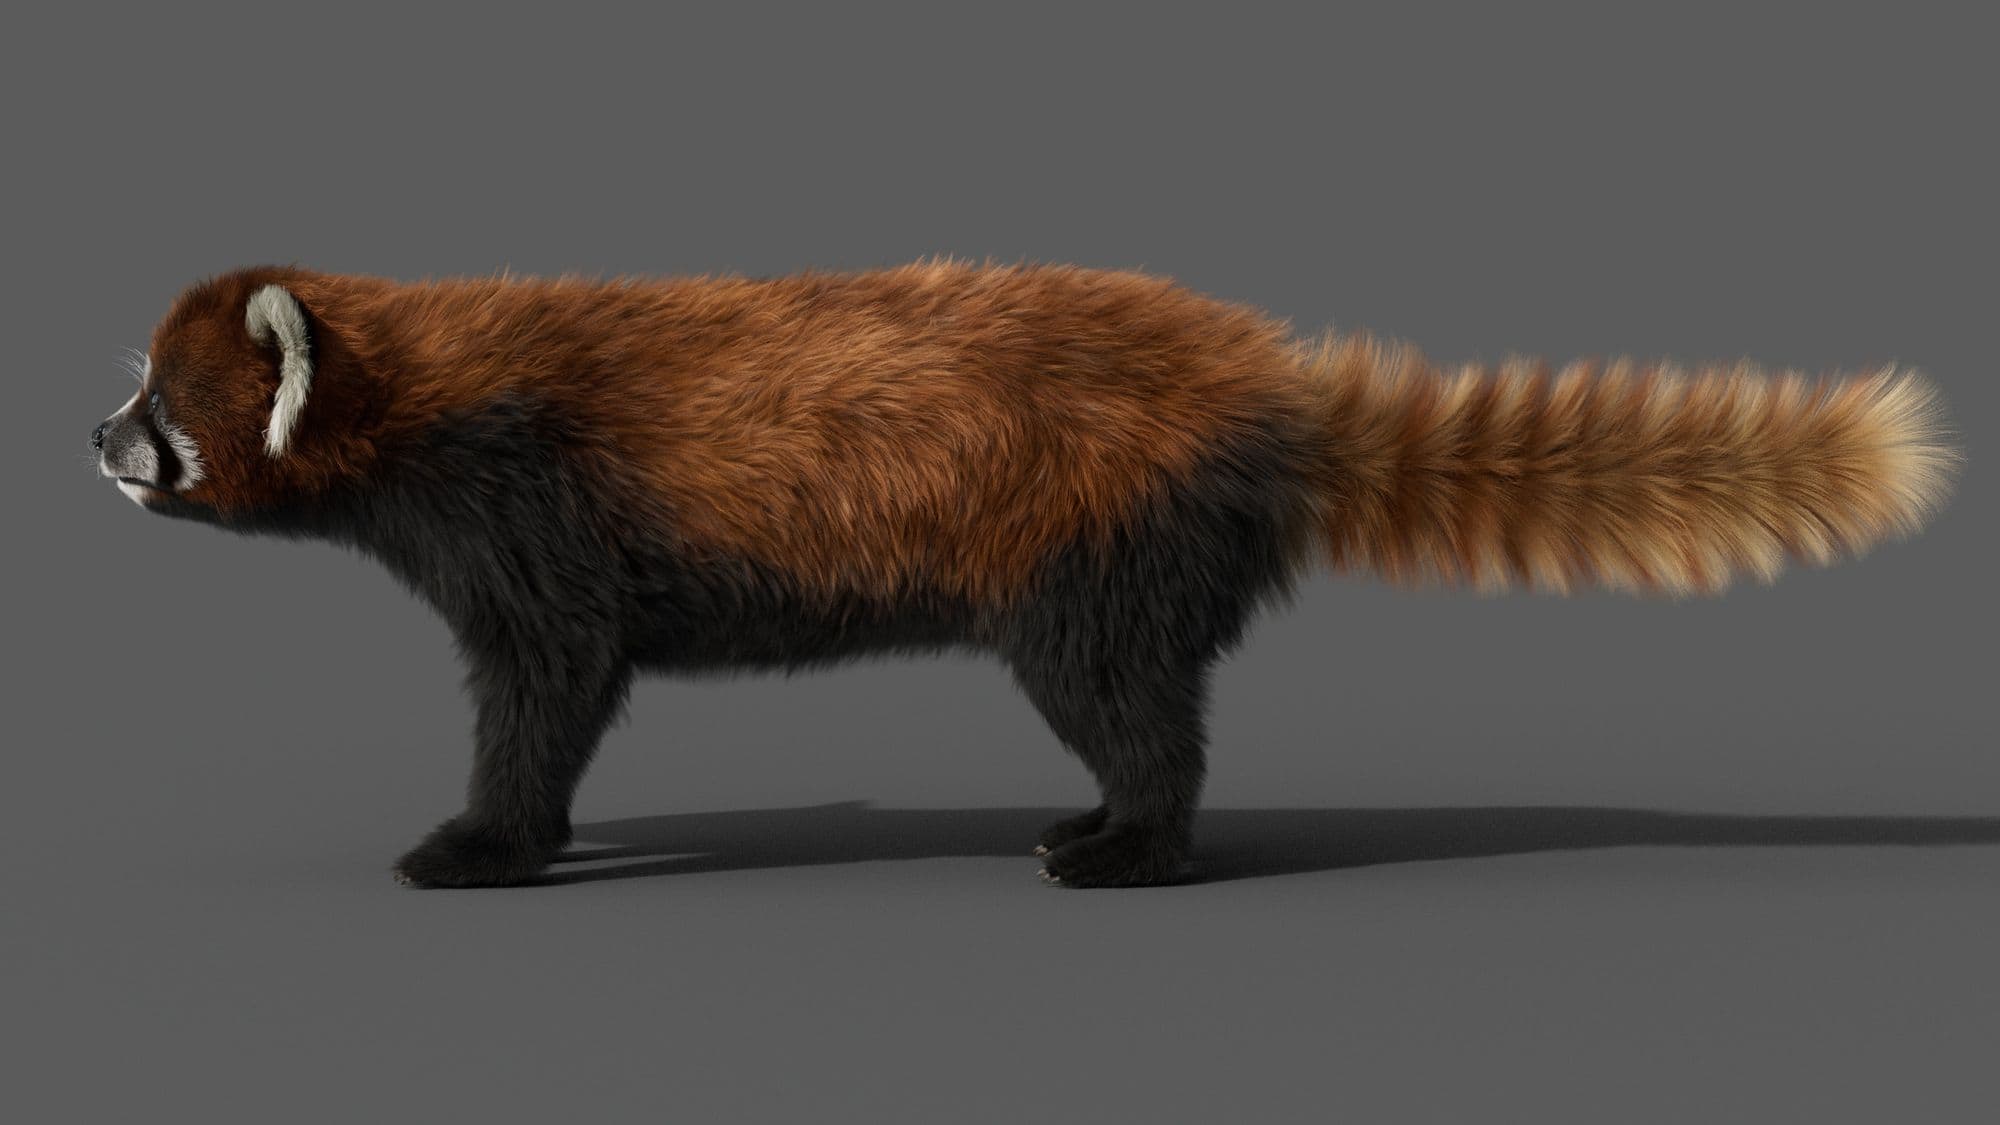
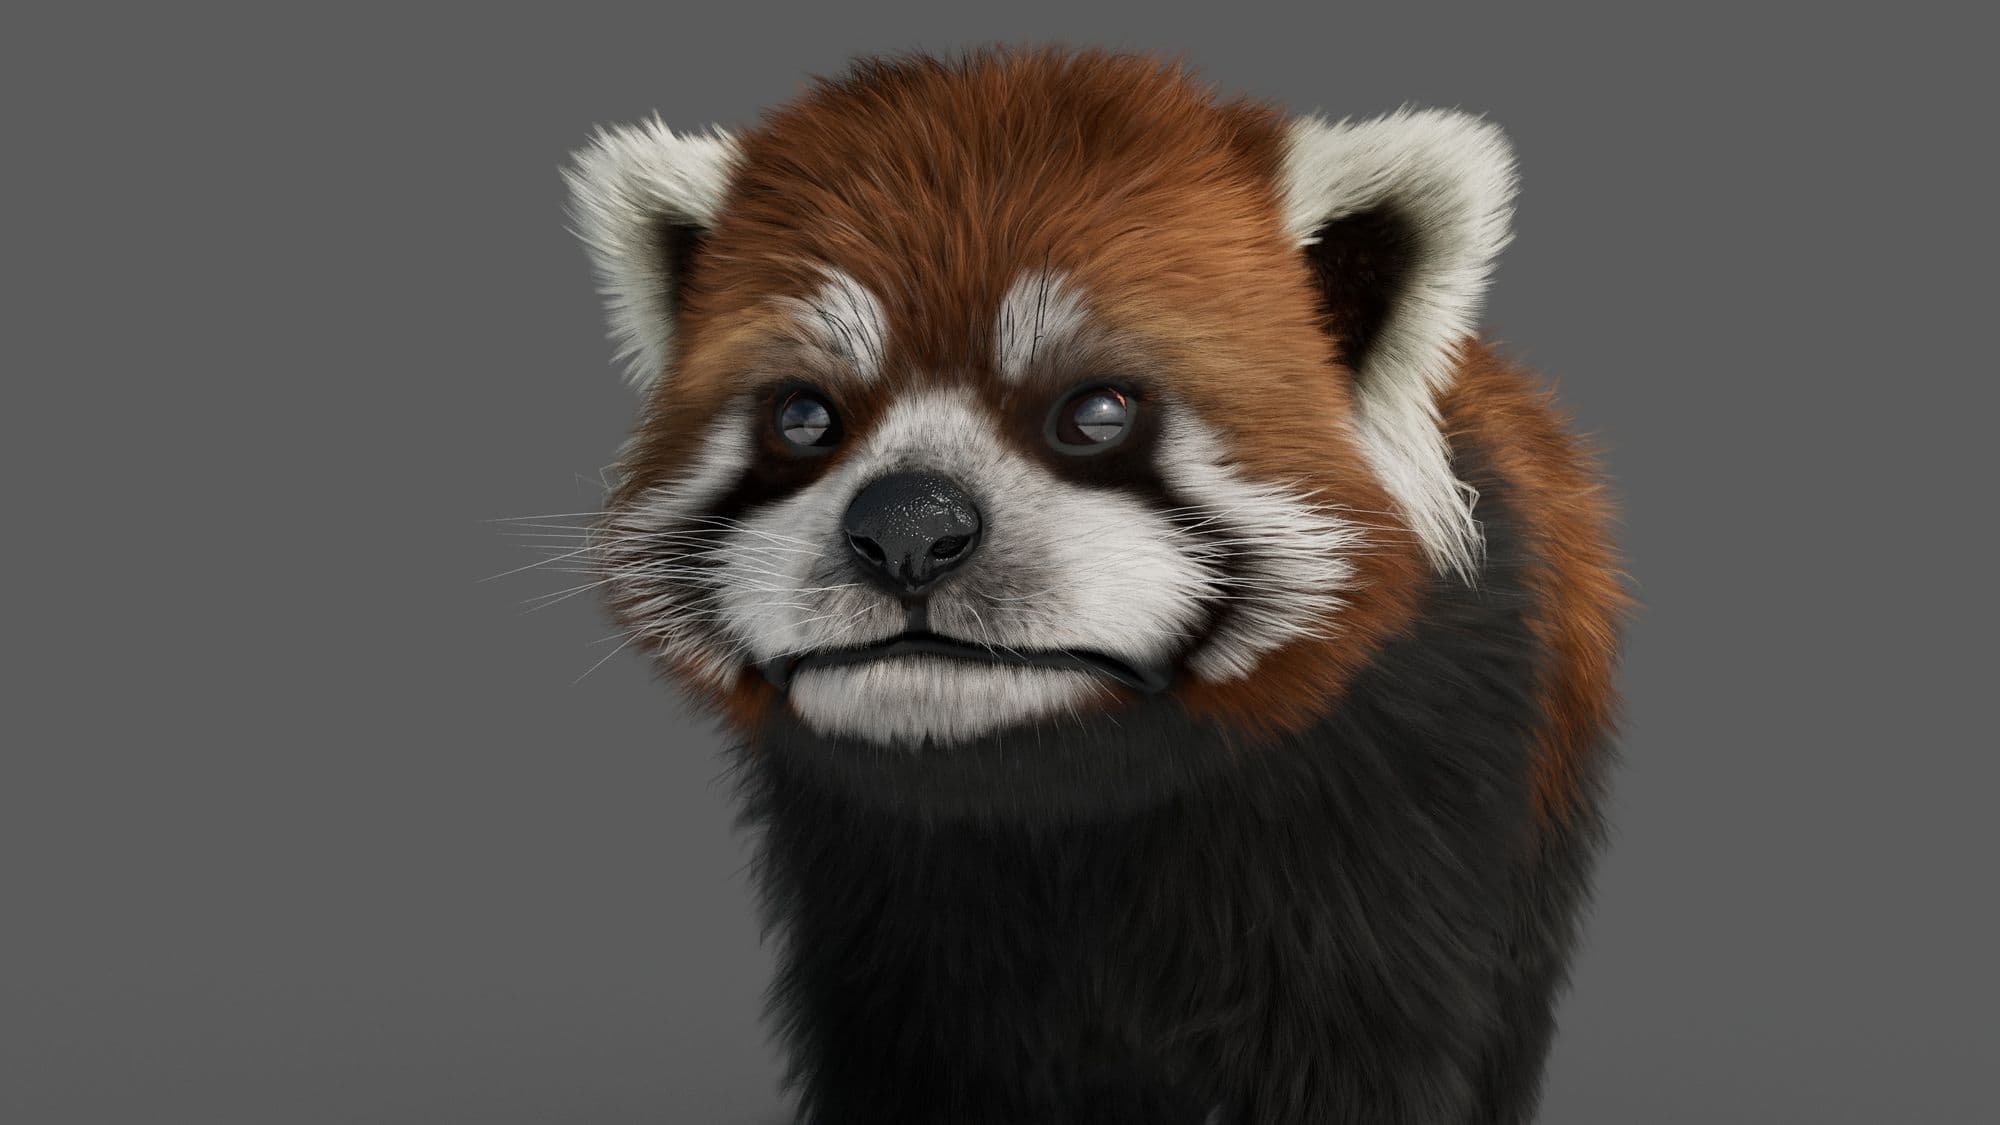
This is the first creature grooming that I did for which I was responsible for the whole process except modeling.
In addition, I have been learning Houdini for a month, and it has been a rewarding challenge those far. This work couldn’t be done without the incredible advice from Tachapon Lertwirojkul, Pichaya Popanyasak, Natasha Santiparp, and Jirawat Panompong. I really appreciate it their support.
Check out the final renders below:
You can find more of ‘Palm’ Piraban's work on The Rookies, Instagram, and her website. You can also contact her via LinkedIn.