The Sorcerer’s Metamorphosis: Jorsalfari Reimagined in 3D
Juan Pablo Torres expands on his process transforming the 2D concept into a cinematic 3D character.
Juan Pablo Torres expands on his process transforming the 2D concept into a cinematic 3D character.

Juan Pablo Torres is a Colombian 3D Character Artist based in Vancouver, Canada. In this article originally published in the Adobe Substance 3D Magazine, Juan Pablo expands on his process transforming an original 2D concept by Even Amundsen, into a cinematic 3D character.
To start, I usually create a mind map visualizing the process of creating the character. In that way I can have a broad look of the project and then break it down into small pieces. This allows me to identify where the tricky points of the project might be, especially with regards to modeling and texturing. I can then research how to resolve those problems ahead of time. I spent around five months creating the character. This included the models, textures, and environments – plus one month of rendering. For this project, I wanted to create a realistic interpretation from this amazing artwork made by Even Amundsen, imagining how the character might look in a movie.

My task was to create someone that didn’t exist and make him look as real as possible. Gathering references was where I began. I looked for different types of images depending on the stage of the process that I was in. Even though the main concept was giving me most of the features and the general look of the clothes and the accessories, I wanted to build him in a way that I could peel off different layers back to show even more details of the character. That said, I needed to think of how the costume of the character was designed underneath, and how the garments and accessories that were not being displayed at first sight would look.
I normally begin with the face of the character because it is the most complex part. I wanted to model everything from scratch, so I decided not to use base meshes or scans.


There are many different approaches to build a face depending on the style of the character. But it is always necessary to have good references to make the process easier. I looked for portraits of old men that I felt that could play this character in a movie. That way, I could use some of their facial features to sculpt my character’s face – since many of the shapes on the portraits are eradicated by the scattering of the skin. I also looked for images of 3D scans of older men to guide me when the building of the main volumes of the face.

Once I had the primary and secondary shapes of the face working properly, I started the detailing process. One way to do so is to use textures created from scans and wrap them around the geometry that is already made. However, I wanted to try to create everything from scratch, so I decided to work with HD geometry in ZBrush to achieve a very high amount of detail on the skin.
The method that I used was to create my own pore and wrinkle brushes and scatter them on the face. For this stage, it was very useful to watch the Daniel Boschung – Face Cartography. This allowed me to understand how the pores on the face work, depending on the area that you are looking at. This includes how they are connected to each other, how wrinkles form, expression lines, and how the age affects their directionality.

I must say that this phase was a long and laborious task, but I figured that once I was good enough to do it by myself, I would become even better at using other tools – thus speeding up my workflow. For the body, I followed the same steps that I did for the face.

One notable difference between my piece and the concept is in the apparel of the character. In the beginning, I tried to stick to the concept in this phase, but it was looking odd to me. I needed to figure out a different design without losing the essence of the character.

What I did was to start by searching for similar characters in pop culture that had already performed in a live-action production. This included Doctor Strange, and Gandalf from Lord of The Rings.

I took some of their clothes and accessories as references and tried to create a mix between them and the original concept. I then sculpted basic shapes to visualize how they would look on the character. Once I was satisfied with the general silhouette, I proceeded to create the garments using Marvelous Designer, and Maya for the belts and jewellery.


For the detailing phase of the clothes, I posed the character using ZBrush and created a blend shape of it using Maya. I made a simple animation of the character changing its pose and exported it as an alembic file to run in Marvelous Designer and achieve a cloth simulation that followed the pose of the character. Then I retopologized those garments and sent them back to ZBrush to add details like memory wrinkles and folds in different areas.

I used a few different types of software to texture: Substance 3D Designer, Substance 3D Painter, Mari, and Photoshop. I projected cross-polarized photos on the geometry to create the base color of the skin and used the projection tools available in Mari.
I then moved to Substance 3D Painter to tweak some values of the skin color. I added layers of red, purple, and yellow tones to make the skin look a fleshier and more alive. This is when the Smart Masks of Painter come in handy because you can mask the color layers automatically using the thickness of the geometry instead of doing it manually. Also, it was useful to create roughness variations on the skin that followed the cavities of the face and the thickness in some areas. Following this, I started to add details like the beauty spots, freckles, and sunburns.


Finally, I added a dirt layer to help the storytelling of the character and make him look more natural. For the face, I didn’t have to use height maps since most of the detail was coming directly from the mesh, which was one of the advantages of having a very detailed sculpture.

For the clothes, I used different textures and materials available both on Substance Painter and on different websites. For the fabrics, I began by creating base color layers. I added breakups using the noise and grunge textures available on Painter, then I mixed them with different height maps to achieve the look that I was going for.


I painted all of the fine details – the flying fibres, worn areas, or holes in the cloth – manually. The only ones that I made in a different way were the embroidery patterns: I created an alpha with the shape of a fibre using Substance 3D Designer, then exported it to Painter and used it to create an embroidery brush that allowed me to create those details.


The texturing process for the accessories was straightforward, and I mainly following the same steps as the clothes.

One thing that saved me a lot of time was Painter’s feature to paint across different channels since I was able to add color breakups or details that also followed a change on the roughness, the metalness or height in the textures.
The grooming was one of the most difficult parts for me. I had to iterate over and over until getting the result I wanted, but I think it was worth it.
To create the beard, I started creating the scalp for the hair by cutting a part of the face that was going to be used exclusively for the beard and the moustache. I used the XGen Core workflow to create the general silhouette and all the breakups, then I changed to XGen interactive to fix some artefacts and give the final touches.

In total, I created six descriptions to create the style of the beard: three to create the general shape of the beard, the moustache, and the braid; and another three to add flyouts and to give some breakup and noise.
I used mainly clumping, cut, and noise modifiers to achieve the look. For the final touches, I changed the descriptions to XGen interactive to get rid of some fibres that were colliding into the beard accessories and to comb out the moustache.

For the thatch cloak, the process was pretty much the same. I created different descriptions with different lengths to create the general volume, and then other ones to blend the layers and make them look like one single volume.
I also created different materials with color variations to enhance the volume of it when rendering. To do this, I used a V-Ray hair sampler node to give every fibre a different color from a specified range, so the color range for the fibres on the top layer was lighter than the one for the fibres on the bottom layer.
I decided to use V-Ray to render my project. I created the materials for the clothes, accessories, and props using the V-RayMtl node and connected the textures that I exported from Painter. For the face, I used a blending material to mix a fast sub-surface scattering (SSS) node with a V-RayMtl to mask out the dirt of the face.
Once I had all the materials set up correctly, I created different light rigs to test the textures under different light conditions.
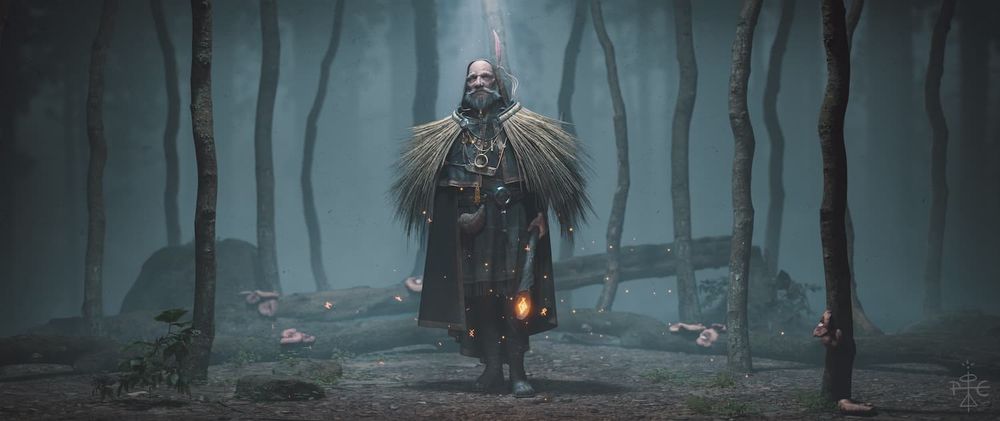
Finally, I wanted to have a shot that communicated the vision I had, which was to watch this character in a real production. I decided to dress up an environment using a bunch of Quixel Megascans and Quixel Mixer. I tweaked some of the textures to create a grimmer feeling, and finally I created a couple of mist simulations to enhance the effect of the light and achieve the result.

The most important thing is to first prioritize the basics before the detail. If you are creating characters, my advice is to study their anatomy and to learn to observe carefully when looking at references. The same applies to environments, hard surface props, etc. If you focus on getting the basics right first, without rushing into creating the details, your projects are going to be good.
For me, it was challenging to create someone without a ‘perfect’ figure or someone young and fit. I needed to make someone older, without muscles and skin that hung in a different way. I needed to look at many references of older people and from there I was able to achieve the level of realism that I did for my character.
It was a learning experience for me, and this made creating this artwork fun. I really enjoyed making the clothing and doing the grooming, but some parts were laborious. A lot of it comes down to patience. It’s not going to look good right away, especially if you’re still learning. I spent a month and a half just on the face of my character and I can imagine that for some people, this is a long time and can be frustrating. You need to give yourself the time to make mistakes often, then work on them, to get it right.
Some people are very talented but impatient, and it’s possible to become frustrated with this cycle. However, you need to be aware of your own process and accept it – if you can do that, you’ll enjoy it. If you aren’t willing to make mistakes, the process will not be fun. You may finish faster, but it won’t be your best work at the end. To be excellent, you need to learn a lot and work a lot.
You can find more of Pablo's work on The Rookies and on ArtStation.