Design, Develop, and Animate a Short Film in Three Months
School of Visual Arts student, Brooke Burnett, designed, developed and animated her winning Rookie Awards entry in just three months, and this is how she did it.
School of Visual Arts student, Brooke Burnett, designed, developed and animated her winning Rookie Awards entry in just three months, and this is how she did it.

Brooke Burnett is a current student at School of Visual Arts undertaking a BFA in Animation. Brooke aspires to work as a part of a television production team as an animator, storyboard artist, or character/prop designer. Judging from her recent winning entry to the Rookie Awards in the 2D Animation category, we think she is well on her way to that goal.
Learn more about how she designed, developed and animated her winning Rookie Awards entry in just three months.
Creating “The Spellening” was a massive undertaking; I had to design, develop, and fully animate a short film within approximately 15 weeks. To properly conquer this challenge, I had to set up a game plan to ensure my success and completion within the means of my school’s requirements.
I wanted to create a film that went outside of my comfort zone. In animation assignments from previous years, I stayed within the bounds of understandable perspective. This year, I wanted to go all out with fantastic action sequences with daring camera moves. “The Spellening” kept me engaged as it was a continual learning experience riddled with trial and error, but it allowed me to grow and gave me more resolve for problem-solving.
I began to contemplate ideas for what my film could be. At the time, I was enamoured with the popular card game “Magic the Gathering” and was inspired to create a parody through my film. For the story, I focused on developing a witty back-and-forth between the protagonists, which I felt would work well for something comical and quick-paced. I knew that my short could be no longer than two minutes given the tight schedule, so, after much time spent editing and peer review, my 2-page script was ready. With the story secured, I could begin to move on to my official production.
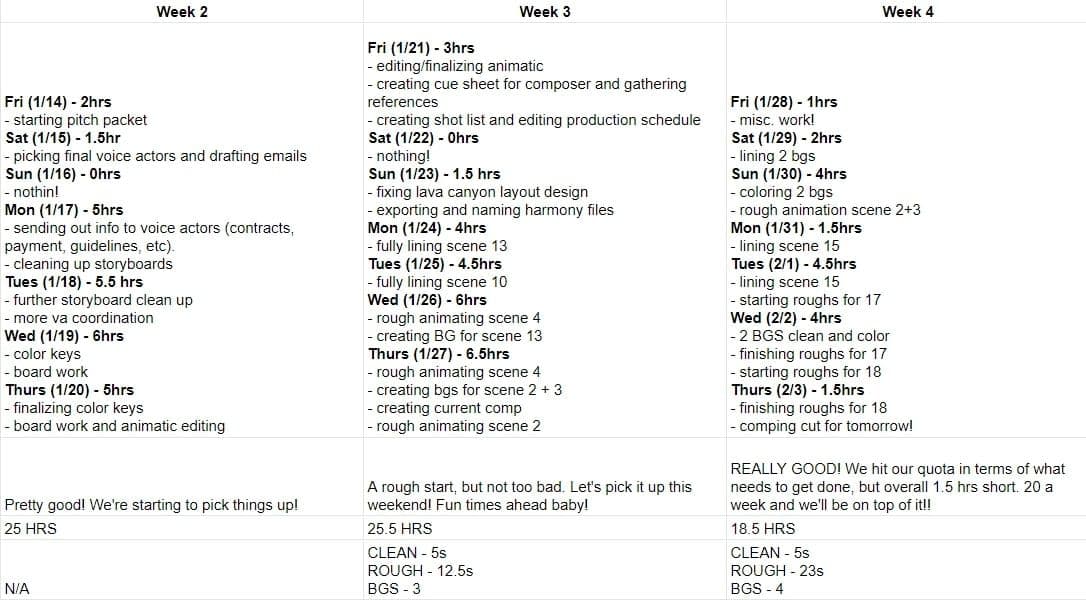
Establishing a strict plan allowed me to lay out all of the tasks in an organised manner to execute everything within a specified timeframe. I made it a goal to dedicate a minimum of 20 hours a week to working on my film, ensuring that I gave it the attention it deserved. I detailed the hours spent each week on a separate page so I could cross-reference it with my outlined schedule, affirming that I was completing everything intended on time.

I immediately jumped into preproduction, getting an early start with my character designs, prop designs, etc.
To match my zany, child-centric story, I wanted all my visuals to be simple but captivating. I collected images and inspirational media, which I threw into a few vision boards to understand the style I wanted to achieve for the film. I drew heavy visual inspiration from popular children's cartoons with shapely characters and imaginative backgrounds, such as Cartoon Network’s “Craig of the Creek” and “Adventure Time”.
I stayed within Toon Boom Harmony when creating my character and prop designs. I find that their vector drawing feature is a great help when resizing and altering drawings. Having the onion skin and frame toggles allowed me to quickly understand what my characters and props would look like with each other in a faux 3D space.


When developing the look of my environments, I opted to make them in Procreate. Backgrounds are certainly not my strong suit, but working in Procreate made the process much more bearable when experimenting with my colour scapes. Although Procreate lowers the number of layers as the composition pixelation increases, it acted as a fun challenge and reminder to keep the design simple and readable.


With my assets for pre-production finished, I could move on to finalising my animatic. When organising the scenes, I first laid out my extremely sketchy thumbs in my sketchbook to get a general idea of the placement and action of the characters.
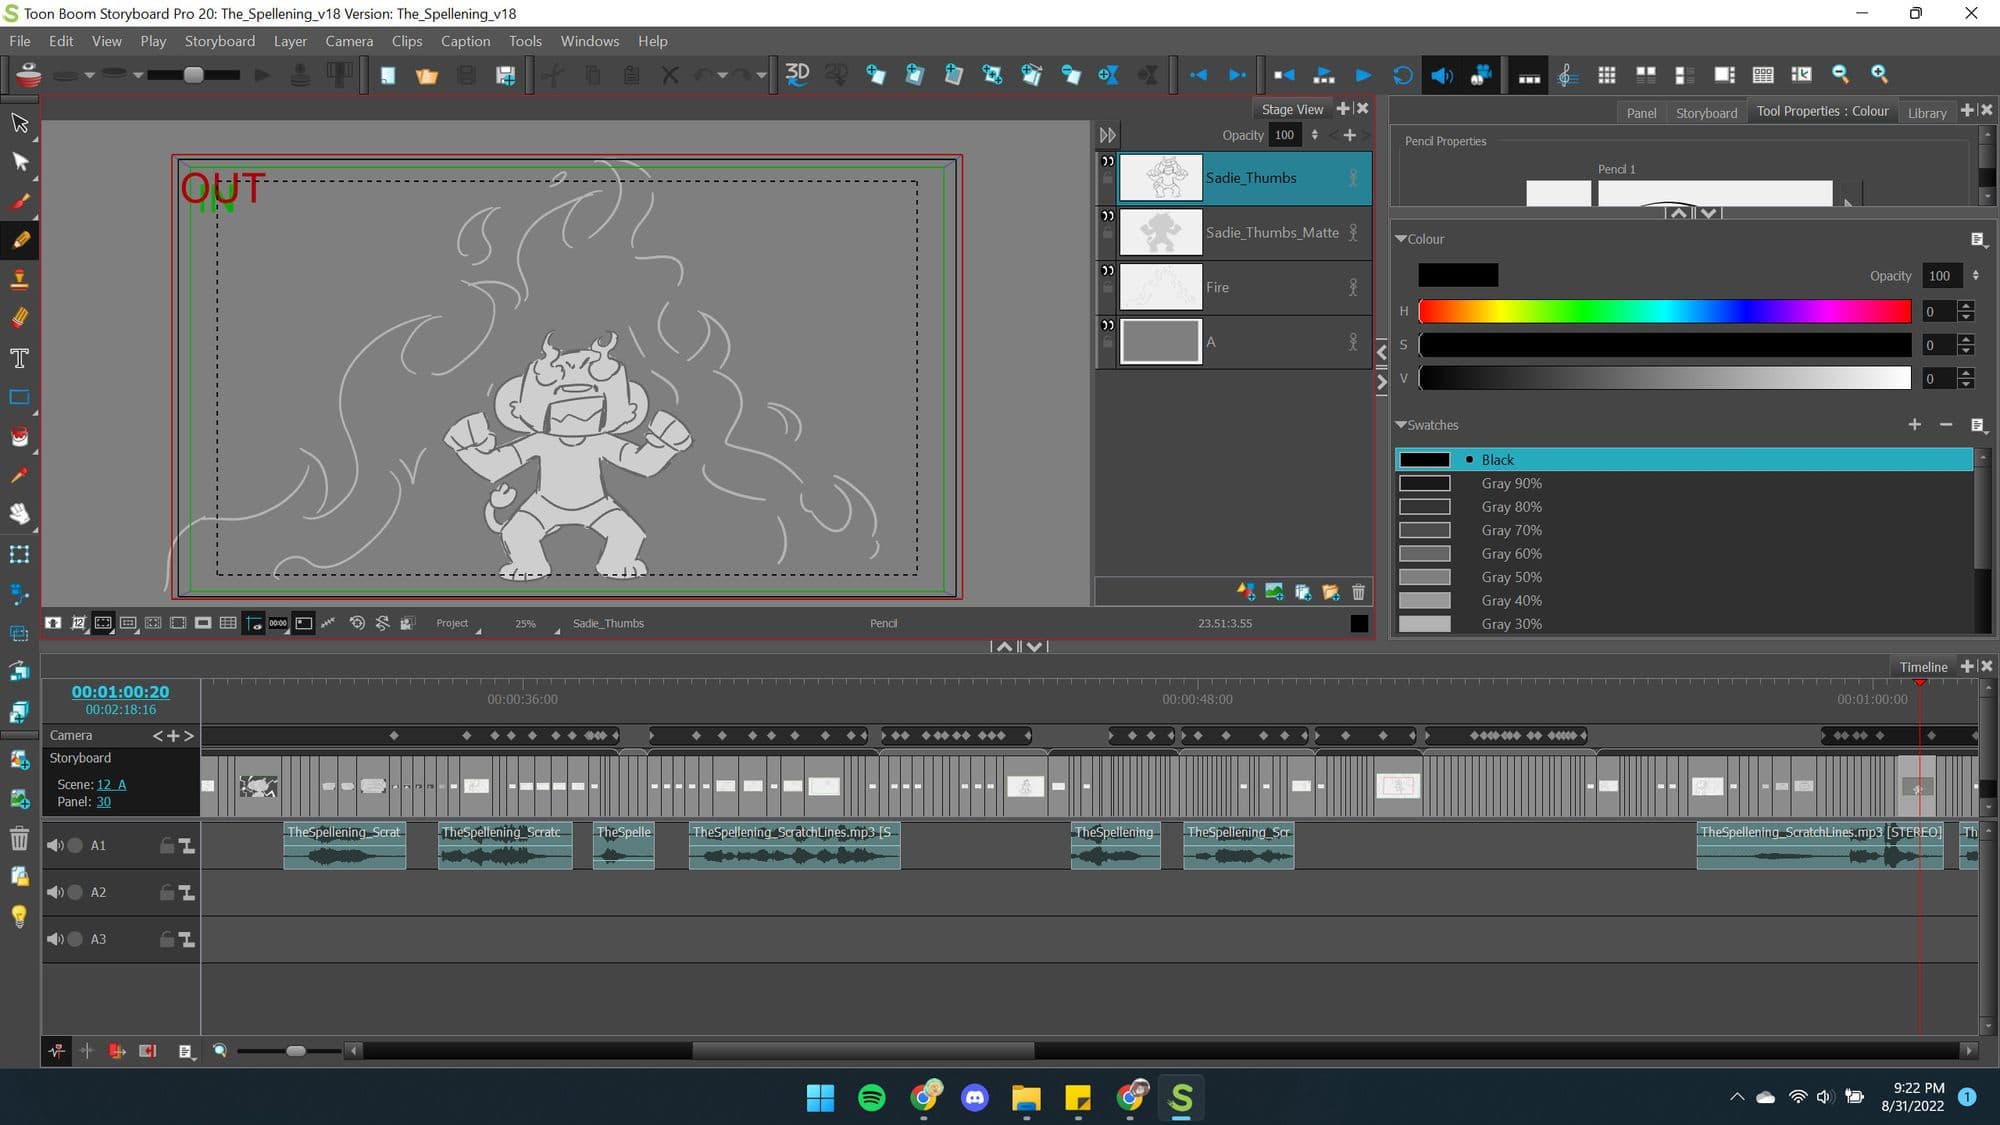
Upon finishing the thumbnails, I created my animatic in Storyboard Pro, providing more detailed imagery to act as the foundation for the movement and timing of the animation.


I wanted all aspects of my film to look and feel professional, so I used my personal funds to pay for a composed musical track and voice talent. I contacted my talented friend, Sam Kaplan, who beautifully composed my previous school film, to hire them for another musical masterpiece.
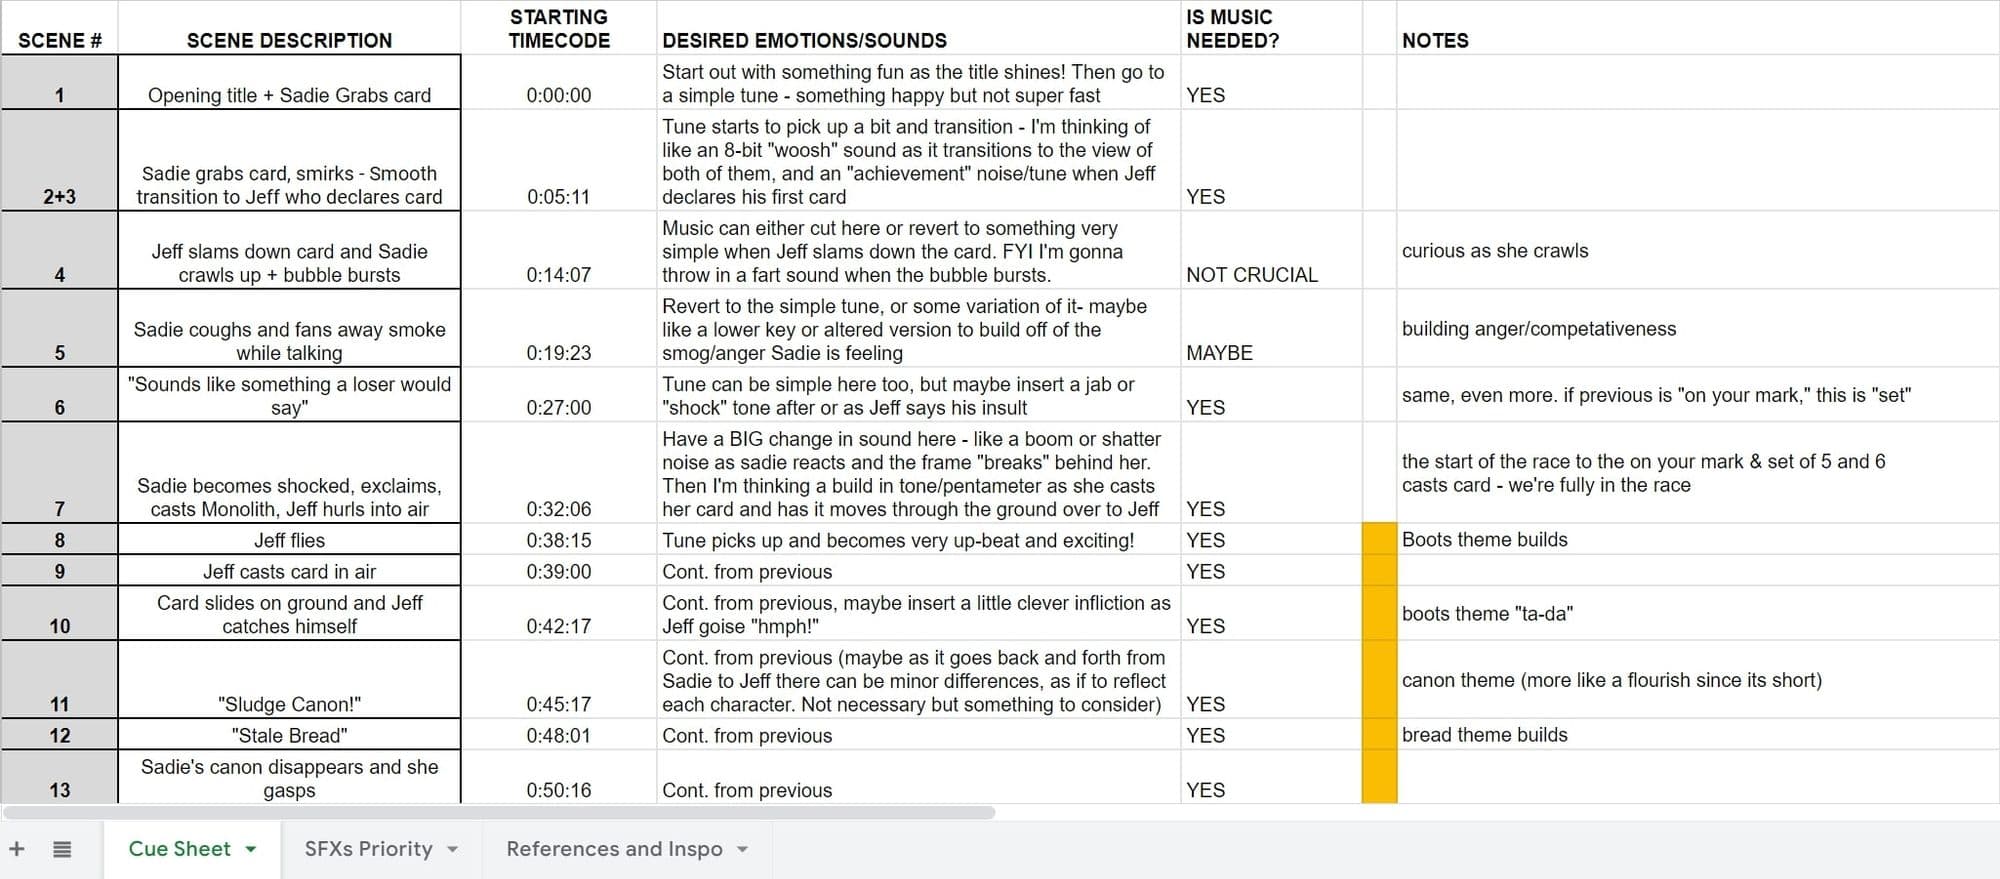
I provided them with plenty of sound inspiration and a cue sheet for certain emotions I wanted to “hit” in partnership with the music. I also posted a casting call on social media with guidelines for anyone interested in auditioning for the characters.
My two chosen voice actors, Analesa Fischer and Michael Malconian, brought gusto and energy to the characters in a delightfully charming way that resonated beautifully with Sam’s soundtrack. When pairing these auditory elements with my animatic, I felt a more energised drive and greater motivation to see it reach the finish line.

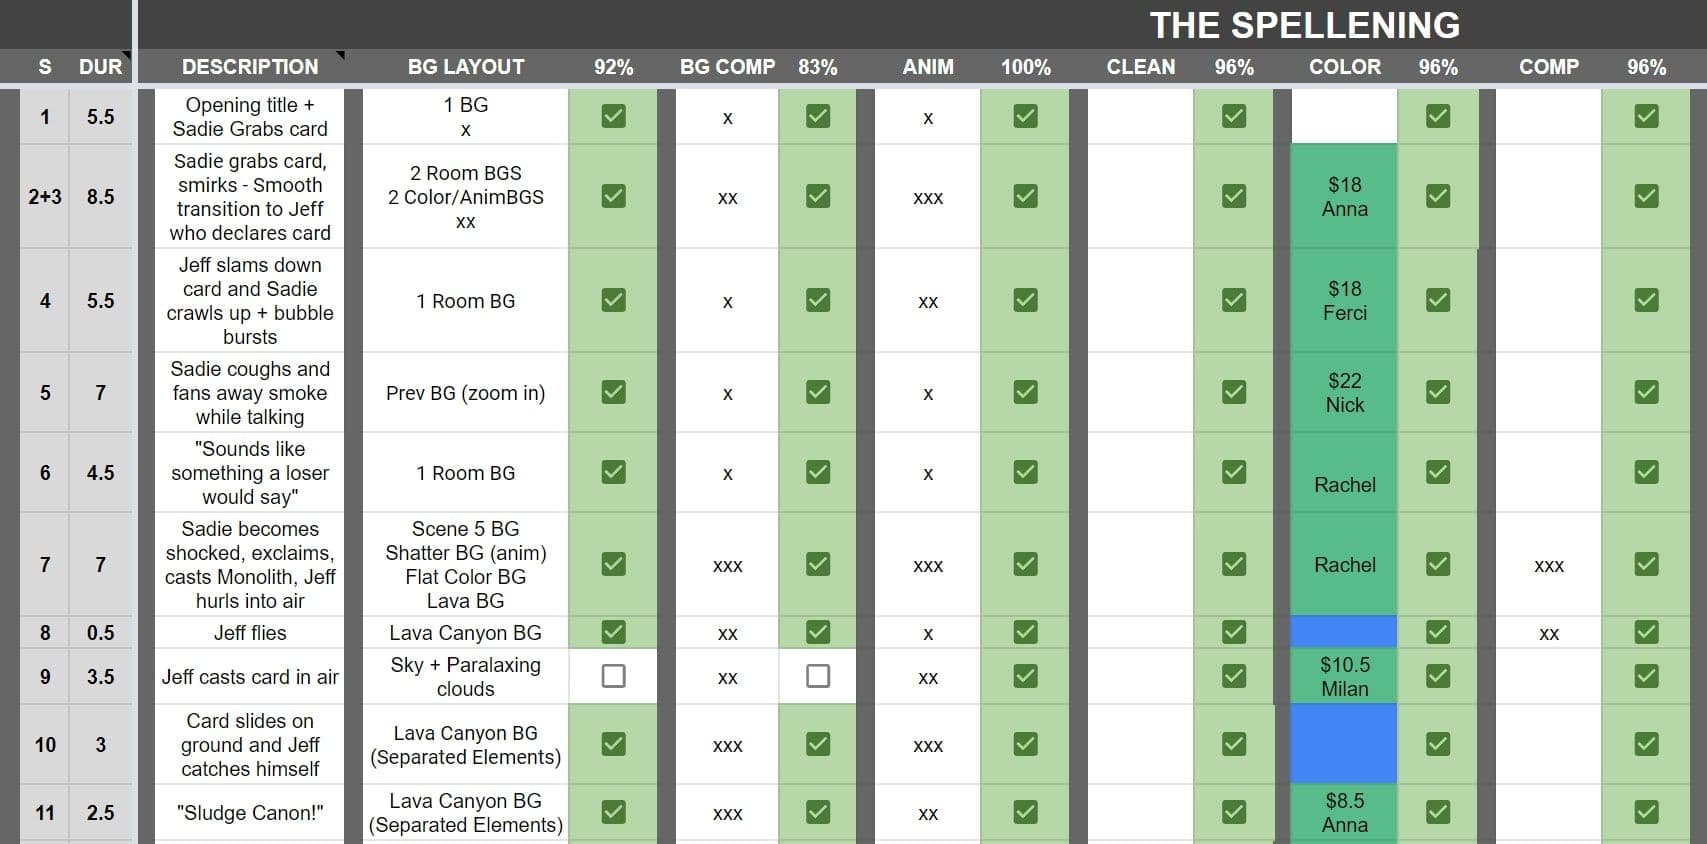
I was ready to start constructing my animation with all the necessary building blocks. Wanting to order my shots and further detail the steps needed to build them correctly, I created (you guessed it) yet ANOTHER sheet! This shot list provided me the opportunity to rank the complexity and notate extra work potentially needed in properly piecing the scene together. It also encouraged me to see how much I’d accomplished each week. Checking off those little boxes is more rewarding than one would think!
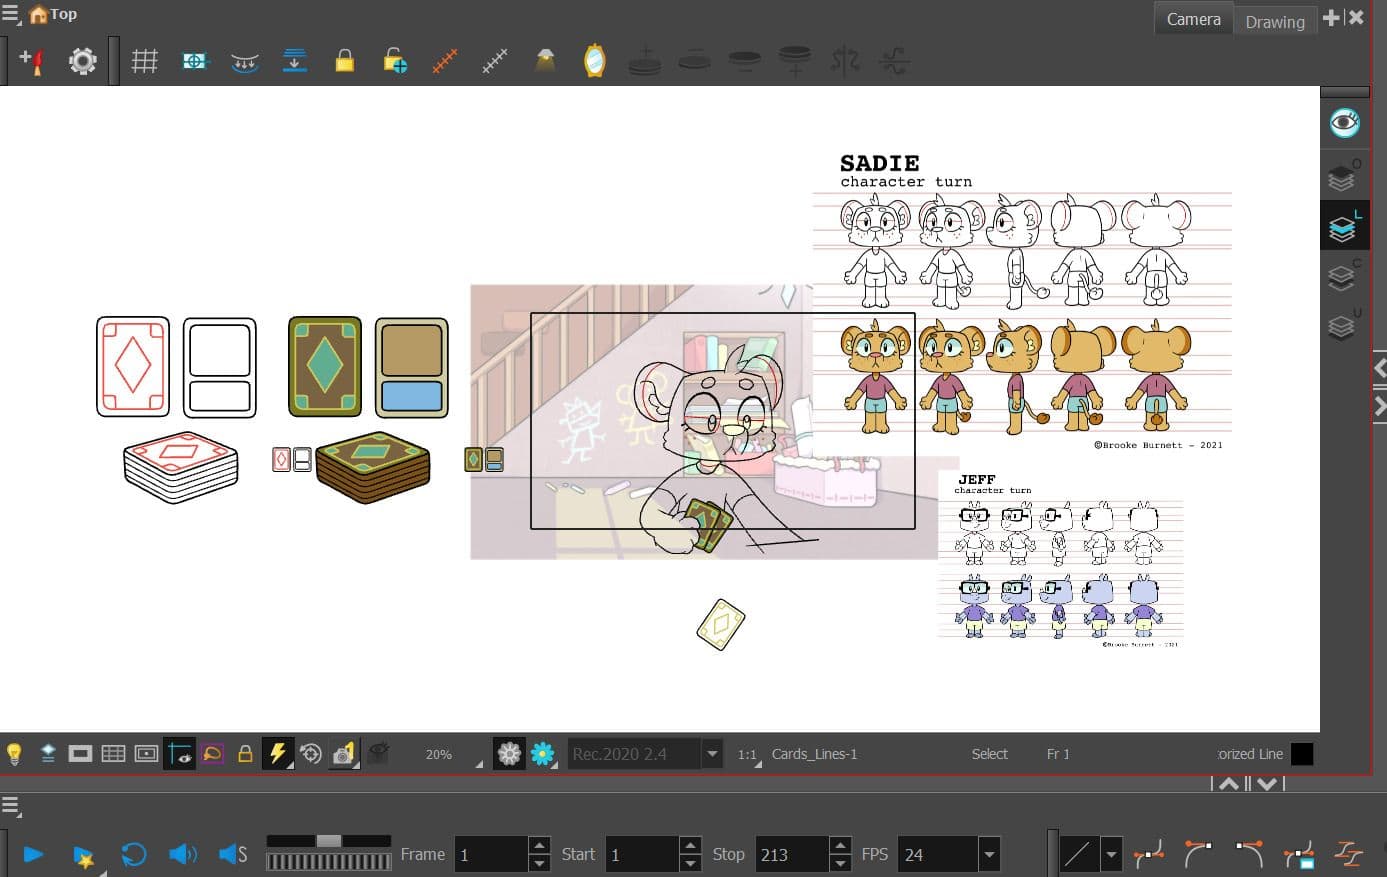
Throughout the following weeks, I would often rotate through tasks for various scenes to keep my mind fresh and entertained with different objectives. I’d focus on animation one day and segue to clean-up and background design the next. For animation and clean-up, done entirely in Toon Boom Harmony, I always imported character designs and prop sheets into the composition so I could toggle my view to reference them quickly. Accuracy and consistency were key features of my animation that I sought after, and utilising my previously made designs proved immensely beneficial in achieving this.
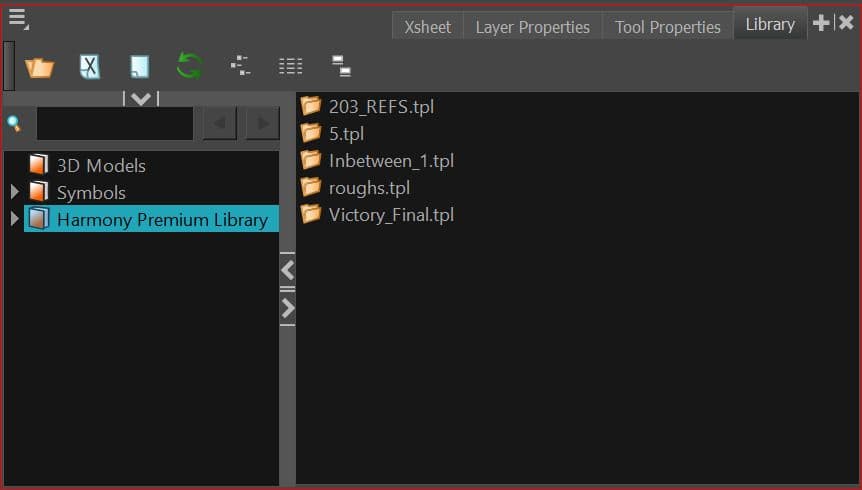
A feature Toon Boom has that benefitted me in this process is its library, often found in the upper right window of the workspace area. Opening the properties allows the user to save layers, groups, references, and animation for reuse in any other scene or harmony file. Rather than re-importing my references one-by-one into every scene, I’d just reach into my Harmony Library and have them instantly on my stage! It also allowed me to re-use assets such as my props which I had made in Harmony using the pencil tool, meaning I could resize the vectors and maintain the quality of the drawing, eliminating the need to re-create it from scratch.
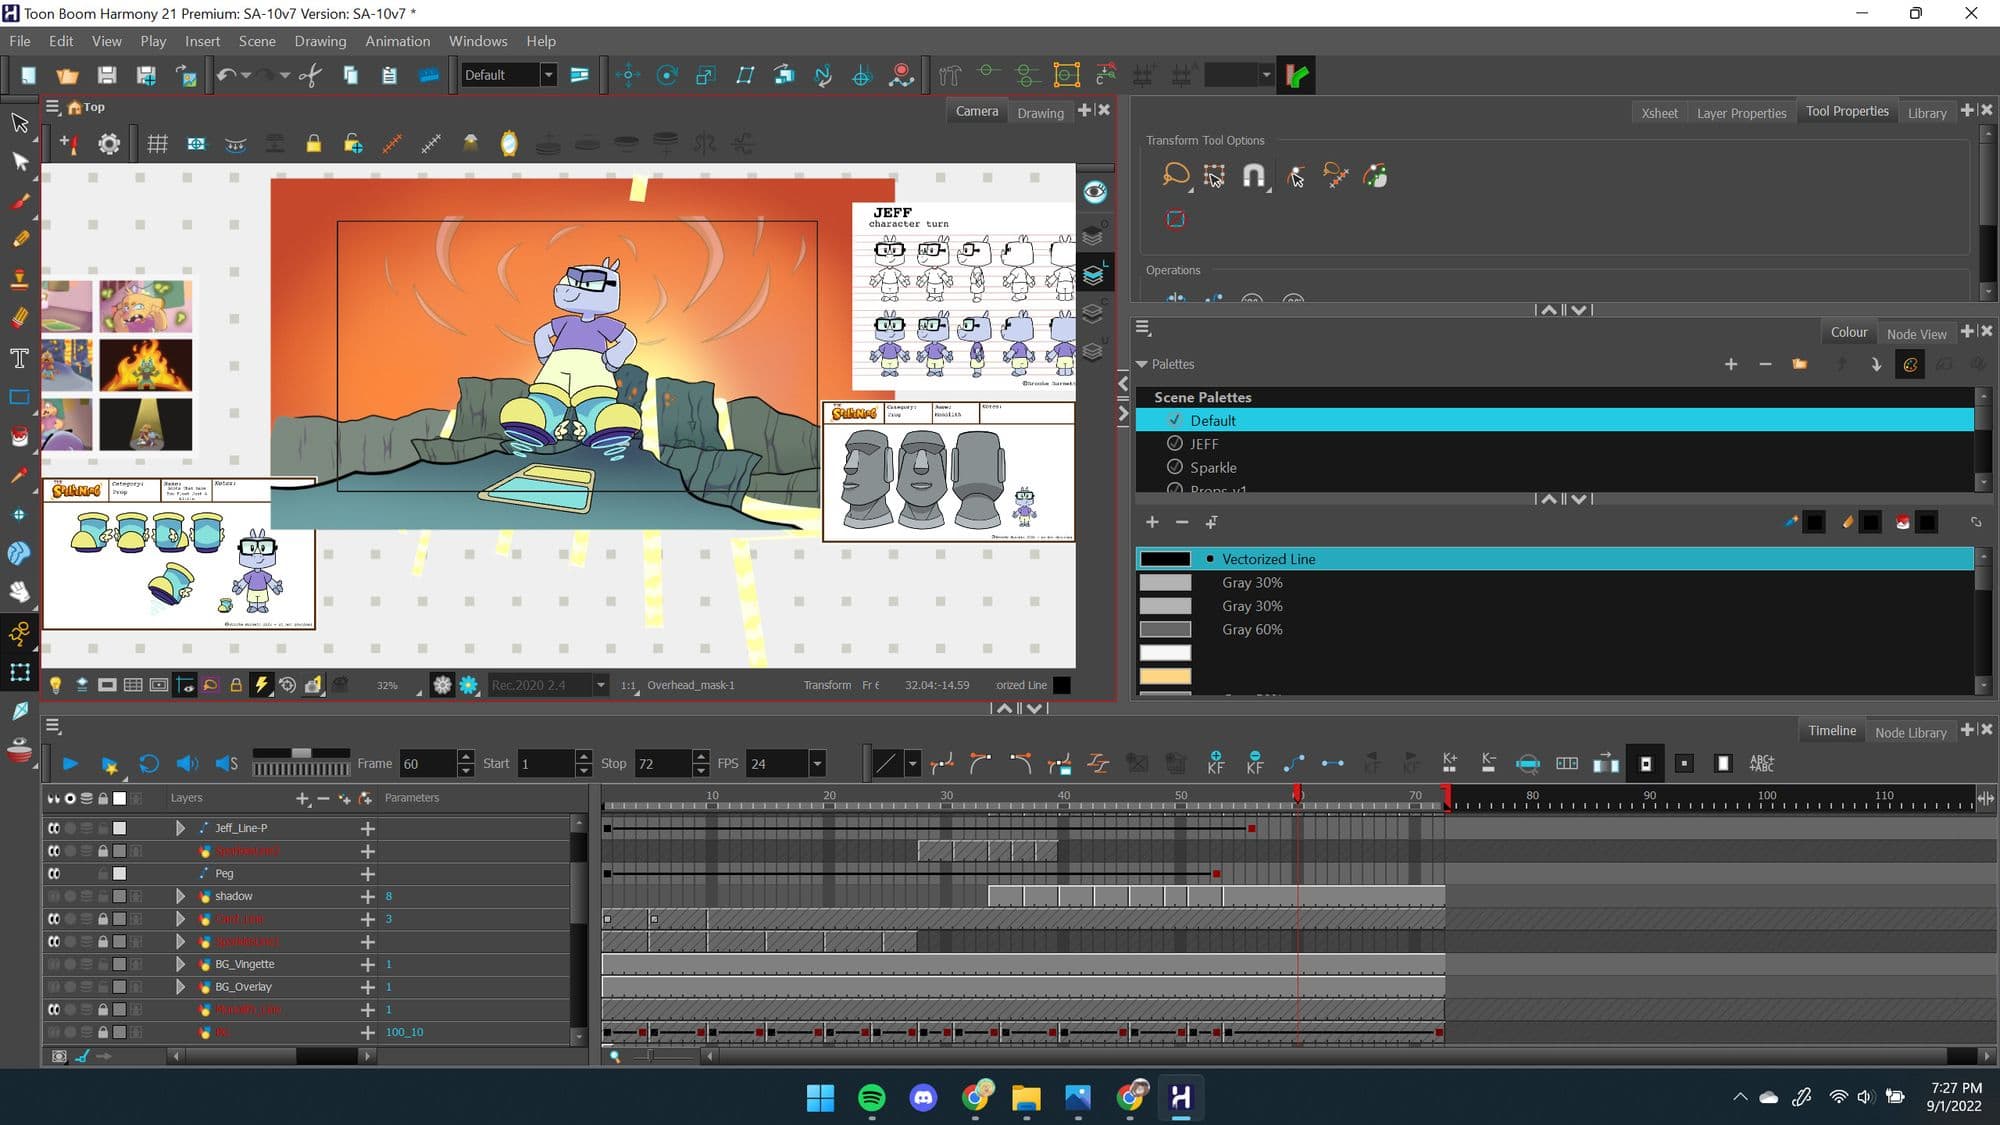
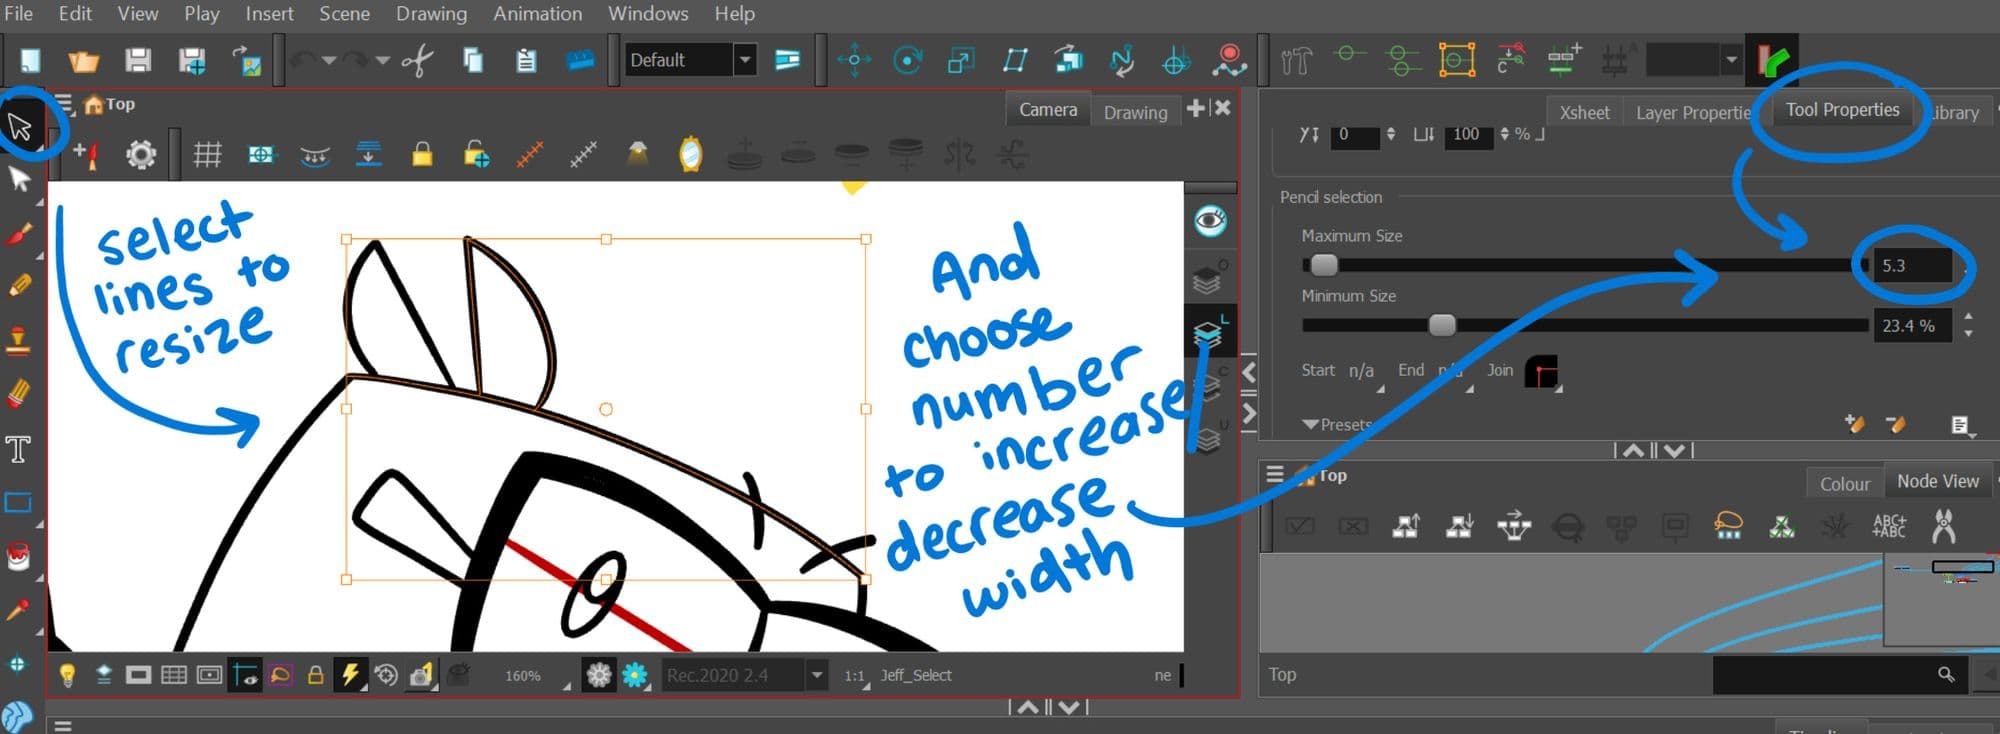
For clean-up, the pencil tool was my best friend. As my characters move through various perspectives, I wanted the line weight to feel natural and consistent as their sizes changed in relation to their environment. The pencil tool in Toon Boom creates vector strokes; with this feature, users can easily change the weight and thickness of their drawings. To do this, you select the strokes you wish to alter and then access the tool properties on the upper right-hand side, changing the numeral to the desired thickness and pressing “enter” on the keyboard. Lines can be made bolder or thinner instantly without re-drawing frames!
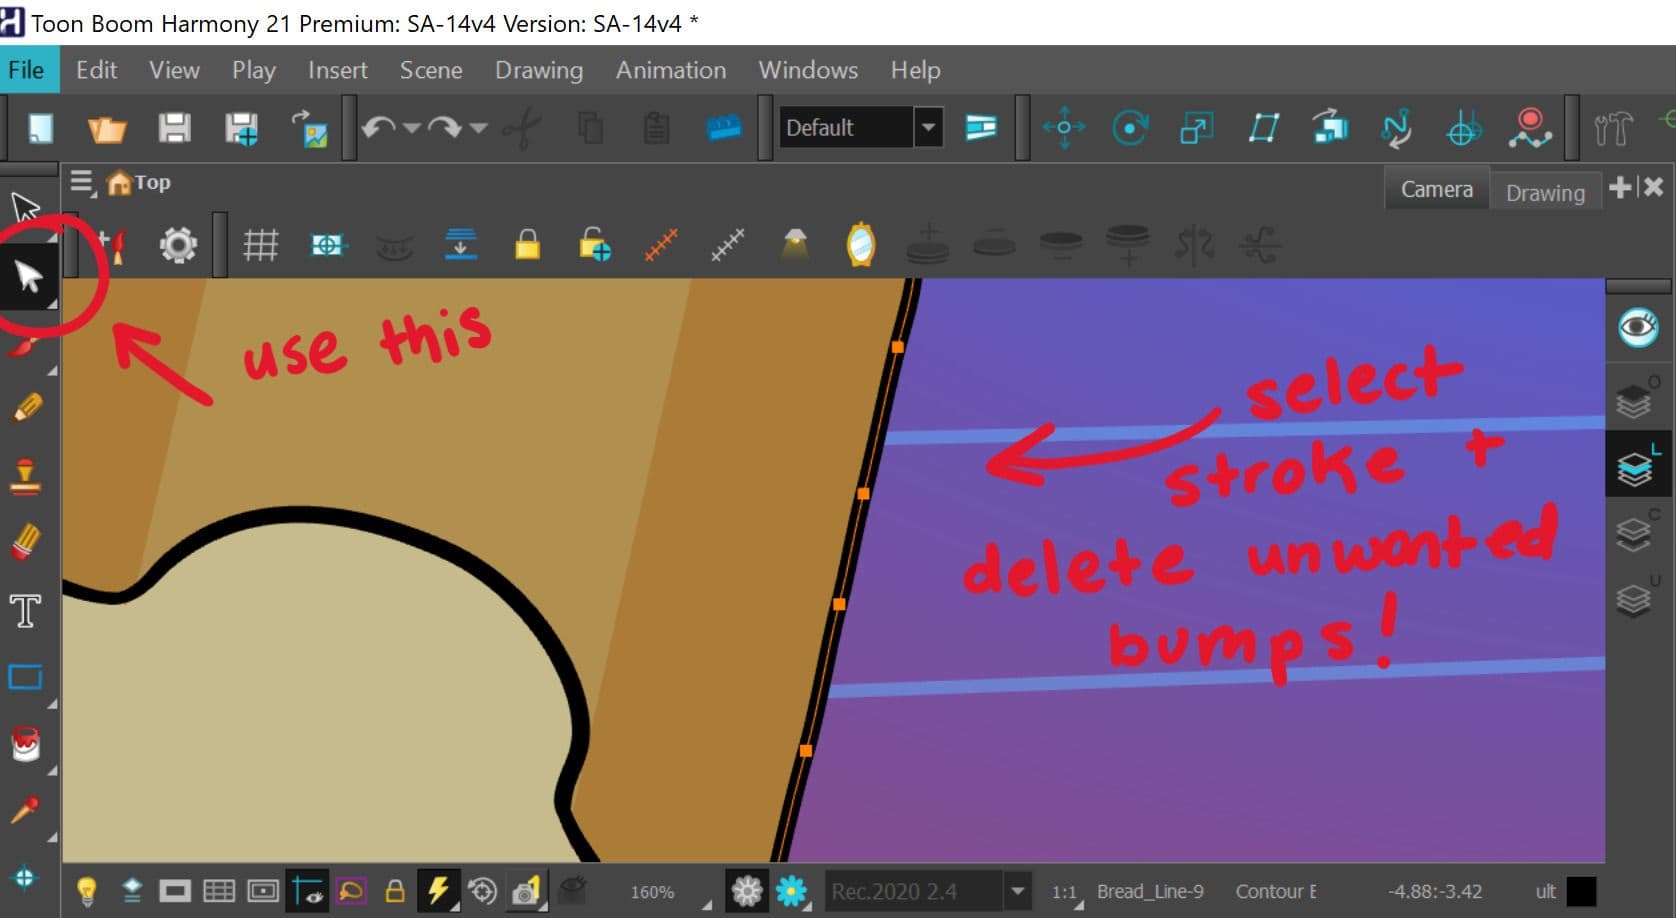
Drawing with the pencil tool also allows you to smoothen/stabilise your drawing, so there are no unwanted bumps or wiggles within the strokes. To edit them, you simply need to click on the Contour Editor (the white pointer on the left-hand toolbar, also Alt+Q for the shortcut) and then navigate to the stroke you’d like to edit. You can then eliminate pinpoints by selecting them and deleting them or giving the stroke a slight “wiggle” to shake them out. This gave my lines a much cleaner and crisp feeling, adding to the polished design of the film.
Although I had tools to help streamline my cleanup process, completing this bulky part of the film took me longer than expected. Understanding my workload and wanting to finish on time, I saved up money so that I could employ friends to assist in frame-colouring.
For colouring in Harmony, I used the “Configure Line Art to Color Art” Button at the top toolbar to create my line-art strokes on the colour art layer. This tool allowed me to colour on a separate art layer while still having the option to edit my line art if needed. Additionally, colouring on a separate layer is an excellent option to consider when compositing if you’d like to change the lighting or add effects to the animation without affecting the look of the line art.
To ensure my friends knew how to colour my animation correctly, I made them a detailed video tutorial and left notes with specific instructions on the individual scene files.

Bringing more people to work on my team also developed my leadership skills. I taught my peers a program I’m well-versed in while offering aid in troubleshooting issues.
My practice of efficient guidance and communication will significantly benefit me down the road, as I’d like to continue working in group settings once my final chapter of college concludes.
Teams of people contribute to creating animated projects, be it a physical studio or a collective of freelance individuals; consistent and transparent discussion paired with willing collaboration is crucial for success.
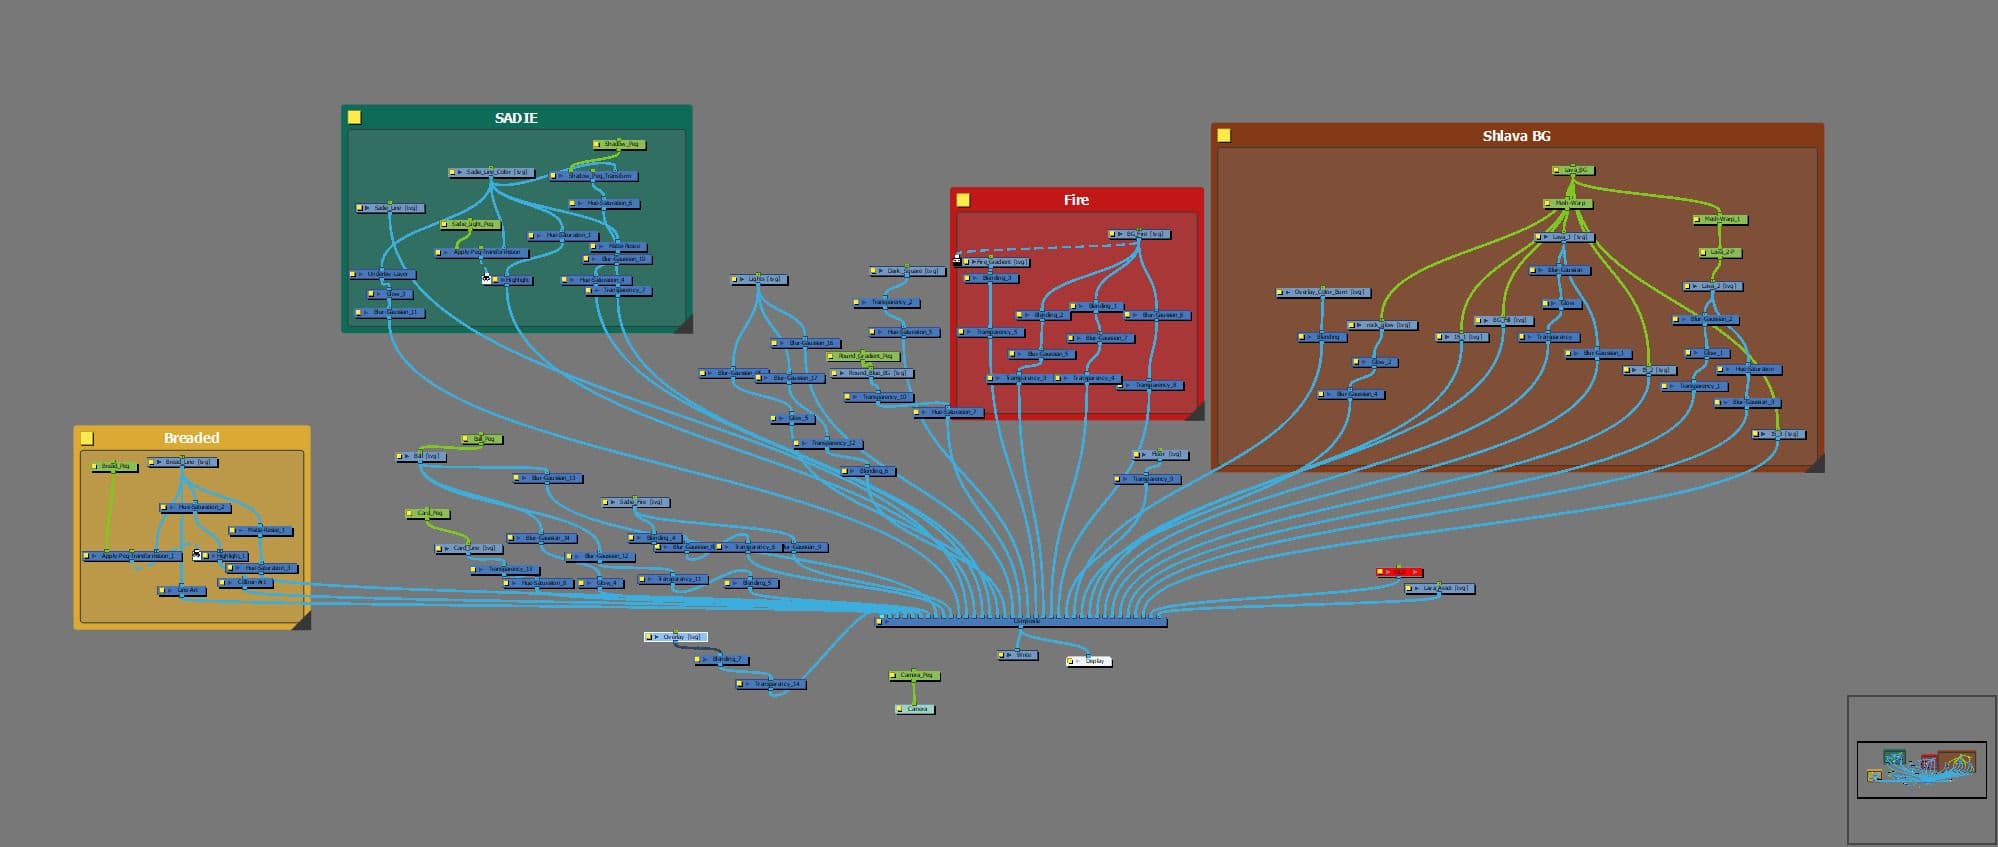
By allowing others to take over this part of the film, I could then focus on the more technical aspects of compositing. Drawing and cleanup out of the way, there was still so much to do. Taking the initiative to teach myself some of the features of the node view in Harmony over the past summer, I determined that I’d continue learning and use my already acquired skills by compositing my film entirely in the program I had already animated.
Ultimately, this decision greatly benefited me; my scene materials were all adequately organised and accounted for in one location. Understanding how to combine features in the node view allowed me to experiment with colours, lighting, and background effects. The ease of blending layers gave me the ability to change the mood of a scene in an instant through simple colour distortion. The node view was an often challenging but incredibly rewarding puzzle that I learned to love and now highly regard as a commemorable feature of Toon Boom’s that streamlines the animation process.
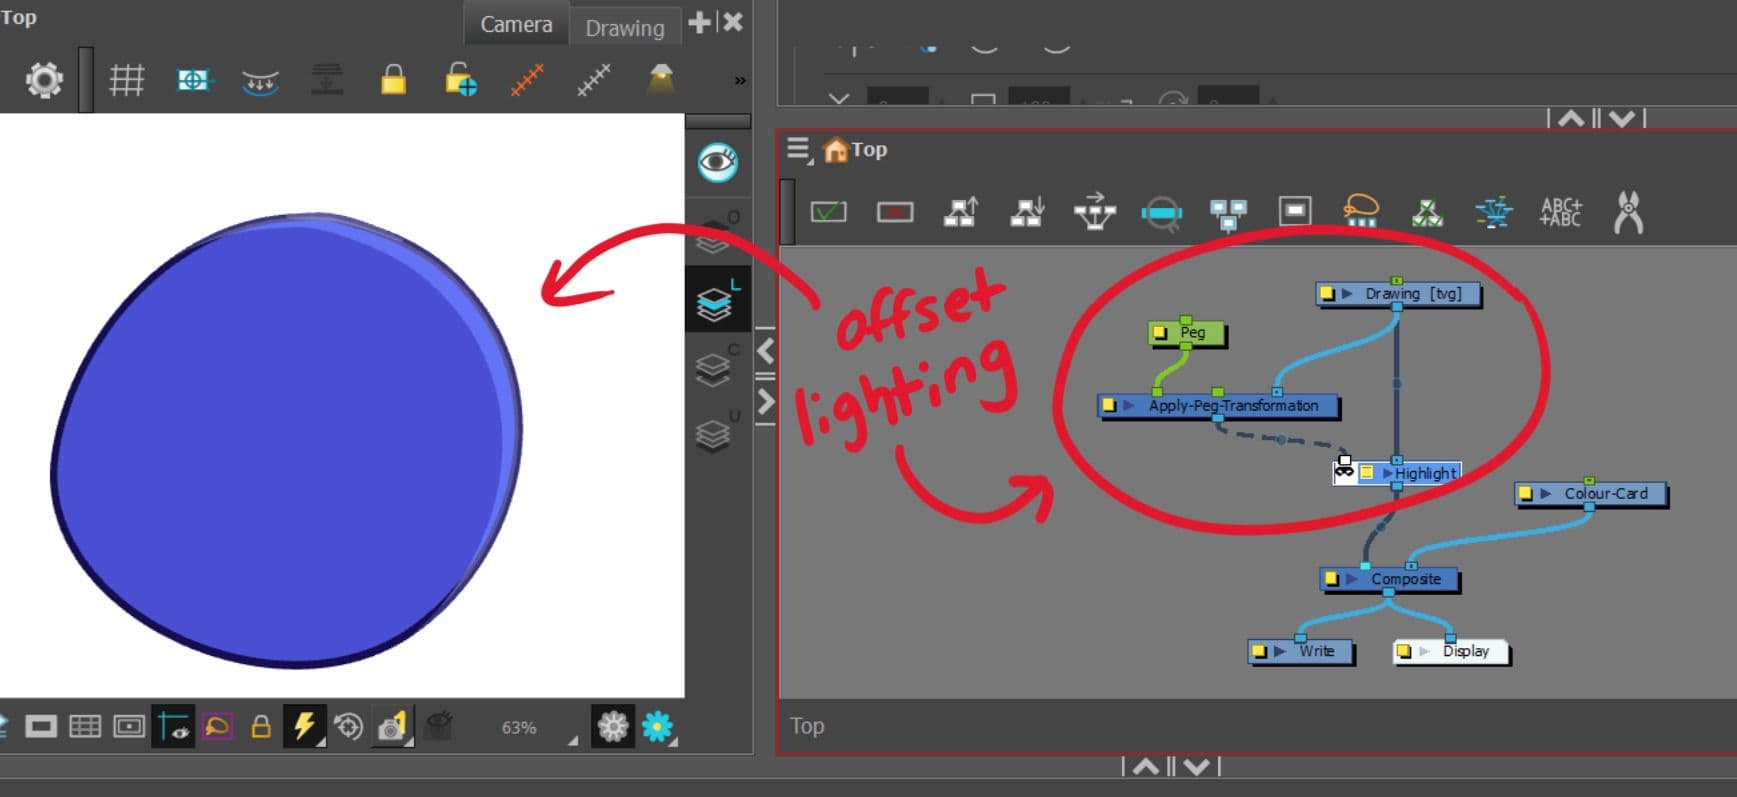
One of the most helpful compositing tricks I’ve learned is the offset lighting feature. The set-up may seem intimidating, but it is surprisingly simple if you take the time to study how the Node view works. To properly use it, you must attach your art layer with an “Apply-Peg-Transformation” node and a “Highlight” Node. The Apply-Peg-Transformation then connects to the Highlight node, which goes down to the master composite.
Finally, after making sure you’ve inversed Highlight Node through its layer properties, you should attach a peg to the green plug on the “Apply-Peg-Transformation,” which you then use to change the direction of the offset lighting. I regularly visit ZeBirdBrain's YouTube Channel for compositing tips and usage of Toon Boom’s Node Library; they’re also the source I used to learn offset-lighting! I highly recommend their channel for great tutorials with clear guiding visuals.


At the start of my college career, I had little knowledge of the Toon Boom. My interest rose every time I discovered a new feature that made my work ten times easier. Over summer breaks, I’d spend hours on YouTube and forums learning about shortcuts and nodes that offered interesting and helpful effects for animation.
Typically, students at SVA take to Adobe Animate, Toon Boom, or TV Paint as their “chosen” program. Having sampled each, I’ve decided that Toon Boom Harmony is the one I swear by. That said, I’m immensely fascinated with my peer’s abilities to create things I can’t fathom in the other programs mentioned. It takes independent immersion to discover one’s interests and likings to determine which platform works best for them. For me, I just love the node view. It’s a fun spaghetti-puzzle.
I’m a firm believer in experimentation and exploration. It makes me incredibly happy to see my friends in their element, transfixed by their work.
Ultimately art should give you fulfilment, and it’s up to the individual to find how that statement resides true. When you discover something you deeply enjoy, you grasp it tightly and refuse to let go.
I recall staying up until 4 am the night before my film was due, putting together all the last-minute touches in the sound design and editing the credits at the end. It was grueling at times, but ultimately it filled me with an inexplicable satisfaction to see my characters come to life. I was determined to finish it, and so I did.
Once the waters had calmed with all my school responsibilities wrapped, I decided to seek out festivals and competitions to enter. My school (SVA) heavily promoted The Rookie Awards to us as an available opportunity. Seeing many of my peers participating inspired me to join in as well!
When it came to the presentation of my entry, I honestly hadn’t put too much thought into it. I was excited to share my project with others, so hurriedly, I submitted my film according to the guidelines. I noticed that some other entrants included their production work in tandem with their film submissions, which is something I wish I’d taken into consideration before displaying my film by its lonesome. It just shows there’s always more learning to do and ideas to consider.
As I’m trekking into my final year of college, I’m excited to see where my efforts will take me. I’d love to continue animating, storyboarding, and compositing in a studio setting if given the opportunity through career practice. My drive and willingness to learn have allowed me to leap hurdles and grow substantially as an artist. I want to hold tightly to the mindset of continually learning past college so that I can acquire new positions to contribute my skills. “The Spellening” is a worthy testament to my excitement and love for animation that will follow me well into the future.
With everything, I’m unfathomably proud of myself and those who lent me their talents and skills in completing this project. I found ways to execute my work diligently while elevating my learning skillset to a proficiency I didn’t realise I could acquire. It shows that the tall mountains are climbable, but you need to plan every step if you want to reach the summit!
You can find more of Brooke's work on her website and can reach out to her via LinkedIn.