Sculpting a Stylised Character in ZBrush by Ana Nikolovska From M3DS Academy
Ana Nikolovska, is a passionate Junior 3D artist who secured a position at M3DS Academy where they honed their 3D skills.
Ana Nikolovska, is a passionate Junior 3D artist who secured a position at M3DS Academy where they honed their 3D skills.

Meet Ana Nikolovska, a Junior 3D artist who recently graduated from M3DS Academy for 3D modeling and Game Design. Fuelled by an unrelenting passion for their craft, Ana wasted no time and secured a position at the very academy that shaped their skills.
But their pursuit of excellence doesn't stop there. In their free time, Ana dives headfirst into personal projects, constantly striving to elevate their 3D skills to new heights. Today, we'll delve into one of these projects that Ana has embarked upon as part of their relentless pursuit of self-improvement.
I never thought I would reach this far in my artistic journey and have the opportunity to be writing on the Rookies site. I feel proud to have never given up art to be the career path I wanted to take since I was a young teen. Thank you again to the Rookies and most importantly to my mentors and now coworkers who have taught me and helped me get to where I am now.
With gratitude aside, I wanted to share this project in hopes it will inspire many young artists to try out new things no matter how intimidating they could be.


Programs used:
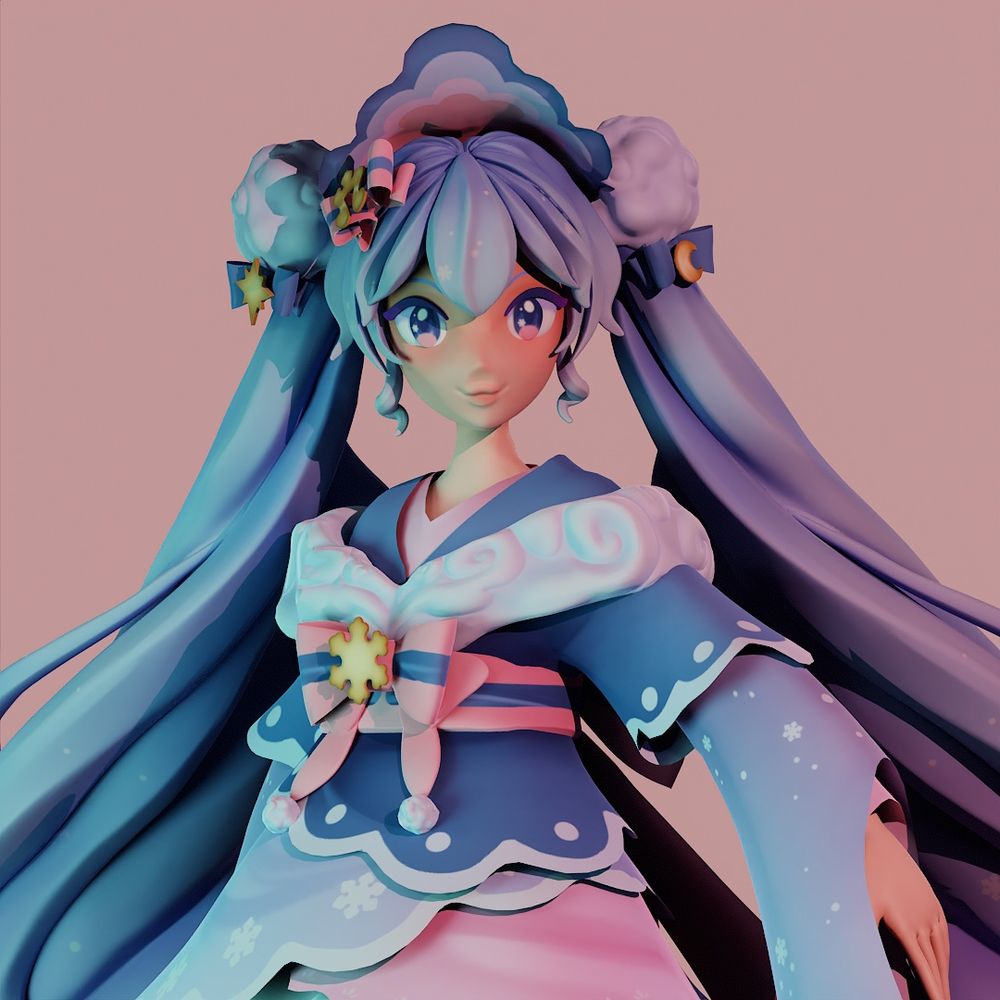
The body was the easiest part to make since most of it is covered in clothes and I was more than used to sculpting faces at that point. The main focal point is the clothes as well as the hair.
The hair was the first thing I made before adding the clothes since I enjoy that part of sculpting more. I really had to trust the process and stick to building the hair up till it started resembling the shape on the reference. Once I got the basic shape down it was all defining and adding in the details.


Clothes aren't my strong point, I mainly focus on the face and hair of the character to make up for the lack of detail and creativity in what the character is wearing. This time there were no excuses.
The reference helped a lot since it showed how the outfit is layered. The most challenging parts were the long sleeves as well as the main cloud-shaped skirt.
I got creative and made the long sleeves out of spheres, making a hole in them by deleting hidden groups.
The skirt was the part I spent the most time on from the outfit. I had to alter it so many times to get that fluffy cloud shape. Looking back on it now they were easier ways to go about it but that is the beauty of improving in an art field. Ideas and solutions pop up the more experience and practice you gain.
The retopology process was very challenging. Most of the parts on the outfit were Zremeshed in ZBrush to save me time and sanity. The real challenge was the smaller details. They were too small for ZBrush to retopologise them for me and I had the misfortune to do it by hand.
Since my topology wasn't the cleanest I had to be really careful where I cut my UV map. I also spent a lot of time focusing on keeping my UV space as organised as possible.
I learned from my past mistakes and the importance of keeping the UV space clean for the baking and texturing process in Substance Painter.
Before texturing I bake the low with the high poly model.
I started off by placing down the base colours on each part of the model to get a good idea of how the colour will look.
The next step, and the one I enjoy the most, is hand-painting the character. I used generators and filters to help me with the build-up before hand painting all the other things by hand.
The snowflake and moon details were alpha masks that I made in Photoshop. I used them on the paintbrush and stamped the shapes wherever I needed them to be.
I kept everything simple and clean to stick with the soft look I was going for.


I used the Transpose Master in ZBrush to pose the character to make the render more appealing. It was a struggle getting all the clothes not to clip into each other but after a lot of masking and grouping, I gained the desired pose I wanted at the end.


The rendering was done in Marmoset as well as the camera animation. It was my first time using Marmoset for rendering but I was immediately surprised with how beginner-friendly the user interface was as well as the entire software itself. I initially wanted to render it in Substance Painter since I was familiar with it, but I am glad I went with Marmoset in the end.


Never back down from something just because the process might be hard and time-consuming. Tackling those types of challenges will only improve your skills and speed.
Thank you for taking the time to read to the end. And remember to always keep improving.
Reach out to Ana and see their other work via their Rookies profile.