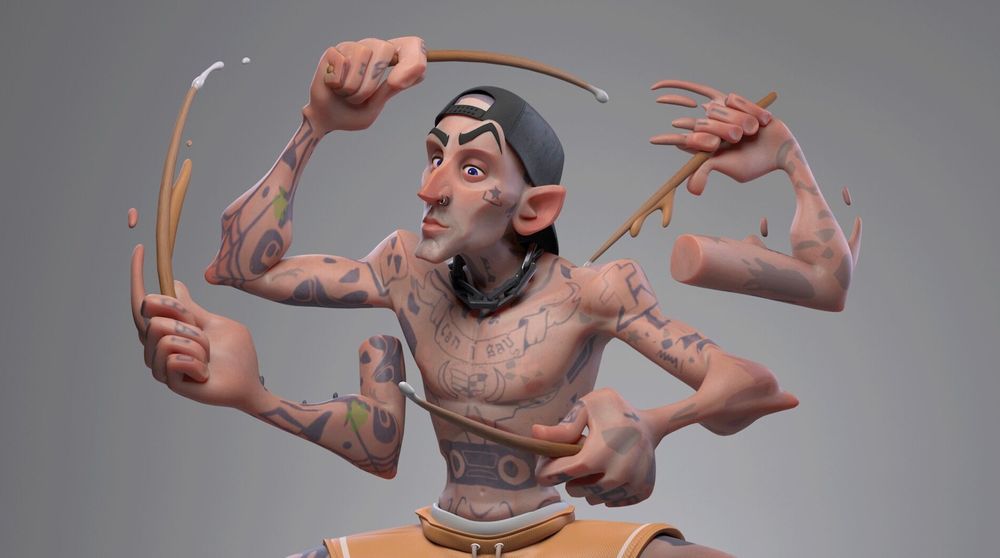
Pedro Rigamonti de Mello, a recent Vancouver Film School graduate, impresses with his 3D recreation of Travis Barker, inspired by Ben Eblen's concept art. Read more about the techniques he used and the tips for creating your own epic recreation.
Pedro Rigamonti de Mello, a recent Vancouver Film School graduate, blew us away with his 3D recreation of Travis Barker, inspired by Ben Eblen's concept art. This artistic expedition not only showcases the technical prowess required but also reveals the passion, patience, and dedication that fuel every stroke and click. If you want to read more about the workflow and techniques Pedro used, as well as the challenges he worked through to get to his final render, this article is for you!
Introduction
Creating Travis Barker, inspired by Ben Eblen's concept art, marked a significant milestone in my personal development as an artist. Before diving into the details, I would like to express my gratitude to my mentor, Manuel Armonio, for providing invaluable feedback and continuously motivating me to improve.
My approach typically involves selecting a concept that I enjoy, it would be horrible to spend a month and a half working o a portfolio piece that I don't enjoy. Although different artists' interpretations of the same concept yield unique results, I find it more interesting to start from a concept that no one has translated to 3D yet.
References
In the beginning of my 3D modeling journey, I used to dive headfirst into modeling without thorough preparation, resulting in over-modeling and that nagging feeling that something was out of place. Nowadays, my process begins with extensive reference gathering.
First References (PureRef)
I start by collecting base references, including clothing, similar anatomical characters, and real-world anatomy. As the project advances through the various stages, I expand my reference pool to cover texturing, the final render look, and topology.
Modeling
My personal preference leads me to start with the character's head. This choice is twofold: the head presents the most challenging part of character creation for me, and, in my opinion, it's the aspect of a character that demands the most attention. Of course, this may vary based on the concept, but the face often plays a pivotal role in capturing the character's essence.
As I make headway with the body, I gradually add the character's clothing and model any relevant props. For instance, in this project, which featured a stool and drumsticks as the primary props, I managed to model, retopologise, UV map, and apply initial textures in a single day's work.
I find it refreshing to work on props in between sculpting sessions. This offers me a break to my brain and eyes while keeping the project's momentum intact.
When modeling props, I often opt for Maya, as to me, I find it the go-to tool for creating hard surfaces quickly and comfortably, based on my experience with it.
Returning to character modeling, I prefer to keep the body parts separated as long as possible. This approach affords me greater freedom to adjust sizes and proportions as needed. As the components align more seamlessly, I create different subgroups for distinct parts, apply boolean operations to combine them into a single mesh, and utilize ZRemesher with preserving subgroups settings. Subsequently, I create subdivisions and project the previous model onto the ZRemesher version to refine the sculpt.
Sculpt Polygroups Face (ZBrush)Sculpt Polygroups Body (ZBrush)
Retopology
As the sculpting phase progresses, reaching a point where I’m happy with the result so far, I see it as a good moment to do a first retopology pass. In this stage, I import the ZBrush model into Maya and hand-retopology the body's base using the Quad Draw tool on Maya.
First Pass of topology
Following this initial pass, I return to ZBrush, re-project the details onto the model after adding subdivisions, and continue fine-tuning the sculpt. Once sufficient details are captured in the model, a second retopology pass is conducted to provide better support for the emerging shapes and forms.
Final Topology
After completing these steps, still within Maya, I proceed to set up the model's UVs and prepare the high-poly and low-poly versions for posing, texturing, and rendering.
UV Tiles
Posing
In terms of posing, my chosen method involved using ZBrush's Transpose Master. This approach, while effective, does require substantial re-sculpting and adjustments to the character's anatomy. It's worth noting that concept artists often take liberties with perspective, elongating certain body parts to enhance visual appeal. If they can "cheat" on paper, why can't we do the same when it comes to posing and rendering?
First Pass of posingSecond pass of posing (with re-esculpt)
Texturing
The intricate process of texturing and baking was meticulously executed using Substance 3D Painter. I prefer to divide texturing by topology or groups of objects. Given that this character was intended for use in film and animation pipelines, and due to the need for extensive tattoos, I ensured the pieces had a higher texture density to provide ample resolution for the textures.
The primary challenge in texturing this character, characterised by heavy stylisation, revolved around making the skin colour elevate the character's unique style. Focusing on color variation, most of my time was dedicated to the base color channel in Substance 3D Painter. Subsequently, I honed the material channel, paying special attention to cavity and displacement maps, as these elements play crucial roles in supporting the textures.
Base Color Channel
This project offered invaluable lessons in texturing. The key takeaway is to examine textures through multiple channels, ensuring variety not only in colour but also in roughness, displacement, and all the layers that collectively form the textures. Each aspect plays a supporting role in the final result.
Another quick tip: incorporate render tests during the texturing phase, the Substance 3D Painter viewer, not necessarily create a reliable end quality result, It is important to see how your textures are being interpreted on the final render software.
Also, a robust 3D workflow remains fluid, allowing adjustments. If you need to fine-tune texture saturation during rendering, don't hesitate to make the necessary changes. Your textures and models should remain adaptable throughout the process, on my opinion.
Rendering
Before embarking on the rendering phase, I took great care to ensure that the scale remained consistent when transferring models between software applications. Accurate scaling is essential when implementing HDRIs and configuring render properties.
In my initial attempts, I experimented with Redshift for rendering. However, I encountered challenges with the Subsurface Scattering (SSS) effect, which affected the skin's appearance, giving it a gummy appearance. Following a fresh round of feedback with my mentor, I opted to shift to Maya’s Arnold render.
Arnold Texture Setup For The Skin Material
Arnold's SSS delivered superior results, not only for the skin but also for the overall lighting. In terms of lighting setup, I positioned three lights to recreate a basic studio lighting arrangement. My goal was to closely match the concept's lighting while allowing room for creative adjustments. Additionally, I introduced a fourth light unlinked to the character, which cast a circular spotlight on the background.
Upon achieving a rendered image that met my expectations, I turned to Photoshop to fine-tune the images, making adjustments to saturation and contrast to prepare them for my portfolio.
Final Considerations
Here, I'd like to share some important insights from this project. Taking breaks and seeking feedback from individuals with diverse backgrounds are crucial elements of the creative process. Remember, you don't necessarily have to implement every piece of feedback received during the development of a personal portfolio project. However, these external perspectives can often pinpoint areas where improvement is possible.
One of the most challenging aspects of embarking on a personal project lies in maintaining motivation throughout its development. When it becomes challenging to take a break, consider engaging in other creative endeavors and then returning to the project the following day. The most critical aspect is to savor the entire journey, not just the final render. It's about finding joy in the process and not solely in the end result. This is hard even for me, but with each project I try to enjoy more the journey, instead of just the final goal.
Thank you for reading.
You can reach out to Pedro Rigamonti de Mello via his Rookies profile here.