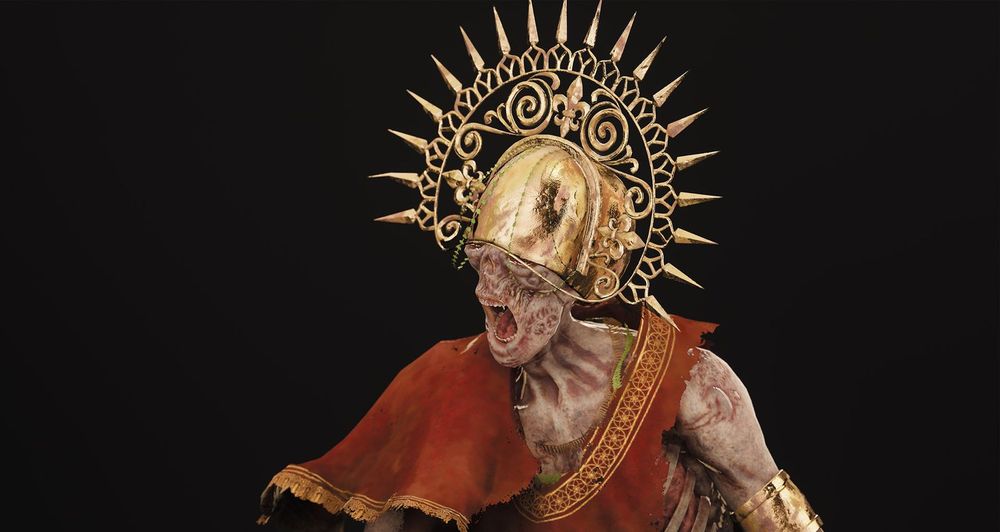
3D Creature Modeling for Games: The Matriarch
Morgane Degras, a fourth-year student at CIME-Art school gives us a breakdown of The Matriarch, a delightfully gorey character in Morgane's graduation game, Echoes of the Past.
Morgane Degras, a fourth-year student at CIME-Art school gives us a breakdown of The Matriarch, a delightfully gorey character in Morgane's graduation game, Echoes of the Past.

Morgane Degras is currently a fourth year student at CIME-Art school in Béziers, France. Morgane specialises in 3D character Art and in this article they present a breakdown of their impressively gruesome character, The Matriarch. This character is the final boss of Morgane and their team's Bachelor Degree graduation game named Echoes of the Past.
Hi everyone, my name is Morgane Degras and I am actually in my 4th year of study at CIME-Art school in Béziers, France. I am specialising in 3D Character Art and the character that I am going to present to you is The Matriarch. She is the final boss of our Bachelor’s graduation game named Echoes of the Past.
The game group was made with: Loïc Maille, Rémy Escales, Martin Lebrun, Fériel Sifi, Lou Fernandez, Lohan Guerci, Lilou Caubert, Guillaume Aubineau, Alexandre Pistre, Camille Greaux and myself. Check out the itch.io link right here to try our game.
The creation of the Matriarch began with sketches and concepts made by Lou Fernandez, a team member for the game Echoes of the Past.


I also did a concept for this creature to help in the process. We were aligned on the ideas for this creature so our teamwork was great on this front.

Once I had the approval from my lead for the concepts I began the sculpting phase in ZBrush. I started by doing my base mesh. I used a scale reference to avoid any scale problem when switching softwares. After the base mesh I sculpted the primary shapes to define the silhouette of The Matriarch. The main goal was to create a long and thin silhouette but also kind of a hatchback shape too.

After the primary shapes I worked on the secondary shapes. It defined the muscle shapes but also helped me to define the personality of The Matriarch. We wanted this boss to have a silhouette that looks like her gameplay: fast and ruthless.


With the silhouette and secondary shapes done, I started the details. I wanted to have some gruesome details on her so I chose to show some of her bones and organs. This helped me to create the asymmetrical quality of the character by opening her chest. This helped me to study my écorché anatomy but also to practice my micro detailing sculpt. I had the opportunity to use a bit more of the Surface option that is in ZBrush to gain some time with skin pores.

Important to note that to gain more time, I used a bought base mesh for the mouth, hands and feet. I also used some zombie brushes and alphas packs that were really useful for this character. Since I had little time I didn’t hesitate to gain time on this kind of thing.
For the assets I used Maya to model the base meshes. I was careful with the polycount, since the jewelery base meshes were also the low poly models. The Crown and jewelery were all made in Maya then imported in ZBrush to do the high poly.

I made the dress base mesh in Marvelous Designer. It was my first time using this software. I was kind of surprised at how well designed and user friendly the software us. The fact that we start modeling with the 2D patterns makes things really easy. Since I had a little bit of understanding with sewing it was a very pleasant modeling phase for me.
I had the opportunity to experiment with some stitching methods like Segment and Free options. I also used the Elastic option to help with some parts like the sleeve. At the beginning I made the outfit symmetrical but then on the 2D Pattern I used the internal shape, trace and cut options to remove some fabric.

The real time simulation of the clothes was really helpful to put the outfit in place on the Matriarch. It made the sculpting phase on ZBrush easier because the main folds were already in place.

After the modeling and sculpting phases, I went back to Maya to retopologize the character and create the UVs.

The retopology was carefully made to adapt to the rig that I did later, so she could deform correctly in game. With the UVs done, I split the Matriarch materials in six: head, body, jewels, bones, organic and clothes.

Since I already was back into Maya after the retopology and UVs, I began the rigging part. Not my favourite part at all, but I made i,t so it was a big achievement for me - small victories and failures help us to grow! Even if the rig that I did was a simple one since I only had to do the FK part. We used retargeted animation and the IK system from Unreal Engine. I did a facial rig for the cinematics but also for the different fight phases with The Matriarch.

The dress was half skinned to the body since I made a cloth simulation in Unreal Engine 5. It was tricky to understand how it worked and why sometimes the physics wasn’t very good but it was a useful tool to use.
After the implementation of the Matriarch in the game I started to do the texturing part. I used a skin smart material made by Rémy Escales since he textured a trashmob before.

I tweaked the material a bit to have the desired result on the Matriarch. Then I made a smart material for the gold that could be used by everyone in the group.

I used it on the crown and jewels. After that I did a simple material for the bones since it was a small part that didn’t need a lot of details.

I really like Substance 3D Painter. It’s very pleasing to have a software that is like Photoshop but for 3D texturing. I think it makes the work even easier with some knowledge with Photoshop.
For the organic parts, I made a material to have this glossy effect and veiny result on the lung and tongue. See below:

And finally, I textured the dress in another file. I had a version compatibility problem between school and home, but nothing serious. Again here I made a fabric smart material for the dress with an opacity map.

I then implemented the textures in Unreal Engine 5 and put them in the material instances. The Master Material for the characters were made once again by Rémy Escales.

I then implemented the textures in Unreal Engine 5 and put them in the material instances. The Master Material for the characters were made once again by Rémy Escales. The model was already implemented after I finished the rig to see if it worked and it did. The IK handle and retarget of animations were made by one of our game developers Camille Greaux. He also attached the weapon to the left arm socket of the Matriarch.

After that I painted the weights for the cloth simulation. I also worked the physical asset of the Matriarch to have good collisions between the dress and the body. Some of the collisions were a bit off but with the speed of the attack animations, it wasn’t a big problem.

After all that we were able to do the cinematics with the model and had a lot of fun with it. The intro cinematic of The Matriarch was made by Loïc Maillé, and the outro by Rémy Escales again.


Finally, I rendered with the Meta Human Lighting scene to test it, and here are the results of it:


This project was a really fun one to do for me and I hope that you enjoyed the breakdown. The Matriarch is a character that really made my art evolve in my third year at CIME-Art, so I’m proud to present it to you all.
Thank you to everyone that read this article and I am open to any and all feedback as I continue on my learning journey.
Reach out to Morgane via their Rookies profile here.