Creating Open World Environments in Unreal Engine 5: Part 3 - VFX, Tech Art and Rendering
Maxon ZBrush expert Rodolfo Silva, in previous articles, detailed the creation of technical art systems for landscape, materials, procedural systems, asset modeling, foliage, and texture creation. In this concluding segment, he highlights the development of environmental effects for the scene.
Before we begin, I want to also share a previous article where I detailed similar workflows for creating VFX for real time and games so be sure to check that out also.
Environmental effects
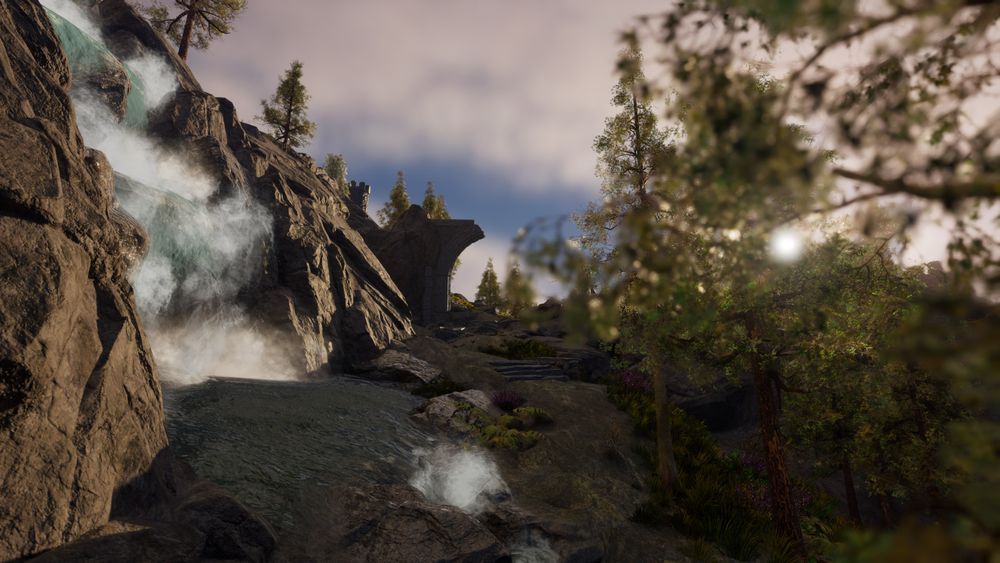
The reference in the high concept emphasised the importance of environmental effects in creating an atmospheric experience. These key effects consisted of distant fog cards, a flowing stream, spore particles in the forest, wind impacts on trees and foliage, and smoke emanating from castle towers.
I generated the spore particles using ‘Niagara systems’ in Unreal Engine 5 and designed them to dissipate and decay over time. I placed them in a box volume which allowed for manual positioning along the camera path, creating the illusion of light catching particles and enhancing the forest scene's atmosphere.
Figure 1 - The basic setup for the spore particle's material
The creation of the environmental effects required a set of textures to drive the shader effects and ‘Niagara systems’. The textures were produced using Substance 3D Designer due to its procedural-driven workflow, which offered greater flexibility in iteration.
Figure 2 - The material and ‘Niagara system’ for the spore particles.
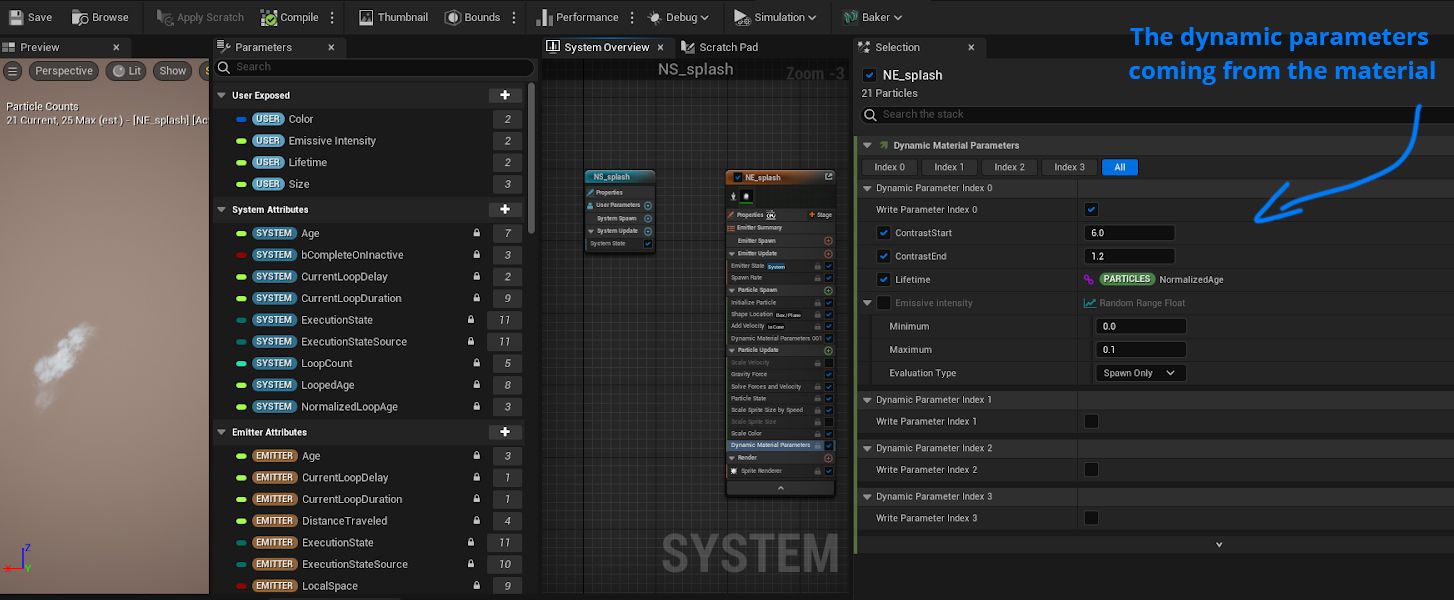
I used a ‘Dynamic Parameter’ workflow where I "exposed" a bunch of parameters in the material to the ‘Niagara System’ in order to control them with the particle's behaviour.
Figure 3 - The Substance 3D Designertexture graph for the water splash effect.Figure 5 - Substance 3D Designer output graph to merge 3 variations of masks into a single linear channel RGB texture.
I incorporated the textures for made in Substance 3D Designer for the splash effect, moving clouds, fog or steam into the according ‘Master material’ in Unreal Engine to create an assortment of ‘Dynamic Parameters’ which would control the texture's contrast, emissive, opacity, colour, etc. through ‘Niagara user exposed parameters’.
Figure 6 - An example on how I used the ‘Dynamic parameters’ to tweak the textures coming from Substance allowing Niagara to take control of how the textures behave in the actual effect.
In the image above you can see I created a ‘Dynamic Parameter’ for the particle's lifetime to drive the interpolation between two contrast values for the texture. This was then exposed in Niagara end tied to the actual particle's lifespan, which means that as the particle's texture spawns with a high contrast values and gradually lower that value during its lifetime.
0:00
/
Lowering the contrast of the texture in the material using a ‘Dynamic Parameter’ allows to control this texture effect along the particle's lifespan in 'Niagara'.
To create the appearance of a dissipating splash texture, I used a ‘Linear Interpolation node’ controlled by a ‘Dynamic Parameter’. This ‘Dynamic Parameter’ was adjusted within the ‘Niagara Particle System’, interpolating between a high and low contrast power value.
Figure 7 - The ‘Niagara system’ exposing those ‘Dynamic parameters’ as Niagara ‘User exposed parameters’ (bottom). ‘Normalised Age' is effectively calculating each particle's lifetime individually.
The Niagara system also includes some custom parameters to control how the sprite stretches according to its speed.
0:00
/
The final effect uses the previously mentioned contrast animation in conjunction with an 'opacity fade' and a 'scale by speed' all controlled inside the 'Niagara editor'.
Water shader effects
I generated the water effects primarily through shader effects, which included refraction distortion, flow map distortion and foam controled through vertex colour painting, colour variations with increasing water depth via a fixed world depth system, and opacity transitions based on depth fade and varying refraction values using the same depth fade controls.
Figure 9 - A general look at the water material.
Additionally, several meshes were created to envelop objects where the waterfall was placed. These meshes then used the water and fog material accordingly to drive the water and wind gust effect using its UV coordinates.
Figure 98 - The meshes modelled for the waterfall and wind.
To create the basic distortion of the water normals I layered a water normal map over itself multiple times with different panner speeds and sizes. I also included a system to mask a gradient from the centre of the texture to the edges which would make the texture slow down as it got close to the edges of the mesh and a simple flow map system that would redirect the stream of the water based on the red and greenvertex colour channels.
Figure 99 & 100 -The water material’s flow map control (top); The foam vertex colour controls (bottom).The Foam system being controlled by both vertex colour and if the water plane is colliding with opaque materialsFigure 101 - Vertex colour painted on the mesh controlling the distortion and foam.
I chose to use vertex colour to control the flow map because this was the only section of the cinematic that would include water. If I desired to further develop of this environment I would a flow map editor like FlowMap Painter in order to edit the flow of the entire river systems in the environment which is more consistent way of working in today's AAA industry.
The node system that controls the speed of the water based on the UVs.
As mentioned previously, the splashes and steam were created using textures generated in Substance 3D Designer and animated through the ‘Dynamic Parameter’ to ‘Niagara parameter’ workflow. The steam effect used the same texture as the previously mentioned fog cards but with altered inputs in its ‘Niagara system’ and different ‘Dynamic parameters’, producing a distinct effect from the fog.
Figure 102 & 103 - The water material’s murkiness system (left) & the opacity/refraction fade using depth fade (right).
I created and assigned a custom ‘Fixed World Depth’ function to drive the fake murkiness in the water and a ‘Depth Fade’ to drive the opacity. This gave the water a sense of depth even though everything was still assigned to a fairly flat surface.
I created a ‘Material Function’ to control the murkiness mask (left) and then used it to assign a named reroute in the ‘Master Material’ (right) which would maintain the working space in the ‘Material Editor’ clean.This custom depth mask would then be used to interpolate between two colours.
0:00
/
The water material without any 'Niagara particles'.
0:00
/
The water effect with with the 'Niagara particles'.
I used Embergento generate a flipbook animation for the brazier smoke. I selected a smoke preset and adjusted its fluid emission, wind, and fuel to achieve the desired result. I then employed ‘Render nodes’, to produce a normal map and various masks capturing light at different angles, which in turn automatically generated the flipbook.
Figure 104 & 105 - The Embergen node graph (left) & one of the resulting flipbook masks(right).
Wind effects
Using the node logic shown in the pictures below, I designed a wind shear as a ‘Material Function’ with parameter inputs for ‘wind speed’, ‘frequency’, ‘intensity’, and ‘direction’ and then created a spherical pivot based mask to help drive the whole movement on a "per tree" basis.
The spherical pivot mask that controls the "base wind pass".
To achieve this, first I had to come up with a way to create a mask that would be slightly different per tree. Since the foliage is procedurally generated I had to “tell” Unreal to look at the object's pivot point individually and then mask out the height based of the world position’s blue channel (Z axis).
A preview of what the masks would look like in the editor and the "randomness" values in the material. The wind effect takes place whenever the mask is purely white.
To add randomness and make the diagonal wind gusts I “told” Unreal to look at the object's position in relation to world space (the foliage actor, not the individual trees) and then divide the red and green channels by different values to create a diagonal effect and add some variation to it.
The wind was made more natural by using a procedural mask in the shader. This mask considered the ‘Object Pivot Position’ and not the entire ‘foliage asset’ since Unreal treats all foliage meshes as part of a single ‘foliage actor’. To add variations, I used math operations to create the illusion of diagonal gusts and add randomization across bigger chunks of tree formations.
From then I created a ‘Material Function’ that would contain the actual wind effect.
The wind effect math inside the ‘Material Function’.
The wind function uses 'Absolute world position' and an assortment of sine waves with variable values and adds them together to deform the vertex position this is then multiplied by a 'Vector3 parameter' to control the direction (X=Red & Y=Green) and 2 ‘Scalar Parameters’ to control the strength and a mask input to tell the function if it's being controlled via the spherical procedural mask mentioned previously or via 'Vertex colour'.
As you might remember from the previous article, I applied ‘Vertex Colour’ to the tips of the tree cards' UVs in order to add high frequency wind later on. During this part of the process the foliage cards were all assigned red and green‘Vertex Colours’ to drive the high frequency wind. In order to avoid a stale and monotonous wind on the leaves.
Figure 109 & 110 - The tree vertex colour application in Maya (left) & the Python script used to randomise vertex colour.
The use of a wind 'Material Function' in the ‘Master Material’ made it easy for the creation of multiple wind "layers" while maintaining the 'Material editor' clean. A ‘Material Parameter Collection’ and mathematical operations enabled control of all wind layers through a single parameter. For example, setting the wind speed to 10 would result in a base wind shear of 10, a cross wind of 5, a high-frequency leaf wind of 1% of the base value, and so on. This allowed for convenient control of the overall wind behavior through that single value.
Figure 16 & 17 - The application of that function in the master material controlled via parameter collection.
You can see, in the image above, that there are two layers of basic wind ( base and cross sheer) controlled by the spherical mask and two layers of high frequency wind controlled via ‘Vertex Colour’.
0:00
/
Using a parameter collection ensured I could tweak the strength and direction of the wind on all materials (foliage cards and meshes) at the same time.
As a final addition I created a simple material system for fog cards and then used spawned sprites and the previously mentioned custom FX meshes to add believability to the wind effect when looking far off in the distance.
0:00
/
The fog material consists of two fog card textures multiplied over each other and panning at different speeds.
I applied the same concept as with the water splash effect to the fog cards and wind gusts, controlling opacity dissipation and contrast along the particle's lifetime using ‘Dynamic Parameters’. The ‘Niagara system’ also included user parameters that allowed for the adjustment of the ‘Spawn Area Size’ and ‘Speed’. This allowed for the creation of smaller, faster clouds near the ground and slower, larger clouds higher in the mountain range, for example.
Figure 7 & 8 - The effect mesh for the wind gusts created in Maya with its UVs (left) & the resulting Effect in Unreal.
I created an assortment of simple meshes with specific UV layouts and placed them on the high areas of the mountain, utilizing the same fog material. This created the illusion of wind-lifted snow, as demonstrated in image above. This technique was used previously for the creation of the waterfall effects on custom meshes.
An overall look at the fog card material.Using a depth fade and distance blend to control the opacity.
I used a ‘Depth Fade’ and ‘Distance Blend’ node to make the fog cards not only fade as they collided with the mountains but also as you move closer to the with the camera.
A closer look at the logic behind one of the panning tileable textures controlling the fog material.
In the image above, you can see the ‘Dynamic Parameter’ and all the flexibility I'm transferring to Niagara in order to have much more control over the behavior of the fog.
0:00
/
A look at a Niagara system that spawns fog cards and wind gusts on the mountains in the background.
The same fog material was applied to the wind gust custom mesh. I had the opacity controlled via a 'Niagara user exposed parameter' to make it appear and disappear. The frequency of this wind gust was controlled by the same ‘Frequency’ parameter for the tree wind from the 'Material parameter collection'.
0:00
/
A look at the overall look of the wind effect with exaggerated values for demonstration purposes.
Debugging and optimisation check
Throughout the entire process, as I was adding complexity to the scene, I used a bunch of commands and tools in Unreal Engine to check performance.
I used the command ‘stat GPU’ to check GPU profiling ‘stat RHI’ to check how much memory was being used for textures and how many triangles were being drawn and used the ‘Statistics visualiser’ to check which models were eating the most resources and how many polygons were being drawn for each Static mesh (overall and per actor)
GPU profiling is displayed in editor. Which means I can move the camera to a different location to get a real time update on performance. It also allowed to see
I also used the command ‘r.VT.Residency.Show 1’ to check how the ‘RVT’ pages were being "called" and how it was performing in different locations of the environment.
Using the ‘r.VT.Residency.Show 1’ and tweaking the 'RVT' asset pages to enhance performance
Keeping in mind that the performance goal was to aim for a maximum of2000Mb of 2D texture memory and 25- 30 million polygons in the entire scene, using these performance visualisers helped tremendously to check where cost cutting measures need to be implemented.
'stat rhi' shows the memory being used for 2d texture maps,
Cinematography
Rendering
The shot composition was staged using dynamic lines that guided the viewer's gaze towards the area where the next shot would take place.
Figure 111 - The compositional lines on the first shot.
I encountered several rendering difficulties following the initial render tests, including ‘RVT’ popping and ‘anti-aliasing’ related shimmering in foliage. I solved these issues by making adjustments to the ‘anti-aliasing’ method and values in the project's ‘rendering settings’.
Figure 112 - Fixing the ‘RVT’ popping (‘mipmapping’ issue) by changing the memory pools in the ‘BaseEngine.ini’ file from 32Mb to 2Gb.
I used the ‘Movie Render Queue’ plugin as the rendering method for this scene as it offers the capability of implementing substantial ‘anti-aliasing subsampling’, essential for generating convincing results in moving foliage. This approach effectively completely removed any slight shimmering or loss of clarity in any materials using vertex deformation within the shader system.
Figure 113 - The ‘Movie Render Queue’ plug-in console variables, removing the denoisers to improve lighting accuracy.
Additionally, this approach granted the capability of entering command prompts that would only activate during the rendering process. This enabled the ability to deactivate the ‘denoisers’ for ‘Ambient Occlusion’ and ‘Raytracing’, allowing for full utilization of the ‘subsampling’ feature.
Figure 114 - The render preview window displaying the subsampling count per frame.
I typed in 4 custom commands into the rendering console variables, these command variables would only run in render time and it's this feature that makes the ‘Movie Render Queue’ such a powerful tool for cinematic rendering in Unreal as you can raise substantially or remove entirely the runtime denoiser using temporal anti aliasing without it being changed in the editor itself.
Conclusion
I ultimately achieved my intended objectives with this project, consolidating the concepts learned throughout my course at Escape Studios and enhancing my technical art proficiency through the creation of an extensive environment that leveraged all the tools and features I had learned so far.
A huge shout out to everyone that helped me through the challenges of the extensive process on the creation of this piece and their incredible feedback with a particular emphasis on Tamara Milenkovic (Senior HR director at Outfit7 ), Inês Coimbra (Asset Artist at Platige Image), Bojan Spirovski (Environment artist/Technical director at Digital Void 3D) Paul Gaboury (Zbrush Expert at Maxon) and Chris Avigni (Lead master's degree instructor at Escape Studios). Without them I would have not have reached the same result nor acomplish my goal when I set out to make this environment, which was to improve my technical know how of Unreal Engine and improve overall as an Game Artist.
I really hope you enjoyed this extensive breakdown and, if you haven't already, be sure to join my Discord server or DM me on Instagram if you have any questions. Find me via this link.
For more ZBrush environment art workflows follow ZBrushLive on Youtube or Twitch where I often stream for Maxon.