Sketching, Modeling, and Texturing and Rogue Elven Character
Aleksandra Jankova, a student at M3DS Academy, shares details of one of her first projects - a female Elf character inspired by Yor Forger from Spy X Family.
Aleksandra Jankova, a student at M3DS Academy, shares details of one of her first projects - a female Elf character inspired by Yor Forger from Spy X Family.
Armed with a powerful arsenal of software, Aleksandra Jankova, a student at M3DS Academy, shares the progress of her vision—a female Elf character inspired by the charismatic Yor Forger from Spy X Family.
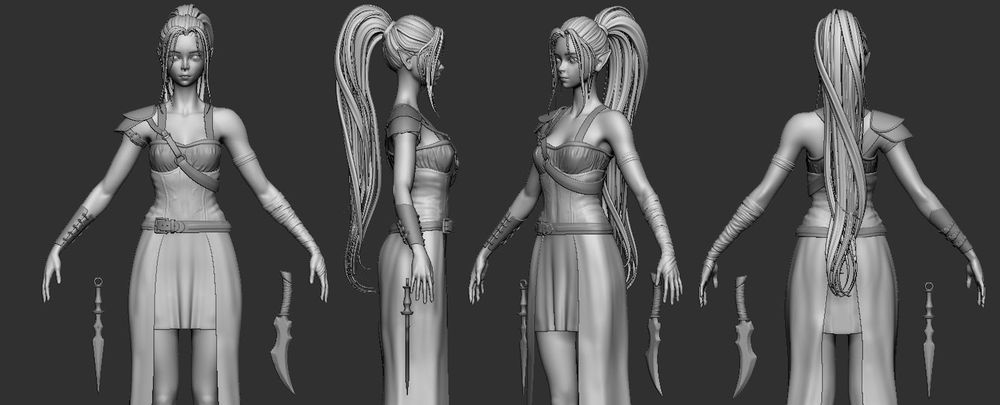
The main idea for this project was that I wanted it to be a female Elf character while the inspiration on how it would look came from the character Yor Forger from Spy X Family mainly for the clothes and colour scheme.
The next step was finding references, which mostly were for the daggers to get an idea for their appearance on what kind of shape and colour pallet they will have. For the type of hair style I wanted my character to have was be long and in a ponytail with a subtle ombre effect going from black to red.
As for the clothes I sketched out the basic form that they will have, while the accessories came later with a lot of changes. My dilemma was the number of details and whether the details would be placed symmetrically or asymmetrically. For sketching out the clothes it really helped out that I graduated high school for visual arts and design where I had classes for design of clothes and textile.


In the character creation process, I first began with a blockout of the daggers in Maya, the relatively easier aspects of the project. The first dagger features a long, elegant blade with a sharp point, two edges, and a central gem. The second dagger takes on a more worn hunting dagger appearance with a wrapped binding around the handle.
The ZBrush workflow was challenging from start to finish, to say the least. The sculpting of the body, face and clothes was the most enjoyable part to do of this project.
For the sculpting of the body the most challenging part were the hands. Which if you ask any artist almost everyone of them they will say is hard to do. Whether it is 3D modeling or drawing.
The biggest challenge was the hair. I started off with a simple blockout of the hair to get the shape that I wanted and then using different type of curve brushes to get the final look.

The retopology process of the body was time consuming as it needs to be clean and easier to work with when posing or animating it and reduce the overall polygon count while maintaining the same physical shape of the model.
As for the clothes and accessories they were Zremeshed in Zbrush to save me time as they are essentially a basic form that when Zremeshed it will have a good topology.
As for the UVs I tried keeping my UV space as clean and organised as possible.

The texturing of the model was enjoyable because it started to look like how I had envisioned it. For texturing the model I used various methods, for some elements I used already made smart materials while changing some things and using filters and generators. Some parts have manual painting like the body, eyes, daggers and bandages.


In the end, I used my knowledge and experience I gained during my studies for film arts and photography, in setting up the lights as if it was shot in a studio: main light, fill light, back light and one more to lit up one of the daggers. This is the most common lighting arrangement used for studio photography.
The main light is the dominant light on the character. It provides direction, shows dimension and texture, and creates the darkest shadows. The main light is set to the side of and above the character. The shadow cast by the key light is visible on the character. On the character face it shows up as a soft shadow cast by the nose.
The fill light is the secondary light on the character. The fill light is placed on the opposite side from the main light. Its purpose is to reduce contrast and bring out detail in the shadows.
The backlight is added to subtly define the edges of the character and add depth. The Backlight is placed behind and above the character.
Lighting is a key factor in creating a successfully rendered image. Besides brightness and darkness it also determines to control and manipulate light correctly in order to get the best texture, vibrancy of colour, and luminosity.
And with that, check out the final renders below.


You can reach out to Aleksandra via her Rookies profile here.