
Exploring VFX: CG Head Replacement
Inspired by ILM's work on The Creator, Bournemouth University student Christopher Hosken undertook a CG head replacement, exploring processes and sharing insights in this article.
Inspired by ILM's work on The Creator, Bournemouth University student Christopher Hosken undertook a CG head replacement, exploring processes and sharing insights in this article.

Inspired by ILM's latest work on The Creator, The National Centre for Computer Animation – Bournemouth University student, Christopher Hosken, embarked on the challenge of exdcuting a CG head replacement, driven by the creative spark ignited by their cutting-edge techniques. In this article, Christopher takes a deeper dive into his processes, challenges and successes with this project.
Every year, Bournemouth University hosts the BFX Festival in which artists and studios come to give talks and connect with students. One of the talks was from ILM on The Creator, and as I had recently seen The Creator and was blown away by the visuals, I decided to attend.
The talk completely shifted my views on VFX. The way ILM described their work made it sound like it was a walk in the park, especially the CG head replacements, which the film has a LOT of. I came out of the talk thinking, "If ILM makes it sound so easy, why don't I try a CG head replacement shot myself?"
I specifically wanted to try and integrate a robot head into a shot without any other assets. No information about the set, No on-set HDRIs, just the clip. While it may not be true, I believed that for a film like The Creator, this is what most of the artists were dealing with.
I started by finding footage on Action VFX that would match the same theme as The Creator. Since the film is about a war between humanity and AI, I wanted something that felt war-related and sci-fi.
I ended up choosing a short clip of a solider being punched by a guard. I liked the shot because I could showcase the CG head integration well. I also decided to integrate a CG hand because I thought "If I'm going to do this, why not go the whole way.".
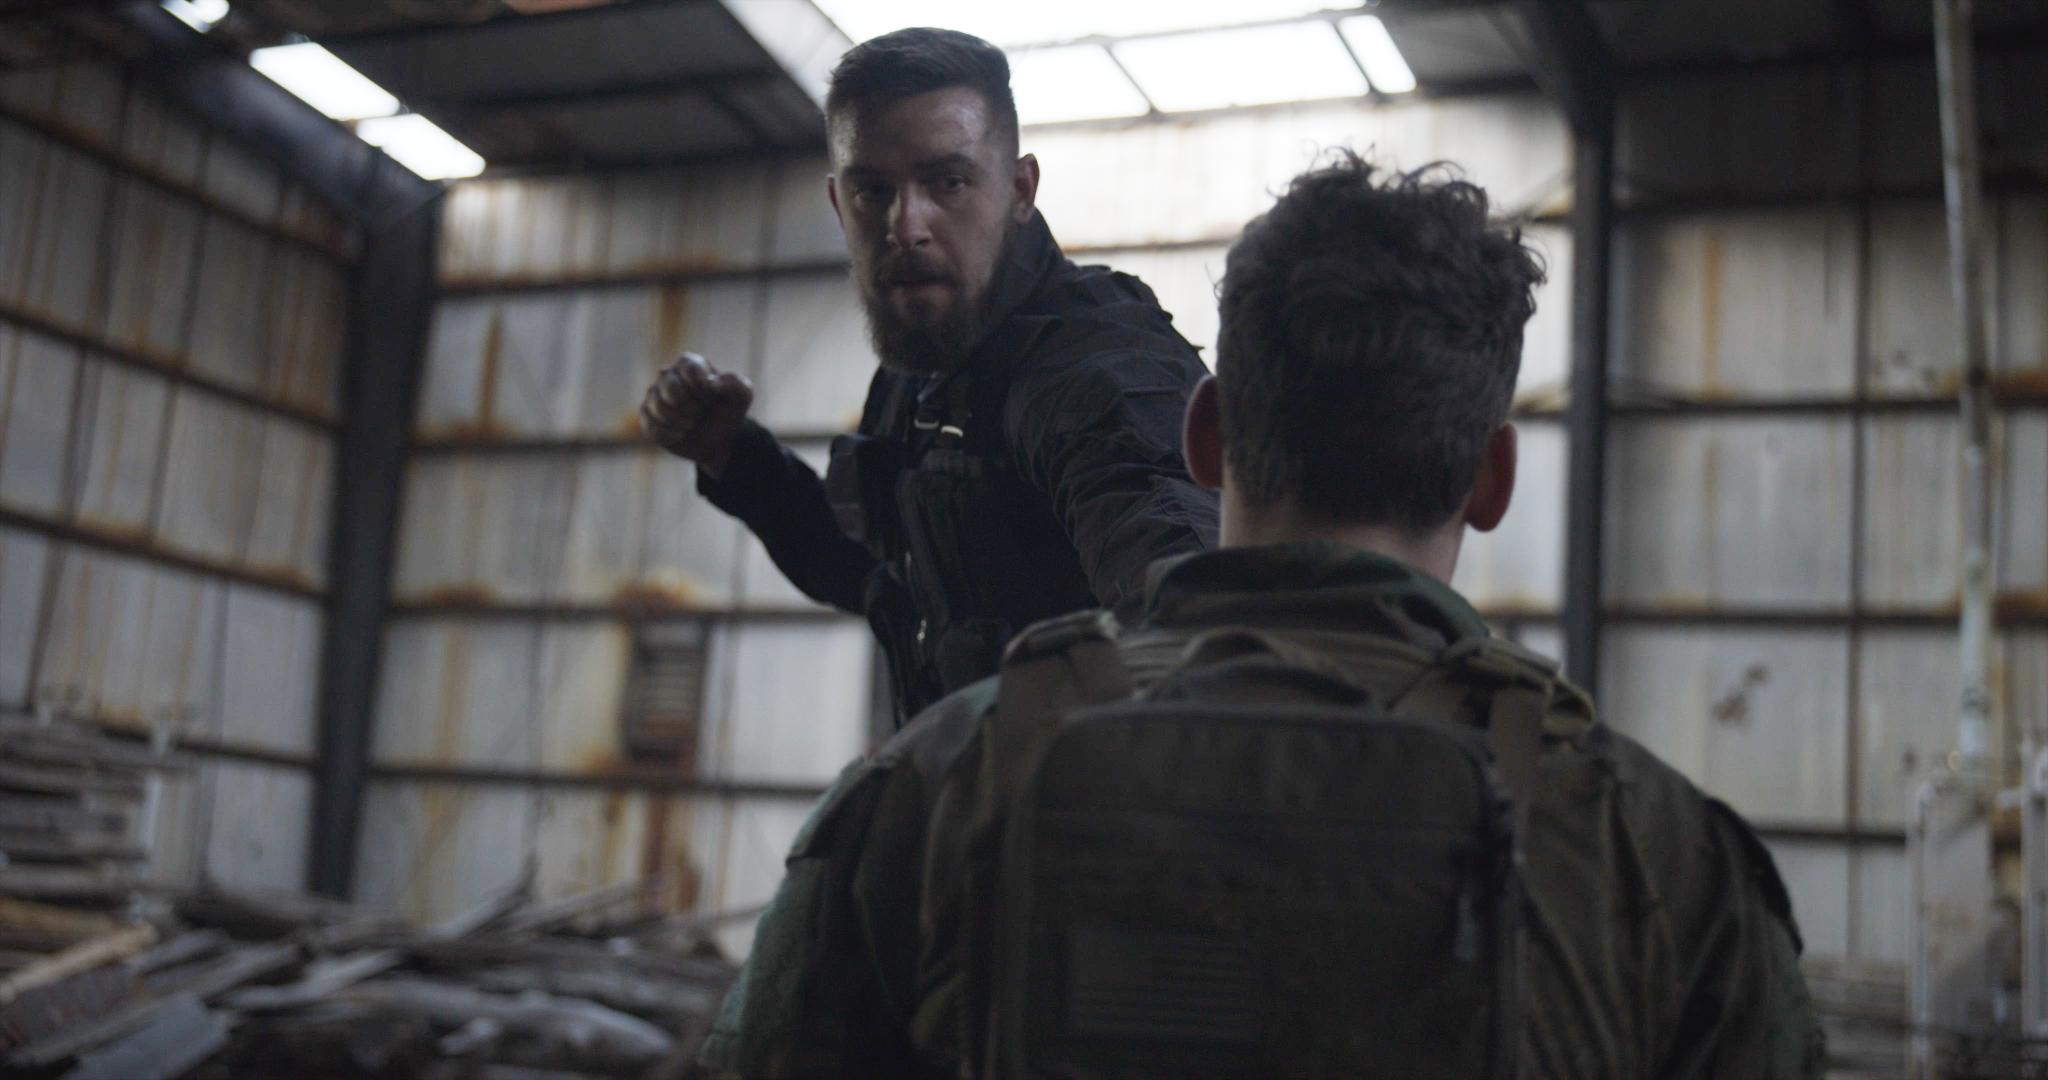
Once I had my clip, I began tracking the shot and rotoscoping individual elements. Due to the defocused background, I had to grade and sharpen the footage to get a stable track. Once I had the track, I started to reconstruct the backplate.
The backplate took the most amount of time in this project. It was especially difficult to build behind the subjects head as there wasn't much data. I ended up doing a combination of roto-masks, roto-paints, and 3D cards. The reason for 3D cards was because of how the actor's arm goes across the entire shot. It would mess up any mask I made, and since I had a pretty good track, I used cards to re-build the back walls.
Although some regions of the backplate weren’t completely accurate, I knew that the robot head and the general action of the scene would distract the audience and stop them from noticing.

I then used KeenTools to track the actors head. I had never used KeenTools before, but I heard ILM mention it multiple times in their talk. It took a couple attempts to get a decent track, but once I started to figure it out I understood why ILM used it. Some frames needed to be manually tracked, but it was a lot more efficient than doing manual point tracks.
Once complete, I exported the head track to Blender and began working on the 3D elements.
For modelling, I built the head and hand using Adrian Rutkowski’s Kitbashing library. Asset creation wasn't the primary focus of this project, so I wanted to design the models as quickly as possible. I started with a base mesh and then iterated on top of it by duplicating, scaling, and editing other kit bash elements.
For texturing, I used the premade Substance 3D materials and changed the colours of different parts. I also added small decals to make the character a bit more interesting. The colours I chose were supposed to be similar to that of police colours. I felt that making the robot seem like it was part of the police would kick off the audience's imagination at to what might be happening.


Once I finished the models, I threw them into a lookdev environment to see how they would look under realistic lighting. I wasn't too worried about the brightness and saturation of the colours as I planned on colour matching them in Nuke, I just wanted to make sure that materials were reflecting as they should.
I then the KeenTools track and attached the robot head to it. I wasn't able to figure out how to export my KeenTools head with correct scale, so I had to a bit of constraint magic to place the CG head at the right distance. I also had to do a bit of repositioning in some frames so that the track looked more consistent.
For the hand, I track it by eye into the shot, and then animated it to close into a fist. I did this by quickly rigging the hand with Rigify and then animating it with animation controls. The hardest part with animation was getting it to match the footage correctly, there were moments where the head or hand would slide around in place, and dialing that in took a lot of time.

Once animation was complete, I lit the scene, rendered it out, and then dived back into Nuke.
Integrating the 3D elements into the shot also took some time. In the rendering stage I create different light passes that I could combine in comp. The different passes made it a lot easier for me to match the lighting to the shot. Without it, I would have had to re-render the scene multiple times.
For the grade, I was lucky enough to attend Victor Perez's compositing masterclass at the BFX Festival. The class taught me the basics of the Nuke grade node and how to integrate CG elements into shots. Without learning from him, I would have struggled a lot more on matching the grade between the elements.
Once the grain and chromatic aberration were added, I exported the shot into DaVinci Resolve and added a cinematic grade with SFX and music.

Overall I’m quite happy with the final shot. I was able to learn a lot about compositing, especially with doing backplate reconstruction and using KeenTools.
If I was to continue working on the shot, I would probably focus more on my lighting as well as refine my roto-masks. There a couple area's of the shot in which shadows aren't realistic and parts of the backplate morph and disappear. However, I feel that for a quick study on The Creator, it looks great.
You can watch the full breakdown below:
More recently I've discovered that I learn a lot more doing the long projects than the short ones, and this project was no exception. I am used to working on projects and then move onto something new as soon as I get stuck, but I've found that pushing through the discomfort of things not working has made me a much better artist over the past couple of months.
In terms of actual technical knowledge, I've found that doing everything step-by-step is whole lot easier than trying to do it in parallel. Don't try and integrate your CG while you're still doing your backplate. Make each part look perfect on it's own, and then bring it all together at the end.
I'm definitely going to use KeenTools in my future projects, I found that not only does it do heads, but anything! It's a very cool tool and I'm excited to use it more.
Although I enjoyed doing CG integration for VFX, I'm actually aspiring to become an FX artist. Over the next few months I'm planning to dive into Houdini and master FLIP, Pyro, RBD, as well as all things CFX. It's going to be challenging, but fun!
At the moment, I'm doing a short competition with my friends. We've all picked shots from well known films and are trying to recreate them. I've picked Pacific Rim, and it's definitely a step up from what I'm used to.
If you're intrigued to see how it turns out, keep an eye on my Rookies account!