Transforming "The Dark Knight" From a 2D Concept into a Game-Ready 3D Model
Irina Kniazhentceva, hailing from Kazakhstan, transitioned from a career in finance to pursue her passion for 3D artistry. Her article shares her latest project - the transformation of The Dark Knight from a 2D concept to a game-ready 3D model.
Irina Kniazhentceva, currently residing in Almaty, Kazakhstan, has been immersed in 3D graphics for over 3.5 years. Despite early artistic inclinations in childhood, she ventured into a career in financial structures due to familial expectations. However, a rediscovery of her passion for art led her to pursue 3D graphics full-time, prompting her resignation from a position as a risk analyst. Irina embarked on a journey of skill enhancement, attending local courses on anatomy and 3D portraiture, eventually delving into comprehensive training for the gaming industry. She is on the brink of completing her studies at Think Tank Training Centre online and has garnered experience as a contract-based 3D character artist. In her article, Irina shares insights into the process of translating The Dark Knight from a 2D concept to a game-ready 3D model.
The Project
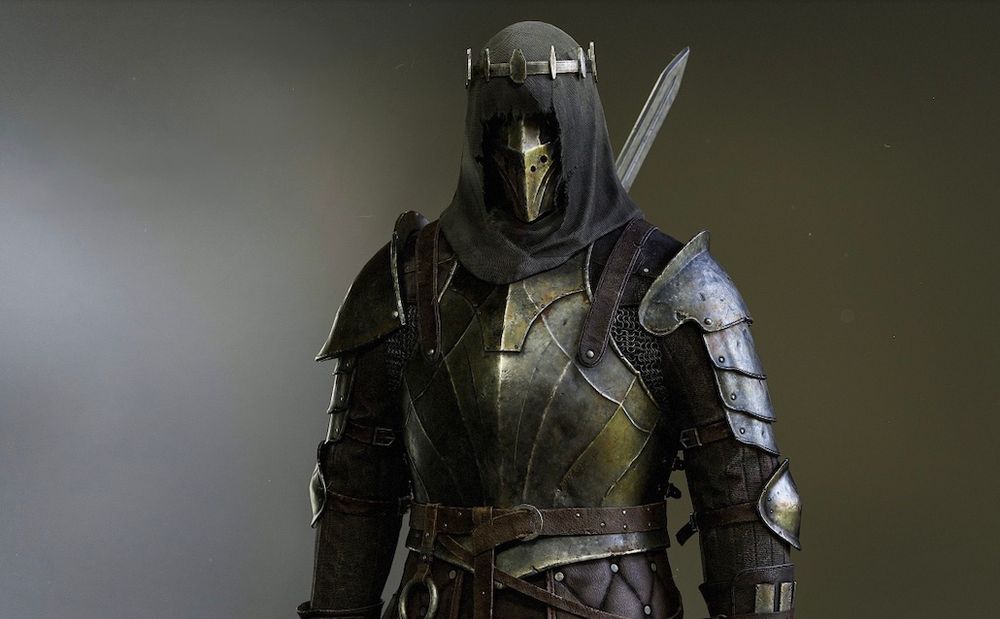
I chose an amazing concept by Jonghwang Lee because I wanted to explore a realistic style with elements of dark fantasy. Also, I wished to improve my hard-surface modeling, texturing, and rendering. The Mortal Shell style has always captivated me, particularly the work of artists like Vitaliy Bulgarov and Dmitry Parkin, and I aspired to incorporate elements of that style into my work.
Concept by jonghwanlee387
Software
Marvelous Designer was utilised for crafting the sleeves, hood, skirt, and a minor animation.
Modeling and sculpting tasks were accomplished using ZBrush and Maya.
Before I start a blockout I analyse the main reference. Initially, I determine the number of heads the character has, for giving landmarks to myself. Then, I interpret every part of the concept and collect references for that. I need to be sure that I understand how different elements function. For example, how pieces of the armour are attached, from what material is his equipment, is it leather or cloth, or metal, is the cloth thick or thin? All these parameters affect future detailing.
I collected references of the real armour old and reconstructed, with damage and with dirt. I found real-life examples of his equipment. (gloves, under armour, armour, etc.)
Then, I added 3D models which can would have appeared in his world. I picked models from The Mortal Shell, Dark Souls, Lords of the Fallen, and other impressive 3D creations. I enriched my reference collection during the whole project.
Blockout
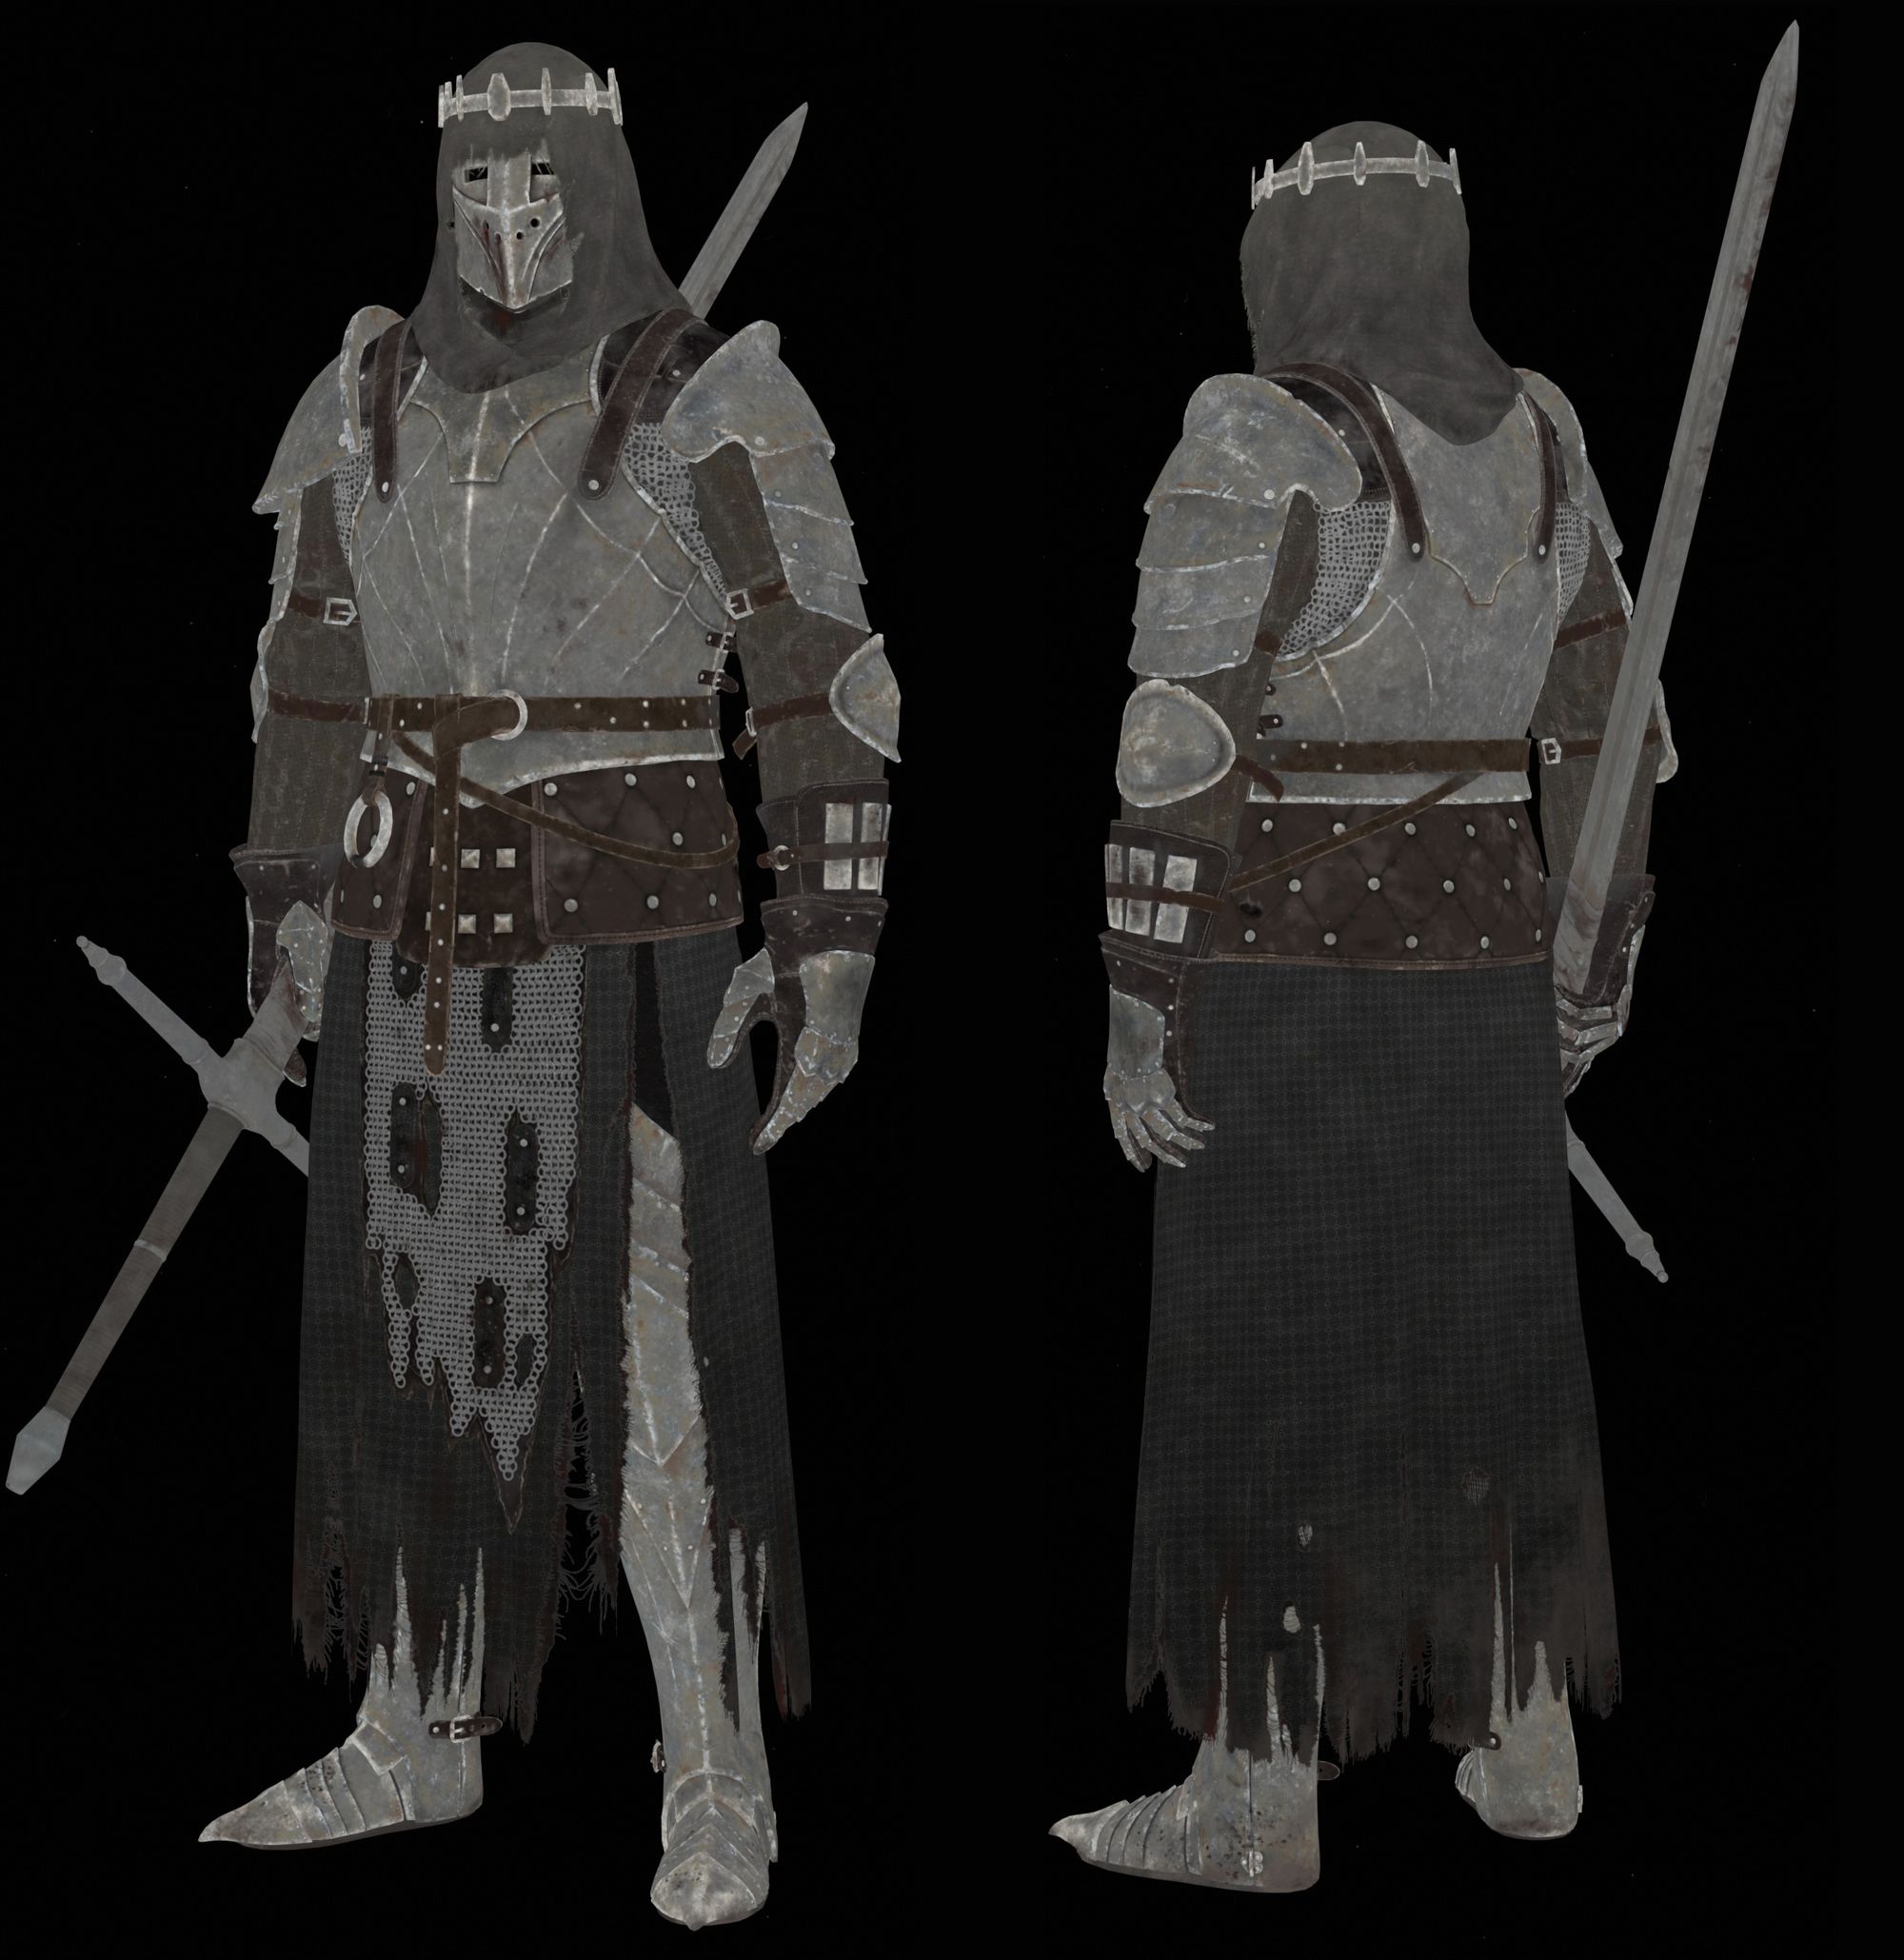
For the rough version of the character, I used ZBrush. I added all the elements and then transferred some dynameshed parts to Maya. There, I used Quadro to create a nice, clean topology for future sculpting.
To create sleeves and a quilted skirt, I used Marvelous Designer. In this case, I decided that I needed elements of a specific size, so I created low-poly sleeves and a skirt in Maya using Quadro, created simple UVs for them, imported them into Marvelous Designer as garments, and applied freeze. Then, I used the Layer Clone Over function, made the top fabric slightly larger in size, added internal lines, and cut the second fabric layer into pieces. For each seam, I set the Fold Angle to ~280 and the Fold Strength to ~60 or higher. Then, all that was left was to adjust the settings for Shrinkage Weft and Shrinkage Warp.
After creating all the character elements, I compared them with the reference, adjusted the proportions, and began detailing.
Hipoly - Metal and leather
For detailing, I had to envision the kinds of damage he could receive and how it should look. Whether it was a strike, perhaps from an arrow or blunt weapon, or just wear and tear, etc.
Additionally, I learned a lot of valuable information about detailing armour from Marco Plouffe's streams in the Elden Frog series. The key was to blend damage and surface in a way that avoids excessive noise, so for each armour or clothing element, I applied a Morph target. After that, I can detail it and immediately remove the excess.
I used both regular brushes and my alphas, as well as custom metal brushes from Vladimir Silkin, which you can find on ArtStation.
The chainmail was created using Nanomesh. To achieve this, I created my IMM Brush shaped like a piece of chainmail. For Nanomesh to work effectively, we need polygons to be as even as possible. Therefore, I created a low-poly base in Maya, imported it into ZBrush, and applied Nanomesh with my IMM Brush. Afterward, I manually adjusted some links of the chainmail as it was challenging to create a perfectly even chainmail. Here is an example mesh for IMM.
I cared about all the seams on the character using the Standard brush, Dam Standard, and a simple alpha witch I created in Photoshop. I aimed to create smaller folds on the fabric and larger ones on the leather skin.
From Blockout to Highpoly
Retopology and UV + Baking
After messing around with Decimate in ZBrush, I threw the mesh into Maya and used the Quadro tool to whip up a new, optimised topology ready for the game engine. Once I had the topology down, I imported the mesh into Rizom UV, a program with some handy tools for unwrapping. For baking Normal maps and Vertex Colour, I employ Marmoset, a program that effectively handles heavy Hipoly meshes. Additionally, it allows for manual offset drawing for the cage and provides a quick way to correct issues in the normal map. Other maps I bake using my normal map into Substance 3D Painter.
Texturing
During the texturing process, I aimed to stick to a few rules: contrast in albedo and roughness, with less intensity at the bottom and increasing contrast towards the top. I wanted to maintain a clear contrast between different parts of the model so that from a distance, the character's elements wouldn't blend together but would be distinguishable.
To achieve this, I sometimes squint my eyes and step back from the model to make sure the elements remain distinct. In the overall texturing process, I pay attention to ensuring the character has good value variation. Even with narrowed eyes, the elements should be readable as separate. I periodically check the black-and-white version of the model to evaluate it in grayscale. If the elements differ, all's good.
I make it a point to intensify colours, roughness and contrast on the model towards key points of the character. For instance, transitioning from subdued colours and roughness at the bottom of the character to brighter colours and highlights at the top.
Fabric
I created a basic fabric pattern in Substance 3D Designer by following a tutorial by Pauline Boiteux available on Gumroad. The fabric material covers nearly half of my character, so I paid considerable attention to it. Since I had single-layer geometry, I aimed to create the illusion that beneath one layer of fabric, there is another layer.
Chainmail
Since the chainmail was baked onto a flat surface, I needed to create the illusion of depth. I darkened the links closer to the leather backing using generators like AO, Dirt, and masks in Multiply mode to diversify the generators. On the other side, I intensified the colour and roughness where the links protrude, employing a Curvature generator and masks in Multiply mode. Following that, I added some dirt and aged blood between the materials.
Pose and Animation
I had to hurry up as I approached my deadline, so I opted for Transpose Master in ZBrush for posing. I spent a couple of days tweaking the pose, transferring the character back and forth between ZBrush and Marmoset to make sure it looked good in the engine.
For animation, I turned to Marvelous Designer. Once I had the character posed, I imported it into Marvelous as an avatar. Then, I brought in the mesh for animation as a Garment with UV. I activated the wind controller and played around with the settings. In the fabric settings, I experimented with different Density and Internal Damping values. After creating a short animation, I exported the file as Alembic. Don't forget to specify the size in cm (DAZ Studio) when exporting.
Rendering and Lighting
For the background, I used a sphere with inverted normals and with cast shadows turned off. I painted a simple fog texture using a brush and the finger tool in Photoshop, creating a soft enveloping effect around the character.
As for the ground, I simply took a standard plane in Maya and applied textures from Quixel Bridge onto it.
Dealing with lighting took some effort because I needed to have a dense shadow under the hood while keeping the character visible. In my case, HDRI provides side lighting that effectively highlights the middle line on the armour and creates a shadow under the hood. Most of the lights in the scene are Spotlights.
0:00
/
Check out Irina's work and contact her via her Rookies profile here.