Adrián Pueyo Bernardini, a recent Voxel School graduate and Visual Effects Artist Intern at Secret 6, caught our attention with his FX skills displayed in a Rookies portfolio project. Explore his expertise in creating FX destruction using Houdini in this insightful article.
Adrián Pueyo Bernardini is a recent graduate of Voxel School and currently a Visual Effects Artist Intern at Spanish production company, Secret 6. We reached out to Adrián after noticing his impressive FX skills showcased in one of his latest projects in his Rookies portfolio. If you want to learn more about creating FX destruction using Houdini, this article is for you!
Introduction
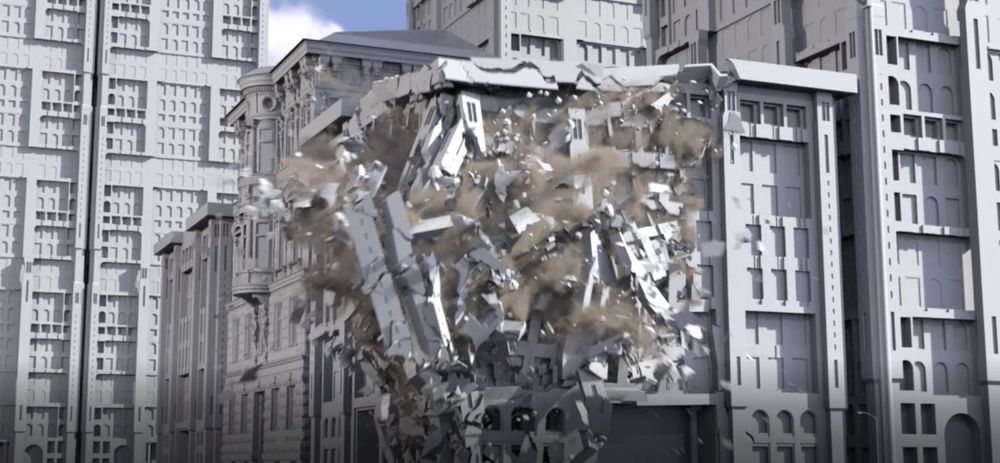
Creating a building destruction in Houdini is common; however, achieving a high-quality destruction is quite laborious. My main goal was to correctly incorporate all the layers, constraints, and camera animations that make an effect shine when seen on the screen. The simulation includes 8 destroyed layers and 3 static ones.
Prepare Geometry
Before starting the destruction, I like to organise the geometry into layers and clean up the model thoroughly. Since we're working with a mesh divided into more than 10 layers, this will be very useful later for creating constraints, clusters, and cuts. Many times, we may receive a model that needs fixing before cutting.
Cutting Geometry
One of the most crucial steps in creating destruction is making a good cutting surface. For the cuts, I usually use grids and wait with noises. Subsequently, we randomise the points where we'll scatter. The bricks don't have cuts; in this case, I wanted them to remain intact when exploding.
Some cuts examples:
Constraints
It's important to create constraints and general clusters correctly; union constraints are what ensure everything has cohesion, and each layer is connected. A recommendation is to assign an individual colour to each constraint and test them within the simulation.
Debris & Dust
For the simulation debris, I use the internal parts of the simulated geometry, generate points from it, and create a particle simulation to attach the rock and debris pieces that we previously randomised with their pscale and normals.
We extract the dust from the same particle simulation as the debris but apply volume values and, in turn, give it a good material with pyro bake volume.
Tools & Tips
For the windows, I decided it would be interesting to create a custom tool to generate the pattern, much more efficient than using the internal tools of rbd material fracture.
The tool consists of a cylinder and several planes rotated around its own axis. The core of the tool involves cutting the cylinder with booleans along the axes and then iterating through each of them using a for loop. By generating a randomised attribute for each piece, we can selectively eliminate the percentage that interests us the most, thus creating more organic glass patterns.
Troubleshooting Tips
When running our simulation, common issues may arise:
Poorly optimised geometry: I strongly recommend cleaning our cutting geometry to avoid problems. To achieve this, we can use an attribute delete to remove all internal attributes. Additionally, a common error is not closing the geometry – it is imperative to always close the geometry before using a boolean fracture, we can do it easily with a poly cap node.
Cuts too small: To ensure our cutting objects work perfectly, it is mandatory to make them larger than the source geometry. Failure to do this may result in internal mesh problems when randomizing the normals of the cutting points.
Issues with piece resolution: It's important to understand how the boolean fracture works, particularly that the internal resolution of the pieces is controlled by the resolution of the cutting surfaces. Therefore, it is good practice to use a remesh node on our surfaces to adjust their resolution.
Comparison & Alternatives
We can explore alternatives to using boolean fracture. The rbd material fracture node is a very interesting node if we want to create glass and wood cuts quickly and efficiently. However, it's crucial to note that the number of nodes and processes these tools involve can significantly slow down our simulation. Hence, it is advisable to use tools that can save disk space and time.
Conclusion
Engaging in demolitions is a great way to practice volumes, particle simulations, rigid bodies, and even camera positioning and effects. However, if we want to achieve excellent results, adding a substantial number of layers and giving the cuts a more organic look is essential.