The Iron Dragon: Creating a Real-Time Post-Apocalyptic Sci-Fi Vehicle
Maximilian-Bastian Jonas, a graduate of PIXL VISN and School of Games, shares his impressive student work in a real-time sci-fi vehicle on The Rookies platform. Gain insights into his creative vision, process, and challenges in this article.
Maximilian-Bastian Jonas, a graduate of both PIXL VISN | media arts academy and School of Games, has shared some pretty cool student work in his Rookies portfolio. We wanted to know more about his vision for his real-time sci-fi vehicle and in this article he gives us insight into his process and challenges along the way.
About the Project
I’m super excited to have been invited by The Rookies to share my process of creating the “Iron Dragon”. For this article we’re going to go through the process that went into the creation of this piece.
I created the model during my mentorship time with James Schauf, then later on finished the project up during my Demo-Reel time at School of Games to bring it to life in UE5. It was a really exciting journey as Post-Apocalyptic Sci-Fi scenarios are my favourite in fiction.
Concept & Inspiration
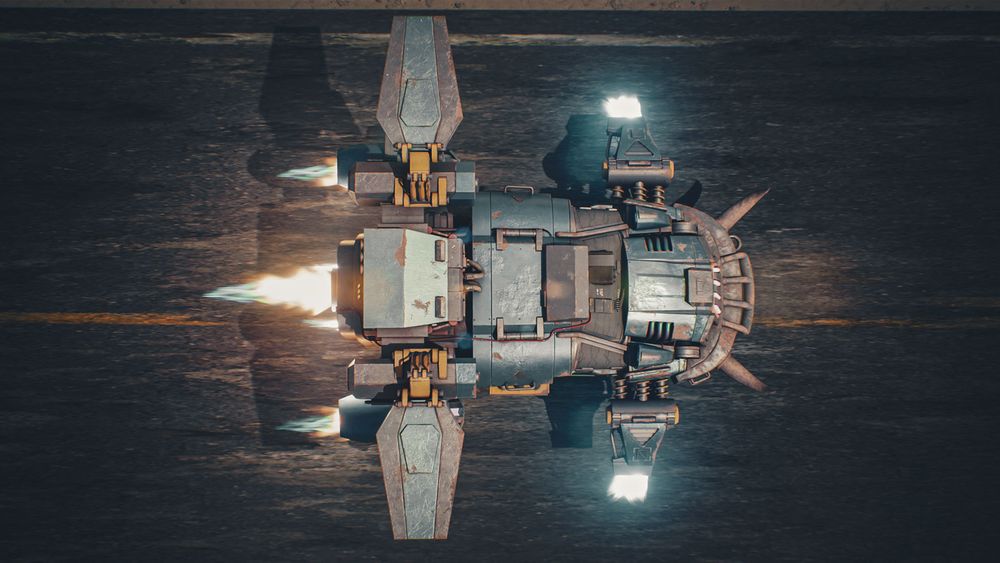
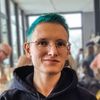
When I discovered the “What the Fuxk” artwork by Rock D. I immediately fell in love with its design. Since I’m a fan of the Mad Max movies and Cyberpunk, an idea formed in my head. A post-apocalyptic patchwork car, made from scrap and old parts to travel through the wastelands, armed and fast to survive even the toughest conditions.
The special thing about this project was that a lot of the parts on this vehicle were made up and needed to make sense to someone just looking at it. So, I observed spaceships and flying cars in movies, games and by other artists to get inspiration on how to make it “make sense”. I also gathered as much reference of old cars and sci-fi car designs as I felt I needed, and organised them in a tool called PureRef. I constantly kept this window on my second screen to keep my vision in mind during all steps.
PureRef is free to download, but I’d recommend donating a little if you can afford it since they’ve done an amazing job on this piece of software. To me, it's the best reference tool.
Modelling
Modelling took a lot of time since the base reference left room for a lot of interpretation (especially in the back area) and the final piece consisted of around 1000 pieces.
In Maya and ZBrush I went through different stages of modelling, constantly getting feedback and duplicating each step onto a hidden layer as backup in case I mess something up later on:
To get things started, I blocked out the base mesh with simple shapes and experimented with proportions.
As soon as I was happy with how the overall proportions felt, I defined the blocking by adding geometry and getting the final low-poly shapes and smaller pieces in place.
With the defined blocking done, I finished every piece of geometry to its final shape, carefully working on my edge flow and getting the larger details in to get my low-poly model.
Tools like “Edit Edge Flow”, “Insert Edge Loop Tool” (and its Tool Settings: “Equal distance from edge” and “Multiple edge loops”), “Slide Edge Tool”, “Duplicate Special” and manipulator orientation functions are incredibly powerful and make your life a lot easier during the process.
Next step, I imported my low-poly mesh into ZBrush, adding dents, scratches and larger damages. Exporting both the high- and low-poly versions gave me a detailed high-poly and matching low-poly so that larger dents match and change the silhouette.
In my final step I switched out the new ZBrush high-poly parts, added smaller detail, beveling edges and smoothing parts of the mesh that didn’t go to ZBrush, adding imperfections and equally distributing my edges across the mesh.
I got a lot of help and feedback during this time to get the project exactly in the direction I wanted it to. In addition, it's always a good idea to ask other artists and friends for feedback since they can look at it with a fresh eye. When working on a large project, one can quickly get tunnel vision and miss certain parts that look wrong or don't make sense which might be obvious to others.
You can always reach out to other Artists to ask for feedback. In my experience, most are more than willing to give you a few lines. If not, remember that everyone can be busy at times or doesn’t check messages frequently and isn't leaving you on read for fun.
UE5 Optimisation & Texturing Preparation
Before going into the next steps, I took some time to check if all my naming conventions were matching on both low and high-poly so baking wouldn't give any errors. If all pivots were set to where I wanted them to and if certain parts could be decimated to a lower poly-count to make the mesh as performant as possible for UE5, as I wanted to use it both as a real-time and pathtraced asset.
Using the “Cleanup” tool I also checked if my mesh is free from Ngons (Faces with more than 5 edges) and Poles (Vertices with 5 or more edges) so I don't run into any geometry issues later on.
UVs & Texturing
For the UVs I took my time and tried to hide the seams wherever I could. Even though baking textures nowadays hides them pretty well, I wanted to get them laid out clean and well hidden, so close up renders don’t have anything uncanny visible.
To make my life easy, I made use of “Constraint selections” and mirrored a lot of UVs when possible since a lot of my model is symmetrical. Small parts like screws were switched out with the “Replace” tool so I only had to do one and switch out the rest.
Maya also has useful UV view modes like “Shaded” and “UV Distortion” to check if UVs are flipped or have some stretching going on, which you don't want in any case.
I planned to take up close renders so I prepared to have a couple of UV spaces when done.
Texturing was probably the most fun part about this project. I imported a separate texturing UV version to Substance 3D Painter using the UDIM workflow so I can paint across texture sets easily, using an Excel sheet I created in advance to know which UDIM corresponds to which UE Material Instance later on.
I started out by searching through the Substance Source library to get my base materials and assigned them to every piece to get my ground work in place.
By adding a few imperfections to get a feel for it and experimenting with different colour variations, I posted my favourites online, asking for opinions. The result was the majority voting for the blue-orange version.
Color variations I experimented with
For the main paint material I used what I’ve learned from Wes McDermott’s awesome Tutorial about peeling paint. Since my textures were going to be rendered in a real-time engine, I had to get all my created height information into the normal map. The “Height to Normal” filter proved to do an awesome job here. This way I was able to leverage all the power of Substance 3D Painter’s height map capabilities and use them as normal maps.
On the right you can see all Material's layers
With this material I was able to freely paint chipped parts and damages, mixing it with smart masks and taking my time observing references to get believable weathering and damages.
With an Anchor Point, masks and paint layer for the chipped paint as the base, I was able to hand paint on multiple layers at a time, manipulating both paint and rust placement where I needed it.
A short Video to demonstrate the functionality of the Paint Material
Since imperfections are the most crucial part to get things to look real, I spent a lot of time creating rust, damage and dirt groups with masks. I decided to do it this way since I wanted to later export my painted masks to use them in Unreal Engine’s material.
All of the masks I prepared for Unreal Engine
Unreal Engine Scene Setup
Setting up the Unreal Project, I began by creating a folder structure and a first map, building a studio environment, setting up lights and post-processing to have a clean scene to work in when assembling everything.
Rigging & UE Control Rig
Since I wanted the back thrusters and wings to move in my cinematic, I decided to create a simple rig in Maya. Being a hard-surface piece, skinning and constraining this was done in no time, ready to be exported to UE and get a Control Rig.
Wrapping my head around Unreal’s Control Rig took a little time but turned out to be very intuitive and quick to set up. After a few tests animating each part and locking certain angles so no geometry is able to crash, I created a blueprint for the vehicle, adding “Sockets”, similar to a “Parent Constraint” in rigging, to constrain my thruster flames Niagara system to the corresponding geometry later on.
Material Setup
For the material I decided to try a look-dev friendly path. My goal was to have the same control over values and colours as I was used to in Maya’s Arnold and its Layer RGB and Layer Float nodes.
I set it up by creating a master material with my substance painter masks layered with a Lerp, from that I made a master material instance of which I then made a material instance for each UV space so the master instance functions as a central control point to edit the mask values. With the masks I was able to control the power, opacity and colour of the texture. Additionally, I added a mask for the overall colour of the paint and rust so I was able to change and tweak those values too in case I needed it.
Niagara System
Unreal Engine’s Niagara particle system was a big part of adding realism to the overall look and believability, so I spent a lot of time studying different approaches and ways of creating thrusters for spaceships. I wanted to go for a powerful looking thrust of flames or particles so I experimented and found that particles are not capable of emitting fast enough to give the feel of speed I wanted. On top, I noticed that no matter how short the update time for the particles was, there was a visible drag at high speed movement of the particle emitter.
You can see a visible drag on the particle version
I decided to go with an animated texture. I came across UNF Games’s VFX fire thrusters Tutorial and adapted a lot of what I learned into what I wanted to create. For the different thruster shapes I designed, I created matching shaped flames by using layered geometry as emitter shape, playing different textures on it.
Cinematic
I created the cinematic scene to emphasise on the scale and speed I imagined for the vehicle. By using the Cyberpunk World Kit by Kitbash3D and Quixel library assets, I built a city in the background and used the spline tool in Unreal to build a street to move along on. I then created a Camera Rig Rail, putting both my cinematic camera and the Iron Dragon blueprint on it. This way I was able to give both the same speed along the rail so I don't have to manually move the camera with the vehicle. I then animated my Control Rig to give it believable movement along the track and created a few camera shots to go along.
Render Setup & Post Processing
For the final renders I used the Movie Render Queue and different Console Variables to push the quality to where I wanted it to. After I had a final look at my Post-Processing element editing my colour grading, motion blur and things like the DoF, I was ready to start the Pathtracer.
The final Images were exported as .EXR to maintain control over the raw colours for later editing in Adobe Premiere, Lightroom and Photoshop.
Conclusion
I learned a lot during this project. Doing a fully functional game asset like this from start to finish really is a journey and a lot of fun, especially when everything works in the end.
I try to learn something new with each project and did so with this one as each aspect had obstacles to overcome, problems to solve and things to learn.
Keeping your references in mind all the time is probably one of the most important pieces of advice I can give. It's always tempting to just freestyle and make things up that look cool but serve no purpose in making the project believable.
A big chunk of this project was created during my time with James Schauf, of which I am incredibly thankful to have had the opportunity to learn from. He gave me a lot of valuable feedback along the way and is an amazing mentor and friend. Additionally my lecturers at School of Games gave me a lot of feedback during my time wrapping everything up and putting all the pieces together.
With that being said, people that give you honest feedback and opinions are invaluable in becoming a better artist and creating great art. The art community has a lot of amazing artists that are happy to give feedback so dare to ask! A good place to start is the The Rookies Discord.
Thank you very much for reading and I hope you enjoyed this insight into the creation of my Iron Dragon!