Cataclysmic Realms: Advanced Dynamics and Volumetrics in Houdini
FX TD, Rahul Gupta reviews and dissects two of his favourite and technically challenging projects to share tips for creating advanced dynamics and volumetrics in Houdini.
FX TD, Rahul Gupta reviews and dissects two of his favourite and technically challenging projects to share tips for creating advanced dynamics and volumetrics in Houdini.

Rahul Gupta, also known as Arctiem, is an FX Artist who recently graduated from Gnomon School of Visual Effects.
With four best-of-term awards and recognition as a 2023 Rookie of the Year Finalist from Gnomon, Rahul specialises in crafting photorealistic effects in Houdini and designing procedural pipeline workflows. Beyond his mastery of Houdini, he has honed his skills in Unreal Engine, Nuke, and various other software, expanding the possibilities of visual storytelling.
In the following article, Rahul reviews and dissects two of his favourite and technically challenging projects featured in his demoreel: a study in Rigid Body dynamics and an exploration of volumetric effects. These projects showcase not only visual diversity but also highlight the distinct challenges and creative solutions employed in their realisation.
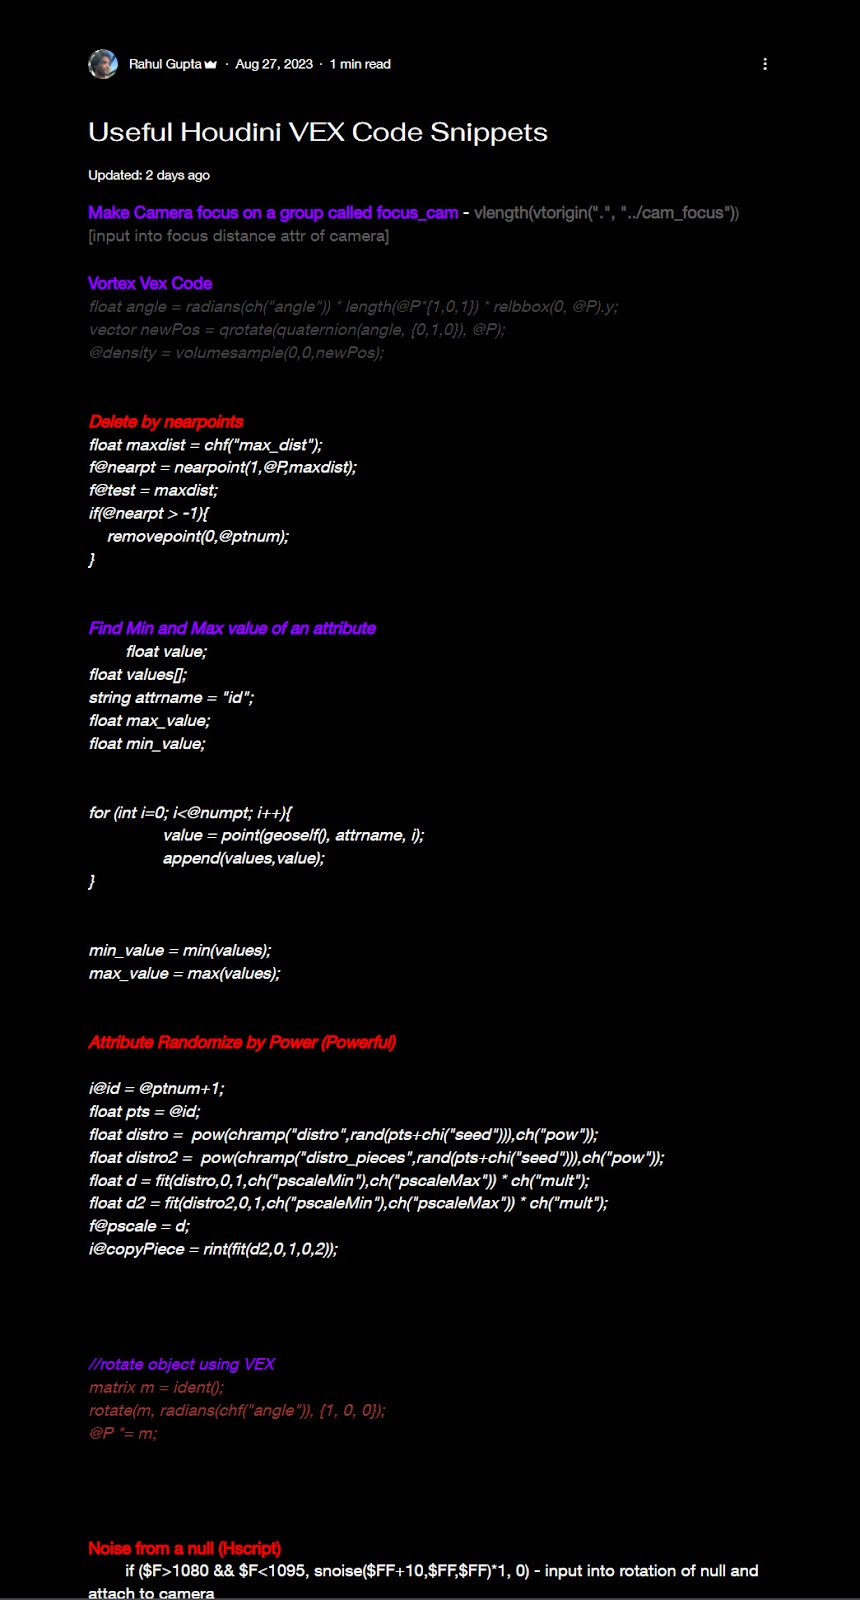
Alongside the studies mentioned above, I will also be sharing some industry tips and tricks, as well as some screenshots of my notes. These tips are some that I've picked up along the way that I haven't found to be widely known. Strap in!
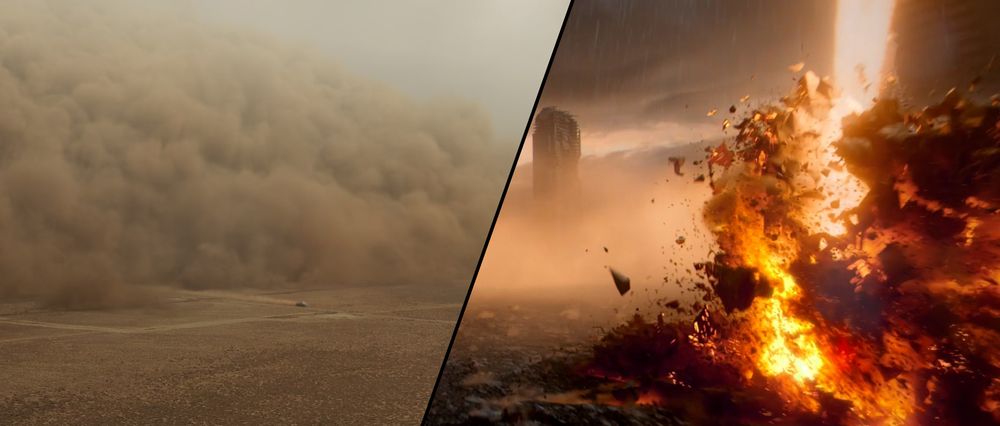
The idea was to create a sandstorm scene of an epic scale and to convey a story of the impending doom.
A more technically challenging project I've done in recent memory. This is partly due to the immense amount of rendering and wedging that had to be done to create the sandscape.
This project was rendered in Houdini and Arnold. The footage was tracked in 3D Equalizer, and compositing was done in Nuke. Backplate from Pexels - Kelly.
For my Houdini scene, I began with comprehensive research, drawing on real-life references, news clips, and weather reports to understand sandstorms better. Additionally, I looked at movies renowned for their impressive sandstorm portrayals, like Dune and Prometheus. These films and images served as a rich source of inspiration in developing the look and feel of this sandstorm scene.

Following the gathering of references, I started by tracking my footage inside of 3DEqualizer. After completing the track, I brought the FBX scene inside Houdini and started blocking out the sand clouds.
Determining the initial shape for the sand cloud's base geometry, from which the pyro smoke would emanate, presented a significant challenge. I experimented with various shapes, sizes, and velocities, tweaking the cloud geometry in many iterations.
Pro Tip - Use a VDB Clip Node to clip volumes outside of your camera culling area, thereby reducing the amount of voxels being read in and saving you time in your render and playback!
This process involved extensive testing, with different speeds emitted from various parts of the smoke cloud. Following this, I wedged a total of 21 different kinds of sand cloud smoke, ranging in different velocities, turbulence, disturbances, etc.
In the initial stages, I engaged in fine-tuning attributes to achieve the desired appearance of the rolling clouds. During this process, I employed a technique in Nuke where I would quickly create a matte painting by duplicating and arranging a single rendered cloud, which helped me determine effective angles and contributed to defining the piece's colour scheme.
Additionally, I occasionally integrated Crag (Houdini default asset) into the scene to assess how well everything meshed with the original footage.
Pro Tip - Instead of creating a visualise node to see how your Turbulence, Shredding, and Disturbance values lok, use the Shape Guides option (found under the Shape tab) in the Pyro solver instead. It is an extremely overlooked feature that I happen to use all the time!
To get a breakup in the shapes of the sand clouds, I had to collide the pyro simulation with 3-4 cylinders at the start of the simulation. I also played with the timescale; I slowed down the simulation in the Pyro solver after a certain point to get the right rhythm of the sand cloud rolling on the ground.
Pro Tip - To reduce the size of pyro sims, be sure to check the checkbox in the output tab of the pyro solver for - Use 16-bit float and convert to VDB. Sometimes, doing this may even reduce your cache sizes by half!
In the sand cloud simulation, I set the velocities to be higher at the bottom and lower at the top. Additionally, I assigned a zero value to the velocities in the reverse direction to prevent the cloud from appearing to blow backward. This approach helped create a more realistic motion for the sand cloud, ensuring it moved forward as intended.

Below are some notes on feedback and critiques I received from peers roughly every week or two weeks while working on this project.

Through the use of a cell table, I kept track of notes that I had addressed and notes that were pending to be addressed.

Pro Tip - Be wary of using very high disturbance values on the Pyro solver, as it can leave a blocky Minecraft-like look to the sim!
In my compositing workflow, I render out different EXRs as distinct layers, each designed to isolate and highlight other layers. Among the AOVs (Arbitrary Output Variables), I consider a few essential and always make sure to export. These key AOVs are pivotal in refining the final look, allowing for nuanced control and depth. Some key AOVs are but not limited to:
I rendered 13 AOVs using Redshift, allowing me total control over the lighting and look and saving me from re-rendering all frames in Houdini. This was followed by a meticulous week of compositing these AOVs to recreate my beauty render.
When I'm compositing with Nuke, the initial step involves setting up my workspace, which includes defining the video's resolution and the color space. I prefer working with the ACES color management system for all my projects.
In Nuke's project settings, I set my color management to OCIO under the color tab and configured it to the latest ACES OCIO version, ACES v1.3. This setup is crucial for maintaining consistent color quality throughout my projects.
For those interested in using ACES, it's available on its official GitHub page - https://github.com/imageworks/OpenColorIO-Configs.

The cloudscape had to be rendered in different layers, with different layers matted out with other layers. Mostly, each cloud had different materials with slight variances in densities and scattering attributes.
All the layers were composited together and graded inside of Nuke.

World Destroyer evolved over five months with numerous iterations focusing on fracturing, texturing, and look development to capture a dystopian, apocalyptic vision.
Rendered in Houdini and Maxon Redshift and composited in Nuke, I handled all aspects except for the building models sourced from Sketchfab and KitBash.

I've had a long fascination for the early Superman with Brandon Routh, Ben Affleck's 2004 Daredevil, and the visuals in Ghost Rider. These movies, each distinct in their style and storytelling, played a pivotal role in making this piece. Even though they may not have directly influenced it, there were constant references to the aesthetics and feel of those films.

Throughout the development of this project, I regularly sought feedback from both my instructors and peers roughly every two weeks. What you're about to see is an unfiltered glimpse into the evolution of my project, from the earliest stages to the polished final render.

To keep track of the feedback, I would note in a separate column which suggestions I had addressed and which ones I still needed to tackle. This method was a great organizational tool and served as my own system of checks and balances, ensuring that no piece of advice slipped through the cracks.

Pro Tip - Always connect a poly soup SOP after fracturing something.
In Houdini, the PolysoupGeometry node is used to optimize the handling and processing of complex polygonal geometry. It essentially combines multiple polygons into a single entity known as a "polysoup," which Houdini processes more efficiently. This is particularly useful when dealing with many fractured pieces and helps speed up the RBD simulation.
Grasping the power of Houdini's nodes is just the beginning. As you delve deeper, you encounter VEX, the powerhouse expression language of Houdini. It's like C++ turbocharged for Houdini's environment, making it approachable for those with object-oriented programming experience.
In this project, VEX proved to be incredibly useful, especially for one specific task. I needed to have control over how my ground-fractured pieces would react to the laser cutting through them. I could have approached this in numerous ways, but I decided to employ some specialized VEX functions that are available for the Rigid Body Solver. These were executed inside a wrangle connected to the presolve input inside an RBD Bullet solver. Here's how I used them:
if true (area of rock is more than 10 and less than 20){
	Exert 300 units of force;
}
else if not true{
	Exert only 10 units of force;
}
These are only some VEX functions that are specialized for RBDs, I recommend checking out this page by John Kunz that lists the other equally useful attributes you can play with to get control over your RBD simulations.

I would like to highlight some resources I constantly reference and utilize to increase my knowledge in VEX:
Apart from this, SideFX has example files showing how different nodes work. It can be accessed by pressing the question mark at the top right corner of Houdini and searching for examples. After that, just click Load to load the example in your current Houdini window. This is a great way to learn how the Houdini devs intended for a particular effect/operation to be done.

In the simulation, glue constraints were tailored to the ground pieces, depending on their center of mass. Larger pieces received fewer constraints, allowing them to break apart more easily.
In contrast, the smaller fragments had more constraints, ensuring they held together more tightly when disrupted by the laser. This approach created a nuanced breakup, with small pieces clinging together while larger ones shattered more freely.

The laser was just two cylinder blocks with animated endpoints. Their start points were more or less stationary except for a little bit of forward movement with the camera, as I wanted to imagine the laser being shot out of someone's eyes.
Once the lasers were animated, I scattered points on the cylinder and gave each point a velocity vector direction, which simulated a force. This way, if any pieces came in contact/close to the scattered points, they would be deflected oppositely, giving an illusion that the laser was cutting through them.

The ring was set up so that they would appear for only a short amount of time and pulse for the short period of time they were there. I set up the rings using a torus and then converted the rings to a VDB fog volume. This way, I could apply a volume texture with some emission.
I converted them into a fog VDB instead of just using emission on geo because the emission parameter is notorious for causing a lot of GI noise and making the render noisy.

Redshift's ability to create procedural textures lets you craft detailed maps, such as noise patterns for materials. These maps are perfect for controlling surface details like diffusion and glow. And so, when applied to UV-mapped geometry, these textures remain fixed, immune to the object's transformational changes.
This technique allowed me to realistically simulate the heated cores within the rock interiors affected by the laser's impact.

Pro Tip: I prefer using the Command Line in Houdini for quicker rendering, as it bypasses opening the entire scene. This approach usually results in faster render times. In Houdini 20, accessing the Command Line Tools has changed; they are now found in the Houdini installation directory, specifically the bin folder where you'll find hcmd.exe. Enter this code inside the command line tools window line by line -
Z: [change to Drive letter your project is located in]

cd Z:/Dynamic Effects 4/theCrack/theCrack [change to project folder directory]

hbatch theCrack_laserSetup_v119.hipnc [change to point to your Houdini file]

Redshift_setGPU -s 11

render /out/lazer_test_54 [After /out, change to the name of render node in out context]
Once I have AOVs, I prefer to deconstruct them in Nuke using the shuffle node. This approach grants me precise control over each scene element. I can fine-tune various components—brightening reflections, toning down emissions, deepening shadows, and more. Like in Houdini, every operation and node in Nuke serves a distinct purpose.
When it's time to bring it all together, I blend the layers. Integrating specific AOVs might initially seem intricate, but a Plus or Over operation is typically my go-to.

Pro Tip: Compositing Redshift AOVs: Beauty = [ Diffuse Lighting + Global Illumination + Specular + Reflections + Refractions + Subsurface Scattering + Emission + Background + Caustics ] * Volume Tint + Volume Emission + Volume Lighting

Don't expect every output from Houdini to match your vision perfectly, which is why mastering compositing is crucial. While Houdini sets the stage for initial visuals, it's just the beginning.
The true magic unfolds in the compositing phase, where tools like Nuke come into play.
You can fine-tune colors, aesthetics, and overall ambiance here, transforming good visuals into professional-grade masterpieces. In this phase, your creative prowess truly shines, elevating your work to new heights.
If you share my passion for crafting intricate, interwoven networks of image sequences, then you'll likely find this aspect of FX shot production exhilarating.

Pro Tip: Some Nuke notes from my notebook -
- Multiply / Gain = Highlights (Brightest area of the image)
- Gamma – Midtones / skin tones/tint/contrast
- Lift – Darks / Shadows
- Use the color lookup node to get finer controls over curves affecting
highlights, mid-tones, and shadows
- Blackpoint – Tell Nuke what is the blackest point in the image
- Whitepoint – Tell Nuke what is the whitest point in the image
- Use radial node to create quick circle masks
- Use ramp node to create rectangular masks
- The best resolution to export in is ProRes 4:4:4:4, but it comes at the cost of a large file size
In conclusion, my journey in FX has been a fantastic mix of learning and creativity. I've grown a lot through understanding color, designing shots, and making storyboards. The future of FX, especially in gaming, is exciting, and I can't wait to create experiences that really impact people.
For those starting in FX, keep working on your skills, listen to feedback, and stay true to your art. Challenges are opportunities to grow, especially in fast-moving areas like real-time VFX.
Finally, I extend my heartfelt thanks to The Rookies for this opportunity to share my experiences and insights, and I hope this article gets you excited to dive into the amazing world of Houdini.
You can check out Rahul's student work on The Rookies and reach out to him via his Website.