A Beginner's Guide to a Stylised Workflow in Unreal 5
Aspiring Environment Artists, Olivia DiPrizio's beginner's guide to a stylised workflow in Unreal Engine 5 is a must read!
Aspiring Environment Artists, Olivia DiPrizio's beginner's guide to a stylised workflow in Unreal Engine 5 is a must read!

Are you an aspiring environment artist eager to jump into the world of video game development? Perhaps you've been honing your artistic skills, yearning to channel your creativity into story-rich projects. If so, you're not alone!
In this article, Olivia DiPrizio gives us a beginner's guide to learning a stylised workflow in Unreal Engine 5. Let's dig in!
Ever since I started making art as a child, I’ve focused more on realism. I was always unsatisfied with my work when I tried to replicate the style of my favorite cartoons or comics, so I stuck to recreating the world around me. Now, in Champlain College’s Game Art program, I’ve worked with realism for the past four years, as I assumed that based on my past experiences I would be more successful sticking with what I knew. Now in my senior year, I decided to take the leap and tackle an entirely stylised scene in my Game Environments class. I wanted to prove to myself that I could learn a new workflow and be successful working outside of my comfort zone.
This article goes into my process from start to finish of how I explored stylisation and incorporated it into my work. I’ll be outlining the different steps I took and techniques I learned along the way, as well as explaining what worked and what didn’t.
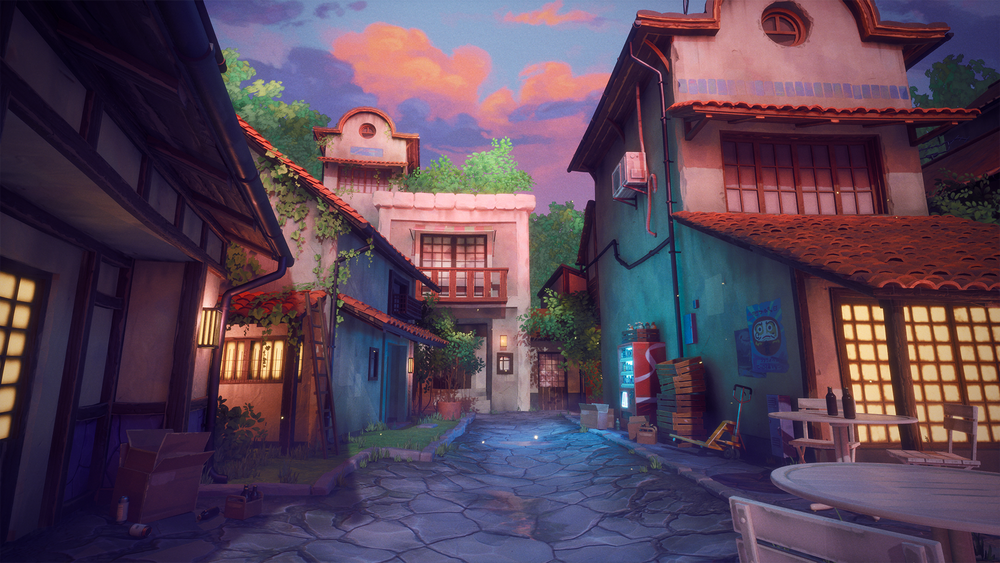
From the beginning I knew I wanted to work from an existing concept, which would allow me to start with a strong composition and therefore spend more of my time modeling, texturing, and lighting. I came across Sylvain Sarrailh’s work on ArtStation, which I was immediately drawn to because of his strong use of colour and his painterly style. I thought it would be fun to recreate one of his pieces in 3D, and I settled on Twilight Street because of my 10-week timeline. I wanted a project that was in scope, but would still allow me to push myself and develop my skills.

As I was in the process of planning my project, I began seeking out tutorials on YouTube and ArtStation for things I wasn’t as familiar with, like creating stylised textures. 3dEx and Kalyson on YouTube both have a lot of great Substance 3D Designer tutorials that I used to get started.
I also put together a Pinterest board, consisting of both real-world reference and existing stylised work to serve as a guide of what I wanted my final piece to look like (I took a lot of inspiration from the art of Overwatch and Valorant). Stylised art, though visually very different from realism, still has a basis in reality and often exaggerates existing characteristics and features, which is why I gathered references for both. I started by analysing what a material looks like in real life, and then compared that to how other artists have interpreted it. This allowed me to get a better understanding of the actual process of making stylised work, as opposed to just re-creating what other people have already done.

The first thing I do when making an environment is get everything blocked out. I started first in Unreal to set up my scene and add some simple lighting. From there, I imported my placeholder meshes to Maya as scale reference and began modeling. The first challenge I faced with this project was during my initial blockout. Oftentimes, concept art is drawn in perspectives that can’t easily be replicated in 3D with a real camera. I had difficulty making all the elements of this environment line up with the original drawing, and so I wasn’t able to replicate the proportions and placement of objects in the scene perfectly. This isn’t a bad thing at all, just a natural result of taking art from one medium to another.
I also ended up adding some entirely new elements to the scene to make it feel a bit more populated. For example, to help guide the viewer’s eye and add more depth to the environment, I placed some tables and chairs in the foreground. I also added a sidewalk to break up the wide road, and some smaller props like bottles and cardboard boxes to scatter around.
When I had to deviate from the concept in ways like this, I went back to the same realistic vs stylised process I used when researching materials - first, I thought about how the street would be assembled in real life. How would things be placed in ways that made sense? Next, I made the necessary adjustments to reach my desired final product - a cohesive environment with good renders. I changed things around as needed to make a visually pleasing composition that still reflected the concept.

While working, I constantly went back and forth between Maya and Unreal, re-importing my meshes often so I could iterate quickly and catch any potential problem areas as they came up. I did this to avoid surprises later that could slow down my work.
Some advice I got that really pushed my modeling at this stage was to break up any perfectly straight lines. I took the time to add a bit of bend or curve into all the major elements of the buildings, like support beams, windows, and roofs. This made everything appear more grounded and lived-in, as well as less rigid, which helped to emphasise the softer, more painterly feel I was aiming for.

I began the texturing process early in the project because of my lack of experience with stylised materials. I wanted to give myself plenty of time to practice and iterate, which I strongly believe was a good choice - it took a lot of back and forth to get things looking the way I wanted, so getting placeholders in early allowed me to figure out what I really needed to spend my time on. Most textures in the scene I revisited multiple times as I got feedback and became familiar with new techniques.
I made an effort to emphasise the strong use of colour in Sarrailh’s original concept, which I did through both my materials and lighting. With materials, I focused a lot on integrating stronger hue variation than I normally would, for example bringing in subtle blues, pinks, and greens into the plaster walls of the buildings. This created more visual interest in the scene and helped to push the overall painterly feel I was going for. With lighting as well, I used a lot of coloured point and rect lights to emphasise the palette and match the reference, which was a major challenge - however, I think it ended up being the most important part of the environment. Once I got the lighting to a place I was happy with it, it really pulled everything else together.

One of the new things I had to learn for this project was how to create a custom skybox. In Sarrailh’s concept, the clouds are very painterly with highly saturated colors and visible brushstrokes. Unreal’s default clouds wouldn’t have allowed me to capture the same look. To create a hand-painted skybox, I exported the existing skybox sphere mesh from Unreal to Maya, where I UV unwrapped it and flipped the normals so the faces pointed inward. Next, I brought it into Substance 3D Painter, where I painted the inside of the sphere with the clouds I wanted.
This took a lot of trial and error, both because I was painting on the curvature of a sphere, and because of the difference in colour between Substance 3D Painter and Unreal due to the emissive and lighting settings in-engine. To make up for this difference, I painted the sky with the final colours I wanted, but added filter layers before exporting that decreased the brightness and increased the saturation. These filters balanced out the changes in-engine and resulted in the sky showing up correctly, while still allowing me to see the proper colours when working. I ended up doing a first pass of the new skybox early on so I could get confident in my workflow, and then revisited it later in the project to really polish up the shapes and colours of the clouds.
Perhaps the most daunting piece of this project for me was creating custom foliage. I had only created foliage once before and was worried that it would be very time-consuming, but it ended up being quite simple!
I created clumps of foliage cards in Maya that I would use for trees and grass, as well as a handful of single planes for the ivy, which I would be placing more carefully in-engine. I made my texture maps in Photoshop, using Devin Elle Kurtz’s free Foliage and Grass Brushset to get the simple leaf and foliage shapes. I painted out the foliage in white on a black background to create the alpha and used a clipping mask to add color for the basecolor map.

When I put everything together into Unreal I added extra colour variation using material instances, by multiplying my basecolour map with a Constant3Vector parameter. I also placed some warm green point lights to highlight the foliage similarly to how it’s lit in the concept.
Another new technique I learned with this project was using normal decals, which work like any other decal in Unreal, but only make use of the normal channel. I used these to add detail to the edges and corners of the buildings in my environment. I made a couple edge sculpts in ZBrush on a simple cube mesh, which I then baked in Substance 3D Painter. Using the resulting normal map, I masked out an alpha in Photoshop, and then created a decal which I applied to the necessary corners and edges in my scene.
I also utilised a lot of simple grunge and grime decals, which I painted in Photoshop and placed at transitional areas, like where the buildings meet the ground and underneath roofs/window sills. These really pushed the scene to feel more grounded and lived-in.
As final touches to my scene to make it feel more dynamic in my renders, I added wind to my foliage with a SimpleGrassWind node in my master material and made a quick Niagara emitter to create a firefly particle effect. I also added ripples to the puddles on the ground with an animated normal map, which was a fun addition! I created a ripple texture in Substance Designer, which I animated inside Unreal and applied to the puddle decal.

My biggest takeaway from this project was learning how to work from an existing concept. Knowing how to interpret someone else’s work is an incredibly valuable skill, especially as an environment artist. With this project, I got to practice balancing the original concept with necessary technical and creative compromises, like changing up the perspective and adding in a few new elements to push the composition.

I’m very happy with these changes, as I feel like they stay true to the atmosphere of Sarrailh’s work while also adding my own spin on it. The current project I’m working on is also based on an existing concept, and I feel much more confident going into that project now having had this experience.
I also improved my general modeling and texturing skills by working in an unfamiliar style - while the pipeline was roughly the same, I was able to see it all from a new perspective and with a different end goal in mind. I think this mindset is going to help me a lot in my future work, as I won’t always be working in the same style and need to have the versatility for that.
Given that this was my first stylised scene, I’m extremely happy with the result. I proved to myself that I’m able to easily adapt to new artstyles, and this has encouraged me to try more new things in the future! It can be very daunting to start a project outside of what you’re used to making, but environment art is a constant learning process already, and the best way to learn something new is to jump right in! Nowadays, with platforms like YouTube, ArtStation, and of course, The Rookies, it’s very easy to find inspiration and learn new techniques quickly.
I would also encourage you to constantly seek out critique when working on projects. Another set of eyes can help pick out things you’ve missed and also give you ideas on how to solve whatever problems you might be running into! This piece wouldn’t be where it is now if not for many other people looking over it and offering their feedback.
Thank you for giving this article a read! This project was a very rewarding experience for me, and I’m very thankful to have been given the opportunity to share my process. If you have any questions or comments please contact me via my Rookies profile.