Creating a Game-Ready Environment in Unreal Engine 5
Loïs Mistrot--Dauzères shares insights into creating the Abandoned Alien Temple, showcasing acquired environment art skills from e-artsup.
Loïs Mistrot--Dauzères shares insights into creating the Abandoned Alien Temple, showcasing acquired environment art skills from e-artsup.

Loïs Mistrot--Dauzères is a 3D generalist artist from France who embarked on learning 3D art three years ago. World-building and narrative design are elements that Loïs loves to observe in video games and cinema, along with a desire to make imaginary universes feel real and alive. Deeply inspired by these experiences, Loïs has dedicated herself to crafting immersive worlds through 3D and environment art, and has recently graduated from e-artsup with a Game Art bachelor's degree.
In this article, Loïs shares insights into the process of creating the Abandoned Alien Temple, a personal project aimed at showcasing the skills acquired during studies and personal practice.

Since I graduated, I’ve been thinking of creating a big personal project to really grasp what I could achieve in Unreal Engine and know what skills or part of my workflow I could improve on.
This project was an opportunity for me to:
I had modeled some meshes for a group project a few months before and didn’t have the opportunity to texture them because we had a texture artist in the team. So I figured out I could create a closed environment using these meshes and texture them myself.
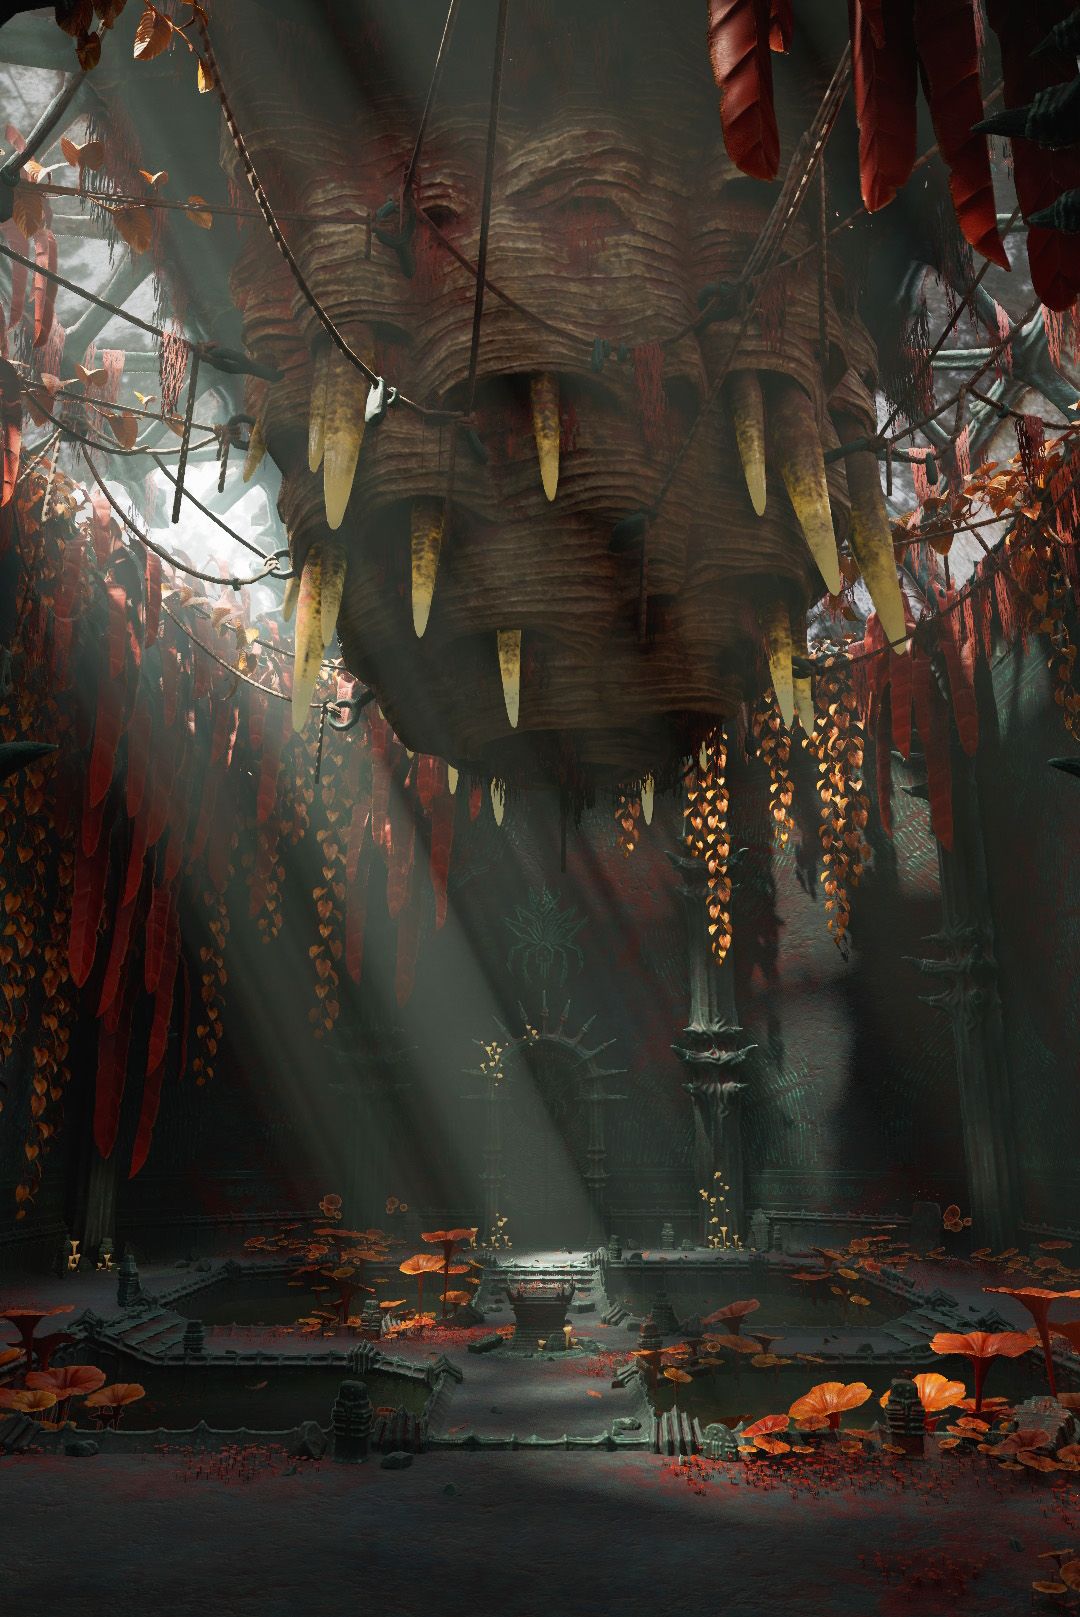
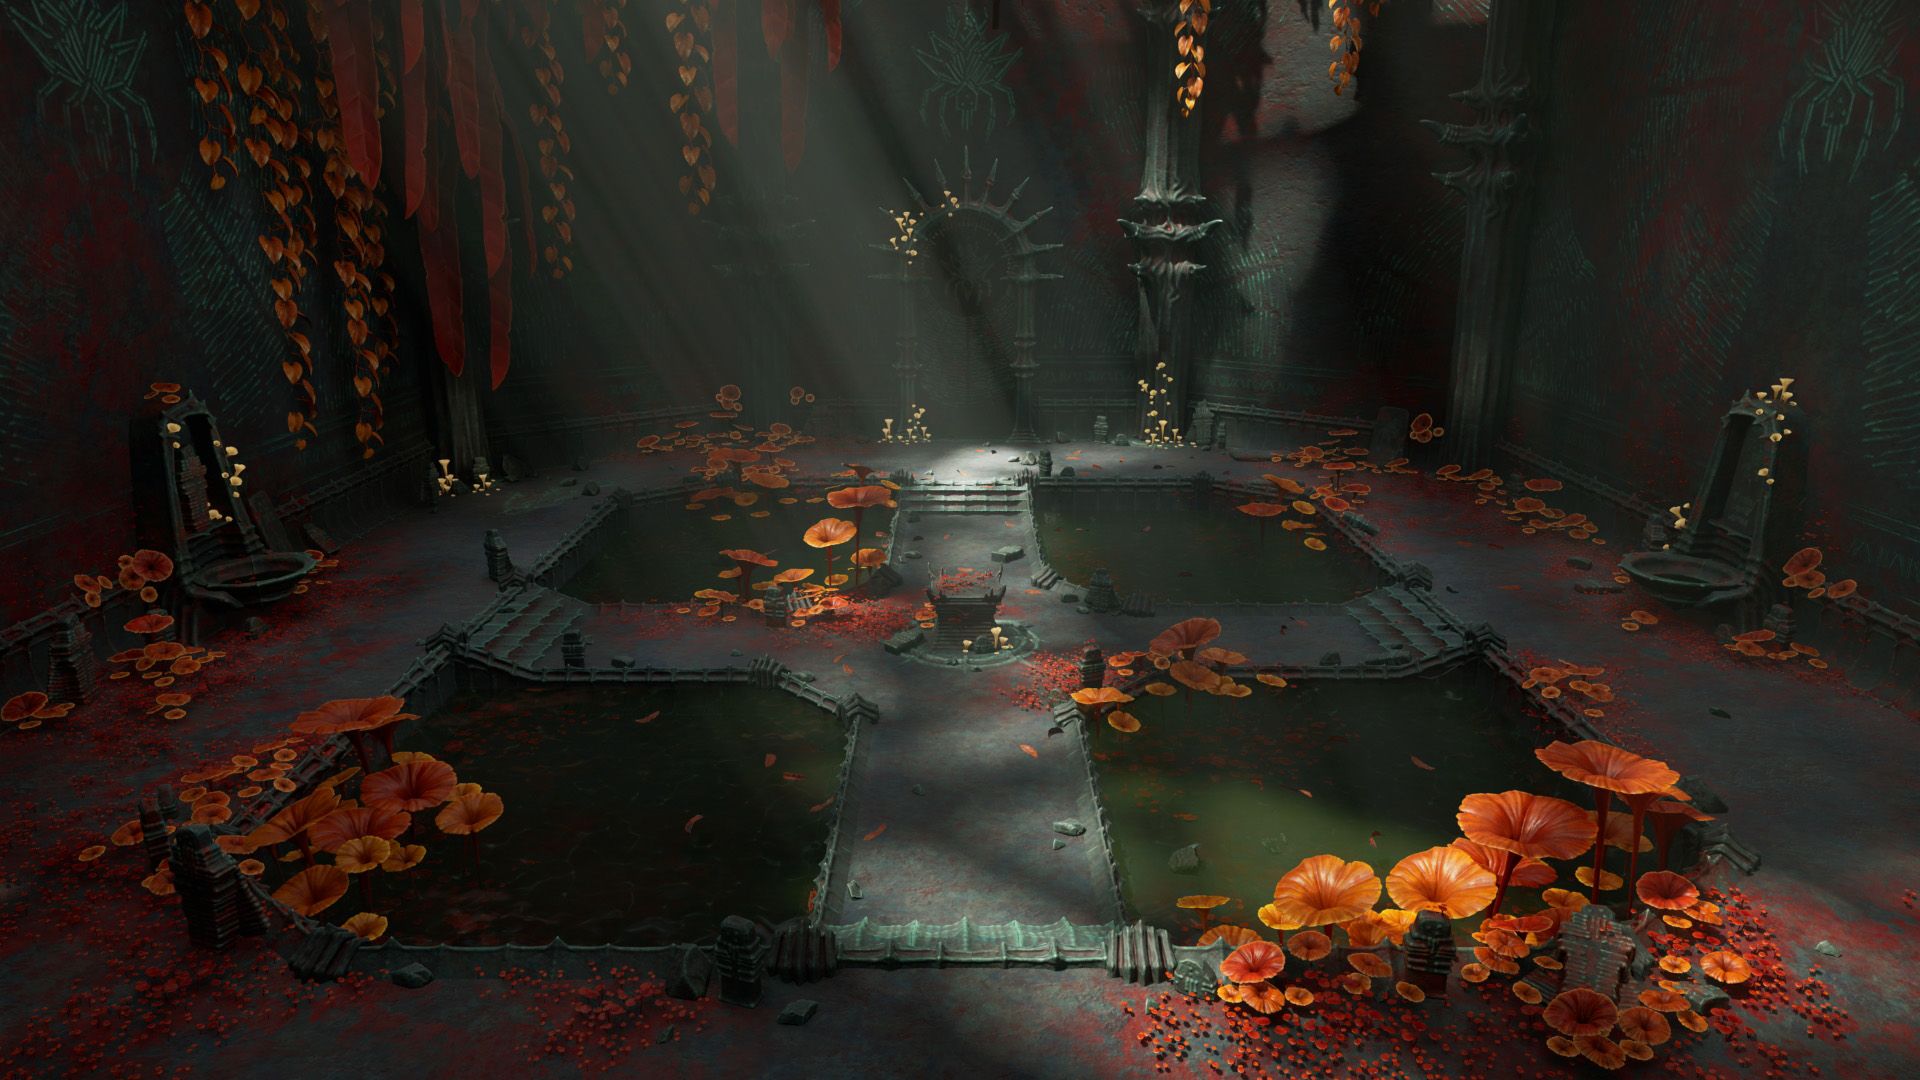
I imagined a large room with lush vegetation and pools of water, a scene in which I could focus on atmosphere and lighting.
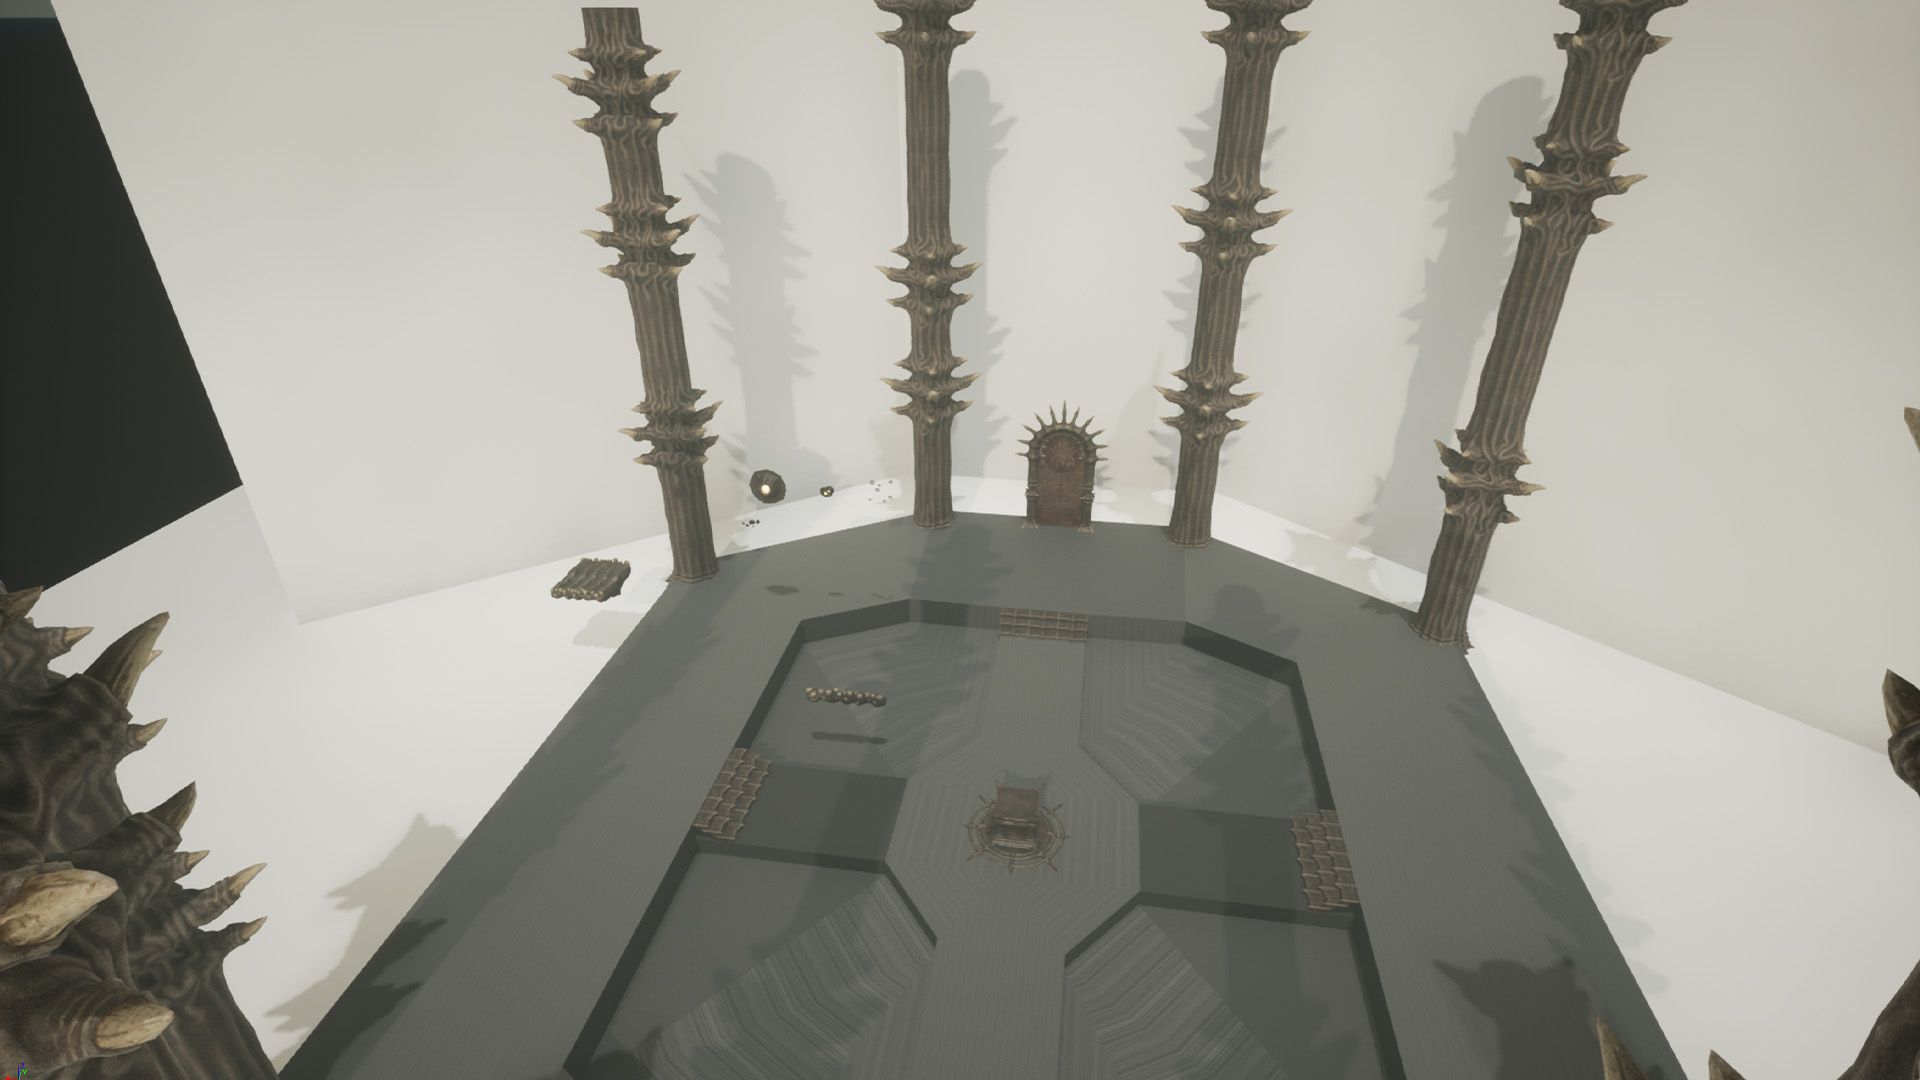
I started by making a blockout in Unreal using the meshes I already had modeled which are the pillars, door, stairs and the small altar. I wanted to create a vertical room with glass windows to have some sunlight inside the room. I imagined this environment could be a boss room or a place with narrative purpose if it was in a video game.
I used a screenshot of the Unreal scene to draw a concept on Photoshop, focusing on the mood and scale of the room. The environment would be an old temple built by a religious group on an alien planet. The aliens would be insectoids and protect a giant nest inside the temple. But at some point they left, leaving the place to deteriorate. As you can see on the concept my first idea was to have smaller eggs in the pools and some hanging from the ceiling.
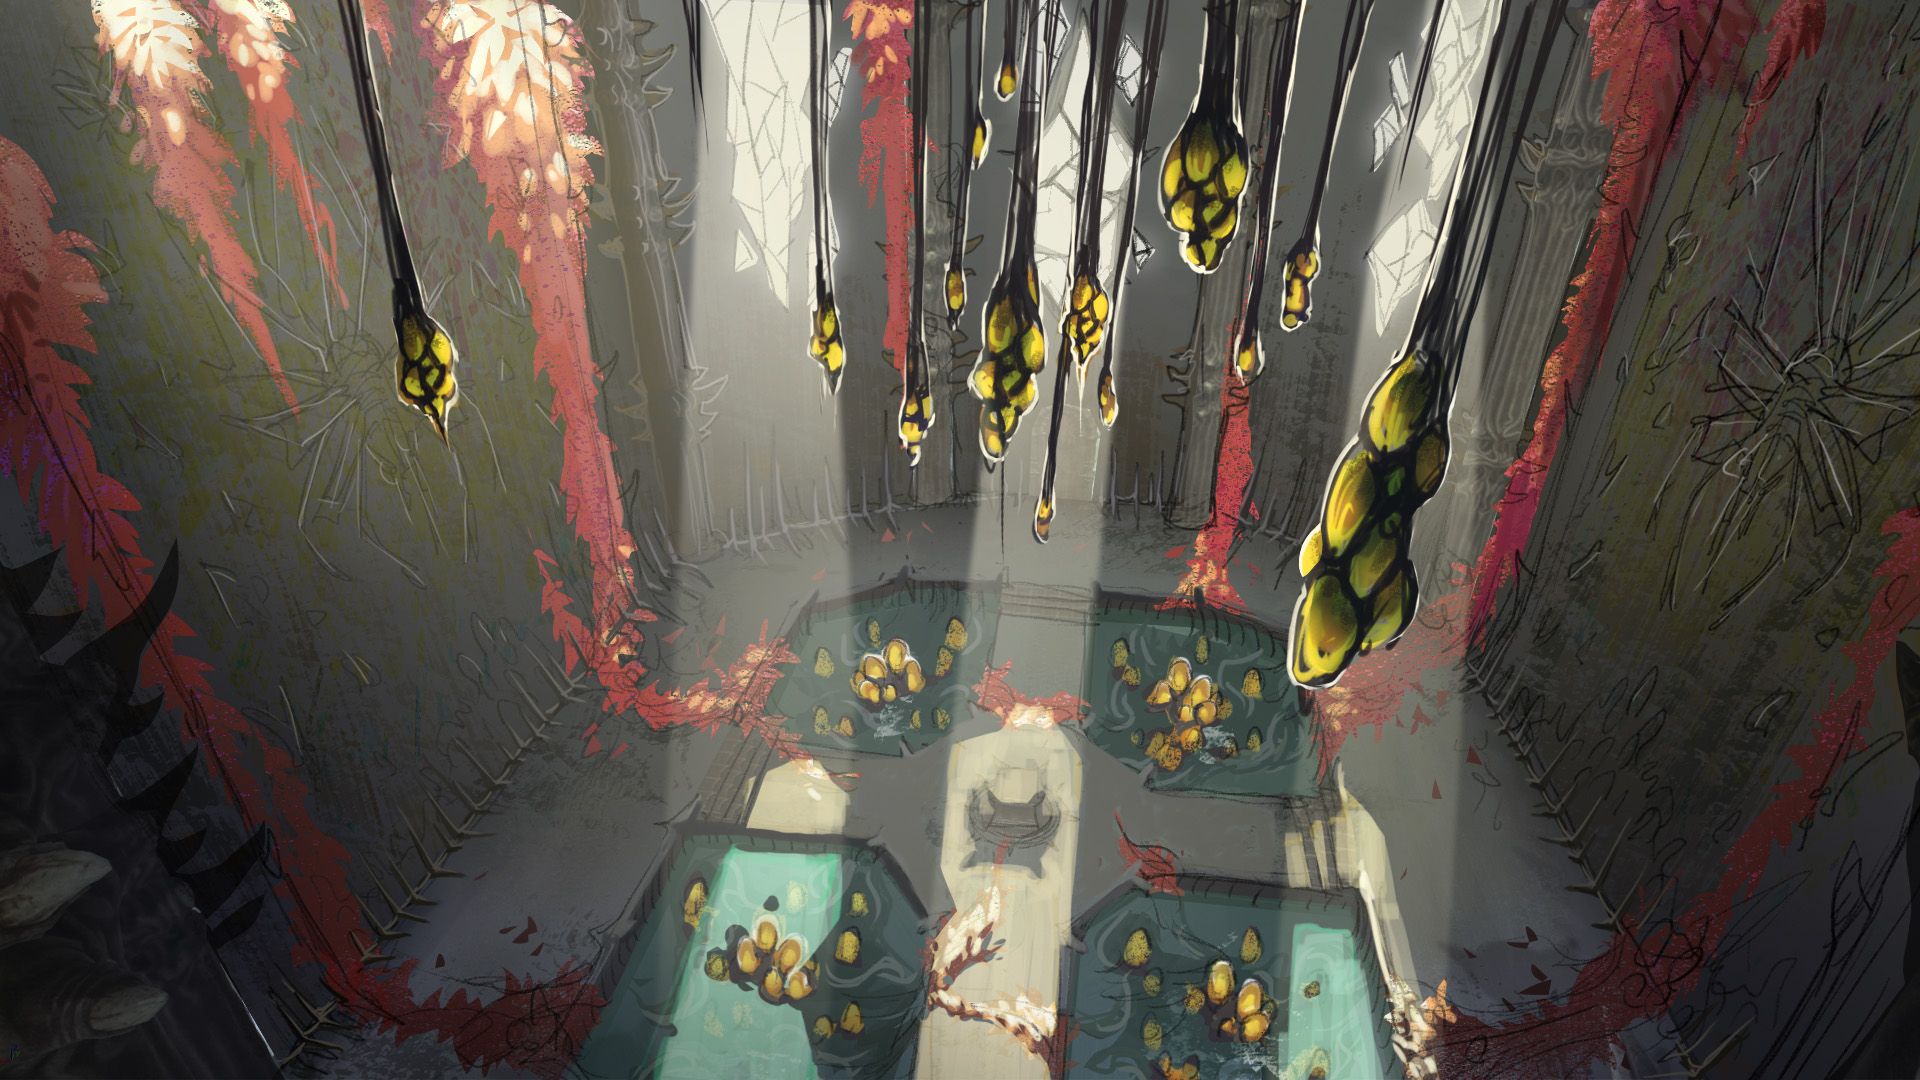
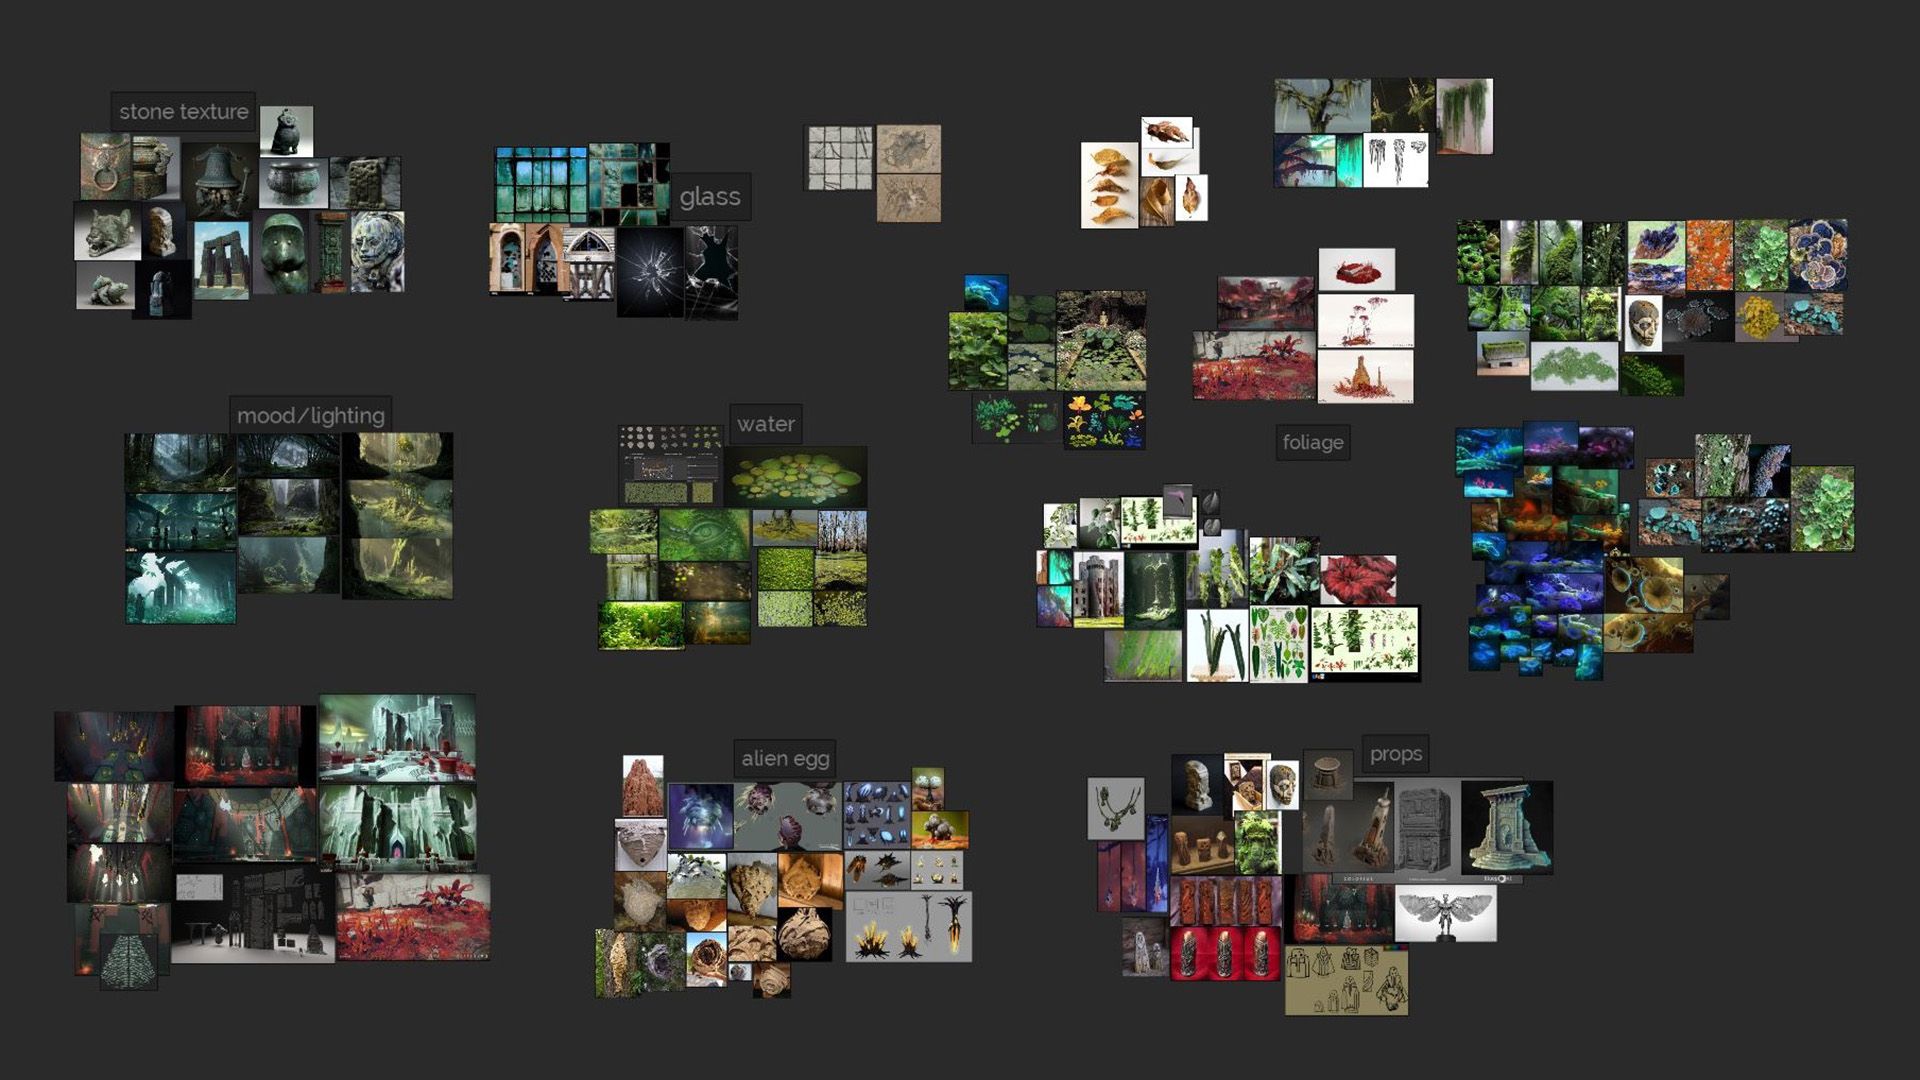
My main references were some of Destiny 2’s environments, especially the Witch Queen DLC’s environments and the red foliage in some levels of the game. Other references for the stone meshes were Giger’s work, Diablo 4 and Diablo Immortal.
I like to gather a good number of references for each part of my project in PureRef. I often add more pictures during the process as I add more ideas and details. I think flexibility is important when it comes to making bigger projects. The final result is never the same as what I have in mind during the first steps of the process and I think making changes is sometimes necessary.
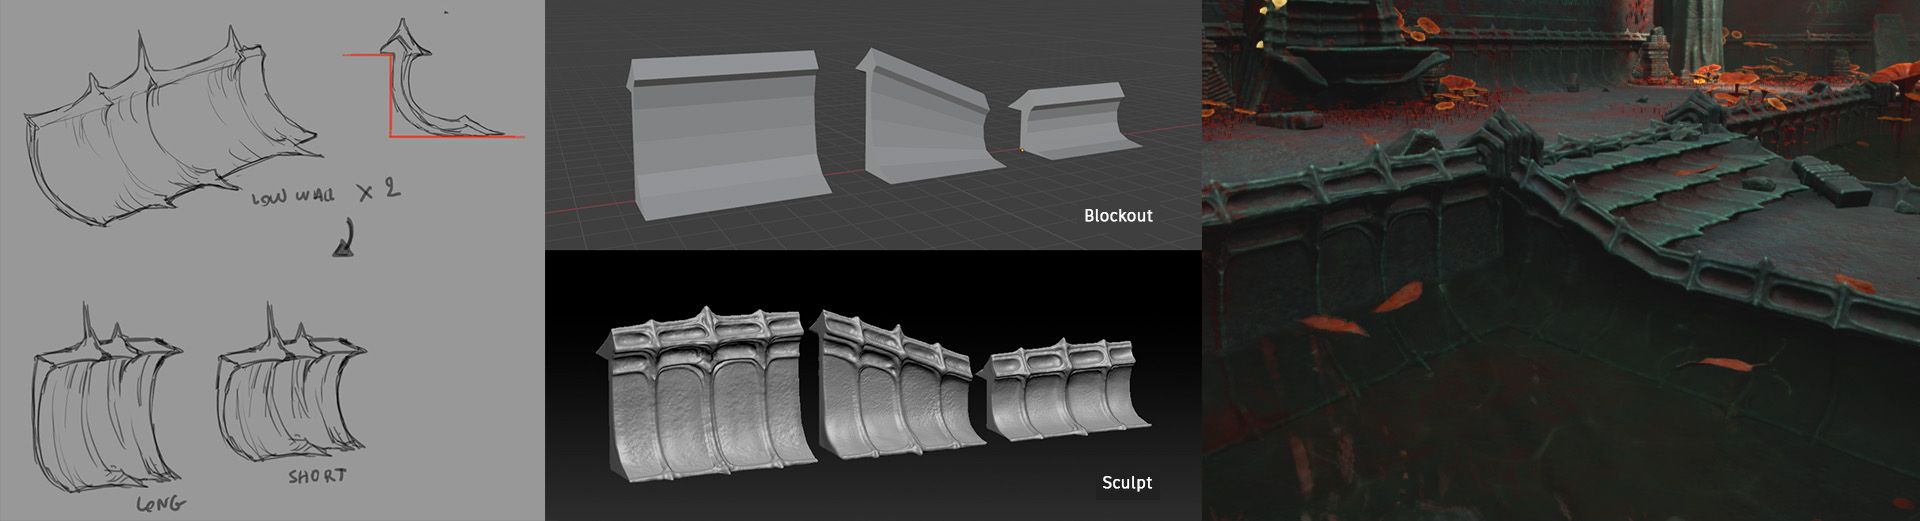
I started my 3D work by making a simple blockout of the scene in Blender to keep a sense of scale and composition. This way I could create kits, blockouts and test different shapes and prop placements.
I like to model a blockout for almost every mesh I sculpt in ZBrush as I find this workflow quicker and easier. I also like to draw quick sketches for some of the assets, especially the modular pieces as it helps me visualise where and how the meshes will connect. My goal is to make kits that don’t look like it’s just the same object duplicated multiple times and more like an organic structure that makes sense.
Because this environment is basically a large room, I wanted to have objects of different sizes, including small and large plants, two altars against the walls, small idols and rocks. I tried to develop the alien architectural style with bony and spiky volumes, engraved symbols and representations of insects.
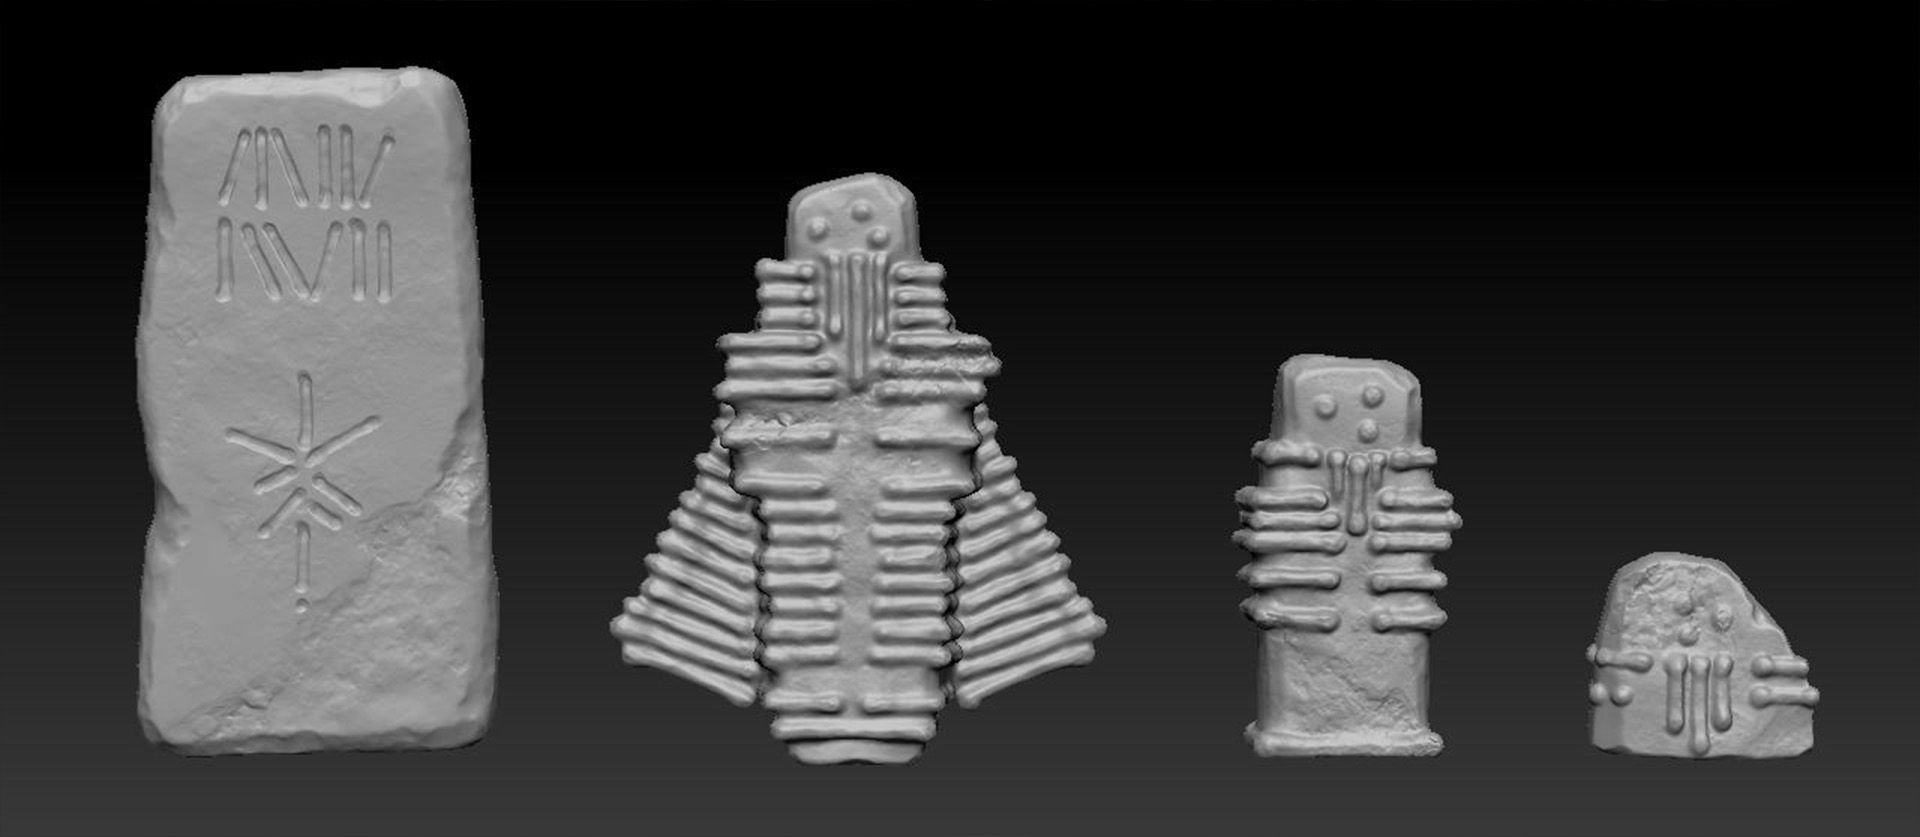
In ZBrush, I usually start by dividing my blockout and enabling Dynamesh to sculpt the general structure. After that, I remesh the subtool and add more divisions as I sculpt details.
I always use the basic brushes of ZBrush like Clay, DamStandard and TrimDynamic but here I used some free alphas from Artstation Market for the rock details. Sculpting is the part of the process I spend the most time on as I prefer to make all the surface details in the sculpt rather than in the texture. I feel like it adds a more organic and realistic look to the surfaces.
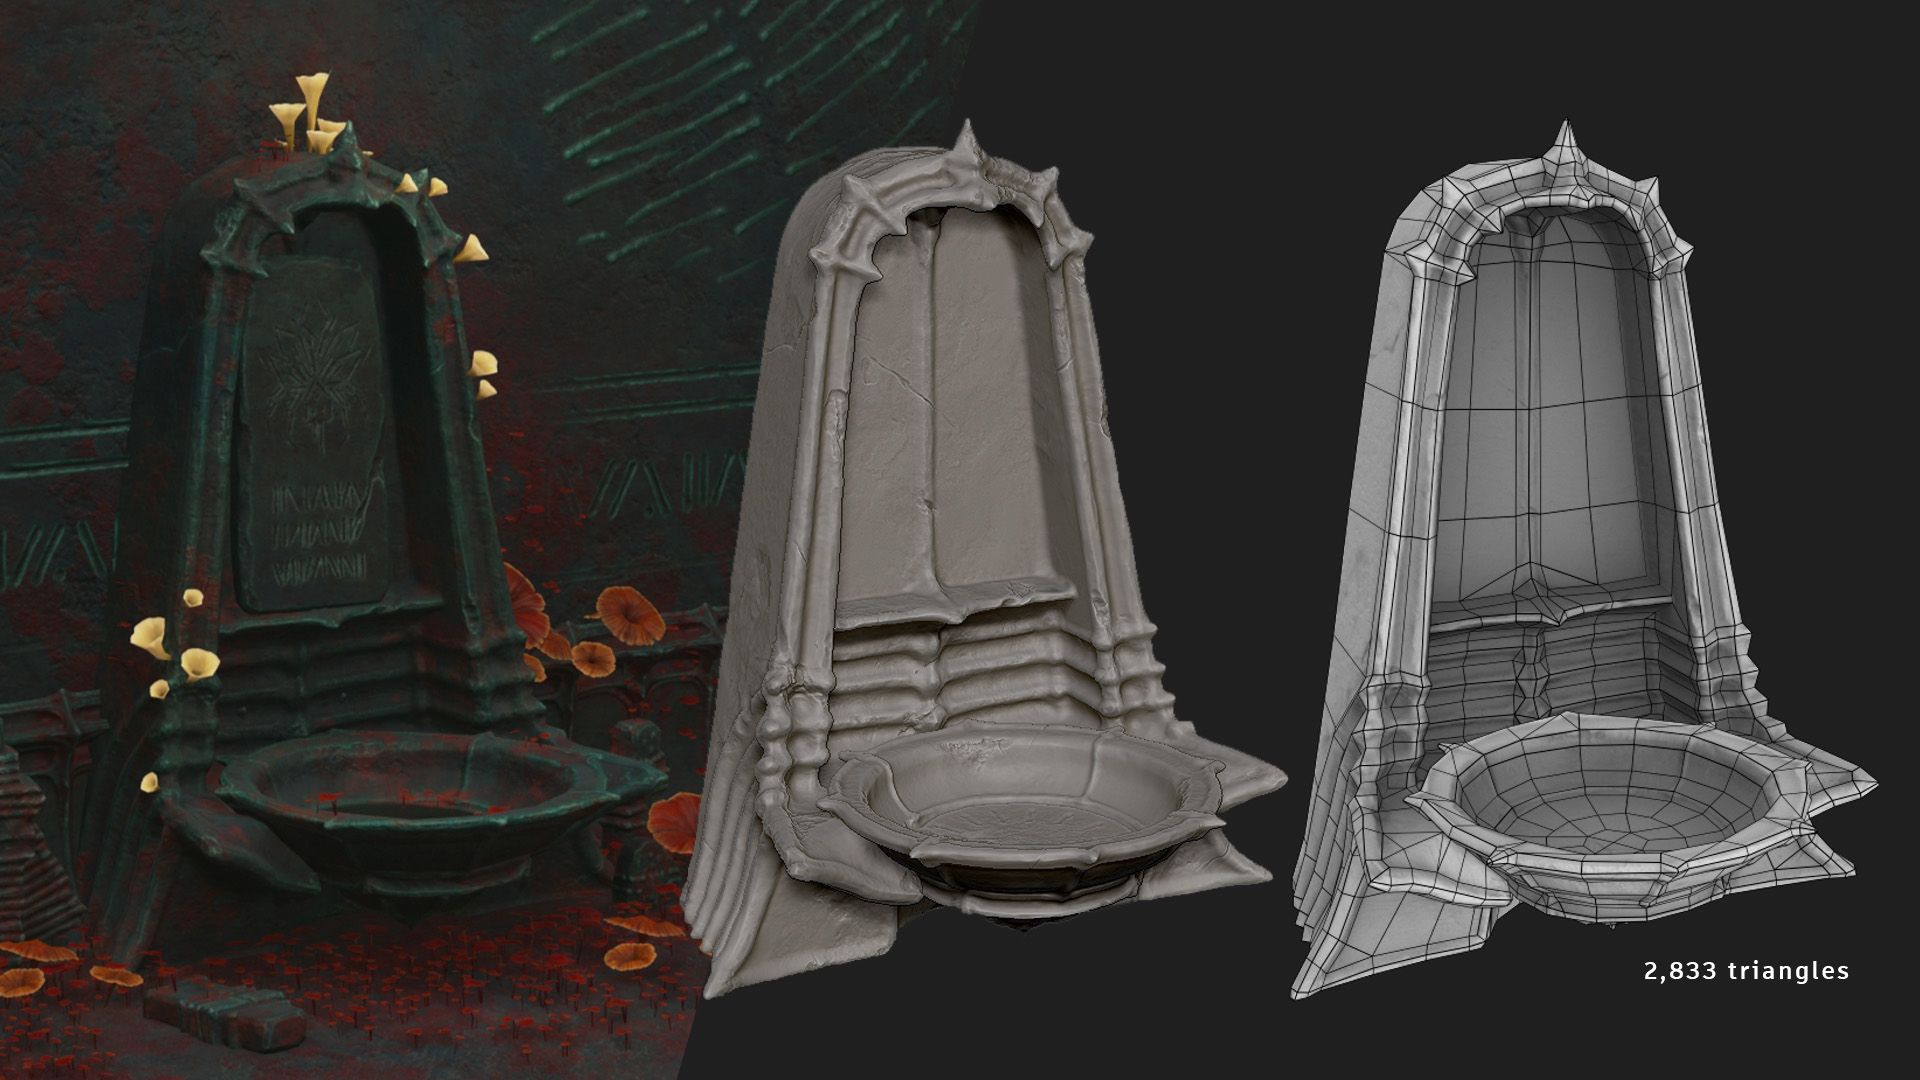
Once I finished sculpting the assets I did the retopology and UVs in Blender. I used the F2 add-on to speed up the retopology process and the TexTool and UVPacker add-ons for unwrapping and packing the UVs.
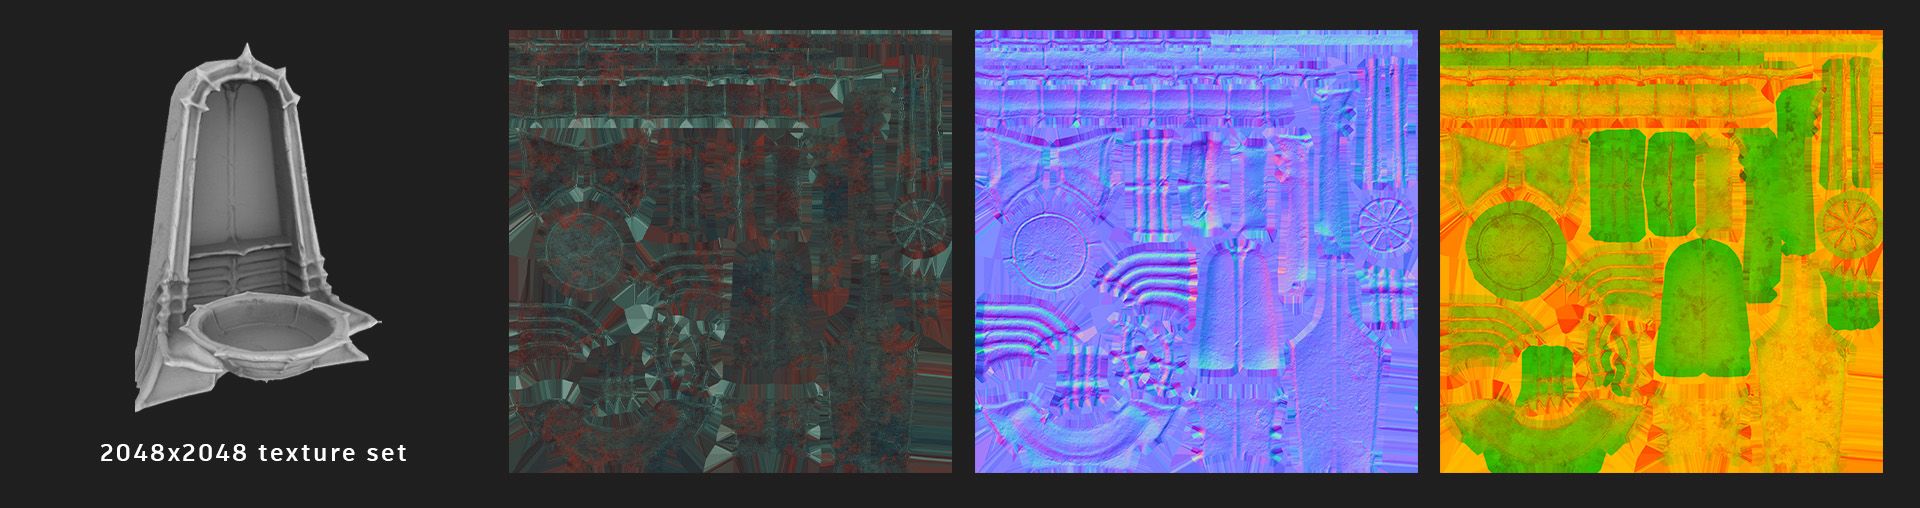
I am using a PBR texturing workflow for this project as I am aiming for a semi realistic look.
One of the first things I did is re-texturing my first assets in order to find the colour palette I wanted for this environment. These meshes compose the entire architecture of the room so their colour and texture are the ones we see the most in the scene.
It took me some time to figure out the colour palette of the environment but I ended up choosing a gray-turquoise stone and orange-red vegetation to create a strong contrast. I wanted to avoid a basic green shade for the plants so I chose a mix of orange and red shades to represent the alien planet.
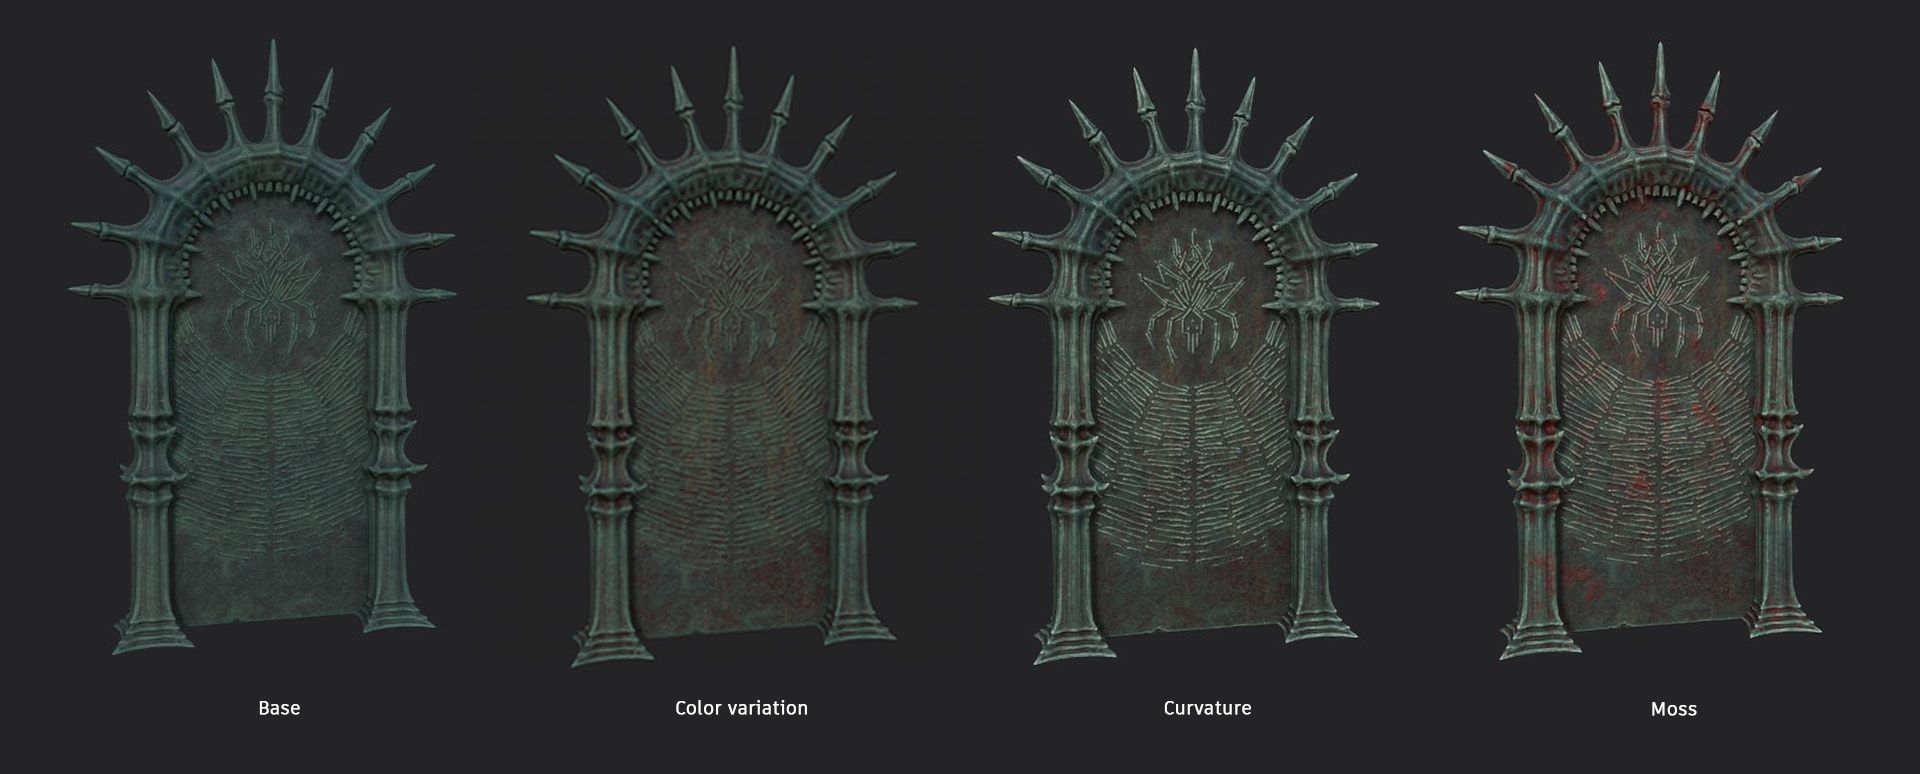
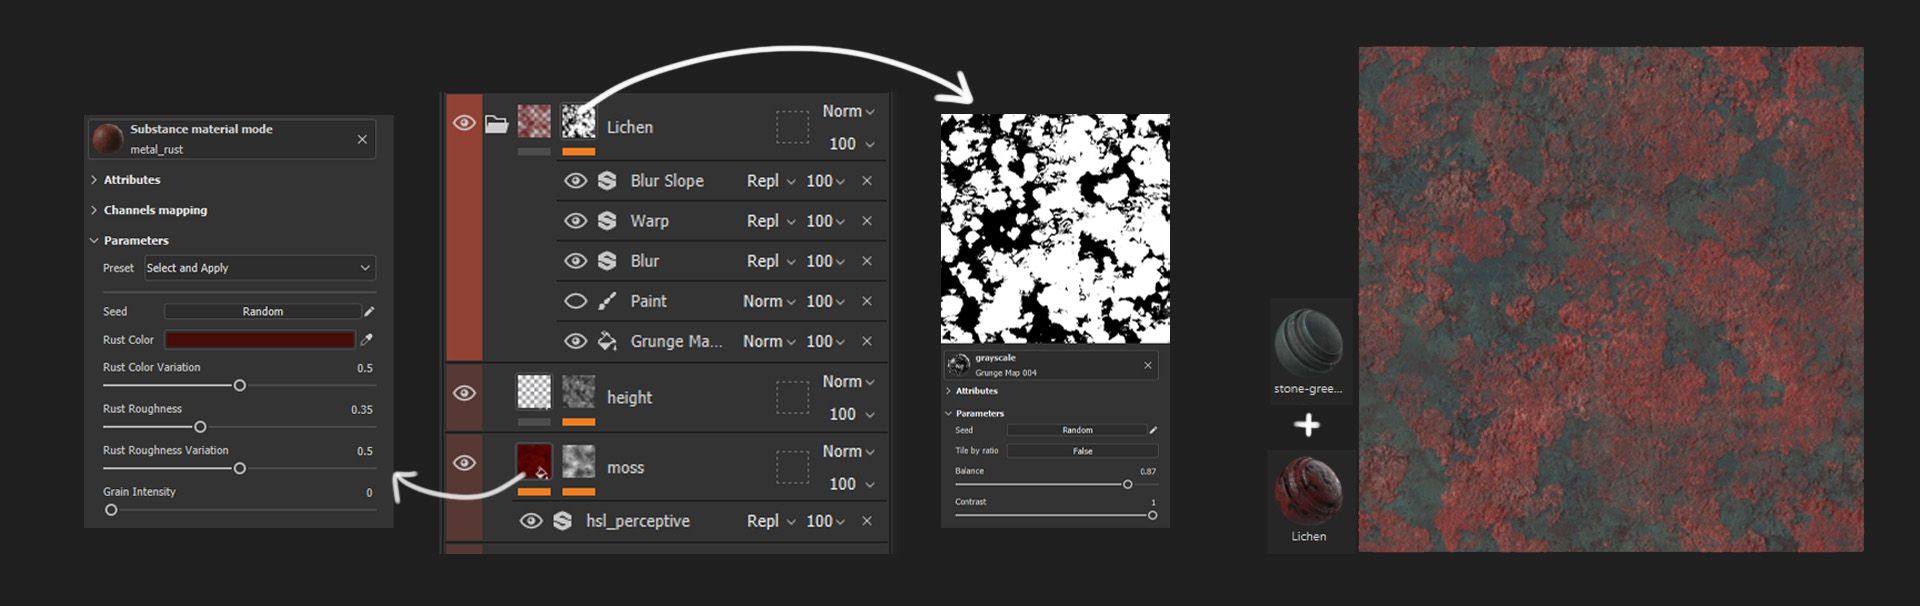
I added a strong colour variation to my stone material to show the passage of time. I also added moss to show that the temple has been covered by nature, and to make those assets fit more with the rest of the scene. Once I textured the first stone asset, I created a smart material in Substance 3D Painter and applied it onto all the other stone objects to speed up my process. I also created a smart material of the red moss and used it to make the generic stone materials of the floor and walls. The “moss” is more like some sort of lichen, it grows in patches on the floor and walls of the room.
This environment was the opportunity for me to create game ready foliage, something I only did once before. I made different plant types, large and small, climber plants and mushrooms-like plants. During the process of making this scene I thought about making aquatic plants like water lilies but as I already placed some plants in the pools of water I figured I should not add much more foliage there. That is why I made small leaves floating on the water surface instead of bigger aquatic plants.
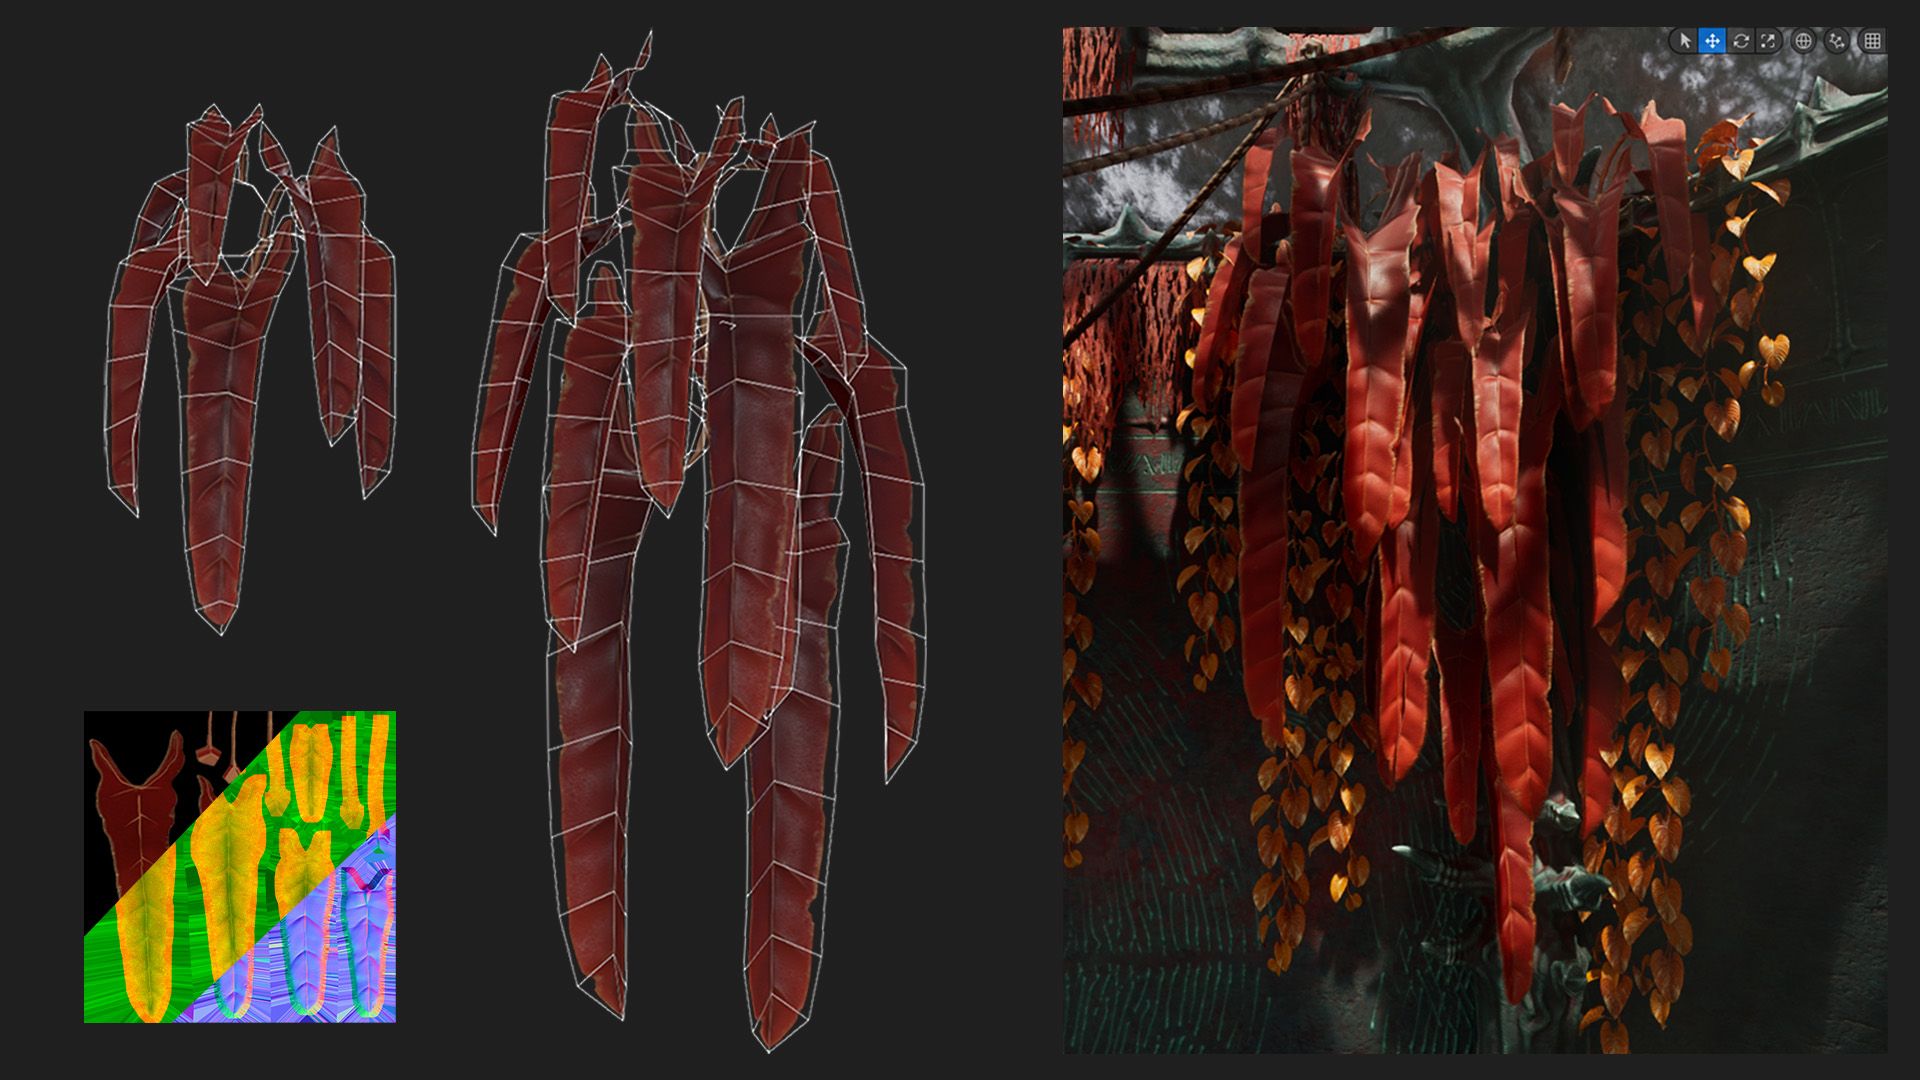
To create the foliage I modeled and sculpted between 4 and 6 separate leaves for each plant type then created a low poly for those leaves. After that, I textured the leaves in Substance 3D Painter and I assembled the low poly leaves in Blender to create different plant clusters. These clusters are the final assets I placed in Unreal Engine.
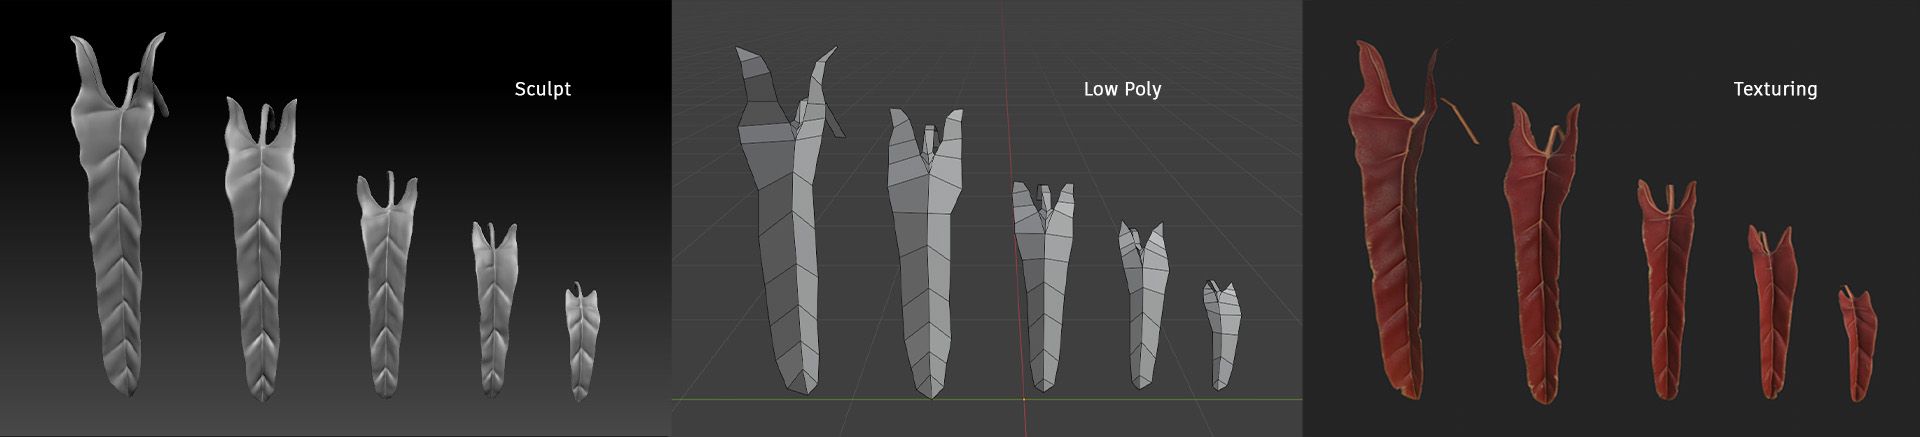
I really enjoy the workflow for making foliage because you are able to create many assets using the same few leaves by placing them and rotating them differently each time. The difficult part was creating a realistic looking texture for each plant, especially getting the roughness right.
I wanted to create a realistic water shader with reflections for a long time and this project was the opportunity for me to finally learn shader creation in Unreal Engine 5 and learn how to work with nodes basically.
My shader is mostly the same as the one Stef Velzeboer showcases in the ArtStation course "Water Shader Creation in UE5" for the Environment Production series. This shader also has caustics and edge ripples. It took me some time to build every part of the shader and to achieve a realistic effect by tweaking the colours and opacity. At first, I wanted to add vertex paint to the shader to paint duckweed on the water surface but I ended up making floating leaves instead.

Making the scene feel alive was also one of my goals and I figured out creating a wind shader is a quick and easy way to overcome this challenge. I wanted something very subtle as not much wind can enter the room.
Unreal Engine already has a built-in node to create a simple wind shader for grass but I ended up doing something a bit more complex. I used the RotateAroundAxis node plugged in the World Position Offset channel to make the mesh slightly bend around its pivot point. I added a Material Parameter Collection to easily change the wind direction and intensity and to adapt the wind effect to each of my plants.
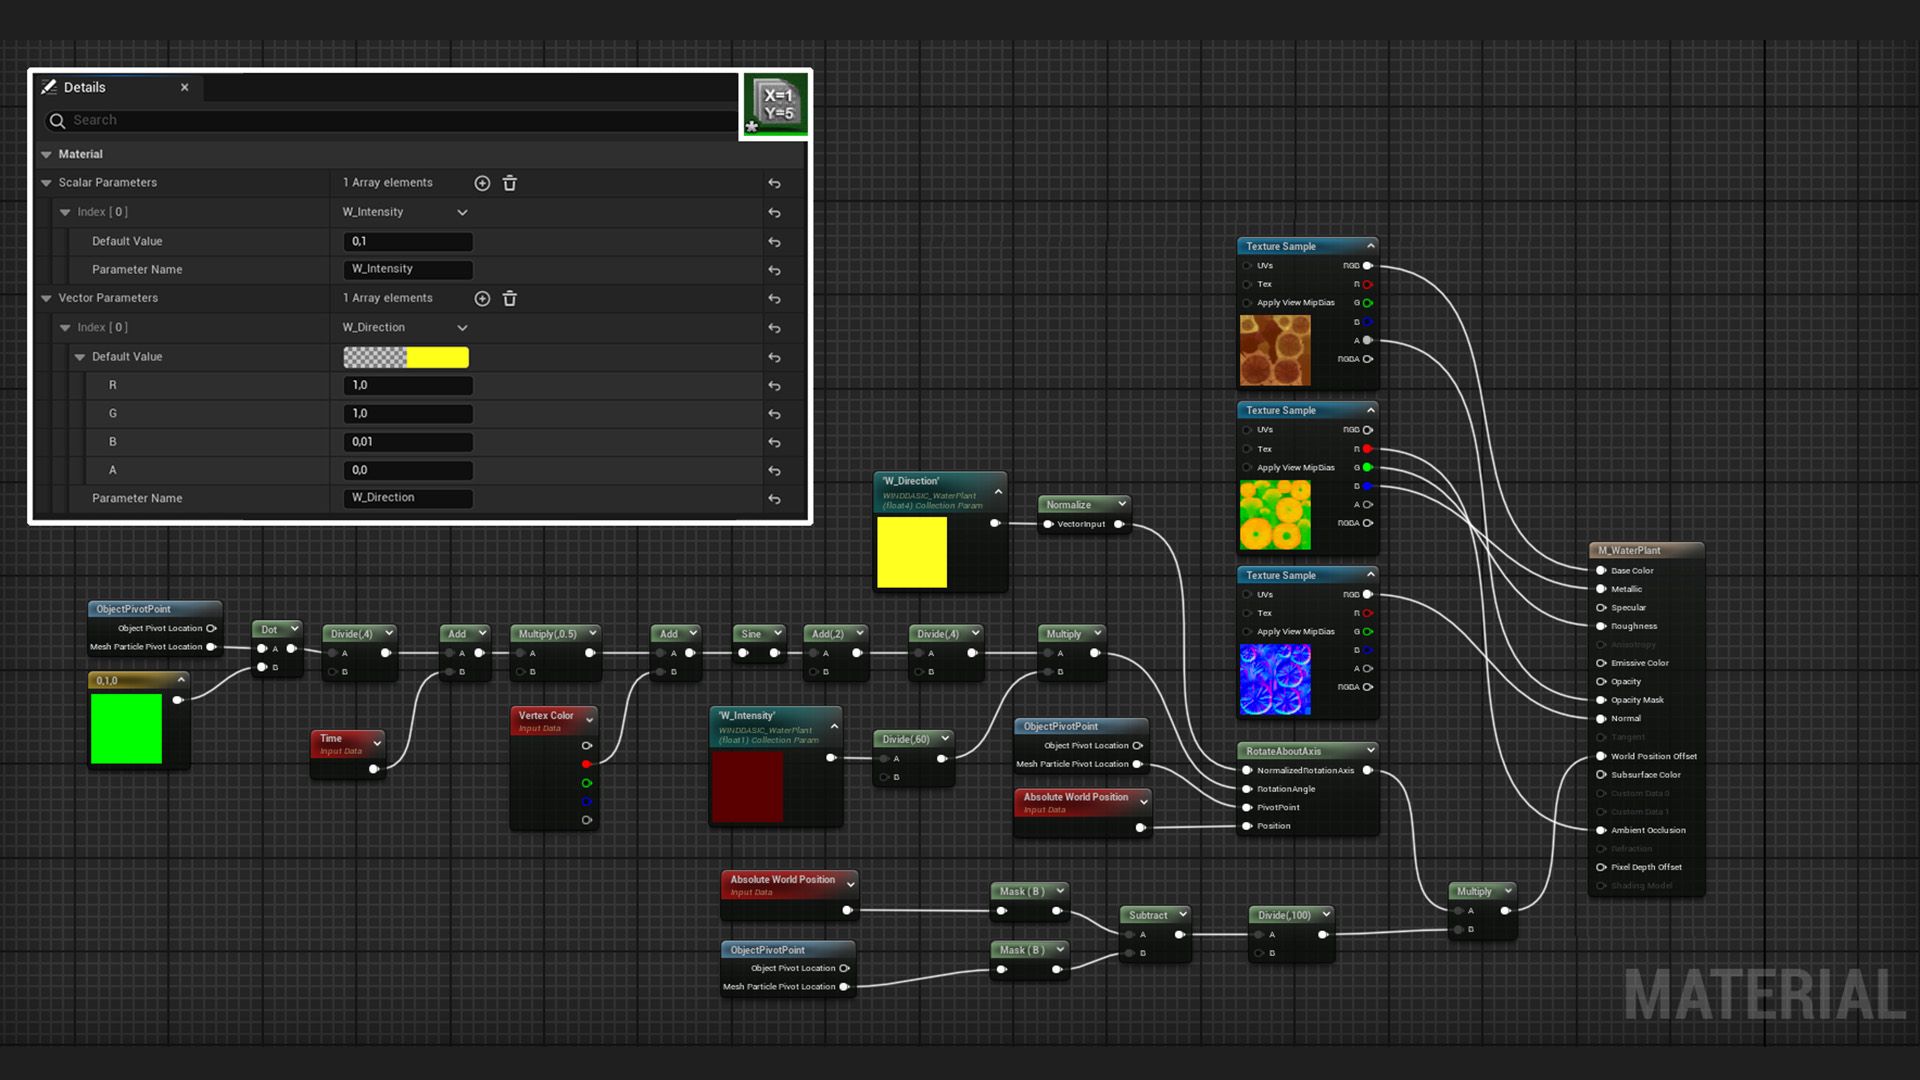
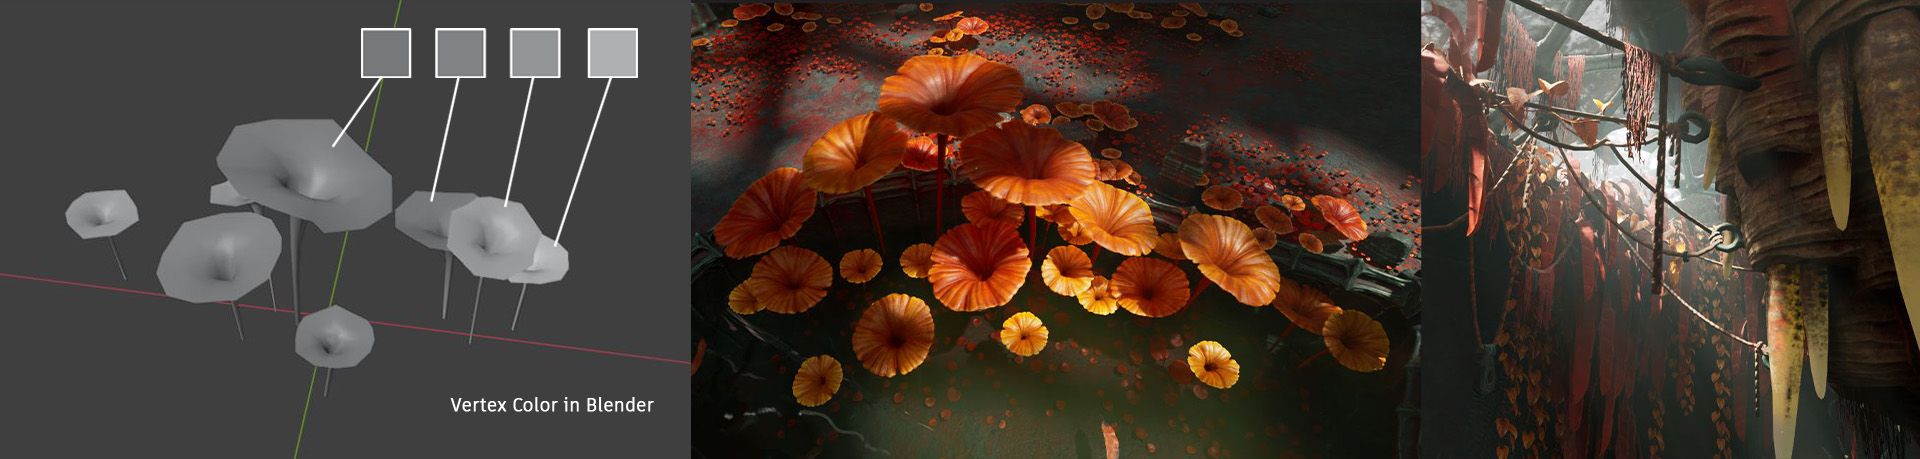
To make the wind effect more realistic, I added vertex colour to each leaf of my clusters in Blender: the darker the mesh is, the more it will bend. This way, each leaf moves at its own rhythm and at a different intensity. I used the same technique for the hanging ropes.
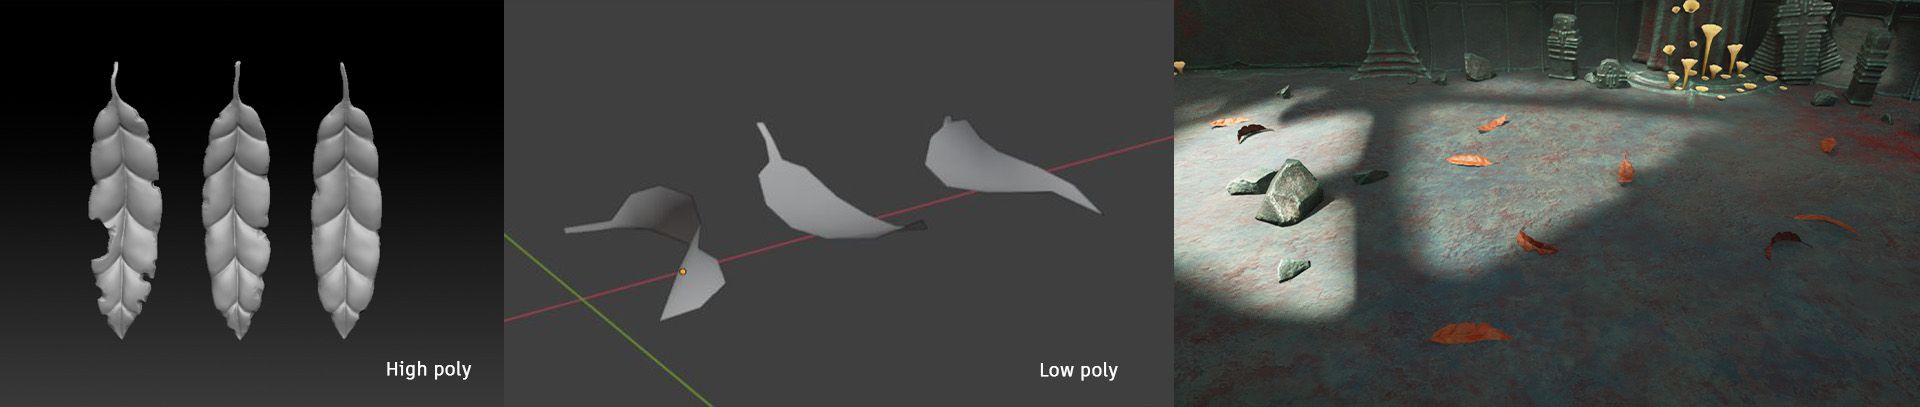
I thought it would look cool if I could have dead leaves fall in the room from the broken glass window. I created a very simple particle emitter in Niagara with wind and gravity force for a realistic look. I didn’t want to have leaves constantly falling so it is more of a subtle detail in the scene.
To create the meshes I sculpted three different leaves, made a low poly for each of them then textured them in Substance 3D Painter. After that I bent the low polys in different ways so each of them looked unique. It is basically the same workflow I used for the rest of the foliage.
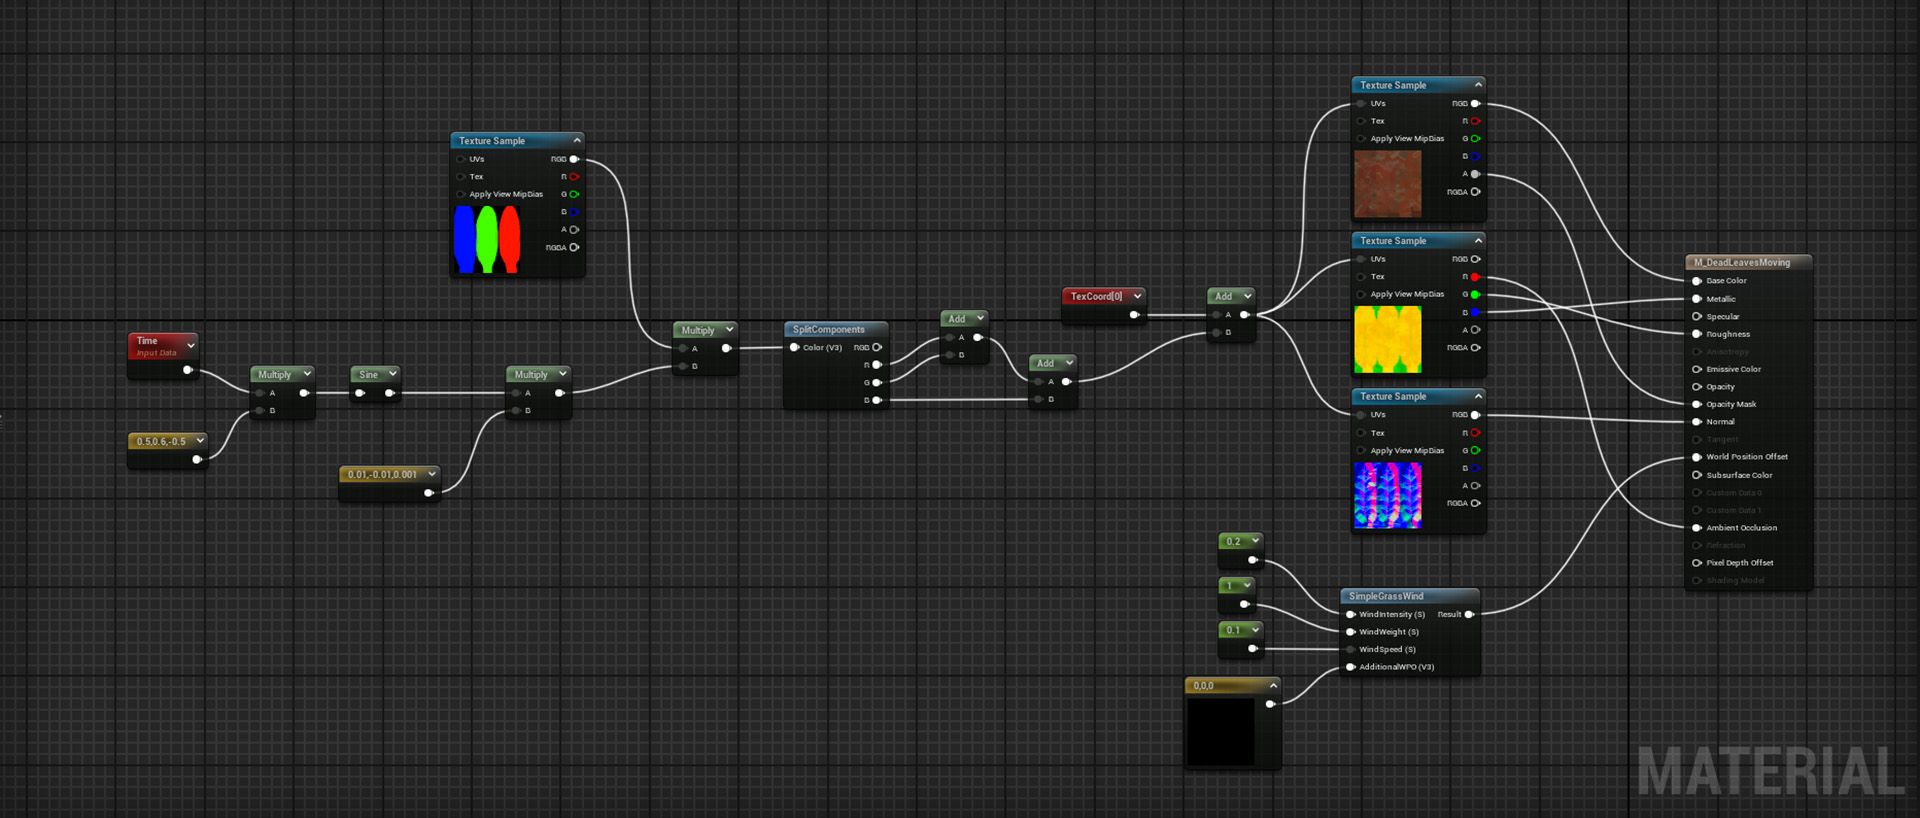
Leaves falling inside the room also means floating leaves on the water surface. This shader is simpler than the previous one: I plugged the SimpleGrassWind node in the WorldPositionOffset channel and made an ID map so each of my leaves can move in a different direction and not at the same time.
I like to have some flexibility in my process and being able to test things out until I find what looks best. To have this flexibility I like to use some optimisation techniques like decals, trim sheets and vertex paint.
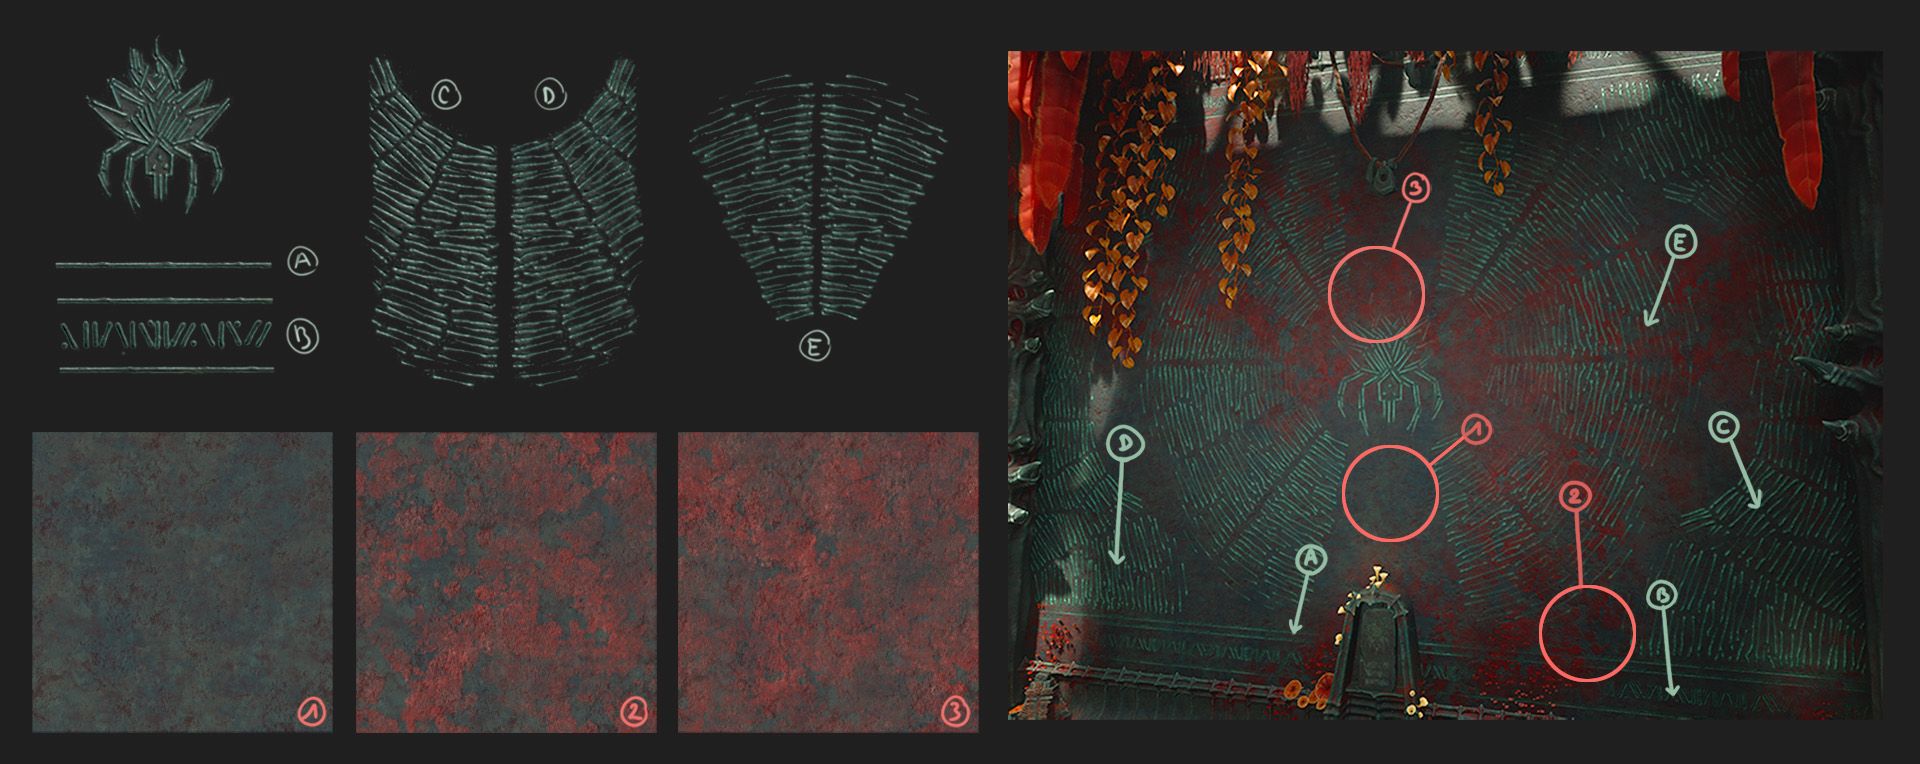
I often make decals because it is an easy way to add details on top of generic materials. I used this technique for the engravings on the walls by sculpting the patterns on a plane then making an opacity map to hide the background. I was able to create different shapes on the walls with only a few decals.
Another technique I like to use is vertex paint. For this scene I created a basic stone material and two variations : the same stone lightly covered with red moss and another heavily covered.
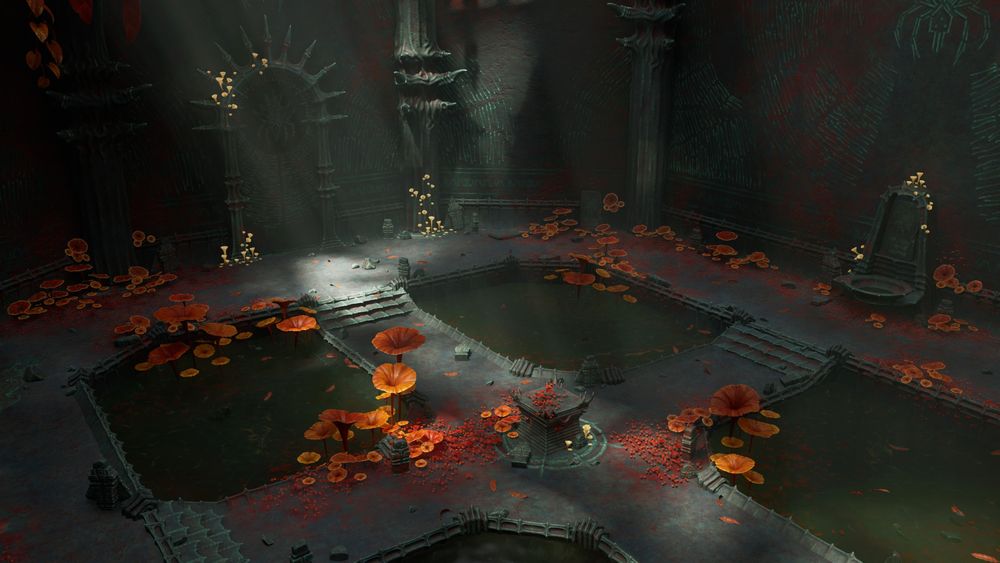
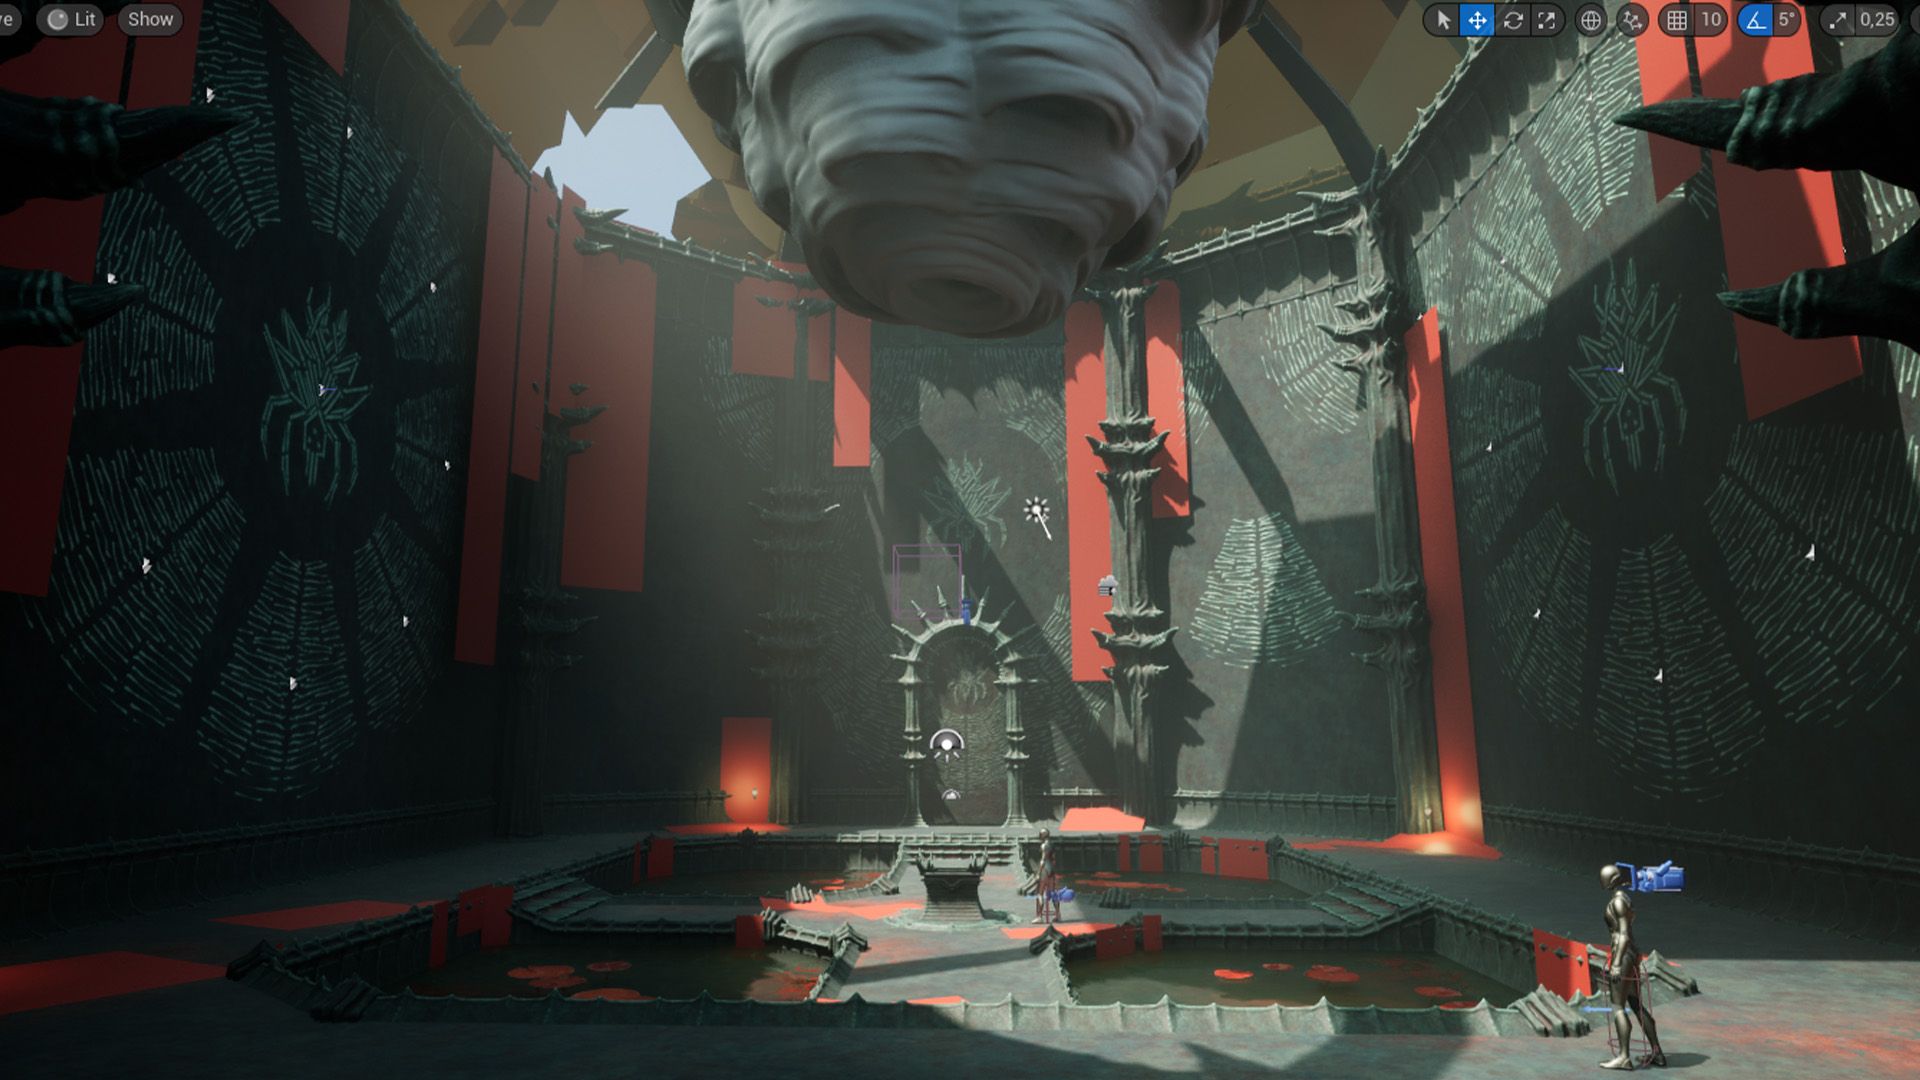
At first, my foliage placement was too homogeneous and the scene composition was a bit boring as you can see on the third picture below. After some feedback I changed the foliage placement to create a better flow and to enhance the composition.
It took me some time to build this environment, figure out the lighting and mood of the scene. I used an HDRI from hdri-haven to add a subtle warm tone to the light and fog as I had a more cold atmosphere at first and it didn’t fit the mood I wanted for this scene.


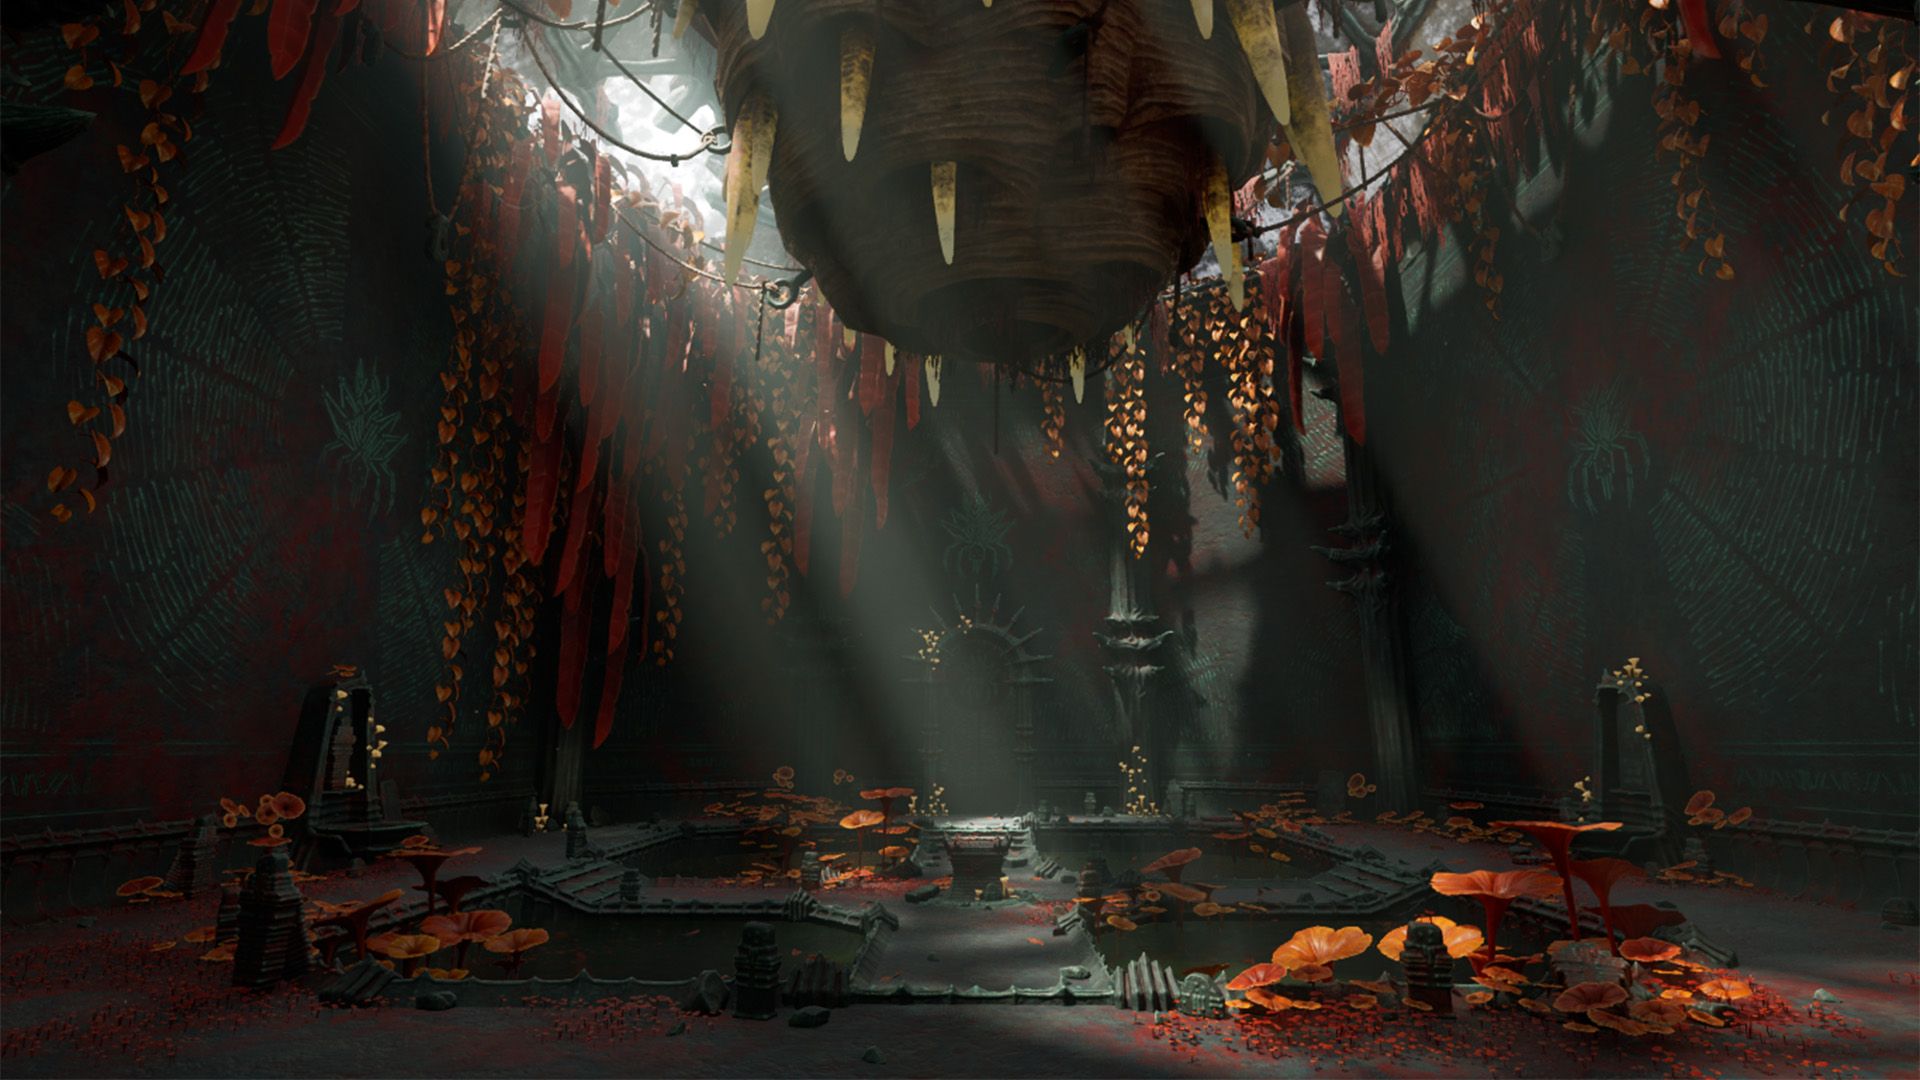
With this project I learned that environment creation requires a lot of planning and flexibility, various skills and a good understanding of the engine we work with. From the modular kit modeling to the asset placement, I had to test and change things the entire time. It was also the opportunity for me to improve my workflow and some of my skills like sculpting and texturing. I learned a lot about shader and VFX creation as well as working in Unreal Engine 5.
The level art part was a real challenge for me as I like doing it, but I don’t feel very confident in composition and lighting. However, as I tried different things and applied feedback, I ended up with something I really like.
I am very thankful to have been given the opportunity to share some insight into my process and I hope this article can help some fellow artists. If you have any questions or feedback, don’t hesitate to contact me via my Rookies Profile. Thank you for reading.