Developing Game-Ready Assets: A Workflow
Michael Jones, a 2nd-year prop and environment student at Staffordshire University explores his workflow for game-ready assets.
Michael Jones, a 2nd-year prop and environment student at Staffordshire University explores his workflow for game-ready assets.

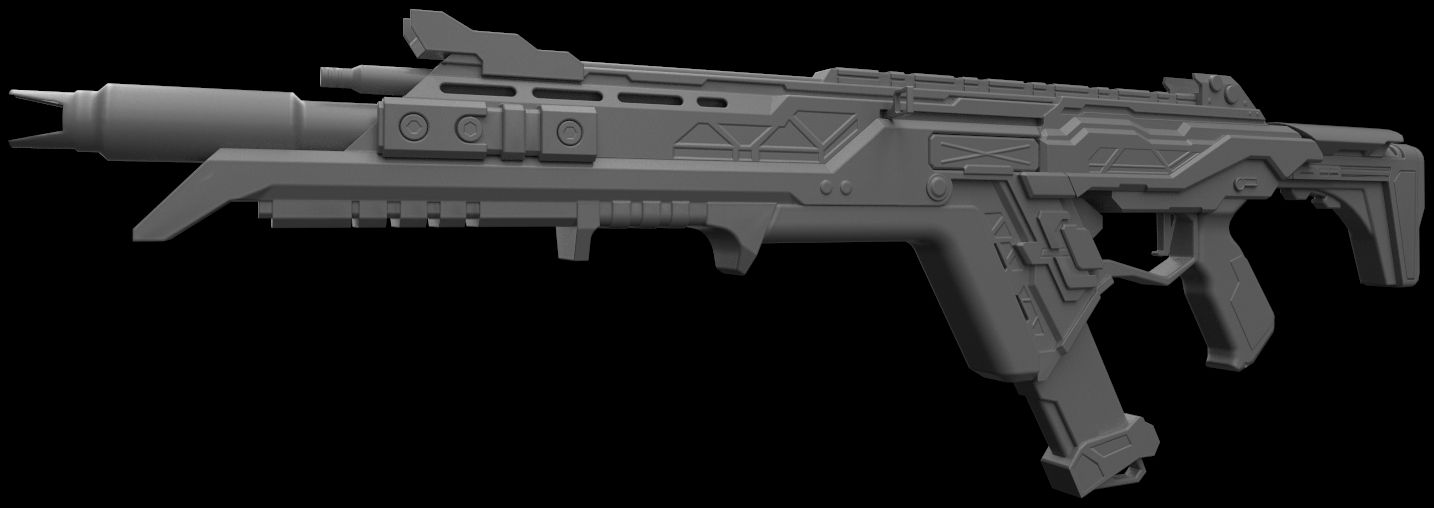
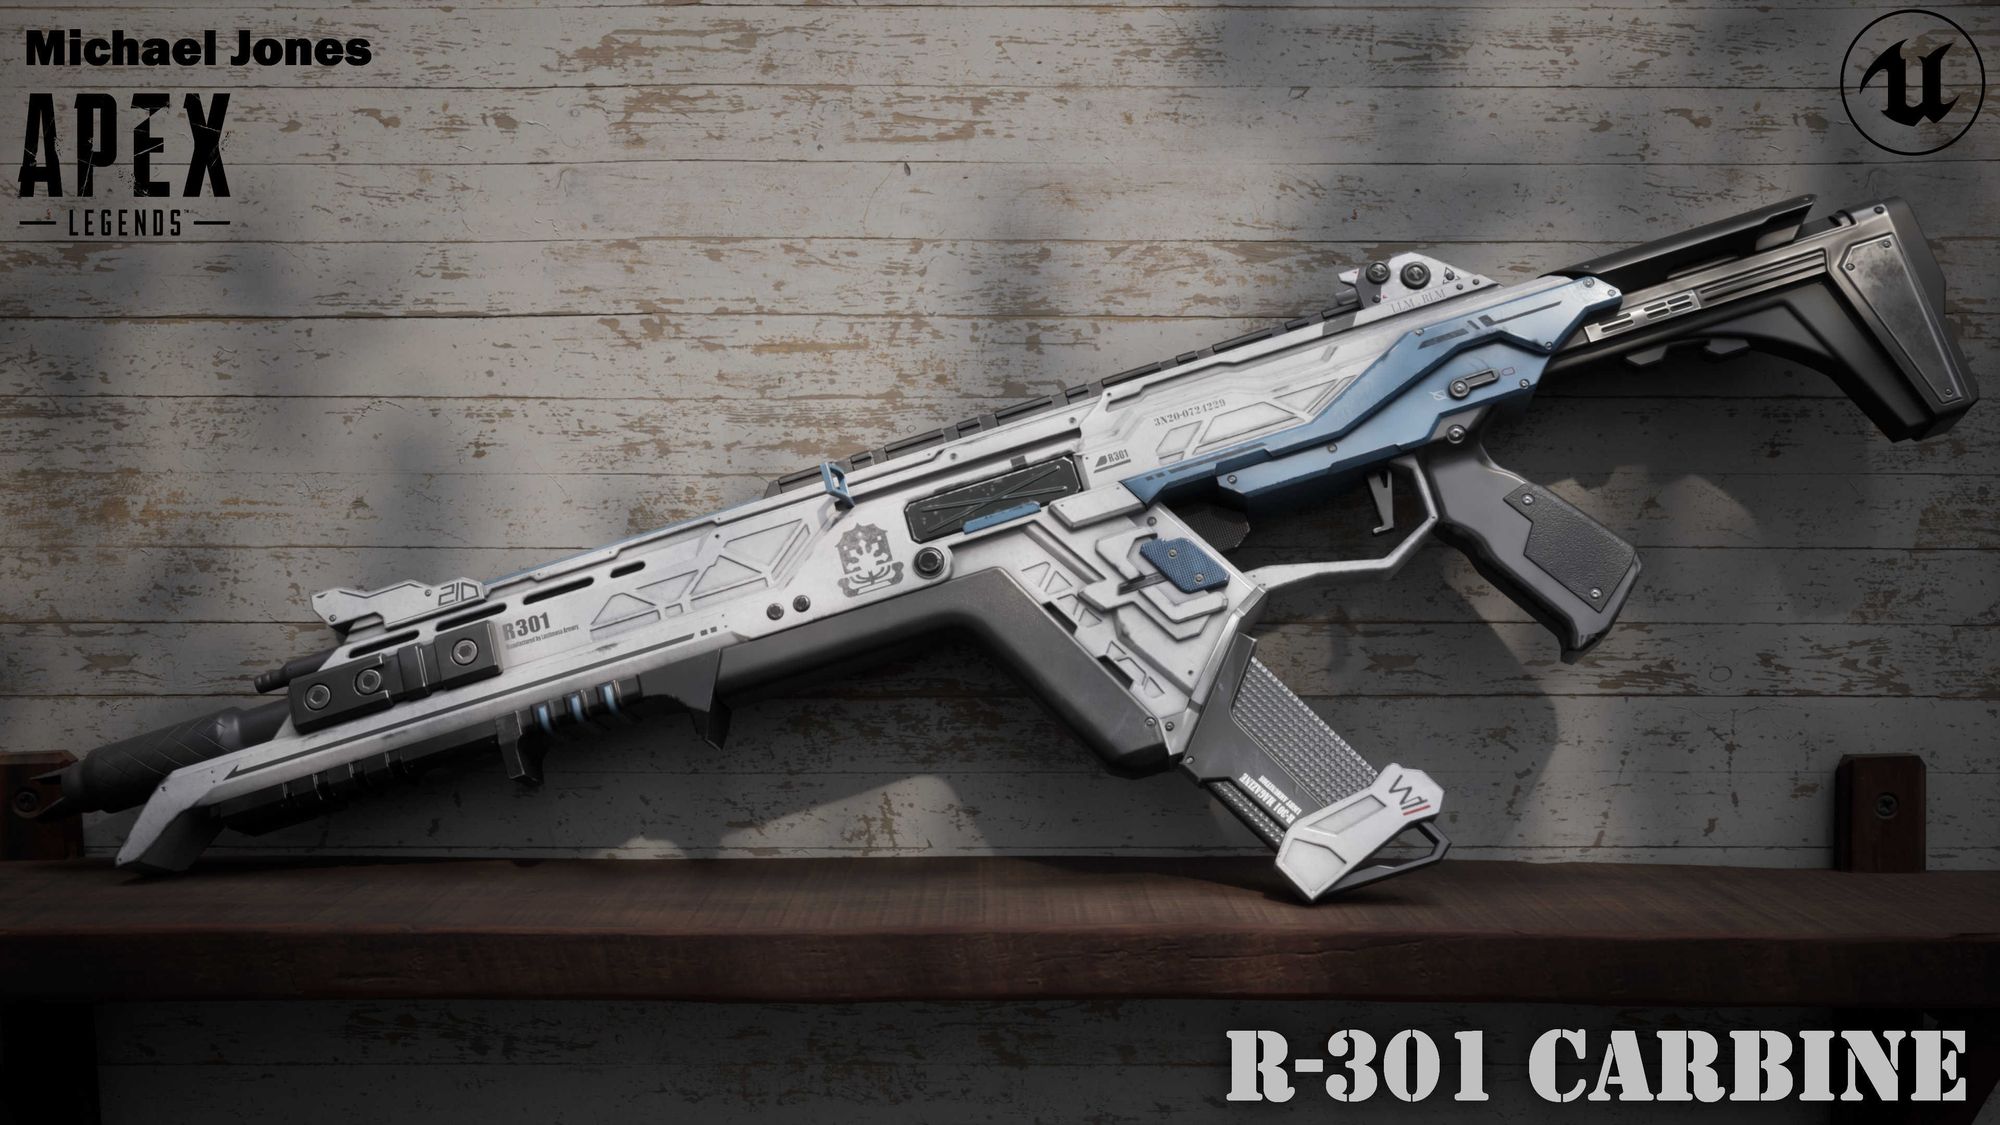
Introducing Michael Jones, a dedicated 2nd-year prop and environment student at Staffordshire University. In this article, shares insight into his learnings during a asset creation module at school. For one of his latest projects he focused on recreating the iconic R-301 from the renowned game, Apex Legends. Learn more about his general workflow and techniques for making game-ready assets.
Starting out with the most important step of any project: collecting various reference images and breaking them down through paint overs.
By breaking down my weapon into basic shapes and forms, I quickly developed a base blockout scaled appropriately for further detailing. Gathering numerous references not only reduces the chance of overlooking important or subtle details, but also ensures comprehensive coverage of every aspect of the object, allowing for accurate recreation at a high standard.
Throughout my project, I took the initiative to install Apex Legends to capture screenshots of my chosen weapon from angles I had missed. This practice is highly beneficial, as it prevents reliance solely on internet resources and expands available options.
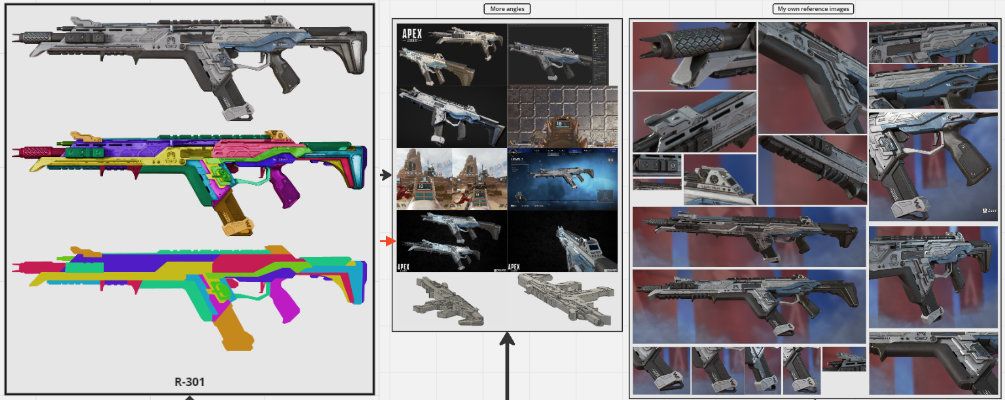
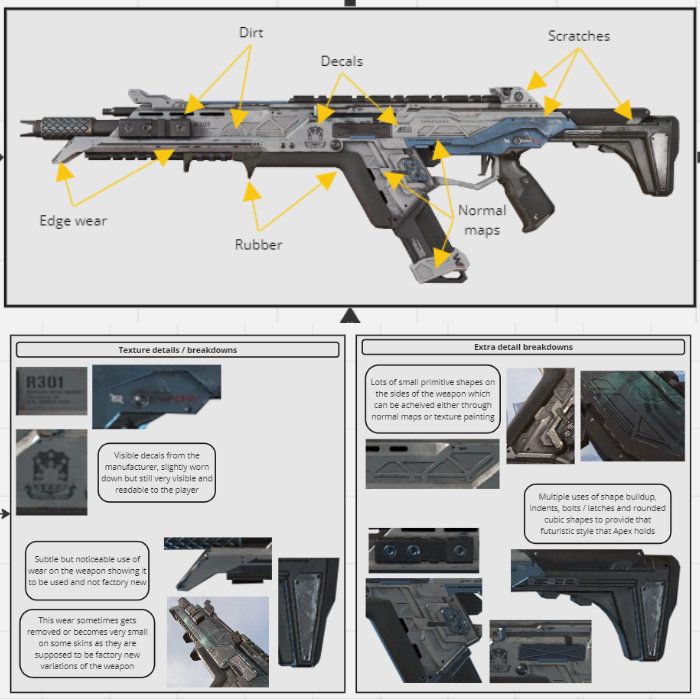
Not only does having a variety of angles and paint overs of your object help with shape accuracy, it also helps highlight texture details such as edge wear and scratches that will be important later on, to add to further improve realism and immersion for your audience.
For the block-out stage, we were introduced to a new software called Fusion 360, which I had never heard of before. Initially, I felt both concerned about the time it would take to learn it and excited at the prospect of experimenting with a new tool.
Using Fusion 360 instead of conventional 3D modeling software for the block-out stage proved to be immensely advantageous for me. The software's flexibility, allowing alterations at any point in the timeline regardless of progress, was particularly beneficial, as it did not necessitate clean topology.
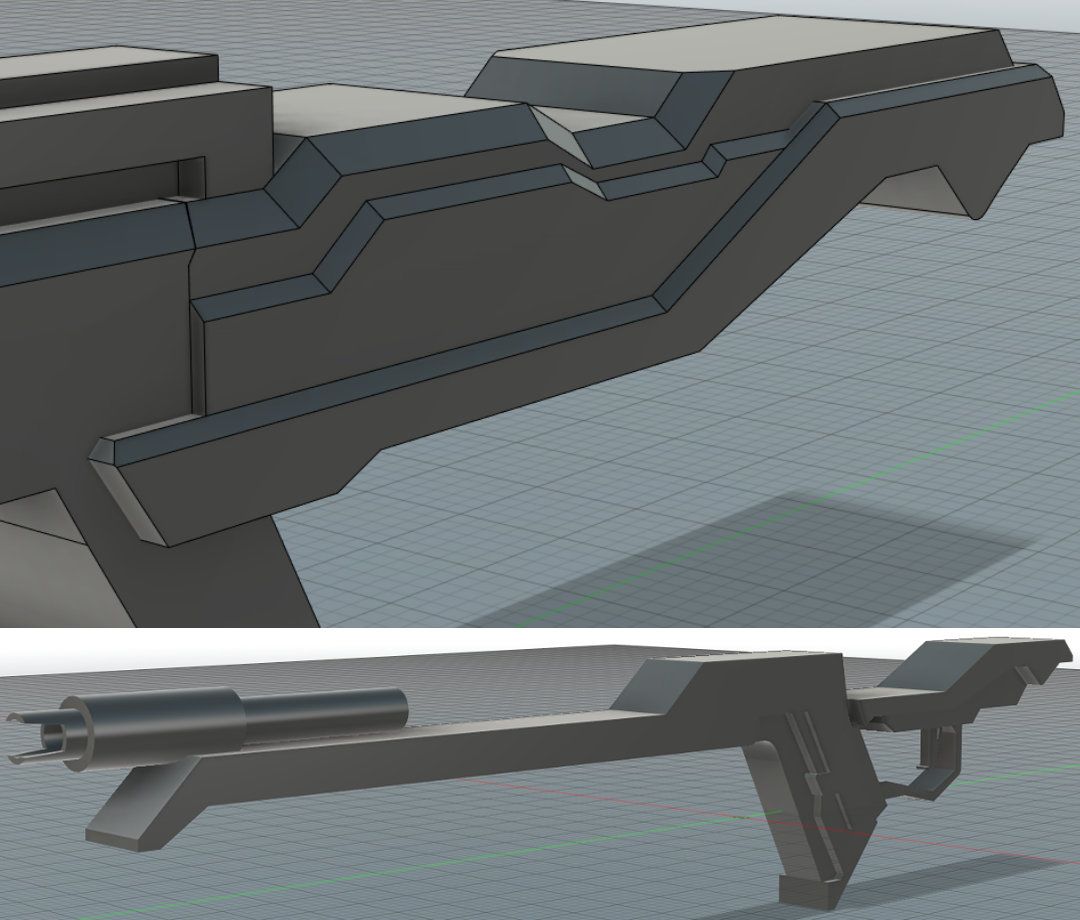
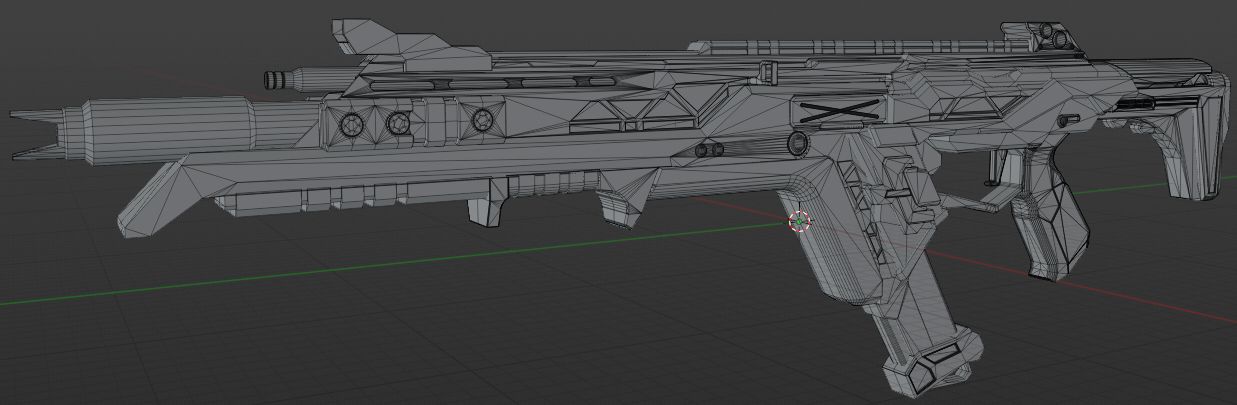
I started the block-out process by focusing on the barrel, which served as a foundational scale reference. Then, I swiftly outlined the main shapes of various components and extruded them while consulting my references to ensure accuracy and fidelity to the original model.
Getting the correct scale took some time as I was still learning Fusion 360 and was not satisfied with how some of the pieces appeared in comparison to the original model. I attempted around three test block-outs before confirming the one that I believed matched the closest and committing to it.
Once the main forms had been blocked out and the scale was accurate, I began adding the details and shapes that make the weapon recognizable. Aspects such as the triangular panels, bolts, and indents were added through multiple sketches and extrusions, with bevels applied to catch the light.
Due to the design of this weapon, it was possible to add a lot of the detail inside of Fusion itself, but this will not be the case for every weapon and extra software may need to be used.
For pieces like the bending of the side latch and the cross seen along the body, I moved into Blender to make adjustments and ensure they were accurate before proceeding. I did this because I was unsure of how to achieve them inside of Fusion at the time, and learning during that period would have disrupted my set deadlines and pushed me off track. Therefore, I opted to utilise what I knew and return to learn when I wasn't constrained by deadlines.
To create these small details, I utilised proportional editing tools for the bending and employed two overlapping cylinders for the cross detail. The two crosses were then slightly offset to prevent any Z-fighting that might occur.
Zfighting is when faces are in the exact same spot and start fighting for visibility which causes flickering and artefacts in that region.
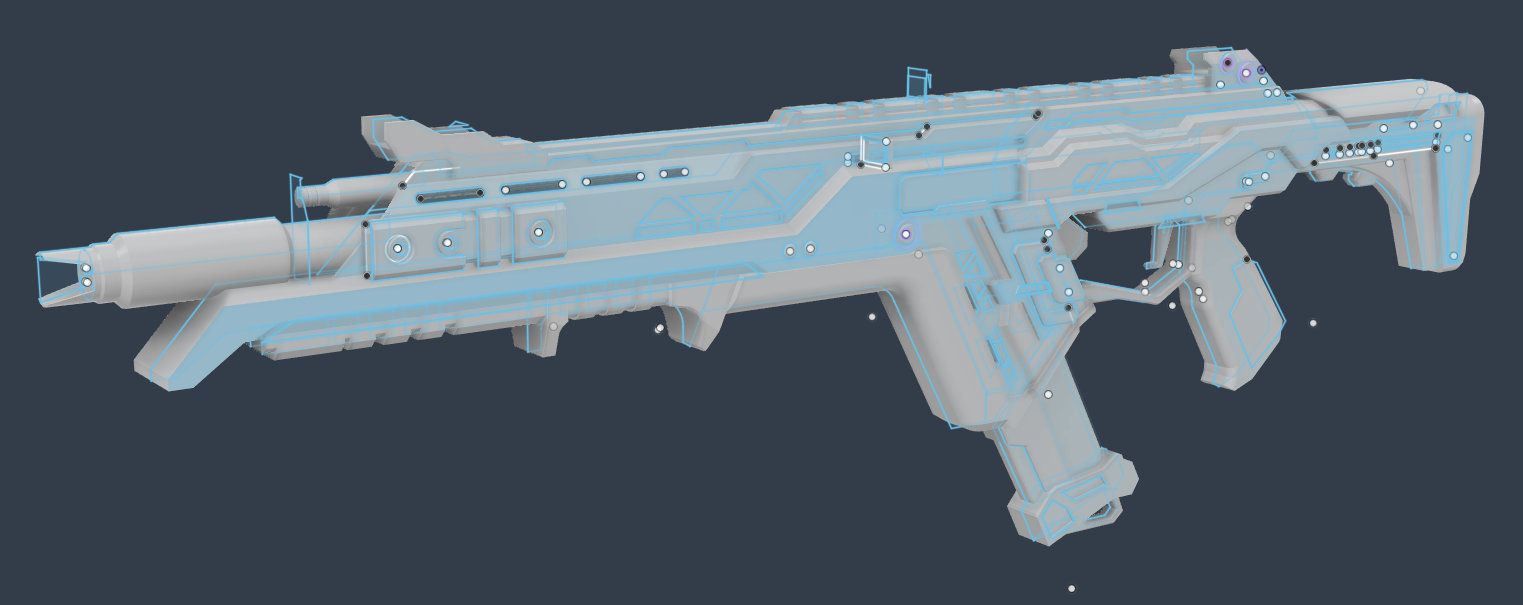
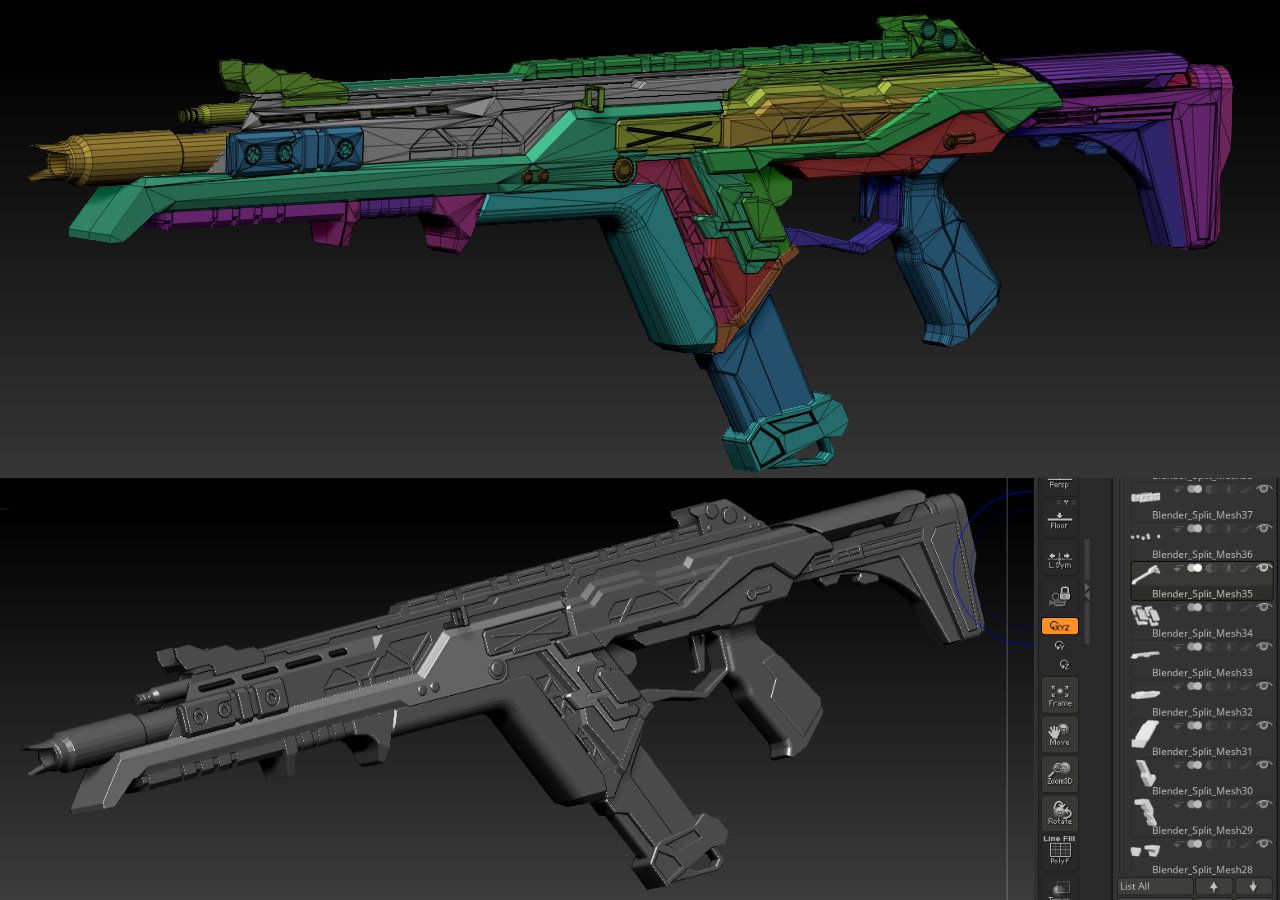
Another reason I used Blender was to separate the mesh into different pieces, as Fusion exports them all as one mesh. This is crucial because I planned to move into ZBrush to develop the details further and wanted to use separate pieces to control the subtools.
Additionally, Blender would later be utilized to further refine the Fusion mesh into a low-poly model suitable for game engine use, ensuring it contained no Ngons or errors.
Low poly models are important as they contain minimal detail and only the silhouette of the mesh. This means we can minimise the amount of geometry being rendered by the engine, and bake a high poly which contains all the detail information down into a normal map which the engine can use to provide the illusion of detail to the audience and players, while using less resources to run the game.
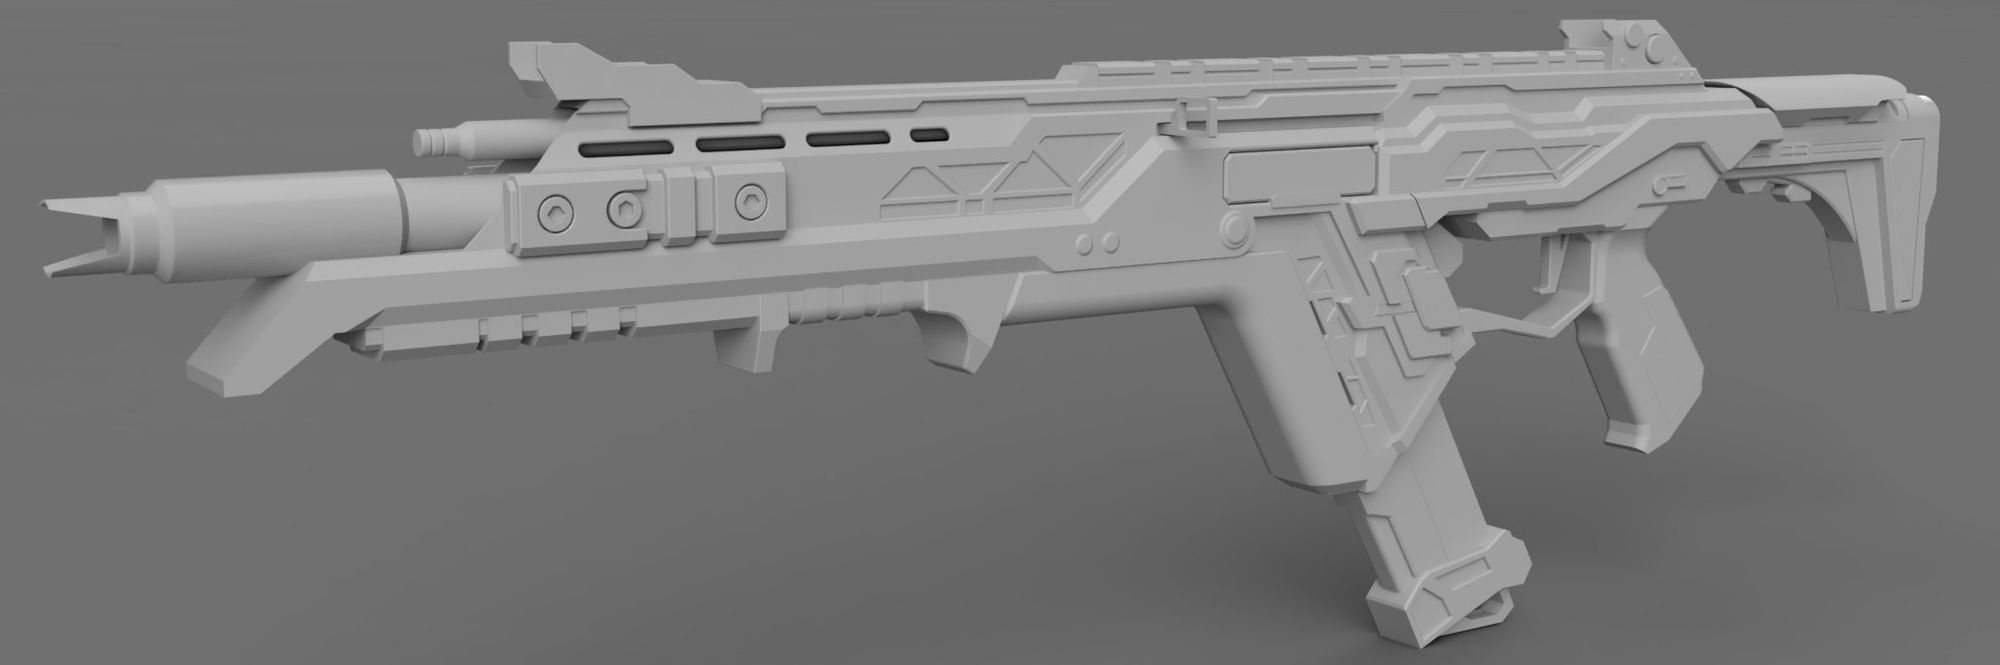
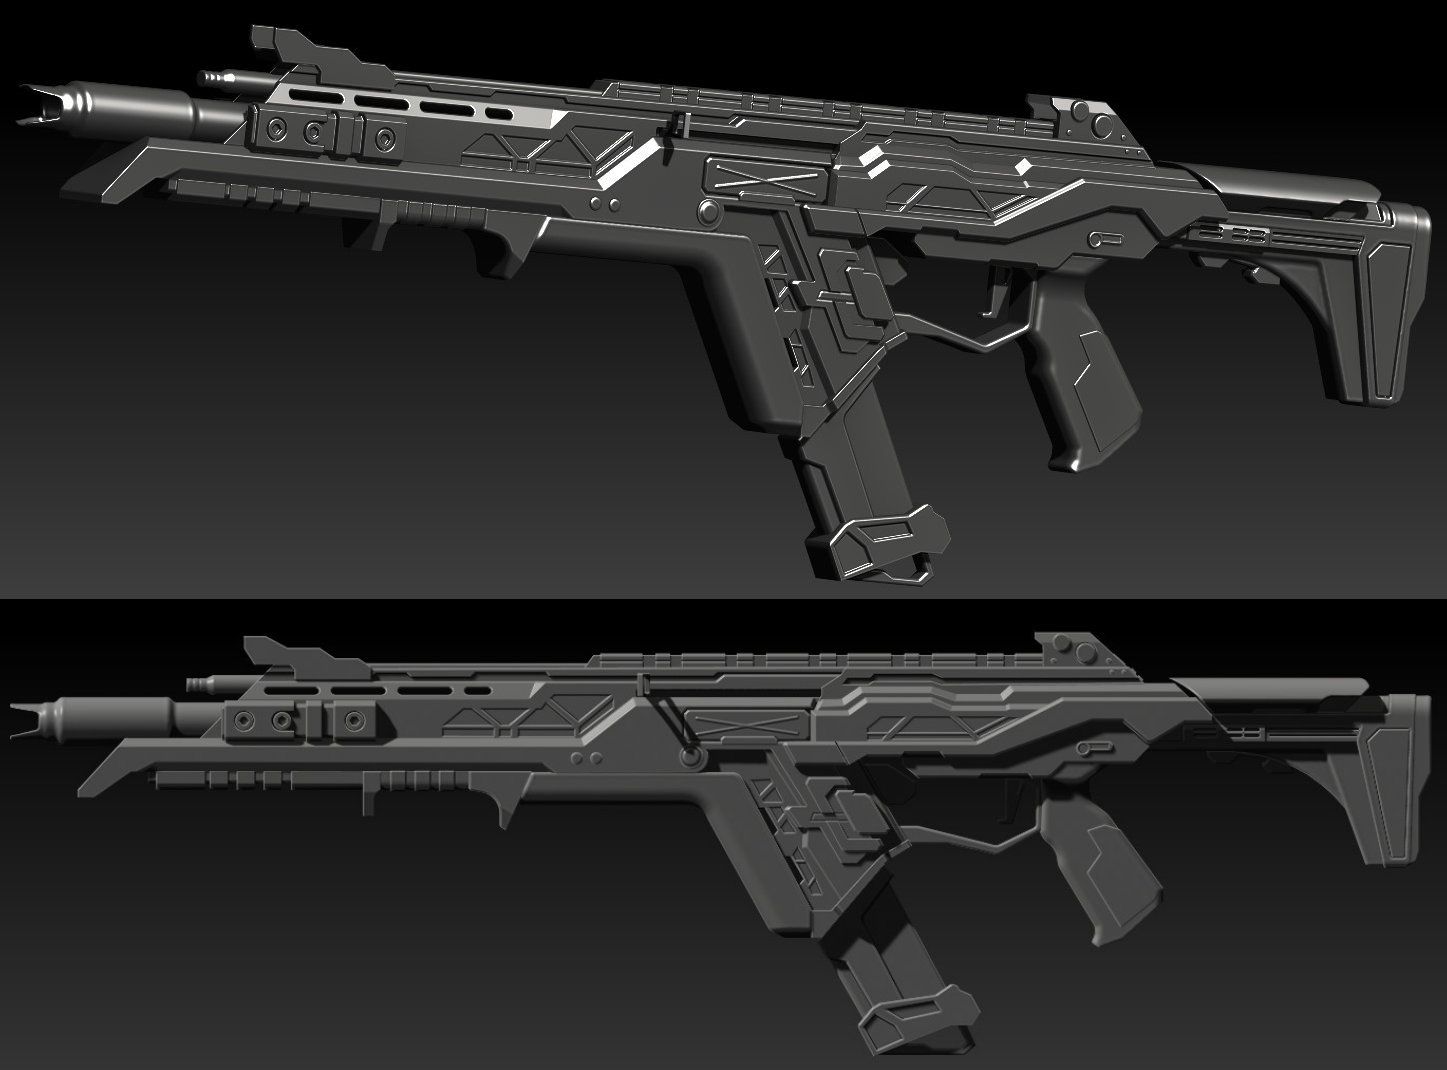
The high poly stage involved smoothing out edges and polishing the various pieces to allow light to catch onto the model easier. This makes the silhouette of the asset more noticeable during gameplay and at a distance when exploring the world.
It is possible to add sculpted detail onto this high poly mesh if any organic details or aspects such as scratching, edge wear or noise are required.
It is also important to remember that the high poly model will not be used inside the game engine, so you can add as much detail as you need without the worry of topology or poly count as this will be baked down as a texture onto the low poly model!
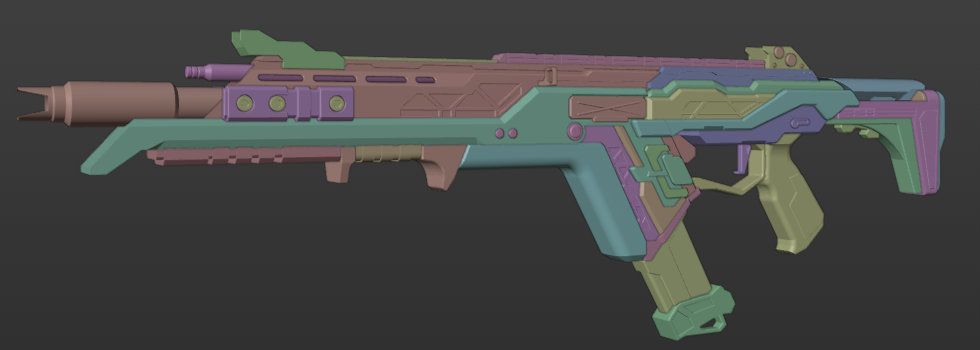
To begin the high poly stage, I split up the mesh into various subtools based on the split pieces I created earlier inside of Blender and named them to ensure I knew which each piece was, and could isolate them accordingly to make this process smoother for both me and my computer.
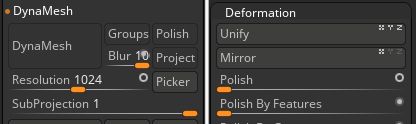
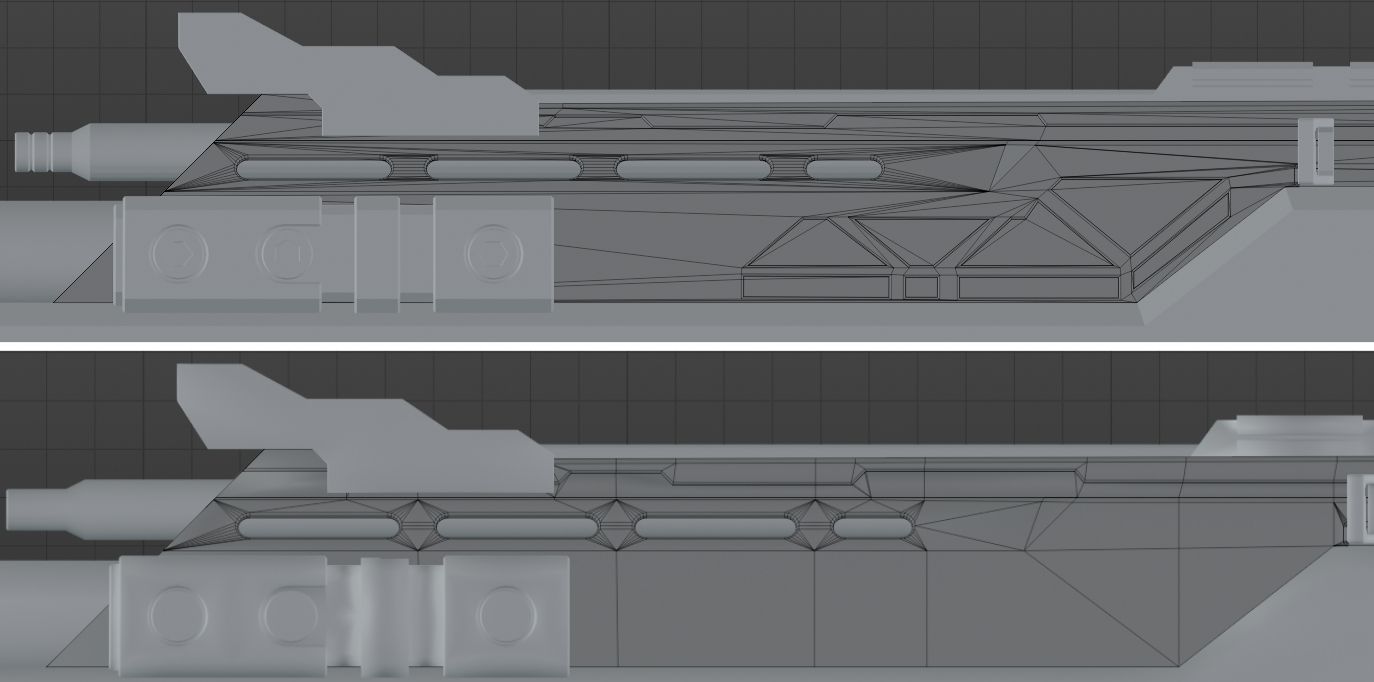
Once I had the piece separated, I began the polishing process using multiple methods to suit the individual areas and requirements. For example, I used Dynamesh set to a high resolution and applied a small amount of the polish modifier to smooth out the noticeable sharp edges on the barrel.
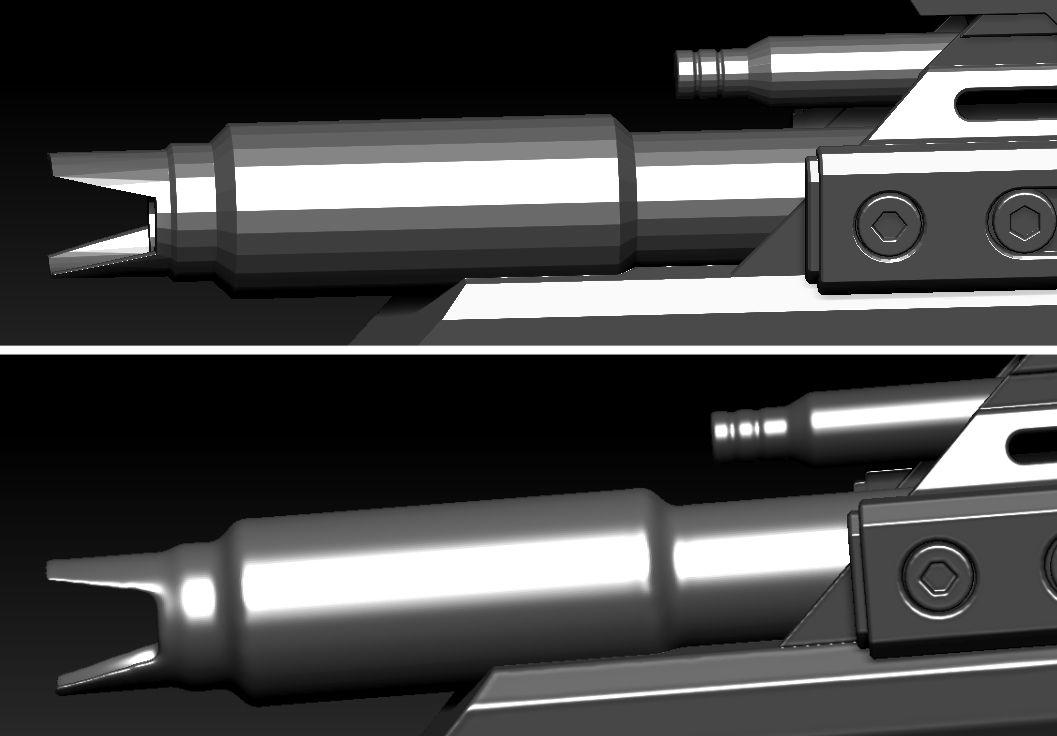
Some sections required additional steps to achieve the desired outcome. For instance, the triangular panels necessitated manual smoothing using a brush while simultaneously applying multiple modifiers until the desired result was achieved. The duration of this process varies, as each weapon piece may demand a different set of tools and techniques to achieve the desired effects.
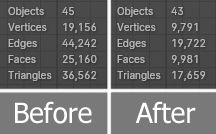
This process significantly increased the model's poly count into the millions, which was unnecessary even for a high-poly model and would lead to longer baking times during texturing. To resolve this issue, I utilised the decimation master on densely packed areas to reduce the count to an acceptable level.
This step was also essential because Substance 3D Painter would crash upon importing a high-poly model with excessive topology density or when I needed to import the high-poly version into Blender for accurate overlay and matching with the low-poly model during normal map baking.
Decimation master is an add-on built into ZBrush that calculates all the geometry inside the mesh and tries to lower the poly count without affecting the detail or silhouette of the mesh.
Probably the most time-consuming part of the entire project, but I enjoyed every bit of it since I could just switch off and rework each piece to be suitable for game engine use.
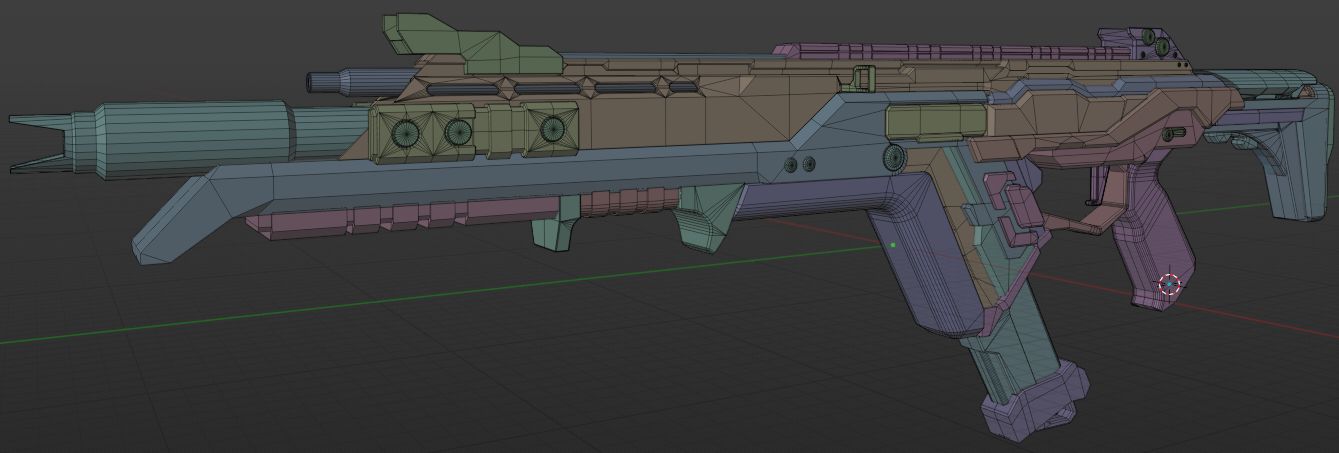
To begin, I duplicated the Fusion model to have a backup of pieces in case I made destructive changes I didn’t like and wanted to redo them from the beginning. Then, I started removing all the details that I knew I was going to bake down later, so I had less geometry to work with. It's unnecessary to keep any useless geometry on the final low poly unless you are using floating geometry.
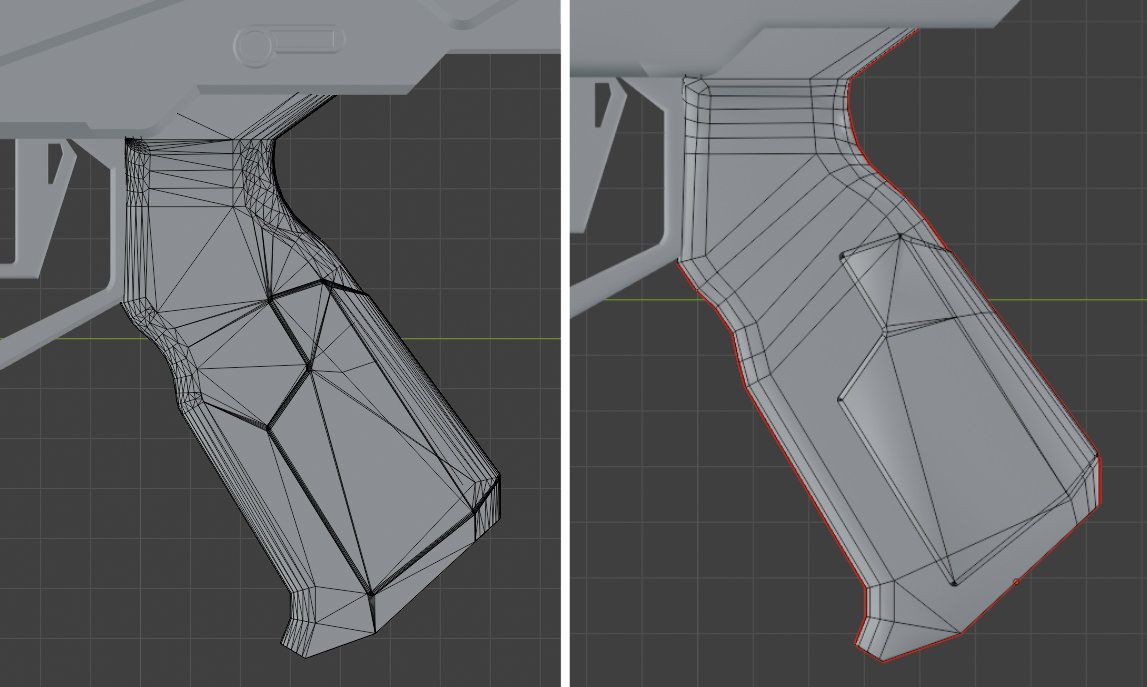
The initial Fusion mesh contains numerous Ngons because Fusion does not prioritize topology like 3D programs such as 3Ds Max or Blender. Consequently, a significant portion of the mesh needed cleanup using tools like the knife tool, face rebuilding, and dissolving unnecessary vertices. This ensured that only quads and triangles were used to construct the low poly mesh
We avoid using Ngons (faces of more than 4 vertices) as they can cause artifacts/errors on a mesh or cause stretching during animation.
Fusion also connects floating geometry to the asset itself during export, causing the mesh to create additional edges to connect the faces. Therefore, I had to detach pieces like the screws and fill in the gaps left behind to allow them to be baked down as floating geometry instead.
Floating geometry are pieces of geometry that sit on top of the mesh but don't connect through topology. This saves unnecessary edges being used to keep quads and triangles consistent throughout the topology.
This process is important not only because it provides a cleaner mesh for texturing, animating, and importing into the engine, but also because it facilitates easier UV unwrapping and eliminates any artifacts that may arise from messy topology or broken Ngons.
In Blender and other 3D software, you can use the selection shortcuts to automatically select faces with more or less than a specific set of vertices. Using this feature to look for any hidden Ngons is important to do consistently to ensure clean and game-ready topology.
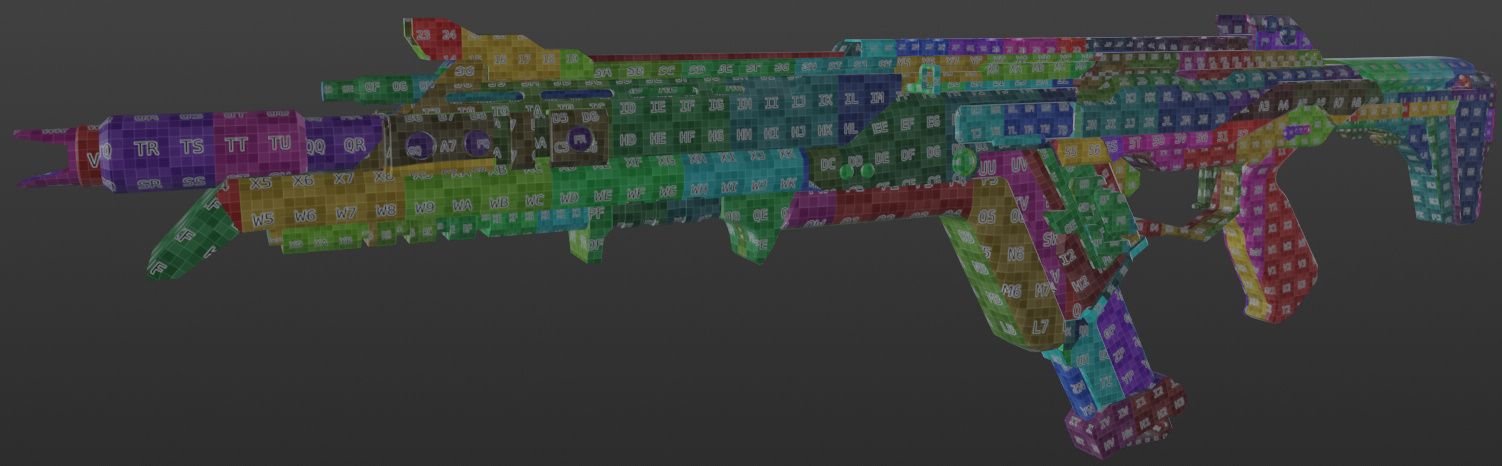
My unwrapping method involves individually unwrapping each piece using the provided UV squares texture in Blender. Afterward, I pack the finished UVs tightly into a square and move them off the map into sectioned areas. I employ this method for two reasons. Firstly, it allows me to easily identify each piece without mixing them with the unwraps of other pieces. This enables me to address any stretching or incorrect areas efficiently and repack them into their specified section. Secondly, I can select each section easily and scale it up or down to achieve a matching and consistent Texel density across the entire mesh.
Texel density is the average scale of each UV island to make textured detail compatible across each other, which ensures they are consistent throughout the entire asset and texture map.
Once I am happy with the entire unwrap, I rotate the pieces to ensure they are facing the correct direction and not rotated weirdly, so that when it comes to texturing everything is consistent to its piece, and I won’t need to mask out faces just to rotate the texture.
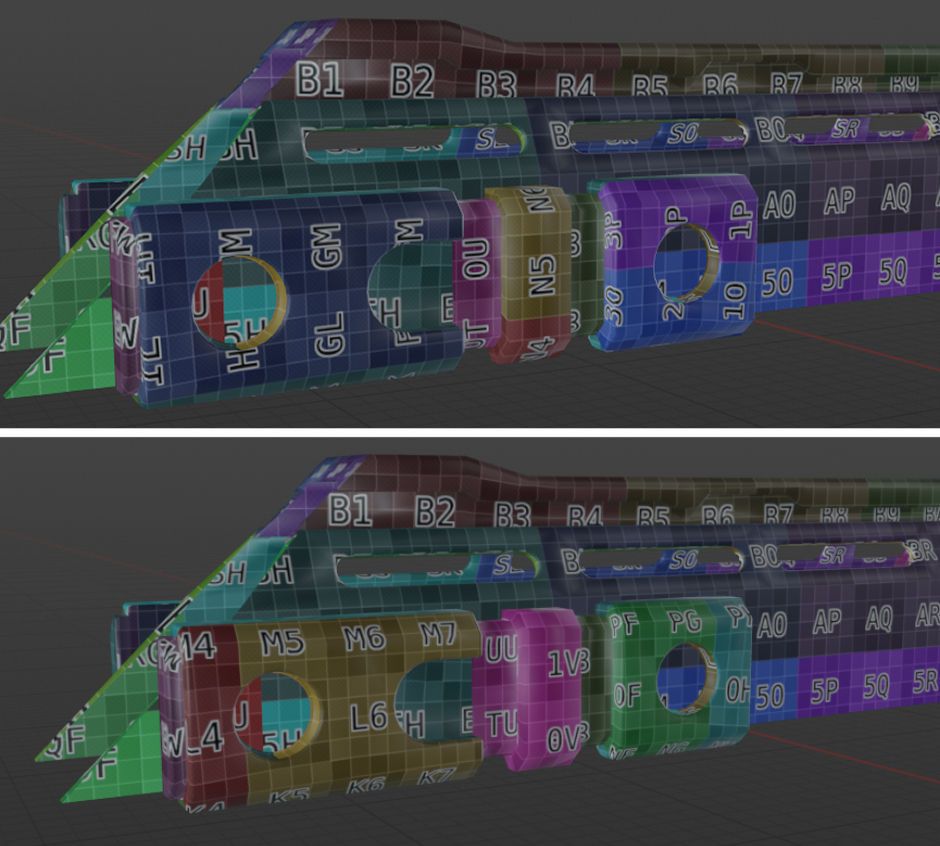
Once I'm satisfied with the rotation, positioning, and Texel density of the entire unwrap, I begin to pack them all together neatly into suitable texture maps using an add-on for Blender called UV Pack Master (UVP). UVP enables precise margin selection, although I opted out of allowing it to change the scale or rotation of the islands, as I had already done this manually with greater precision. Additionally, UVP can generate multiple optimized pack iterations in just a few seconds, making it my preferred choice over Blender’s built-in UV map packer. The project brief provided by my tutor required the use of a single 4k texture map, made possible through consistent Texel density and optimised use of UVP for packing.
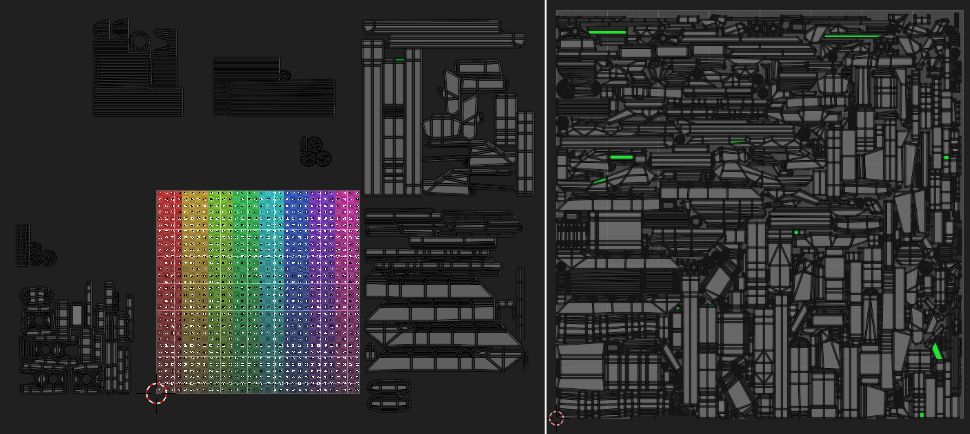
I also tend to keep my margin very low for my assets and increase it slowly if there are any artefacts being created during texturing or baking. This is a huge advantage as it means I can increase the size of my islands and get more crisp detail while leaving minimal empty space inside my final texture.

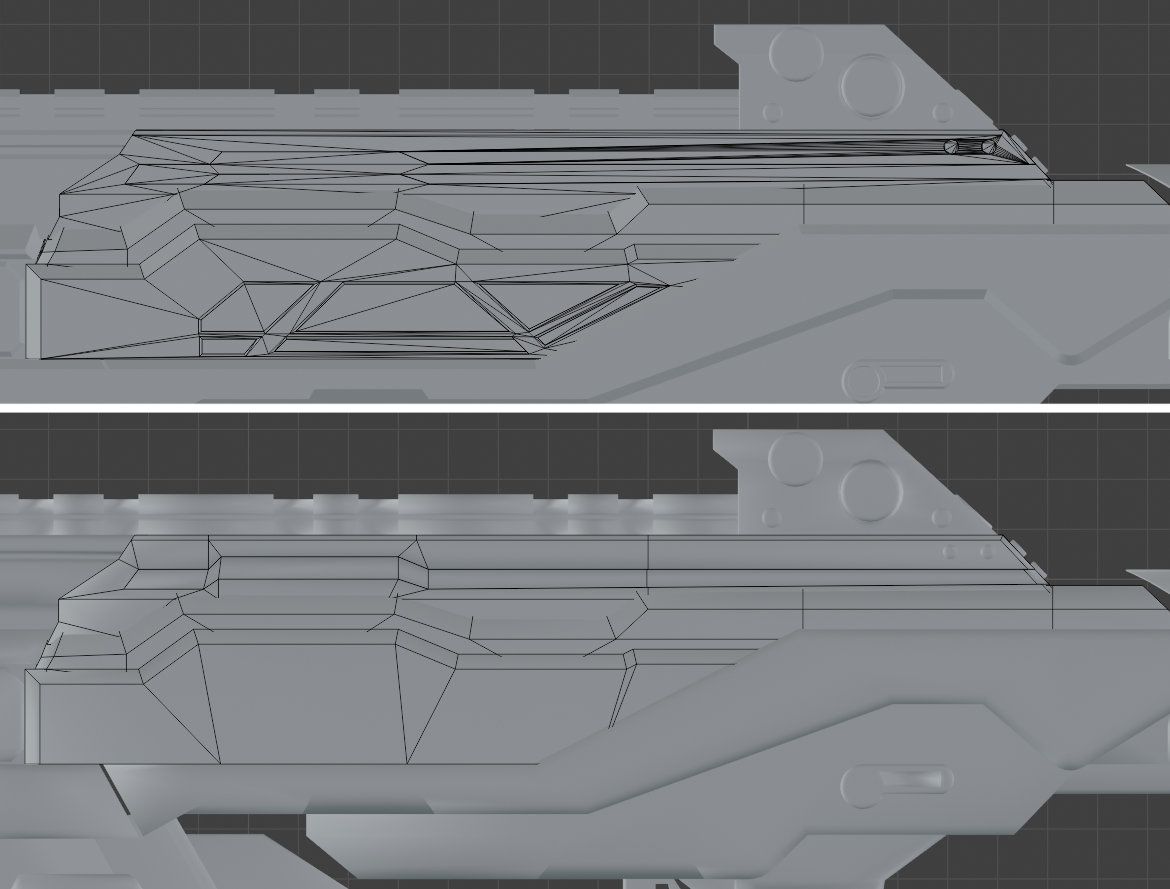
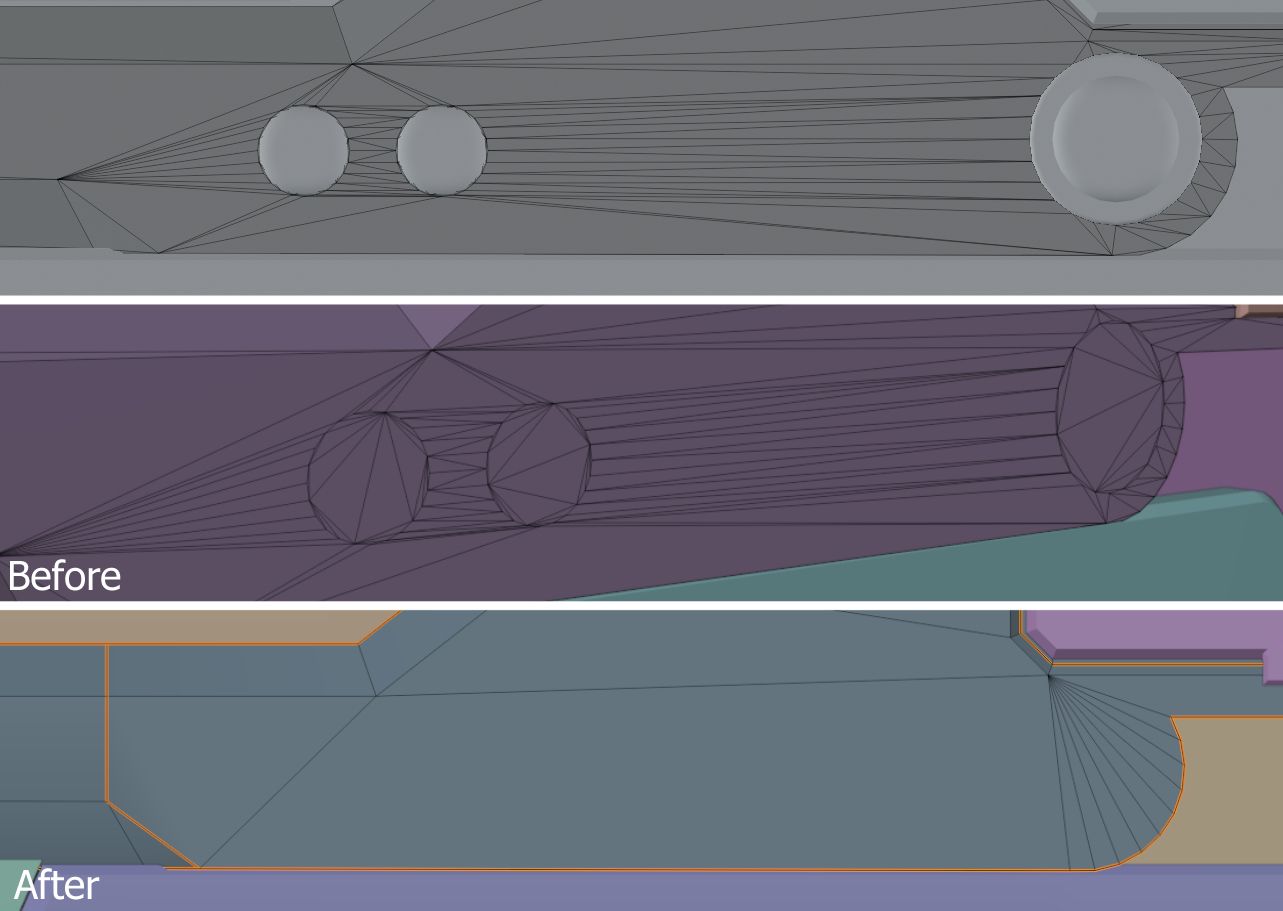
I exported individual pieces and conducted test bakes throughout the retopology stage to identify what was working and what was causing errors. Here are some highlights of those tests: Initially, I stacked UVs for some pieces to save space and improve overall texture quality, bakes, and Texel density. However, some pieces ended up baking through each other, resulting in artifacts. I realized that this was likely due to the decimation from the high poly stage causing errors. Remirroring the piece to match the original correct side resolved the issue.
When stacking UV islands, be sure that both sides are perfectly symmetrical to avoid baking errors. The stacked islands should also be small aspects or repeatable objects such as screws or patterns, as the stacking will become very noticeable if used incorrectly.
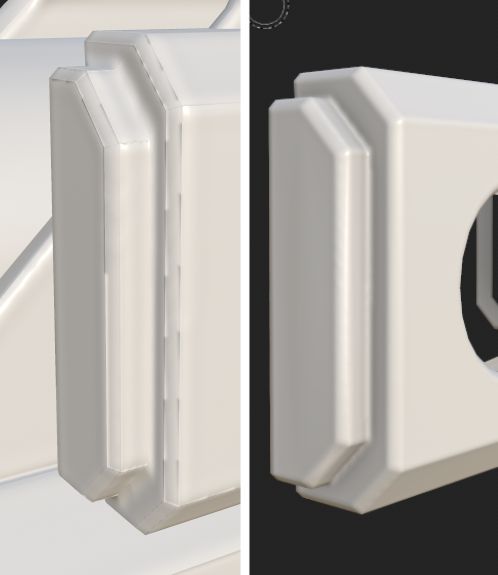
Another issue arose when the edges from the low poly mesh were poking through the high poly bevels. Unable to resolve it on my own, I reached out to my tutor for assistance. He provided a helpful guide on vertex normals and ensuring their correct setup on sharp edges throughout the topology. After studying the guide and conducting further tests, I successfully resolved the issue, resulting in a clean bevel bake on the low poly asset.
Make sure when exporting a mesh that you have recalculated any normals using the modifiers or tools inside your 3D program. It is worth ensuring all your pieces are smoothly shaded when exporting too.
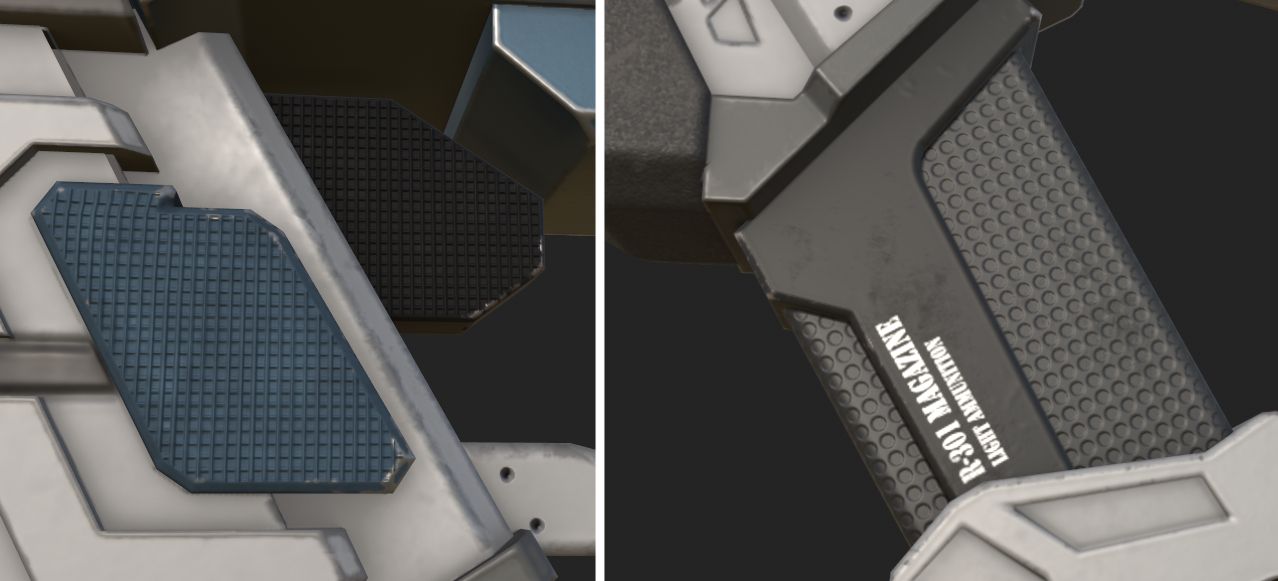
The final bake for the asset was done using a single 4K texture map, and was using specified piece names to ensure nothing baked onto an unintended place, using an LP_ and HP_ prefix inside of Painter.
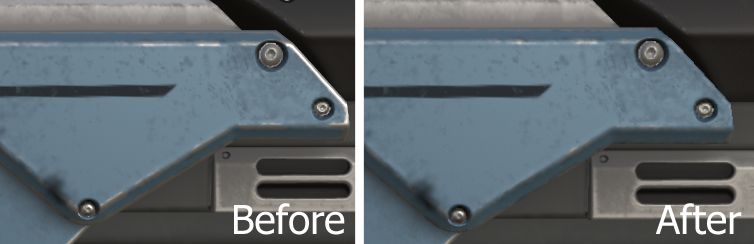
I initiated the texturing process by masking out the distinct pieces that required unique materials, followed by applying basic color fills, generators, and noise. This initial step helped me differentiate between each material. After establishing the basics, I revisited each element to enhance them, striving for a more professional and less generated appearance.
It is incredibly obvious when your asset relies on generators or pre-made substance painter materials. Experimenting and improving upon your texturing abilities is always a worthwhile journey!
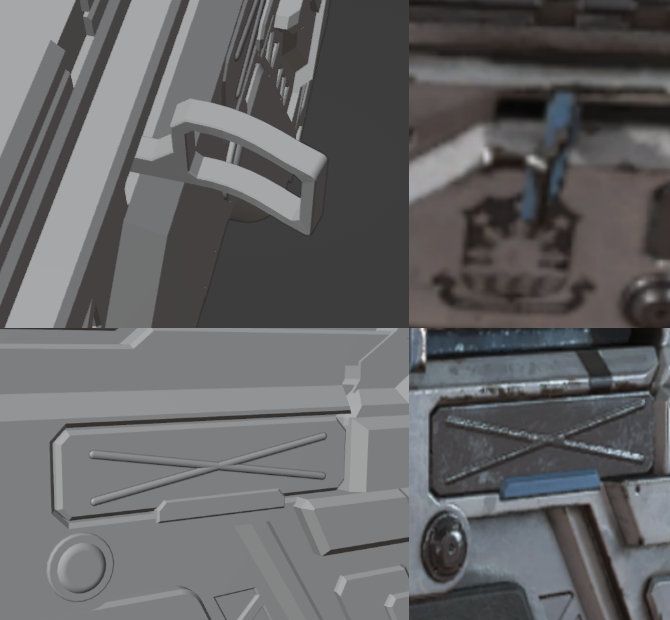
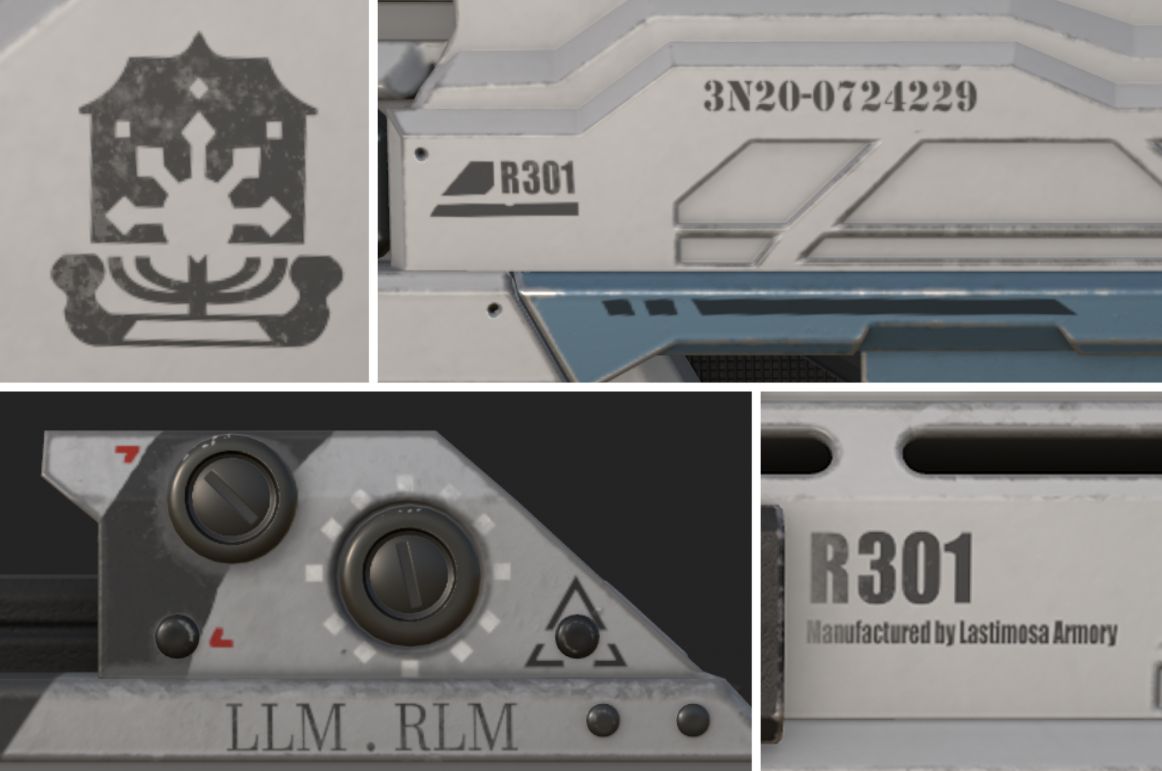
I then took some time to step back and start working on some of the decals needed. Creating them all in Clip Studio and changing a few since some were long strings of text that were almost impossible to see, make out in game or through reference images.
You can create custom decals in any photo editing software like Photoshop, export them as PNGs and import them into Painter. You can then drag and drop them onto your asset or use a brush/stencil.
For some of the painted areas, I chose to use splines as I could further control the location and scale of the brushes, even after I had applied the paint to the mesh. I used this technique for areas such as the blue stripes under the main body and to create the rest of the linework that I didn't create custom decals for.
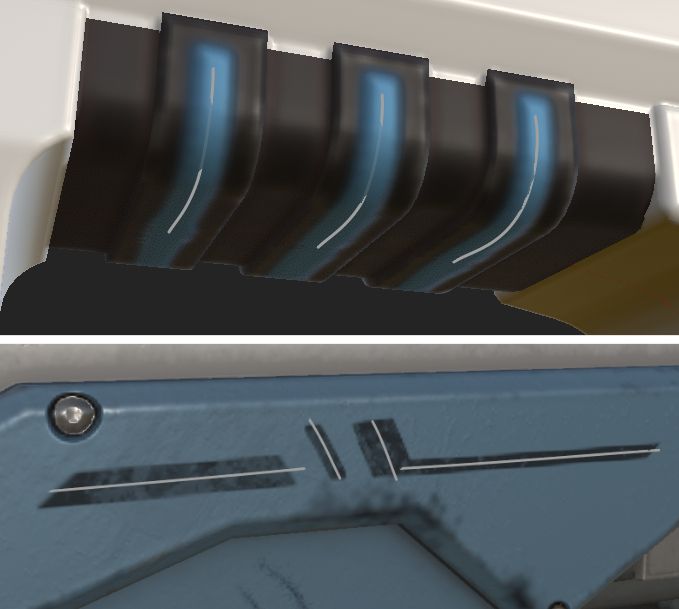
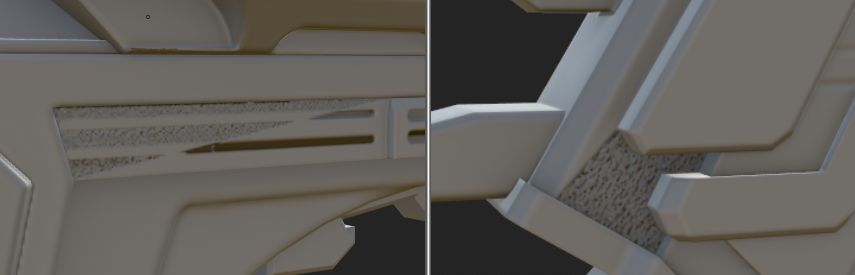
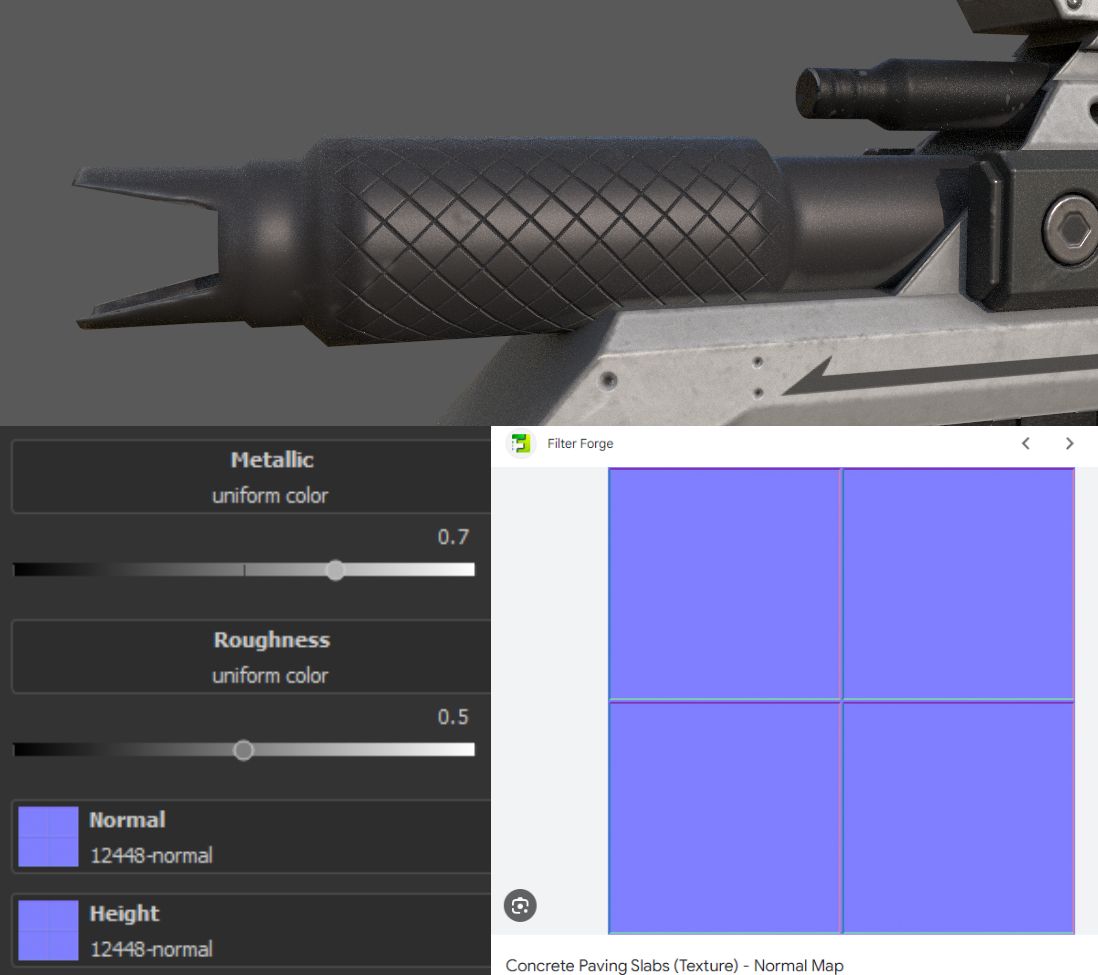
The barrel has a repeated diamond engraving on it which I found difficult to replicate, however, I managed to recreate it using a concrete slab normal map I found online and applying a 45-degree rotation to it.
The rest of the normal details were done through paint layers and normal only brushes or fill layers with built-in substance painter normal maps.
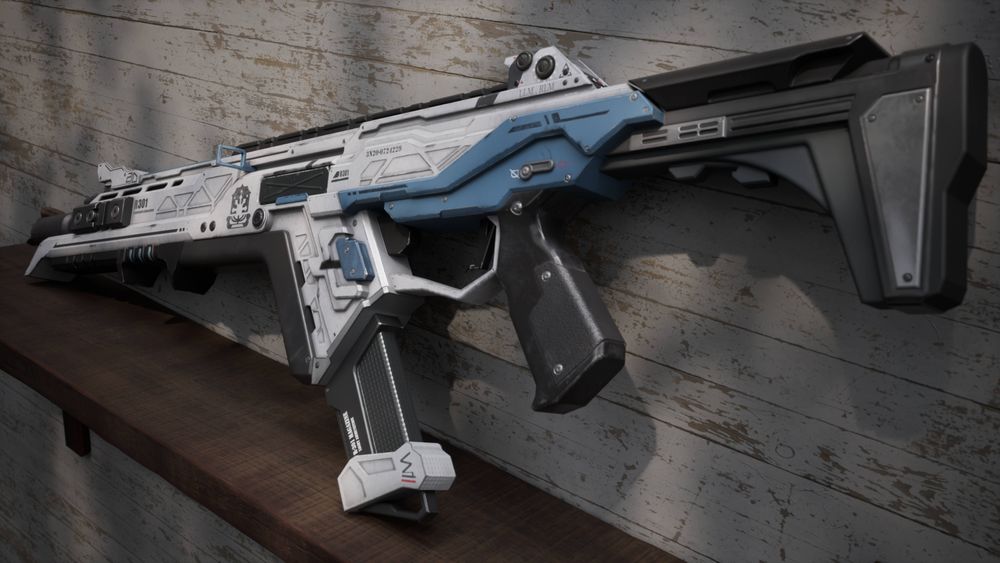
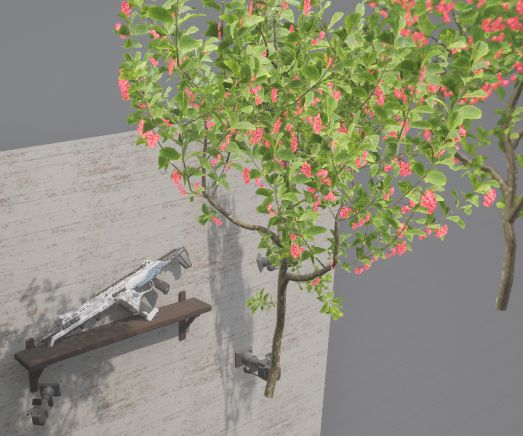
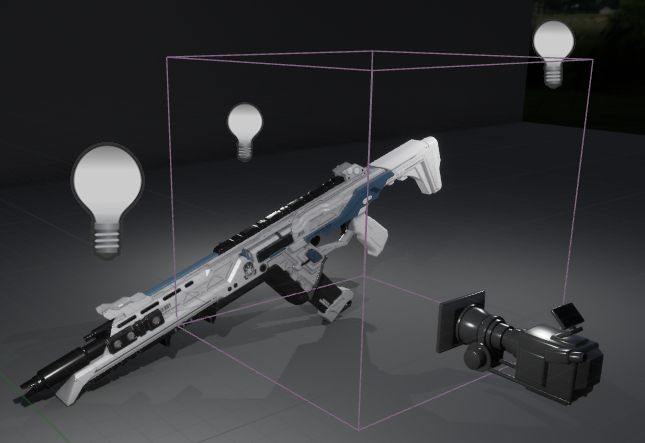
We were required to setup an Unreal Engine 5 scene using Quixel megascans assets, and create a small environment for the model to be rendered in. I decided to have my model sit on a shelf with some plant shadows overlapping the lighting to give more atmosphere to the scene.
Unreal Engine was requested as it shows the industry that you are capable of producing game-ready and engine-suitable assets, while also having a built-in path tracer that is incredibly powerful and provides high-quality renders fit for portfolio usage. The engine also allows for professional level cinematics to be rendered out.
The lighting for this scene was simple, using only a HDRI image and skybox that I adjusted the intensity of to fit the feel of the scene I was going for.
The other scene was a top down and side view of the asset in a blank environment, so the audience could scroll up and down to inspect the full detail of the asset. This was done using a standard UE material set to grey and a quick 3-point lighting setup to ensure the weapon was always visible from all angles.
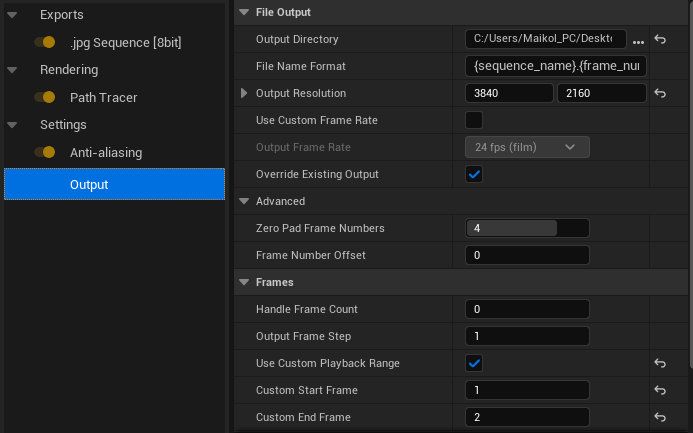
When rendering, I used the render queue to have better control over the rendering settings and give myself access to the other post-processing effects that the path tracer is capable of using. The only one I used in the end was the antialiasing.
The settings were set to render at a 4K resolution and to only render out between frames 1 and 2, which would ensure that the path tracer would only render out exactly one frame and not the entire timeline.
My past experiences with weapons before my university module were mediocre at best. The biggest struggle was scale accuracy during the initial block-out stage and eventual detailing. This challenge stemmed mostly from topology issues, as I consistently aimed to maintain cleanliness at every stage. However, my tutors helped me break out of this habit, and the introduction of Fusion made the process even smoother.
This module was invaluable in teaching me the workflows necessary to create suitable and professional-grade game-ready weapons. It has even inspired me to continue crafting weapons and embark on my next personal project—an MP5 with varied attachments! Fusion is undoubtedly one of the best software tools I've learned through my modules, and I highly recommend it to anyone interested in hard surface props and weapons. However, I am still not content with my texturing abilities and have set a goal to enhance them to a higher standard over the course of this and the next university year, particularly focusing on creating all textures from scratch.
I'm willing to utilize Substance 3D Designer to achieve specific effects. I encourage others to do the same, as mastering the art of creating professional and unique textures reduces the reliance on pre-made Substance 3D Painter materials and ensures more distinctive assets. Additionally, I aim to improve my skills in ZBrush and explore more organic weapon hybrids in the future. Weapon development is a significant ambition of mine, and I don't want to limit myself to just hard surface shapes and forms.
Thank you for reading, and many thanks to The Rookies and my tutors for the help and opportunity to write this blog! Check out my student profile on The Rookies here.