Creating Your First Prop Optimised for Immersive Gameplay and Real-Time Rendering
Discover Manuela's process for creating a realistic prop, tailored for immersive gaming and real-time rendering.
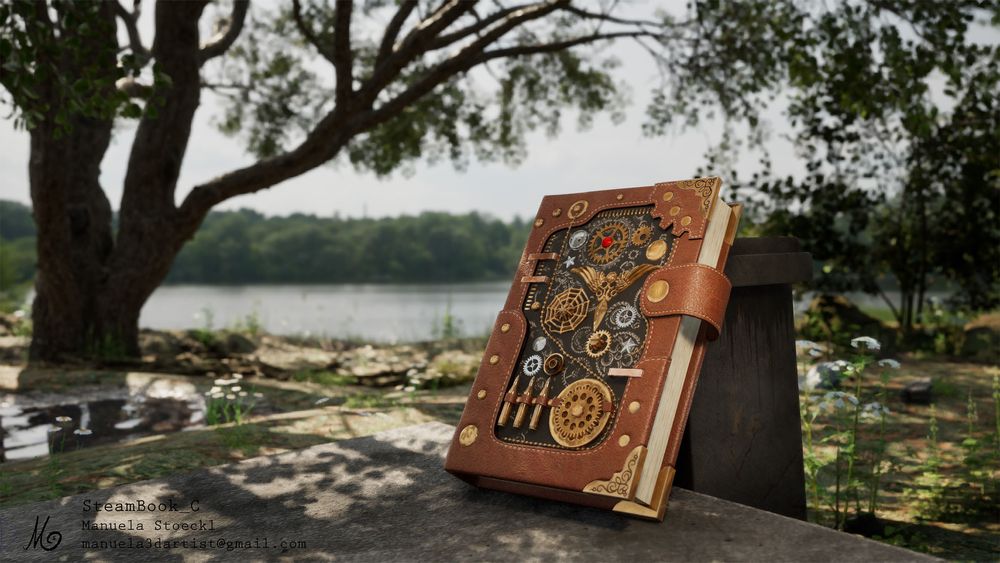
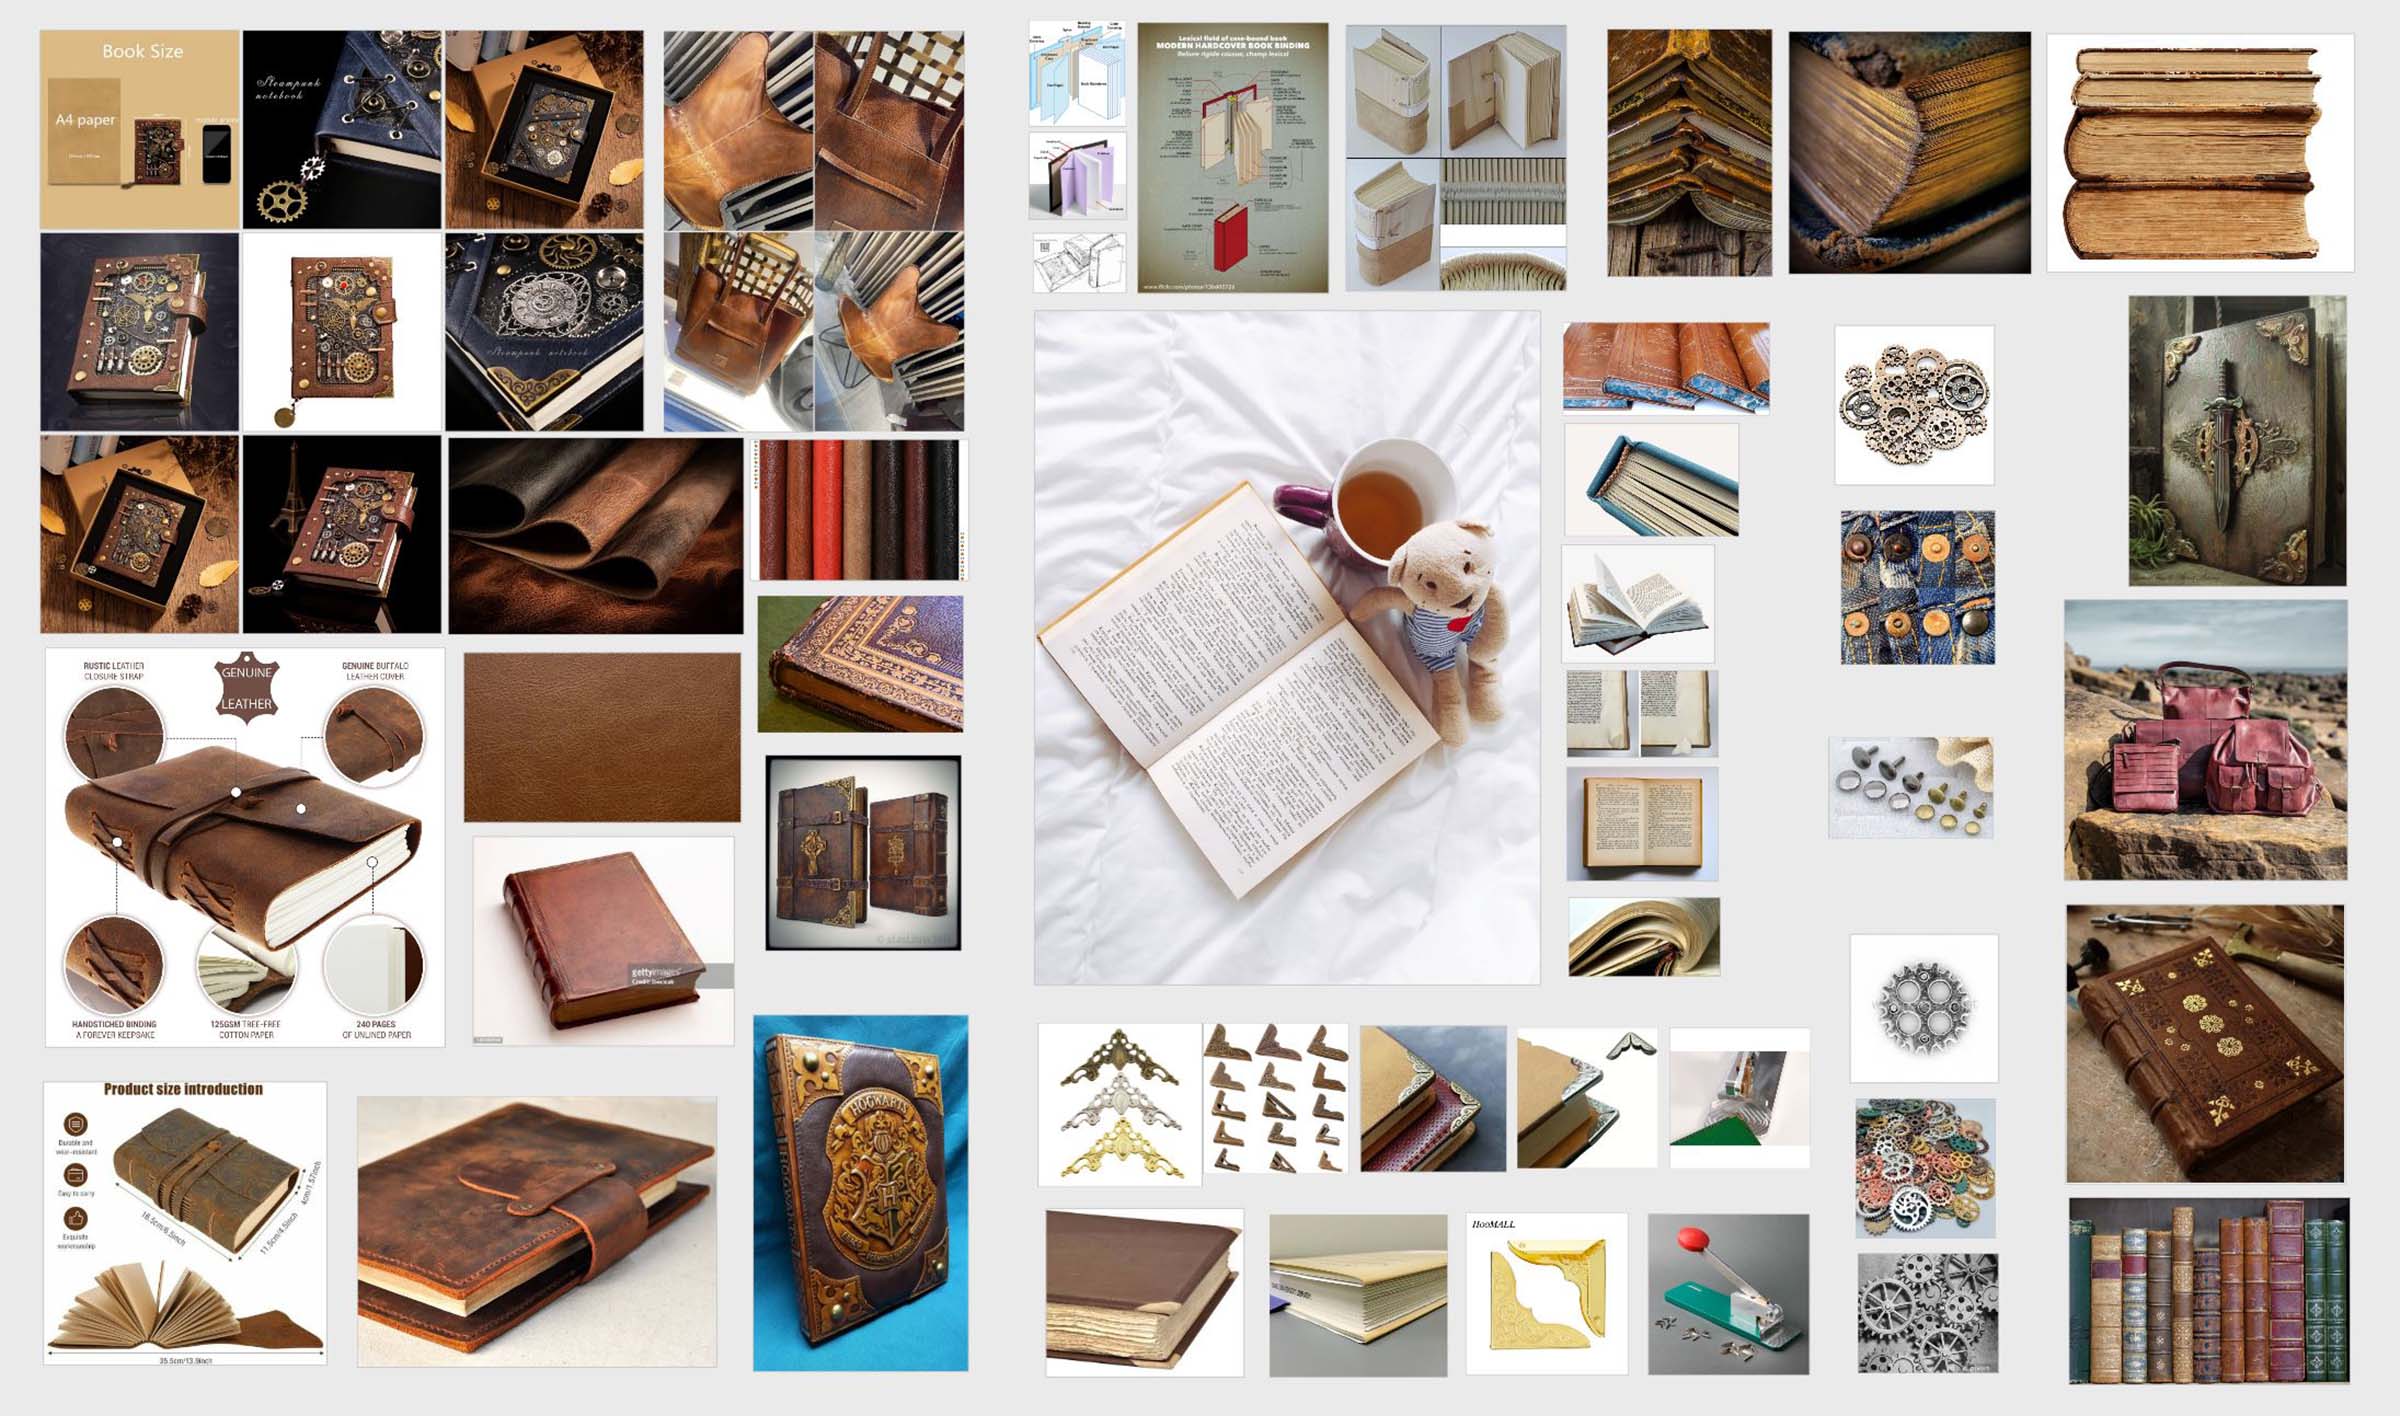
My debut project - SteamBook_C
Discover Manuela's process for creating a realistic prop, tailored for immersive gaming and real-time rendering.

Meet Manuela, a burgeoning 3D character artist, who has taken the time to share her first project at Vertex School — a beautifully crafted game prop, designed under the mentorship of industry professionals. Learn how Manuela has created a realistic steampunk-style book, optimised for immersive gameplay and real-time rendering.
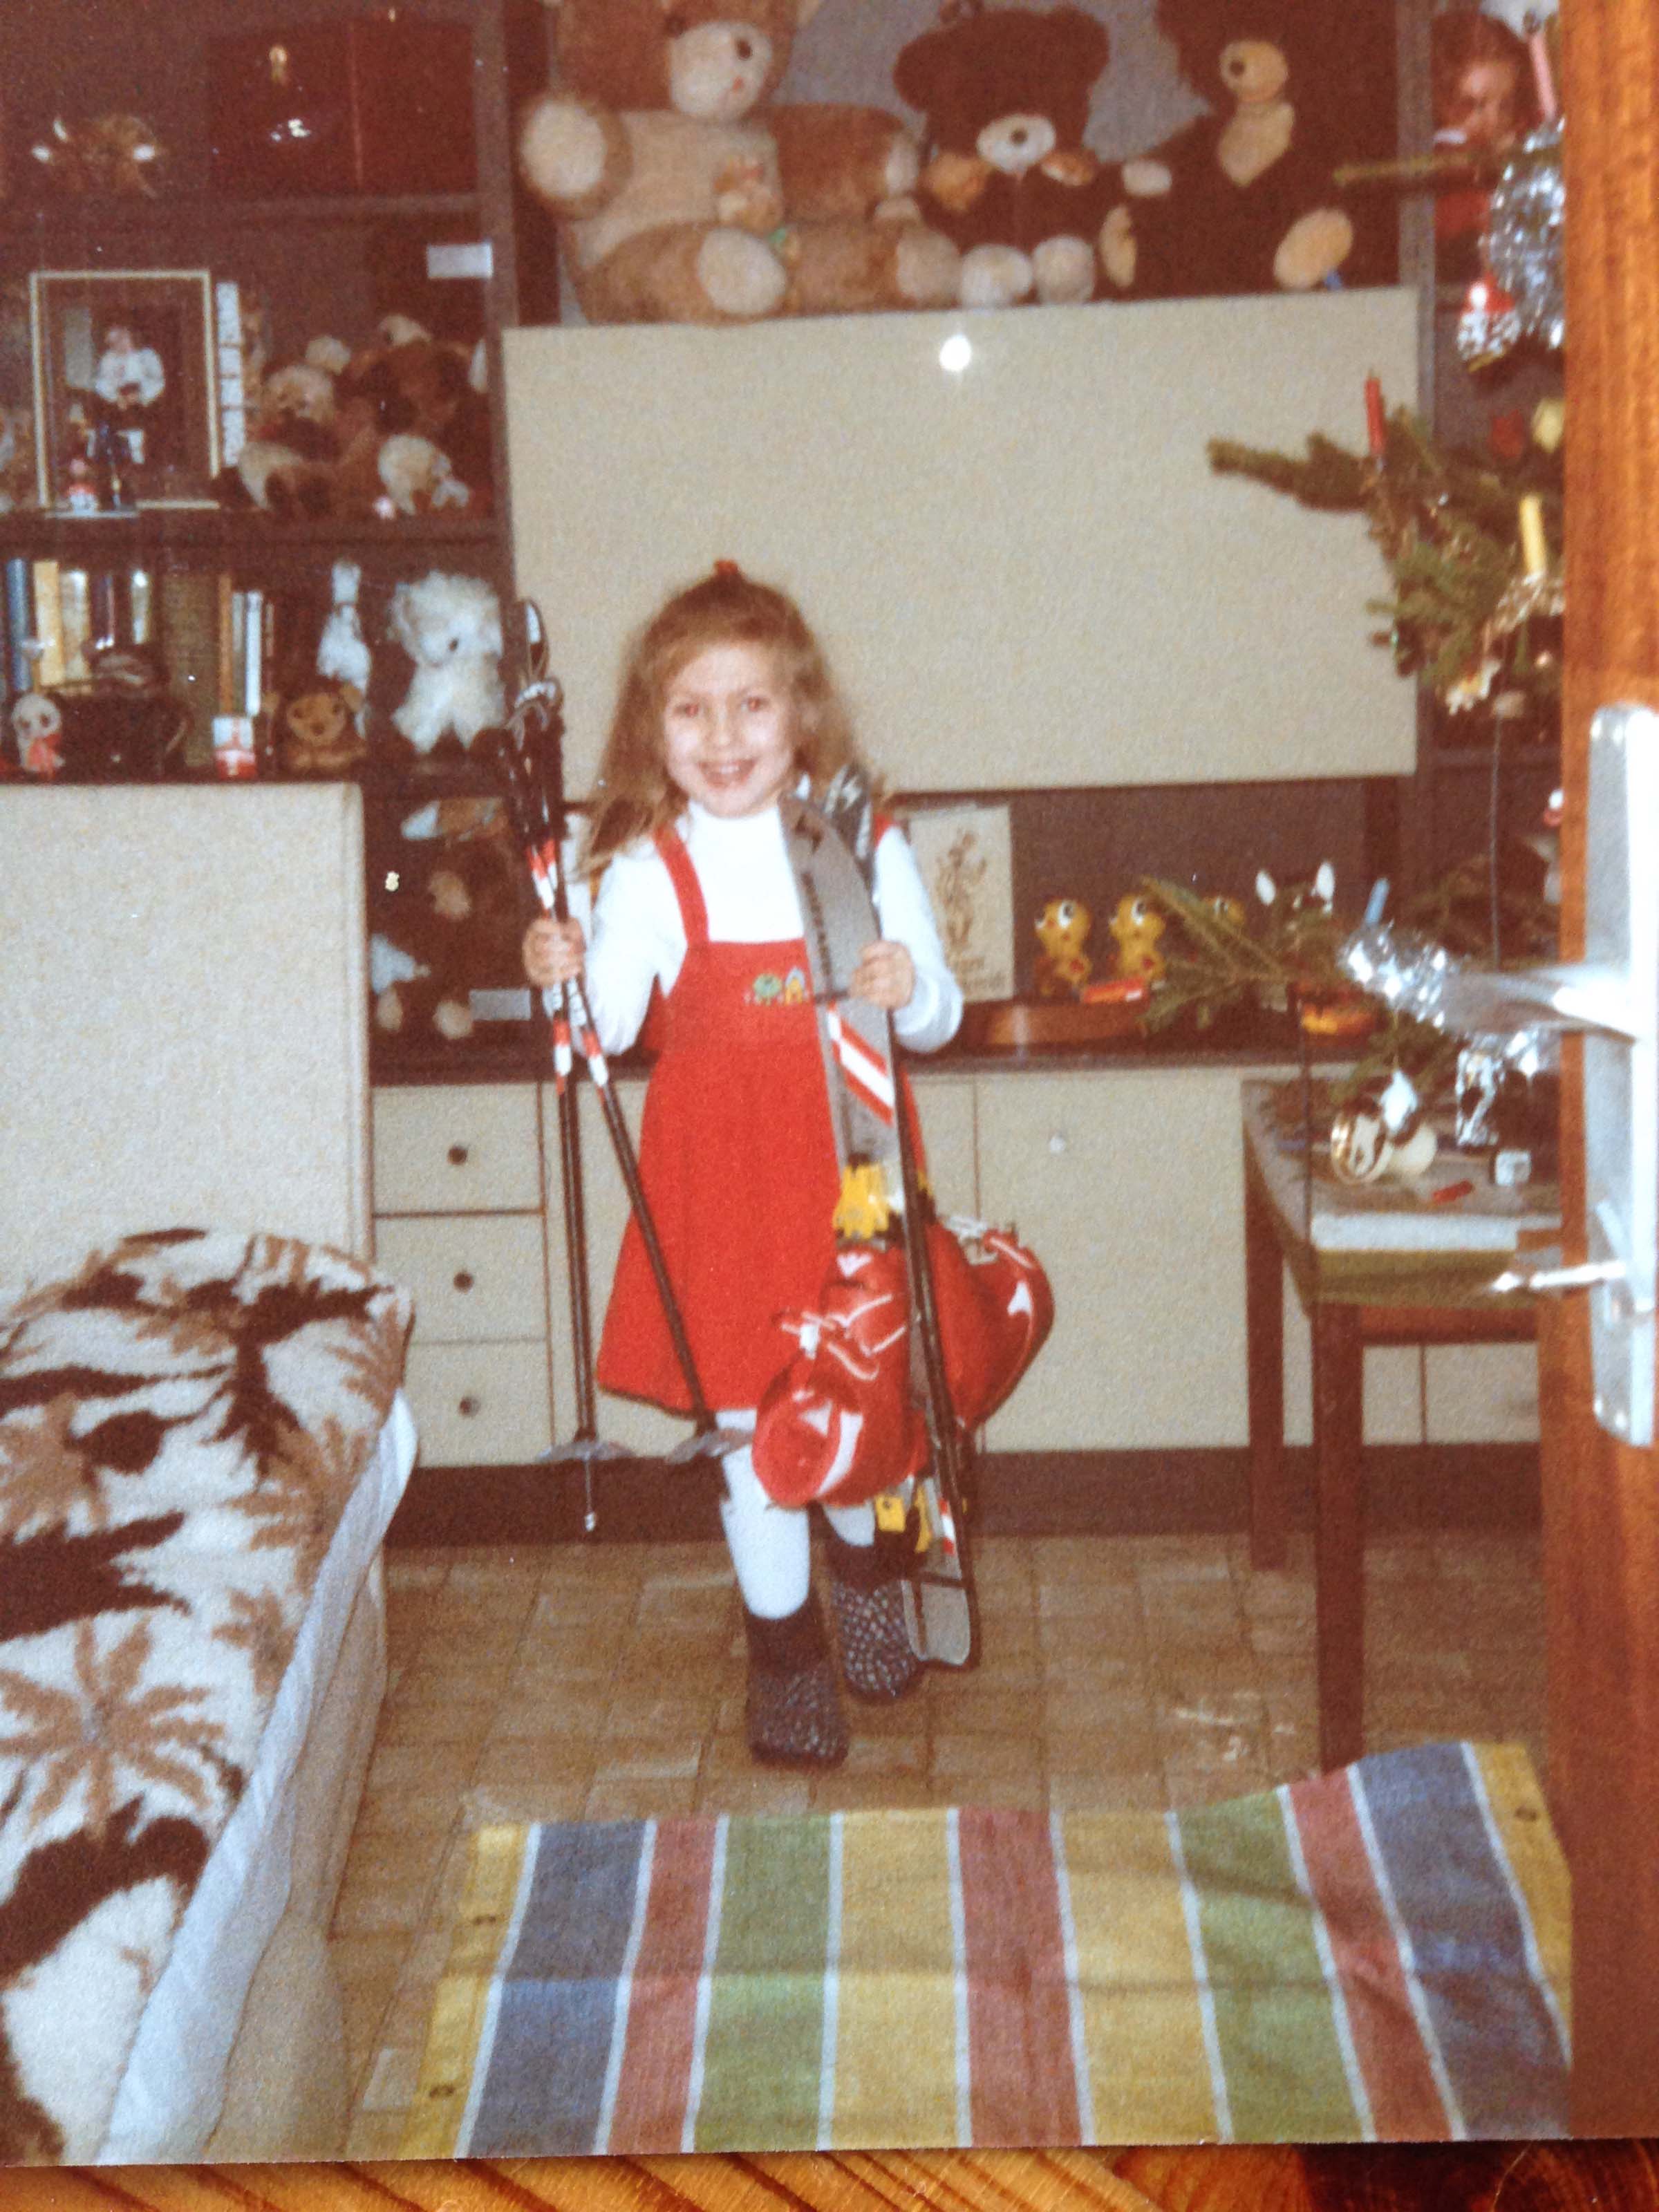
My name is Manuela, and I'm currently training to become a 3D character artist, specialising in game development. Growing up in Austria in the 80s, I was surrounded by mountains, lakes, and the exciting world of video games like Nintendo and Sega. My passion for creativity was sparked at a young age when my grandpa gave me my first Game Boy, and I spent countless hours immersed in games like Super Mario. Despite facing setbacks in my artistic career, my desire for knowledge and personal growth has always been a driving force. Now, I'm channeling that passion into pursuing my dream of becoming a 3D game character artist.
My initial foray into CGI began with the "ZBrush Course for Absolute Beginners" tutorial by Abraham Leal on Udemy, initiating a period of self-study spanning several months. Throughout this duration, I acquired fundamental knowledge and technical terminology. Whenever faced with uncertainties or intriguing terms, I sought explanations, gradually gaining insight into the realm of 3D modeling. However, to transition my passion into a profession, it became evident that returning to school was necessary and desired.


After thorough research, I decided to enrol in Ryan Kingslien’s Vertex School with the assistance of The Rookies School Directory. The 9-month Game Art Program boot camp proved to be the ideal choice for honing my skills and venturing into new realms. Under professional guidance, I'm learning everything necessary to fulfil my dream of becoming a successful 3D character artist. This milestone not only signifies progress in my career but also represents a step toward my deeper purpose — the aspiration to bring joy, inspiration, and hope to the world. My goal is to serve as an example, encouraging those who feel alone, powerless, and afraid to pursue their own path and live authentically. If I can achieve this, then anyone else can too.
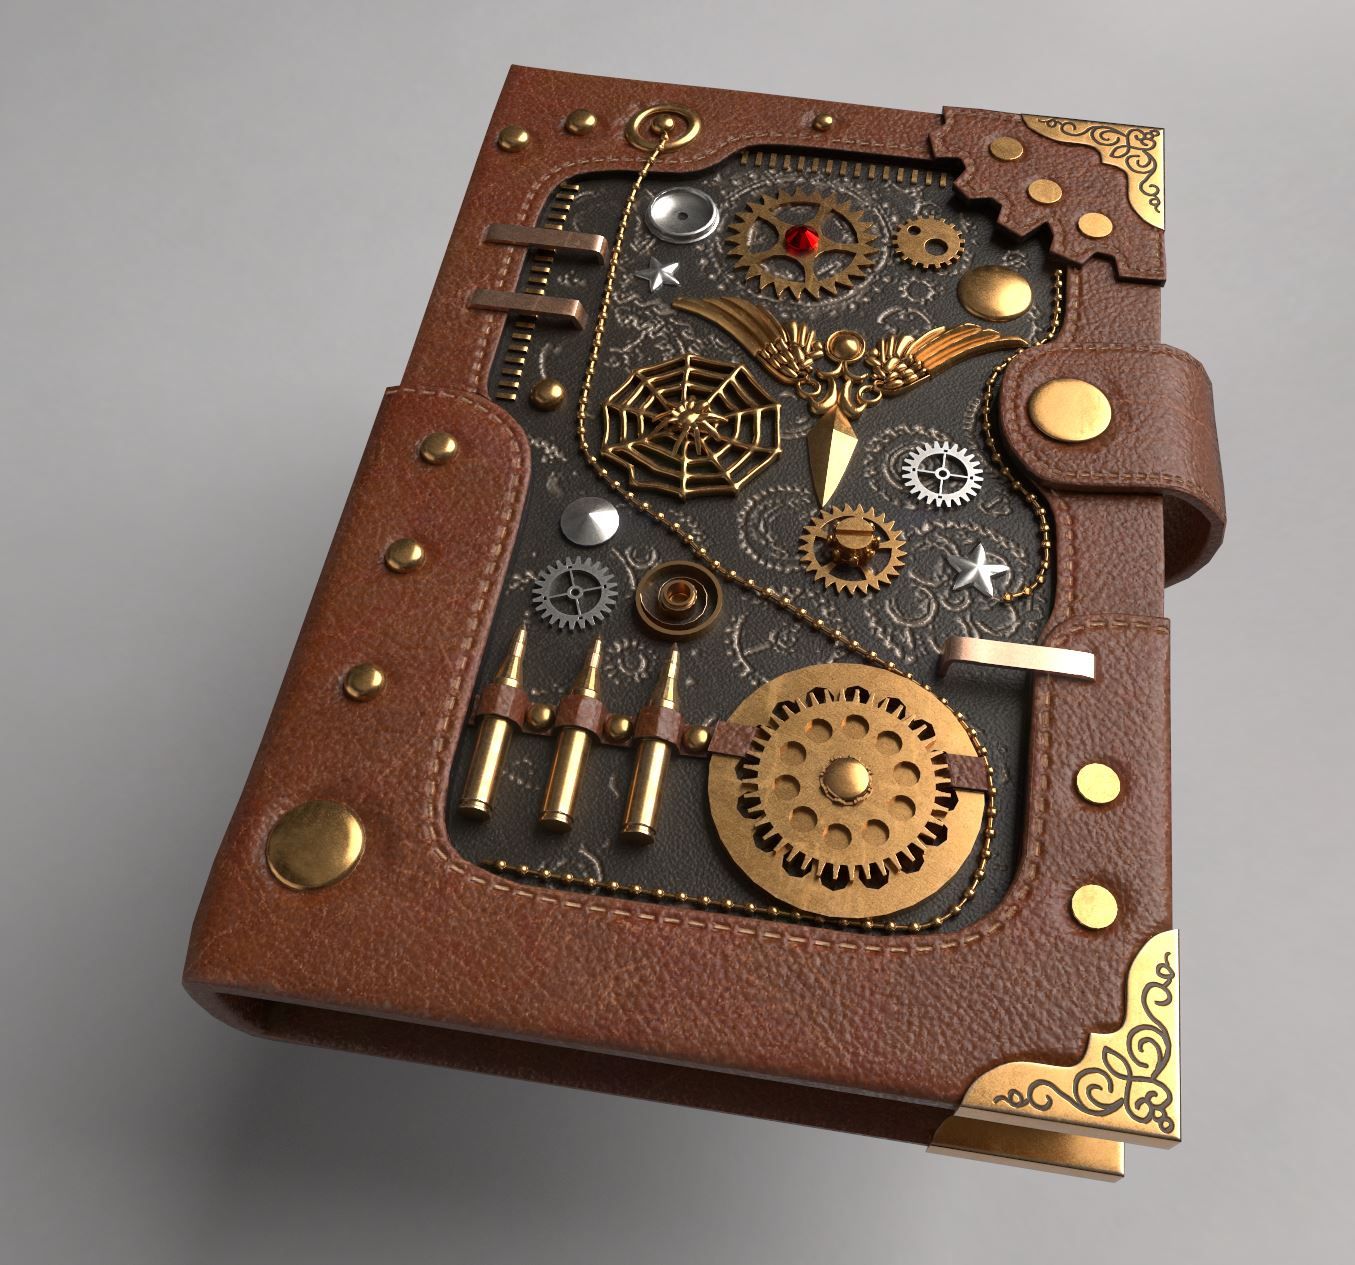
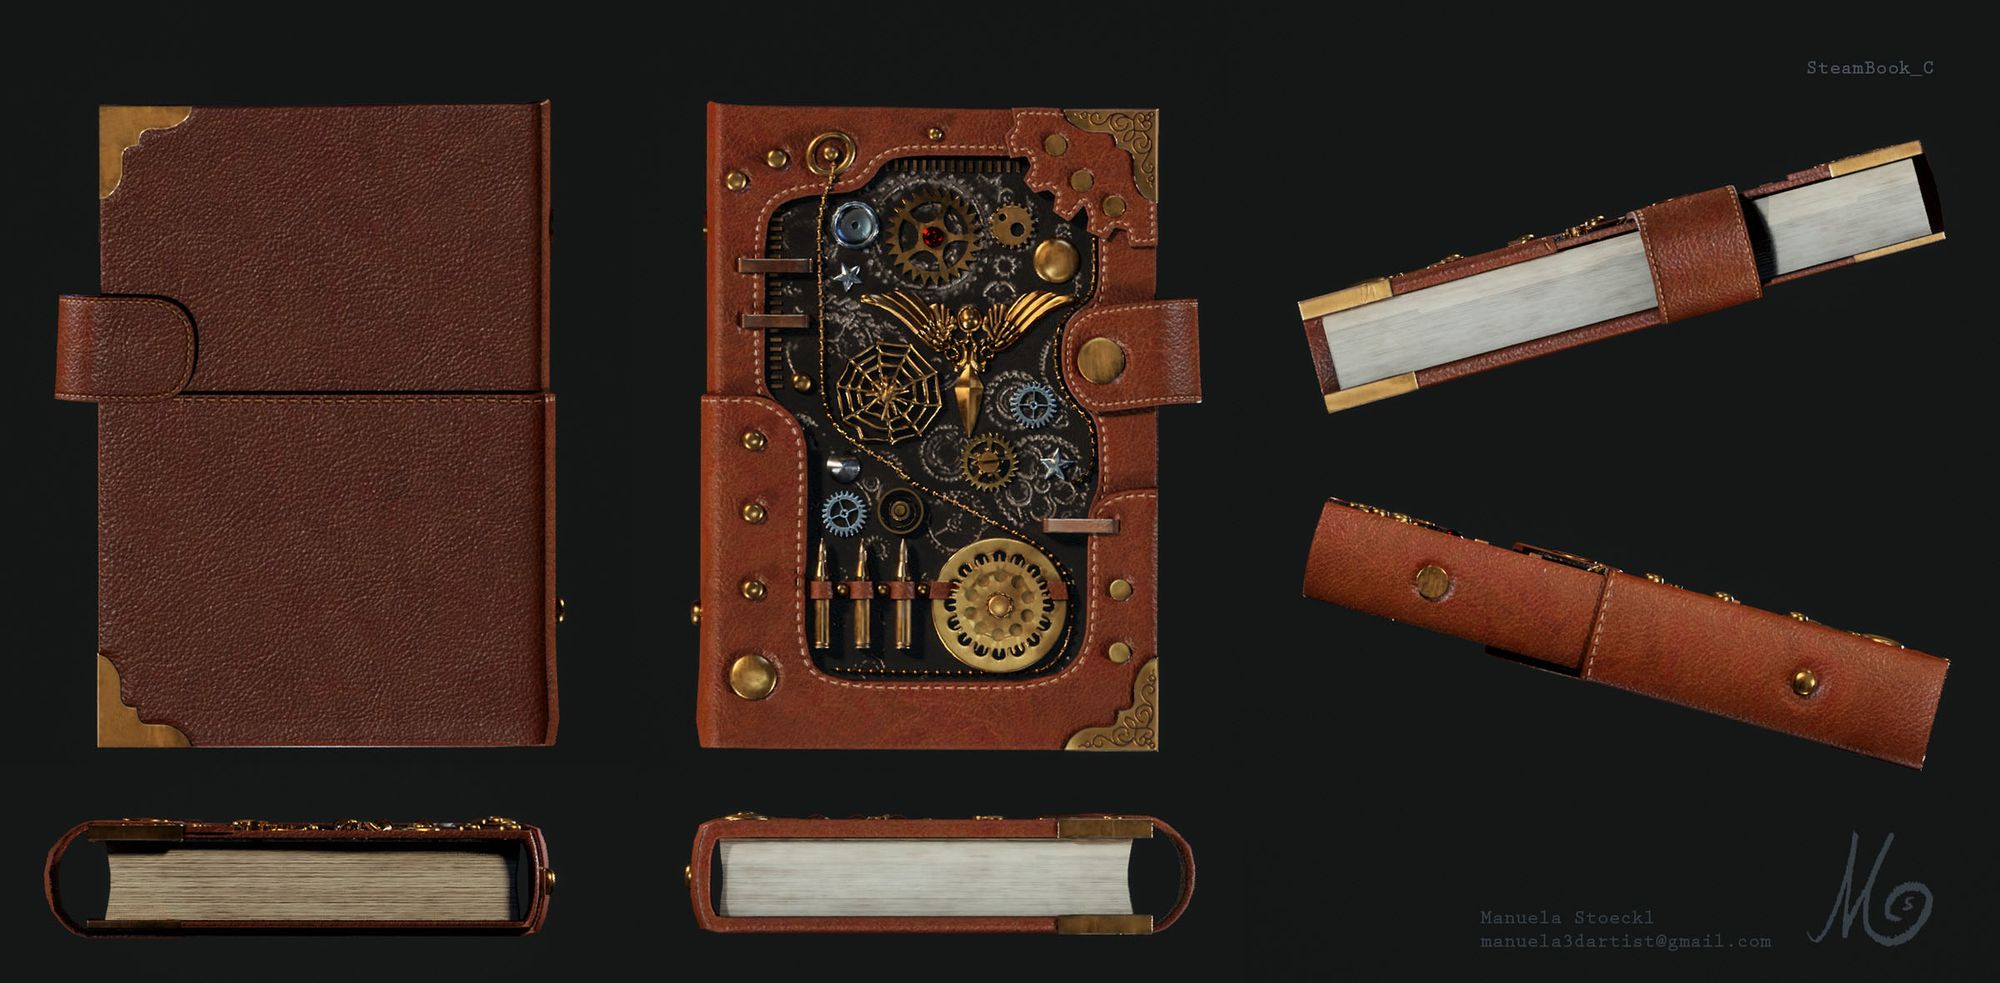
My first project is a game prop, crafted with the guidance of 3D pros, following industry standards and deadlines. It's a steampunk-style book, tailored for smooth gameplay and real-time action. This project showcases my passion, ambition, creativity, and dedication. The goal was to make a prop that truly feels authentic, enhancing the gaming experience for players.
In the next paragraphs I will share my creation process of my book, into the heart of my debut project. This part of my journey was an exciting time full of challenges from the first to the last step. The necessary pipeline is explained in detail below, with some screenshots for better understanding, and also give an insight into how I personally felt about the individual sections.
Before even touching a single polygon, I had to determine my direction, which was no easy task. With countless possibilities, personal preferences, and Vertex School specifications to consider, I faced the challenge of deciding what I could realistically achieve within the given timeframe. After some deliberation and consultation with my teacher, Rex, we settled on a steampunk-style notebook. Then, I began gathering reference images, not just of the book itself, but also of the various materials like leather, metal, zippers, and gears. With PureRef, I organised these images in a visually appealing manner. Excitement and anticipation filled me, but I wondered if I could execute the project to industry standards and meet the weekly deadlines with my current level of knowledge.
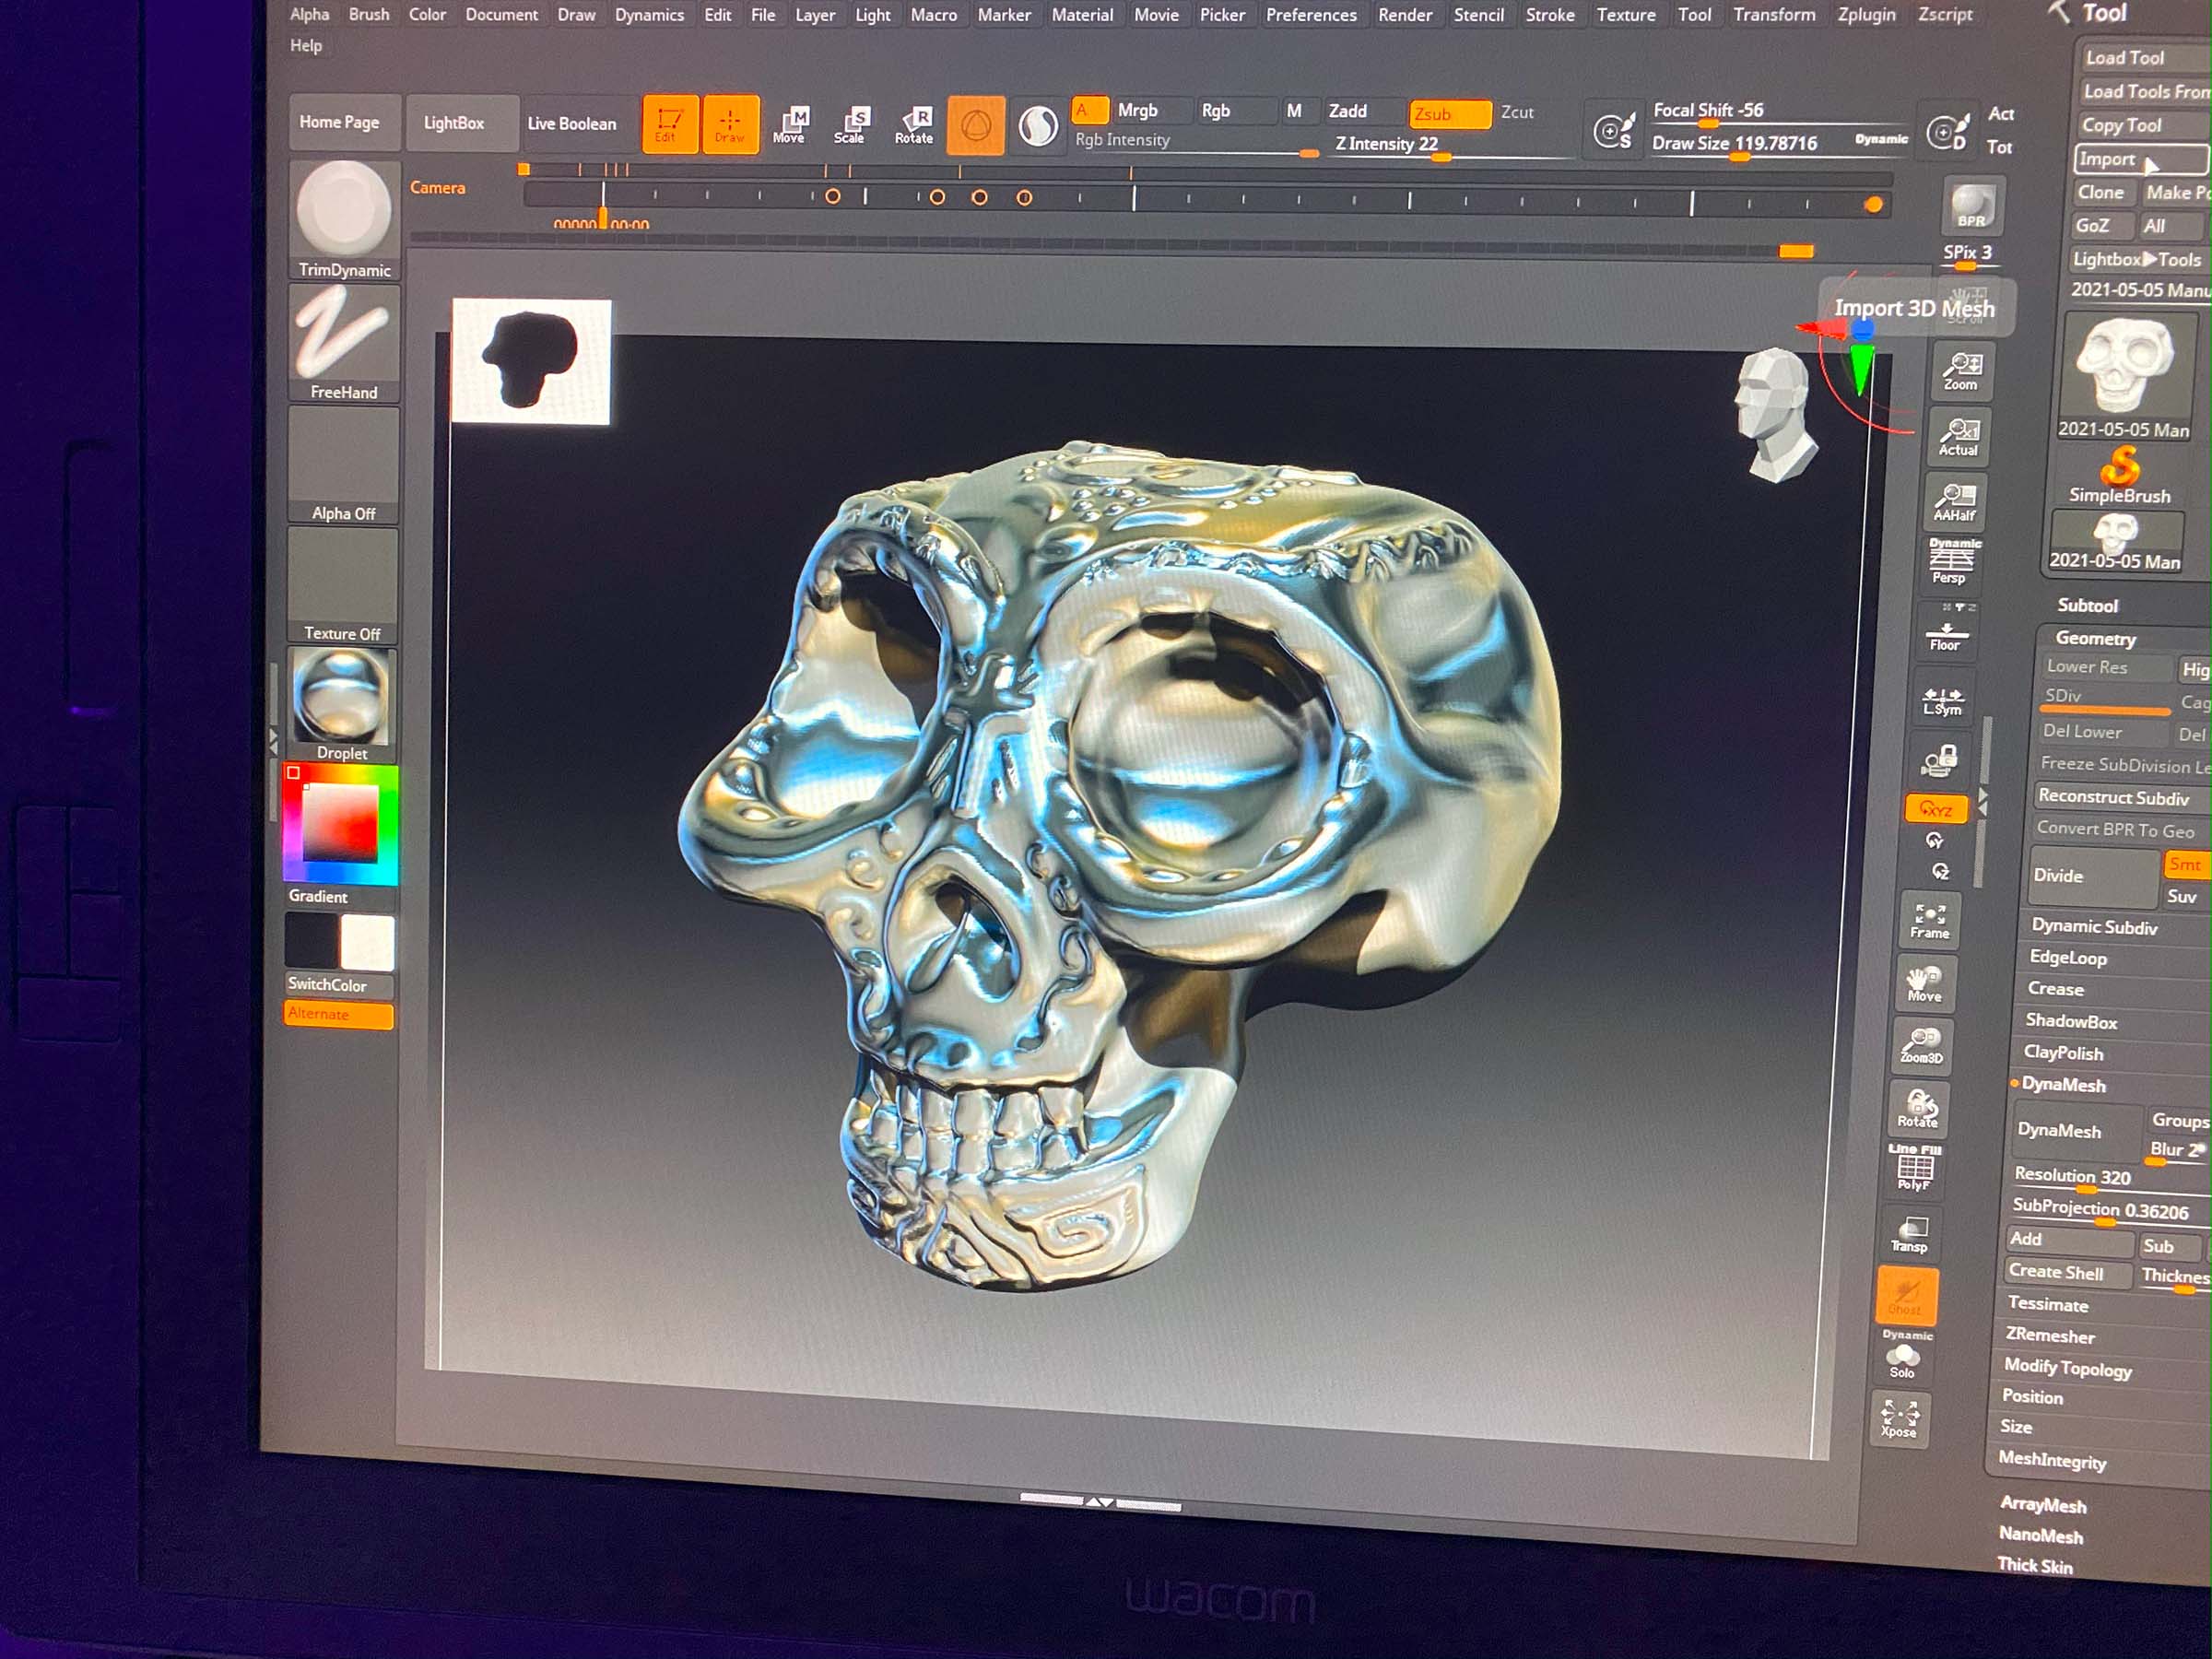
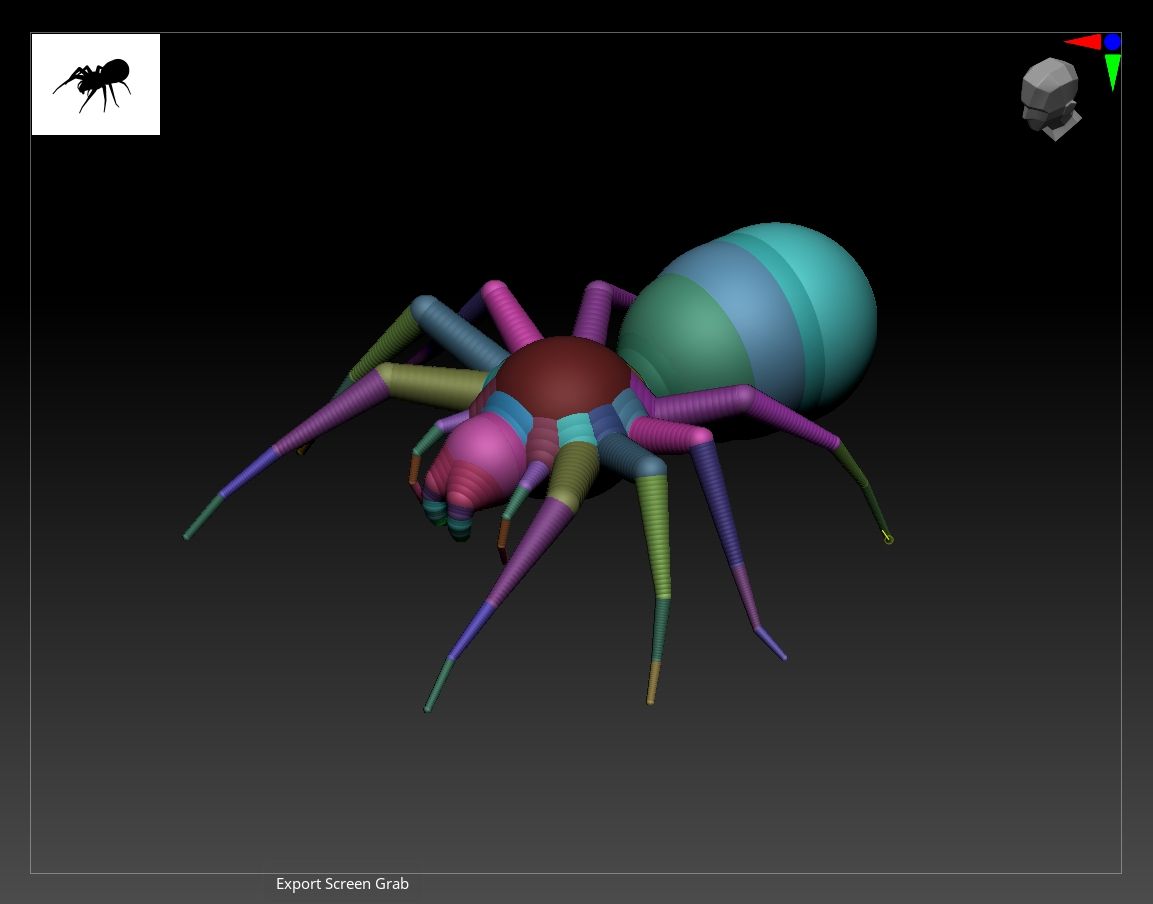
The starting signal was given! It was time to block out all parts of the book, to see how they fit together. However, I have a confession to make now that the project is complete: I didn't do that at all! But shh, don't tell my teacher. Instead, I immediately began crafting the detailed high-poly model. I worked non-destructively from the start, using layers to organize my objects. Maya, with its quirks like "Non-Manifold Geometry" and frequent crashes, often pushed me to the brink of despair. I would have preferred to work in ZBrush with the ZModeler! Working on organic features like the spider and its web allowed me to escape Maya's technical reality and retreat into Maxon's sculpting cave. As I sculpted the spider, I became so engrossed in ZSpheres that I almost ended up creating a realistic spider by accident! Thankfully, I snapped back to reality and refocused on the task at hand, returning to Maya to stay on track with the tight schedule.
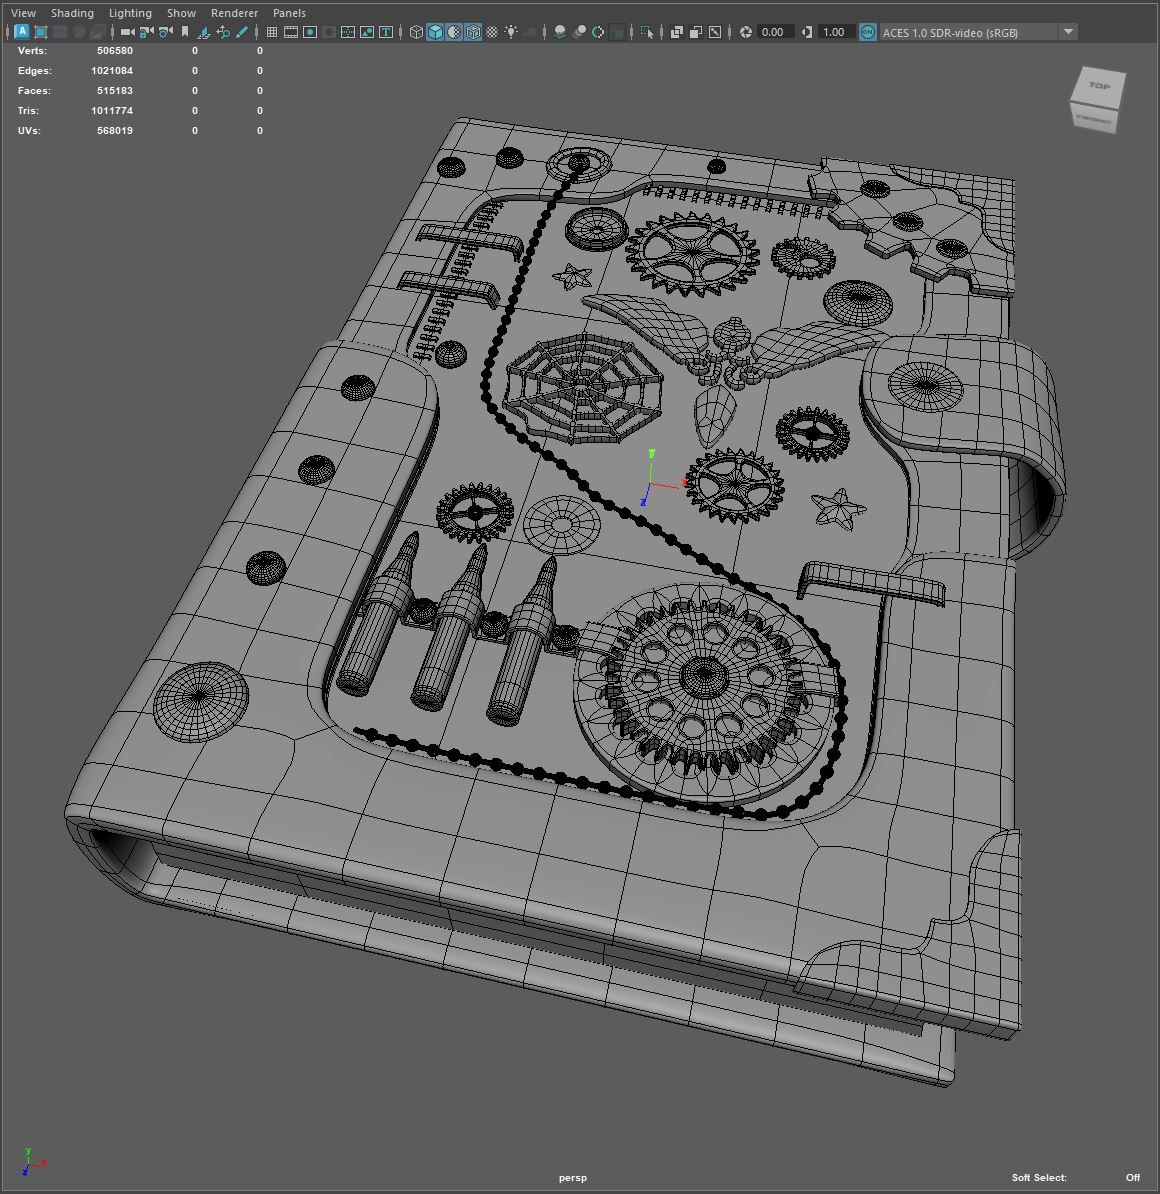
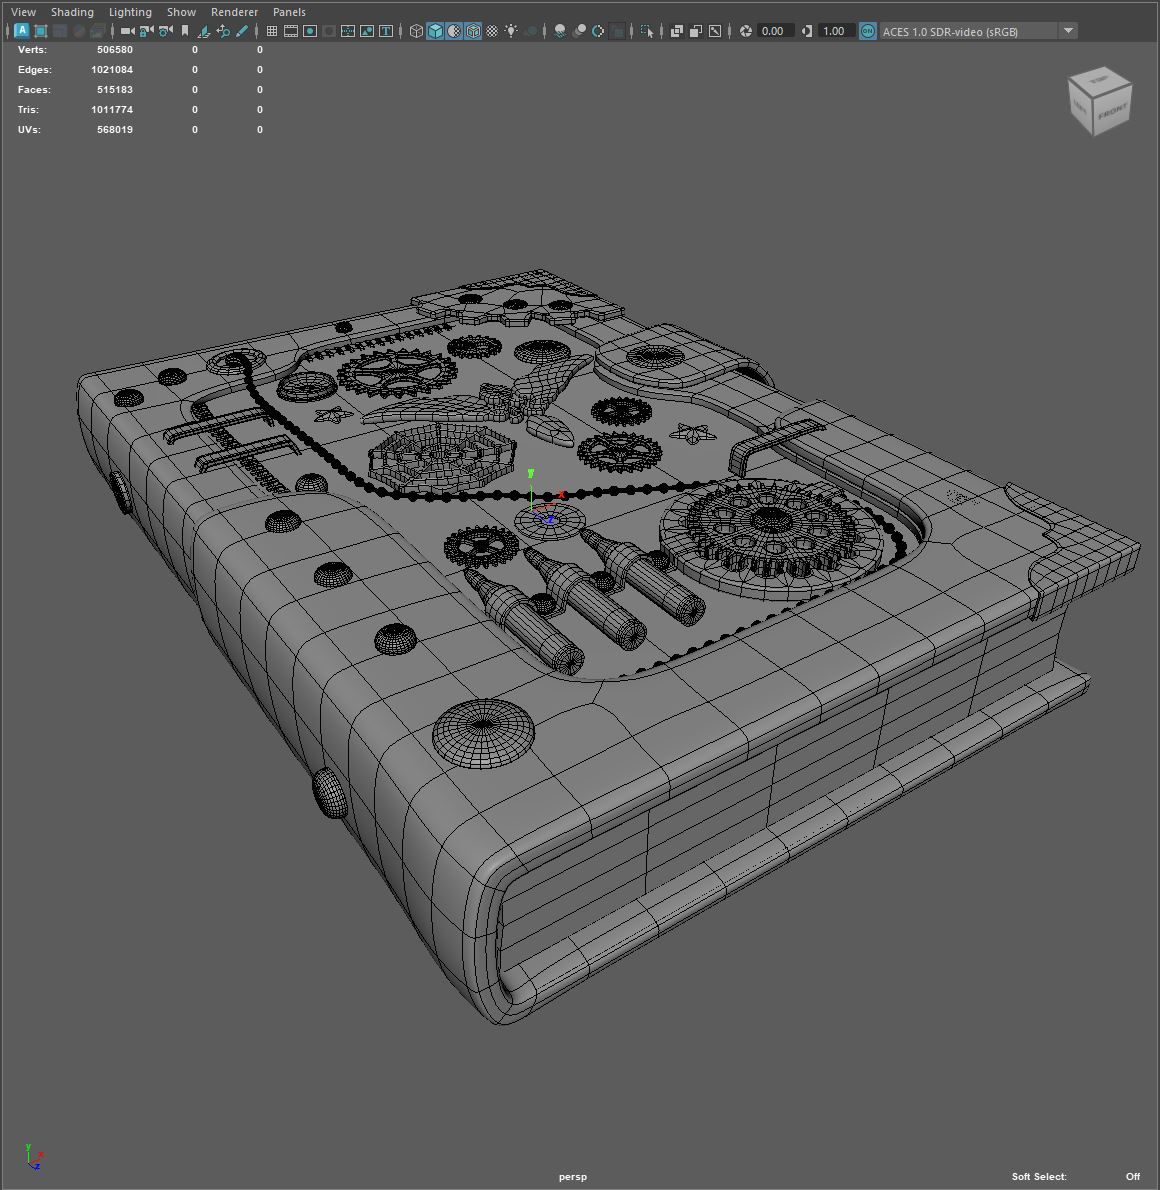
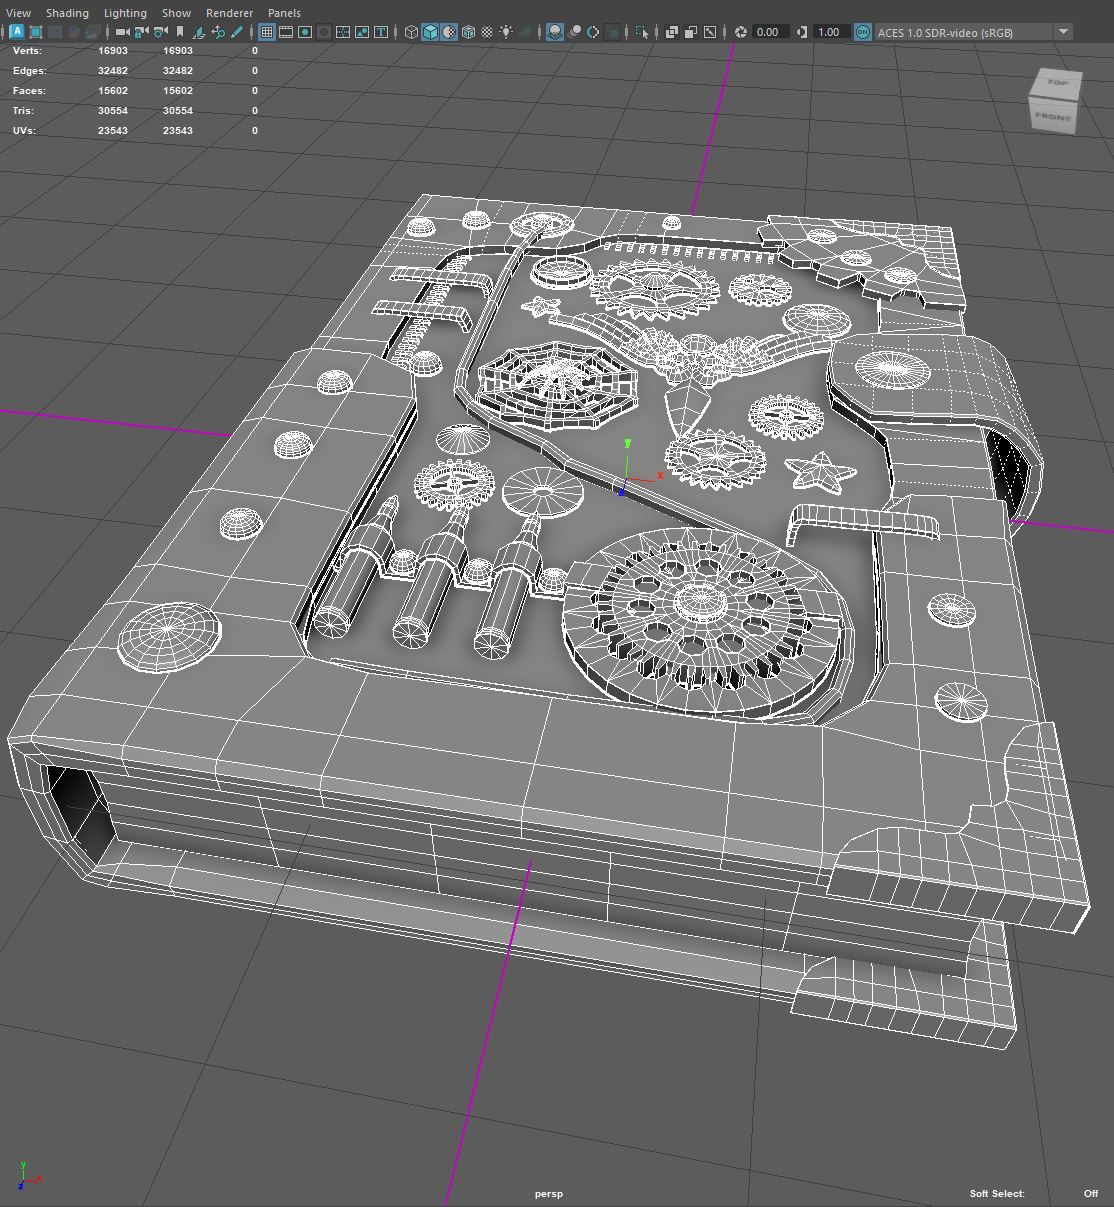
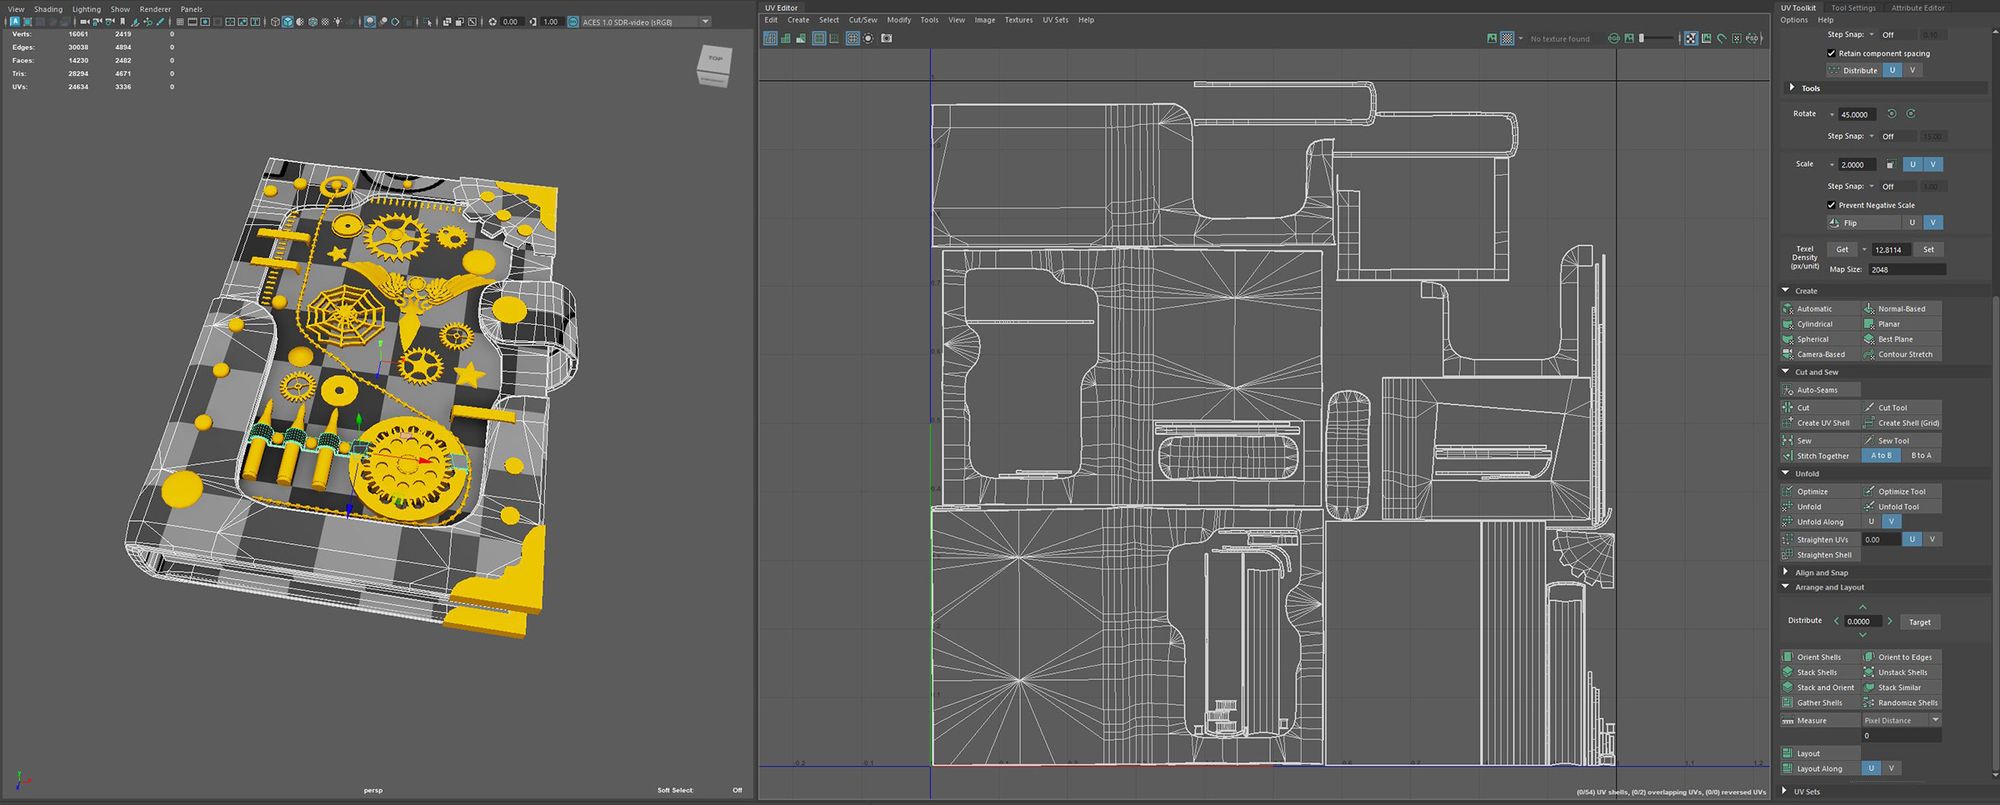
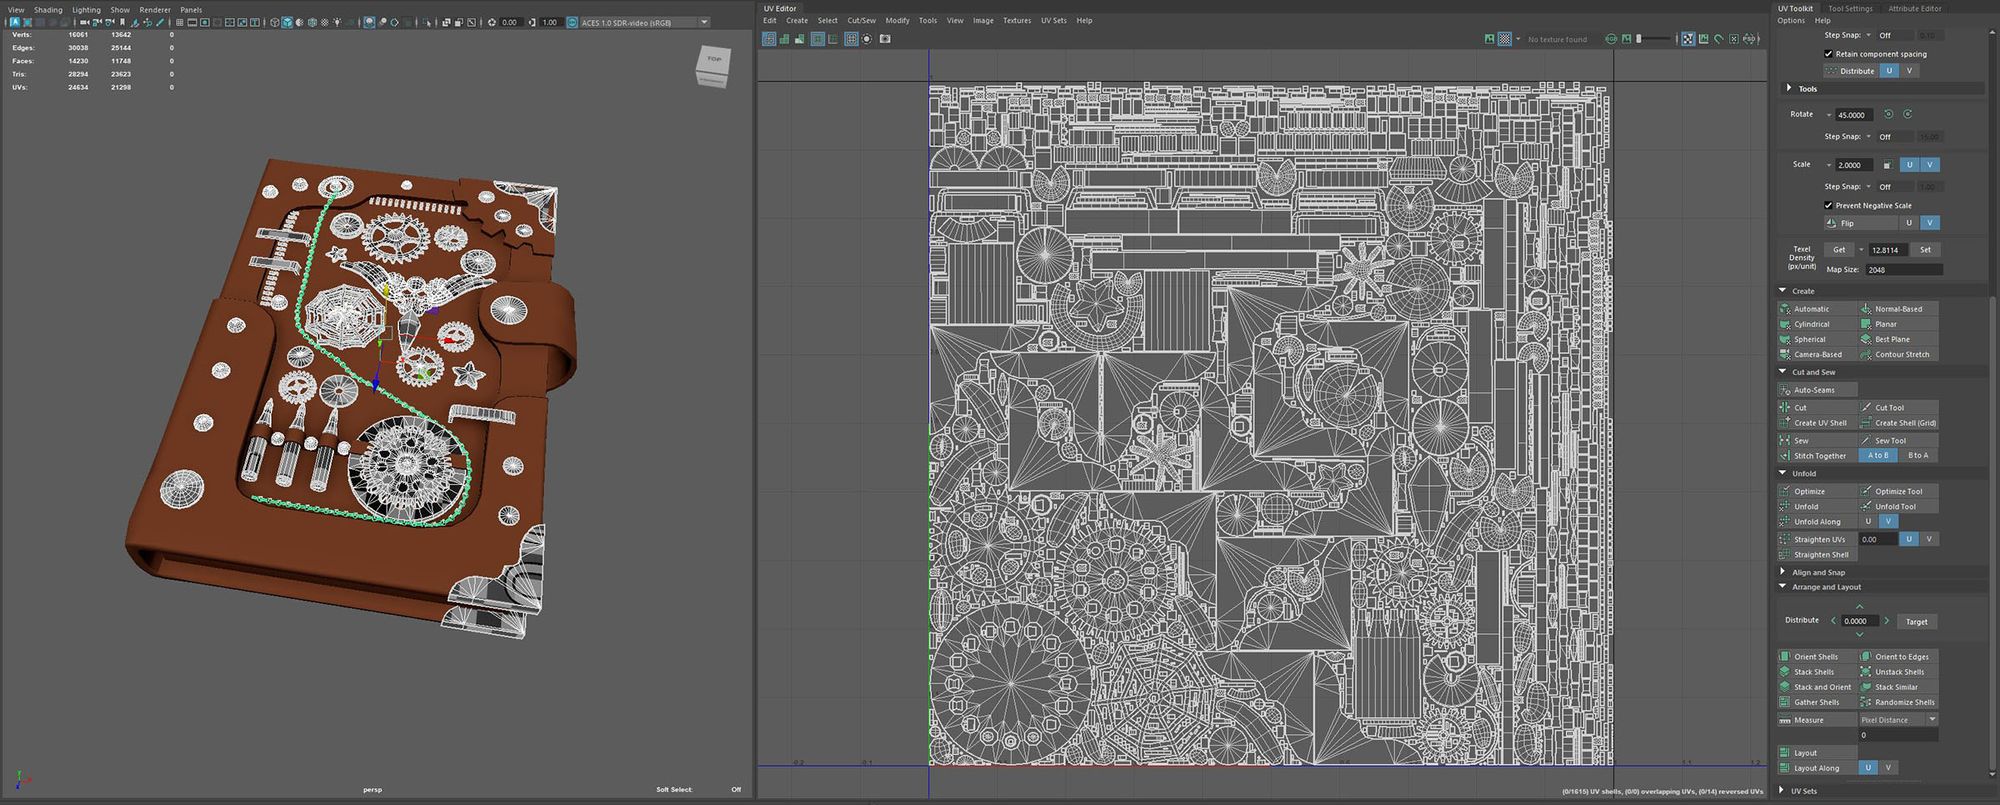
Next, the High Poly objects needed optimisation for the game world, one piece at a time. It was quite a task! In Maya, I recreated the HPs with a significantly reduced number of polygons, ensuring they remained faithful to the original. With the player's camera positioned approximately 30 to 40 cm from the prop, precision was crucial; any detail mistakes would be noticeable. Even when baking, I couldn't leave anything to chance. So, I diligently rebuilt most of the over 60 items, reducing polygons like a pro and adhering to the "spend on curves and save on flats" rule from school. Tris weren't an issue since the prop wouldn't be animated. Since most parts were hard surface objects, I prioritized adding bevels at the edges where necessary. This entire low poly step was quite laborious! To simplify the creation of Low Poly objects, I had to dial back my perfectionism and attention to detail significantly. The next step, creating UVs by cutting surfaces into parts, was also quite demanding, but my aforementioned qualities helped me through it.
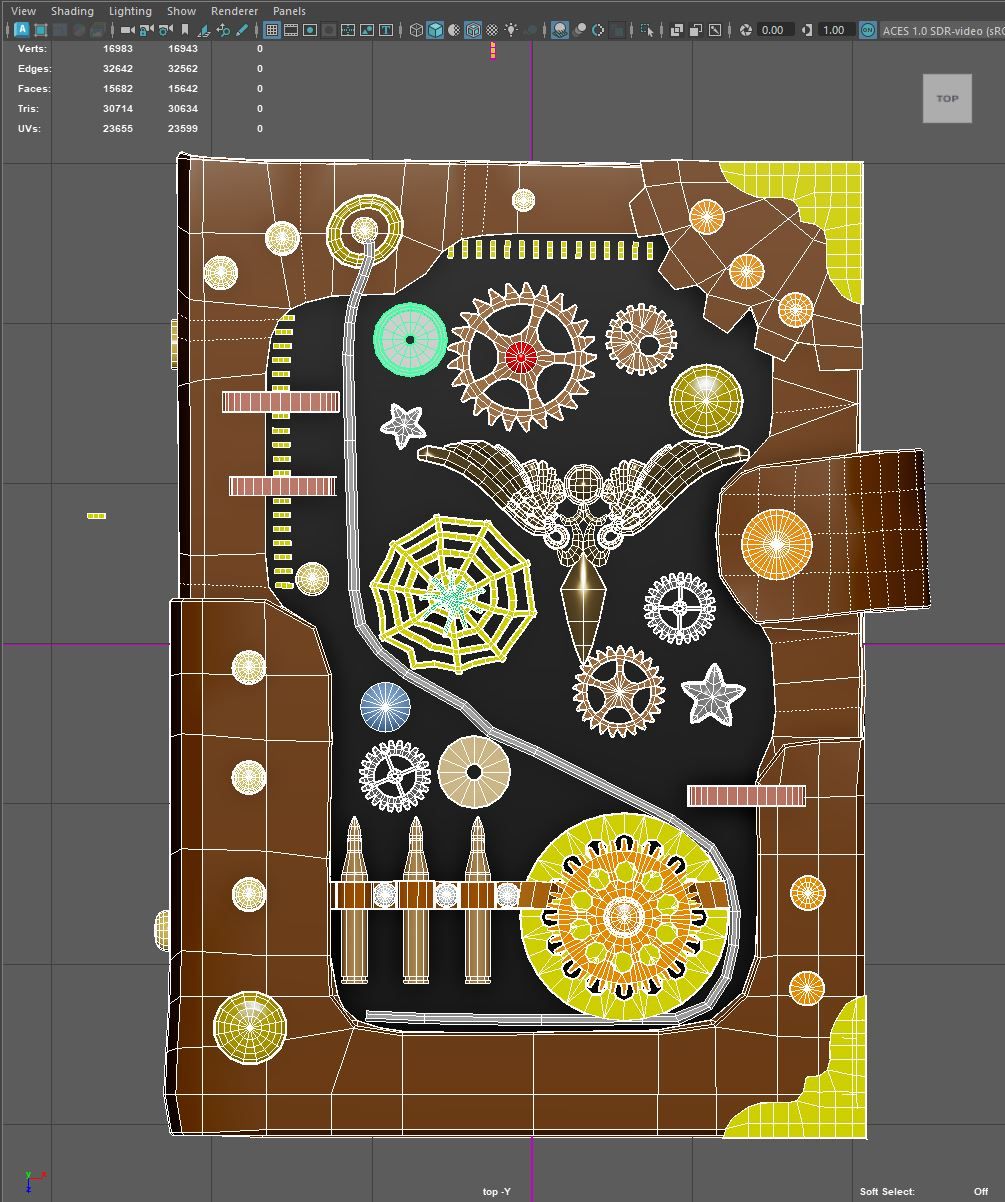
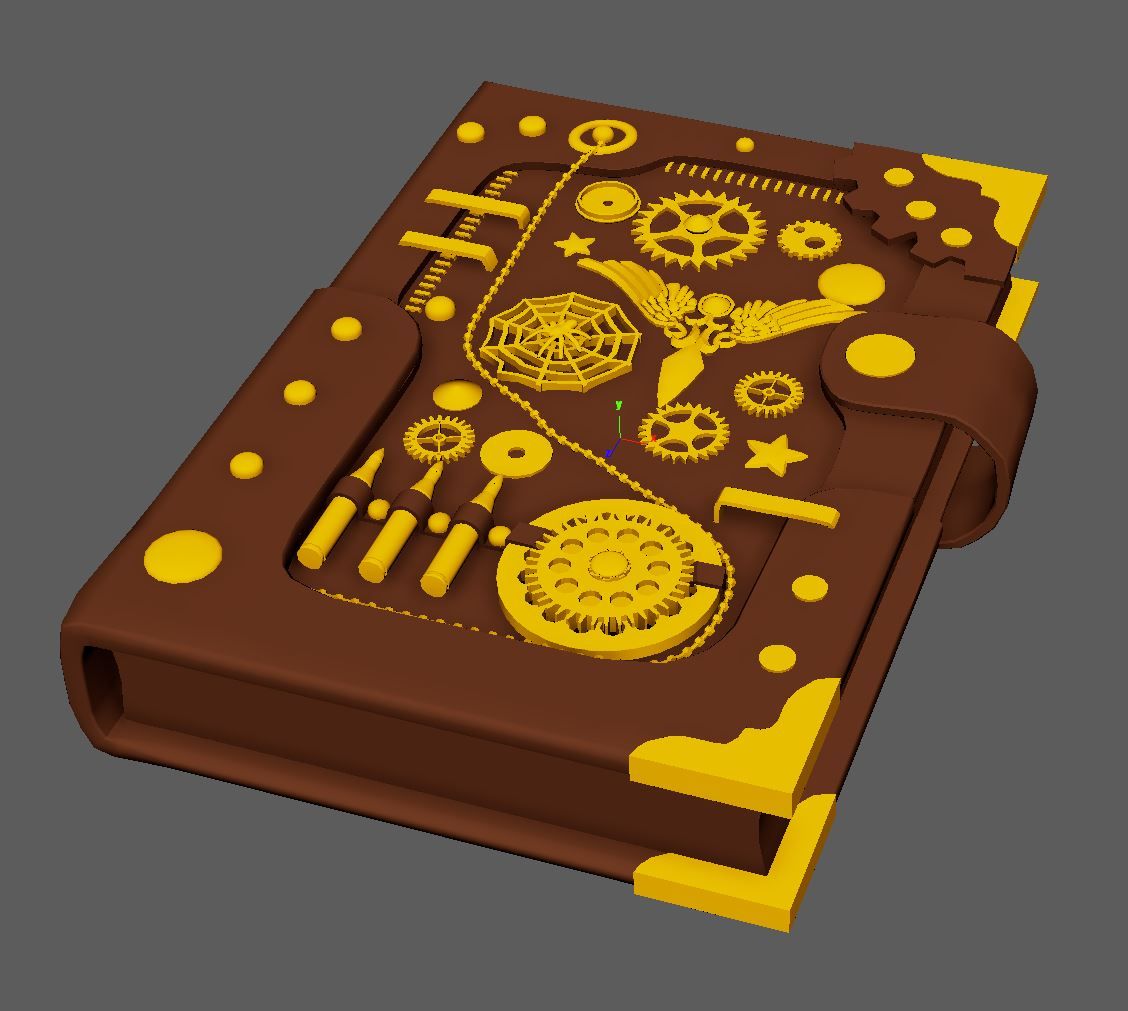
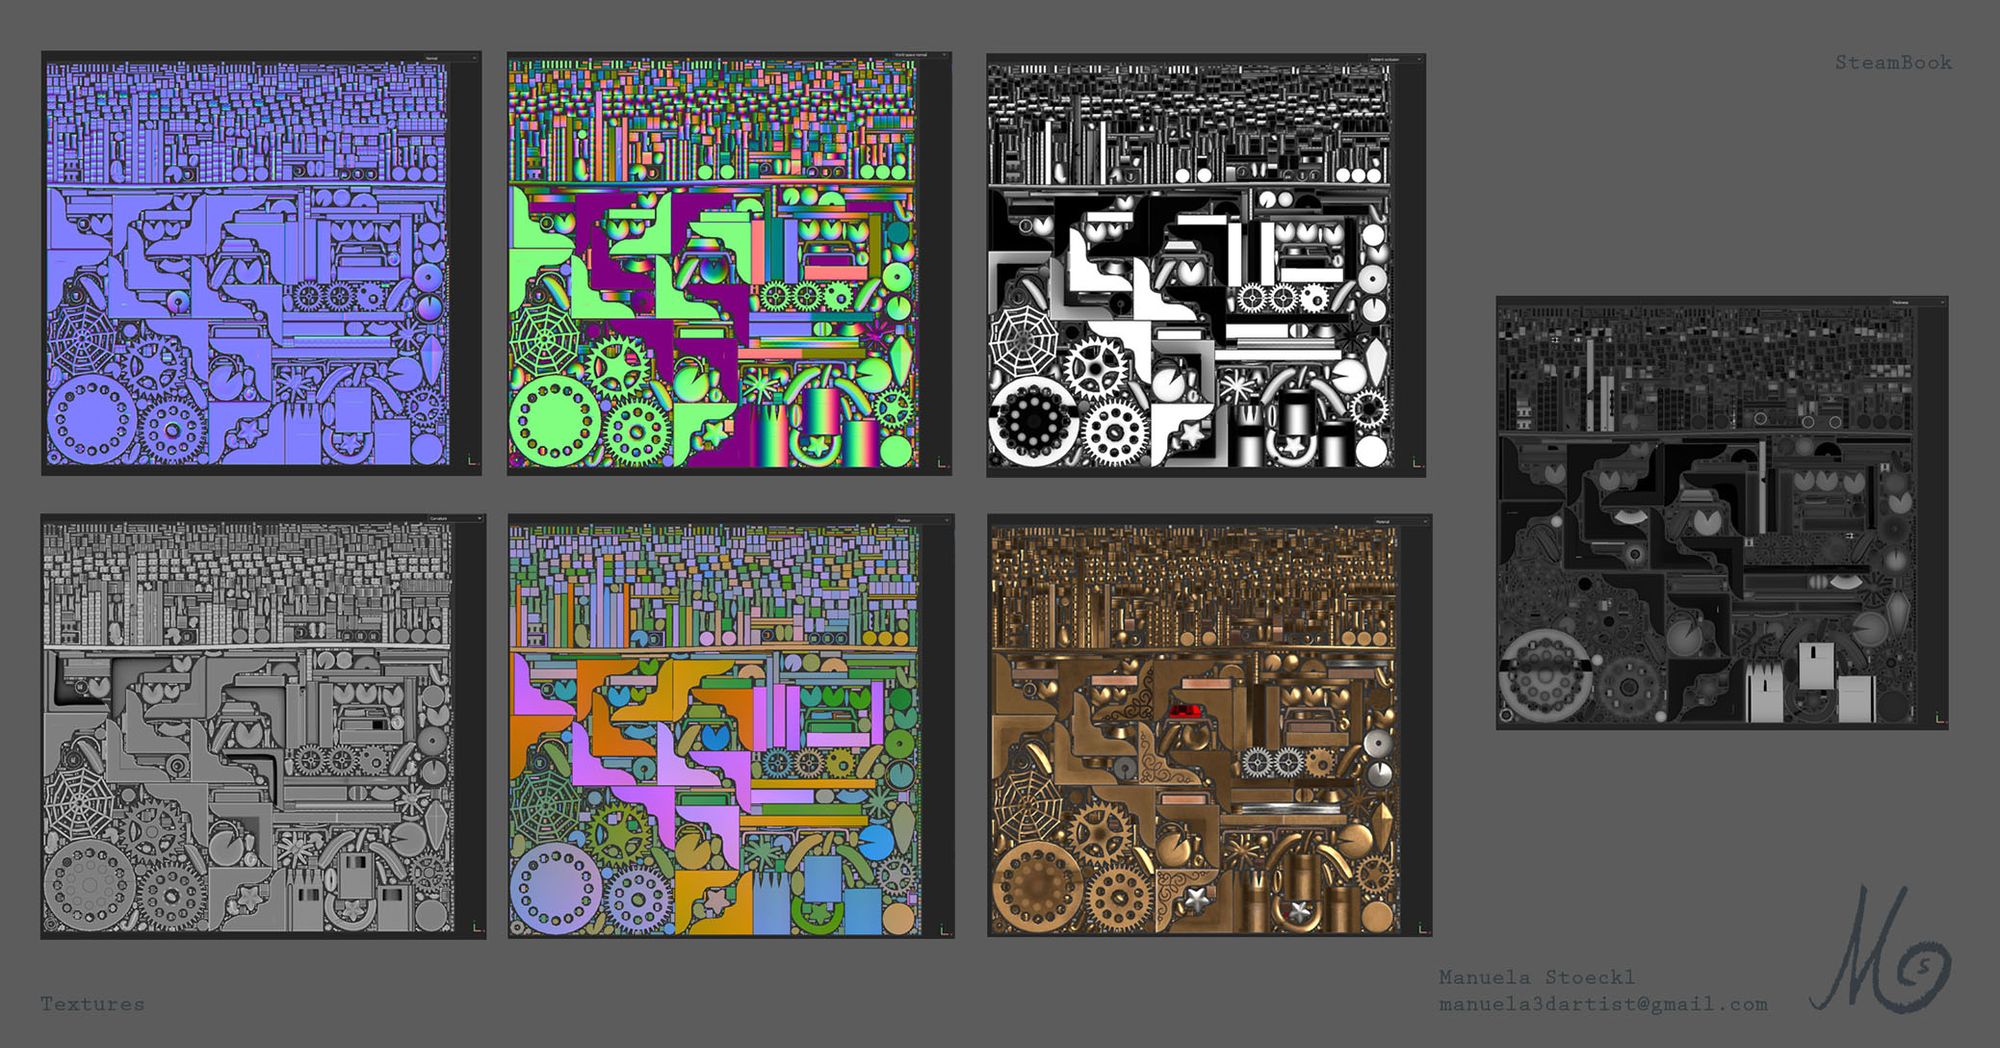
To achieve optimal baking results, I followed a meticulous procedure. I grouped all High Poly objects into material categories to simplify UV assignment. Utilizing the "Bake by Mesh Name" method, I ensured there was no bleeding. It was crucial to name each object correctly, both in the High Poly and Low Poly versions, to avoid endless error messages in Substance 3D Painter. After successful baking, we moved on to texturing. While it was a lot of work and exhausting, my innate sense of organisation, honed in my daily job, made the process manageable.
Creating textures in Substance 3D Painter felt like magic, as objects could be imbued with character with just a few clicks. However, achieving excellent results required a lot of work, precise hierarchy adherence, and good layer organization. Close observation of references was crucial to ensure colours, surfaces, details, and materials were as realistic as possible, which both enchanted and motivated me. The design possibilities felt limitless, sparking my imagination instantly. The outcome was two textures: one for the SteamBook Happy Adventure and a slightly more unusual version, both available in my portfolio if you're up for it.
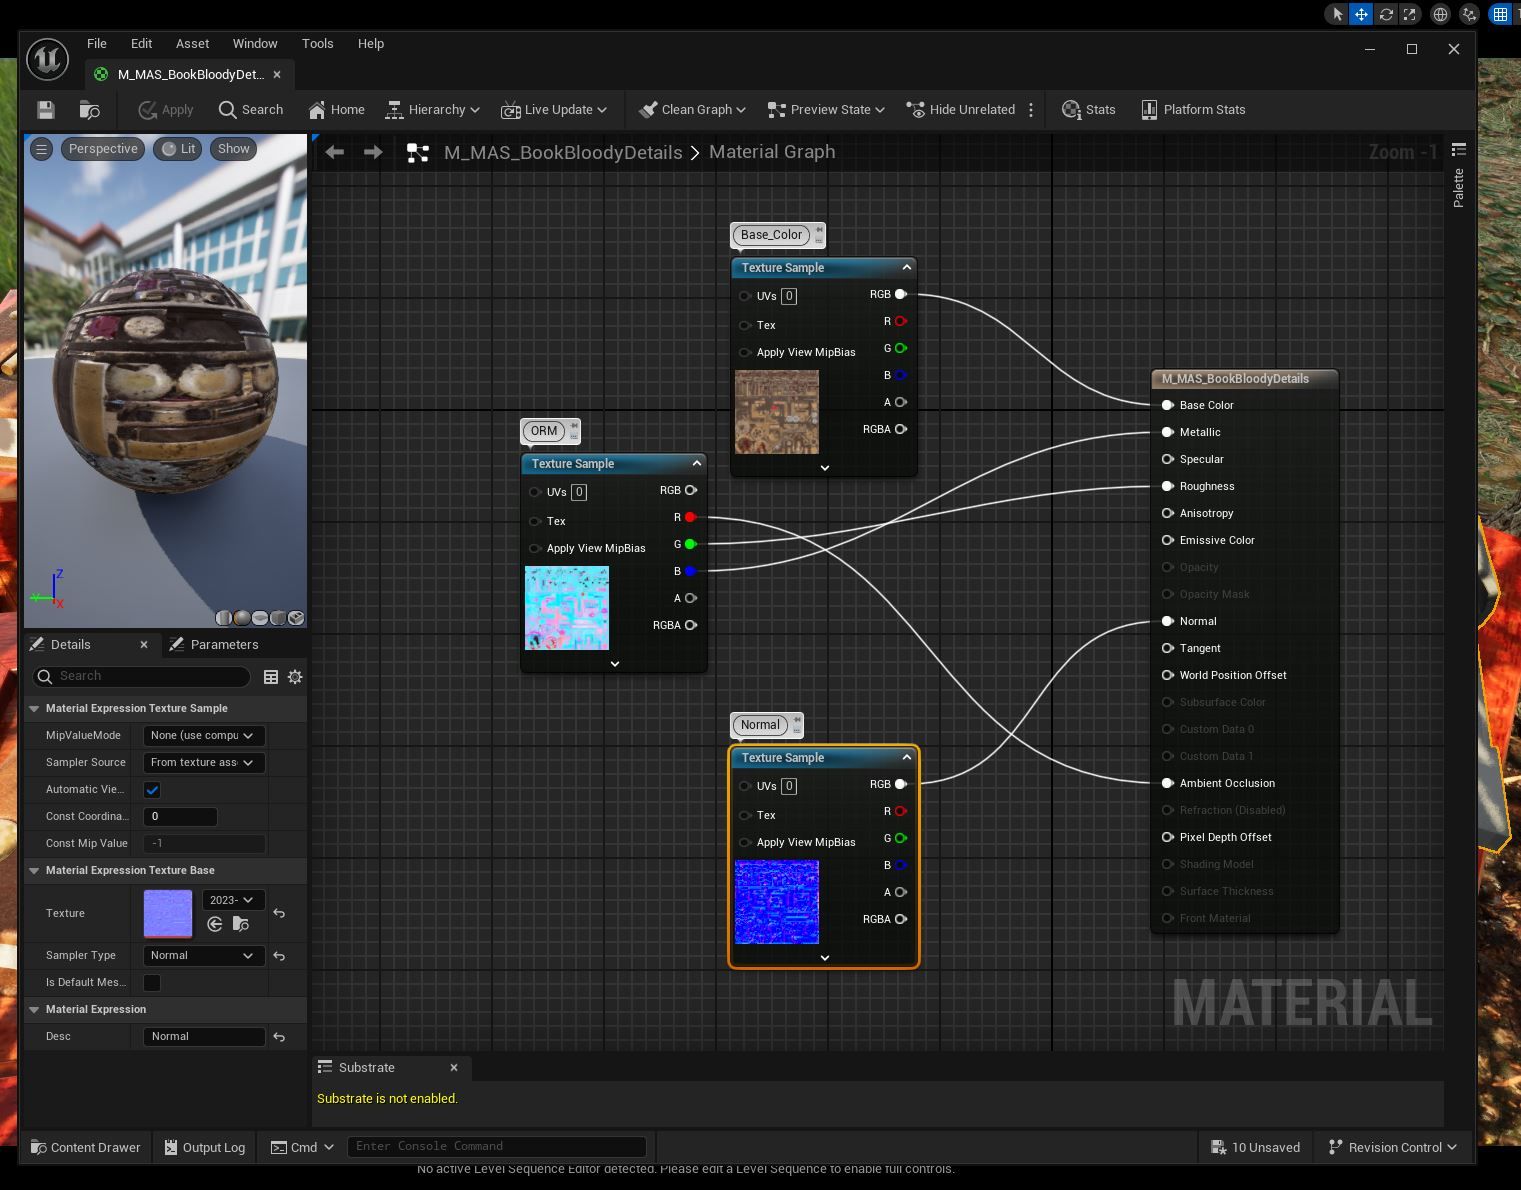
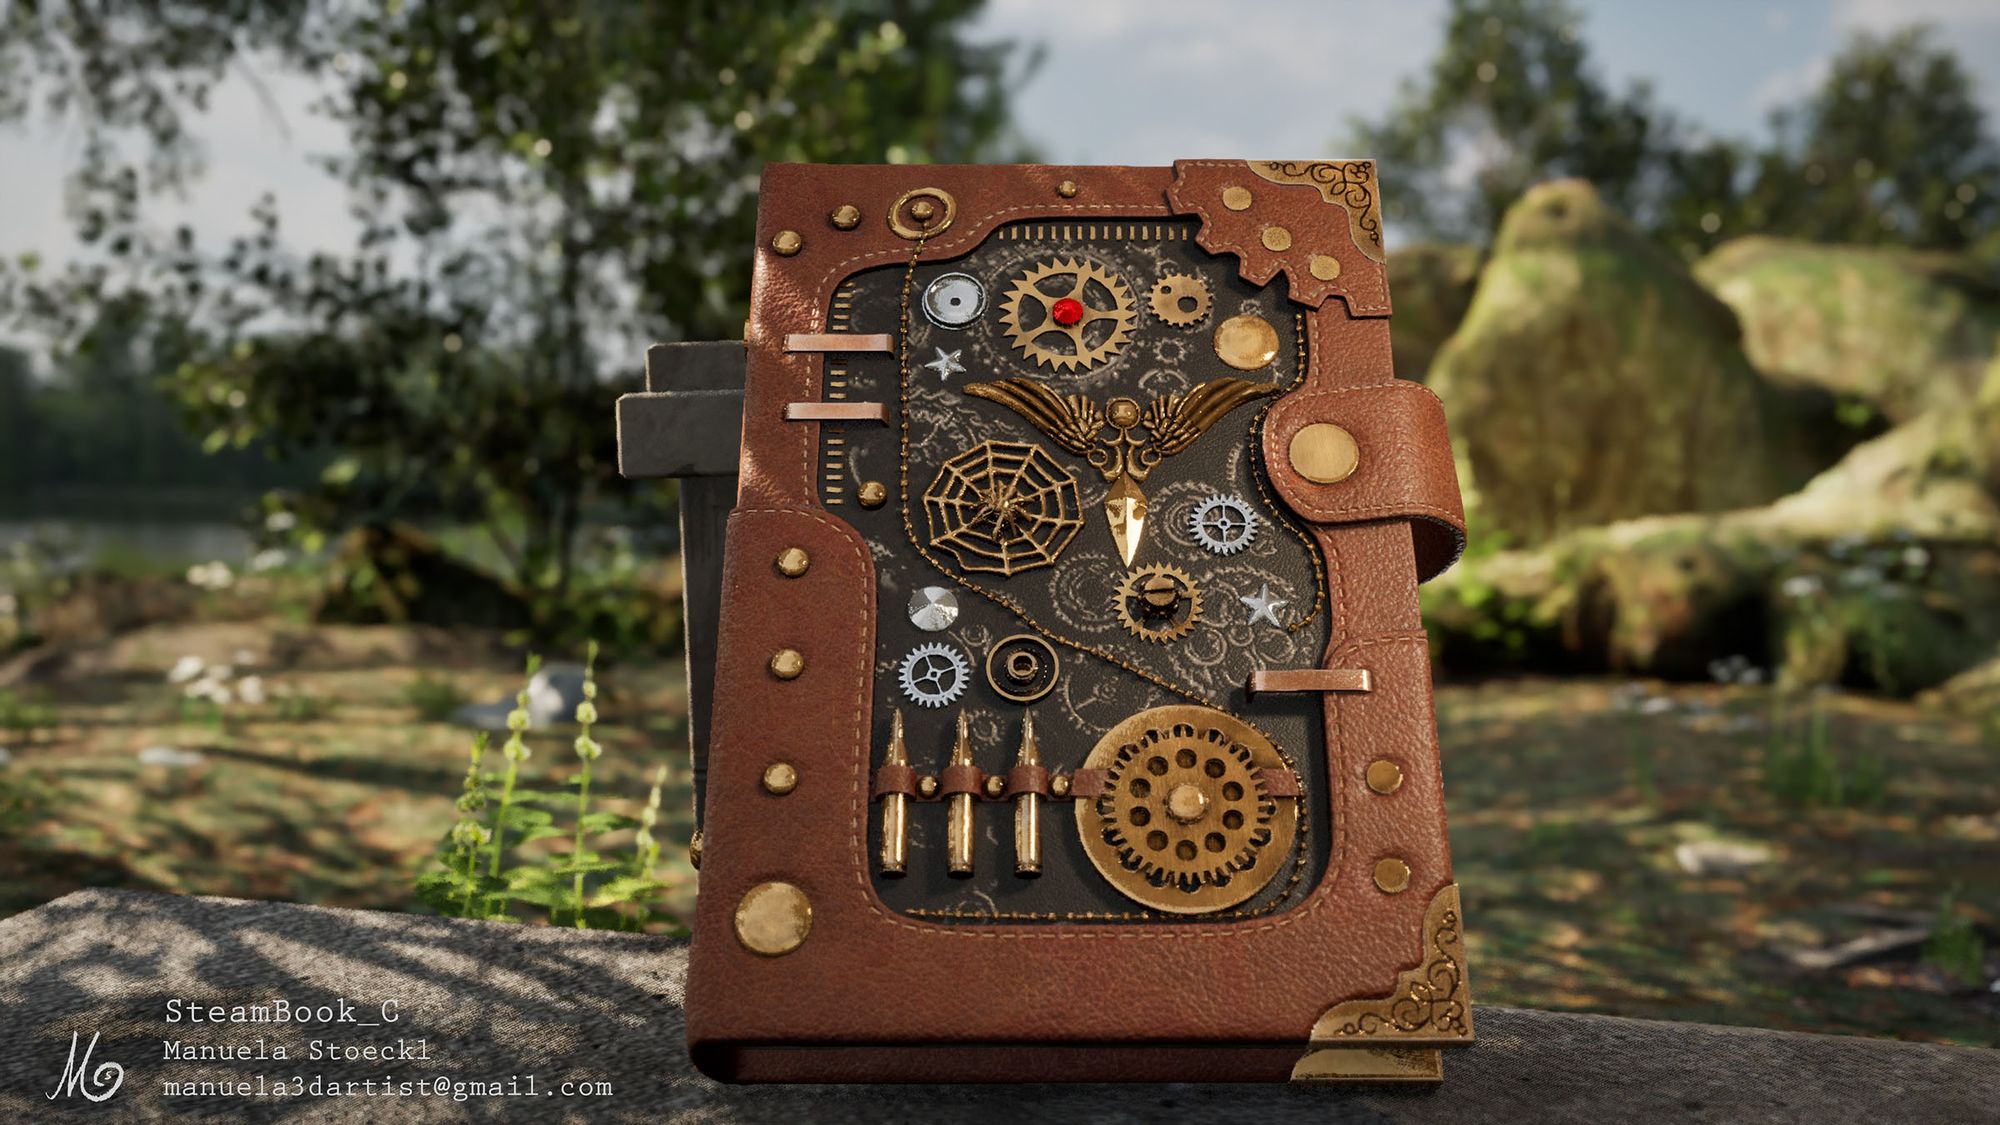
Rendering my SteamBook was next on the agenda, and I opted for Unreal Engine 5, despite my limited experience with it. Impressed by its presentation videos, I dove in, following a tutorial titled "Quick Environment Creation with Unreal Engine 5" that I stumbled upon. My aim was to showcase my book in the sunlight of an idyllic landscape with a lake backdrop. With the help of a HDRI map, static mesh, assets from Quixel Bridge, scattered grass, and my newfound favorite, material blend, I pieced together the scene. Along the way, I encountered some challenges, but with resources like UE Help, YouTube, and forums, I managed to overcome them. The end result was a beautifully lit scene with a great atmosphere, achieved through a few camera adjustments and settings like focus point and focal length. The idea of experiencing this scene as a player excited me, and despite my limited experience, I felt incredibly proud of the 3D space I had created through curiosity, ambition, and a few hours of diligent work.
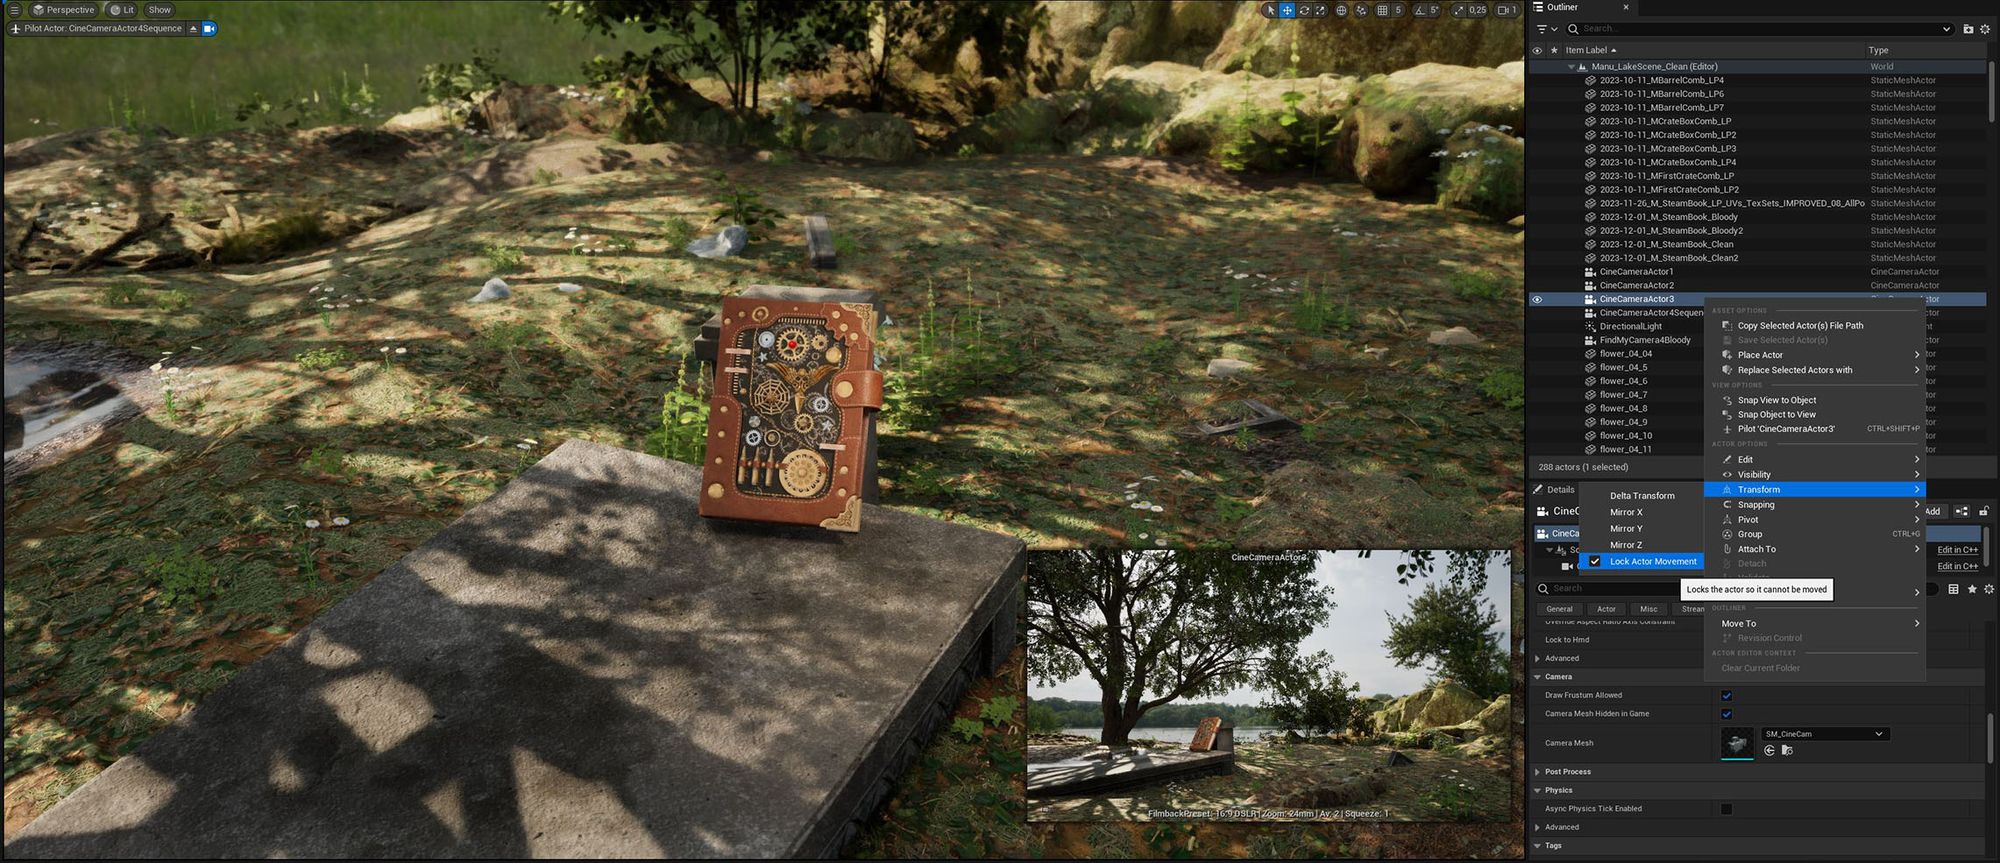
Finally, the time had come to unveil my project to the world. As outlined earlier, I created several renders and a short video using Unreal Engine. In this phase, I focused on applying the golden ratio to draw attention to my book and its intricate details. To provide insight into the underlying techniques such as HP, LP, UVs, and textures, I crafted visually appealing collages in Photoshop. Each image was adorned with my logo and contact details in a readable font and matching colour, ensuring easy inquiries from interested parties and potential clients. The prospect of presenting my prop filled me with nervous anticipation. What would my classmates, friends, teachers, and the world think? But hesitation was not an option, so I took the leap and went public! Upon publishing, I braced myself for criticism. Would my work be well-received, perhaps even admired? Or had all my efforts, countless hours, and sleepless nights been in vain?
Sharing my book with the world marked a significant milestone in my educational journey. It signified the successful completion of Term 1 at Vertex School and paved the way for Term 2, where I delved into character art and embarked on creating my first character, the next chapter in my journey. Reflecting on this experience, I can confidently say that my determination, passion, thirst for knowledge, and drive propelled me to achieve a wonderful result with this project. Moreover, it presents a tremendous opportunity for me to spread positivity, courage, and inspire creativity. As we bid farewell to this visual odyssey, I hope it serves as inspiration for you to pursue your creative dreams, to heed the calling of your heart. Remember, it's not just about reaching the destination; it's about embracing the journey, facing challenges, and celebrating triumphs that shape us. What did I learn along the way? Resilience, perseverance, patience, self-confidence, time management, self-compassion, and the importance of self-love. I also conquered feelings of impostor syndrome, thanks to a combination of self-reflection and professional guidance – a heartfelt thank you to my coach. And the most significant lesson I've learned? Aim for progress, not perfection!

Many thanks to Rex Lucilla, my teacher during this term. He always helped me with words and deeds and his humour as well as his positive attitude and lovable personality hold me a great support.
Also a big thank you to Eyal First, who brought me to new insights in the labs and whose praise motivated me further.
One more, especially to my mum, Ramona, Lenny, Alex, Verena, Chris, Julienne, Adrian and James. As well as all the friends and colleagues who were there for me and last but not least the Vertex School team.
The biggest "thank you" goes to Peter, my husband, who supported me over and over again, motivating and comforting. He gave me his decades of experience, freed me from the confusion of the Maya pitfalls and provided me with the composition of my workplace, hardware and software for a well-thought-out basis. Without his encouragement to try out digital rather than analogue art, I would probably never have dared to take this step and this journey might never have taken place.
Check out more of Manuela's work via her Rookies profile here.