Designing a 3D Bionic Mermaid Character
Aleksandra Donevska, a student at M3DS Academy, ventures into her academic journey as a 3D Artist, tackling her maiden character design - a 3D bionic mermaid.
Aleksandra Donevska, a student at M3DS Academy, ventures into her academic journey as a 3D Artist, tackling her maiden character design - a 3D bionic mermaid.
Aleksandra Donevska is a student at M3DS Academy, embarking on an academic career as a 3D Artist. She recently took on the challenge of designing and creating her first character - a 3D bionic mermaid. In this article she shares her workflow and invaluable lessons from her instructors along the way.
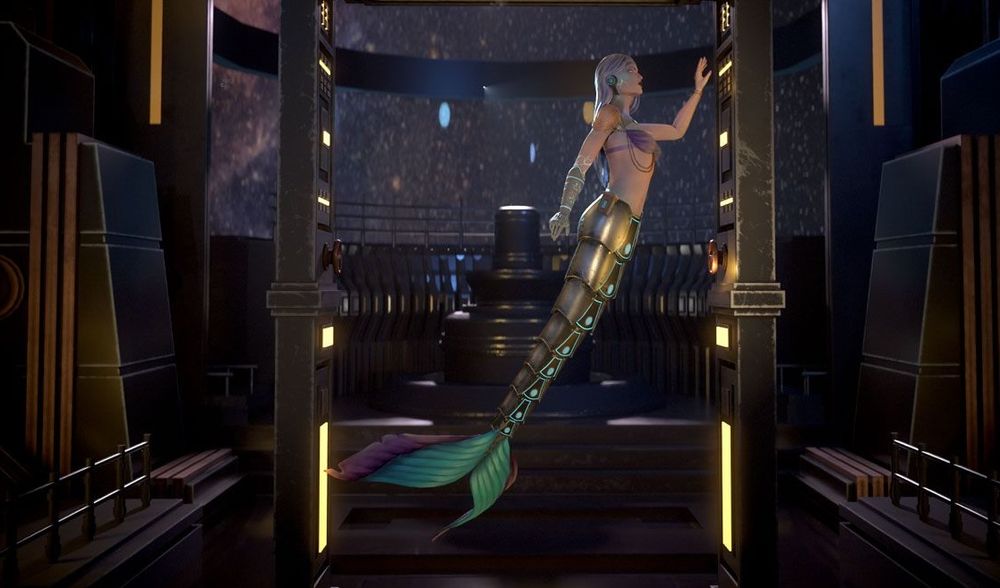
The main idea was to create a half-mermaid / half-robot creature existing in space sometime in the future, where civilisation has advanced and progressed into a bionic robot world with barely any actual humans and organic forms left.

The journey started with the idea of creating a half-mermaid / half-robot creature in space sometime in the future, where civilisation has advanced and progressed into a bionic robot world with barely any actual humans and organic forms left. This phase was exciting because I created a whole story around the character and made a concept sketch, which was my guide for the entire process.
Before I started working in Photoshop and drawing concept art, I collected some ideas, which helped me inspire myself and define what exactly I was going to do. The greatest challenge during this phase was finding specific images of robot bionic mermaids, so I ended up gathering bits and pieces of different robot/mermaid stuff that I was planning to put together into one concept.
I started with drawing the main mermaid shape and instantly decided to give her a robotic tail and keep the upper part of her body more organic. At first, I drew a very rough sketch with the brush tool in Photoshop – I got the primary body forms and ensured that the overall proportions were correct. I added another layer above the first one and kept refining the sketch into a drawing that could be coloured. The third and final layer was added in order to colour the sketch. I wanted to keep the colour palette interesting and somewhat colourful despite the metallic grayness, so I chose a purple-cyan colour spectrum.
I learned that this phase is imperative in order to get a refined and detailed preview of the model. It makes the whole process of sculpting a lot easier because you know exactly what you are doing. I had a clear vision of the concept—the Bionic Mermaid has an organic left arm, body, hair, and fins, while the other parts, such as the tail, right arm, and part of the shoulder, will be artificially made.
The Bionic Mermaid also holds a weapon, which I later decided to be a Trident.

The next challenge was deciding what weapon I would use for her to hold. What characteristics should a weapon of a bionic mermaid have? Since she is a mermaid, it was logical to create a Trident. Since she is a half-robot in space, the Trident should not be regular but a specialised mechanical power-induced weapon that humans somehow enhanced. During this thinking process, I understood that it was essential to think about these things because you must put a story behind your creations. That way, you can create something you know well and feel personally connected to.
With that thought, I created the Trident with the idea that it should have an engine that takes raw energy from the carved gems and produces lighting. The concept of the Trident was challenging because it was my first time creating a Trident weapon. I had to find a way to combine the classical form of the Trident and the mechanical part that was incorporated into the original form.

The sculpting process was time-consuming yet enjoyable. This phase is where I created the foundation for the model, so it was imperative to keep in mind the proportions and the anatomy, and stay close to the concept art.
I wanted to create a semi-stylised character similar to the one I had drawn in the concept sketch. I started by making the block out of the body from a simple sphere, activating DynaMesh, and slowly adding more details to the model using the ClayBuildup, Move, and DamStandard brush. I started with the torso, slowly defining the shape of the upper body, and then created the shoulders from spheres. I used the mask and transform tool to pull out the shoulder meshes into arms and started defining their primary shape. The head was created separately from a sphere.
The bottom part was made from different meshes since every piece of the tail needed to rotate in order for the mermaid to be able to move through space. I created these pieces from cylinders, mainly with tools like KnifeCurve and Booleans. When I got the main form, I used ZRemesh to improve the topology and continued refining the shape with ZModeler. The fins were made from a primary cube shape – I made the cubes very thin and then stretched the form while using DynaMesh and defining the shape I wanted. For the cutout parts, I used the method mask–split–delete (you mask the part that you want to cut off, split that part from the geometry using the Split Masked Points tool, and then delete it).

The most challenging part was the hair. I aimed to achieve a stylised piece and was challenged to make a smooth-looking mesh that had to look stylised but not chunky and unappealing. The main issue was not being sure of what form I was going for and how I would achieve that particular form. I started several times and tried different custom-made hair brushes. Still, after spending hours researching various techniques and ideas, I eventually understood that the easiest way for me at this level was to create a sphere and carve it out piece by piece using the DamStandard, TrimDynamic, and Flatten Brush for most of the time. I took my time smoothing out the hair strands since it was an essential aspect of the look I was going for. During this process, I learned that if you feel stuck in the creativity department at some point, you can always find inspiration from different artists on the Internet, practice, and learn through trial and error.
For the Trident, I made the basic shape with a simple rectangle and used the KnifeCurve tool and the Boolean function to get the form I wanted. After some time of working with the Trident, through conversation and feedback with my instructors, I realized that the form was flat and needed to be changed because it seemed not organic. This guidance taught me that even though I am working on a hard surface model, because of the carved-out parts, the finished look needs to look organic, and I need to be careful and look at references more while working to create something realistic.

After defining the main forms, I worked on the details and made the clothes parts, the chains, and the robotic arm. I subdivided the model and worked on the more intricate details of every part, eventually achieving the final high-poly product.

Since this mermaid model was supposed to live in space, I wanted to show off her natural habitat and create a sci-fi spaceship scene. I had a blast doing this scene because I got to play and experiment with forms and shapes in Maya.
The main idea for this model came from a tutorial on sci-fi set modeling that I watched from Ashish Dani. I learned more about sci-fi spaceships and inspired myself to use that knowledge to create a similar scene that would fit my needs. Due to my background and knowledge from my architecture college studies, I felt at home with this part of the process.
During this process, I learned that if you feel stuck in the creativity department at some point, you can always find inspiration from different artists on the Internet, practice, and learn through trial and error.
During this process, I had to think about the final render - what would be the focal point of the environment, and how would my character interact with it? With that thought, I decided to create a frame piece and place it in the middle of the spaceship so I could import the mermaid there.
During the block out of the main shapes and forms, I mainly used the Extrude / Transform tool, and I found some tools that our instructors taught to be extremely useful in my model, like the Snap Alignment Tool, which saved me many hours of aligning screws and buttons on the spaceship interior.

The retopology was time-consuming, which was the most challenging part of this phase. Reproducing the hard surface parts was easier while creating the organic parts like the body, hair, and fins was more difficult.
The main challenge of retopology is avoiding n-gons and triangles while also figuring out how the model will work in the end - especially in the rigging phase, where the topology is essential to how good the character's pose will look.
Creating the UV maps demanded a keen eye for detail, as I had to meticulously watch out for seams and strategically place them where they would be less noticeable. I have decided to create five materials/texture maps for the model - one for the body, the tail, chains, eyes, and the accessories.

The UV maps of the spaceship were relatively easy to cut and spread out in several texture sets.
The first bake went differently than I had planned, which was already challenging initially. I had to go back to Maya and recheck my model. I remembered that the hard surface parts of the model (robotic parts) needed to have hard edges, and the organic forms (body, fins, etc.) required smooth edges, so I had to redo and recheck this part. When I finished this part, everything looked better.
This process made me remember what I had already learned - before working on the UVs, you need to identify edges that may need to be explicitly hardened or softened. For the best result at baking, I needed to cut the UVs along the hard edges.

The texturing process was the part where my vision came to life. I started with base colours and slowly added more details with hand painting and generators.
Skin texture was an area that was part of a process that I improved upon with feedback and guidance from the instructors. At first, the skin looked a bit pale and lifeless, but I learned that the skin had underlayers and various tones in different skin parts. Having the guidance and recommendations, I added scales to the skin to make it look more exciting and relevant since the model was a mermaid.


Also, the robotic tail and the metallic parts of the mermaid were a little too simple. After receiving feedback, I hand-painted more parts with a brush that looked like cracks and added some generators like Dirt and Metal Edge Wear. The hand-painted part was achieved using two layers in Substance 3D Painter - one with a lighter colour and one with a darker colour from the base. I used the painting brush and the smudge tool interchangeably to create the look I was going for.
The final result was a mixture of using various materials and generators for the robotic parts of the mermaid and hand-painting the organic areas like the body, hair, and fins.


The baking process of the spaceship was relatively easy because I used the same low-poly model I had created in Maya to get a better result. I did not make a high-poly version of the spaceship because the central aspect of the whole project was the mermaid, so my main focus was on her.
Texturing the sci-fi set was a bit challenging because I had envisioned everything to be metallic, but at the same time, to avoid a monotonous, plain look - which meant that I had to think more about light/dark balance, colour saturation, and roughness contrast between adjacent elements, until getting to the point where I found the scene interesting. I achieved this by adding various textures with different base colours, roughness, and metallic elements and using generators like dirt, metal edge wear, and curvature. Adding emission to details was the most exciting part because I knew this would be an attractive feature in the final render.


After the textures, it was time to create an exciting pose in Maya that would integrate into my sci-fi spaceship scene. I also wanted to create a more dynamic second pose of the character holding the weapon.
The rigging was time-consuming and challenging, but I was glad to work on it and improve my technical skills. The first part of this phase was adding the joints to the correct position, making the proper hierarchy with parenting, and binding the skin. After that, the time-consuming part came - assigning the mesh parts to the joints. This process was finished using the Paint Weight Tool, which lets you paint weight intensity values on the current skin and then tweak the skin weights that control how the character model deforms when the rig moves. After assigning selected vertices to a particular joint, I had to test it immediately so I could refine and redo anything if corrections were needed.
The most challenging part of the rigging process were the chains, and I had to do a lot of trial and error to get them to move as I had envisioned. To achieve that, I had to assign the weight of the chains proportionally across several joints in the chest/shoulder area.
Posing the mermaid was fun - I got to see my character in a more dynamic setting. During this process, I learned that the best way to pose a character is to follow the natural curves of the body, keep the form asymmetrical, and aim for balance because it gives the natural feeling of body weight. Gravity wasn't an issue since my model is meant to float in space. However, I still had to think about the form, the natural curves, how the elements of the body interacted with each other, and the overall mood in order to make a dynamic and engaging pose.

For the final part of the project, I transferred the Mermaid and Spaceship to Marmoset Toolbag 4. I wanted to create something dramatic, so I knew I had to play a lot with lights and shadows. I used several lights coming from different angles to achieve the look I was going for.


The first challenge was finding an appropriate background for the space that could be seen behind the glass sphere's central part of the environment. So, I searched for an image with more purple tones that would complement my scene's colours and overall mood. Given the brightness of the stars in the image, I created a light source from that direction, giving the mermaid nice rim lighting.
The first render pass was a bit dark, and the overall light setting did not put the focus on the mermaid. Also, the background was not blurred enough, which did not give a feeling of 3D space.

The final renderings came to life through feedback and recommendations, with the mermaid as the main focal point in the image as it should be.

The same issue came with the individual mermaid pose renders; the lights were not strong enough to enhance the mermaid's characteristics, so I had to redo those renders as well and add more lights that would put the main accent on the model.


In conclusion, the most important lesson I have learned during this journey is that from the first phase (concept art) to the last one (rendering), you must think about every step of the way and how your choices will affect your model for future phases. For example, when you are sculpting - you have to keep in mind the retopology, UV, etc., so everything can go smoothly. Otherwise, you will face problems because you disregarded the process as a whole and would have to go back, lose time, and fix mistakes. When working on retopology and UVs, you must consider baking and texturing (will this cause some problems with baking? Is the resolution of my UV maps good enough for texturing?). All of these processes are connected and cannot be isolated separately.
Ultimately, I learned a lot throughout this journey, and it was very beneficial to experience the whole process from start to finish.
Check out more of Aleksandra's student work here.