
 My thesis project is called Lord of Horticulture: The Quest for Quaintness. It is essentially, an idea for a game taking place in Victorian England where you play as a robot and build rooftop gardens to help clean up the city. The project involved conceptualizing and building art assets and creating a trailer to represent this game idea in Unreal Engine 4. For the project, I drew inspiration from classical paintings, Victorian architecture, and machines, as well as games such as Animal Crossing and Harvest Moon.
With this tutorial, I’ll try to go through some of the main steps that I took in creating one of the key shots for this trailer.
Planning
I started planning out my environment shots by doing quick thumbnail sketches to explore different ideas for compositions and think about the overall value structure of the image. While sketching, I came up with the idea of having a shot of a majestic glass greenhouse with a shape similar to the Crystal Palace. I thought that this could be a good key shot to showcase one of the big rewards you would get in the game after building up your garden.

With this new idea, I began creating a full-color drawing to visualize the mood, lighting, and look of the architecture.

In addition, I created drawings of different building pieces and started duplicating them to form buildings and get a sense of how I could modularly break down the architecture when I start working in 3D.

Block Out
With my idea planned out, I began blocking out the broad first-read details of the shot, attempting to match the composition of my concept. I also began experimenting with adding some lighting and fog to the scene.

During the block out, I also started gathering some reference images together to inform more specific modeling details for the next stage.
This shot had a lot of architectural elements in it, so it was key for me to create pieces that I could duplicate and reuse as building blocks for larger structures

Modeling
Next, I began modeling major objects to greater specificity. This shot had a lot of architectural elements in it, so it was key for me to create pieces that I could duplicate and reuse as building blocks for larger structures. I started by creating simple models that could easily snap to the grid. While making these pieces, I created different structures out of them off to the side to test their ease of use as well as versatility.

An important consideration for me was trying to create an interesting sense of depth on the building by mixing recessed areas, like windows, with overhanging elements, like awnings and balconies. Turning on the screen space ambient occlusion feature in Maya helped me to better visualize the form of the building as opposed to the more flat default lighting.

The next image shows some test constructs with details on the sides to enhance depth such as signs, awnings, flower boxes, windows, pipes, quoining, and dentils.

In order to save some time, I copied a clock face from a model in another shot in order to make a clock tower roof piece, which helped add more variety to the rooftops in many of my shots.

I used the same modular method to build the greenhouse.

In addition to these modular buildings, I also created a simple cylinder with masked texture to fill out the background in the distance.

While creating these models, I began placing them in the scene and adjusted the lighting and composition. I changed the camera angle to more closely match my drawing and I also worked on lightening up the space behind the flying robot to get it to pop out from the background. Additionally, I added some emissive to the windows to work towards giving the building a warm glow, which was a key aspect of the initial drawing I made.

Materials
With new models added in, I began to work on defining the materials. I started by gathering references for materials that I could use in a variety of areas to cover up as much screen space as possible. I started creating these materials first.

For this particular image, you see a lot of rooftops, so the roof tile material was a fairly important element. To create the normal map, I modeled out some tiles, making sure to rotate them to different angles to create a sense of imperfection and allow the light to reflect off of them in interesting ways. In the material, I used a mask to leap between the base texture, and a custom tinted version of the roof tiles, allowing me to make instances of varying colors.

Here’s an example of the buildings with materials. A majority of the meshes use tiling textures and instanced materials with different color variations.

Now the scene was beginning to get some textural variation, but it still needed some more work in terms of the lighting, colors, and postprocessing. Since the last image, I adjusted the light direction to be coming from the upper left to give more of an impression of a glow radiating out from the greenhouse towards the robot.
I also changed the windows to a translucent material to make them feel more like glass and added some simple variation to the emissive glow.

Final Adjustments
One area that I focused more on towards the end was the sky. Usually, the sun creates a radial gradient of light around it as it scatters in the atmosphere, gradually getting darker as it gets farther from the sun. I tried adding some bright yellow light in the upper left corner that gradually falls off to a darker violet to the right of the image.

Another adjustment involved enabling depth of field in the post process settings. Before every edge was very sharp, so I used depth of field to get the painterly effect of softening details as they recede into the distance.

In terms of colors, I worked towards pushing a greater contrast between yellow and violet complementary colors. To do this, I increased the saturations of the violets and tried to make more of the sky take on a violet hue.

In addition to color, I also slightly adjusted the values to hopefully get a better sense of depth in the image. Before, the sky was a relatively dark grey, which I felt was flattening the image. By making the sky lighter, I felt that it helped push it more into the background, while also creating a stronger contrast between it and the dark iron framework of the greenhouse.

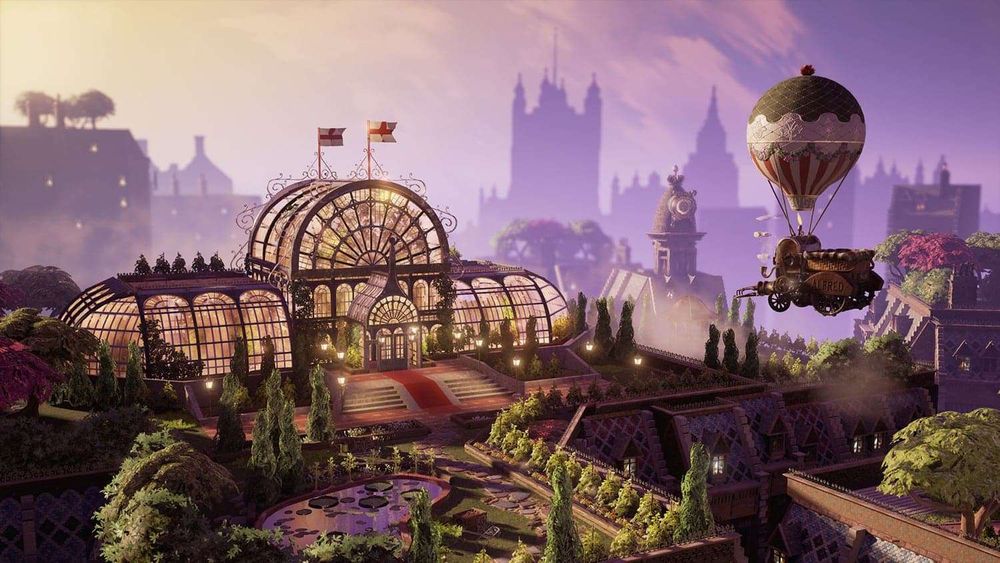
Here’s how the image ended up looking after these adjustments and adding in the model for the robot character.

Thanks for looking through this tutorial! More images from the project and the trailer can be found on my entry page or my website: