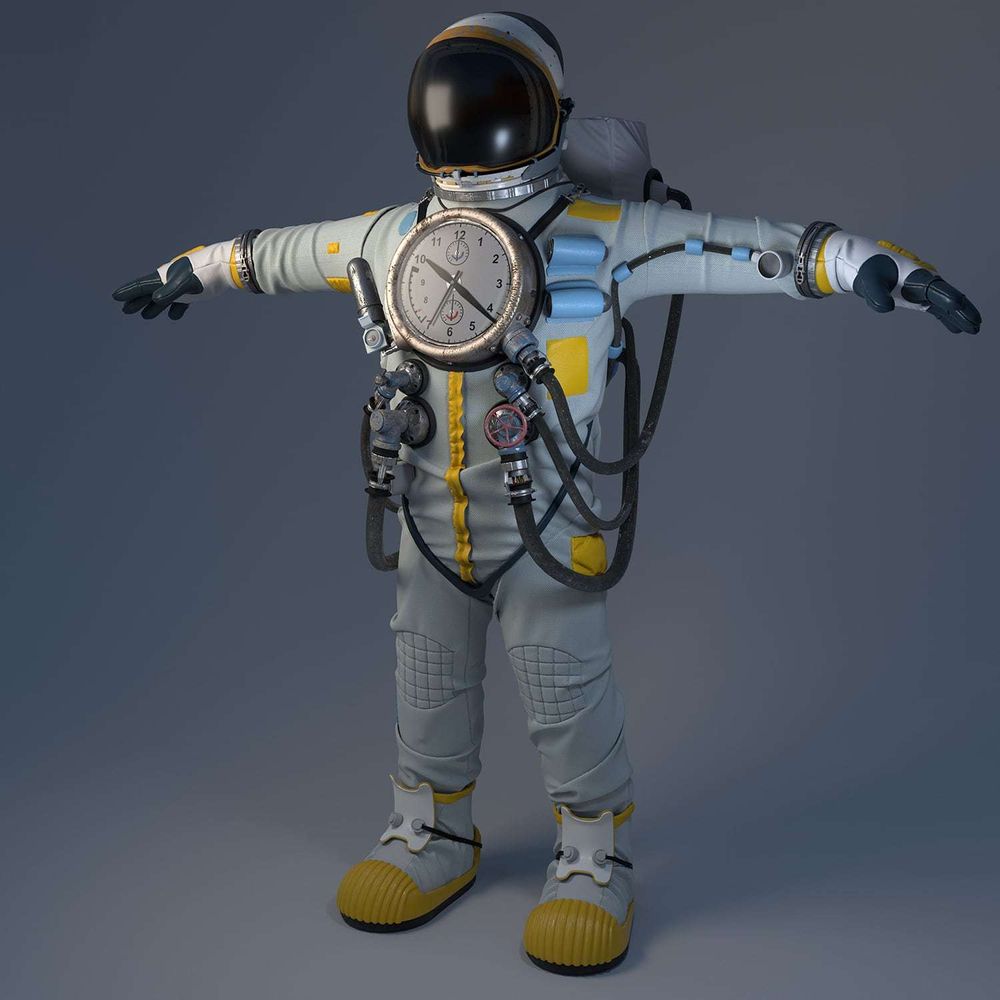

 My name is David Olson and I’m a 3D Generalist attending Gnomon School of VFX in Los Angeles. I wanted to share with you a little of my process when designing and modeling my time-traveling astronaut **“The Watch Commander” **a stylised 3D character.
Reference
The development for this character originated from long-lost graffiti stenciled in my old neighborhood (huge shout out to this unknown artist) who led me to concept a short children’s book to which these characters belong.
It’s important to my process to first fit my character into a world before I can nail down what the character needs to succeed in their environment. Having a backstory is the key to believability. A character should tell just as much about their environment as they do about themselves.

Blocking
Everyone says this all the time (because it’s true) but blocking out is the most crucial part of my process. Especially when having to concept on the fly, blocking in your shape language and silhouettes early allows you to figure out if and how the character works.
Having a backstory is the key to believability. A character should tell just as much about their environment as they do about themselves.
I blocked out my body shapes and proportions in ZBrush using ZSpheres. This low poly mesh was brought into **Marvelous Designer**and used as an avatar to begin detailing my fabrics. There was a lot of back and forth between Maya and Marvelous Designer to ensure the overall shapes hadn’t been lost.

Detailing & Fabrics
When adding details to my model, I find it important to level up all of my assets together. How specific details interact with each other on a small scale is crucial to the uniformity of the entire piece.
Related article: How to build and compose a game environment
I added patches and seam-creasing in Marvelous Designer all the while referencing both how real-world clothing is constructed and the materials I wanted to depict. Differentiating the movement and build-up of different fabrics was incredibly important to give breakup between the gloves, shoes, backpack, and torso. There needs to be a visible breakup between a leather and a windbreaker material even before the texturing process.

Hard Surface
I use Maya for all my hard surface assets. Maya is what I am most familiar and I try to stay in it for as long as possible. Feels like home. Re-using familiar assets like latches, bolts and screws throughout the character ties different parts together and gives the viewer hints on how mechanics would be constructed. Don’t be afraid to re-appropriate assets from previous projects either.

Rendering
When showcasing a model, I like to use V-Ray’s Fast SSS shader. Having a little subsurface variation brings out some of the smaller details that can sometimes get lost in monochromatic renders. It also gives the model a little more depth and variance in its surface.


Closing
So that’s it. Super simple. This all should take about 15 minutes. (Just kidding)
I’d like to thank The Rookies for putting together such a great competition and giving me the opportunity to share a bit of my workflow and process. Secondly, I’d like to thank Gnomon School for teaching me everything I just mentioned above.
Now I guess I need to finish texturing it, let’s see if I can sneak a WIP in here…
Hope you all find this tutorial informative and I hope these techniques are helpful to your practice!
Keep making all that super-cool-mega-art!