

 When creating an environment, you need to have a good solid piece of concept to work from, whether this is something you create or a piece that someone else creates.
A concept or idea bring the feel, life and character to the design of the piece that you will create. Having a good idea to give the direction of where your piece will be going is truly the foundation of your environment.
I was honoured to be able to work from a piece of concept by John J. Park from scribble pad studio – this, allowed me to lay the first foundation of what the feel and attitude of this environment would be.
Breaking down the Piece of concept
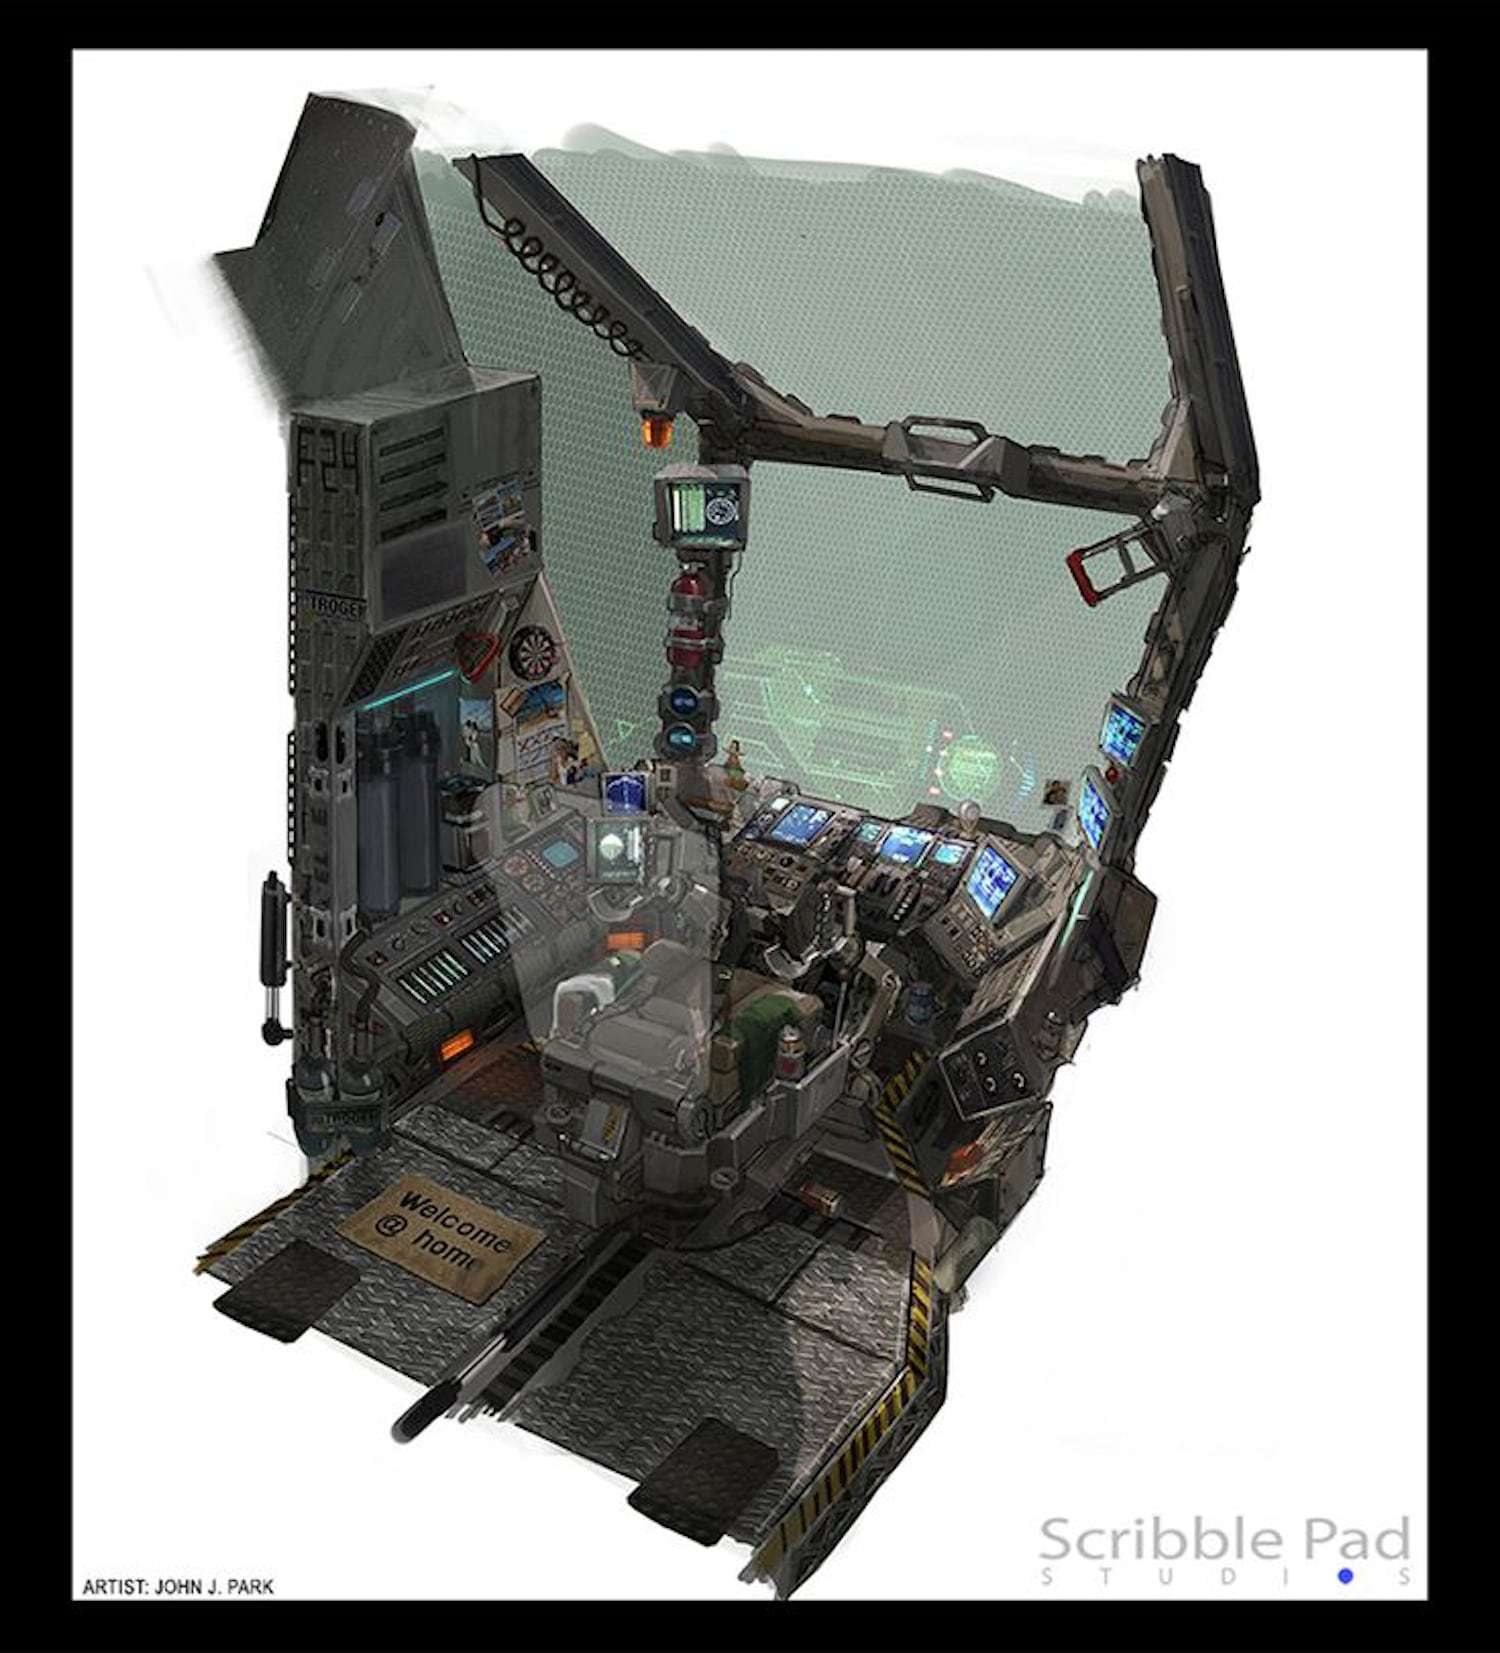
As an environment artist, I need to take the piece of concept that I am drawing inspiration from and break-down the elements.
The first thing is making sure you put the same feel into your environment as the piece of concept. Using clues and subtle hints of colours really draw the viewer to conclude these feels from the environment.
Another thing we need to be aware of is with 2d drawing the perspective can be cheated – Unlike 3D we need to make sure that we convert those cheated perspective lines into shapes that work in 3D space.
Reference
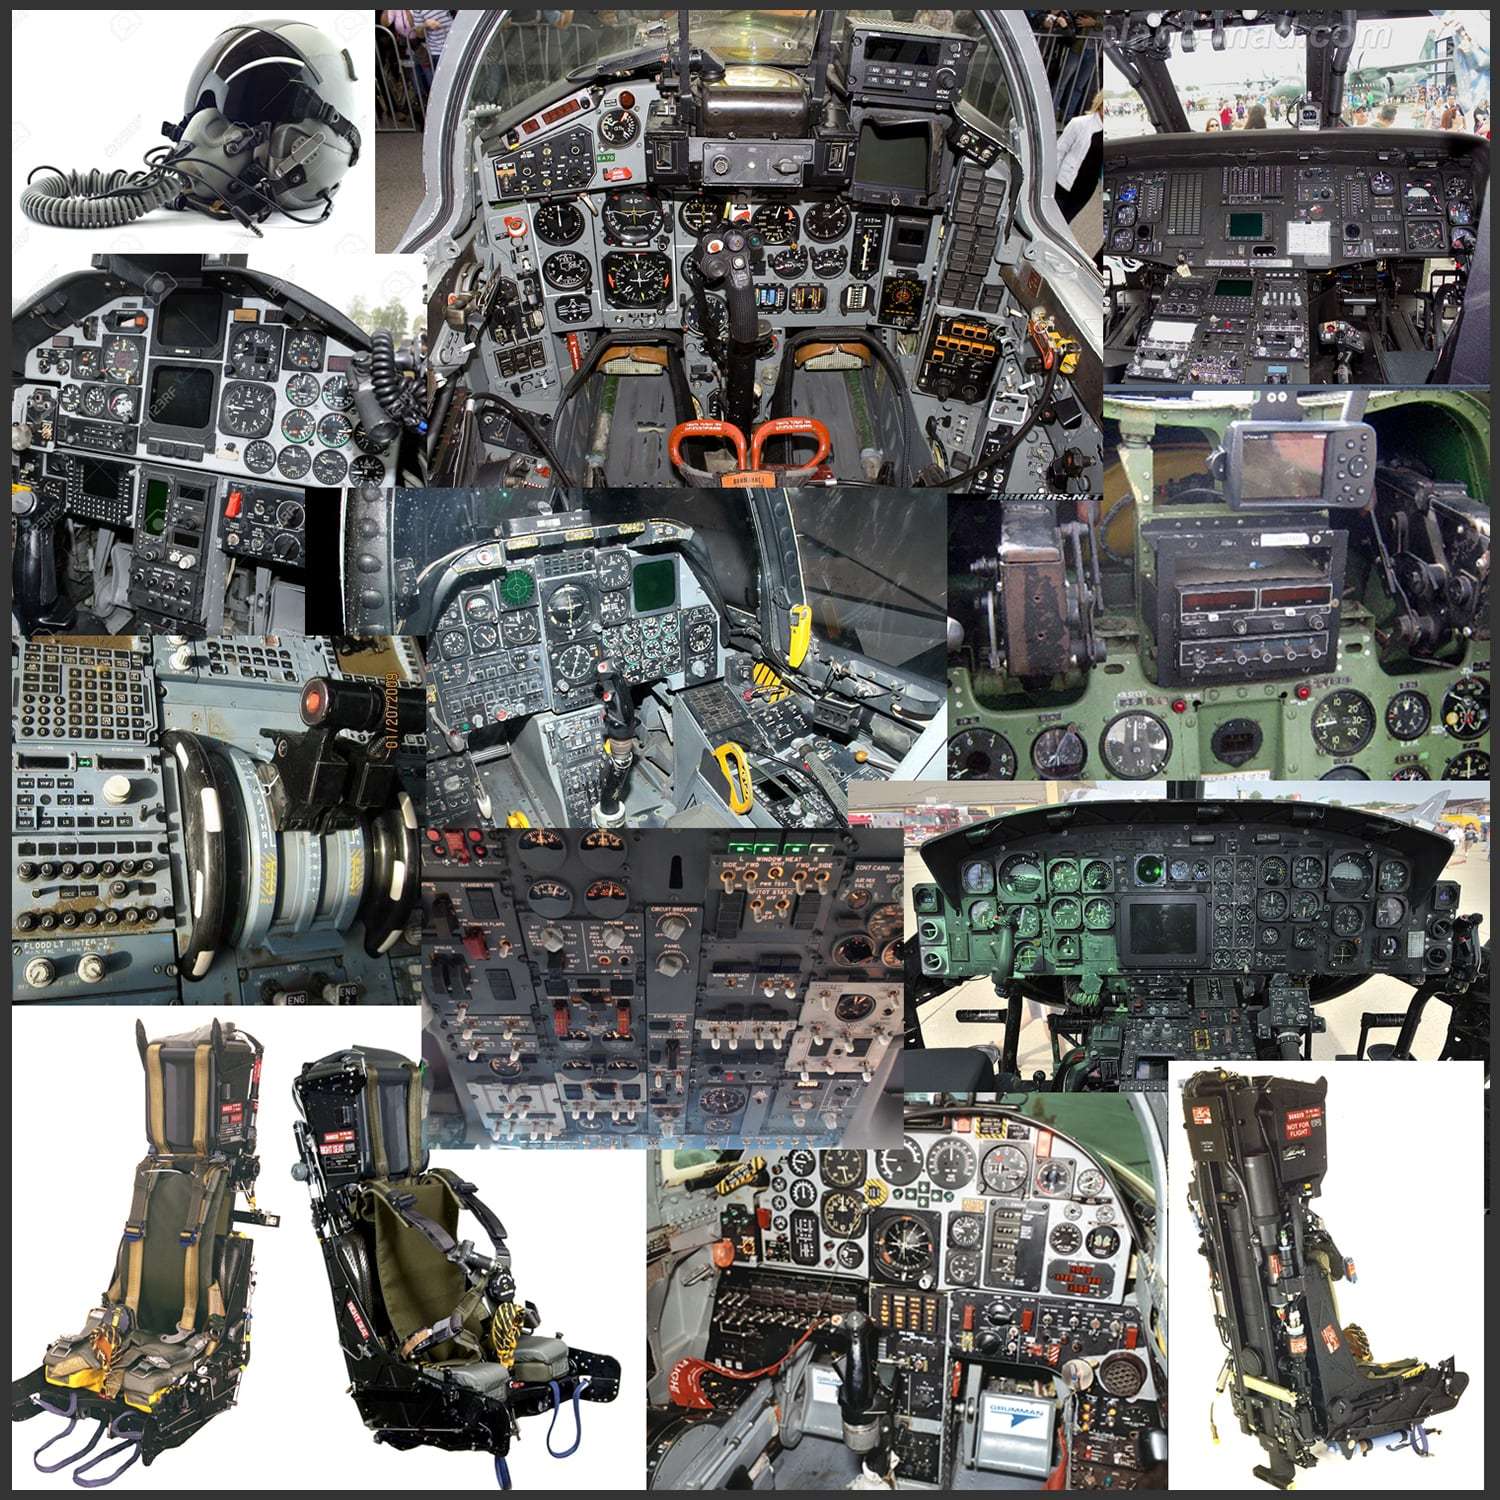
Gathering reference is a must when creating an environment, no matter how detailed the piece of Concept is. Gathering reference allows you to add details to your environment to give it the realism that the piece of concept couldn’t provide you.
Making things fit together into your environment and function properly brings life into your scene.
Blocking
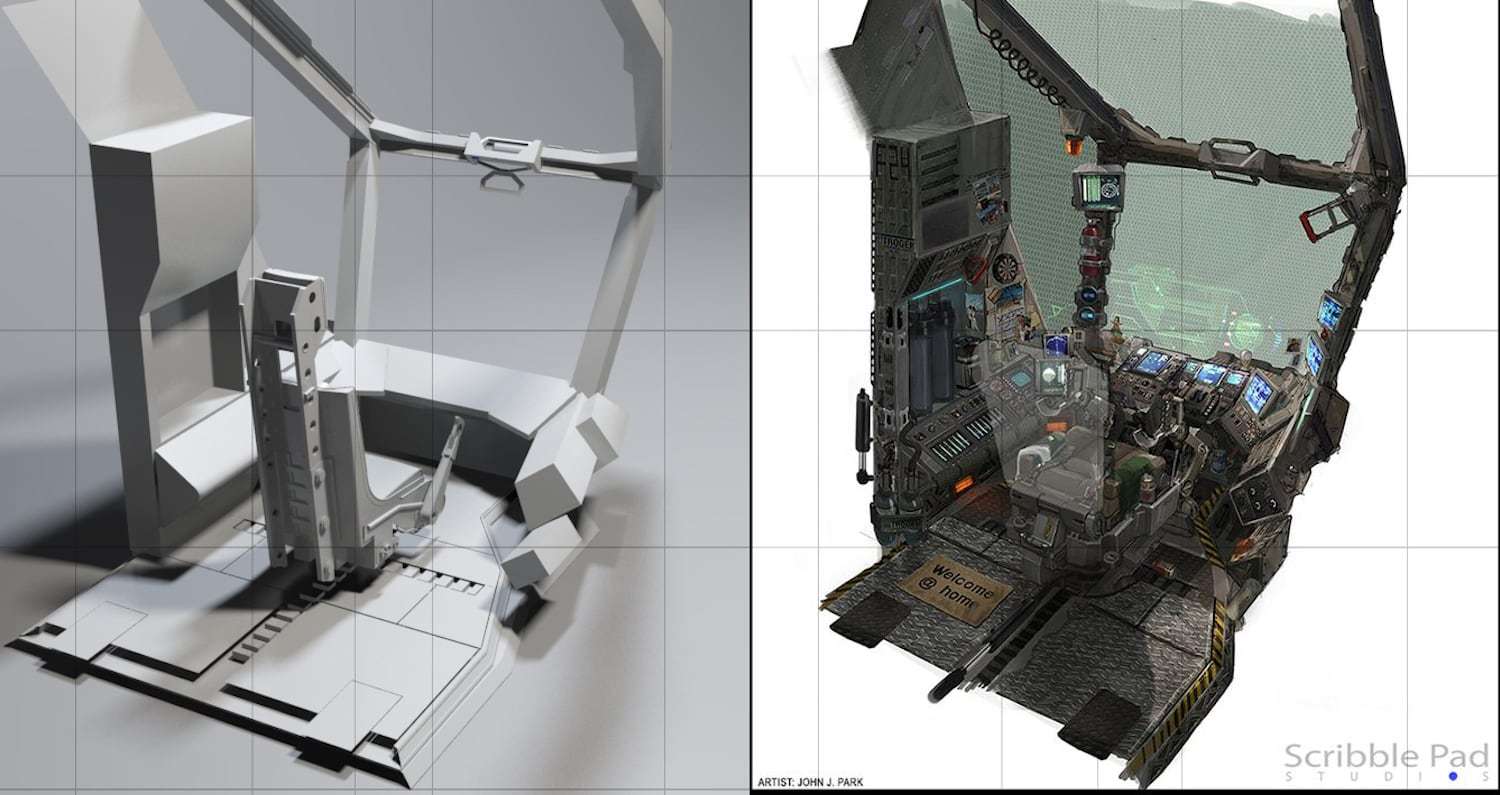
The first step is the blocking phase. The blocking phase helps give you the proportions and the scale of the concept that you are working from. As I said, the perspective is not going to be the same because we are working in a 3D world.
Getting the shapes and the overall look of the concept down in a blocking stage allows for quick correction. Blocking also allows for placement of how things will be assembled and how it works and looks before all the hours of details are added.
Allowing the story to dictate these artistic decisions, makes the art process organic and the environment realistic and full of life
Once we feel happy with the look and feel of the scale of the blocking stage, we can move onto the modelling side.
Modelling with a story in mind

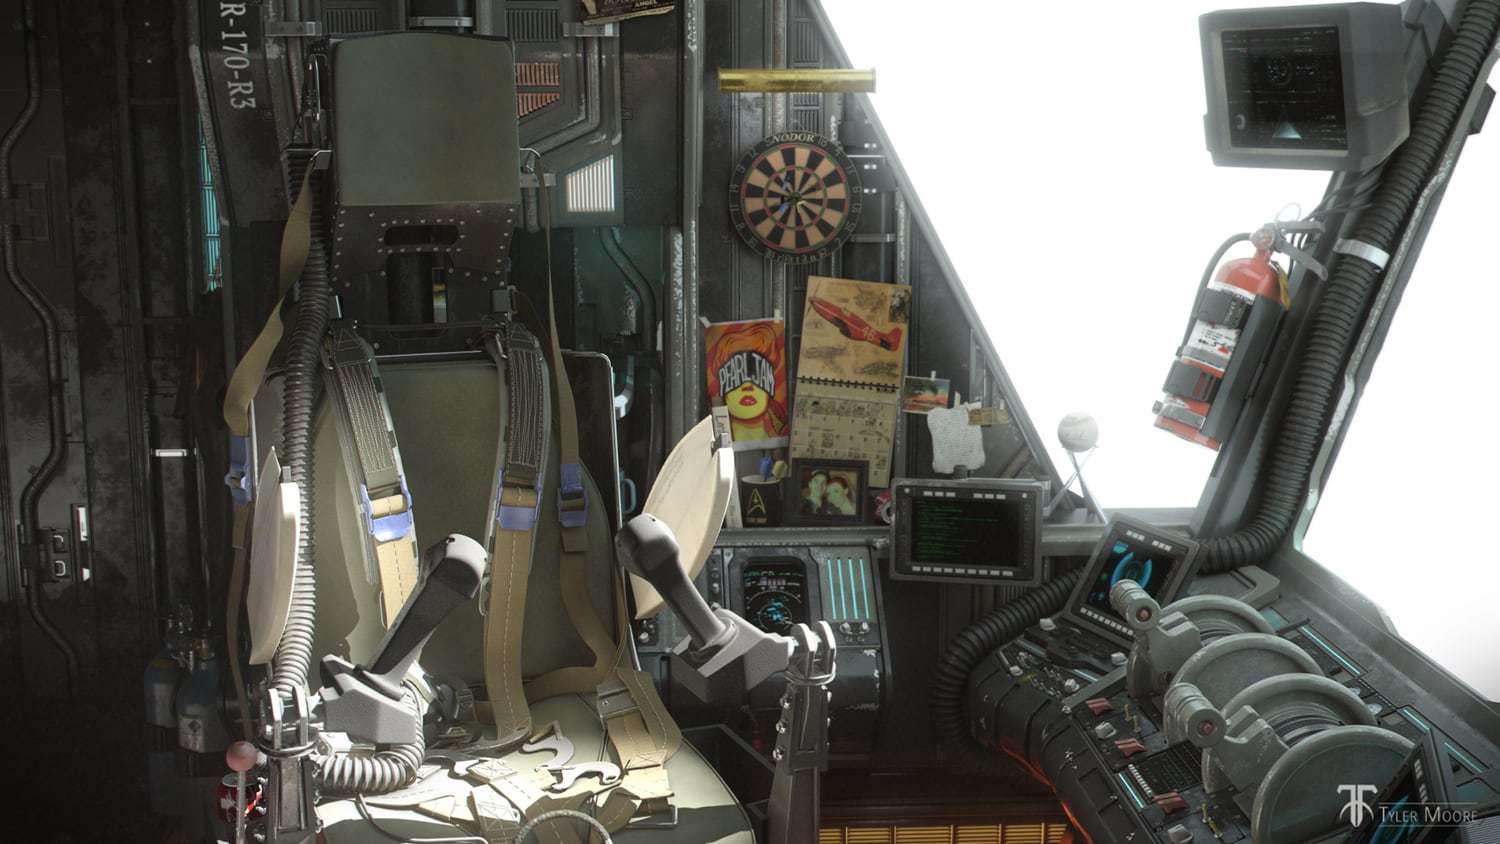
When modelling start to think about how the pieces of your environment are going to flow together to create a story for the viewer to conjure just from looking at the clues that you have left in the environment.
With the environment in this example, I wanted to give a backstory to the character that was potentially flying this spaceship. I wanted to give the feel that this character has made this spaceship his home from the months or years he has been in space.
Related Link: How to Make Awesome Gaming Assets using Substance Painter
The first thing I needed to think about was what would be placed on the walls of the spacecraft to make it feel less stale and more like home. So, I started to add his favourite bands, sports teams, favourite places, and pictures of loved ones back home.
I also added a few things to help make the time go by such as a dart board and a calendar to mark down the days. Adding these small details to your environment will lead the viewer into a story which makes the environment more organic and realistic and less like a CG creation.
Texture

Once the modelling is finished, the texturing process begins – This is where the reference comes in handy. I wanted my spaceship to be dirty and feel old, but I didn’t want it to have so much grunge that it felt unusable.
When texturing do not forget the story that you are conveying to your viewers. I tried to average the different techniques in a way that best fits the look of texture I want on the piece.
Related Link: The Apex Robot Guide to 3d Texturing
I unwrapped a few things but used procedural texturing as my main outlet. In 3DS Max there is a node called vertex paint which isn’t available in most programs but allowed me to create grime and rust fairly quickly.
With the pieces that I wanted to be scratched or have wear on them, I used the vertex paint node to paint black where I wanted the wear to be. This vertex paint allows you to use this black and white painting technique as a mask into the blend node with the 2 different materials.
The bitmaps that I used for the two different materials needed to have a UVW box map to project the texture onto the piece.
Lighting

I wanted to light my environment as though the spaceship was passing the sun or a bright star to give a sense of a bright light shining in the windshield and harsh long shadows inside the cockpit.
Making these lighting decisions was still based on the first storyline that I created during the modelling process.
Allowing the story to dictate these artistic decisions, makes the art process organic and the environment realistic and full of life.
Post process
When rendering out your environment, you want to render out AOV (arbitrary output variables) passes so you can composite it together in another program.
Conclusion
When creating a realistic environment, you will need to take the art to another level and add details clues and a story line that give the environment the feel that the piece could exist, provoking emotion from the viewer to make them want to know more about the story and background of your piece of art.
The project I write about was one of my final projects at The Art Institute of Dallas. It was tonnes of hours and hard work, but it all paid off in the end and learned a lot in the process, and that’s what is it all about.
I also want to thank my teacher and mentor Professor Michael Eudy for all the knowledge and support you have given me over past years. Also, my friends and family who has always supported me. Thanks for viewing!