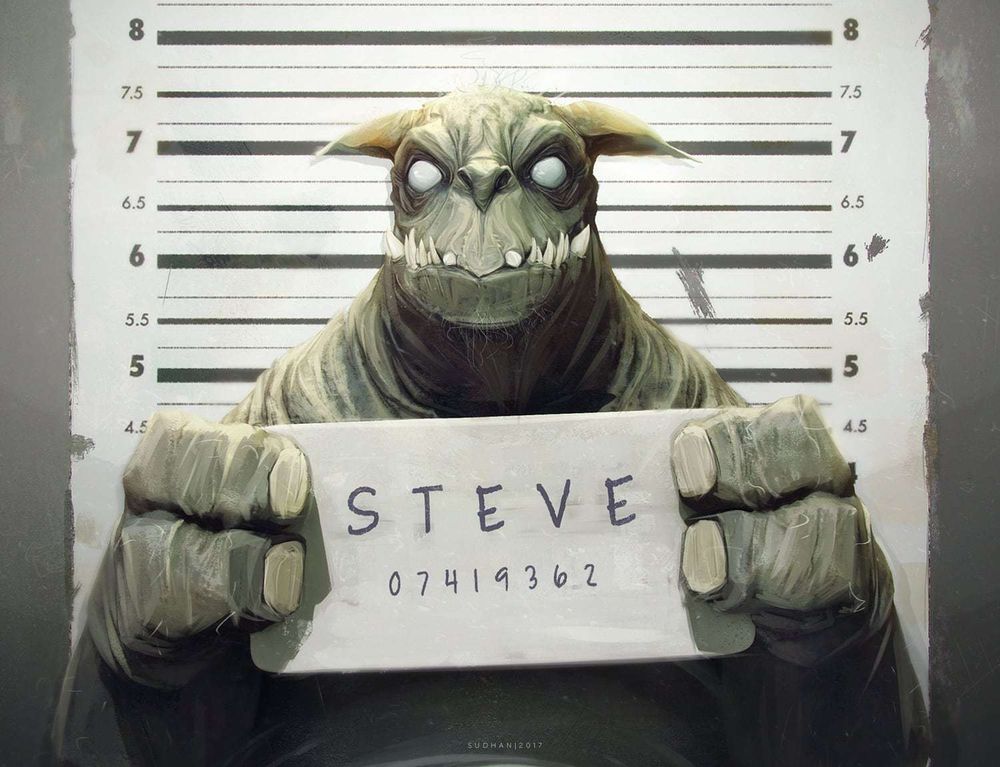

I’m a huge fan of cartoons from the 80’s and 90’s. And this piece started as a tribute to the Men In Black series, one of my favourites. Hopefully, you can use this as a complete beginner’s guide to concept art, and how I create my digital illustrations.
Process
Understanding and Defining the character.
So it’s a mugshot of an alien creature. Answering questions like,
- “Why and how was he caught?”
- “How big or small is the creature?”
- “Does he wear clothes?”
- “Is he prey or predator?”
- “What’s his general demeanour?”
- “Are there any quirks unique to the species?”
Really helps inform the design choices down the line. Arbitrary cool shapes alone will not tell a story!
It helps when exploring silhouettes to take a screenshot and nudge it around in photoshop to quickly create some happy accidents!
Sculpting
ZBrush is my goto medium for starting a creature design. The freeform sculpting with dynamesh allows you to ideate, test and iterate without committing too early to one idea.
And working in 3D has it’s benefits for concept art production too, like being able to have a different view or lighting setup or pose for the same character much faster. Besides, it’s also easier to see how far you can push a design from all angles before it’s functionality breaks.
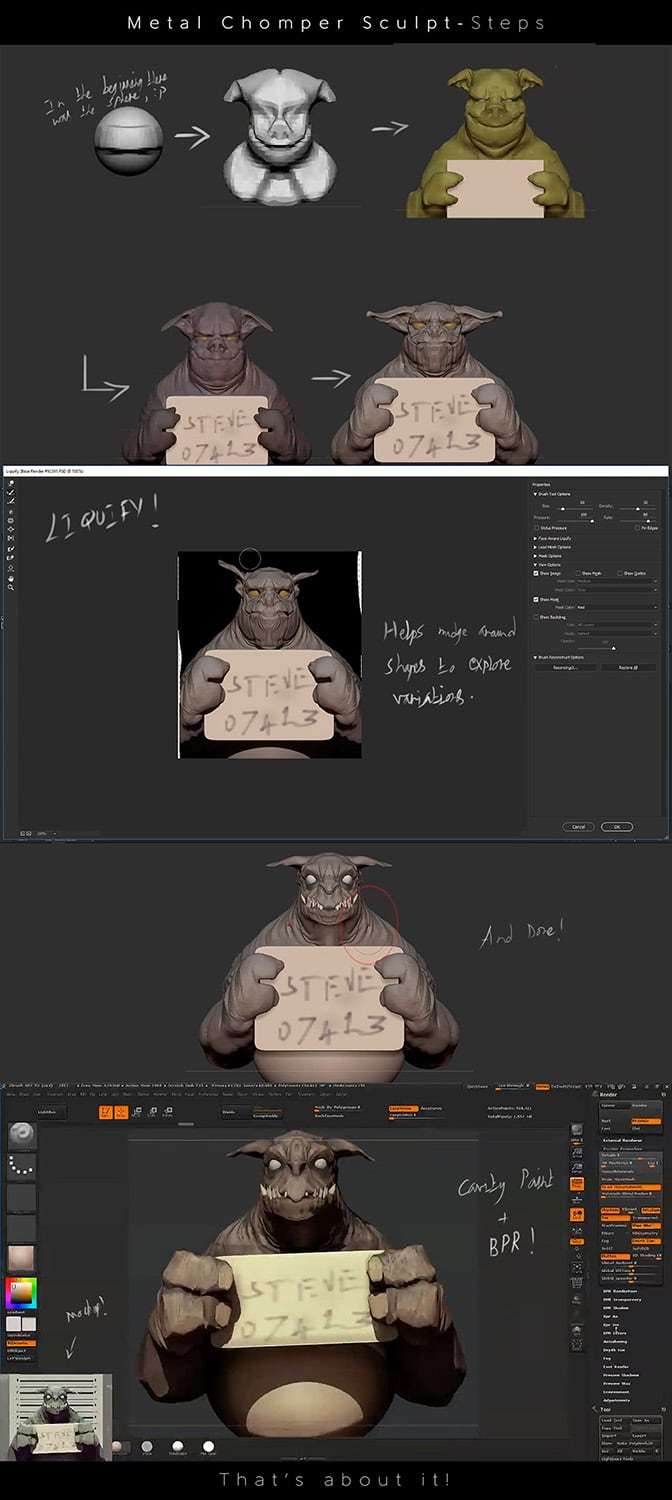
It helps when exploring silhouettes to take a screenshot and nudge it around in photoshop to quickly create some happy accidents! Speaking of silhouettes it’s a good idea to base the creature on an existing animal. In this case I used references of pigs and sphynx cats.
Lastly, this isn’t a production asset so I keep things fairly loose and spend more time on areas that will give a jump start for painting.
Paintover
- Once there’s enough information on the sculpt, like
- Overall silhouette
- Major shapes and landmarks
- Some indication of colour
- Areas of details[Ideally places where you want the focus to be]

It’s time to render out several passes of lights, textures, specular, etc and blend them together in photoshop as necessary. Colour correction, Curves and Levels will be your friends in that process!
After that, I flatten all the layers and paint over the areas that don’t work as they are and add things that would be simpler to add by painting. In this case, It was far quicker to clean up the teeth and mouth area and add some peachfuzz by painting rather than in 3D. Conversely, using an alpha to create the wrinkles around the neck in 3D gave me a better starting point than trying to paint it all from scratch.
Related Link: How to Make a Stylized 3D Disney Character
Having the information in 3D would help maintain consistency when you need to see the character from a different angle. For instance, if the character has a tattoo or something you don’t have to spend time fiddling around where exactly to place it from another view. So plan ahead about what information you would need to add in 3D and which ones you can get away with by painting!
Finishing up
Even at this point a lot of aspects of the image are changeable. Do not hesitate to liquify/cut up and change proportions or colour a bit if things aren’t working. You do NOT have to stick 100% to the 3D base mesh!
The background was quickly photo bashed with a couple of grunge textures and decals.

And I like to bring it all together by adding a few layers of lens dirt, vignetting, sharpening the image and a dash of noise!

I’d like to take moment to thank the team behind The Rookies for their support and this cool opportunity! And you, for reading this!
It was a lot of fun to work on this guy and I hope you’ve picked up something useful from this summary. But If you’ve got more time and wanna dissect him some more, you can find the full-time lapse video over here on YouTube and the original files of this project on Gumroad!