

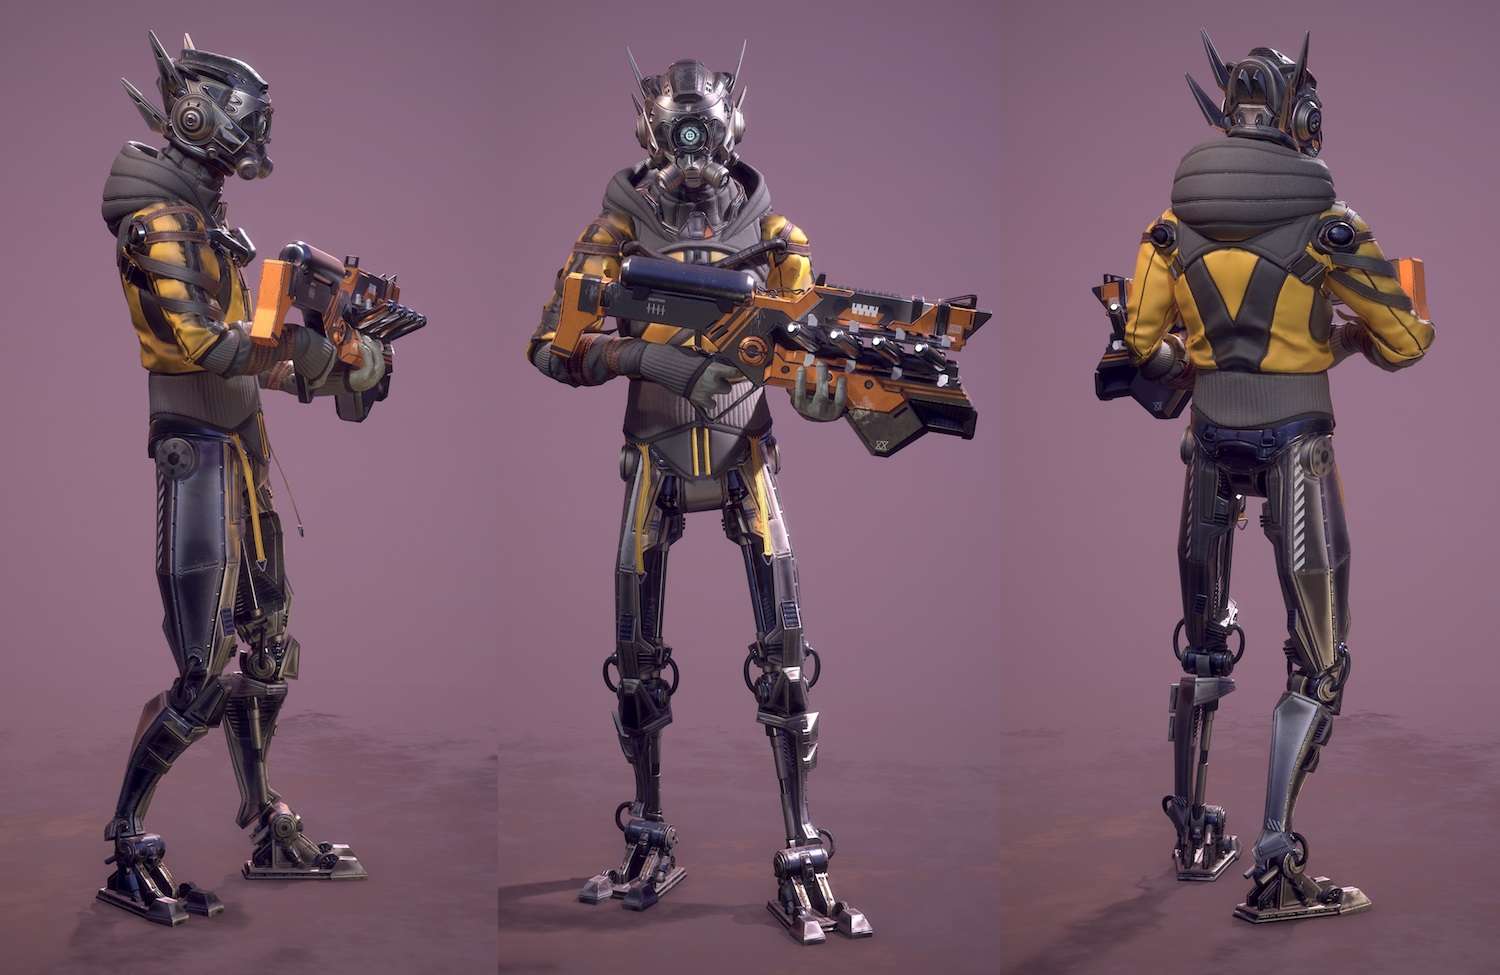
The Rewind Cyborg was part of one of my projects at The University of Hertfordshire. We received a brief from Rewind in St. Albans. Create a character that would run well in an Unreal Engine 4 scene on an HTC Vive.
The images were in a dystopian world which showed mostly snow, in an (after)war zone, mechs and empty buildings in what seemed Poland. At that point, I had never really done any hard surface characters before. I always admired the extreme details of that kind of characters though. But a problem that I see a lot in hard surface art, as an organic character artist, is that hard surface seems to look “lifeless”. There is very little emotion in these pieces. So for this project, I used my knowledge of organic sculpting and applied that to a hard surface concept.
For the brief I set three goals:
• The robot needed to be able to show emotion
• The concept should be kind of realistic
• The robot needed to be able to run well in VR
Inspiration
Most of my inspiration came from Star Wars and Destiny. Star Wars was an excellent reference to look at because even while characters are totally unnatural they still blend in and feel like they have a personality and story. Their clothing makes sense for the environment they live in. Destiny though is able to show emotion incredibly well through their robotic characters, they feel very organic even though it is hard surface because of a combination of cloth and round organically shaped metal plating.
Emotion
In order to create a concept that would be able to show emotion, I looked at how humans actually perceive emotions. I believe that the eyes are the “window” to the soul. If you remove for example the mouth, a part that also shows emotion, you can still know which emotions the person is showing. However, when you keep the eyes in a normal position and let only the mouth move it will look very weird. One eye should be enough to show all the emotion that I needed to display.

Using the two shutters I could replicate the eyelids and eyebrows to create a range of emotions. Even the color of the visor could be edited to make those emotions stronger. The antennas could work like a cat or dogs ears. This way the character would have something more “alien”. Eyes working like a human, though ears like an animal.
Realism
Something I try to be aware of in my art is the realism of the characters. It is very easy to just throw in a few shapes and it will look totally great in 3D. However, it is also very important to realize why you add those shapes. How will the character be moving, or what kind of actions will the character take? How are those shapes going to help the character with that? Don’t just add in a piston because it looks cool, adds in a piston because it will help movement as in the real world! If you do this you can boost the believability of your model, preventing parts of your model that could look wrong. Something that can help if you don’t have much knowledge of hard surface is looking at real-world photographs of prosthetics and machines. These kinds of objects are created to do a specific “thing” without adding too much noise of parts that are not needed.
Another thing that helped me a lot was something I call “embedded-surface”. In order to make sure that all the parts seem to be connected you actually need to embed them. Every time two different pieces of metal are combined they should be connected in some way, for example, welded together, screwed or pressed together. A simple line at the edge of each plate already gives the idea that a piece is welded together, instead of being just one solid block. These screws and lines at edges on the edge of plates also give nice small-level details.

Sculpt to Lowpoly
Because I had no prior experience making robotic characters and my time for the project was rather short I decided against learning a new technique. I used the same techniques for organic sculpting what I normally do, with a few changes.

I start with a very rough block out in ZBrush. This is mainly to find the silhouette and big shapes. I cut up everything and export them to Maya to create clean surfaces. With a few beveled edges, I export them back to ZBrush and smooth it a few times. With the IMM brushes that are in ZBrush, I tried to make better transitions between the different parts. After that I added more medium-sized details by adding a lot of different IMM parts that are in ZBrush, these are there to show the function of the surface they are on. In the fifth step, I started on the small surface details connecting the parts better, putting a line next to all the edges. Using the JRO Trim brushes, that are really useful for this kind of stuff! In the last step, I used a lot of alphas for screws finishing the high poly.
The low poly was mostly made by hand using Topogun. The brief mentioned that everything should run at 90 FPS. It is very important that VR runs at least 90 FPS or higher to prevent motion sickness. Another thing to keep in mind with VR and AR is that they break normal maps, billboards and a lot of particle effects. Normal maps can be used for small details. However, you can’t use them as a substitute for actual depth, because you will see the flatness. Also, since alpha shaders are kind of expensive I did not use any of those. Instead, I modeled everything, since triangles are less expensive than special shaders. This resulted in a model that has 70k triangles. Since I knew the distance that I would put the character in the game I focused most of the details on the face and put less geometry in the legs. This way I could keep the polycount rather low.

Conclusion
This was my first time focusing on a hard-surface character. It was really cool to see how I could use my knowledge from organic modeling into this and it definitely showed me the way to try it again some other time. I’m incredibly happy with the final model, as it reached the goals that I set in the beginning with a nice result.