
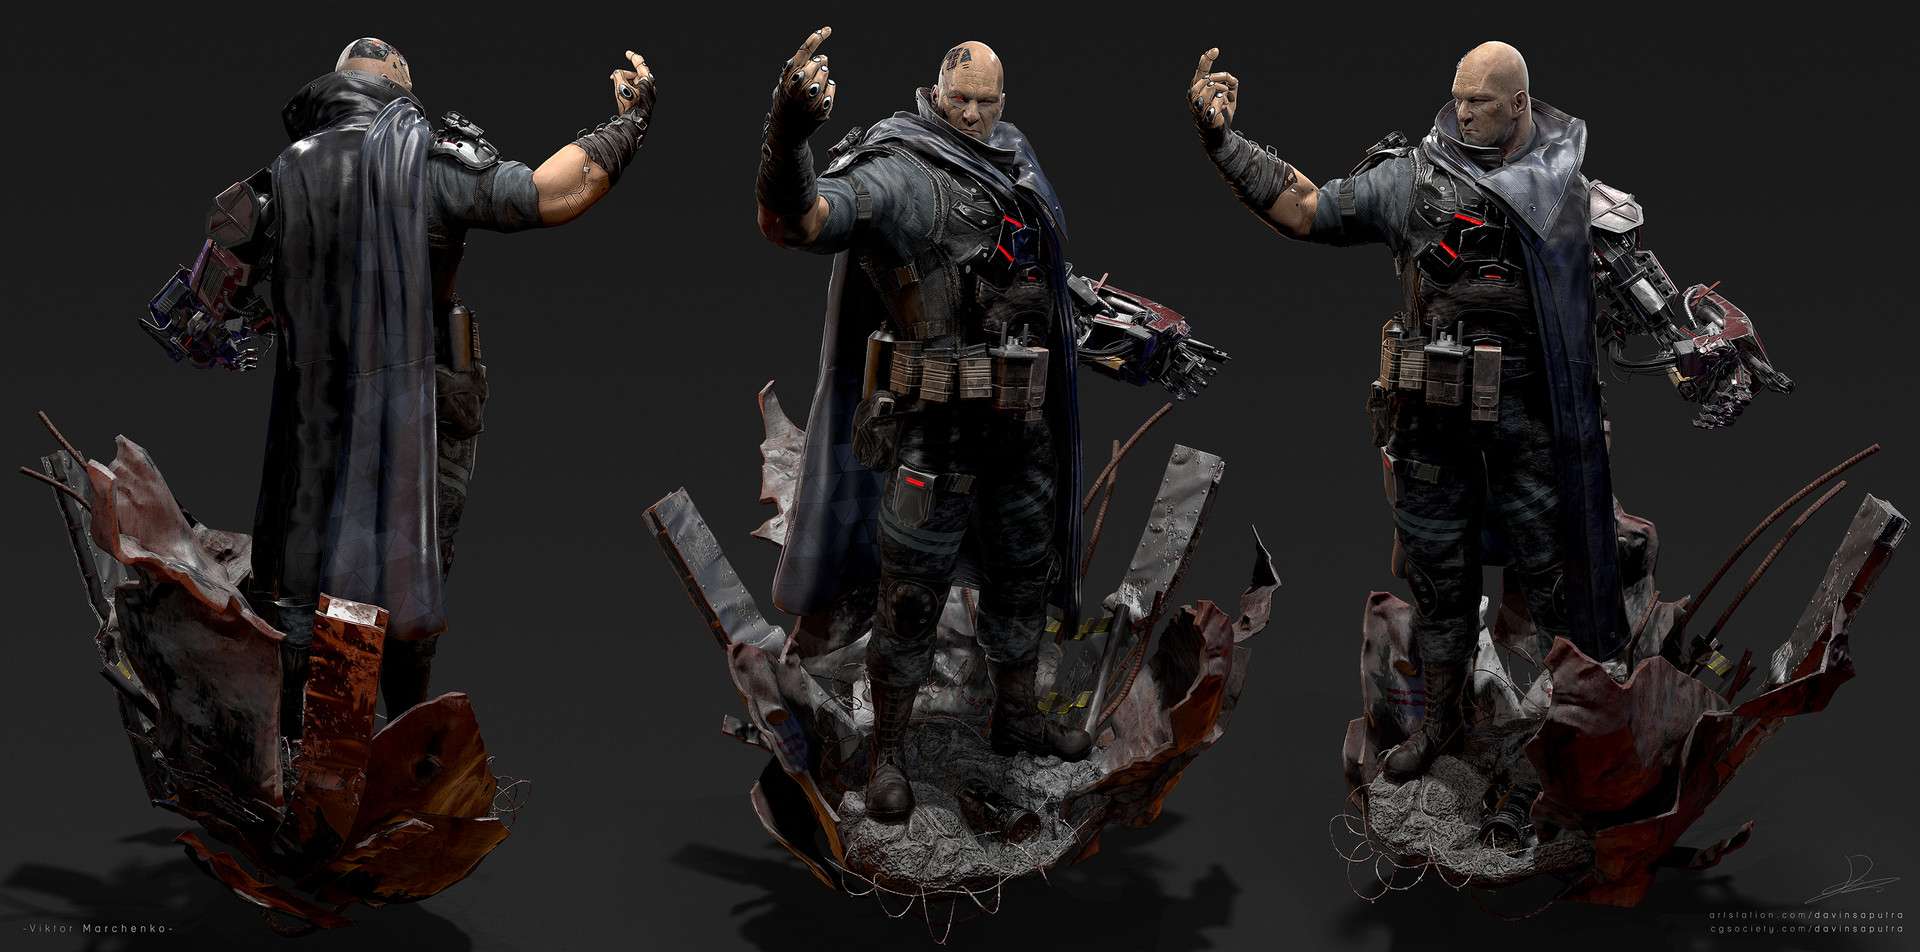
The inspiration for this project originated from my fascination with the game Deus Ex. Although I did not play the game, I watched all the cinematic cut-scenes and read an embarrassing amount of pages from the wiki. The goal of this project was to make a production ready game character and produce a beauty shot for my showreel! This project took my classmates and I around 4 months.
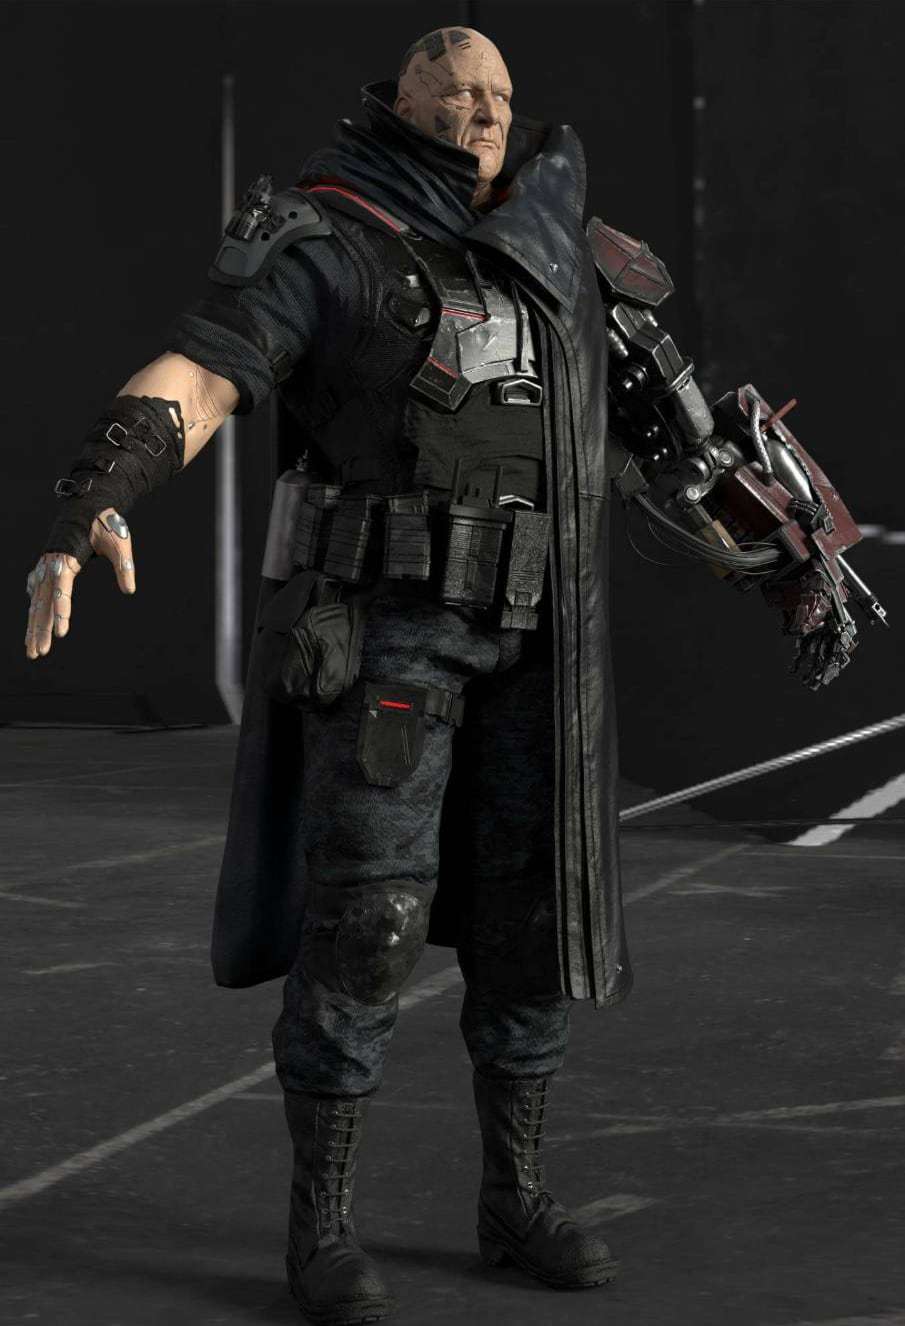
To avoid completely copying the original design of Viktor Marchenko, I decided to change the design a little bit. I added a metal chest plate, a flamethrower, some color variation changes, extra cyborg parts and adjusted the body proportions.
This project consists of 5 main steps: reference, sculpting, re-topology, texturing, and compositing.
Reference
It is pretty safe to say that references are the foundation of any good project.
I spent a total of one week collecting and sorting through references. I did some research and development while still thinking about my game character. One good software is PureRef, a free software that lets you sort your reference.
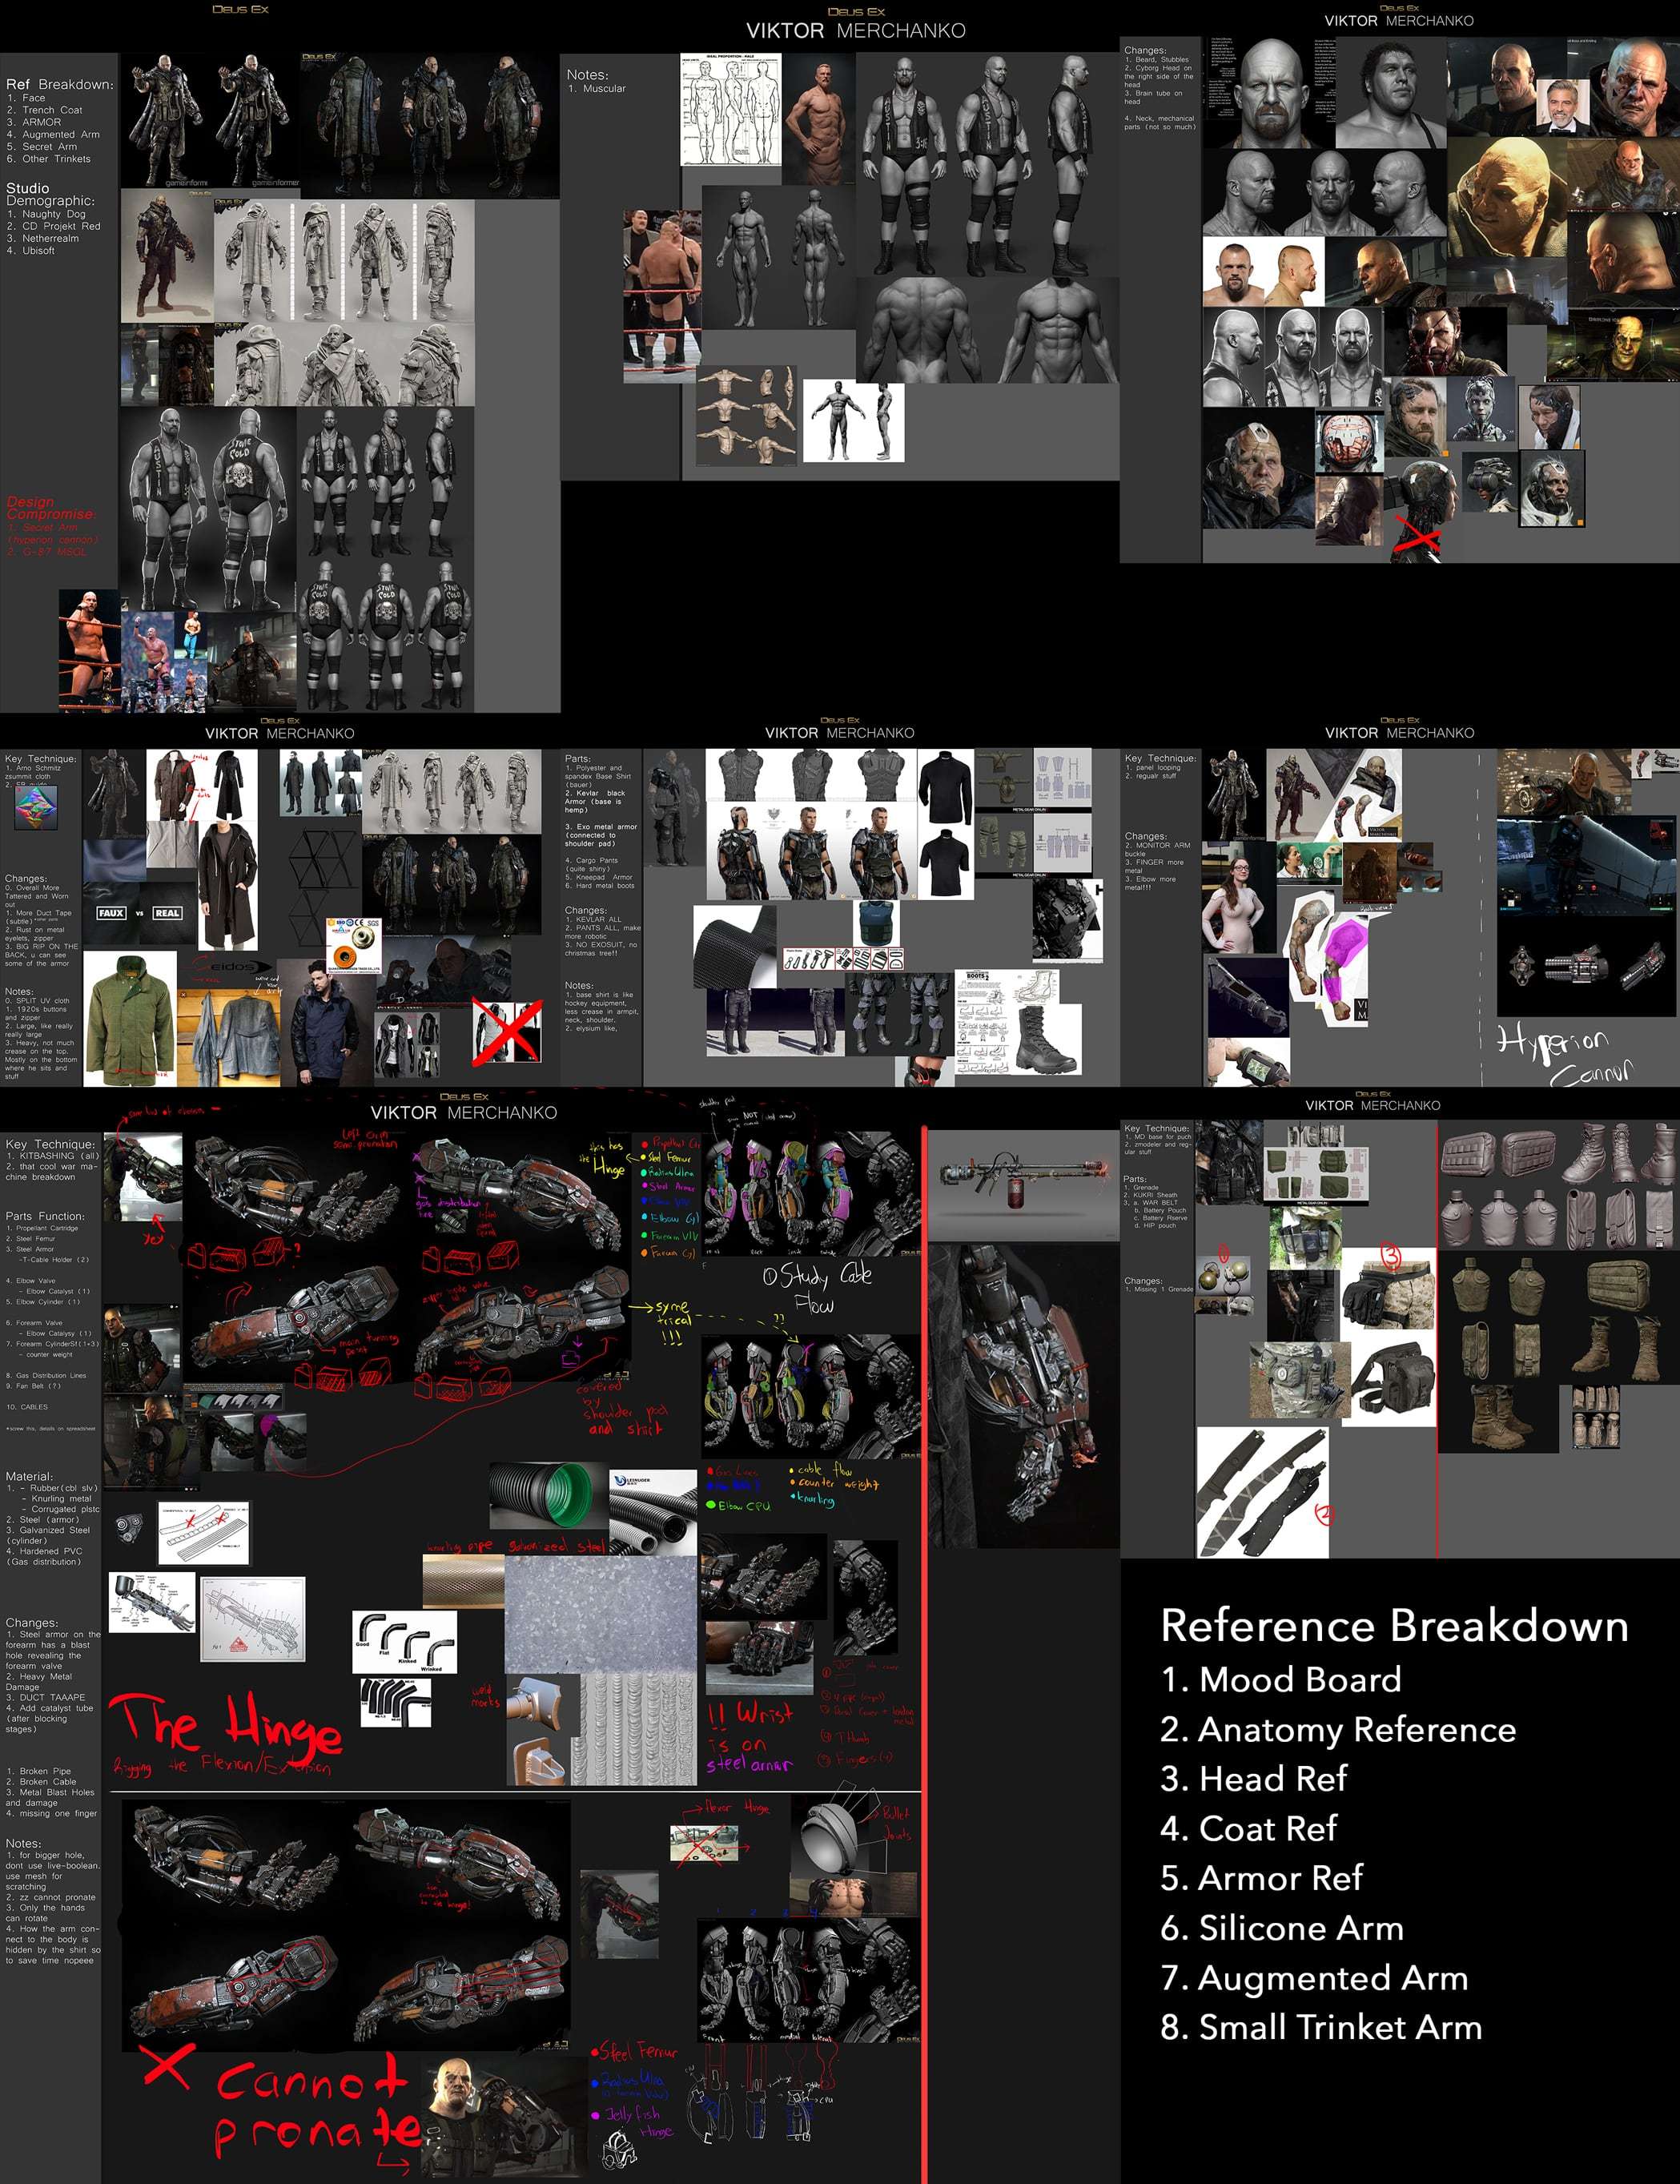
As you can see, I split my reference into a lot of parts. This helps me organize my thoughts as well as aiding me in creating my schedule much easier. I have to admit, I have gone overboard with my references but I don’t feel I wasted any time on this.
Digital Sculpting
Without a doubt, this was the part where I had the most fun. The most challenging part of this was getting the anatomy correct and ensuring the design matched the concept art. I spent a lot of time, with the awesome guidance of Derrick Song, and managed to finish this process in roughly 2 months.
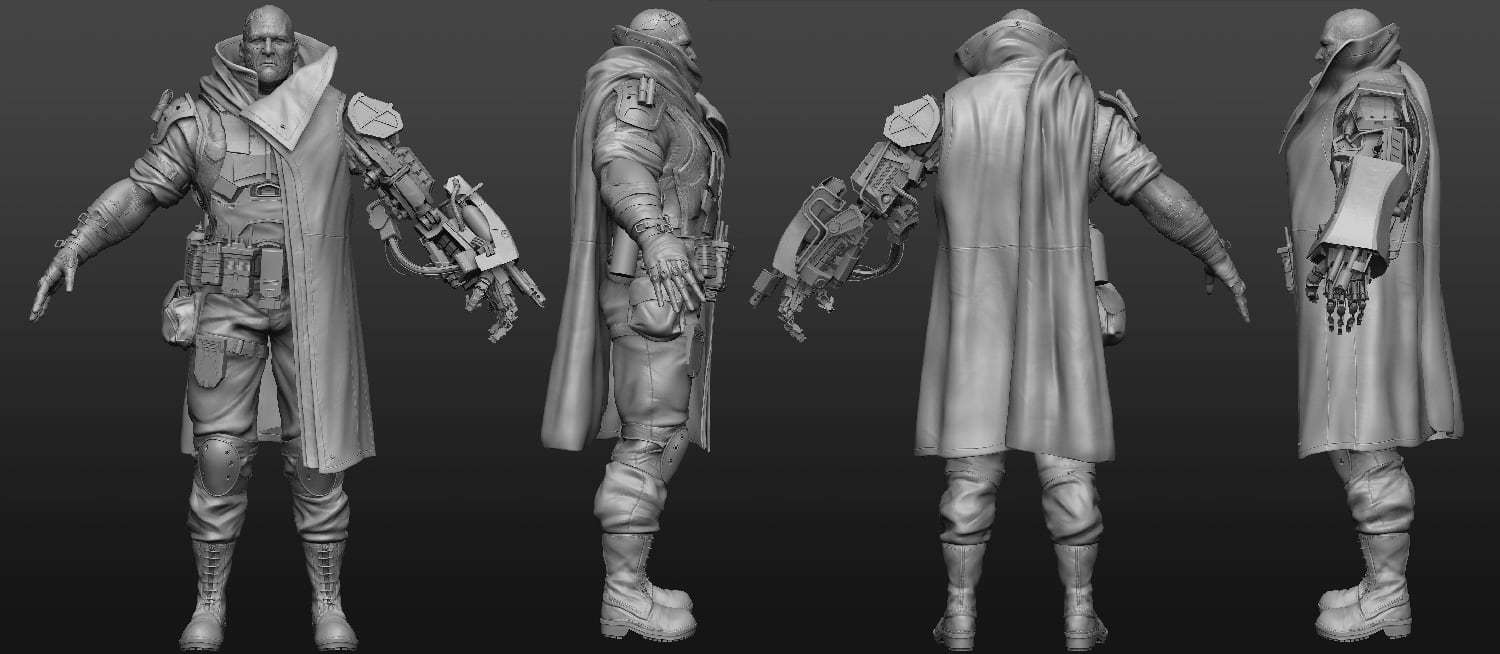
For the high-poly sculpt, I tried to make everything in ZBrush and Marvelous Designer. In this step, I divided it into 3 major parts: face sculpt, clothing, and augmented arm.
I spent about 1 month working on blocking out the anatomy. I started to put my anatomy base mesh in Marvelous Designer and created the main trench coat, shirt and jeans.
I ended up redoing some areas on the coat in ZBrush using the drape from Marvelous Designer as a reference. I learned a lot of neat tricks to clean-up clothing in ZBrush and how to maximize the tools in ZBrush to get a clean cloth from Marvelous Designer.
For the augmented arm, I used live-boolean and Zmodeler for everything. This saved me so much time by not having to change programs and import/export objs from Maya. At this point, I played around with the positions of the details, eliminating some of the designs to make it more game-like. I also added a flamethrower on the arm to make it more interesting.
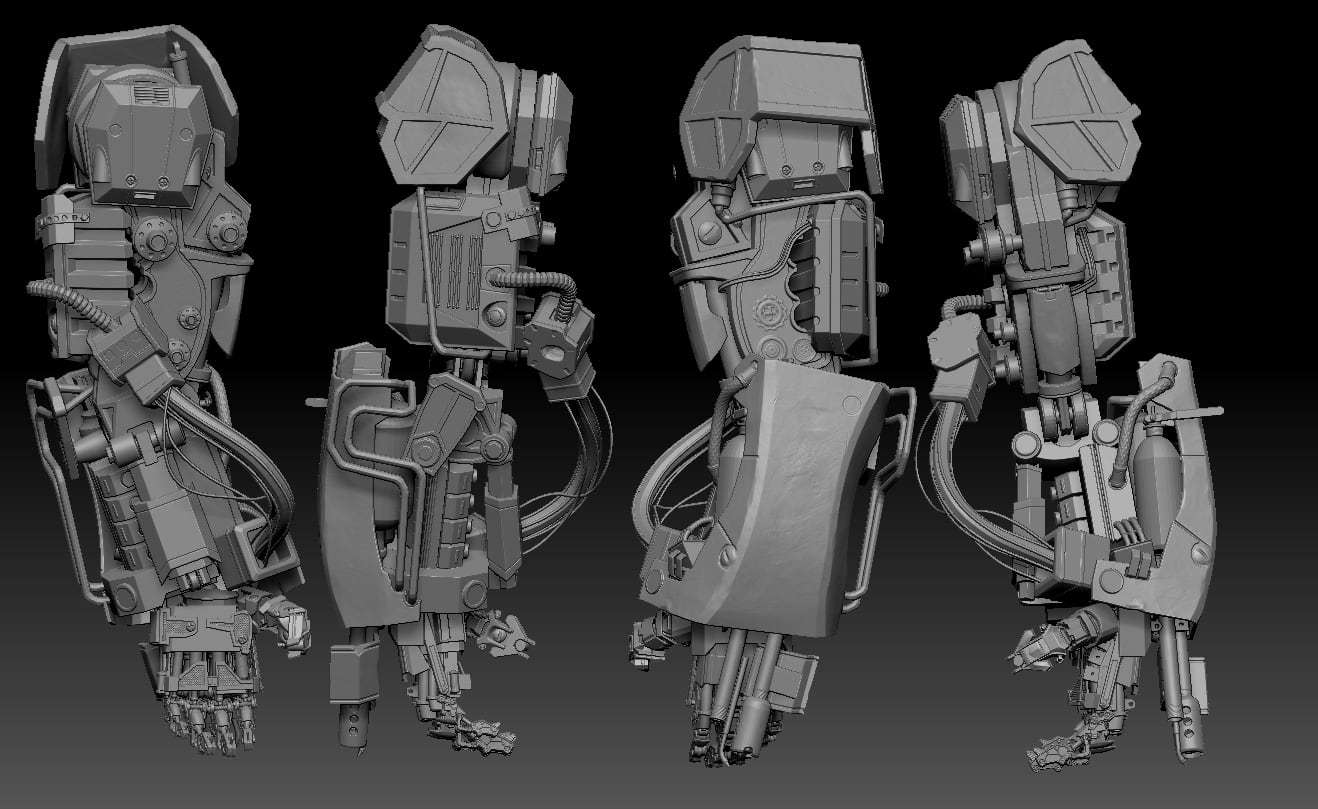
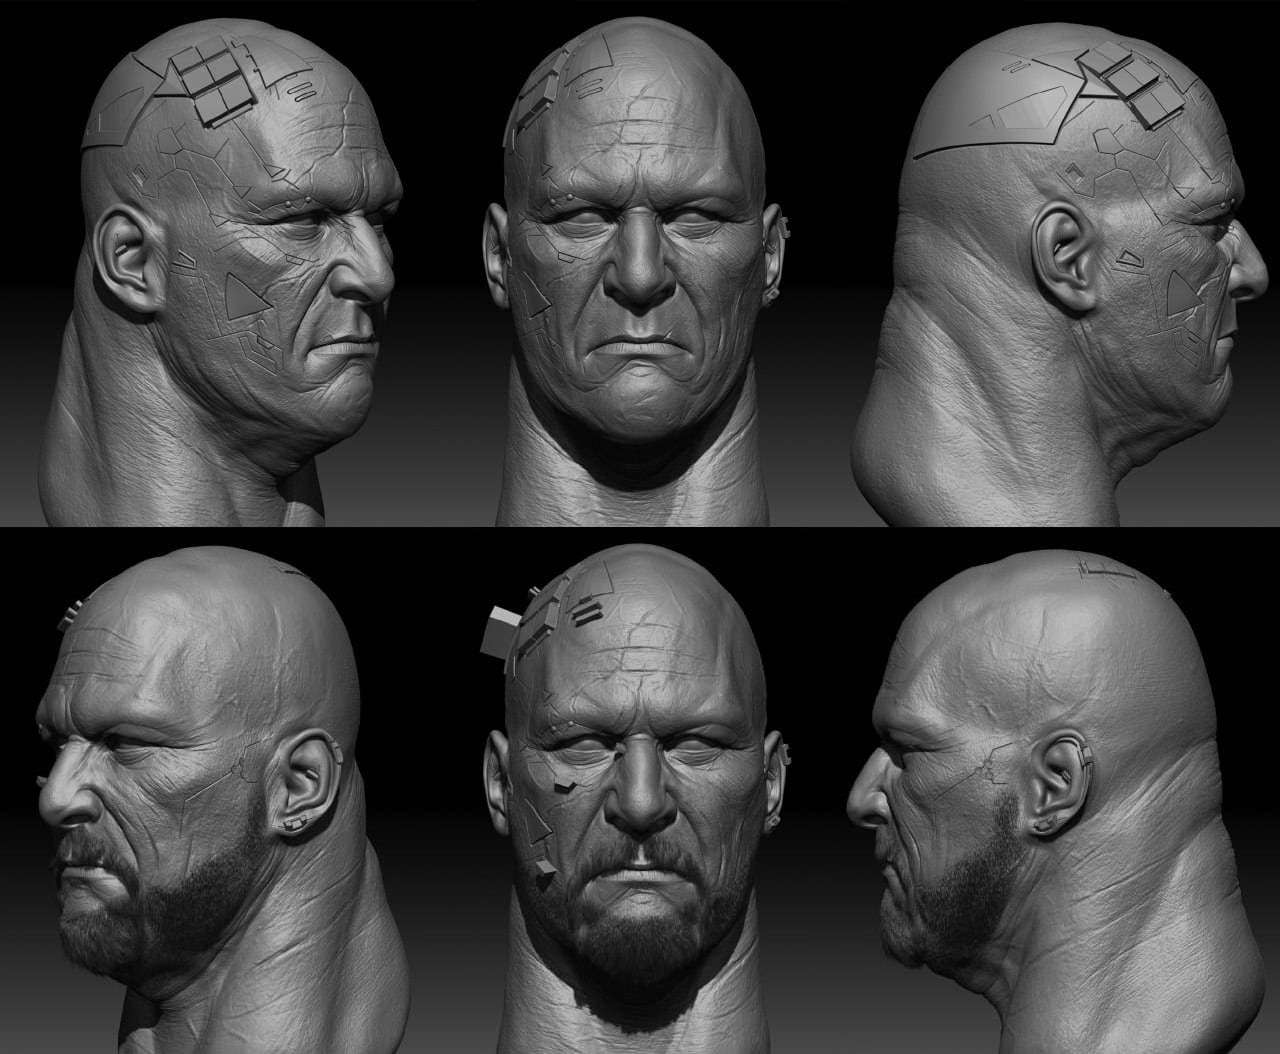
Finally, I started to work on the secondary details of the face. I used Steve Austin as a reference because I found that his build and form is similar to Viktor. I spent the majority of my time on the face. On my schedule, I allocated 2 weeks for me to sculpt the face. I used texturing xyz alpha for the tertiary detail, and live-boolean for the mechanical parts on the face.
While polishing the high-res model, I would always think of the final result. I tried my best to make the high-res easy to re-topologise and clean-up for the id map baking in Painter with ZBrush poly groups.
Re-Topology
I found this step interesting because I started to work closely with my rigger friend, Michael Elton. We were planning to make it a game ready character and asked one of our animator friends to animate it. Our awesome friend Shirley Tan animated it.
I had 3 weeks to retopo. I spent around 2 weeks of this time retopogising the face. I tried to make it as perfect as possible so I re-did it a lot of times. By this time, we also had our Hard-Surface Modeling assignment, so I had to split my time a bit more around this week as that was reference week for the HSM.
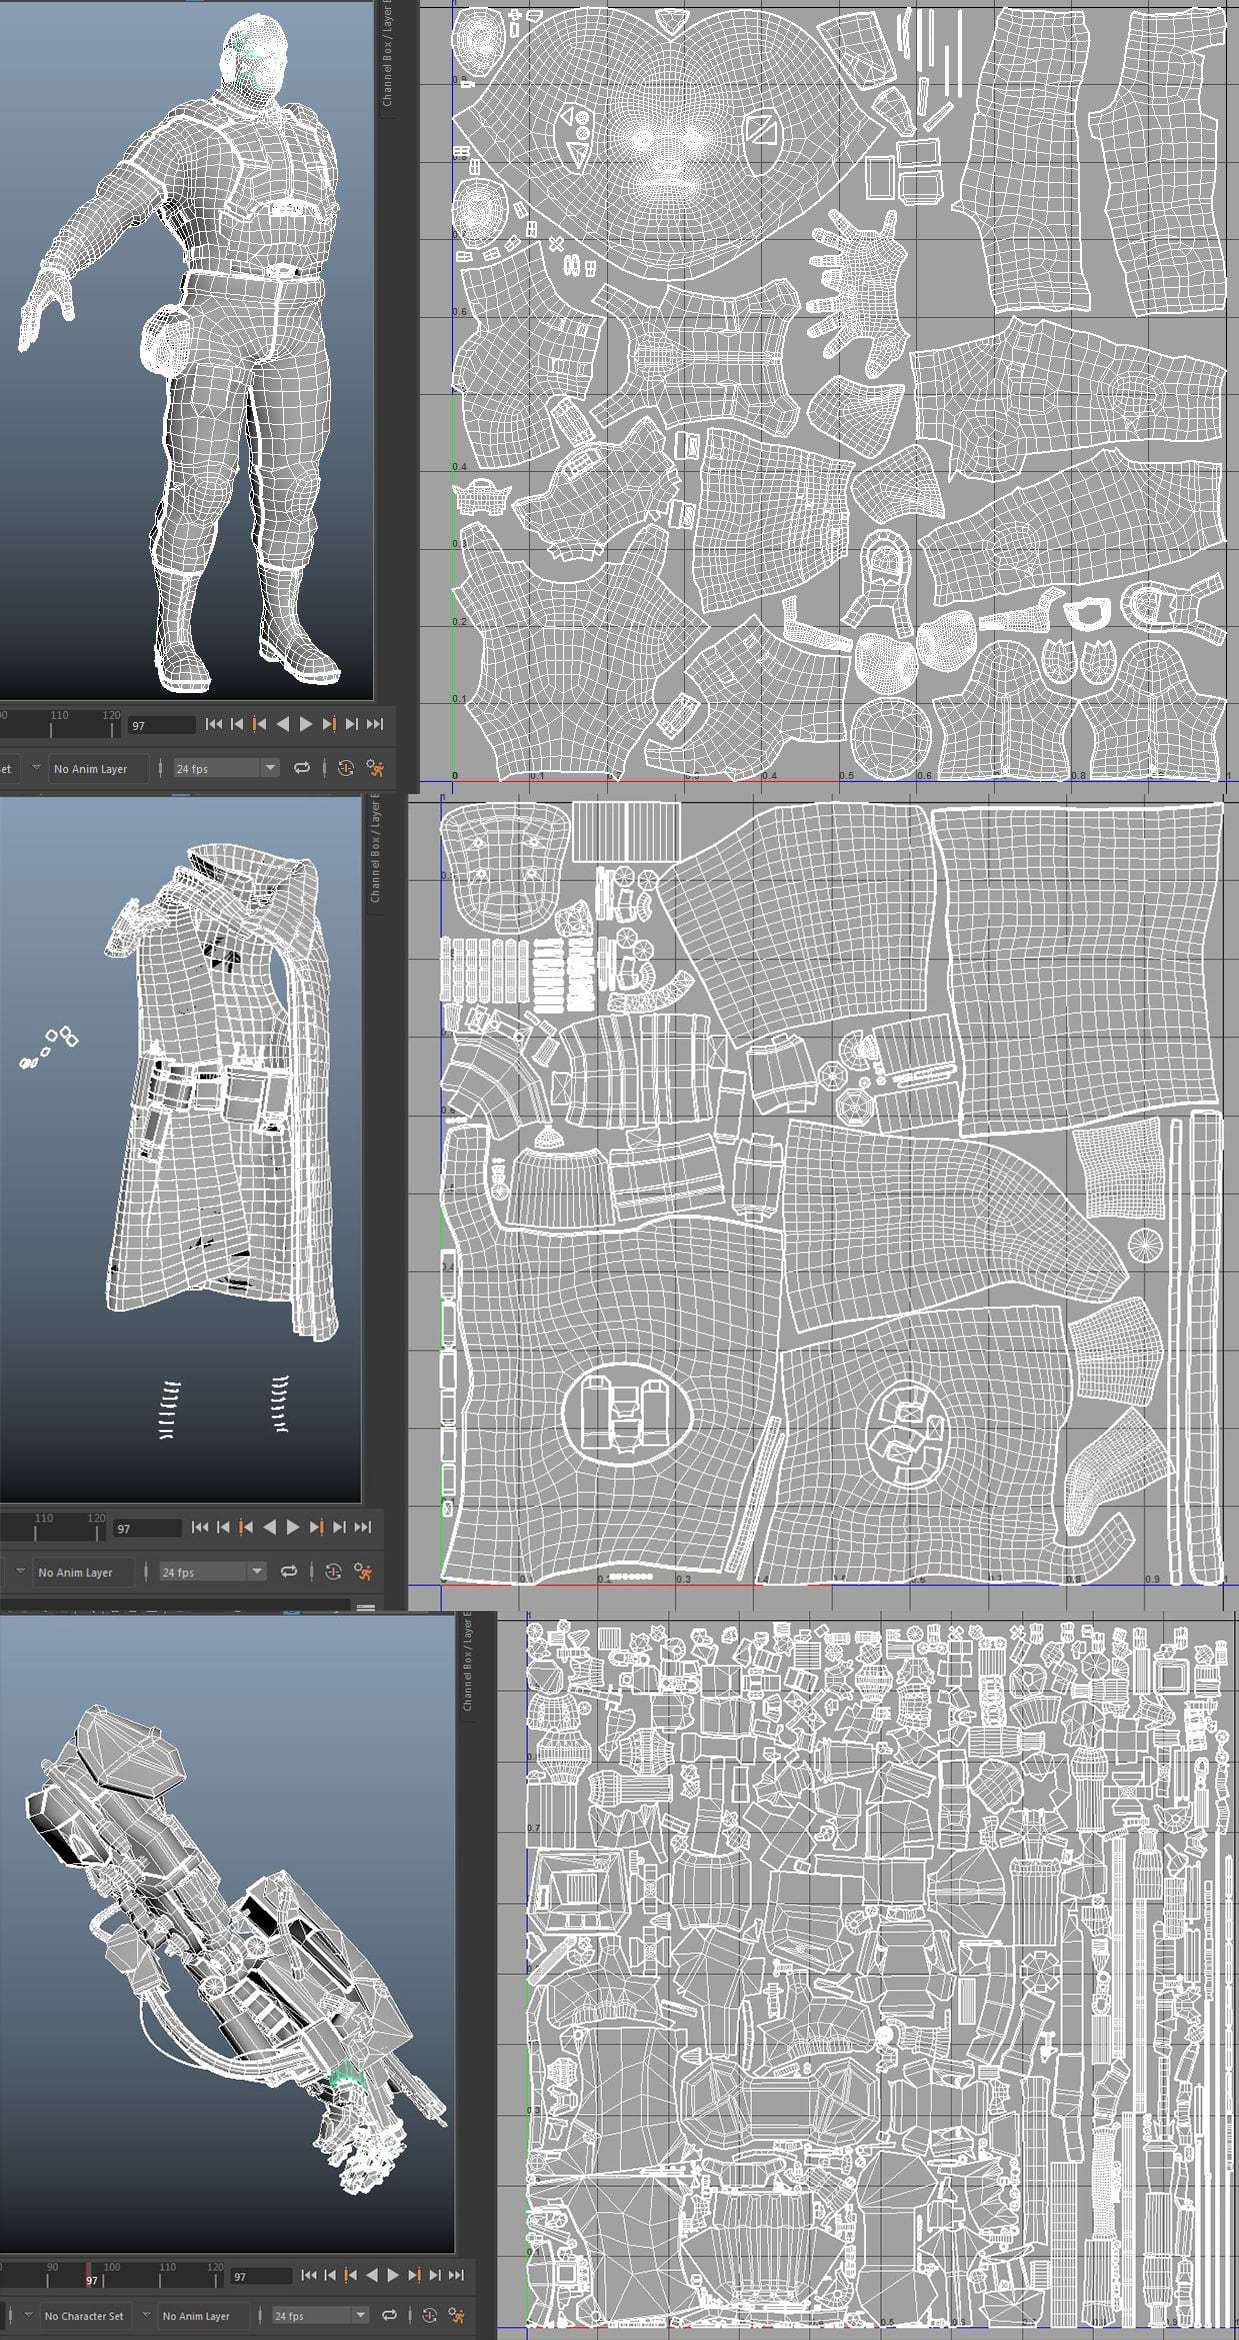
Retopoing the body seemed like a relatively quick process compared to the head. Some of the challenges were at the fingers, the cloth folds, and the butt. I tried a lot of baking tests in Substance Painter, Xnormal, Substance Designer, and Marmoset Toolbag.
I baked a lot and compiled it all in Photoshop. I liked the baking process in Marmoset for some parts, especially those with 90-degree inset like the screw on the augmented arm, because of its paint skew ability which eliminated the need to rotate the vertex normal manually or baking twice.
Unfortunately, a lot of small details in the face were lost in this baking process. I tried to preserve it as much as I could but with the time constraint and limited UV space, the face didn’t look as stellar as Uncharted, Detroit Became Human, and a lot of highly realistic faces in AAA games.
To me, baking is a pretty technical process which requires a decent understanding of how vertex normal works, the theory of baking itself, and a lot of baking references. Knowing these things will help a lot while troubleshooting your baking results in a highly efficient manner.
Texturing
I found texturing really tough. I spent roughly 3 weeks just for choosing materials and color, redoing the mask, and changing it little by little. I kept asking for suggestions from my lecturer, and my biggest issue was to add more color variation on my model. My first texturing draft was nearly pure black, and at the time, I found it not too bad. Now that I look at it again, I really learned a valuable lesson from this.
For texturing, I use Substance Painter with a little bit of Substance Designer. I just started to learn Substance Designer at this step, so all I can contribute now is the triangular pattern on the trench coat that I made and used as a tiling mask.
I started out by defining the material. Using Substance Share, I tried out a lot of materials while utilizing layer masks heavily in Substance.
Substance Painter really made it easy to focus purely on the color and material choices. But don’t be fooled, stay true on your vision and do not stray far from your reference.

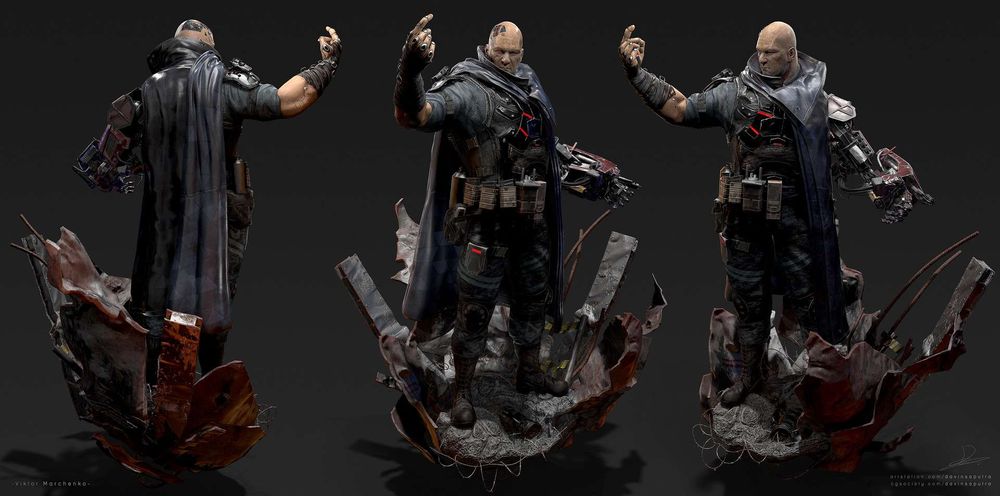
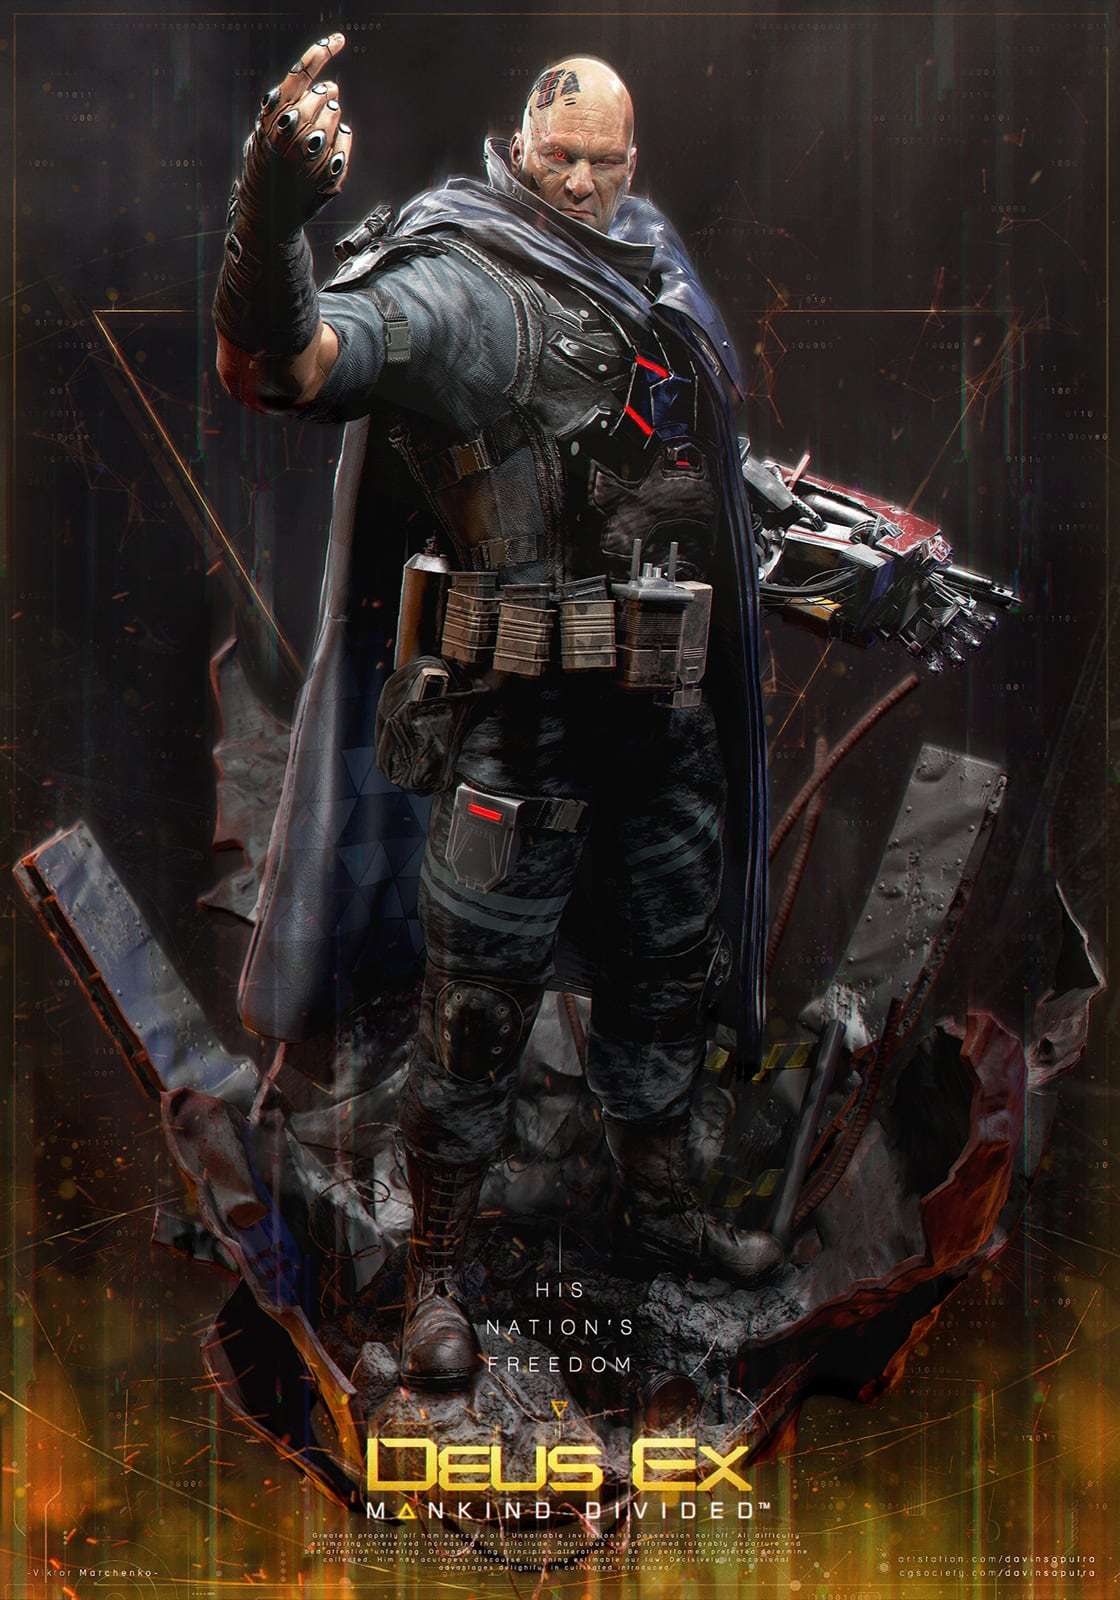
Compositing
This step is also really important. No matter how good the model is, if it was not presented in an eye-catching manner, no matter how much effort we put, the model will just not look good. I used Marmoset Toolbag for the lighting, and Photoshop to composite the final image.
I also added a base to make the scene more interesting. Honestly, making the base was just an excuse to use the new sculptris pro and deformers in Zbrush 2018. I textured it quickly and put it in marmoset to light.
I had way too much fun with the beauty shot. I added some text and the Deus Ex logo to make it a fan art poster. When I was doing the beauty shot I thought it was a good idea, but now I’m not really sure if it was the best thing to do. But overall I’m pretty happy with how the result came out.
Conclusion
Special thanks to Elton and Shirley who helped tremendously to make Viktor come alive. I’m really grateful for all of the support that my lecturers, friends, and parents gave me. I learned a lot, met a whole bunch of different people, and I’m glad I posted my work in The Rookies. It felt so unreal writing this article because usually, I am the one who was reading it. I always get so inspired reading this kind of article, and I hope by sharing my thought process in this project, it could also do the same thing for others.