How to ZBrush Sculpt an Animal
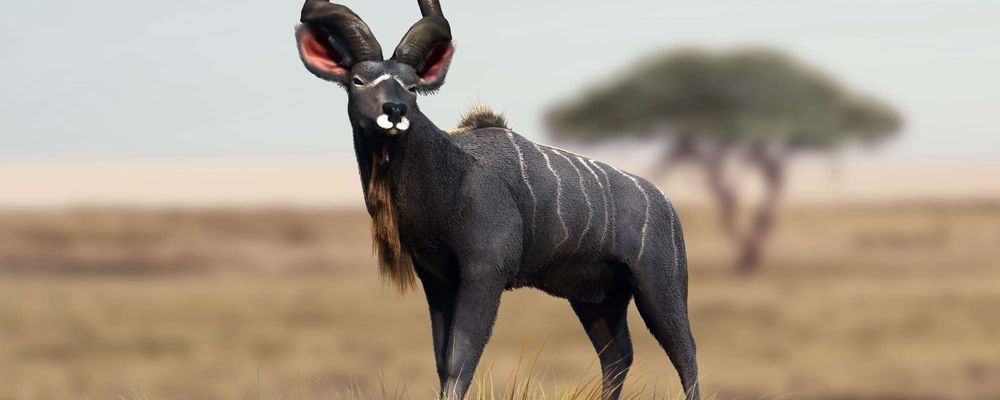
The article demonstrates one way to approach a creature diorama based on a breakdown of Beatrice Gröger's 'Greater Kudu' project.
The article demonstrates one way to approach a creature diorama based on a breakdown of Beatrice Gröger's 'Greater Kudu' project.
This article will show a breakdown of my Greater Kudu project and explain my method to sculpting creatures. The project itself taught me how to approach a diorama and various functions within ZBrush.
For this piece I've tried to incorporate many elements that I liked about other digital artworks.
Dioramas always had a certain appeal to me. They not only present the subject itself, but also its natural environment. A life-like setting can also further highlight the subjects personality.
This paints a pretty nice picture of what habitat the creature might live in and how it behaves, but adding color to your creature sculpts is always a nice addition.
Even a bit of Polypainting does the trick, as gray renders always let them appear cold and mannequin-like—unless that’s what you’re going for!
I truly appreciate every artist who is bold enough to choose a rarely seen subject over the commonly known ones. This is a wonderful way to educate not only yourself, but also everyone who views your artwork about a lesser known creature.
Choosing a subject that is not as well known was a way for myself to avoid ‘lazy referencing’. When sculpting a feline or canine for example, it might be tempting to look at other artists work of these animals and practically re-sculpt it. Don’t do that!
With the greater kudu I have found a beautiful animal which was a rarer subject, so I couldn't be tempted and be lazy about collecting references for it.
Your subject should also have a quality which you want to highlight—like an extraordinary pattern, shiny scales or a slender body.
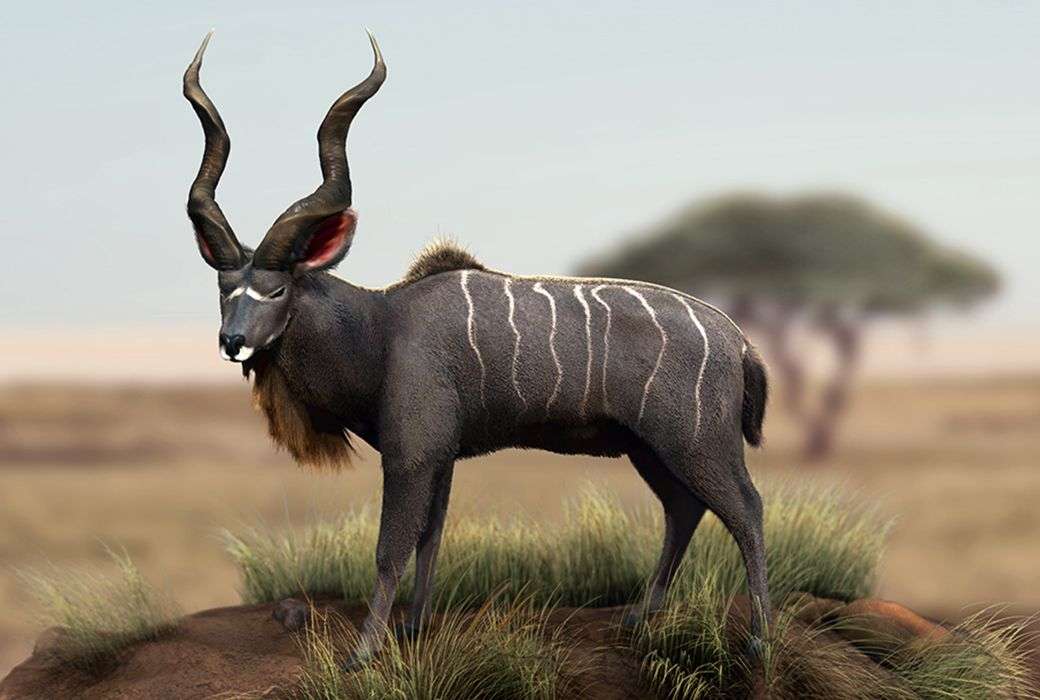
The Kudu obviously has magnificent horns, but the white markings are just as pretty in my opinion. These will be the qualities which I’ll focus on while setting up the scene.
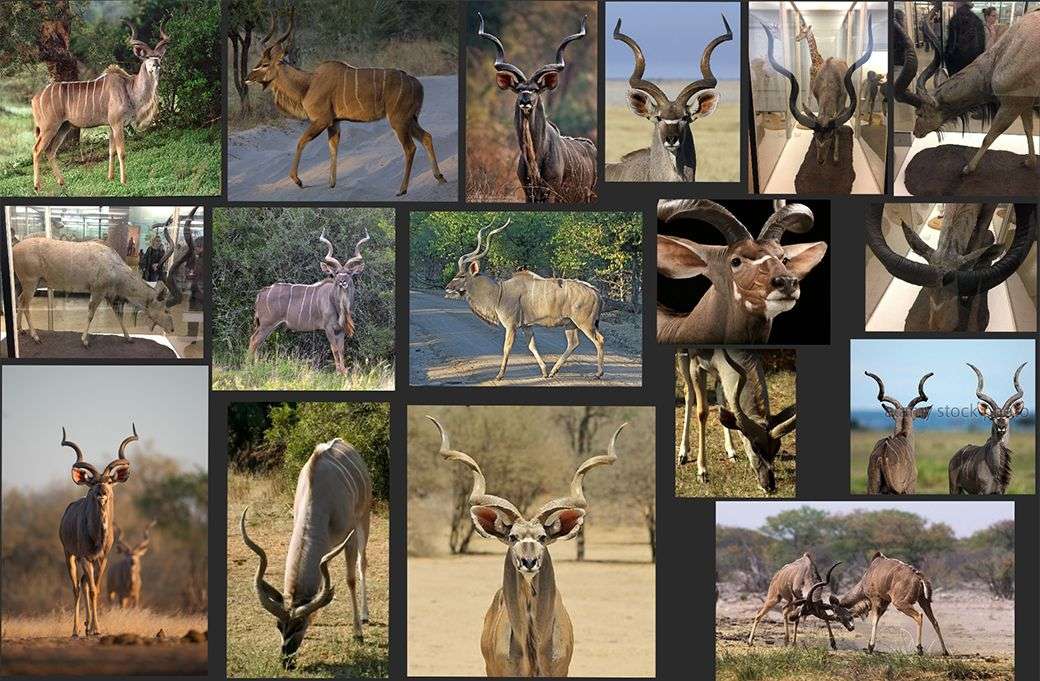
Collecting images and videos might seem dull, but it is the most important step for any artwork.
If Google doesn't seem to spit out the right images for you, worry not! Try searching for the scientific name of your subject and you will usually get a lot more pictures in a much better quality.
As for books 'Animal Anatomy for Artists: The Elements of Form' proved to be a valuable reference for the general anatomy of my subject. Of course visiting my local zoo and Natural History Museum were a tremendous help as well.
Taxidermy and (if you can stomach it) dissections are another great way to learn about the creature and its anatomy.
Since I like to organize my images I've created a reference board using PureRef.
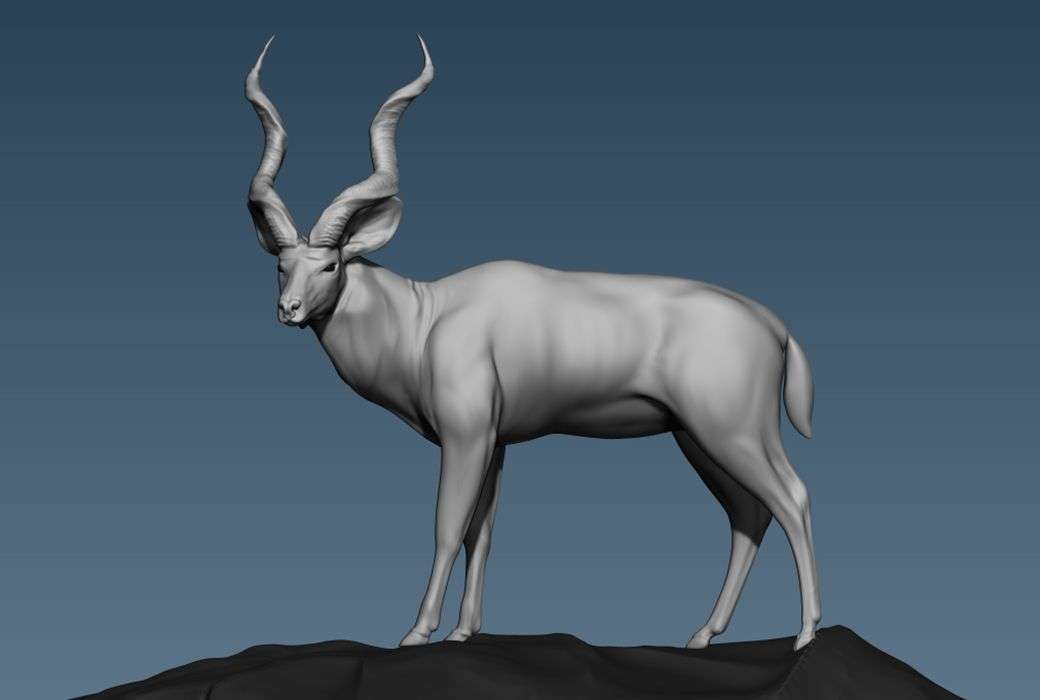
A goal for this project was to minimize the use of other programs besides ZBrush as a way to teach myself more about this software and its possibilities. The only exceptions were the creation of the base mesh and the final composition.
I created the base in Maya, even though ZModeler and ZSpheres would have been a good alternative. Since I was still very new in this software it felt too easy to slip into the detailed sculpting mode rather than defining the basic forms first.
Even now, almost two years after the kudu project, I still prefer Maya for the early low poly stage. Another important step to keep in mind is the scale of your model.
Always try to create your models using realistic measurements. A model that’s too small/big can cause problems with lighting later on.

Making use of all my references I now start building up the forms and detailing the model. The symmetry feature was used until the biggest shapes were established, but after that it felt more natural to sculpt each side manually.
Before adding too much detail I posed the sculpture to my liking and I adjusted the anatomy based on my changes.
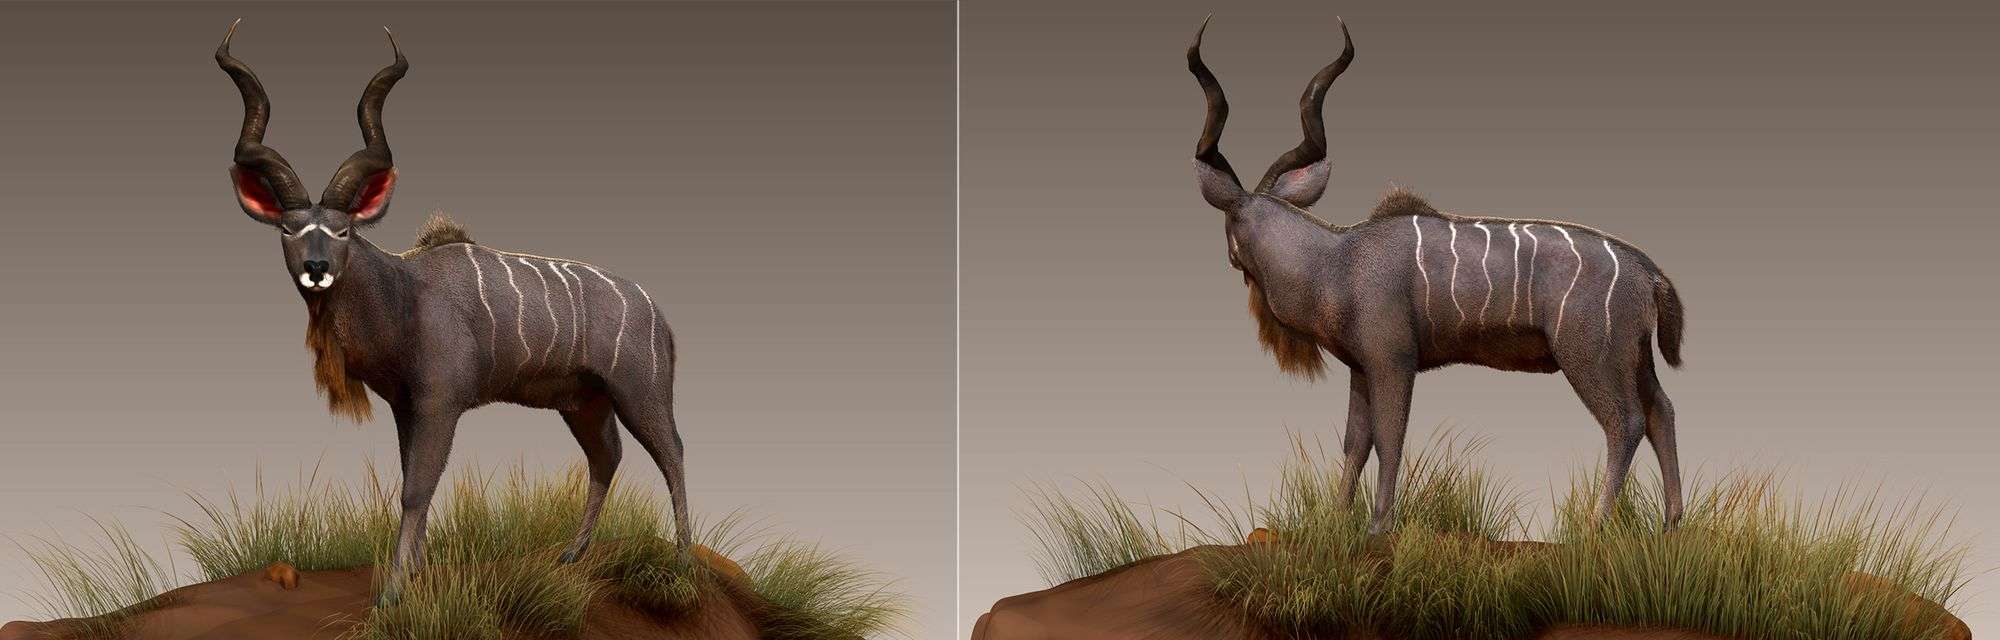
Out of all the reference pictures, I selected only a few which depicted the fur coloration which I liked most. From there I started sampling colours of various body parts and hand-painted all the details using Polypainting. This was a lot of fun since I discovered the variety of markings kudus could have.
At this stage I also started detailing the environment platform. By adding a few rocks and adjusting the background colours I could set the basic mood.
References for this were the diorama setups in my local Natural History Museum. They also had some interesting light setups for the African wildlife which I later used as a guide.

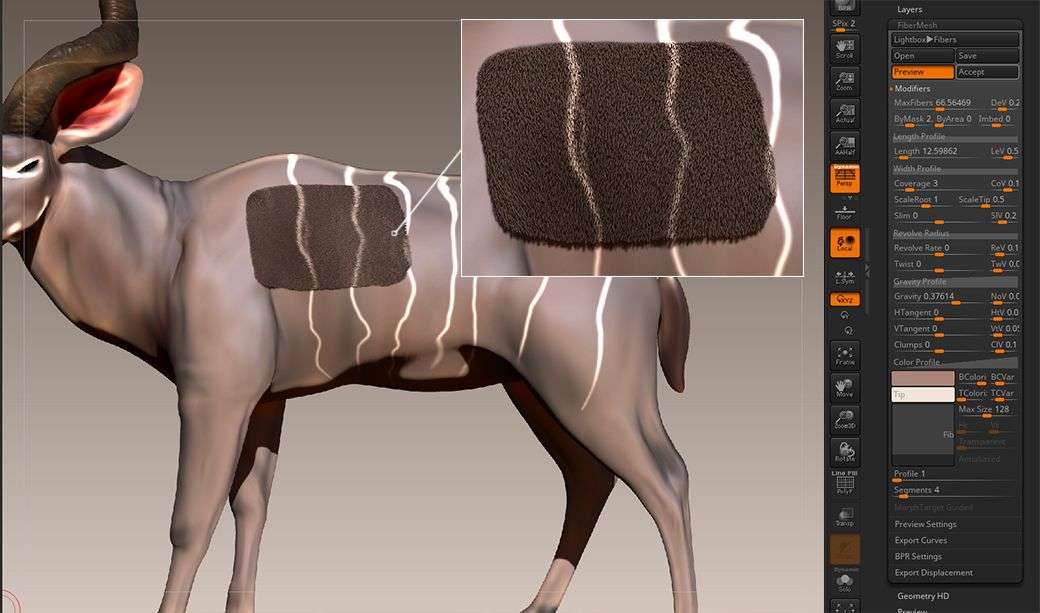
Working with FiberMesh proved to be the most challenging part. Tweaking each parameter proved to be rather time consuming, since it was my first time actually attempting to create fur.
To combat this for future projects I made a fur-like preset. It’s not perfect but it did work out in the end.
Feel free to use it as a starting point if you want to give FiberMesh a go.
For the material I chose the ToyPlastic material from ZBrush. It might sound like an odd choice but I liked the end result best.
I also learned that creating a shorter undercoat beneath a longer coat provided the best results and good coverage. What I ended up with were the following fur sections:
Using a FiberMesh preset from ZBrush I added some patches of grass to add some colour variation and vegetation to the scene.
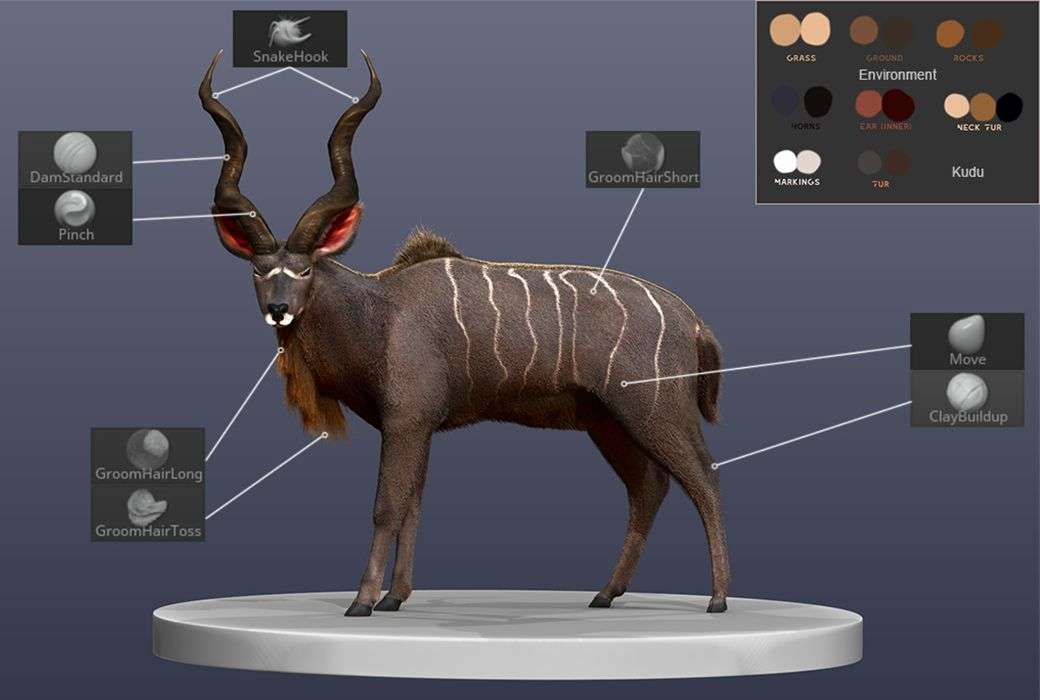
I created a little overview demonstrating which brushes and colours I have used for the final sculpt. Only basic brushes from inside of ZBrush have been used to keep the process as simple as possible.
The colours were sampled from various pictures while keeping in mind the lighting conditions.
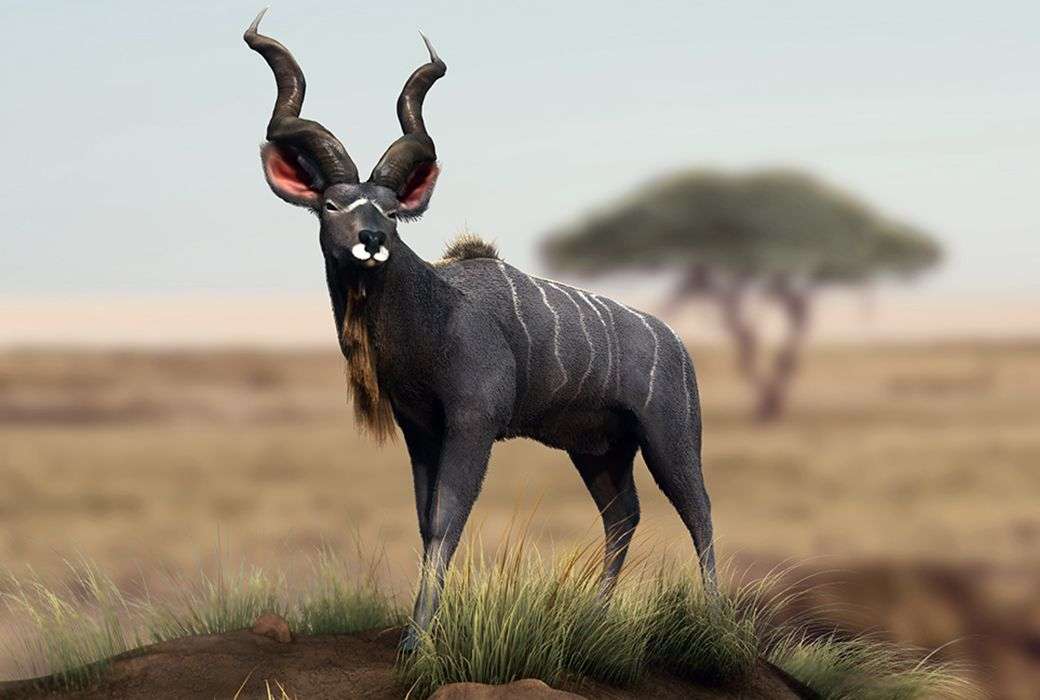
Since I wanted the freedom to experiment with my lights, I didn't use one of ZBrush's Matcap materials (as they have the light information baked inside them already).
Instead I chose a standard material and added a 3-point lighting. It is a fairly simple setup, but by adjusting the colour to mimic a natural tone from the kudus environment it gave a very nice result.
It also added some interesting shadows which provided the model with a bit more depth.
Since this was the first time that I had actually used Photoshop to touch up one of my renders, it did seem a bit overwhelming at first.
Thank god the Internet has a lot of great tutorials to teach you what to do. To tackle this last step I used the composition guide from Pablo Munoz G.
Although I did initially play with the parameters quite a lot, in the end I only added a background image, some DOF and color corrected some parts to match the new background.
The whole project proved to be a much larger challenge than I initially anticipated, but I also learned a lot from it.
I had to teach myself many new skills which will prove to be useful for future projects. And although the final piece still makes me very proud, I also know that there is still a lot to learn and improve upon.
I hope my breakdown of this project could provide you with some valuable tips. Please keep challenging yourself, it’s the best way of going forward.