
There is an infinite choice of materials to reproduce, don't try to make it as complicated as possible. Take something with a simple global form, where you can work on the details: a floor tile, roof tiles, or a wood tile as I will present here. We have already seen and reviewed them, but it is only when these “simple” materials work that you can move on to the next level.
Take a material that inspires you, because you are going to see it for a long time.
The procedural side of Substance Designer is what makes it so great. That is why I wanted my wood to be able to change shape, to change the number of slats, not to remain frozen. With my new knowledges, I could add even more possibilities, like changing the age of the wood, making it more brittle, drier.
You could try anything! Be creative. But I should start all over again, and this point will lead to another one I will speak about later.
Gathering time
That is where the investigation begins! References are essential. No need to have a ton of it, what you need depending on the material you want to create. For my case, wood is complex because of its varieties, and this is the case for many materials. We must ensure that we stay on the right track.
Take PureRef with you so that you can collect all your references and zoom as much as you want on an image without losing its quality. For micro-level, take the tool option of Google Image and choose only large images. For macro-level, don’t be too harsh on bad quality images, you can see nice height informations on them sometimes. It all depends !
I also like to take references from works done by amazing artists, such as Javiez Perez, Enrico Tammekänd or Daniel Thiger. It is nice to set a quality goal, analyze how they have made the same material and how they have enhanced it with a nice lighting.
Setting things up
If you are starting out, get ready to be surprised. All the time. In fact, even if you are not a beginner.
Each material has its share of surprises, little things that we had no idea existed. I remember wanting to make concrete, thinking at first sight that it was a simple grey thing... Marvelous mistake! Learn to see at the macro level, but also at the micro level. Thus, we learn to build our texture in stages. It is so easy to rush towards the three small grains of dust (essential) while the overall shape does not work perfectly.
Analyse the different stages of construction carefully. Note how the height works, the different categories of details (cracks, shocks, grains...) how the roughness reacts on each part of your material, why is this material interesting? In general, it is a question of harmony between the details and the rest areas, of contrast, a little like absolutely everything in art.
I was talking earlier about the new things I could do with my wood, the new parameters, and why I would have to start from the beginning. If you want to make your subject as procedural as possible, you will have to be even more rigorous in your construction. What are the parameters you want to create? What information will it include to add on each map?
You will need other references from the different states your material may have. If you don't want your graph to be destroyed by a parameter changes, or buried under unorganized nodes, it's better to structure your way of thinking.
Of course, in the first tests, it won't be perfect (and it never will be, you learn all the time) but at least knowing what you want to do with your material does a lot.
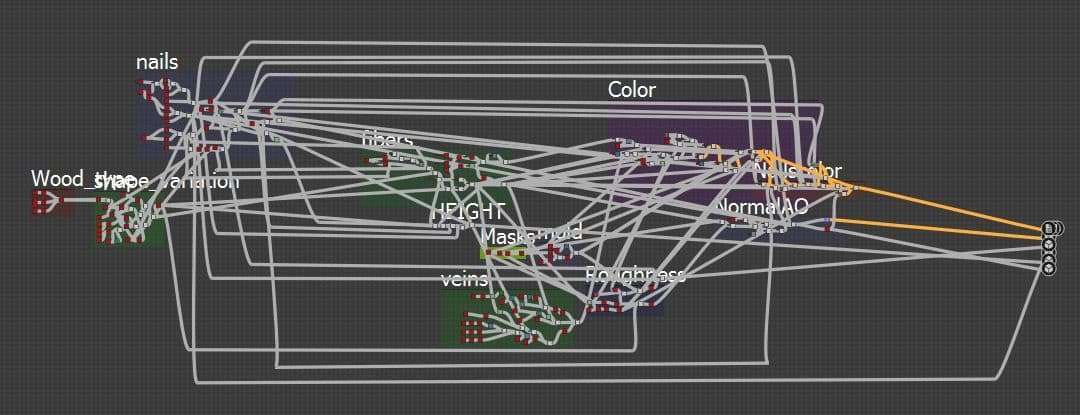
For my wood, I wanted to change the tiling, the humidity and the edge damages.
A question I didn’t ask myself at that time, because when you are learning Substance Designer it is better to put this aside for the learning process. In what kind of project do you want to use your material? A game? A movie? A nice sphere on ArtStation? This will change a lot about how you treat each information of your material to make it fit its final location.
Ready to start
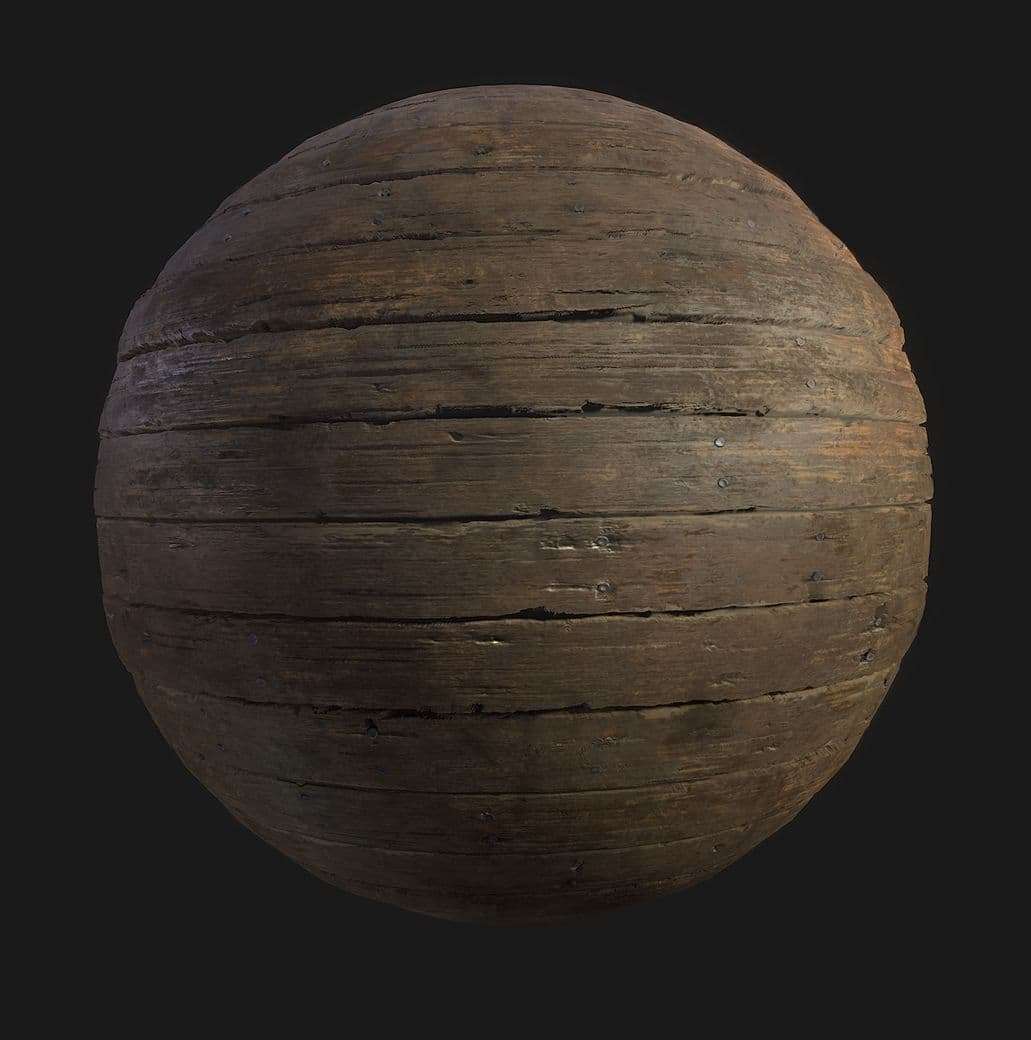
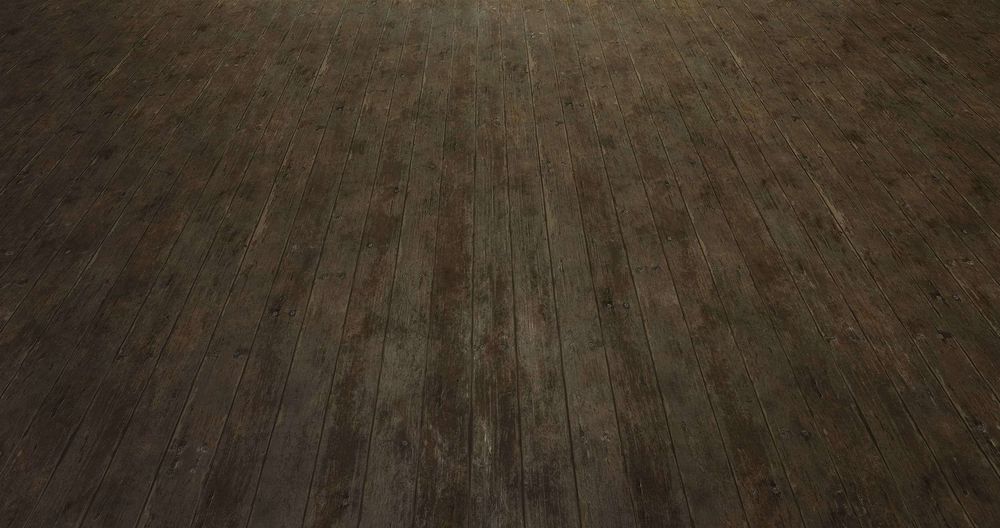
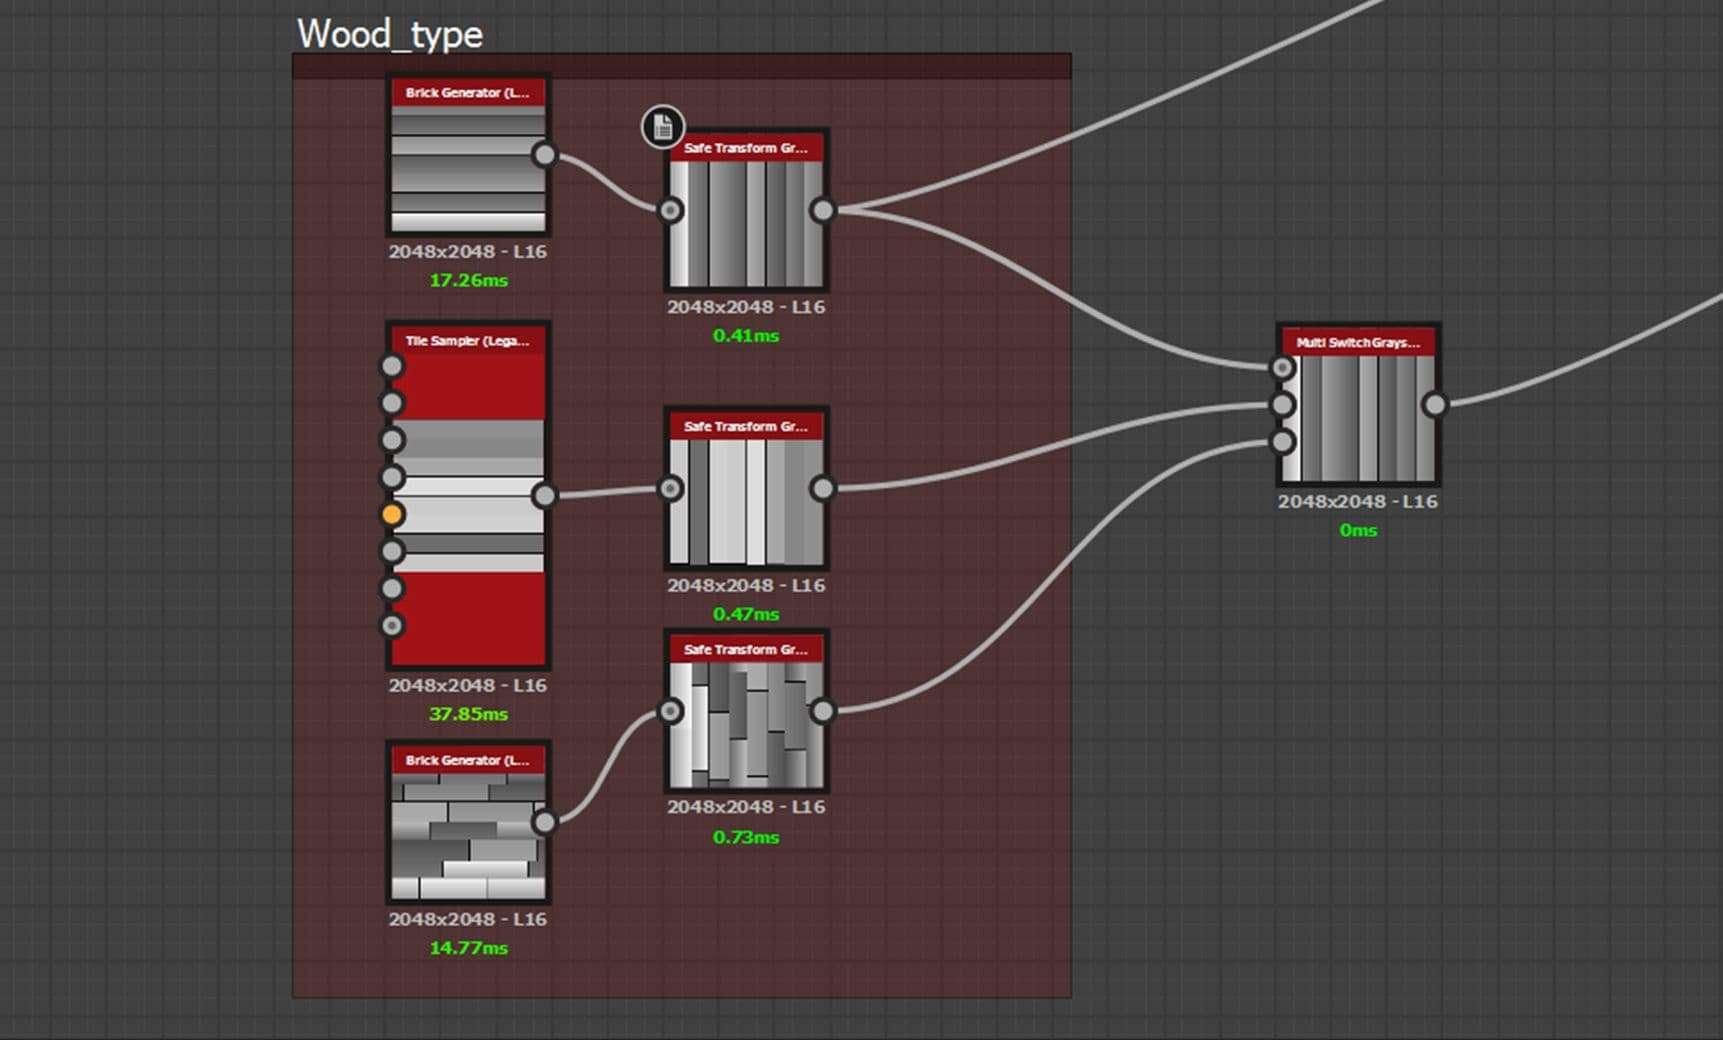
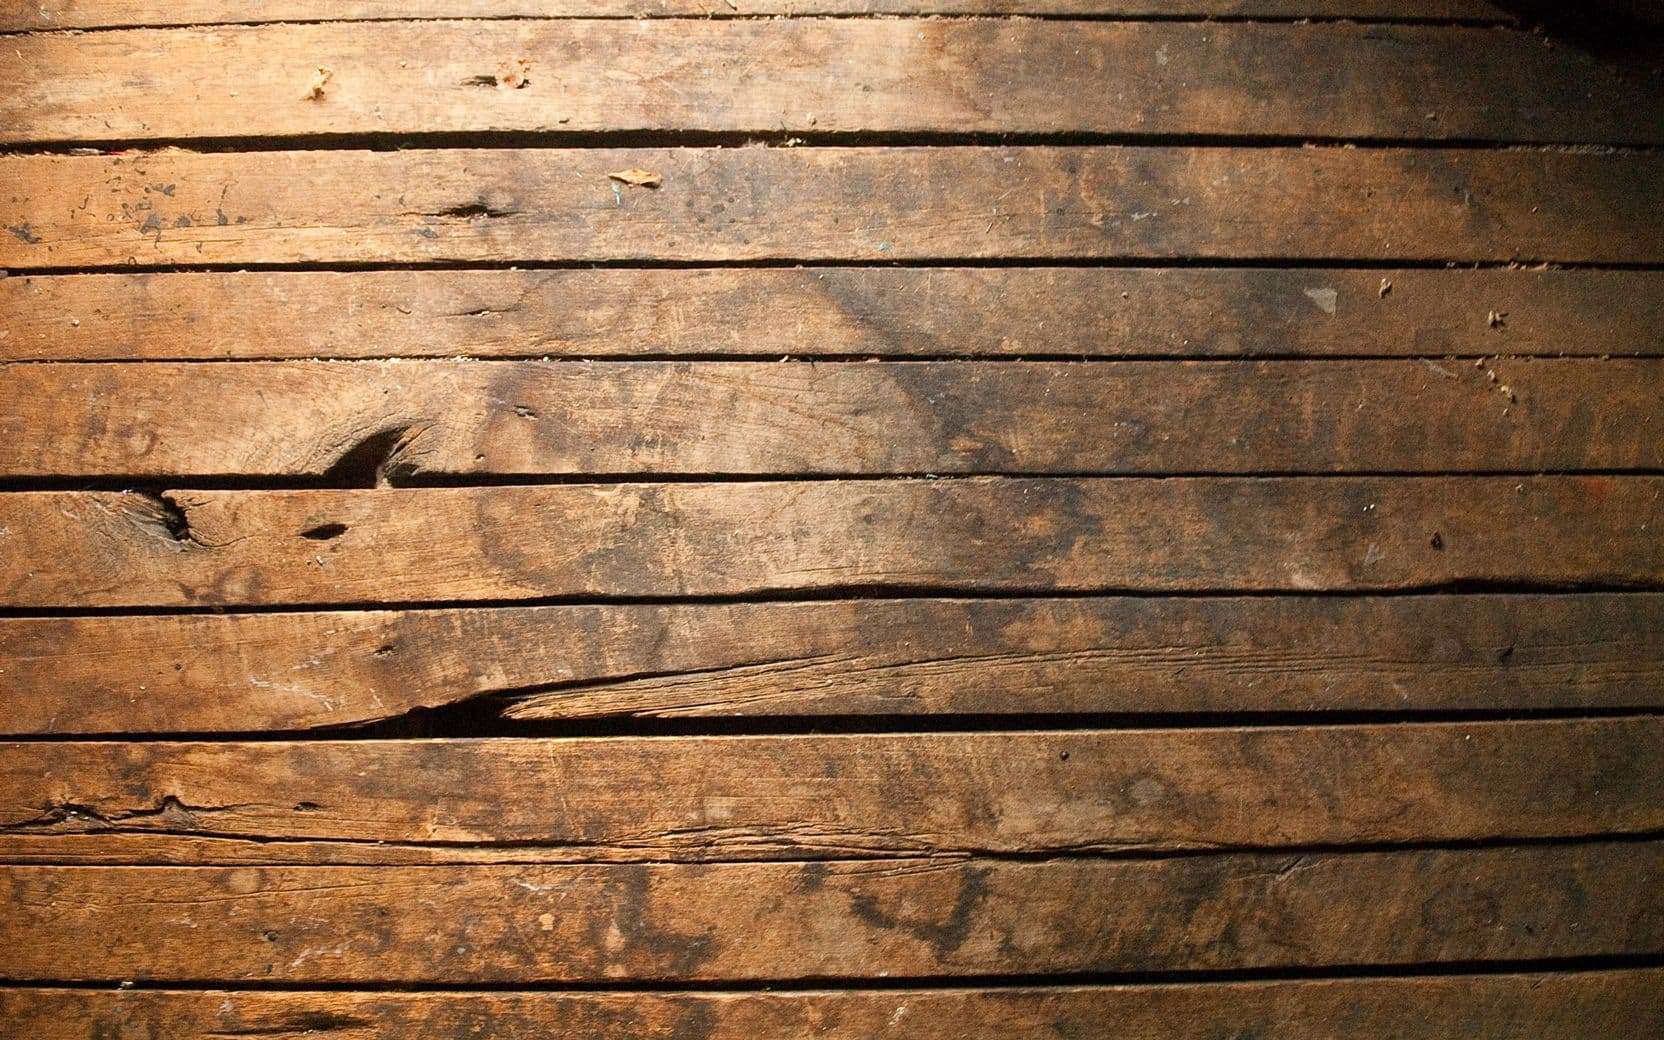
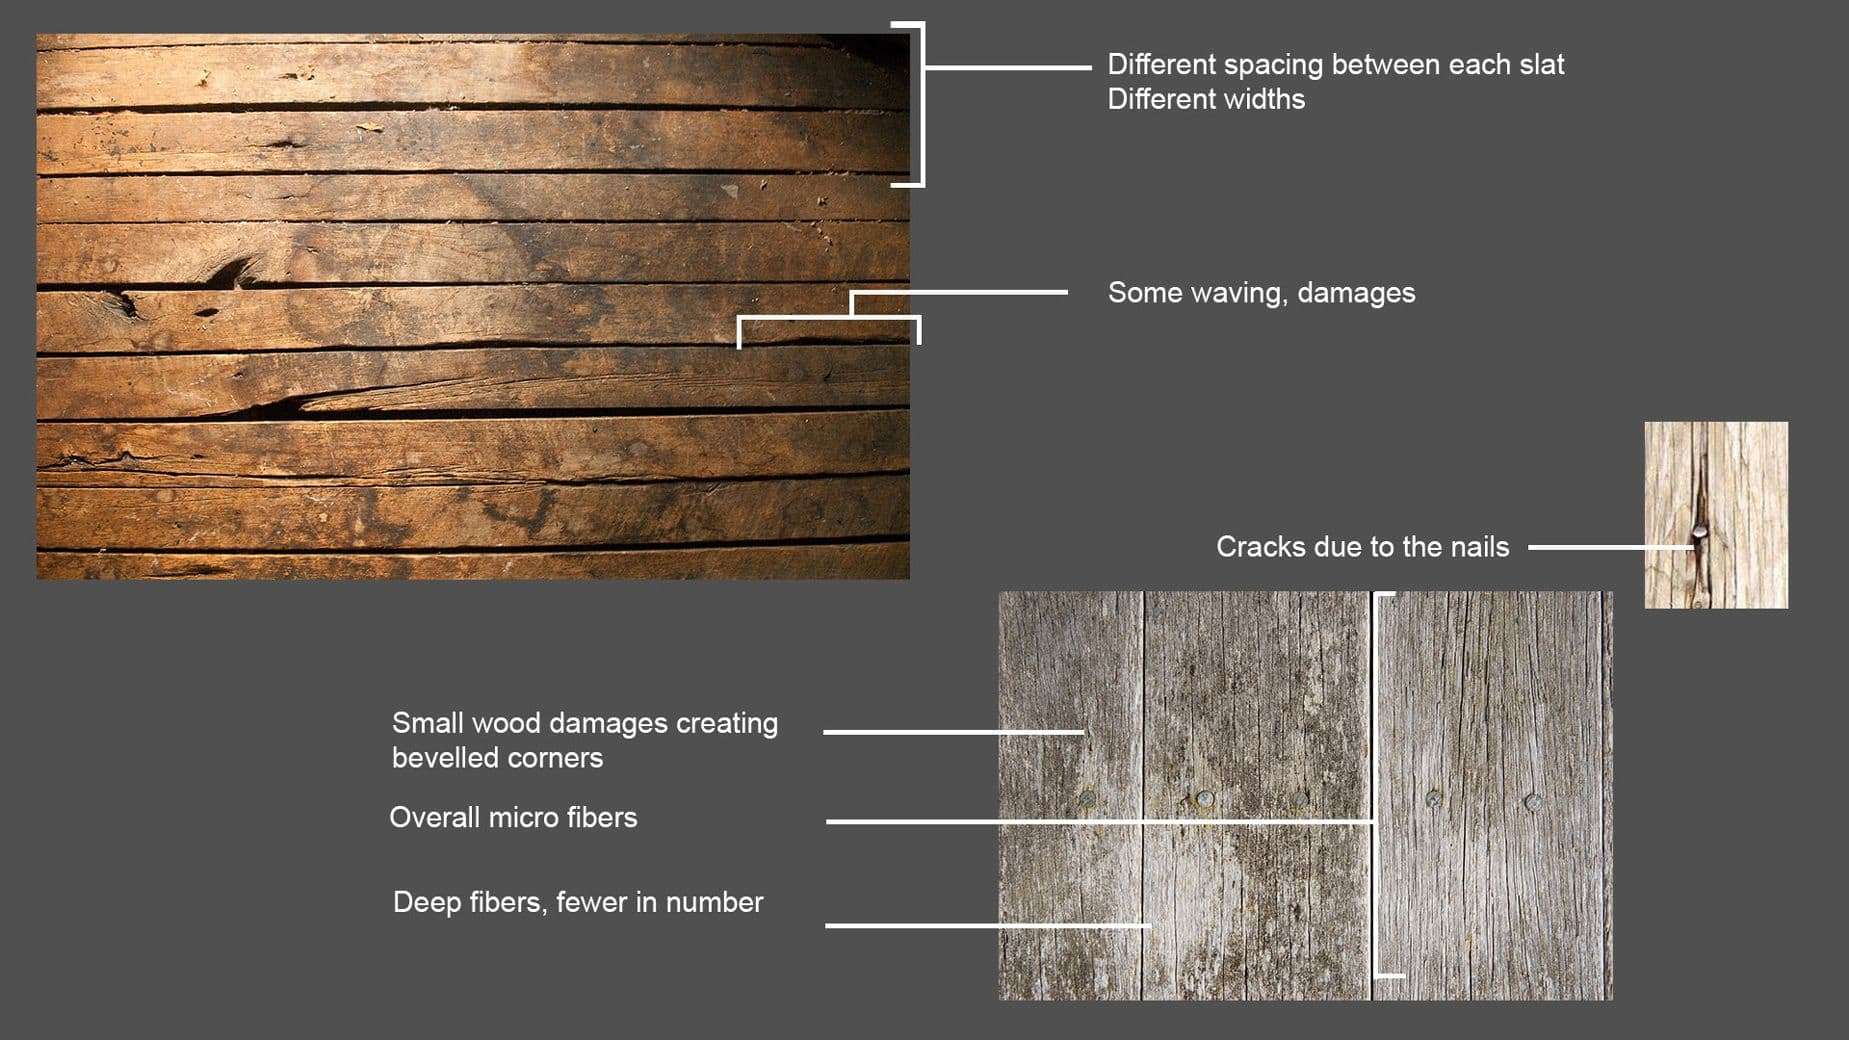
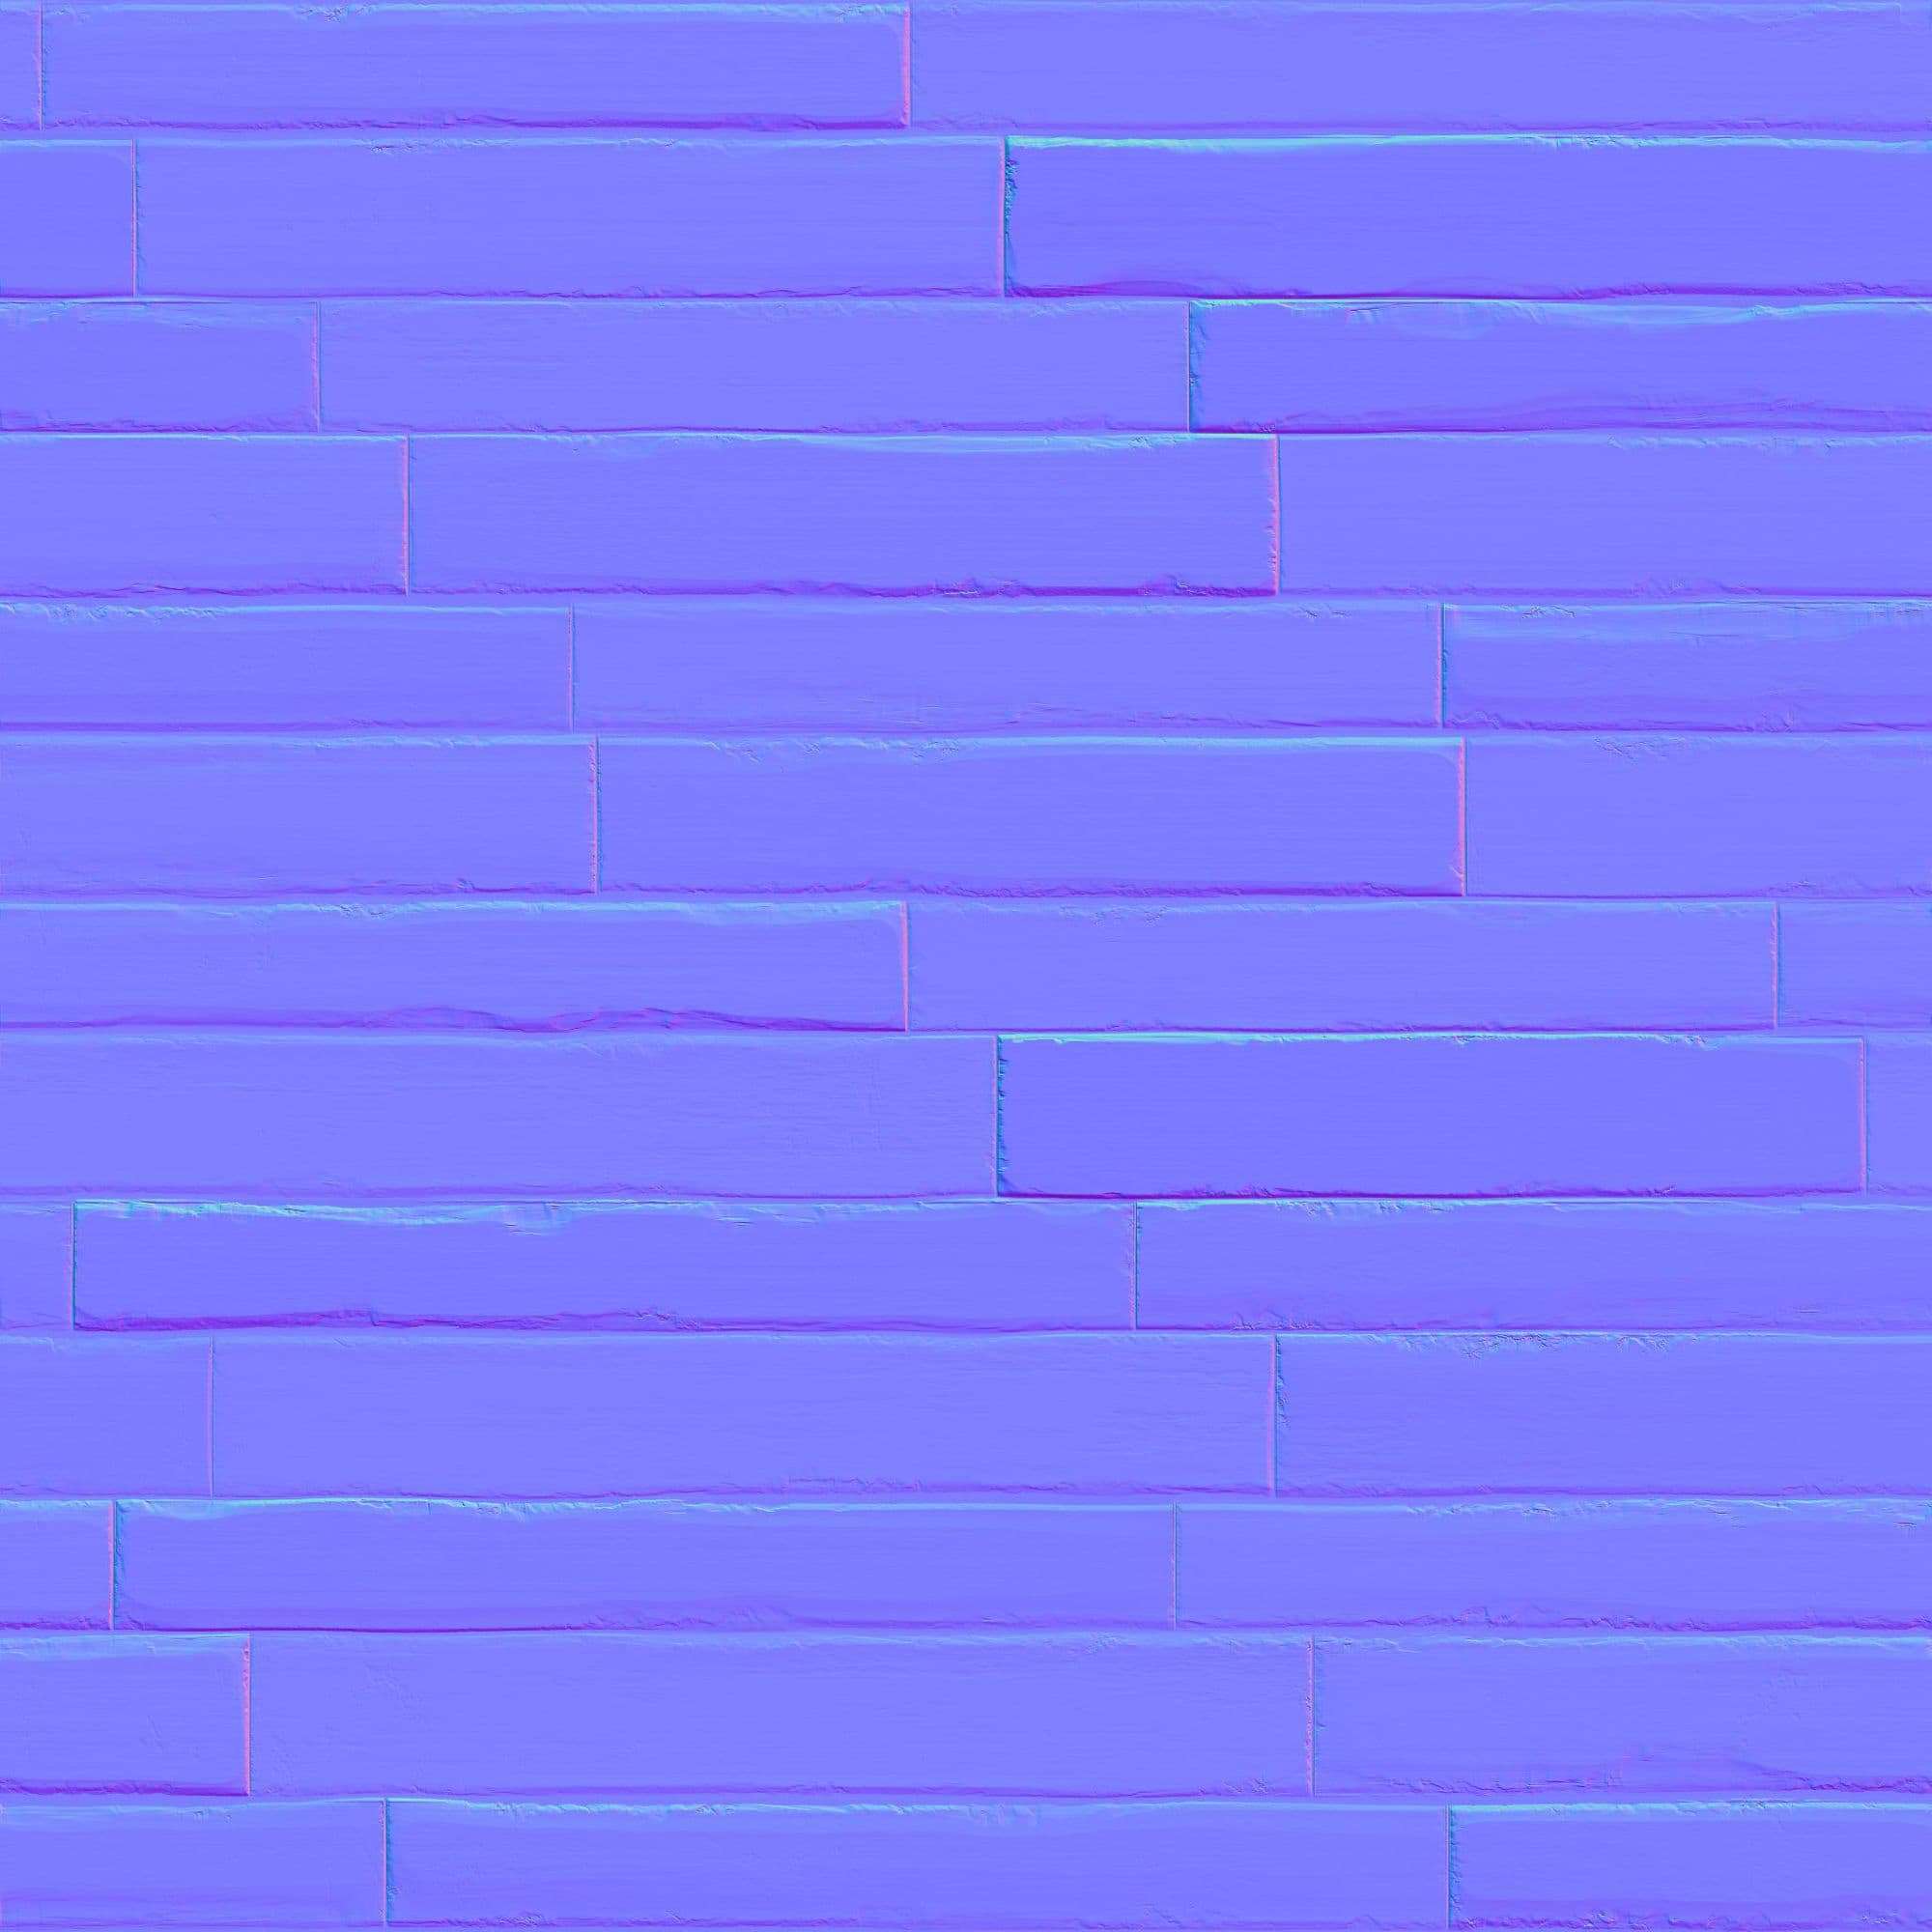
After all these intense thought process, it was time to refine this wood. First I asked myself the question of the overall shape and the height map: I wanted to make an old, dirty floor. Each slat had to be placed differently.
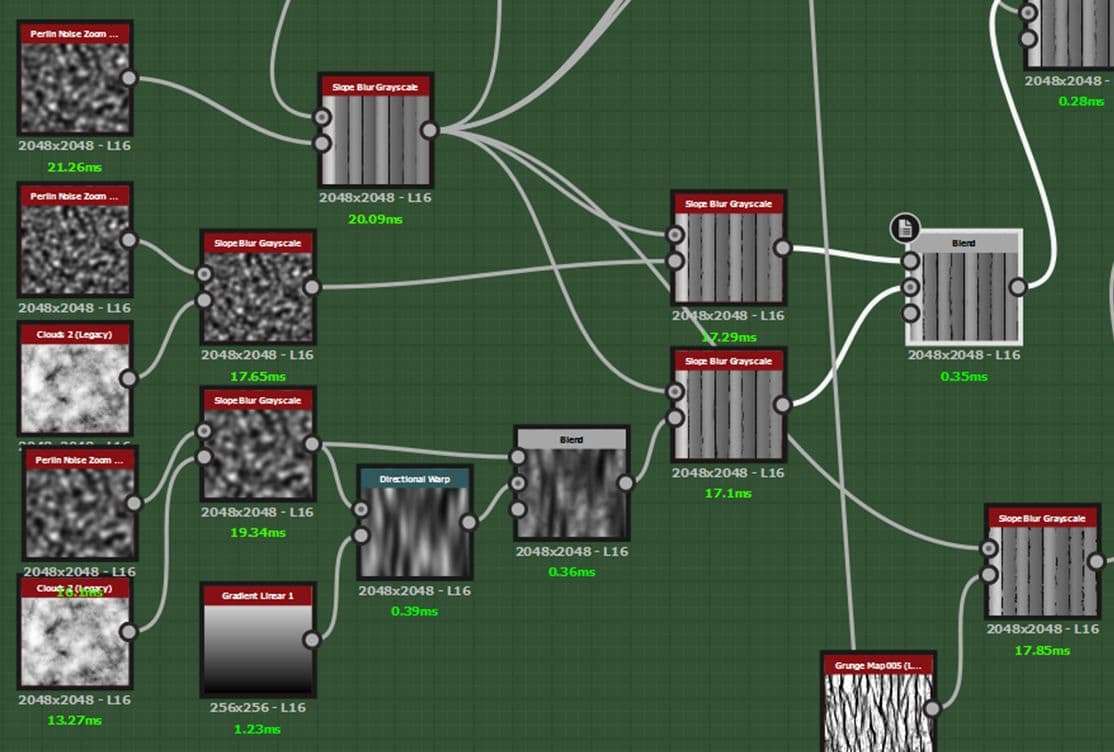
I used the "brick generator" node to be able to control what is called the slope, which gives a gradient oriented differently on each slat.
I also made a different spacing for each of them. All this was done in a subtle way, I wanted people to be able to walk on it without risking their lives.
Talking about the height map, know that if the range value is under 0,5, it will dig down your mesh if you are making some displacement or parallax occlusion. The value 0,5 is the “neutral” value, your mesh will keep its original size and will have the desired areas (above 0,5) pushed over.
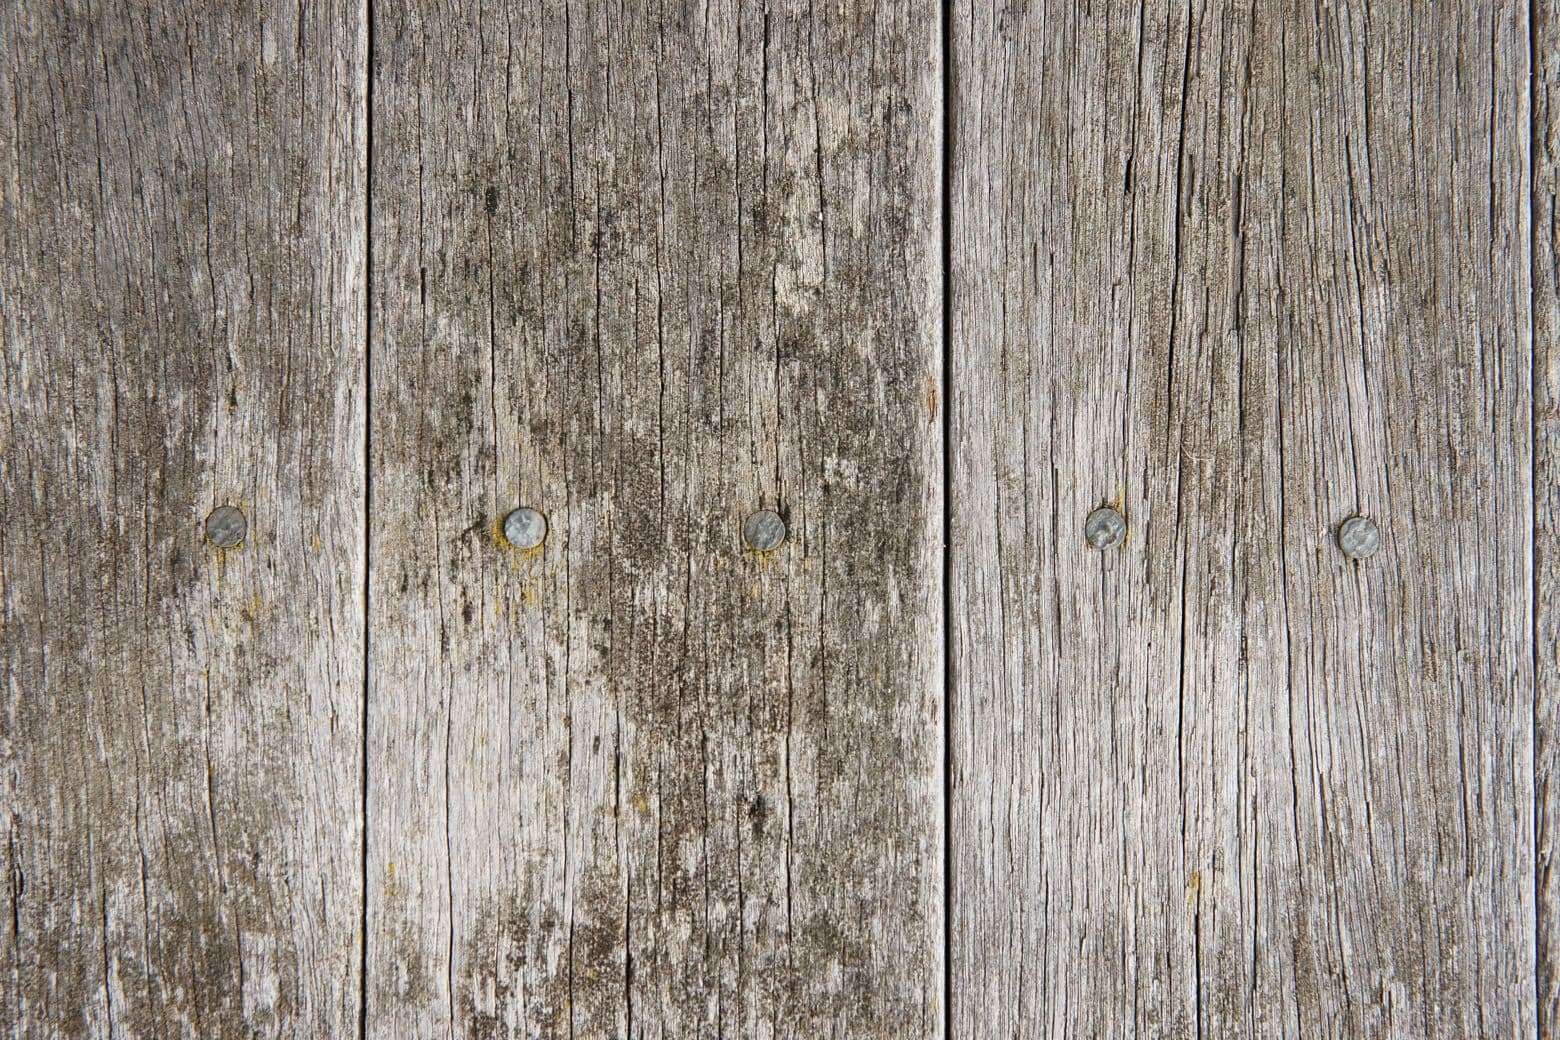
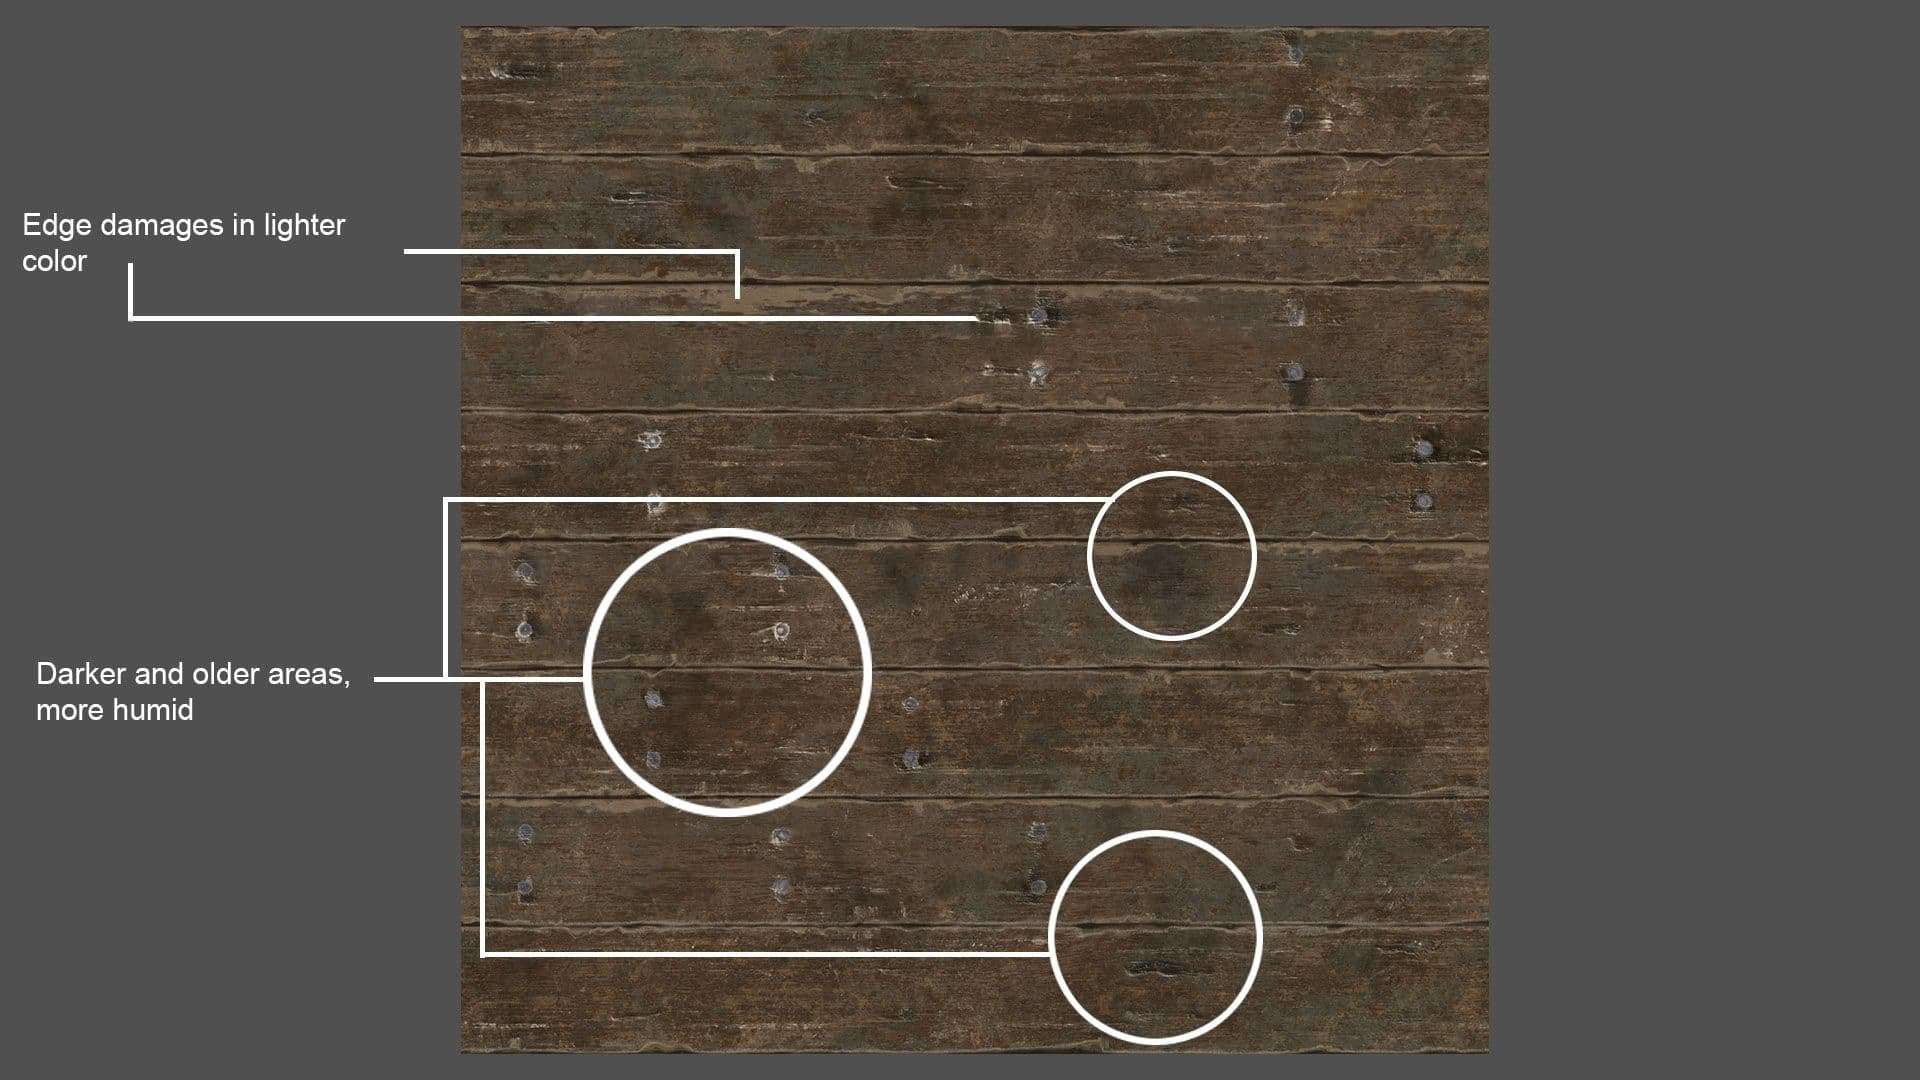
Once the overall form suited me, I worked on the most striking details. It seems strange but, sometimes, I squint at a reference and concentrate on what I still see in vision to know what stands out most. Here, before small wood fibers, small damage, or cracks, I saw the damaged edges, as well as the largest wood fibers.
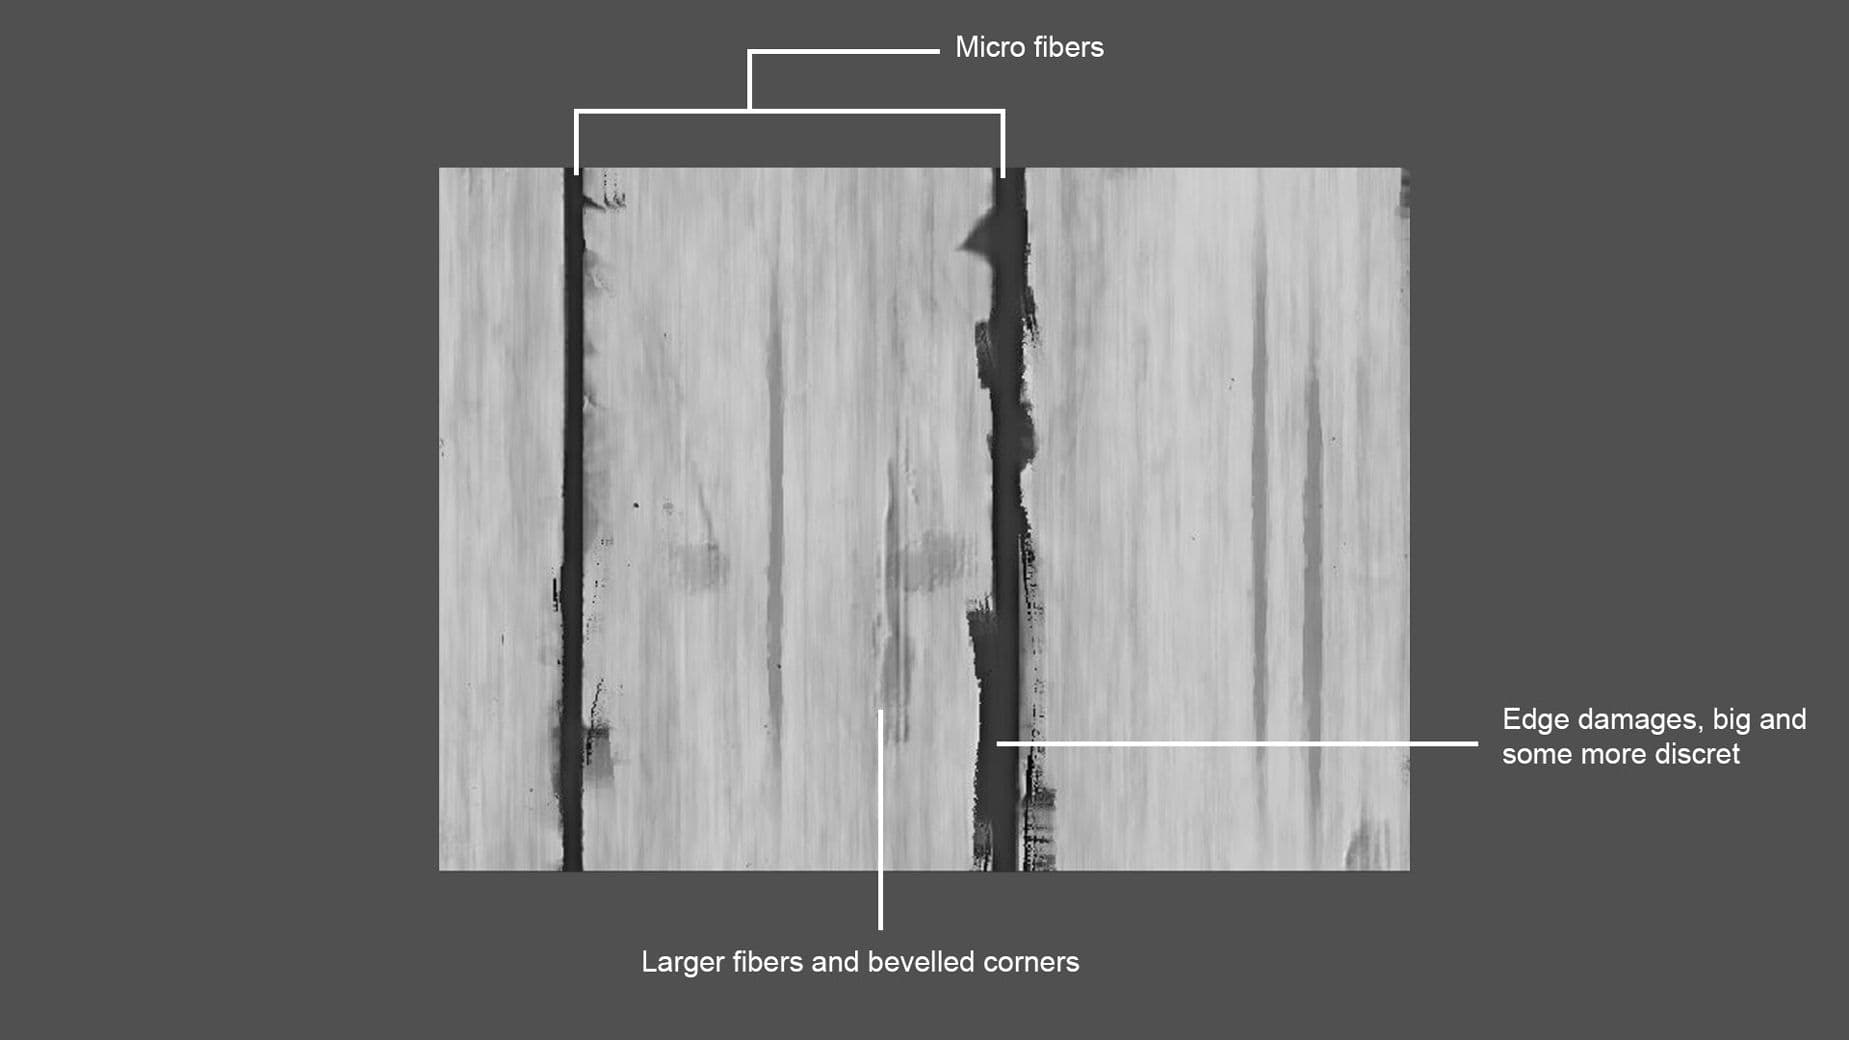
The slope blur is great for creating damage on the edges. Do not hesitate to take time to create a good noise map that will serve to make the right forms of damage on the desired area.
As for the normal map, it is sometimes necessary to put the micro details on it only, because the height map can cause strange artifacts on them. Here I did not put the micro-fibers on the height map, or some of them but with a very, very low intensity.
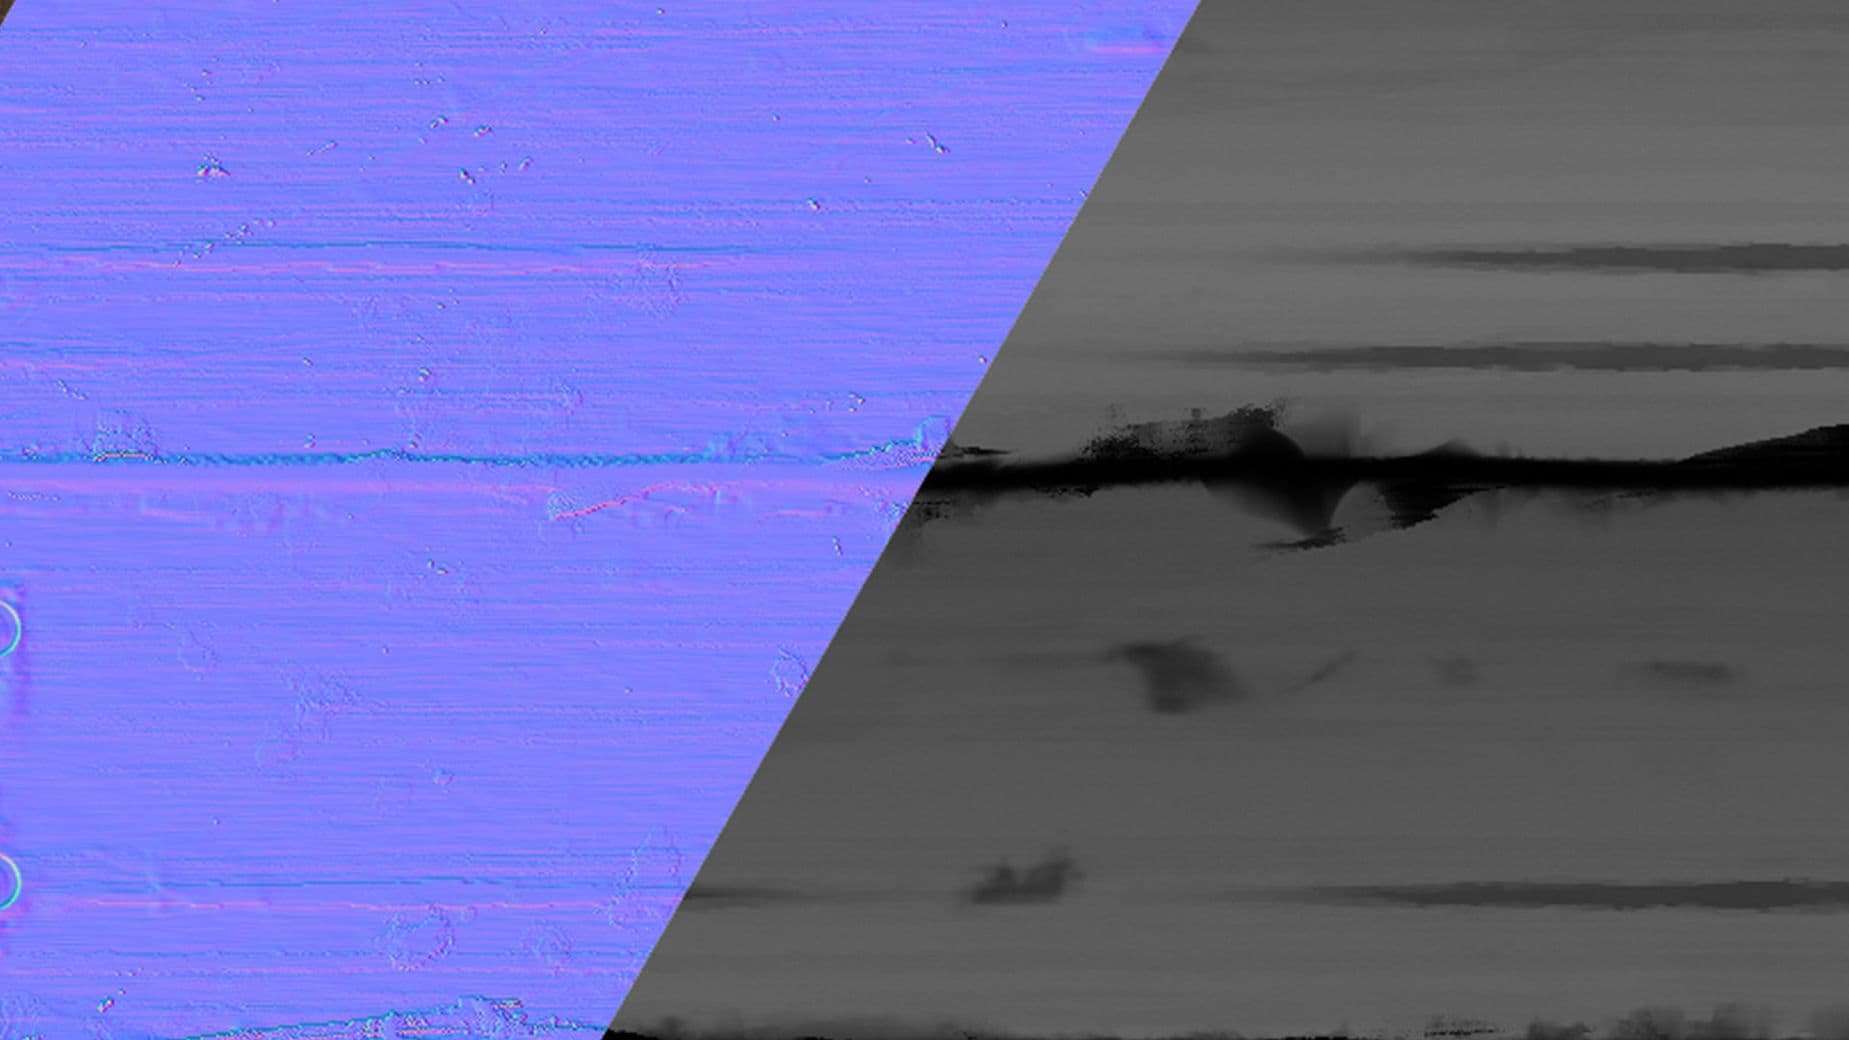
Also it is nice to add different information on the normal map, like adding again the slope gradient on the height map for the slats. To switch from the height to the normal map, I sometimes use "height to normal world unit" or "normal sobel" to keep the height informations. You can also use the "normal" node, it all depends on whether the result suits you or not.
The normal map should not be too noisy, I had this problem a lot on Unreal Engine for example. It is not necessary to put in on intensity 10, 1 or maximum 3 is enough. But as I said before, it all depends on where you want to use your material.
Here is an example of another wood ground normal map I am doing for an Unreal Project. You can see that slope I have on the height map I had to add on the normal map. It gives a real bending effect on different slats.
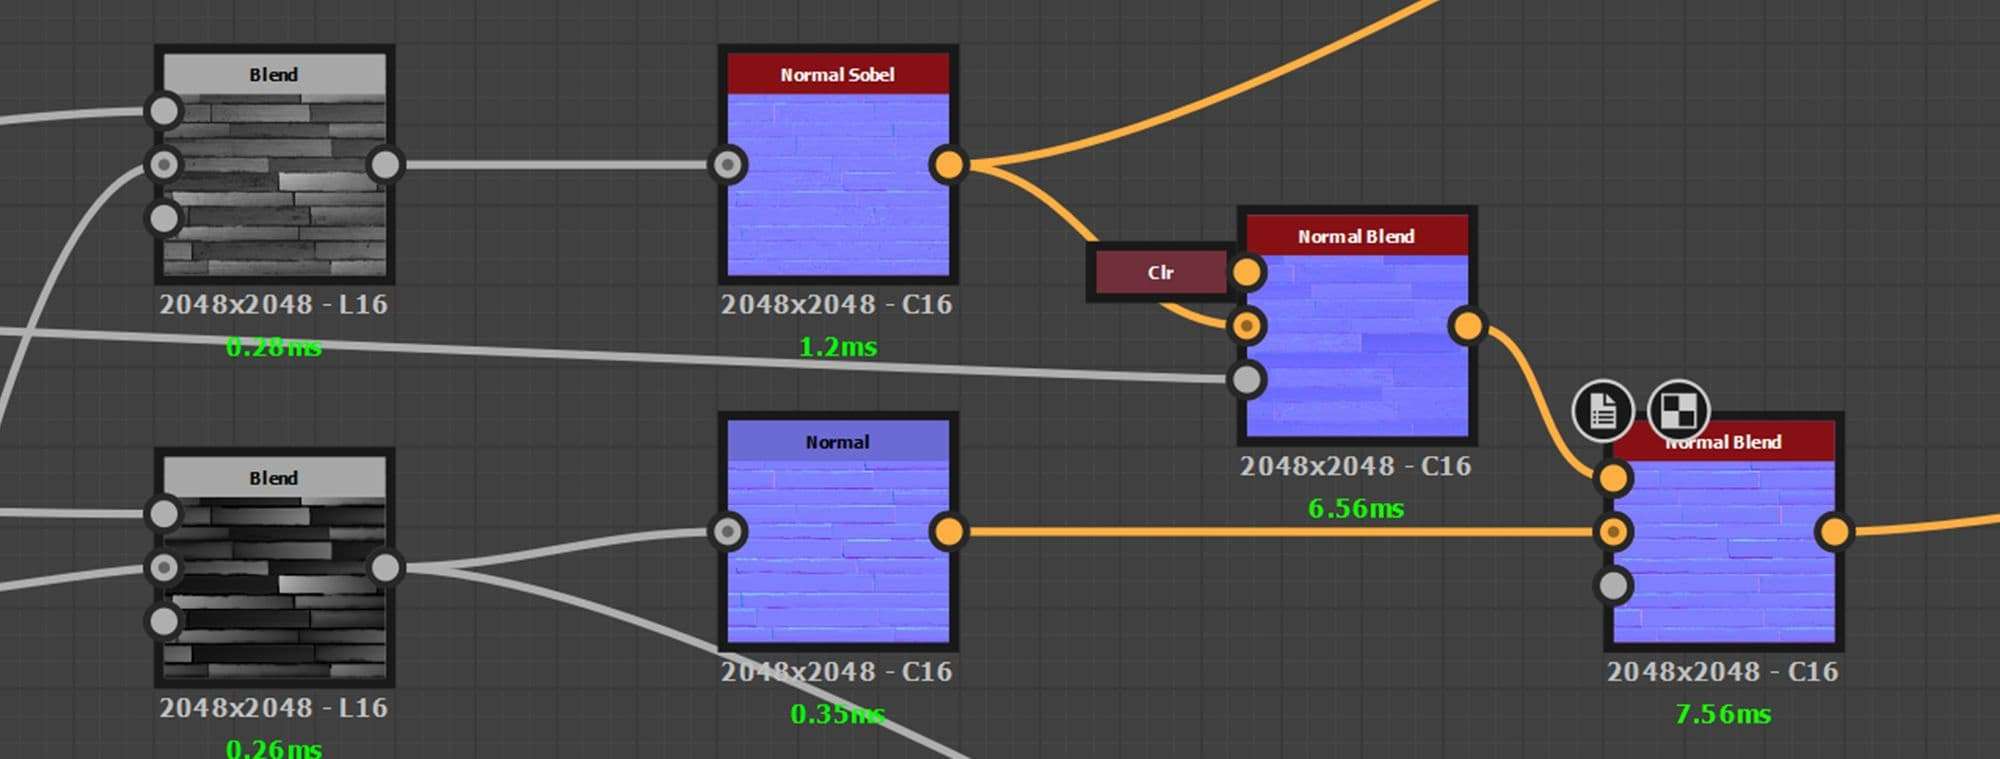
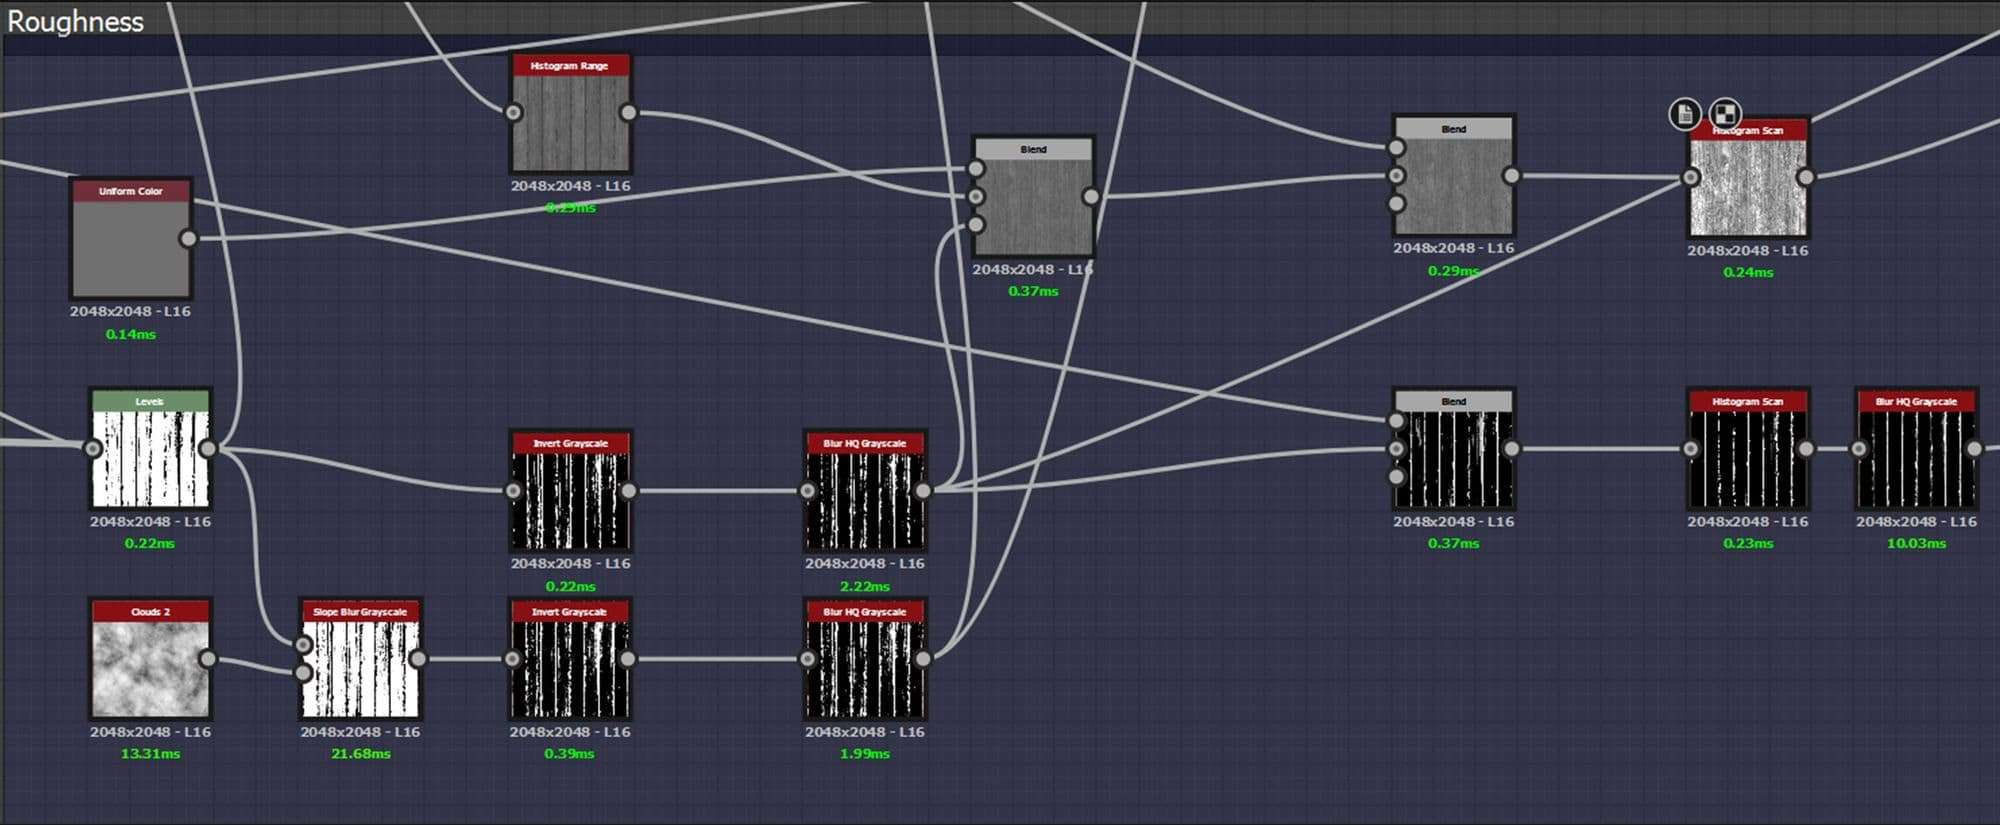
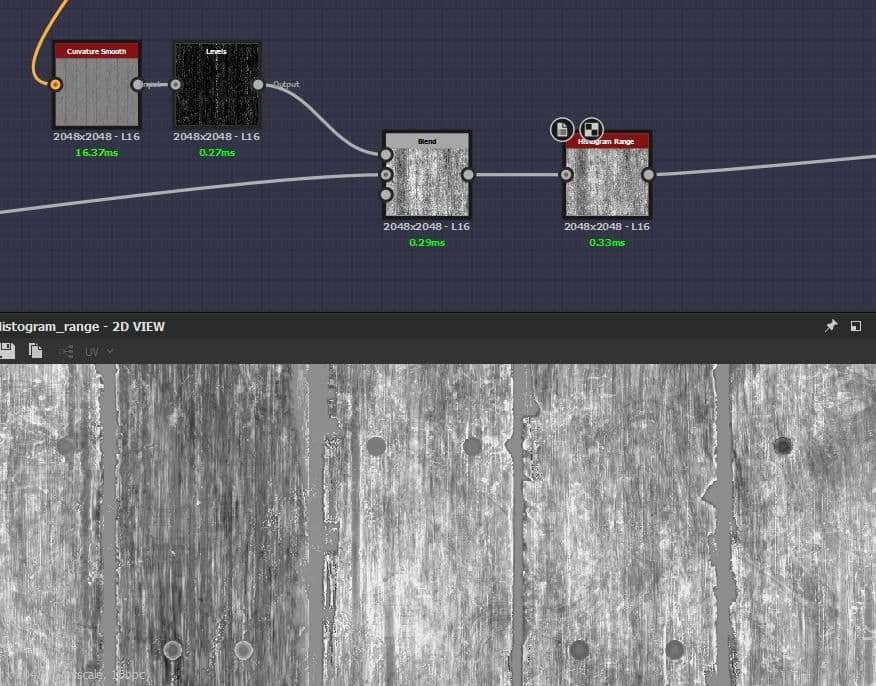
The normal map is pretty useful to create a curvature used on the roughness map sometimes. Here, I used an edge detect to get the in-between slats, where these areas are dry and in that case, light grey on the map.
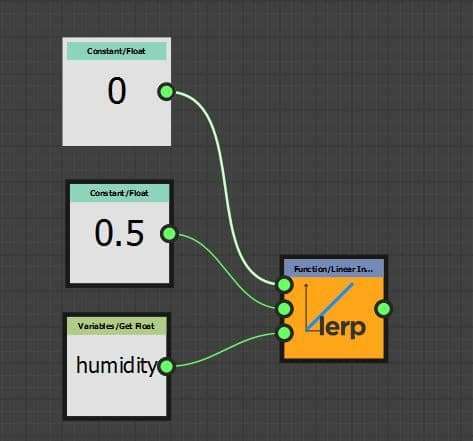
Make sure, exceptions aside (mirrors, water, …) that your roughness value is never 0 or 1. This is not PBR, not realistic. I had to play with the roughness to make the humidity parameter.
Then finally comes the albedo. It is important to make the difference between albedo and diffuse. Albedo is used with new physical-based material workflows. The difference is that albedo maps are the pure color of an object, without the shadow and light information that is on the diffuse map. So don’t put any light information!
Maybe a little of ambient occlusion to add some depth, but that is it. The only case where you need to do that is when you are making a stylized texture. I can’t say more about it since I have never tried this out, but the time will come for sure.
The color of the wood is particularly complex, as it is very diversified on the same type of wood. The key is to succeed in understanding and harmonizing it.
I like to use the gradient map to pick the color information on a reference for example. It is a good way to have a global overview of where you should go with the color of your material. Then it is only playing with noises again.
In conclusion, work on each map separately, making sure that they are matching together.
About the parameters, this how it looks like. It is located at the right of the user interface, when you double click on a empty field on your graph. This is a very convenient way to change your material quickly.
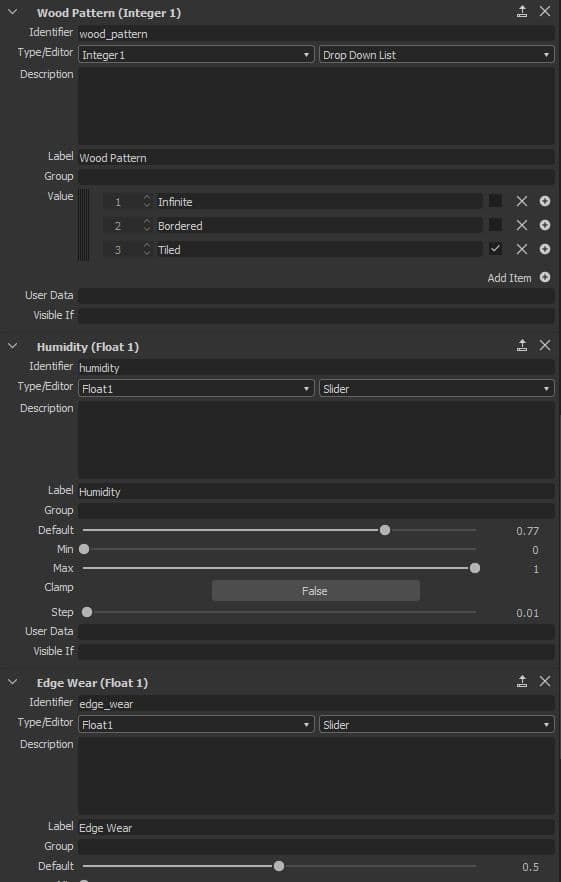
To create one, click on the icon at the right of whatever is in a node you have used, and click on "expose parameter". Name it and it is nearly done. Now the icon is a blue curve, if you click on it, you will enter the matrix. Or just its function.

Don't be afraid of what you will see below, it's a very simple function here, saying that the value will never exceed 0.5. There are many other possibilities and it is up to you to discover them!
Feedbacks
This is the most important part, I think. If you went with something realistic: does your material looks like what you are seeing everyday ? If not, is it at least credible and good looking ? Do not ask only professionals, also friends or family, they are sometimes the more useful advice givers.
This is how I got the idea of putting some nails on my wood, to work more and more again and again. Share your passion. Why is this such an important point for me? I'm one of those people who get used to what they see very quickly. I need to change constantly.
It is very important to make the "gaze rest" as I call it. Take a break for your eyes for as long as it needs to see what needs to be changed.
At work, I do several materials at the same time so that I can change whenever I want. I regularly ask for an outside look. Really, don't hesitate.
Lighting and presentation
Lighting is super important to give a super look at your material. I inspired myself with others lightings on Artstation, but mostly of real-life images of where my material could be the most in the real world. I did it on marmoset and tried to reproduce them, then adding my own touch.
I always try to follow the Three Point Lighting technique (a key light, a fill light and back light). On Marmoset, I put a HDRI where my material could fit. Then I place some sky lights, two in general with one global and one to make a rim light or a more brighter light somewhere.
Sometimes, by trying rather hazardous things, it can lead to some surprises.