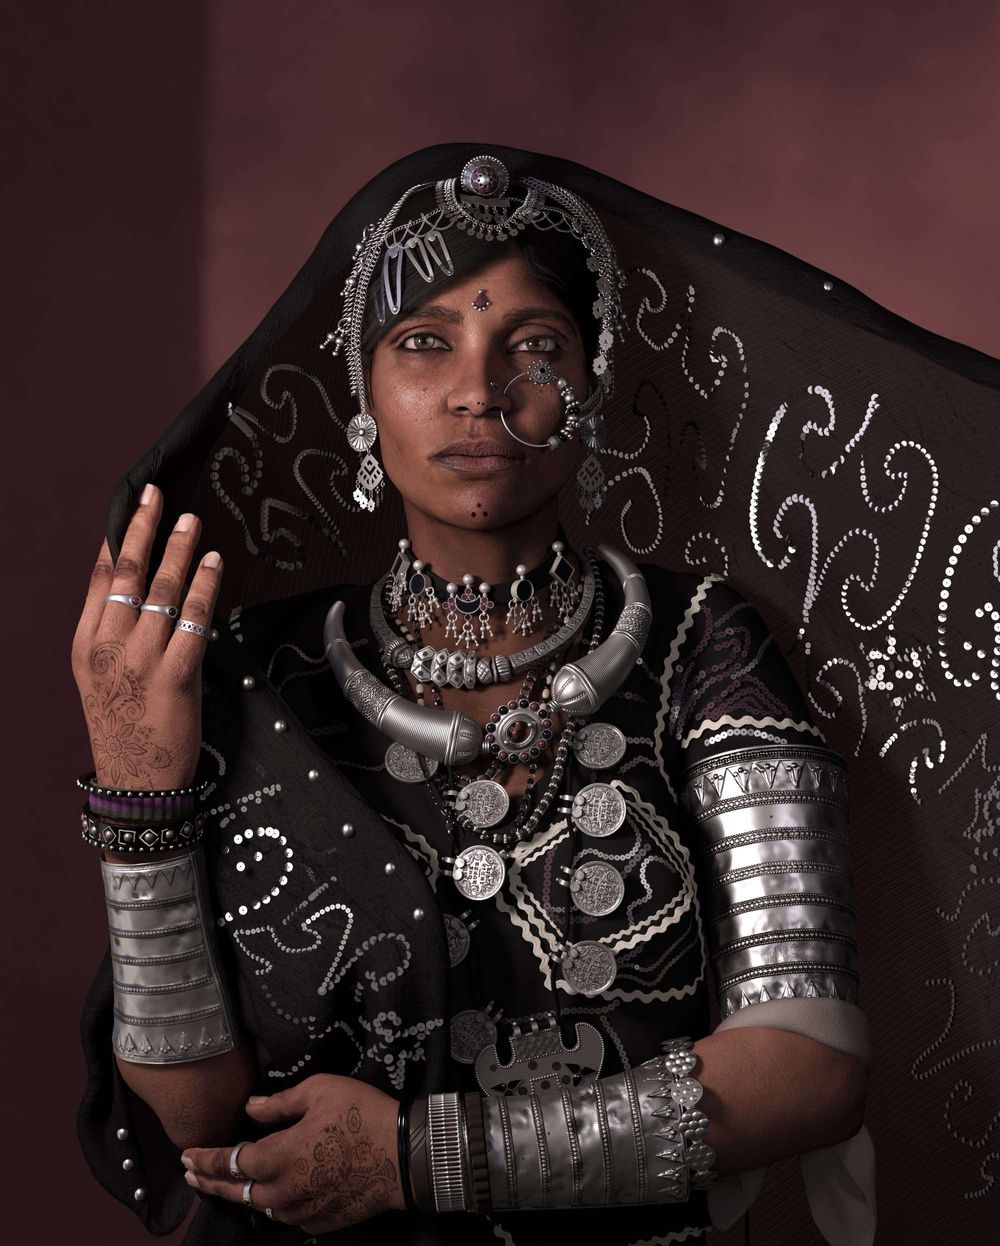
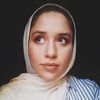
“Rabari woman” is my second term’s final project at Think Tank Training Centre. I had 6 stressful weeks to create this project. I was inspired by Indian culture and Jimmy Nelson's photography of the Rabari tribe. I wasn't aiming to create a likeness, I was more interested in capturing all the interesting elements in the image that represent the tribe.
This is the photo I was inspired by:

In this blog post, I will share the modeling workflow for this artwork.
Here’s a list of the softwares I used: ZBrush, Maya, Marvelous Designer, Mari, V-Ray, and XGen.
Modeling & Sculpting
Since I only had 6 weeks to create this project, I needed to work efficiently. For the first week, I blocked out all my assets, in addition to the lighting setup and the turntable setup. I created a base mesh for the character and adjusted its scale to match the real world scale. I blocked out the initial lighting setup using rectangle lights and an HDRI. I modeled the Jewelry using the tools in Maya, which I will discuss later in detail. Clothes were blocked out in Marvelous Designer. Once I got all the assets modeled, I moved on to polishing them.
Character
Using the base mesh I created earlier with good uniform topology, I transferred the character to ZBrush to start sculpting. It is essential to match the scale of the character in ZBrush as the one in Maya from the start, so you won’t face problems down the road with the displacement map scale later in your project when extracting high poly detail.
Usually the asset in real world scale would be too large for the ZBrush world and the brush size would be too small in relation to the model even if it is at maximum size. Here’s a tip: disable ‘Dynamic’ at the draw size slider by double clicking on it, which automatically adjusts the draw size depending on the size of the model on your canvas.

A solid understanding of anatomy is essential when sculpting a character. My main focus was on the face and the arms, since they will visible in the end. The torso was hidden, so I only sculpted its primary forms. For the face, Phillippe Faraut's face planes was a great resource, I also had an ecorche to look at, in addition to multiple images of the woman I was sculpting from different angles. I wasn’t going for a likeness sculpt, I just wanted to sculpt the features of an indian woman.

Once I was content with the sculpt, the model was taken back into Maya to be UV-mapped.
In Maya, I deleted half of the model, created the UVs and then mirrored the character. It is best not to flip the UVs in the UV editor so when you’re texturing in Mari, you can easily work on half of the model and then copy the textures from selected patches to the other side without the need to flip them.

At this point I still haven’t added tertiary skin details. My approach was to take the model into Mari and paint the displacement map I used from texturing.xyz and import the map into ZBrush.
Here are the list of textures I used:
Face:
https://texturing.xyz/products/female-face-20s-fullface-28
https://texturing.xyz/products/displacement-female-face-20s-fullface-01
https://texturing.xyz/products/humaneyes-green-iris-03
Arm:
https://texturing.xyz/products/displacement-male-arm-30s-handfingers-01
https://texturing.xyz/products/displacement-female-arm-60s-backelbow-01
https://texturing.xyz/products/female-arm-40s-palmhand-04
First, I needed to prepare the maps for painting. Generally, you would get 3 maps from Texturing.xyz; displacement map, micro and tertiary maps. I converted each map to RGB and organized the scans in Photoshop; pasting the secondary, tertiary and micro detail maps into the red, green and blue channels respectively. I recommend Sefki’s Ibrahim tutorial for map preparation which is a great resource for creating textures for a realistic face.
Once I prepared my displacement map, I took the character into Mari and I started painting the displacement map onto the face and arms.

It was an iterative process between Mari and ZBrush, it was easy to re-paint details and export textures to ZBrush.
Since ZBrush doesn’t support importing textures from different UDIMs, I used this awesome UDIM importer plugin to import the displacement maps painted in Mari.
It’s very easy to use, in ZBrush, go to ZPlugin -> UDIM Importer -> Import Displacement -> Select the images exported from Mari. You can choose whether you want to merge all images into one layer or keep them separated. Once you hit import, it will import the displacement onto your model and create layers for you to adjust the intensity of the displacement.

Hair
The hair was a tricky part to get right with XGen since I didn’t have previous experience with this tool before, so I used hair cards for the scalp and I used XGen for the eyebrows and the eyelashes.

I created different hair strands using XGen and Arnold; rendered out diffuse and alpha maps and applied these maps to a plane, placing them onto my model using a tool called Hair Grabber, which made the process much easier. You can watch this tutorial to learn more about the process.
Clothes
The process of creating clothes in Marvelous Designer was straightforward. In the first week I have blocked out the clothes when the character was in A-pose.

After I posed the character in ZBrush using transpose master, I took the final pose in Maya and created a blend shape animation of the character going from A-pose to final pose. This method worked for me because it was a simple pose and the blend shape animation didn’t cause weird animation interfering with the clothes.
I keyframed the animation, keeping 100 frames for A-pose and another 100 frames for the final pose simulation. I imported it into Marvelous Designer as an Alembic file, and there's a tab where you can play the animation while simulating the clothes. The clothes cling onto the character for the first 100 frames and then the character begins to animate and the clothes will adjust accordingly.
For the Shawl particularly, I found the pin tool to be very useful, to hold the shawl in place, especially around the character’s finger.

Once I had the clothes fitted onto the character, I needed to create good topology for the clothes. Clothes in Marvelous are triangulated and they need to be converted to quads in order to create the UVs and polish them in ZBrush easily.
First thing I did in Marvelous was to transform the clothes in the 3D view to flattened 2D patterns (same as the ones in the 2D pattern window), you can do so by selecting all the patterns in 3D view, right click -> Reset 2D arrangement.
This is what you will get:

I selected all the flattened patterns in 3D view and exported them to Maya for retopology using Quad Draw.
In the Maya scene you need the 2D arrangement of patterns and the clothes you exported from marvelous and the retopologized 2D arrangement created in Maya. I recommend you watch this tutorial for retopology and UVs.
I then took the clothes to ZBrush to add extra details, including the stitching around the pockets and at the edges of the shirt. I created a brush and used curves to create the stitching.

I recommend you check out these tutorials: Curve Brush Functionality and Controlling ZBrush curves to learn how to create a brush and use the curves. It is so useful.
Jewelry
There were a lot of jewelry pieces to create, which involved creating repeated shapes. For the beaded necklaces, sequins on the shawl and head jewelry, I created instances of the beads and placed them along a curve. I wanted to keep everything instanced so my scene would render efficiently.

I used bend and flare modifiers for some necklaces, including this one. You can use them by selecting the object, go to Deform tab, select Nonlinear -> Bend/Flare.

For the large bracelets, I created a cylinder that resembles the shape of the cuff, and all the details on top were created using Quad draw. I created 1 shape and then created instances of it that rotate around the cuff.

The large cuffs were making the scene heavy, so I had to retopologize them and send them to ZBrush. I projected the details onto the low poly version and transferred it to Maya.
For the coins necklace, I painted out an alpha map in Adobe Illustrator that portrayed some of the graphics on the original Indian coin, and then used this alpha in ZBrush and projected it onto the coin.


Turntable
It was a really fun challenging project, I have learnt a lot from it and I hope you do to. Thanks for reading and I hope you enjoy it and learn a couple of things along the way.