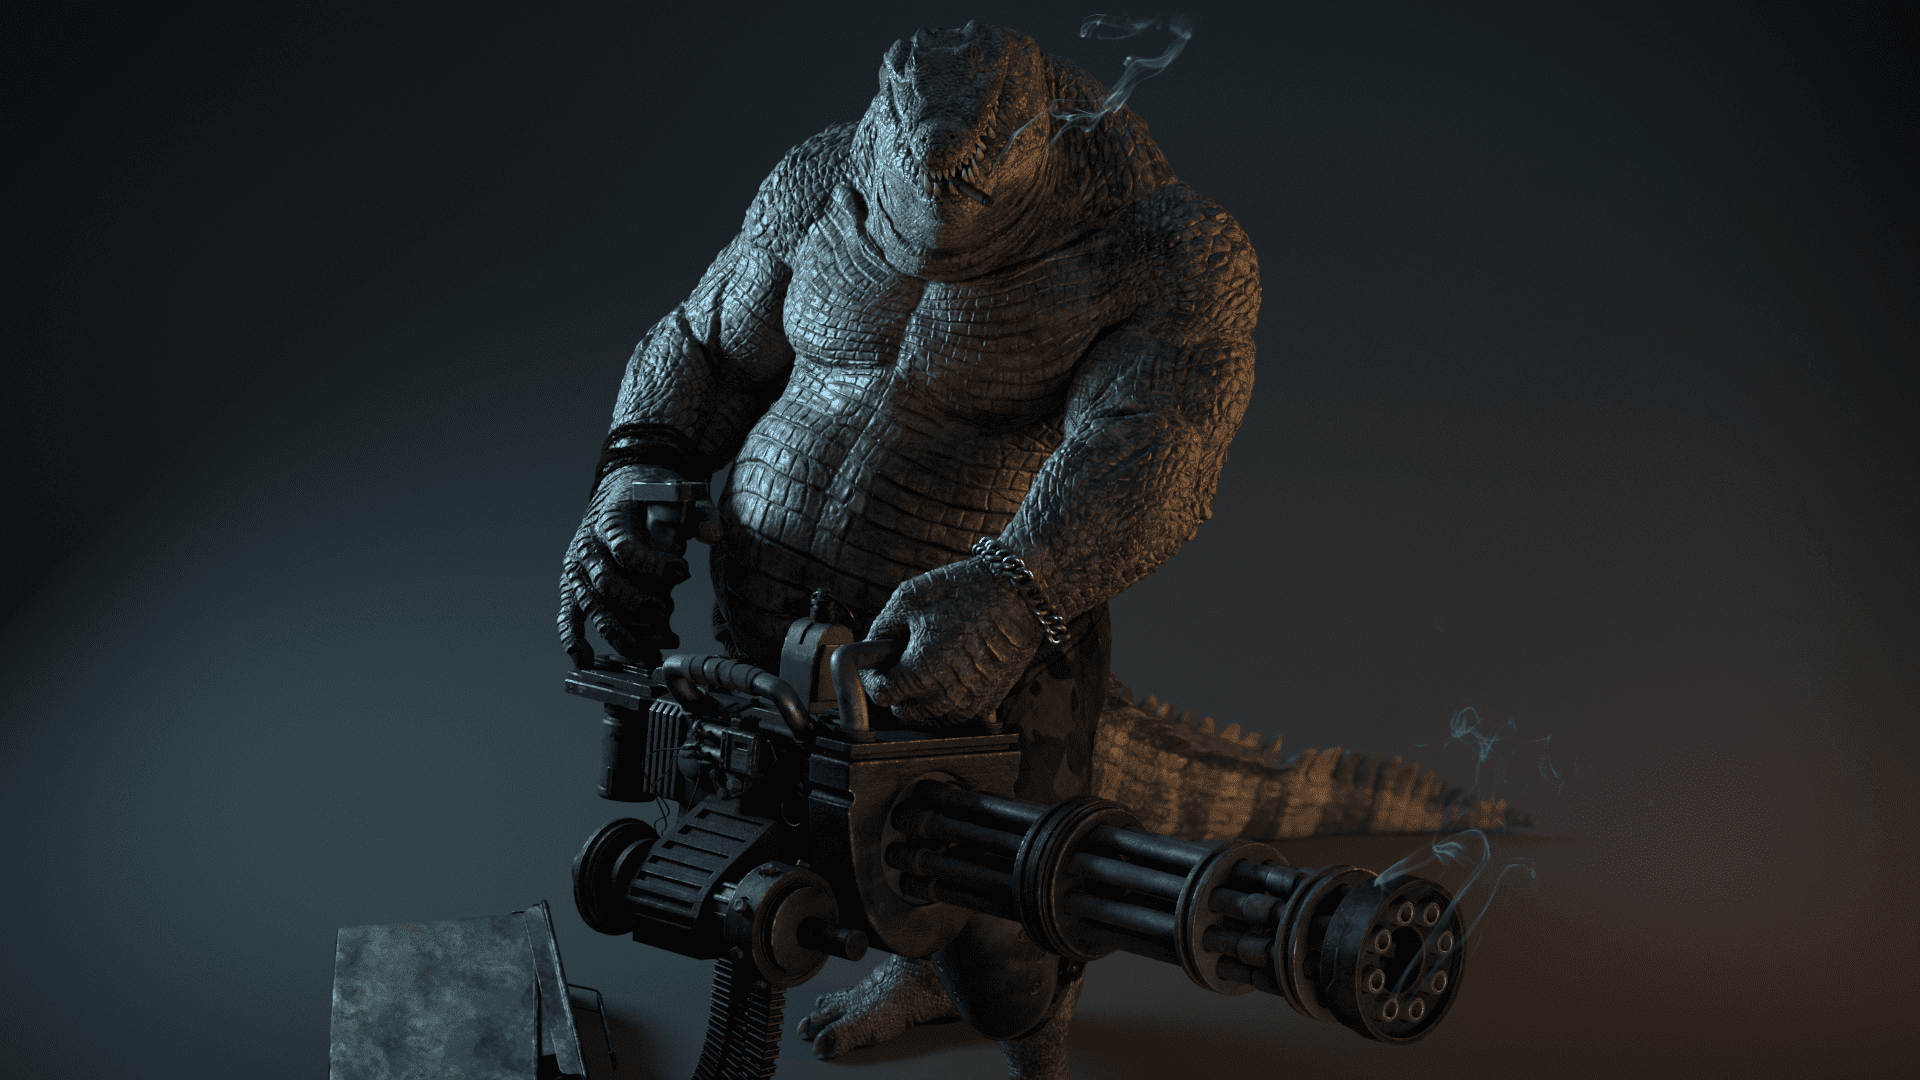
Hi, my name is Michael. I am a french modeler and texture artist. I am excited to share some tips and tricks from the workflow I used to create the Warcroc, a bad-ass anthropomorphic alligator holding a Gatling gun.
Workflow
For the organic character :
For the Gatling gun:
- Maya for modeling
- Substance Painter for texturing
Overall:
- Maya for look dev, lighting, and Rendering (Vray)
- Nuke for compositing
- After Effects for editing
Concept
Picking your concept can be tough, and sometimes having to choose between a character and a creature is even tougher. But why not choose both?
I knew from the start that I wanted to go for something original. I was looking for something cool, complex, unique.
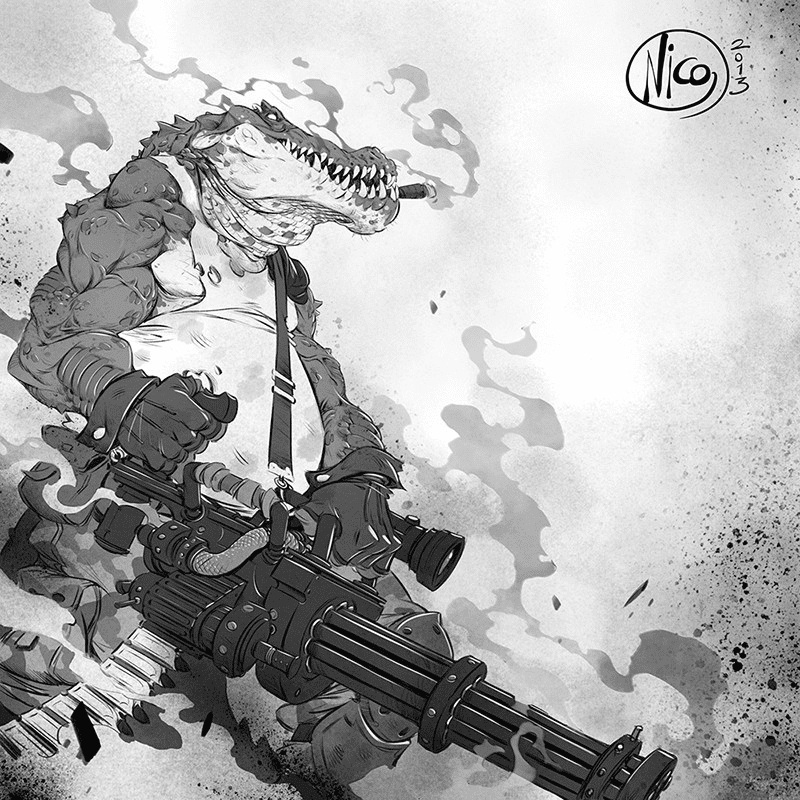
Nicola Saviori's character seemed to be the perfect fit!
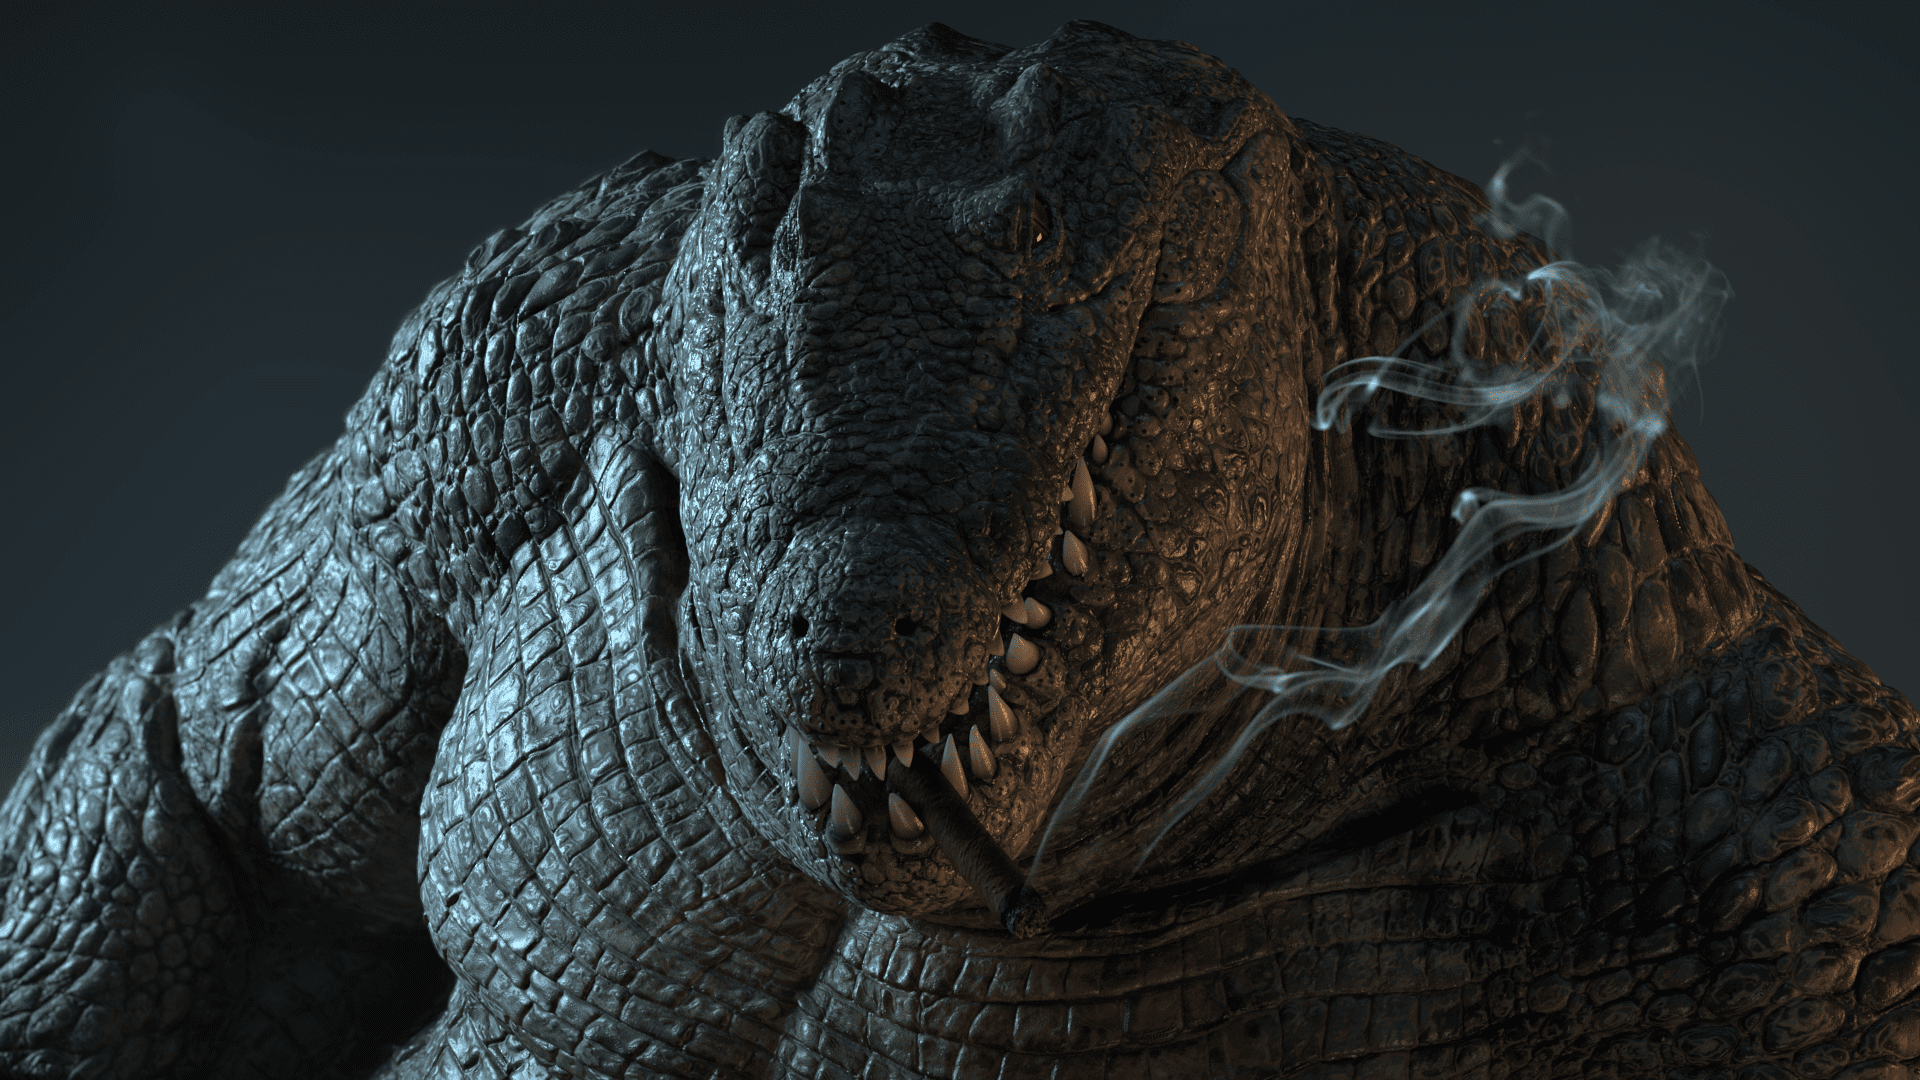
The humanoid alligator had complex scale patterns and a Gatling gun, which ensured I could show off all of the skills I wanted to practice. These include anatomy knowledge, organic sculpting, hard surface modelling, creature/character design, texturing, look development, and later on, lighting, rendering, and compositing.
With the help of my amazing mentor Javier Blanco, and feedback from my many friends and teachers at Think Tank Training Center, I was ready to accept the challenge.
Character Design
Although the concept art is super cool, the legs, feet, and tail were missing or obscured. Each of those parts could either be very long and big or small and short. I had to use my imagination to fill in the blank areas.
I started by playing around with the shapes in ZBrush to visualize them using dynamesh, zspheres and Photoshop.
I experimented with many different combinations, using references from both humans and reptiles, but I settled on what I personally thought looked the most correct.
Everyone has their own way of seeing what is more appealing to them. One artist would easily suggest you to do the exact opposite of another, so I think it is important to trust your own instincts as well as the references.
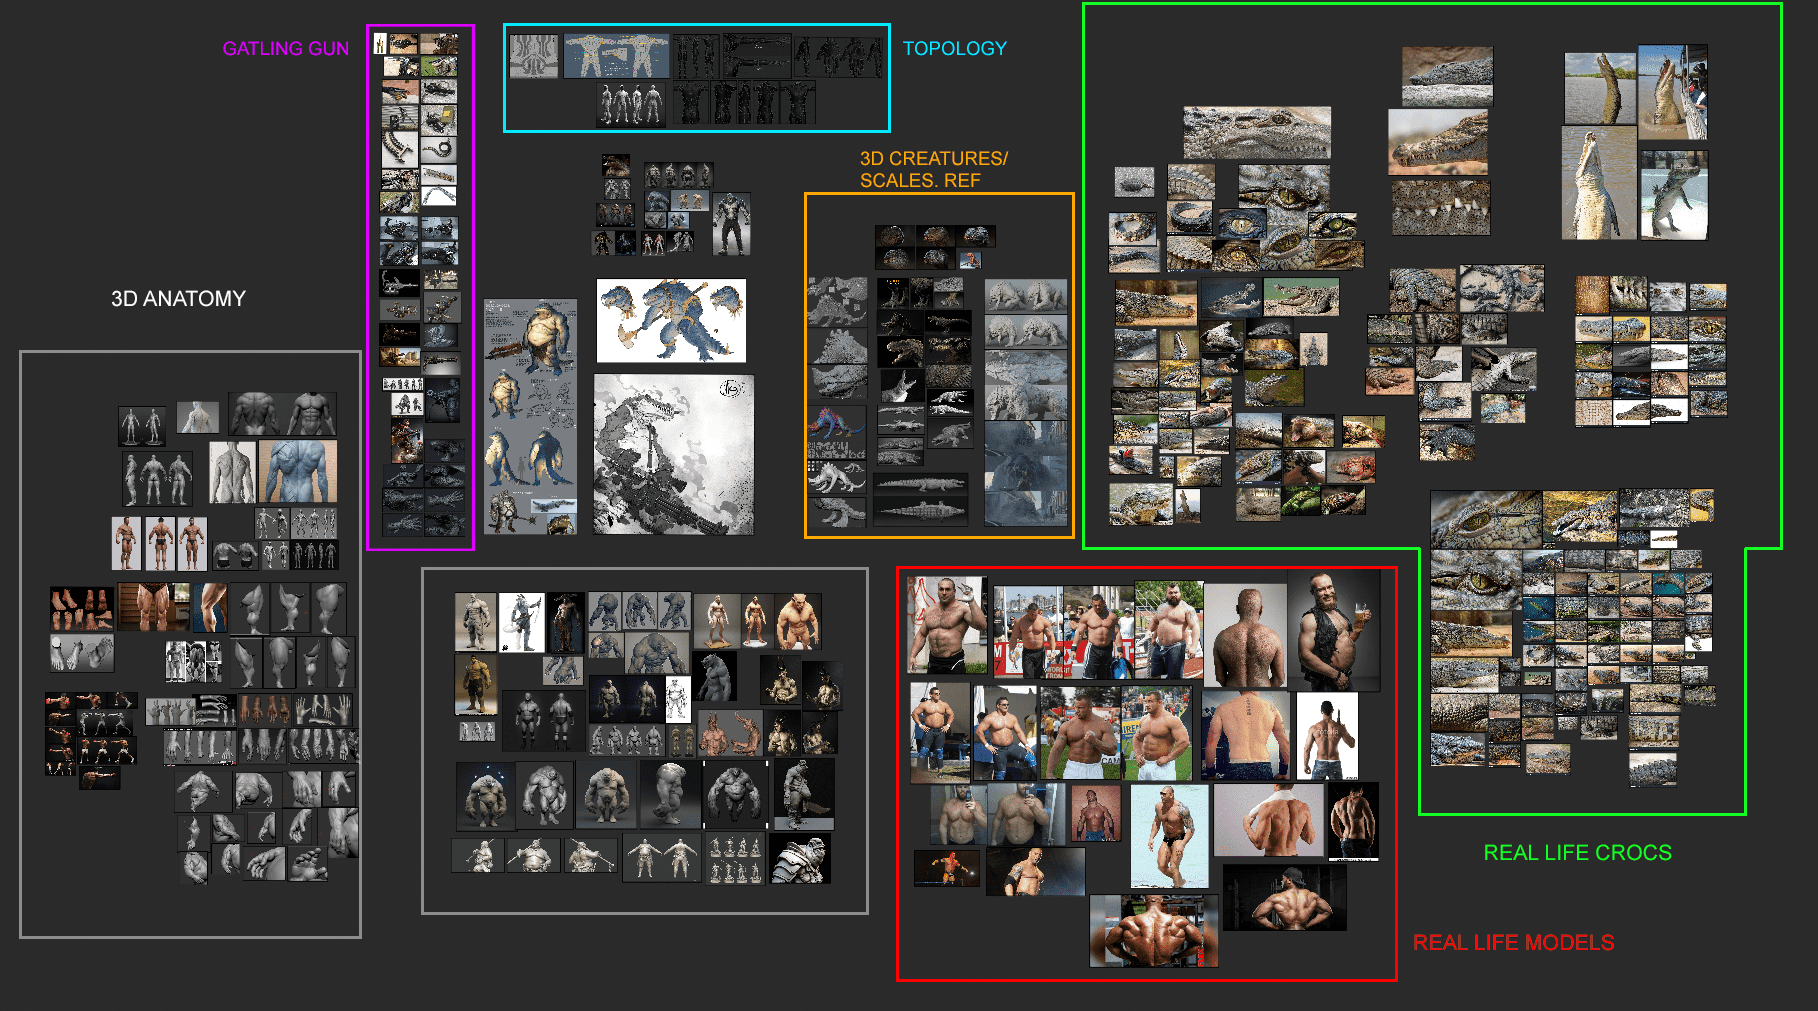
Reference
Before playing around in ZBrush I gathered as many references as I could. From crocodiles and reptiles to bodybuilders and beer bellies, I had to make sure I had all of my images ready, since the Warcroc has strong, scaly arms but also a big belly.
I mainly used PureRef, which you may have heard of before. It is a free image referencing tool that can store a huge amount of pictures that you can organise with ease. It is very useful, I recommend it 100%.
Here is what my Reference Board looked like:
Topology & UVs
I completed the base mesh in ZBrush. Once it was done, I duplicated the subtool (to save it for later), decimated the new mesh, and then exported it as an .obj for Maya. Inside Maya, I made the exported subtool “live” so that I could use quad draw. I used quad draw for only half of the model, and then began to UV it.
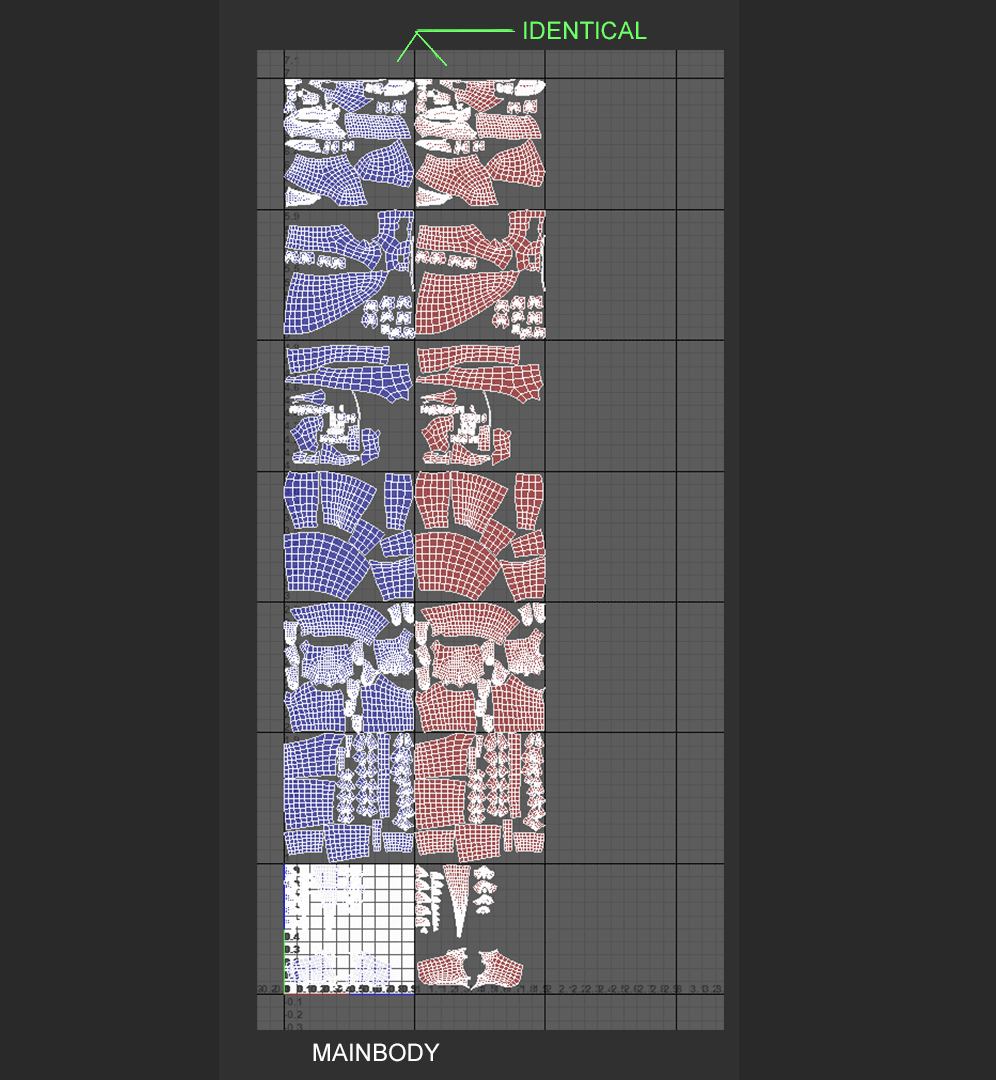
For the UV's, I had to make sure that each part of the Warcroc would receive enough detail. I knew that all the textures were going to be 4k, so I fit my UV shells accordingly, and ended up having 14 tiles, 7 on each side.
One very important tip is to UV only half of the model, then duplicate the tiles for symmetry purposes later on (in texturing). To do that, I applied “mirror” to the half of the model with UV's and then moved them to the next row in the UV editor.
I did not horizontally flip the new mirrored UV's, because leaving them in the same orientation will make sure I can texture both sides at the same time.
When the topology of the new mesh was done, I exported it back to ZBrush as a new subtool. To add the details back from the old subtool, I used “project all” each time I subdivided the mesh.
Sculpting
For my sculpting process, I made sure to use many anatomy references. I frequently referred to anatomical sculptures, the book, “Anatomy for Sculptors”, and my PureRef library gathered from the internet.
I tried to stay away from 3D references, since you never know how reliable they can be, although I did find some that were very helpful.
In my PureRef images you can see images of the famous actor, Dave Bautista and other bodybuilders. Real life pictures were key to getting the character's body to look correct.
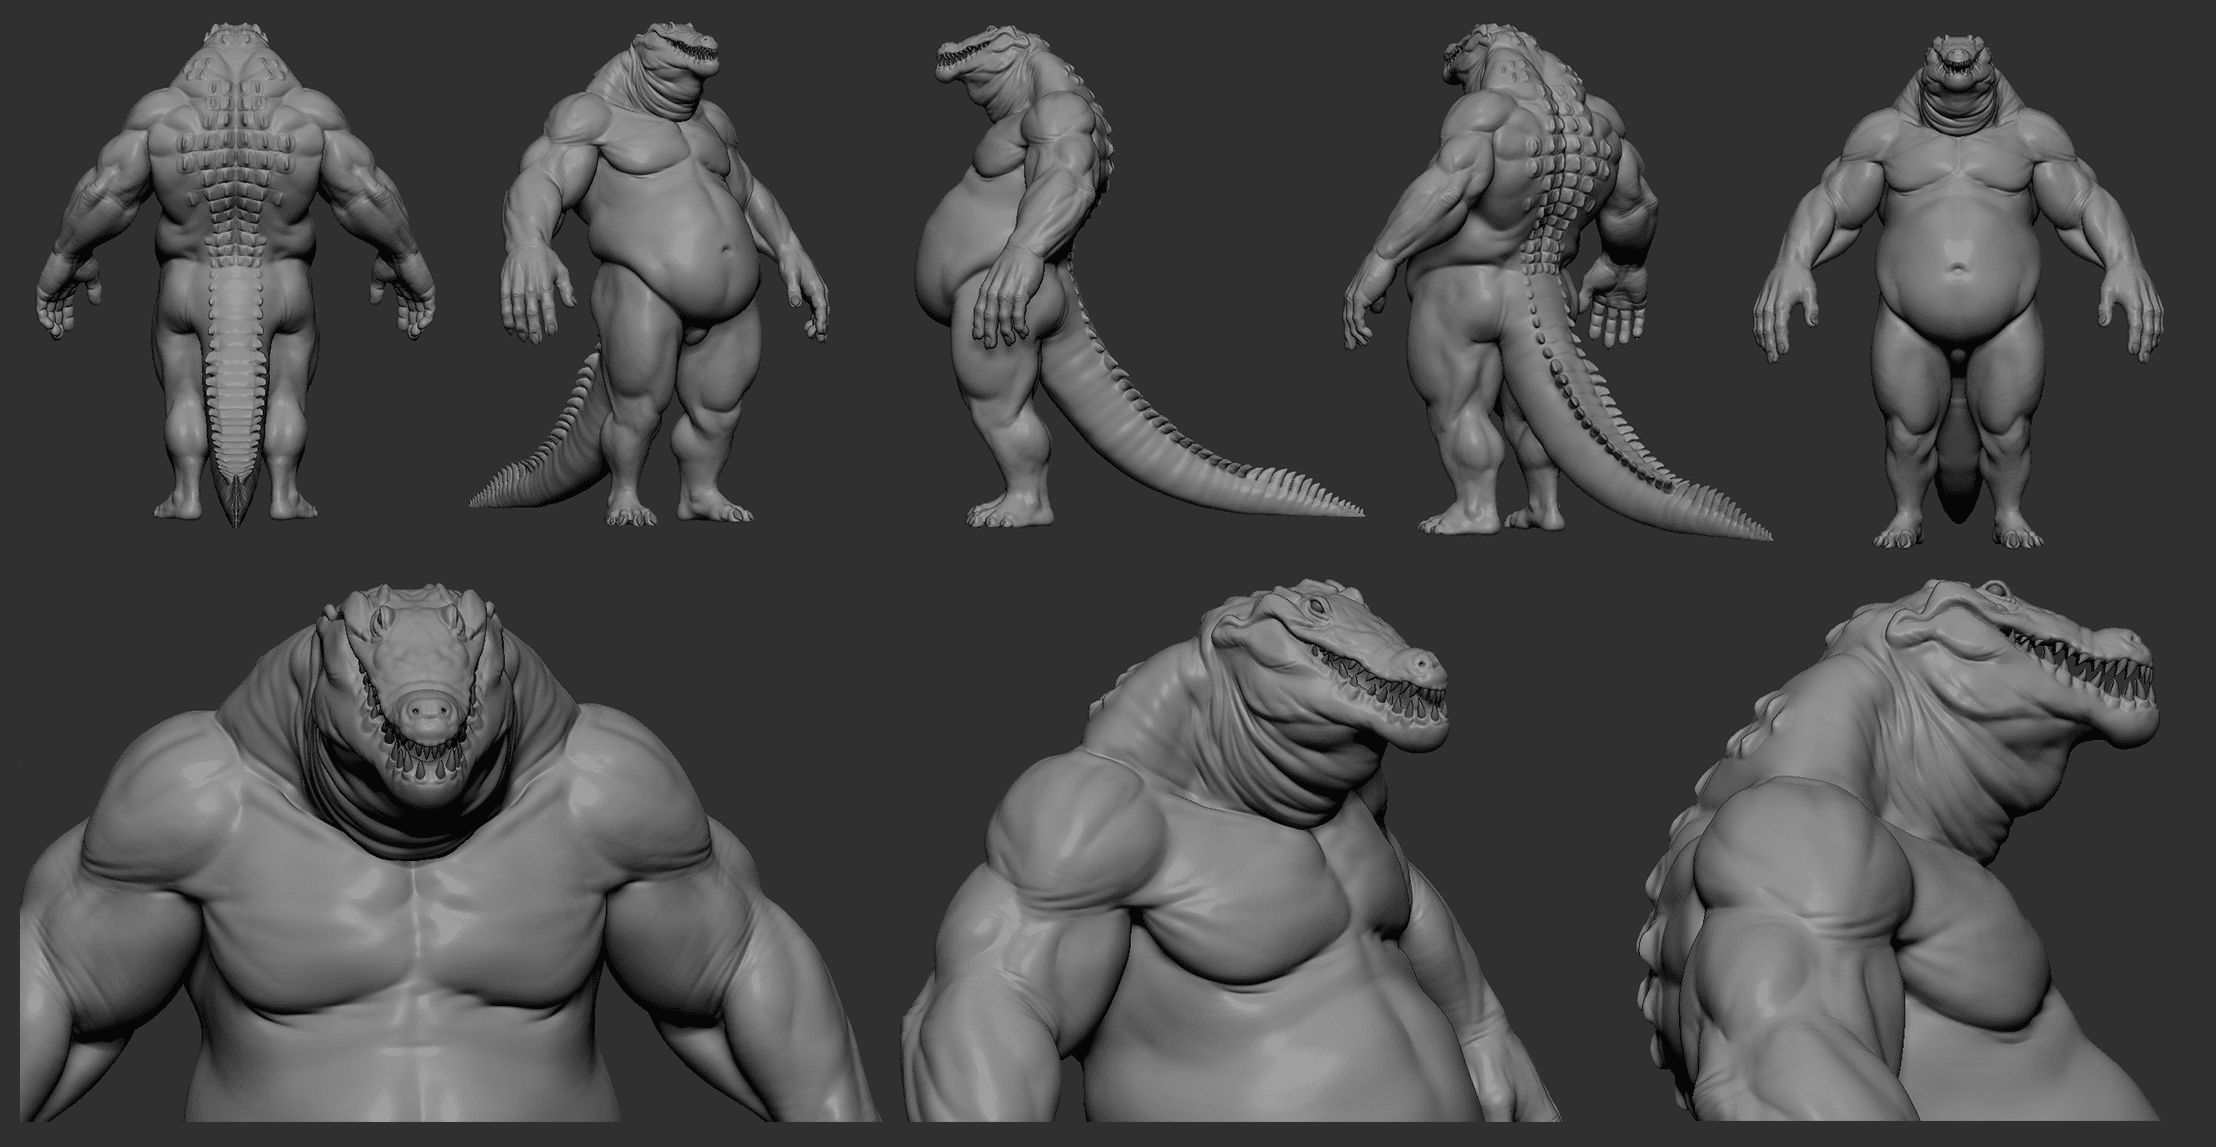
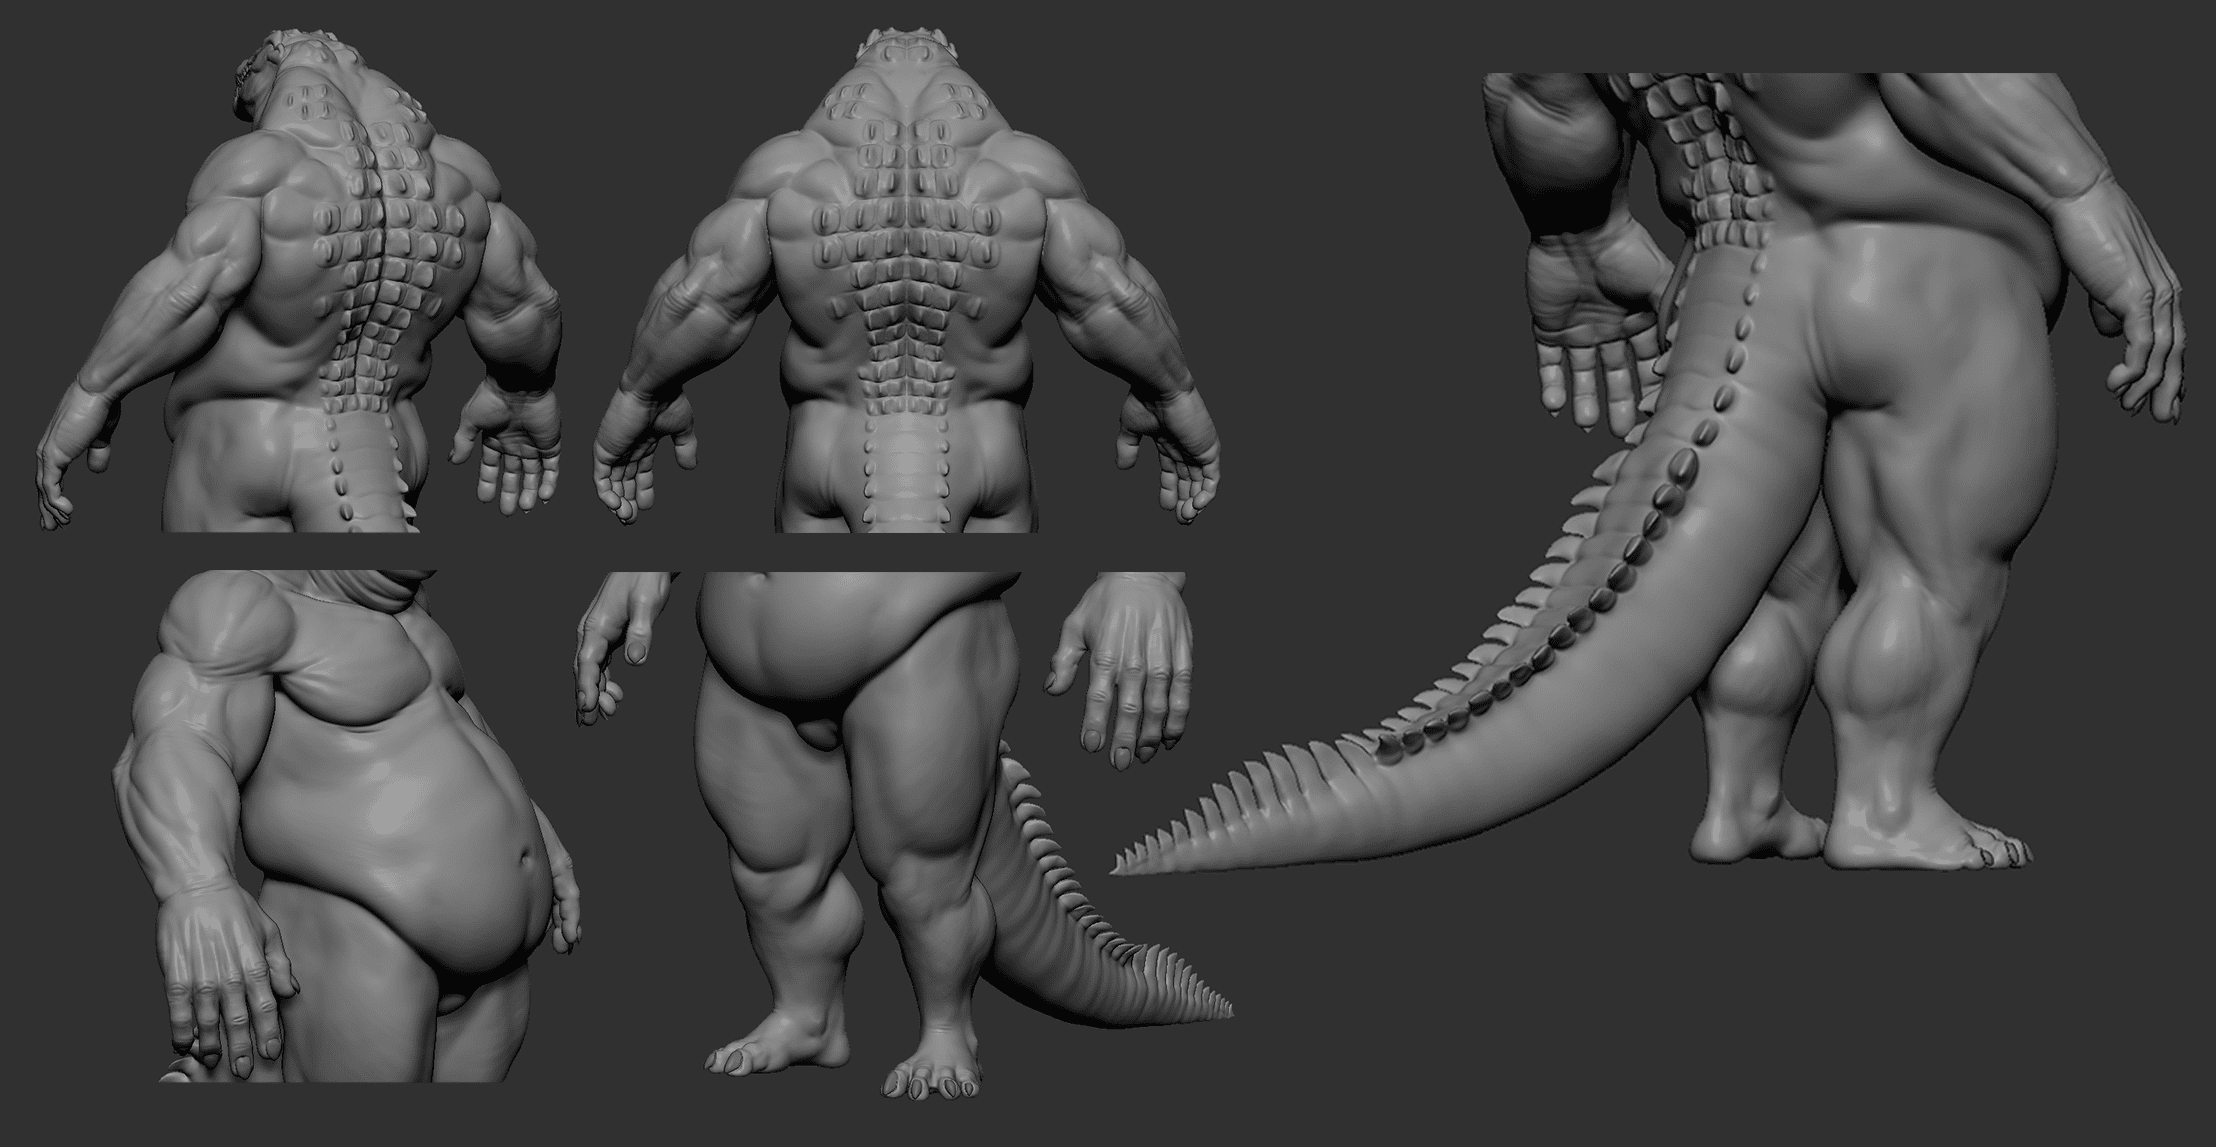
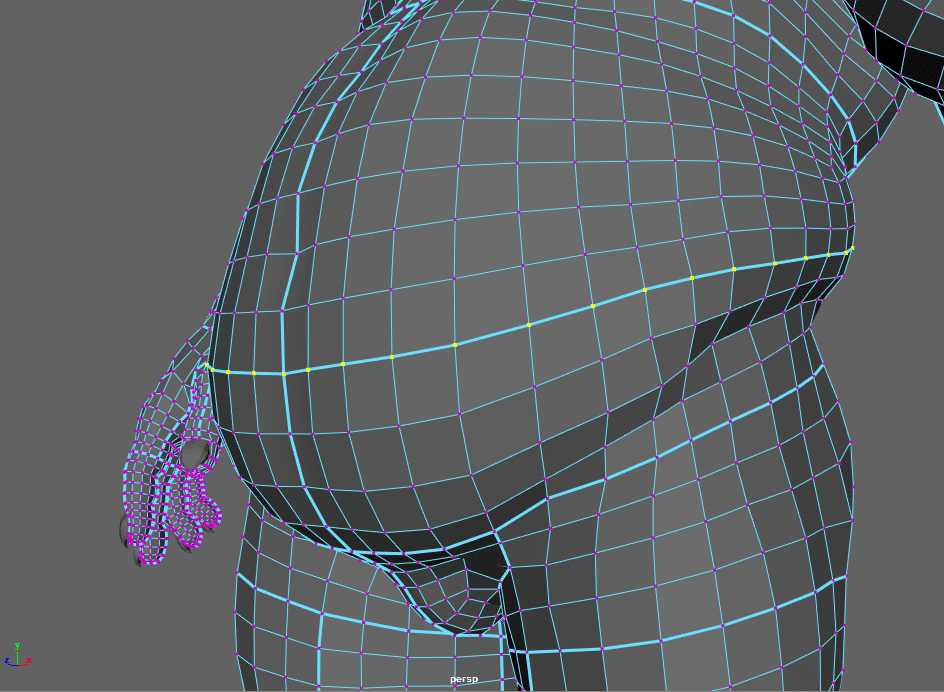
The first step was to get the shape right. I wanted to get the feeling of heavy weights sitting on top of each other, because of his huge muscles. I added in lots of skin folds, and used my reference to make sure they were in the right place.
Here is how the croc looked before he got his coat of scales:
The main brushes I used were :
- Clay Buildup (with alpha 48, my favorite)
- Move
- Dam Standard (default alpha)
- Pinch
- Trim Dynamic
- Inflate
- Sk ClayFill
I like to use layers a lot, since they help me to see if the model looks actually better after I make a change. The opacity slider also helped me not to overdo things.
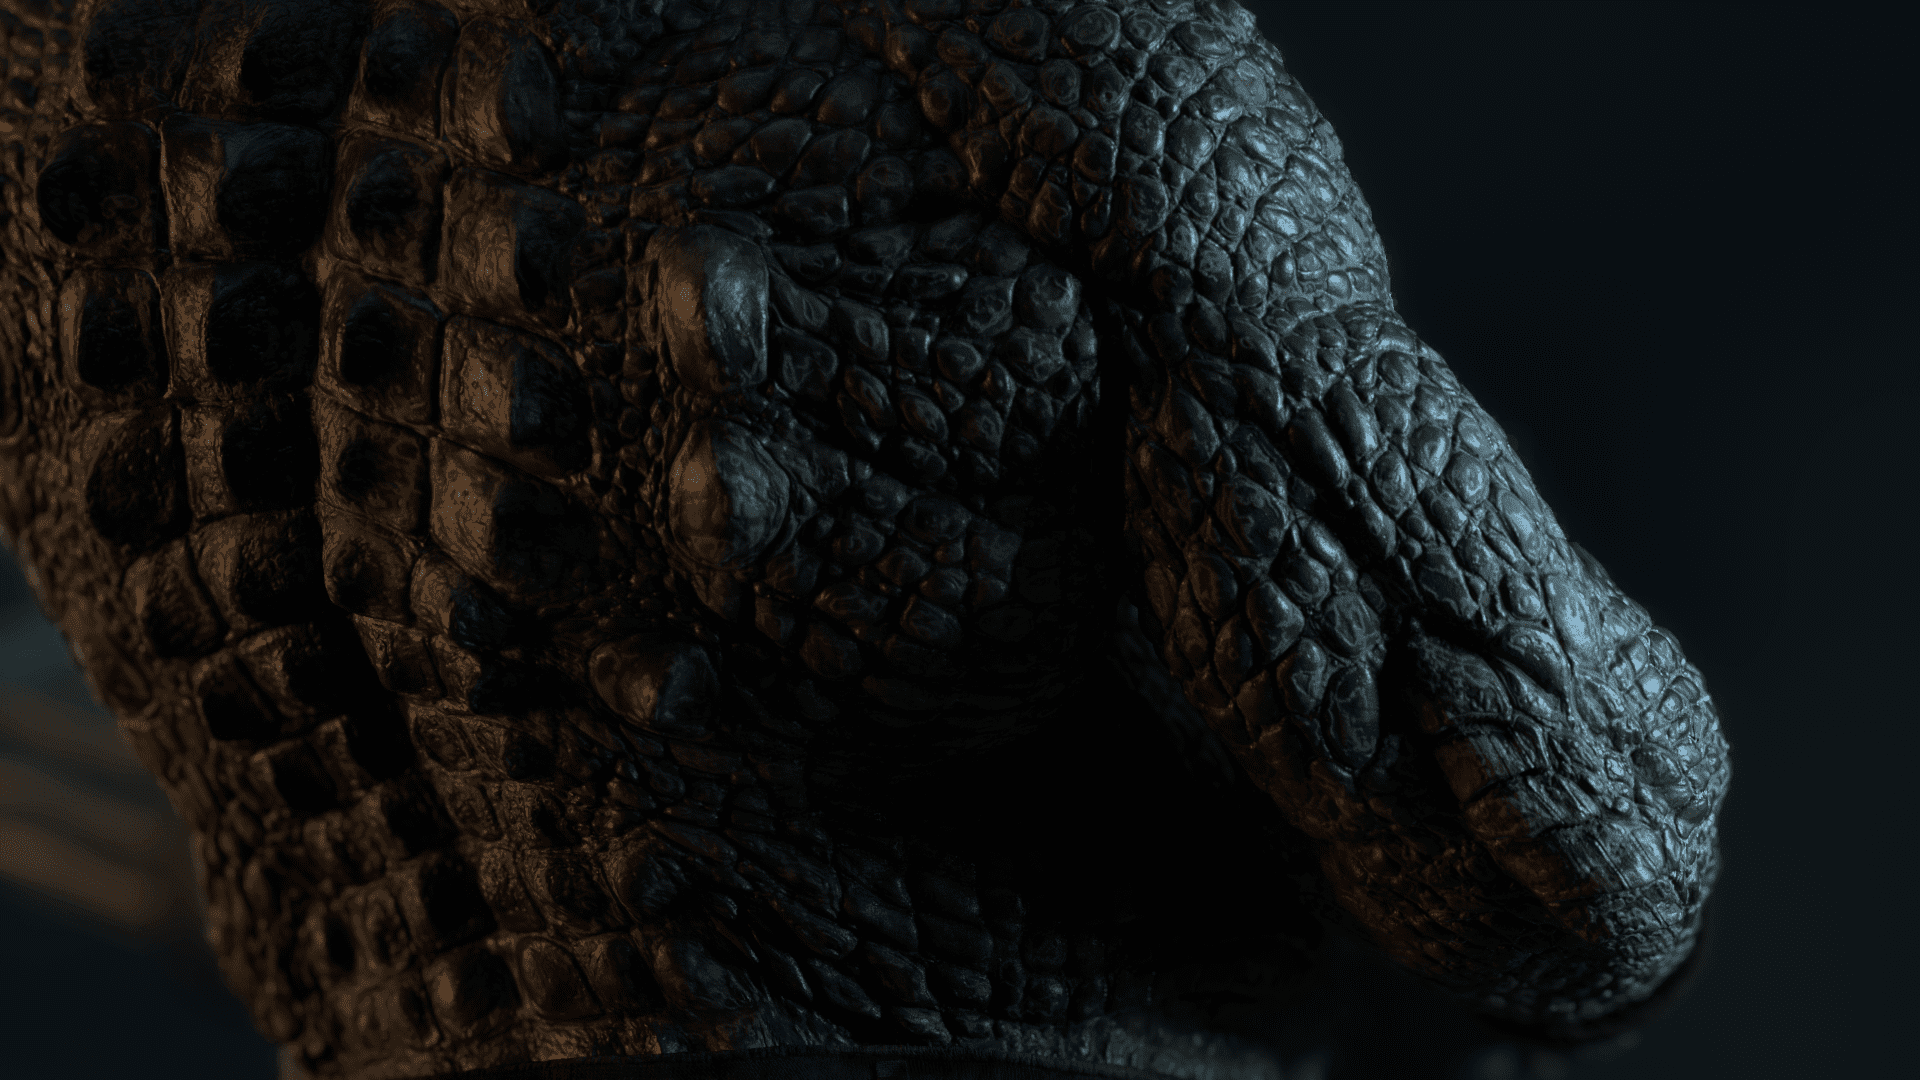
Scales
When the anatomy was done, it was time to make the scales.
I sculpted my own alphas in ZBrush and exported them into Mari so I could more easily project them onto my model. I used the “liquify” and “warp” tools to make sure they fit the way I wanted them to. I used close up pictures of crocodile scales as a base to sculpt these alphas.
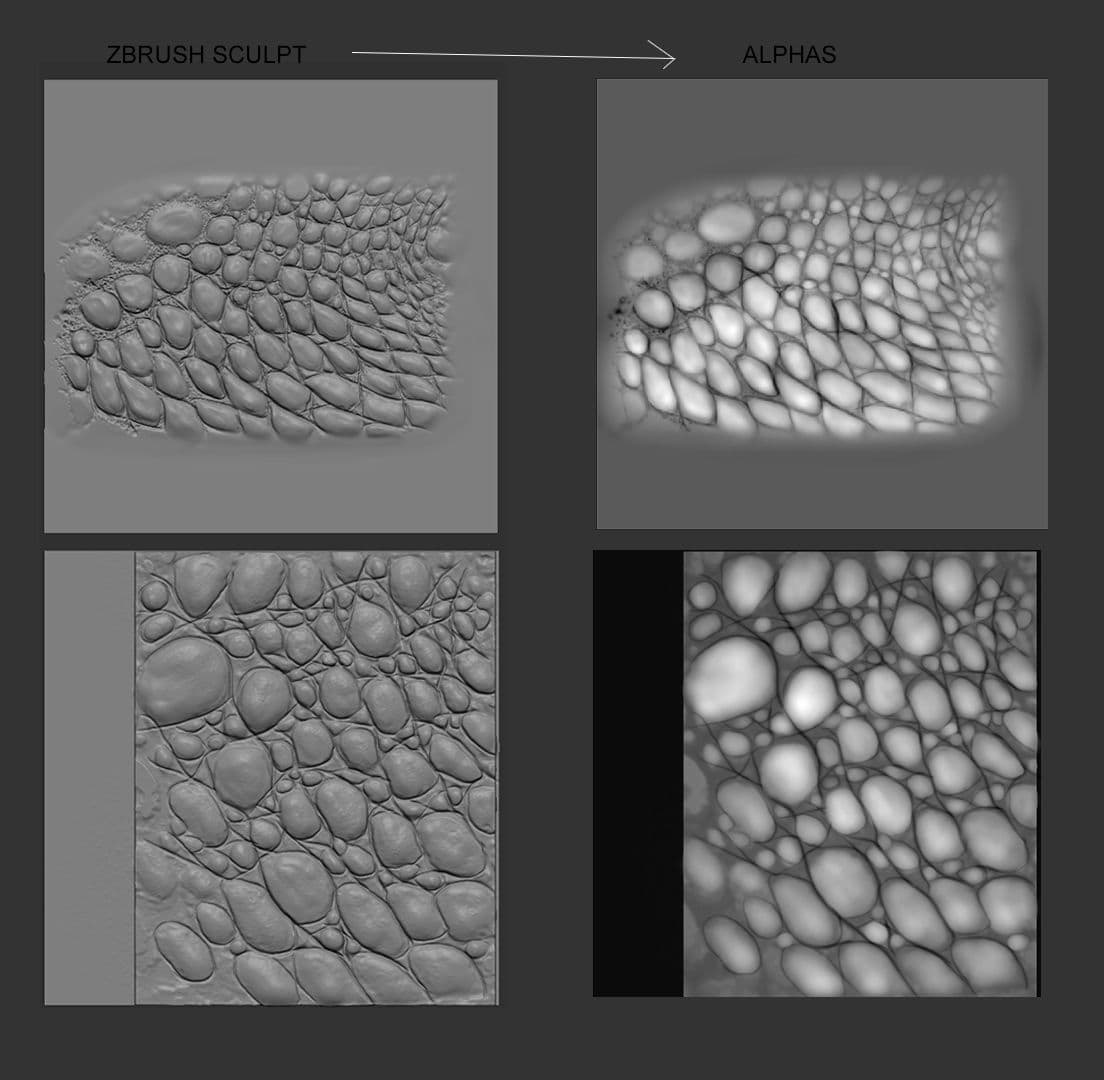
Sculpting the alphas in Zbrush first is a safe bet, since I would know exactly how the scales would look after I completed the projection process in Mari.
In Mari:
Thanks to the mirrored UV layout, it was possible to project onto one side of the model, and then reuse the same projections on the opposite side. The trick is to select one patch then Ctrl+c (quick copy) after painting/projecting, then select the opposite patch and hit Ctrl+v (quick paste).
That way it's like working with symmetry on, which saves a huge amount of time.
Exporting back to ZBrush:
Before bringing in the scale projections, I needed to split the main subtool into two parts so they could support the high amount of detail that the alphas were adding.
To split the subtool, I used the “polygroup by UV's” function. Then, I selected the polygroups on the top half to split them into two separate subtools. Both were divided to around 43 million polygons, to make sure that all the small details could be supported.
When I imported the scales, I could easily designate them to their separate polygroups/uv-shell.
When I used the scale projections on the subtool, they overrode all of my anatomy details from earlier. Yikes!
One cool trick to get them back is to play with the layers and morph target tools.
First, I store a morph target. Then, I create a new layer and smooth the designated surface. I then make a second layer where I use the morph brush. If I deactivate or delete the layer with the smoothed paint on it, it will increase and bring all the anatomy details back underneath it. I could even amplify the effect by duplicating the layer with the morph paint on it.
EXPORTING DISPLACEMENT MAP TO MAYA
Before texturing, I needed to make sure the displacement map would work in Maya. I export both subtools (as obj) from ZBrush (subdivision 1, 2 or 3 depending on the quality I want) and import them into Maya.
Displacement maps are exported with the following settings:
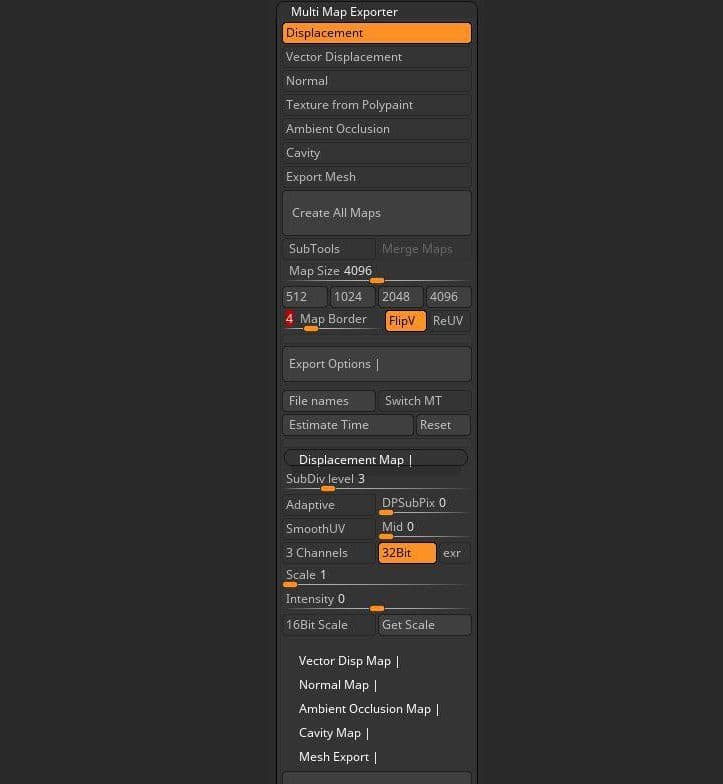
it's very fast. In the option box ''files names'' I choose to export as UDIM as well. I could also increase the quality of the displacement by setting the values of DPSubPix to a value of 2 or higher but it was not necessary.
Back to Maya. I select my new two meshes and combine them, I select the vertices in the seam and merge them together:
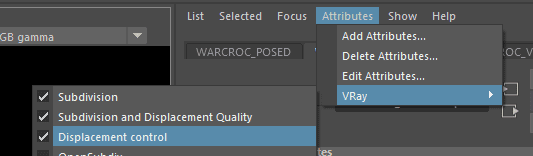
now to make the displacement work a few things need to be done . In the ''shape attribute'' of the mesh I go to attributes and turn on the following:
then I go to the ''Extra Vray Attributes'' down and turn on the settings as follows.
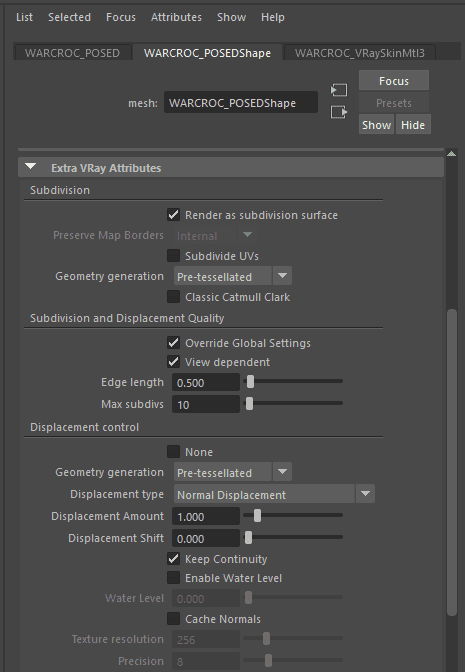
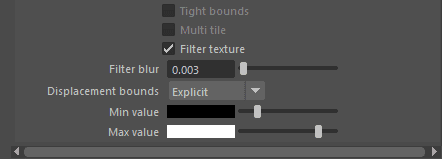
In displacements bounds I set the Min value to -10 and the Max value to +10 (RGB)
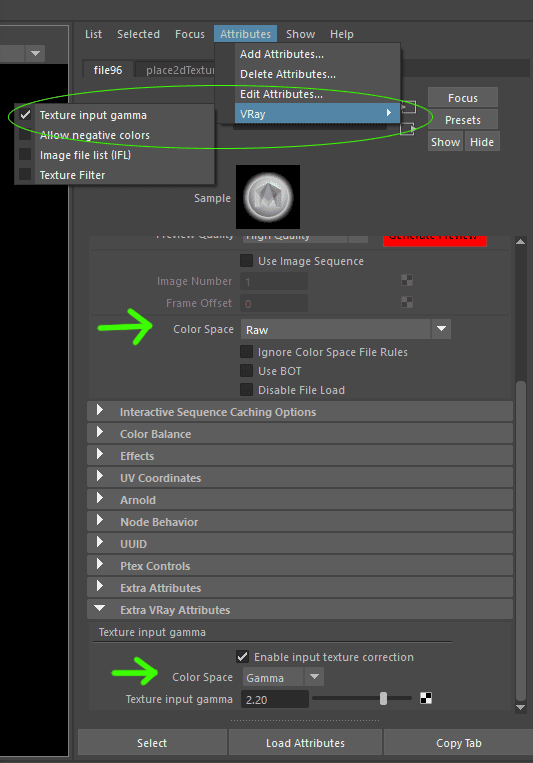
Next, I import my displacement file texture. UV tiling mode is set to UDIM (Mari). The following attributes have to be turned on.
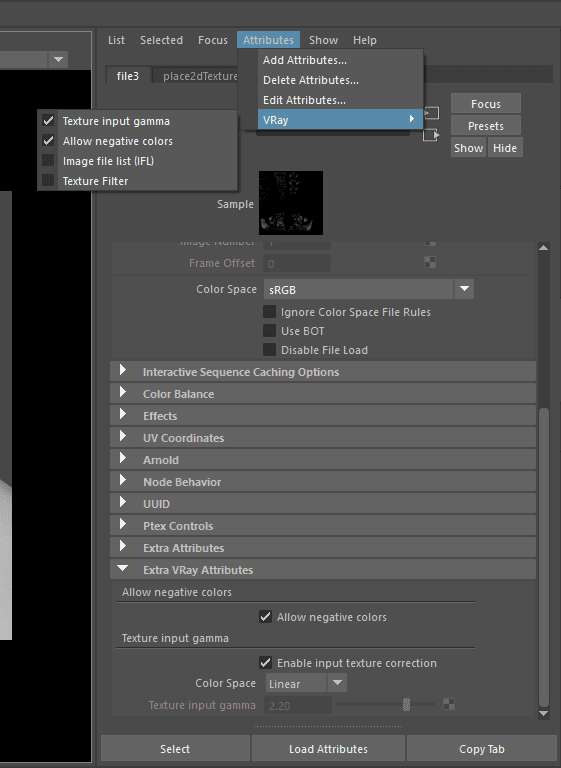
Color space of the file attribute is set to sRGB and the Color Space in the Texture input gamma is set to Linear.
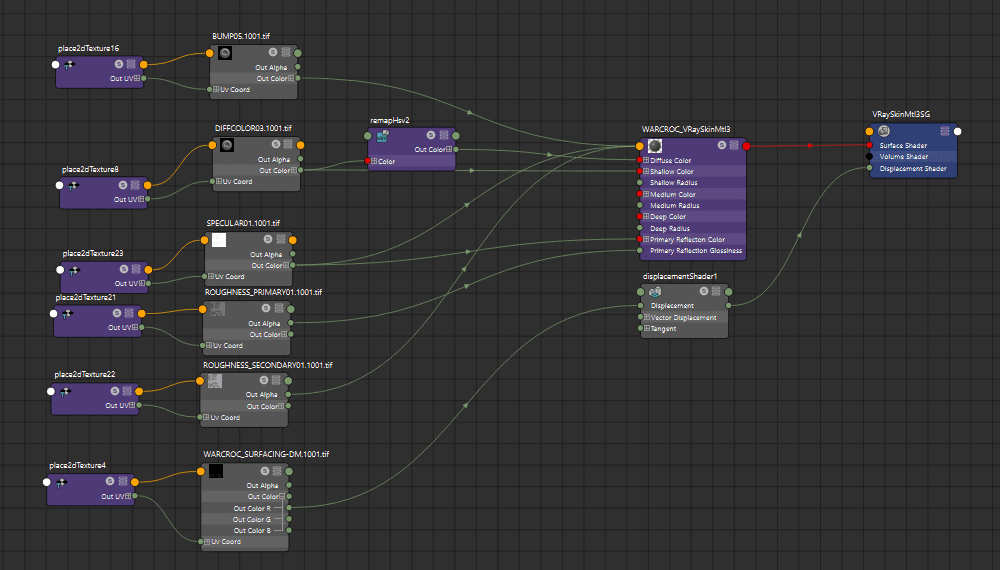
To connect the displacement texture file to the displacement shader I choose the ''output color R'' because i choose to turn off the ''3 channels'' option in the zbrush multimap exporter.
Texturing
Now that the Warcroc has his scales, the next step is texturing.
Before I took the model back to Mari, I needed to export the displacement map out of ZBrush. The displacement map will be used to make filters for texturing, like the high resolution cavity map.
I spent a long time in Photoshop to convert the displacement maps into many different filters I needed. This was a very important step, as I used these filters as a tool in Mari to paint complex shapes and patterns. I used my crocodile images as reference, and I tried to replicate the patterns they have on their skin.
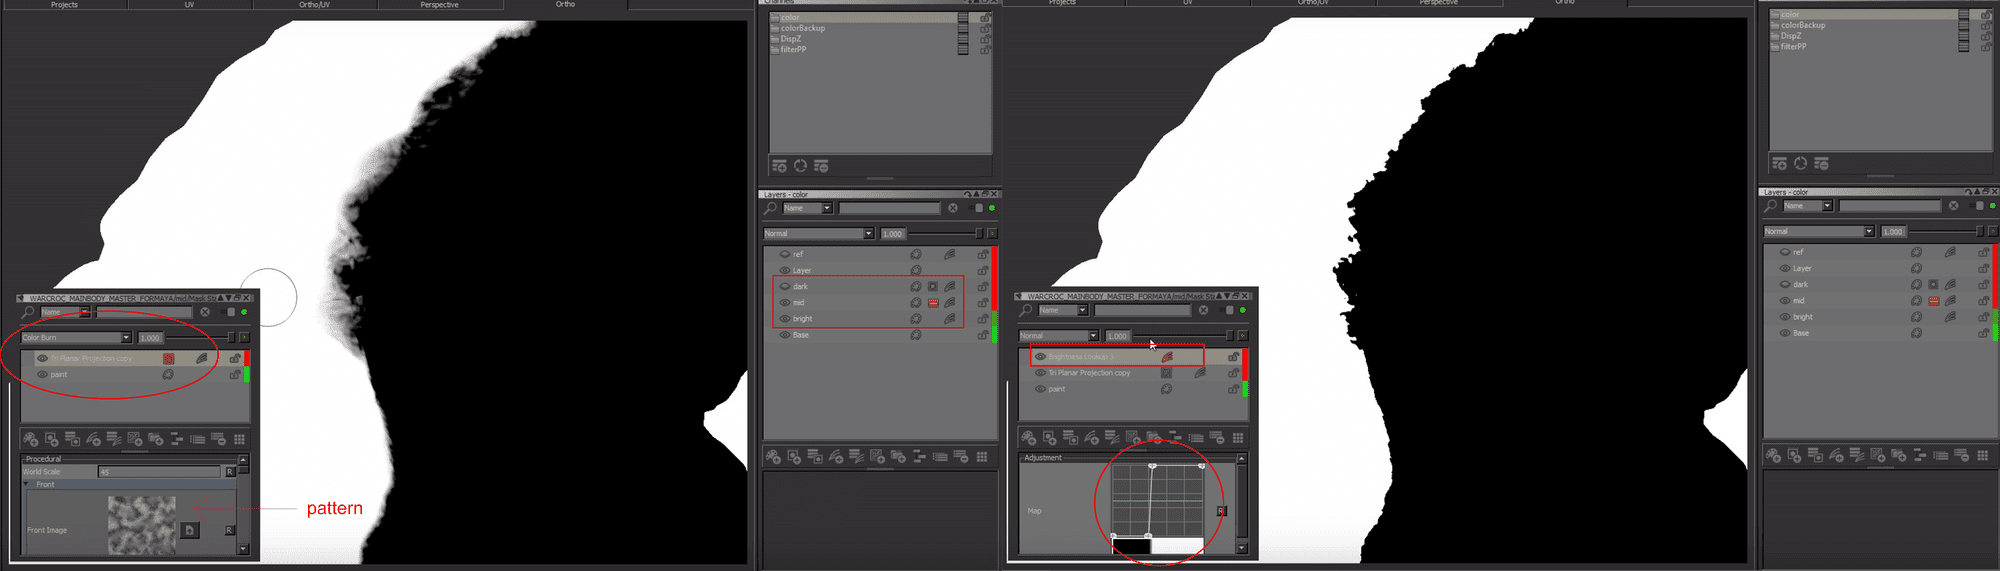
Painting the diffuse colour was a very long and tricky process. By analysing saltwater crocodiles, I realize there are three main base colours: light, medium, and dark.
To replicate them, I created three tri-planar projection layers, each of them having the same tileable texture (made from a human skin texture). Each of these tri-planar projections got an individual HSL adjustment to match the base colours.
I then placed them in order, from top to bottom: dark, medium, light. I painted the medium and dark values over the bright layer using procedural techniques within the mask stack to break up the patterns and make it look organic.
In the mask stack (medium and dark layer), I first created a layer with only black (0) and white values (1). Next, I placed the tri-planar projection with a pattern, and a brightness lookup (high contrast) on top. The tri-planar projection was set to either add or color-burn.
Now, if I go back to my first paint layer and paint with a smooth brush values between 0 and 1, the break up will be created in real time!
I made sure that the texture used in the tri-planar node did not contain any pure blacks (0), because otherwise this technique won't work.
Gatling Gun
I modeled the Gatling gun in Maya and textured it in Substance Painter. It was the first time I had used Substance Painter.
When setting up my new project, I selected PBR - Metallic Roughness (allegorithmic) with the option “create a texture set per UDIM tile” on. When exporting the textures out of Substance Painter I choose the option VRay UDIM.
When importing the files in VRay and plugging them on to the VRayMtl. Each file has to have the Colour Space set to Raw and the ''textures input gamma'' on. It is important for the files to be set to Raw instead of sRGB because it was giving me unexpected and wrong results in the renders. The bump (normal map) file is the only one who does not get an ''Extra VRay Attribute''.
Smoke
I used smoke footage containing an alpha channel for the smoke effect. In Nuke, I used merge, transform, and time offset nodes to comp it on top of the footage. For the smoke coming out of the Gatling gun, I simply put three copies of the footage on the separate pipe openings with different timings.
Rendering using YellowDog
When facing the final stage of my project I had access to YellowDog a cloud rendering and batch processing platform online which helped me speed up the process of rendering all of my shots. It is very easy to use.
Once the plugin is installed a new tab appears in Maya. The first icon from the left is used to export the scene to the YellowDog platform.

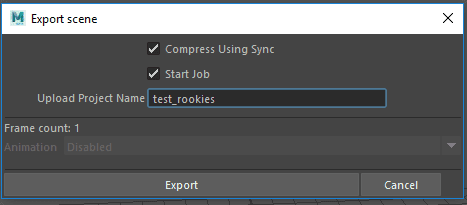
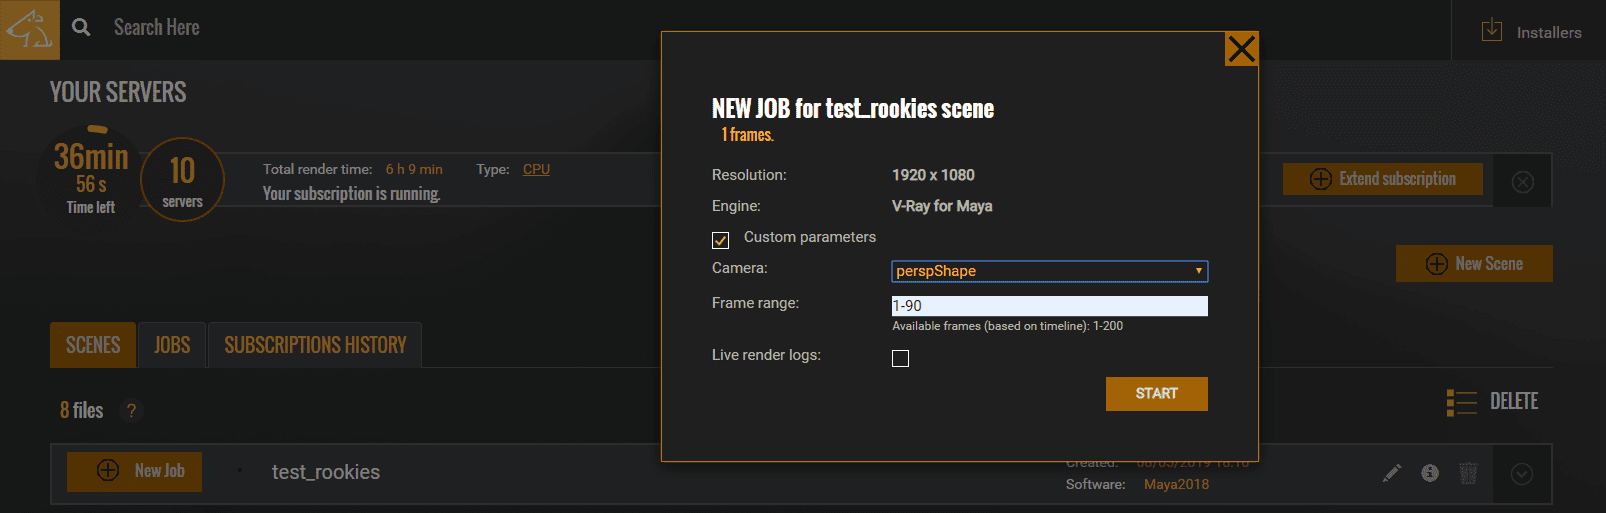
When I clicked on it, the scene and all the textures will be compressed and uploaded. This can take a while. This is why the best way to take advantage of it, is to upload a scene that contains all the shots I wanted to render. On the platform I could then choose any camera and render the frame range I wanted in the custom parameters.
Once the upload is done I would go to the YellowDog online platform and simply render my scene by clicking on ''New Job''.
In the plugin I had the option of choosing in which folder i wanted to download the rendered files.
It was also very convenient to be able to check statistics and image previews while the frames are rendered.
When the Job-render is done the frames would automatically be downloaded in the indicated folder.
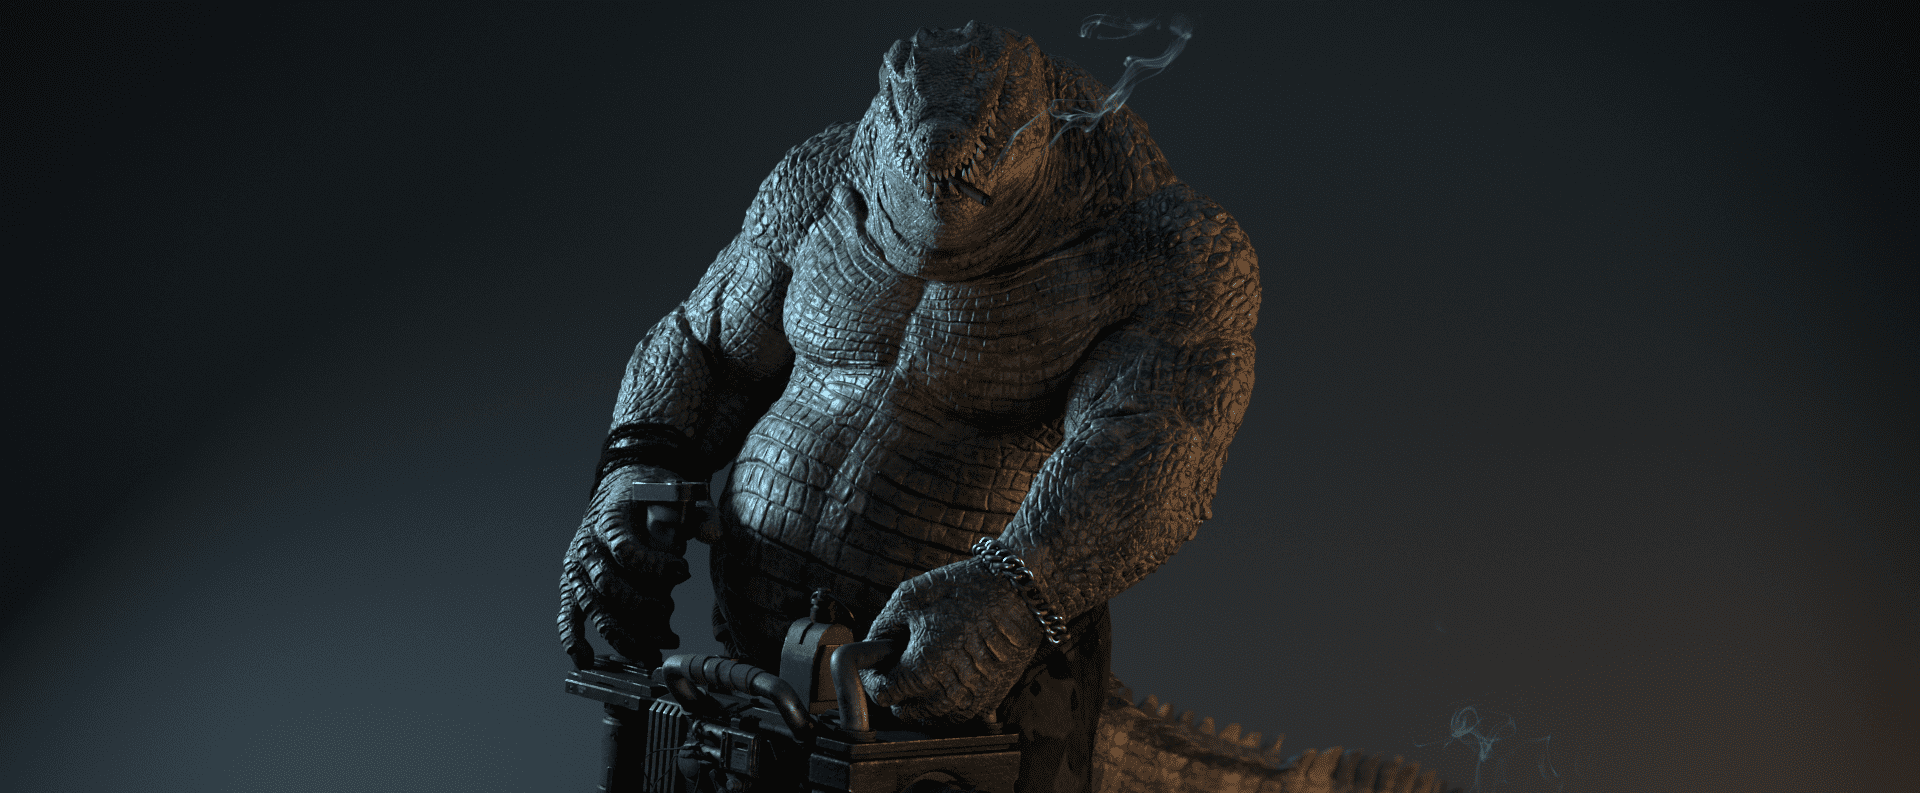
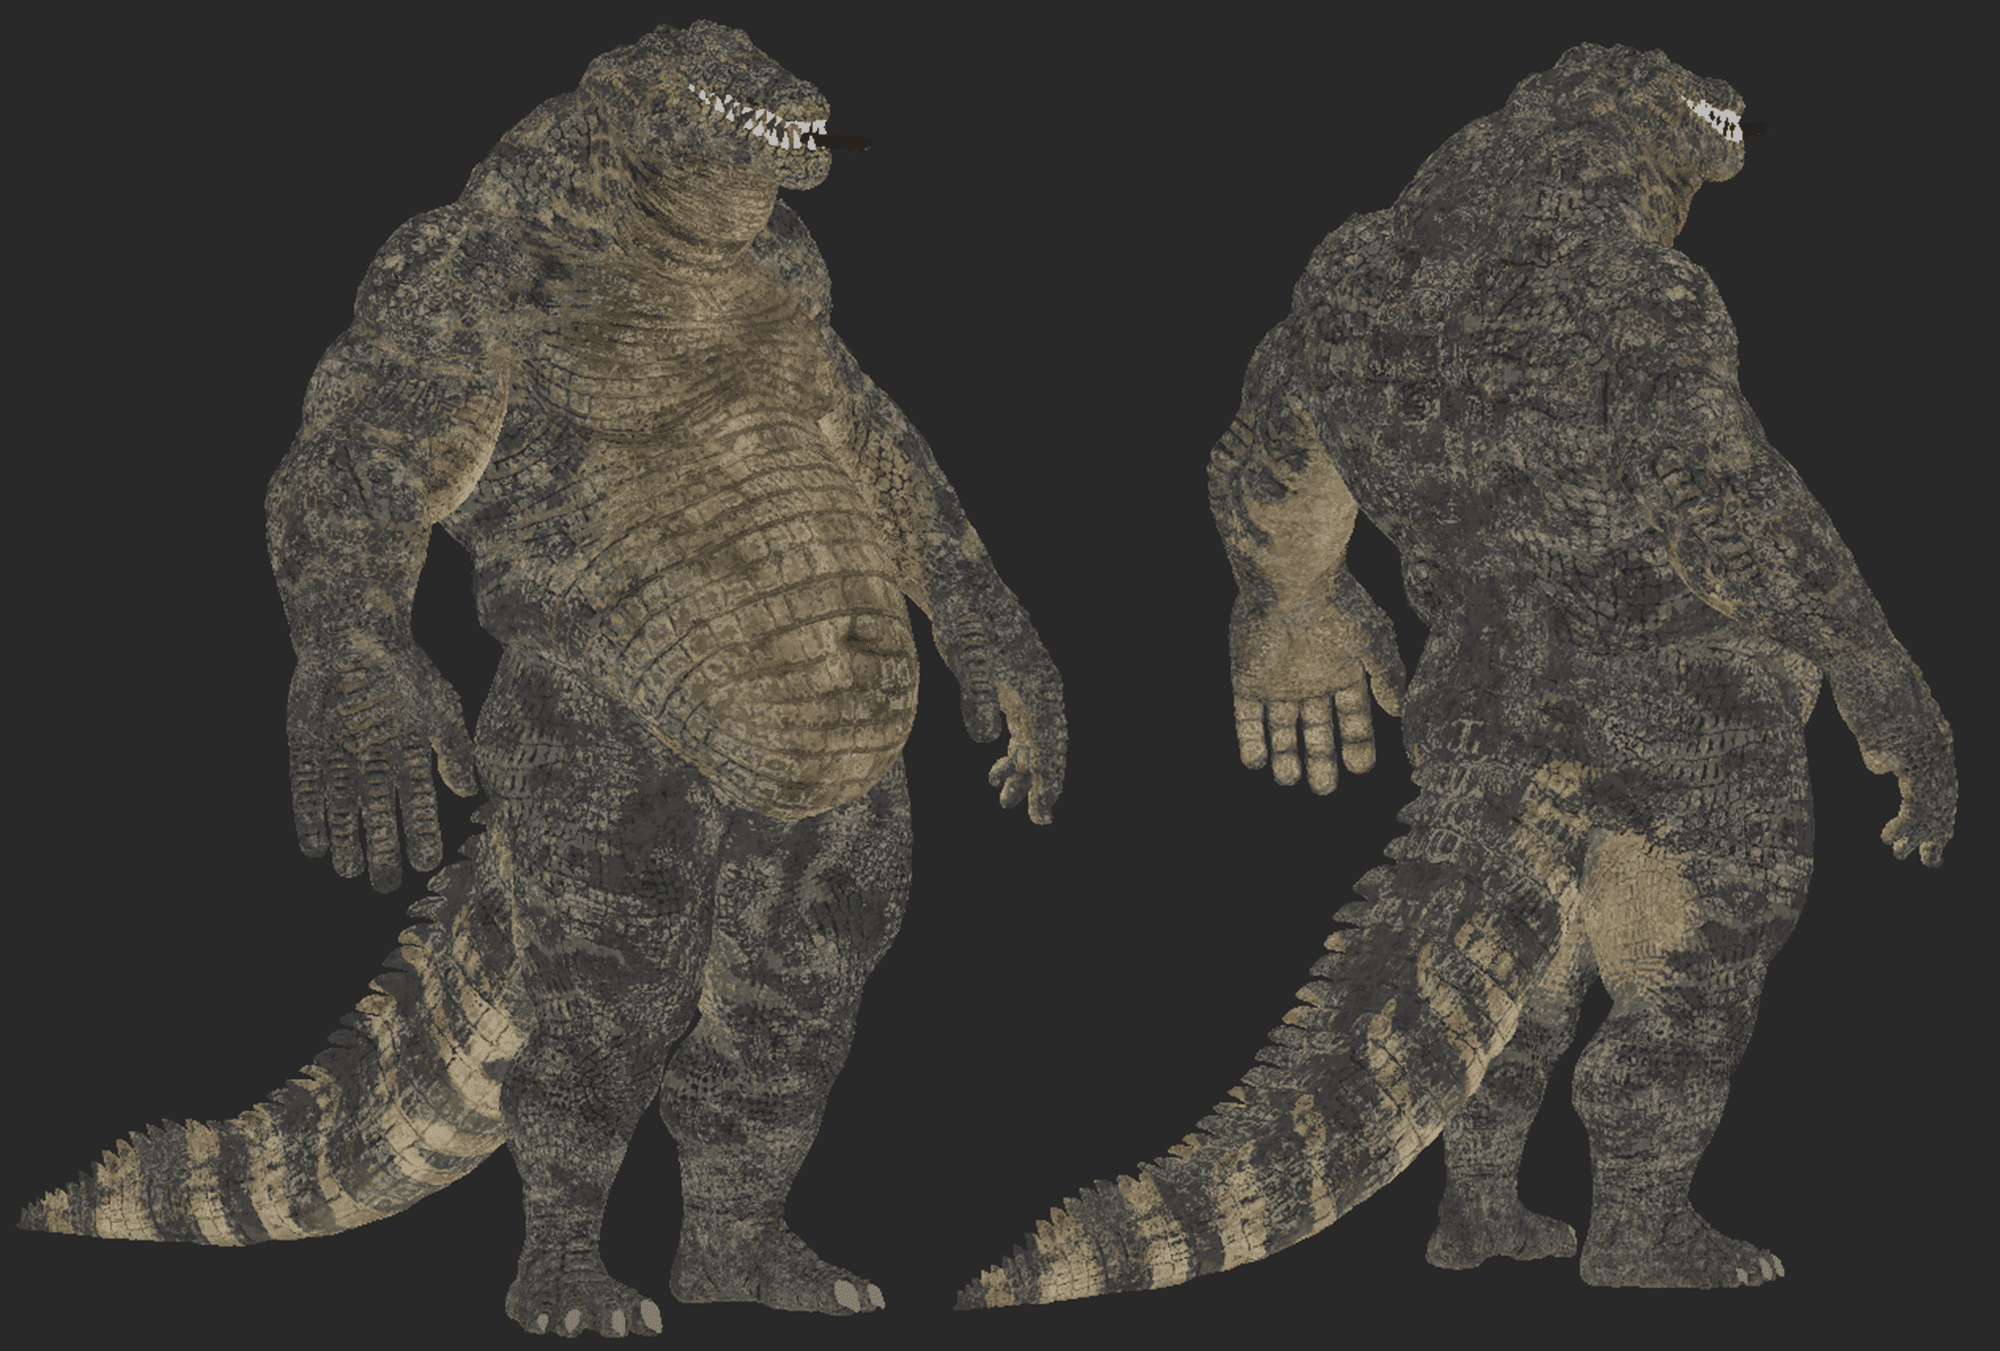
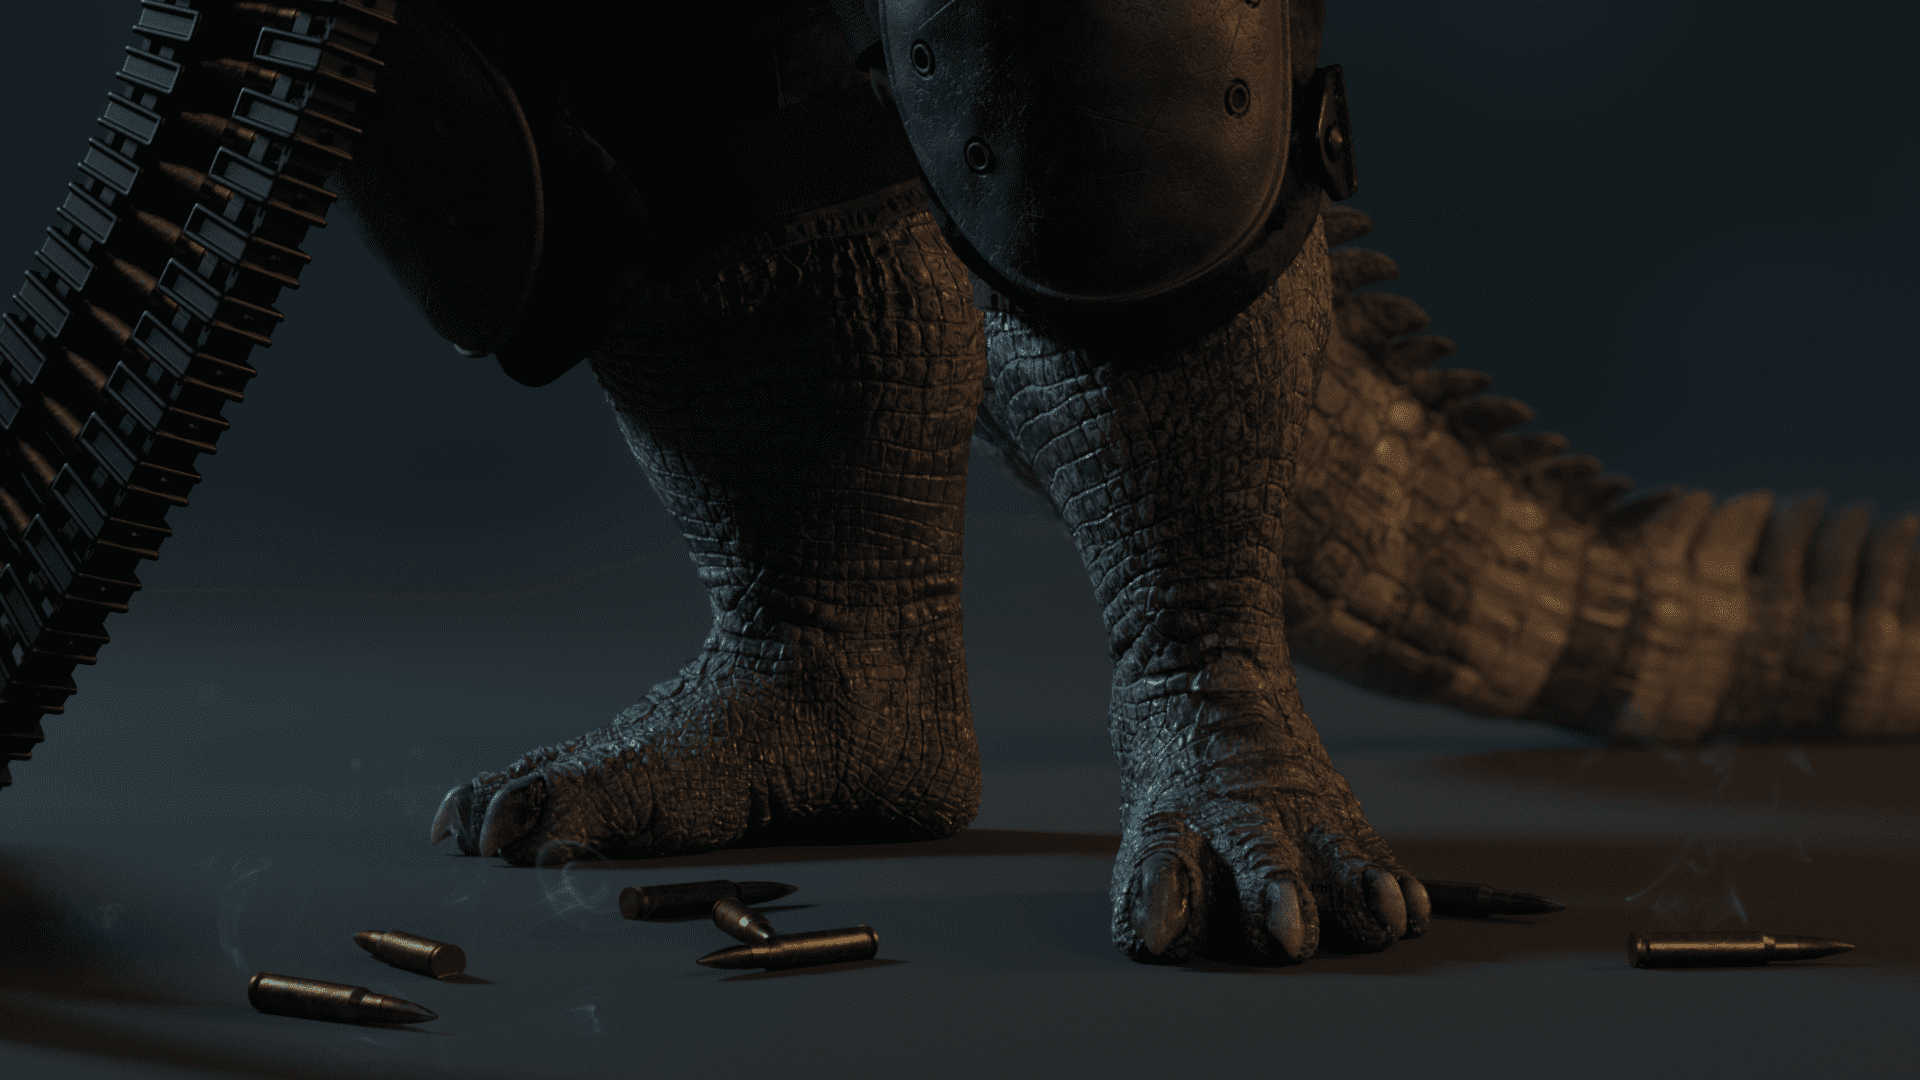
Final Renders

That's it for now folks.
I am happy how far this project came along. It was the biggest project I have achieved so far and I learnt a lot from it. I hope you have enjoyed the read and hopefully learned something along the way as well.
I want to make a special thanks to my mentor Javier Blanco for the dedication and patience. He's a great artist and a good friend. Without his help I wouldn't have been able to make half of it.
Cheers!
Reel - vimeo.com/326064641
my artstation - artstation.com/mikahoeft
my website - mikahoeft.wixsite.com/portfolio