Create a Believable 3d Character Animation Performance
Elise Bourgeois explains her process in creating a believable character performance. She talks about some of the issues that she ran into and how she overcomes them.
Elise Bourgeois explains her process in creating a believable character performance. She talks about some of the issues that she ran into and how she overcomes them.

Elise Bourgeois explains her process in creating a believable 3d character performance. She talks about some of the issues that she ran into and how she overcomes them.
This short sequence tells us the story of a little girl who is the best at playing the trumpet. She realises she’s not able to play as good as she expected, which breaks her dreams and ego.
The goal of this animation was to try to give a strong personality to this little girl, by making her reactions driven by her feelings.
Once you have a main idea of the kind of animation you’d like to do, it’s time to create your character.
It is very important to define who the character is to make him react according to his past, temper or fears.
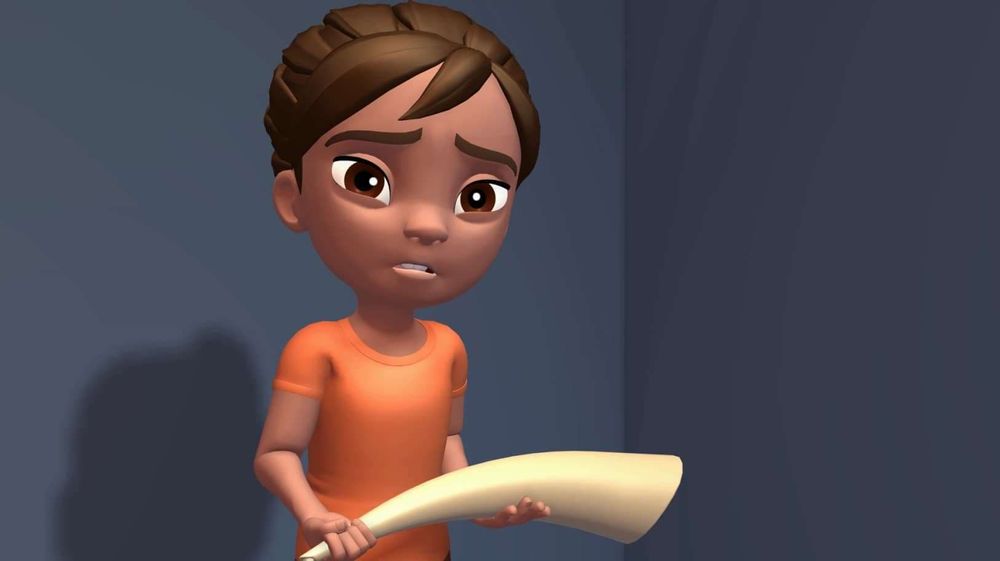
For this shot, I decided that the girl would be immature and hot-blooded due to her young age. She is also proud because of her ability to play the trumpet, and selfish because she only cares about her success. This is already a good start. The more the personality of your character will be complete, the more possibilities you’ll have to animate details.
Now that the character is set up, it’s time to think about an acting and a context. In this case the girl is blowing her trumpet as loud as she can but doesn’t succeed to make the result she wanted. I acted this scene out myself and came up with this video reference. It helped me to get the right timing and to analyze the movement of my body during this whole acting.
To make a character’s mindset believable, the most important thing is to give him time to analyze and react.
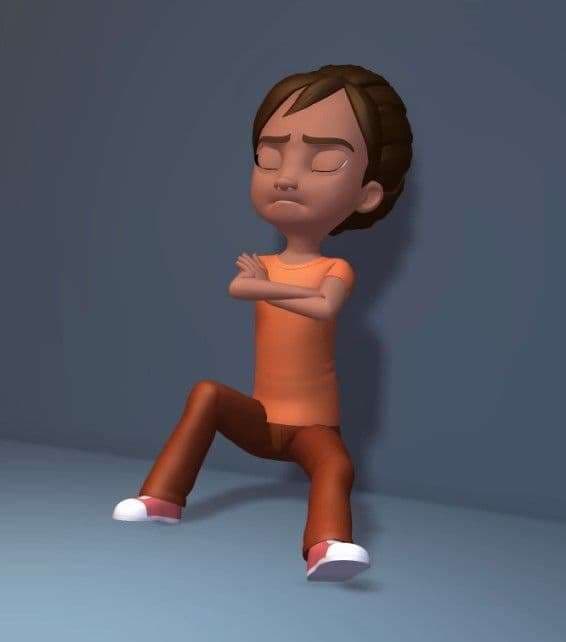
In this animation, the girl reacts in 3 parts. She looks at her trumpet first (is it broken in some way ? does it need to be cleaned ?), then at the person who was watching her to expect a reaction from him (Is he mocking me ? what can he thinks now that he saw me fail ?), and finally she looks to the side to do an introspection (Am I this good ? Am I tired today ? What’s wrong with me ?). Realising she still needs to improve, she throws the trumpet away (hot-blooded trait) and goes to sulk in a corner like a child would do (immature trait).
It is now time to open Autodesk Maya or any other animation software you like to start blocking the main poses of your shot. Blocking is the first step of animation, where you identify the narrative poses of your shot. Following the video reference, you can start posing you character every 4 or 5 frame to start. Don’t hesitate to push and exaggerate the poses and timing—having a nice and readable silhouette is a must have. It will make your animation more interesting and appealing to watch.
Once you're done with the first step of blocking, you move on to the blocking plus step to refine it by adding more keys.
The goal is to not let the software interpolate automatically. Maya always goes for the easiest and shortest path, which is usually boring and not entertaining to watch.
If there is a large movement in a short time, like the part when she throws the trumpet, I would have to make a key every two frames to make it look as good as I want. Usually the acting part (here where she looks at the audience) needs less keys.
Once you’re happy with your blocking, you can go to the next step which is splining.
This pass can be either very long and painful of very short, depending on how well you did your blocking.
To spline your shot, make sure you locked all the poses by going over them and pressing the “S” key in Maya to key all attributes. It will avoid flying or moving feet while the hips are not even moving for example. Select all the keys in the graph and hit the “Auto” tangent button in the graph editor.
For my shot, the main problem of the spline was to fix the constraints. The trumpet is constrained to the head at first, then this constraint is disabled. The two hands are constrained to the trumpet, one leader in FK and one passive in IK.
During the spline, I mainly made sure that the constraints activate and deactivate smoothly by making a one frame transition for each.
Then I cleaned the curves of all my controllers in the graph editor to find the timing I had in blocking. I tried to clean the offset of all the body parts I already started during blocking to make the character feel more organic. I also added some rough ease in and out to make the movement less robotic.
You can see that this result was not really satisfying, it needed a lot more work on the details. This is the step we call polish.
I had to refine the eases and add moving holds so the movements end less abruptly and still feel alive even when she doesn’t move much. Then I tracked all the arcs of the main body parts of the characters ( hips, spine, wrist, feet, nose). I made sure that the knees and elbows doesn’t pop by fixing them frame by frame.
I checked that the body parts are connected to each others (when you raise your arm, your shoulder goes up and your torso even twists a bit for example). I delayed one foot when she sits at the end to desynchronize the feet and make it feel more natural. To make the character even more organic you can add smear frames by stretching and squashing the character during fast movements. In this case, it allowed me to delay even more the body parts.
Polish takes a lot of time but it is worth it because it really makes the difference.
Once your shot is finished for good, you can enhance it by adding props, lights or textures and make a nice render of it. You can then add sound design and even music if you want in a audio software or an editing software.
If you’re as lost as me with CG, there’s still a way to make your shot looks good. You can start by activating shadows, ambient occlusion, and anti-aliasing.
Then, turn on the lights button, it will allows you to see your lighting directly in the viewport 2.0 of Maya. Try to make a quick lighting by adding directional lights and area lights.
You can now playblast your shot.
I hope this article will help you to find some answers. Of course this is only a direction. You don’t have to follow exactly what I’m saying, but I hope it can help you to find what’s best for you.