A Beginners Guide to Ziva Dynamics
Create a new Maya scene, import the alembic cache of the skeleton and the muscles simulated, and the fat mesh.
Create a new Maya scene, import the alembic cache of the skeleton and the muscles simulated, and the fat mesh.

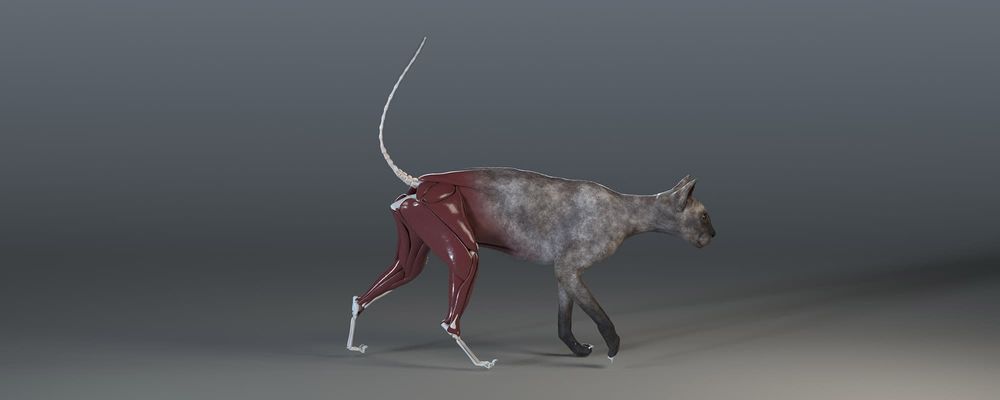
This is a great article for anybody wanting to take their characters to the next level with sophisticated muscle sims. This same muscle system were used in movies like The Lion King. Benjamin Makki give us a step by step on how he used Ziva Dynamics on a personal project to simulate the muscles, fat, and skin of a cat.
If you're not interested by the modelling part you can download one of the free assets Ziva provides on their website. In my case I did the modelling of the asset myself.
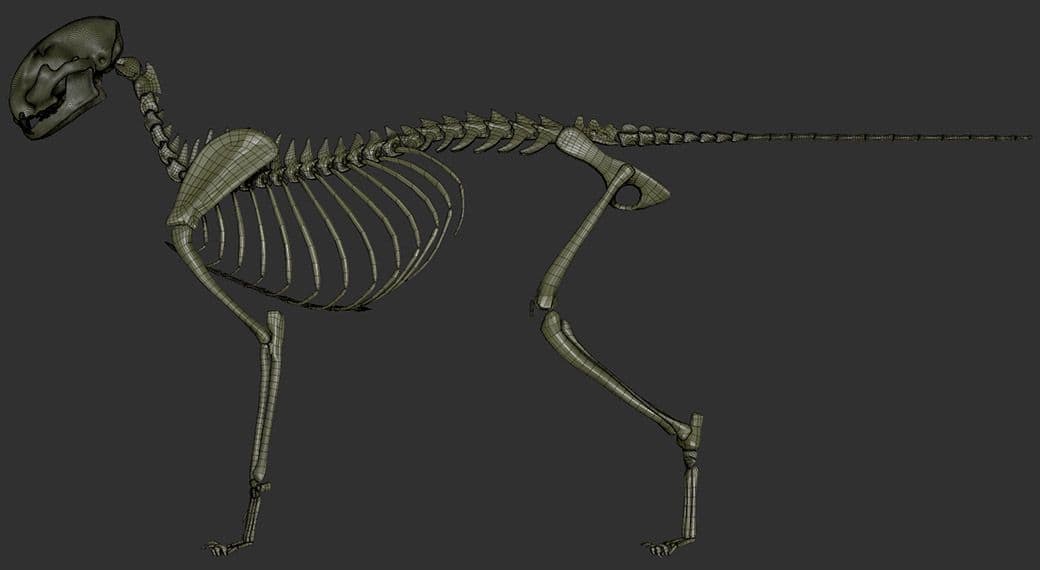
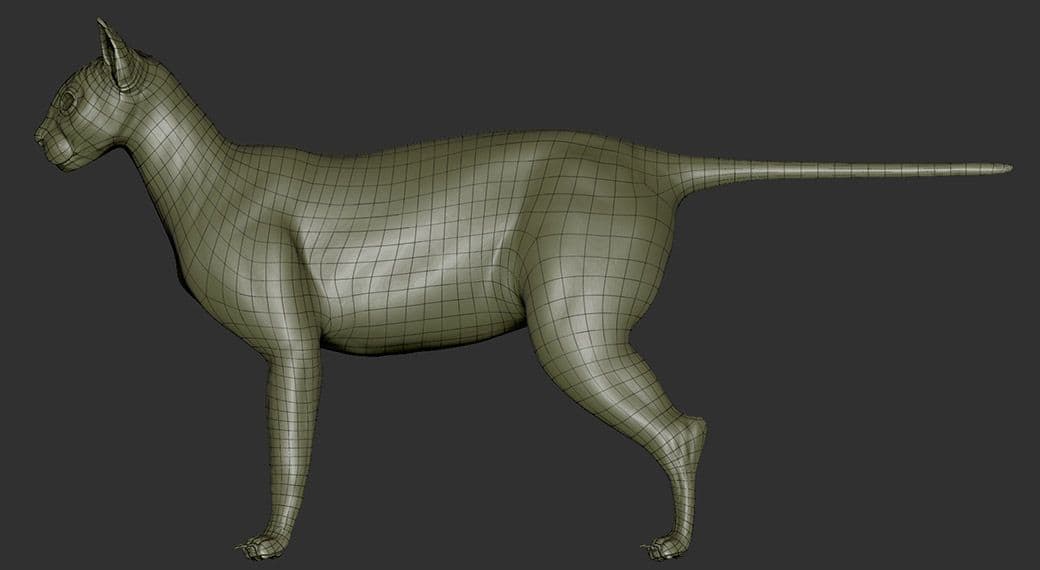
I started to sculpt the skeleton in Zbrush. The topology of the bones is not that important, just keep it low poly for the export to Maya. No need to do any complex handmade retopology, the ZRemesher does the job. Don’t forget to unfold the UVs, you will need it later in Ziva, but again you don't need anything complexe. I unfolded them in Zbrush with the Unwrap tool, and then organised them in 4 UV sets in Maya to keep it clean.
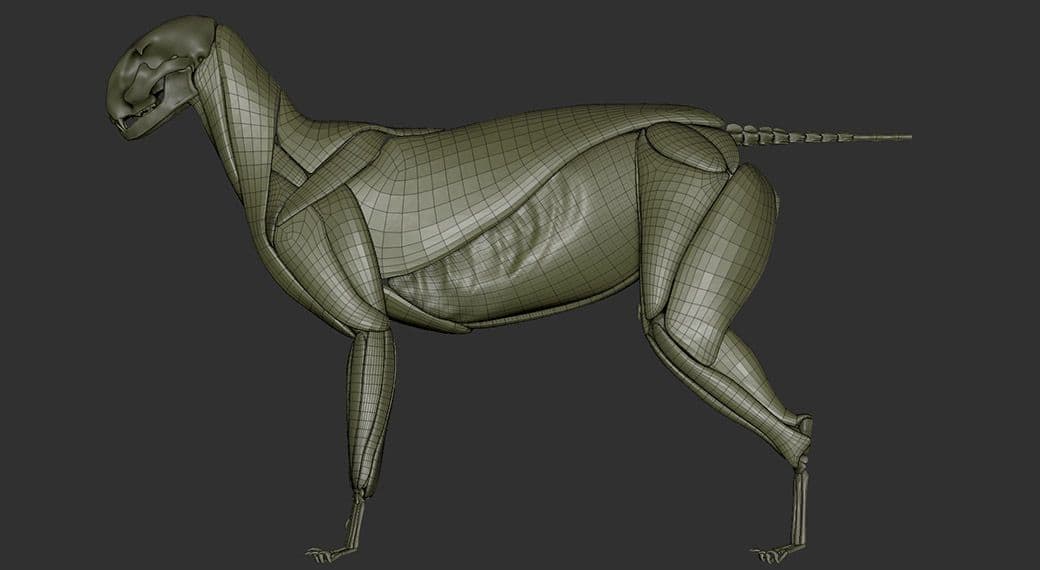
Now let’s do the muscles, it might be the most demanding part of the modelling. You want to have as little interpenetrations between the muscles as possible. Otherwise it might cause abnormal behaviour at the simulation stage. If you find out about some interpenetrations when you are already doing the simulation, that’s okay. You will still be able to go back to Zbrush, do some retakes, then re-export your meshes to Maya and pick up your simulation where you left off.
One thing you have to care about is that you need to have your neutral pose like 10 frames before the animation begins.
It’s a non-destructive workflow so don’t be afraid to do some mistakes. You will want the muscles edge flow to go in the same direction as the muscle movements. (Like for the bones, ZRemesher might also be enough to get this done). This will help you to get a nice simulation with fewer polygons.
Speaking of polygons, you need to know that the more polys you have on your simulated meshes, the more folds you will be able to get. That said, you don’t really need folds on muscles so you might be able to get the result you are looking for by keeping them quite lowpoly. The only muscle i exported with a higher polycount is the External Oblique so it can be moulded around the rib cage.
For the UVs I did the same thing as I did for the bones.
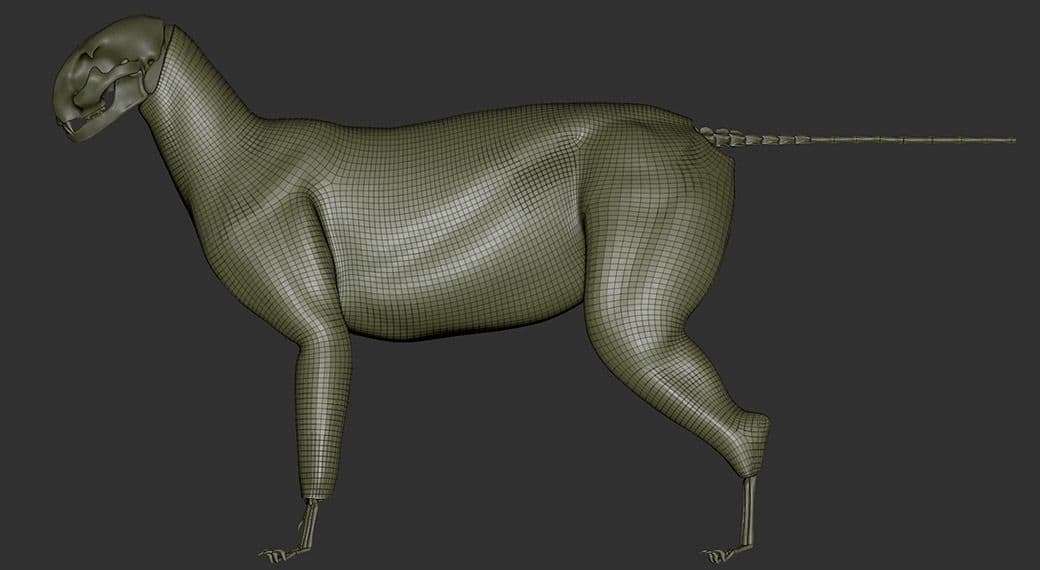
Done with the muscles, we can start the fat layer. This layer must cover all your muscles. Here is a small tip I found to have the base of the fat mesh : Duplicate all the muscles, merge them into one subtool, Dynamesh to make it a single mesh.
Then you can mask the outside of this mesh and extract it to create the fat subtool. Now you just need to do an extrude on the whole mesh to create the thickness and you have the basic shape of your fat layer. (You can delete the dynameshed muscles at this point). The topology isn’t really important again, ZRemesher will do the job well.
When you will export the fat mesh to Maya it needs to be quite highpoly to get folds when running the simulation, mine is about 140.000 faces. For the UVs I advise you to cut the inner side from the outside because at some point later in Maya you will need to select the inside vertices of this mesh, so you will be able to select them through the UVs.
The next step is sculpting the skin, when the sculpt is done you will need to retopologize it by hand so it can be rigged and animated. Then you can unfold the UVs. Like the fat mesh, you need to export a highpoly to get folds, mine is about 300.000 faces.
At this point I asked my friends Claire Auvin to rig the skeleton and Auriane Bertil to animate it. So I don’t have a lot of things to say since I didn’t do it myself. One thing you have to care about is that you need to have your neutral pose like 10 frames before the animation begins. You will need this so the simulated meshes can smoothly transition from the neutral pose to the animation.
Create a Maya scene and import the animated skeleton and the muscles.
Go to the Ziva Menu and select “Create” to get your zSolver. Now you might want to check some settings on your zSolver. The only settings I tweak here are the Integrator and the Substeps.
The Integrator you choose will define the stability and accuracy of your simulation. The default one is BackwardEuler, it is stable but you might want to try BDF2 for creatures, it will give you a nice jiggly effect.
The Substeps is the number of steps Ziva will compute between each frame, the higher it is the more accurate your simulation will be. You can maybe start with 5. Increasing this value may help you if you have collision issues but it will also extend the simulation time.
Here is the zSolver documentation if you need more detailed informations.
I will explain kind of the whole workflow for one muscle so you can understand how it works, and then be able to repeat it on every muscles.
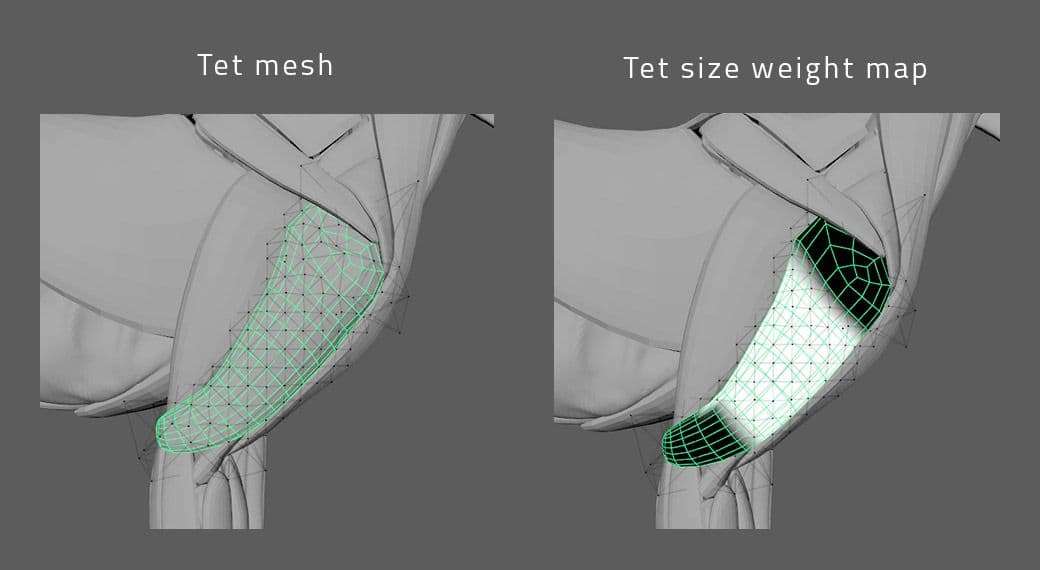
In a first place, you need to select the bones the muscle will be attached to, go to the Ziva Menu and select “Bone” to turn those meshes into Ziva Bones. Then select the muscle, go back to the Ziva Menu, and select “Tissue” so it can be submitted to physics. Now you have a kind of lattice around the muscle, this is the Tet mesh.
You can set the Tet size in the zTet settings, the lower it is the more resolution you will have. To optimize this you can paint a map that will define your Tet size. To do that, select the muscle, right click in the viewport, then go to Paint > zTet > zTet-weights.
Now you can paint white where you want the resolution to be higher and in black where it needs to be lower. Then in the zTet settings you can multiply the resolution of the white areas by increasing the Surface Refinement setting.
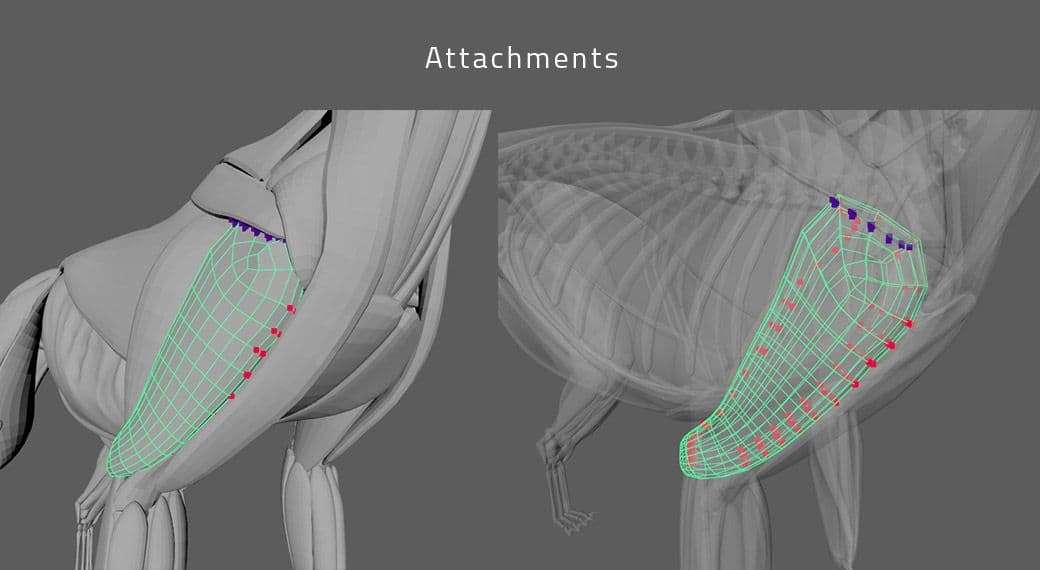
Now we need to attach the muscle to the bones, to do that select the vertices you want to attach. Try to select as minimum vertices as possible, it’s useless to attach too many. Then shift+select the bone and in the Ziva Menu select “Attachment”. This will attach your selected vertices to the closest points on your bone surface.
You can access the settings of this attachment in the zAttachment node in the Channel Box. Most of the time I leave the Attachment Mode on Fixed for the attachments between a muscle and a bone. The Sliding mode may be useful when you attach two muscles together so they can slide against each other. Stiffness and Stiffness Exp are the same parameter.
The latest allows you to not have to deal with too many zeros in the Stiffness value, so I usually tweak only the Stiffness Exp value. For an attachment between a muscle and a bone you might want to set it between 10^8 and 10^9 so it doesn’t get loose.
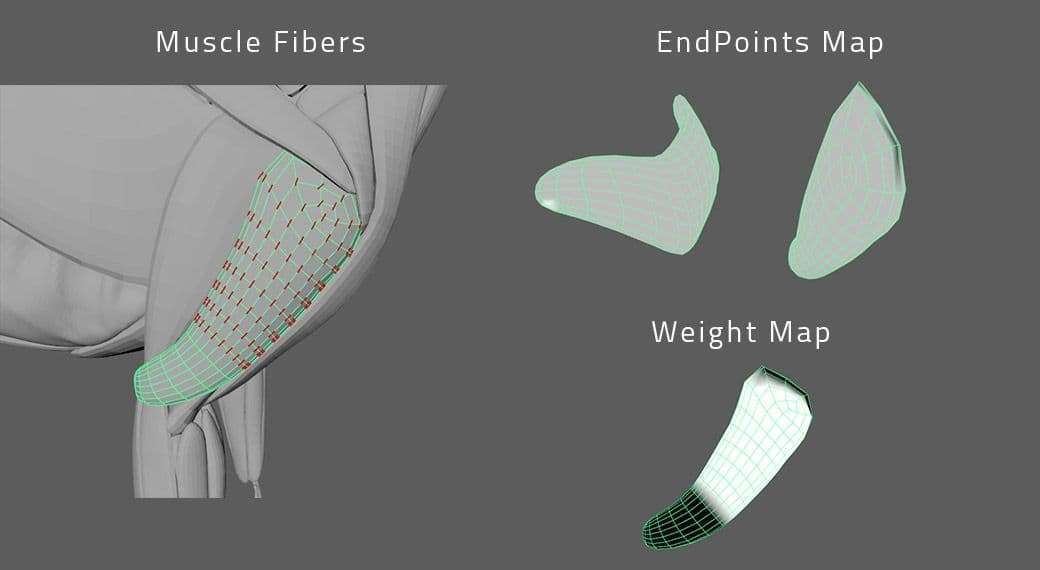
Once all the attachments are set the simulation should start working fine. The next step is to set the fibers and line of action to make the muscle contract automatically depending on the animation. So select the muscle and click on “Muscle Fiber” in the Ziva Menu to create the zFiber node.
Now you can see the fibers on the muscle representing the direction of the contraction. The direction is controlled by a map that you can edit by right clicking in the viewport with the muscle selected and then go to Paint > zFiber > zFiber-endPoints.
To make it work you need at least one vertex painted in white, an other in black, and the rest painted with a 0.5 value. So the direction will go from the white vertices to the black vertices across the grey area.
You can also paint a weight map to control where the muscle should contract or not.
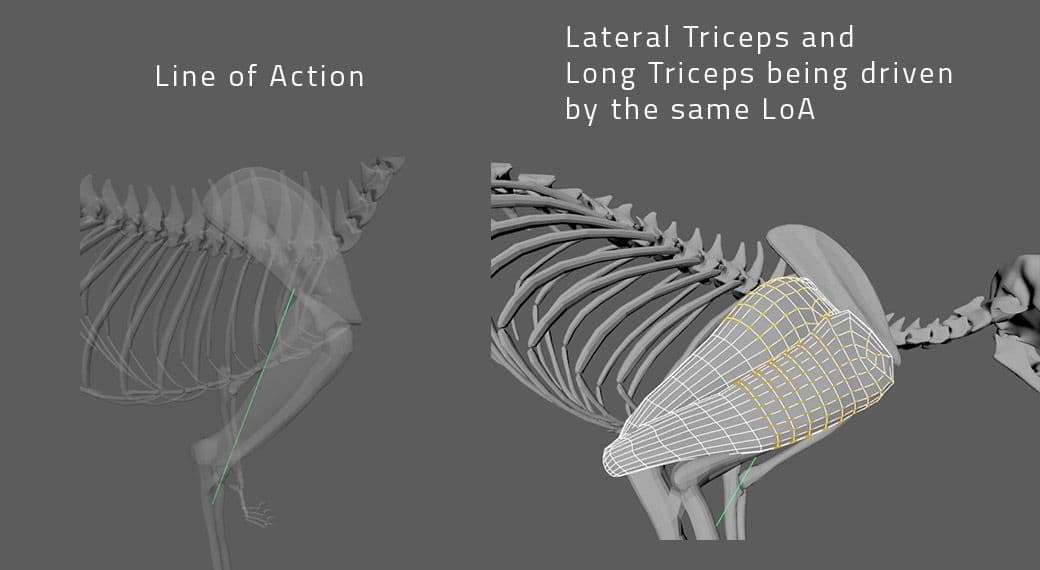
Now we need a Line of Action in order to make the contraction automatic. So select the muscle then in the Ziva Tools Menu select “Create Line-of-Action Curve”, this will create a CV curve along the muscle. This CV curve needs to be parented to the bones so the muscle can be contracted or relaxed depending on the length of the curve.
In my case I’m working on the Lateral Triceps so I rigged one tip of the curve to the Scapula and the other tip to the Ulna. I attached it more towards the middle of the Ulna so the length of the curve gets more affected when the cat will bend its leg. When the curve is rigged to the bone, select it and the muscle then in the Ziva Menu select “Muscle Line-of-Action”.
Now if you do a simulation you can see the fibers on the muscle becoming yellowish when the muscle is contracted. You can increase the contraction by increasing the Pos Sensitivity value in the zLineOfAction node.
You can use the same Line of Action for different muscles that are supposed to get contracted with the same movements.
That’s it. Now repeat those steps for all the muscles.
When you’re done, launch the simulation of the whole animation and then export the skeleton and the muscles to an alembic file.
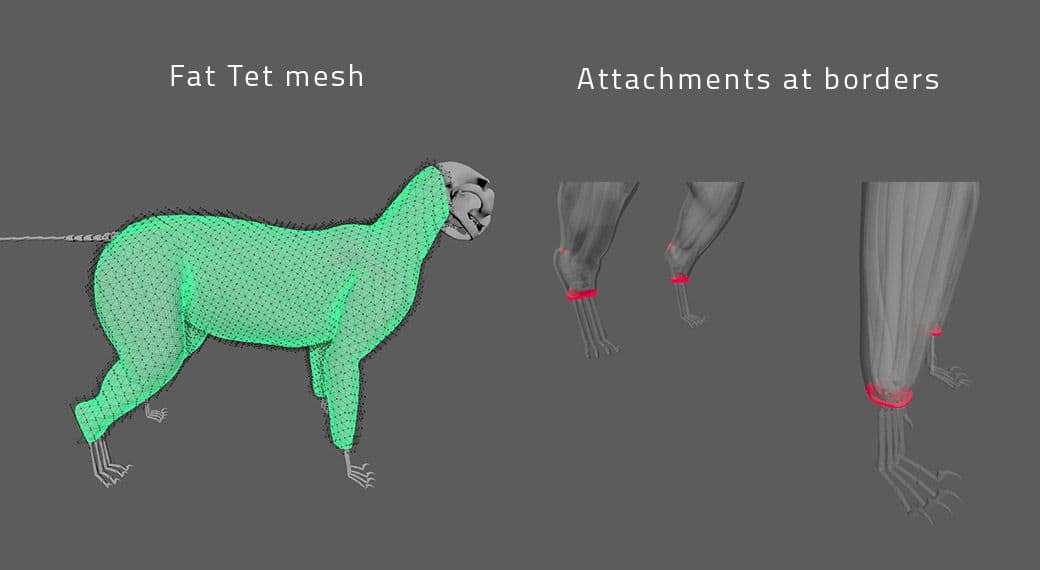
Create a new Maya scene, import the alembic cache of the skeleton and the muscles simulated, and the fat mesh. Select the skeleton and muscles and turn them into Ziva Bones, and the fat mesh into a Ziva Tissue. Attach the borders of the fat mesh to the bones. I also attached some vertices of the fat along the spine to make it more stable.
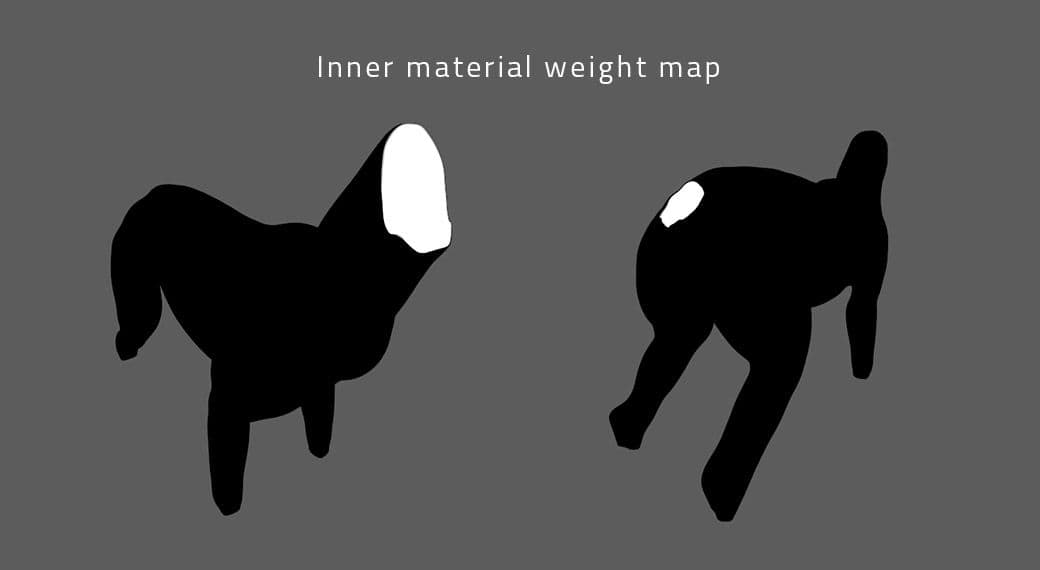
Here we will need to set different physical properties to the inner and the outer part of the fat mesh. To do that we will need 2 Materials. You already have the default one and you need to create the second one by selecting the fat and click on “Material Layer” in the Ziva Menu. One of these zMaterials will be for the inner part and the other for the outside. To assign those materials to the right part you need to paint their weight maps.
In the channel box the highest zMaterial in the list has the priority (like layers in photoshop). So if the inner material is on top of the outer material, you need to paint the weight map of the inner one. So select the fat, right click in the viewport > Paint > zMaterial > innerMaterial-weights.
Now you need to paint all the inner vertices in white all the others in black so the other material can be applied to those. If you have separated the inside vertices from the outside ones in the UVs (as advised in the modeling part of the guide), you can easily select those you want and Flood them with the right value.
Now let’s modify the zMaterials settings. I won’t go too much into the details of which parameter does what because it would be too long, check the Ziva Documentation if you need more informations. I will present you the values I used to give you an idea. It worked for me but you might need to play a little bit with those settings to get the result you are looking for.
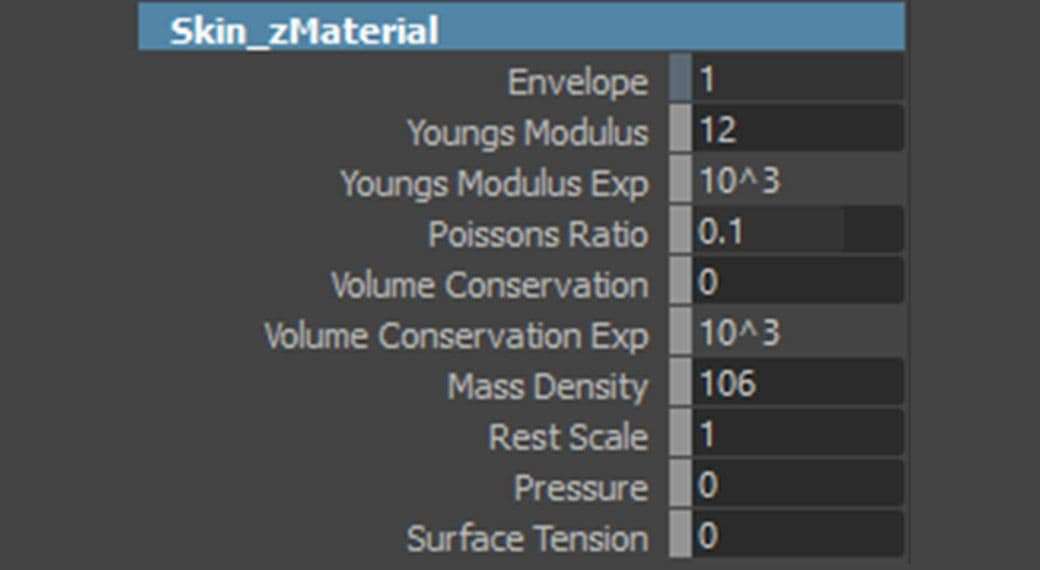
The Young modulus is basically the stiffness of the material, I left it on 12 and 10^3 for the Exp for both zMaterials.
Poissons Ratio controls the volume conservation under small deformations, I set it to 0.25 on the Base Material and 0.1 for the inner one.
I set the Volume Conservation Exp to 10^4 for the base Material and 10^3 for the inner.
For the Mass Density it is suggested on the Ziva Documentation to divide the default value by 10 to reduce the excessive sliding effect. So I set it 106 and it worked fine.
The Rest Scale is basically a scale of your mesh, I let it to 1.
The Pressure will apply a force in the normal direction. It’s a really important parameter for the inner material, you need to put a negative value so the inner part of the fat can wrap itself on the muscles. I put -2500. I leave it at 0 for the base material. Now to avoid some collision issues, we need to have the pressure effect to fade in during the simulation. The Pressure attribute is not keyable so you need to go in the zTissue node. Here you can see the Pressure Envelope attribute, this is what we need to key for the Pressure. So set it to 0 at the first frame, right click on it > Key Selected. Then go to the frame 5 and set the Pressure Envelope value to 1, then “Key Selected” again.
The last attribute is Surface Tension, we also need it for the inner Material. It’s another force applied to the mesh that will shrink it. I set it to 45. You also need to key it like the Pressure, this time with the Surface Tension Envelope attribute in the zTissue node.
Now your simulation should work fine, you can still adjust some settings to get the result you are looking for. I also added a third material that I applied on the stomach. I have the same settings on this than the base Material, except the Mass Density that I set a bit higher to have a better jiggly effect.
When you are done, like we did for the muscles, run the simulation and export it as an alembic file.
To get the final skin result I did on one side the simulation of the mesh and on another side i skinned the skin mesh with the skeleton’s rig. And then did a blendshape between those 2 meshes to have the body simulated with Ziva and the parts not simutated (head, tail, and paws) at once.
So for the skin simulation, create a new Maya scene and import the alembic cache of the skeleton, muscles, and fat, and also the skin mesh. Turn the skeleton, muscles and fat into zBones and the skin into a zTissue.
To optimize the simulation time I edited the zTet weights map to paint in black the areas I won’t need for the final result, so the head, tail, and paws.

I attached the skin to the whole exterior of the fat mesh. Also did some attachments with the skull, tail bones, and paws bones, so the skin follows them approximately during the simulation. This will be useful to make the transition smoother with the blendshape between the animated mesh and the simulated one.
For the zMaterial I don’t have a lot of things to say, I already explained it for the fat. Those are my settings of the skin zMaterial :
When you are done tweaking those settings, play you simulation and export it as an alembic file.
Now import this alembic cache and the skinned mesh in a new Maya scene (again).
So I need to get the head, tail, and paws from the animated skin mesh to the Ziva simulated skin mesh. To do that select in a first time the skinned mesh then the simulated mesh, go the Rigging menu set > Deform > Blend Shape. The default options of the blendshape work well.
Now your simulated mesh should look like the skinned mesh because the blendshape is applied on the whole mesh. So select the simulated mesh and right click in the viewport and select Paint > blendShape > baseWeights. Here you can paint the influence of the blendshape, so you need to have the simulated areas painted in black and the others in white.
When you are done you should have the final result of the skin. You can export this mesh as an alembic file and import it in a final Maya scene. Now you can rig things like the eyeballs, the fur, etc., add shaders, lights and render your creature.
Thank you for reading this article. What I presented here is the workflow I used but it was my first time with Ziva Dynamics, I had to improvise sometimes to find solutions. I still have a lot to learn. So I don’t know if it’s the best workflow but it works.
I tried to explain things and give some tips that I would have liked to have when I started this project, so I hope it helped you.
Of course you can also check the Ziva doc and also their community forum for help and informations.
You can find me on TheRookies, ArtStation, Instagram, and LinkedIn.