7 Steps To Completing a 3D Character Animation Shot
Animation looks better when it is easy to track. And, when our eyes recognise organised shapes, the movement can remain in our brain longer.
Animation looks better when it is easy to track. And, when our eyes recognise organised shapes, the movement can remain in our brain longer.
Dahyun Beak is an animator based in San Francisco, California. A recent graduate of the Academy of Art University, Dahyun has won many awards for his projects, and shares with us his tips to creating a winning character animation shot.
The most important thing to get across with your animation, is to showcase your skill and to entertain or draw in your audience. So, I always try to come up with ideas that I layer with several elements, successfully and effectively executed.
Most animators use existing rigs, which can sometimes limit the style of character you chose to go with. So, when I look to chose a character, I make sure of two things:
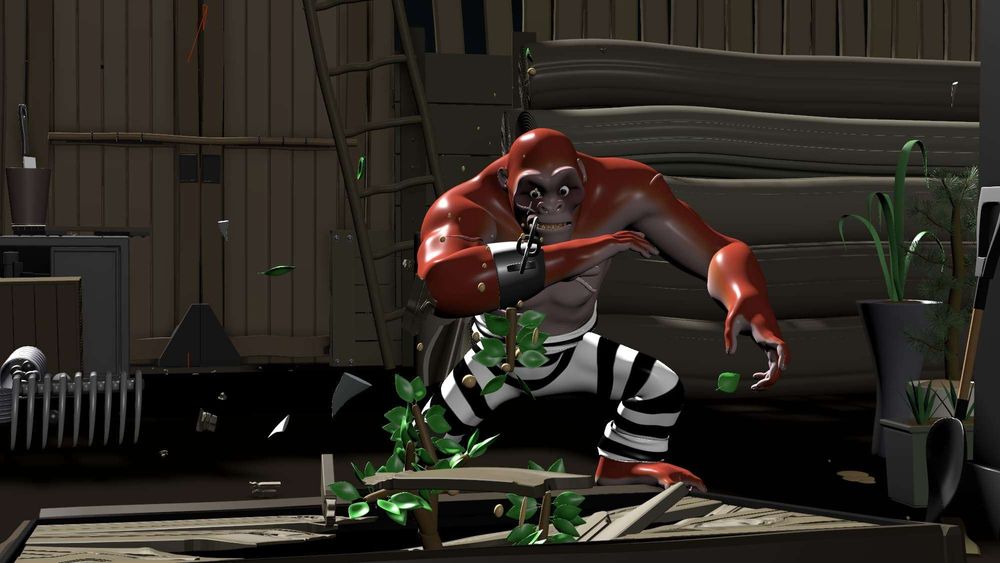
First, will this character fit in the environment I want to create? Take the chimpanzee for example - I asked myself if the silhouette of the character would support his actions and, if those actions would work harmoniously with the situation in the shot or not.
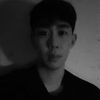
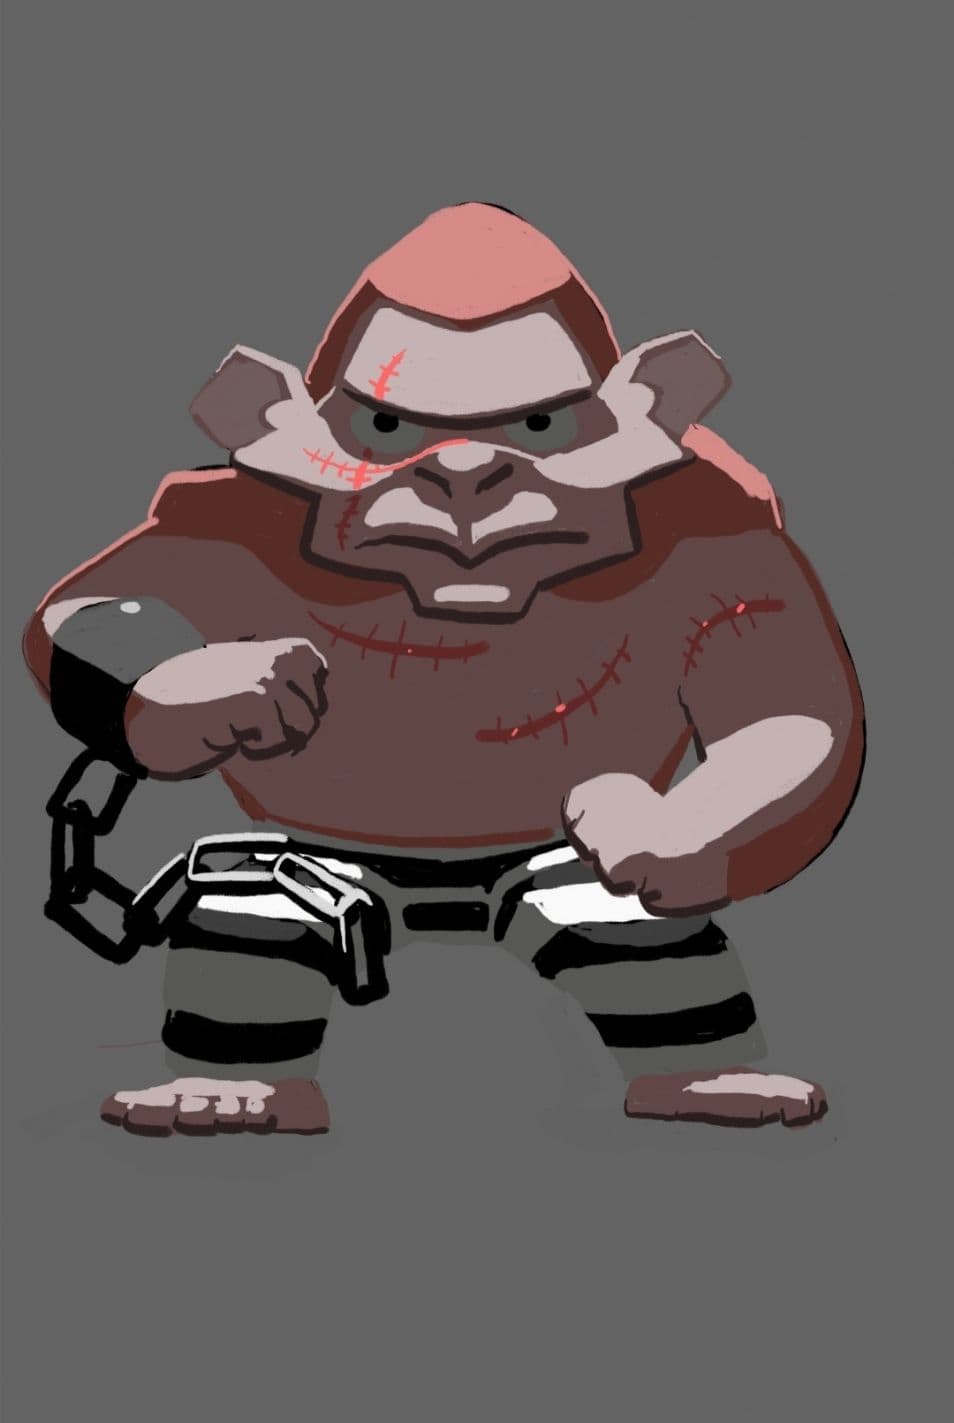
Second, I look to create a simple and clean design. Animation looks better when it is easy to track. And, when our eyes recognise organised shapes, the movement can remain in our brain longer. So, my aim was to simplify the original character's texture.
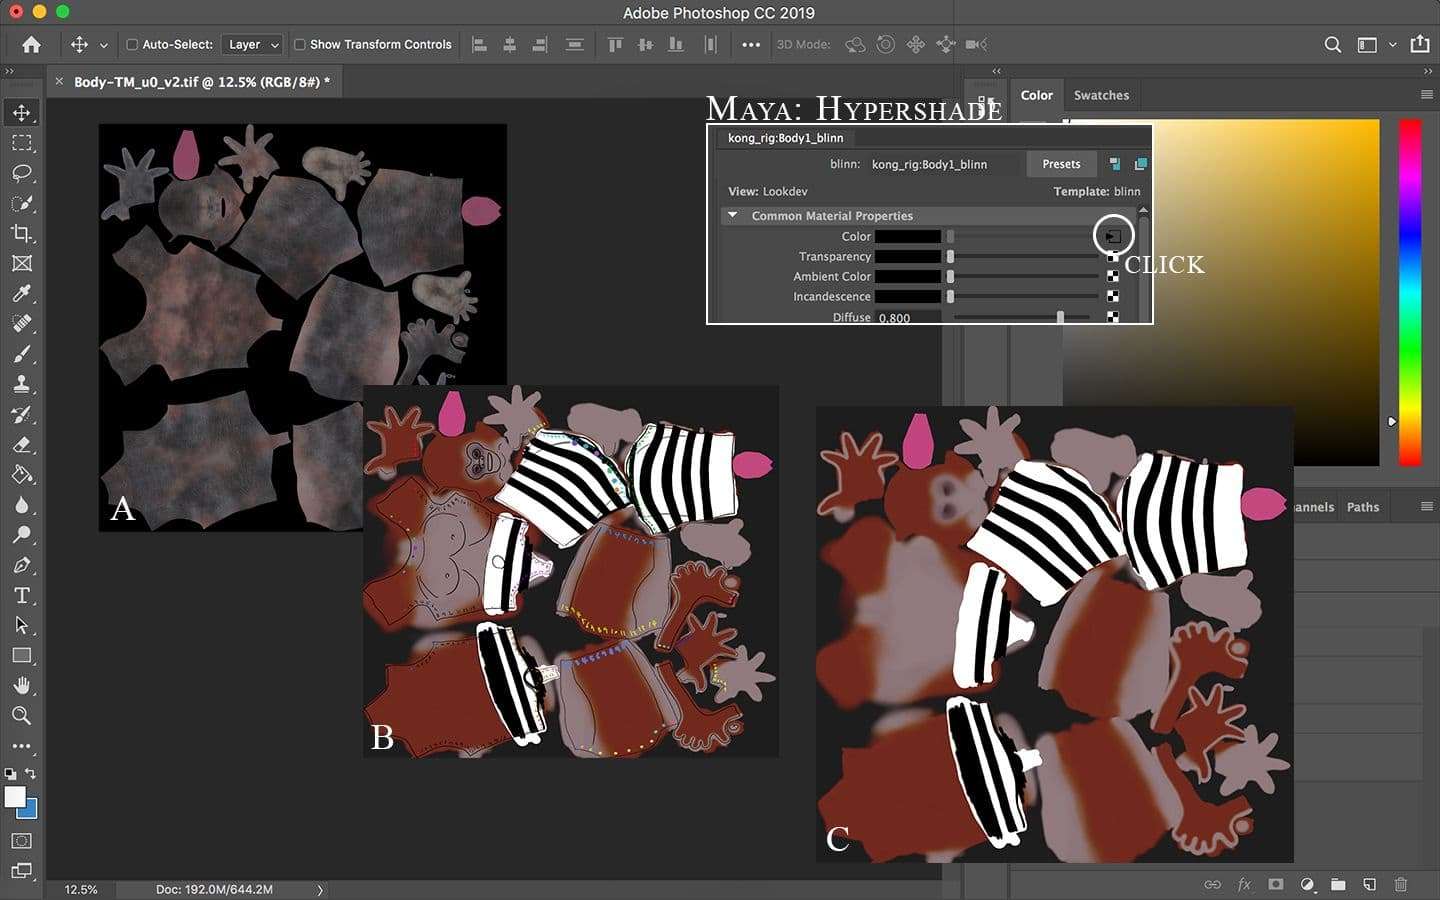
I first opened the Hypershade in Maya, and clicked the material assigned to the character. Then, I clicked the black arrow in the rectangle icon to find the location of the TIF file of the original texture. I then opened the TIF file with Photoshop and created a new layer at the top of the original texture to separate my drawing and the original texture. I created a guideline with numbers and outliners to paint at the right position. Once I finished drawing, I hid the guideline and saved the Photoshop file. I hit number 5 and then 6 on the keyboard in Maya to refresh the texture and to switch to the modified version.
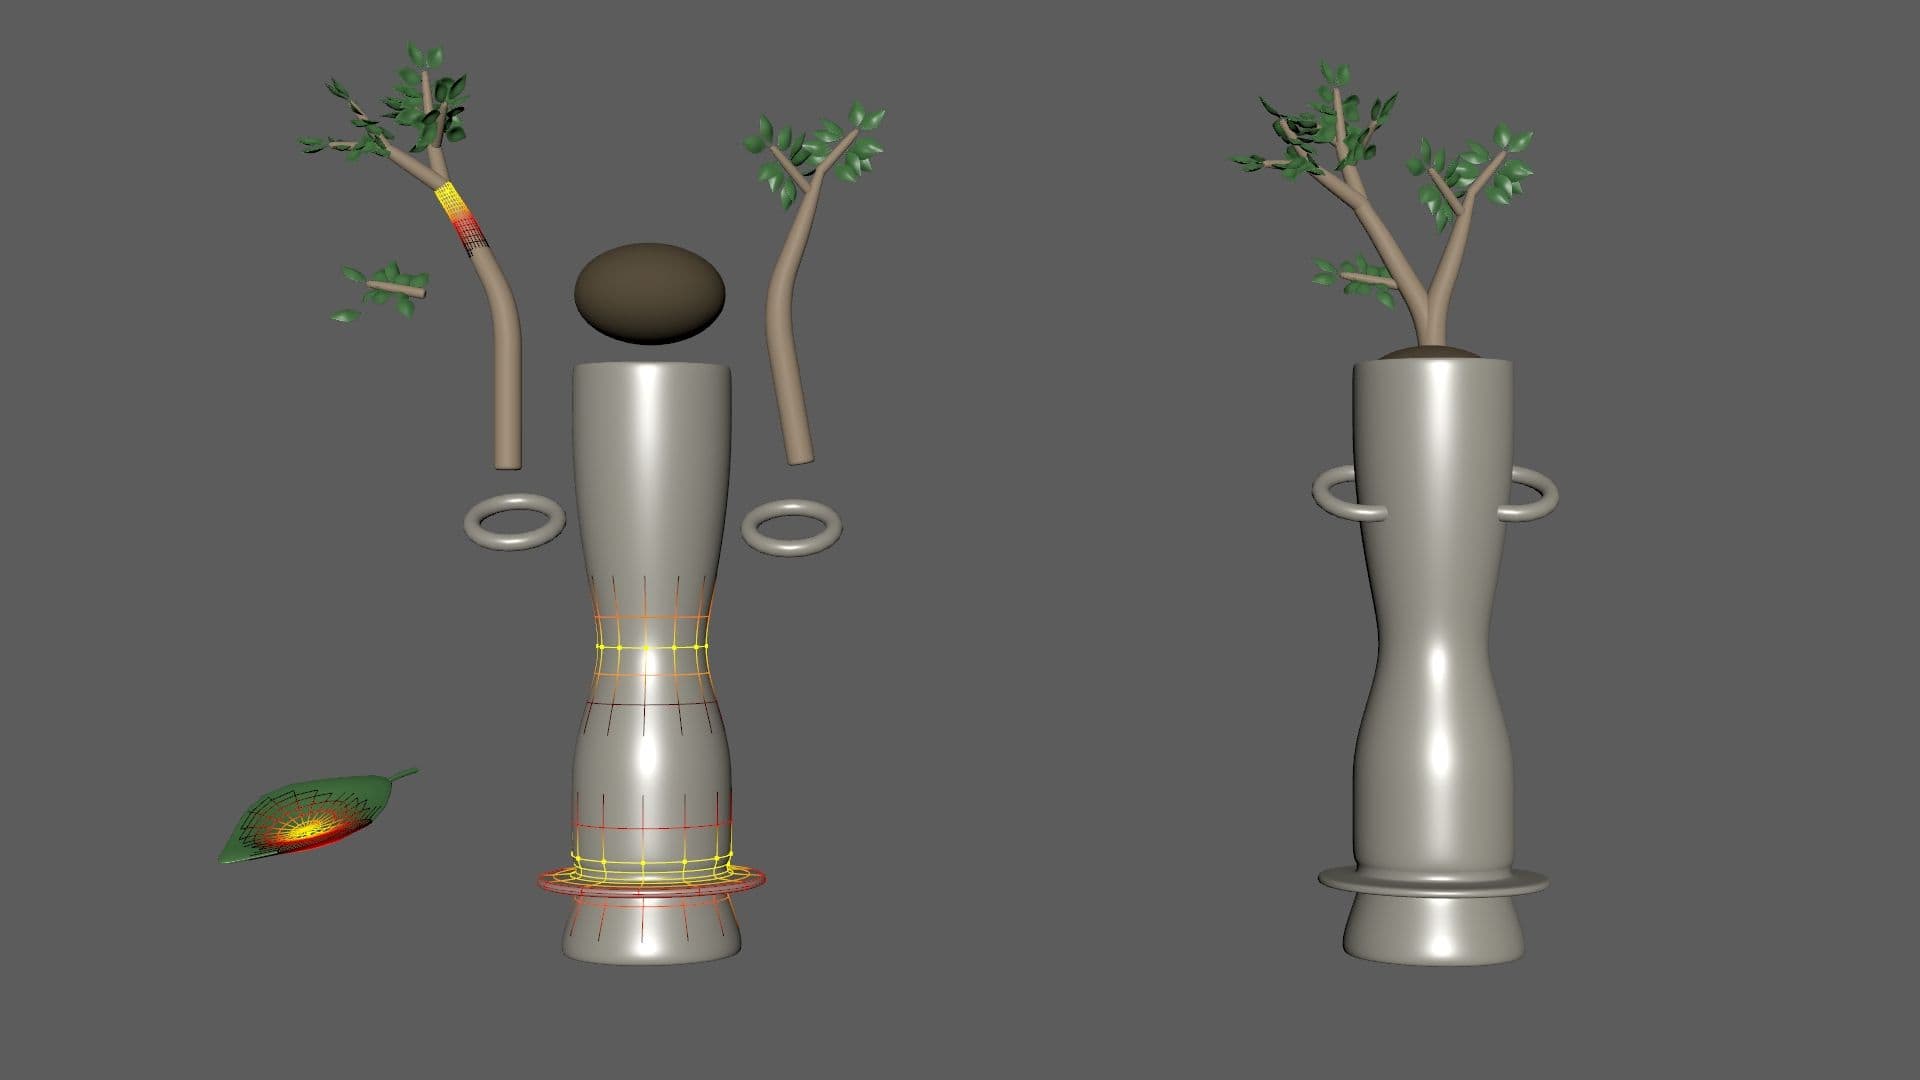
Creating props for an animation shot is optional, so I planned to design the props as simple as possible. I didn’t think I had to make realistic looking objects, so I tried to give each prop a unique characteristic without adding too much detail.
A tool that I used when making props was soft select mode. It was very effective to sculpt any shape that I wanted. With the tool, I could actually move not only the selected vertex but all vertices in the colour zone when I modified the shape. The way to use it is to hit B after selecting vertex. Also, I could scale up and down the zone by holding B first and the middle mouse button and moving the mouse up or down.

To make the clothes and scars follow the geometry of the character, I had to select the clothes, scars, and the geo. Then, I applied Wrap under Deform. I found Max Distance under OUTPUTS in the channel box and changed the value to 1.8. Once I used Wrap, all the options in the Render Stats turned off. So, I also had to check all the options were on, except Hold-Out, again.
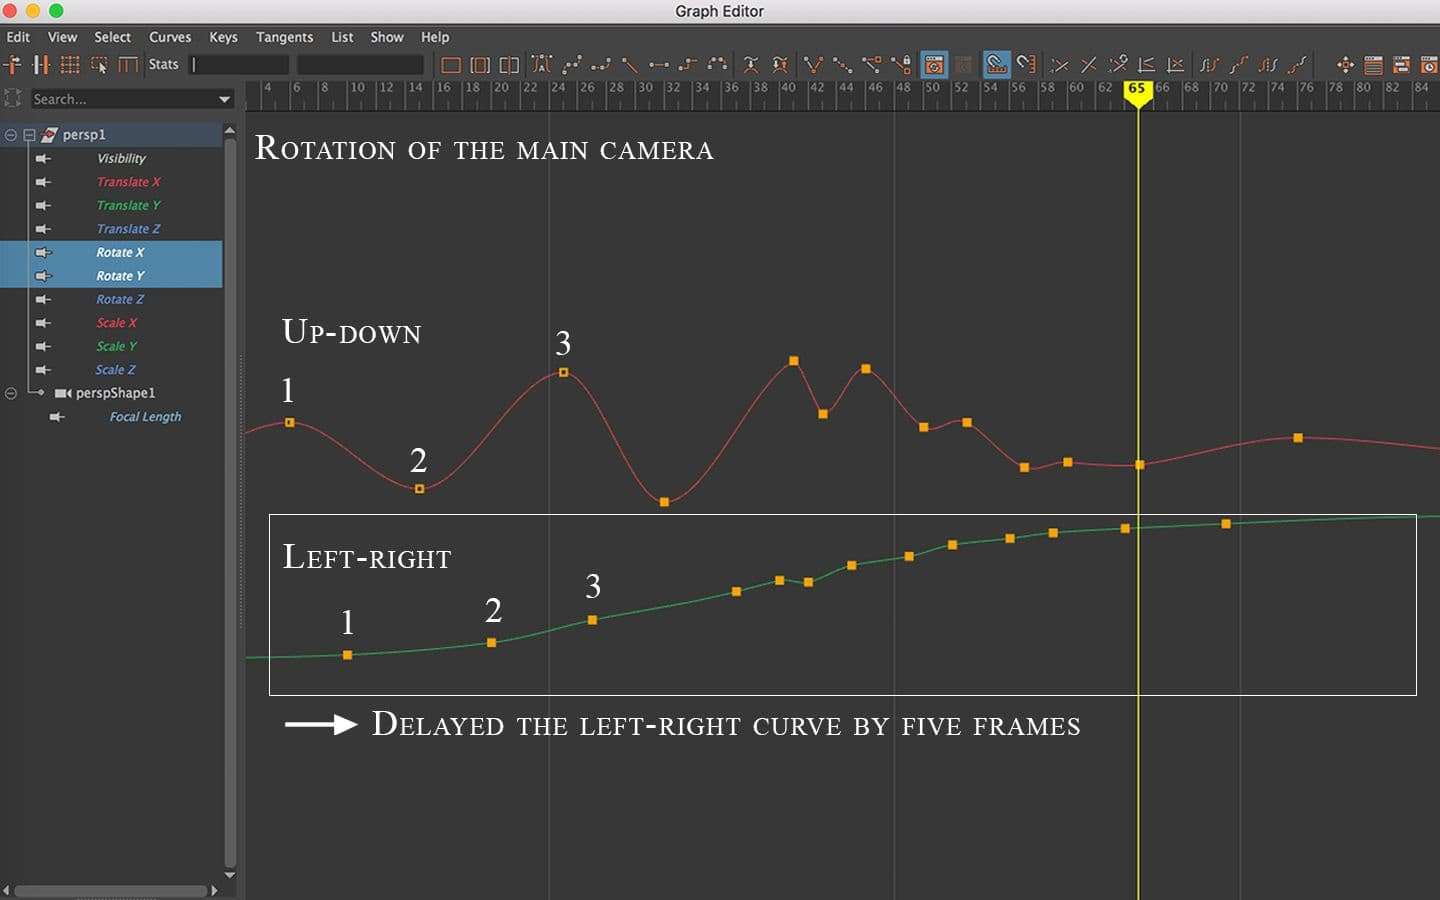
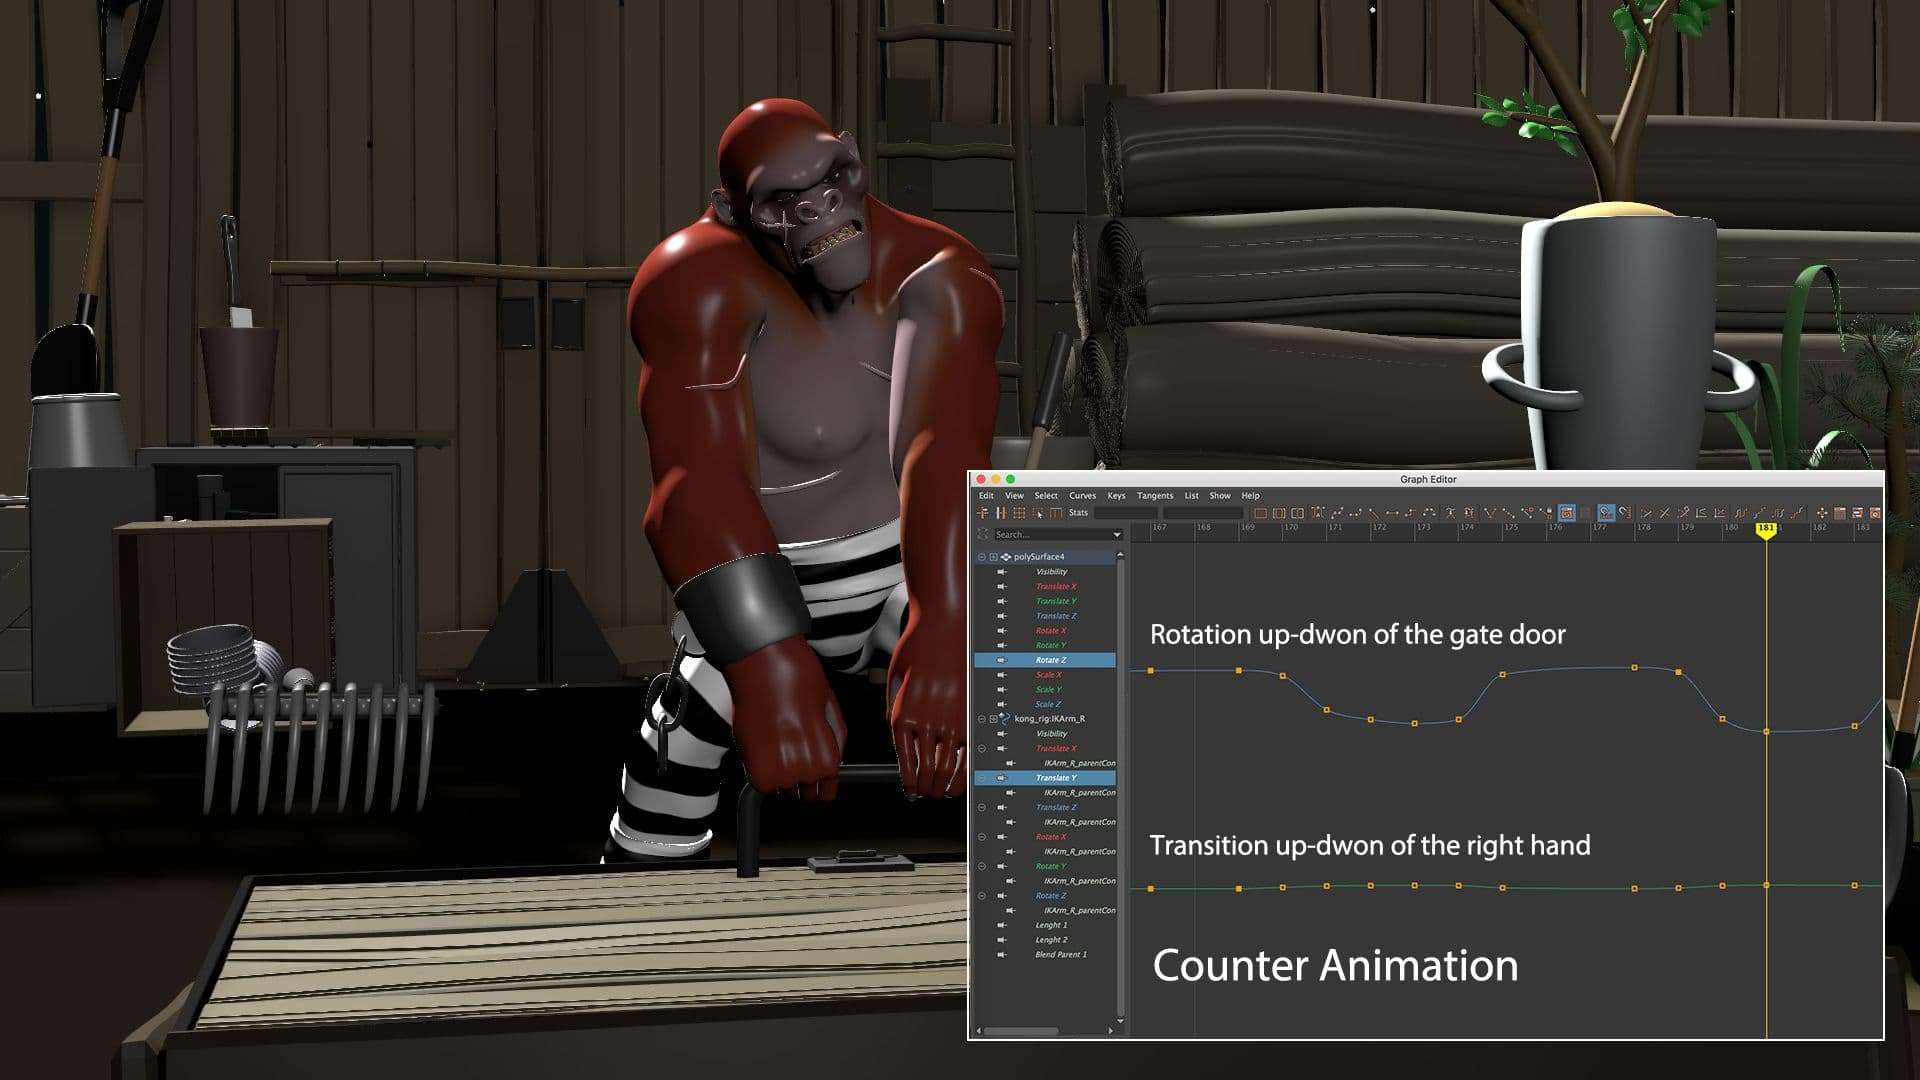
To make a realistic camera movement, I spent a lot of time analysing the movement, I imagined that I actually had to animate a camera man. So, because the camera is on the camera man’s shoulder, the camera man’s movement involves a rotation of the camera.
Based on this fact, I made an easy approach for the handheld-camera movement. It was to overlap the up-down and left-right rotation curve in the Graph editor. Those two rotations combined created a spiral movement in a row like a shaking movement. I first only focused on rotation up-down, and once I finished that, I copied the curve of up-down and pasted it to the curve of left-right. Then, I shifted the curve of left-right back by five frames. And after I did all those steps, I finally adjusted the amount of movement on the keys accordingly.
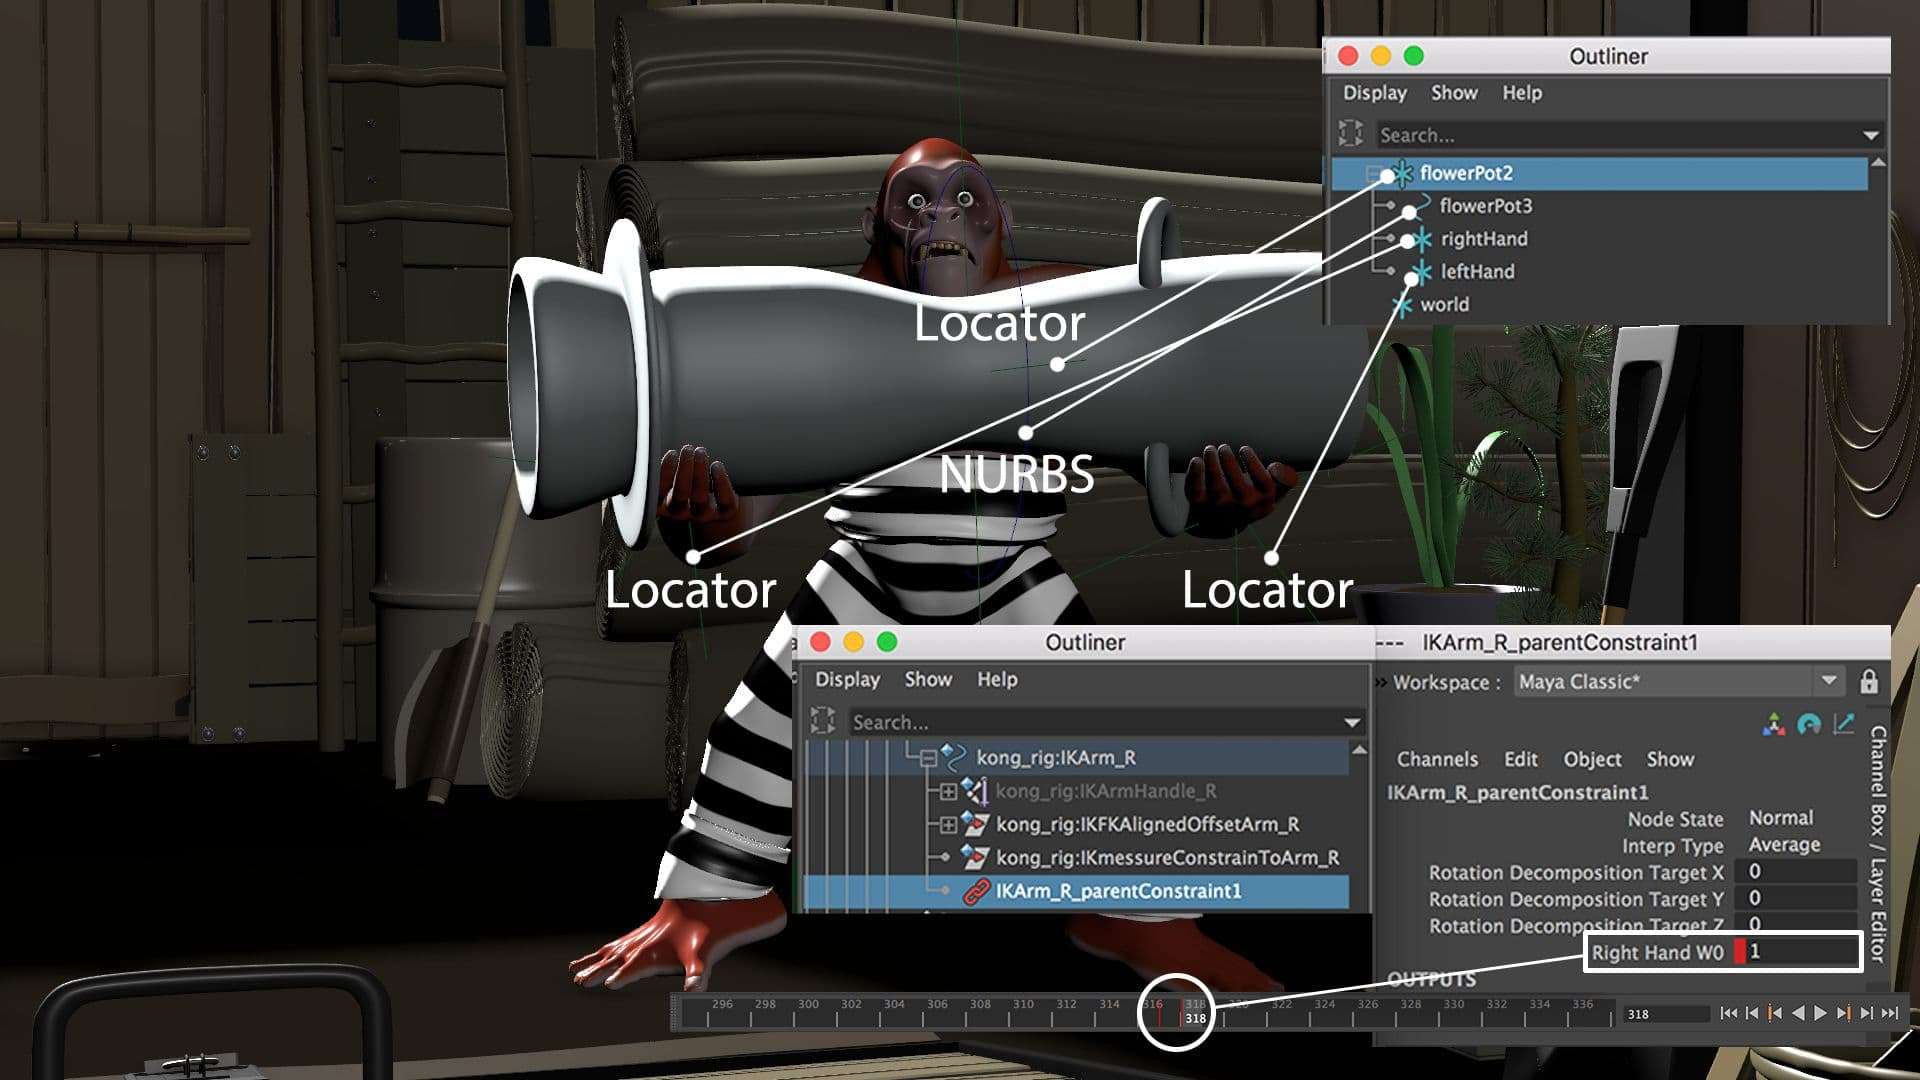
Because I had a lot of interactions between props and character, I set up a construction that I could turn on and off for the character to be free from the constraint when he moved around, and back to the constraint when he lifted the props. Also, I used locators to be able to move the position of his hands as he held the flower pot.
To do that, I constrained his arms to each locator first. Then, I put the locators for his hand under the locator for the flower pot in the outliner so that I moved his hand separately while animating the flower pot. Finally, I set the key on the frame where his hands had to be at the flower pot as well as the next frame. I then changed the value of the Right Hand W0 in the channel box to 0 to turn it off on the first frame, so his hands could move independently until the frame in which the value is 0. And after the next frame in which the value is 1, the hands would follow the flower pot.
Here, the important thing was to finish the part that didn’t need any constraint stuff first, before applying the constraint. The reason is that once I applied it, I could not animate the controller for arms. So, I only set up the constrain and animated the part before the character had to lift the flower pot first. Then, I applied the constrain and finally animated the rest of the part.
There was another part that needed the constraint, but I wasn’t able to constrain the hand’s controllers to another space anymore. So, I decided to work on the character trying to open up the gate with the counter animation. The counter animation is to line up all keys in the different curves and match the one movement to another. In this case, the curve of the hand’s animation can be the same with the curve of the gate’s animation, and they can still move together.
My animation workflow was a layered approach with a movement by movement concept. First of all, I roughly animated his root, head, and eye dots as the main control that I had to focus on first. Because the character had a lot of dynamic movements, I looked at the root as a bouncing ball and tried to register the right feeling of gravity only. Once I finished it, I added arms’ animation for the moments where his hand had to contact with the objects or ground. I then worked on the body mechanic by adding spine animation based on the principles such as centre of body, offset, and overshoot.
At this stage, I didn’t care about the interaction issues between his hands and the objects or ground. The reason was that during the process to polish animation, the accurate position where his hand were supposed to be at the objects, might well have changed.
To round off my animation, I focused on adjusting the entire silhouette as I worked on squash and stretch and found more appealing poses. And after polishing the body enough, I finally cleaned up all the interaction issues and animated his facial expressions.
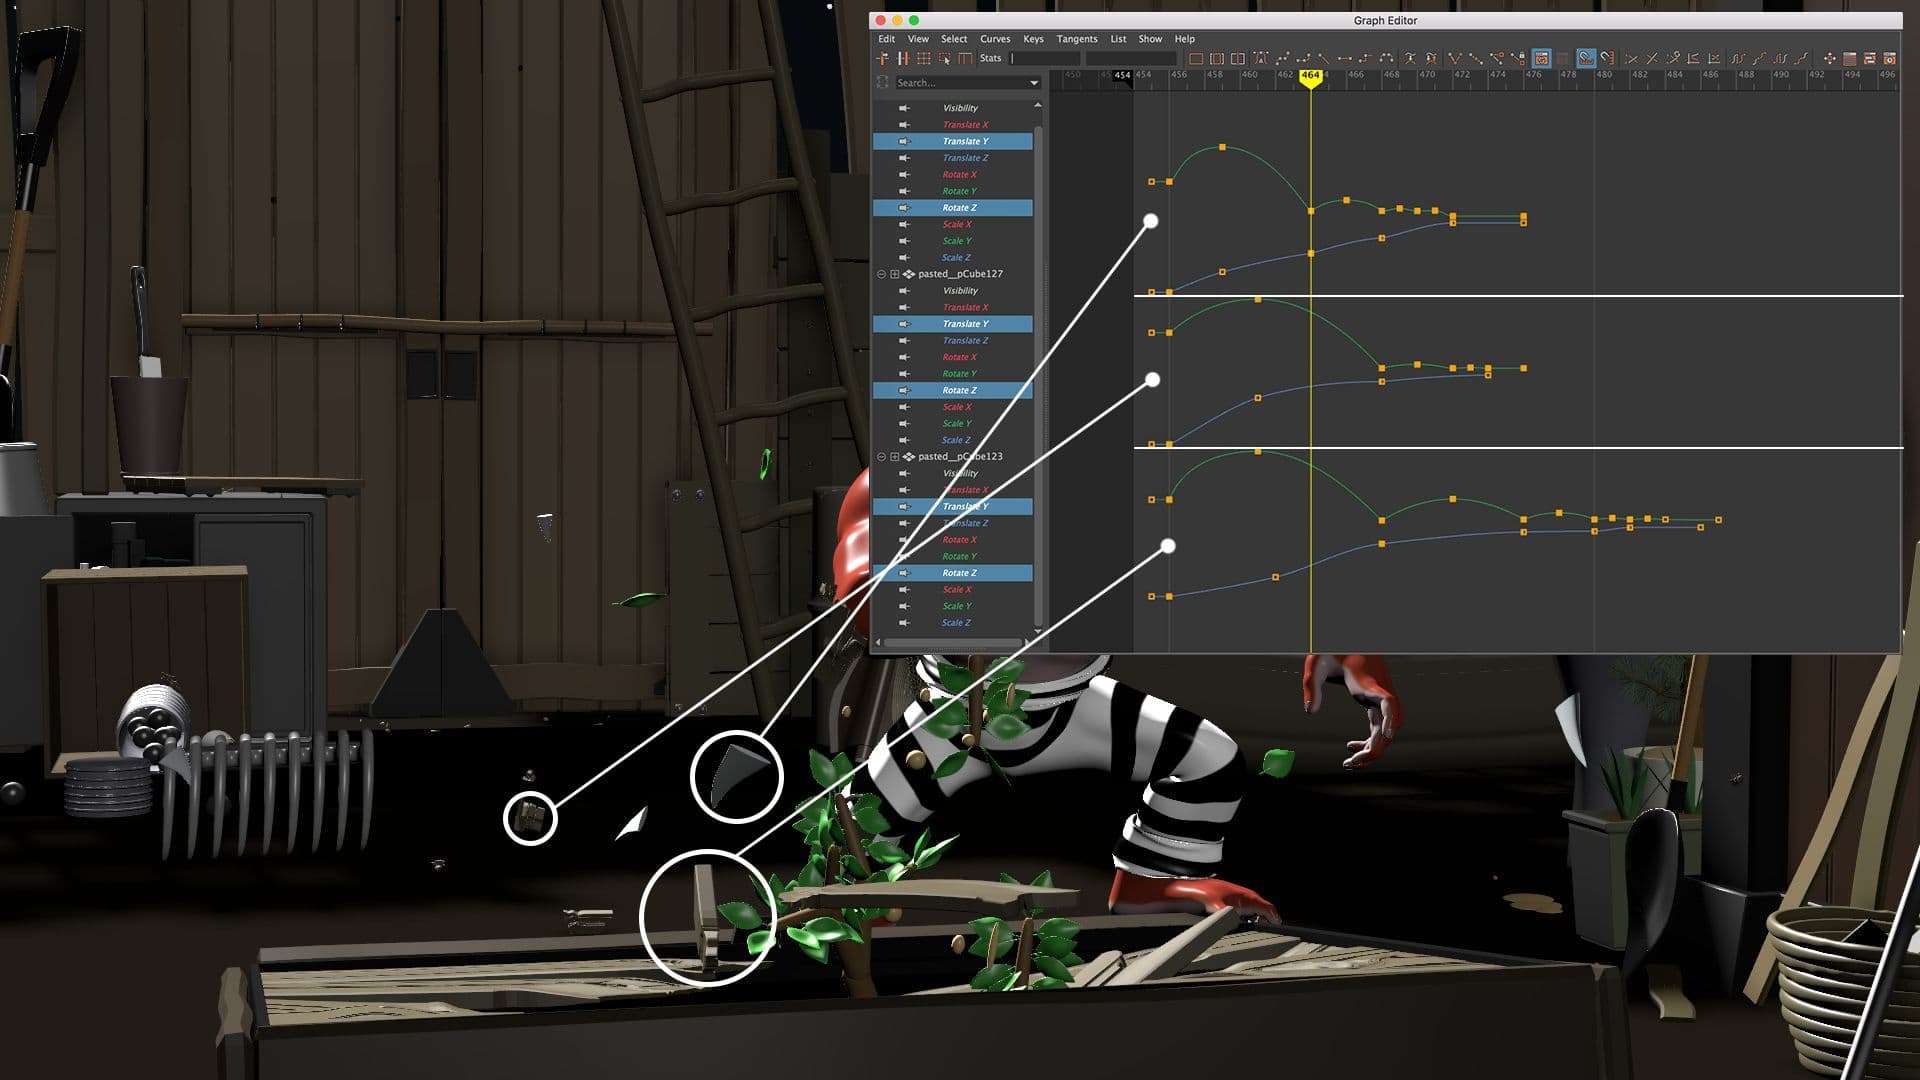
When I animated the objects, I concentrated on the gravity of the objects and looked at them as a bouncing ball. I first worked on the up-down of the object based on the concept of the bouncing ball. I added rotation and transition later under the up-down animation.
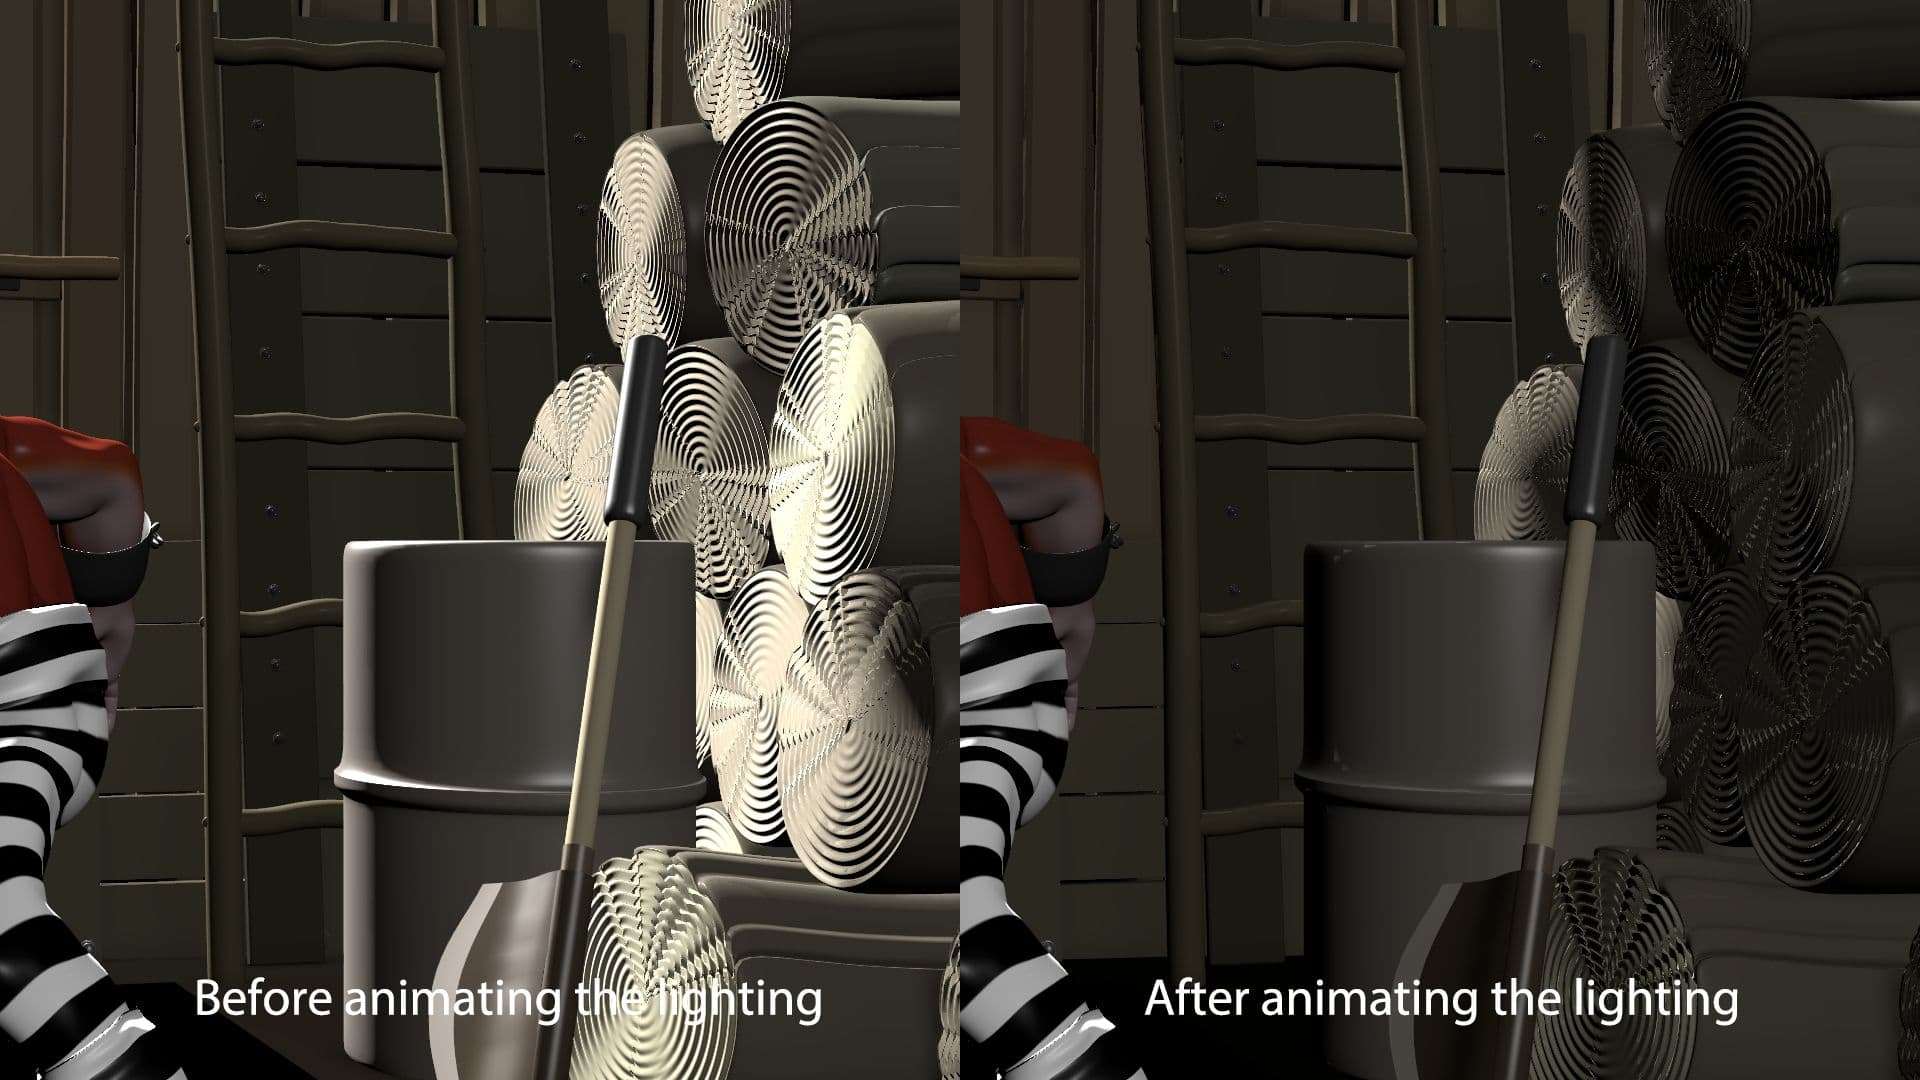
The lighting set-up in my shot looks pretty stable, but it is actually not. I put a strong spot light and volume light above the main door at the beginning of the shot when the chimpanzee climbed up. I then had to tone down the brightness of them and turn on another spot light when the camera moved down and showed off the different props and environment. I switched and animated the lighting depending on where the camera looked at.
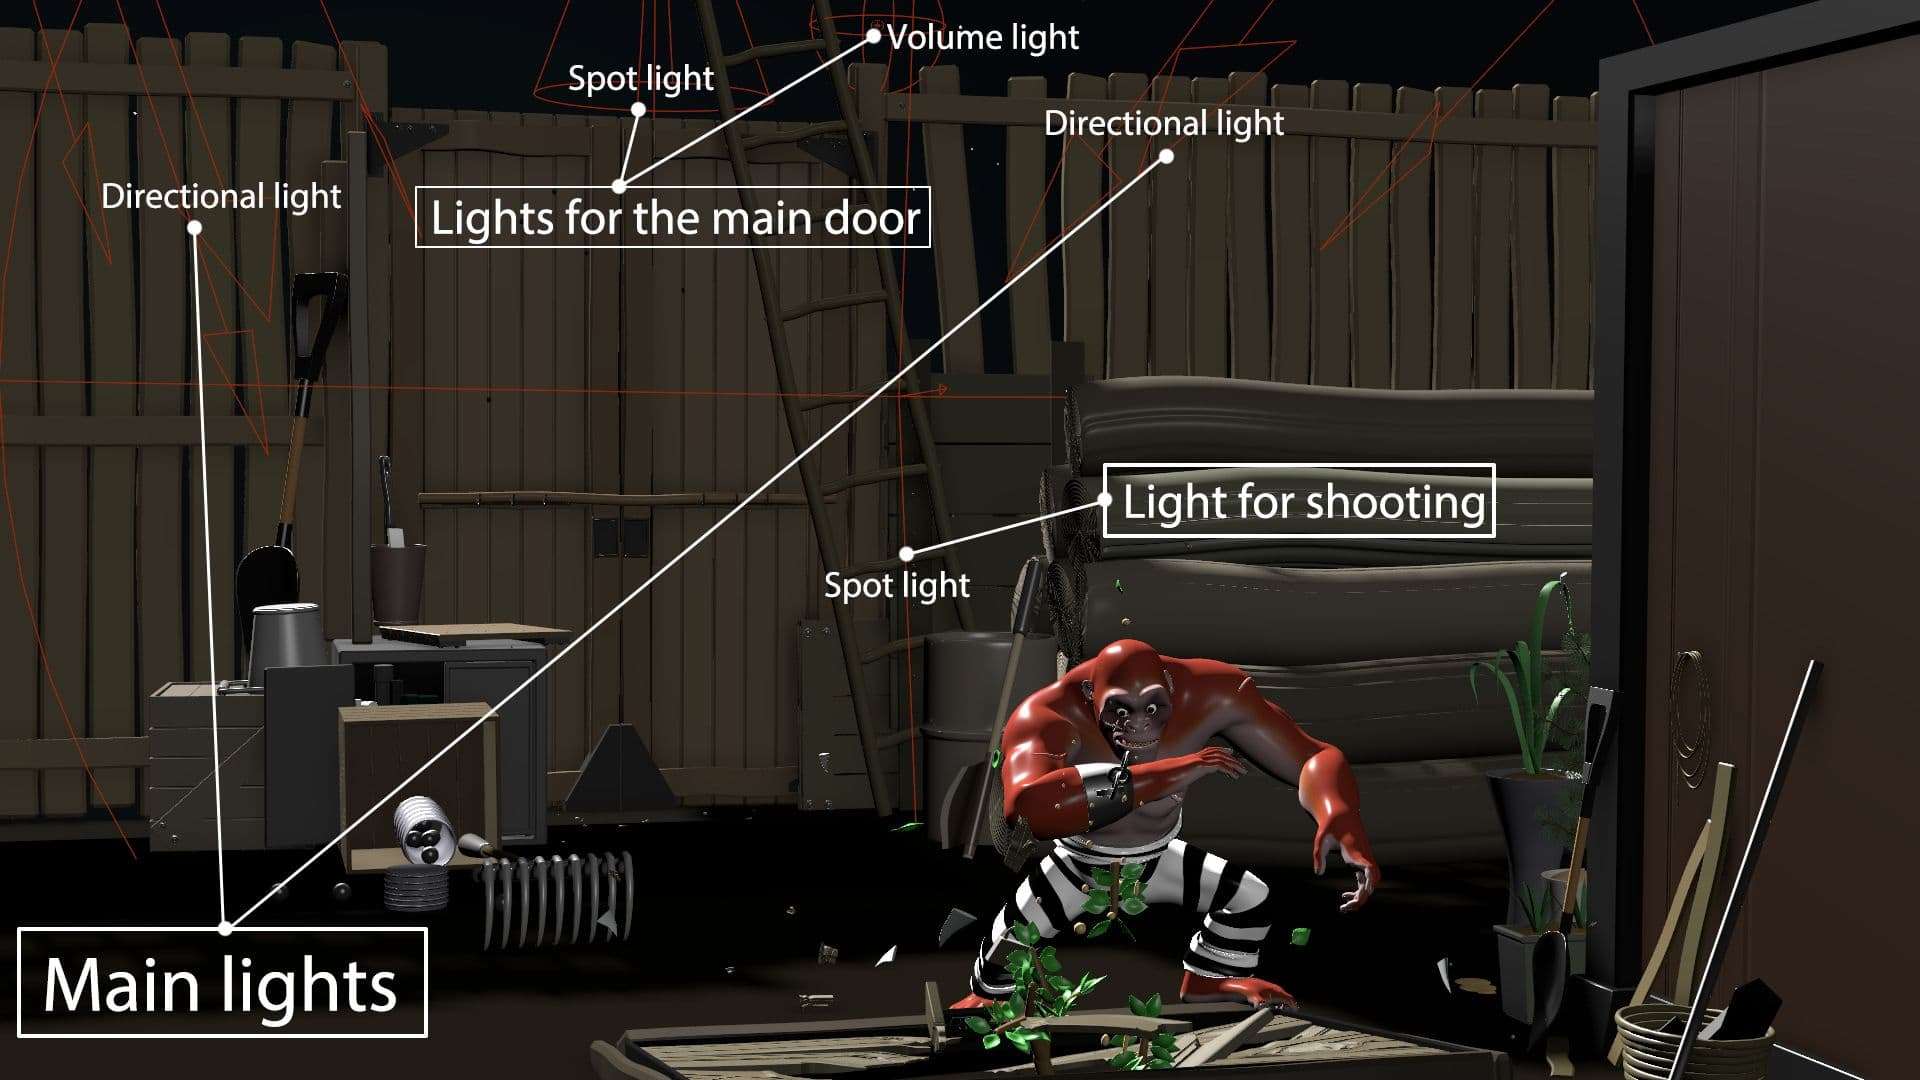
I set up two direction lights for my main light - a counter-light (a moon light) cone at screen left was the strongest light in the shot, and the other one was a reflection light.
I put the spotlight and volume light at the top of the main door and the fence to make a highlight on them. The big spot light in the middle was for creating a spark when shooting a gun behind the main door at the start of the shot. I controlled the intensity of each light in the attribute editor to create a harmonious light setting.
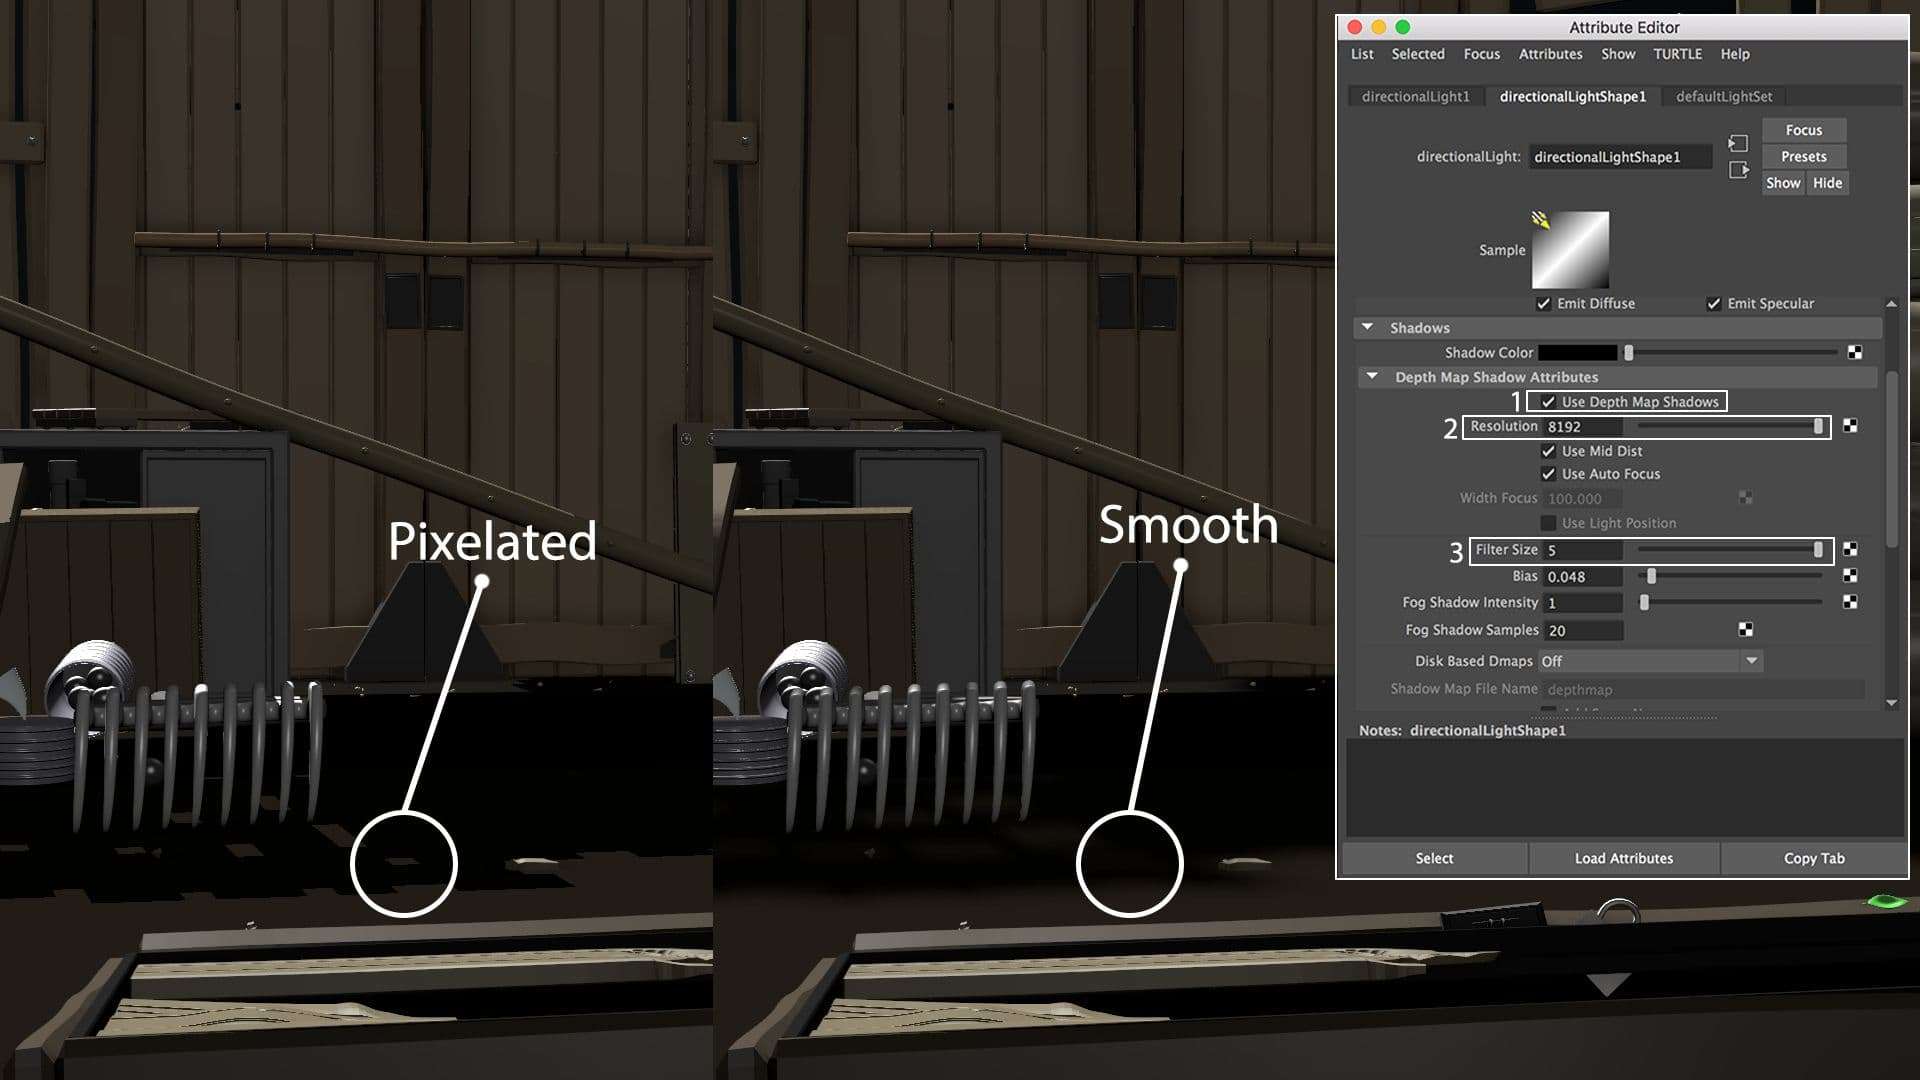
I also checked the setting of Depth Map Shadow Attributes in the attribute editor. To avoid a pixelated cast shadow, I turned on Ues Depth Map Shadows and changed the value of Resolution and Filter Size to maximum.
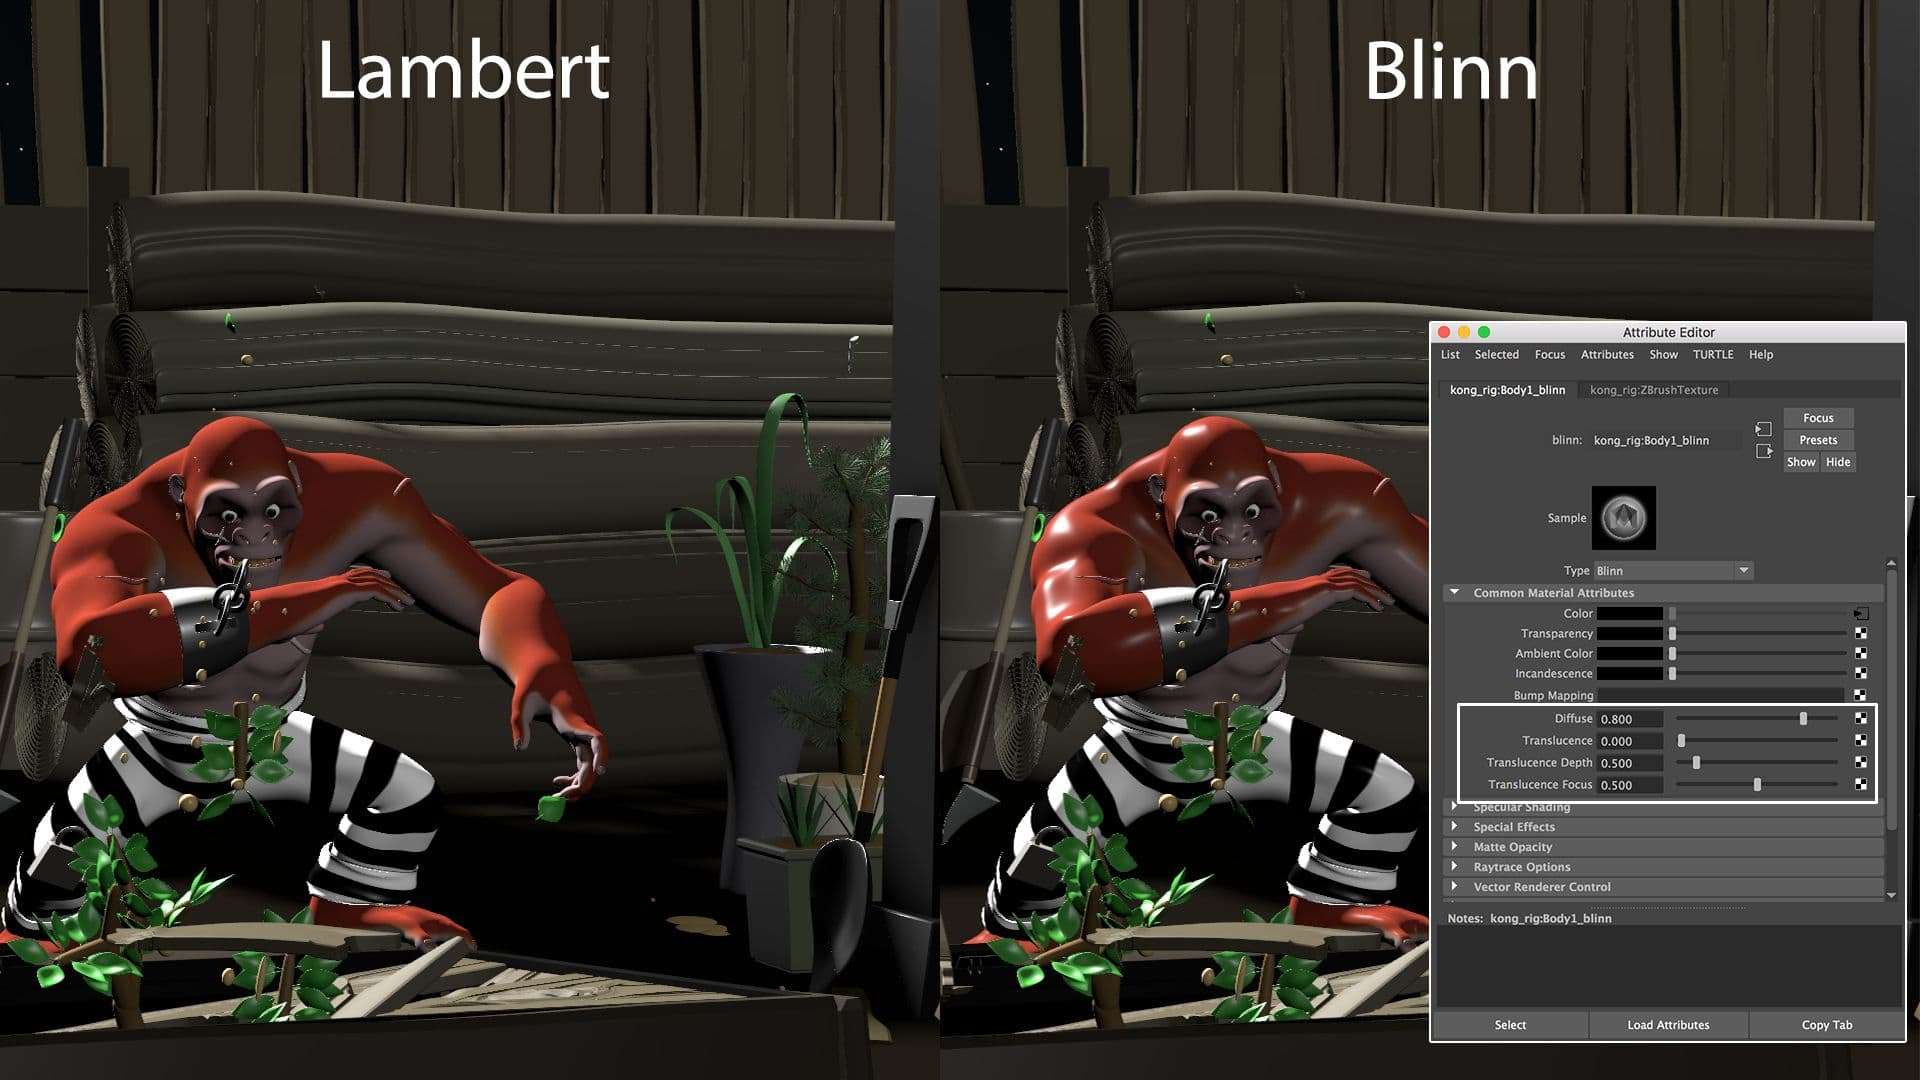
It is always good to switch the lambert to the blinn or phong - I always control the setting of the materials under the attribute editor for objects and the character - it will make the texture look more gentle and soothing.
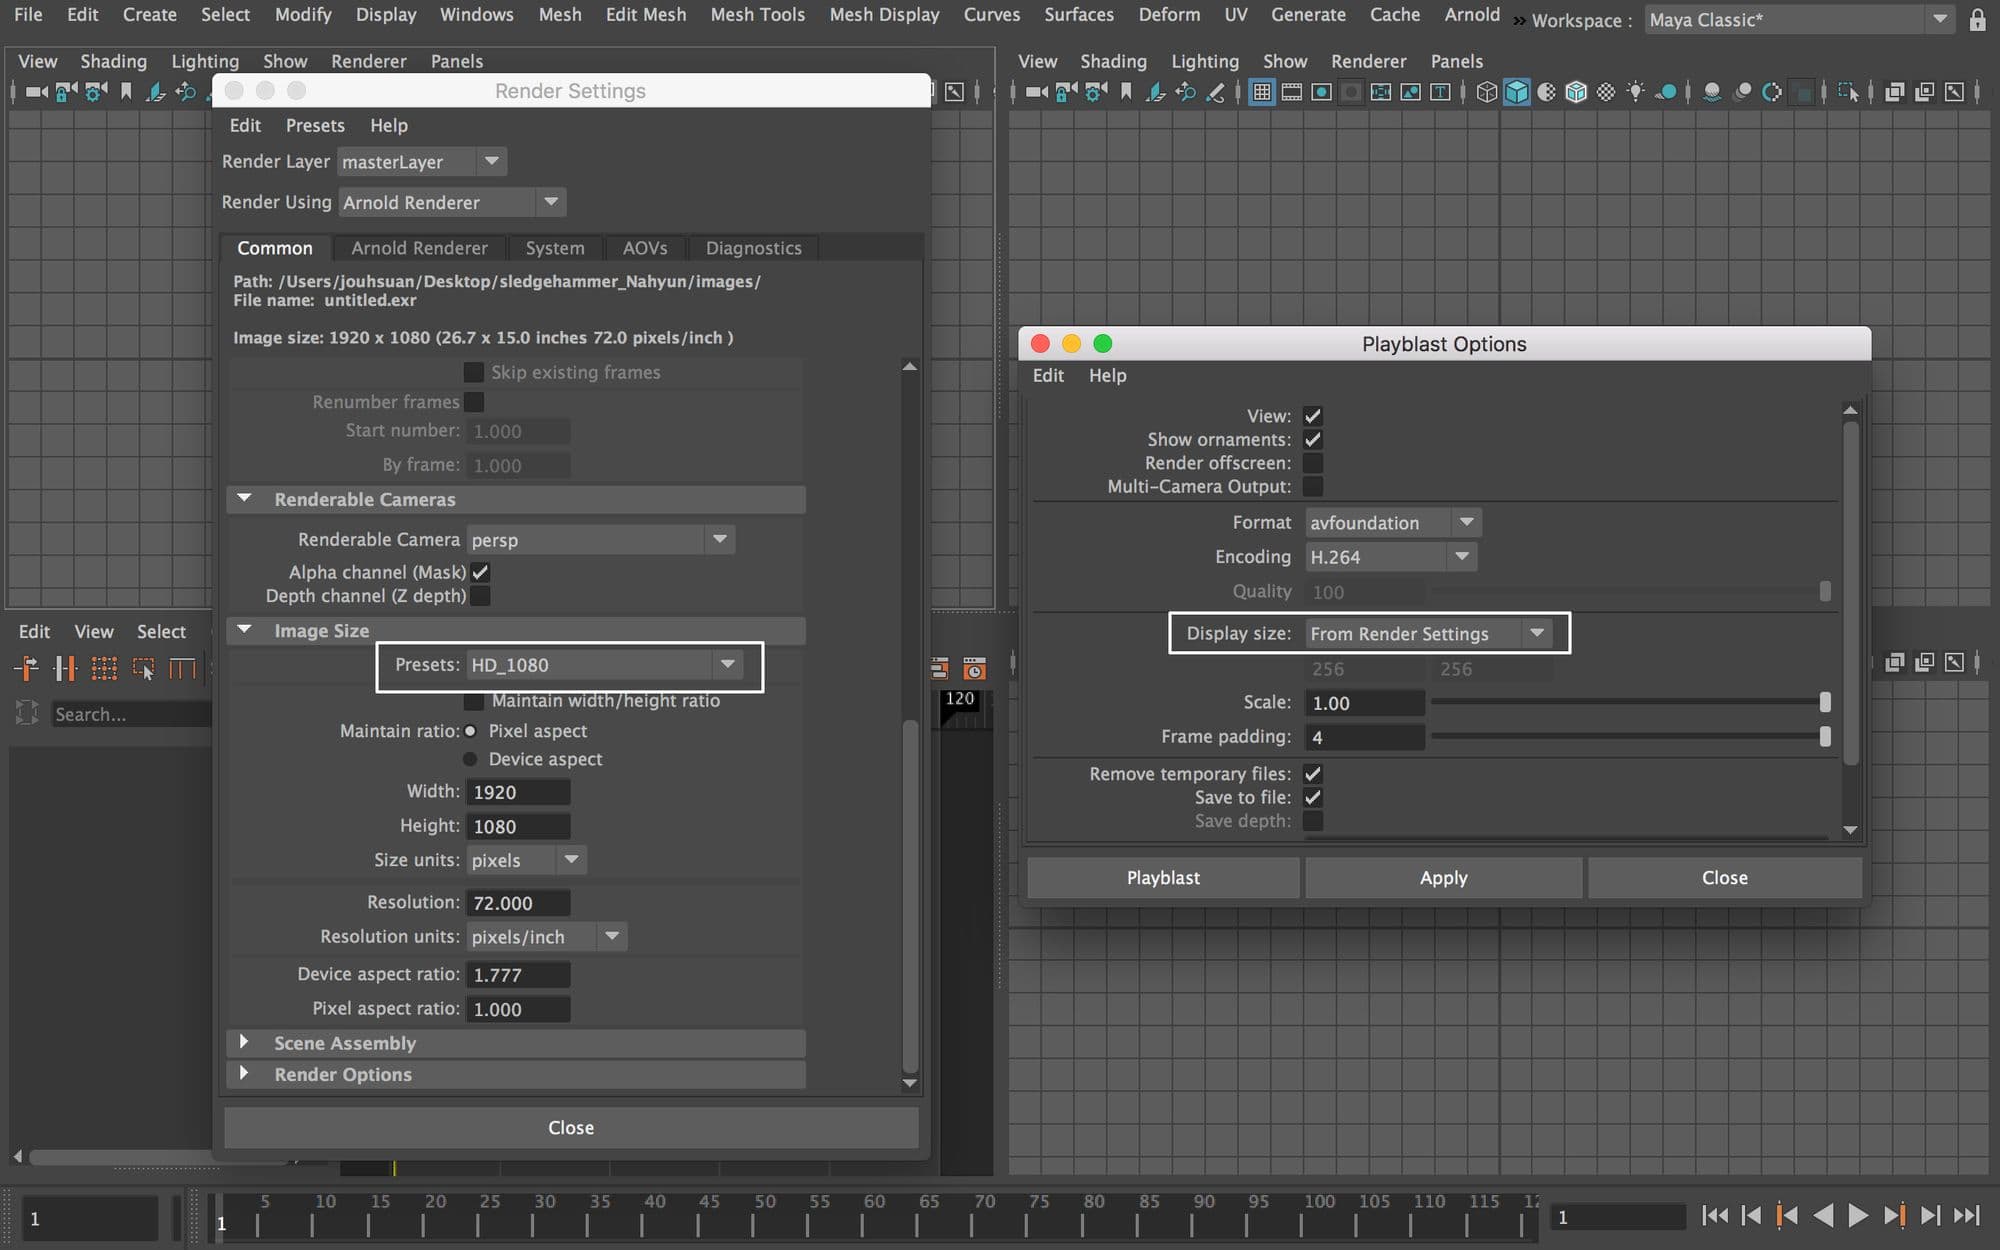
When I create playblasts, I check Presets in the Render Settings and Display size in the Playblast Options. For an animation demo reel, I usually use HD_1080. To import the video with the preferred size, I select ‘From Render Settings’ under Display size.
And there you have it, the steps I took to create my animation shot, "Escape." I hope this inspires your next animation!