How to Create a 3D Game Character in ZBrush
I would advise everyone to do is to choose a subject you are passionate about. Working on 3D characters can easily get frustrating, especially when you’re just starting out.
I would advise everyone to do is to choose a subject you are passionate about. Working on 3D characters can easily get frustrating, especially when you’re just starting out.
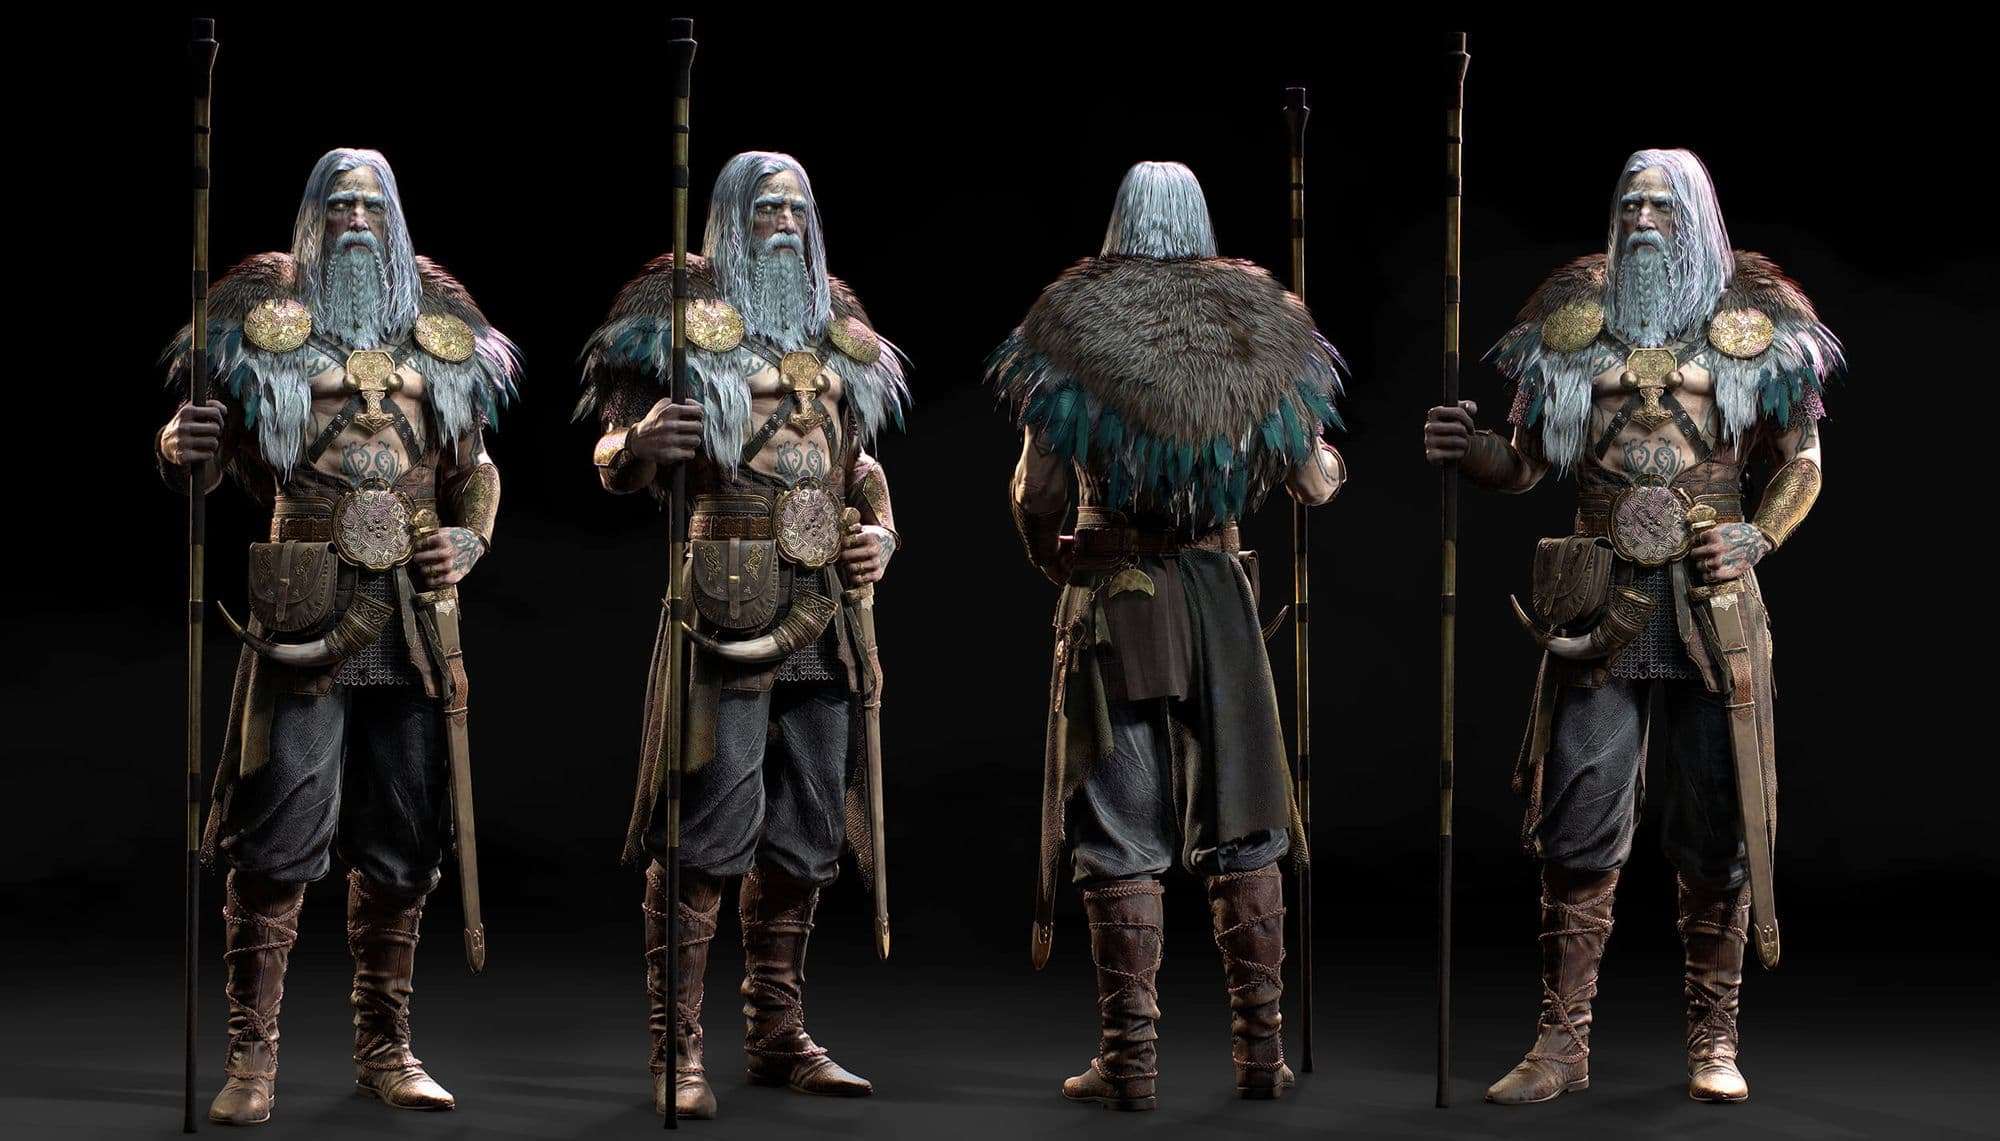
Bianca Bălăşoiu's first encounters with 3D happened 3 years ago when she started university. Back then she imagined herself working as a concept artist for games. It wasn’t until the end of her second year at university that she realised that characters were her true passion. Bianca didn’t have a fine art background and knew very little about 3D modelling and sculpting in general. So, she started her journey a little confused, but very determined, to create her own compelling game character. We thank Bianca for taking the time to share with us how she created a 3D Game Character in ZBrush.
First thing's first! Something I would advise everyone to do is to choose a subject you are passionate about. Working on 3D characters can easily get frustrating, especially when you’re just starting out. I feel like having a specific goal in mind keeps me motivated.
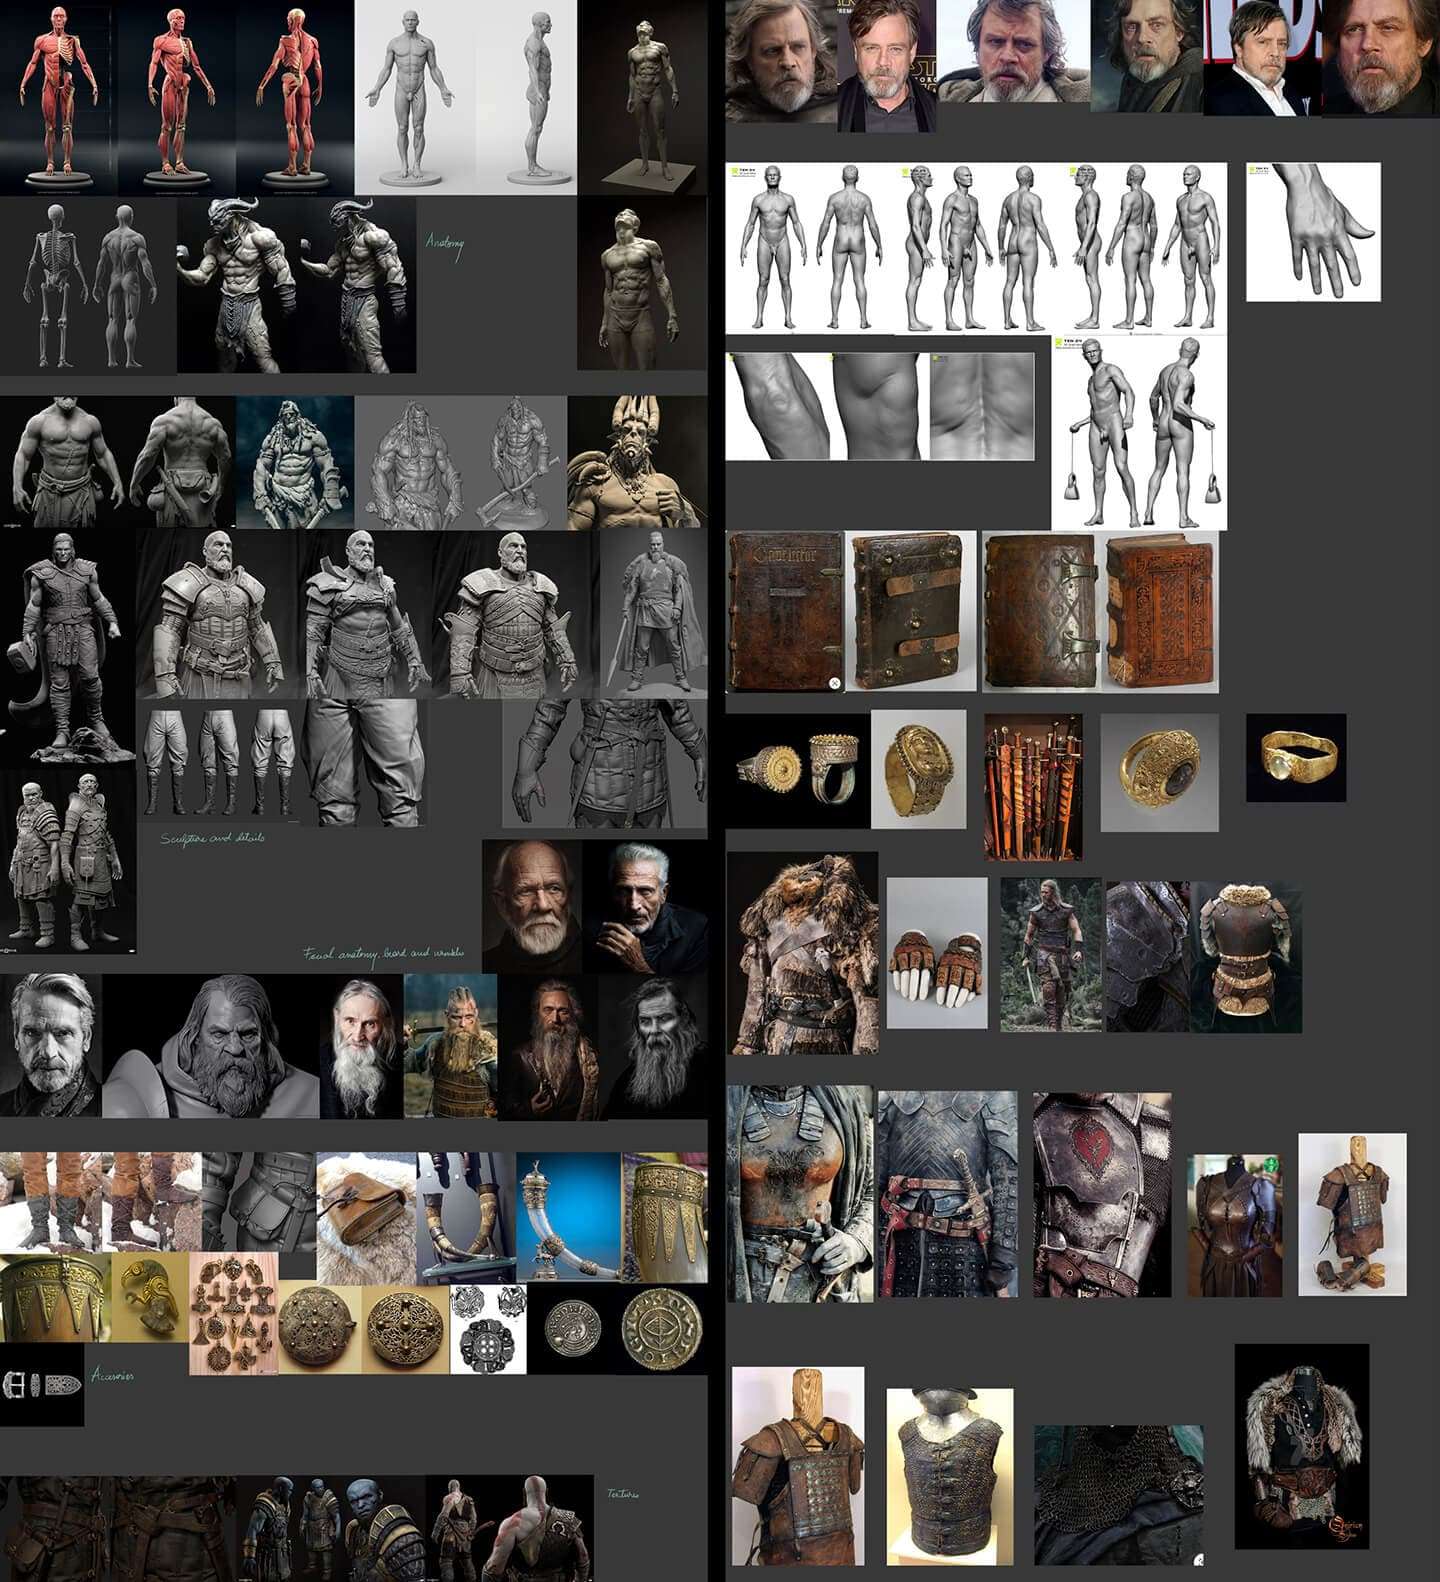
The first step for me is gathering my reference images. I usually go for both real-life references and work produced by other artists that I find inspiring. The latter, I use as a reminder of my initial goals. They also help me learn how more experienced artists make their characters stand out.
The majority of my references include anatomy. I believe there is no secret shortcut to learning how to sculpt the human body other than observation and practice, so it is a good idea to find pictures taken from different angles and take some time to study how something is built and how it works. In addition to that, I think about the background of the character in order to understand what frame the character should have, based on their occupation or story.
I started sculpting the body in ZBrush from Zspheres. Most of the parts were done in ZBrush, aside from the base of the horn, the sword, and the leather bag, which were made in 3ds Max. Since I was going for a realistic character I simulated all the cloth parts and boots in Marvelous Designer.
After I brought the clothing from Marvelous to ZBrush, I spent some time adding tertiary detail-small folds and wrinkles. Another great idea would be, as one of my tutors suggested, to look for wrinkled paper textures and use them as alphas to add some break-up to the material.
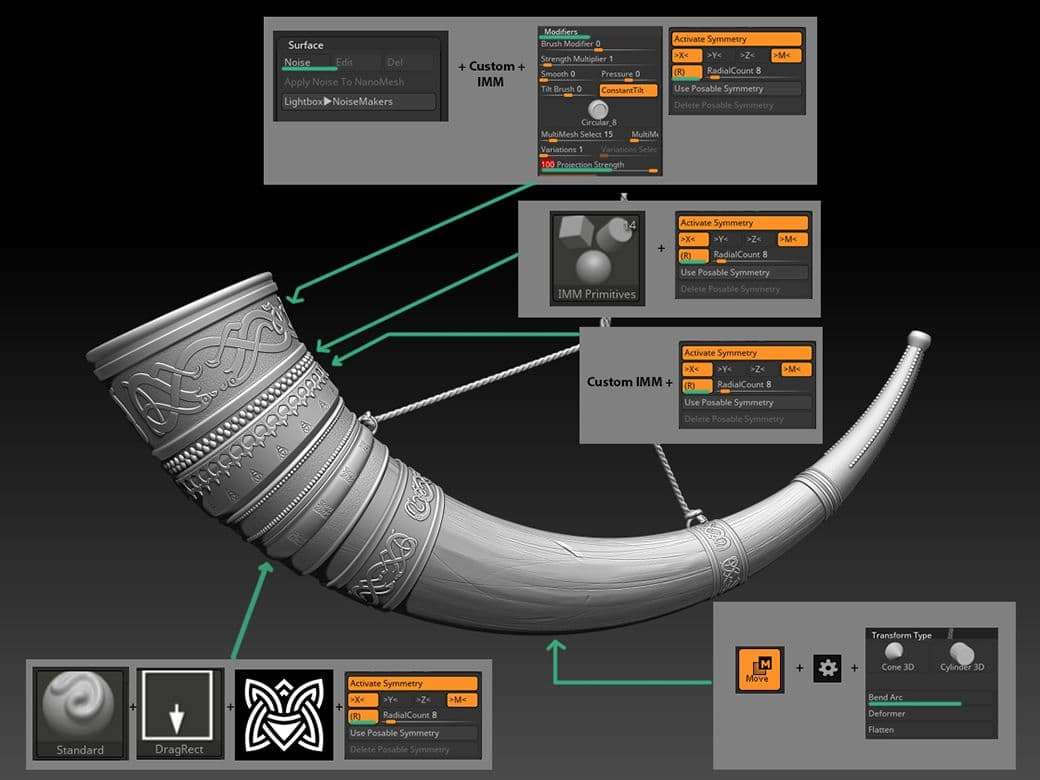
For the horn I created a cone in 3ds Max. I duplicated the poly loops that I wanted to be gold and gave them some thickness with the Shell modifier. I brought the model into ZBrush, subdivided it and started to work on the decorations. I made some insert mesh brushes with the help of an alpha pack I got from Jonas Lau Markussen’s website.
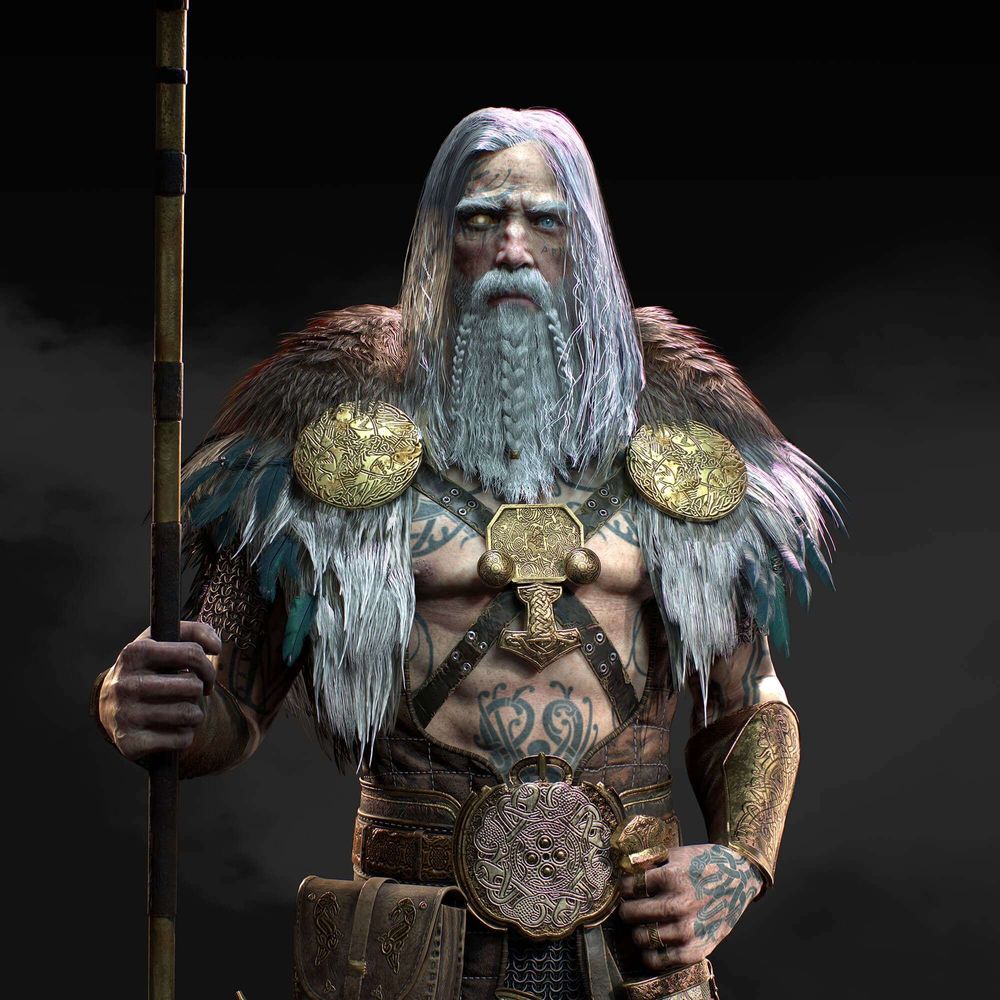
The overall shape of the body was quite a tricky part. I started out from defined abs and arm muscles, but ended up toning everything down and working on a more subtle approach. I somehow wanted to find a middle-ground - realistically, there wouldn't be much definition in an older man, but I also wanted him to look strong.
The face was another big challenge. I worked from a bunch of reference pictures, until one of my tutors pointed out that the concept artist used Mark Hamill's face in the concept. However, a likeness sculpture would have taken me a lot of time, since I have never tried to do one before. Generally speaking, face anatomy is one of my weakest points and I will work to correct that in the future.
I stopped tweaking the features the moment I got a decent looking result and started building the secondary and tertiary details.
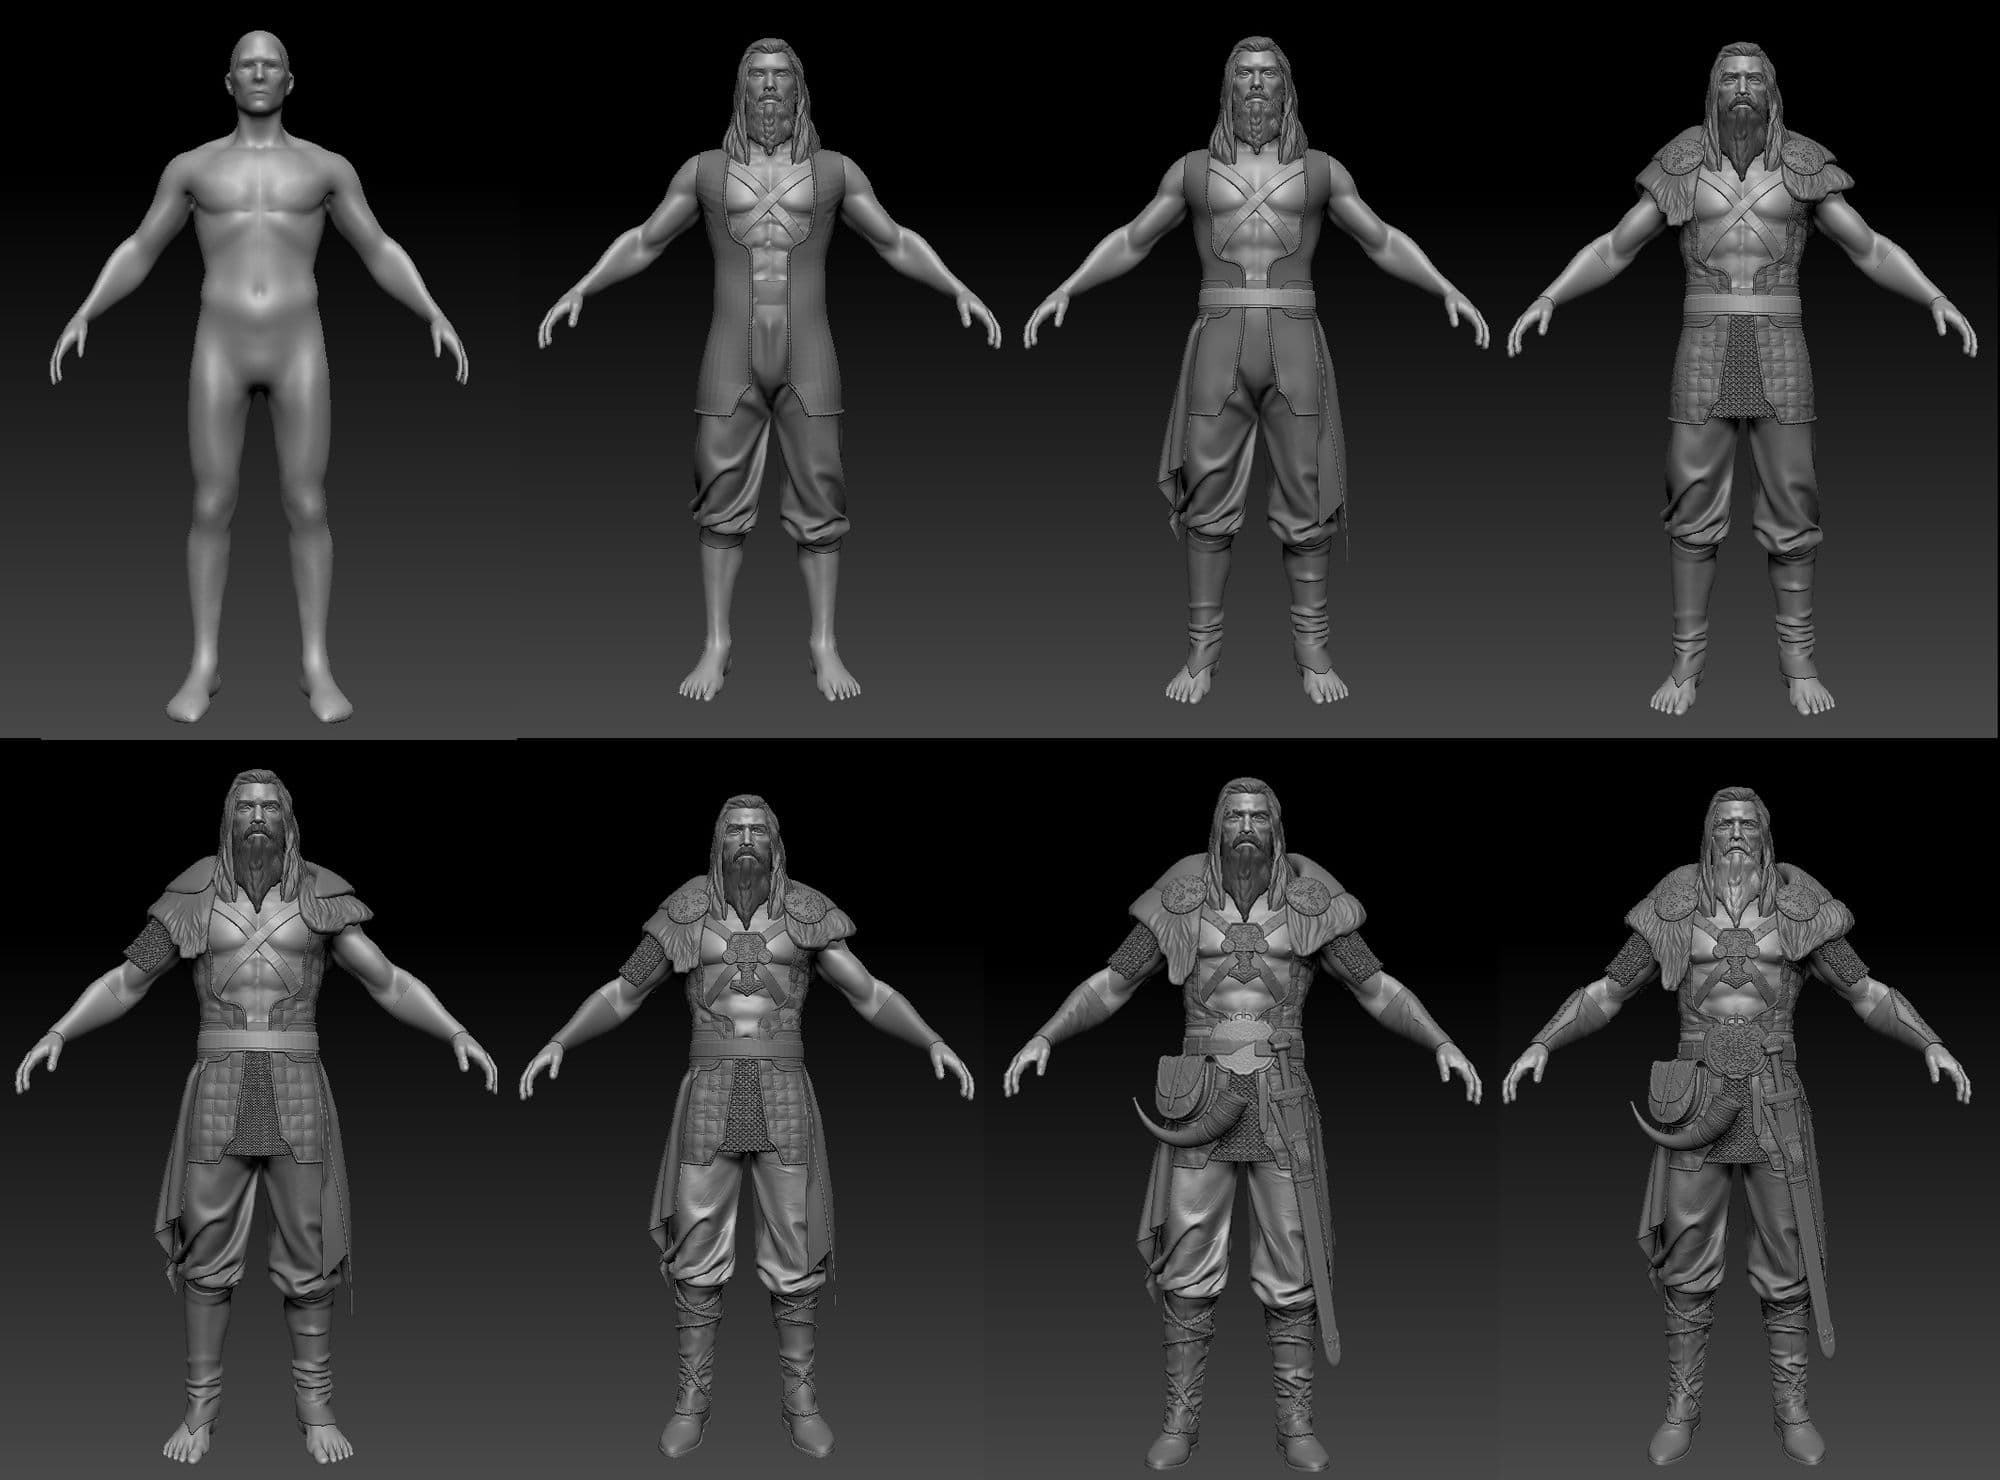
After all the major forms were in place, I went on to refine them. I spent quite a lot of time adding wear and scratches to the leather, knowing that I wouldn't be able to add them in Substance Painter as precisely. I tried to take each individual bit and think about how that piece would age/ where I should add the wear.
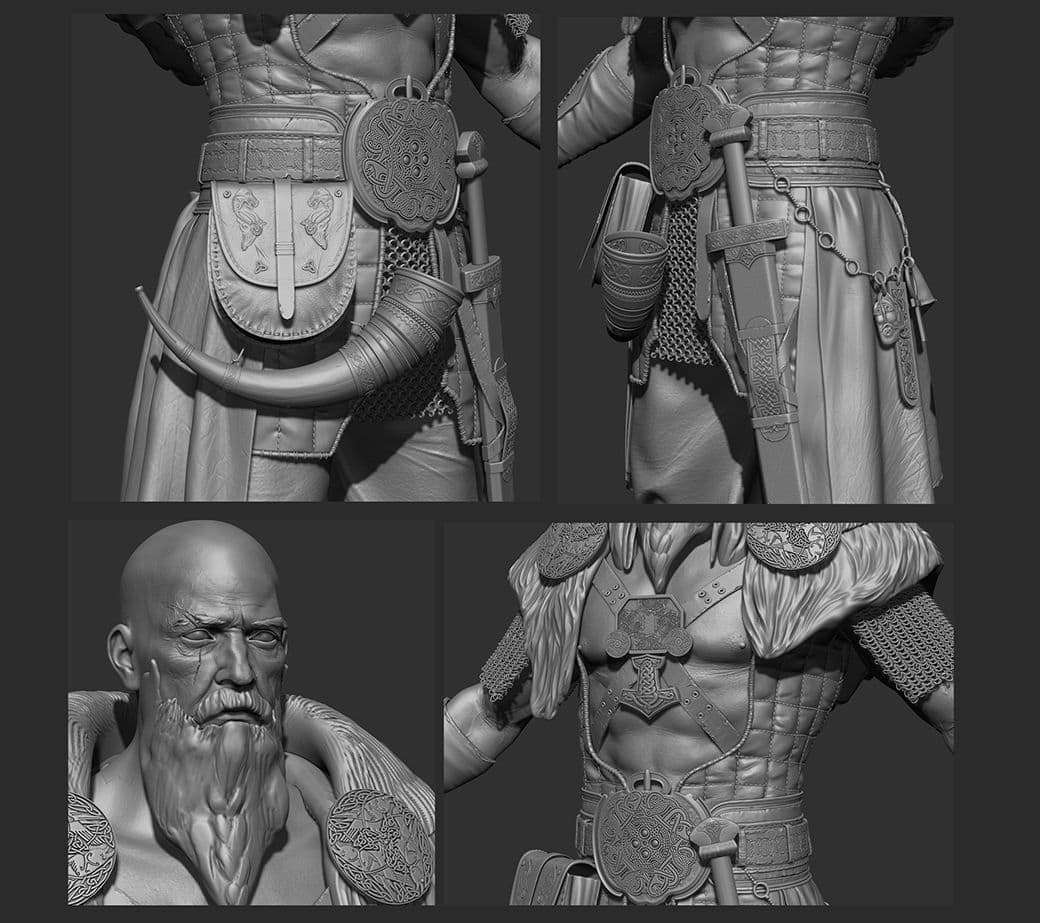
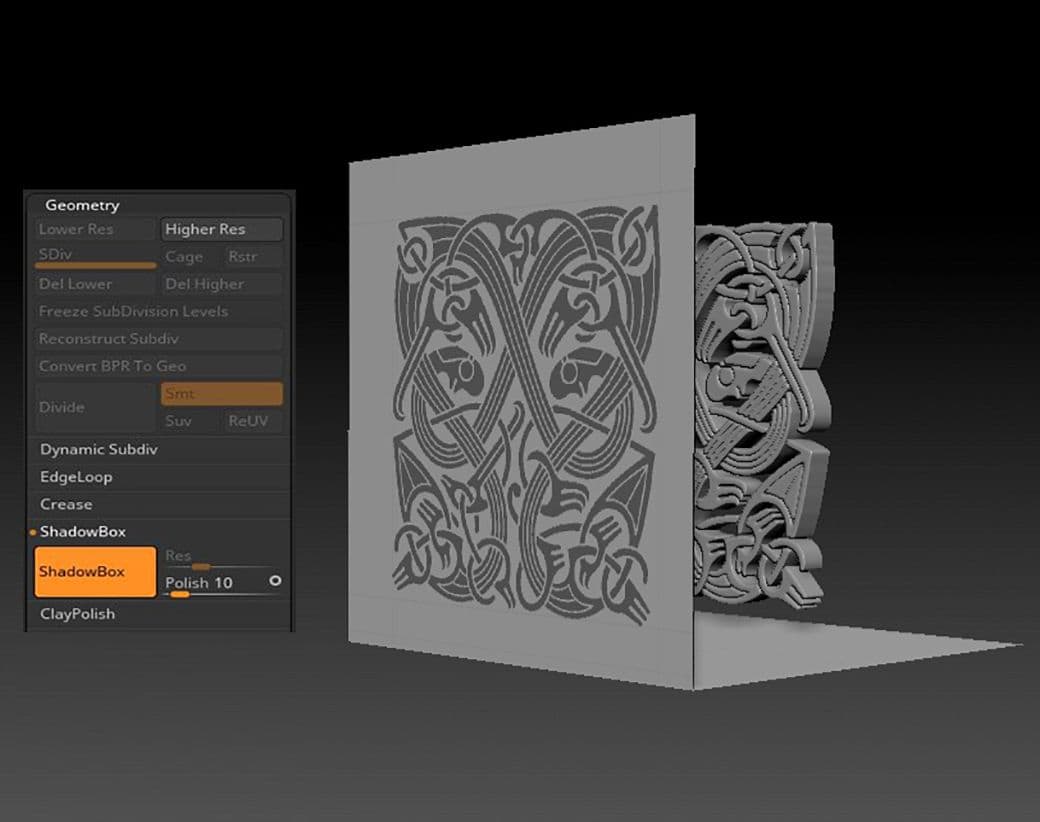
I made the metal decorations (such as the ones on the belt) using Shadowbox. I learnt about it from Michael Pavlovich’s "Intro to Zbrush Part 2", an amazing course that I can recommend to anyone who is struggling to learn Zbrush.
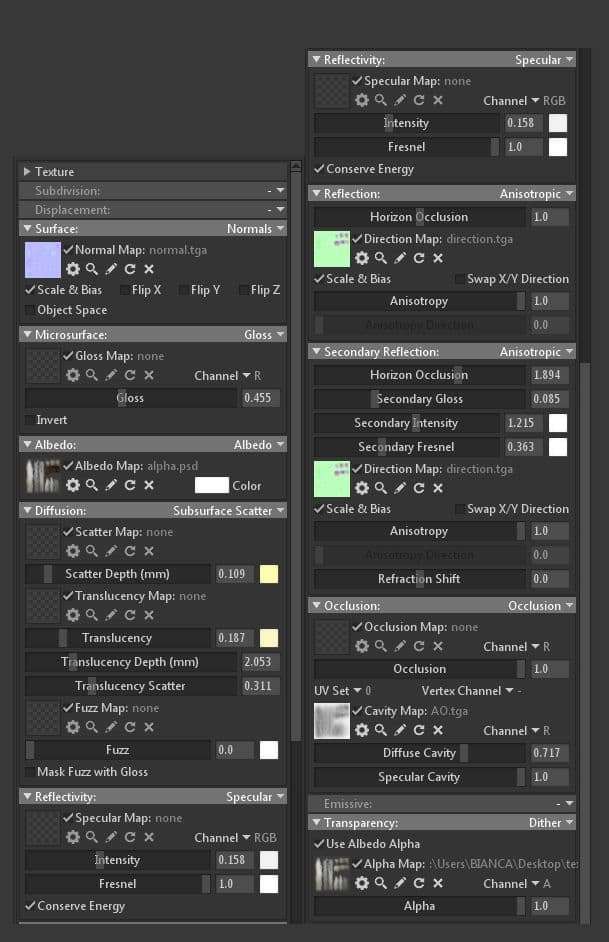
I set up a base material for each surface, consisting of colour, a couple of layers with colour variation, a base roughness value, and height. I try not to go overboard with the colour variation, so I tend to put the layers on Multiply and set the opacity to less than 10%. One of my tutors also suggested looking at stylised assets for colour variation references. For example, for a metal piece you could go for contrasting colours, such as cyan and orange.
I generally leave out the roughness variation as the final layers and this was my approach this time as well. Grunge masks are very helpful in this case. Also, roughness breakup is important. For instance, I added around 3-4 layers with slightly different roughness values to the metal pieces, trying to break up all the straight edges around the corners.
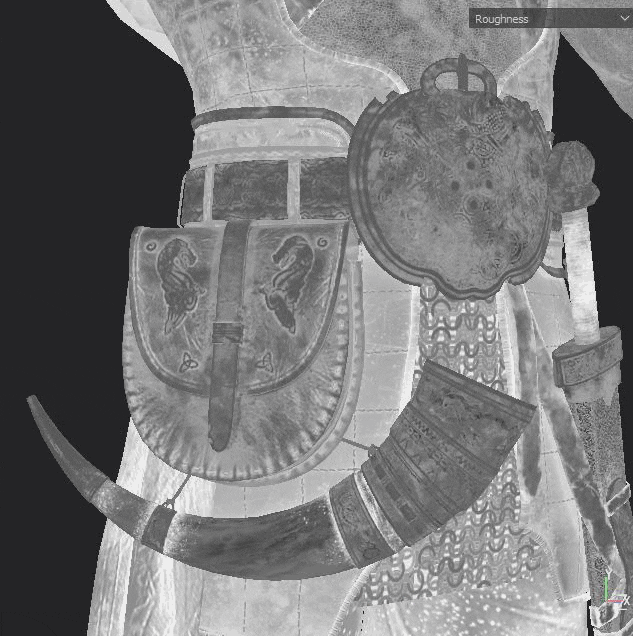
Since my character is wearing several leather pieces, I tried to differentiate each one, not only to make them have a different feel and materiality, but also to make the objects read better.
For the skin I used reference pictures to establish the overall tone. Slowly built up more variation with additional layers - red tints, blue, yellow, orange, brown moles, darker moles and small veins. Magdalena Dadela has a great breakdown on this topic that you can find here.
It took a bit of cleaning until the skin stopped looking blotchy and I could finally start working on the roughness and SSS. After building up the roughness as I'd usually do, I added an additional layer with a lower roughness value and used a mask with a fill set to "cells".
After the texturing part was done, I started generating the textures for the hair cards in Xgen. I’m not an expert with Xgen, and this was the second time I ever used it. However, I’ve noticed that many artists approach real-time hair by generating the textures first, then placing the hair cards manually.
So, I generated all the necessary maps in Maya: albedo+alpha, direction, AO and normal. The albedo and alpha maps can be generated directly, but for the other ones you would need three different materials. I found this great breakdown and the author was kind enough to include the materials so anyone interested could download them and understand how they work. I created an additional map in Photoshop to use as specular.
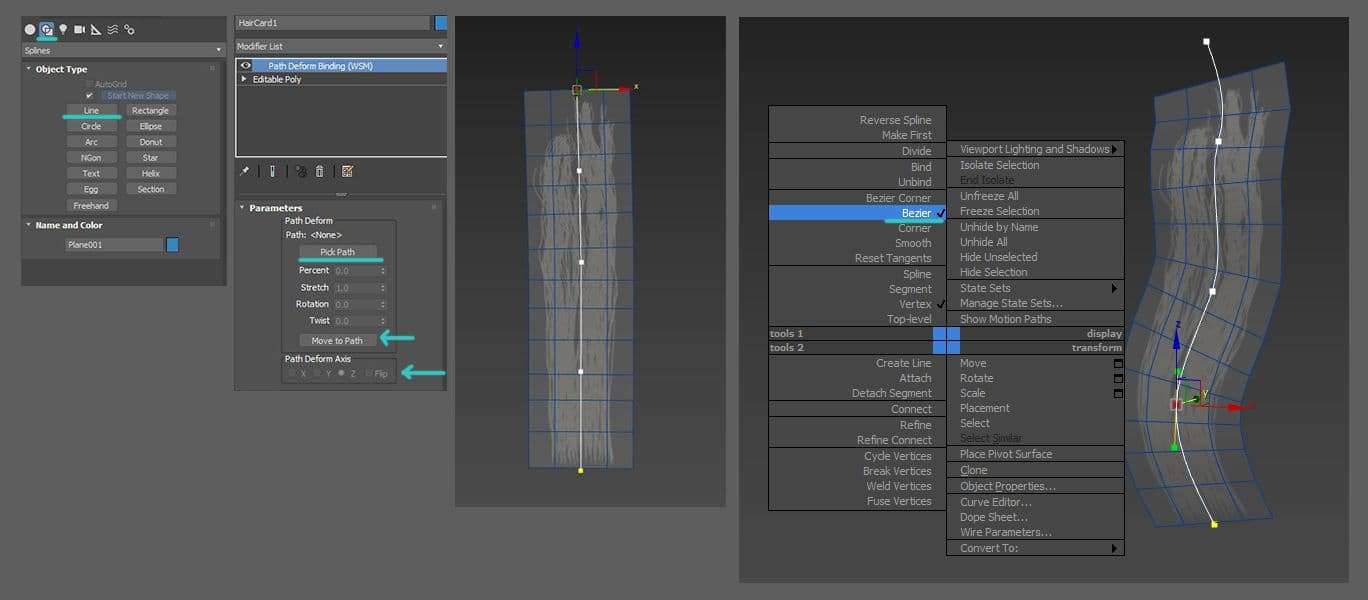
Then, I started placing the hair cards in 3ds Max. An easy way to control them is the PathDeform(WSM) modifier. I make planes for all the hair cards, unwrap and place them accordingly, then create a line. I then apply the modifier to the hair card and select the line as the path.


The whole project took me seven weeks to complete. All in all it's been almost two months of iterating, going back and forth, fixing issues, and asking myself whether I'm improving or not.
Truth be told, there are so many things a beginner needs to learn that it's hard not to feel overwhelmed. It's good to try and remember that hard work will eventually help you meet your aspirations.