Character Production Workflow: From 2D Concept to 3D Render
Rafael Mesquita shares an extensive character production workflow, sharing how to take 2D concepts and transforming them into amazing 3D renders.
Rafael Mesquita shares an extensive character production workflow, sharing how to take 2D concepts and transforming them into amazing 3D renders.

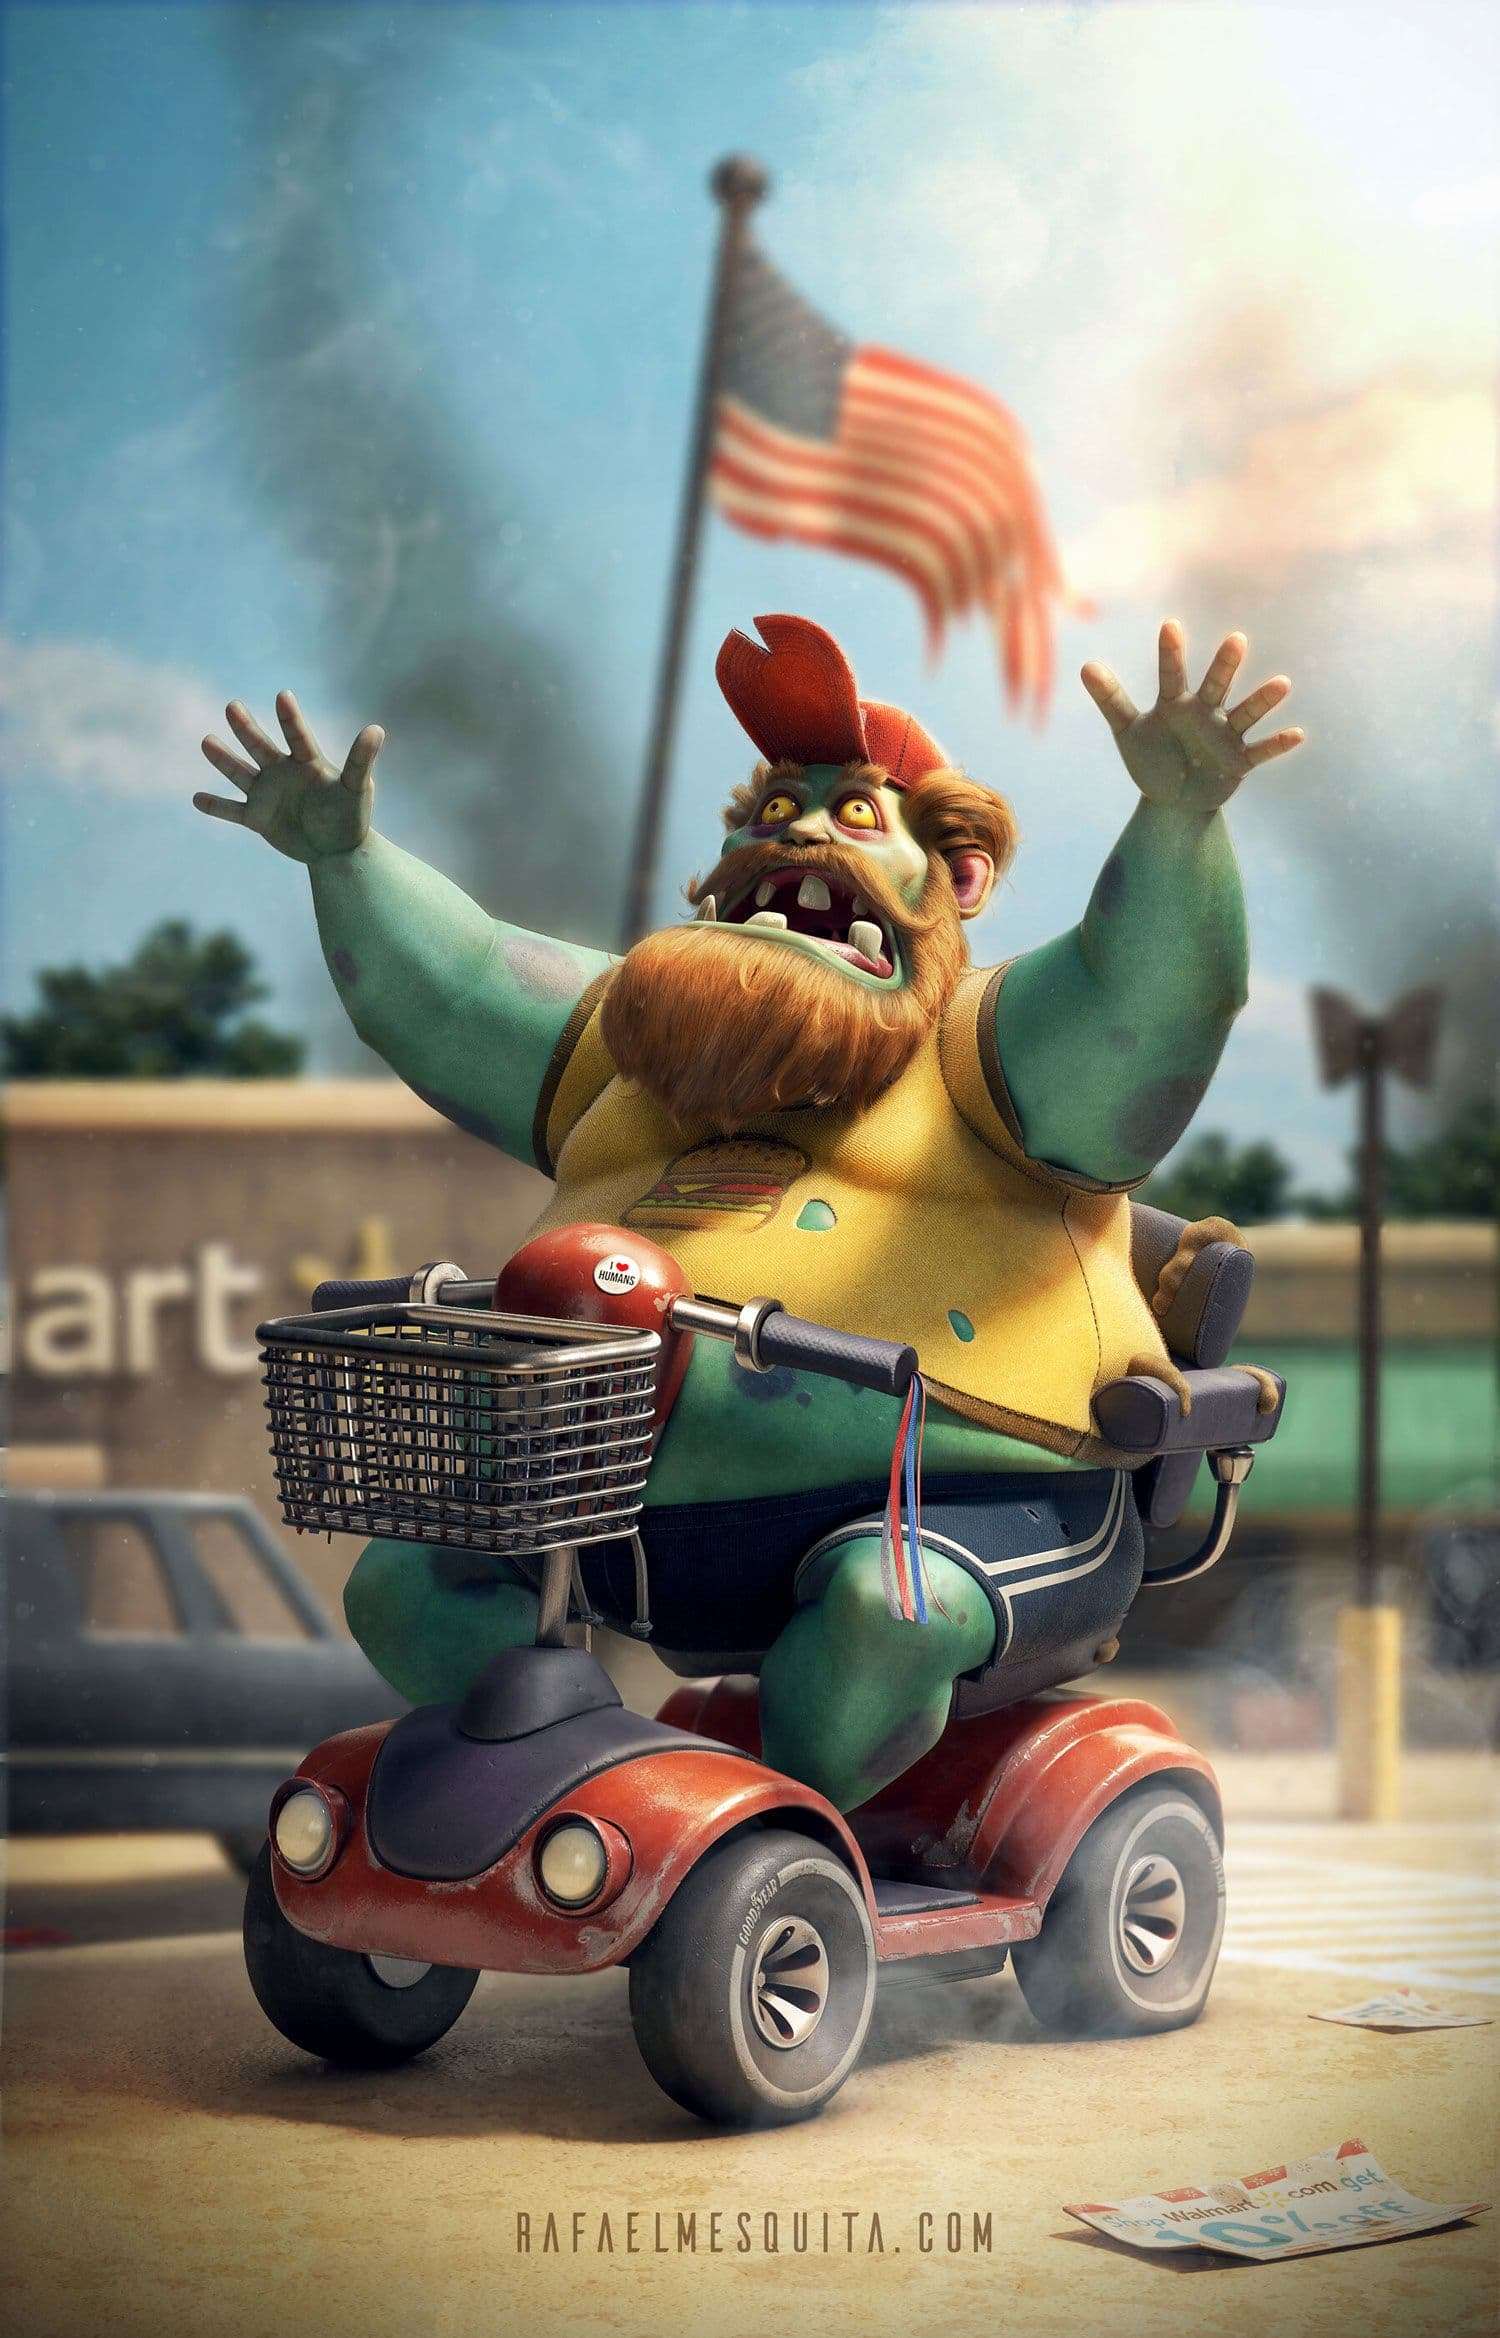
Born in Brazil, Rafael Mesquita started his career as a Graphic Designer. In 2017 Rafael decided to change his course in life and follow his passion and from there dedicated himself completely to studying and improving as a 3D Artist. Along with the passion in bringing stories to life, whenever he can, Rafael also tries to give back to the community, be it with tutorials and articles or in forums. We thank Rafael for taking the time to explain his character production workflow, taking 2D concepts and transforming them into amazing 3D renders.
The first step towards the finished project is choosing concept that makes sense to us, and there are some points that you should take into consideration at this stage. When selecting concepts to work from, think about what you want to study: texture, environment, anatomy, hard surface, grooming, new software, or a project that has it all together. Analyse and try to figure out if working with the chosen concept, you can study everything you need.
Another suggestion that can help you decide on what concept to work from, is to look for projects of companies that you want to work with someday and make something similar so you end up targeting your portfolio more effectively.
Make sure to always choose something that inspires you to work in your free time, so that way this doesn't turn into another WIP in your hard drive.
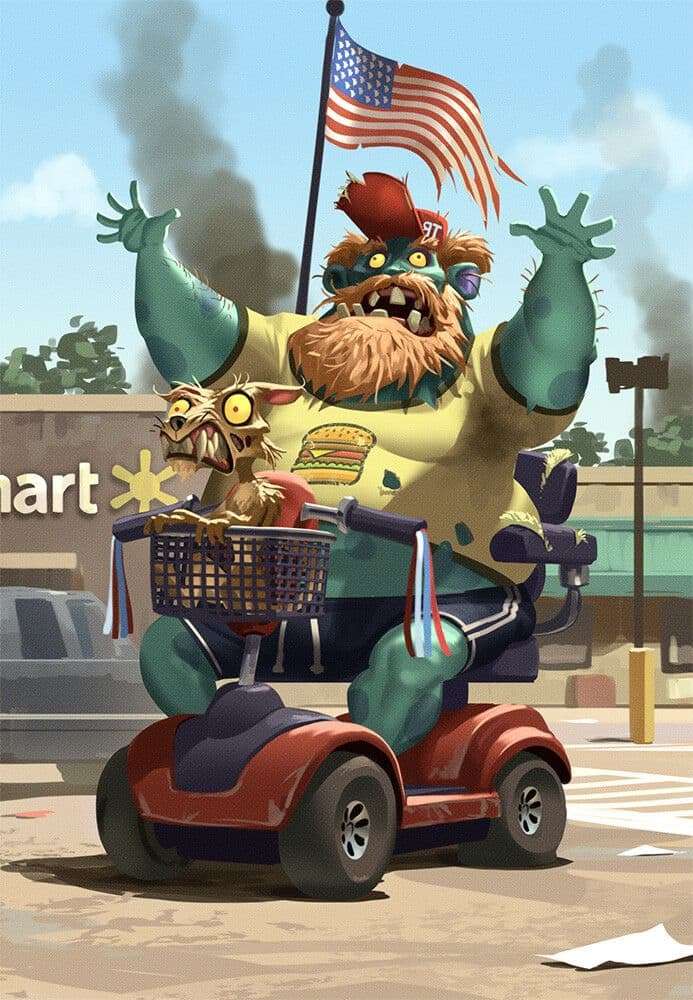
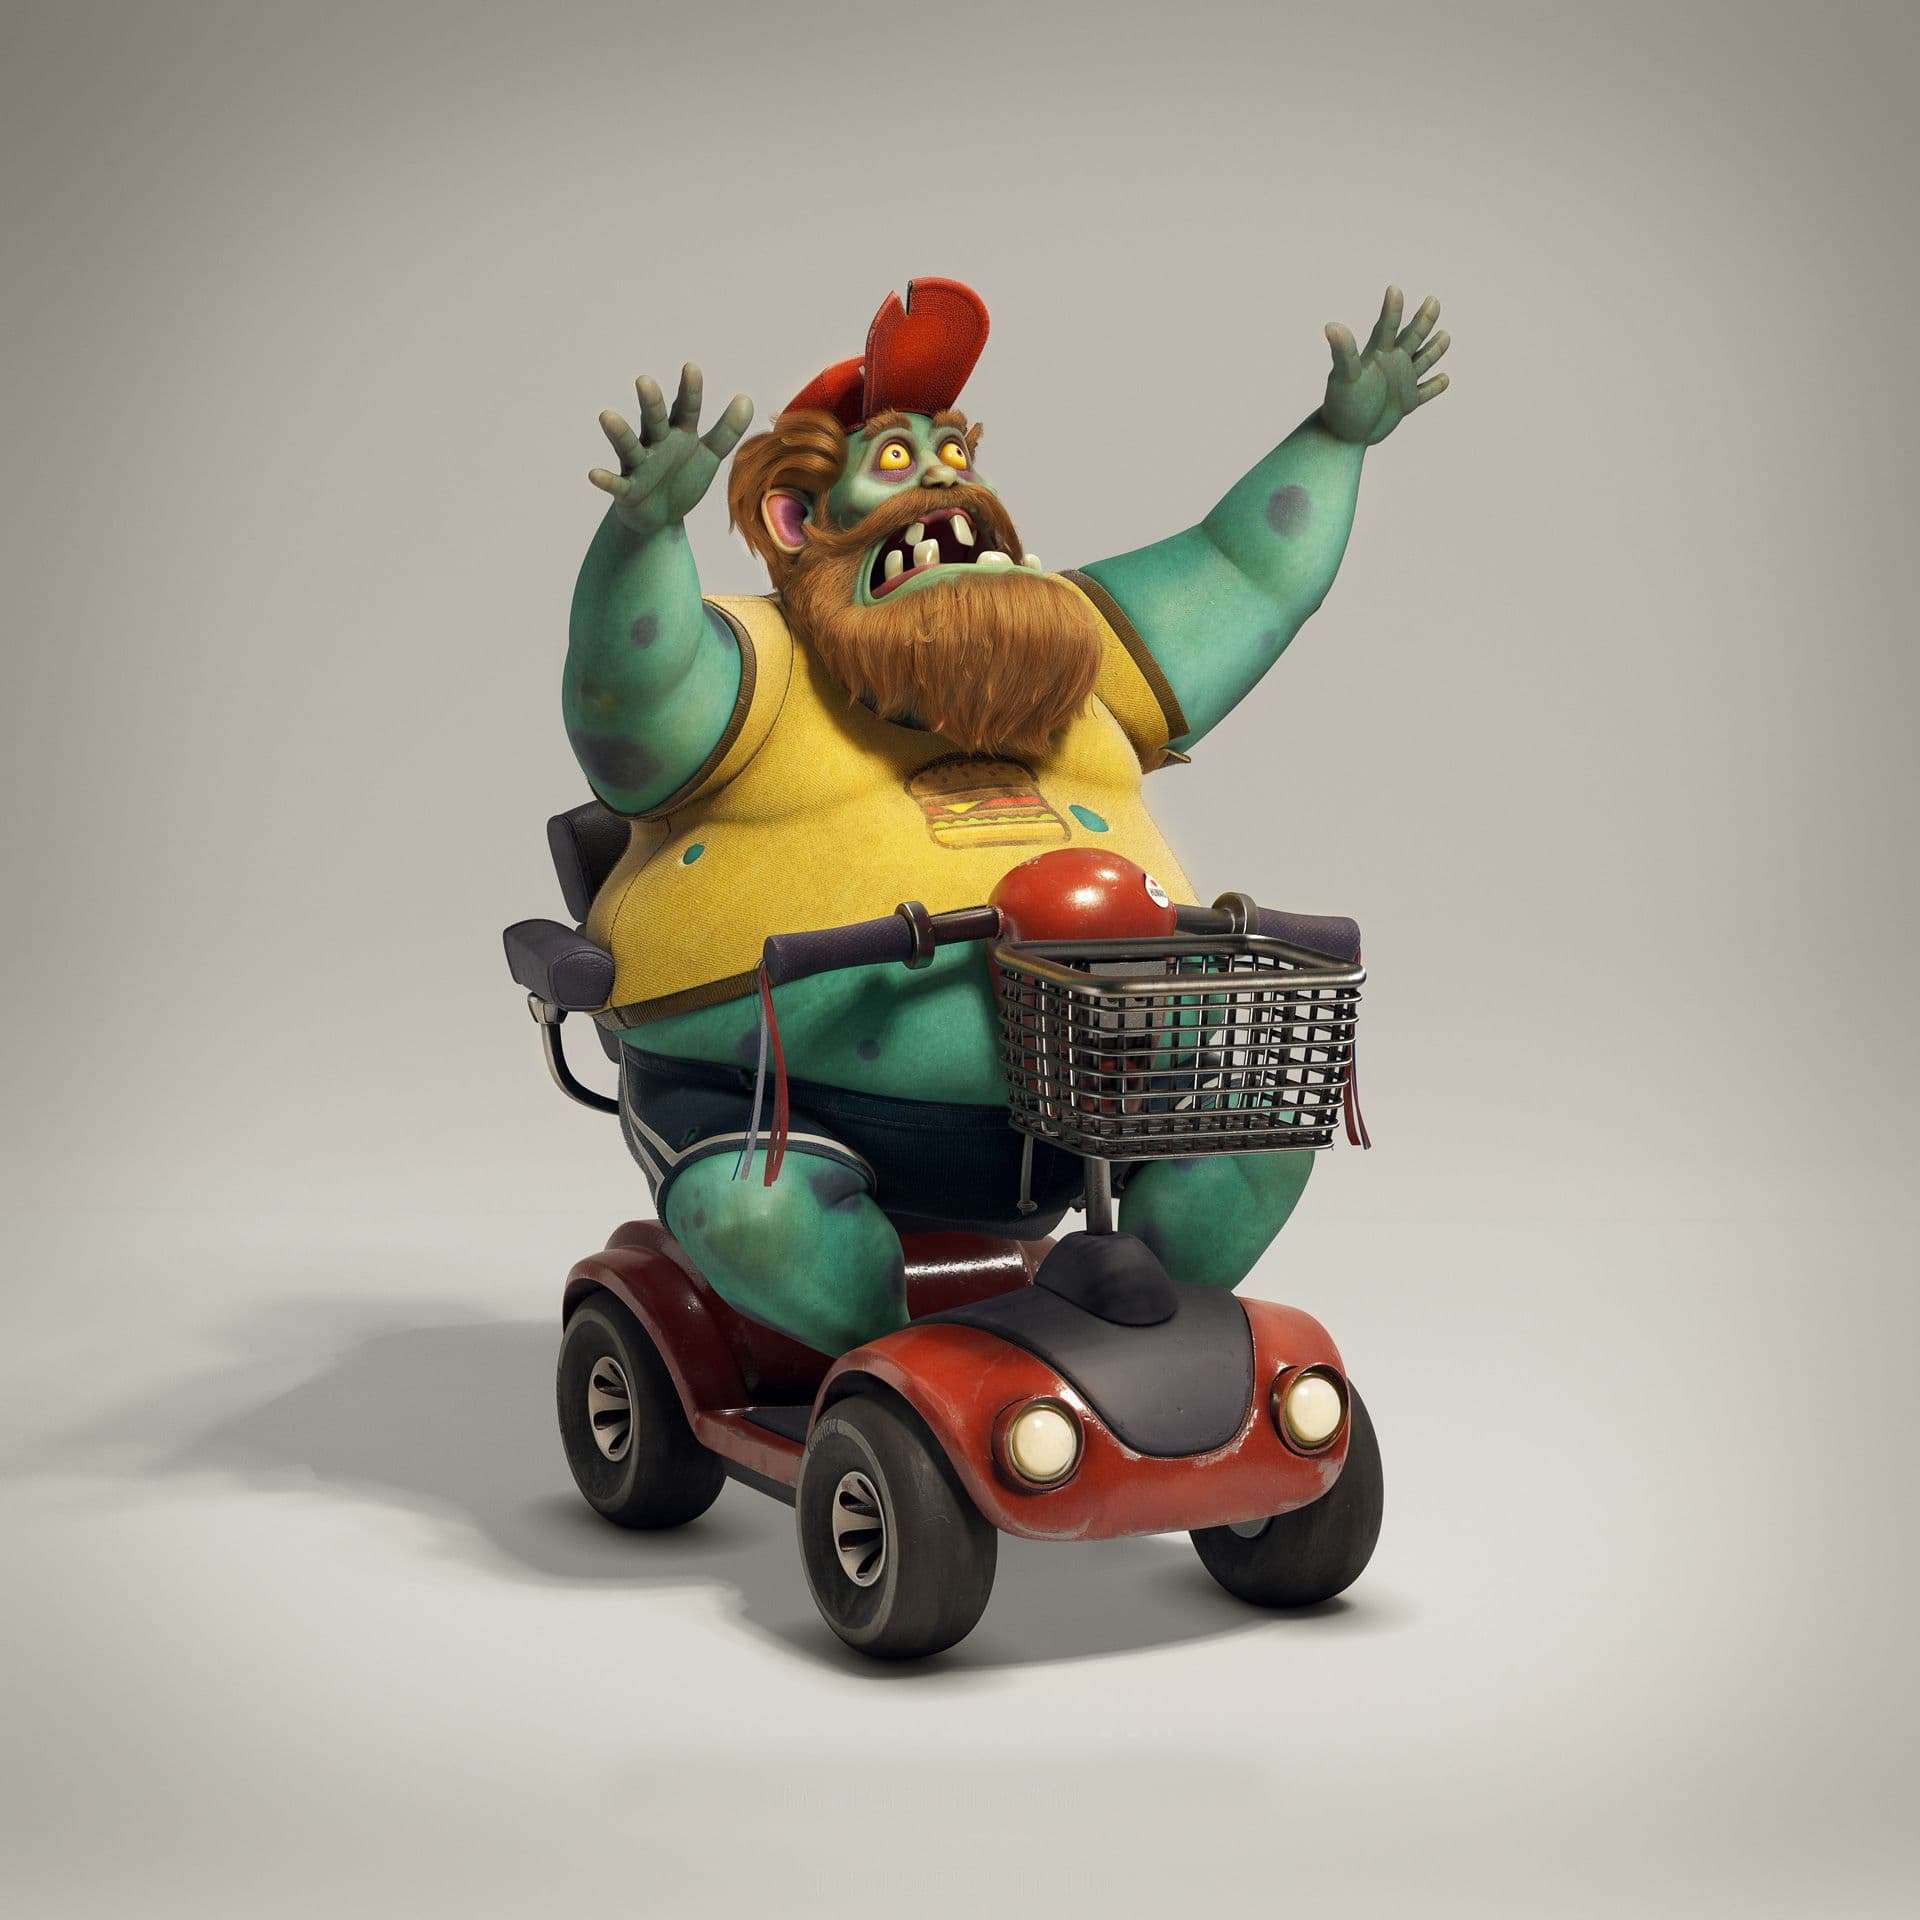
In my case, I chose this concept with the purpose of making only a final image, similar to some works present in advertising, however, as I enjoyed working on it I also decided to make the whole character ready for animation and a more complete presentation at the end.
Before we go to the next topic, here is the software I used in the process:
At the beginning of a project, I like to make a very simple schedule to make my life organised and give me a sense of progression. Sometimes it's difficult to be 100% committed to it but try your best, this can show you how productive you have been over days and weeks.
I usually create a topic for each stage, for example:
These were the ones I used in my project, if you want, next to each topic you can put the time you want to spend on it. Keep in mind your routine and how much free time you have to dedicate. In the beginning, it can be difficult to predict how long you will spend on each stage, but after finishing some projects you end up having a better idea.
I'm going to talk about my approach to each of these topics. I hope it can be helpful for you!
Collecting references is a moment when we build the character in our head with a compilation of images focused on each part. The creation of a reference board will help you from the initial blocking to the final presentation of the project.
I like to create small islands of images for each element of my project, the amount of images depends on how much detailed information the chosen concept shows. Below are some of these islands I used as reference:
As said earlier I used PureRef. With it I can leave all my references open at the same time in an organised way, and for those who don't have two monitors like me, it is possible to leave it in “always on top” mode for easy comparison with your model.
Some good resources to collect these images from are, Pinterest, Shutterstock, Flickr, and all the online portfolio websites. Sometimes we forget to search for references near us - look around if you don't have what you are looking for at your home/work, this way you will have a reference in all possible angles.
When blocking your model, you shouldn't get too attached to specific parts and think more about the whole; try to find the main shapes and proportions, keep it simple, and only move on to the next step when you have a solid base compared to your references. It is faster to make big changes at this stage than later when you'll have a large polycount and detailed mesh. A good time spent on blocking is an investment for avoiding headaches on future parts.
Make sure to always choose something that inspires you to work in your free time, so that way this doesn't turn into another WIP in your hard drive.
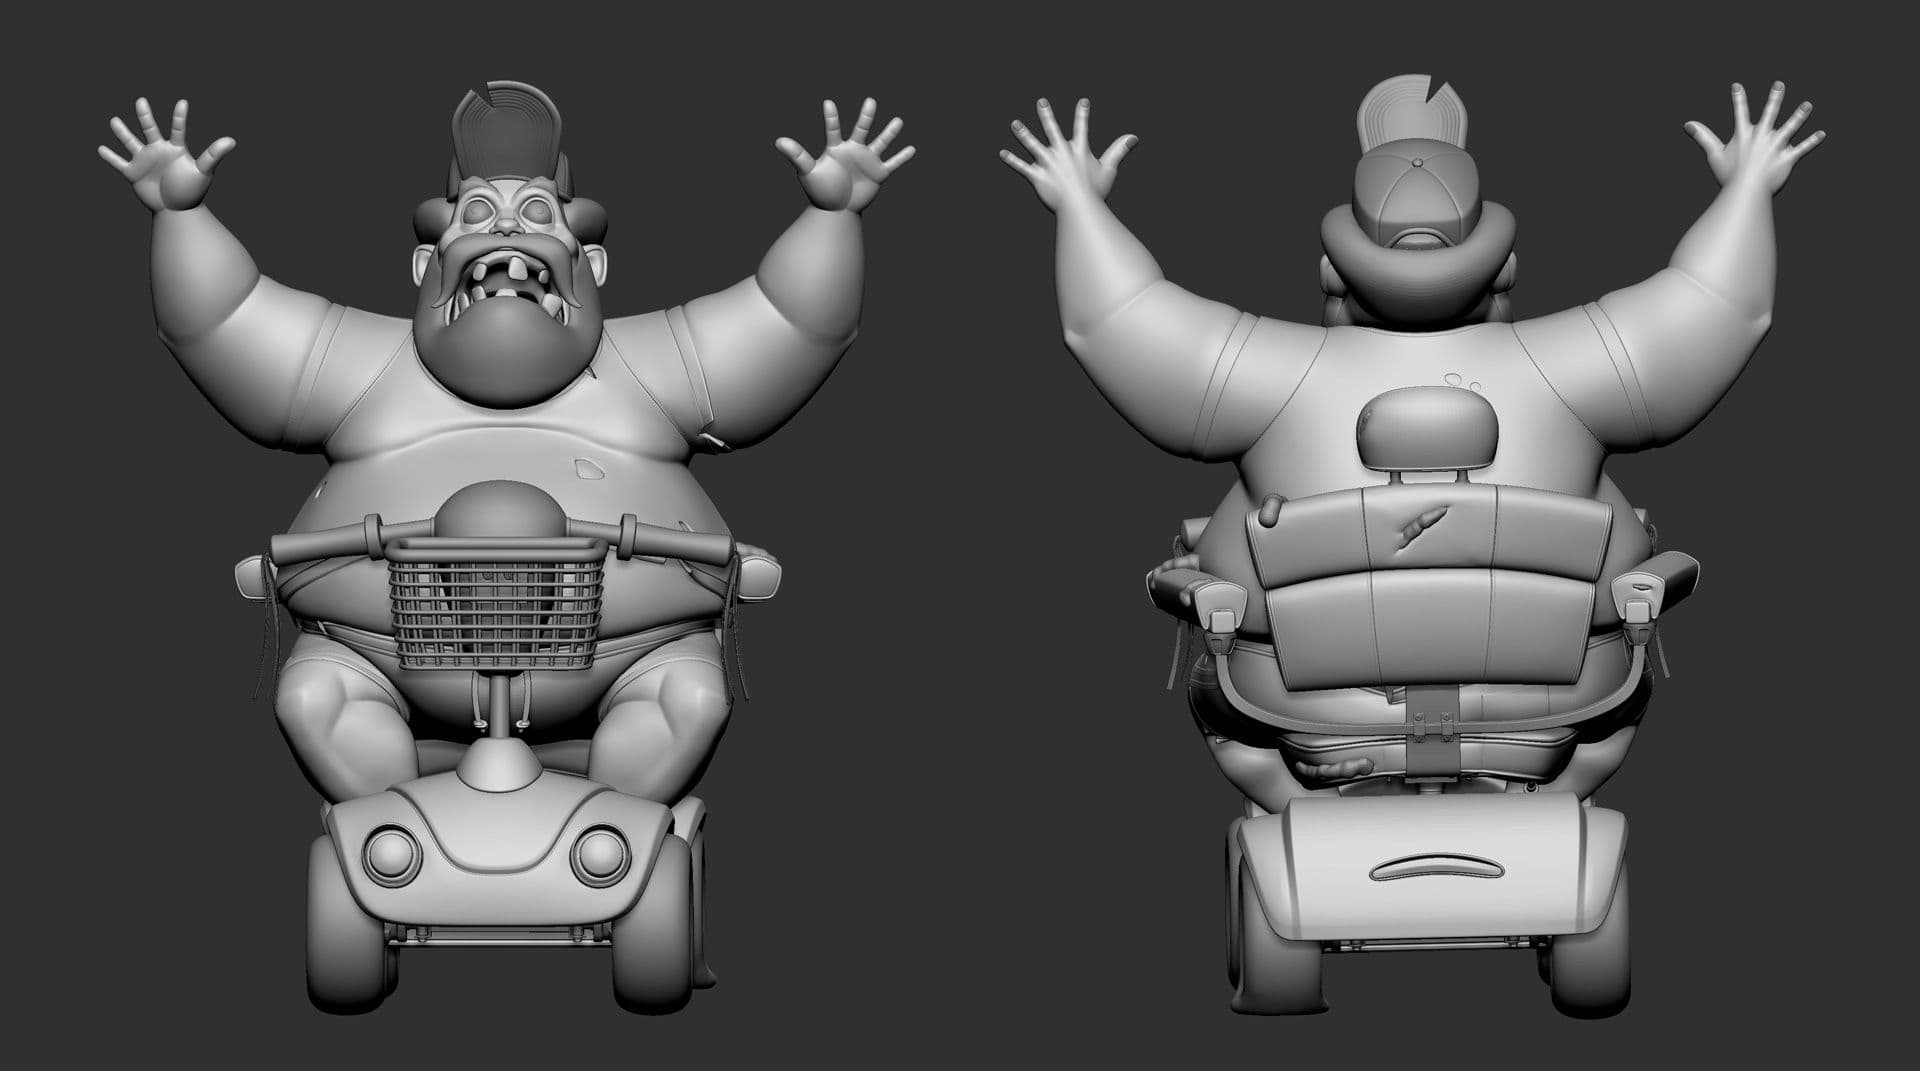
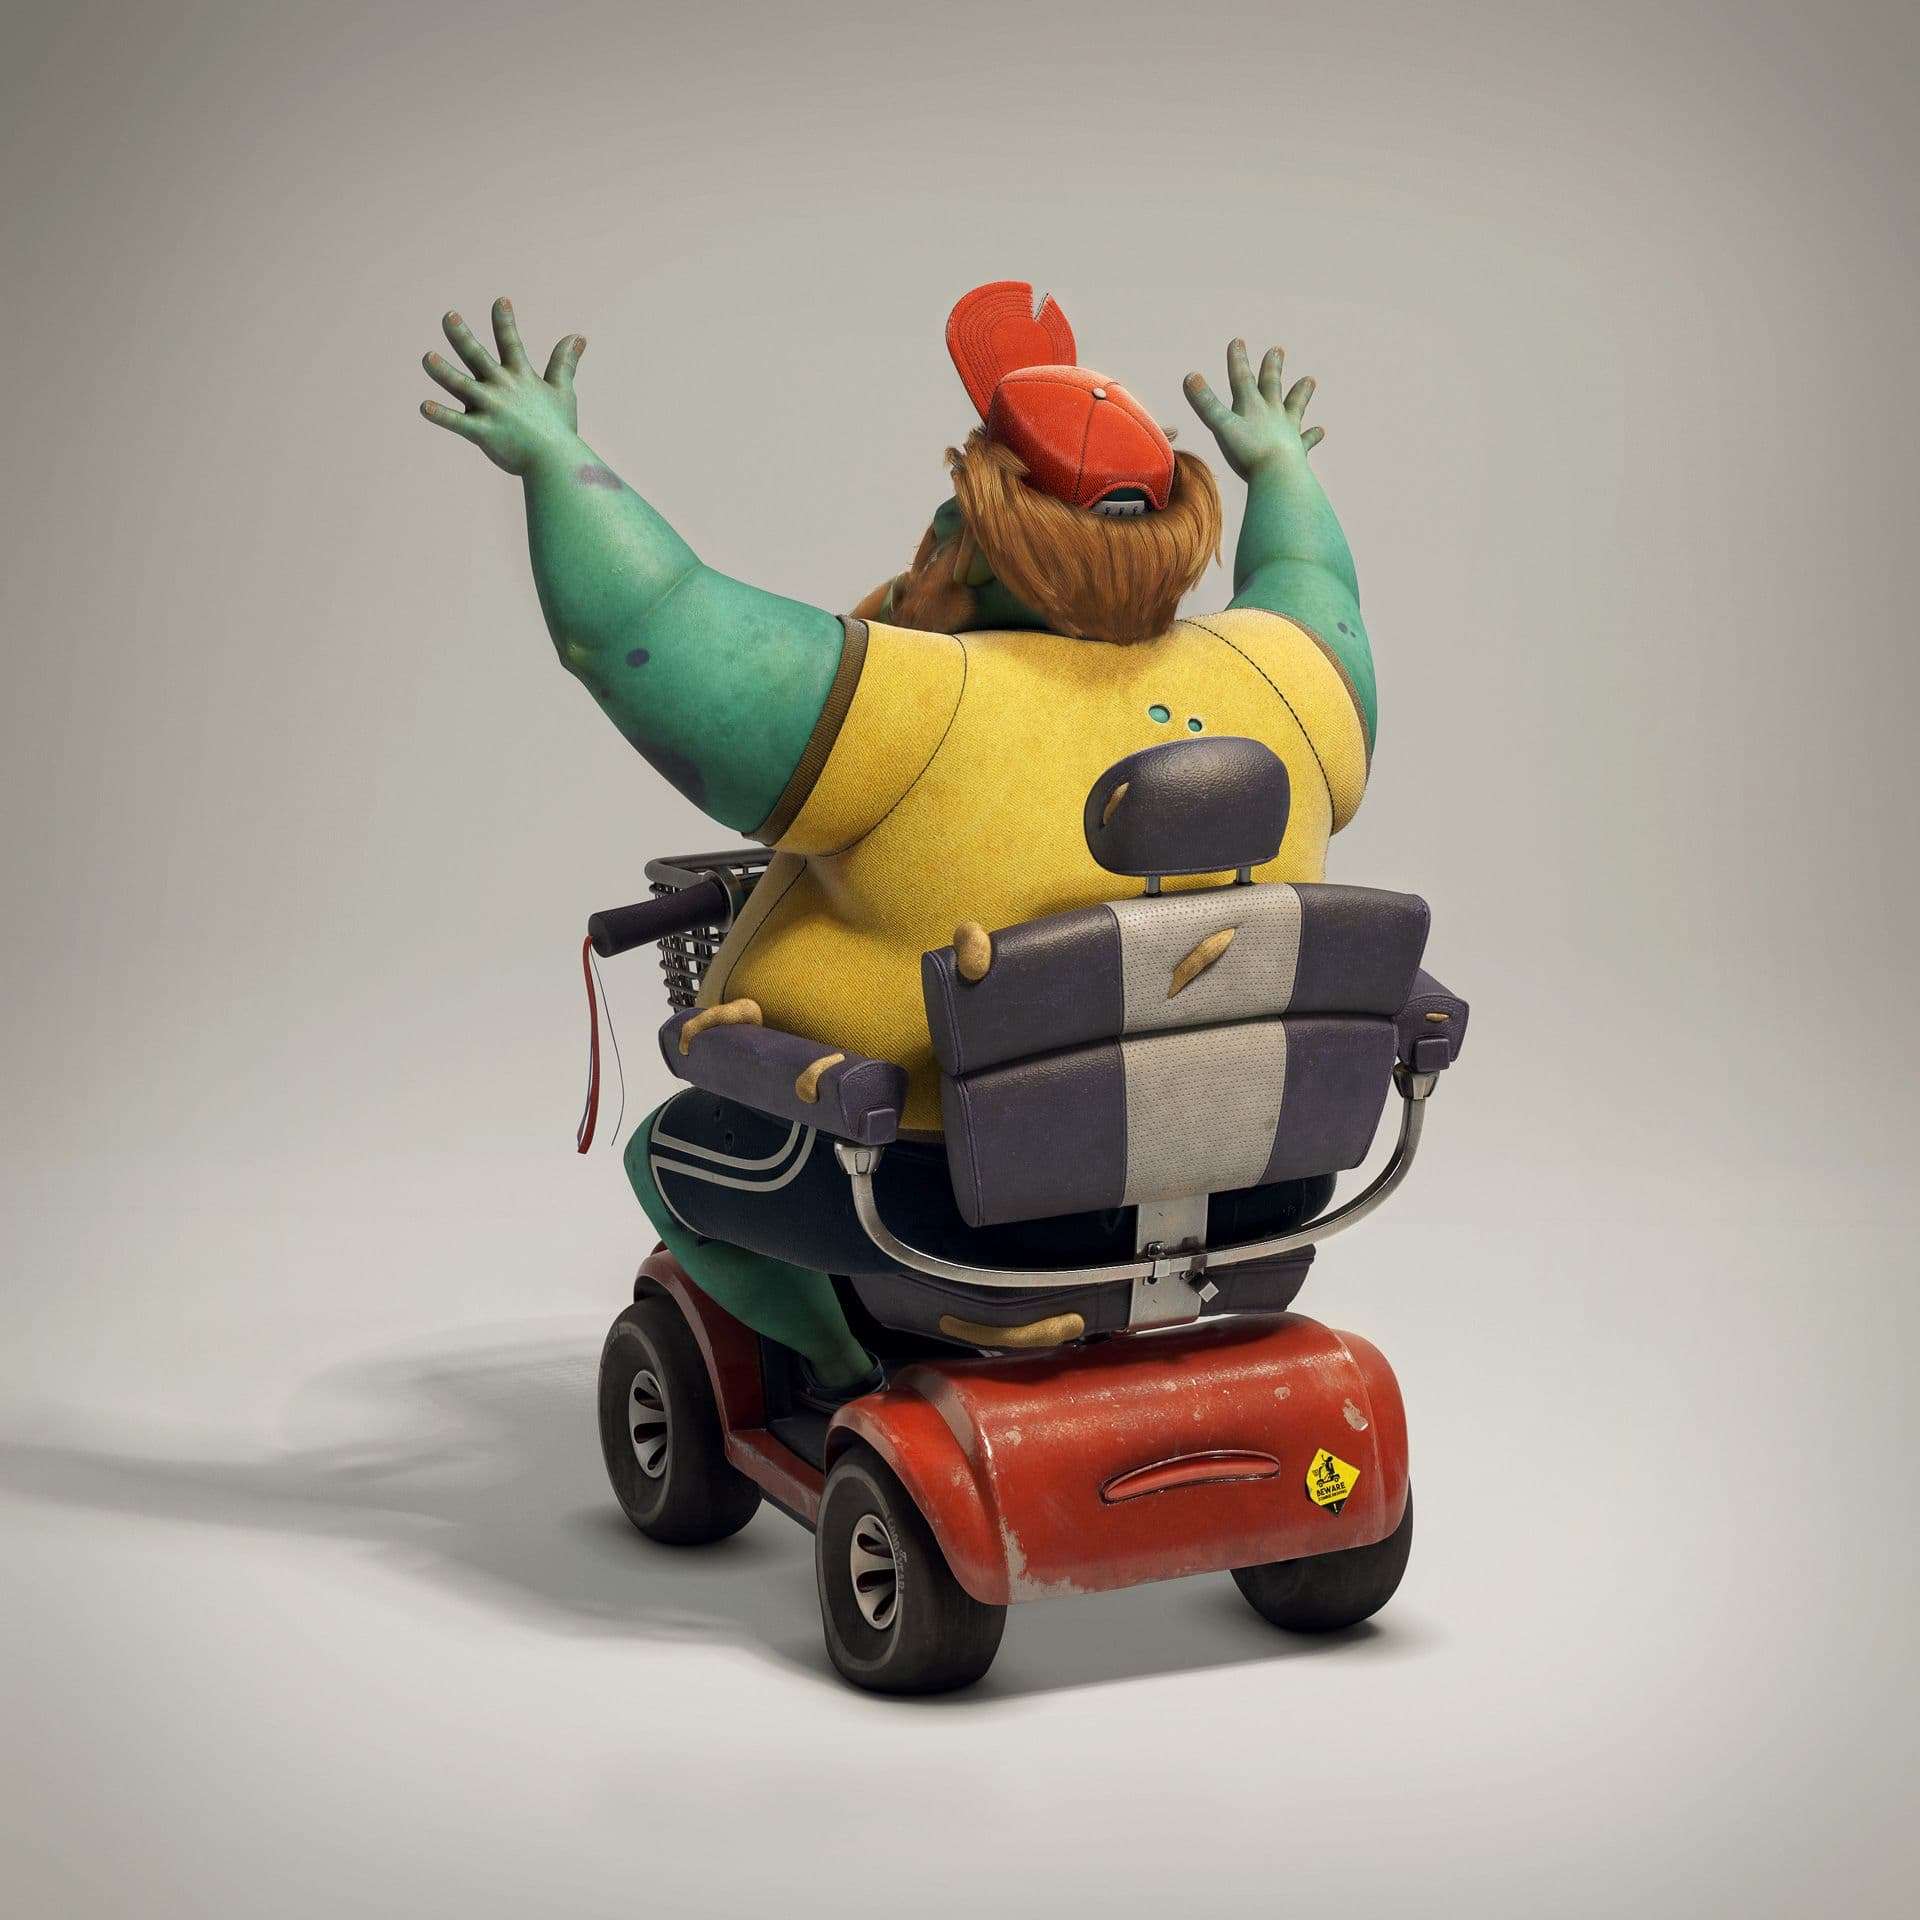
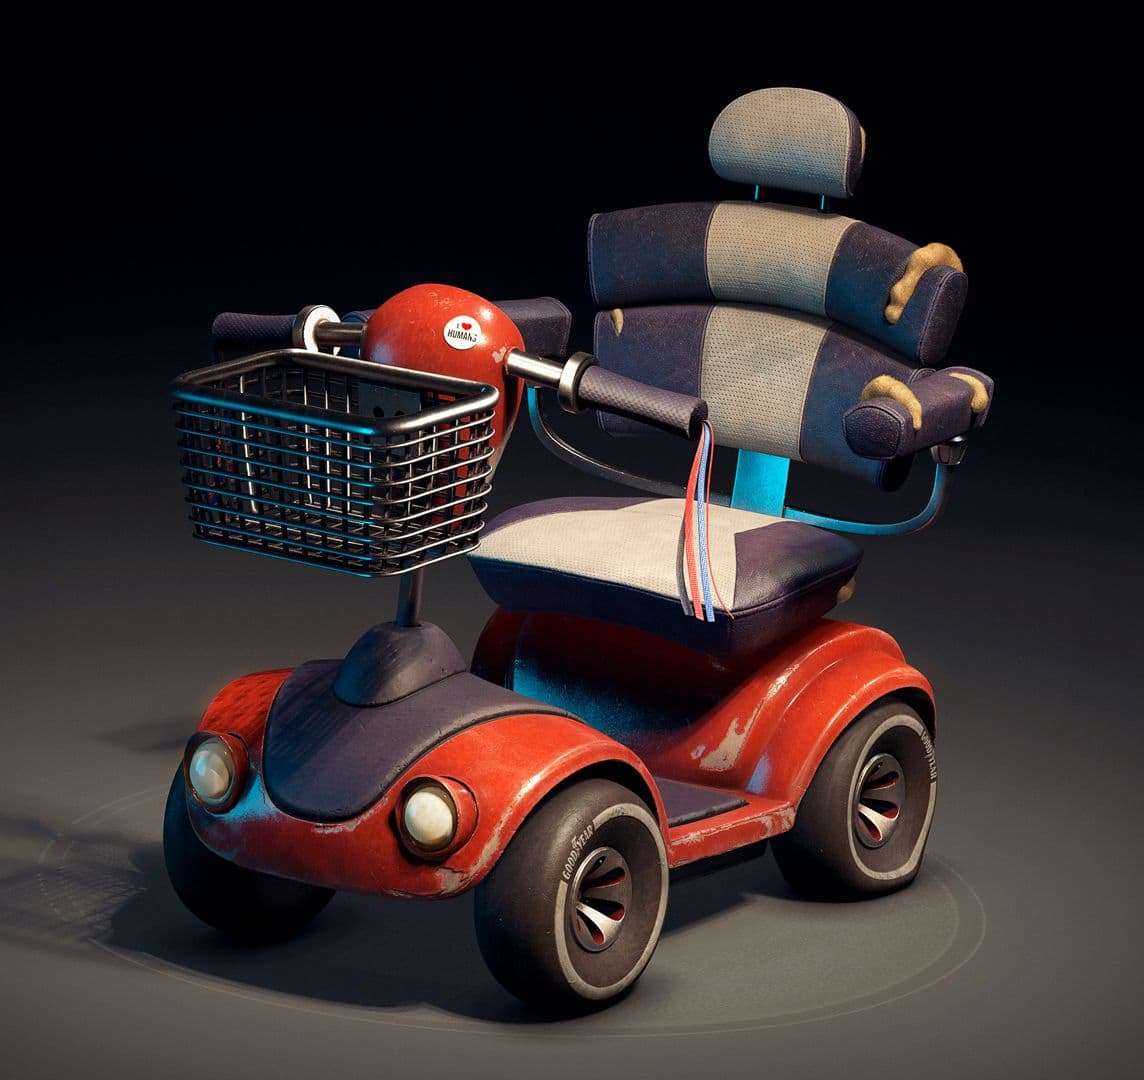
My chosen character has proportions that can get a bit weird when transferred to 3D. One of the main difficulties was making adjustments so the body and the scooter seat would be similar to the concept but working in all angles. This stage is where I like to solve all my problems regarding the parts where the concept doesn't show, like the back of the scooter for example. You can test if your solutions are working as a whole and make quick changes if you need to.
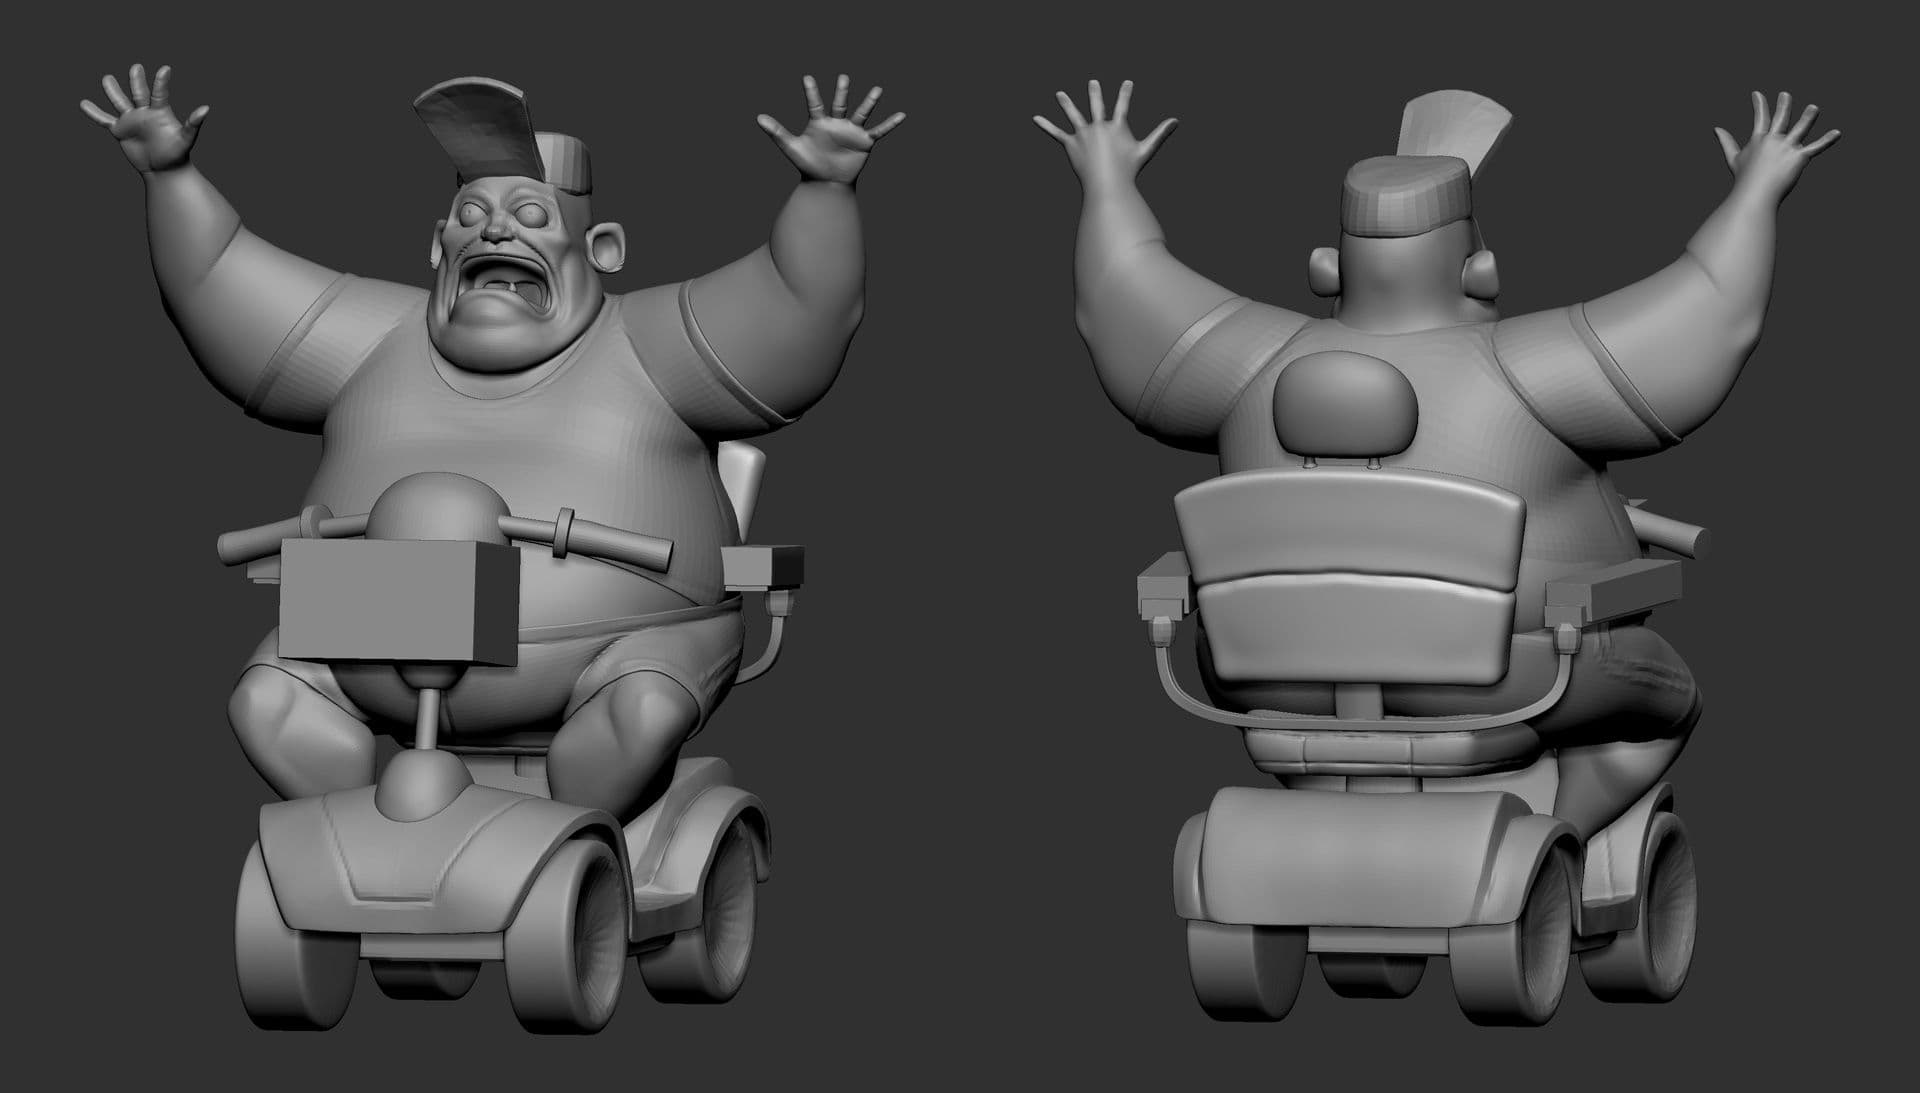
Everything was done in Zbrush, using DynaMesh, ZRemesher, Extract and some primitive geometries. I wasn't worrying about topology at this stage. At this stage I wanted to make my sculpt with simpler forms and some landmarks to facilitate refinement in Maya.
One thing I like to do is saving a camera inside Zbrush to match the character's position in the concept, even if the character is still symmetrical, it is easier to compare some proportions with its references.
Whenever you open your project, you just need to load the camera file you saved.
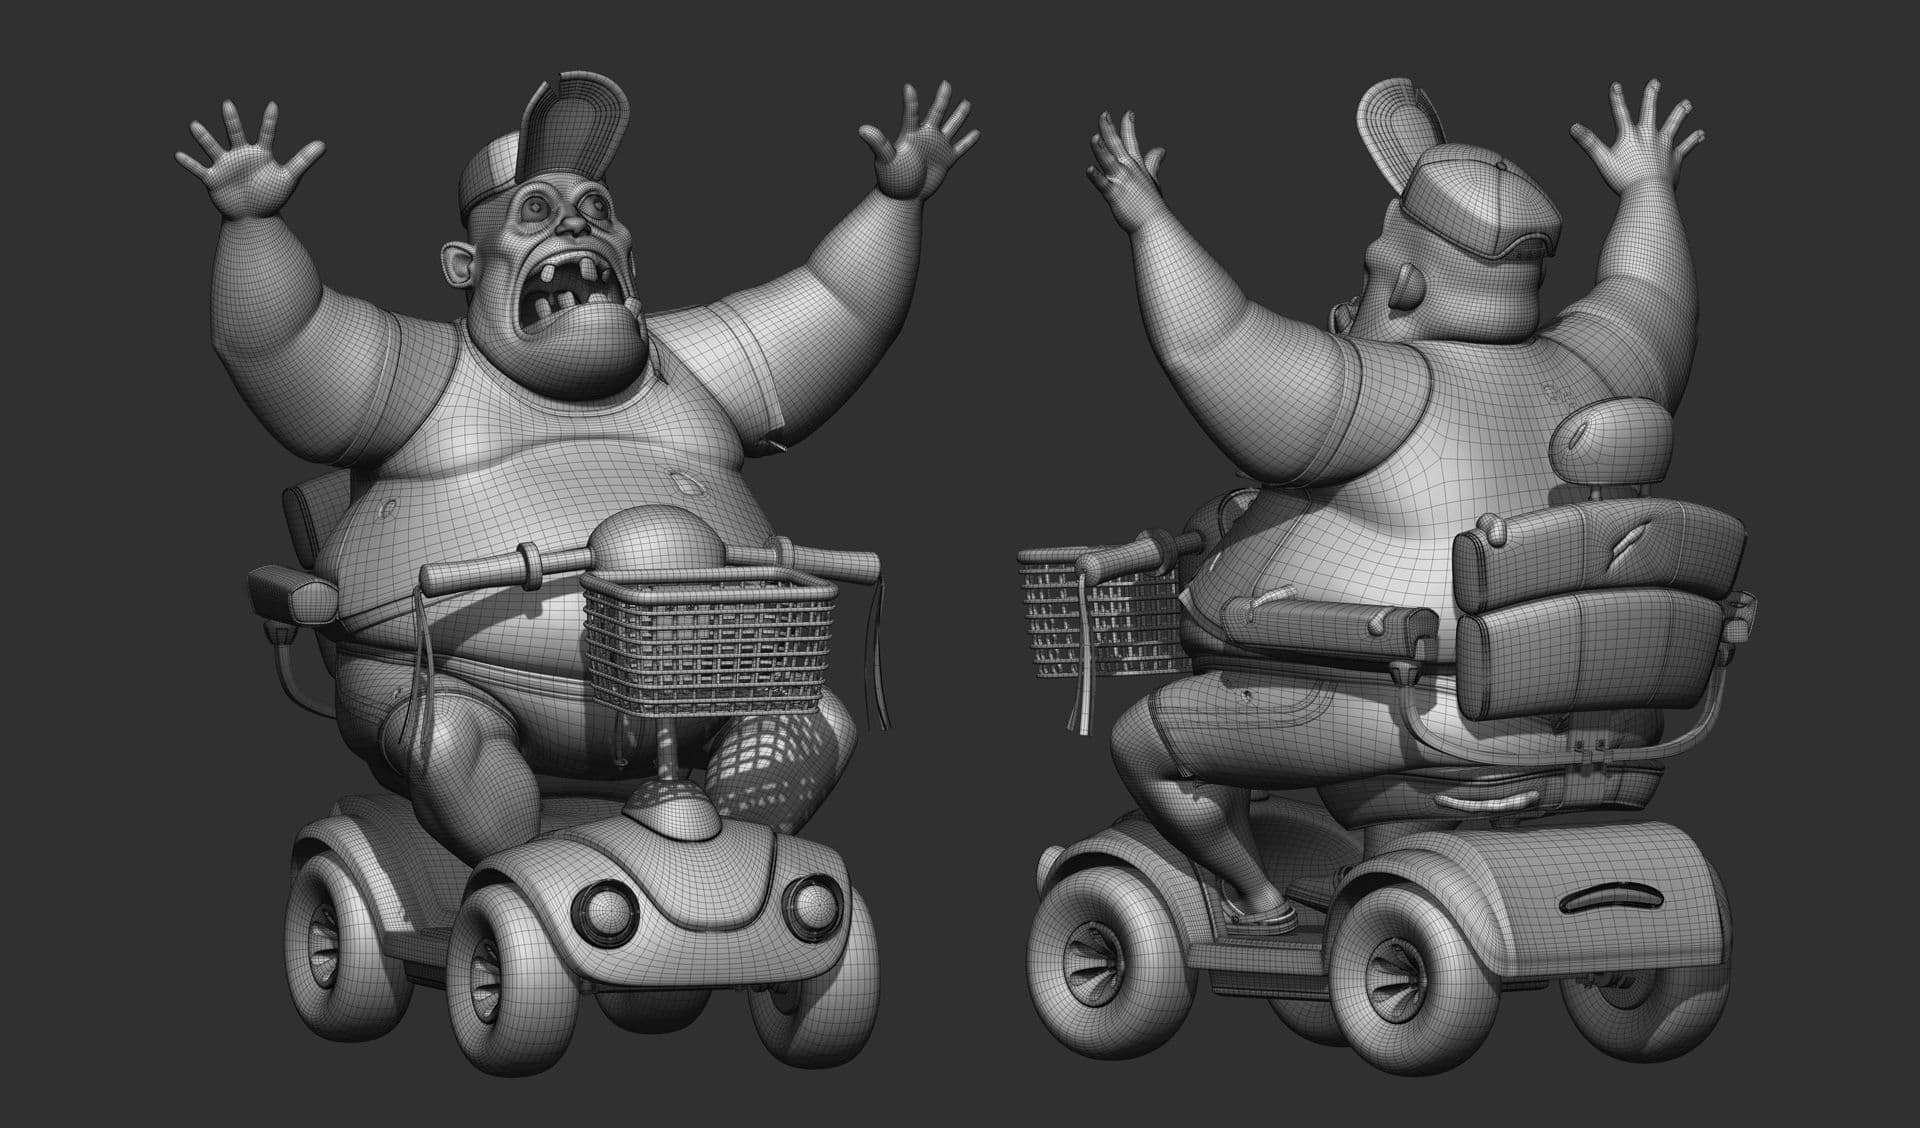
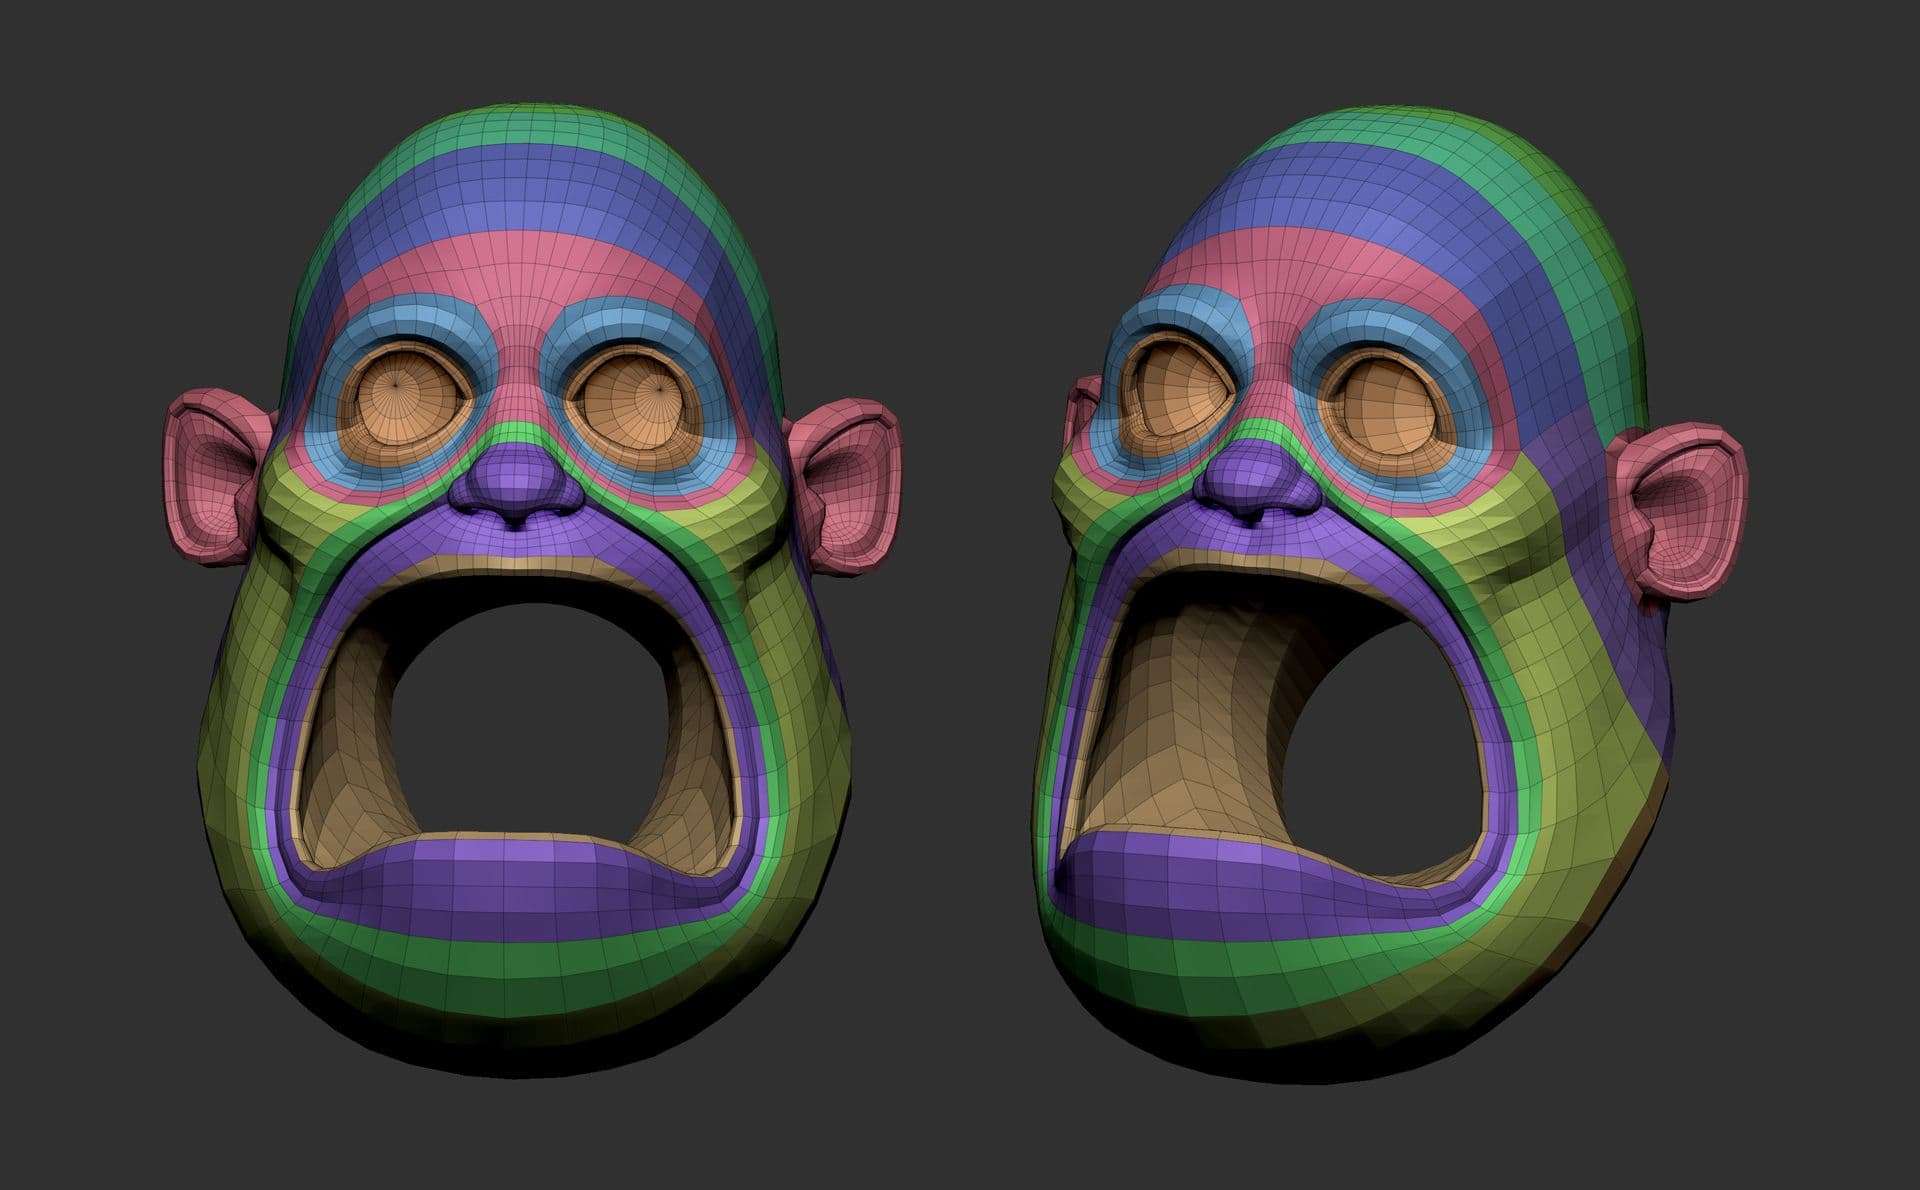
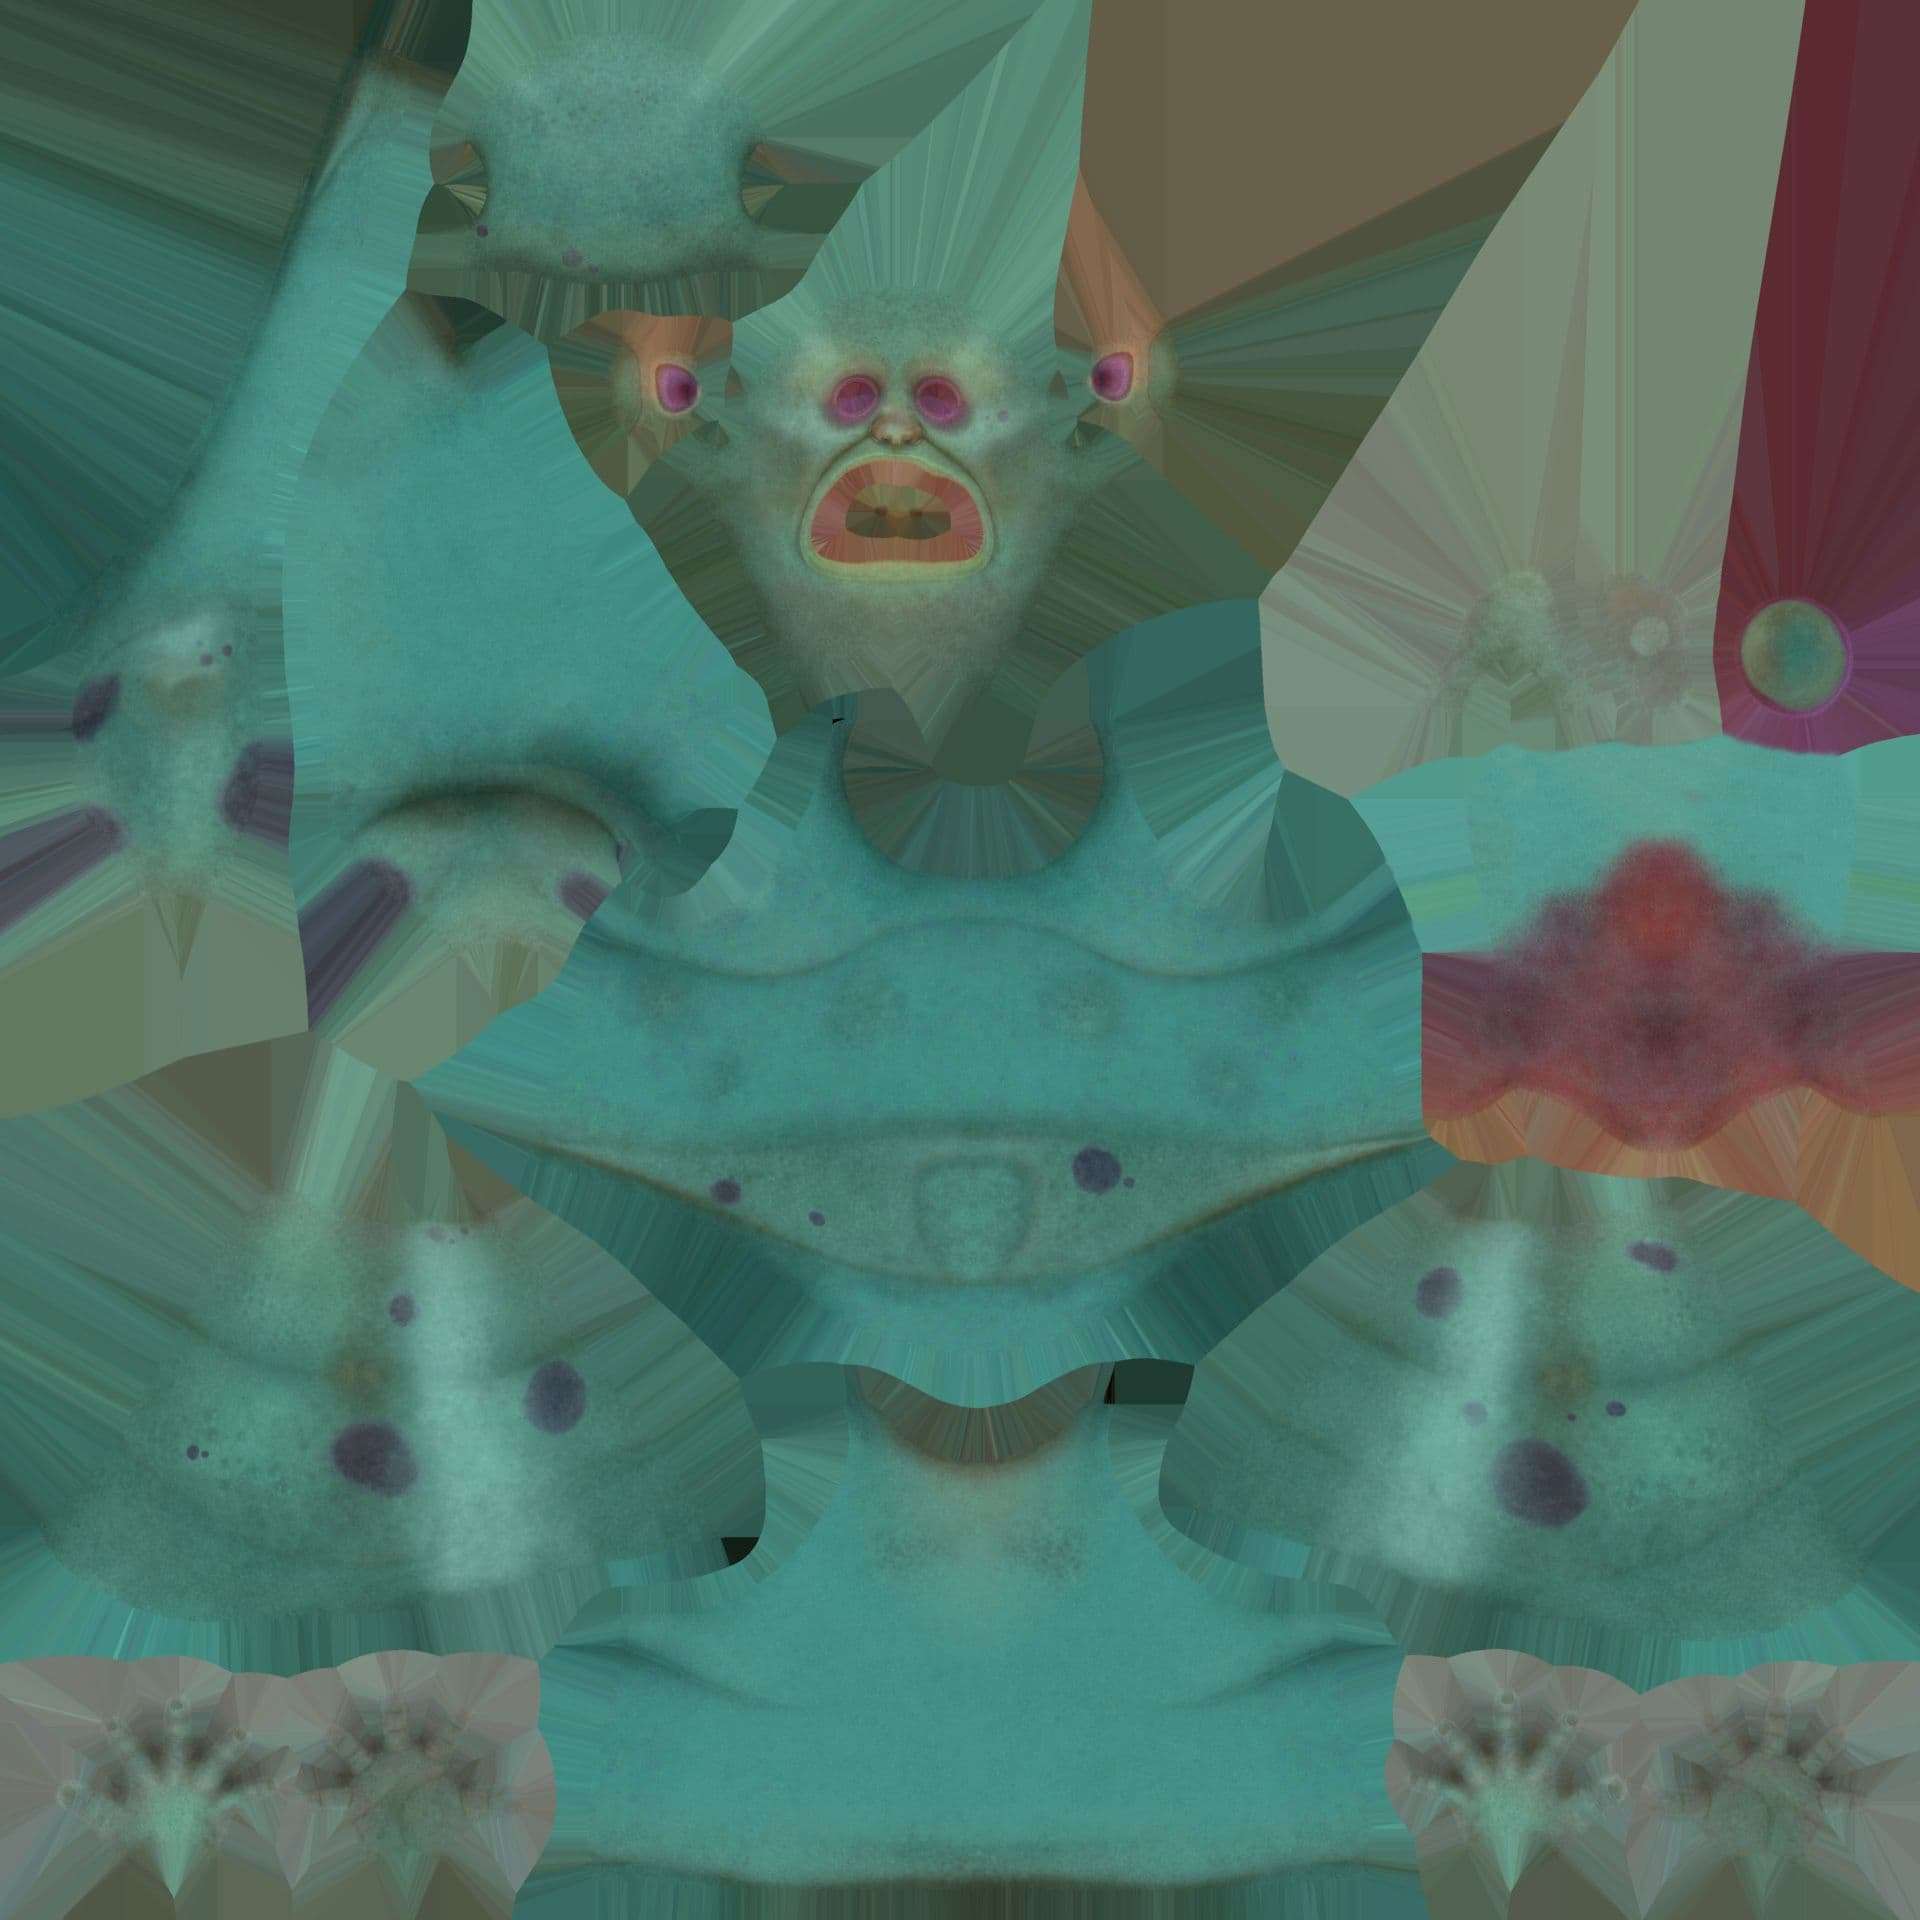
After the blocking stage is done, I keep the symmetry on and start adding the details gradually, refining the shapes, volumes, some wrinkles, bruises, removing imperfections from the mesh where I don't want to, everything that isn't so micro, always keeping in mind the human anatomy. The character has a more stylised shape, that way I didn't need to sculpt as many details on his body as if it was for something more realistic.
When blocking your model, you shouldn't get too attached to specific parts and think more about the whole; try to find the main shapes and proportions, keep it simple,
Micro details such as pores were added after retopology and UV unwrap, using Noise Surface and some alphas, after that, I generated the Displacement Map to capture all the information.
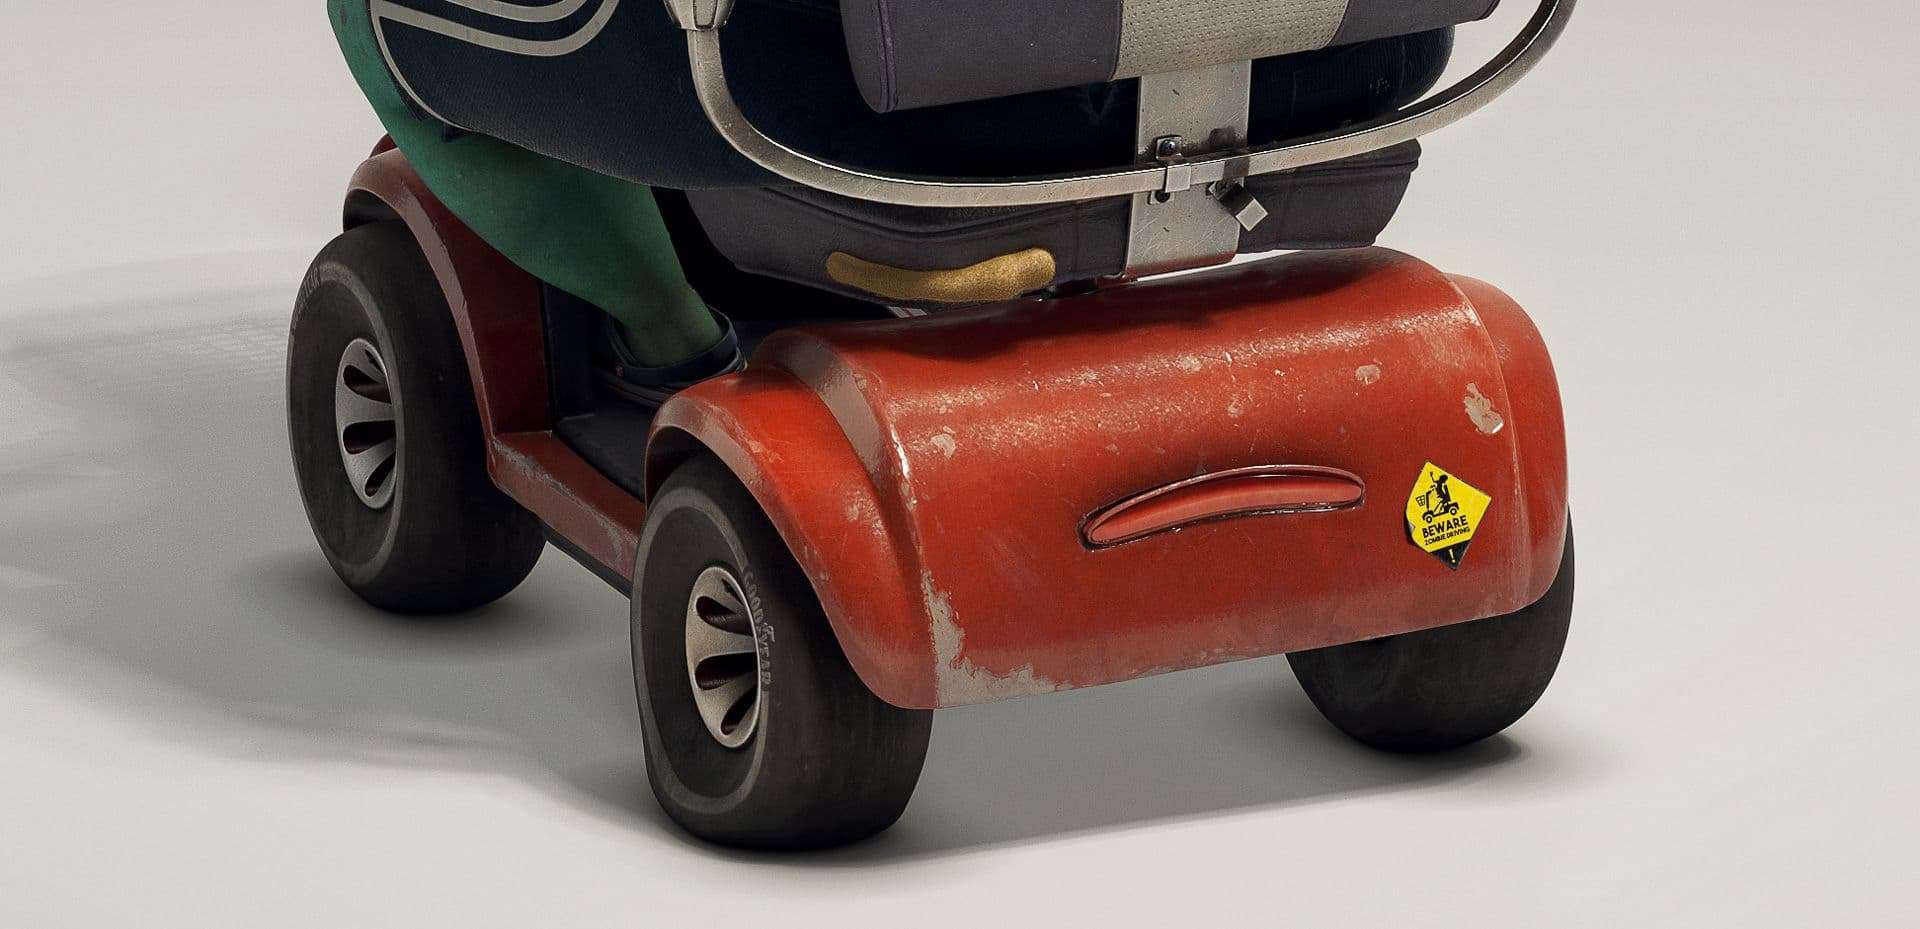
The scooter was modeled in Maya, I imported the initial blocking made in Zbrush and used its proportions to make a more finished looking model with good topology. When starting a hard surface modeling always pay attention to some of these points:
The background scene was also made at this stage, but as it would only show the silhouette of the objects at my final render, I made it quickly and didn't worry about details and topology, saving time to spend elsewhere.
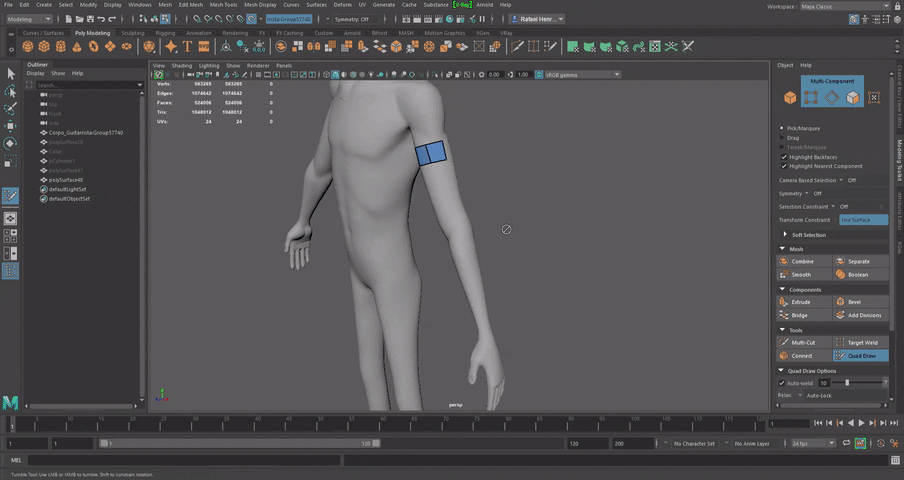
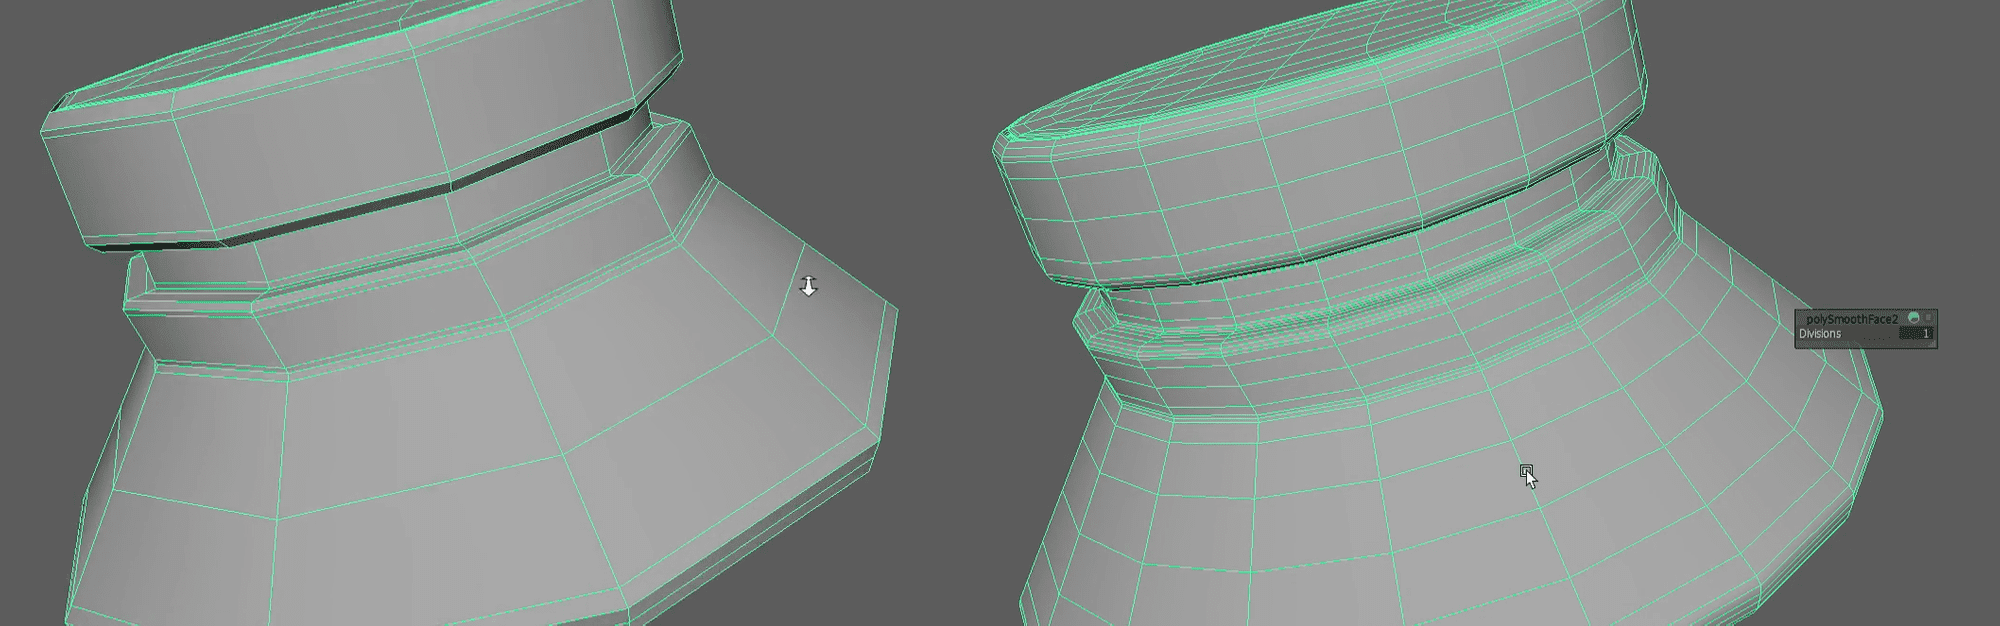
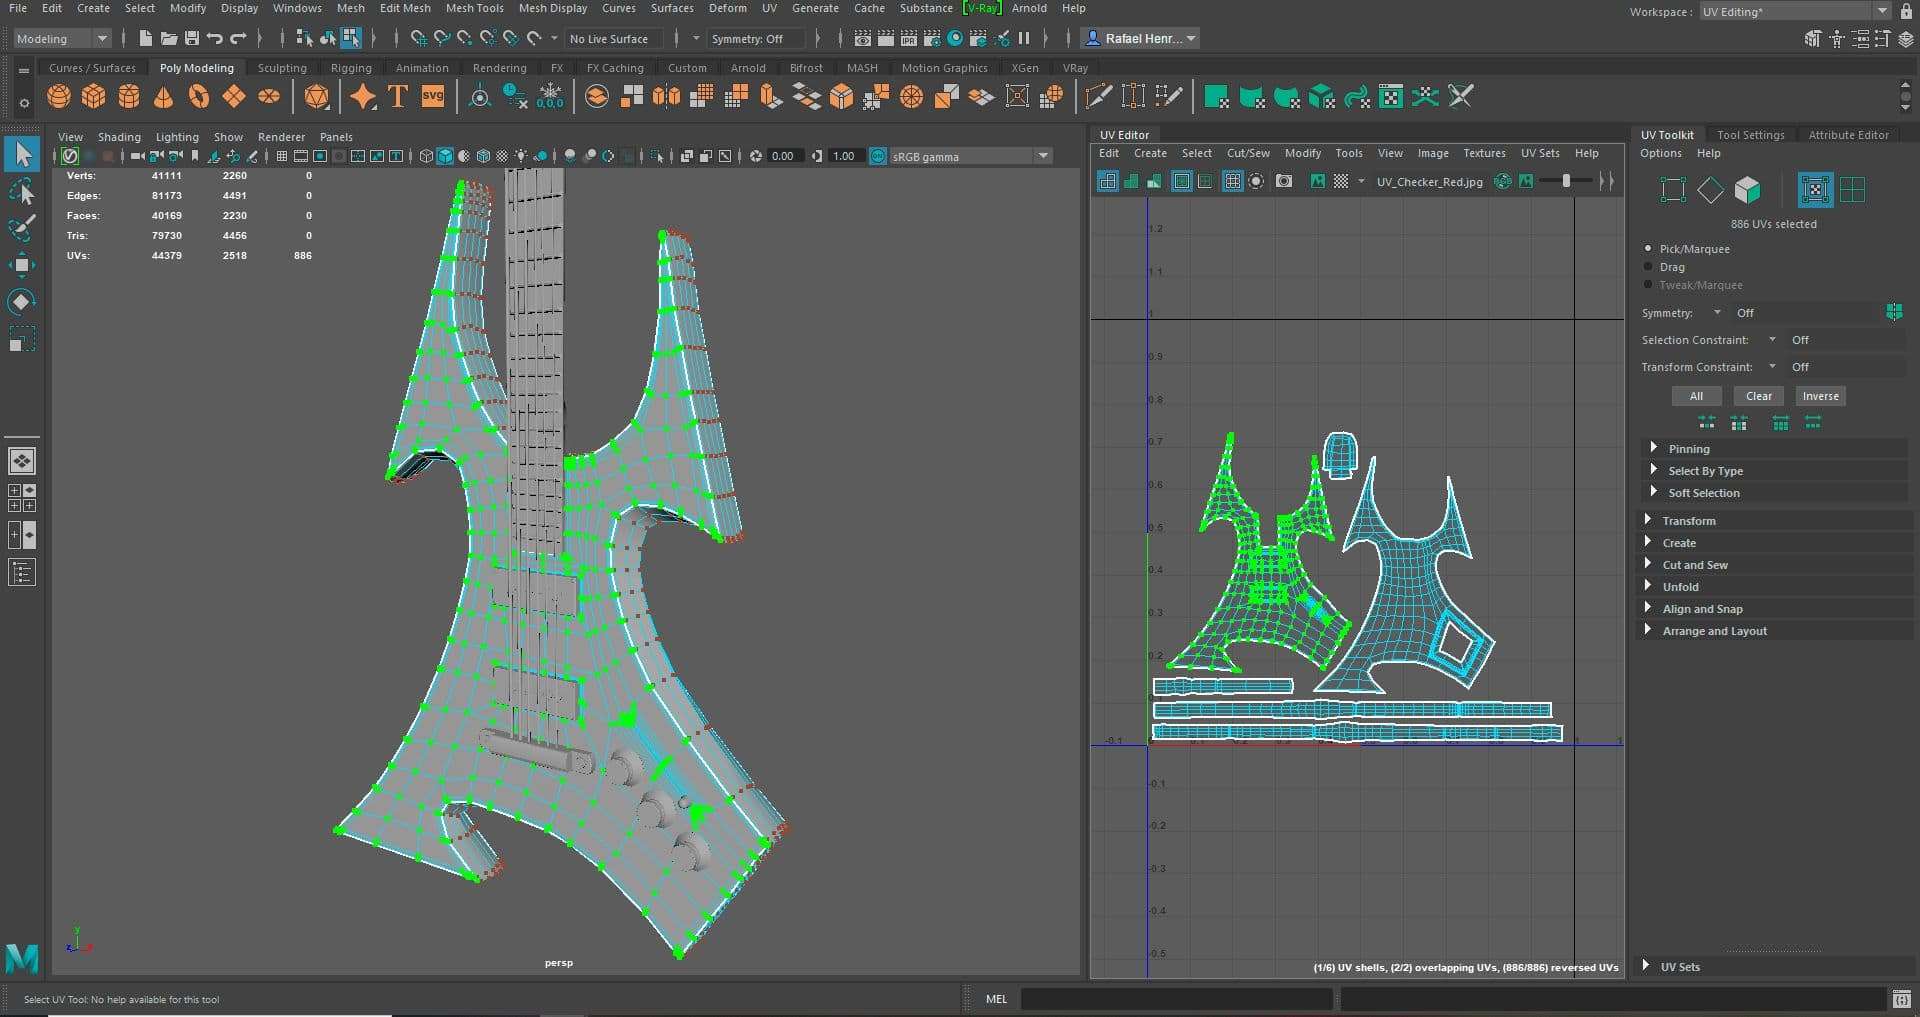
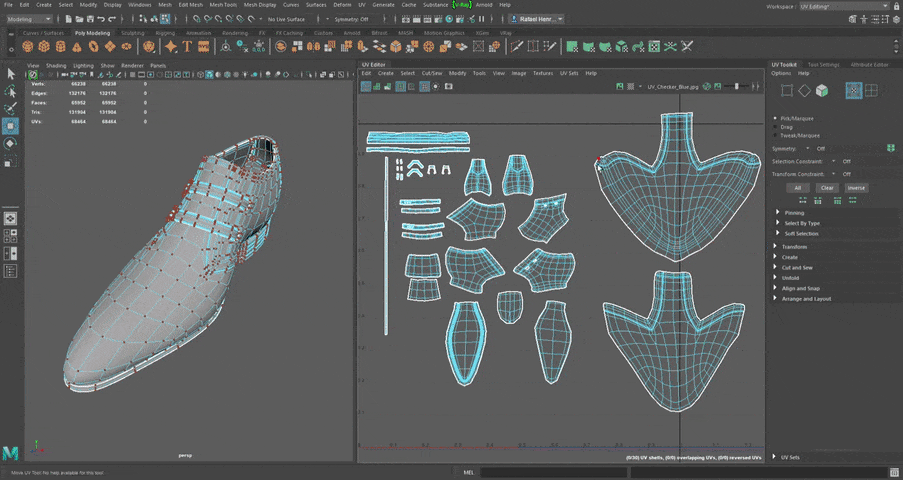
Retopology and UV unwrapping are more technical and repetitive works than other stages, but it's important, especially in production that you find the best loop solution, measure the number of polygons of your new topology, think the best ways to unwrap and organise the mesh to facilitate your work ahead. If you are working on a personal project, don't forget to include this part in your presentation, this will show your clients and recruiters that you know how to proceed through the entire process.
A well-built topology and UVs bring great benefits, some of them are:
I used only Maya in this part of the process, Quad Draw and Unfold for retopology and UV unwrapping respectively. Maya doesn't usually accept large count of polygons, so always bring a light mesh to work with, if in this step you need the details of your high-resolution mesh in Zbrush to make your retopology more precisely, you can use Decimation Master; it is one of the fastest ways to make your mesh light and still keep the details.
In case your character is going to be animated, there are some polygon loops on his face and body you should pay attention so the animator gets more fluid movements to work on.
Your character's final amount of polygons depends on its purpose, when made for games the mesh is usually much lighter for a real-time rendering optimisation, but in animation, as the film is all pre-rendered, it is possible to have a larger number of polygons. Each company has its own pipeline.
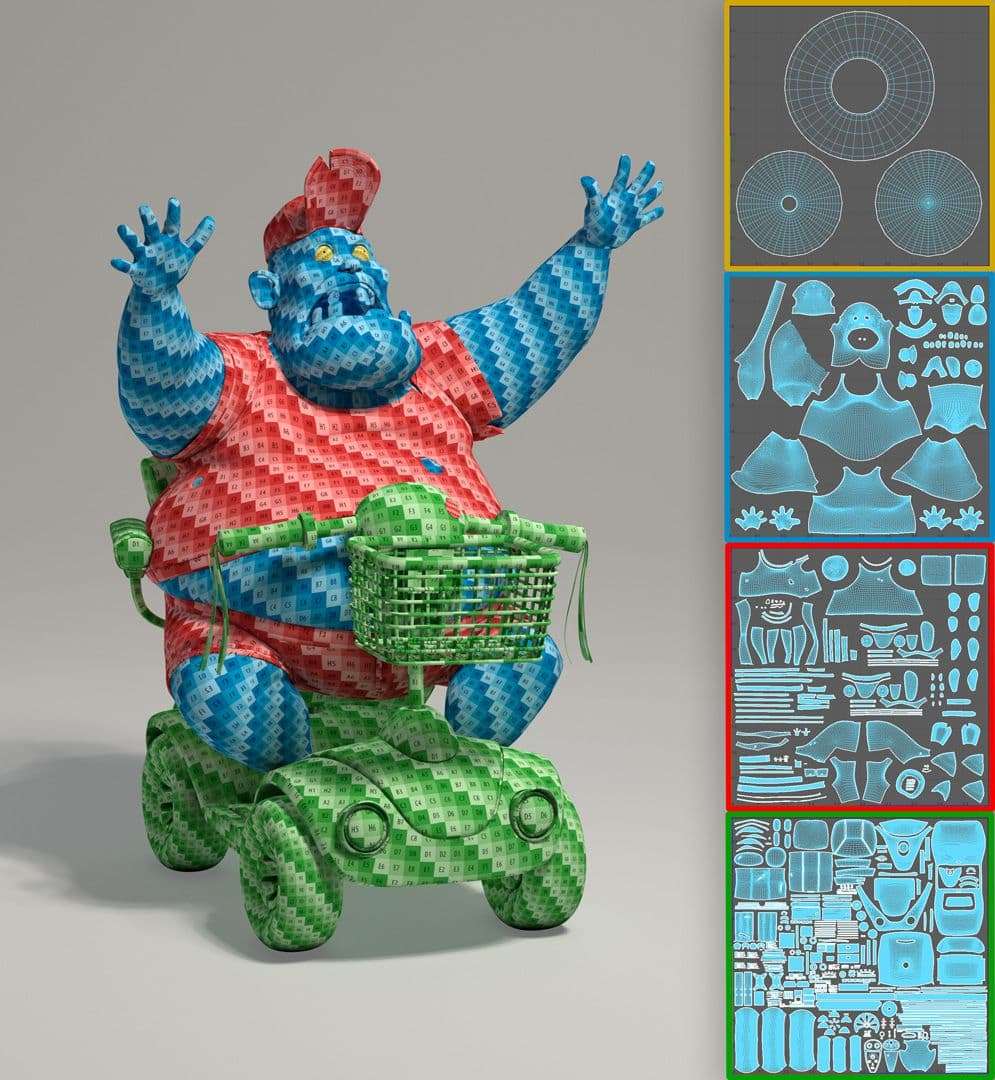
Adjust your resolution according to how close your render camera will be to the model, in my case I used 3 different UV islands, one for the body, other for accessories and one last for the Scooter, each with 4K resolution. Remember that besides making your cuts for the unwrapping in hidden areas, use a checker to make sure the entire UV resolution of your character has the same size, so the texture quality will not be different in each part (unless you want it). An easy way to keep everything the same size is by using Texel Density in Maya's UV Toolkit.
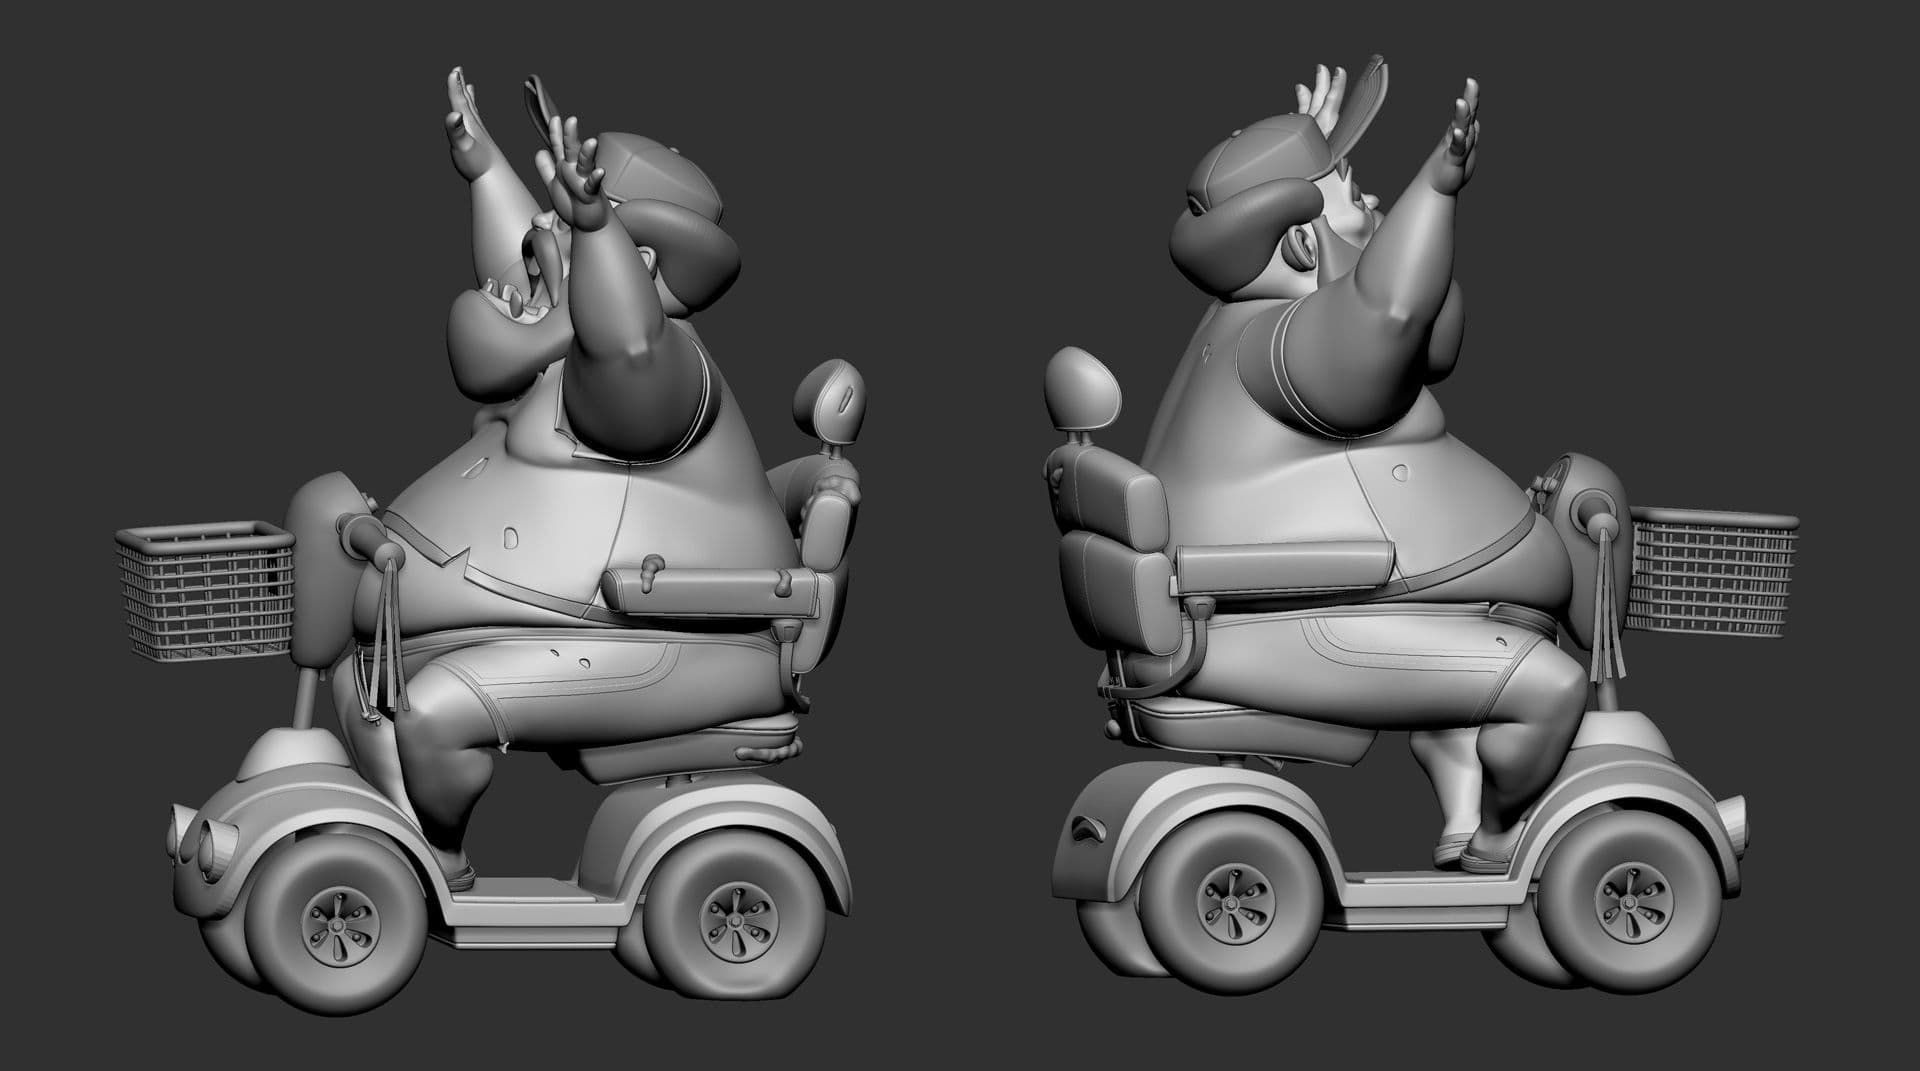
After finishing my retopology and UVs, it's time to begin the last step before we go to the textures. Here we start bringing more life and story to our character, taking out his symmetries and posing his body and objects according to the reference, depending on how extreme your pose is, you may have to redo some parts. Everything was done inside Zbrush using only Transpose Line and Transpose Master. I also like to keep my symmetric version in another file and use it when I'm making my textures.
I like to work in the lowest possible subdivision and separate each element into different polygroups, that way I have more control over the masks and modifications. Here is where Transpose Master comes handy, it will make only the first subdivision level of all Subtools marked as visible available and group everything into one layer, transforming each Subtool into a different polygroup. After you are done posing you can easily recover all subdivisions and SubTools again. The GIF below shows this process.
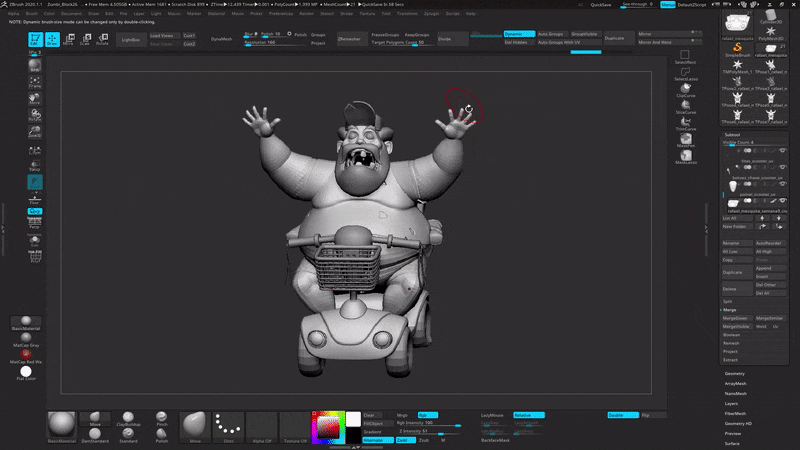
To help you find a pose that makes you happy, it's always a good idea to check how your character and background scene are behaving inside the software it will be rendered (Maya in my case) so you can adjust the camera settings, angle and pose to get a sense of how it will look in your final render. In this case, the concept artist did a great job on the perspective, but sometimes we will have some discrepancies between the 2D concept and the perspective in the 3D software.
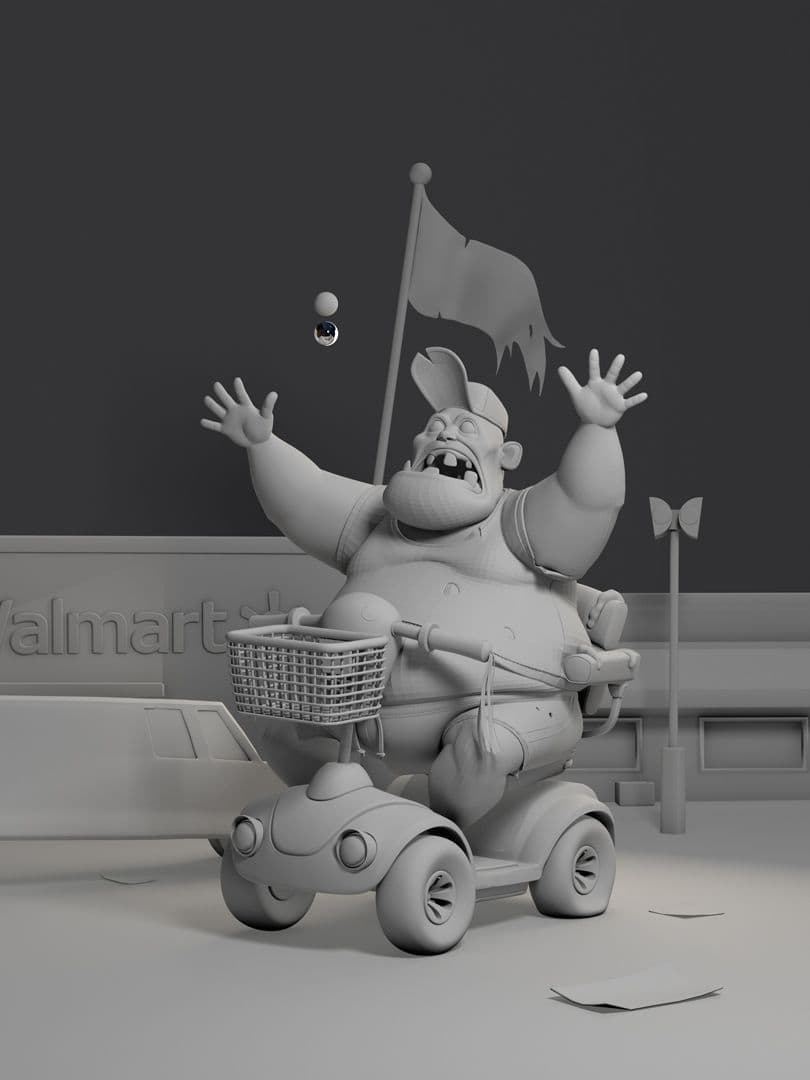
After the character and background are framed I usually create a neutral lighting setup, nothing too complex so it doesn't interfere with the texturing process later on. The setup consists of 1 HDRI and 3 Vray-Lights, composed by a stronger main light, a fill light, and a rim light to highlight the character from the background.
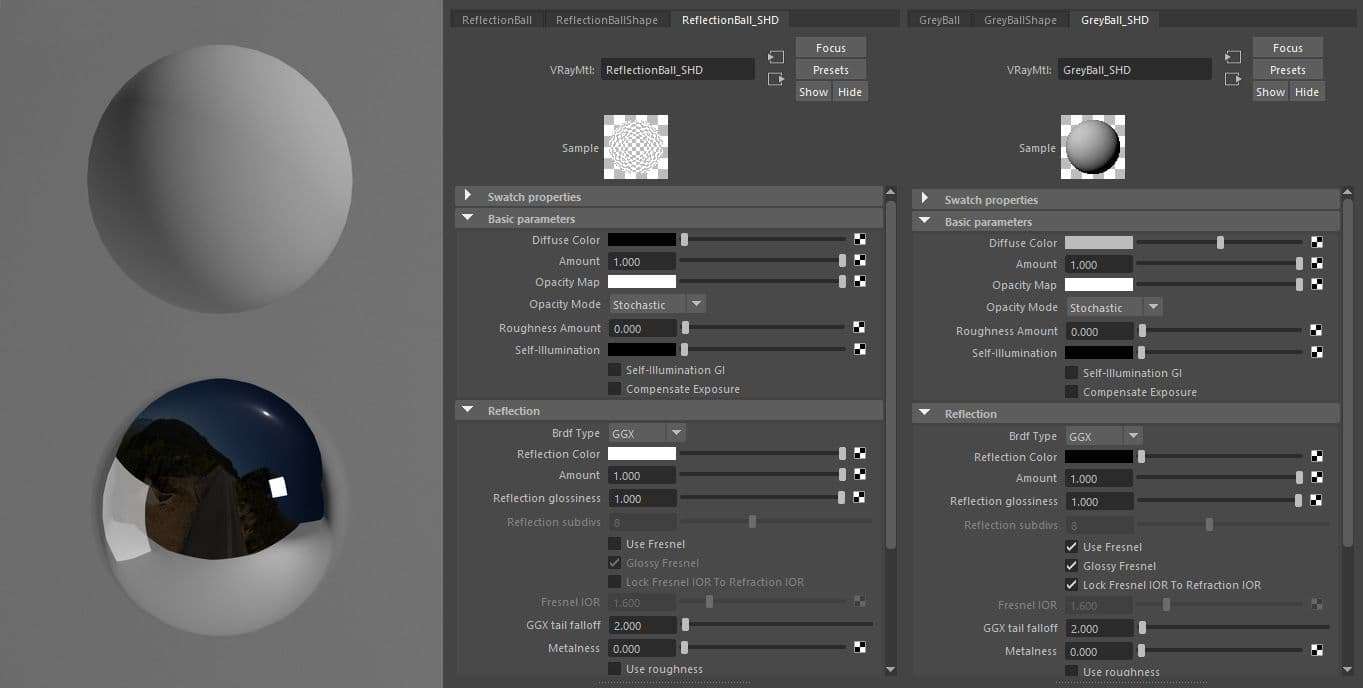
Be careful to not exaggerate in this step, as we still don't have textures and shaders, it is important to keep the lights with low contrast so you don't get confused creating the materials. To help you create the lights you can use some reference spheres that are commonly used in film productions, these spheres capture the source and distribution of lights in your scene, making it easier to control the direction and intensity of each one.
Now it's time to take our character to the next level, we'll add colours, tiny details that weren’t sculpted and generated along with the displacement map, and change how the light will behave in each object.
The first step is to analyse the references and create a plan, some key points are to think about which colour variations are most present, how damaged the object is, and how everything is behaving with the light. Use it all to help you create a story for your character.
During this character development I used only Zbrush and Substance Painter to create the textures. In this stage I like to leave Photoshop and the scene created in Maya open to analyse how my maps are looking inside V-Ray, not relying only on the Substance Painter viewport. You must do these checks to get a more precise idea of what is working and what is not in your composition. With Photoshop open it’s easier to make notes and use some tools for quick colour and texture tests.
I used my symmetrical mesh to create the textures, being able to work with the mirror tool in some parts when necessary. After that, you can apply the textures to the posed model inside Maya, as they share the same UVs everything comes out just right.
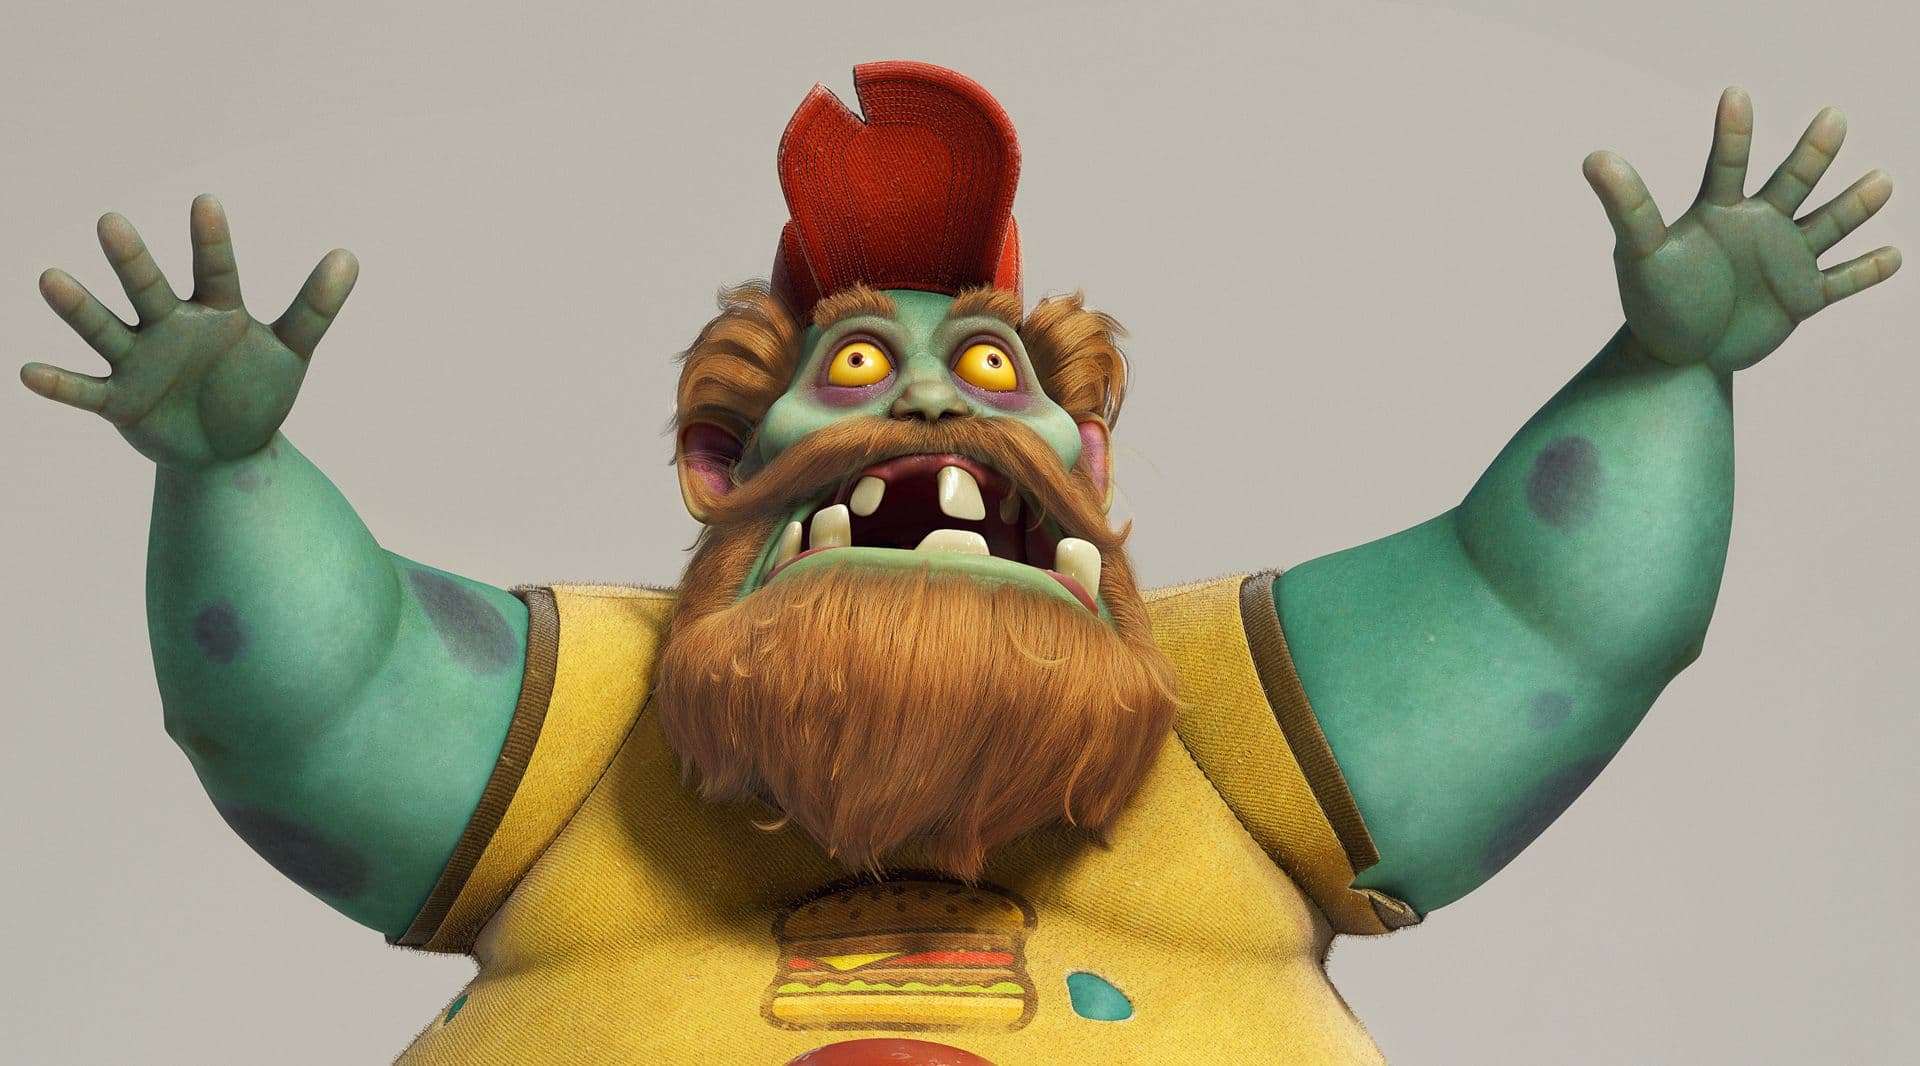
The skin texture started inside Zbrush, it was done with polypaint, using alpha to give variation, and a brush with low intensity in spray and colour spray mode. As you add shades of different colours the character's skin starts to get rich in details and variations. Always keep good references by your side, it's important to understand how colours work on a real human face so you can translate it to your model, even if it's a stylised version. After feeling good with the painting in Zbrush, I like to export the map and add some new details with Substance Painter.
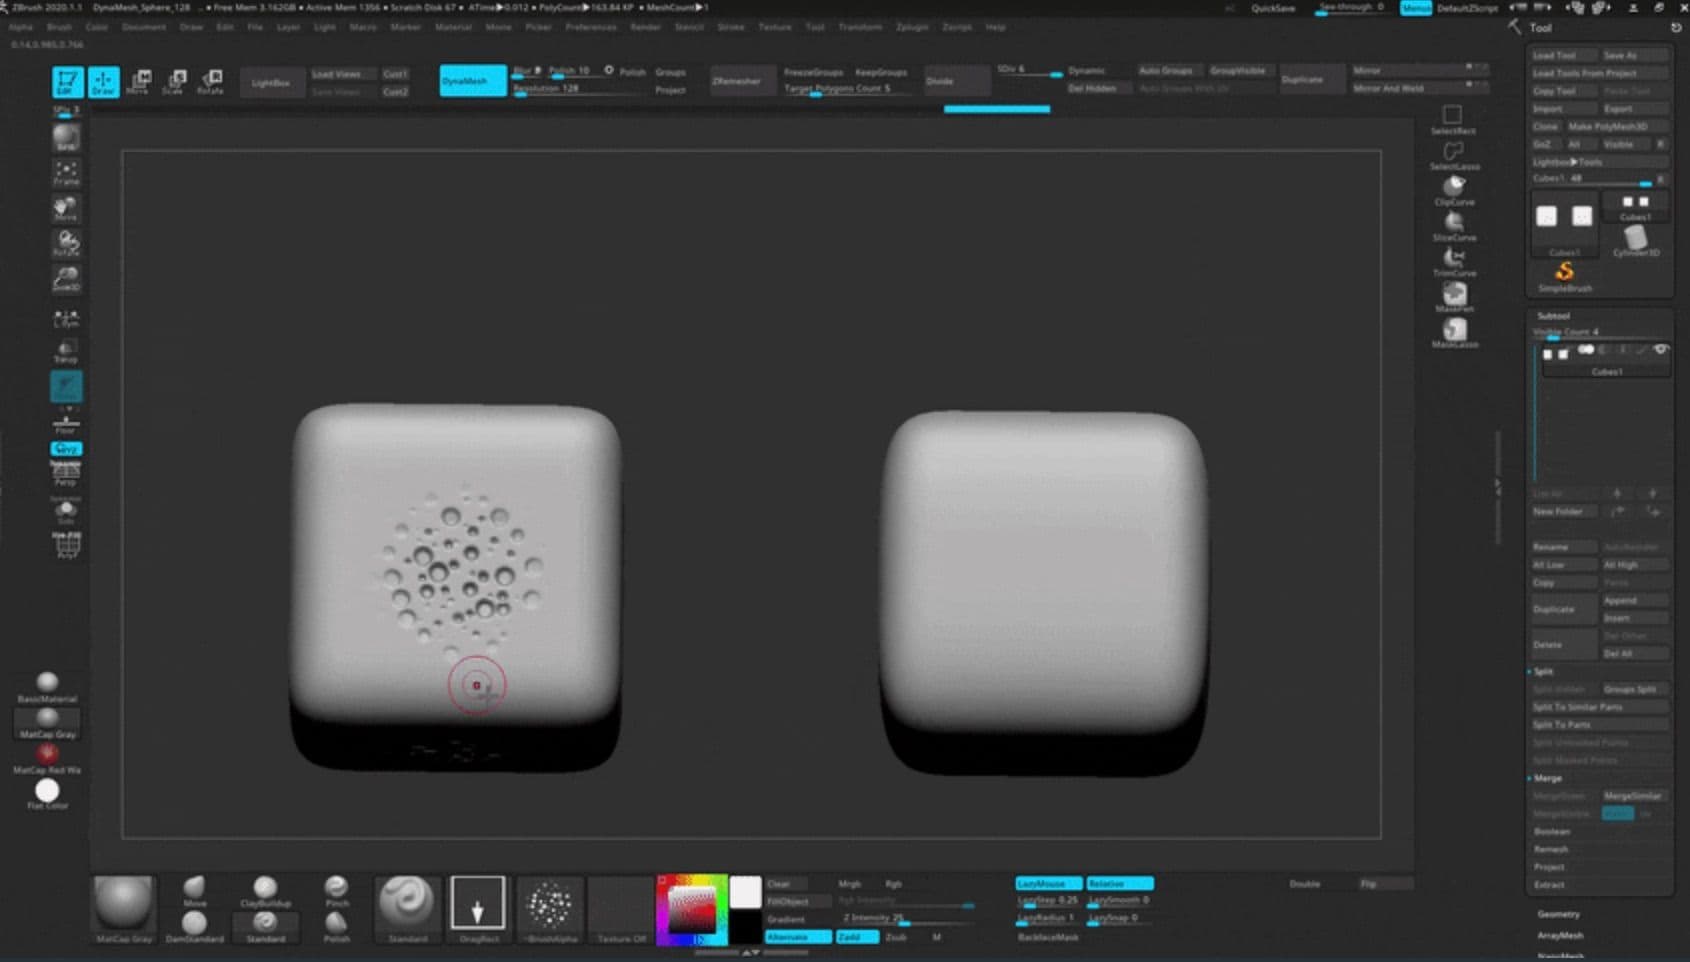
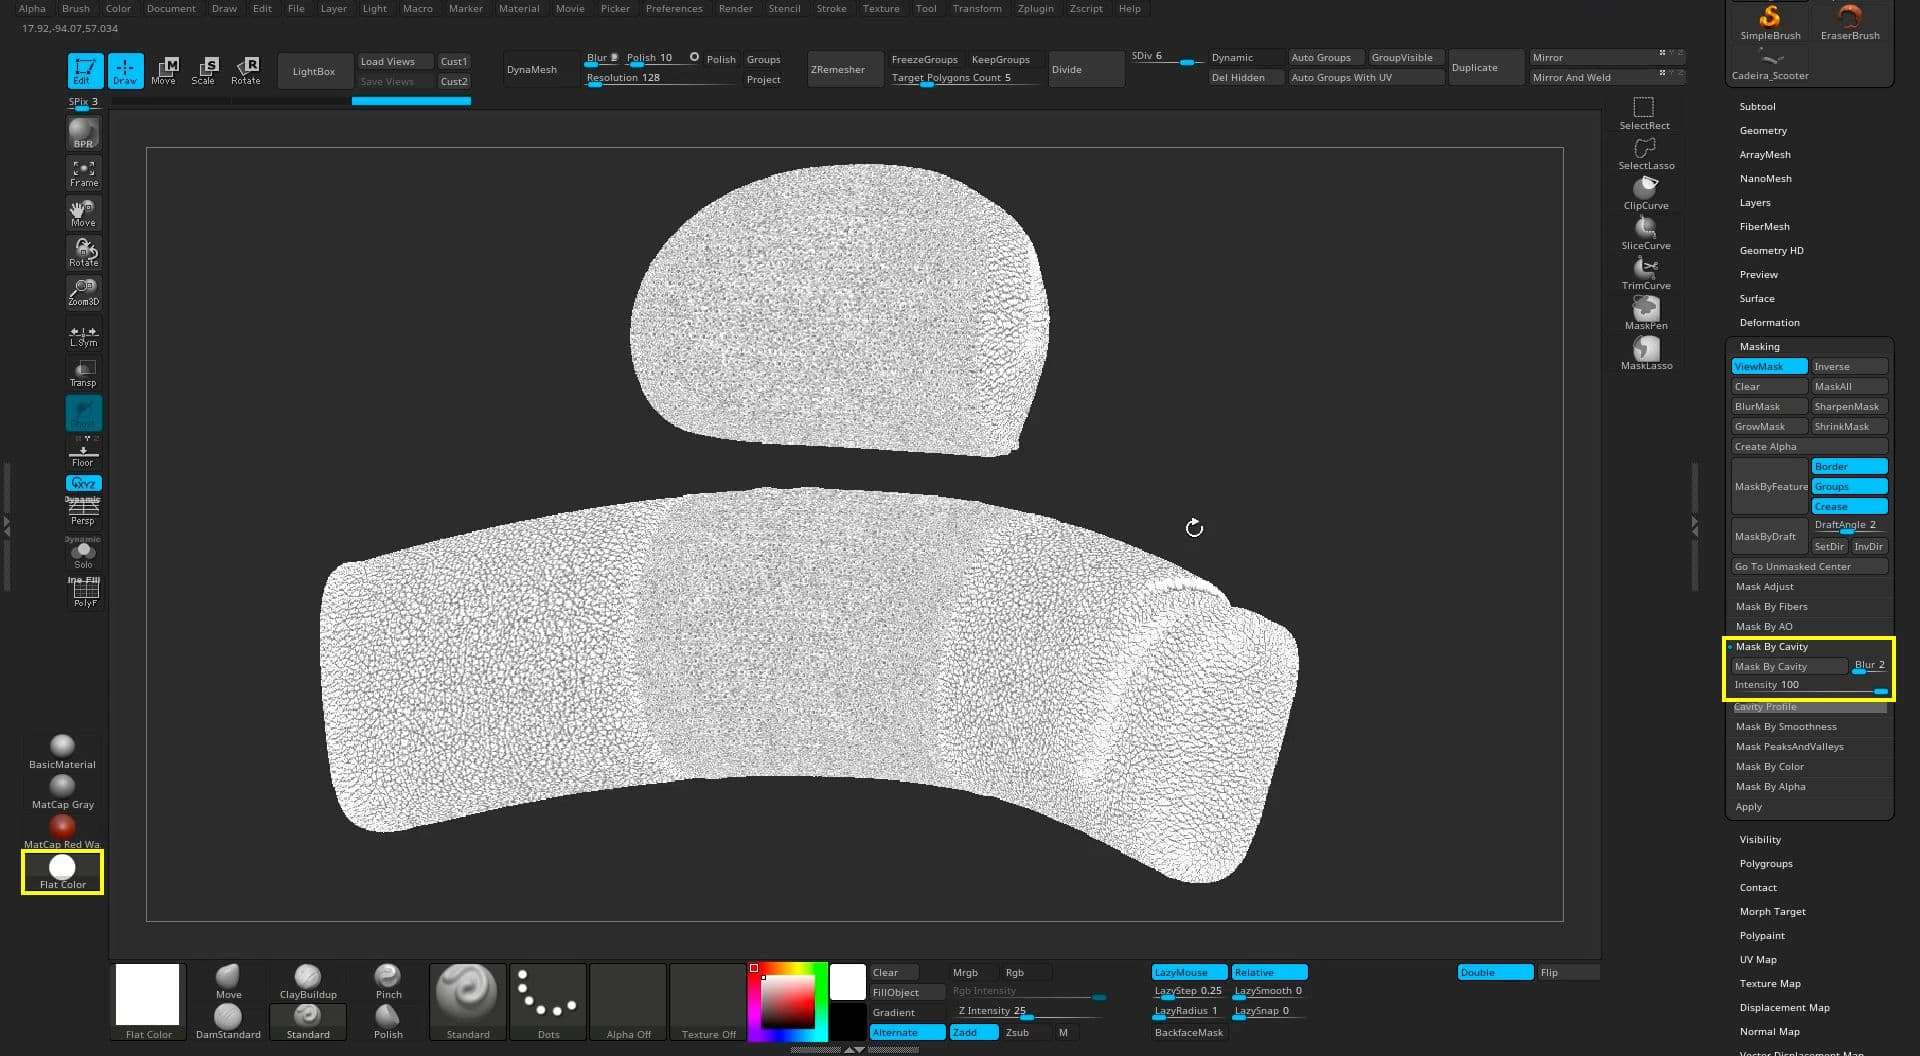
Zbrush is also great for generating some auxiliary maps that can be used for your textures, as an example, you can use all the details of your high-resolution mesh to generate a cavity map, and inside Substance use it as a mask to add colour variation and roughness to those specific locations.
The textures of clothes, accessories, and scooter were made only with Substance Painter. The first step is to analyse the references and create a plan, some key points are to think about which colour variations are most present, how damaged the object is, and how everything is behaving with the light. Use it all to help you create a story for your character.
A preference I have is to add layers according to how I think the object was wearing over the time, for example, the story behind the object, how it was when it left the factory, what possible damages came first, what kind of dirt it acquires over the time, it helps me to start planning the texture, remember that there is nothing in the real world that is 100% clean or polished, variation is the key.
Try not to overuse the pre-made materials that Substance Painter offers, they can easily pop up especially when applied on objects close to your render camera. Use them as a complement, add a smart material and analyse how they are made layer by layer and if any of them can be incorporated in your texture, this can bring variations that you may not have thought of.
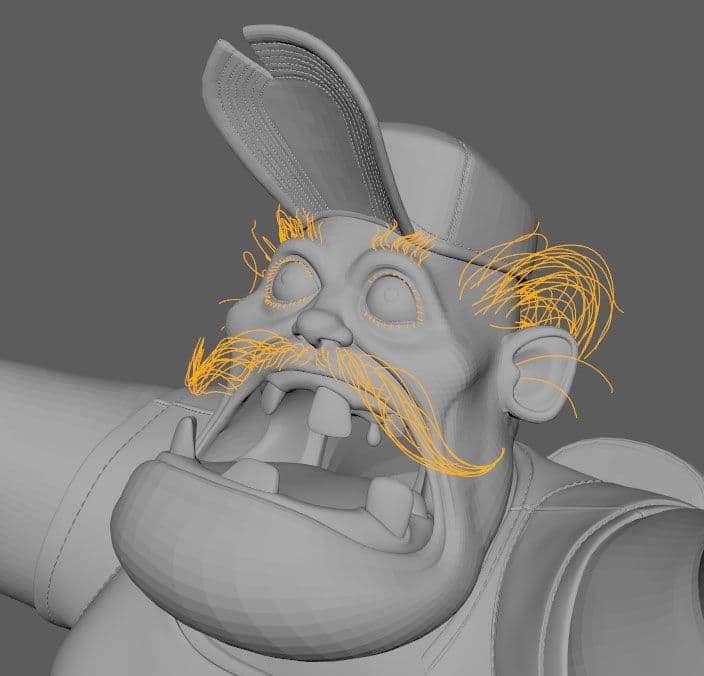
The character's hair was done in Maya with XGen. Before we move forward, if you haven't done this yet, it is important that you Set Project in Maya before starting the grooming process, that way all the generated files will be saved in your character creation folder.
The first step is to separate each part of the character's hair into groups and create the mesh you will use to work on each one, for example, a mesh for the beard, one for the body hair, another for the scalp, and so on. To create these geometries you have to select a part of a version from your model that does not have a high amount of polygons and has a good topology and UV, extract the mesh from the original model and then delete all the exceed polygons that will not receive any hair, and finally, don't forget to rename your new geometry.
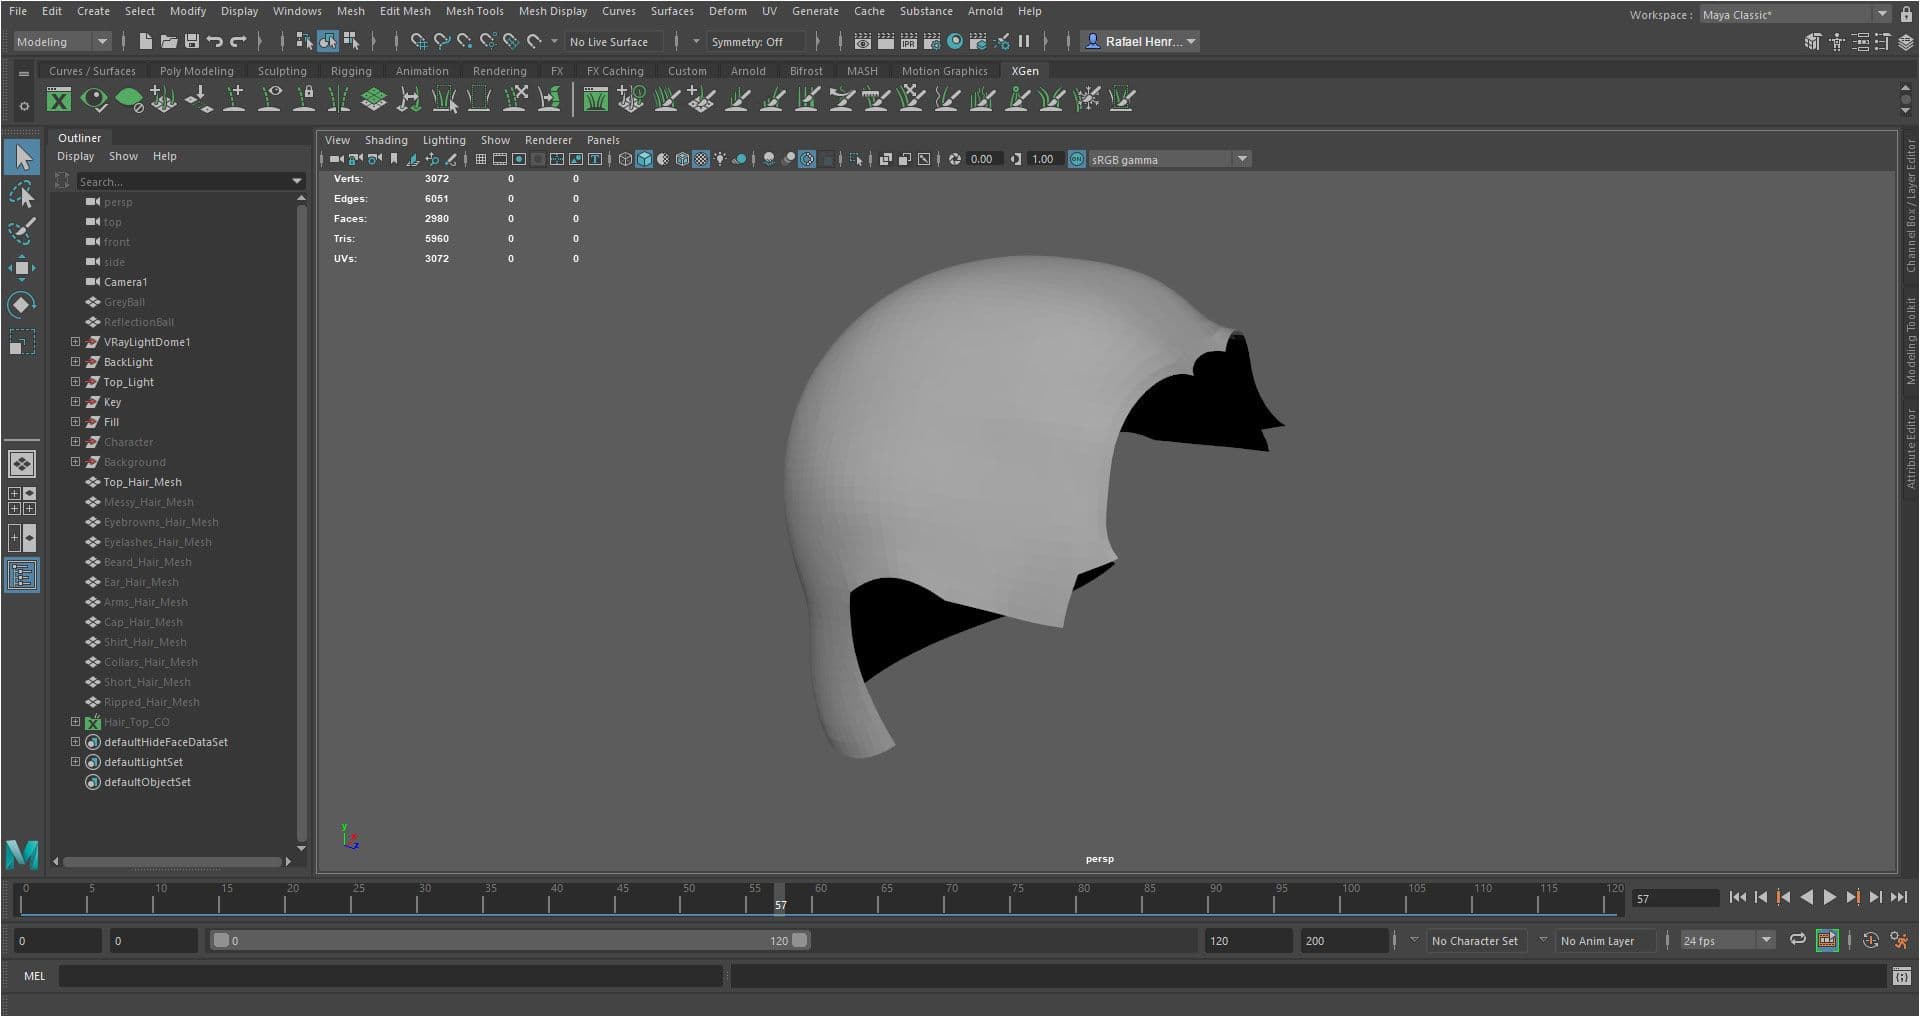
It is important that every geometry has a safety margin, an area bigger than necessary for creating the hair, so if you need to make changes in the future you already have space to work in that geometry, otherwise, it would be more difficult. Another tip is to make sure that the scalp geometry UV has good size, so when you paint maps and masks you don't have a problem with low resolution.
In this project, I divided into 2 different collections, body hair and clothes, each with multiple descriptions, like beard, mustache, eyebrow, etc. It is important that you spend time organizing and properly naming your collections, descriptions, and maps created with XGen to avoid bugs and help you with possible backups, you never know when the program might crash during the process.
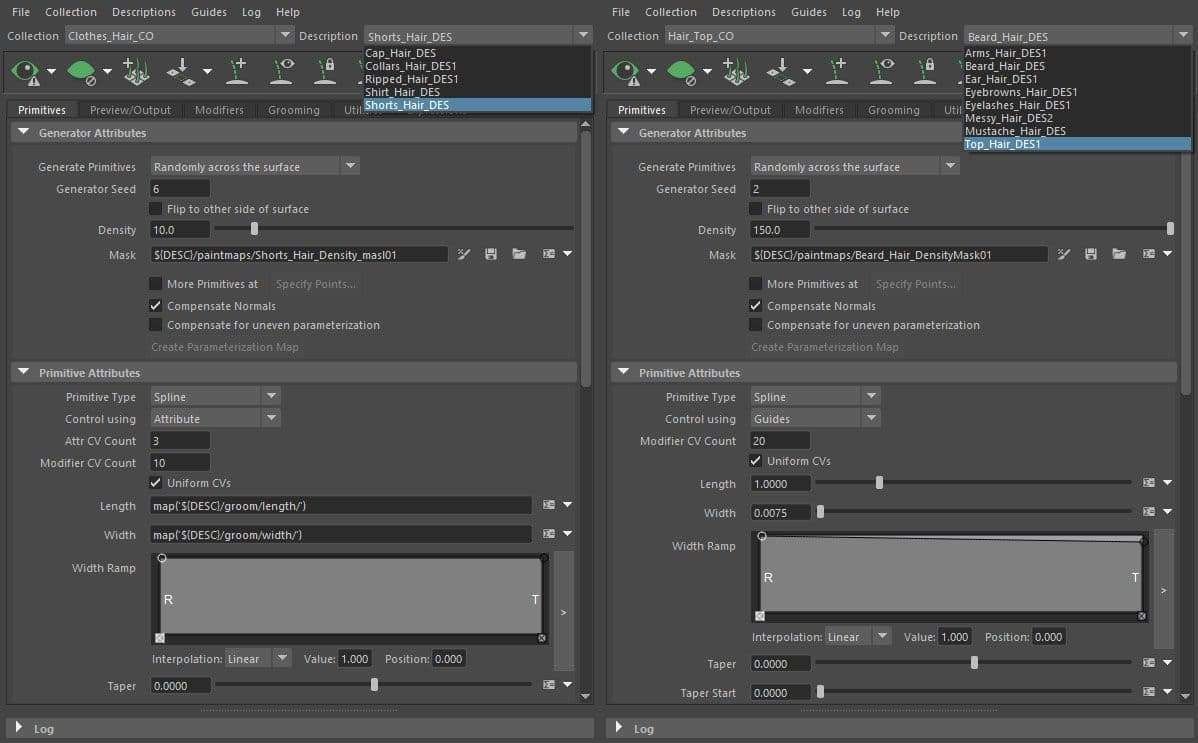
This is a division I use to organize my process, you can separate in even more groups if you prefer.
After all this, it's time to start creating the actual hair, everything is basically done with guides, maps, modifiers, patience, and many tests. Below you will find some points that are worth paying attention to:
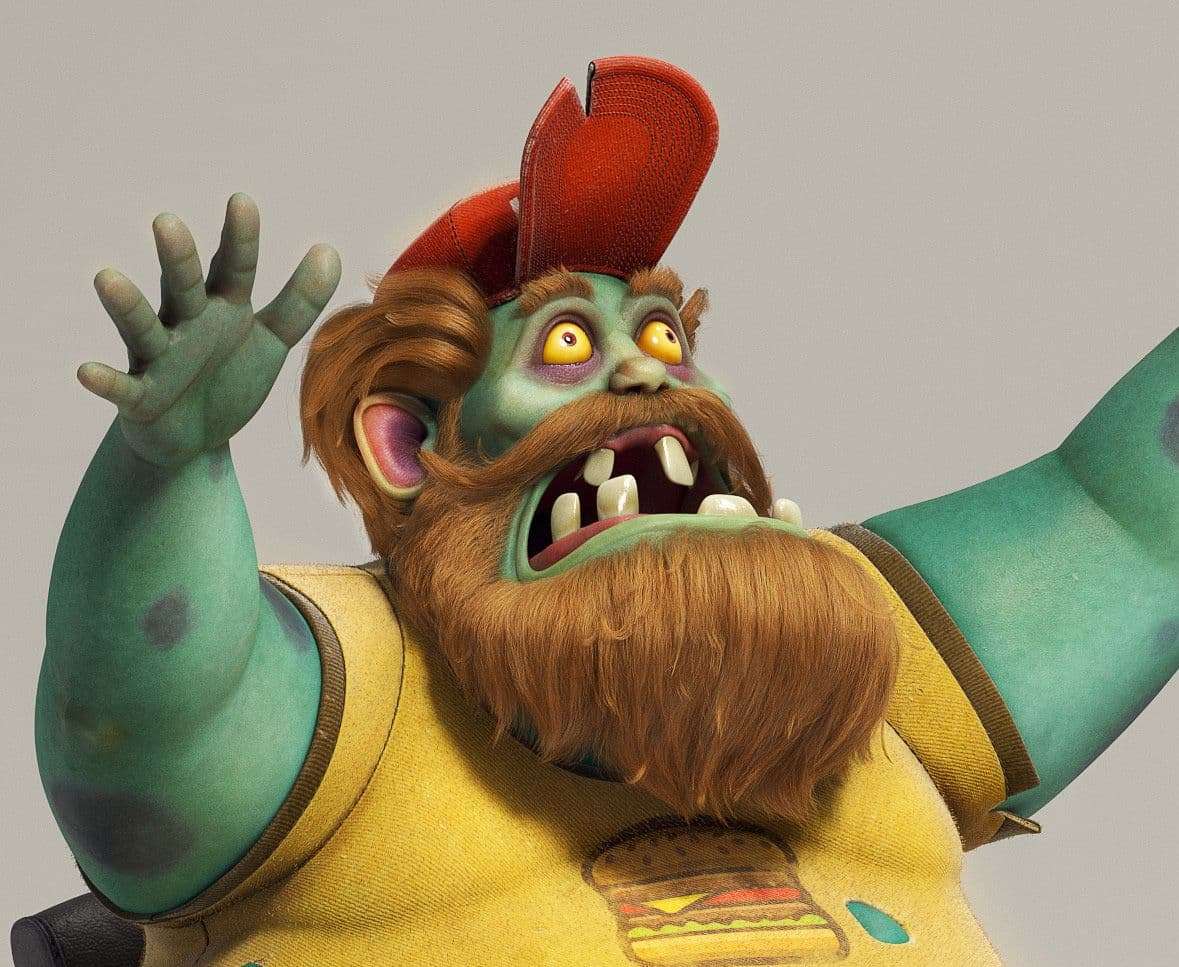
When my textures are done, I start working on creating and adjusting the materials inside V-Ray and also improving the overall light so that it matches the mood from the concept.
After rendering some images using a neutral light to create the shader, I started to give more contrast to the scene and added some lights around the zombie to achieve a composition that would bring more attention to the character. Started by changing the HDRI to one with a low-intensity yellowish colour, added 3 more lights, one to simulate the sun, another to help brighten the scene, bringing more bounce light to the background, and one last behind the character's ear to bring up the subsurface scattering.
If you are looking to learn more about lighting, I recommend reading the CG Cinematography Book, it is completely free and has great content on ACES, Color Theory, Gestalt, Lighting, and Composition, rich in details and information.
After importing the Substance Painter maps and adding to VRayMtl, the materials were almost ready, I just made small adjustments to the settings of each object, glossiness, SSS, color saturation, Normal, and Displacement map intensity.
We are finally at the last stage before rendering our final image, with the camera at the correct angle and materials applied to the character, our next step is to configure some V-Ray properties to generate some auxiliary images with our final render. Go to V-Ray Properties> Render Elements tab, there is a list of render passes options, you can choose some of them to help you in post-production, in this project I only used these:
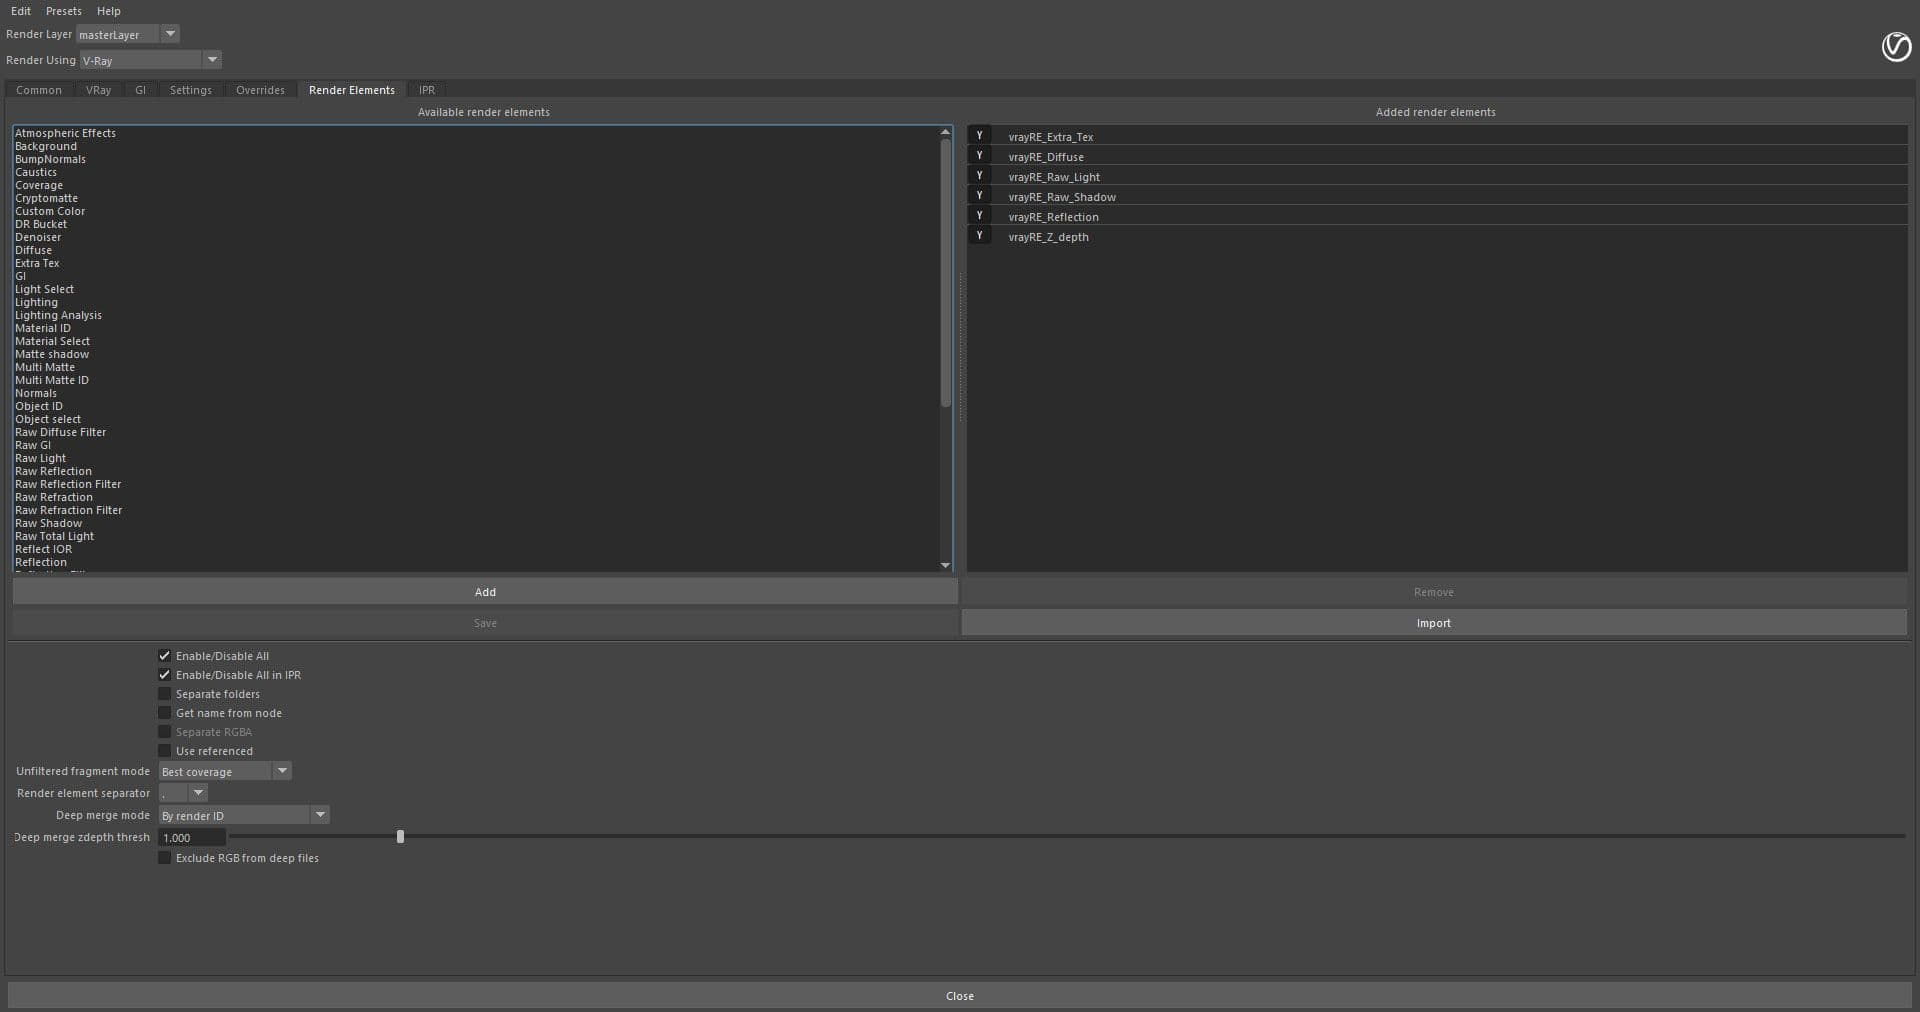
Render Elements or Render Passes, is a way to separate into parts what we see in our final render, we can get all the components such as colour, reflection, light, shadow, AO, among others, which gives us more options and control during the edit in Photoshop. Here and here you can access if you want to learn more and see some examples of these passes from V-Ray.
Inside Photoshop your post-production depends on your final render, the emotion you want to give your scene, and if you need to correct anything that went wrong. There is no magic recipe, you just need to keep in mind what is the main focus of the image, and work in a way that you don't end up taking the attention away from what matters. Don't forget your references to be inspired in your post-production too.
This was a great project to improve my process at all stages, I would like to thank my friend Eduardo Silva for helping me with great feedback during this character creation.
If you have any questions or suggestions feel free to send me a message!