Finding Your Style: Discovering New Techniques for Your Creature Art
Arlinka Viljoen, a self-taught artist, aims to work in game development, crafting landscapes and mythical creatures. Fuelled by her passion for dragons and legends, she explores techniques for creature art to discover her artistic style.
Self-taught artist, Arlinka Viljoen aspires to immerse herself in the world of game development, contributing to creating landscapes, captivating characters, and mythical creatures. Arlinka's love for dragons, steeped in myths and legends, has served as a constant source of inspiration, driving her to not only engage with games but to create them. In this article she explores how discovering new techniques for your creature art, might help you find your artistic style.
Start of a Journey
The world of digital art is a vast sea of different mediums and art styles, from Concept Art to Digital Character design and animation. Finding your own unique voice amidst this diversity can be challenging, given the abundance of established artists and styles. However, it's crucial to recognise that there's always room for growth.
My journey in digital art has involved studying various mediums, including Game Art, Environments, Concept Art, and Character Art. Through this exploration, I discovered my greatest skill and passion: creature art. From childhood, mythical creatures like dragons have captivated my imagination. Many of the beloved characters in video games and films, such as Smaug from The Hobbit, Alduin from Skyrim, and the Dementors from Harry Potter, had inspired me. Dedicating significant time to experimentation and refining techniques, I've continually found new ways to enhance my creations. Over the past year, I've experienced substantial growth as an artist through dedicated study and practice, and I'm excited to share the insights and lessons learned through my latest projects.
Preparations
No journey can be completed without proper preparations. While you may have a clear vision for the creature you want to create, referencing is crucial in the creative process. Consider the creature's story, its movements, interactions with the environment, and the conditions of its habitat. Having anatomy references and studying animal or creature concepts can provide invaluable insights and inspire new ideas and details for your design.
Gathering references or concept images from games or movies can be invaluable, especially if you aim to practice or incorporate existing art styles into your designs. Researching various art styles is essential for developing your unique style, enabling you to generate fresh ideas and experiment with different techniques. In my recent project, I extensively studied the creature designs in Guild Wars 2, focusing on their scales, texture, and intricate details.
Tools of the trade
ZBrush offers a plethora of fantastic brushes, though navigating them all can feel overwhelming. Start by mastering the basic brushes, understanding their capabilities and limitations. Once comfortable, explore additional brushes through experimentation - random strokes can lead to unexpected discoveries. I've found some excellent free brushes, such as those from ZBrush Guides and Michael Vicente's Orb brush pack on ArtStation.
For this project, I primarily utilised the basic ZBrush brushes and my custom-made creature VDM brush pack.
Explore
Stretching the main shapes
In art, there are no accidents; it's a blend of intention and chance. Embracing happy accidents often leads to innovative techniques. During the design phase, I begin by sculpting random shapes from a basic sphere, unafraid to experiment and potentially 'break' the mesh, as it can yield intriguing textures post-Dynamesh. I picked up this tip from Ashley A. Adams on Pixologic's YouTube channel. Learning from fellow artists can spark creativity; by building upon their methods, I've uncovered a technique that's become a staple in my projects.
When Dynameshing the stretched mesh, it generates new shapes and lines that can be exaggerated to accentuate medium details and the creature's anatomy. This serves as the foundation, albeit initially appearing messy. Establishing anatomy, design, and silhouette is crucial during this block-out phase. Avoid delving into smaller details; instead, concentrate on defining the larger and medium shapes.
Stretching the medium shapes
Expanding on this method, you can introduce more detailed medium shapes by masking areas for stretching, creating intriguing curves. This technique is particularly handy for crafting horns, spikes, and feathers in concept designs. Exercise caution, though, as excessive detailing can complicate retopology. Consider grouping similar shapes, as I did with the horns on my final dragon. While suitable for concepting or 3D printing, finer details like feathers or smaller spikes may not be practical for production in games or movies.
The process of masked stretching.Masked stretching applied to the final dragon’s horns and spikes.
💡
Here's a good example of this technique in action for Concept Art, Illustration, and 3D printing—utilised for feathers and spikes.
When it comes to design, the most important aspect is readability. While artists may revel in details - I'm guilty of this myself—overall shape holds equal, if not greater, importance.
💡
Emphasizing shapes enhances the 'coolness factor' and elevates the creature's visual language for the audience.
Tools such as the move, snake hook, inflate, and pinch brushes play a pivotal role here. They enable significant modifications to existing shapes, enhancing their visual appeal and dynamism. Additionally, VDM brushes prove invaluable. I employed my custom-made spike VDM brush to incorporate spikes and edges into this example’s serpentine hood.
To amplify the main dragon's silhouette, I accentuated the horns and introduced ridge-like spikes on the head using the spike VDM brush. Further, I elongated the teeth using the snake hook tool and refined their sharpness with the pinch tool.
Discover
This is where you find your own voice within your art. Learning new techniques from other artists can lead to discovering your own unique style. For me, I've developed a method called 'texture stretching,' which accelerates conceptual sculpting by incorporating detail work into the initial stages. Using VDM brushes, I imprint textures onto pre-stretched shapes like spheres, then use the move and snake hook brushes to stretch them further. This process yields intriguing details that serves as a foundation for future elaboration.
Texture stretching, particularly when combined with other brushes, can yield remarkable results. Experimentation is crucial. For instance, utilizing texture stretching alongside the nudge tool with backface mask enabled can produce a feather plume effect.
Don’t be afraid of using external resources
As an artist, I've grappled with reluctance to utilise external resources like brush packs or photo textures. However, consider this analogy:
💡
when a clay artist purchases new tools, they don't dwell on not crafting the tools themselves.
Incorporating external resources, such as VDM brushes, can significantly enhance your work.
You needn't necessarily purchase VDM brush packs, instead you can create your own with photo textures. Websites like Pexels, Unsplash, and Pixabay offer free royalty-free images for artists. In this project, I used my custom VDM brush pack created from photo images. While I won't delve deeply into this process here, for those interested in learning to create custom VDMs and alpha brushes using photos, I recommend checking out FlippedNormals on YouTube—they provide a comprehensive tutorial on the process.
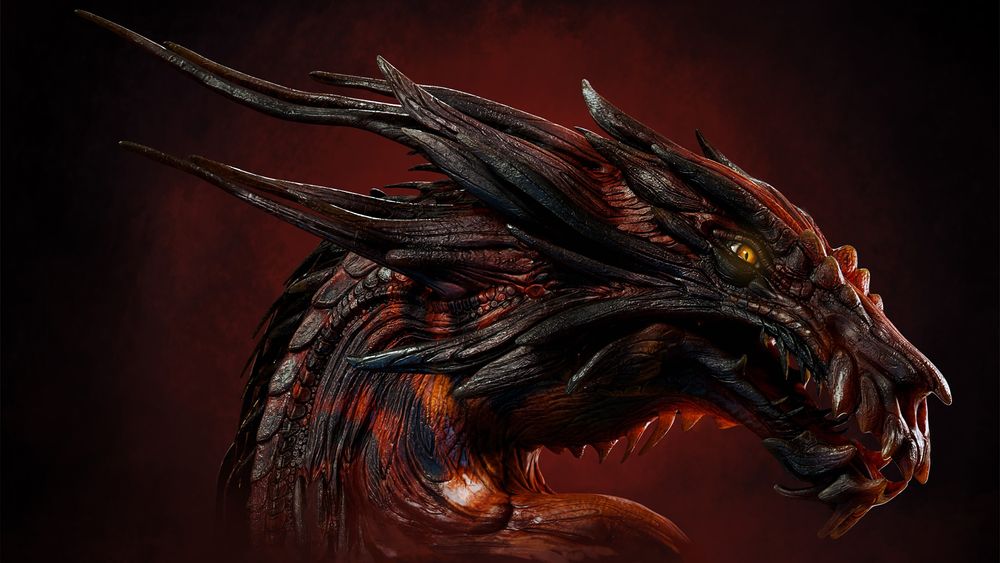
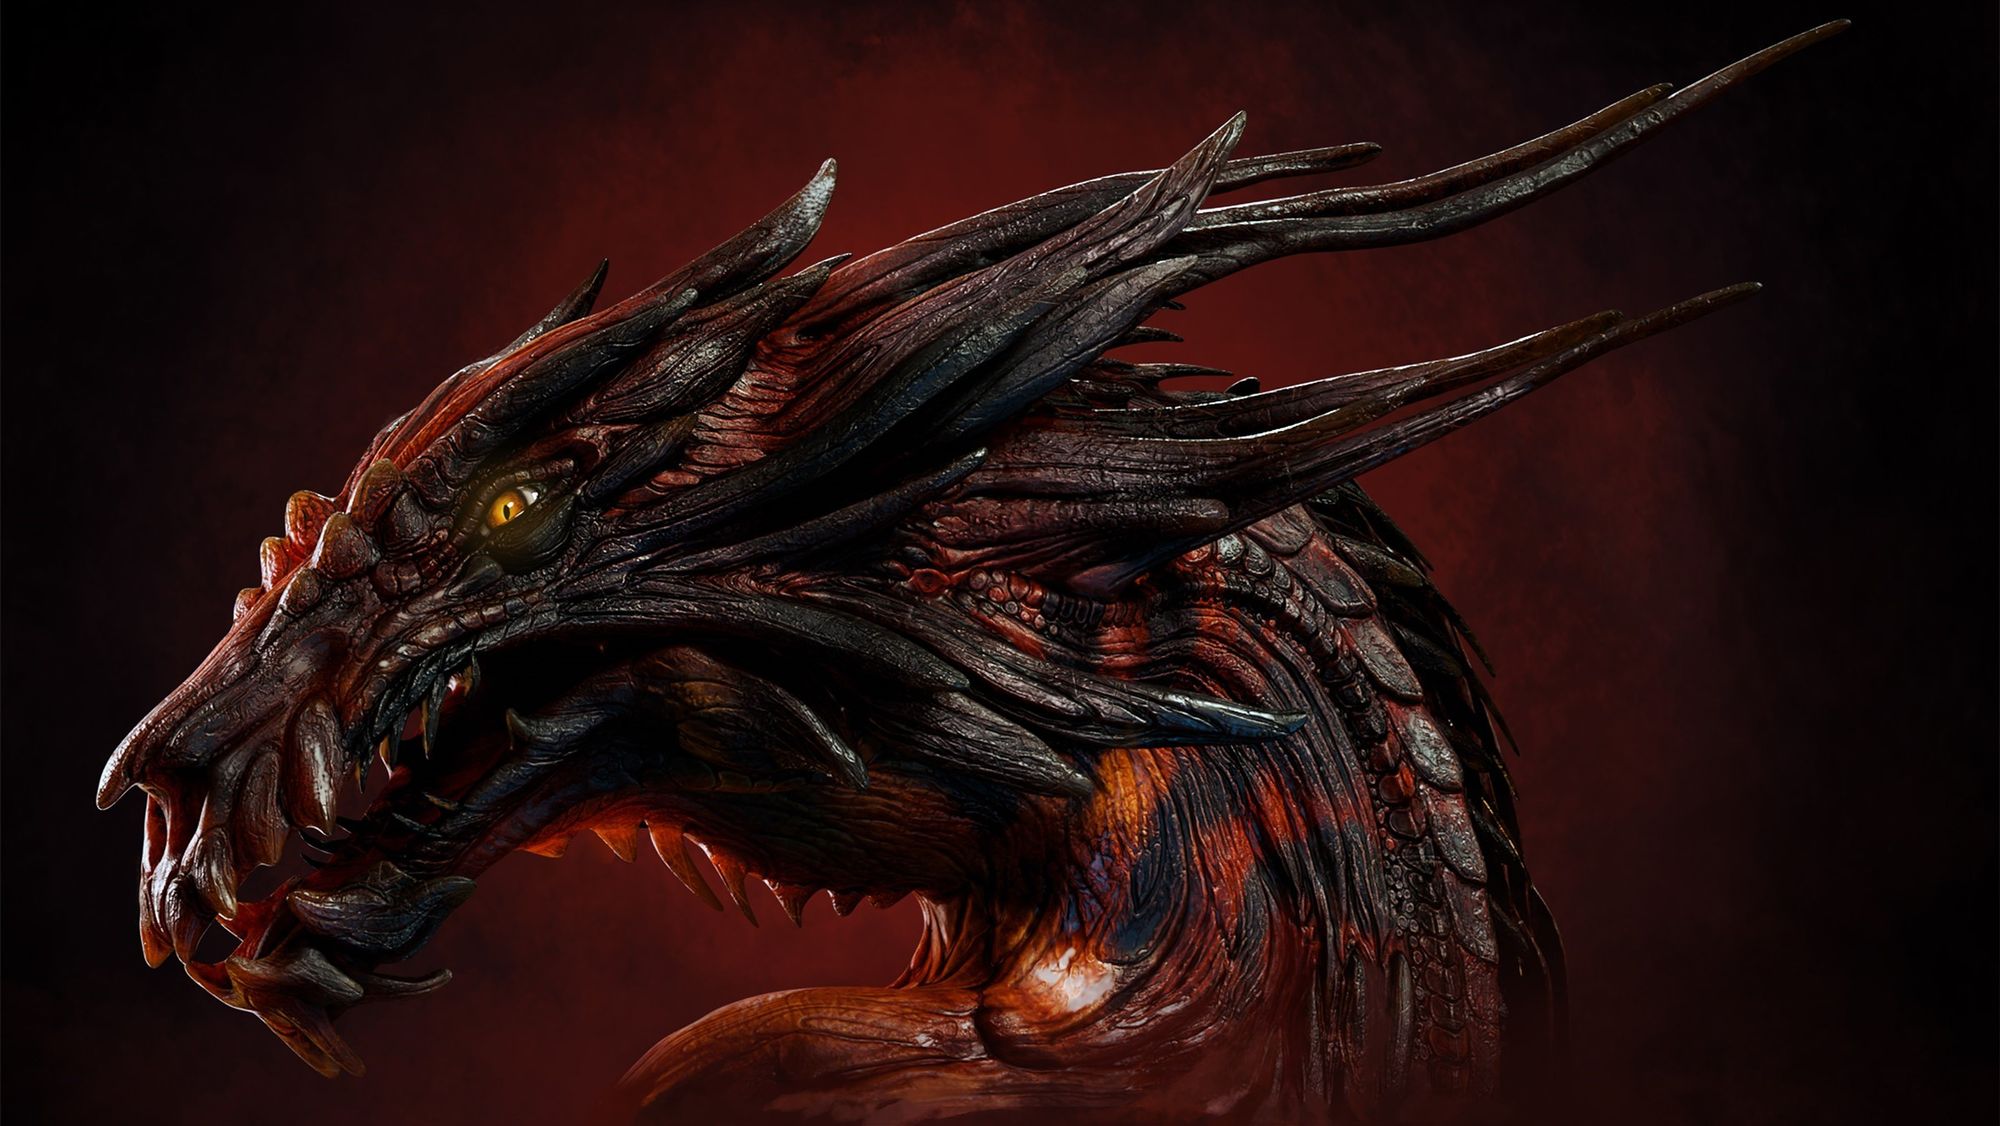
The Dragon
Returning to the project, I crafted a dragon bust using this newfound texture stretching sculpting technique. The primary goal was to experiment with the new style and enhance my texturing skills.
Block-out
Unlike my usual approach, I focused solely on sculpting the dragon's head for this bust. The design unfolded organically, with the neck and spikes inspired by the face scales and horns. While I initially blocked out the neck, wings, and pose, I ultimately discarded that first concept.
The stretched texture resulted in a fluid-like scale pattern, which I found appealing and decided to maintain that aesthetic throughout the design. Employing the mask tool, I generated multiple closely spaced circular masks to sculpt the horns. By utilizing the move and snake hook tool, I elongated the horns, forming a root-like structure due to the proximity of the masks. This technique created a clustered effect within the horns.
Sculpting organically
The next step involved refining the shapes by breaking them down from large to medium and small. When designing, prioritise larger shapes before transitioning to medium and small ones. While texture stretching established the foundation for the details, it required further expansion and seamless integration. The stretching and masking process often results in hard artifacts and transitions that need smoothing out. In areas with fewer details, such as the mouth, I create detail clusters like the cuts between teeth and the snout, supplemented by smaller details like scratches. Breaking up smoothness is crucial to avoiding a plasticky appearance in organic creatures. Ensuring that even areas with less texture remain impactful without becoming overly busy.
Using the dam standard brush, I carved scales to follow the dragon's bone structure and flow of scales, aiming for a fluid and root-like effect. Imagining scale growth over time informed my cuts, akin to tree bark's development. Researching different reptilian scales, from snakes to crocodiles and desert lizards, provided insight into diverse scale patterns. Researching the horns of herbivores, I noticed how they form ridges over time.
Sculpting with anatomy in mind
Anatomy also offers guidance for detailing, with muscle structure and skin folds serving as pathways for scales and wrinkles. In the example below, I began by sculpting muscles before layering scales along their paths.
💡
It's crucial to adhere to nature's anatomical principles, even with mythological creatures.
Experiment with these pathways to infuse uniqueness or supernatural elements. Transform muscles into bone or wrinkles into scales. For instance, the plated scales on the dragon's neck draw inspiration from quadrupeds' neck muscle fibers, while the wave-like plated skin on its throat mirrors throat muscle fibers.
Sculpting the finer details
My primary goal for this project was mastering the creation of organic-looking scales, essential for a dragon's appearance. Here are some tips I've gleaned from this endeavor:
Embrace the longest and most meticulous route for optimal results.
Hand-craft big and medium scales for authenticity.
Mask out scales creatively, avoiding perfect circles.
Use the standard, inflate, or clay build-up tools to push out scales.
Employ the polish all tool while still masked.
Smooth scale edges before unmasking for a natural look.
Sculpt muscle lines with the standard tool to enhance anatomy.
Use the dam standard and standard brushes to create cuts between scales.
Polish scales with the polish and trim tools.
Optionally, raise edges of certain scales with the standard tool.
Mask out the lower edges of the bigger scales, and pull them over one another.
This area is ripe for trial and error. Sculpting medium details, such as scales, significantly impacts your creature's style. For a stylised appearance, use enlarged scales with a polished surface. Employ the trim dynamic tool for sharp scale edges, exemplified in the top right corner of the eye.
Sculpting techniques for different materials
Bone, muscle, flesh, leather - each material demands different sculpting approaches. However, the combination and sculpting techniques used can significantly influence your art style. For instance, consider a quick example from one of my previous fan art projects.
This is my fan art rendition of the Deathhound from Skyrim and ESO, reimagined with a realistic and gory aesthetic. Notably, my version features more pronounced muscles with deeper cuts and varied thickness along the edges. The muscle material connecting to the bone appears smoother and bubblier compared to the original's dry and rough texture. Additionally, I emphasise the bone structure, particularly with a prominent bony snout and skull nasal cavity, consistent with my general art style.
Examining the dragon's snout, while it's not undead with exposed bone, I aimed for a skull-like appearance. Drawing inspiration from bird beaks, I sculpted the front teeth into the mouth and added small details resembling scratches and wear typical of bone. The smaller teeth I blended into the mouth scales by placing them over the scale intersections. Small scales served to blend the bony skin with the scaly texture.
Reusing or combining elements
Reusing parts from prior projects is a dynamic technique employed frequently by professionals. It not only saves time but also fosters new designs through the inventive combination of elements.
Here's a quick example of how I apply this technique: I repurposed wings from my Seraphim project, morphing and stretching them to fit my dragon's neck shape. Using four copies of the same wing pair, I adjusted the shape, added thickness with the inflate deformation tool, then merged them. After Dynameshing, I smoothed the artefacts with the polish all tool, leaving the neck ready for sculpting. Remaining issues like holes and artefacts can be addressed during the sculpting process.
Micro Details
This technique can also dramatically alter the sculpture's style. Micro details in stylised sculptures differ from those in realistic ones. Stylised pieces feature larger, smoother micro details spread farther apart, whereas I prefer a more realistic approach. Micro details serve to diversify the skin texture, with alpha brushes proving invaluable. For my root, bone, and feathery aesthetic, I utilise scale and stone alphas for hard surfaces. Then leather-like and fish scale alphas for smoother areas like the throat.
💡
I used my custom made VDM brush using images from free stock images found on the sites I mentioned earlier.
Another usecase for the VDM, making easy repetative scales.
Textures
The final stages involved preparing textures to bring the dragon to life. Initial steps included retopologising and preparing UVs, without any new approaches. However, it's worth noting that this dragon was designed with high-quality rendering in mind, utilising multiple UDIMs and a high poly count to retain intricate detail.
Texture Preparations
Here are some final mesh statistics. While the polycount could be reduced, I aimed to maintain maximum detail for renders while ensuring suitable topology for potential animations. a Reduced polycount with manual retopologising instead of just decimation and auto UV unrwapping will also make the texturing process much easier and far less problematic.
Finding new ways to texture
Before detailing my texturing process for the dragon, I'd like to highlight some new techniques I've discovered through experimentation and research.
Subdermal under layer
One technique I discovered during research involves starting with subdermal colours when texturing organic creatures to enhance realism. Though, for my dragon with its hard scales and bone-like skin, this layer isn't as prominent. Using bright and saturated colours below the main skin layers achieves the effect:
Red: The primary layer
Light red: Adds variation to the main red layer
Blue: For areas closer to blood vessels, like around the eyes
Purple: Blends blue with red
Yellow: For areas closer to bone.
💡
Comparing a regular under layer to a subdermal layer, the effect is subtle but adds significant colour variation and organic texture.
Due to the dragon's thick scales and bony skin, the traditional subdermal layer technique didn't apply. Instead, I adapted it by considering thickness. The horns and scales, akin to thick cartilage or bone, lack significant blood flow but experience wear at the tips. Hence, I applied a gradient from dark black to grayish blue. The only exception is the teeth, which retain the reddish-orange colour of the skin.
Skin near muscle or blood vessels appears darker red, while areas above cartilage or bone have lighter colours, like oranges.
Early experiments to gauge the effect before commitment.
Blending mode patterns
I stumbled upon another simple technique accidentally during a different project. It entails blending grunge noise over a hand-painted pattern, enhancing detail and variation. Experimenting with blending modes like colour dodge and difference unveils diverse patterns.
Gradients
Gradients enhance texture depth and visual appeal, common in stylised art and my realistic style. I've found a technique using generated mesh maps and baked lighting works best. After masking the area, I apply a baked light filter, either Substance 3D Painter's or custom ones from ArtStation. Baked mesh maps like ambient occlusion or thickness are then inputted into the colour channel of a new fill layer, and multiplied over the base colour and baked light colour layers.
Photo multiply layers
I discovered this technique through research, employing photos and textures to introduce colour variation. These textures needn't match the material being textured. For instance, concrete textures can enhance metal. In this case, I utilised reptile and tree bark photos to diversify my dragon's skin colour.
Texture Breakdown
Here's a breakdown of the dragon's texture layers, starting from the darkest to the lightest.
Begin by hand-painting major colour areas and separating materials like horns and skin.
Incorporate colour variation using blended photo textures for each main colour, resulting in folders with 2 or 3 layers: the base layer, a blended photo layer influencing the base, and a potential layer for additional details.
Utilise a custom-made smart material for the horns by using curvature and scratch masks to lighten dark colours and introduce wear and tear.
This is the layout of each major colour layer folder.
Next, I apply curvature masks to create final colour breakup and darkening cavities. I use three types of curvature masks, ranging from larger blotches to smaller, detailed cavities. I also have an inverted fine curvature mask to lighten the edges of details.
Roughness variation is my final step in creature texturing. Main roughness layers are created alongside painting main colours, with each colour having slightly different roughness. This technique suits creatures with high-contrast patterns or two-toned designs really well. Adjust cavities' wetness using different curvature and roughness levels. Smart materials like scratch creators can be fine-tuned for added variation. Further roughness breakup is achieved using different grunge maps, each representing 2 or 3 roughness values.
Handcrafting the eyes
The creature's eyes are crucial for realism, comprising of multiple parts and crafted through various methods, from handcrafted to specialised shaders. I opted for the simpler handcrafted approach.
Shaping the eye
I begin by creating a base eye model, ideally in software like Maya or Blender for precise polycount control. In this example, I used ZBrush, carving out the iris area and removing geometry for the pupil. I then added some thickness to the pupil by extruding the edges inwards twice. Real-life pupils are essentially light-filtering holes, so I placed a dark disk inside the eye to emulate this. Sculpting the iris, I employed a technique I learned from J Hill's YouTube video.
Tears of the dragon
Completing the eyeball involves two additional pieces of geometry for realism: a transparent membrane in front of the eye ball and another for the illusion of surrounding liquid. These pieces require only a transparent material with high reflectivity, eliminating the need for texturing.
Flaming eyes
Texturing breathes life into the eyes. An exciting discovery in my experimentation is using grunge maps with sphere projection to create iris patterns.
By employing the sphere projection mode and masking unwanted areas with the paint layer mode, various patterns can be created. Experimenting with different grunge map and blending mode combinations can yield captivating results.
💡
Always have reference in front of you when painting the colours and creating the masks.
I googled tons of different reptile eyes. It took a lot of trial and error. But, having a good reference image in front of you can provide a good guideline on how colours in the eyes morph with the eye muscles.
Lighting to bring the creature to life
As we approach the project's conclusion, rendering becomes crucial. This is where the creature truly comes to life, with cinematic lighting, subsurface scattering, and final composition. Setting up can be technical, but it's best done after completing base textures to avoid later headaches. For instance, due to subsurface scattering, I had to adjust my dragon's normals and colour contrast to prevent colour and detail loss. Test renders also allowed for major adjustments before investing too much time in details, masks, and blends. For instance, I initially used purple with black patterns, but changed to red due to colour blending issues in the renders.
Setting up the renders
Obtaining the right lighting for my renders posed a challenge, as I wanted to have good renders from all angles. Here are some factors I considered after trial and error:
Setting the world colour to black for full control of ambient lighting, using multiple directional and spotlights.
Employing two light orange directional lights on both sides for balanced illumination.
Utilising multiple spotlights around the dragon with varied values and hues for focused illumination and colour variation.
Implementing two to three directional lights with greater strength than spotlights, aimed at the head, wings, or neck for rim lighting in desaturated yellow or saturated blue.
For the eyes, I utilised a basic glass shader, while for the body, I employed a mixed shader incorporating subsurface scattering. Shaders can be complex, and though I'm still refining my skills, I experimented with various nodes and followed online resources to achieve the desired look. Below are screenshots of the node trees for each material
Final composition
With the renders complete, I'm now preparing the final presentation, exploring various art styles that compliment my renders. I often incorporate hand painting to craft backdrops and seamlessly blend my 3D renders with the environment.
In my second Deathound render, I merged the creature's bust with the background by painting its general shapes and anatomy, along with adding flat colours to the edges of the 3D render.
💡
Compared to the original flat render, the hand-painted version is more interesting and stylistic.
Filters can really make your renders pop. I mainly use the colour lookup filters in photoshop. Here is a demonstration on how much it can change the final composition.
The Journey
As an artist, I've made strides but still have much to learn. This project was pivotal in honing my skills and defining my style. I've learned valuable lessons and discovered new techniques.
Becoming an artist is challenging, especially with so many talented individuals. However, the journey is as crucial as the destination. Pushing forward, experimenting, and embracing mistakes are essential for growth. It's vital to focus on personal improvement rather than comparing oneself to others.
Don't hesitate to seek advice from fellow artists. I'm grateful to Kate Pfeilschiefter for her invaluable guidance.
Creating this dragon, along with the Deathound and Seraphim, has been fulfilling. Each project brings me closer to realizing my artistic aspirations.