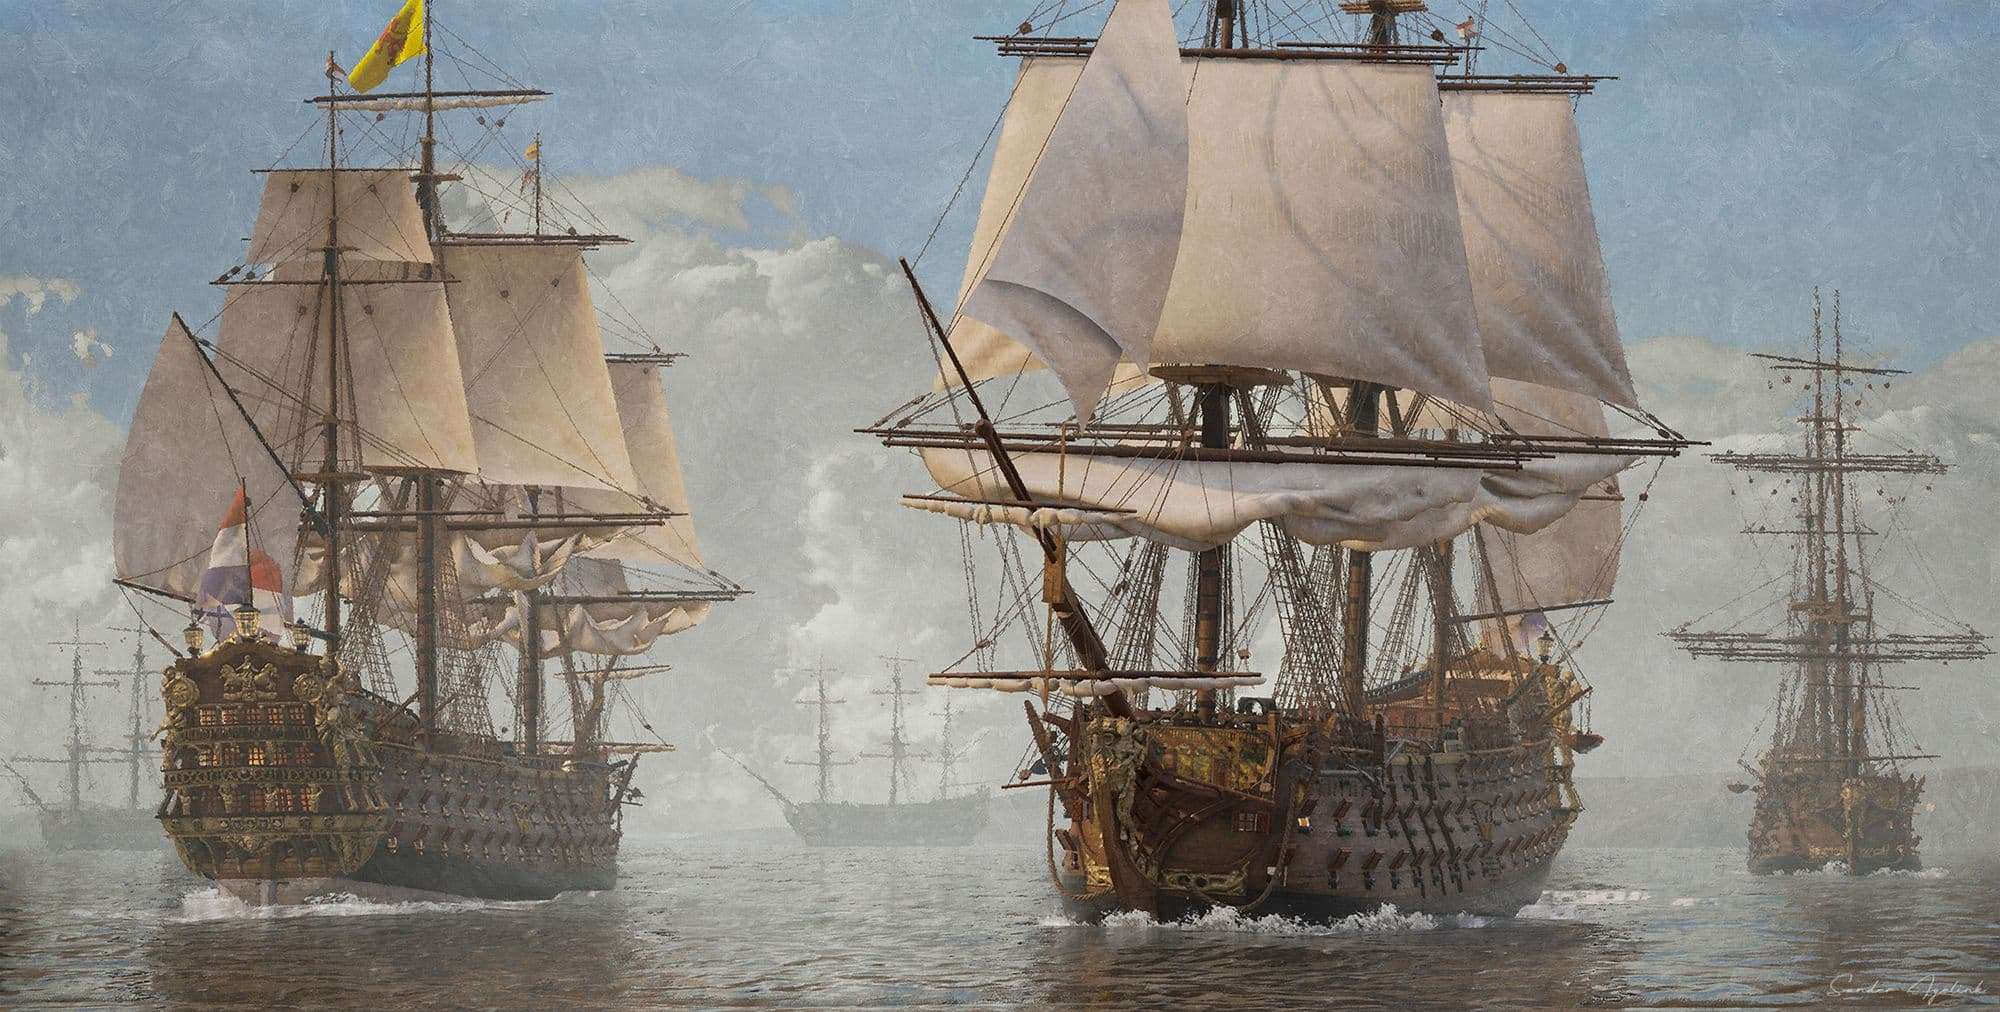
Modelling a Ship for Gameplay Design in Unreal Engine
Sander Agelink is in his 3rd year at BUAS (Breda University of Applied Sciences) in the Netherlands, studying to become an environment artist. In this post he will break down the steps he took to complete an 18th century first-rate ship in Unreal Engine, whilst trying to maintain video game specs.
Sander Agelink is in his 3rd year at BUAS (Breda University of Applied Sciences) in the Netherlands, where he is studying to become an environment artist.
Sander started out in 2D, while also playing with proceduralism and 3D on the side. It didn’t take long for him to call environment art his home, where the best of both worlds meet.
In this post he will break down the steps he took to complete an 18th century first-rate ship in Unreal Engine, whilst trying to maintain video game specs.
Setting Goals
I think it’s very important to set a specific goal when you start out a new project. In my experience, when you work towards a specific goal, the project in general often turns out a lot better, and you learn a lot more than you might expect.
Try to be specific, so not a goal like: “I want to make better art”.
My goal was to learn high to low poly workflows, as well as PBR texturing. Up until this project I primarily worked with hand painted textures and low poly workflows. I planned to learn Substance Painter and Zbrush while making the stern and figurehead. In the end I learned so much more, which I’ll reflect on at the end of this article.
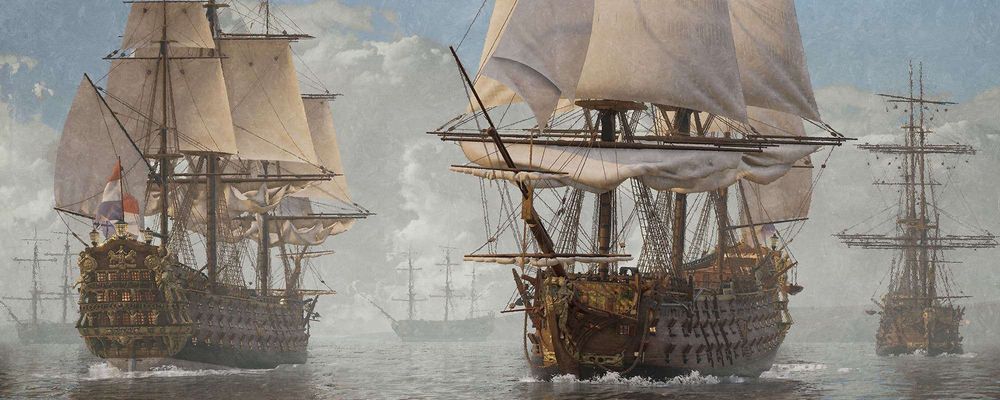
Reference
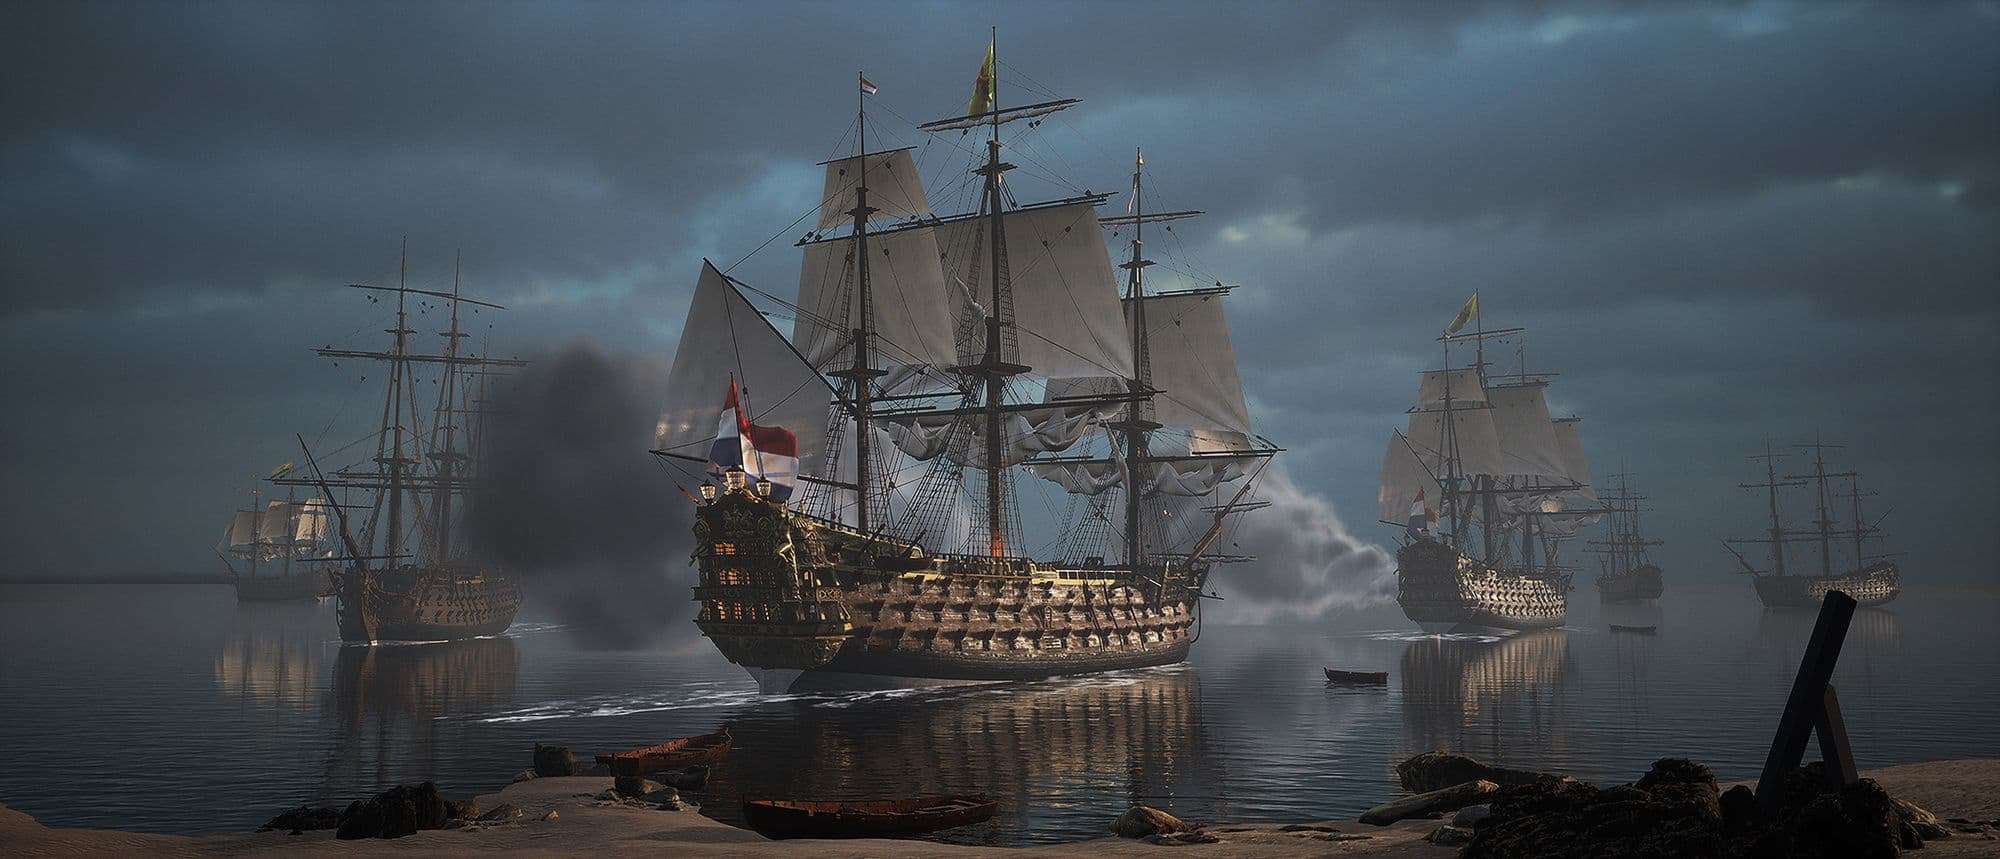
I wanted to create a scene similar to a classical painting, with lots of character and drama. Perhaps some high waves, sails that are being lowered, or cannons being fired.
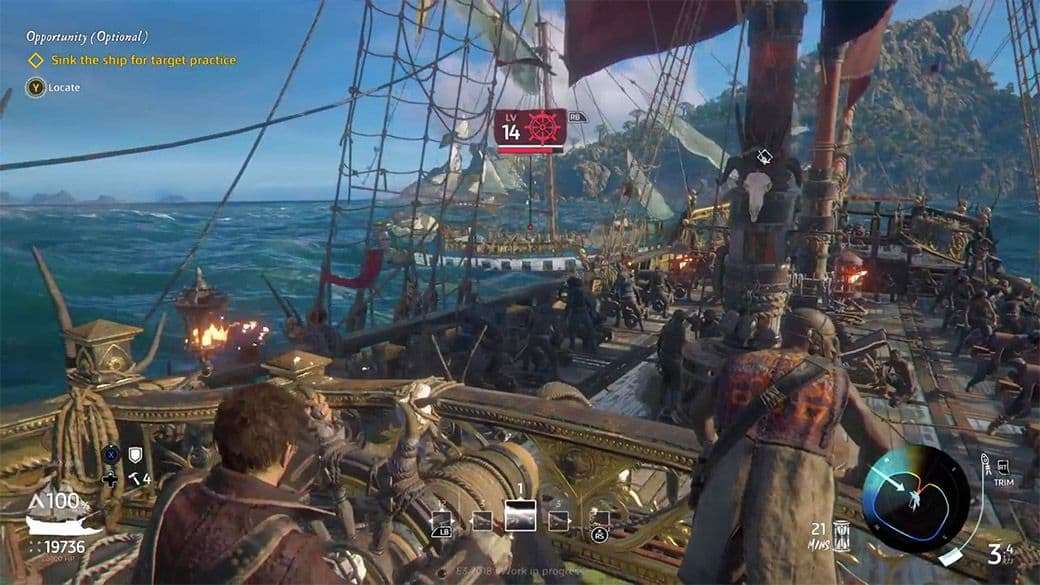
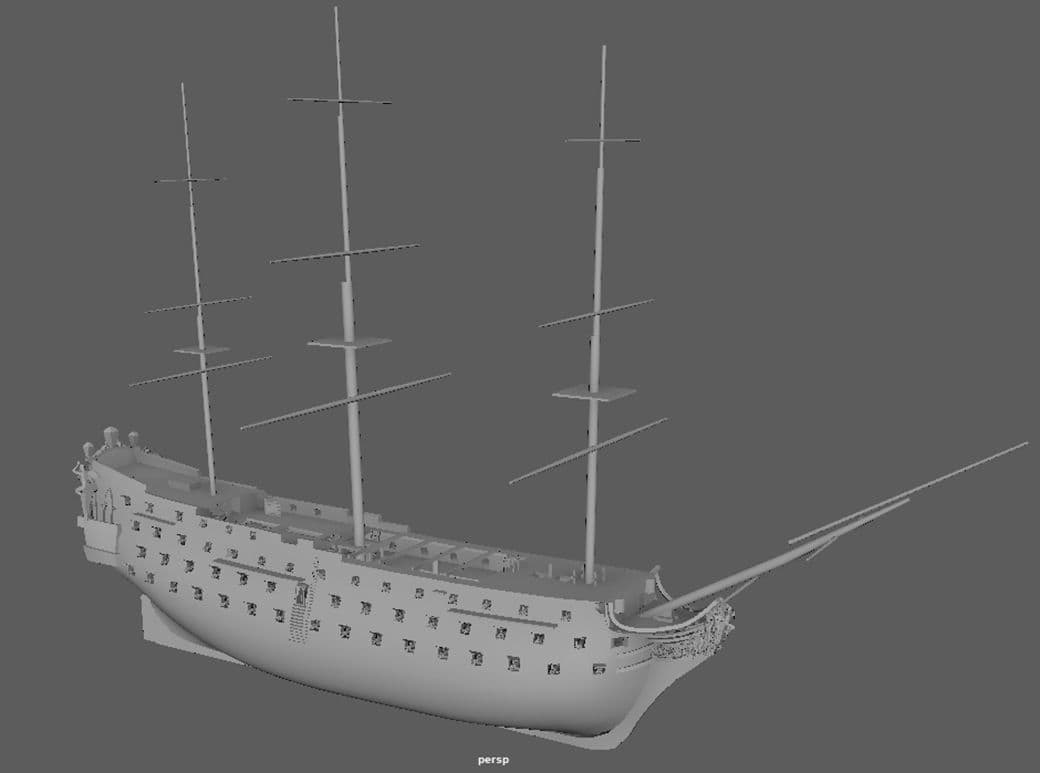
For the ship itself and the level of detail I got inspired by the game Skull & Bones. This meant I would have to take into account a level of detail that works well with similar camera angles.
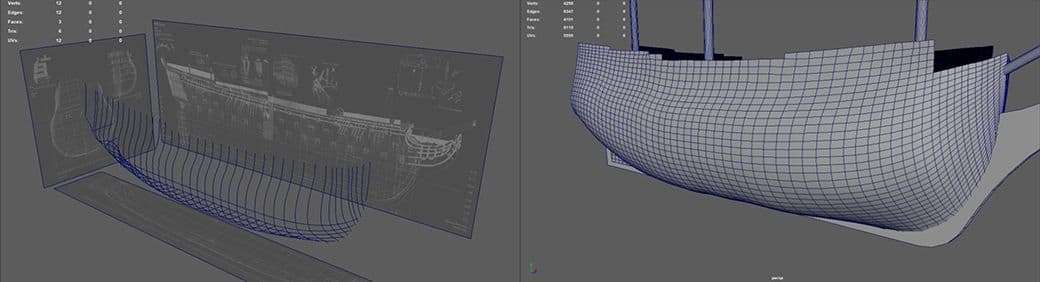
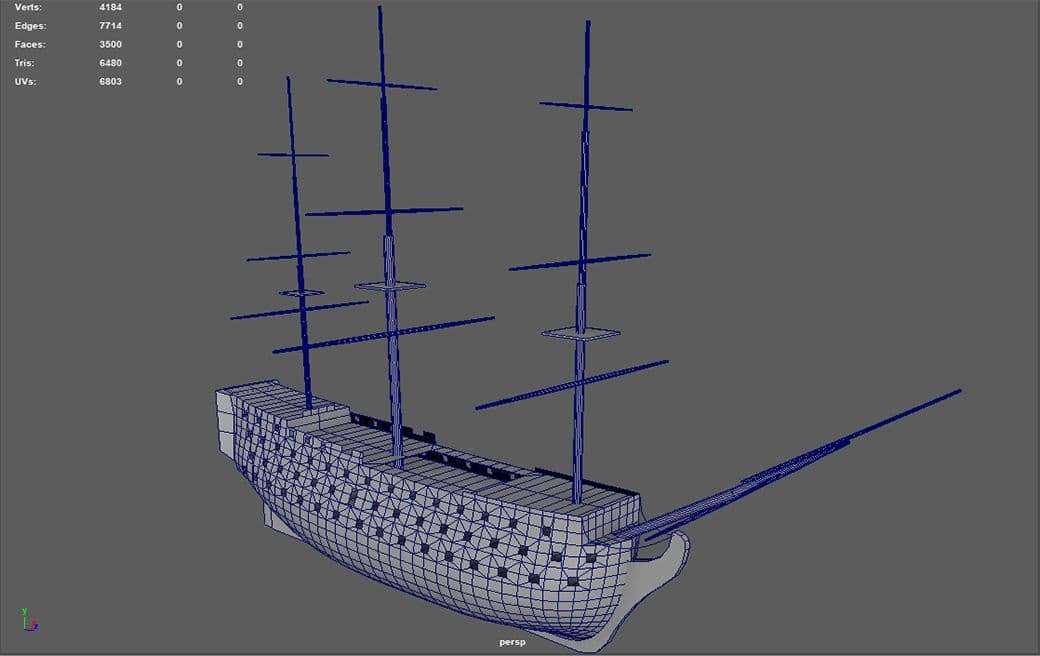
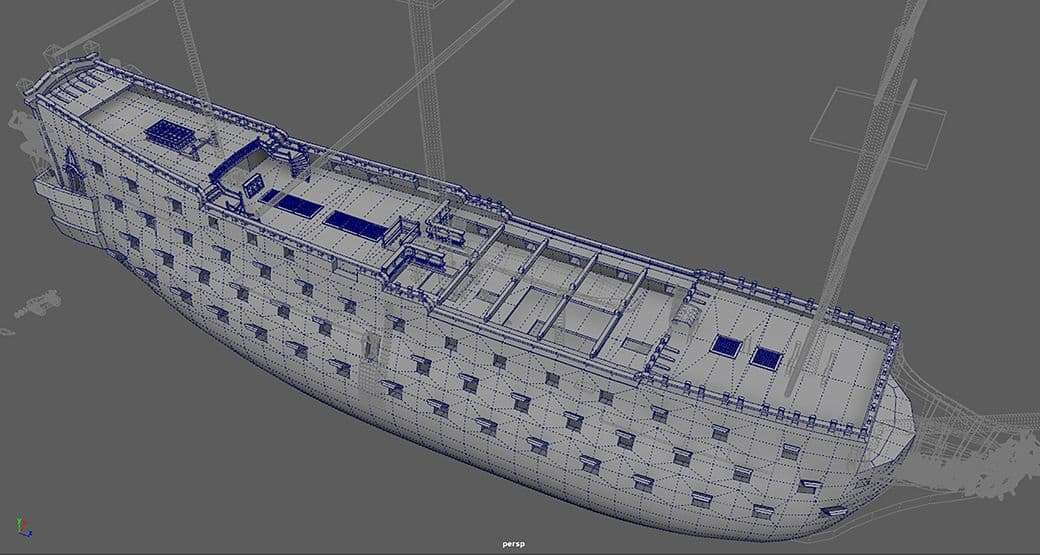
Usually I don’t care too much about topology for the blockout, but one exception was the hull. A complex shape that I wanted to get right, to prevent any issues later on. Using blueprints, I drew a set of curves, and then extruded the hull shape alongside it.
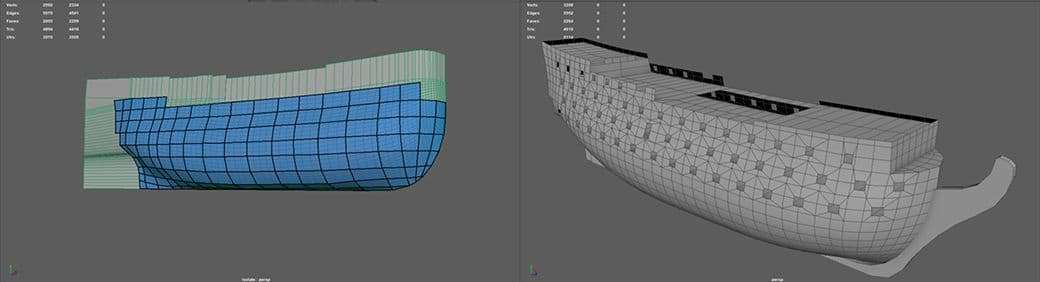
I quickly realized the curves weren’t perfect, as the hull looked wobbly. First I looked into Houdini to retopologise it, but that didn’t work. I then got recommended to try the Quad Draw tool in Maya, and subdivide the result. This worked perfectly and also introduced me to retopo tools!
I then added floors, masts and a very simple stern, and with that the main shapes were ready!
Adding Details & Character
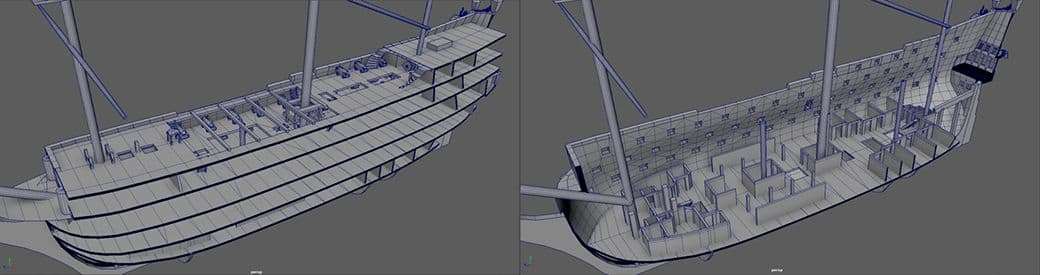
The blocking out phase isn’t over yet. With the base shape in place, I decided to continue my research into 16th century ships. I was hyped and decided to add an interior as well.
A feature I would quickly cut while downscoping the project
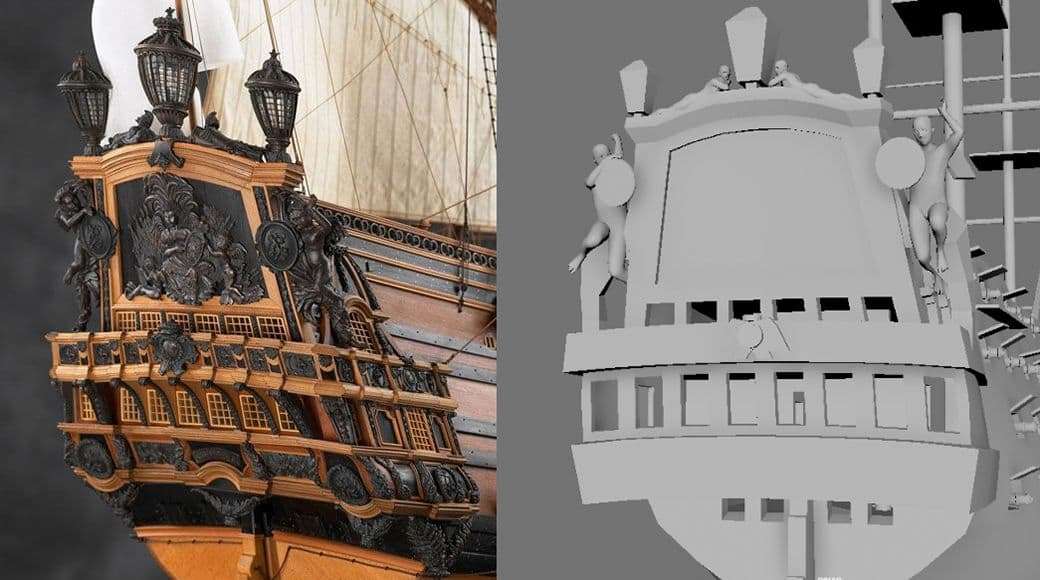
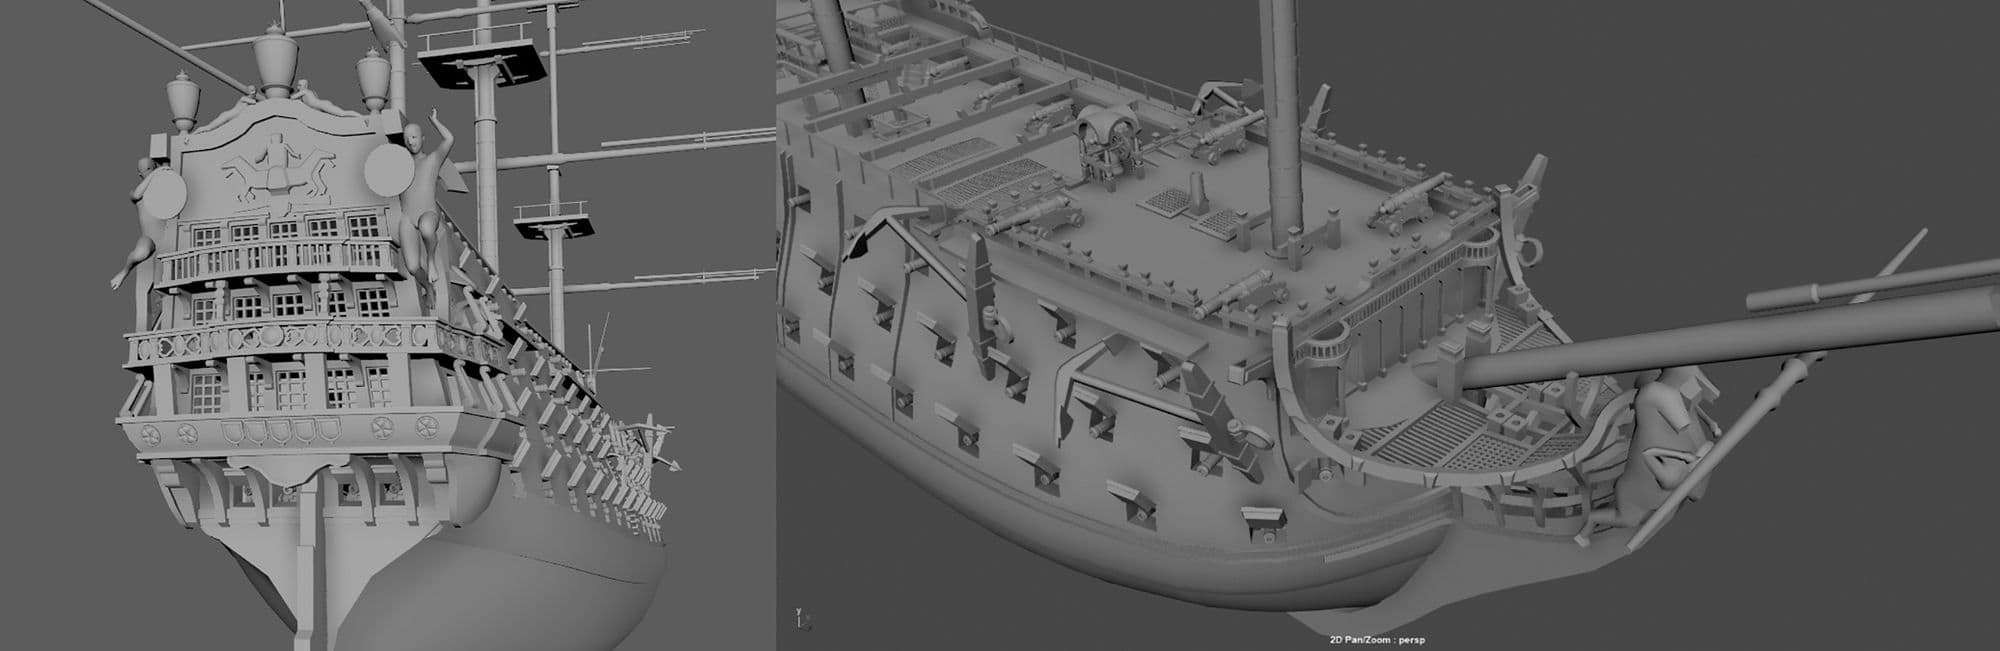
While researching the interior, I realized this would become an admiral’s ship. That would mean it needed an extra floor for his quarter. Therefore I raised the stern a bit to make space. This also allowed for some more personalisation on the back of the ship. For this, I took inspiration from the ship L’Ambiteux.
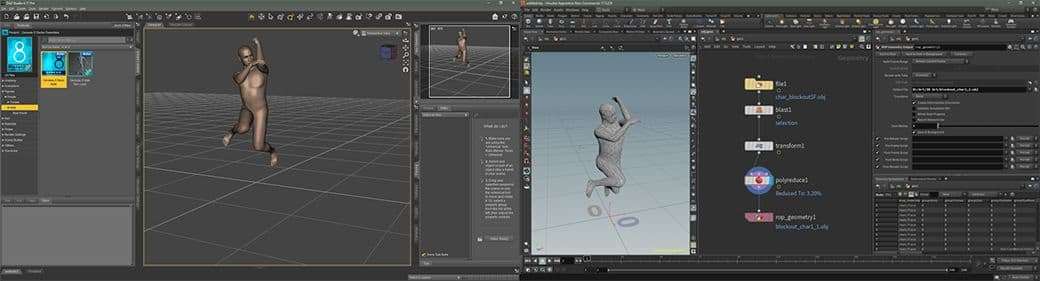
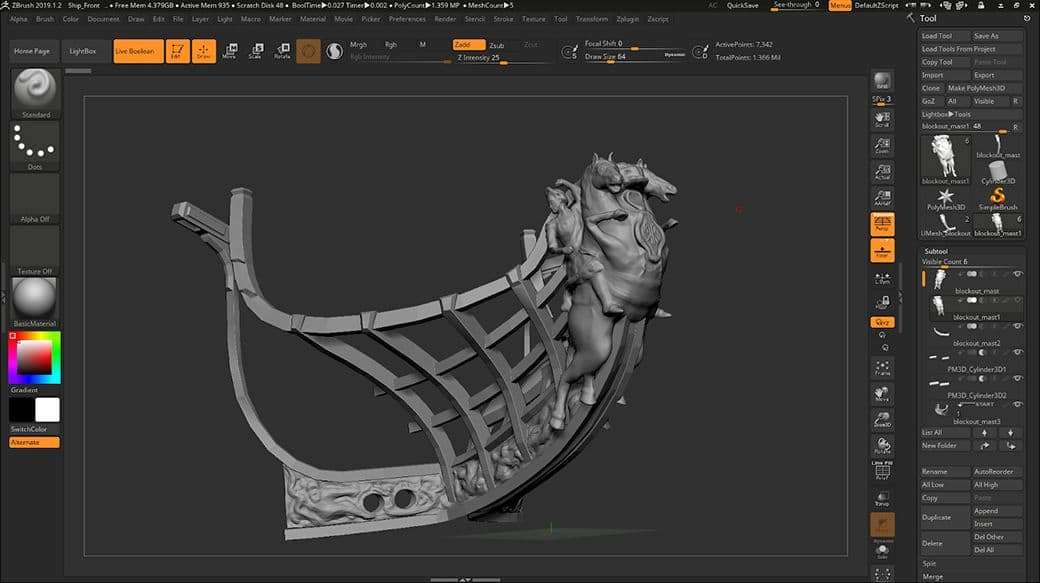
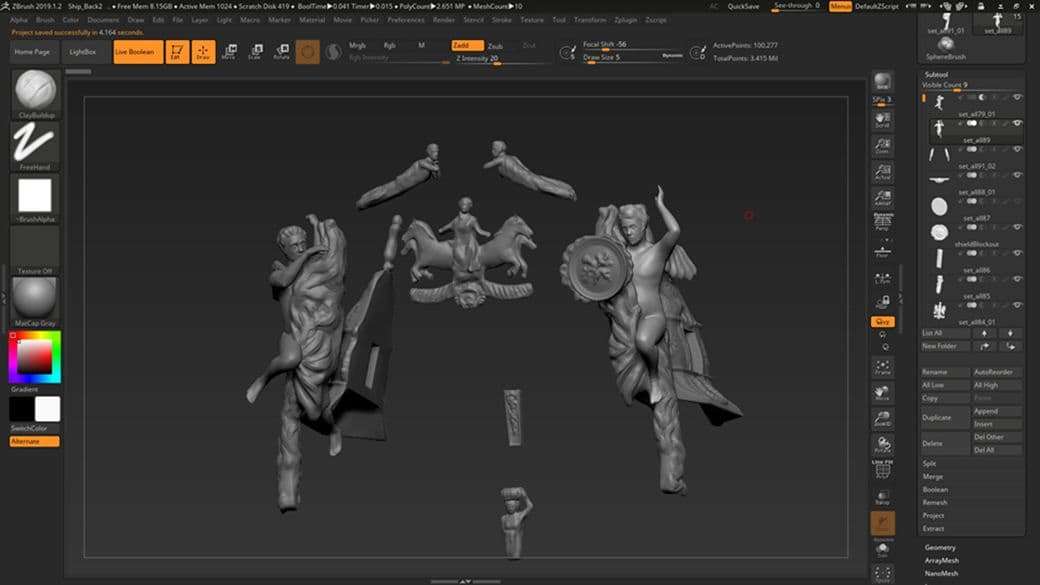
For the stern details I made some character poses in DAZ. I then quickly retopologized them in Houdini and then imported them in Maya. This technique allowed me to make very detailed blockouts of characters. Almost as fast as making them out of basic cubes.
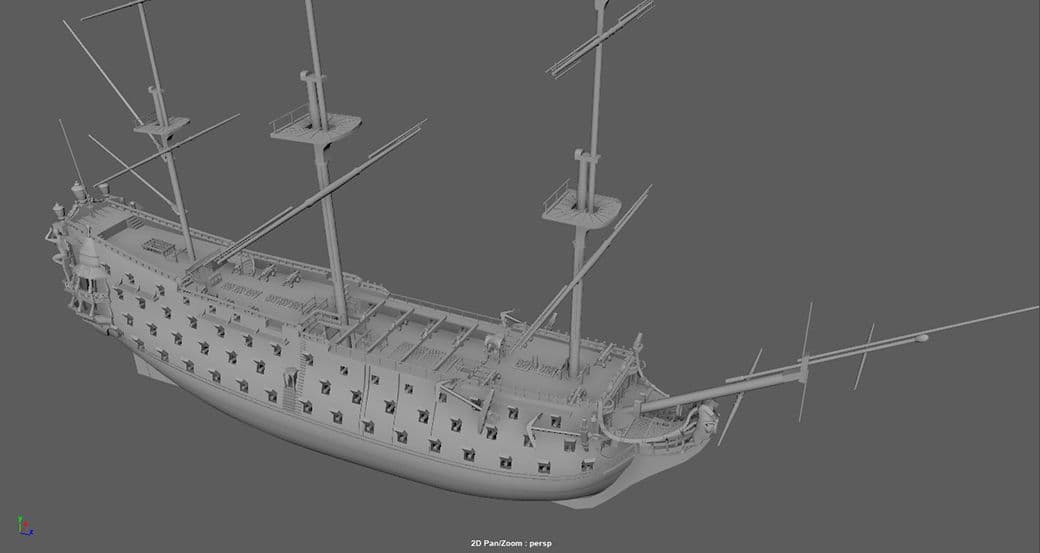
The same technique was used to block out the headpiece. At the same time, I also finalized the main shape of the hull and added some key elements on the deck. Like stairs, a steering wheel and basic masts.
With that, the blockout is completed. It's more detailed than my usual blockouts. But with a complex shape like this, if I hadn't addressed these questions in the blockout, they would return as problems later on.
Modeling Phase
First I place the blockout on a separate layer and make it transparent, just like in Photoshop, with its sketch on a separate layer and lower opacity. This quickly tells you what parts you still need to add.
The modelling phase was pretty straight forward. For the most part, the shapes weren’t too difficult, but there were a lot of them.
All the box modelling parts are completed at this point. It’s at this point that my learning goals really start to come into place. I had to tackle the more complex, organic shapes next, like the sails and the statues.
In my experience, when you work towards a specific goal, the project in general often turns out a lot better, and you learn a lot more than you might expect.
High Poly
This was my first attempt at Zbrush. It took many tries to get the sculpts right, but in the end I got something I was fairly happy with.
For the stern, because there were so many characters on it, I decided to use the character blockouts I made earlier as a base to speed up the process.
Looking back, I could’ve definitely optimised the retopology more. But, for a first attempt at Zbrush I was quite happy with the results.
Sails
I’ve researched various approaches for the sails. One option would be to simulate them realtime in UE4, but that wouldn’t be very performant. Alternatively, I could simulate the sails in Maya or Houdini, but that wouldn’t give me the control I want, because I wanted to pose the sails in a dynamic way. Therefore I decided to try out Marvelous Designer.
The program isn’t really made for simulating sails, but it worked quite alright and it gave me the control I wanted. Not only that, it also gave me excellent topology and UV’s.
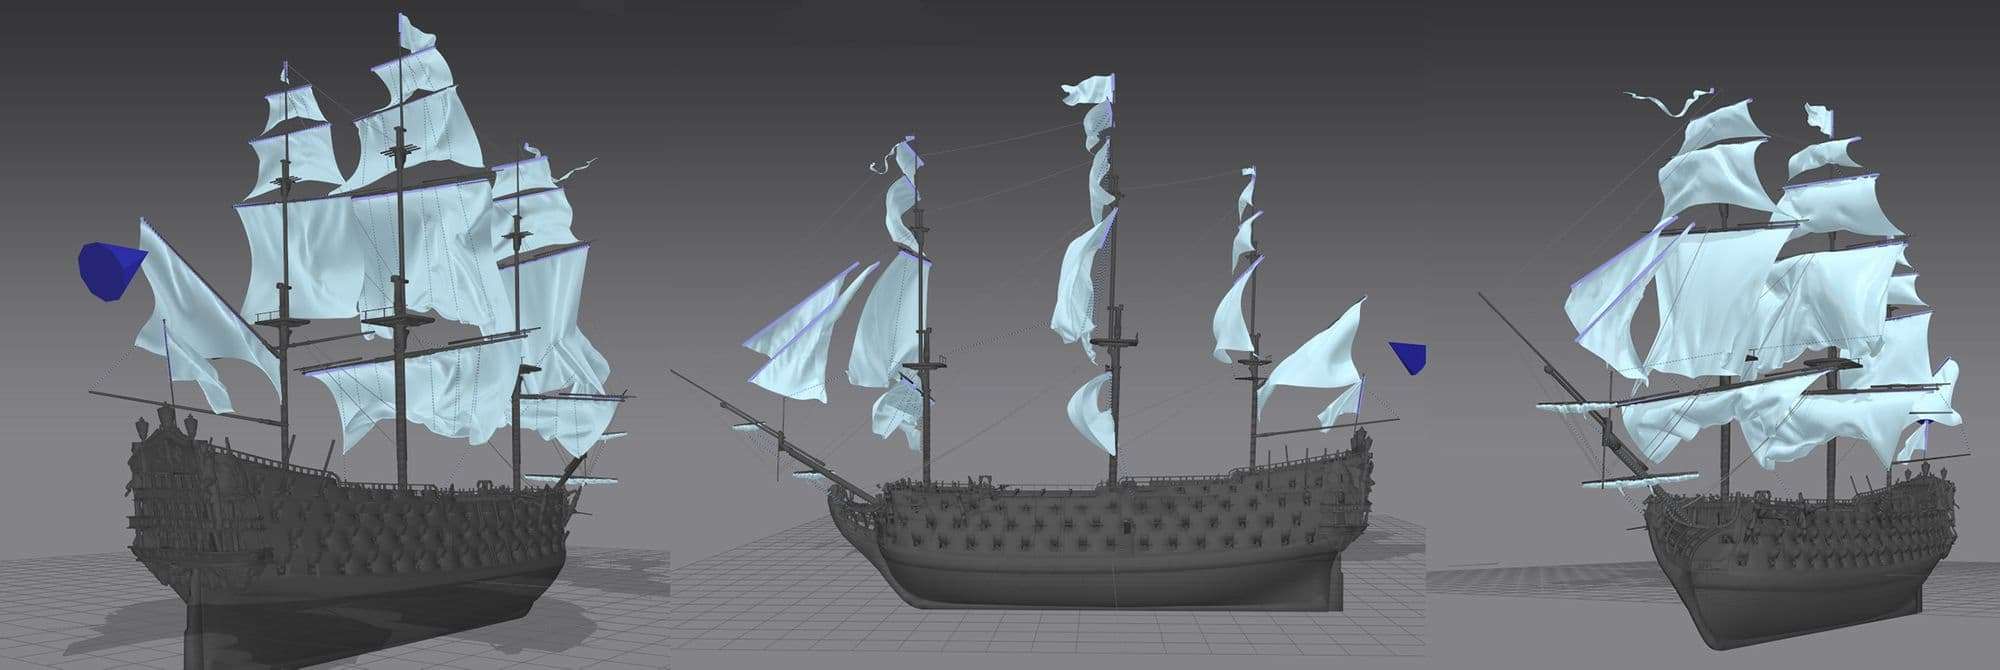
I ended up with static sails that are posed in position. Originally I thought it would be amazing to have animated sails, but that was too ambitious for this project.
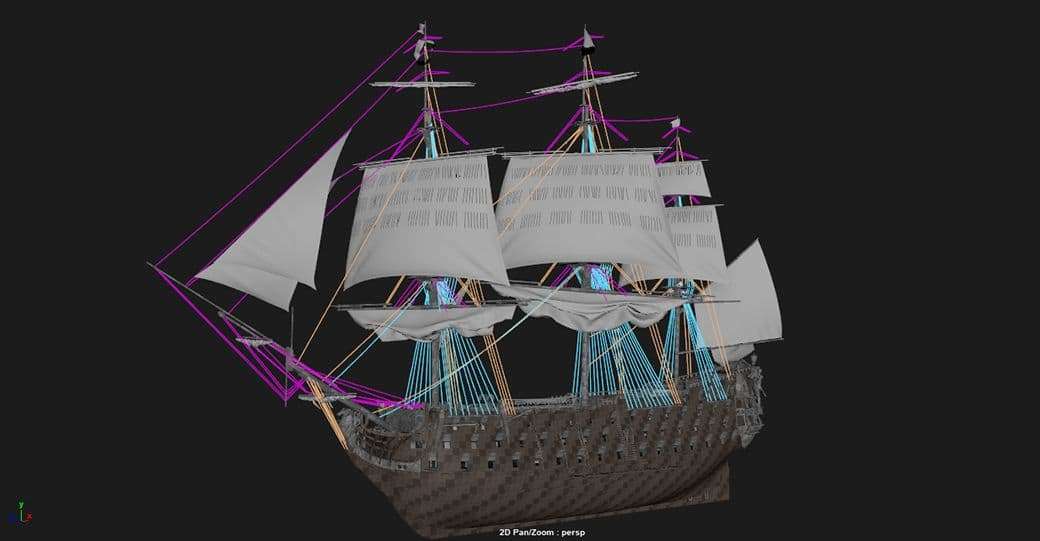
Rigging
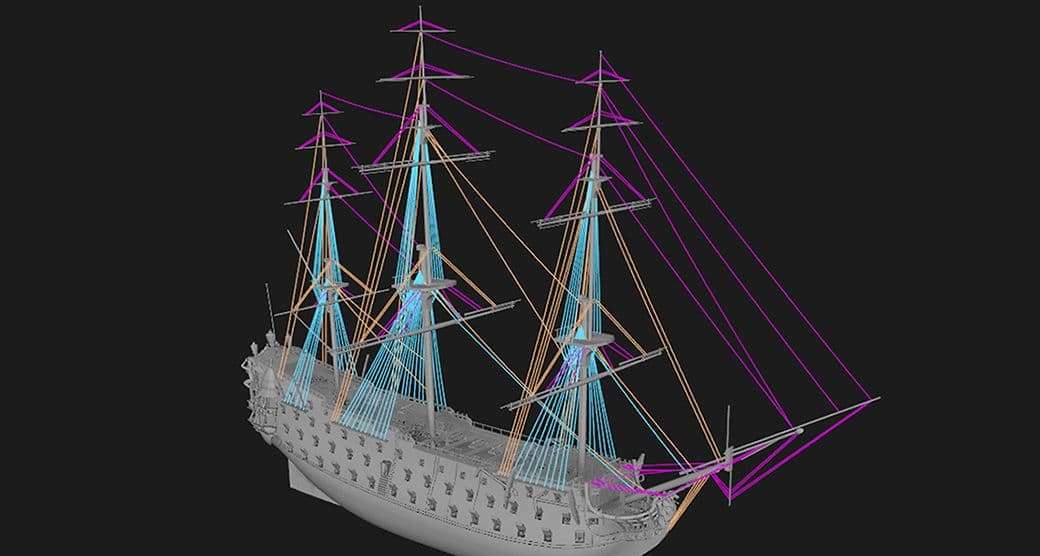
A ship the size of the HMS Victory, which my ship is based on, requires more than 26 miles (42km) of rope. To keep this manageable I decided to plan them out with curves, and color code them based on their thickness.
In the context of shipbuilding, rigging refers to adding ropes.
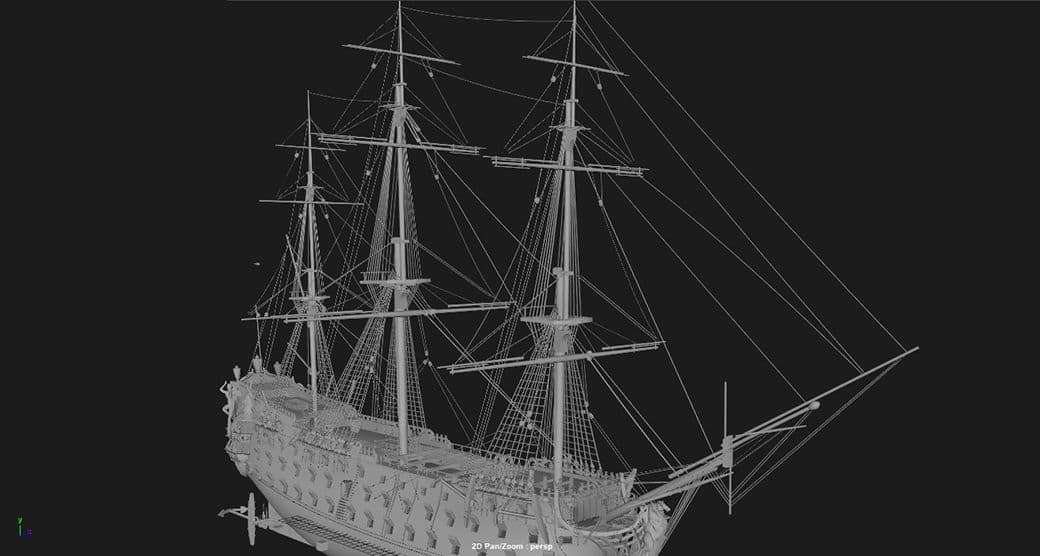
To quickly turn the curves into actual meshes, I used the Autodesk Maya Bonus Tools, which comes with an option called ‘wire mesh from curve’. An option that works on all the curves at once.
At this scale the ropes only need a thickness of 3 polygons. If you smooth them, you won’t see their edges, and with this many ropes it’ll save you countless polygons.
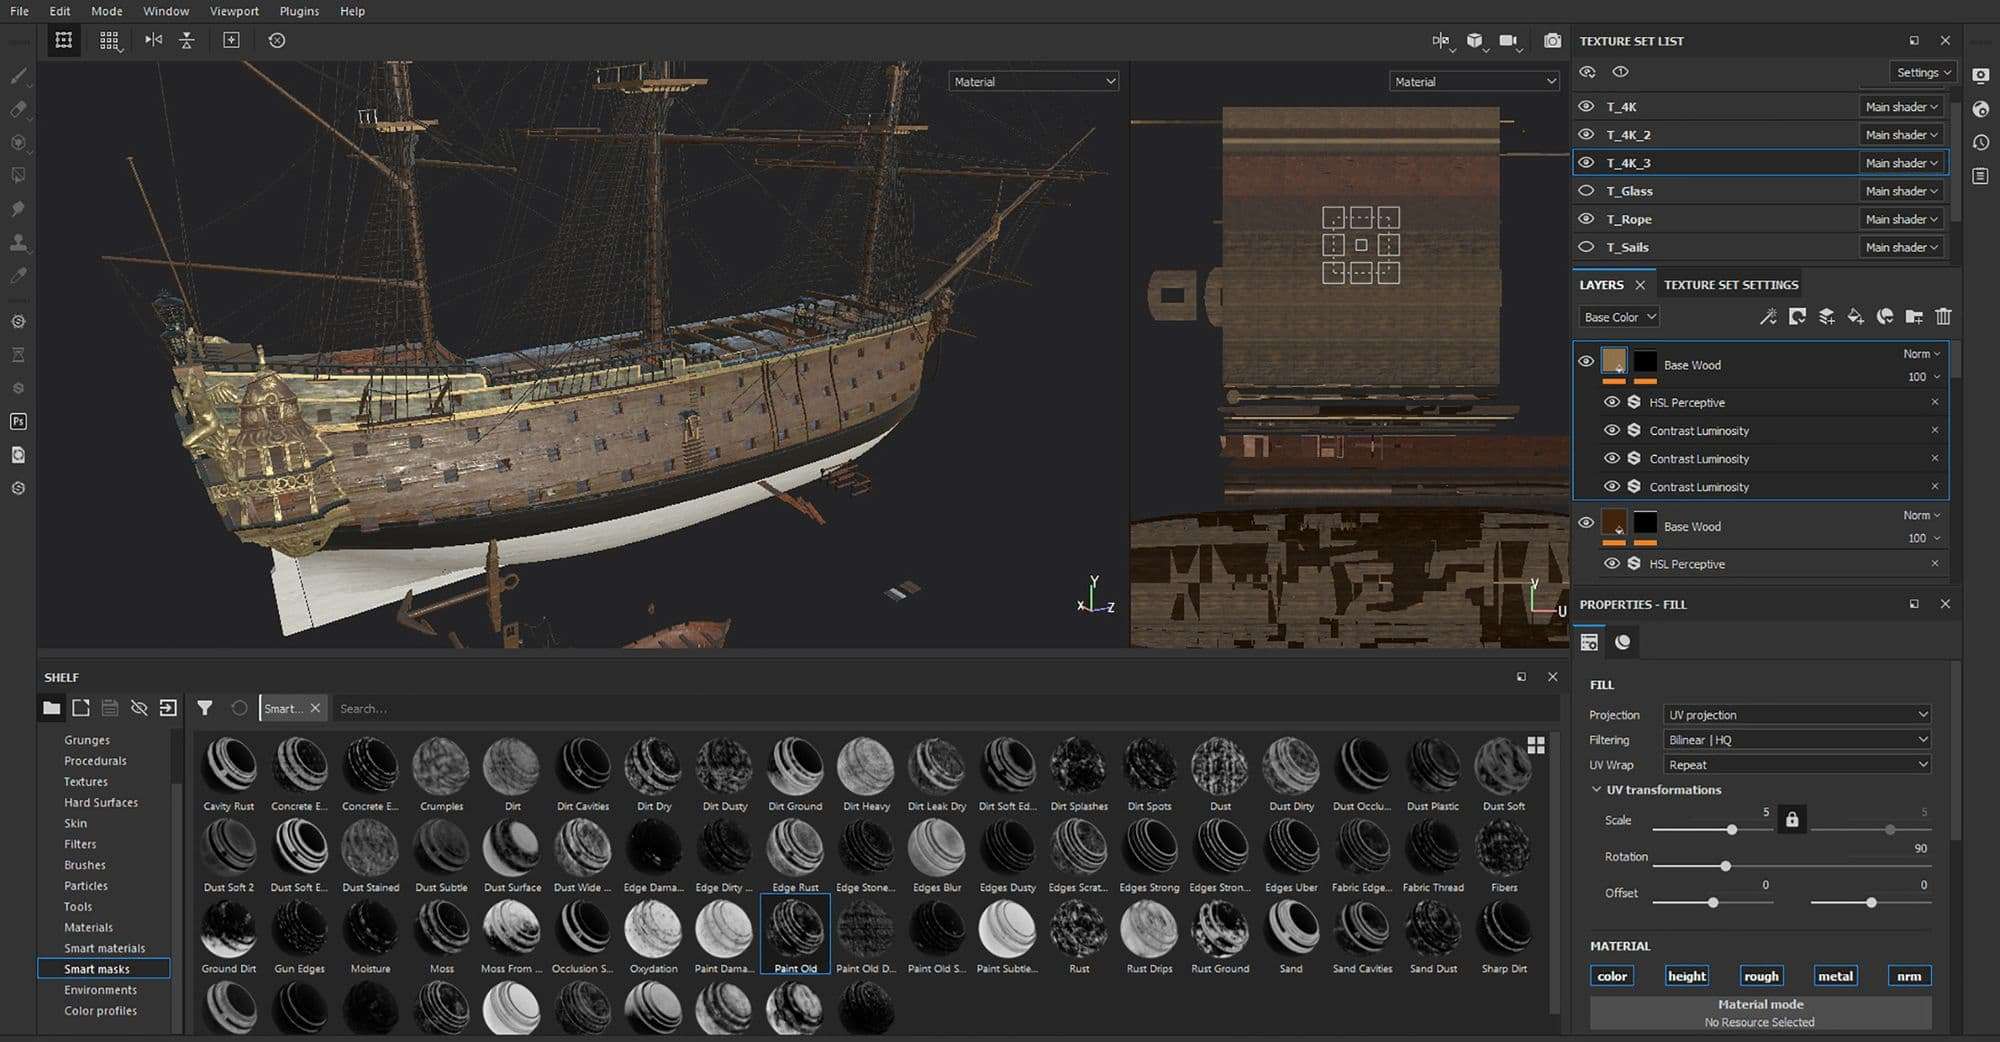
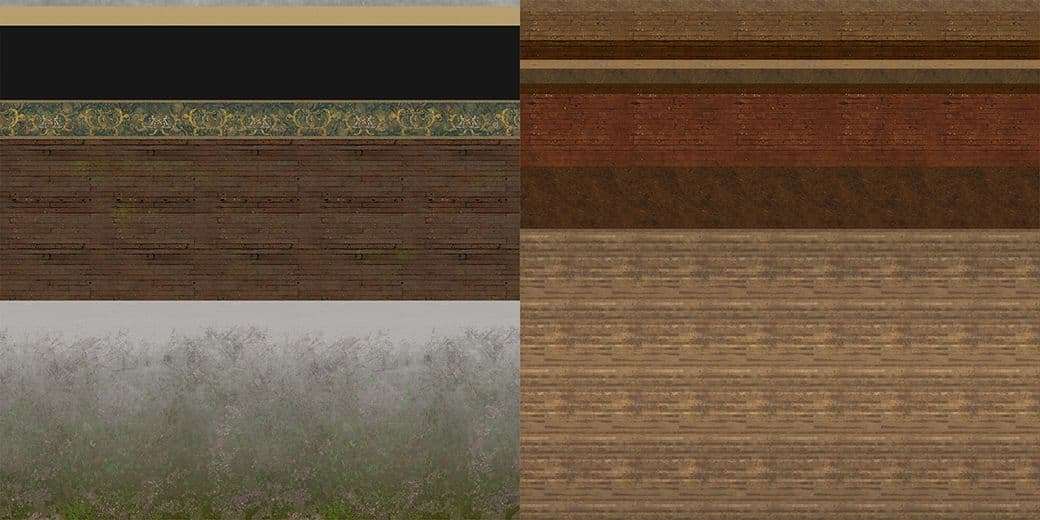
UV'ing & Texturing
I looked into various approaches for the texturing, but in the end I realised a lot of the textures are very similar. Therefore I decided to look into trimsheets for this project.
Besides a texture for the baked normals and a tileable texture for the sails, the whole ship runs on 2 trimsheets.
After UV’ing, I combined and tweaked several wood textures from Quixel Bridge into Substance Painter.
Looking back on these textures, I notice a lot of repetition. Because of that, I believe that with some alterations to the UV’s I could’ve reduced it to one texture. A challenge for the next ship!
Unreal Engine
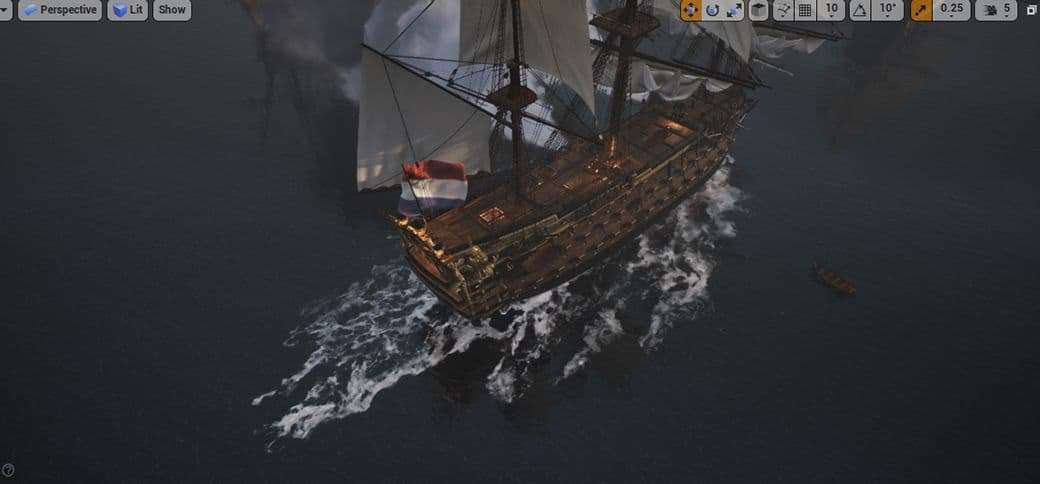
With the ship nearly done I shifted my focus on presenting it in a scene in Unreal Engine.
I initially liked the first version, but it had some issues. For a start, the colors were too similar to my previous work. I wanted to add some variation, so it would need a different lighting setup. The composition was also a bit too symmetrical, and the horizontal composition made the ship feel smaller.
In the meantime, I spent quite some time trying to come up with fancy water shaders. I made various real time versions in Unreal Engine. I also tried to simulate both textures and meshes in Houdini, but neither really worked the way I wanted.
In the end I decided to keep it simple, and just use overlapping normal maps for the water, without any large waves. For the foam I used simple decals and planes with textures.
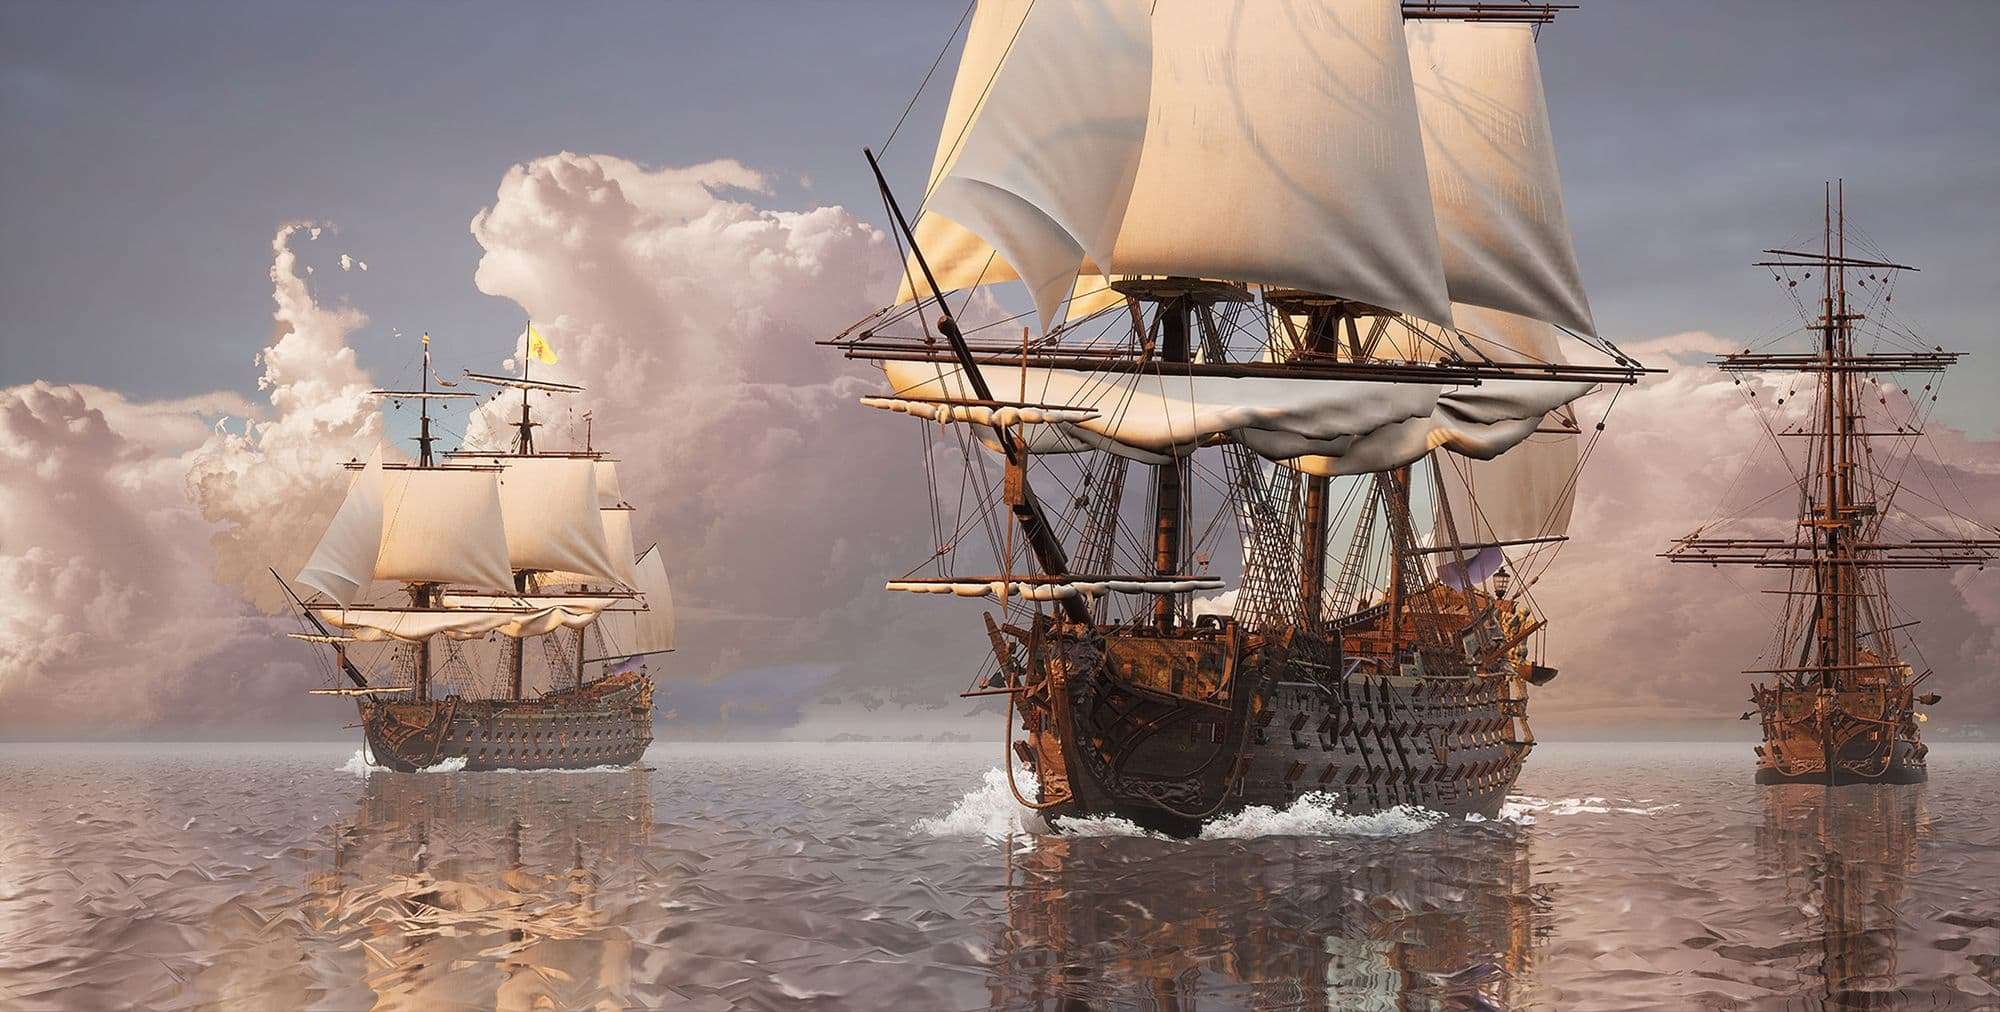
I tried a few vertical compositions, but knowing it would mostly be viewed on a computer, I fell back on a horizontal composition for the main image. In the final Artstation post, I did add a vertical version as well.
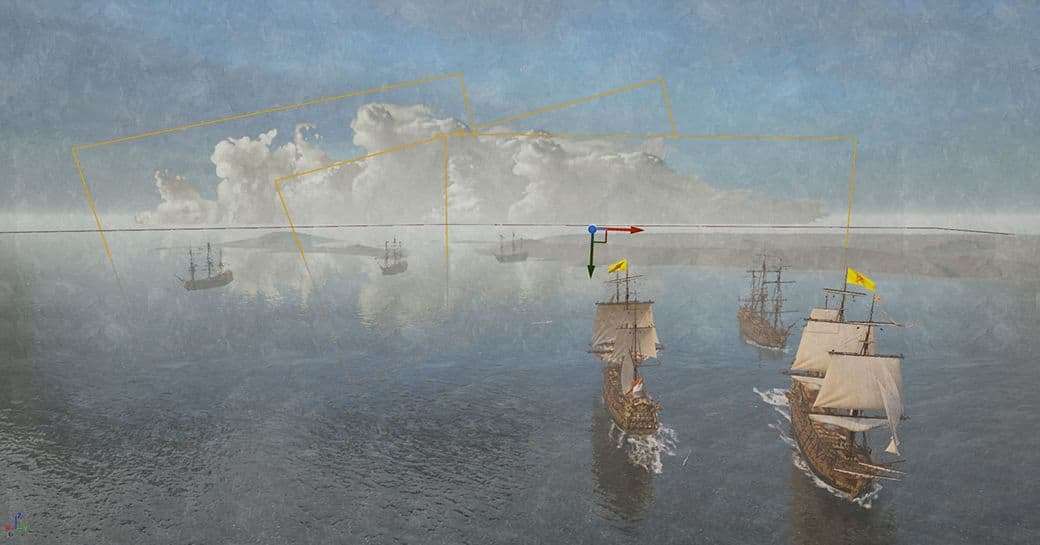
One thing I discovered looking at classical paintings is that the perspective is very flat. I really liked this effect, but it made the skybox look very pixelated, as it basically means you’re zooming in a lot from a large distance. And so you're only seeing a very small part of the actual skybox.
To fix this I replaced the skybox clouds with custom ones on a plane, that could be placed in focus of the camera. This also allowed for a more custom, dynamic look, like clouds in classical paintings.
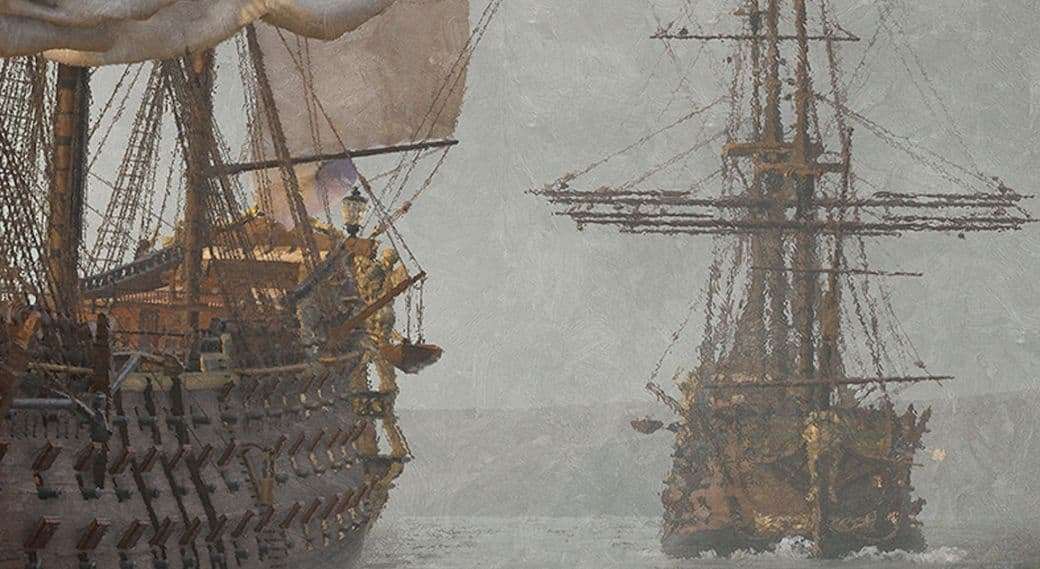
Satisfied with the colors and the composition, it was time to make it look less ‘CG’, and more like a classical painting.
Step one was getting rid of the heavy contrast. This was done by adding some height fog first, followed by playing with the contrast in the post processing. One thing I learned is that Photoshop effects translate over really well into UE4.
A straightforward example would be LUT’s (Lookup tables). You could color grade your image in Photoshop. You then apply those effects to a color strip, which you can import into Unreal Engine and then it’ll apply those effects directly onto your camera.
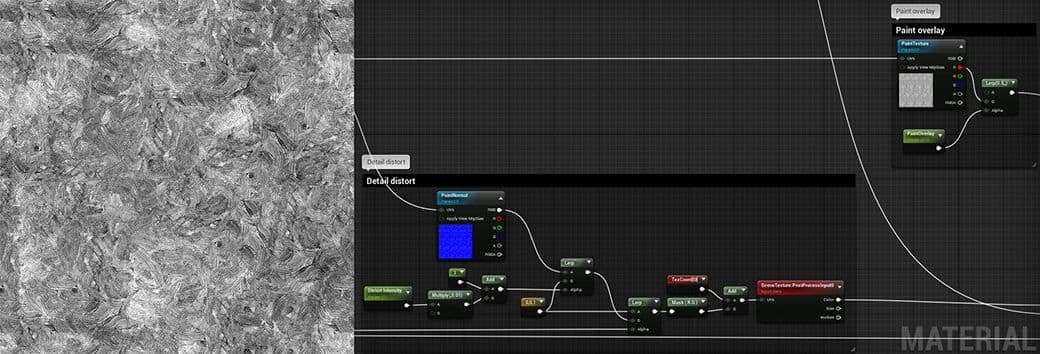
To create a painterly effect I did some tests in photoshop that couldn’t be applied to a LUT, like distortions and overlays. However, I discovered the effects I wanted could be recreated in a post process material. The 2 most important effects are the paint overlay and the emboss.
For the paint effect I used a grayscale image of paint strokes and overlaid it. I also made a normal map out of this texture to distort the image according to the brushstrokes.
To add some extra nuance to the render, I took the depth buffer and multiplied it with the result of the paint strokes. This way the background would become more distorted than in the foreground, like with real paintings.
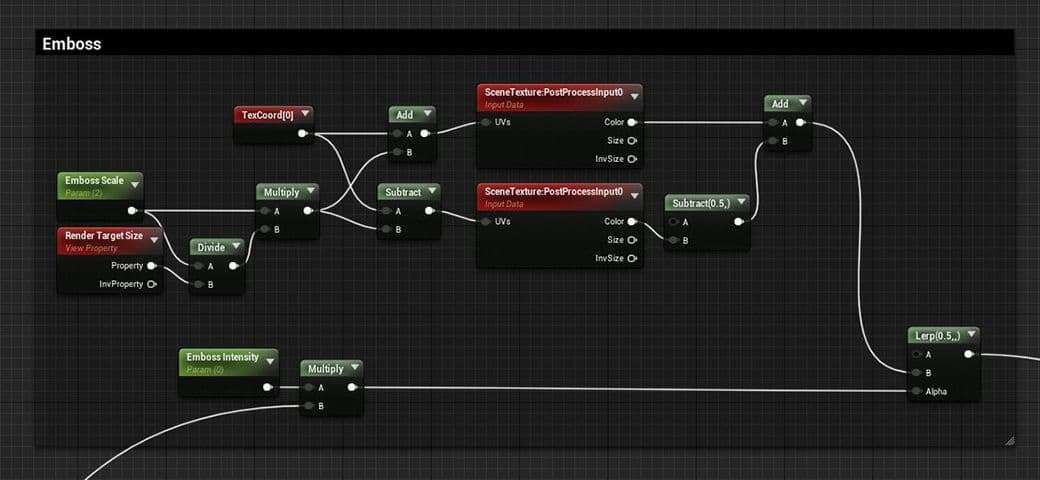
Then, as a finishing touch I added an emboss effect. It’s very subtle, but it pushes out the highlights in a way that makes it look like a 3D drop of paint on top. As if the painter took a brush and gently added some highlights onto the painting.
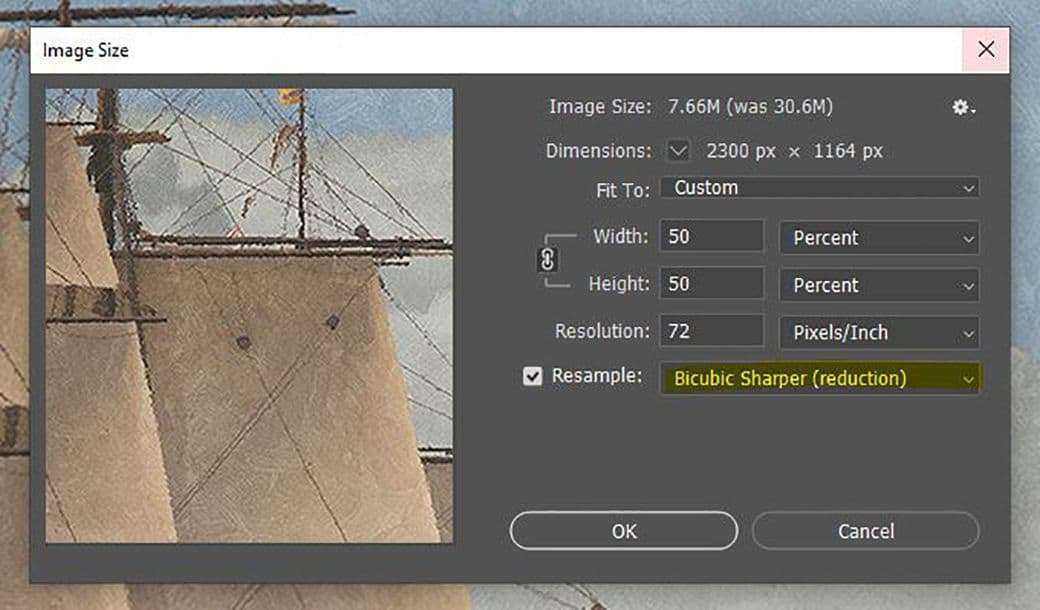
For the final render I exported the image double the size, and cropped it back down in Photoshop, with “Bicubic Sharper (reduction) ” turned on. This made the result sharper and preserves details better.
The default anti aliasing settings in Unreal don’t really do your details justice, and this should compensate for it. If you want to push the details even further, you can add a sharpen filter to your render as well.
Post Mortem
It's important to try and finish your projects. When you do, you can reflect on the things that you learned, and what to focus on in your next project. This project has uncovered a lot of firsts for me. I learned a lot, and looking back there are things that I definitely can improve upon.
For a start, I’m sure I can reduce the polycount by a lot. Most could've been saved on the retopology of the Zbrush sculpts. And removing leftovers of downscoping, like the interior. I also could have spent some more time on reducing the edge loops in the rigging.
The ship currently requires 3 sets of textures, which I am confident I can crunch down to 1, maybe one extra normal map for potential bakes of sculpts. I also could've reduced texture size based on the camera angles I initially referenced from Skull & Bones.
The biggest lesson I learned has been that even a project as complex as this one, can be accomplished if you tackle just one problem at a time. If you worry about a difficult part later in your project, try not to make that stop you. I find that there is always a solution, so for now just focus on the first problem at hand.
If you made it this far, thank you for checking out my article! I hope you enjoyed it and learned something from it.