Using Unreal Engine to Create and Render a Stylised 3D Environment
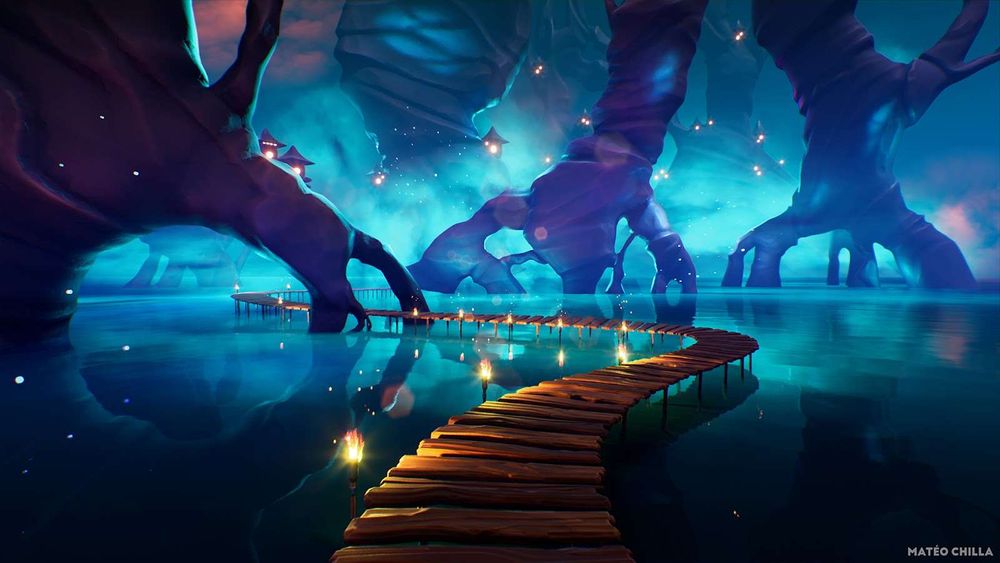
Learn how to create and render a stylised 3D Environment in Unreal Engine, with Matéo Chilla.
Learn how to create and render a stylised 3D Environment in Unreal Engine, with Matéo Chilla.
A recent 3D Artist graduate of Brassart, Matéo Chilla, has a passion for Environment Art. This passion grew from a final year project: A VR Game in Unity built around an Inca Civilization.
Now moving on to specialise in Environment Art, Matéo is enrolled at Artside Game Art School to start in 2022. Before he gets busy imagining new worlds, we asked him to share his recent project with us - a stylised environment conceptualised in Unreal Engine.
After graduation, I wanted to challenge myself by learning Unreal Engine, since I was very familiar with Unity already, and I like to get versatile. So, I was looking for references to start my journey and create an environment. When I came across Nicole Segawa's concept, I knew I wanted to rework the concept in a 3D world. I thought it would look pretty cool in the Engine. As I love creating stylised stuff, the art direction for this artwork was all set.

Everyone can try their hand at creating stylised environments thanks to all the online tutorials and resources out there. Trying to get your own style is another challenge and it takes some time; that is something I have been also working on in the background.
In this case, I wanted to work from this concept piece. I loved the vibrant blue and the atmosphere given by the fog and the little lights on the houses. There is such a mystical and fairy mood that I felt, and I wanted to transcribe it.
The blockout phase was pretty simple actually, I just placed the trees and the bridge in the scene at first. The most challenging part was trying to get the proportions right, and the distance right between each tree. I moved them a lot during the building of the piece.

I added a WaterBodyCustom given by Unreal so I could set up the water. I tweaked it later when the composition and the blocking was pretty much finished. I didn’t add the little tree houses in the blocking phase; to me they should be added as final touches, and they weren’t helping that much with the placement of the trees anyway.

This was the first challenging part of the scene creation. First of all ,I wanted a completely dark environment with no lights.
I made sure that all lights were deleted on my hierarchy. And then, I went into the Exposure Settings and deactivated the Game Settings to be able to put the EV100 to 0. By doing that, I prevent the lighting from automatically adjusting the exposure. And also avoid getting that phototransduction effect (the effect of getting dazzled by the light exiting a dark room).

I then added just one directional to get a base lighting, and everything else was just playing around with point lights here and there - mainly around the trees to get a rim light effect on them.

To create the volumetric effect, I created some fog planes that I interleaved between the trees according to the reference as well. The shader effect is pretty easy actually, it's just a plane with a panning noise texture. I created three of them: one orange one, and two blue planes with one being more transparent than the other.
Well-placed, these planes can really make a difference in terms of depth for your environment.

For the trees, I first created the base models that were used for the blocking, and defined them a bit more thanks to being able to bring the concept in Blender. After that, I went in ZBrush and played around with some brushes to get the result I wanted. For example, I wasn’t really looking for a trunk effect but more something smooth and appealing to the eye.

Quite the same thing for the bridge was done, I used a spline and array modifier to repeat the planks on the shape I wanted, and added the pillars to the spline.

Torches were placed manually in the Engine, and I made the flame shader with this wonderful tutorial by Underscore.

For the textures, it’s a pretty simple stylised effect on the models. I just noticed that on the concept, there was a kind of hollow effect on some trunks. So I tried to recreate that with an emissive map. I then painted the model to trick the eye to see a translucent effect.


For the VFX, I made some Fireflies with the Niagara System that I placed around in the scene, and added some embers on top of the torches to add something to the flames. Pretty quick and easy!

Final touches are the most fun part to me as it’s where you see your work coming to an end, and your artwork coming to life. You can finally play with every render settings to get the best result. This is the part that usually takes some time as well: adjusting the lighting, adding fog planes, vfx, in the scene and moving the trees to get that feeling of depth.
In this case, I added the tree houses with some emissive planes to give the feeling that there are some windows in the houses in the distance.

To conclude I must say that this project was full of discovery, and I learned new skills as well. This once again was really to train my lighting and volumetrics skills. I loved this little project and how it turned out!
I hope that you liked to read this little breakdown and I thank you for your time. I wish you good luck for your upcoming projects and I’m excited to see them!
And thanks a lot to The Rookies for featuring my artwork as well. I really do appreciate it!
Find more of Matéo's work on ArtStation, Instagram and LinkedIn.