3D Character Modeling and Mastering Anatomy Using Maya and ZBrush
Think Tank Training Online student and aspiring 3D Character Artist, Zoé Brening, shares her workflow and tips for creating an anatomically correct 3D character.
Think Tank Training Online student and aspiring 3D Character Artist, Zoé Brening, shares her workflow and tips for creating an anatomically correct 3D character.
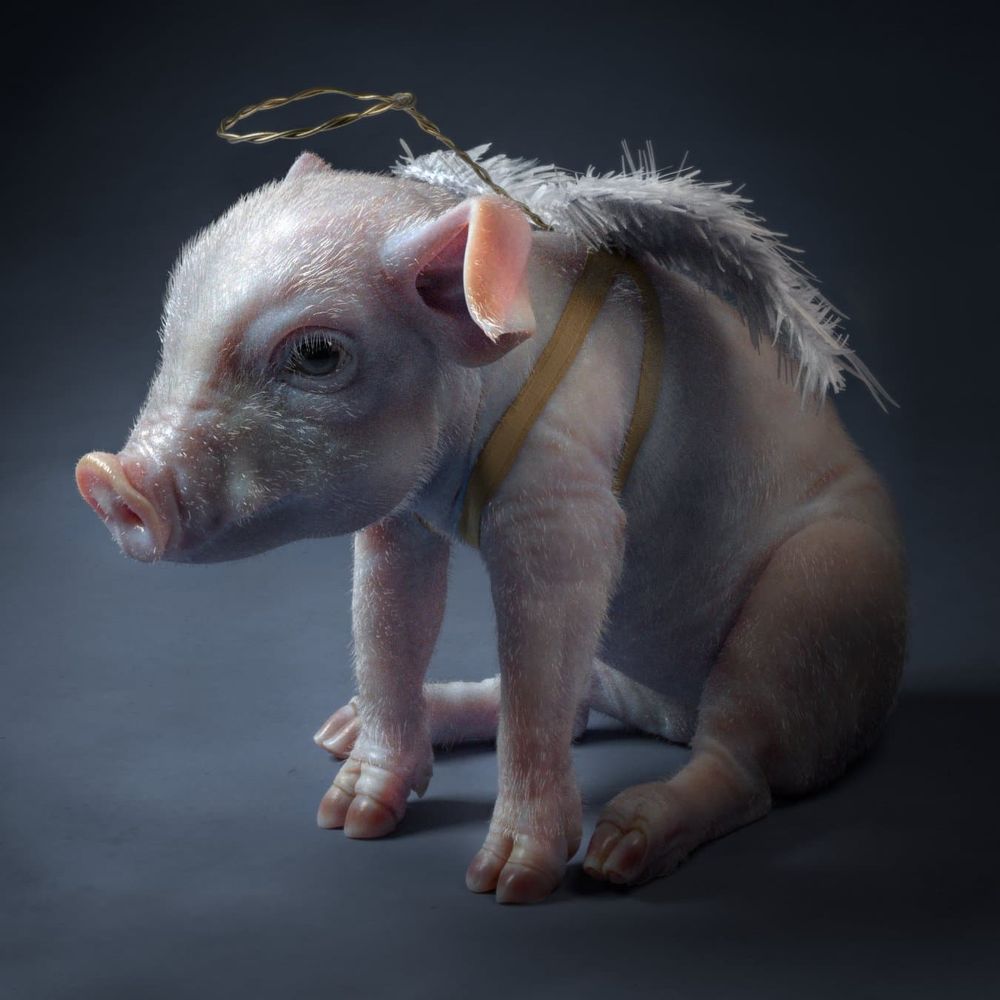
Zoé Brening is a student at Think Tank Training Online and aspiring 3D Character Artist. Knowing that one of the main components of good and realistic character creation is proper anatomy, Zoé saw an opportunity to practice her skills by creating a 3D piglet. The outcome was so successful that she submitted this angelic looking animal to the 2022 Rookie Awards. Read on for Zoé's tips for creating an anatomically correct 3D character.
The goal of this project was to study anatomy. Everyone knows that one of the main components of a good and realistic character is proper anatomy. I am sure that many start their journey as character artists by studying anatomy.
To be honest, I was intimidated to start with humans. Since most mammals are close to humans in their anatomy, I decided to practice on a pig and leave men for the seventh day.
So, let's begin. The workflow of this project is very straightforward, which may be of interest to beginner artists. You will see further on that I aimed at keeping things as simple as possible.
The list of the software used in this project is quite short:
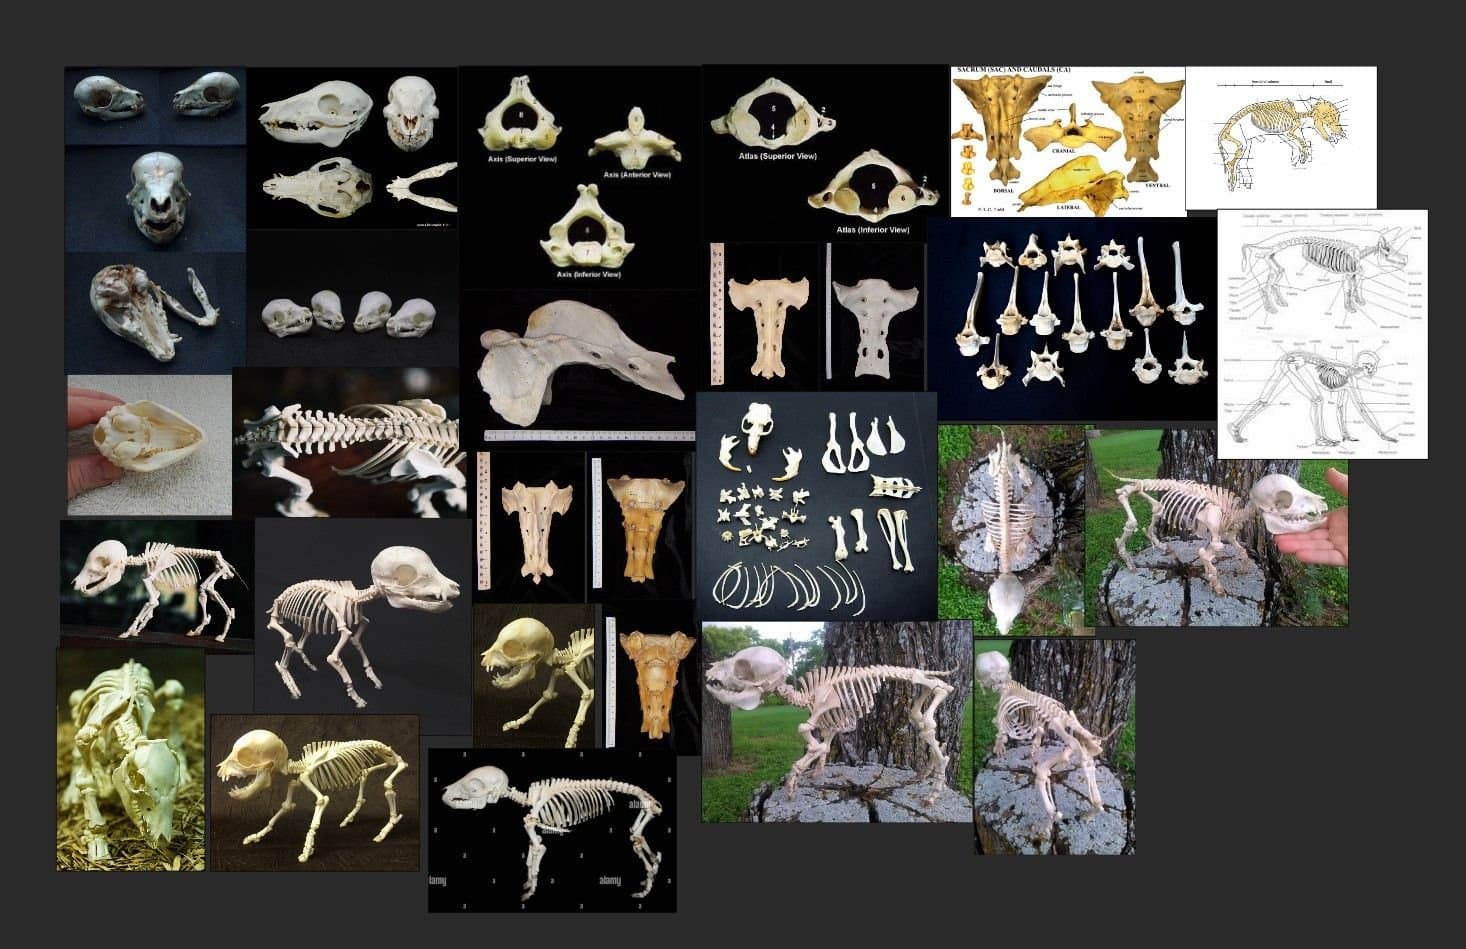
I can only repeat what everyone has known for a long time. Gathering references is the most important stage of the work.
Never start a project without good references.
I started by studying books on veterinary anatomy, computer tomography of different parts of a pig's body, and different books on animal anatomy for artists. The best of them I found to be Animal Anatomy for Artists: The Elements of Form by E. Goldfinger and An Atlas of Animal Anatomy for Artists by W. Ellenberger.
Very useful to me were the so-called “Afterlife Shops”. These shops specialise in Skull and Skeleton processing, Preservation, Skeletal Articulation, and Taxidermy. For example, on this Site, I was able to examine in detail a skeletal system of a fetal pig.
I am not posting my PureRef file in full, as I'm not sure if everyone can stomach it. But I will show you a small part relating to the bones:
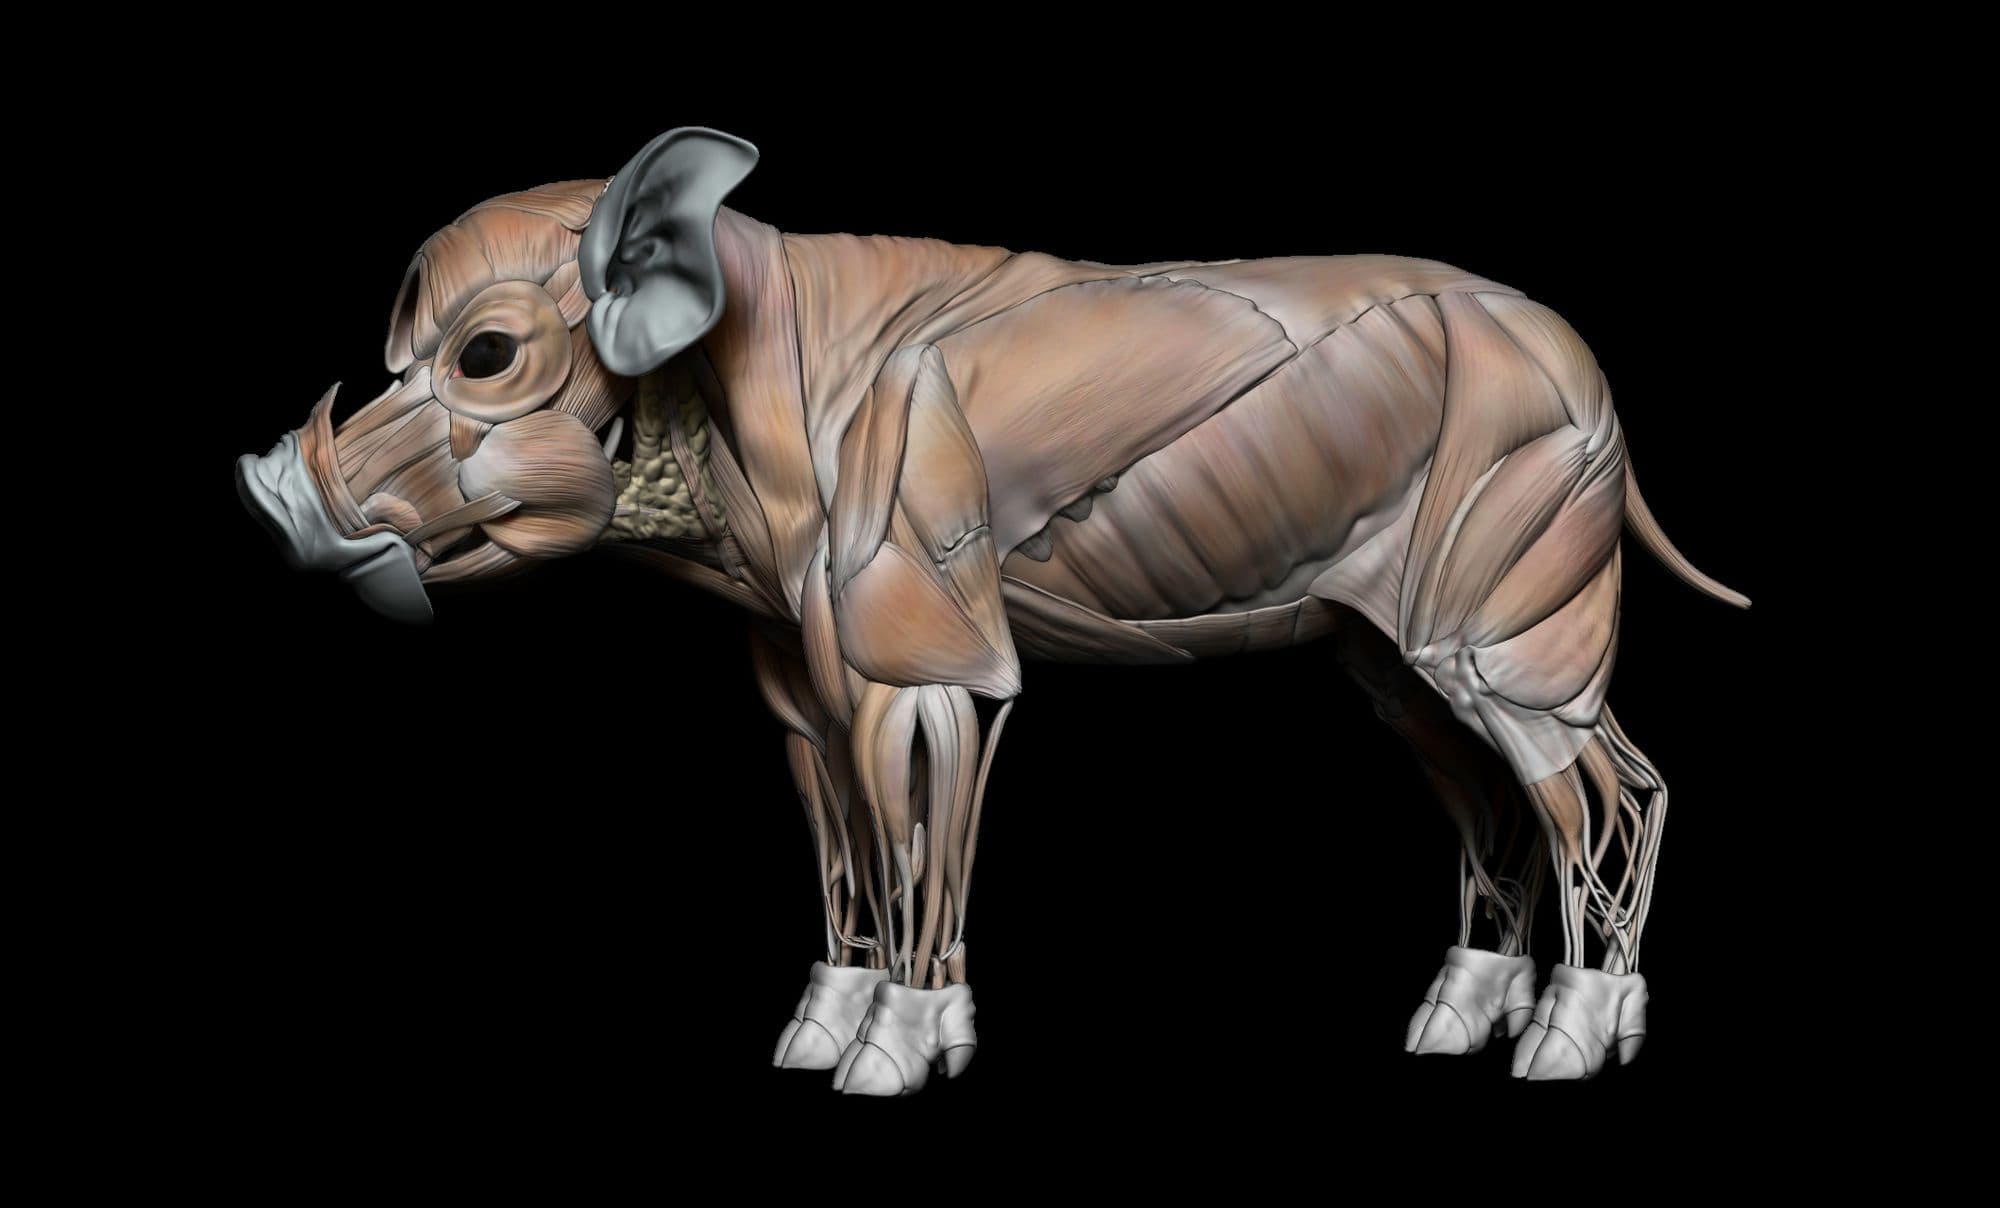
Inspired by the example of many artists, I started creating an écorché. It is a really useful and rewarding practice that helps to understand the relationship between the different elements.
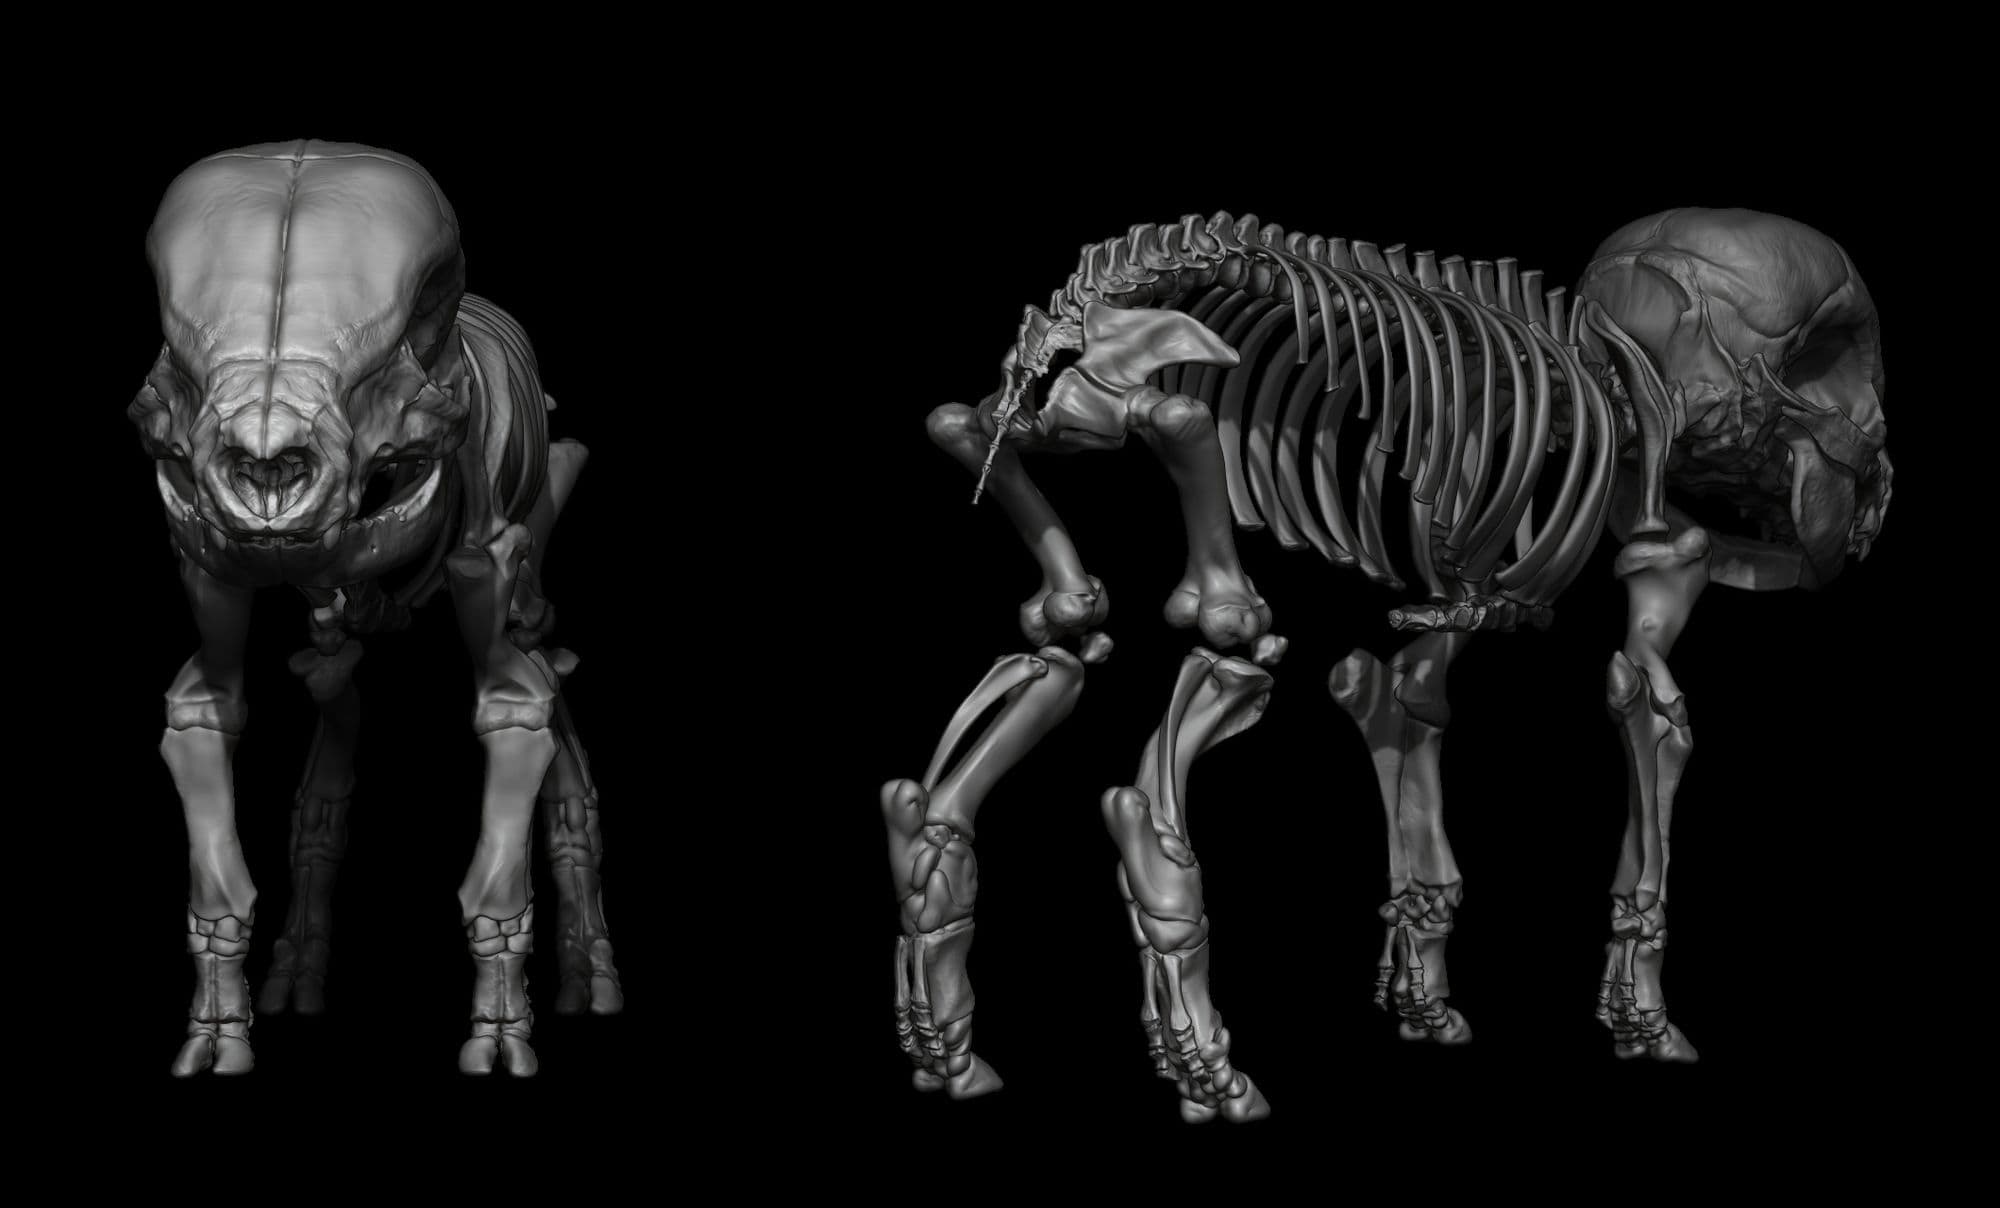
The most important step in creating an écorché is the skeletal system. It determines the basic proportions of the model and the location, or to be more precise, the attachment points of the muscles. This is the most important part of the creature.
Everything about the skeleton must be right.
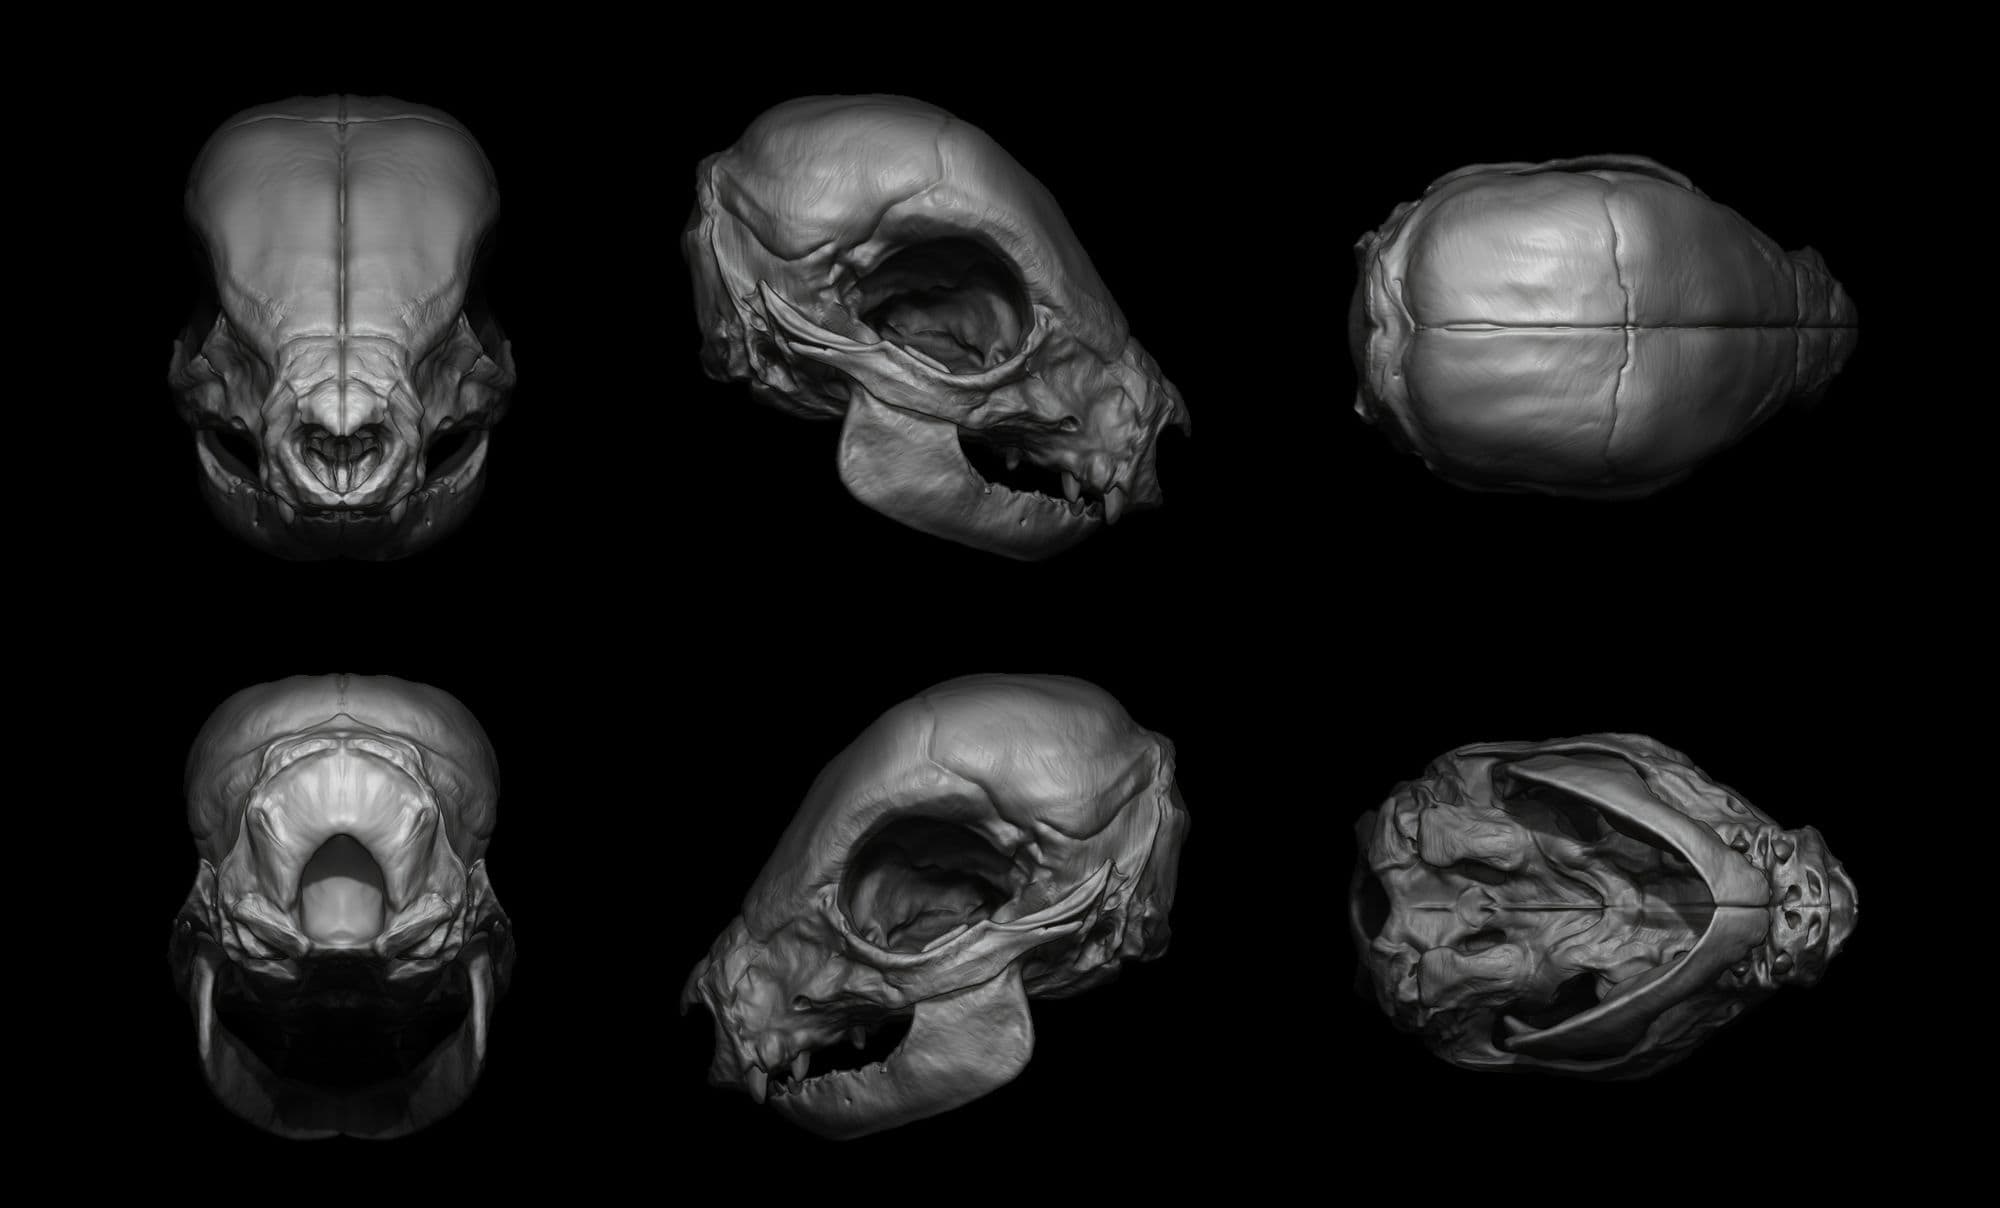
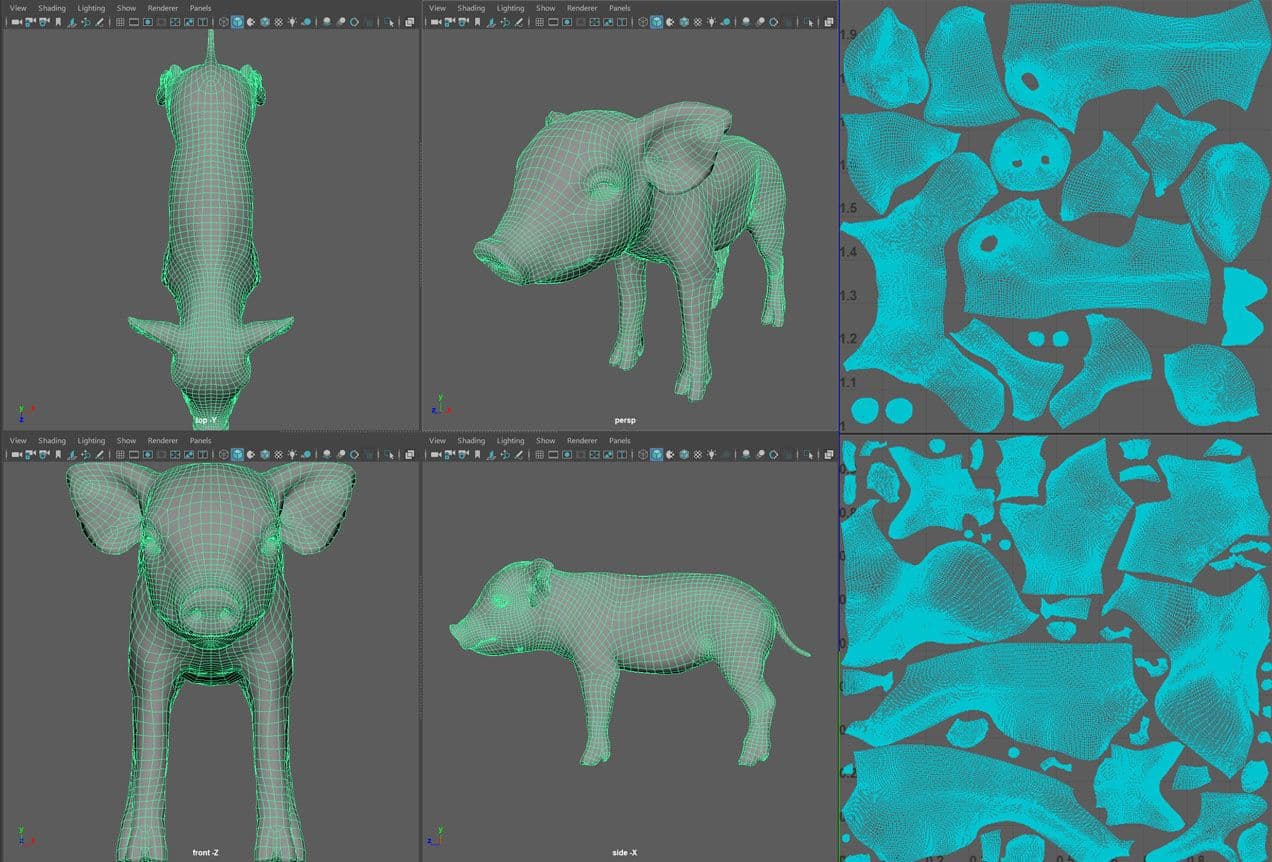
The workflow in ZBrush began with blocking out the general silhouette and proportions of the skeletal system with ZSpheres. I broke the work down into four main parts: skull, spine and ribcage, forelimbs, and hindlimbs. Once satisfied with the silhouette, I moved on to each bone individually.
I sculpted the skull first. To create the skull, I started with a cube that I pushed and pulled with a Move Brush and subsequently dynameshed to create all the cavities. To make the concave surface and holes, I used IMM Primitives Brush with Subtract Mode and then dynameshed again. The ClayTubes Brush was used to sculpt the different plane changes of the object, starting with the primary shapes and moving on to the secondary shapes. ZRemesher was then used before moving on to more refinements.
For the entire skeleton, the process is pretty much the same. I tried to make everything as anatomically correct as possible, so I made each bone and later each muscle separately. But there are some repeating parts such as vertebrae and ribs. So some of them were duplicated.
Once the skeletal system was built up, I began layering the muscles, starting at the head and working my way toward the tail.
Naming the Subtools correctly will make life easier when you need to make adjustments.
To avoid confusion, I have created folders for each muscle group and named each muscle. Later on, it made my life easier when I had to make changes and adjustments.
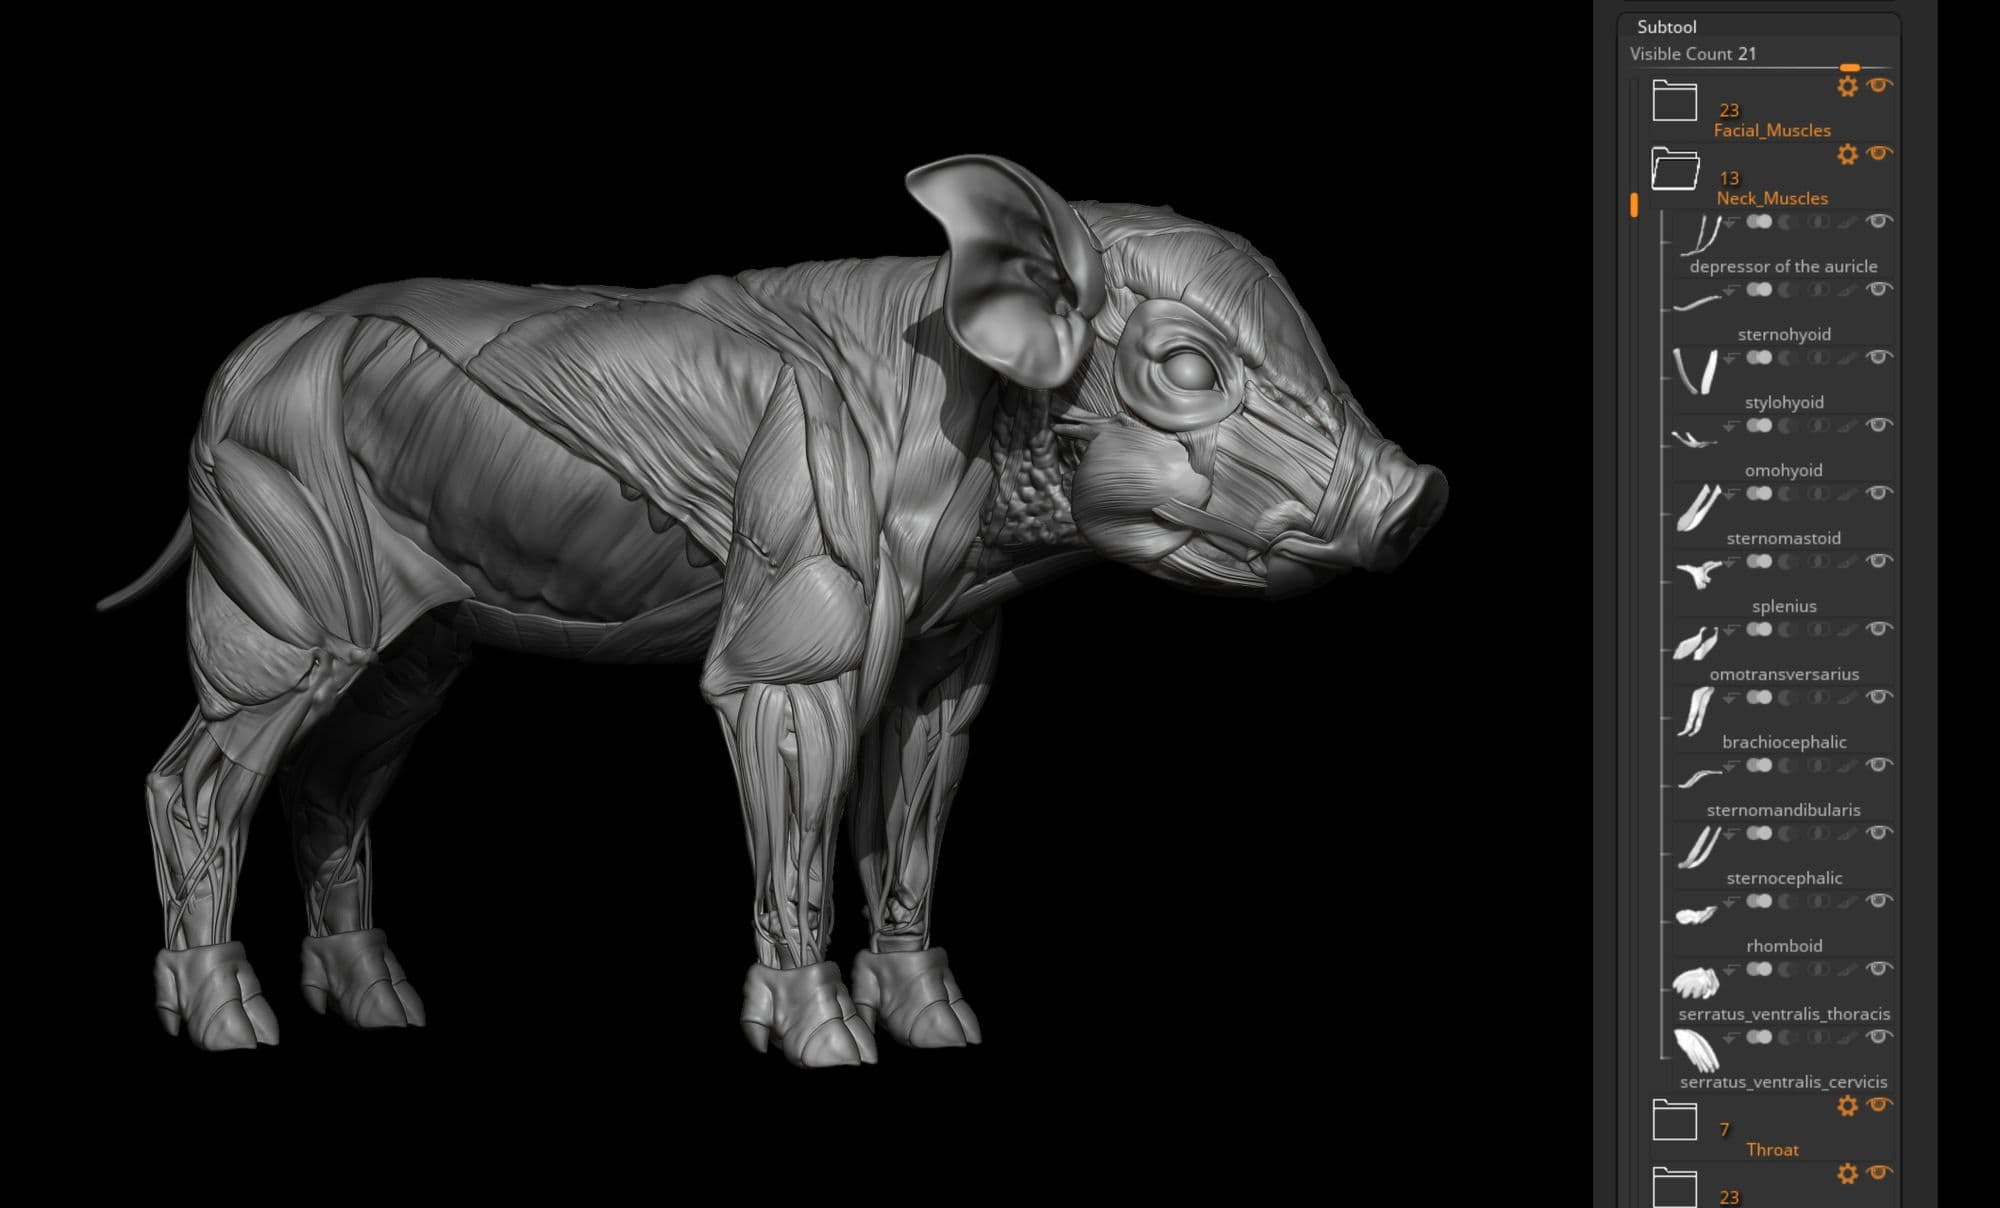
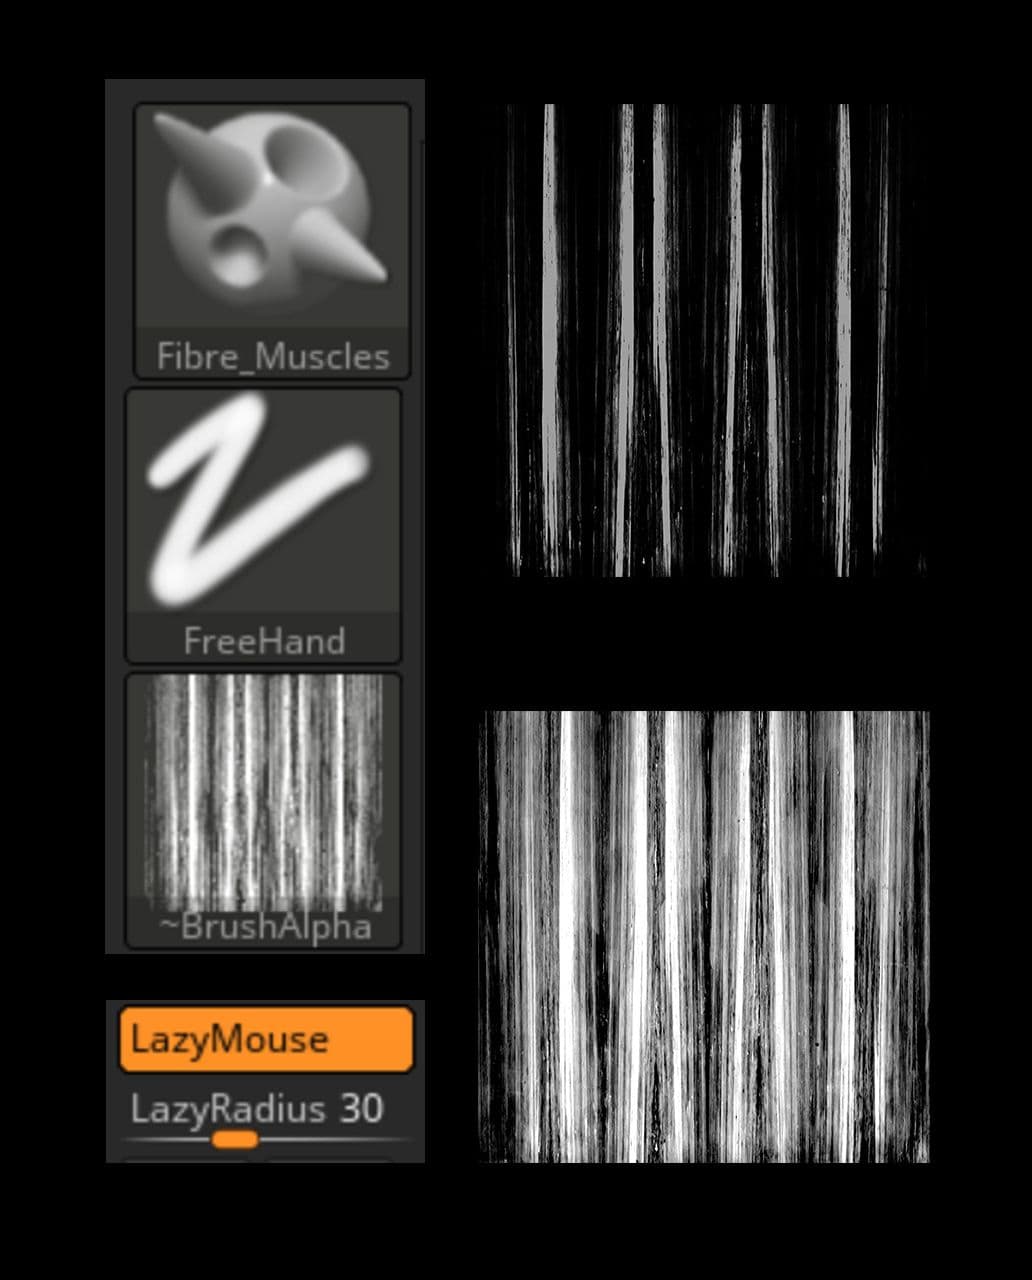
Most of the muscle detailing was done with the Displace Brush and a custom Alpha. The Alpha should be mostly black with thin white fibers. This results in a lot of random-looking lines. I used this brush along with the SmoothDirection Brush at low intensity. This trick was shared by Maria Panfilova.
When the skeleton and muscles were ready, I combined them into one object Tool>Subtool>Merge>MergeVisible and moved on to sculpting the skin. I used the ClayTubes Brush with slightly modified settings.
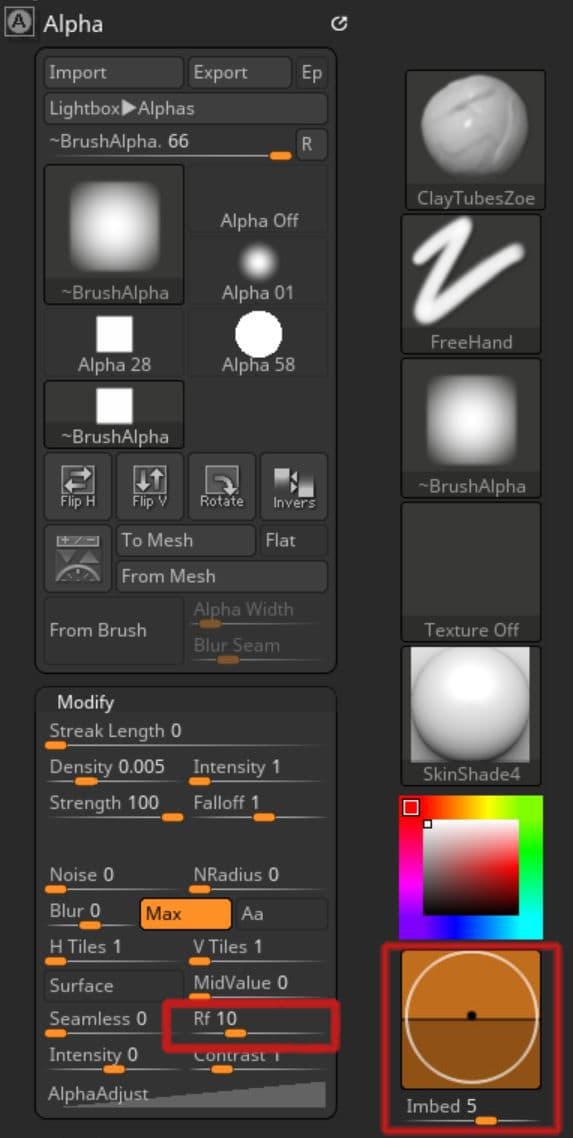
I reduced the intensity of the brush and kept changing the Brush>Depth>Imbed parameter. I didn't want to lose details, so I hardly used the Smooth Brush. But I occasionally reduced the Imbed Value of the ClayTubes Brush to zero. It helped to make minor changes and thereby smooth out the model. However, it is important not to lose completely the definition of the muscles under the skin.
So before I start working on the skin, I remembered to save Tool>Morph Target. This way I could bring back the muscle relief with the Morph Brush when I got too carried away with smoothing.
Once the general smoothing and refining of the model was completed, I brought it to Maya for retopo and UVs. It is important to have enough texture resolution so that the details of the sculpture are not lost, and fine noise from irregularities further accentuates them. That is why I arranged UVs into two UDIMs.
After completing the retopology, I returned the model to ZBrush and started adding wrinkles and skin folds. Wrinkles occur in places where extra skin is needed to allow movement, such as joints. Looking at the reference, I carefully added wrinkles, making sure they look natural.
Flippednormals Skin Kit helped me in creating skin relief. If you need to create incredible skin in minutes, they are the way to go.
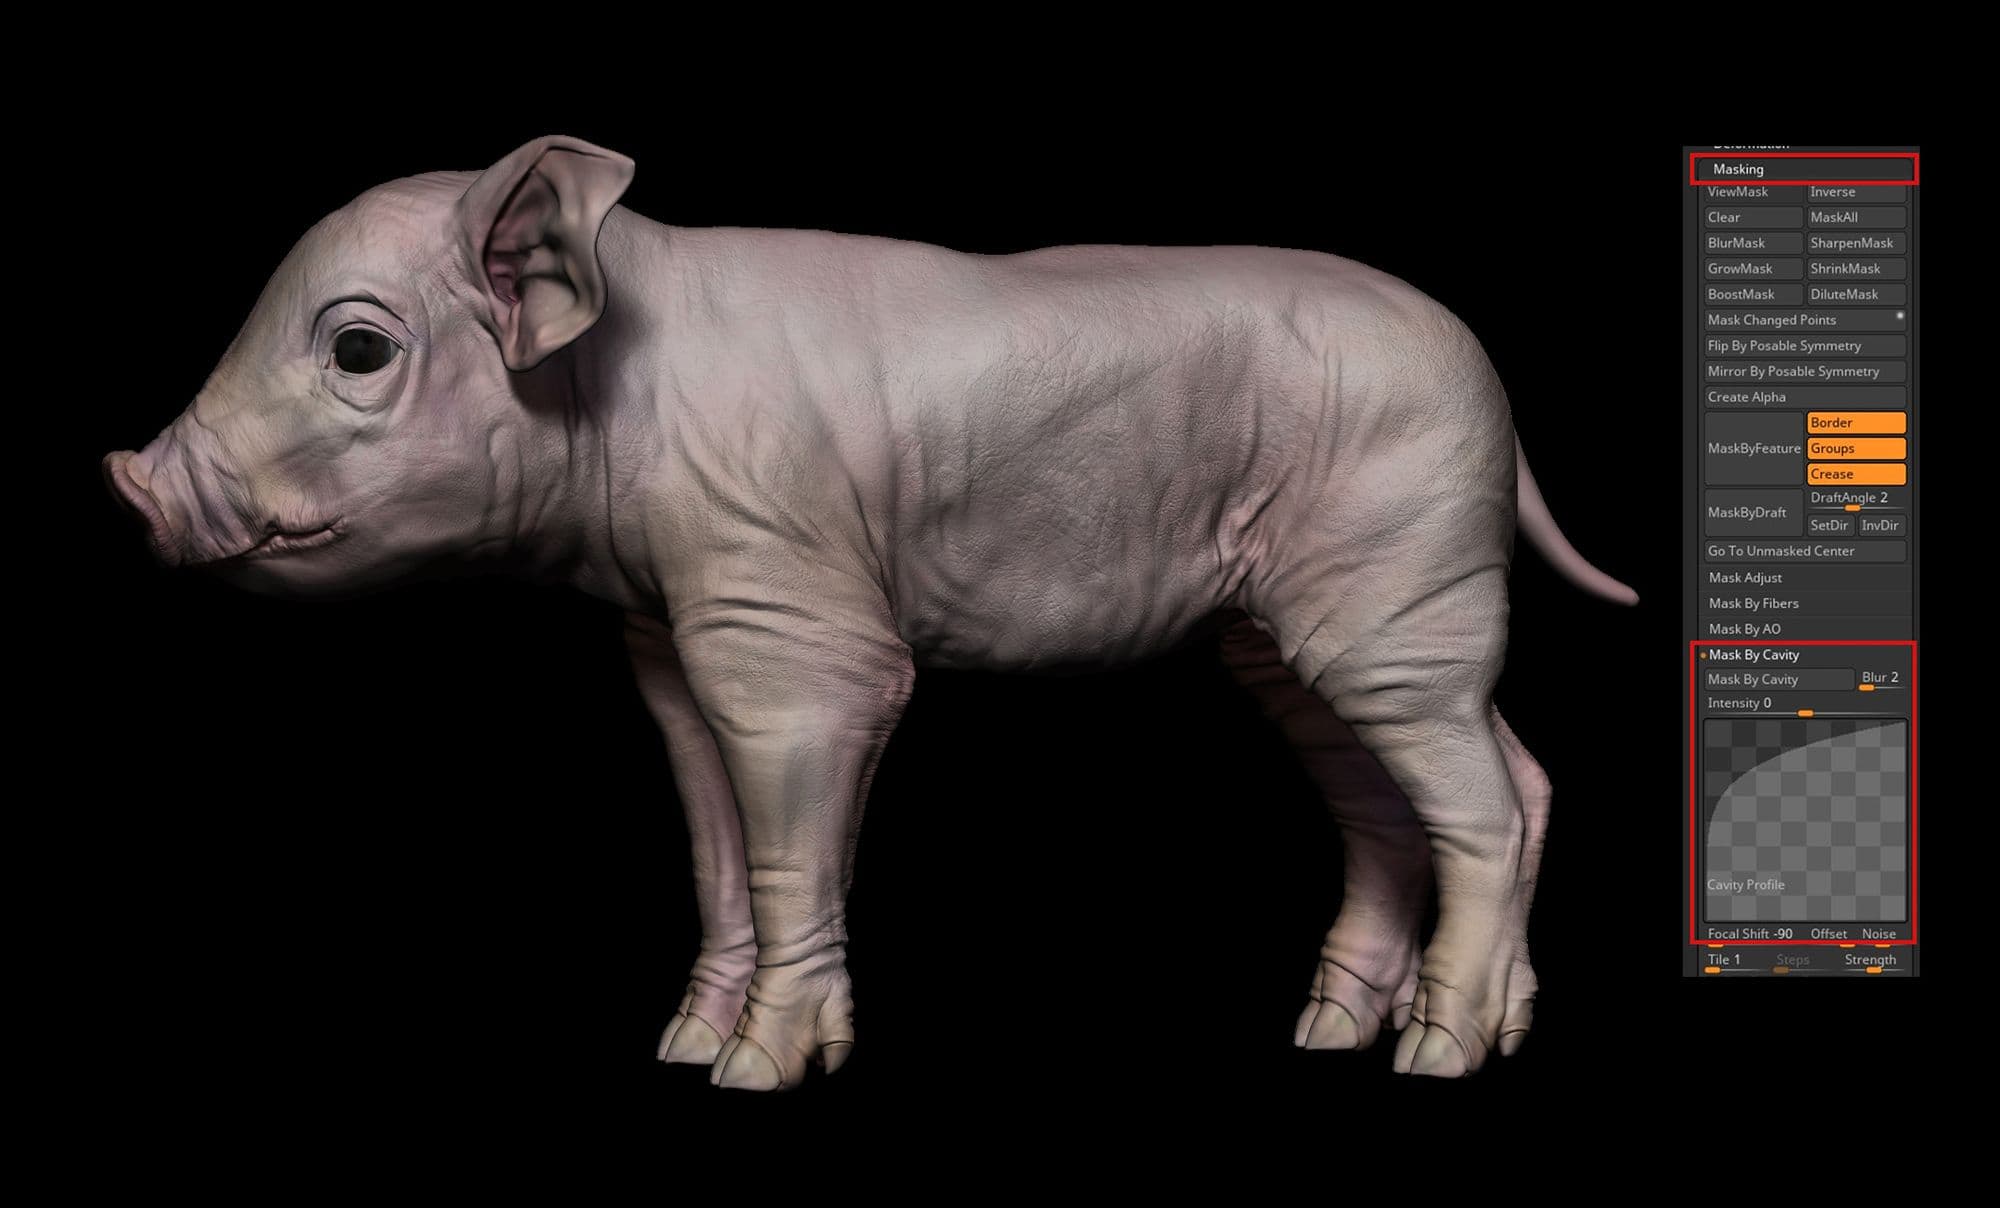
Next, the model was polypainted. I used StandartBrush, changing the Stroke parameter and alternating Alpha. For color depth, I used Tool>Masking> MaskByCavity with different profile settings. This way you can create a mask for shallow depressions, invert it and add the desired color to folds, wrinkles, and pores.
For more information about masking by cavity please check this video by Michael Pavlovich.
Where the skin is thin and veins may show through, I added more cool shades. And where the bone is almost immediately below the skin - yellow shades.
Many layers of colour were added to emphasise the details of the model.
The same approach was used for muscle polypaint.
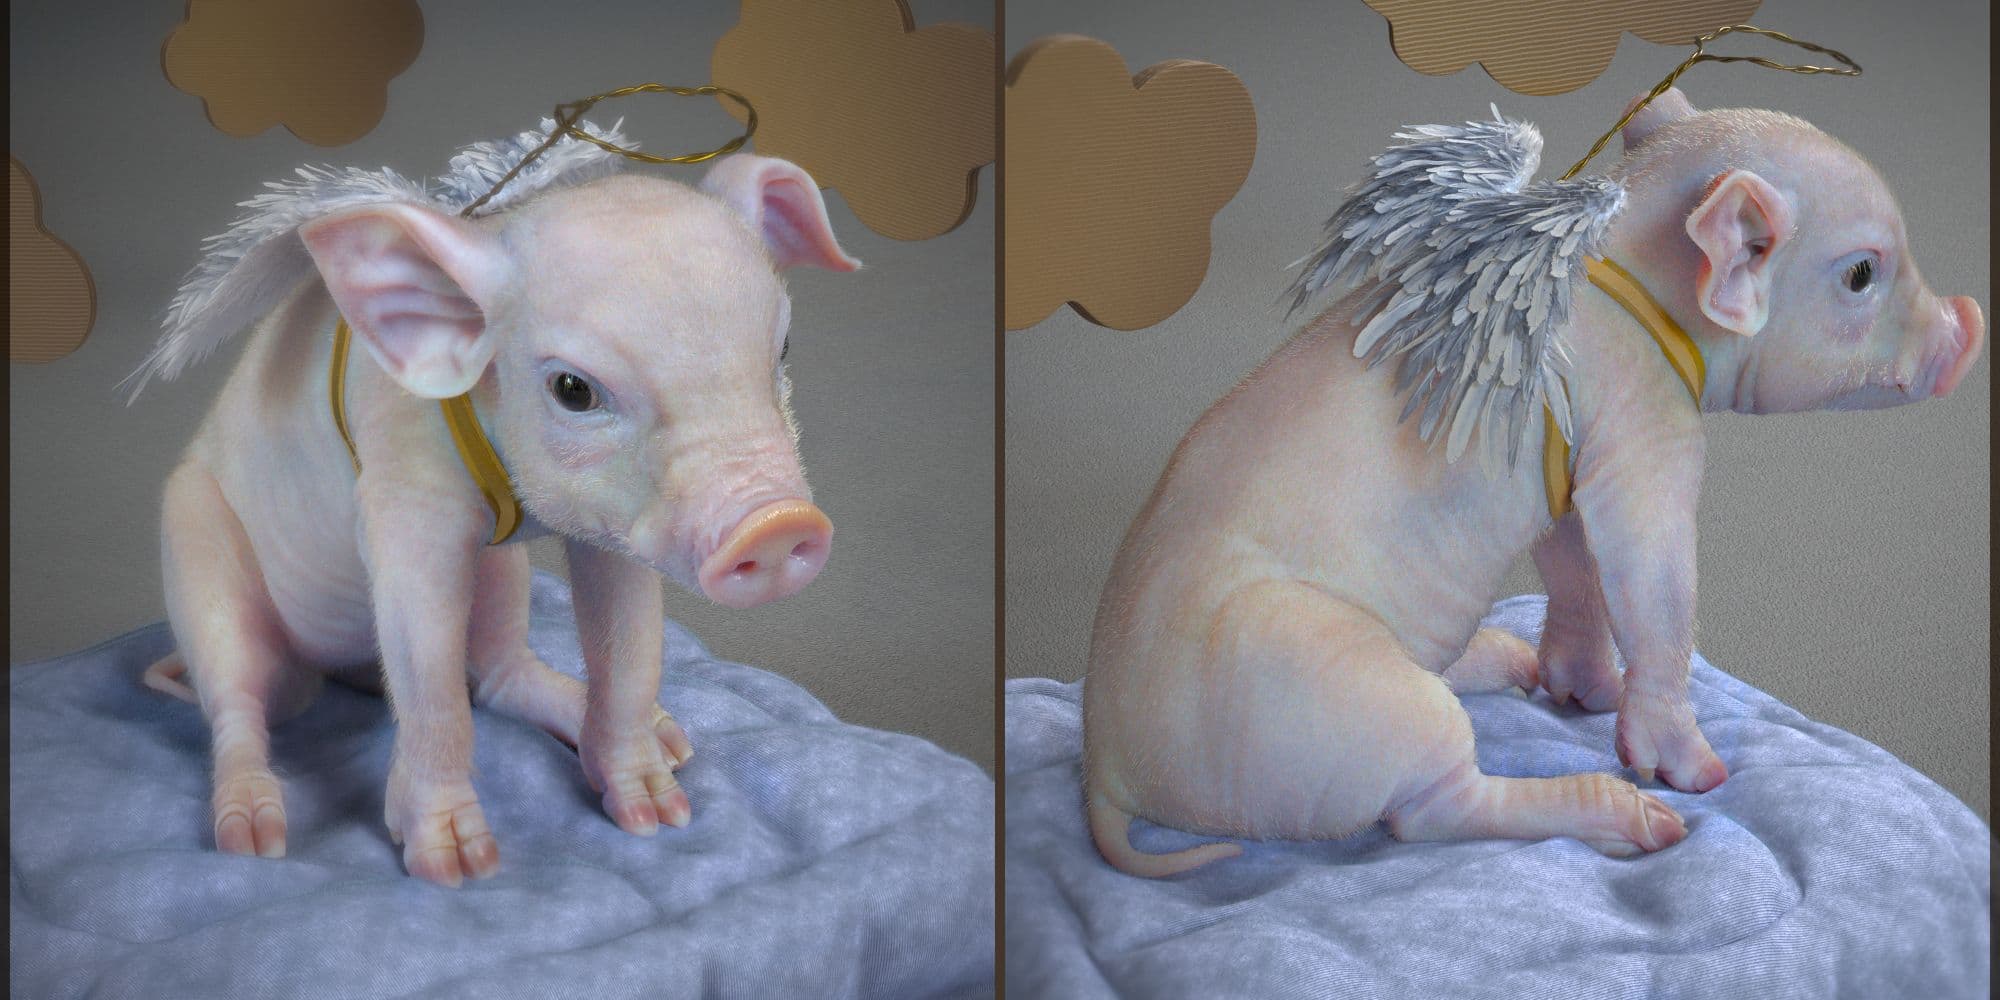
It was time for a compositional solution. Initially, I was only interested in the anatomy of the animal. But while studying the references I constantly came across information about the inhumane treatment of animals. I did not think about it much before. This project changed my view of the subject. Because of that, the idea of the wire halo and toy angel wings came by itself.
In the first version of the work I added cardboard clouds, but then I decided to abandon them. I felt that the presence of many objects in the scene could interfere with the viewer's perception of the work as a whole.
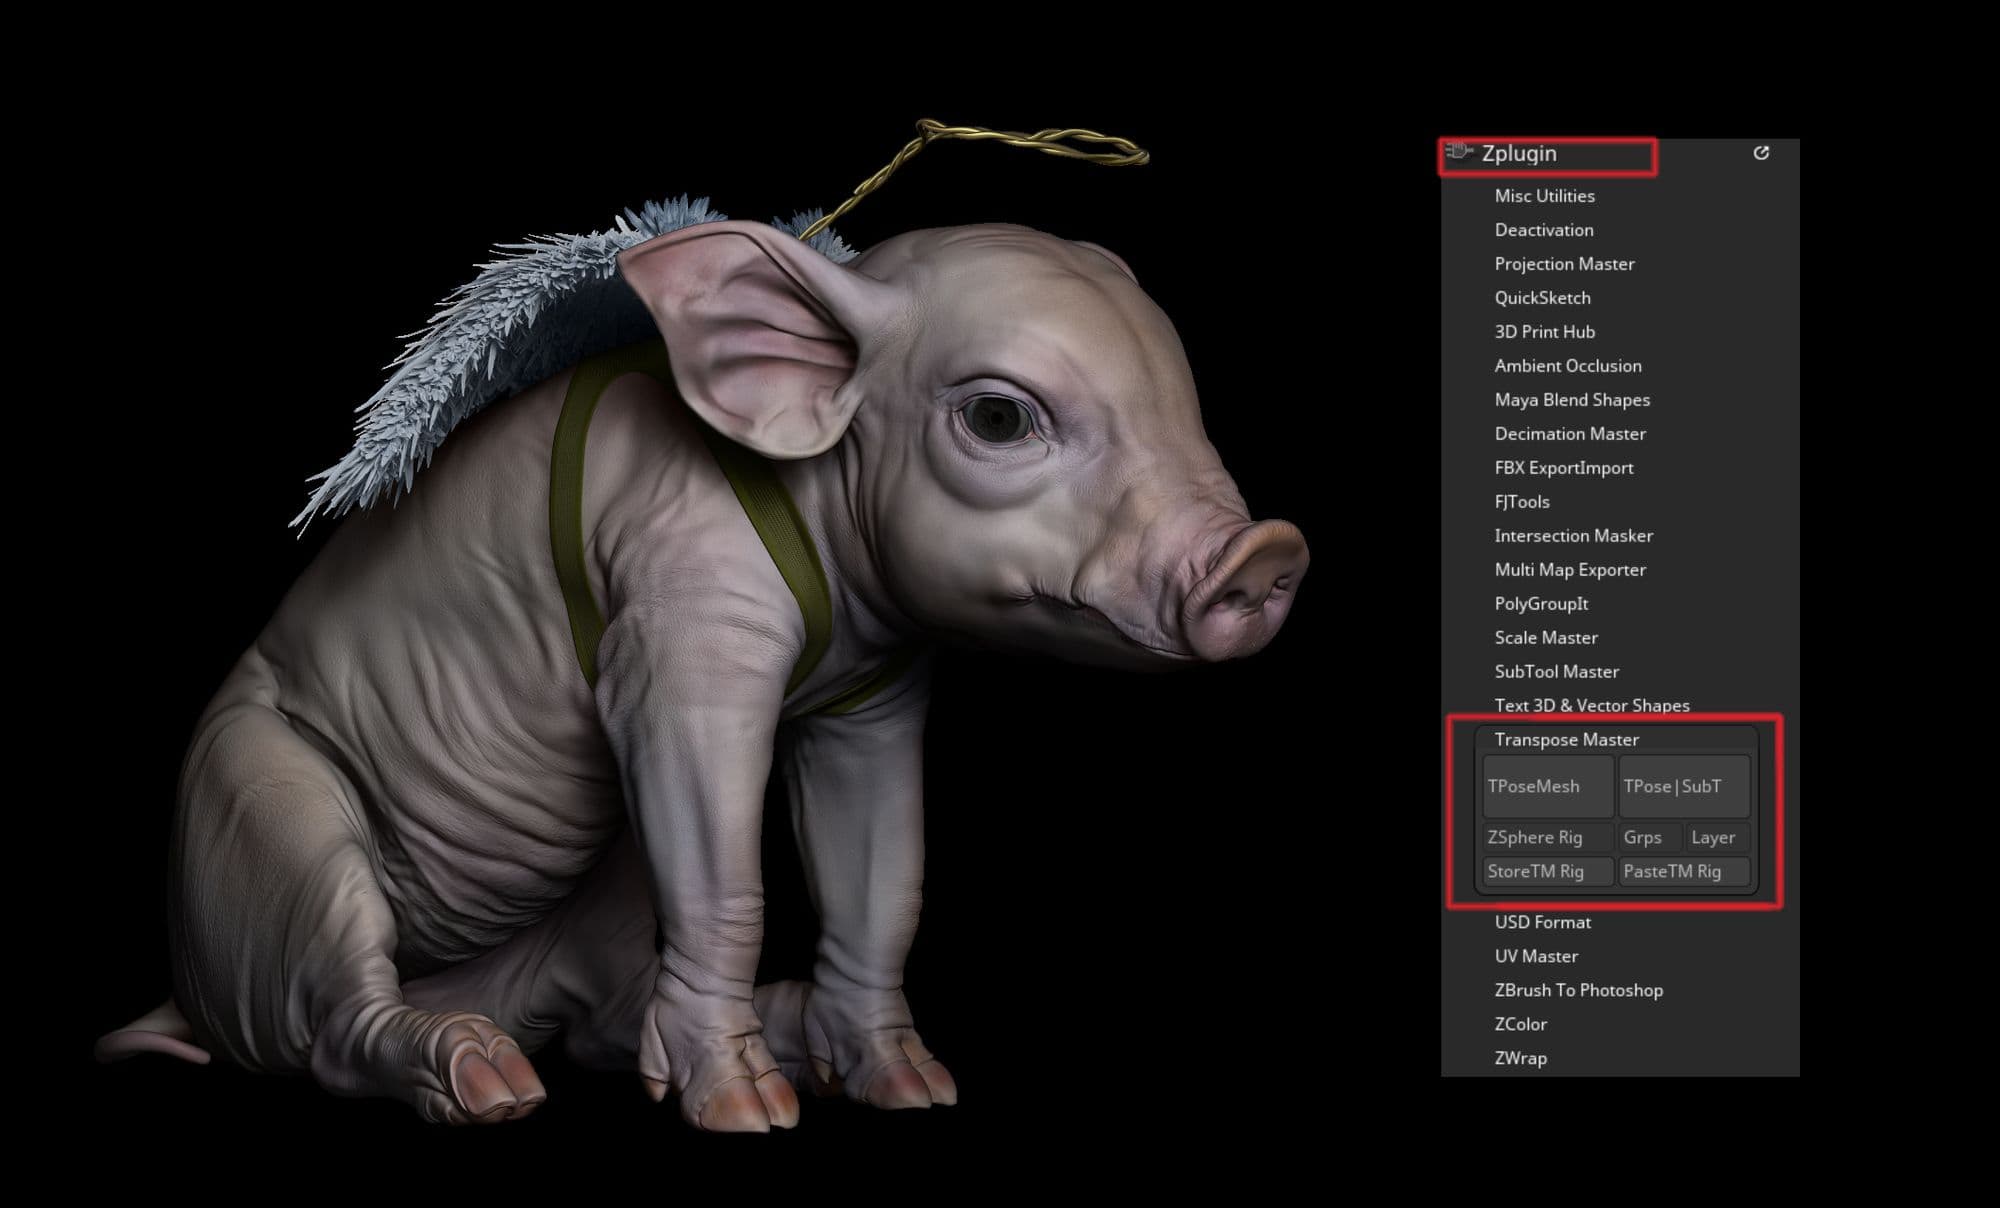
The model was posed in ZBrush using Zplugin>TransposeMaster. The pose offered an opportunity to further study the contraction and stretching of muscles and skin. To have the model look correct in the pose, I had to continually line the model up with my references to check and maintain the correct proportions.
Fortunately, finding images of a sitting piglet is quite easy.
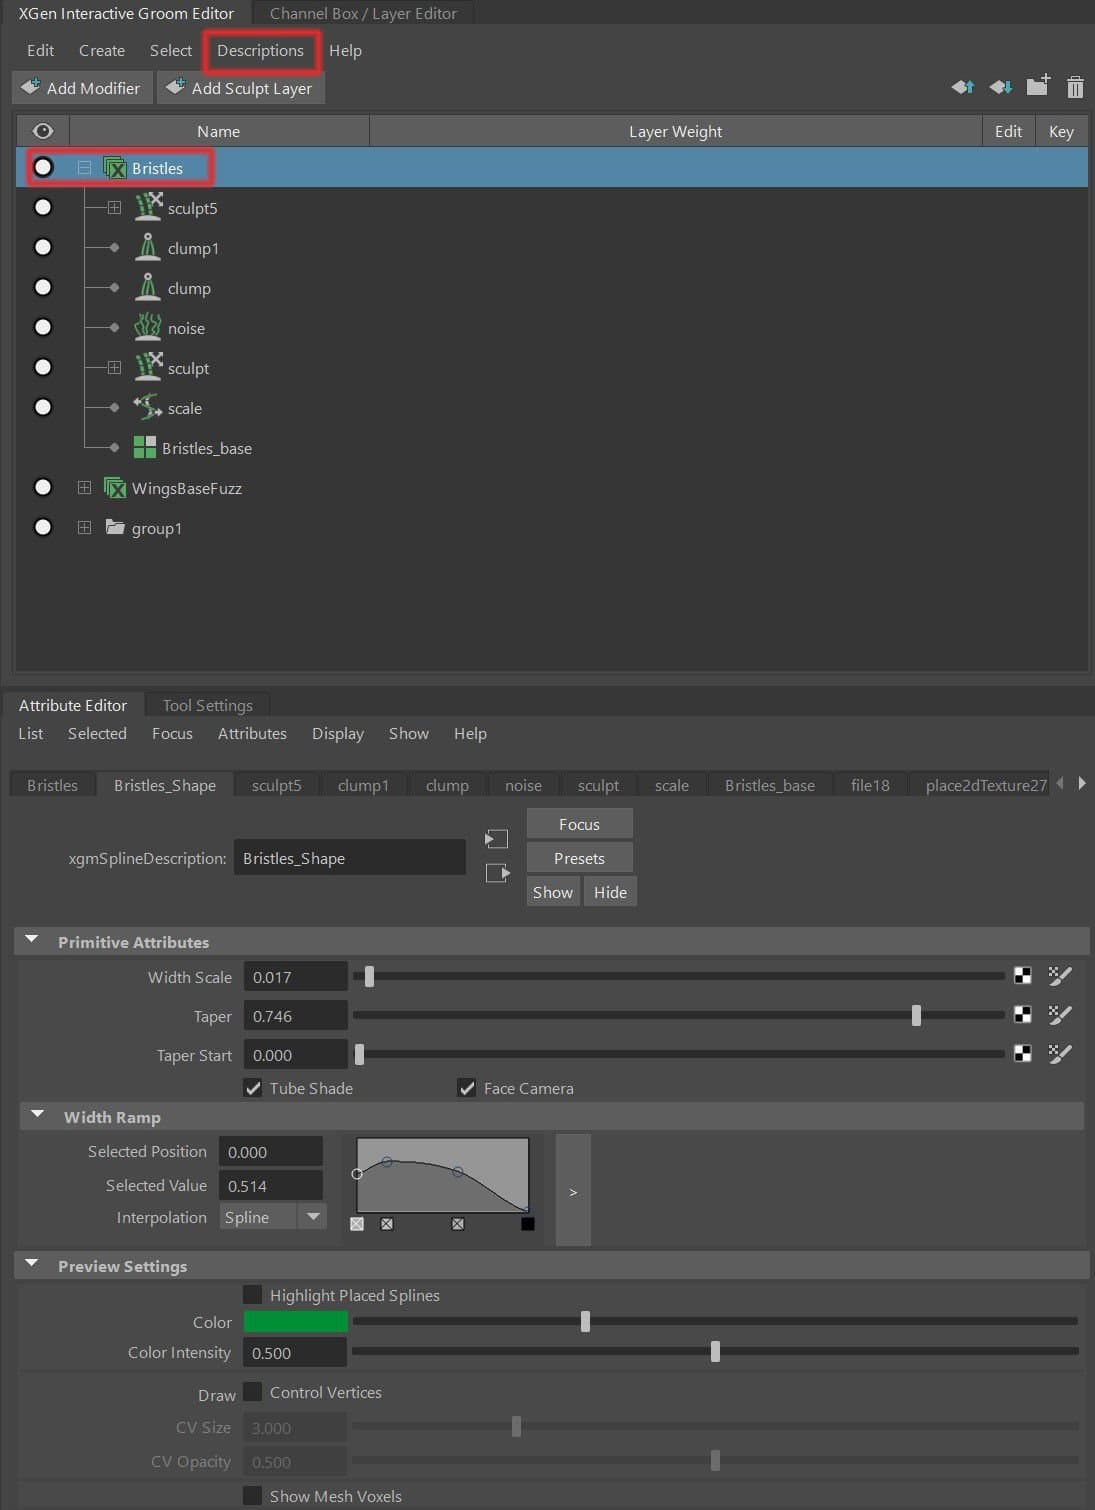
I used the XGen Interactive Groom in Maya to create the bristles. This tool is easy to learn and use. And the nice thing is that every brush movement is displayed in real-time, providing an interactive workflow that doesn't require you to create a preview.
There is a downside though, Interactive Groom is not completely stable. Therefore, I advise you to save the scene from time to time during the work. And in order not to lose your work export a description after each save: XGen InteractiveGroom>Descriptions>Preset>Export.
Also, after creating the XGen Interactive Groom, you should not rename objects or delete the history. But in case of an emergency, you can always import the created hair back if you saved it before.
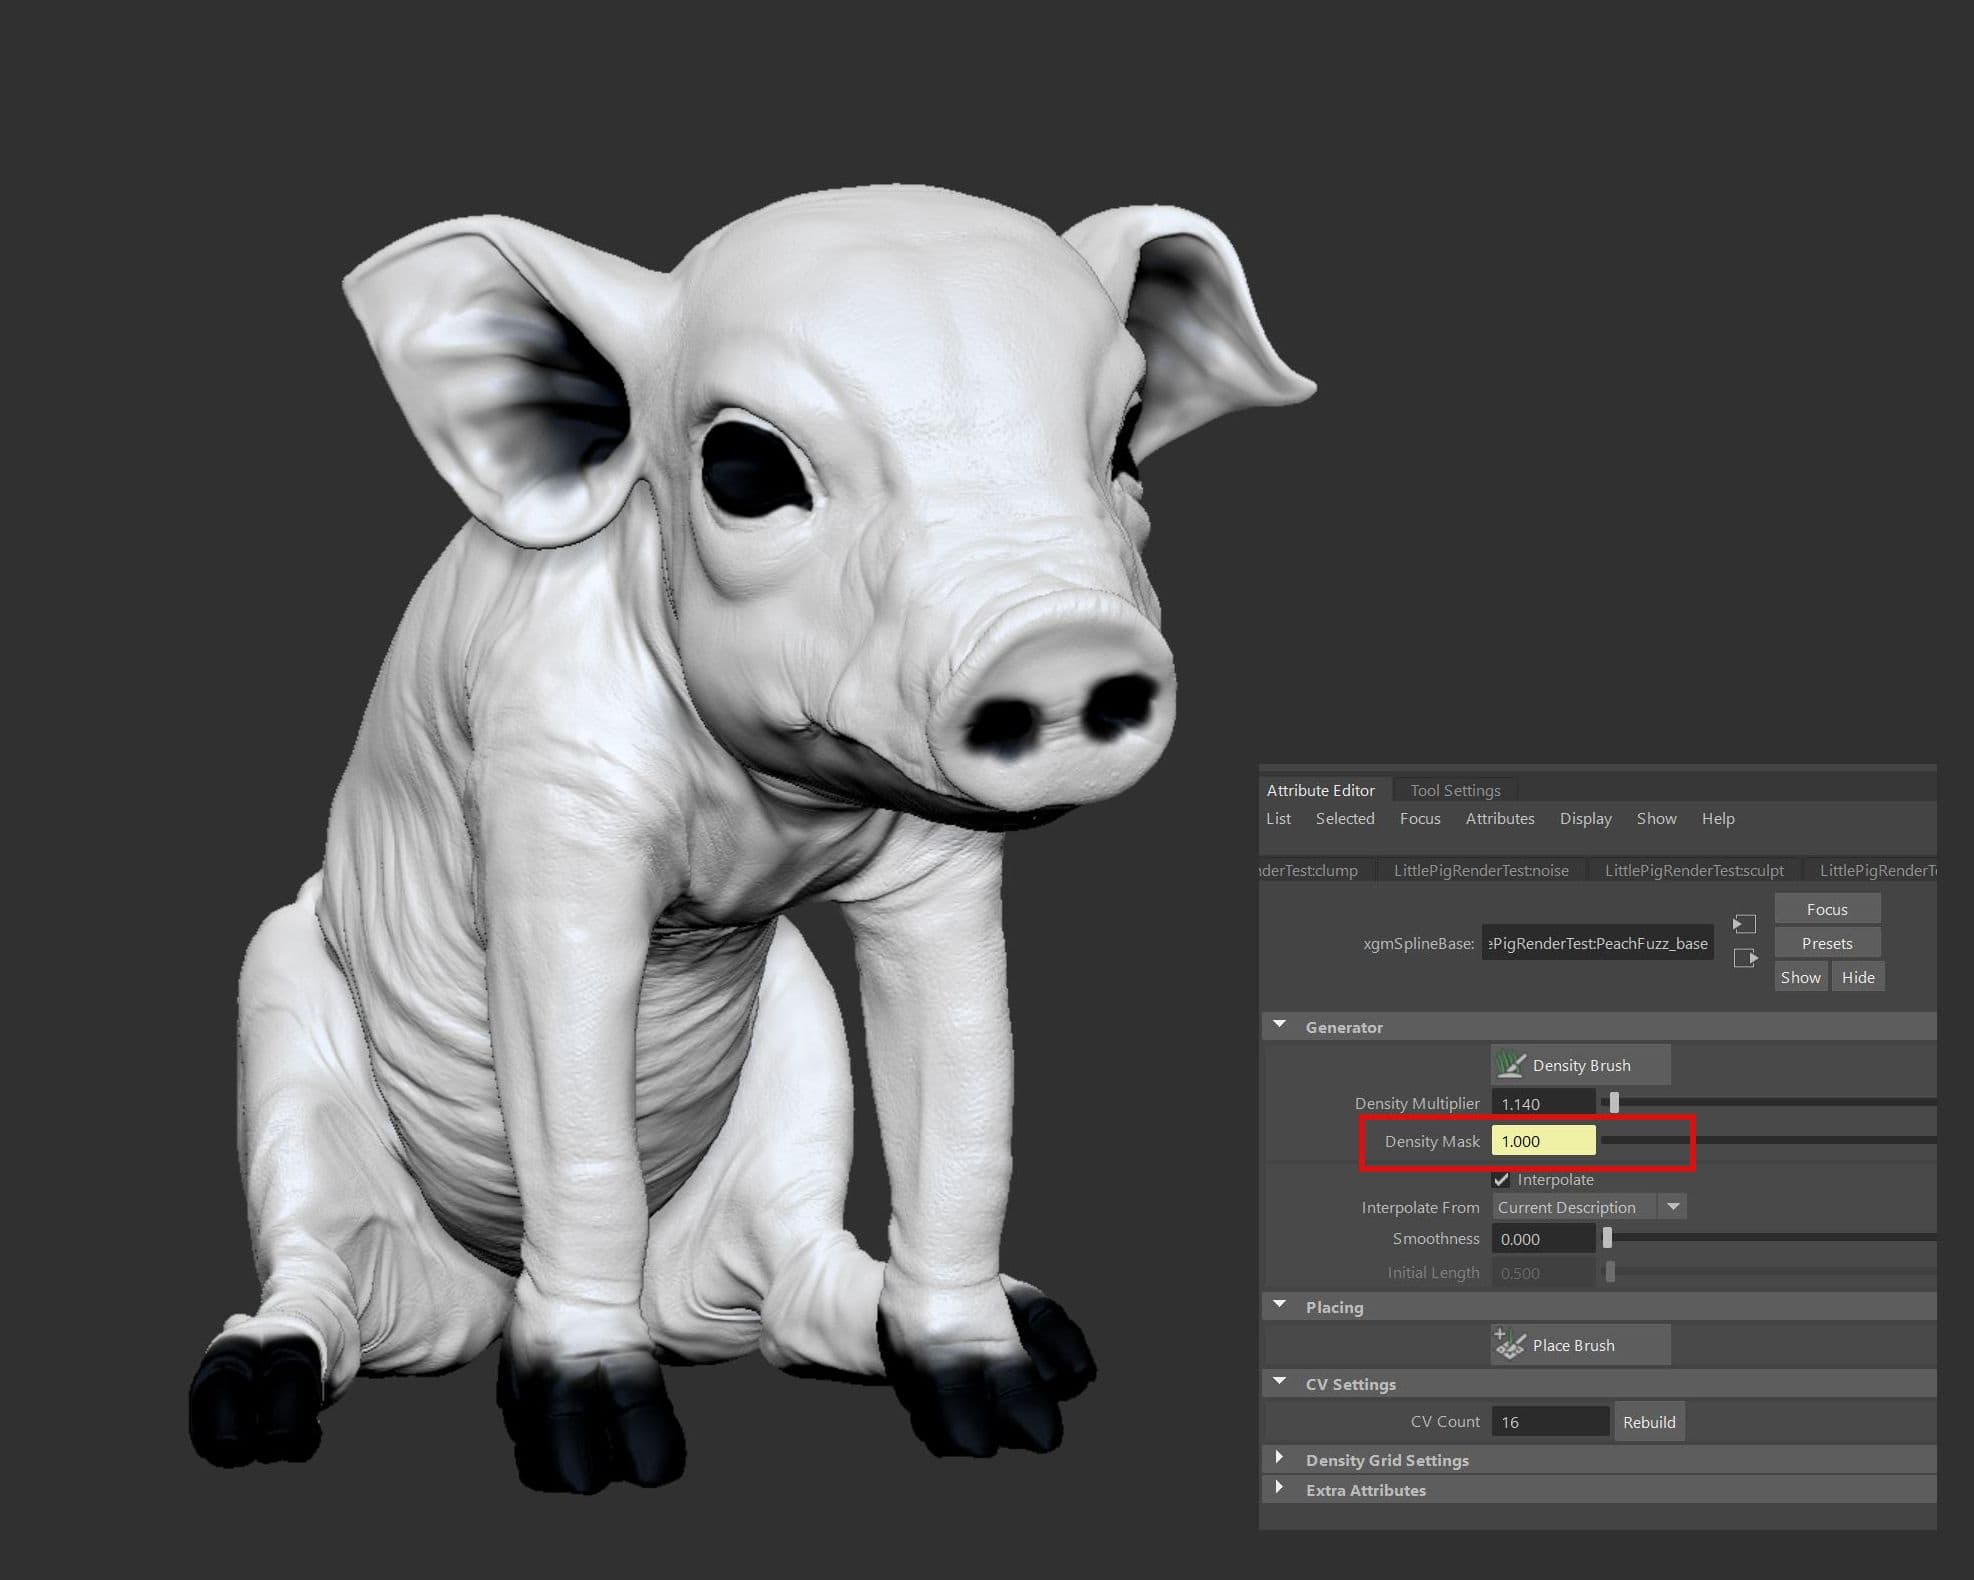
To make the bristles grow only in places where they are supposed to, I created HairDensityMask in ZBrush. In places where black is used, no bristles are generated.
Watch this video to help you get started if you have not used the XGen Interactive Groom before.
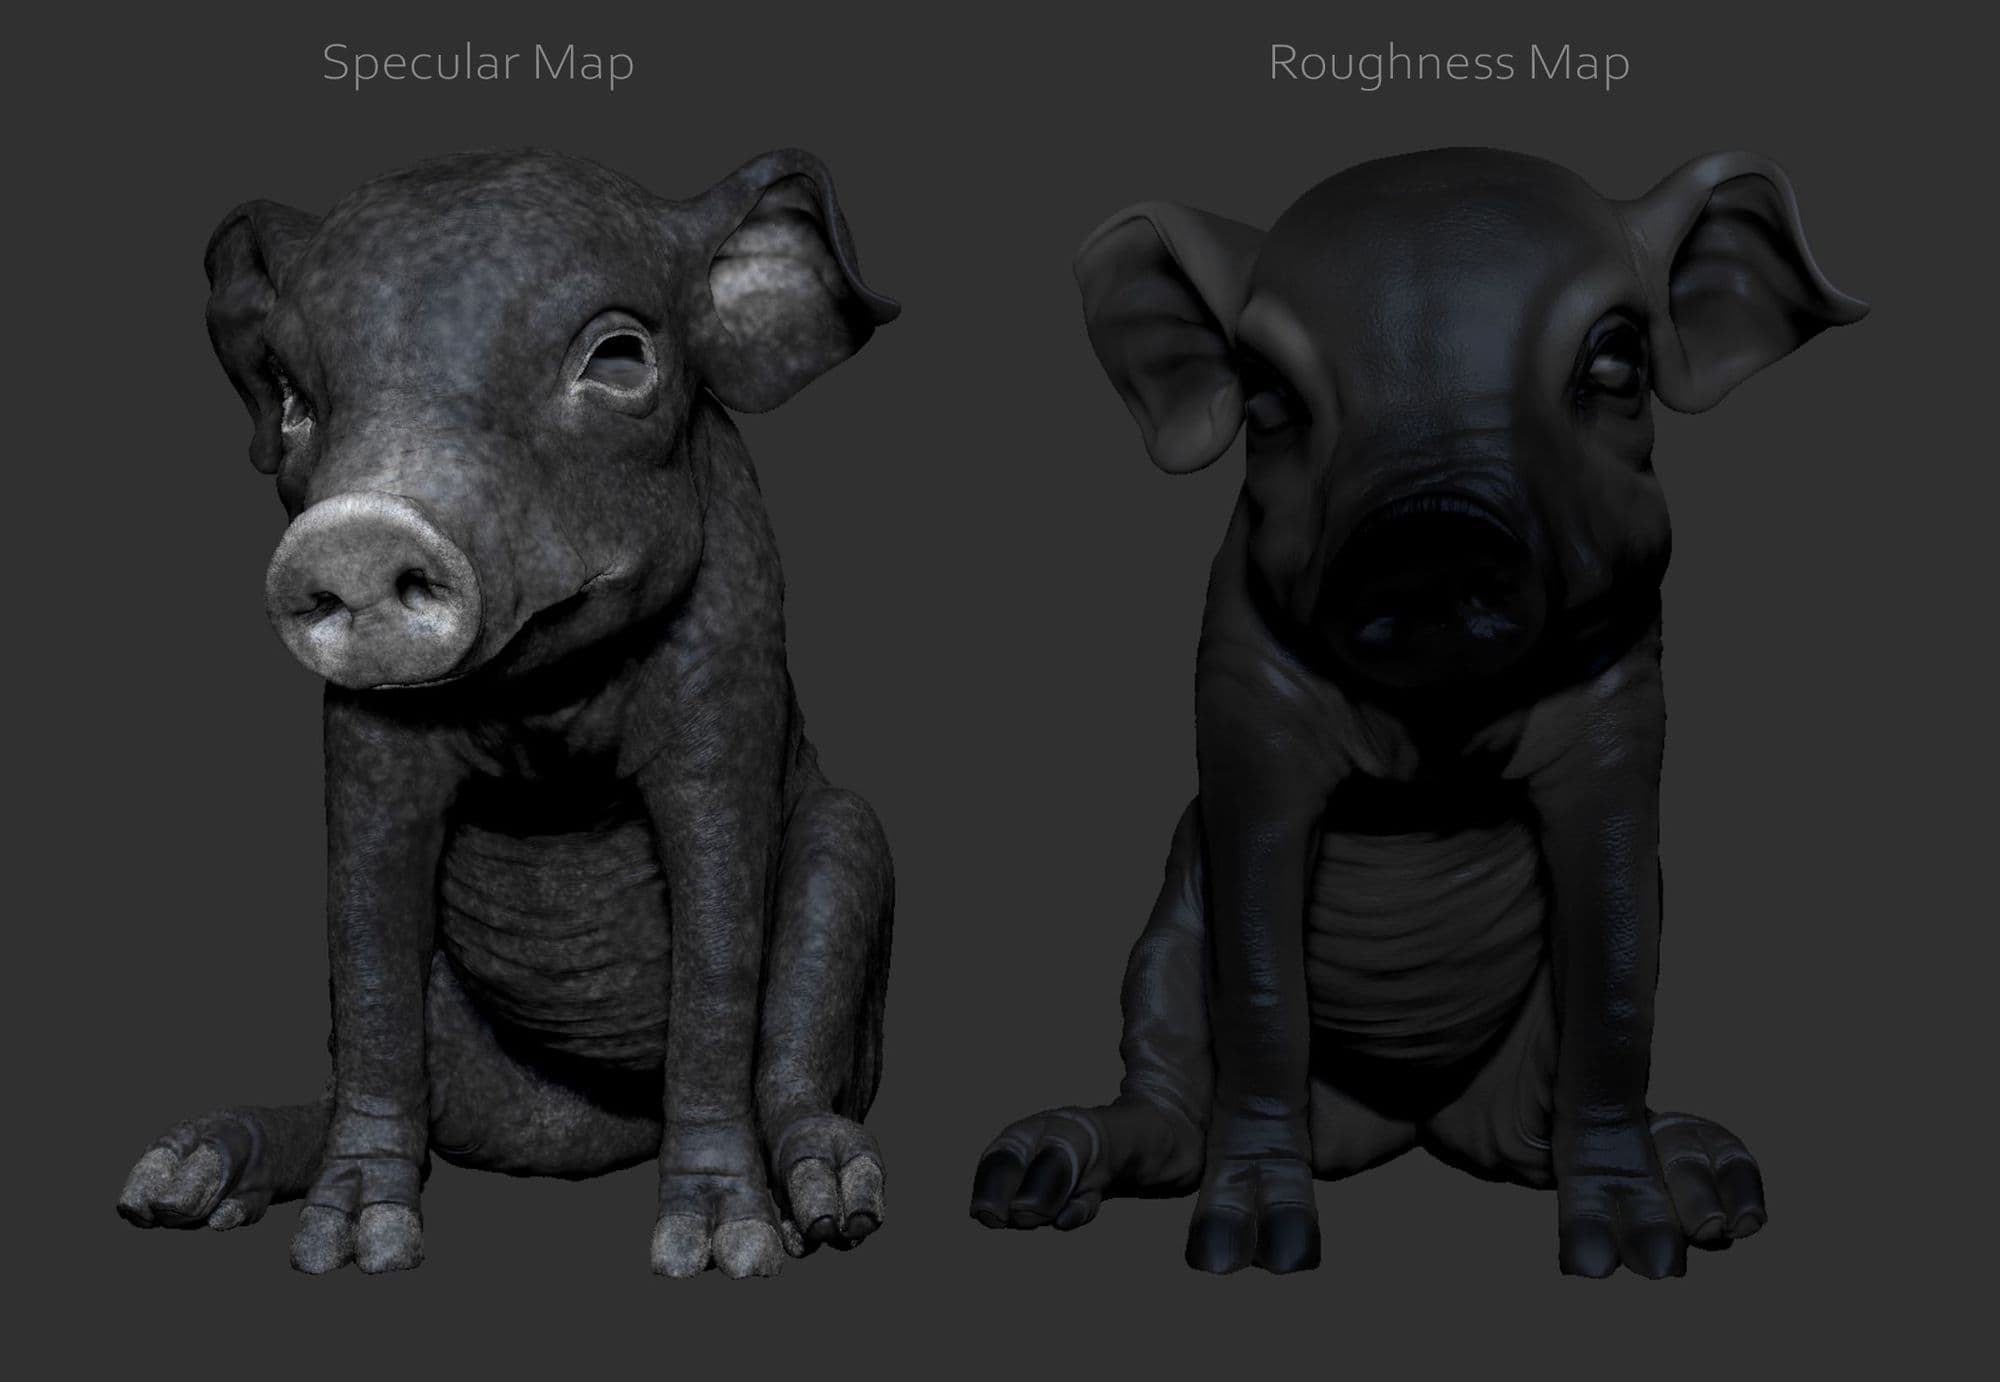
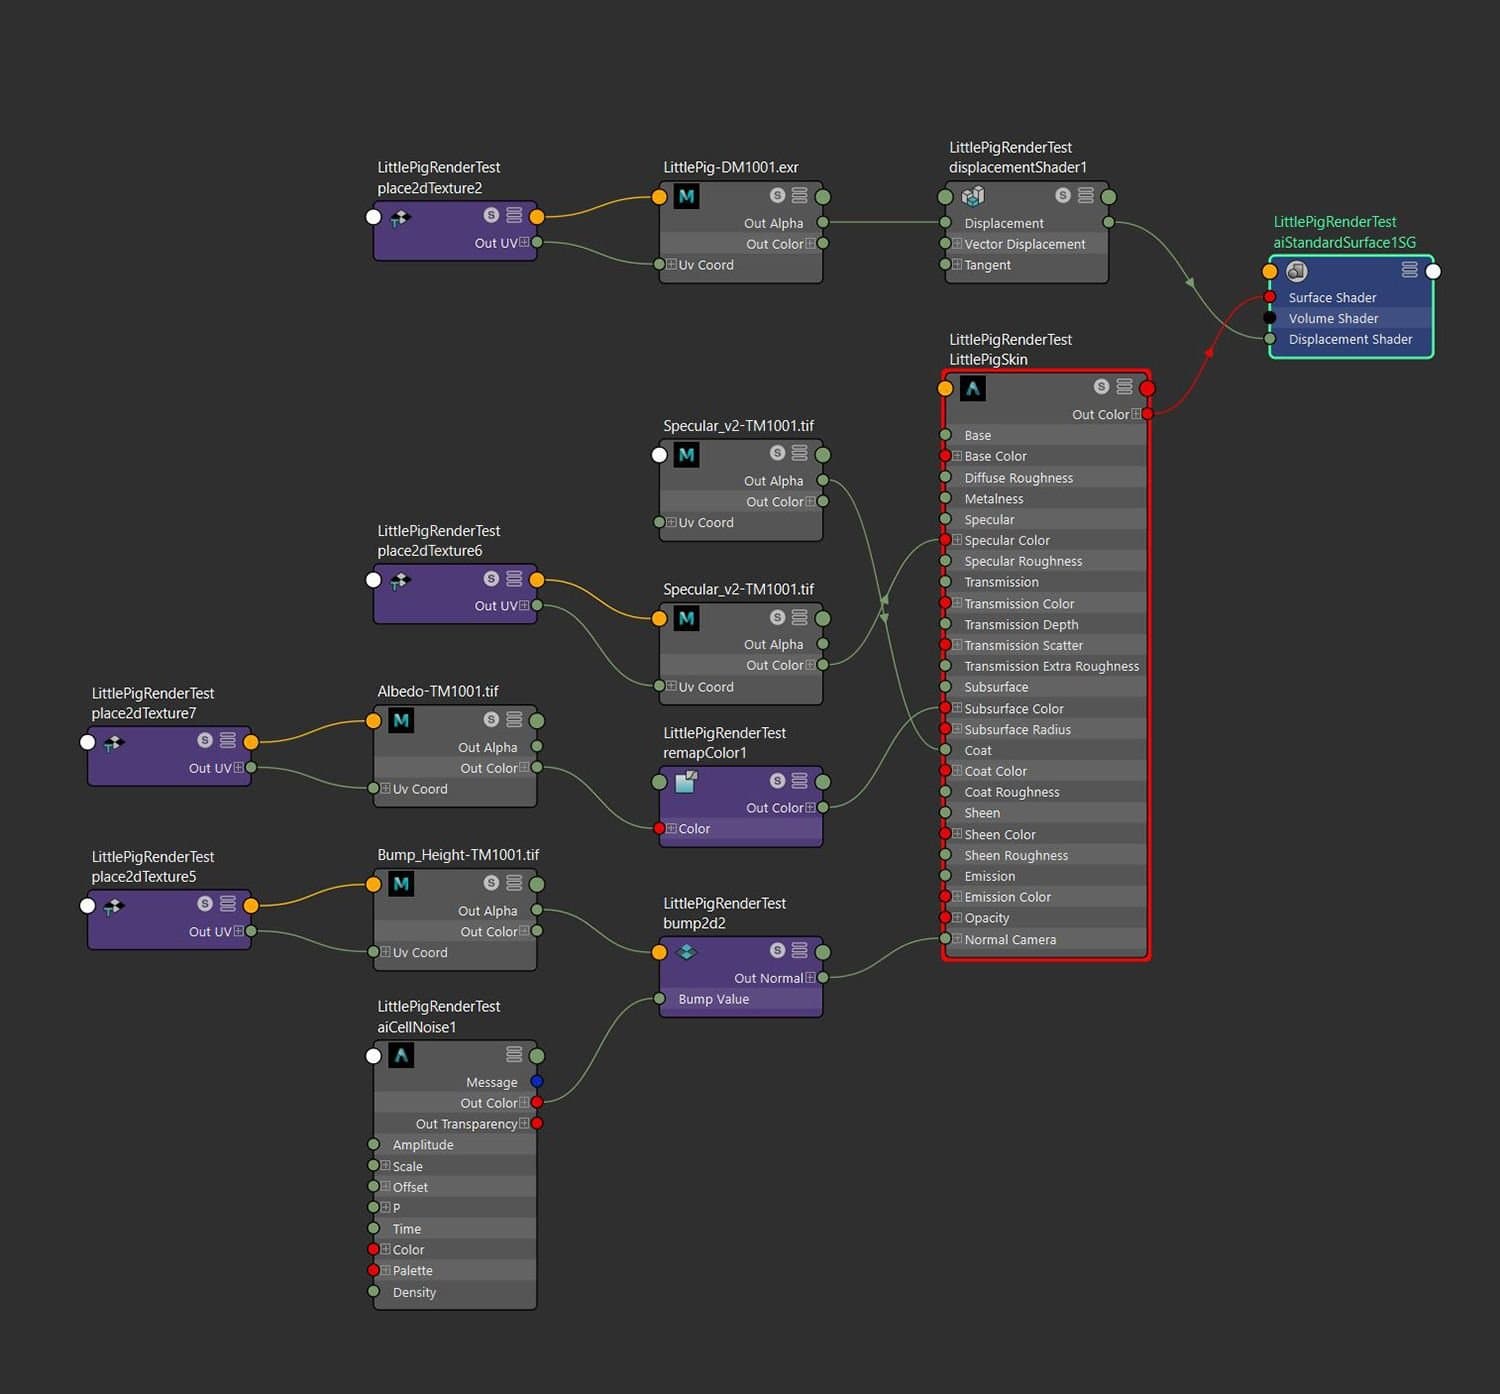
The final render was made in Maya with Arnold. As it usually happens, I had to experiment a lot. I exported the Base Colour, Specular, Displacement, and Roughness maps from Zbrush.
The technique for creating the Specular and Roughness maps is quite simple. In the beginning, I assign the SkinShade to the model, so it was possible to see the shapes. But as I draw the map, I switch to FlatColor so I can see what I'm drawing. The drawing technique is about the same as with Polypaint (StandartBrush-Stroke-Alpha).
It is clear that during the experiments, the maps had to be redrawn several times. For me, it was important to achieve a wet nose feeling, but not too oily skin in general. So when creating the Specular map, I kept adding white where I wanted to get more shine. The Roughness map was used to break up the surface even more. Where the black is, the surface is smoother and shinier. And both of these maps gave me good results.
As a skin shader, I used aiStandardSurface. I added an aiCellNoise texture to the BumpValue parameter. This gave more realism to the skin, further dividing the surface into shiny and matte areas.
In the end, the Shader Graph looked like this.
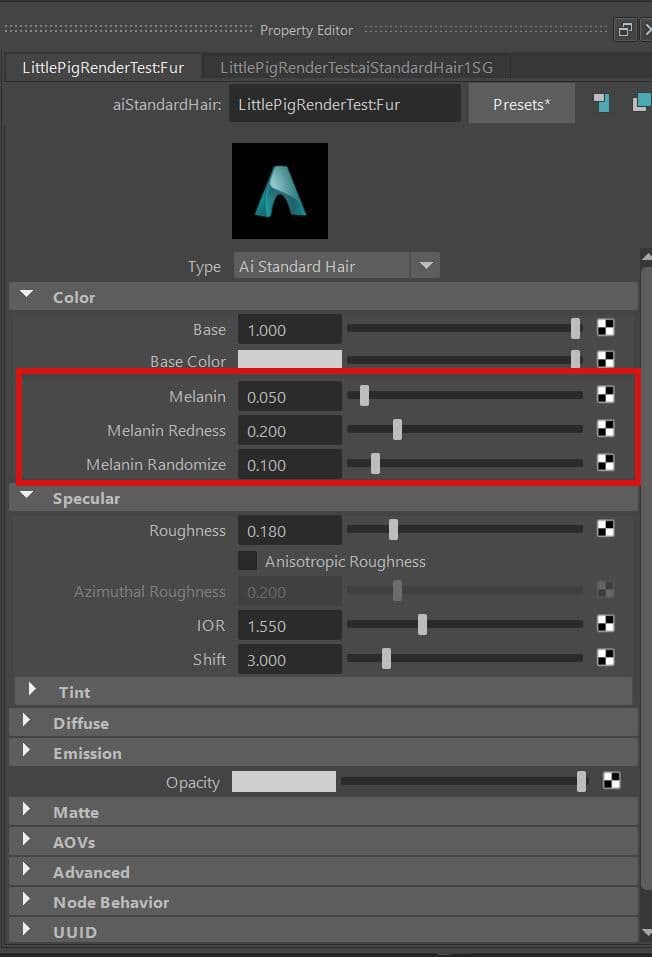
I used aiStandardHairShader for the bristles. This material has simple settings. I only changed these settings.
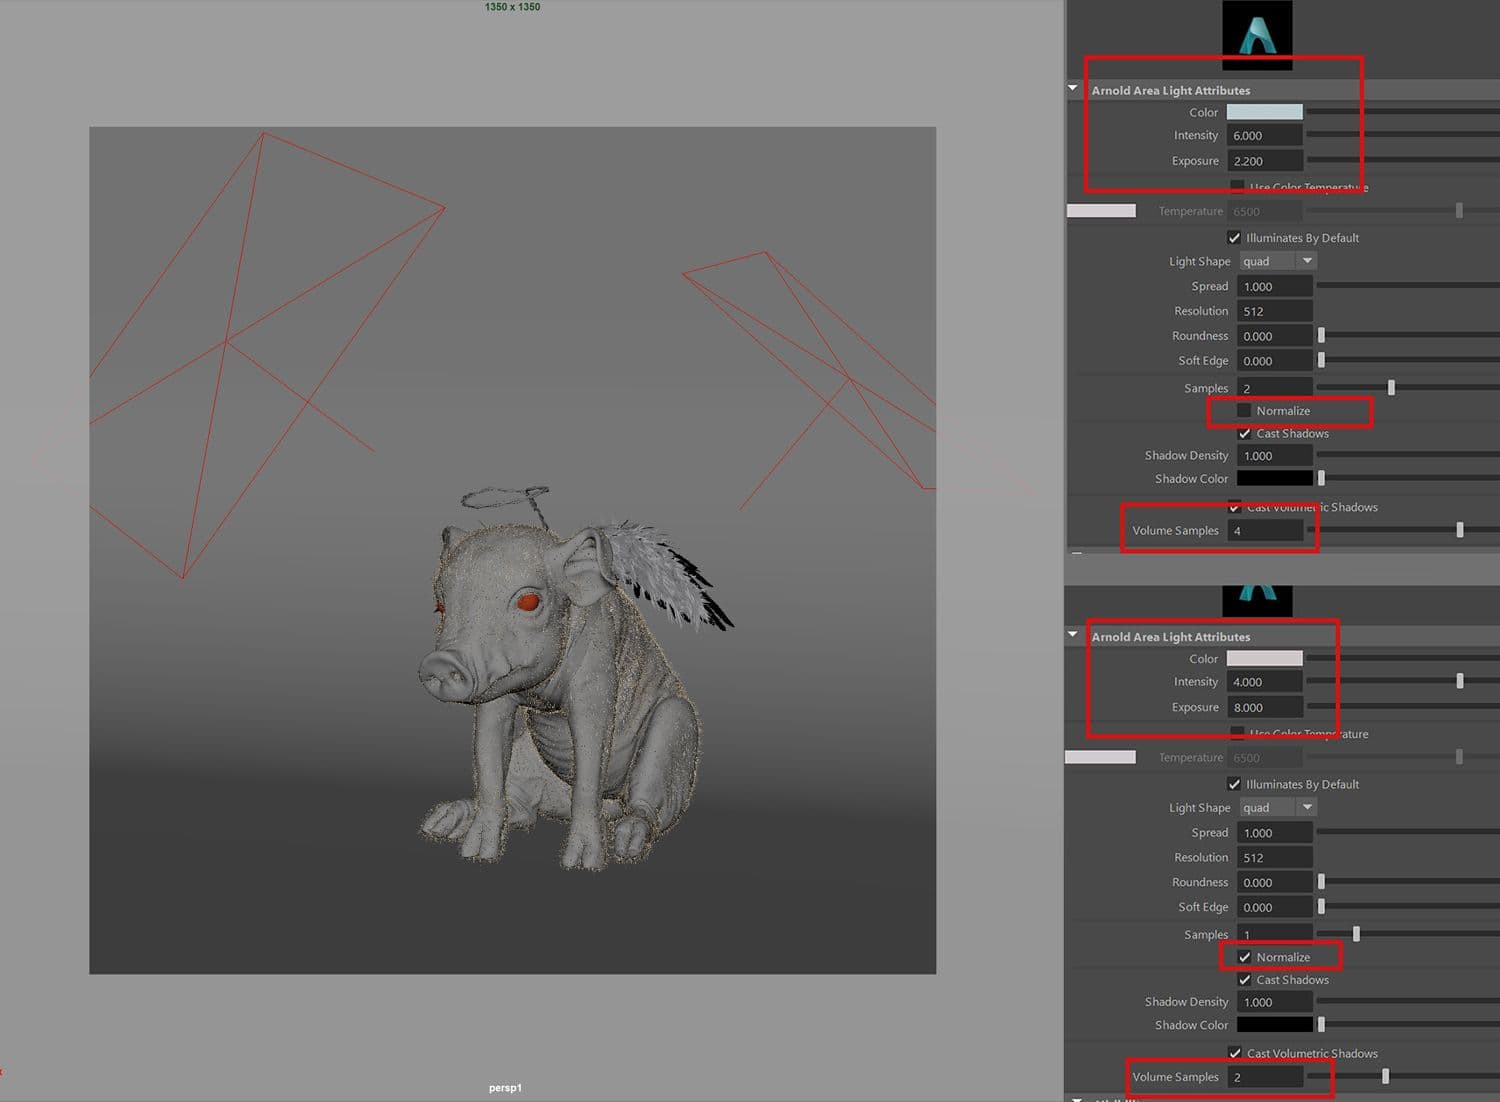
As for the lighting, I kept it very simple and used two Area Lights and a Skydome Light. I knew that fur with a displacement map would mean long render times. So I tried to optimise the scene as much as possible.
The lookdev of the Écorché was done in KeyShot Render. I used the ZBrush to KeyShot Bridge, a plugin that allows you to send your model directly to KeyShot with a single click of the BPR button, transferring all SubTools, Polypaint, and textures to KeyShot. Through the LiveLinking connection with KeyShot, model updates can be sent over without the need to reapply materials, with all changes appearing instantly in real-time.
Starting to study anatomy was the right decision. I have recently gained a lot of experience and knowledge in this field. Although it is hard to argue with the statement that studying anatomy is a never-ending process.

Thank you for reading to the end!
If you find any of these techniques useful, please tag me on my social media.
Let's grow together!
Rookies
Artstation
Instagram
Facebook
Twitter